Installing ThingsBoard Edge on Ubuntu Server
This guide provides step-by-step instructions for installing ThingsBoard Edge on Ubuntu 22.04 LTS, Ubuntu 24.04 LTS, and Ubuntu 26.04 LTS.
Prerequisites
Section titled “Prerequisites”To run ThingsBoard Edge, you need an active ThingsBoard Community Edition account that supports Edge functionality.
You can install a local ThingsBoard CE server. The local server is accessible at http://localhost:8080.
Hardware requirements
Section titled “Hardware requirements”The hardware requirements for ThingsBoard Edge depend on the number of connected devices and platform interaction intensity.
| Workload | RAM | Description |
|---|---|---|
| Light | 1 GB | Fewer than 100 devices, minimal dashboard/device management usage |
| Heavy | 4 GB | 100+ devices or intense platform interactions |
Deploy a new Edge instance
Section titled “Deploy a new Edge instance”To create a new Edge instance on your ThingsBoard Server:
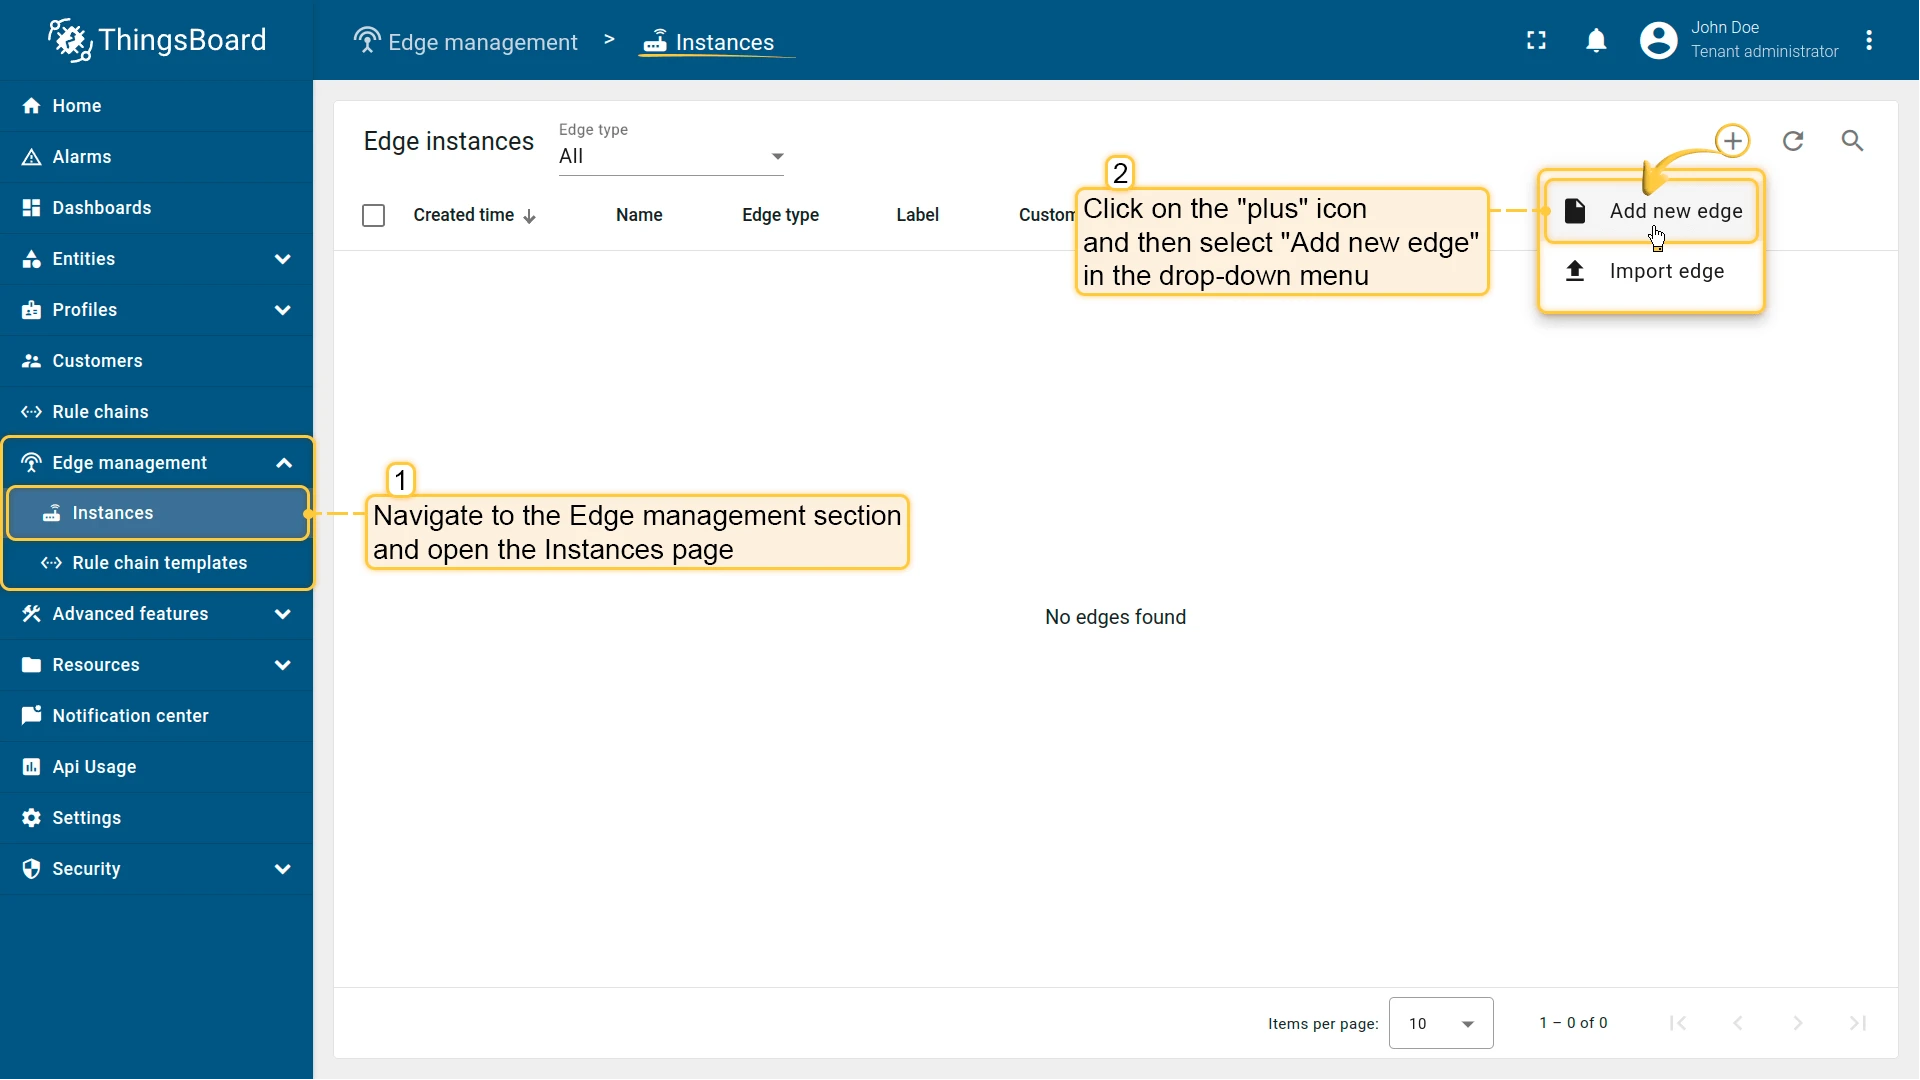
- Sign in to your ThingsBoard instance and go to Edge Management → Instances. Click Add (+) in the top-right corner and select Add new edge.
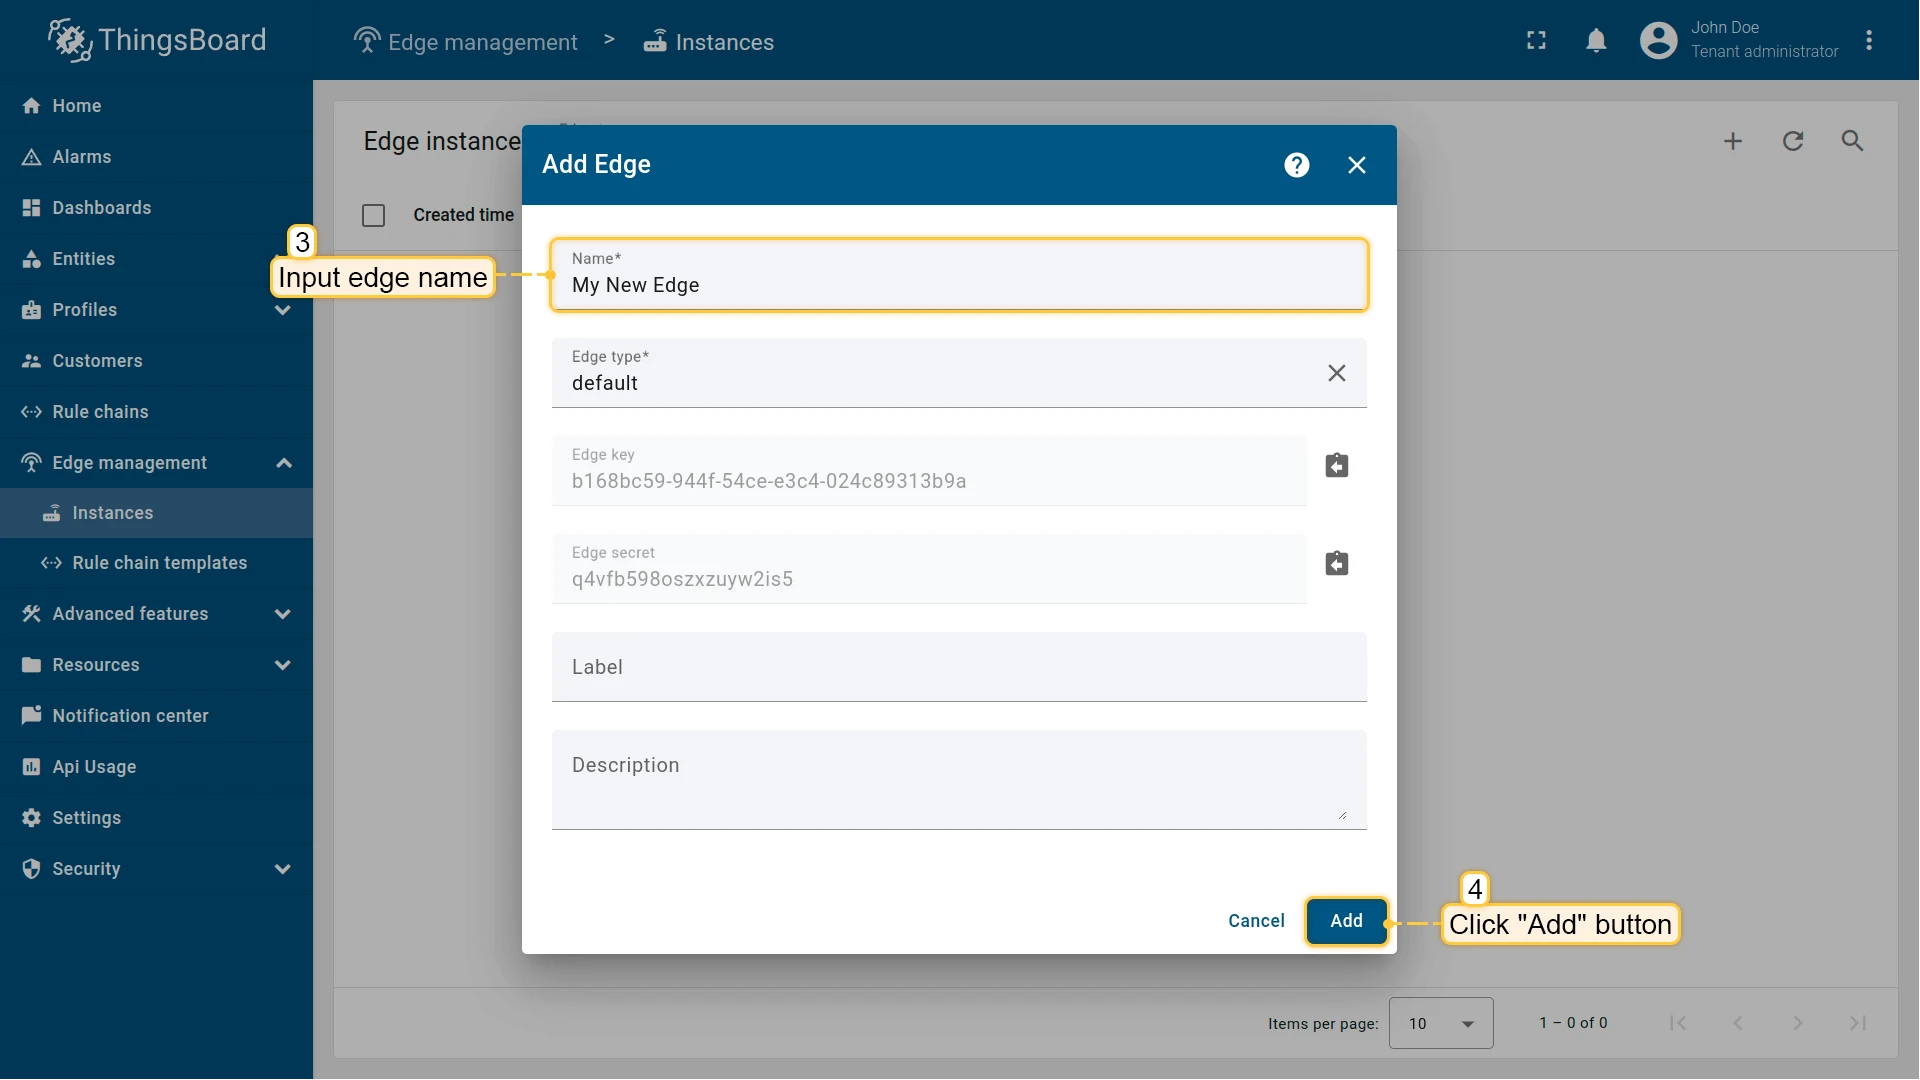
Enter a name for the Edge, like My New Edge.
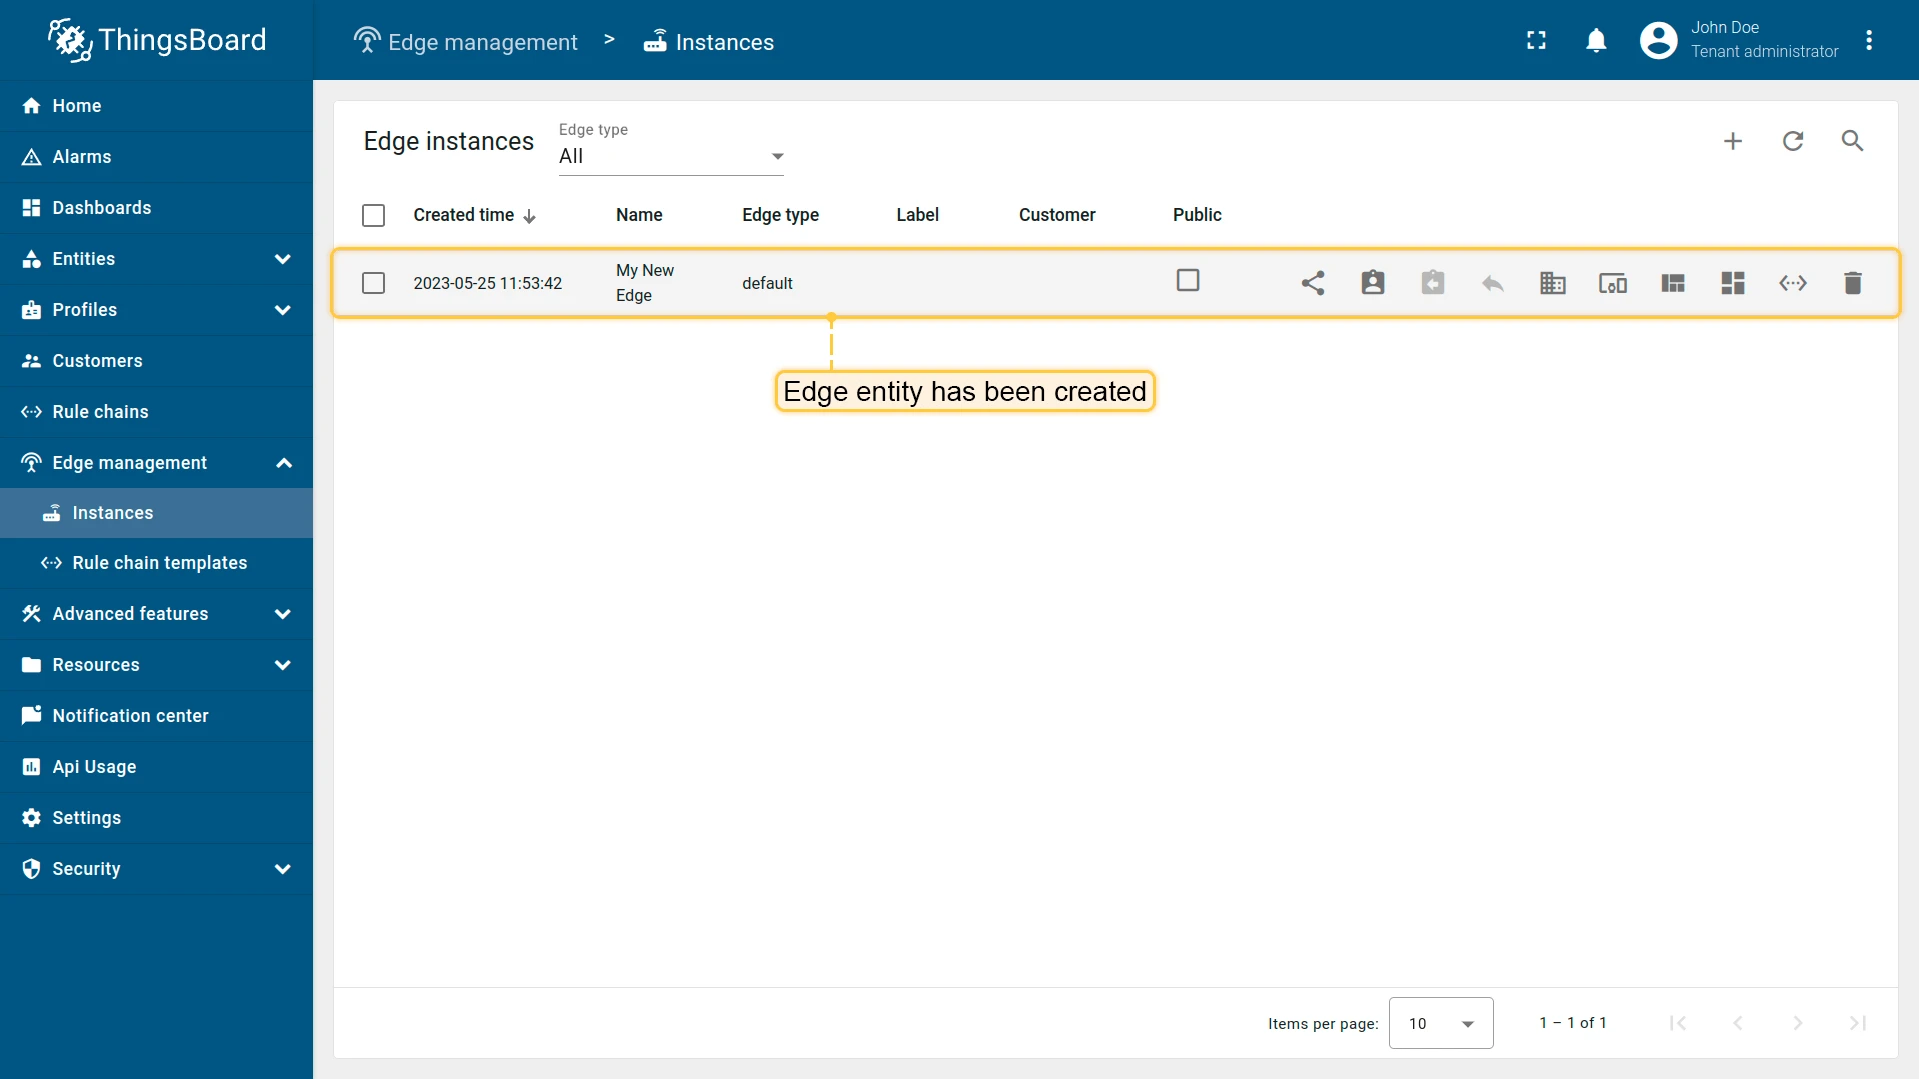
Click Add.- Your new Edge instance is created and appears at the top of the list.
Guided installation using ThingsBoard Server instructions
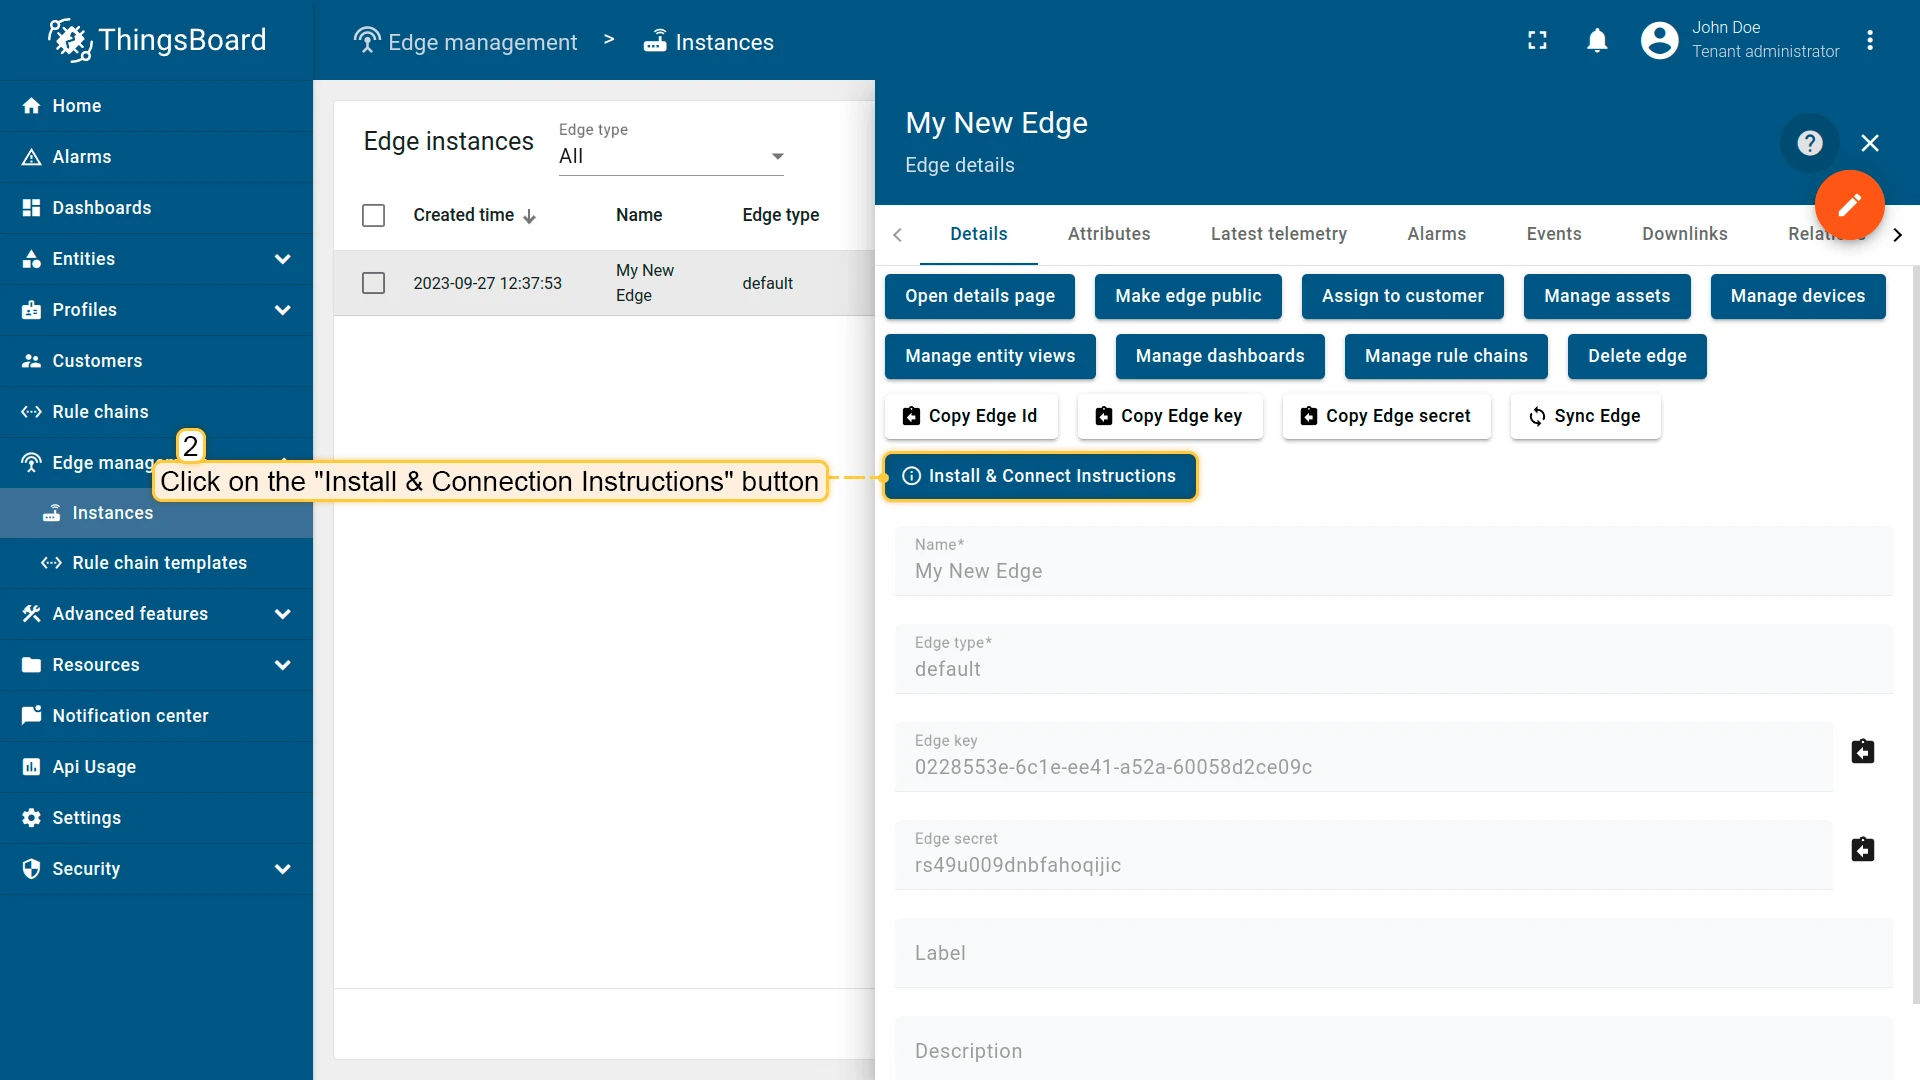
Section titled “Guided installation using ThingsBoard Server instructions”Once an Edge instance is created, the server generates pre-configured installation instructions containing the Edge credentials (Edge Key, Edge Secret, etc.). To access them:
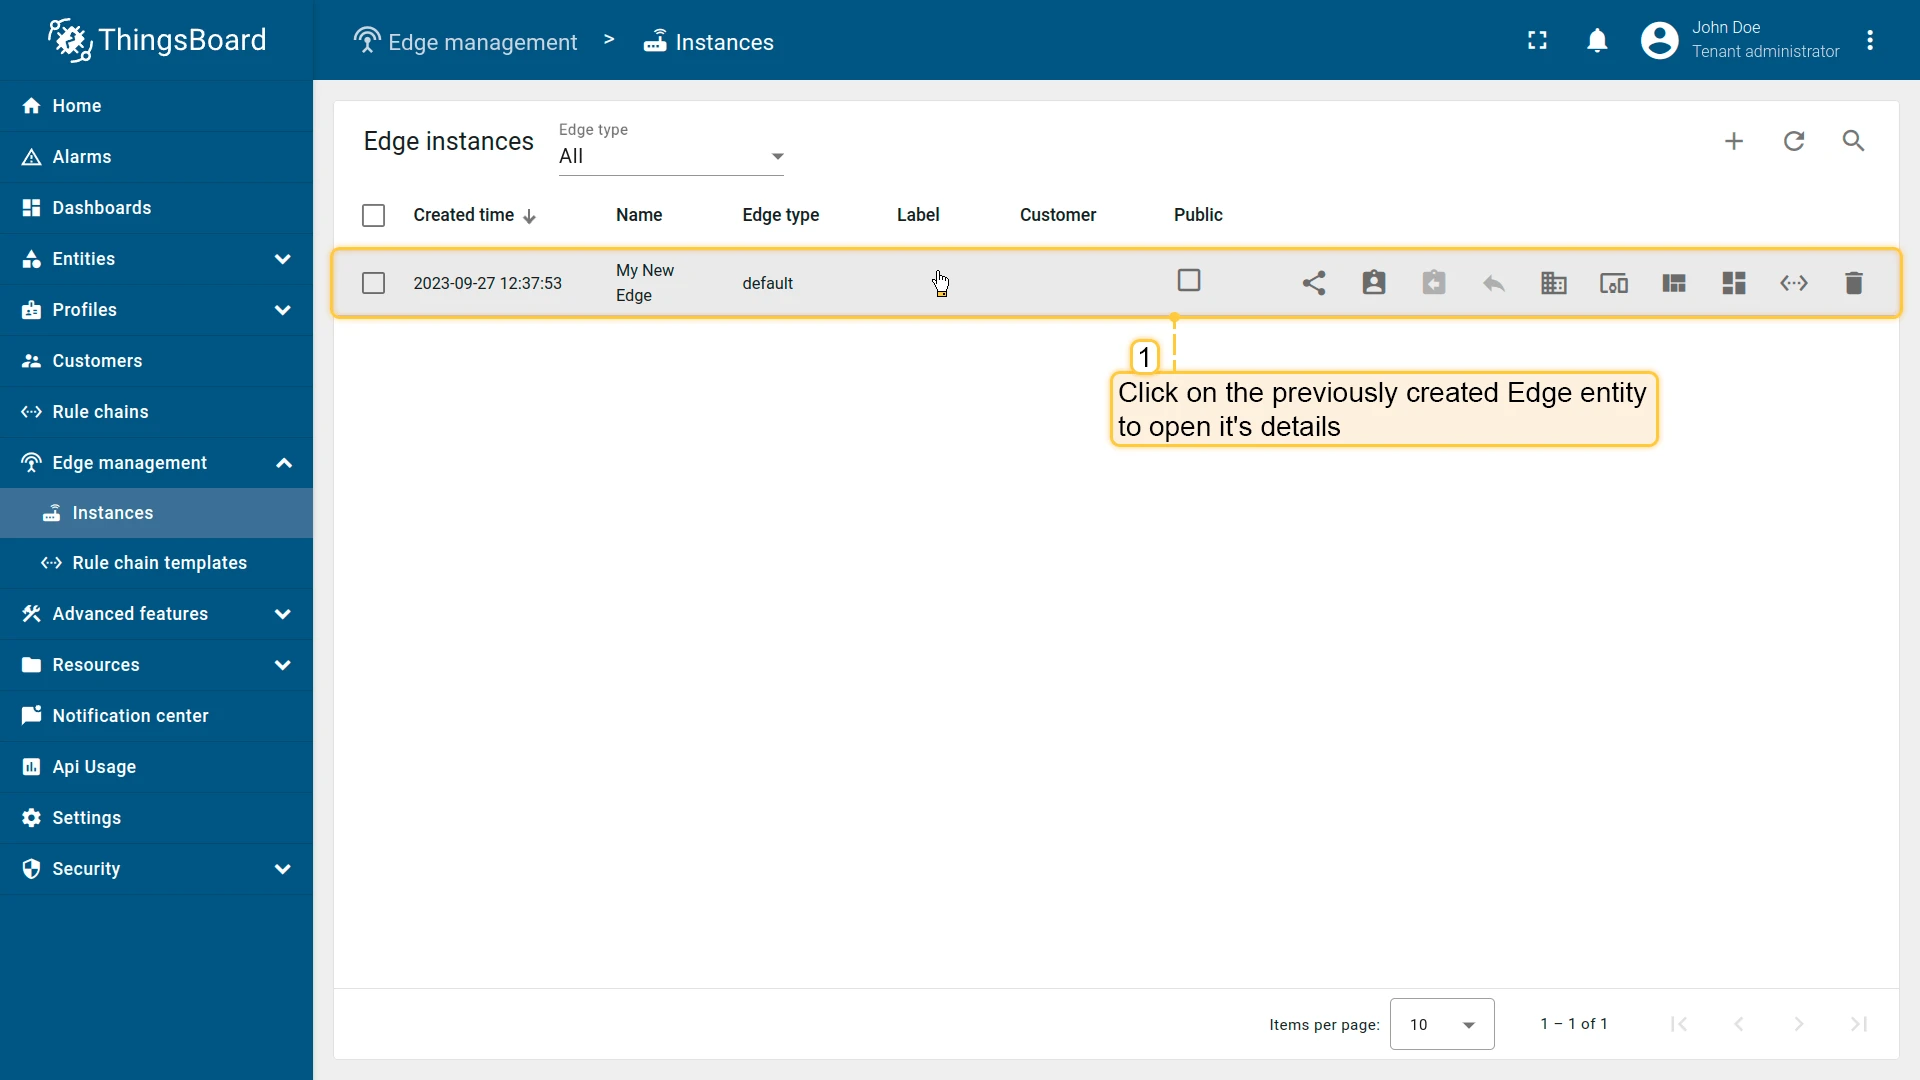
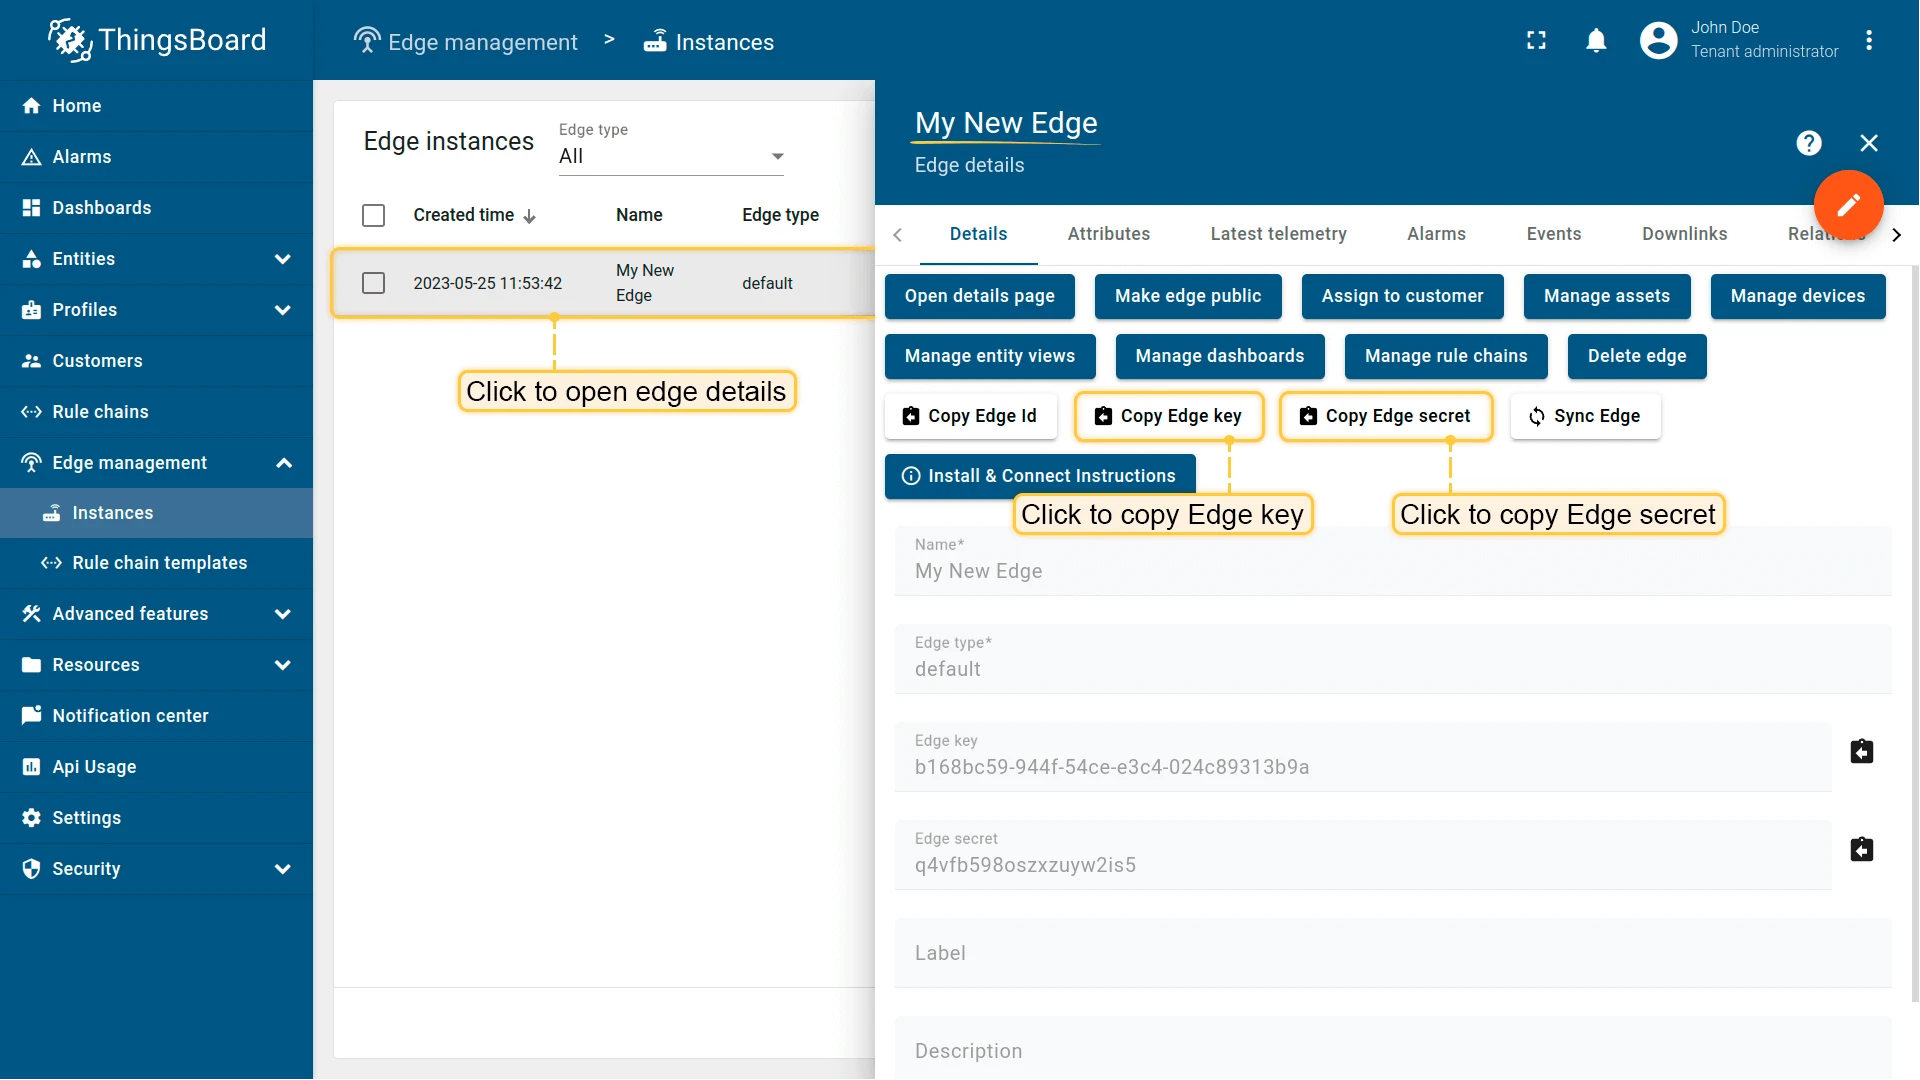
- Click the Edge entity to open its details.
- Click Install & Connection Instructions.
- Select the installation method and follow the instructions to install Edge and connect it to the server.

Manual installation and configuration
Section titled “Manual installation and configuration”If you are unable to use the guided instructions above, follow the steps below to install and configure Edge manually.
Step 1. Install Java 17 (OpenJDK)
Section titled “Step 1. Install Java 17 (OpenJDK)”ThingsBoard Edge requires Java 17. To install OpenJDK 17:
sudo apt update && sudo apt install openjdk-17-jdk-headlessConfigure your operating system to use OpenJDK 17 by default:
sudo update-alternatives --config javaVerify the installation:
java -versionThe expected output:
openjdk version "17.x.xx"OpenJDK Runtime Environment (...)OpenJDK 64-Bit Server VM (...)Step 2. Configure the ThingsBoard Edge database
Section titled “Step 2. Configure the ThingsBoard Edge database”ThingsBoard Edge supports SQL and hybrid database approaches.
PostgreSQL is recommended for development and production environments with moderate load (fewer than 5,000 messages/sec). Many cloud providers offer managed PostgreSQL services, making it a cost-effective option for most deployments.
To install the PostgreSQL database:
# Automated repository configuration:sudo apt install -y postgresql-commonsudo /usr/share/postgresql-common/pgdg/apt.postgresql.org.sh
# Install and launch the PostgreSQL service:sudo apt updatesudo apt -y install postgresql-16sudo service postgresql start
Once PostgreSQL is installed, set the password for the main PostgreSQL user:
sudo -u postgres psql -c "\password"Enter and confirm the password when prompted.
Create a new PostgreSQL database named tb_edge:
echo "CREATE DATABASE tb_edge;" | psql -U postgres -d postgres -h 127.0.0.1 -WThe hybrid approach is recommended when you plan to manage 1M+ devices in production or handle high data ingestion rates (more than 5,000 messages/sec). In this case, ThingsBoard Edge stores time-series data in Cassandra while using PostgreSQL for primary entities like devices, assets, dashboards, and customers.
PostgreSQL installation
Section titled “PostgreSQL installation”To install the PostgreSQL database:
# Automated repository configuration:sudo apt install -y postgresql-commonsudo /usr/share/postgresql-common/pgdg/apt.postgresql.org.sh
# Install and launch the PostgreSQL service:sudo apt updatesudo apt -y install postgresql-16sudo service postgresql start
Once PostgreSQL is installed, set the password for the main PostgreSQL user:
sudo -u postgres psql -c "\password"Create a new PostgreSQL database named tb_edge:
echo "CREATE DATABASE tb_edge;" | psql -U postgres -d postgres -h 127.0.0.1 -WCassandra installation
Section titled “Cassandra installation”To install Apache Cassandra:
# Add Cassandra repositoryecho "deb [signed-by=/etc/apt/keyrings/apache-cassandra.asc] https://debian.cassandra.apache.org 50x main" | sudo tee /etc/apt/sources.list.d/cassandra.sources.listsudo curl -o /etc/apt/keyrings/apache-cassandra.asc https://downloads.apache.org/cassandra/KEYSsudo apt-get update# Cassandra installationsudo apt-get install -y cassandra cassandra-toolsVerify that Cassandra is running:
nodetool statussudo systemctl status cassandra.serviceThe status column in the output should report UN (Up/Normal). You may need to wait a few moments for Cassandra to initialize.
ThingsBoard Edge configuration for hybrid mode
Section titled “ThingsBoard Edge configuration for hybrid mode”Open the ThingsBoard Edge configuration file:
sudo nano /etc/tb-edge/conf/tb-edge.confAdd the following lines. Replace PUT_YOUR_POSTGRESQL_PASSWORD_HERE with your actual PostgreSQL user password:
# DB Configurationexport DATABASE_TS_TYPE=cassandraexport SPRING_DATASOURCE_URL=jdbc:postgresql://localhost:5432/tb_edgeexport SPRING_DATASOURCE_USERNAME=postgresexport SPRING_DATASOURCE_PASSWORD=PUT_YOUR_POSTGRESQL_PASSWORD_HEREOptionally, add the following parameters to connect to external Cassandra nodes:
export CASSANDRA_CLUSTER_NAME=Edge Clusterexport CASSANDRA_KEYSPACE_NAME=thingsboardexport CASSANDRA_URL=127.0.0.1:9042export CASSANDRA_USE_CREDENTIALS=falseexport CASSANDRA_USERNAME=export CASSANDRA_PASSWORD=Step 3. Select the queue service
Section titled “Step 3. Select the queue service”ThingsBoard Edge can use different messaging systems for storing messages and enabling communication between its services.
The In Memory queue is the built-in default implementation. It is suitable for development or proof-of-concept environments, but is not recommended for production or clustered deployments due to limited scalability.
No additional configuration is required.
Kafka is recommended for production deployments and is used in most ThingsBoard production environments. It provides high throughput, durability, and horizontal scalability.
Install Docker for Ubuntu if you have not done so already.
To install Kafka in a Docker container, run the following command. It creates a docker-compose-kafka.yml file and starts the container:
cat > docker-compose-kafka.yml <<EOF && docker compose -f docker-compose-kafka.yml up -dservices: kafka: restart: always image: bitnamilegacy/kafka:4.0 ports: - 9092:9092 #to localhost:9092 from host machine - 9093 #for Kraft - 9094 #to kafka:9094 from within Docker network environment: ALLOW_PLAINTEXT_LISTENER: "yes" KAFKA_CFG_LISTENERS: "OUTSIDE://:9092,CONTROLLER://:9093,INSIDE://:9094" KAFKA_CFG_ADVERTISED_LISTENERS: "OUTSIDE://localhost:9092,INSIDE://kafka:9094" KAFKA_CFG_LISTENER_SECURITY_PROTOCOL_MAP: "INSIDE:PLAINTEXT,OUTSIDE:PLAINTEXT,CONTROLLER:PLAINTEXT" KAFKA_CFG_INTER_BROKER_LISTENER_NAME: "INSIDE" KAFKA_CFG_AUTO_CREATE_TOPICS_ENABLE: "false" KAFKA_OFFSETS_TOPIC_REPLICATION_FACTOR: "1" KAFKA_TRANSACTION_STATE_LOG_MIN_ISR: "1" KAFKA_TRANSACTION_STATE_LOG_REPLICATION_FACTOR: "1" KAFKA_CFG_PROCESS_ROLES: "controller,broker" #KRaft KAFKA_CFG_NODE_ID: "0" #KRaft KAFKA_CFG_CONTROLLER_LISTENER_NAMES: "CONTROLLER" #KRaft KAFKA_CFG_CONTROLLER_QUORUM_VOTERS: "0@kafka:9093" #KRaft volumes: - kafka-data:/bitnamivolumes: kafka-data: driver: localEOFConfigure ThingsBoard Edge to use Kafka:
echo -e "export TB_QUEUE_TYPE=kafka\nexport TB_KAFKA_SERVERS=localhost:9092" | sudo tee -a /etc/tb-edge/conf/tb-edge.conf > /dev/nullReplace localhost:9092 with your actual Kafka bootstrap server address if necessary.
Step 4. Download and install ThingsBoard Edge
Section titled “Step 4. Download and install ThingsBoard Edge”wget https://github.com/thingsboard/thingsboard-edge/releases/download/v4.3.1.1/tb-edge-4.3.1.1.debsudo dpkg -i tb-edge-4.3.1.1.debStep 5. Configure ThingsBoard Edge
Section titled “Step 5. Configure ThingsBoard Edge”In the Edge instance details panel, click Copy Edge Key and Copy Edge Secret. Store these values securely — you need them below.
Edit the ThingsBoard Edge configuration file to set your Edge credentials and cloud connection parameters.
sudo sh -c 'cat <<EOL >> /etc/tb-edge/conf/tb-edge.confexport CLOUD_ROUTING_KEY=PUT_YOUR_EDGE_KEY_HEREexport CLOUD_ROUTING_SECRET=PUT_YOUR_EDGE_SECRET_HEREexport CLOUD_RPC_HOST=PUT_YOUR_RPC_HOSTexport CLOUD_RPC_PORT=7070export CLOUD_RPC_SSL_ENABLED=falseexport HTTP_BIND_PORT=18080export MQTT_BIND_PORT=11883export COAP_BIND_PORT=15683export LWM2M_ENABLED=falseexport SNMP_ENABLED=falseEOL'Configuration parameters:
| Parameter | Description |
|---|---|
CLOUD_ROUTING_KEY | Your Edge key (copied above) |
CLOUD_ROUTING_SECRET | Your Edge secret (copied above) |
CLOUD_RPC_HOST | Hostname or IP address of the ThingsBoard Server |
CLOUD_RPC_PORT | gRPC port used for Edge–server communication (default: 7070) |
CLOUD_RPC_SSL_ENABLED | Set to true to enable SSL — required when connecting to ThingsBoard Cloud |
HTTP_BIND_PORT | Local HTTP port for the Edge UI (18080 avoids conflict with ThingsBoard Server on 8080) |
MQTT_BIND_PORT | Local MQTT port (11883 avoids conflict with ThingsBoard Server on 1883) |
COAP_BIND_PORT | Local CoAP port (15683 avoids conflict with ThingsBoard Server on 5683) |
Step 6. Complete the installation
Section titled “Step 6. Complete the installation”Execute the installation script:
sudo /usr/share/tb-edge/bin/install/install.shStart the service:
sudo service tb-edge startOnce the service is running, open the Edge UI at http://localhost:8080.
Troubleshooting
Section titled “Troubleshooting”ThingsBoard Edge logs are stored in:
/var/log/tb-edgeTo check for errors:
cat /var/log/tb-edge/tb-edge.log | grep ERRORService management
Section titled “Service management”To stop the ThingsBoard Edge service:
sudo service tb-edge stopTo restart the ThingsBoard Edge service:
sudo service tb-edge restartTo check the status of the ThingsBoard Edge service:
sudo service tb-edge statusWas this helpful?