Domains
After installing TBMQ, as described in the Installation Options guide, your instance is accessible by default via its public IP address or the DNS record of the cloud Load Balancer. However, configuring a custom domain name provides several important advantages:
- Simplified access — users can log in using a memorable hostname instead of an IP or Load Balancer DNS name.
- Secure SSL connections — domains enable the use of trusted SSL/TLS certificates.
- White labeling — TBMQ uses the domain to apply custom branding to the login page (logos, titles, and colors). The domain simplifies configuration management, as each TBMQ deployment supports only one login page branding configuration.
- OAuth 2.0 / SSO integration — multiple domains allow separate login configurations for each authentication provider.
Domain registration
Section titled “Domain registration”To use your own hostname with TBMQ, you must first configure DNS and then register the domain inside TBMQ.
-
Configure DNS
On your DNS provider’s website:
- Add an A record (or CNAME record) to map your domain to the IP or hostname where TBMQ is hosted.
- Add a valid SSL certificate for the chosen domain.
-
Register the domain in TBMQ
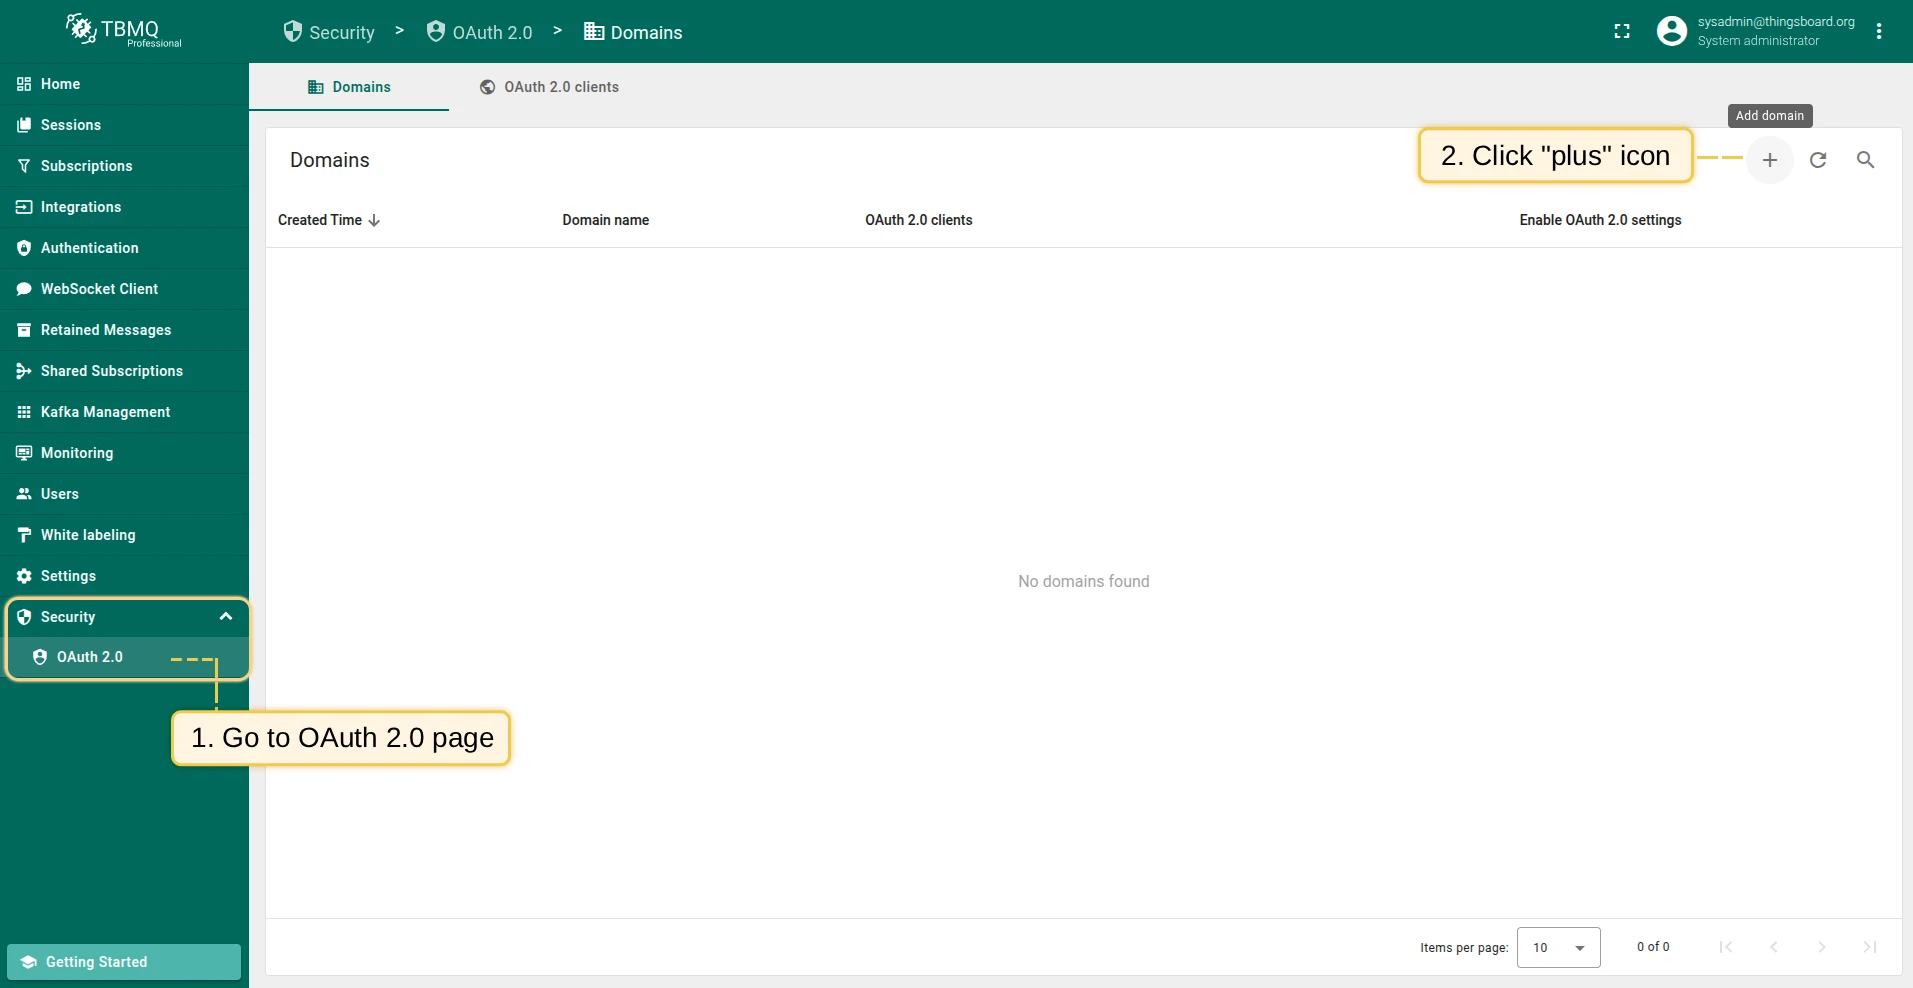
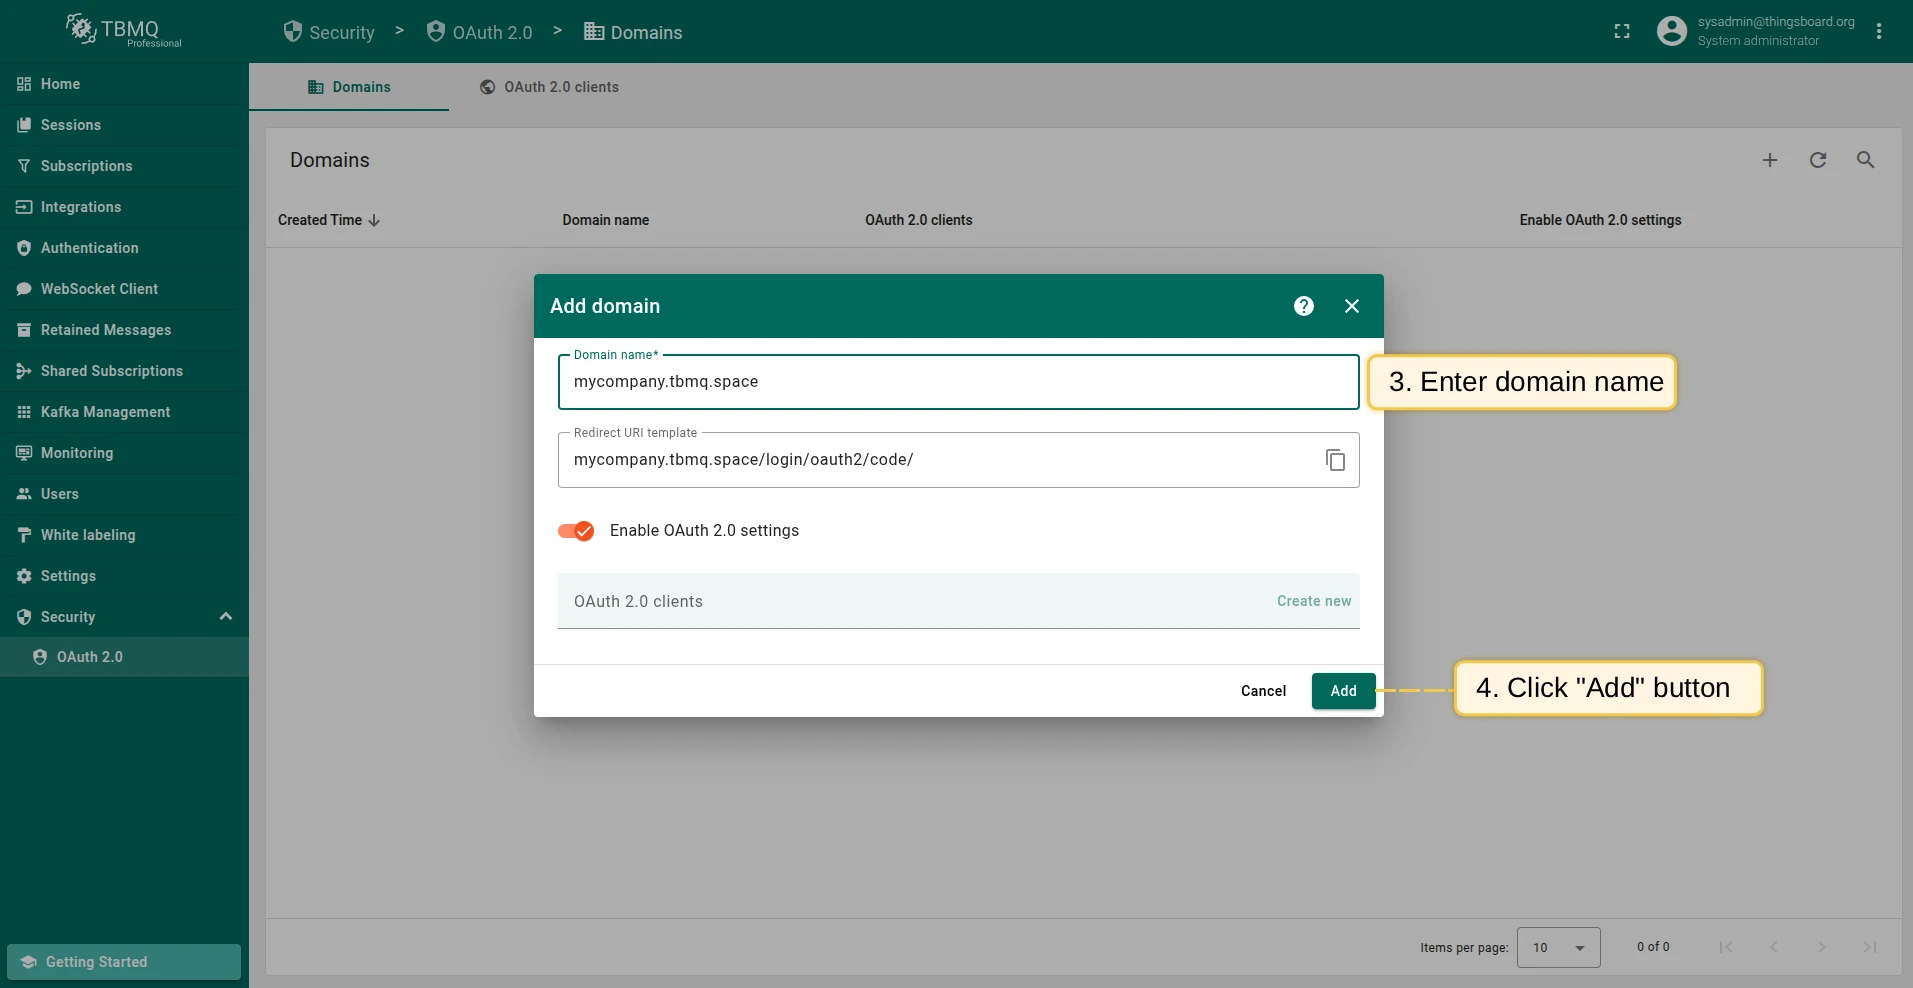
Log in to your TBMQ instance, navigate to Security → OAuth 2.0 → Domains, and add your domain.

Logging in with your domain
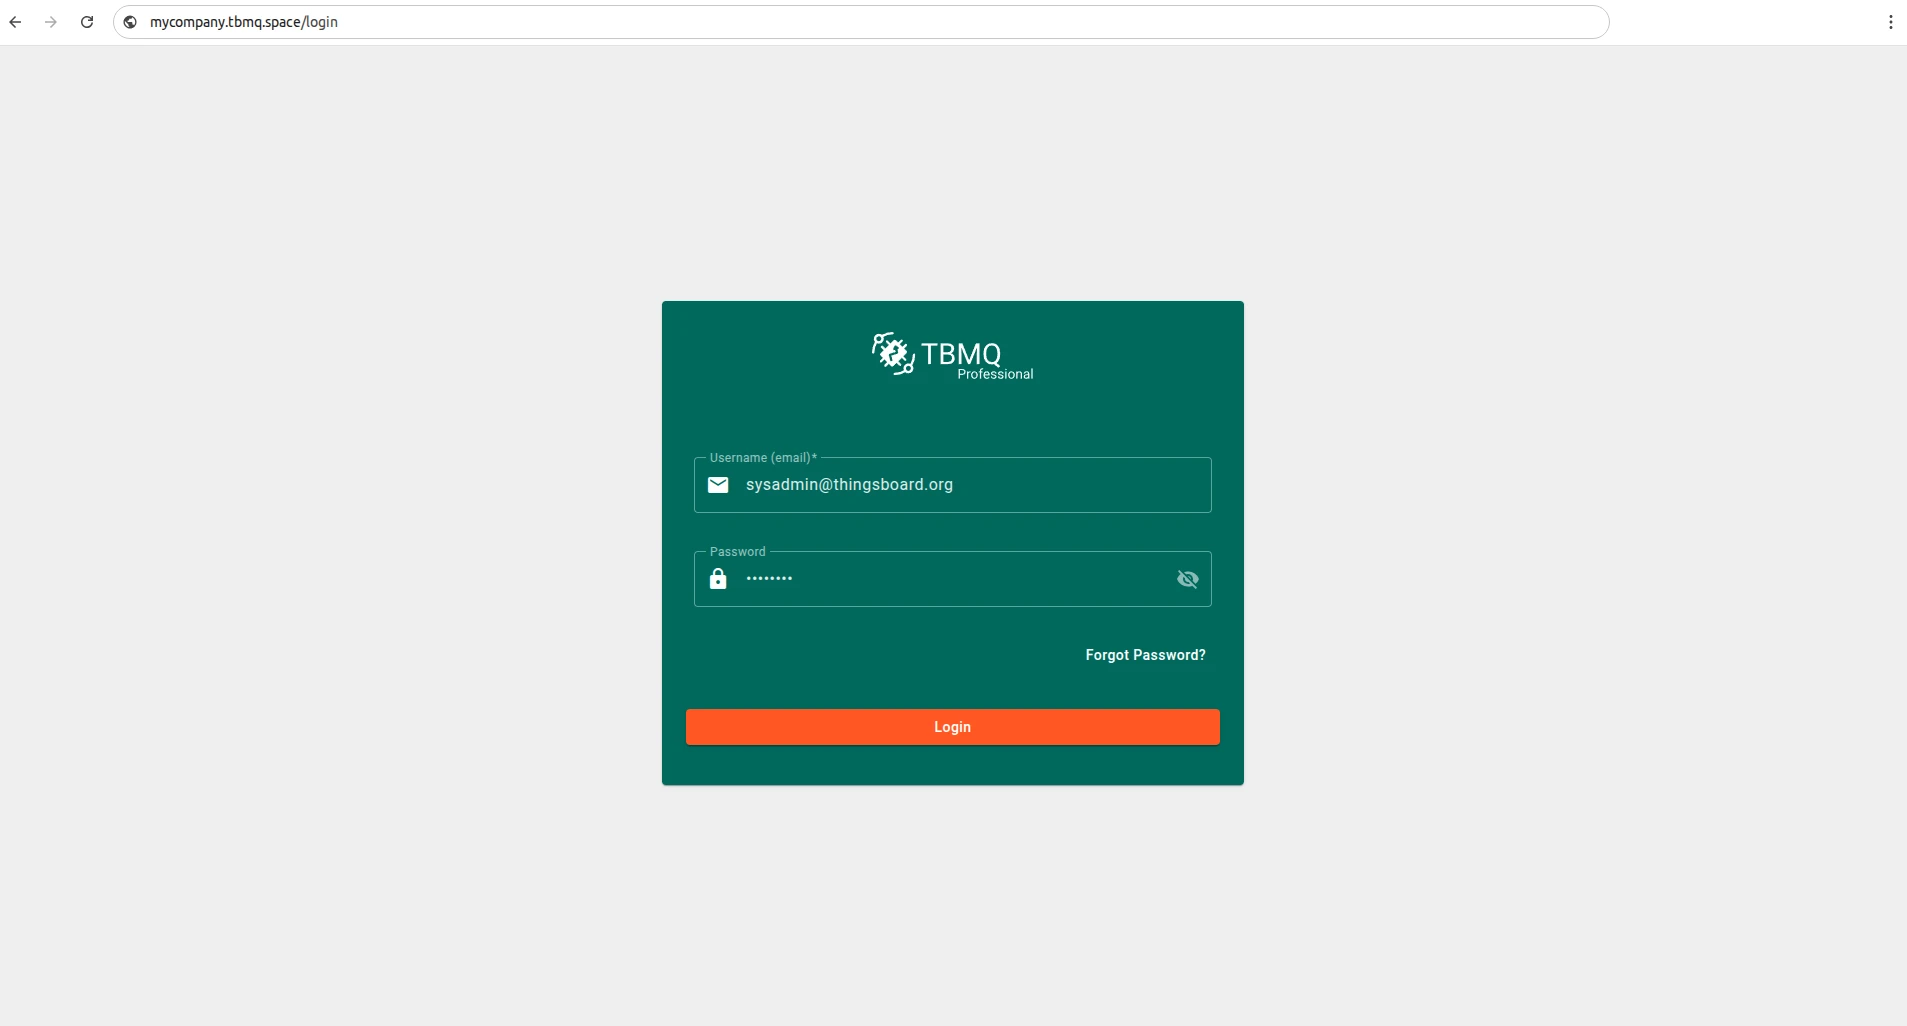
Section titled “Logging in with your domain”After successful registration, you can access your TBMQ instance using the configured domain name. Open a web browser and enter the domain in the address bar — you should see the TBMQ login page.
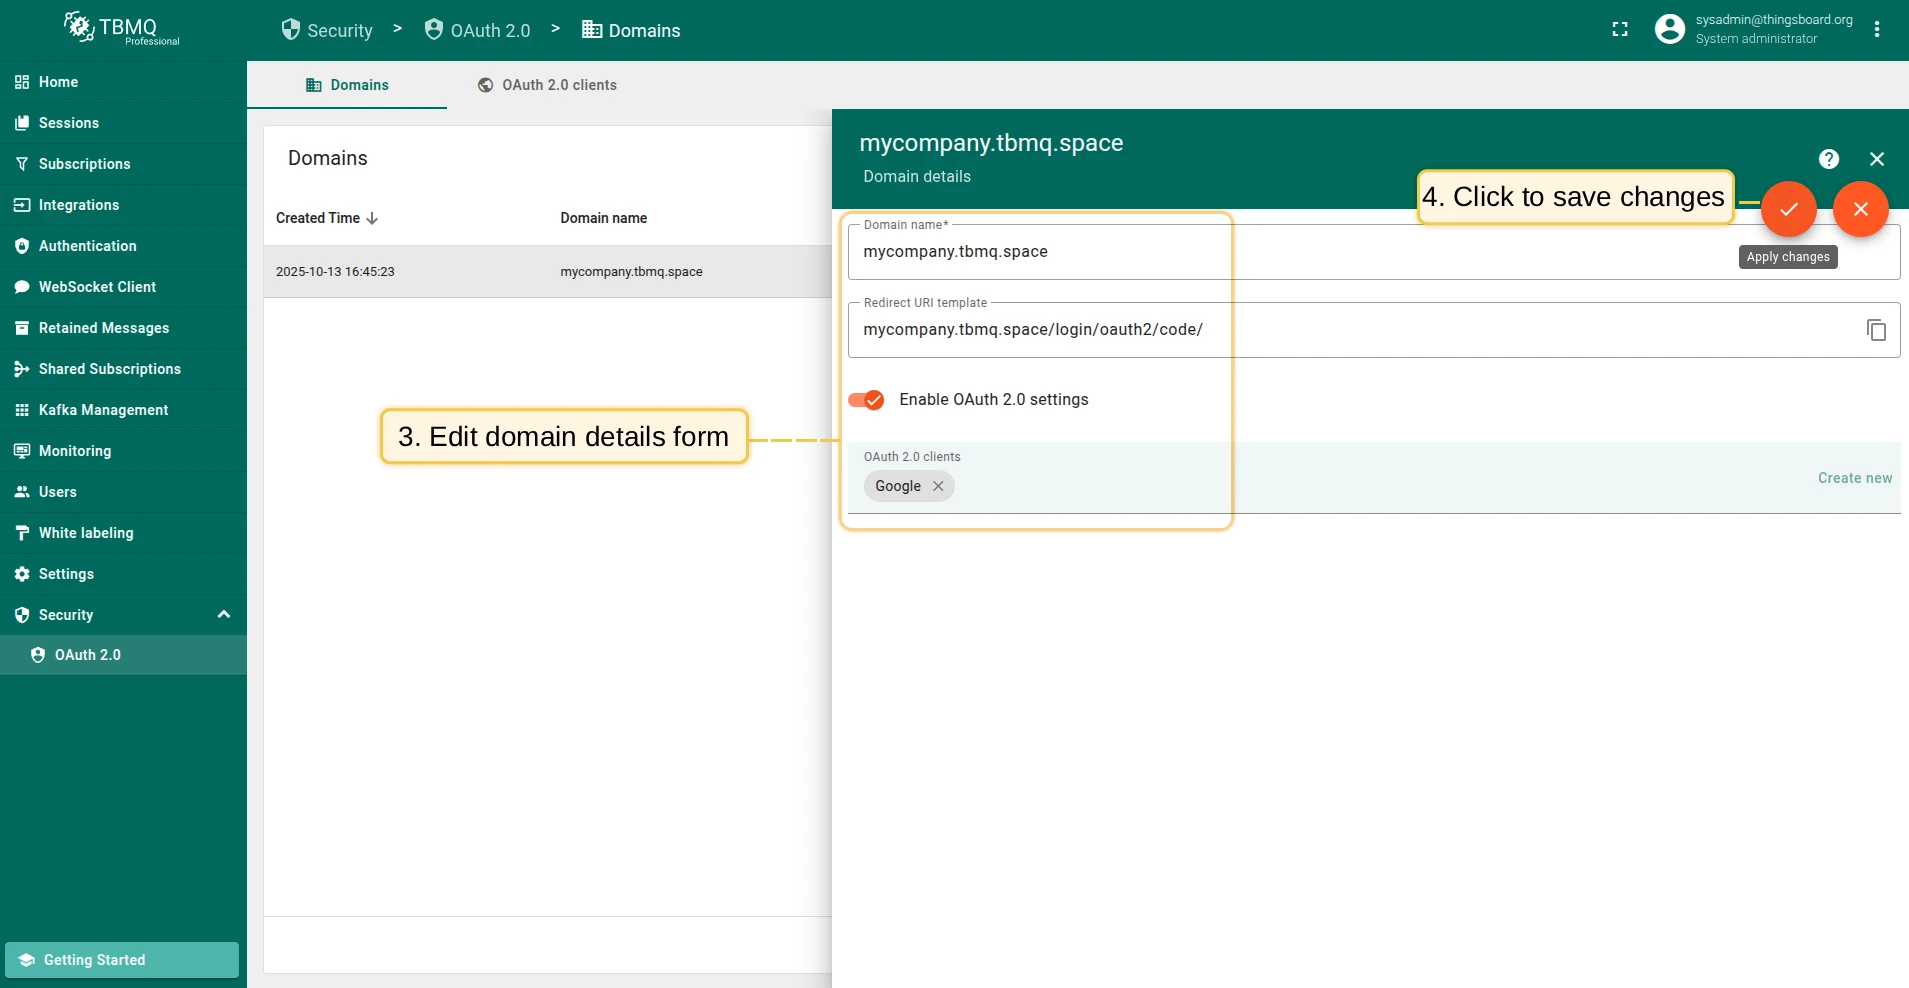
Viewing domain details
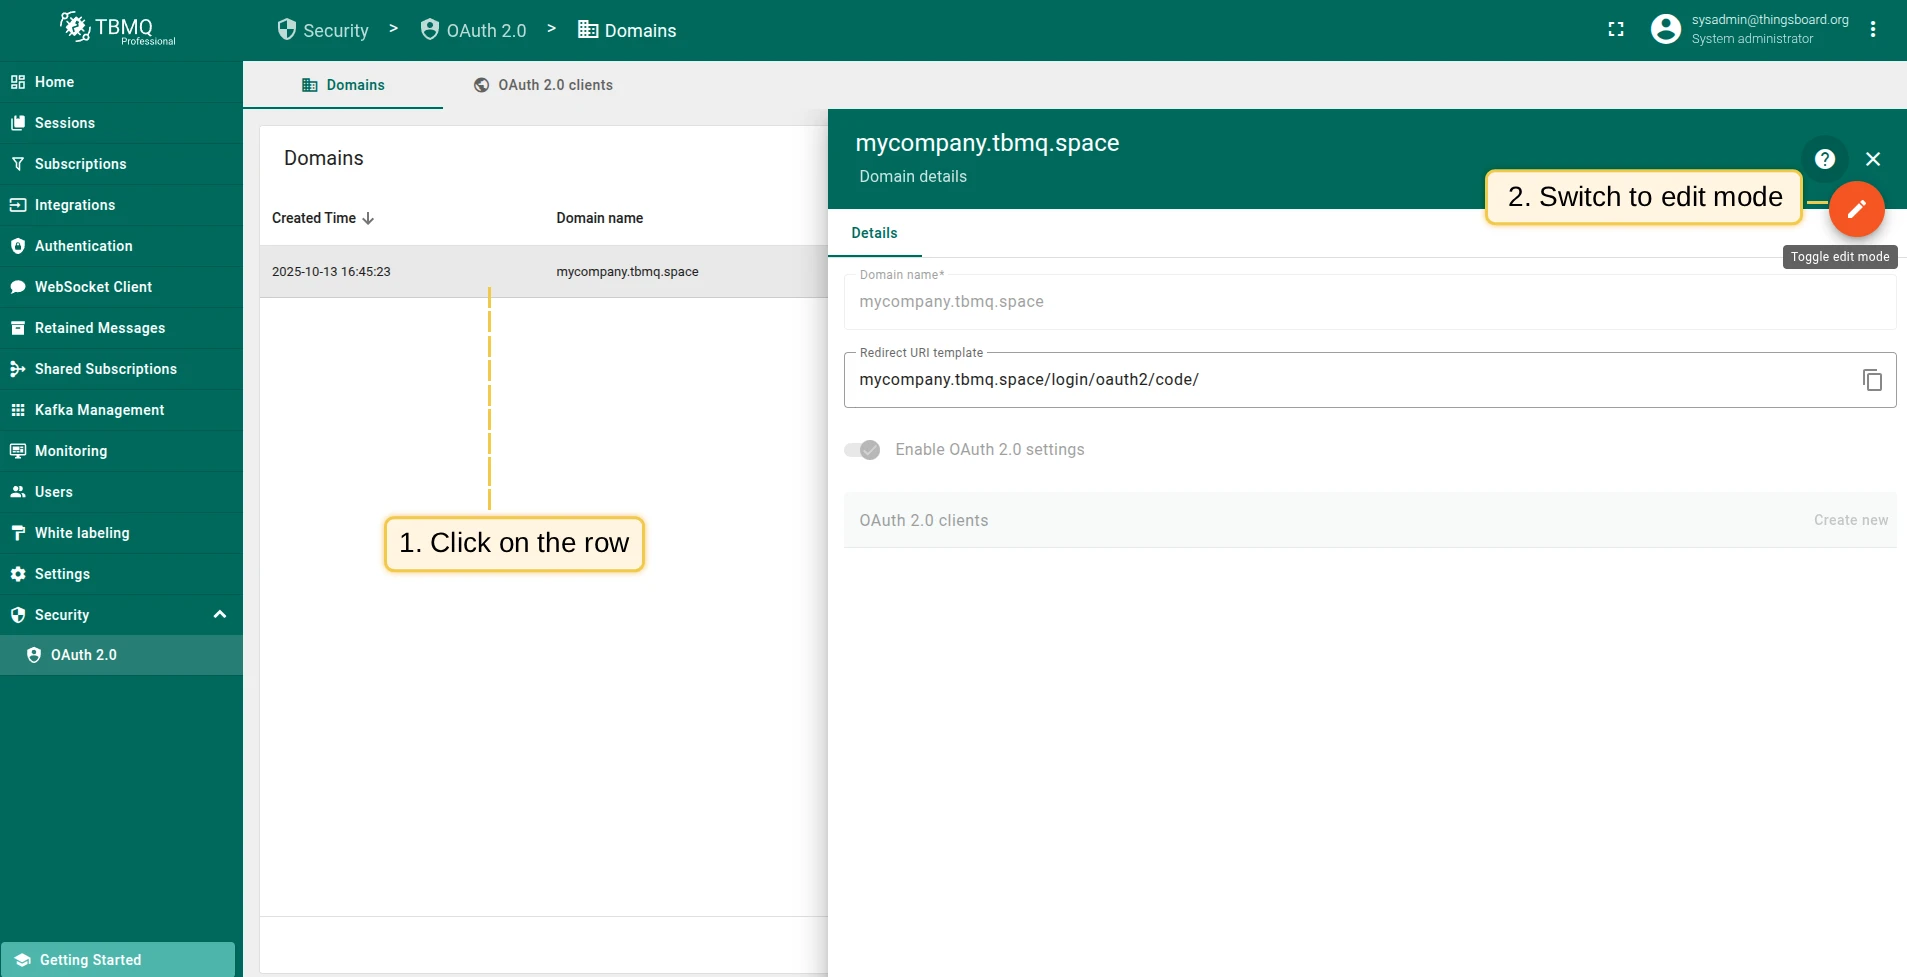
Section titled “Viewing domain details”To view details about a registered domain, simply click on it to open the domain details dialog.
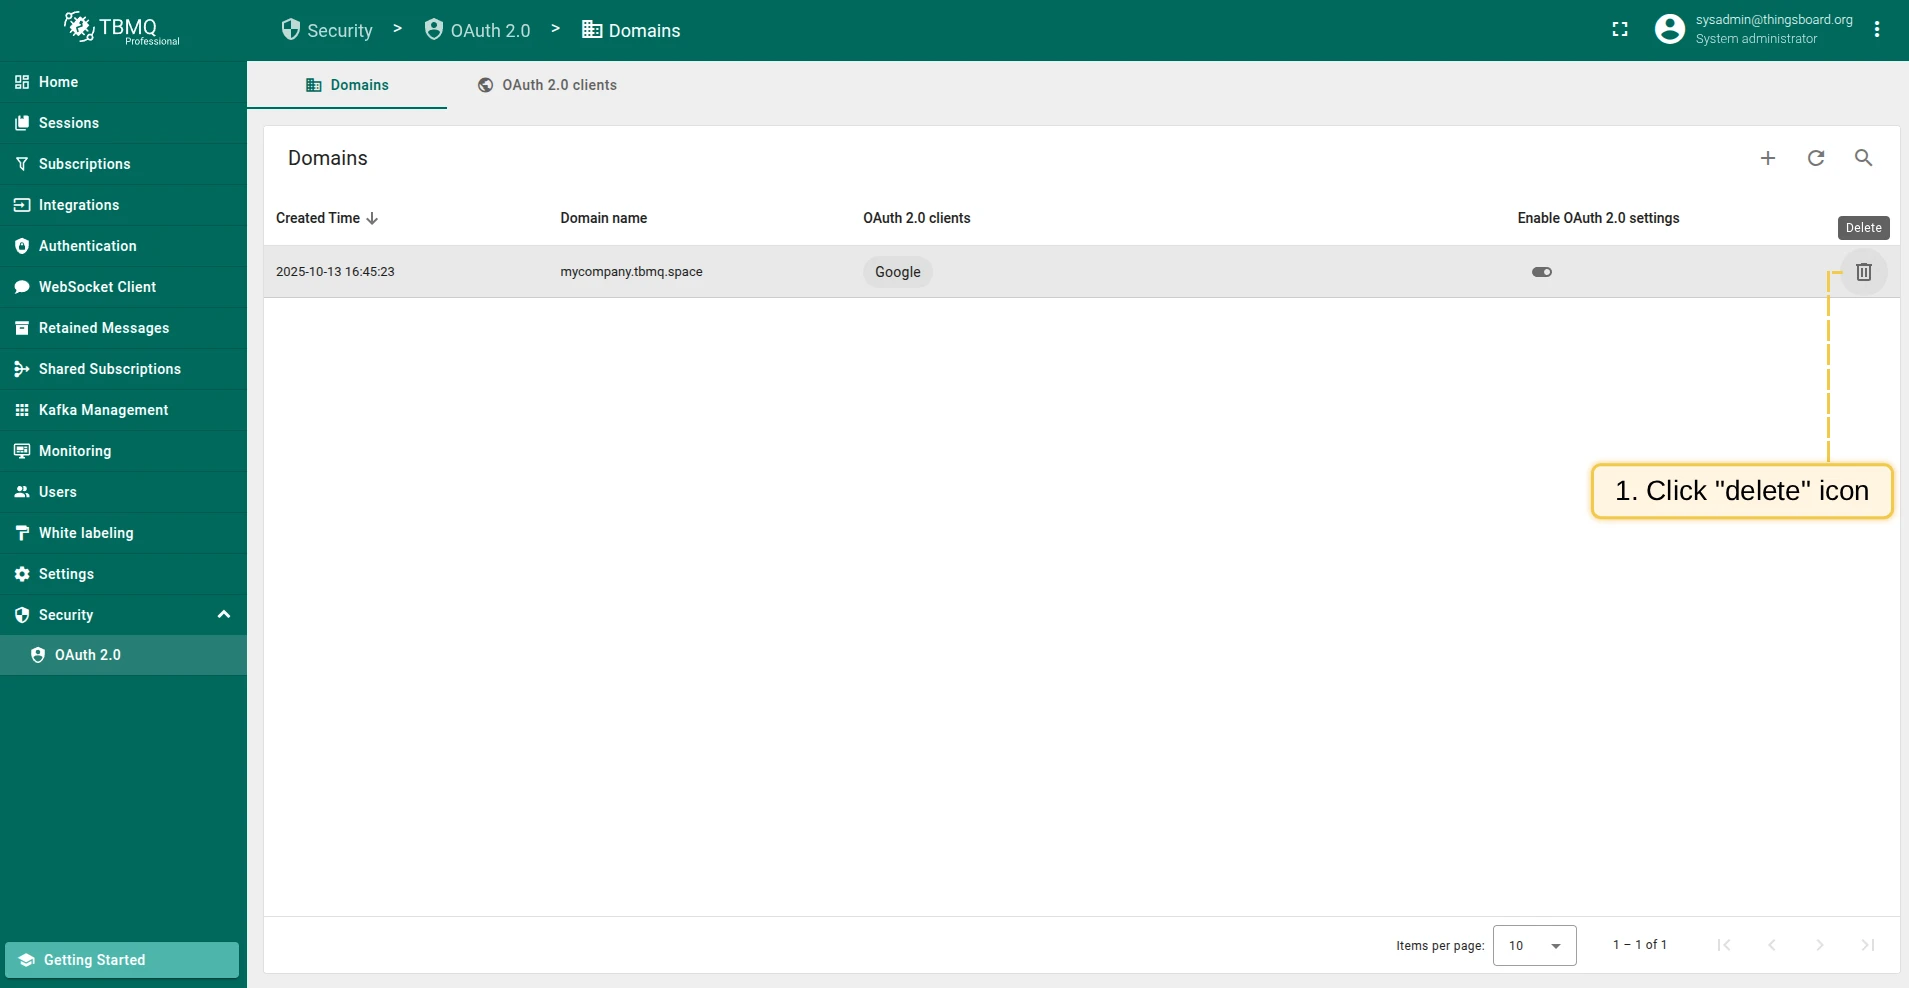
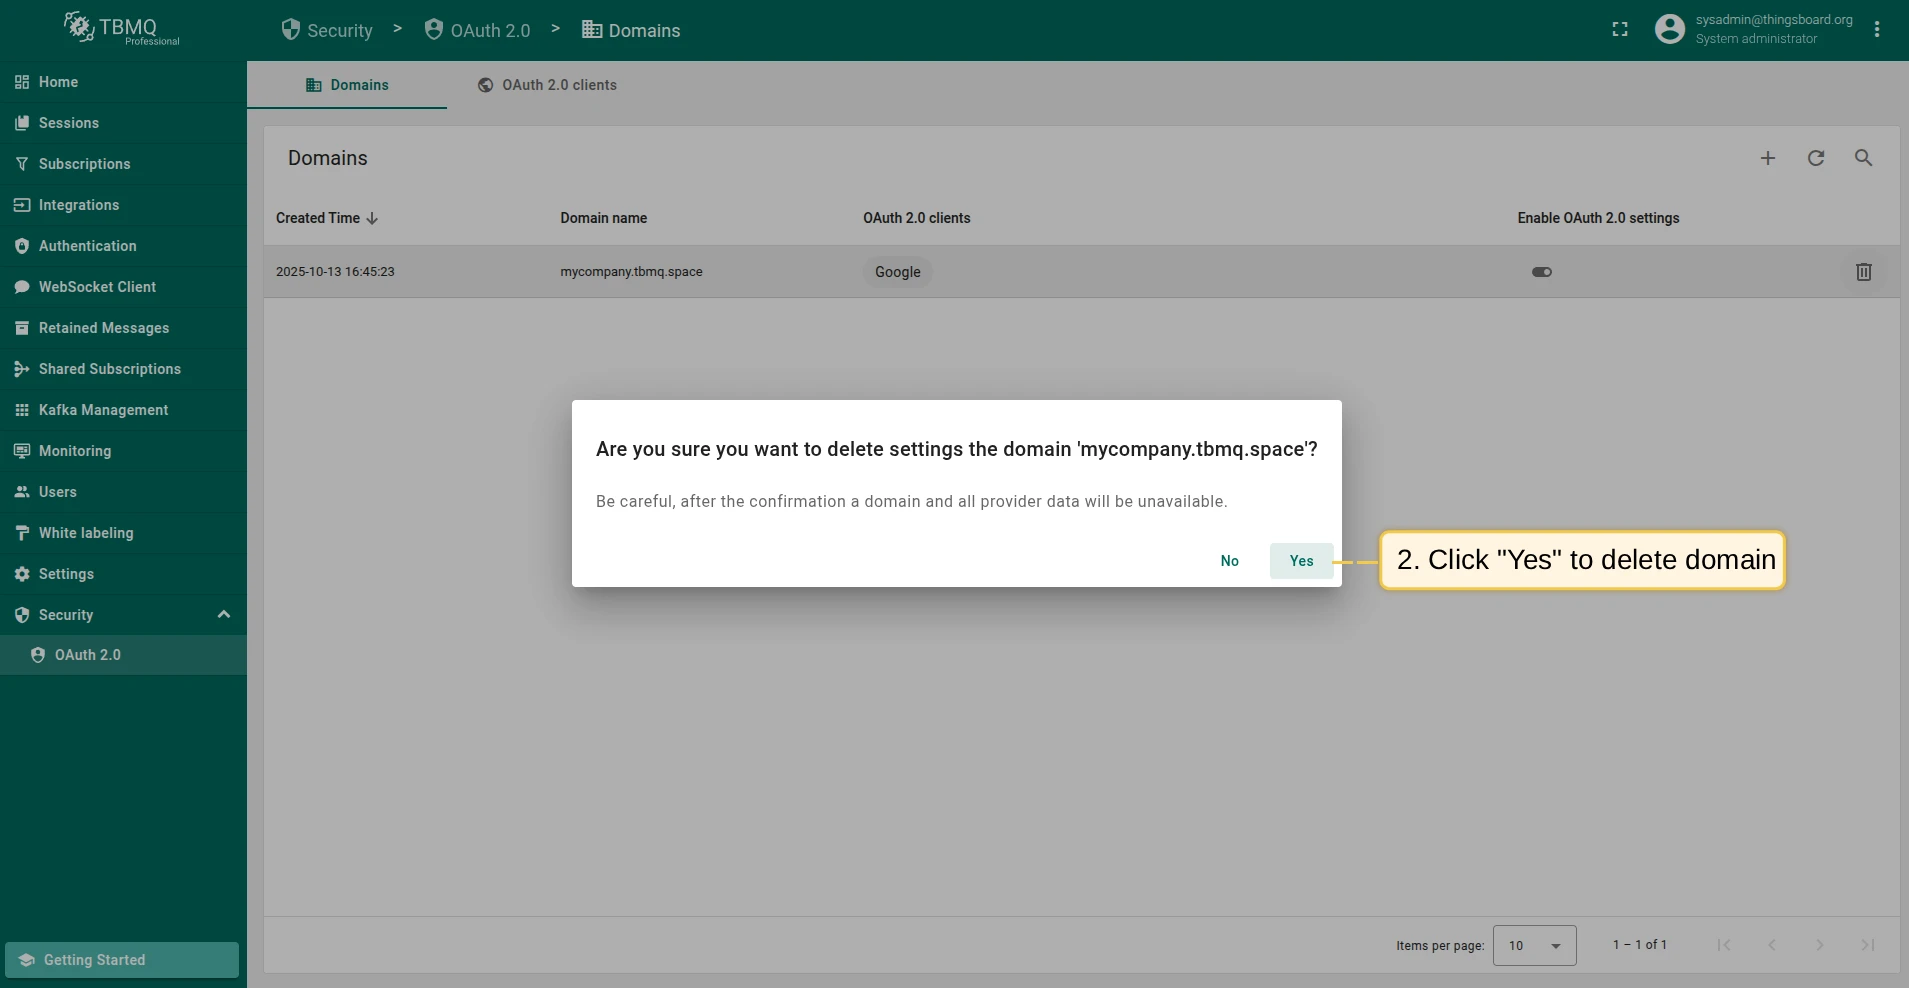
Deleting a domain
Section titled “Deleting a domain”To delete a domain, click the trash icon in the domain’s row. In the confirmation dialog, click Yes to confirm.
How to create an A record for your domain
Section titled “How to create an A record for your domain”What is an A record?
Section titled “What is an A record?”An A record (Address Record) links a domain name directly to an IPv4 address. It tells DNS resolvers where to find your server.
Example:
mqtt.mycompany.com → 203.0.113.45When to use an A record
Section titled “When to use an A record”Use an A record when your TBMQ instance has a fixed public IP address — for example, a VM, Kubernetes service, or on-premise server.
How to create an A record
Section titled “How to create an A record”The exact procedure depends on your DNS provider. Refer to their documentation for detailed instructions:
- Amazon Route 53
- GoDaddy
- Cloudflare
- ClouDNS
- Google Cloud DNS
- Name.com
- DNSimple
- Infoblox NIOS
- Namecheap
If your provider is not listed, check their documentation or contact their support team.
How to create a CNAME record for your domain
Section titled “How to create a CNAME record for your domain”What is a CNAME record?
Section titled “What is a CNAME record?”A CNAME (Canonical Name Record) maps one domain name to another domain name. It acts as an alias, allowing several domains or subdomains to point to the same hostname.
Example:
mqtt.mycompany.com → broker.mycompany.netWhen to use a CNAME record
Section titled “When to use a CNAME record”Use a CNAME record when:
- You want multiple domains (e.g.,
mqtt.mycompany.com,iot.mycompany.com) to resolve to the same host. - Your server’s IP may change, but the target domain remains constant.
- You want to simplify DNS management by maintaining only one A record on the primary domain.
How to create a CNAME record
Section titled “How to create a CNAME record”Each DNS provider has its own interface for adding CNAME records. Below are direct links to their setup guides:
- Amazon Route 53
- GoDaddy
- Cloudflare
- ClouDNS
- Google Cloud DNS
- Name.com
- DNSimple
- DNSMadeEasy
- easyDNS
- Infoblox NIOS
- No-IP.com
- Namecheap
If your provider is not listed, check their documentation or contact their support team.
Troubleshooting
Section titled “Troubleshooting”If your domain does not resolve or TBMQ is not accessible, verify the DNS configuration.
Check DNS record
Section titled “Check DNS record”Use the Google Admin Toolbox DIG or run the following command on Linux:
dig your-domain.com anyReplace your-domain.com with your actual domain name. For example:
dig mqtt.mycompany.com anyReview the output
Section titled “Review the output”If no ANSWER SECTION appears, the record was not added correctly.
For example, this output indicates no record found:
;; ANSWER SECTION:mqtt.mycompany.com. 3600 IN HINFO "RFC8482" ""A correct record should look like this:
;; ANSWER SECTION:mqtt.mycompany.com. 3600 IN CNAME broker.mycompany.net.Or, if using an A record:
;; ANSWER SECTION:mqtt.mycompany.com. 3600 IN A 203.0.113.45Contact support
Section titled “Contact support”If the configuration appears correct but the issue persists, please contact us for further assistance.
Was this helpful?