ChirpStack Integration
ChirpStack is an open-source LoRaWAN Network Server. After integrating it with ThingsBoard Edge, device data is processed and visualized locally at the edge — enabling low-latency insights and offline operation.

Prerequisites
Section titled “Prerequisites”- ThingsBoard Edge Professional Edition, up and running.
- ChirpStack Network Server installed via Docker Compose or Ubuntu.
- A LoRaWAN device connected to ChirpStack. See Connect a device in the ChirpStack docs.
Create converter and integration templates
Section titled “Create converter and integration templates”Integration templates are created on the Cloud (ThingsBoard PE server) — log in as Tenant administrator.
Basic settings
Section titled “Basic settings”-
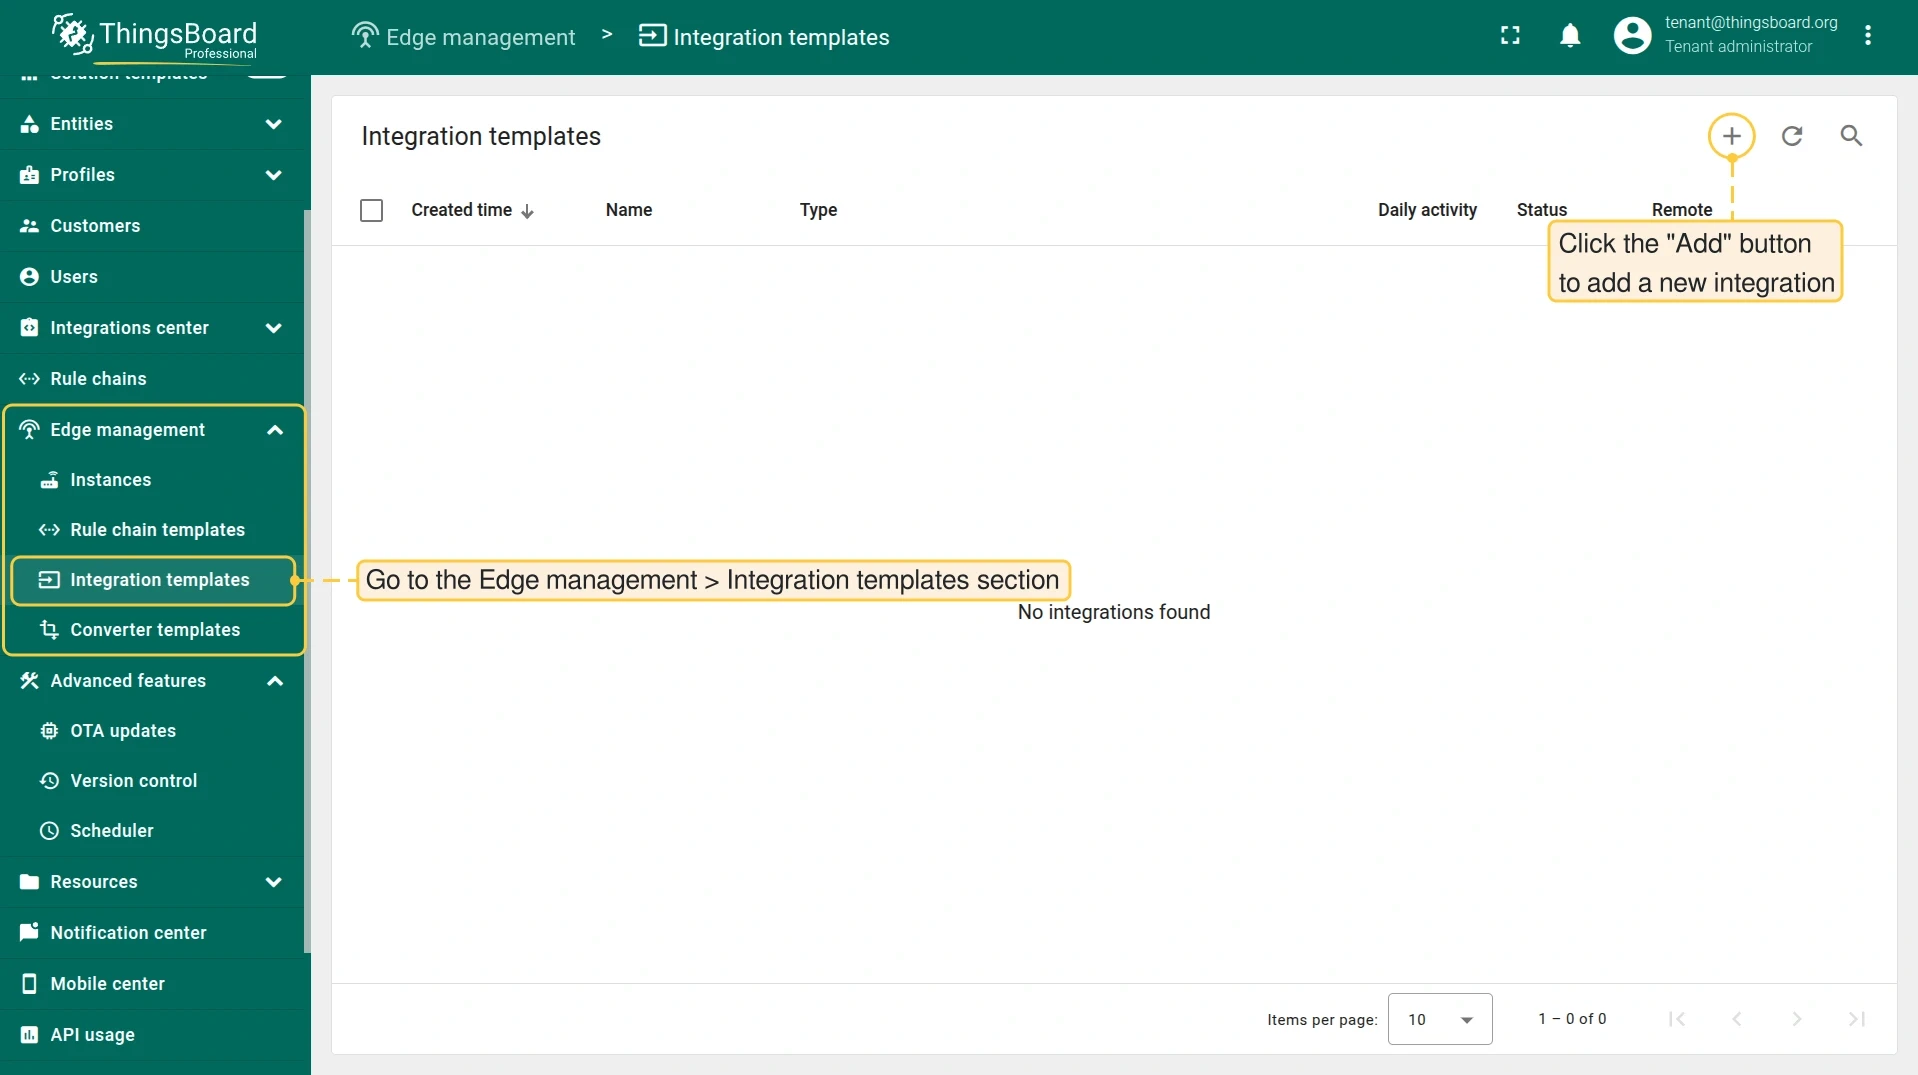
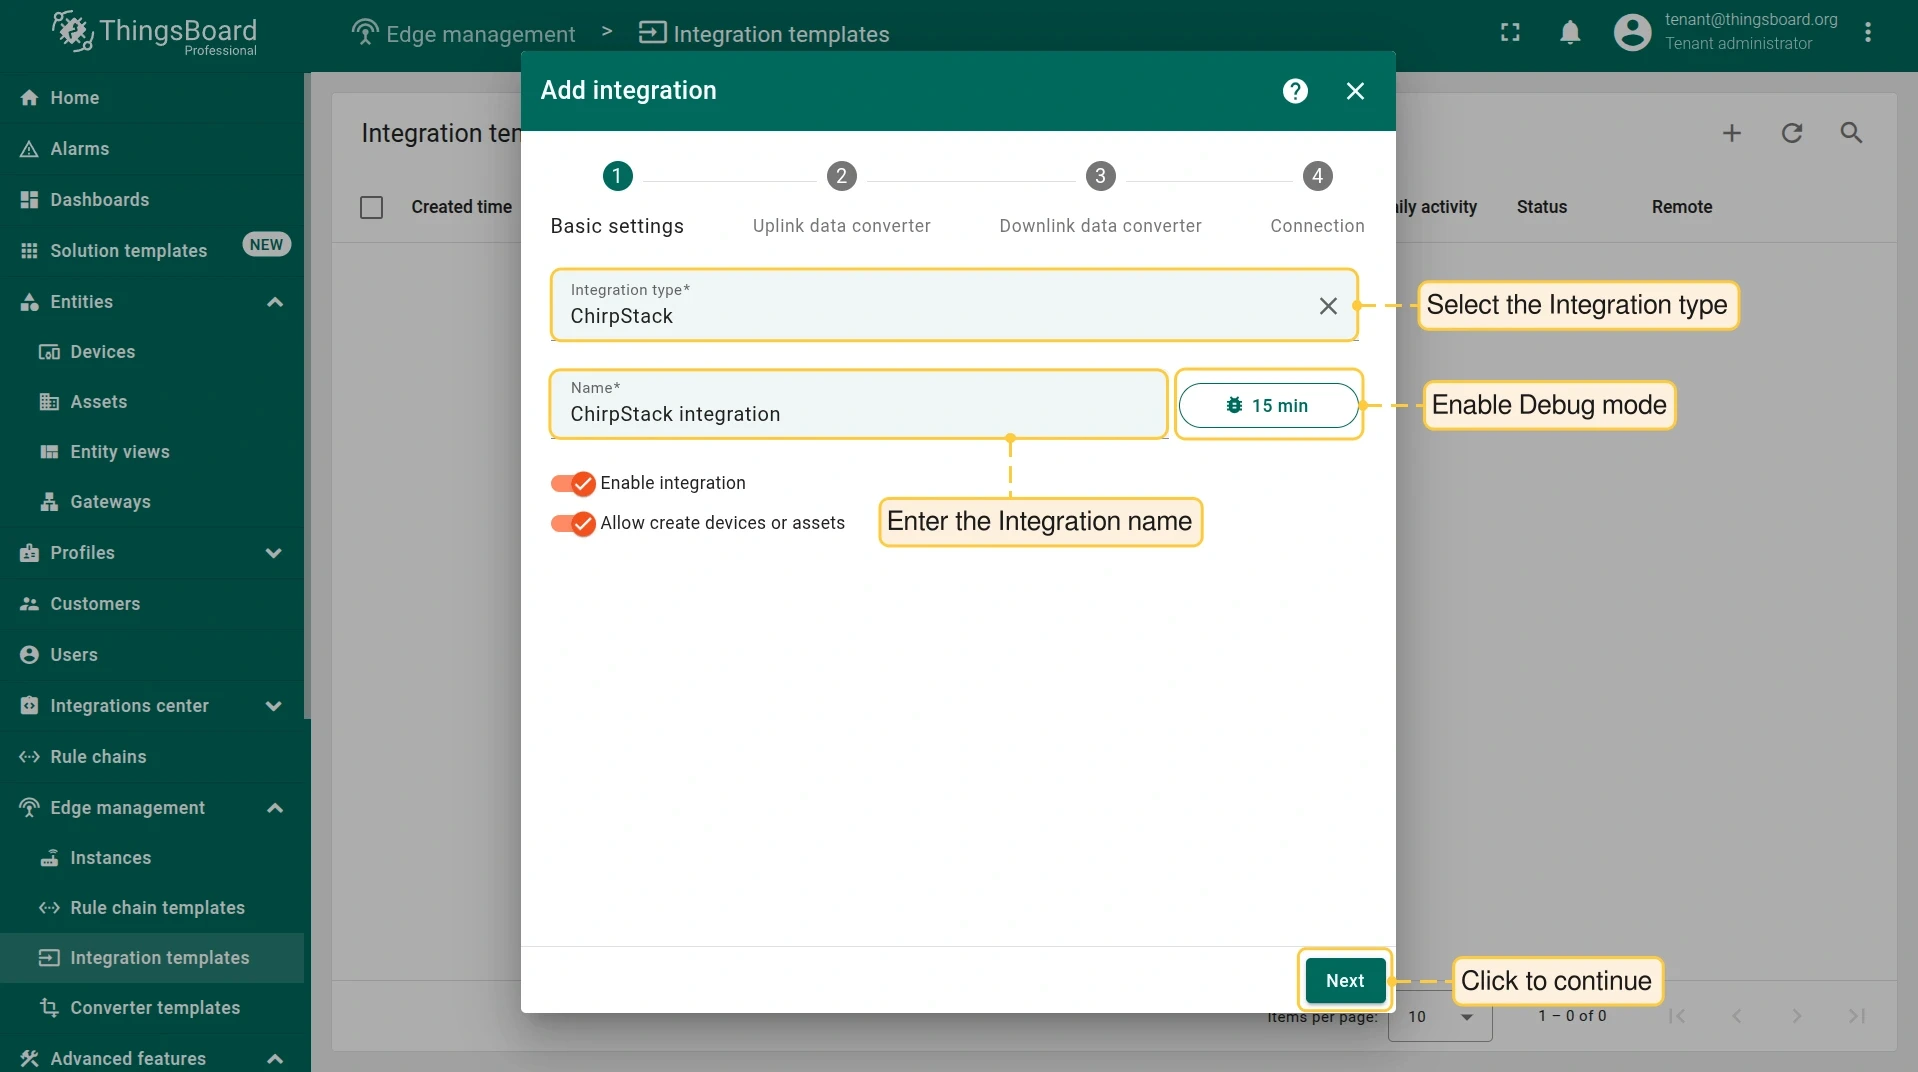
Go to Edge management > Integration templates and click Add. Select ChirpStack as the type and enter an integration name.
-
Click Next.
Uplink data converter
Section titled “Uplink data converter”The uplink converter decodes incoming ChirpStack payloads into ThingsBoard telemetry and attributes.
-
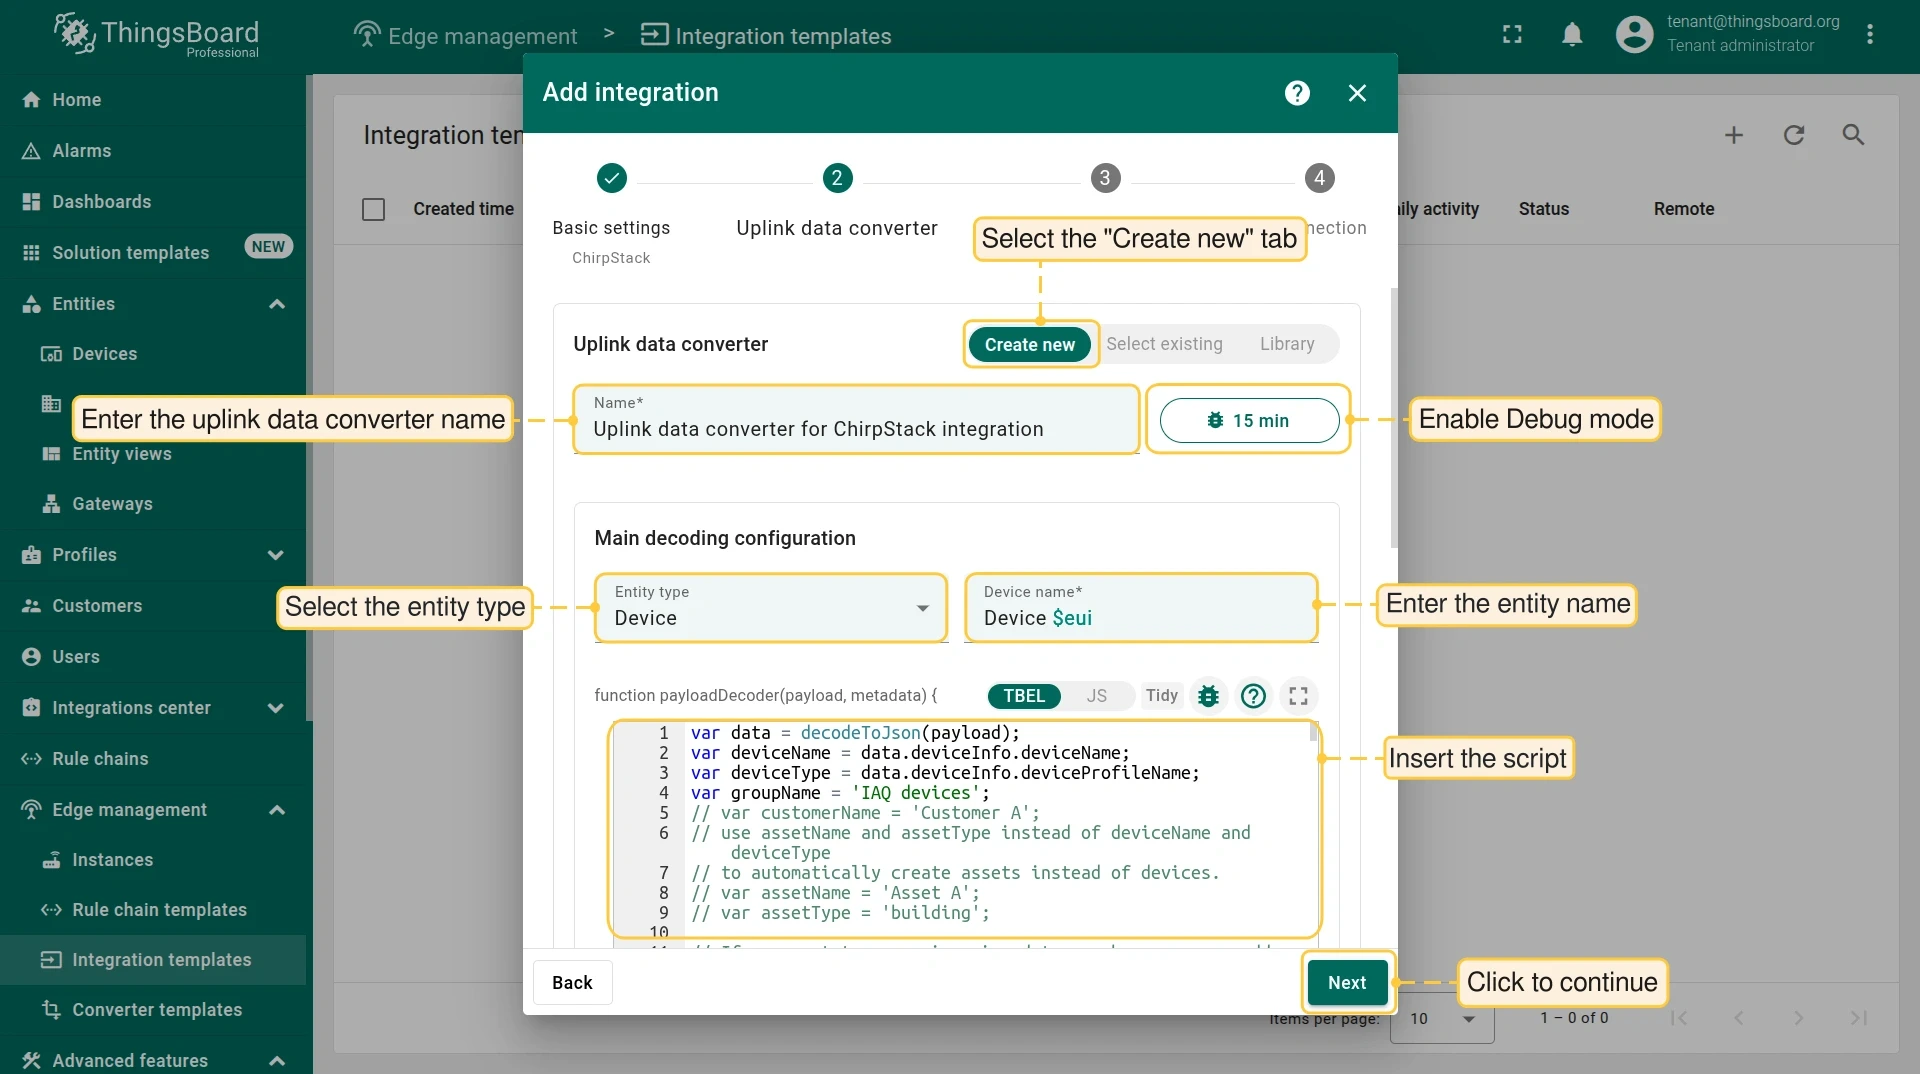
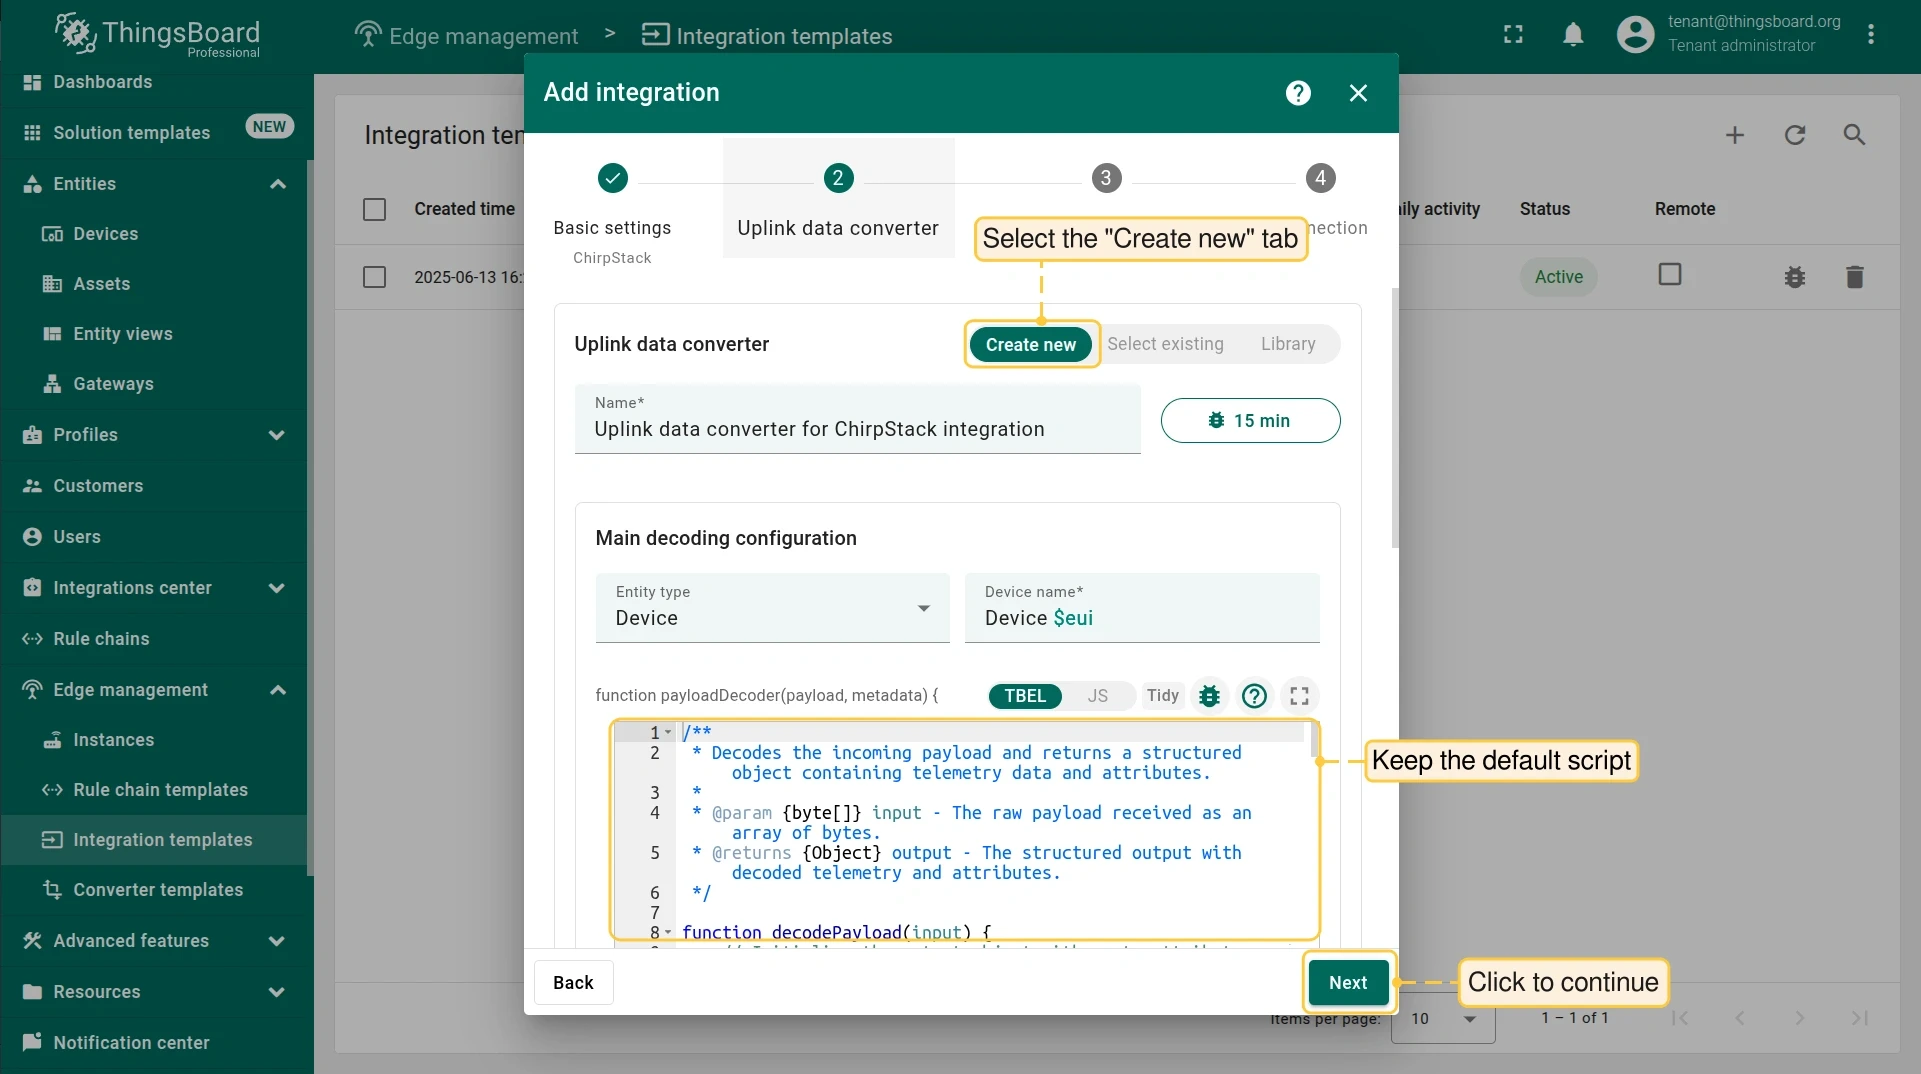
Select the Create new tab. Enter a converter name.
-
In the Main decoding configuration block, select the Entity type (Device or Asset) and enter the entity name.
-
Paste the decoder script into the function payloadDecoder field. For Edge version 3.9 and older:
var data = decodeToJson(payload);var deviceName = data.deviceInfo.deviceName;var deviceType = data.deviceInfo.deviceProfileName;var groupName = 'IAQ devices';function decodePayload(input) {var output = { attributes:{}, telemetry: {} };output.telemetry.HEX_bytes = bytesToHex(input);if (input.length > 0) {for (var i = 0; i < input.length; ) {var channel_id = input[i++];if (i < input.length) {var channel_type = input[i++];if (channel_id === 0x01 && channel_type === 0x75) {output.telemetry.battery = input[i];i += 1;} else if (channel_id === 0x03 && channel_type === 0x00) {output.telemetry.pir = input[i] === 0 ? "normal" : "trigger";i += 1;} else if (channel_id === 0x04 && channel_type === 0x00) {output.telemetry.daylight = input[i] === 0 ? "dark" : "light";i += 1;}}}}return output;}var telemetry = {};var attributes = {};var dateString = data.time;var timestamp = -1;if (dateString != null) {timestamp = new Date(dateString).getTime();if (timestamp == -1) {var secondsSeparatorIndex = dateString.lastIndexOf('.') + 1;var millisecondsEndIndex = dateString.lastIndexOf('+');if (millisecondsEndIndex == -1) { millisecondsEndIndex = dateString.lastIndexOf('Z'); }if (millisecondsEndIndex == -1) { millisecondsEndIndex = dateString.lastIndexOf('-'); }if (millisecondsEndIndex == -1) {if (dateString.length >= secondsSeparatorIndex + 3) {dateString = dateString.substring(0, secondsSeparatorIndex + 3);}} else {dateString = dateString.substring(0, secondsSeparatorIndex + 3) +dateString.substring(millisecondsEndIndex, dateString.length);}timestamp = new Date(dateString).getTime();}}if (timestamp == -1) { timestamp = Date.now(); }attributes.deduplicationId = data.deduplicationId;var excludeFromAttributesList = ["deviceName", "rxInfo", "confirmed", "data","deduplicationId", "time", "adr", "dr", "fCnt"];var excludeFromTelemetryList = ["data", "deviceInfo", "txInfo", "devAddr","adr", "time", "fPort", "region_common_name", "region_config_id", "deduplicationId"];var telemetryData = toFlatMap(data, excludeFromTelemetryList, false);var attributesData = toFlatMap(data, excludeFromAttributesList, false);var customDecoding = decodePayload(base64ToBytes(data.data));if (customDecoding.?telemetry.size() > 0) { telemetry.putAll(customDecoding.telemetry); }if (customDecoding.?attributes.size() > 0) { attributes.putAll(customDecoding.attributes); }telemetry.putAll(telemetryData);attributes.putAll(attributesData);var result = {deviceName: deviceName,deviceType: deviceType,groupName: groupName,attributes: attributes,telemetry: { ts: timestamp, values: telemetry }};return result;var payloadStr = decodeToString(payload);var deviceName = 'Device A';var deviceType = 'thermostat';var groupName = 'thermostat devices';var result = {deviceName: deviceName,deviceType: deviceType,groupName: groupName,attributes: {model: 'Model A',serialNumber: 'SN111',integrationName: metadata['integrationName']},telemetry: {temperature: 42,humidity: 80,rawData: payloadStr}};function decodeToString(payload) {return String.fromCharCode.apply(String, payload);}function decodeToJson(payload) {var str = decodeToString(payload);return JSON.parse(str);}return result; -
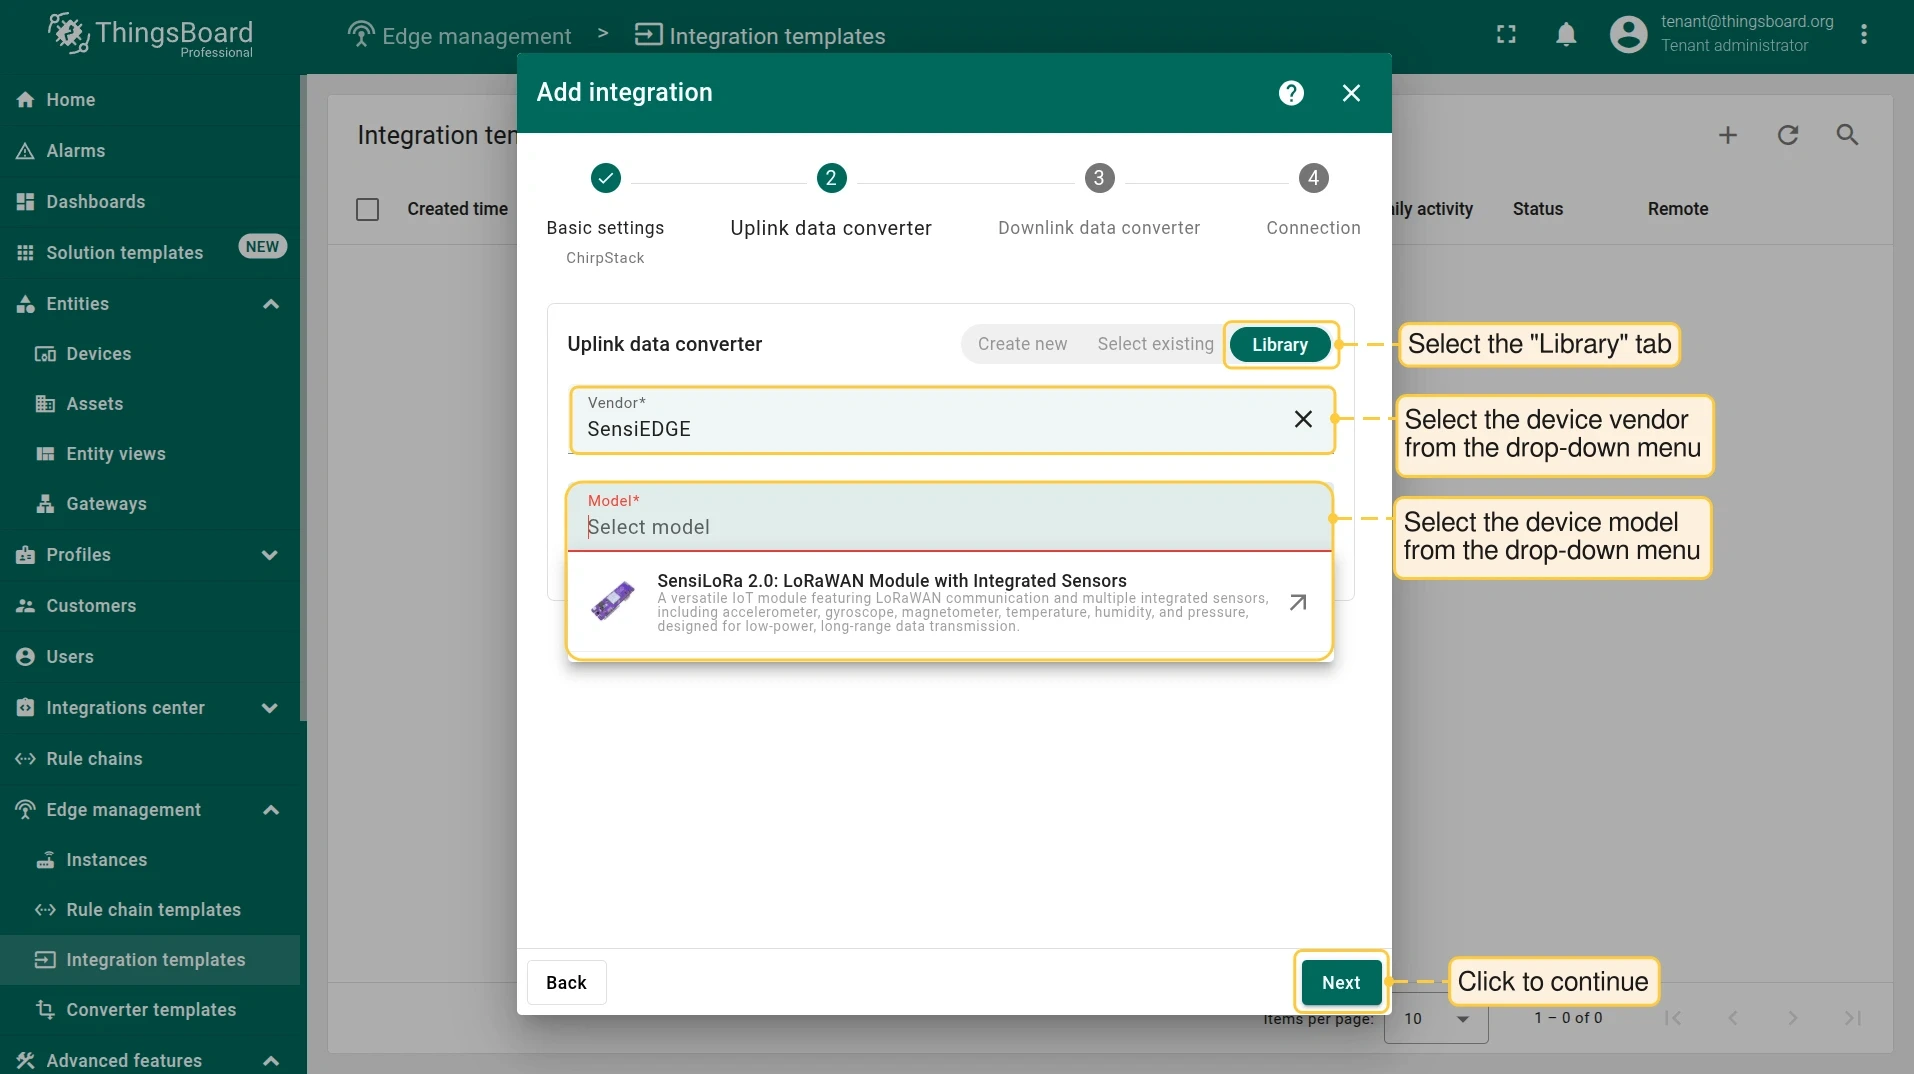
Starting with Edge version 4.0, you can alternatively select the Library tab, choose a Vendor, and select the appropriate device Model from the drop-down menus — or use the default script provided in the converter.
-
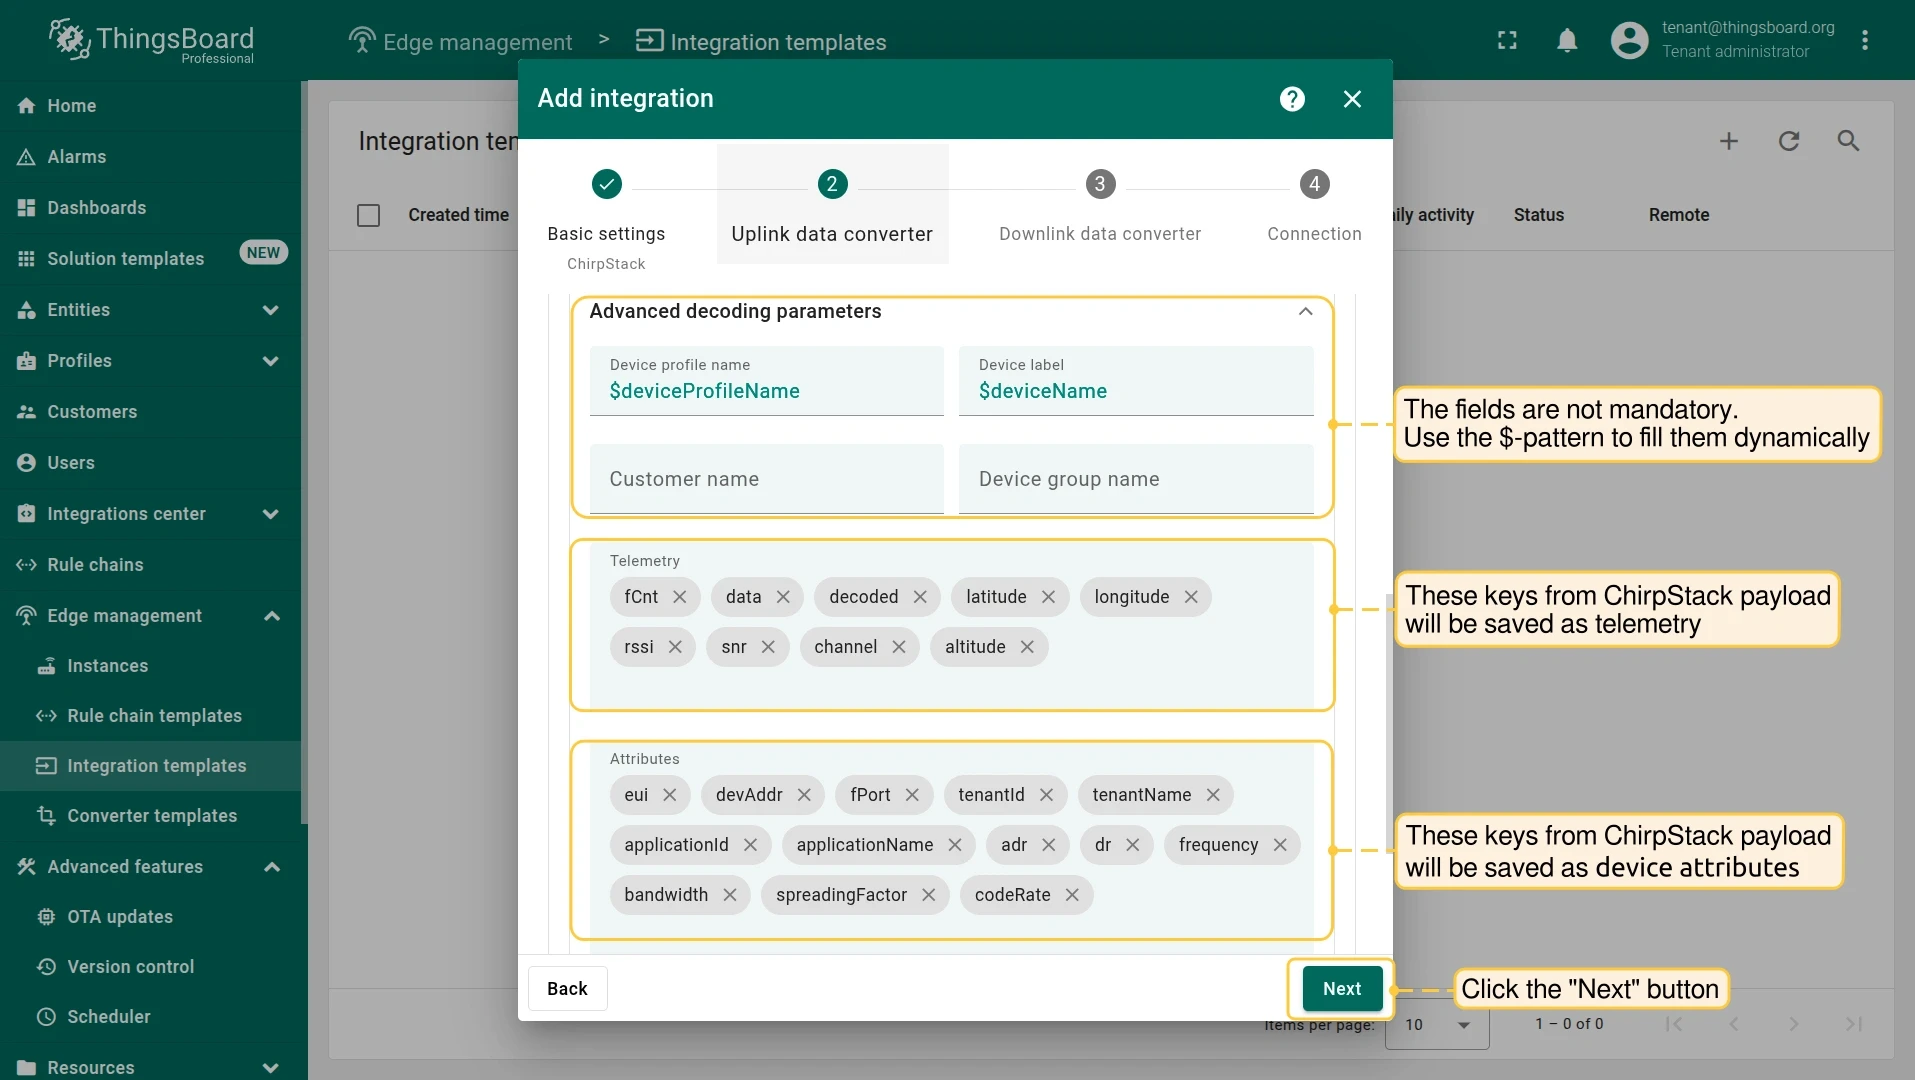
In the Advanced decoding parameters block, optionally configure Device profile, Device label, Customer name, and Device group name (all support
$-pattern placeholders). Set Attributes and Telemetry keys, and configure Update only keys list to save values only when they change. -
Click Next.
Downlink data converter (optional)
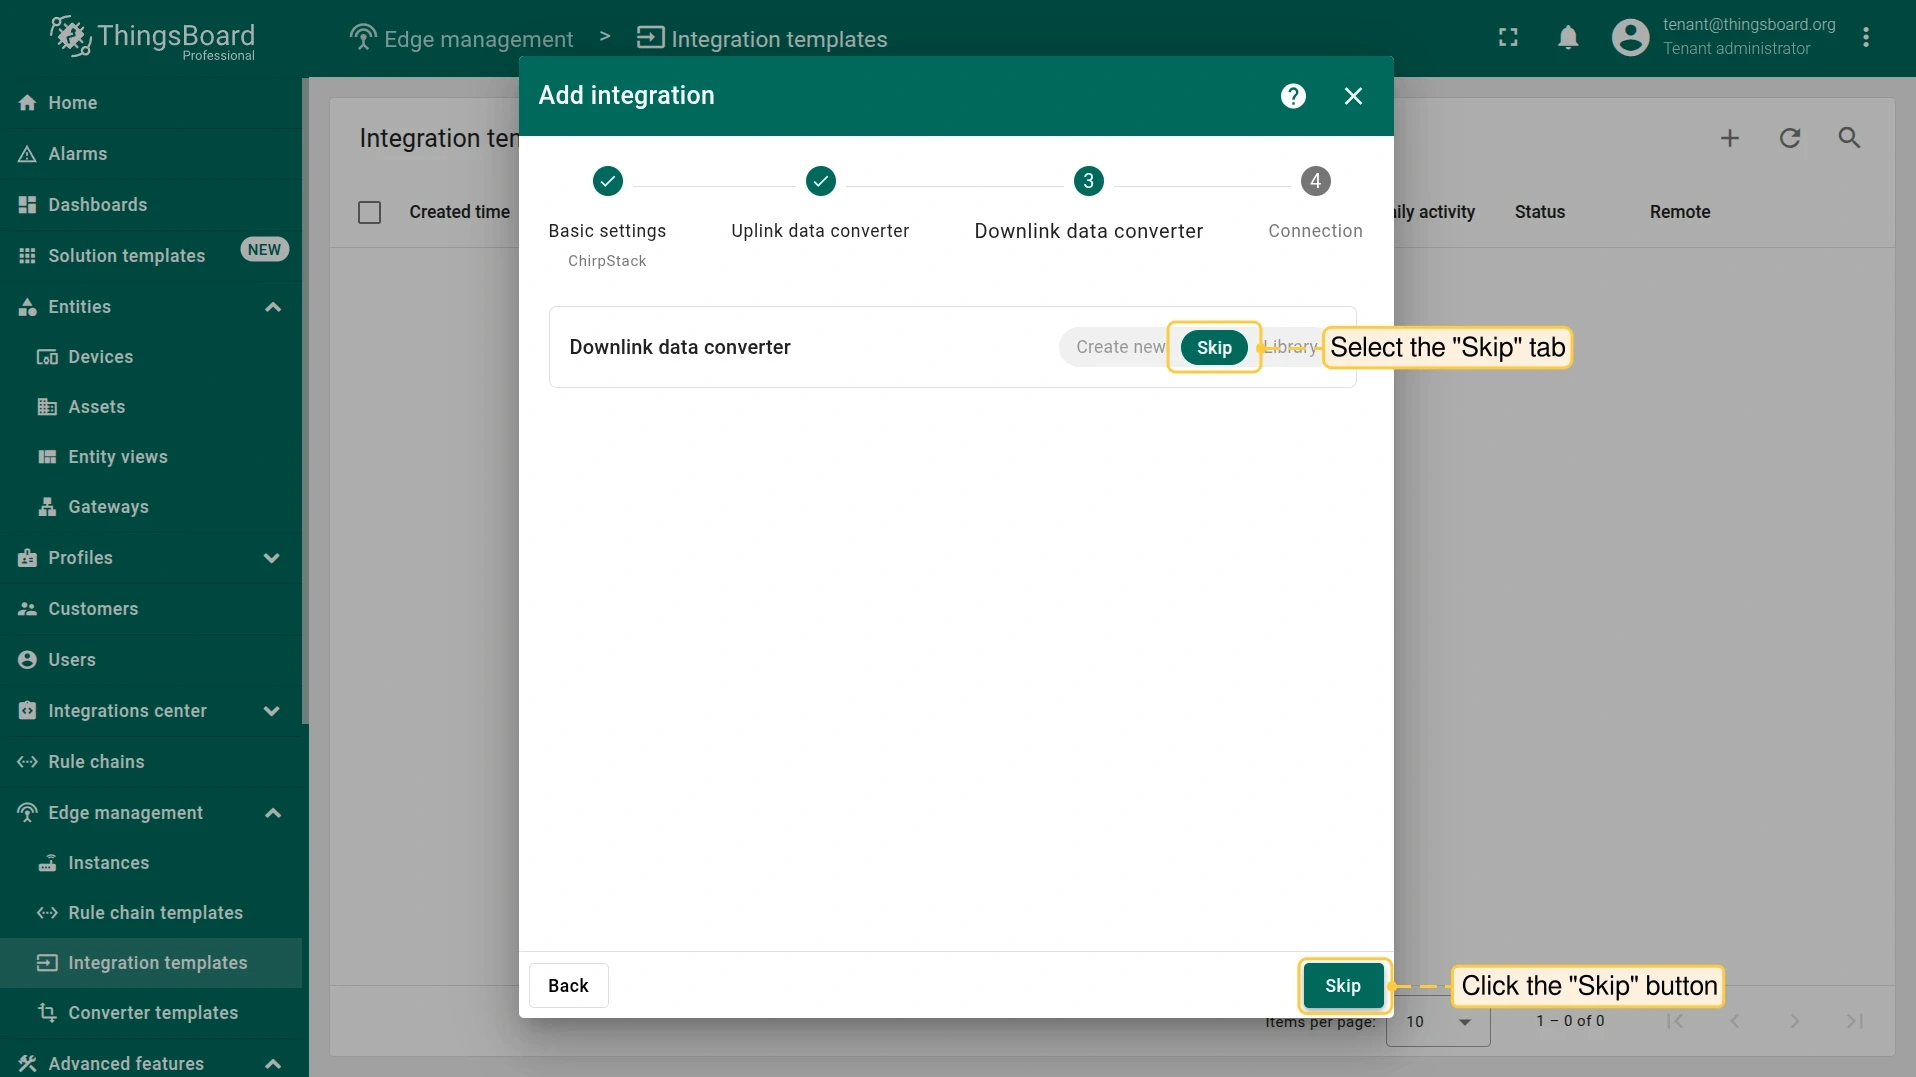
Section titled “Downlink data converter (optional)”Configuring a downlink converter is optional. To skip it, select the Skip tab and click Skip.
Connection
Section titled “Connection”Before configuring the connection in ThingsBoard, create an Application server API Token in the ChirpStack UI.
-
Open the ChirpStack UI at
http://chirpstack-server-ip:8080and log in. Default credentials: usernameadmin, passwordadmin. -
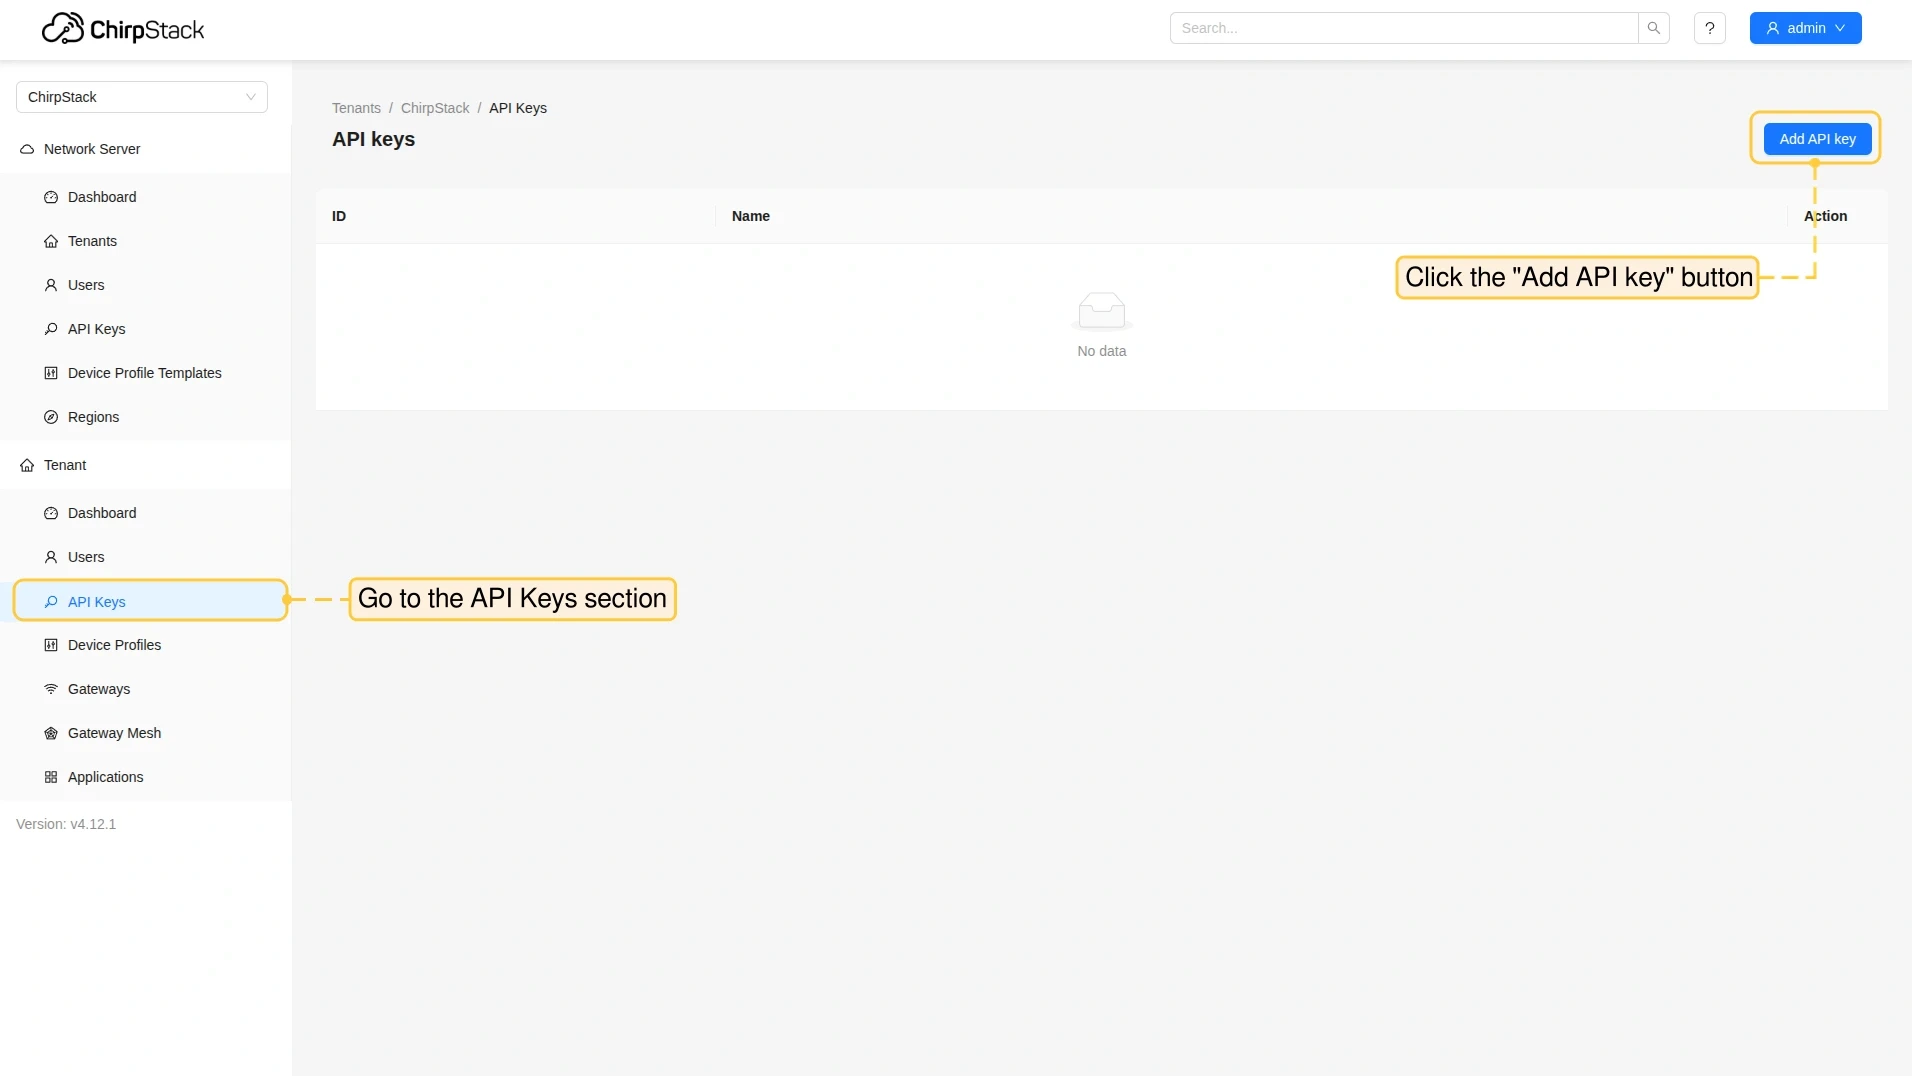
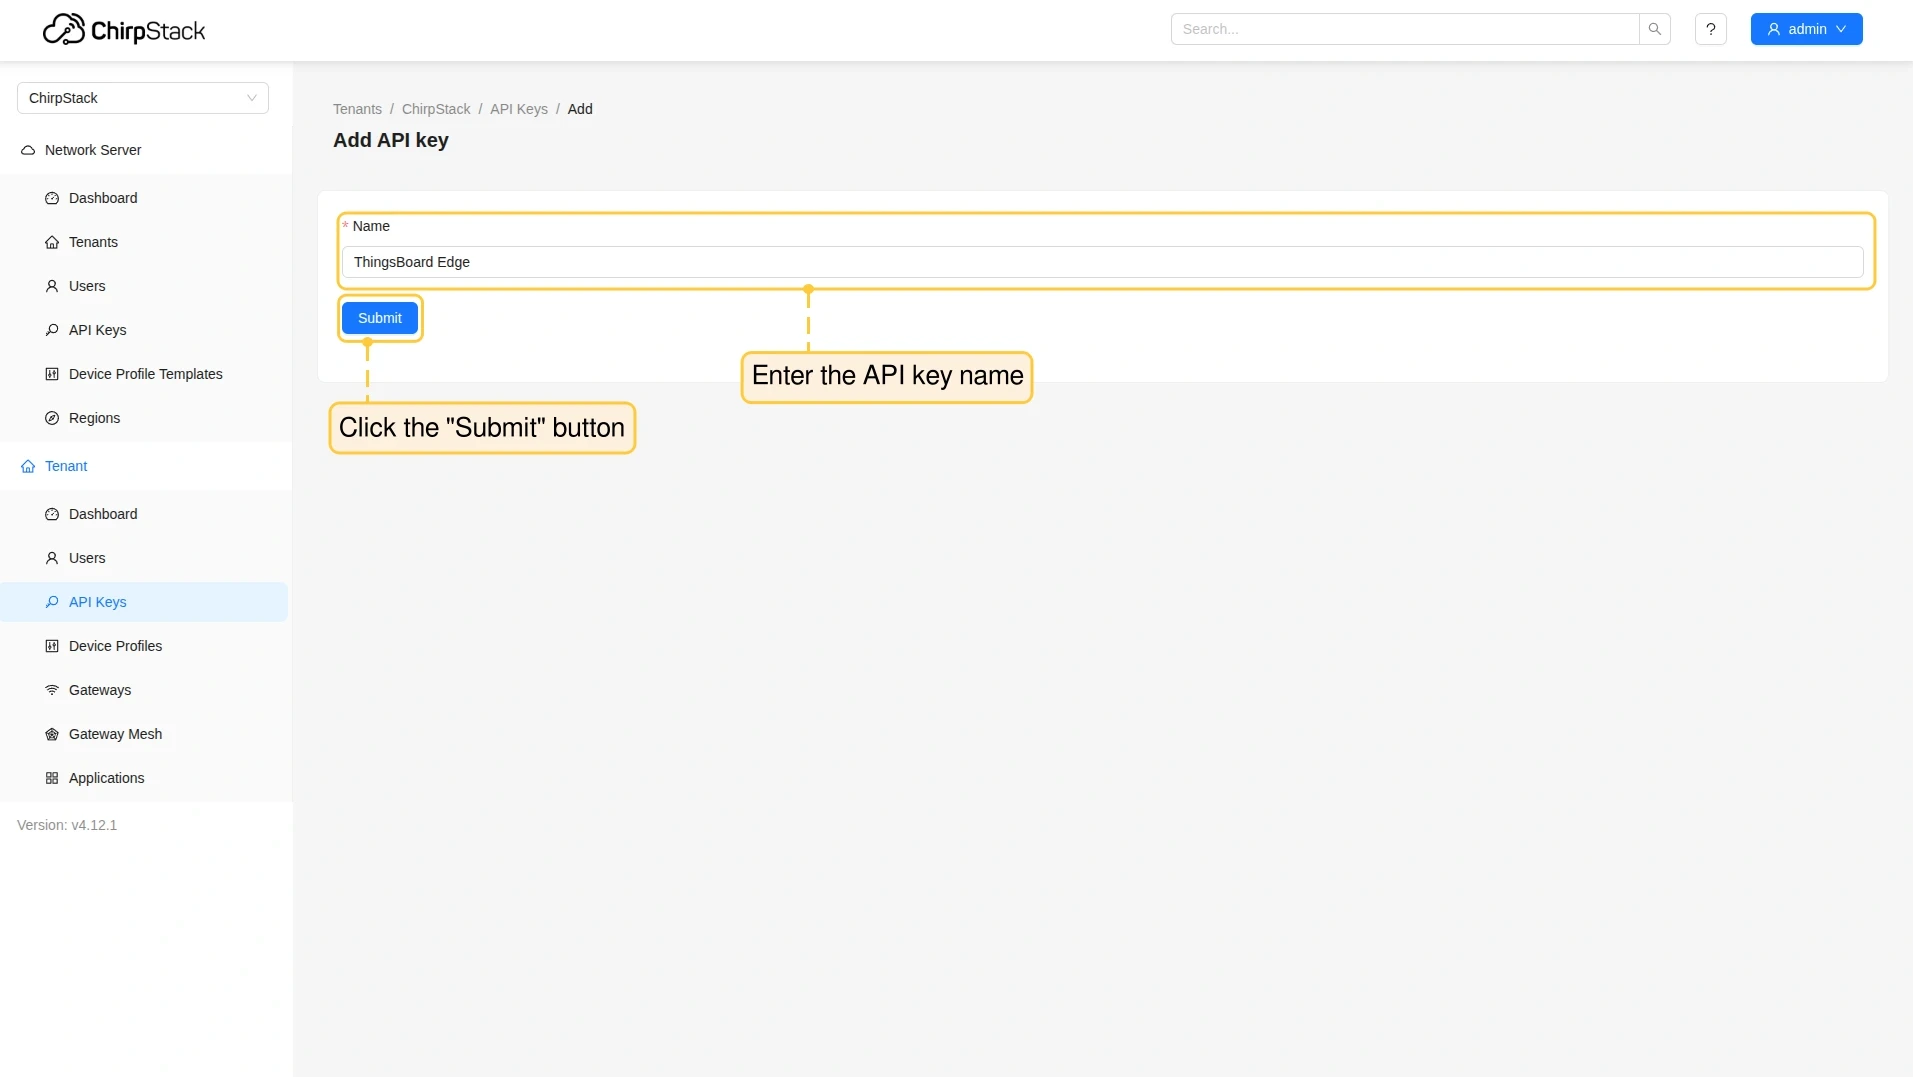
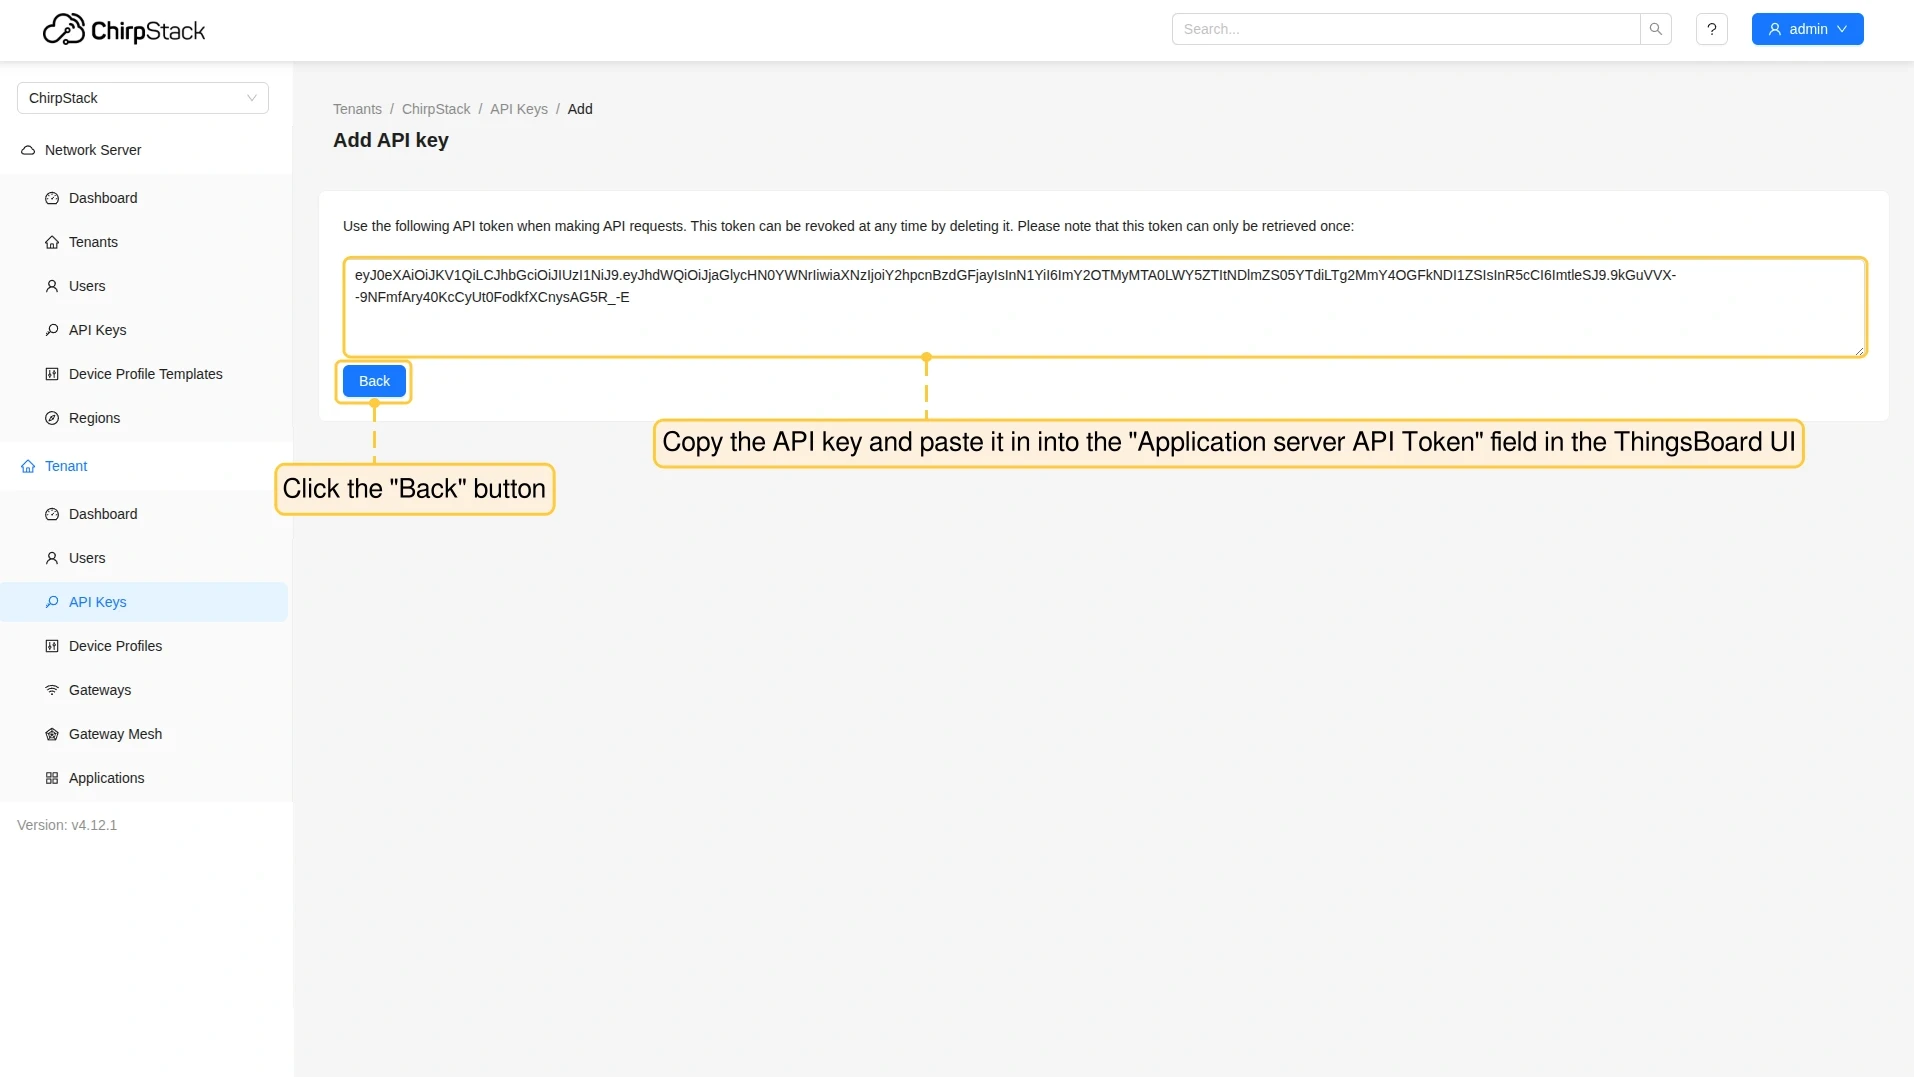
Go to Tenant > API Keys and click Add API Key. Enter a name and click Submit. Copy the generated API key.
-
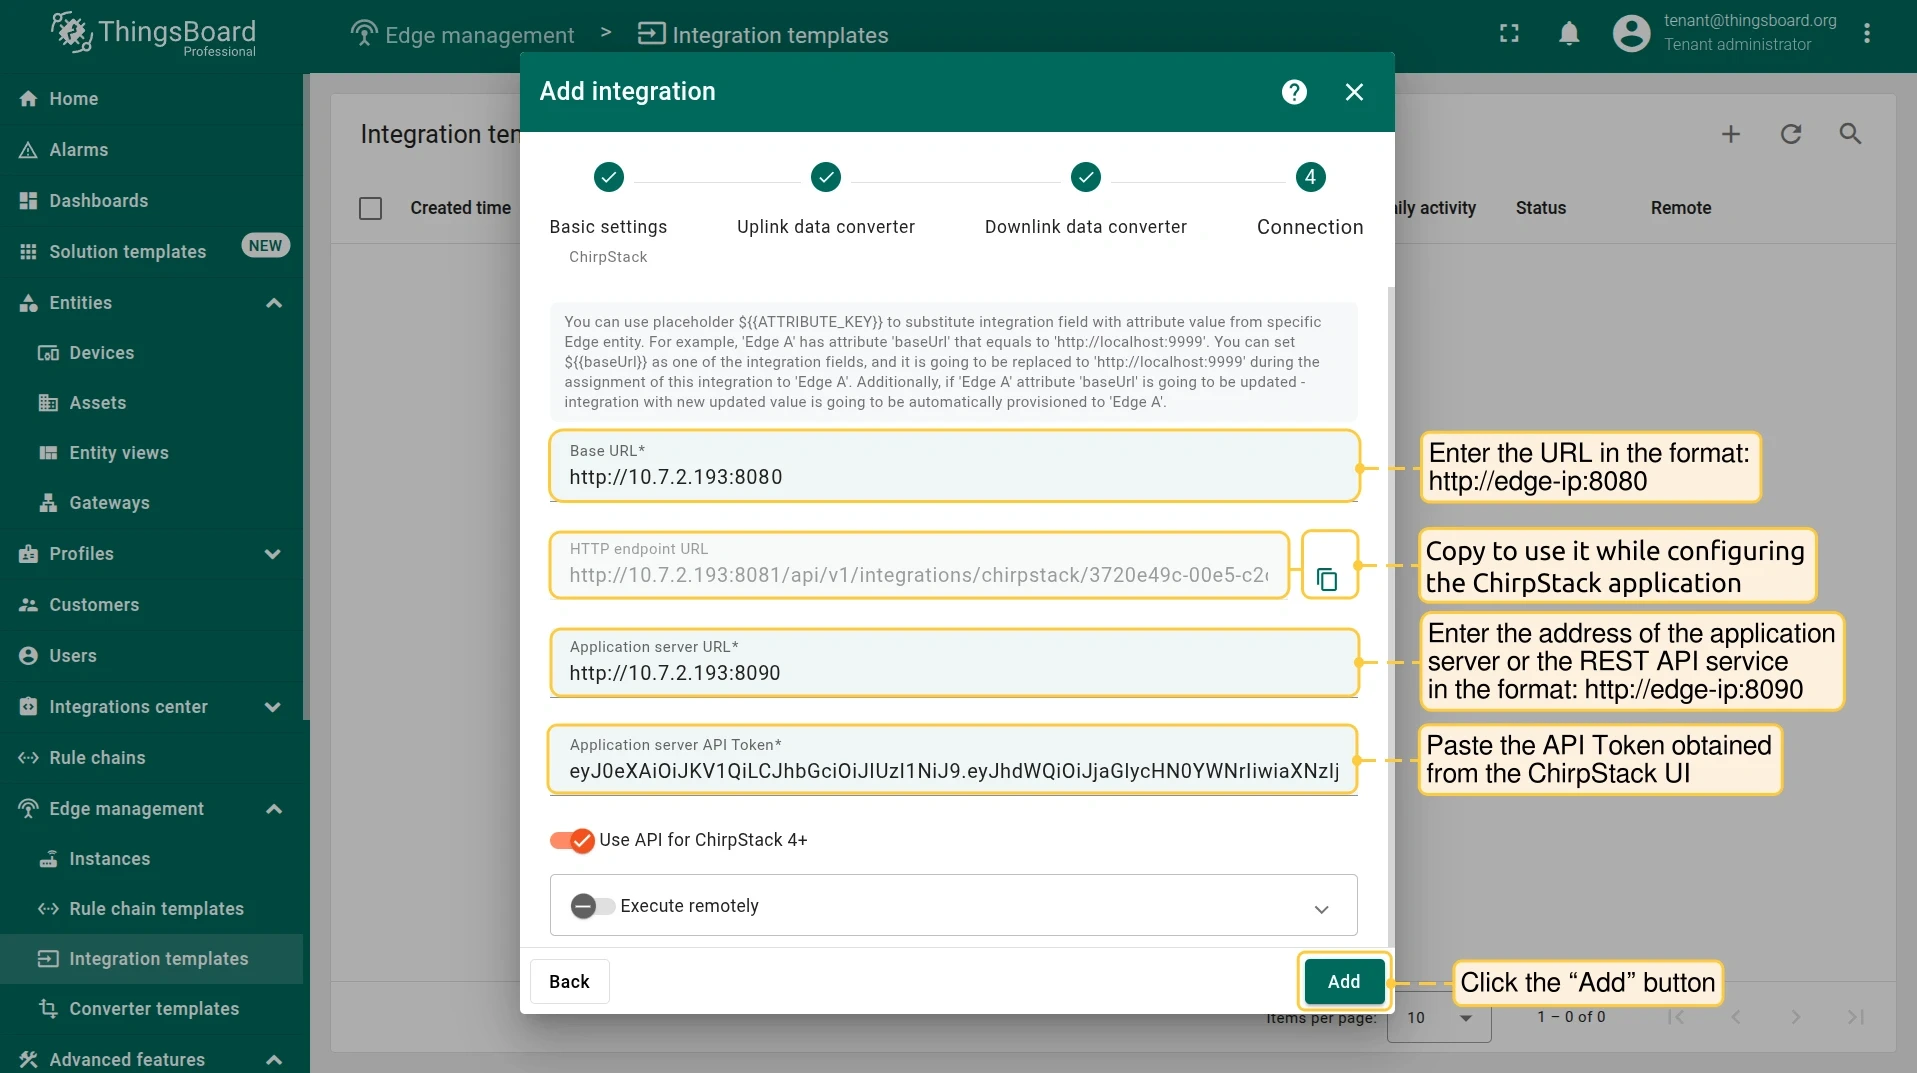
Back in ThingsBoard, fill in the Connection block:
Field Value Base URL URL of your ThingsBoard Edge: http://edge-ip:edge-portHTTP endpoint URL Copy this value — you will need it when configuring the ChirpStack application Application server URL ChirpStack REST API address: http://chirpstack-server-ip:8090Application server API Token Paste the API token from ChirpStack -
Click Add.
Configure the ChirpStack application
Section titled “Configure the ChirpStack application”Log in to the ChirpStack UI at http://chirpstack-server-ip:8080 to configure the application integration.
Add a device profile
Section titled “Add a device profile”-
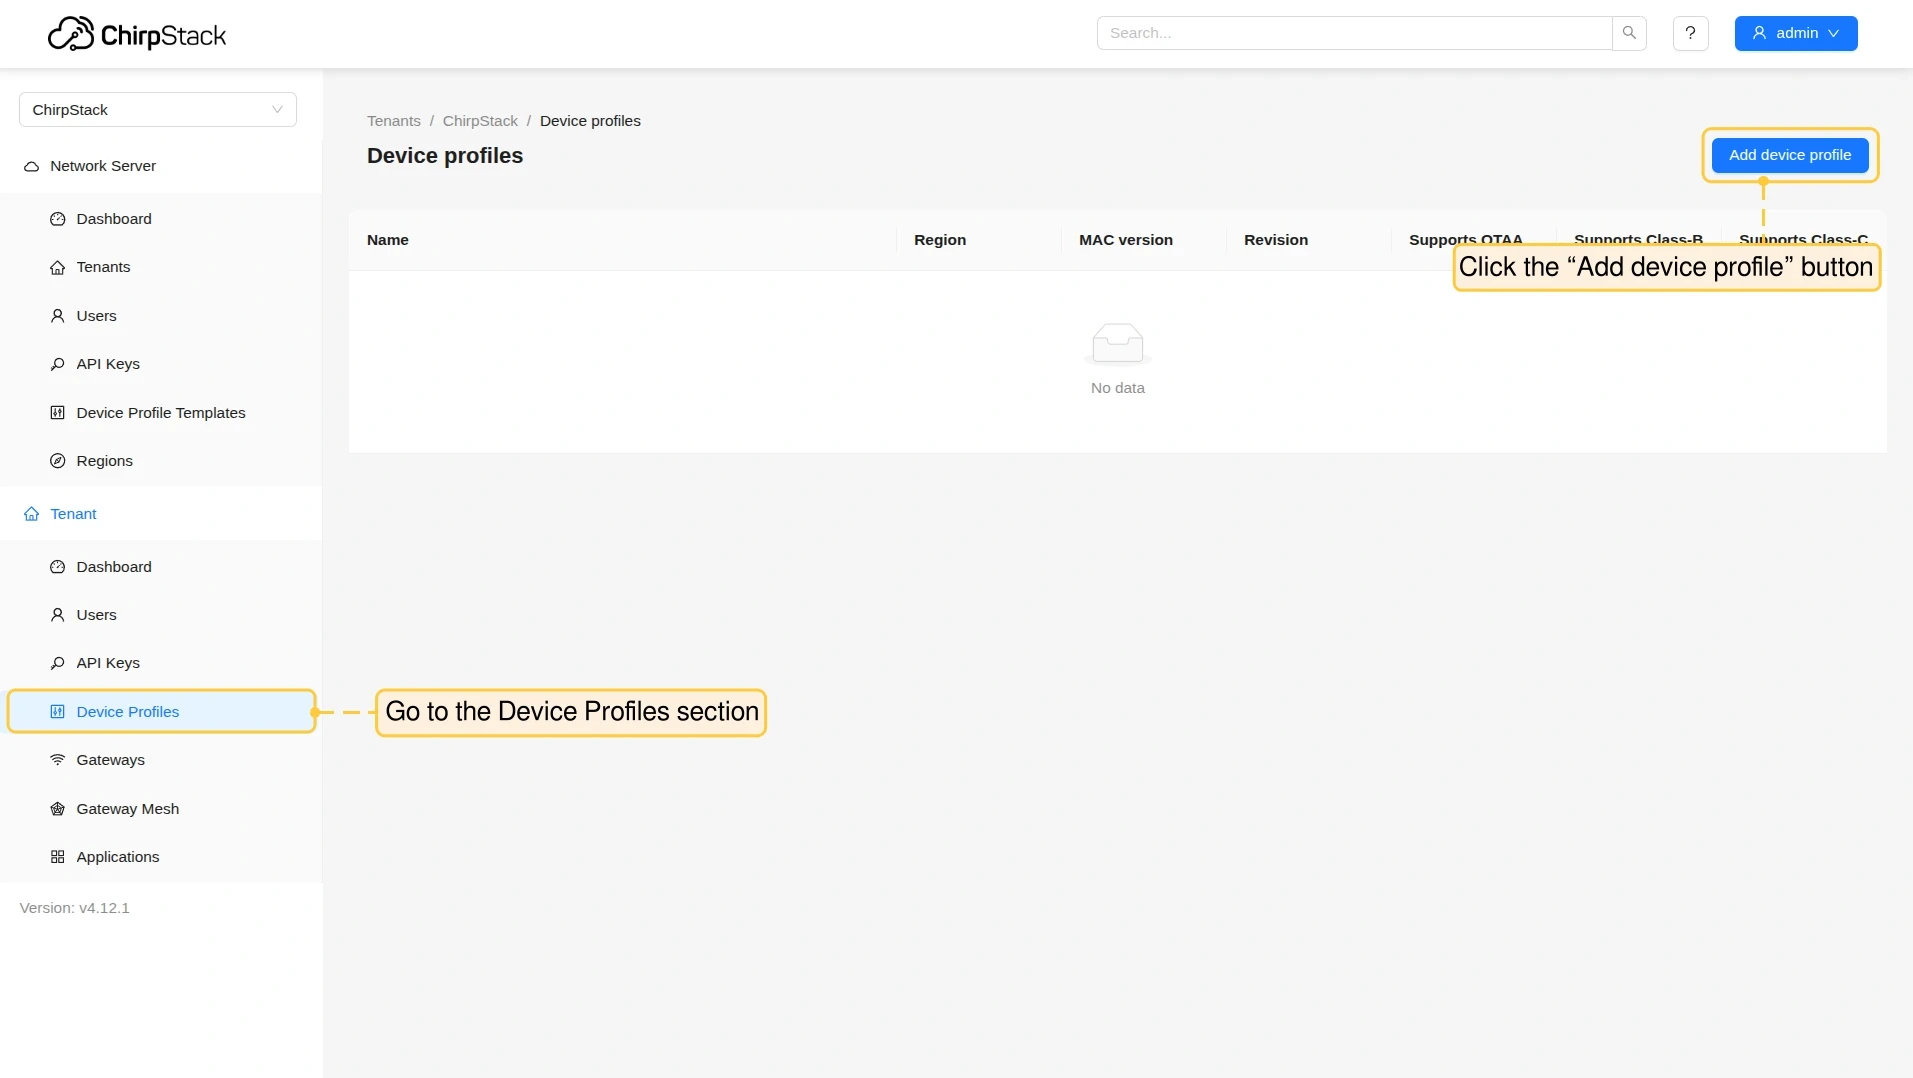
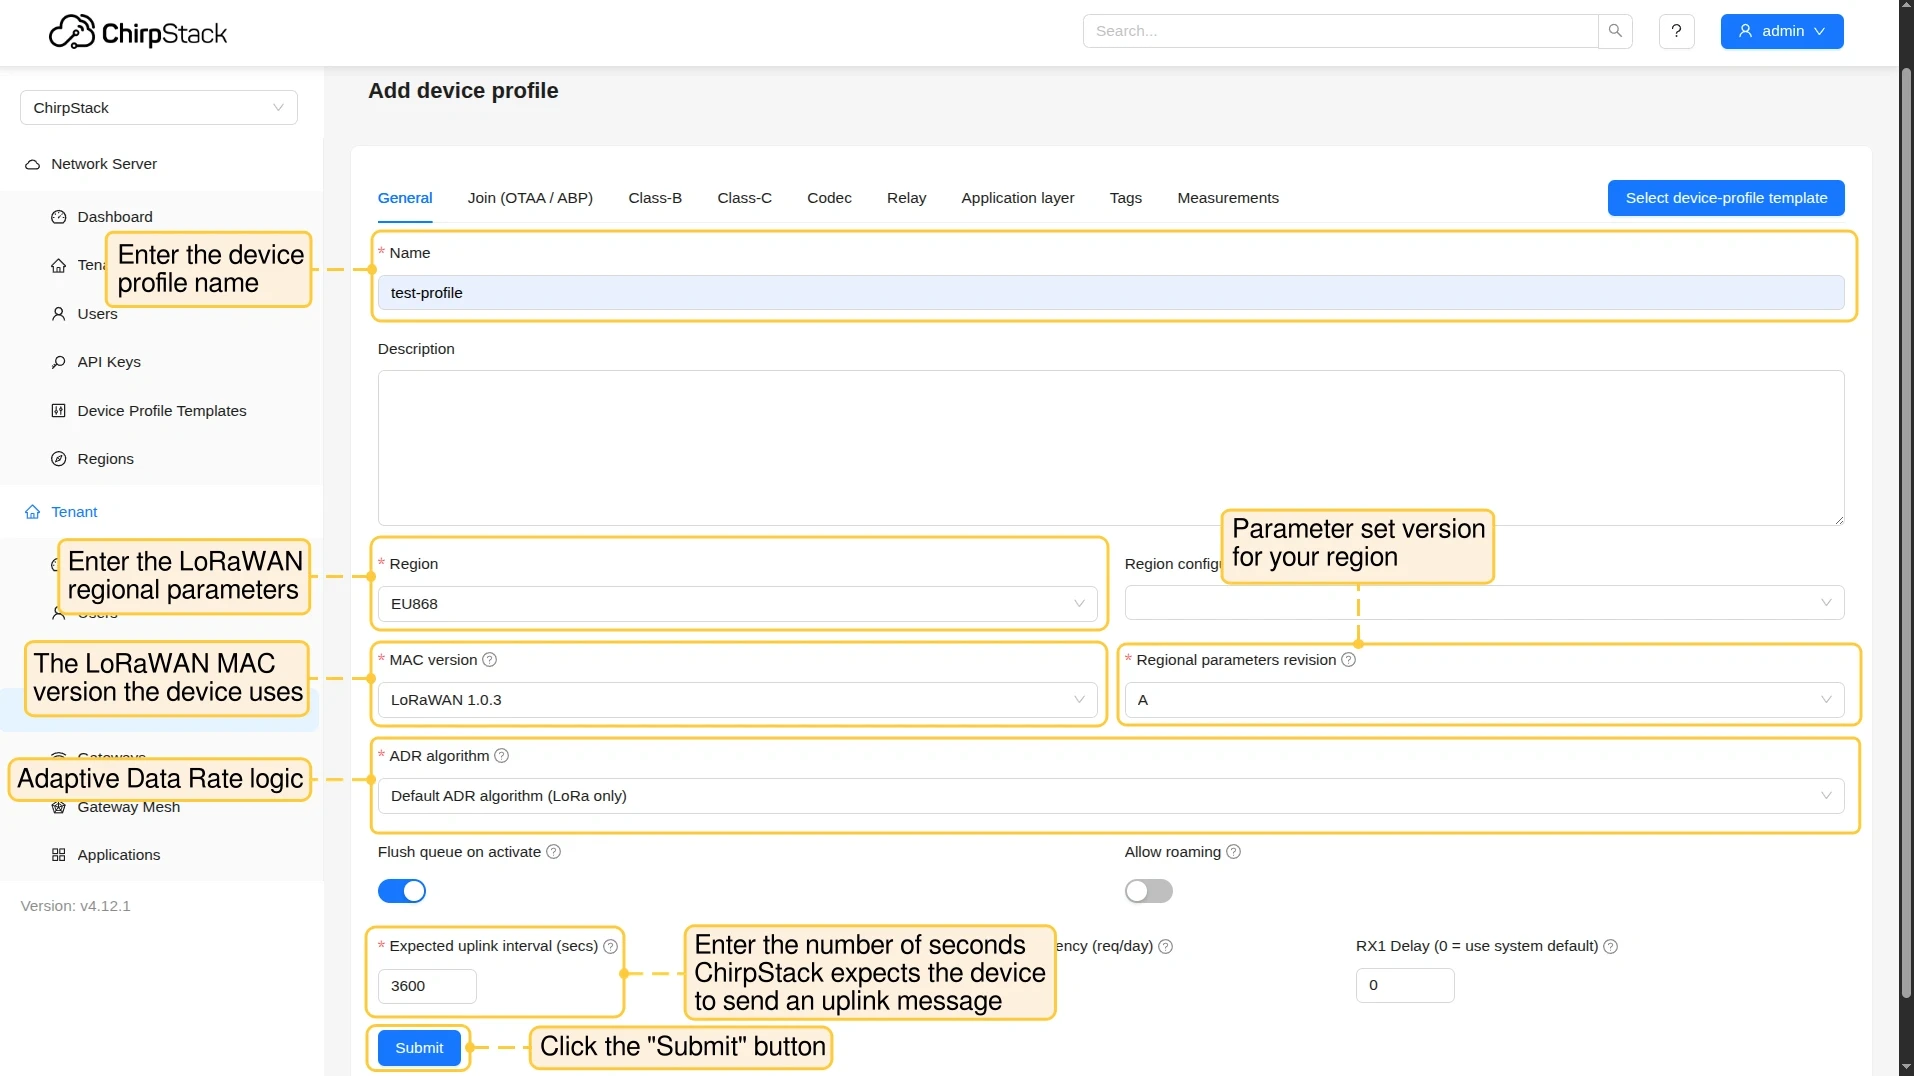
Go to Tenant > Device Profiles and click Add device profile.
-
On the General tab, fill in the required fields:
Field Description Name Device profile name Region LoRaWAN regional parameters MAC Version LoRaWAN MAC version the device uses Regional parameters revision Parameter set version for your region ADR Algorithm Adaptive Data Rate logic Expect uplink interval (secs) Expected interval between uplink messages -
Click Submit.
Add HTTP integration
Section titled “Add HTTP integration”-
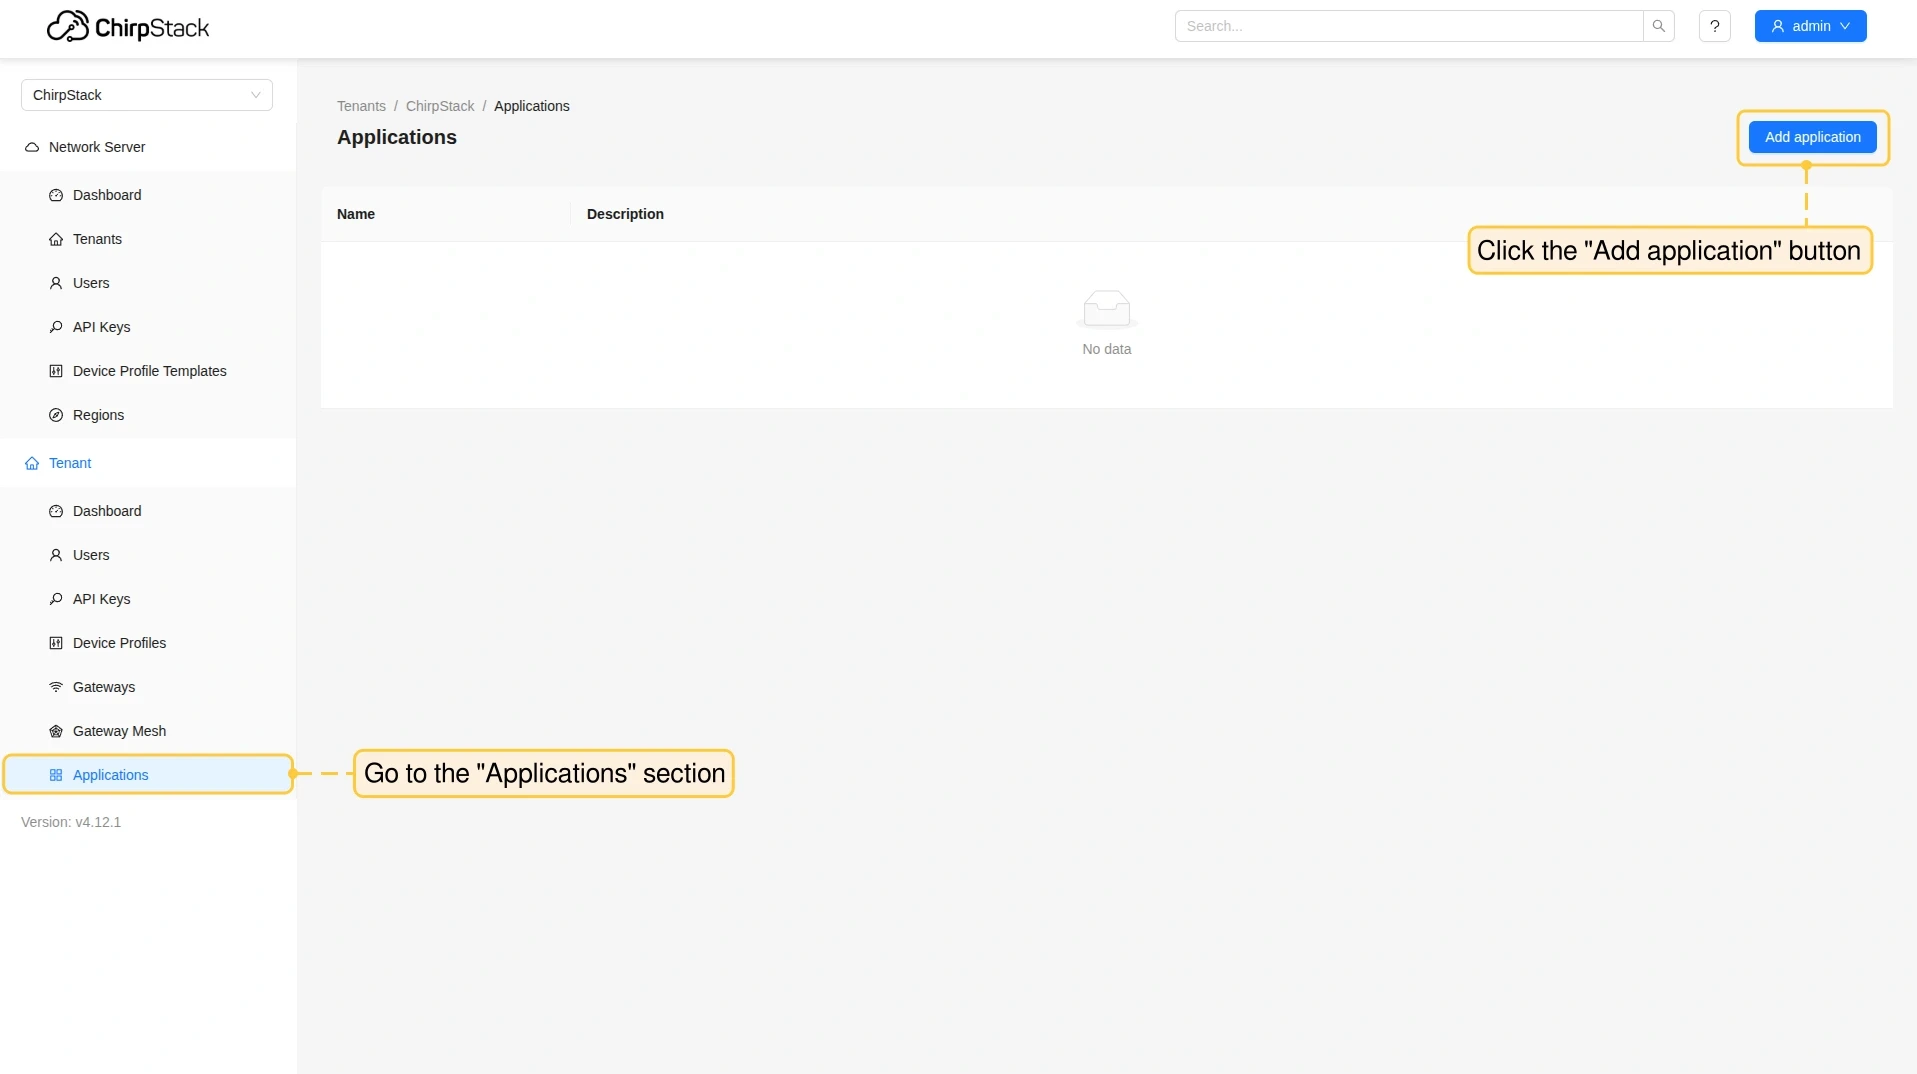
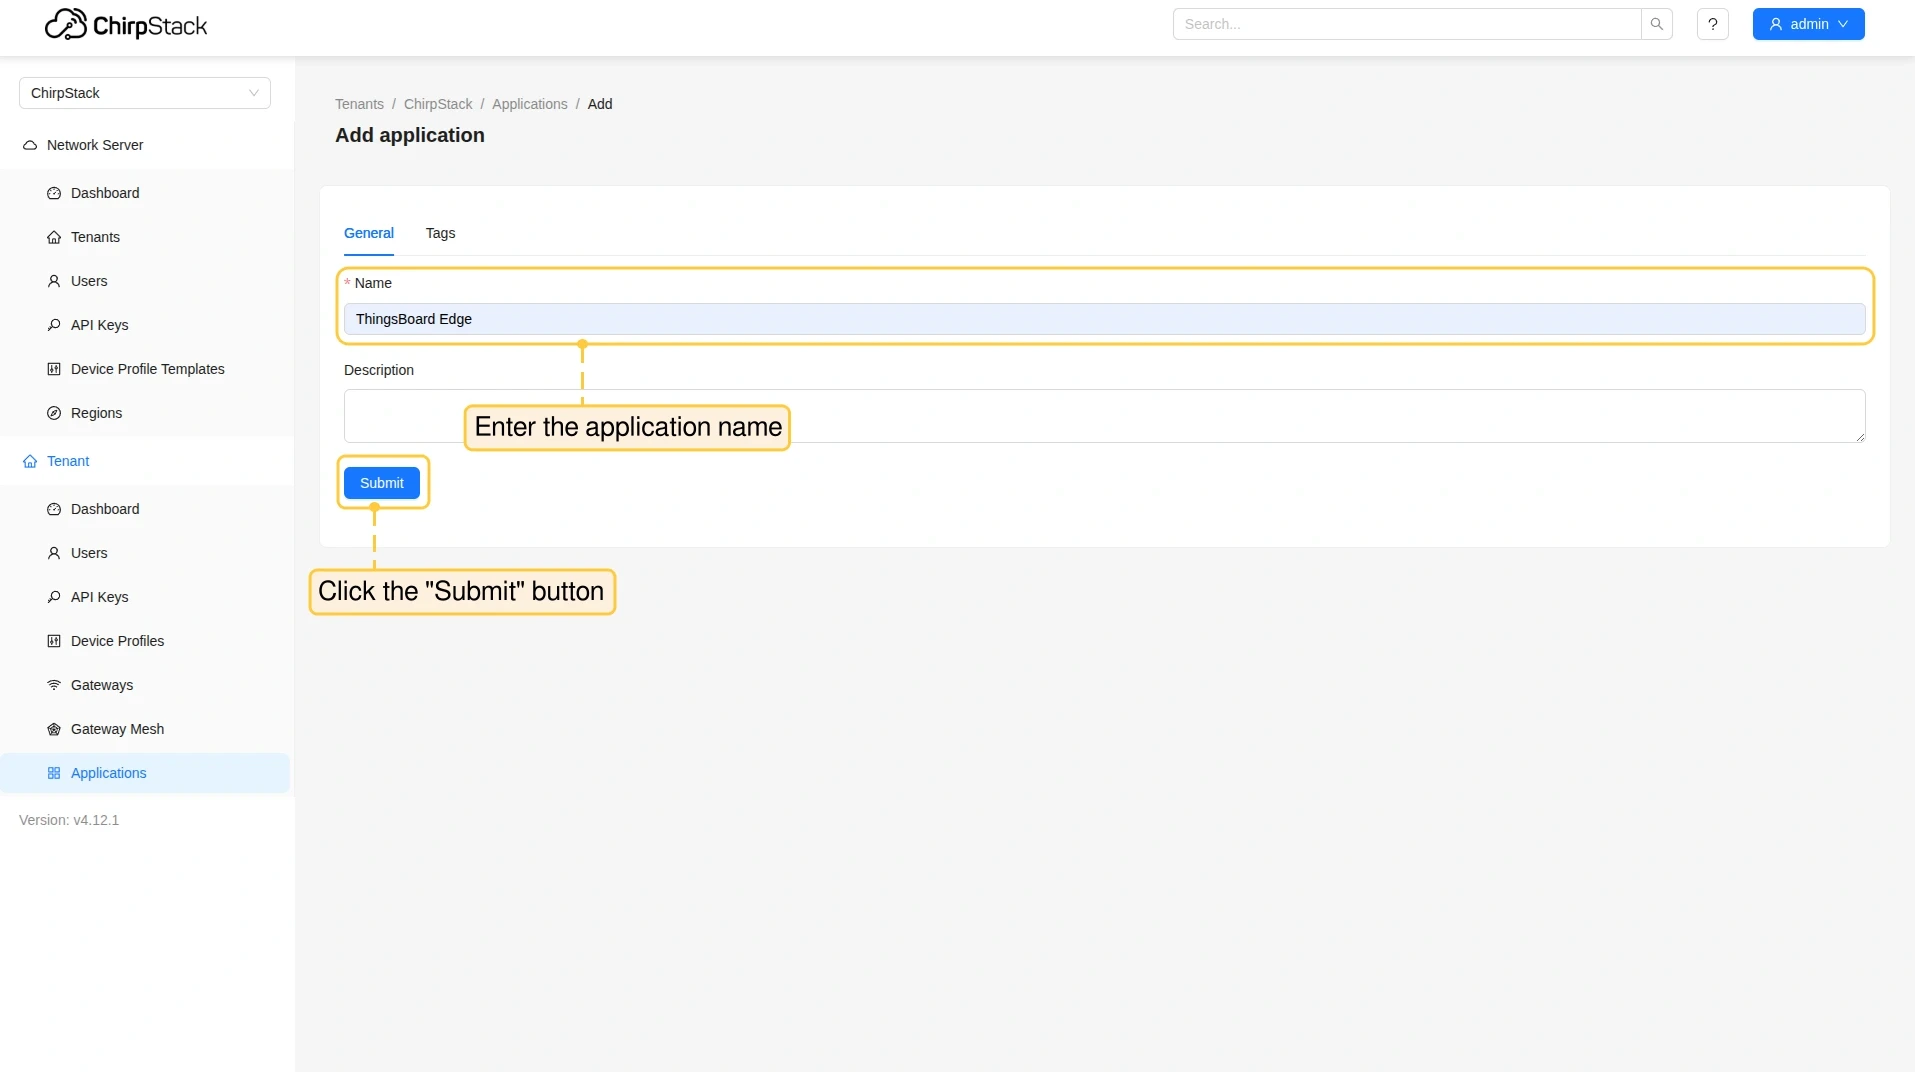
Go to Tenant > Applications and click Add application. Enter an application name and click Submit.
-
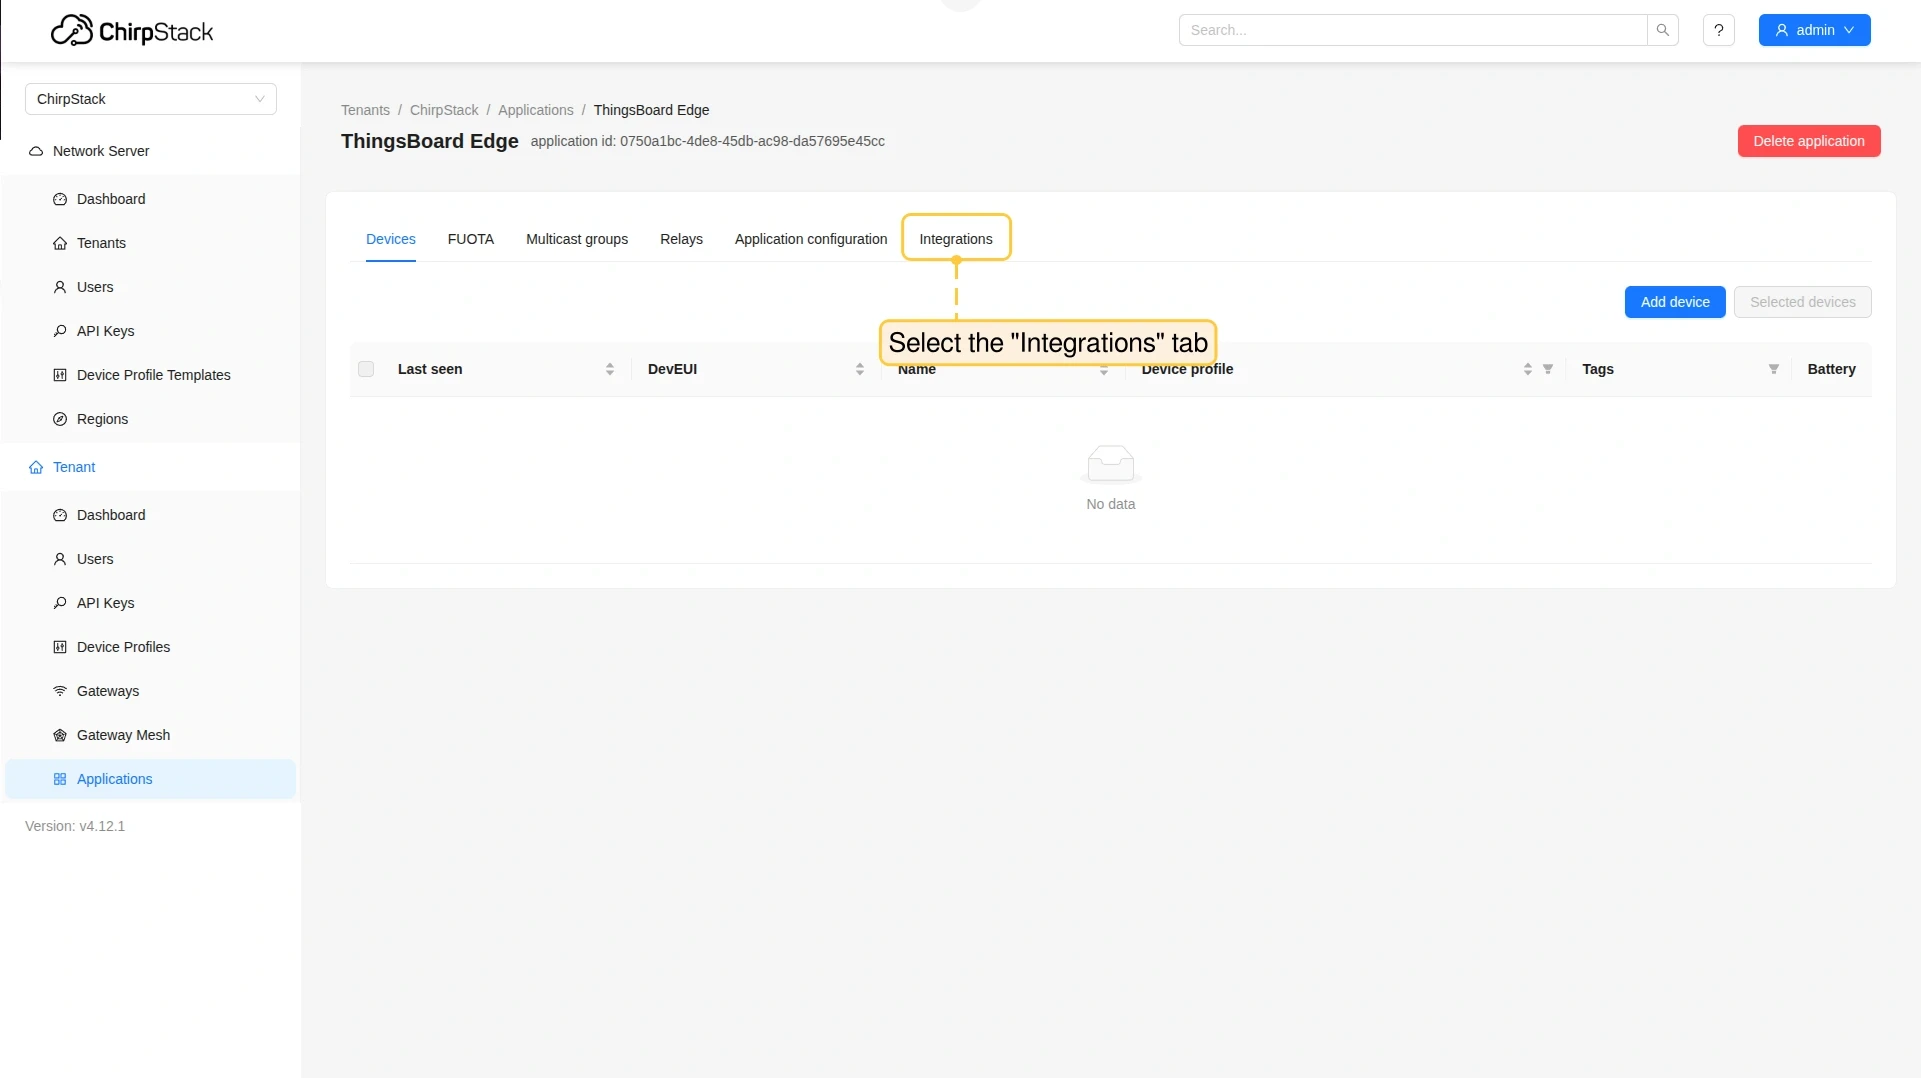
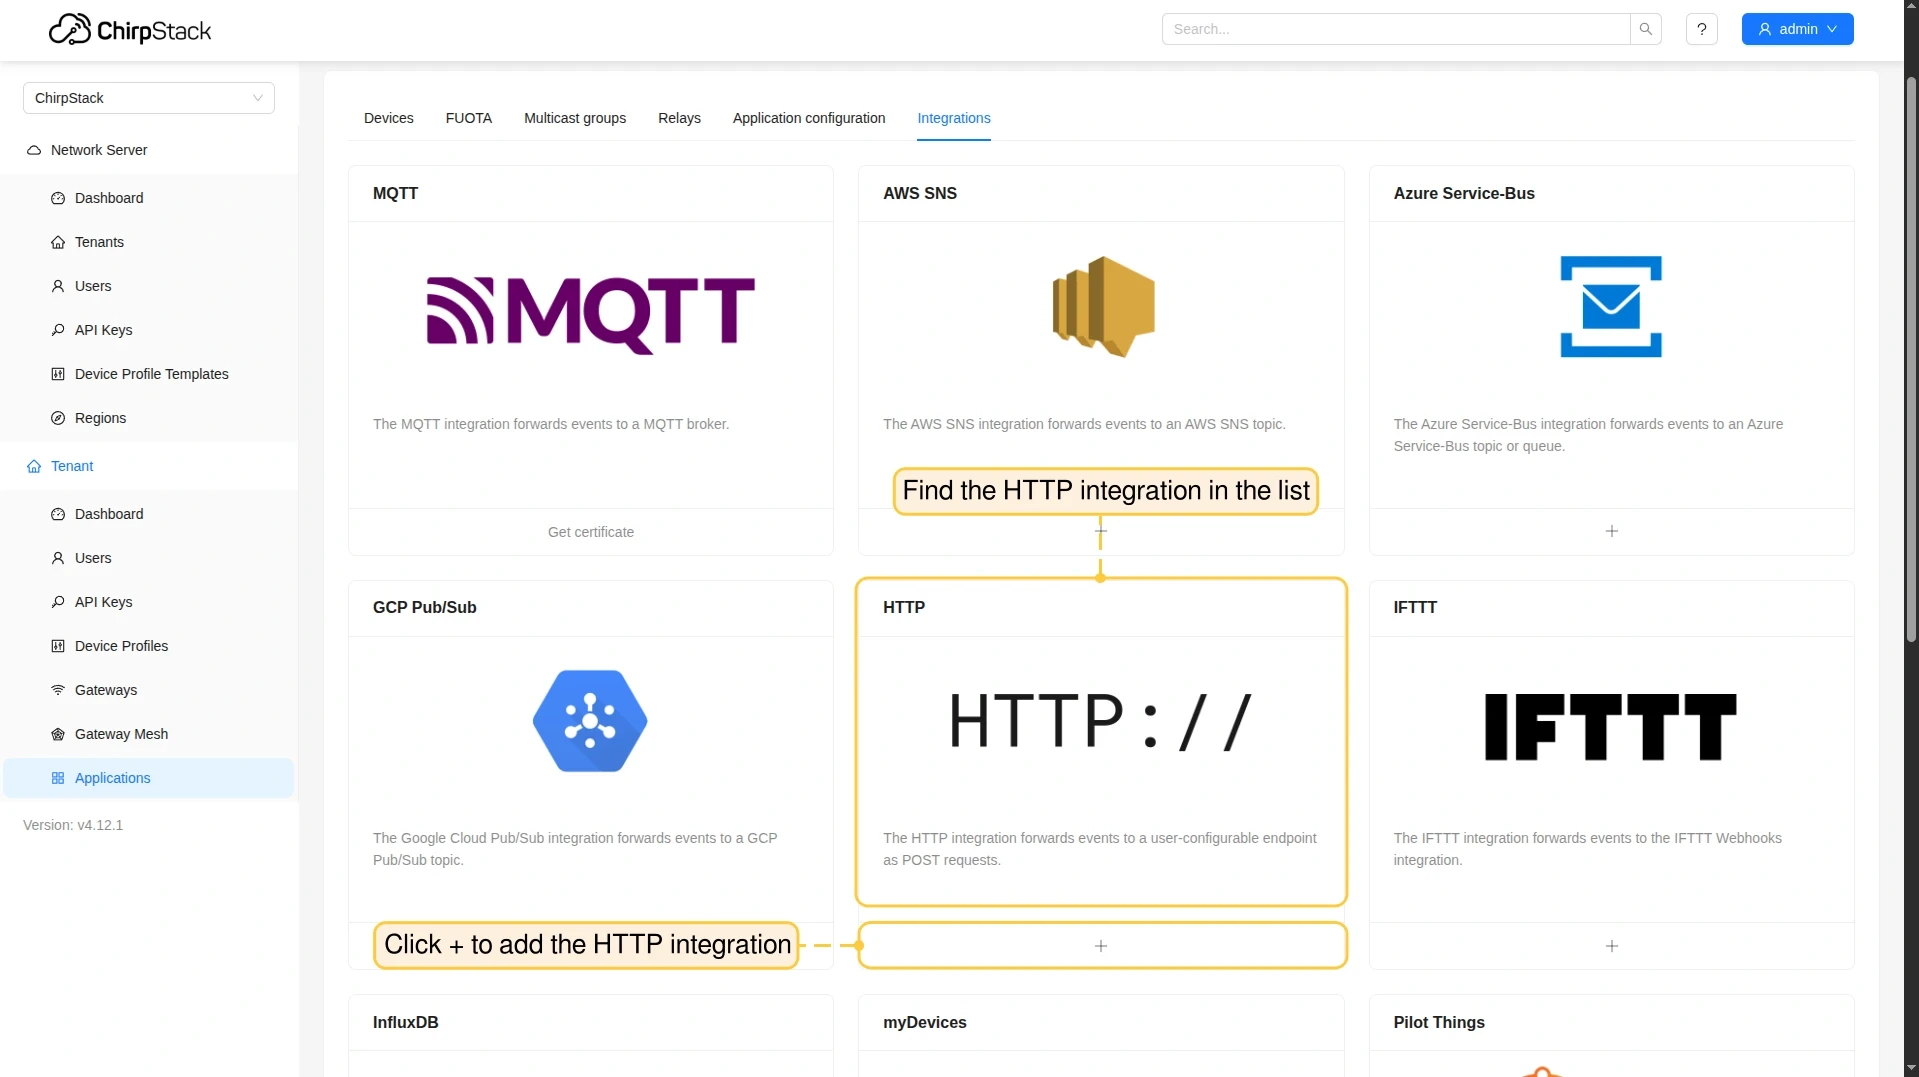
Select the Integrations tab. Find HTTP in the list and click +.
-
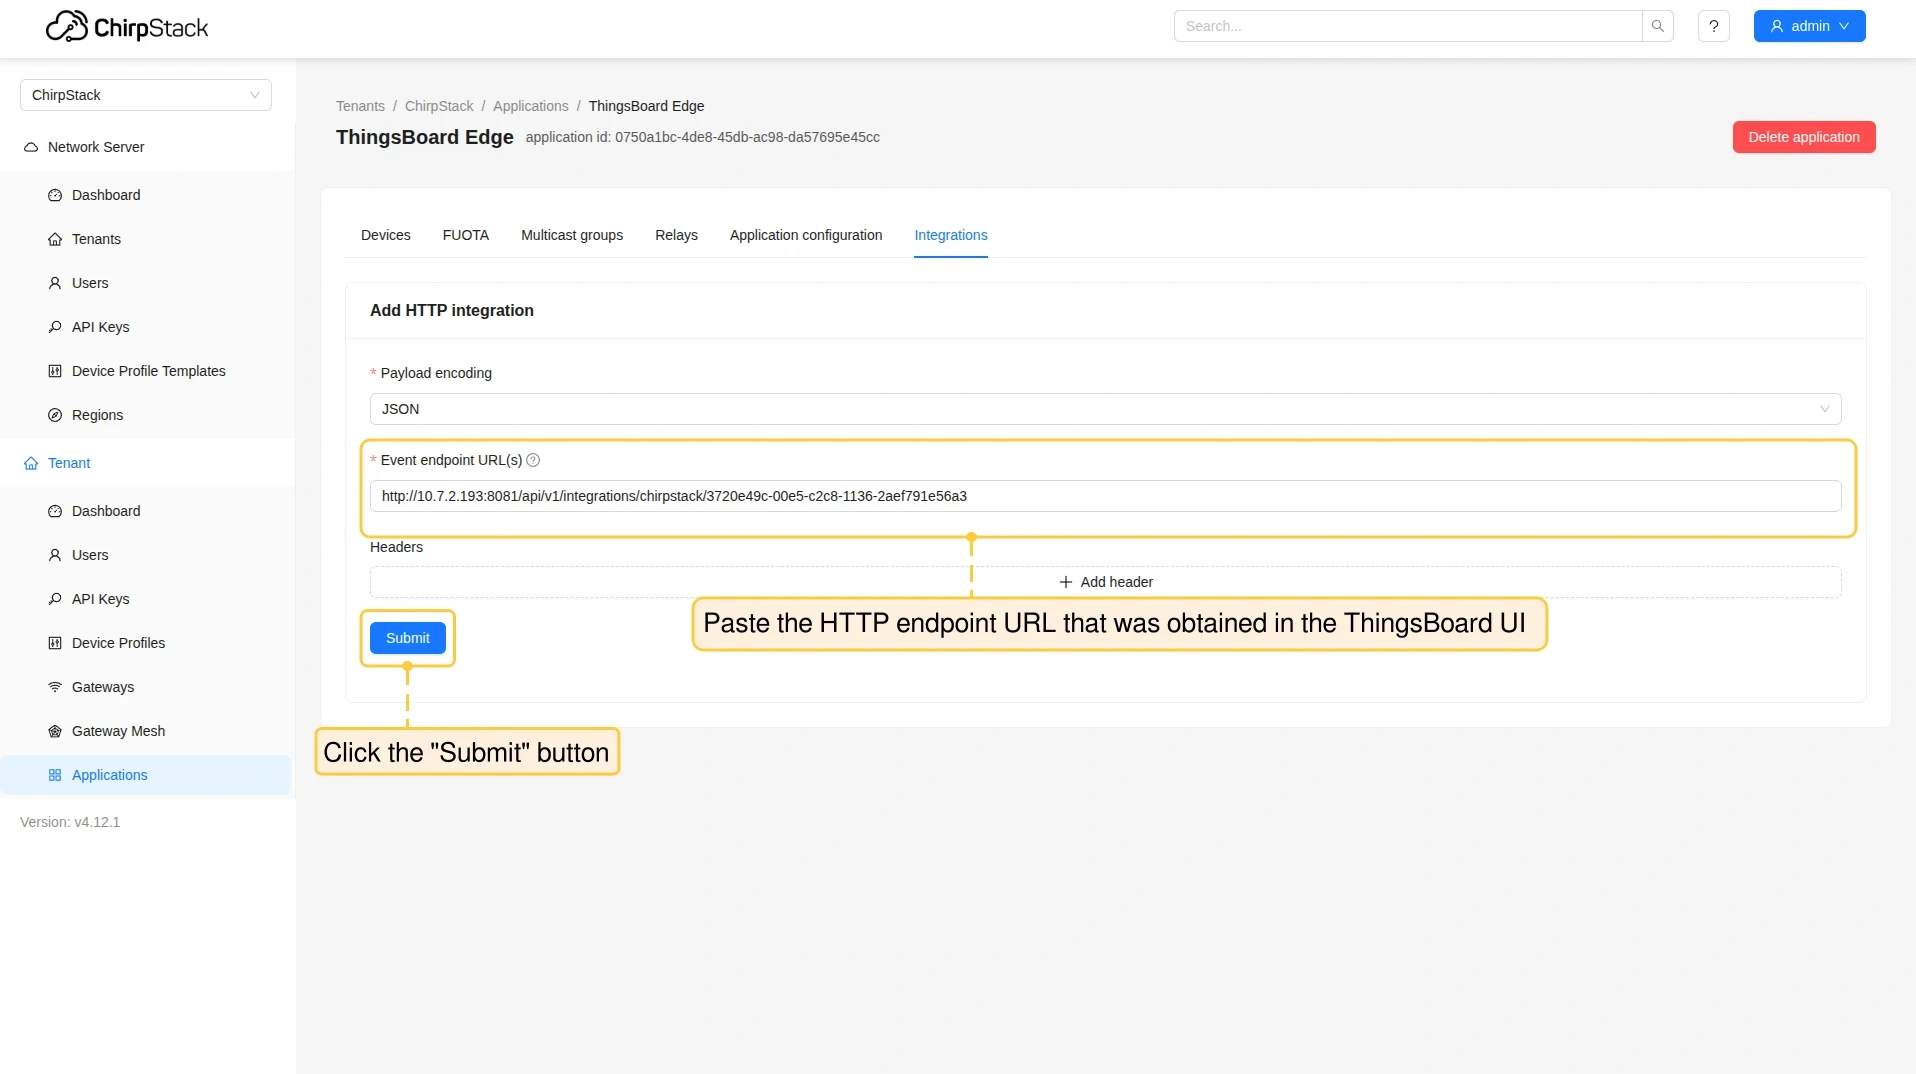
Paste the HTTP endpoint URL from the ThingsBoard Connection step and click Submit.
Add the device
Section titled “Add the device”-
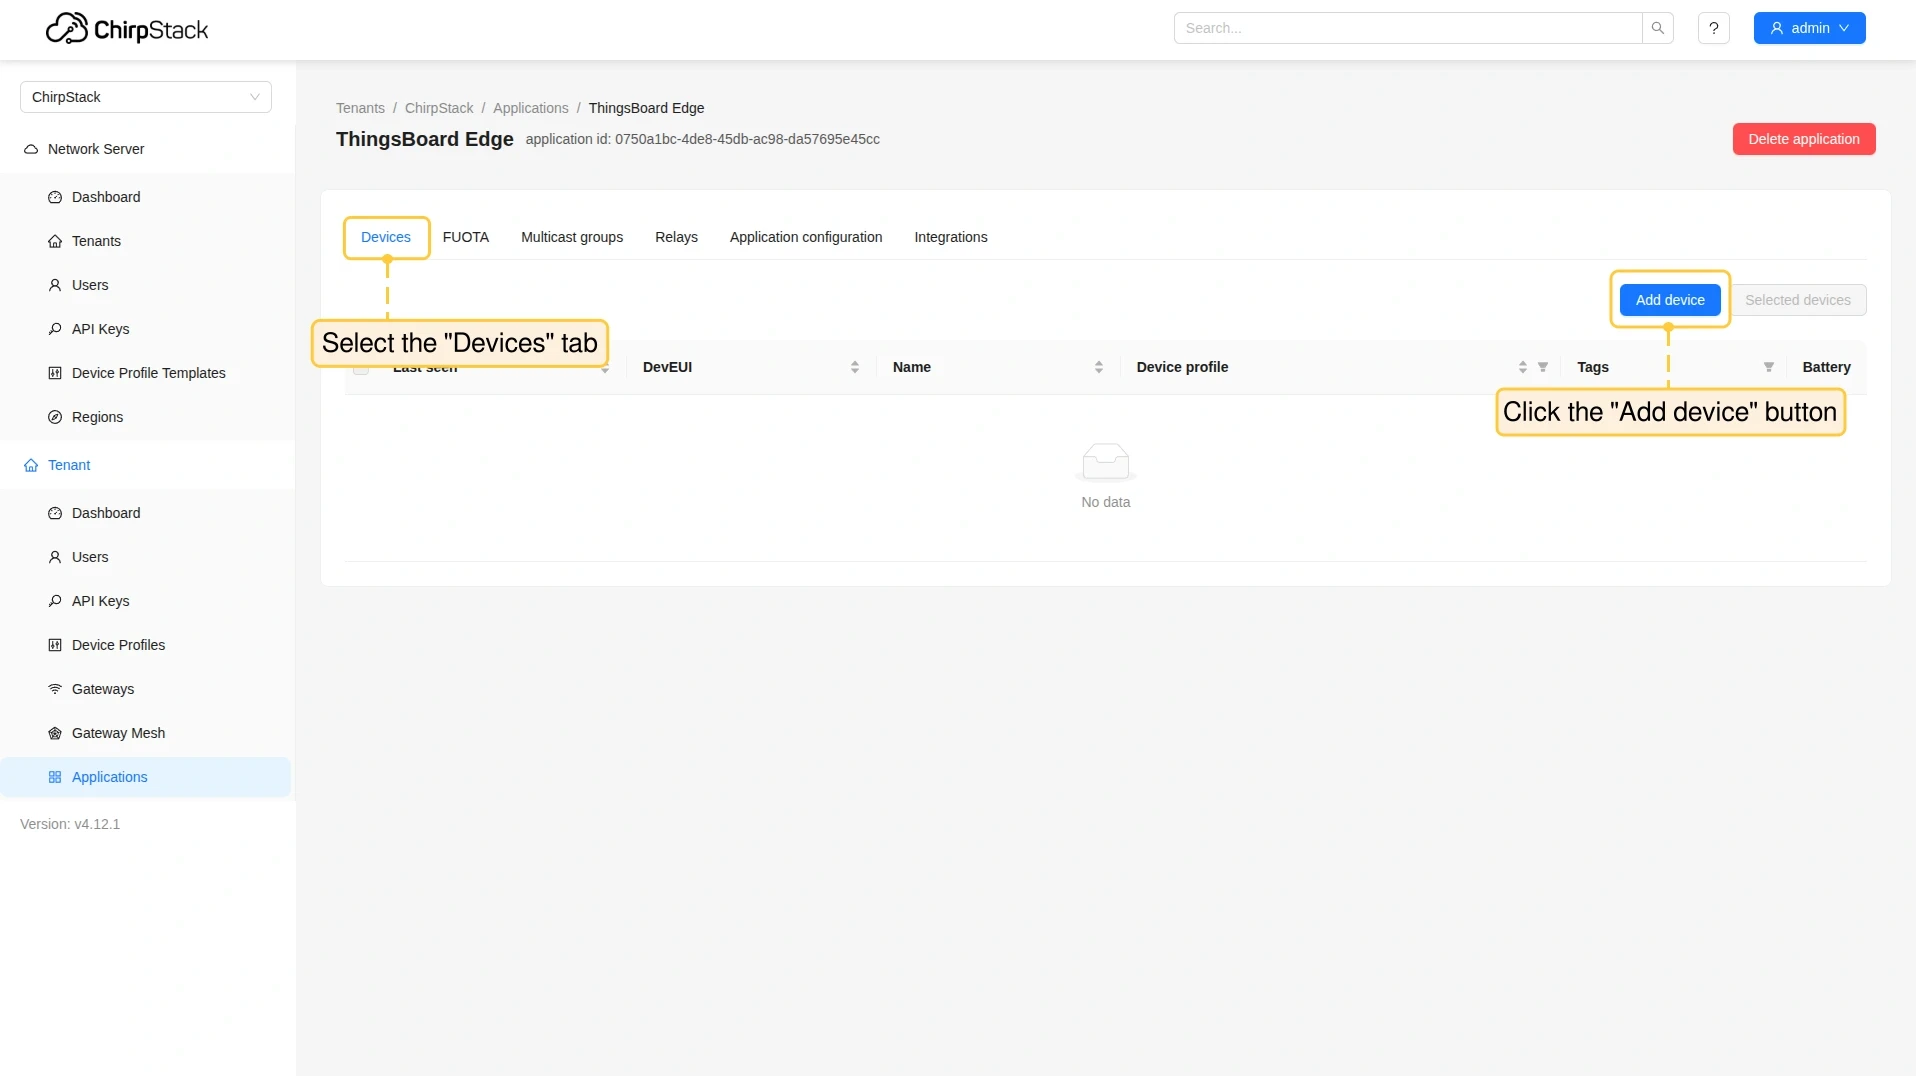
Select the Devices tab and click Add device.
-
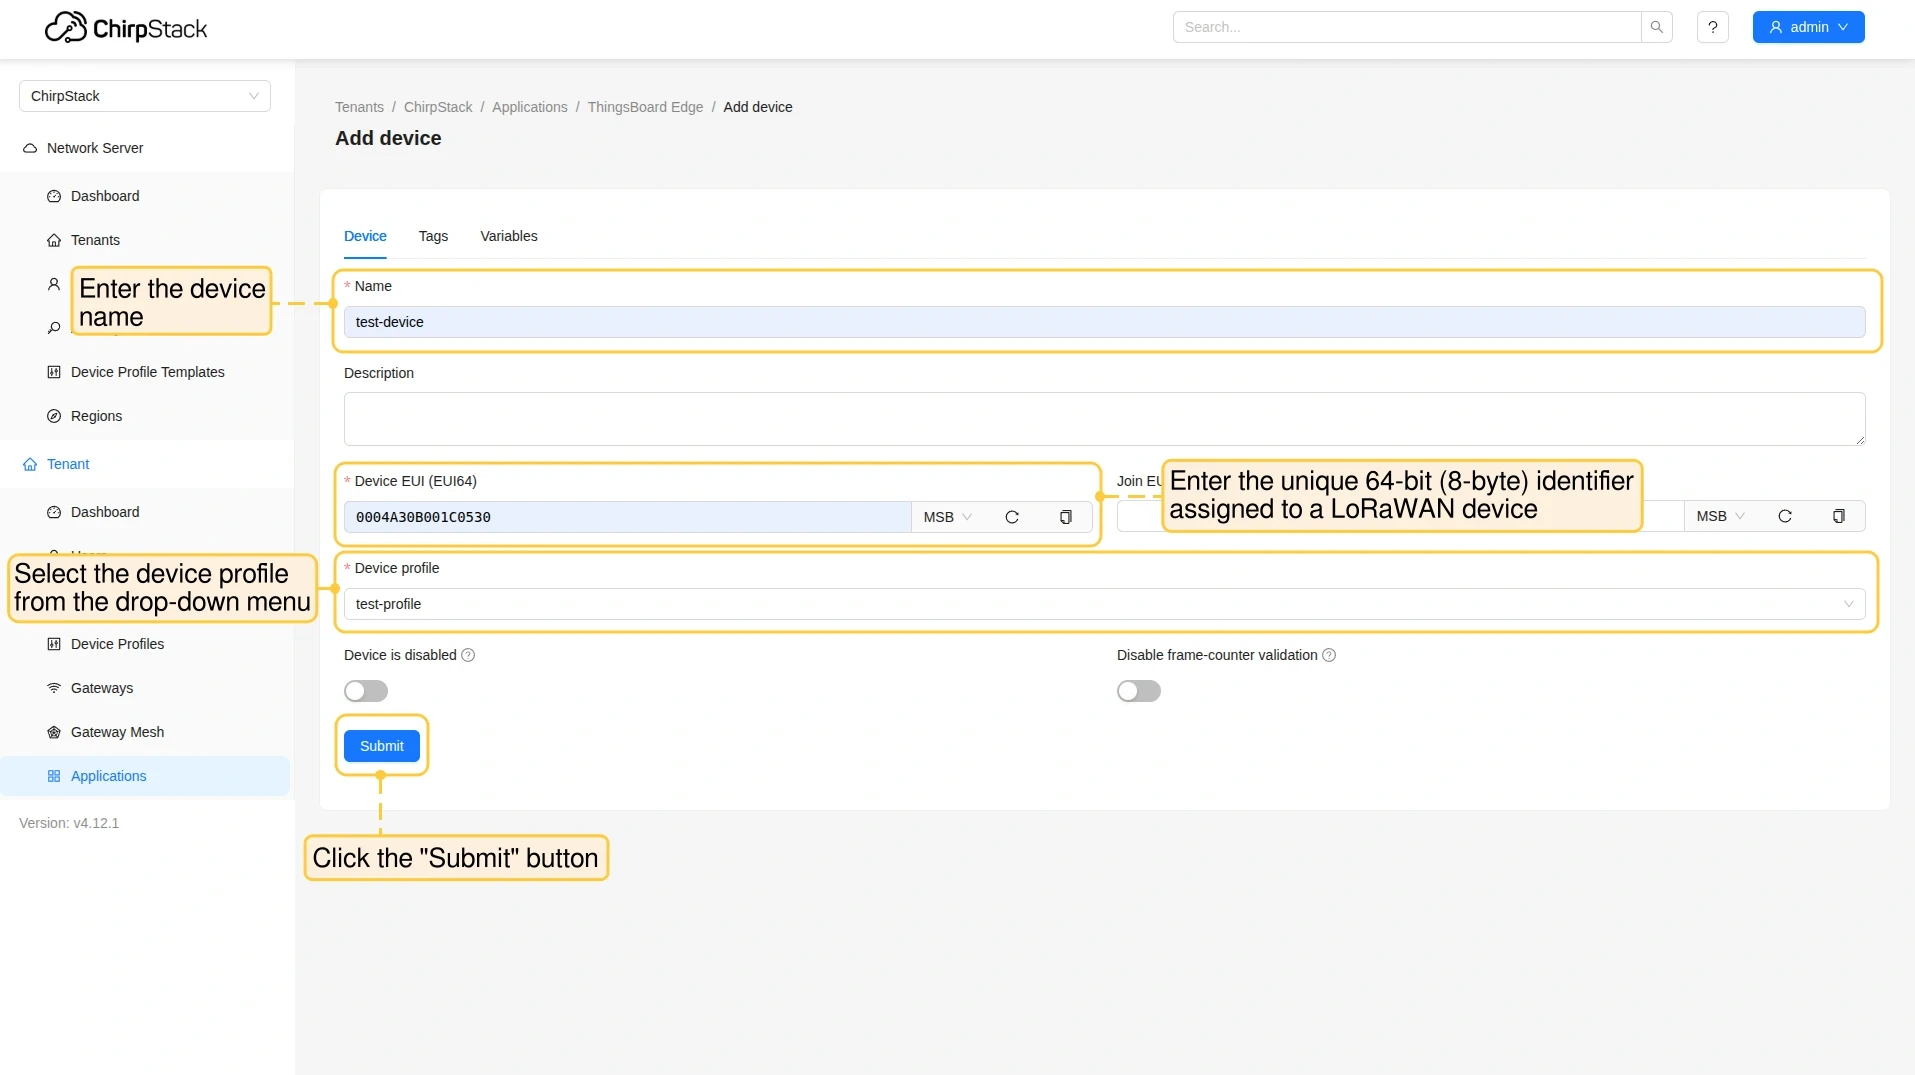
On the Device tab, fill in the required fields:
Field Description Name Device name Device EUI (EUI64) Unique 64-bit identifier assigned to the LoRaWAN device Byte order Byte order used to represent the DevEUI (MSB or LSB) Device profile Select the device profile created above -
Click Submit.
Add the gateway (optional)
Section titled “Add the gateway (optional)”In a testing environment, you can skip adding a gateway — the device itself sends data through the gateway. To add a gateway:
-
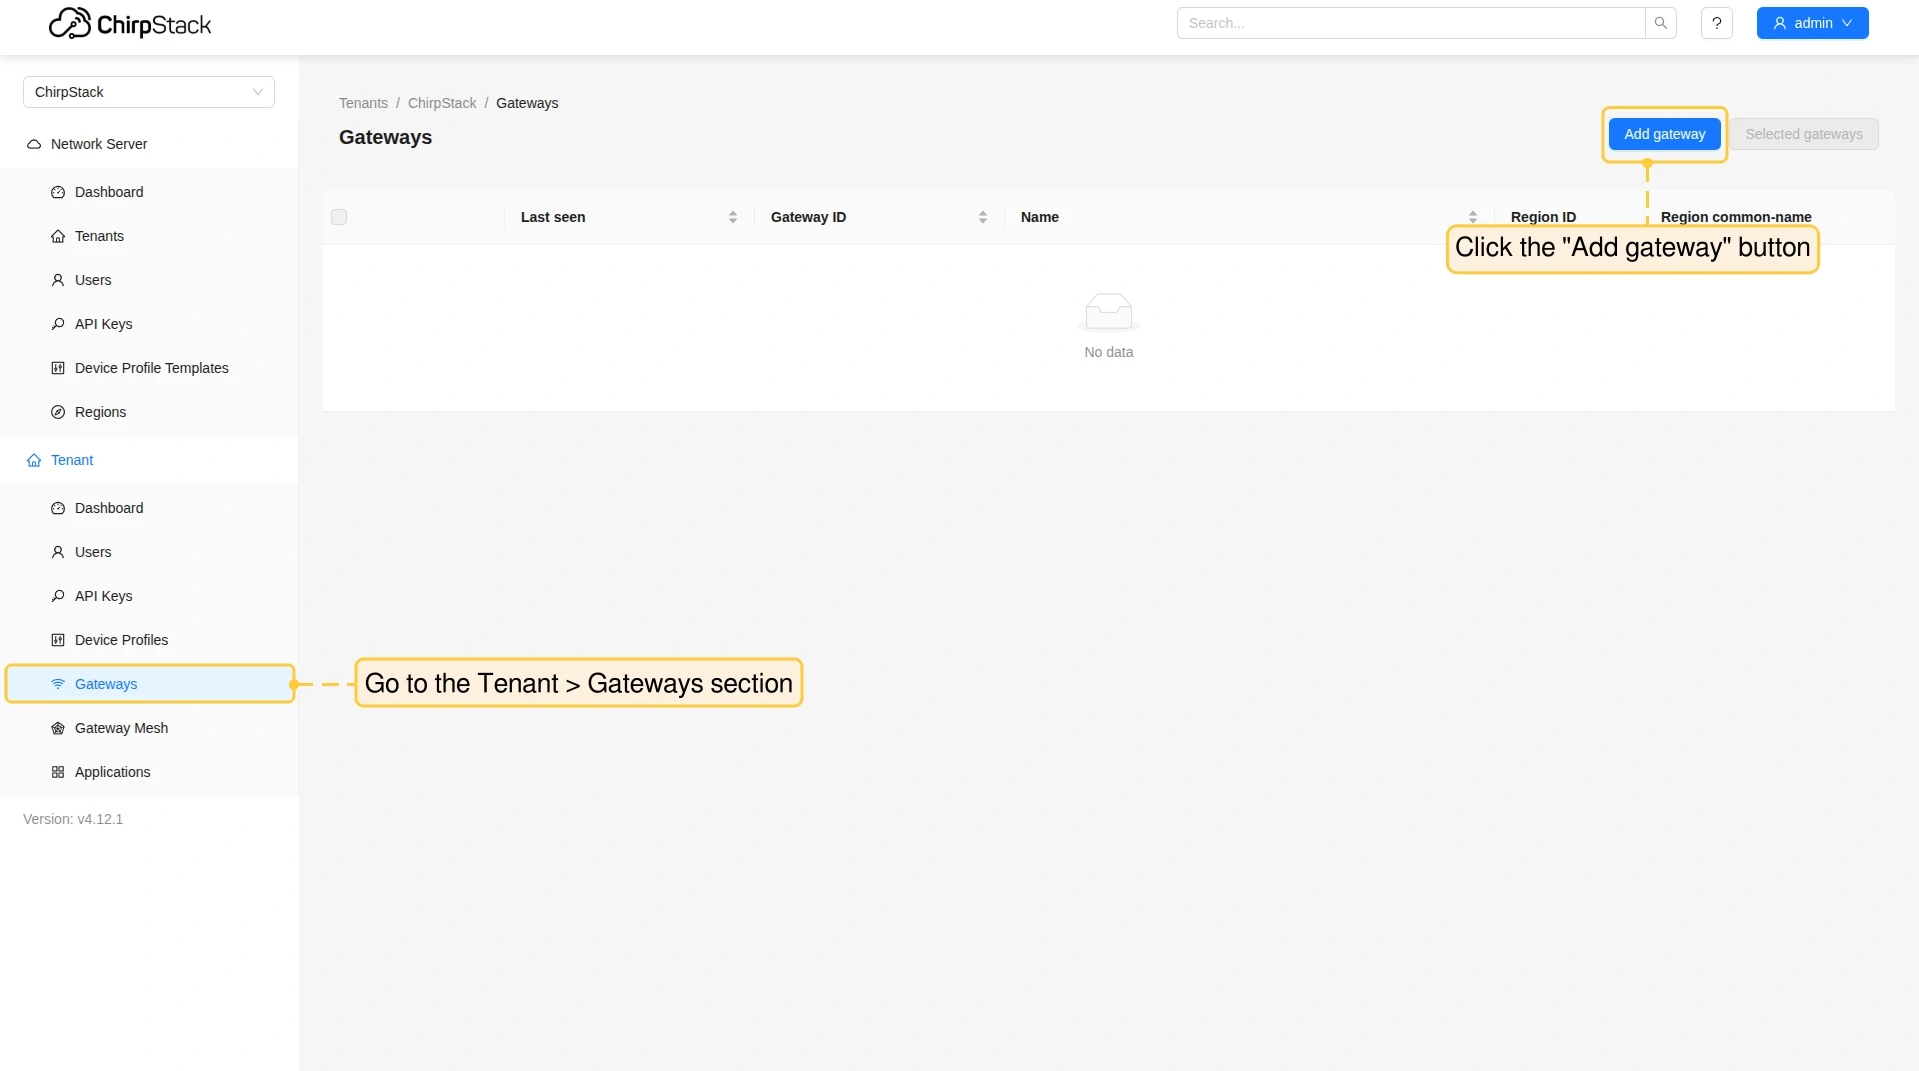
Go to Tenant > Gateways and click Add gateway.
-
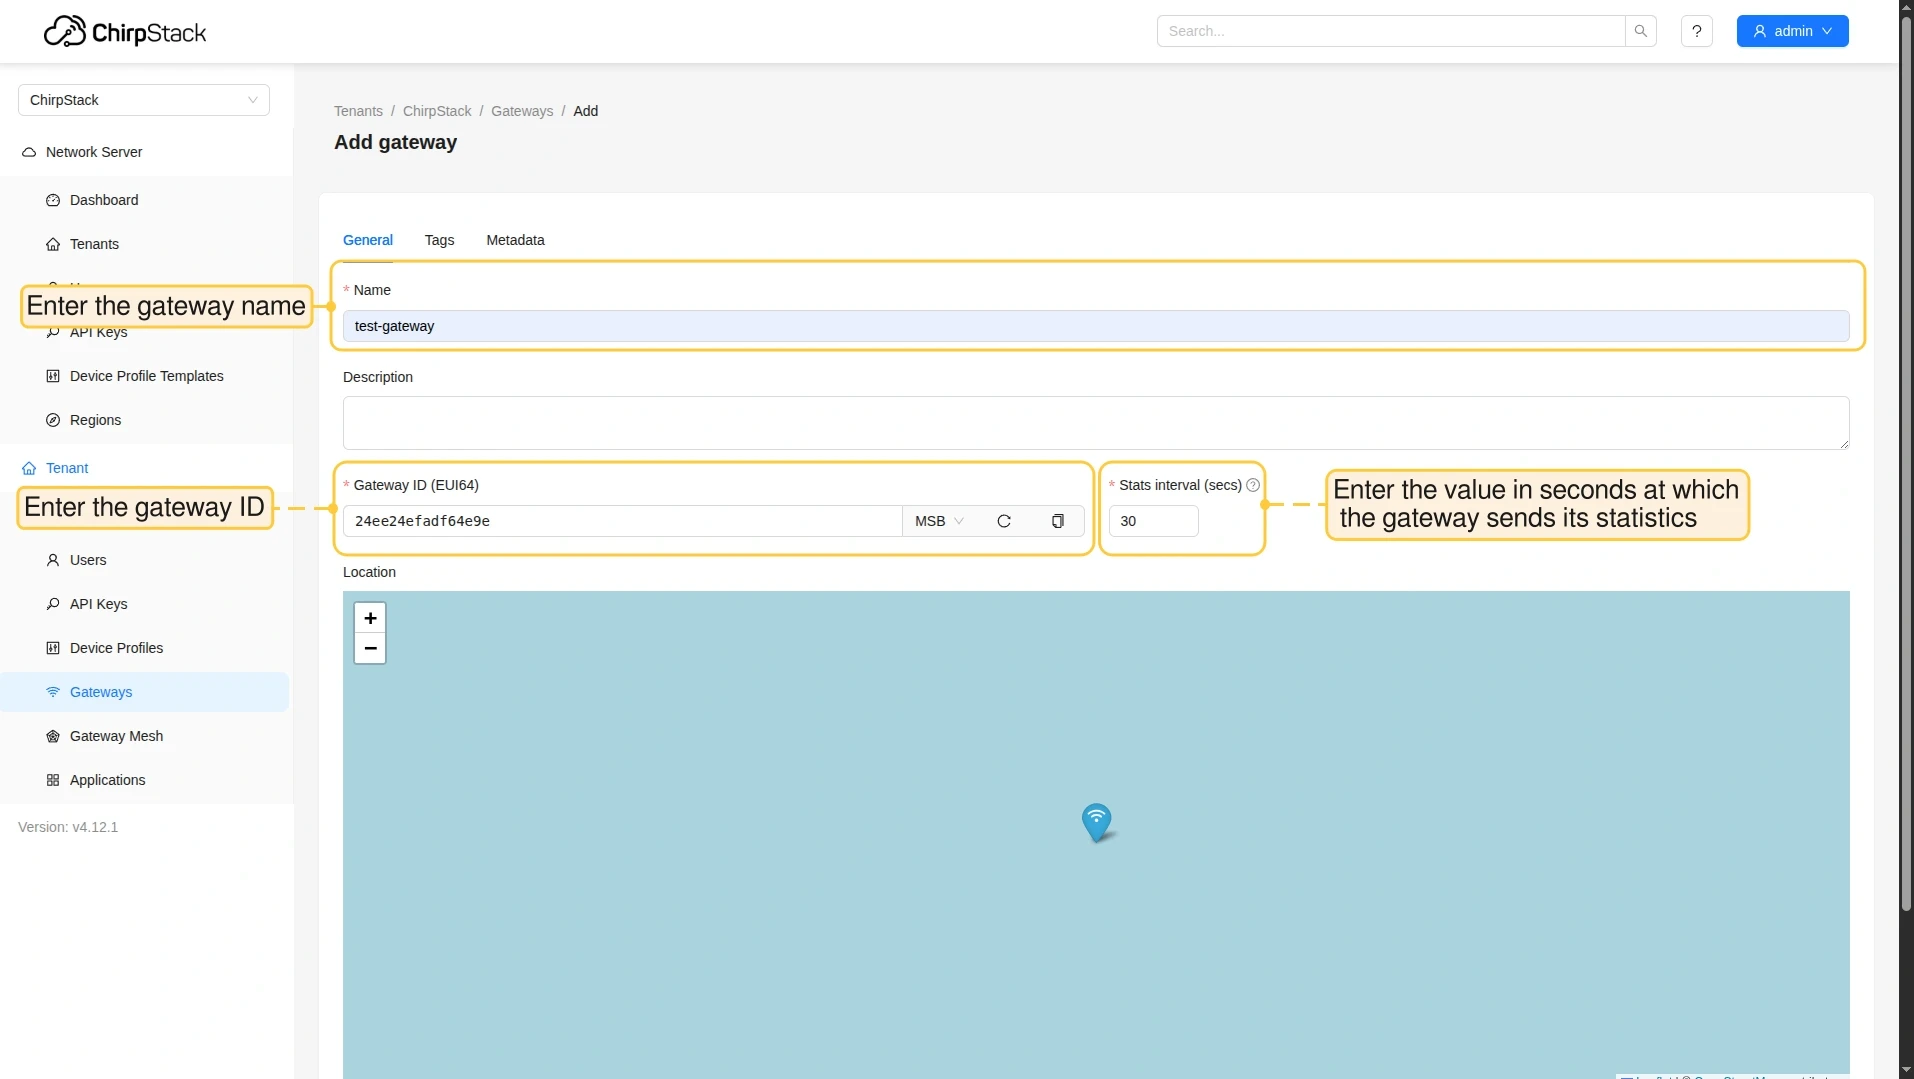
Enter the gateway name, gateway ID, and the statistics interval (in seconds).
Assign integration to Edge
Section titled “Assign integration to Edge”-
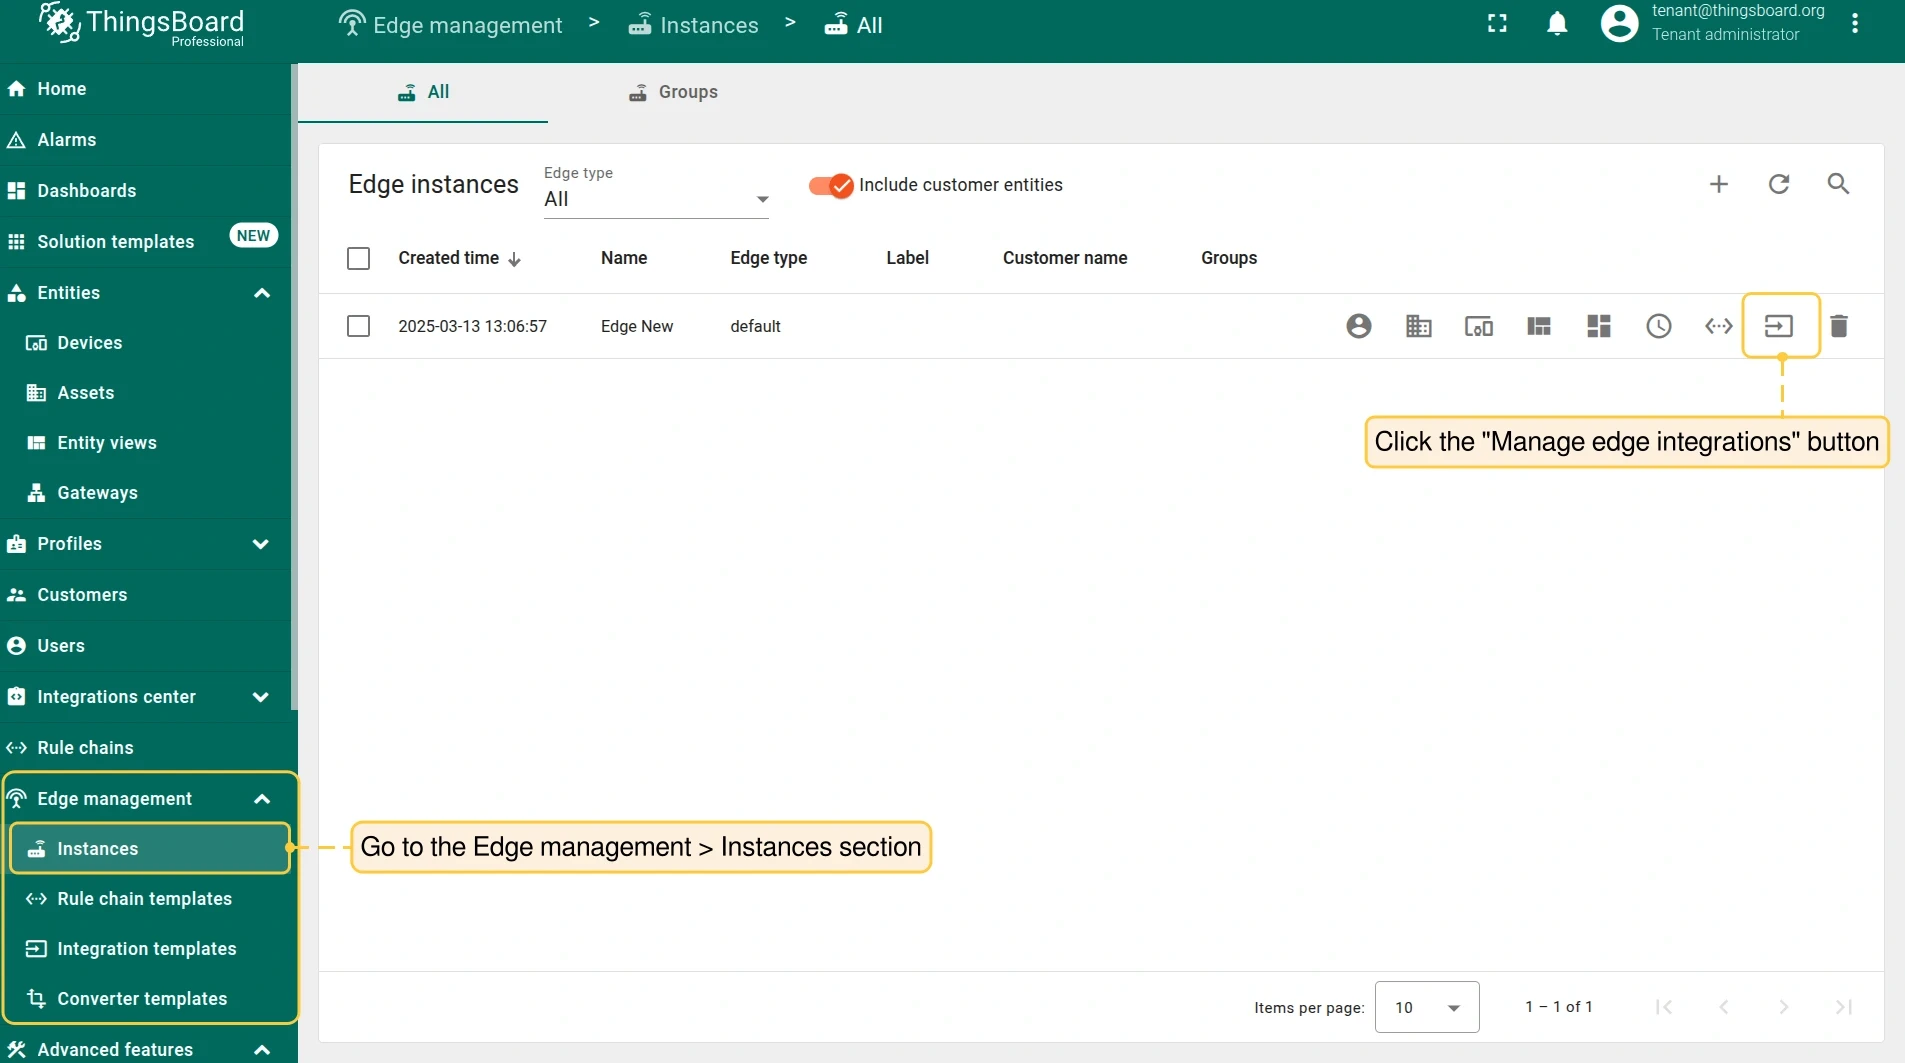
Go to Edge management > Instances and click Manage edge integrations.
-
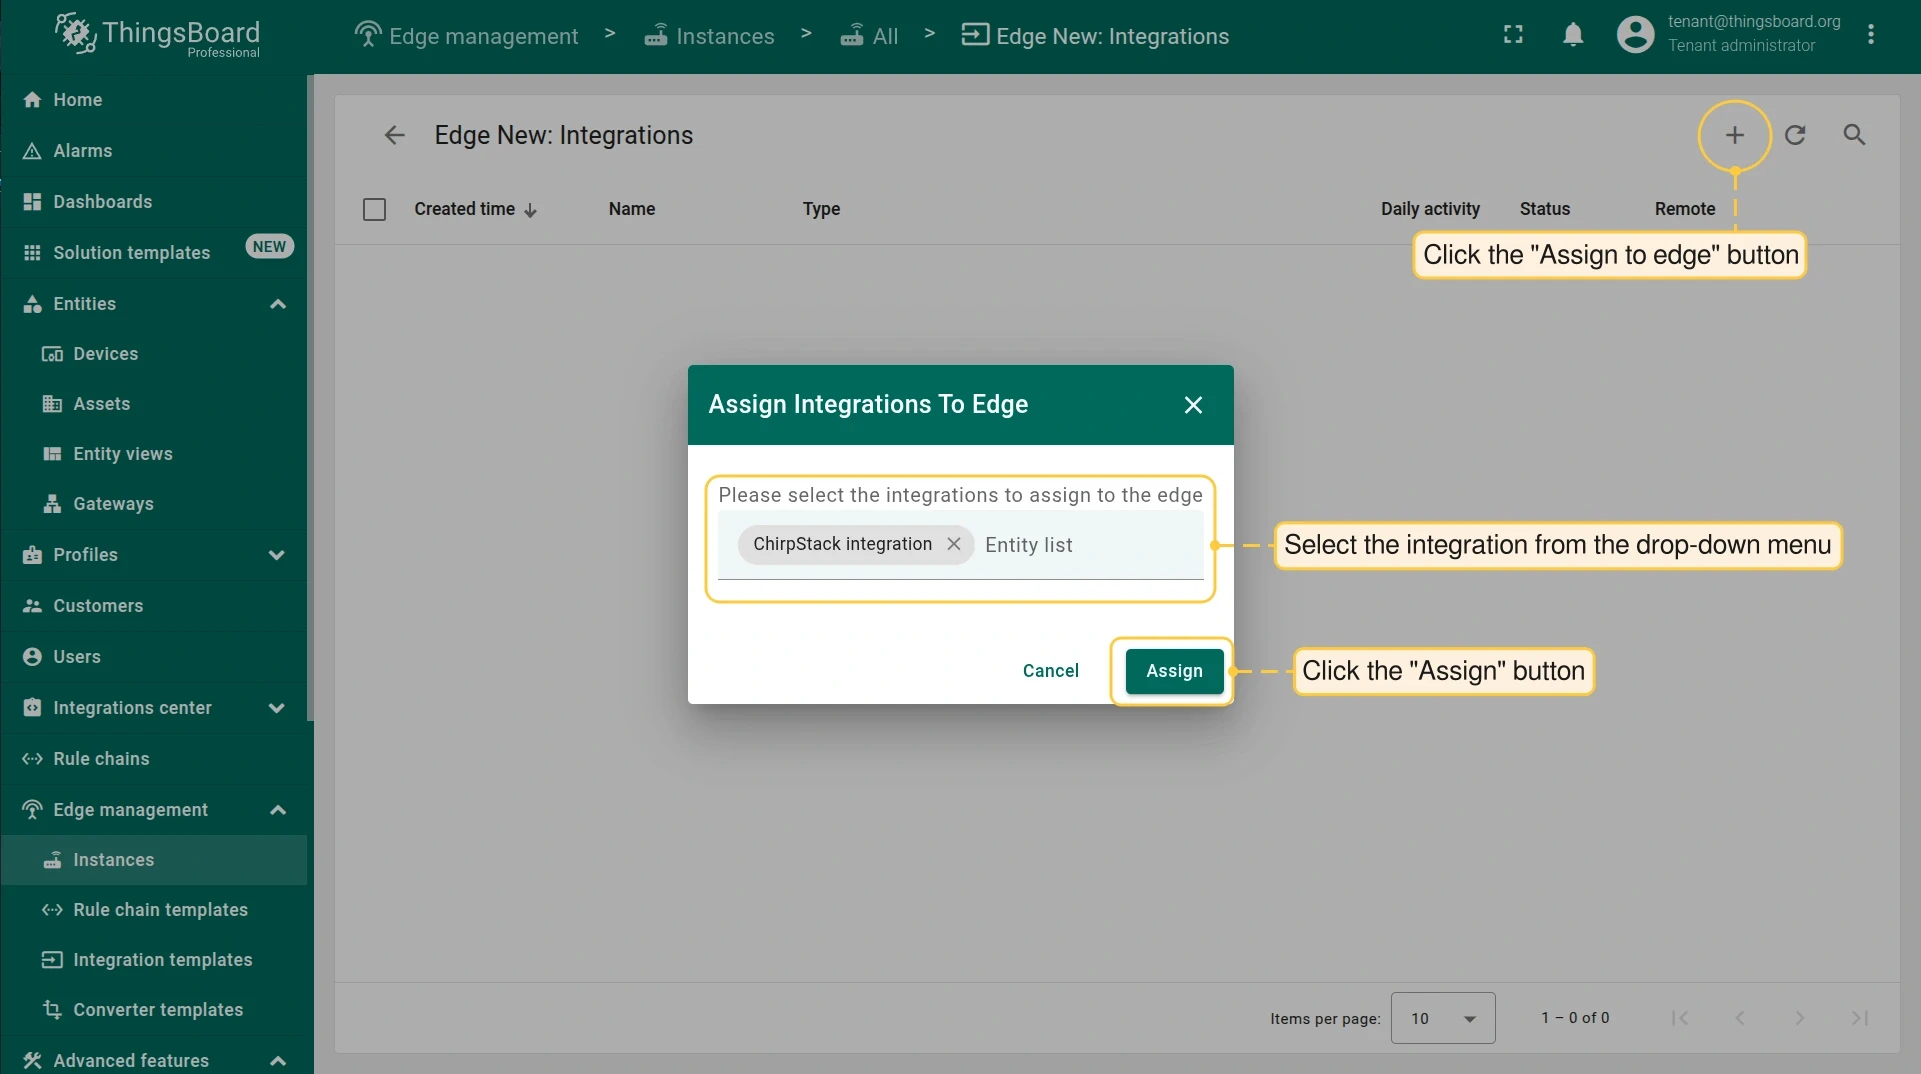
Click Assign to edge, select the ChirpStack integration from the drop-down, and click Assign.
-
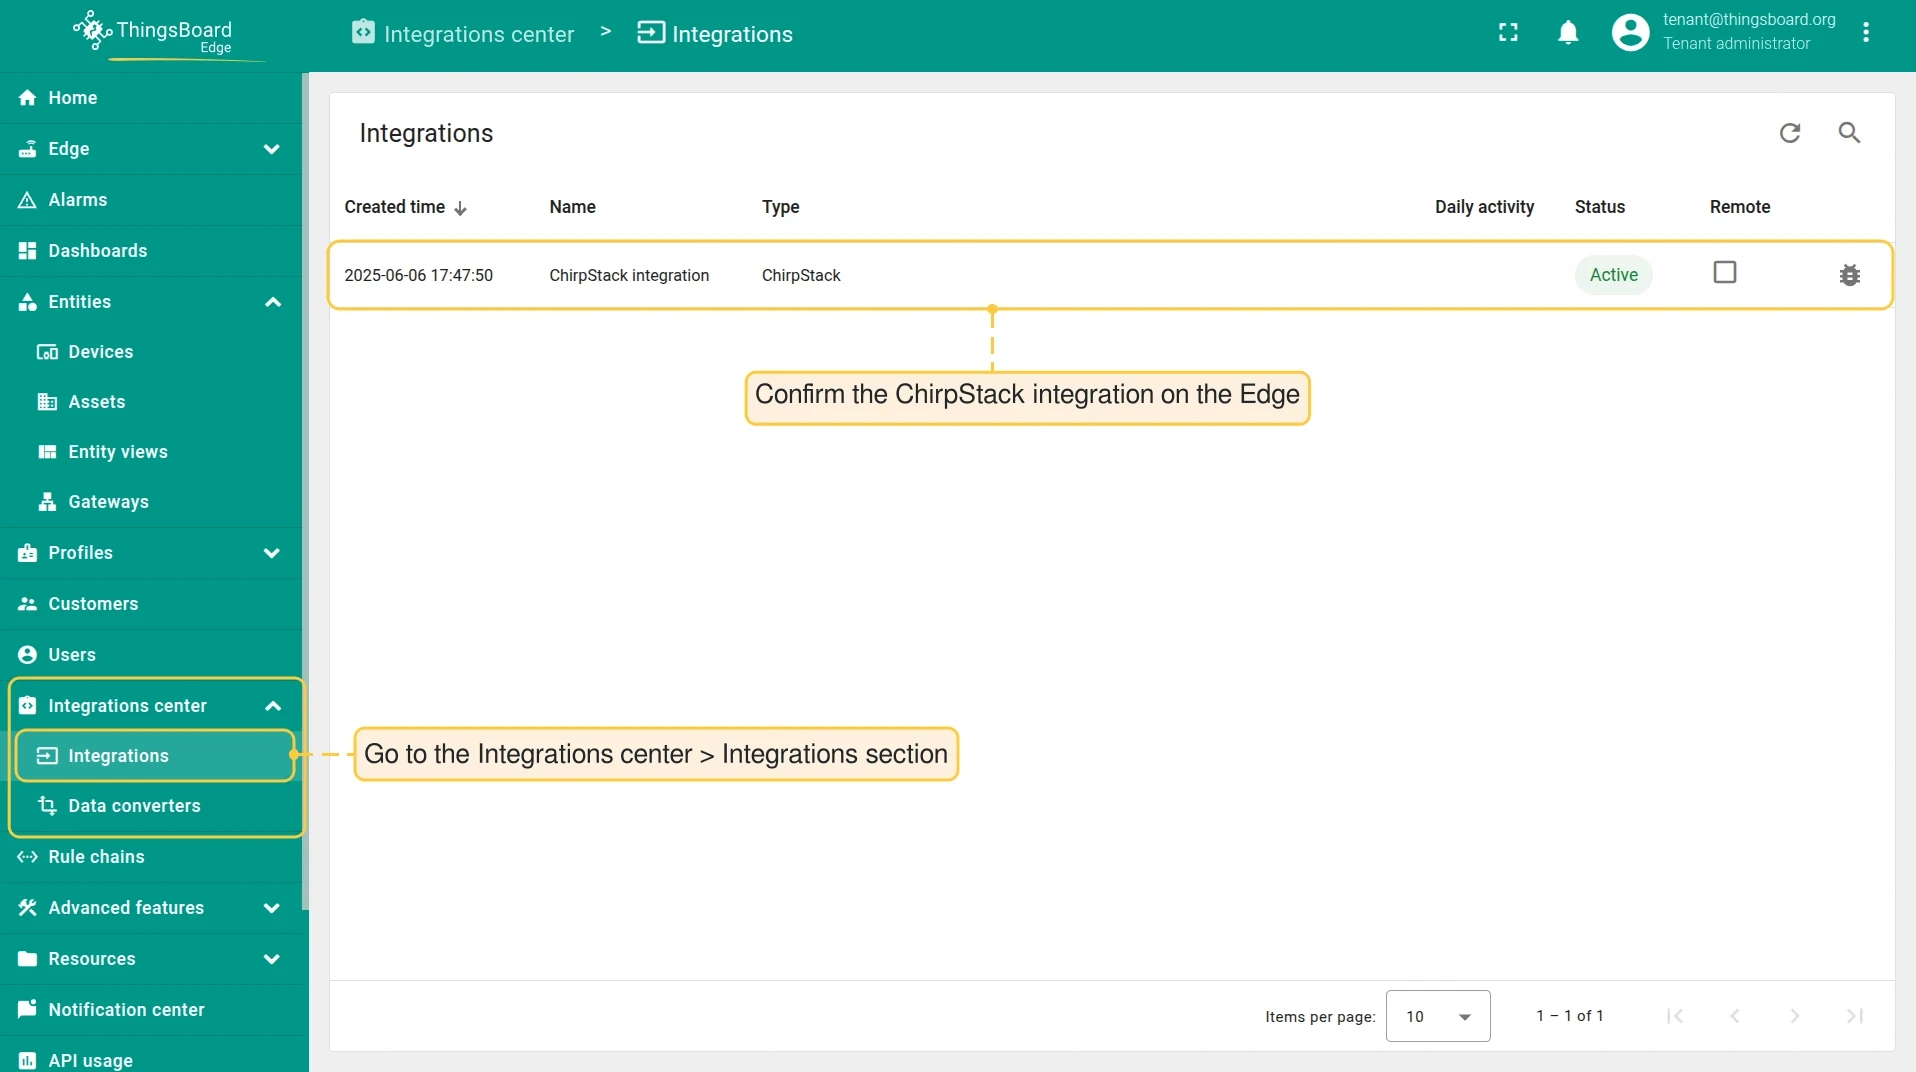
Log in to your ThingsBoard Edge instance and confirm the integration appears under Integration center > Integrations.
Send an uplink message
Section titled “Send an uplink message”In production, devices send uplink messages automatically. For testing, you can use the ChirpStack Device Simulator or send an HTTP message directly to the ChirpStack Application Server:
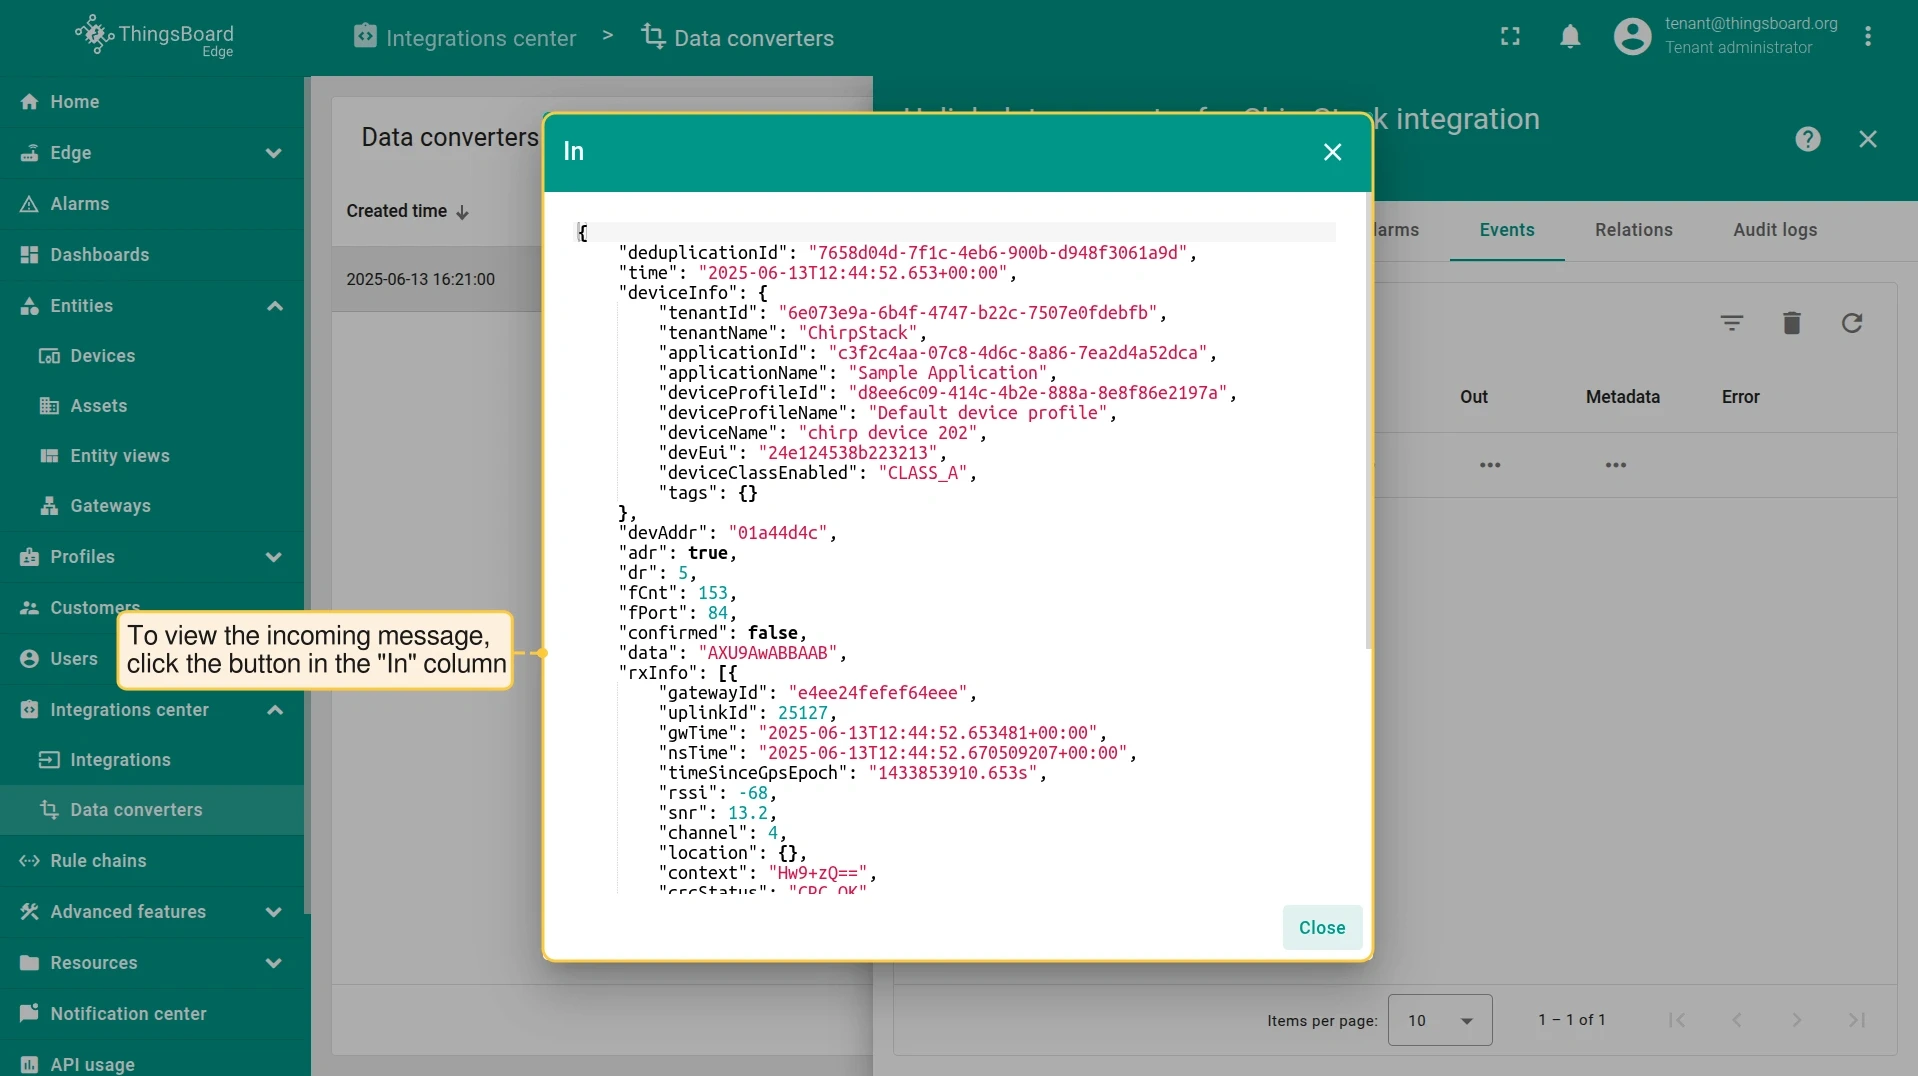
curl -v -X POST -d '{ "deduplicationId": "7658d04d-7f1c-4eb6-900b-d948f3061a9d", "time": "2025-06-13T12:44:52.653+00:00", "deviceInfo": { "tenantId": "6e073e9a-6b4f-4747-b22c-7507568debfb", "tenantName": "ChirpStack", "applicationId": "c3f2c4aa-07c8-4d6c-8a86-7ea2d4a31dca", "applicationName": "Sample Application", "deviceProfileId": "d8ee6c09-414c-4b2e-888a-8e8f86e3187a", "deviceProfileName": "Default device profile", "deviceName": "chirp device", "devEui": "24e124538b223213", "deviceClassEnabled": "CLASS_A", "tags": {} }, "devAddr": "01a44c4c", "adr": true, "dr": 5, "fCnt": 153, "fPort": 84, "confirmed": false, "data": "AXU9AwABBAAB", "rxInfo": [{ "gatewayId": "e4e124dadef64eee", "uplinkId": 25127, "gwTime": "2025-06-13T12:44:52.653481+00:00", "nsTime": "2025-06-13T12:44:52.670509207+00:00", "timeSinceGpsEpoch": "1433853910.653s", "rssi": -68, "snr": 13.2, "channel": 4, "location": {}, "context": "Hw9+zQ==", "crcStatus": "CRC_OK" }], "txInfo": { "frequency": 867300000, "modulation": { "lora": { "bandwidth": 125000, "spreadingFactor": 7, "codeRate": "CR_4_5" } } }, "regionConfigId": "eu868"}' $YOUR_HTTP_ENDPOINT_URL -H "Content-Type:application/json"Replace the following placeholders with your actual values:
| Placeholder | Description |
|---|---|
deduplicationId |
Any valid UUID v4 (for testing) |
tenantId |
Your ChirpStack tenant ID |
applicationId |
ChirpStack Application ID |
applicationName |
ChirpStack Application name |
deviceProfileId |
ChirpStack device profile ID |
deviceProfileName |
ChirpStack device profile name |
devEui |
Device EUI from the ChirpStack device |
gatewayId |
ChirpStack gateway ID |
$YOUR_HTTP_ENDPOINT_URL |
HTTP endpoint URL from the ThingsBoard integration |
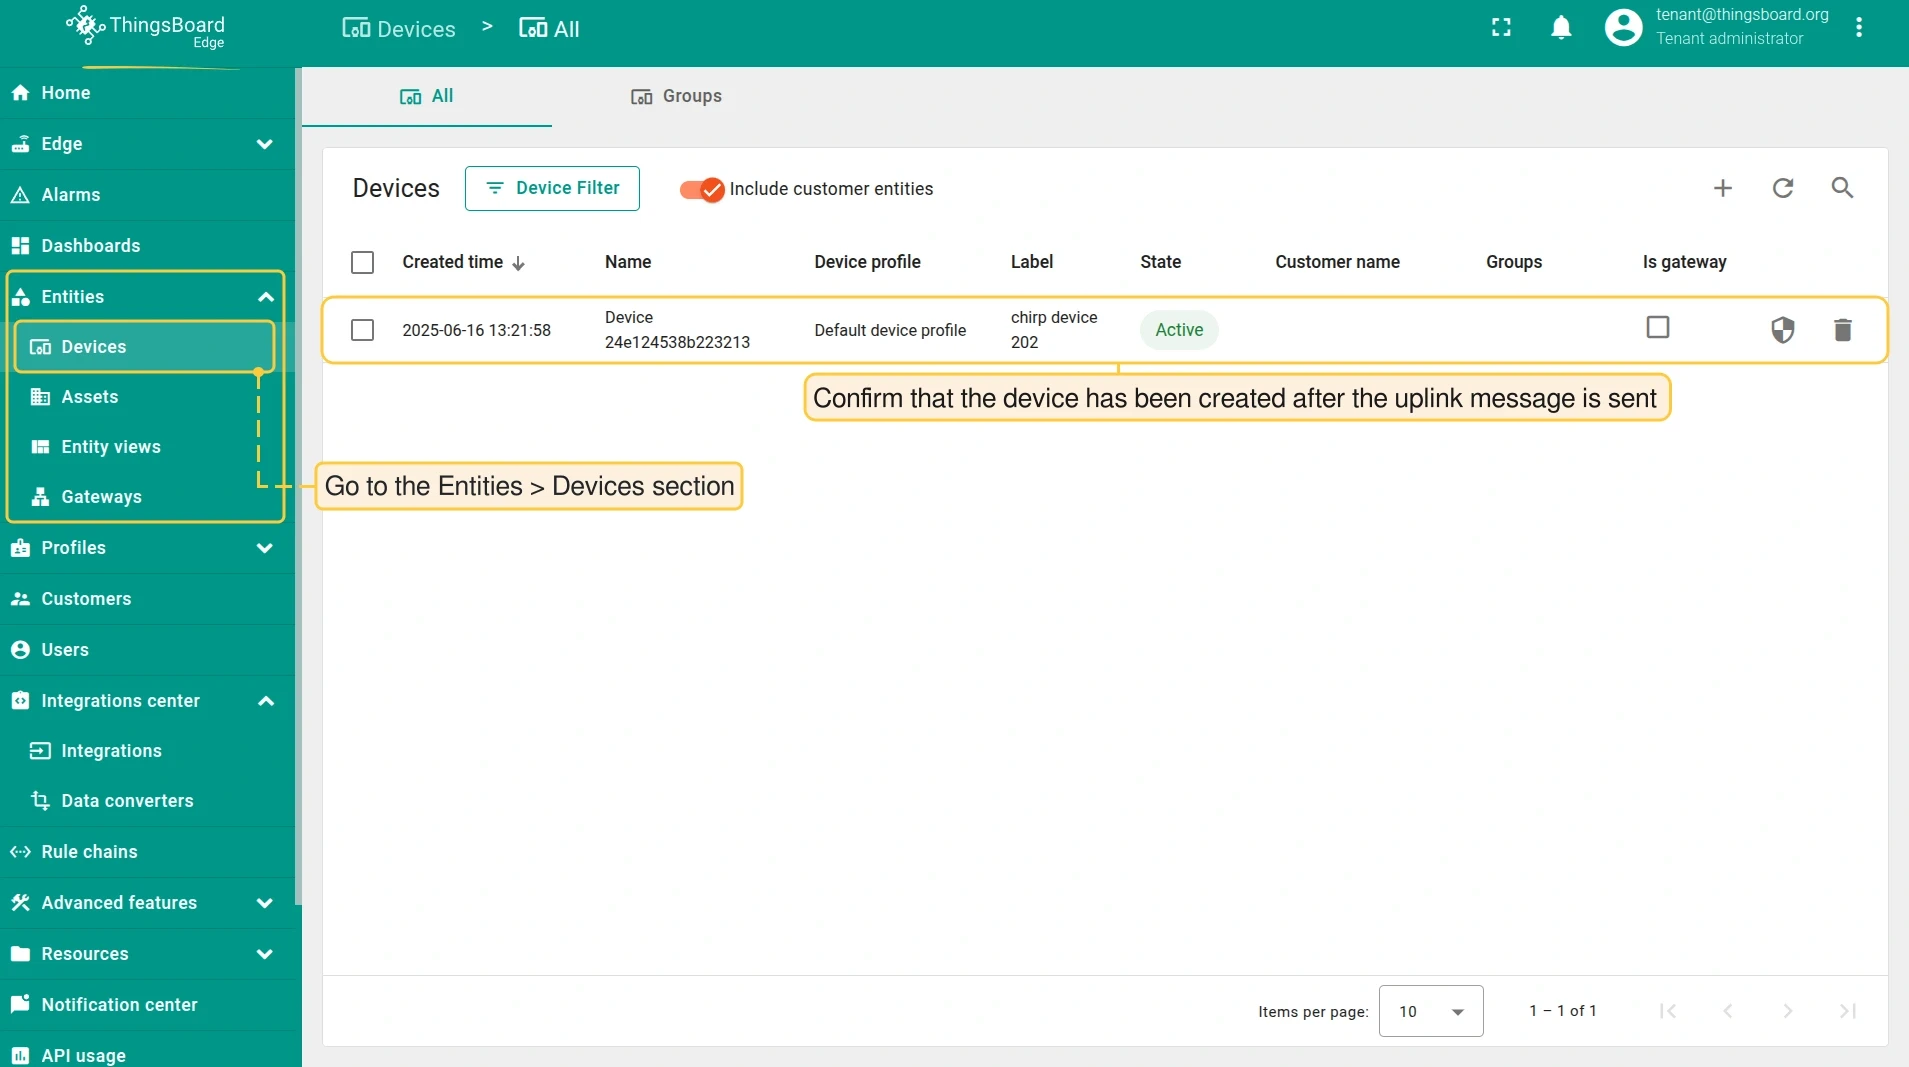
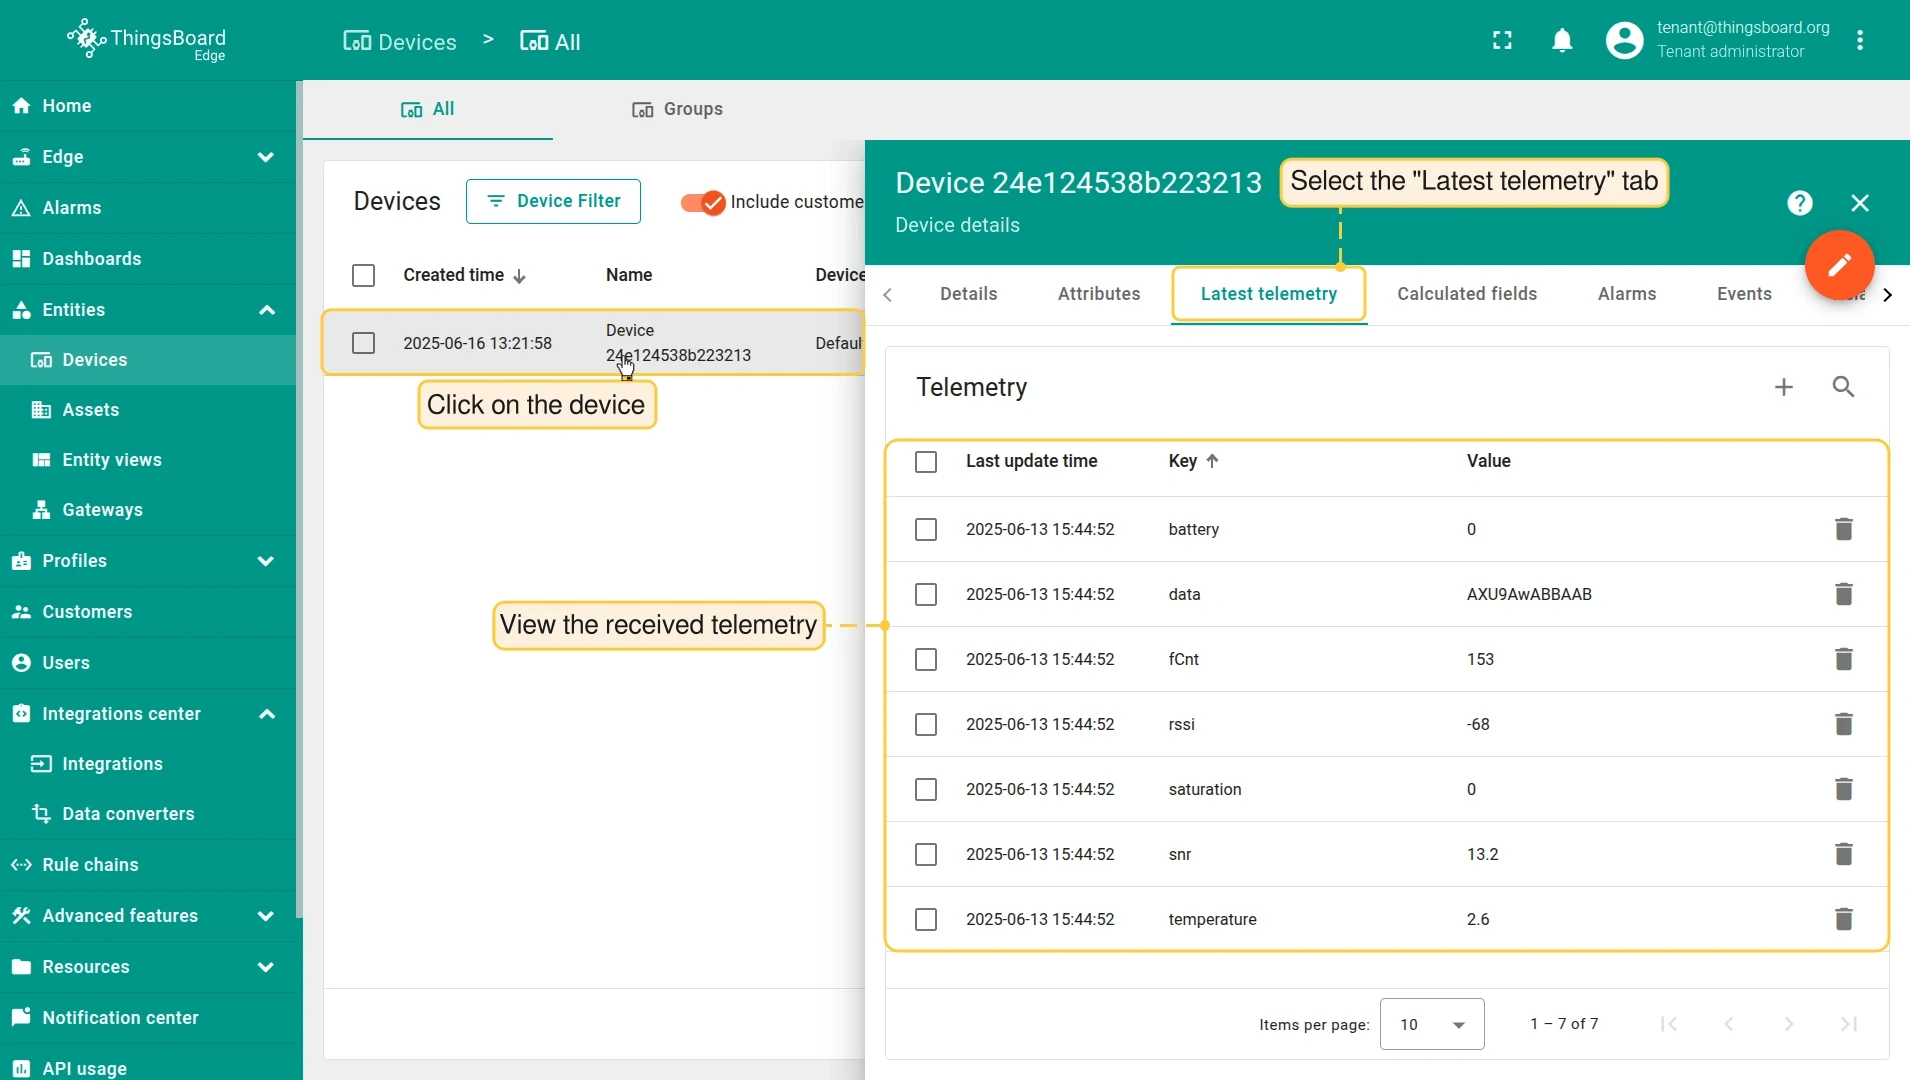
After the message is sent, a new device is created in ThingsBoard Edge. To view its telemetry:
-
Go to Entities > Devices, click the device, and select the Latest telemetry tab.
-
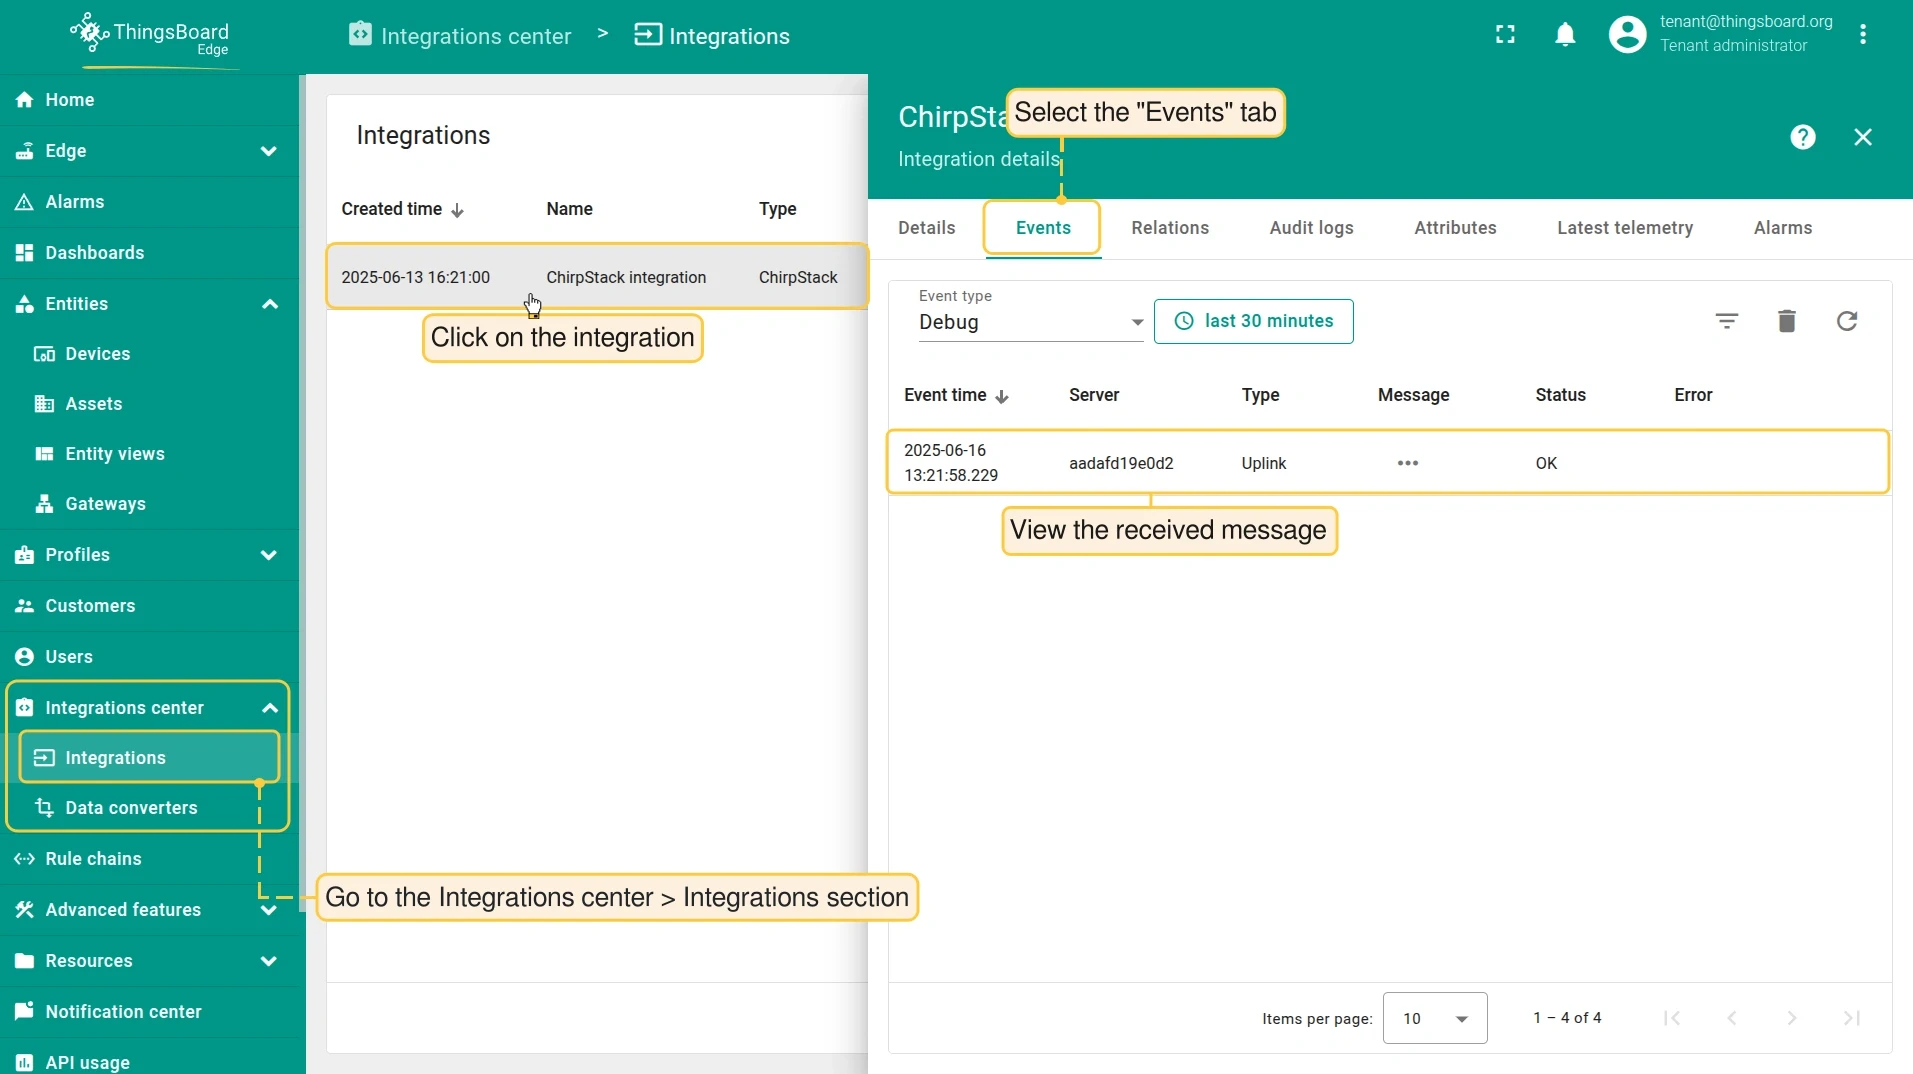
Go to Integration center > Integrations, click the ChirpStack integration, and select the Events tab to view the received uplink message.
-
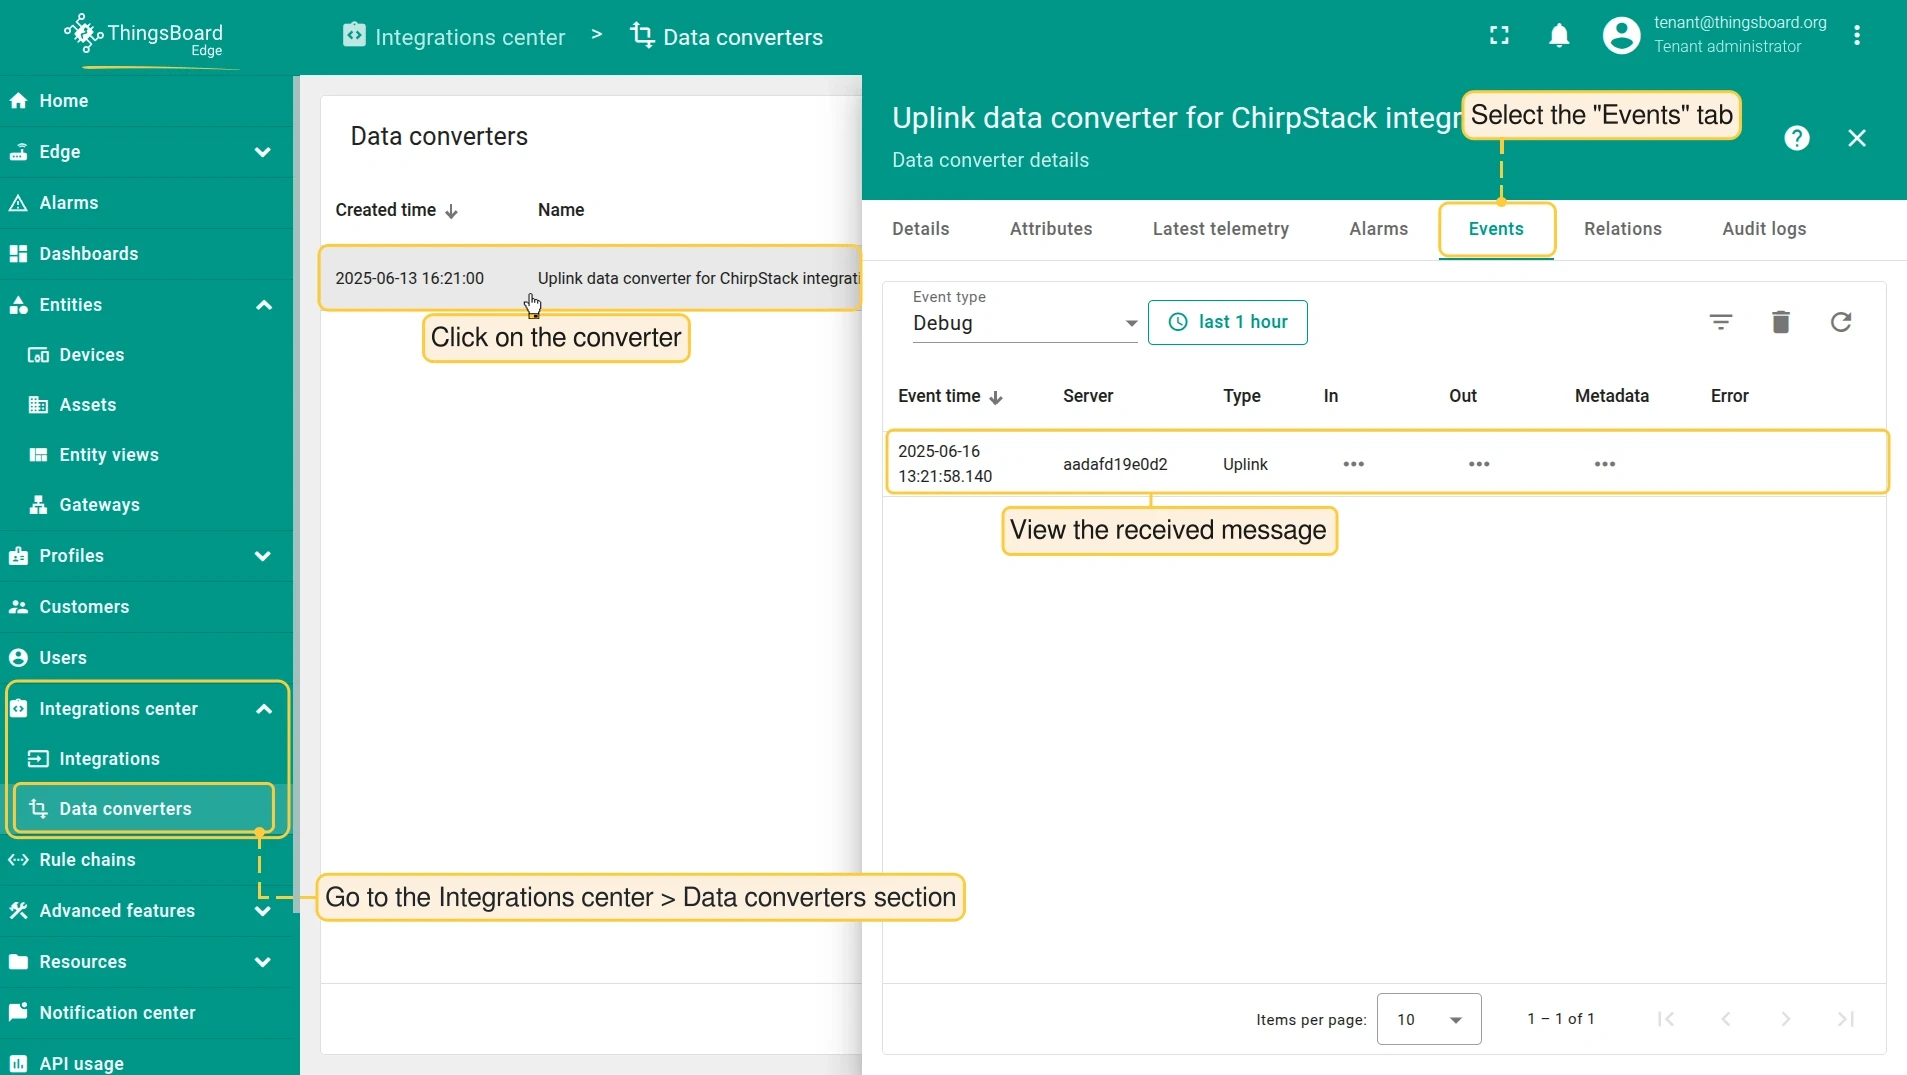
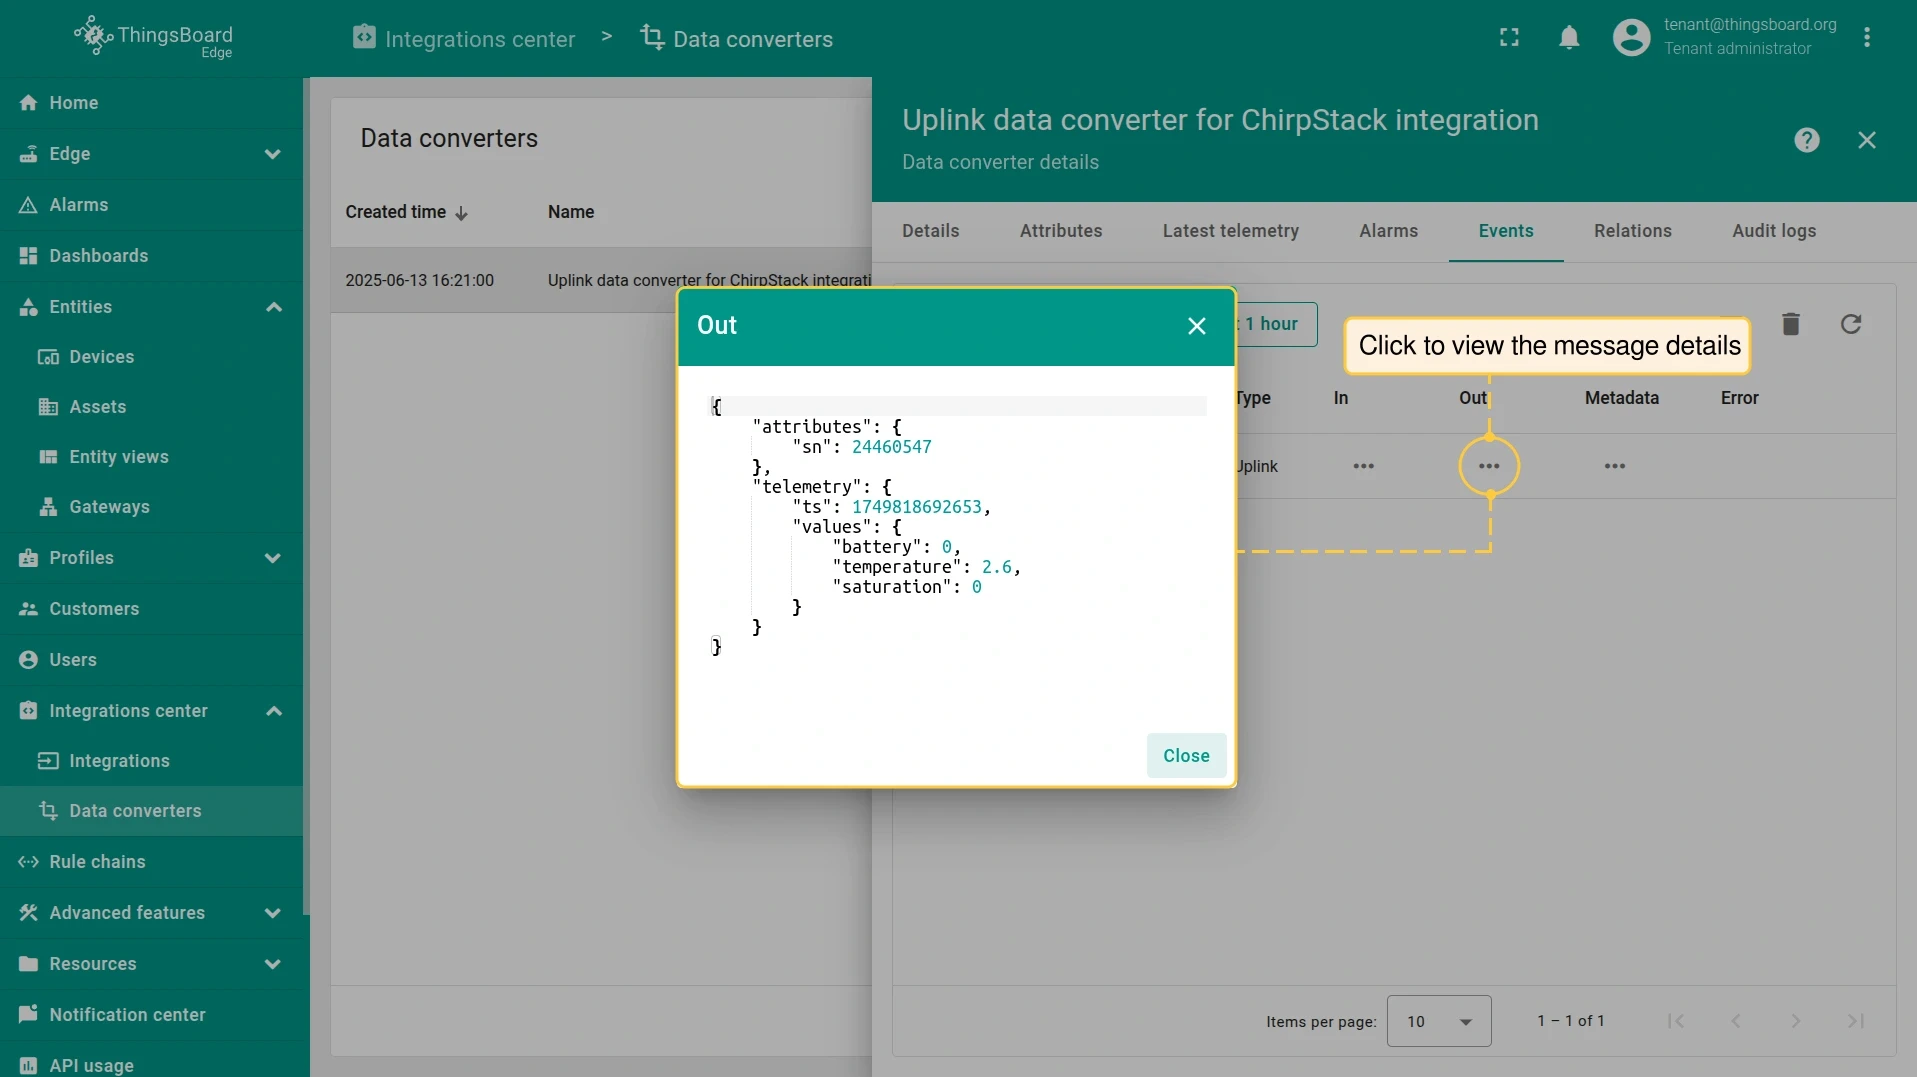
To inspect how the uplink converter processed the message, go to Integration center > Data converters, open the uplink converter, and select the Events tab.
Was this helpful?