Attributes
Attributes on ThingsBoard Edge are stored and processed locally, and remain available to dashboards and rule chains even when the connection to the server is offline. Changes are not automatically propagated between Edge and server — synchronization requires explicit rule chain configuration on both sides.
For an overview of how attributes work on Edge, see Edge attributes.
Assigning attributes to entities
Section titled “Assigning attributes to entities”Attributes can be added directly on the Edge instance and are stored and processed locally. The steps below use Server attributes — the scope for manually assigned metadata that is not reported by the device.
-
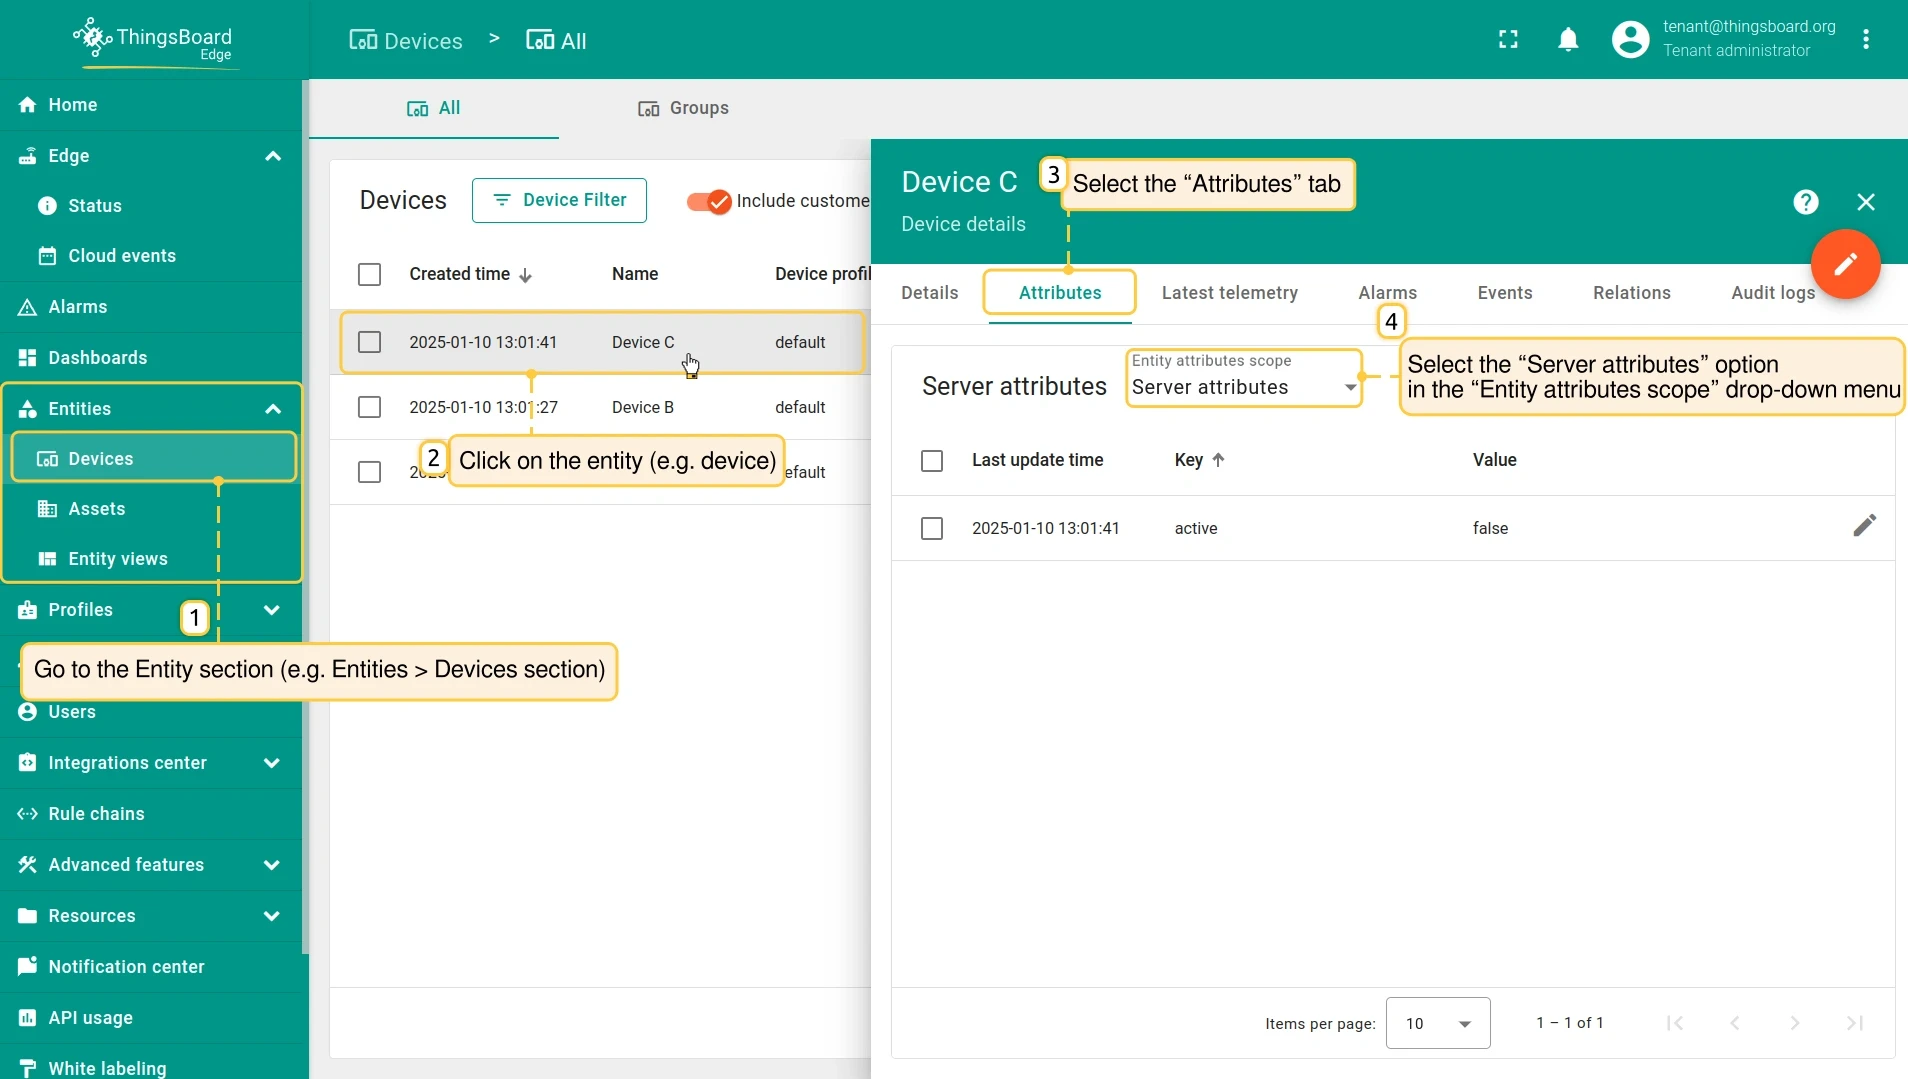
Go to the entity section — for example, Entities → Devices — and click the entity.
-
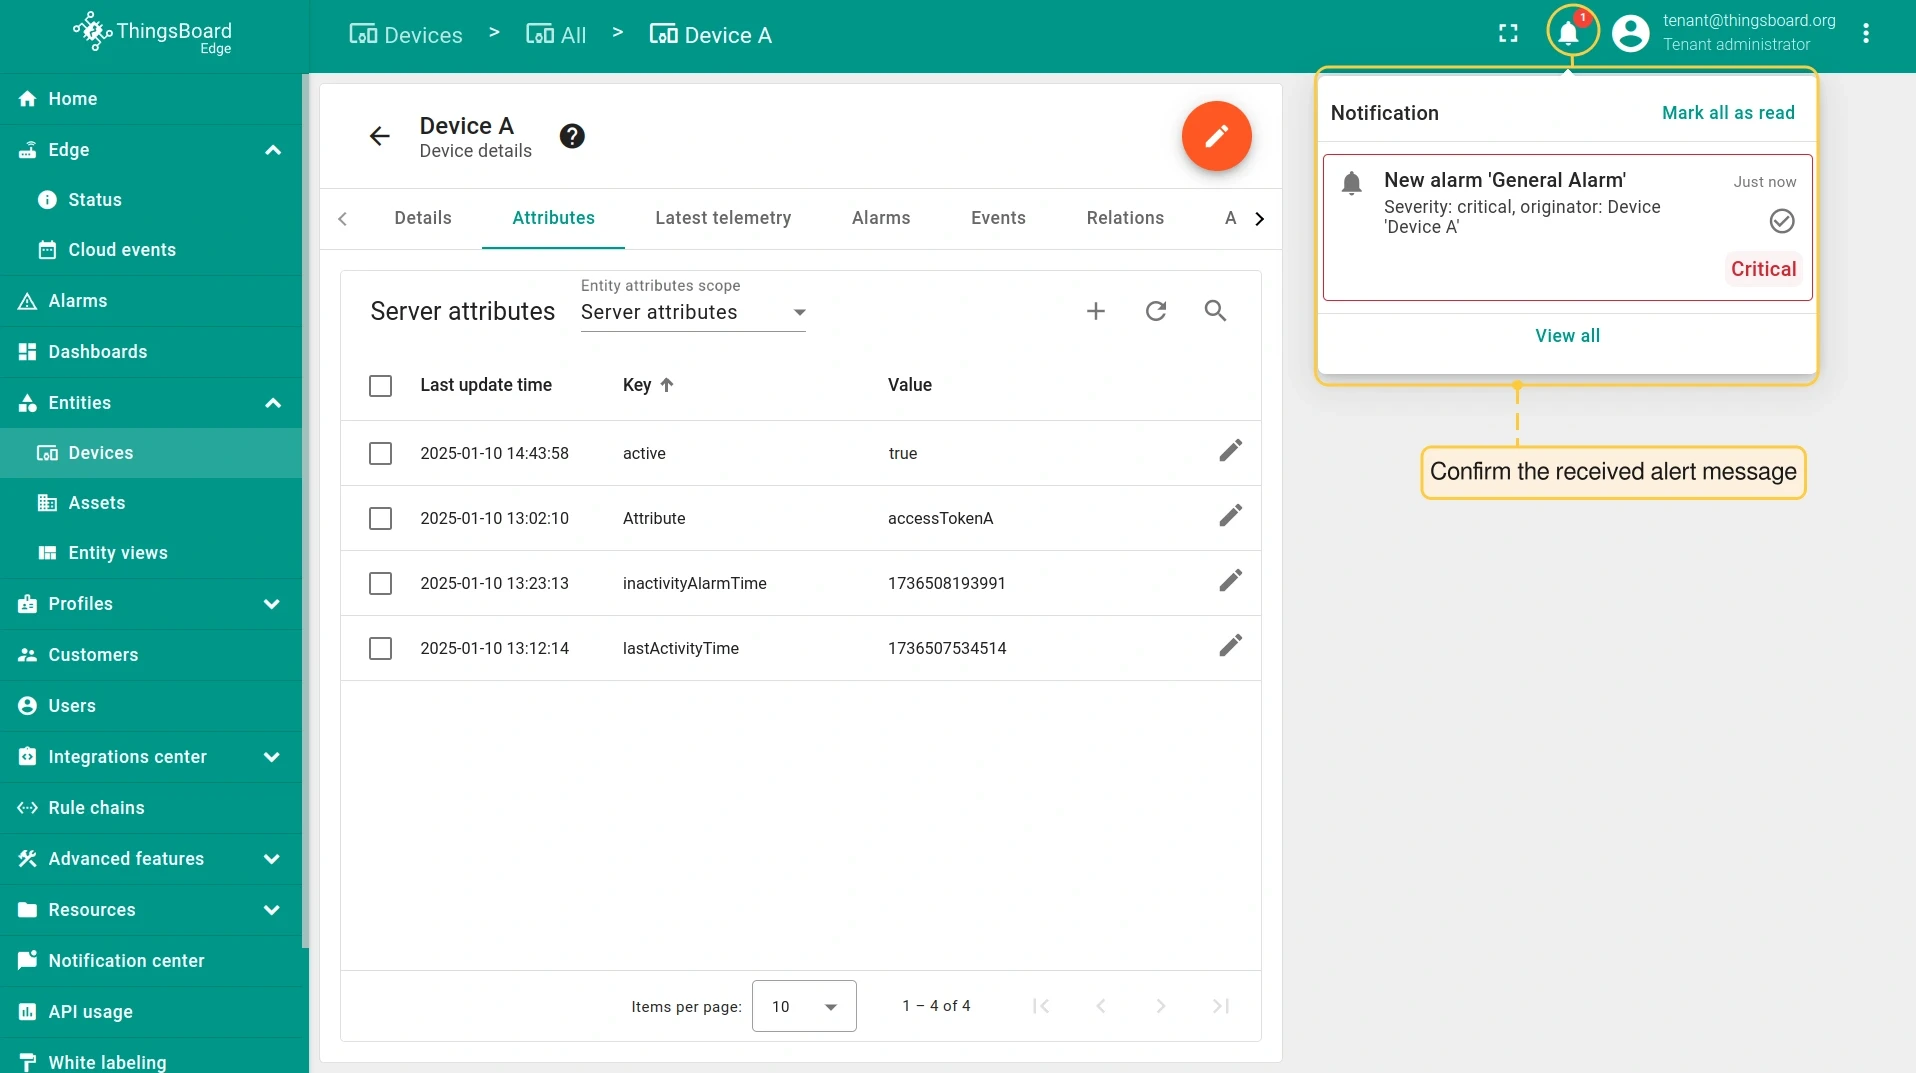
On the Entity details page, select the Attributes tab and choose Server attributes in the Entity attributes scope dropdown.
-
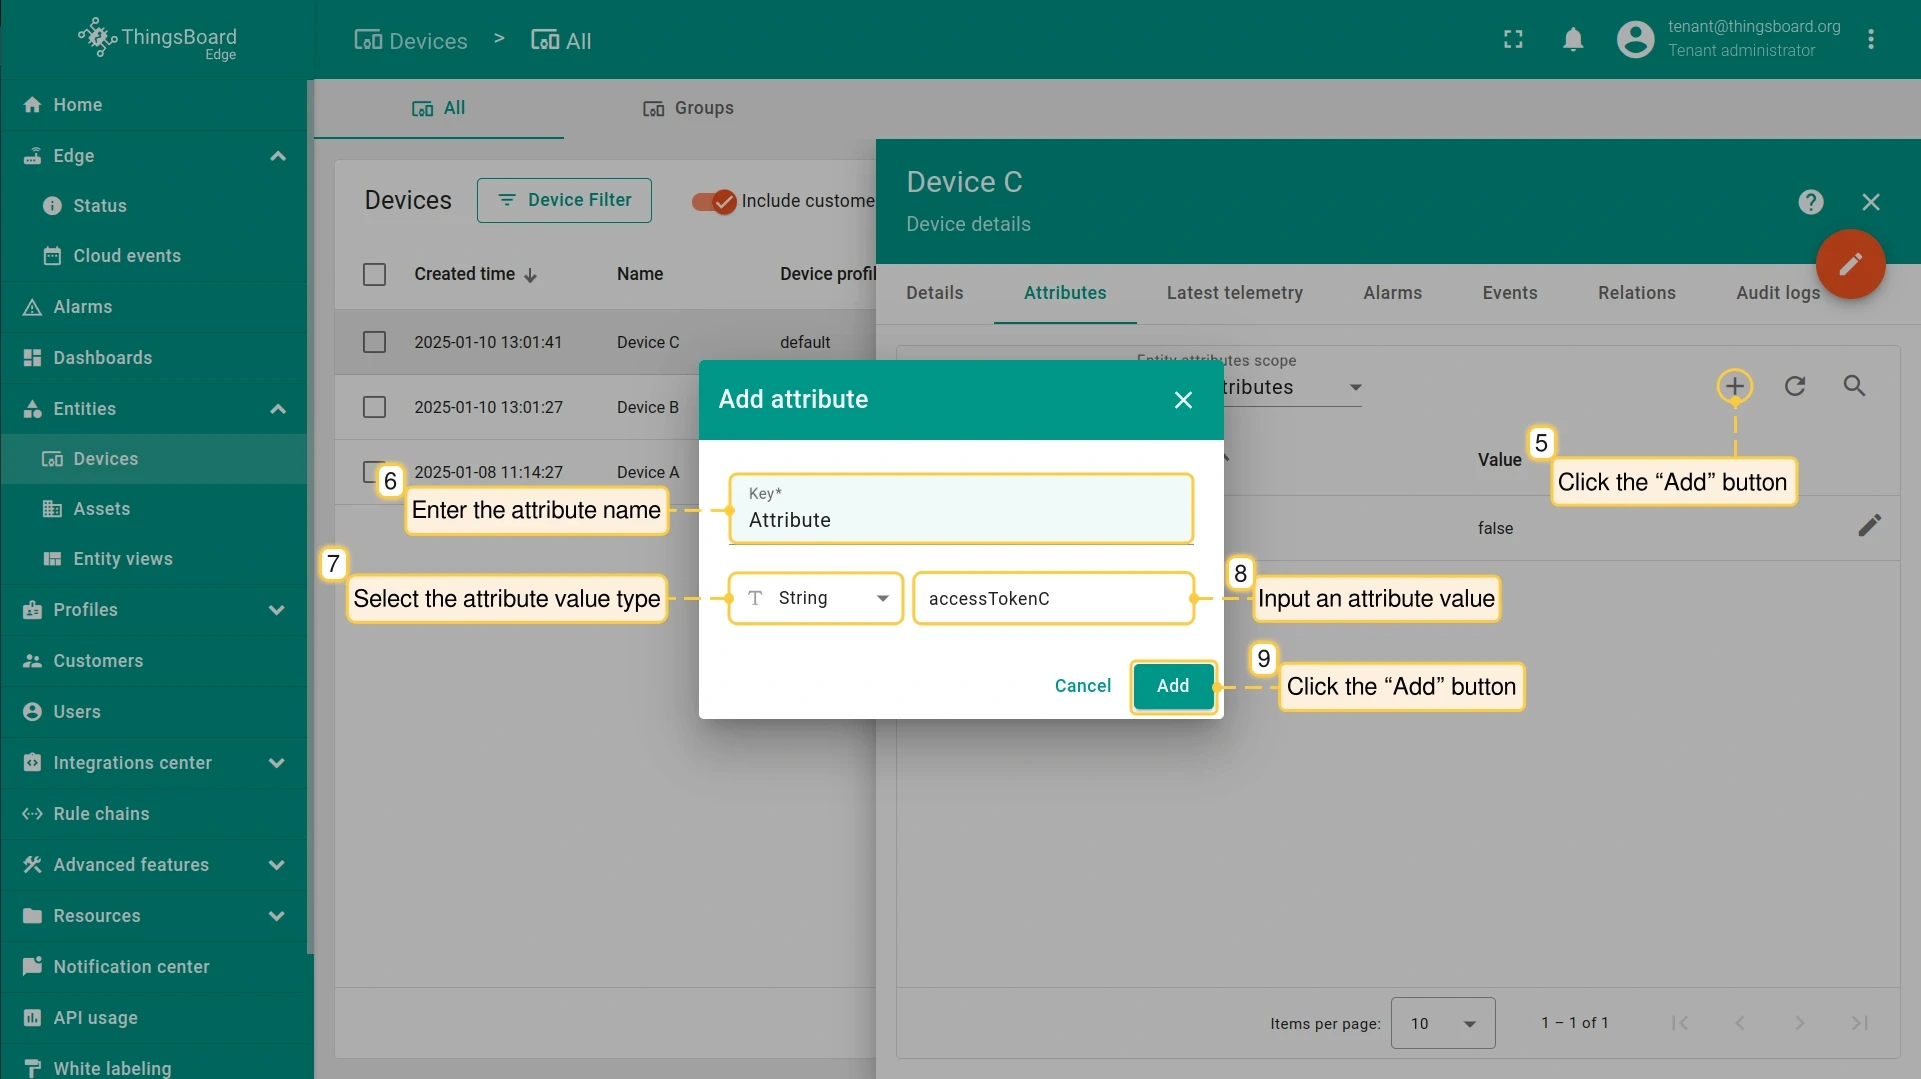
Click Add (+). In the Add attribute dialog, enter the attribute name in the Key field, select the value type (String, Integer, Double, Boolean, or JSON), and enter the value. Click Add.
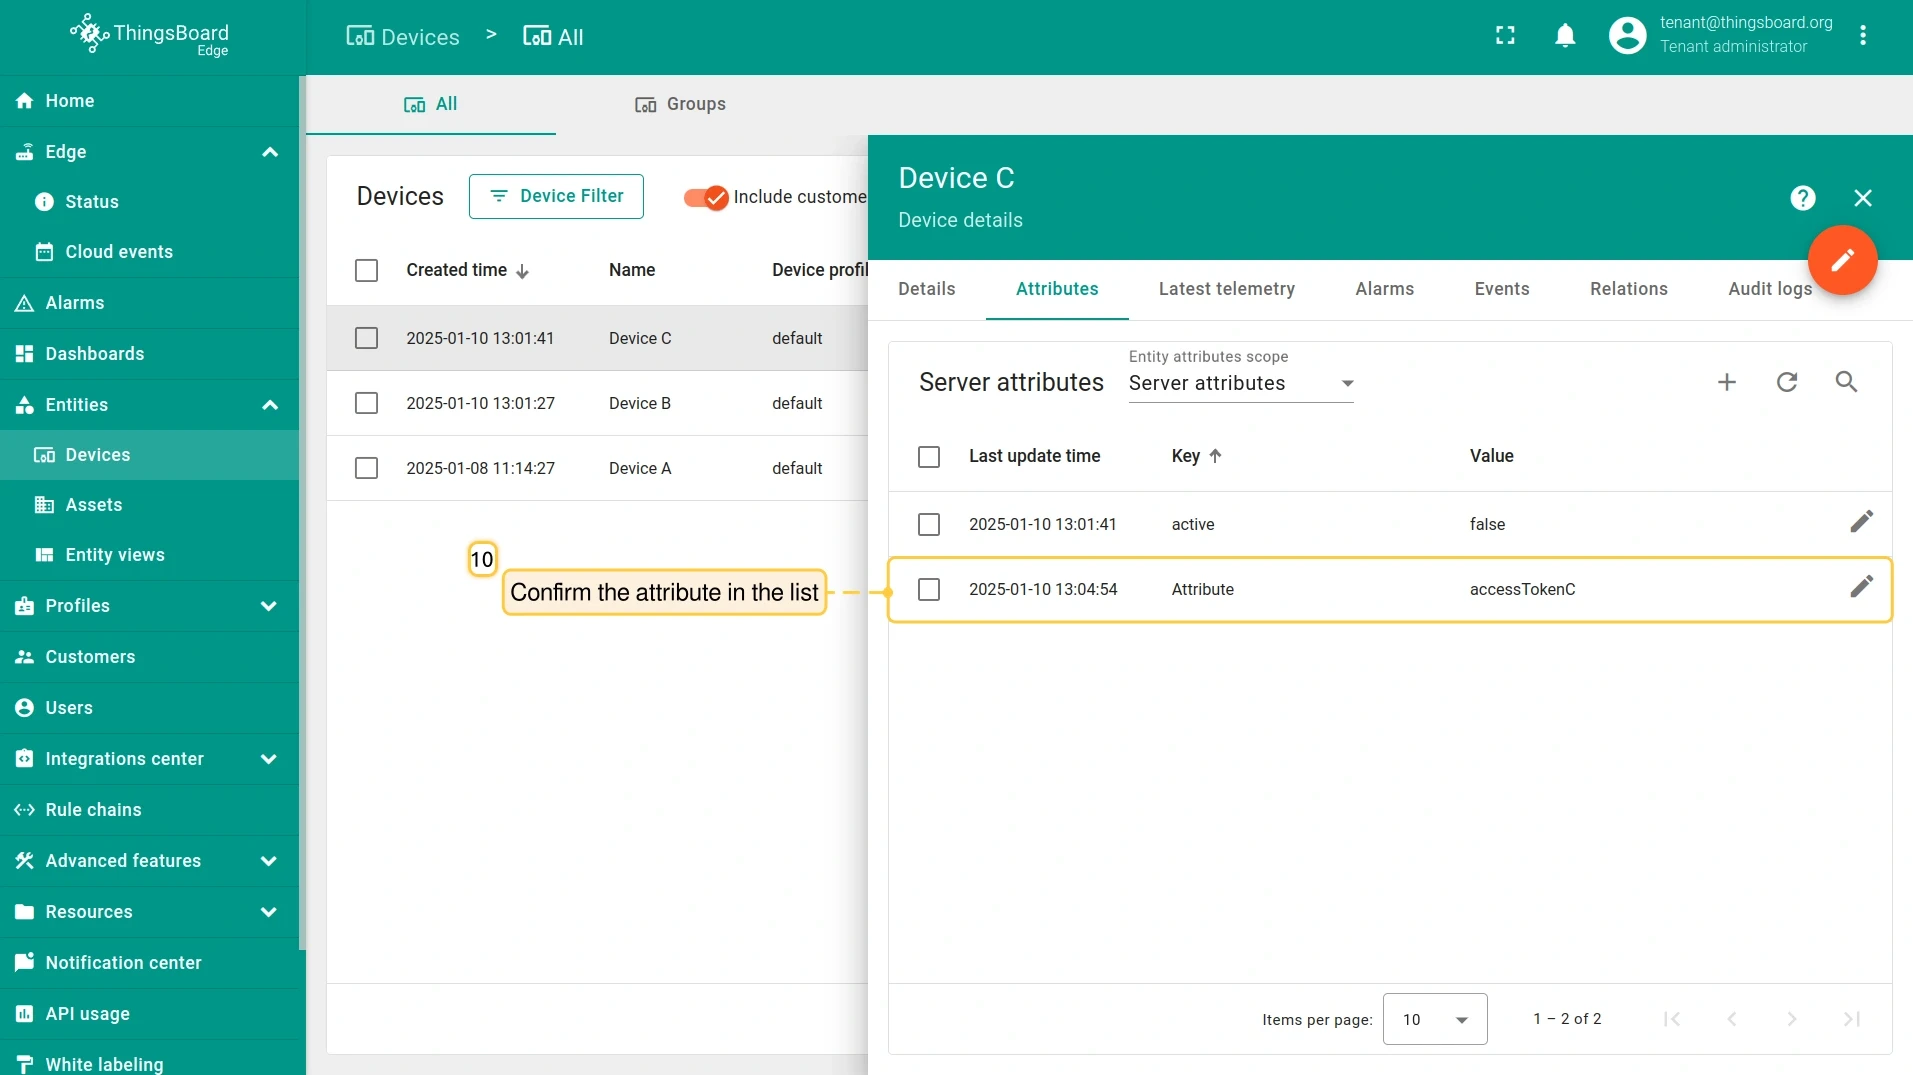
The attribute appears in the list.
If an attribute is assigned to an entity on the server, and that entity is then assigned to an Edge instance, the attribute is pushed to Edge automatically.
Using attributes in dashboards
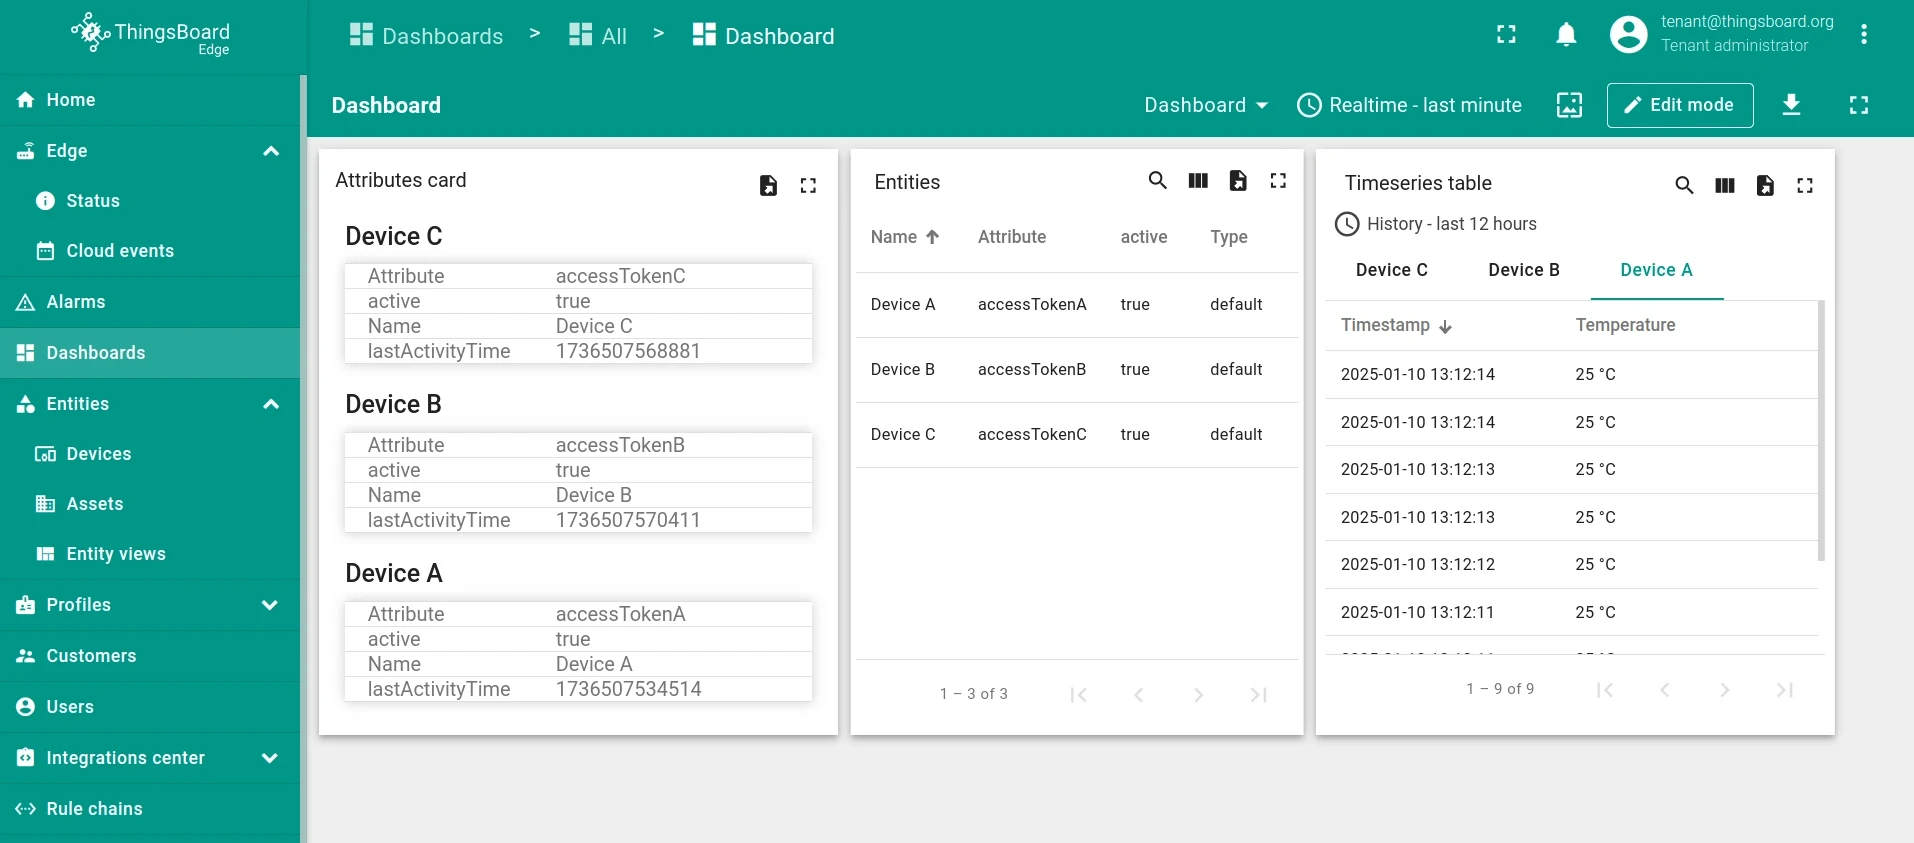
Section titled “Using attributes in dashboards”Attributes provide context for telemetry data on dashboards — displaying static or dynamic metadata about devices, or acting as configuration parameters to filter or annotate widgets.
-
Open a dashboard and enter edit mode.
-
Add a widget — Cards, input widgets, and entity table widgets are well suited for displaying attributes.
-
In the widget datasource, create an entity alias pointing to the entity whose attributes you want to display.
-
Select the attribute keys to display and click Add.
Syncing attribute updates
Section titled “Syncing attribute updates”By default, attribute changes are not automatically propagated between Edge and the server. Synchronization requires configuring the rule chain on each side.
Push attribute changes from the server to Edge
Section titled “Push attribute changes from the server to Edge”-
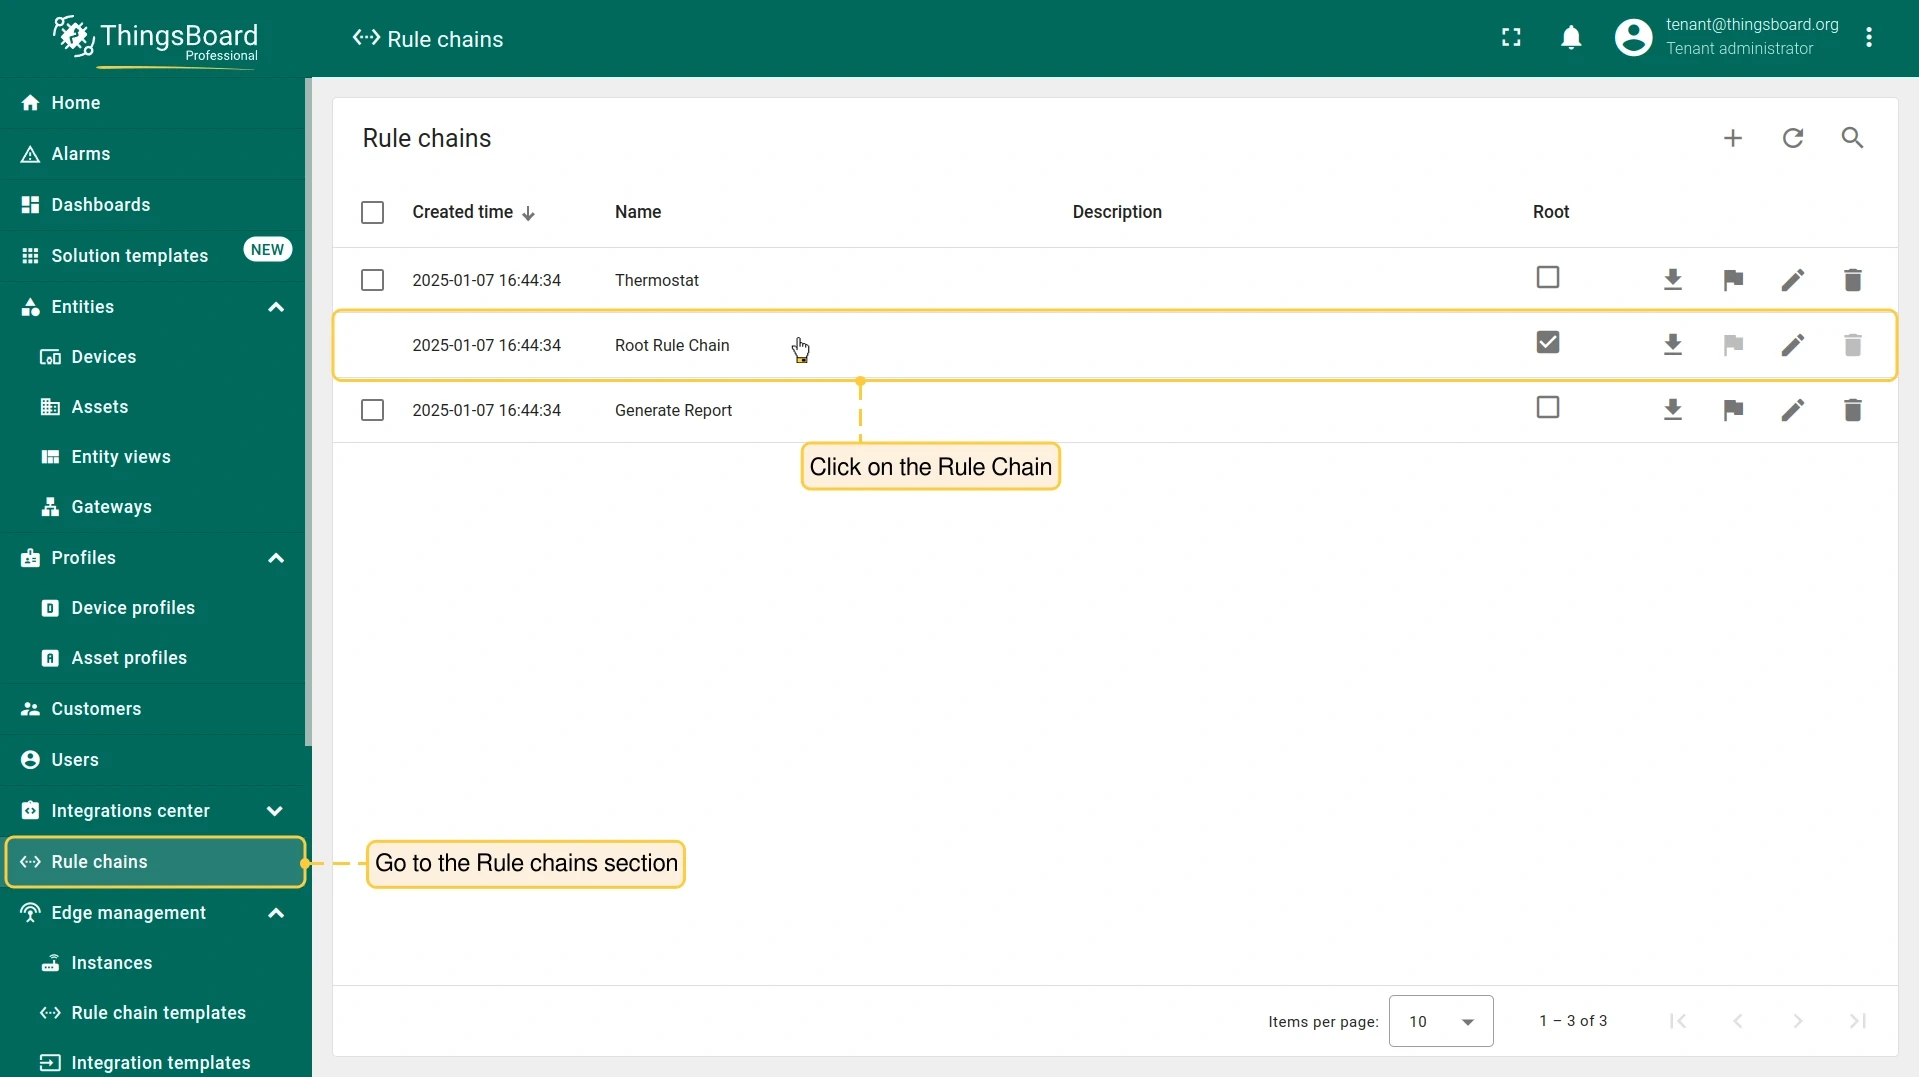
Log in to the server. Go to Rule chains and open the rule chain.
-
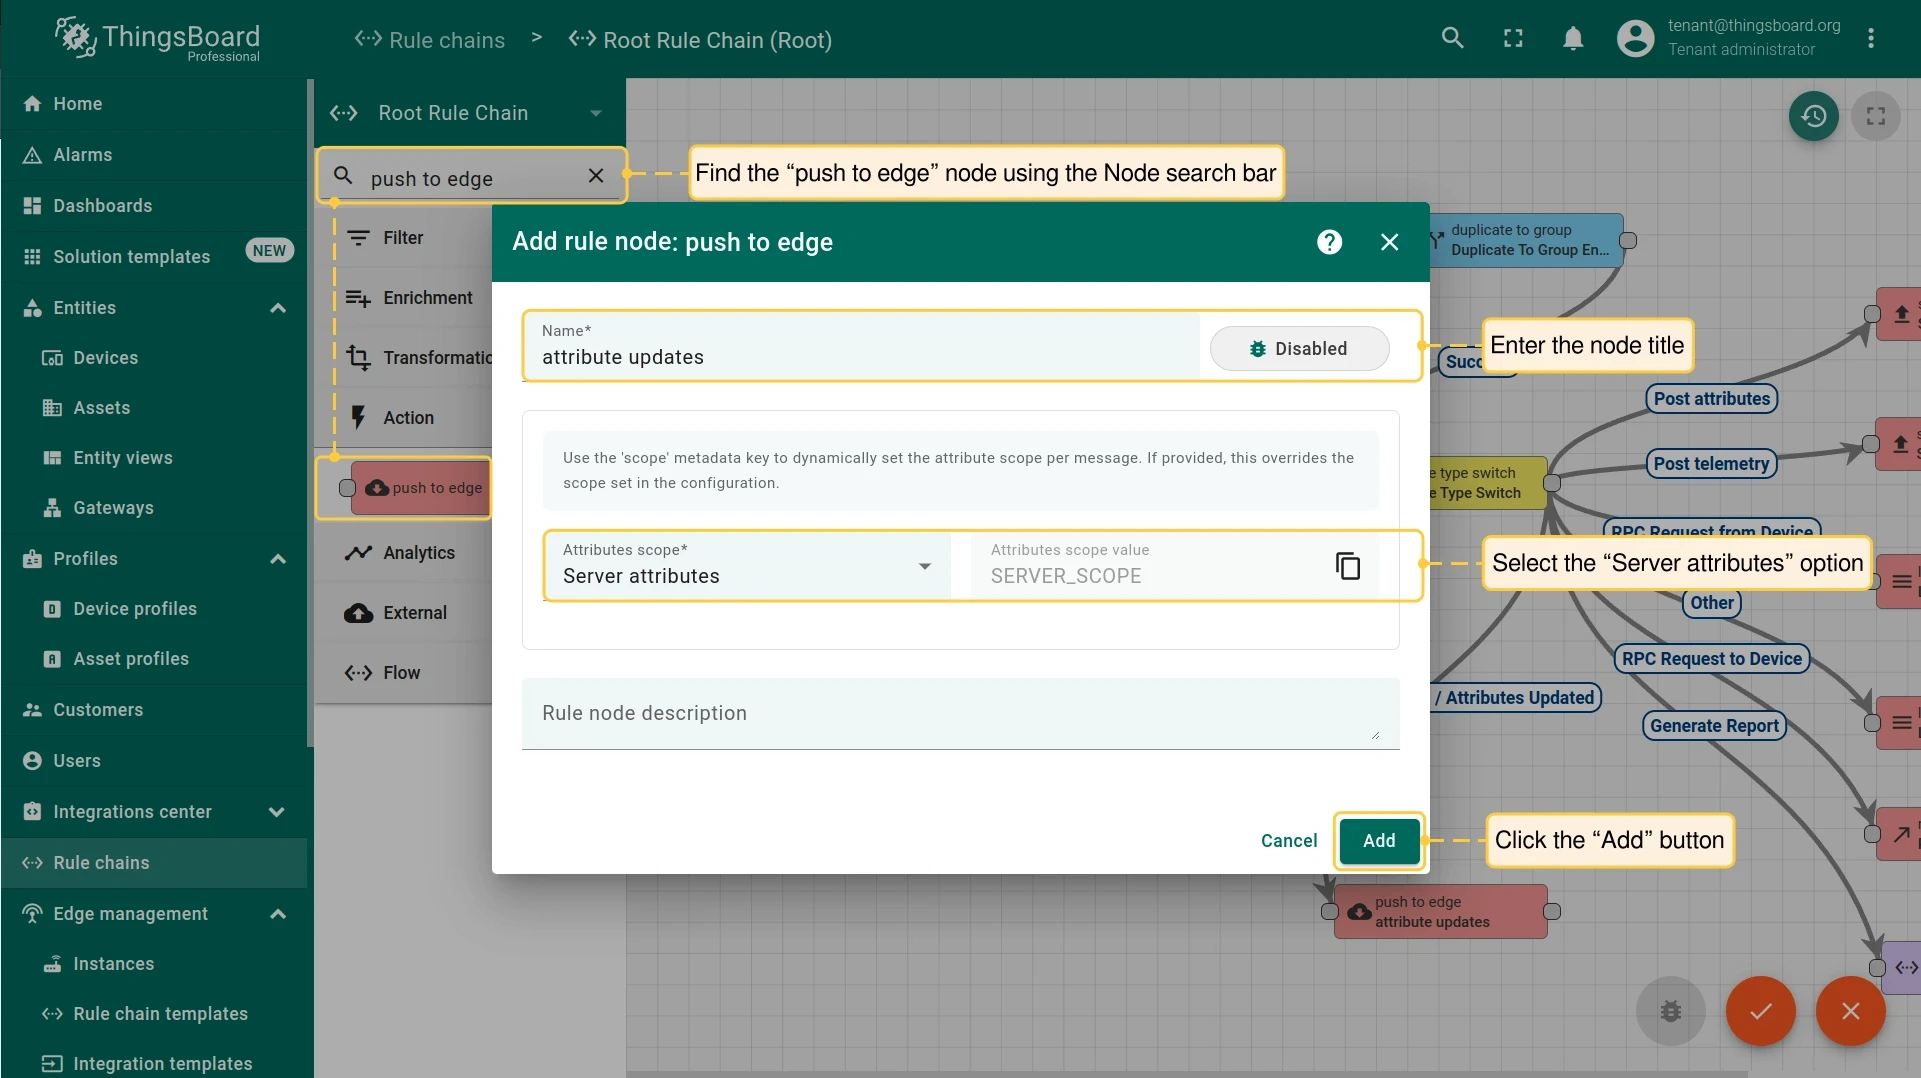
Search for the push to edge node in the Node search bar. Drag it onto the rule chain sheet. In the Add rule node dialog, enter a name and select Server attributes in the Entity attributes scope field. Click Add.
-
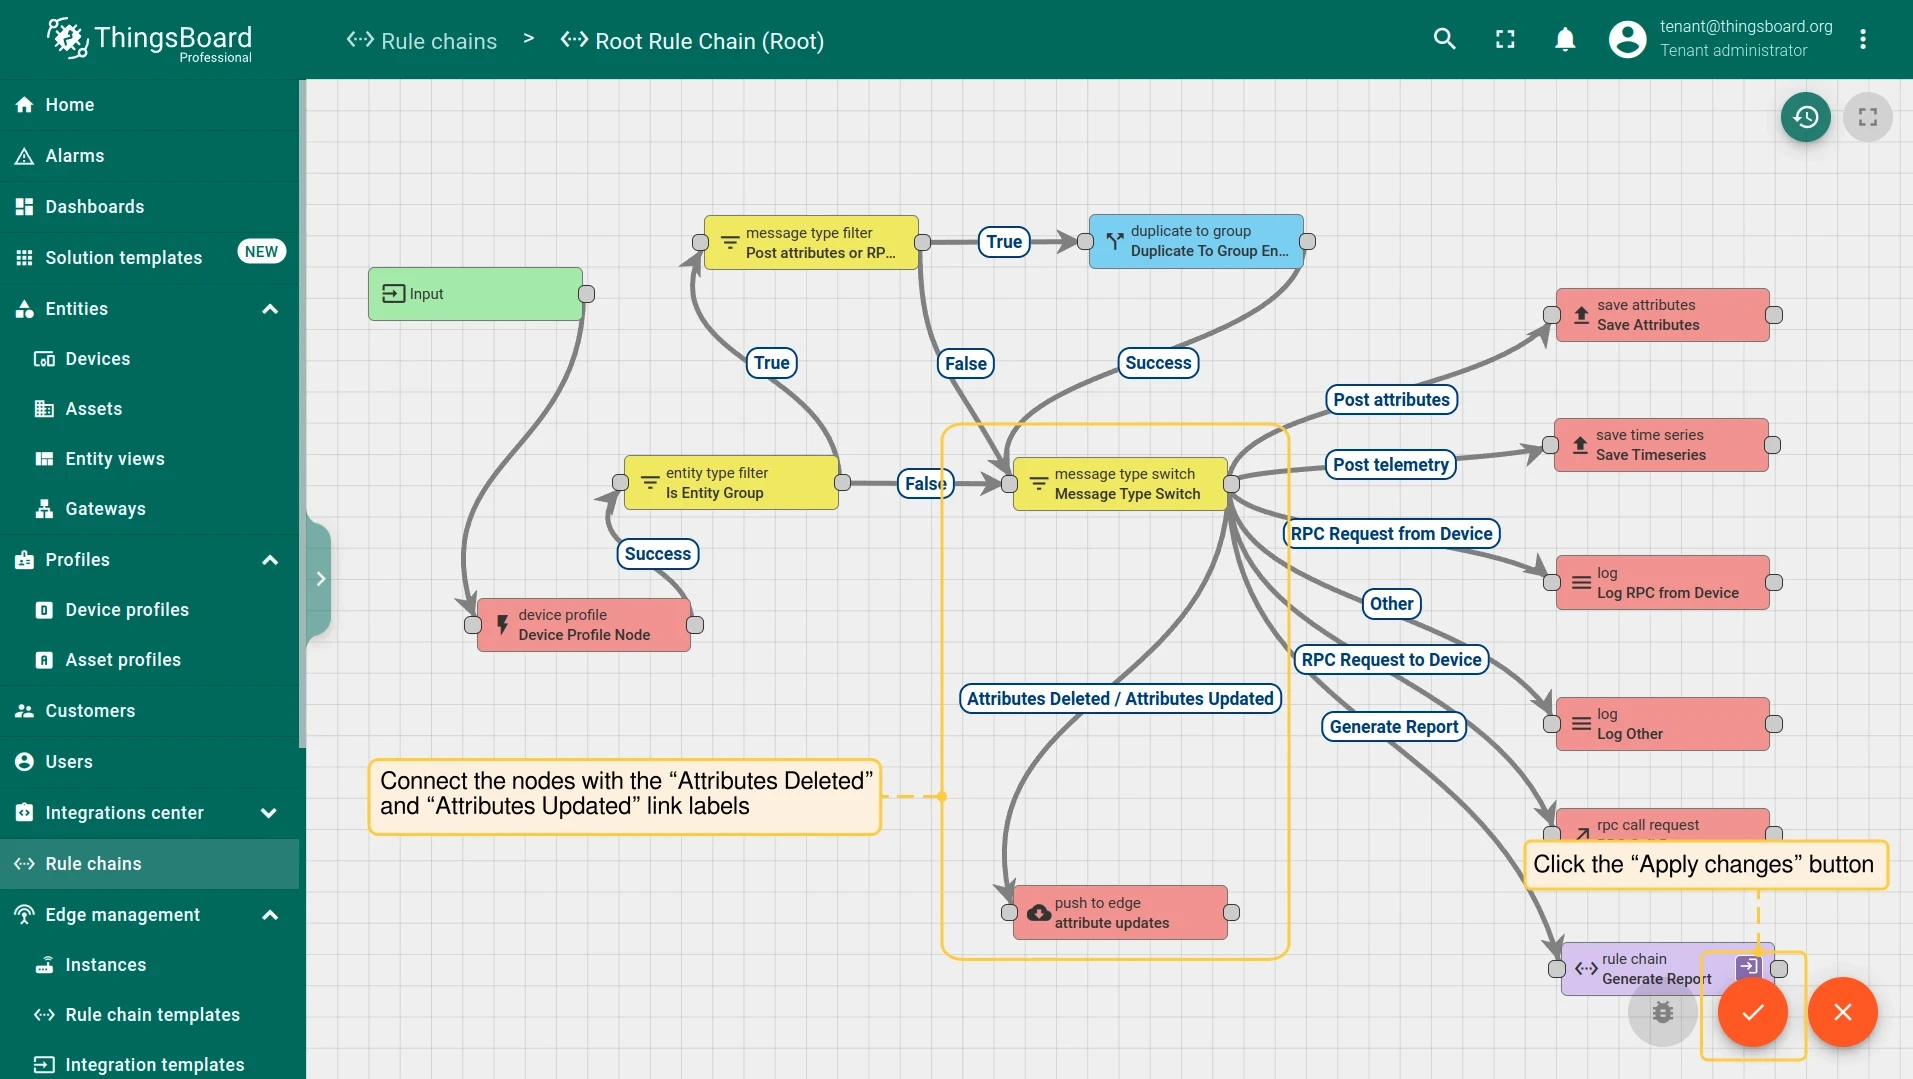
Connect the message type switch node to the push to edge node with the Attributes Deleted and Attributes Updated link labels. Click Apply changes.
Push attribute changes from Edge to the server
Section titled “Push attribute changes from Edge to the server”-
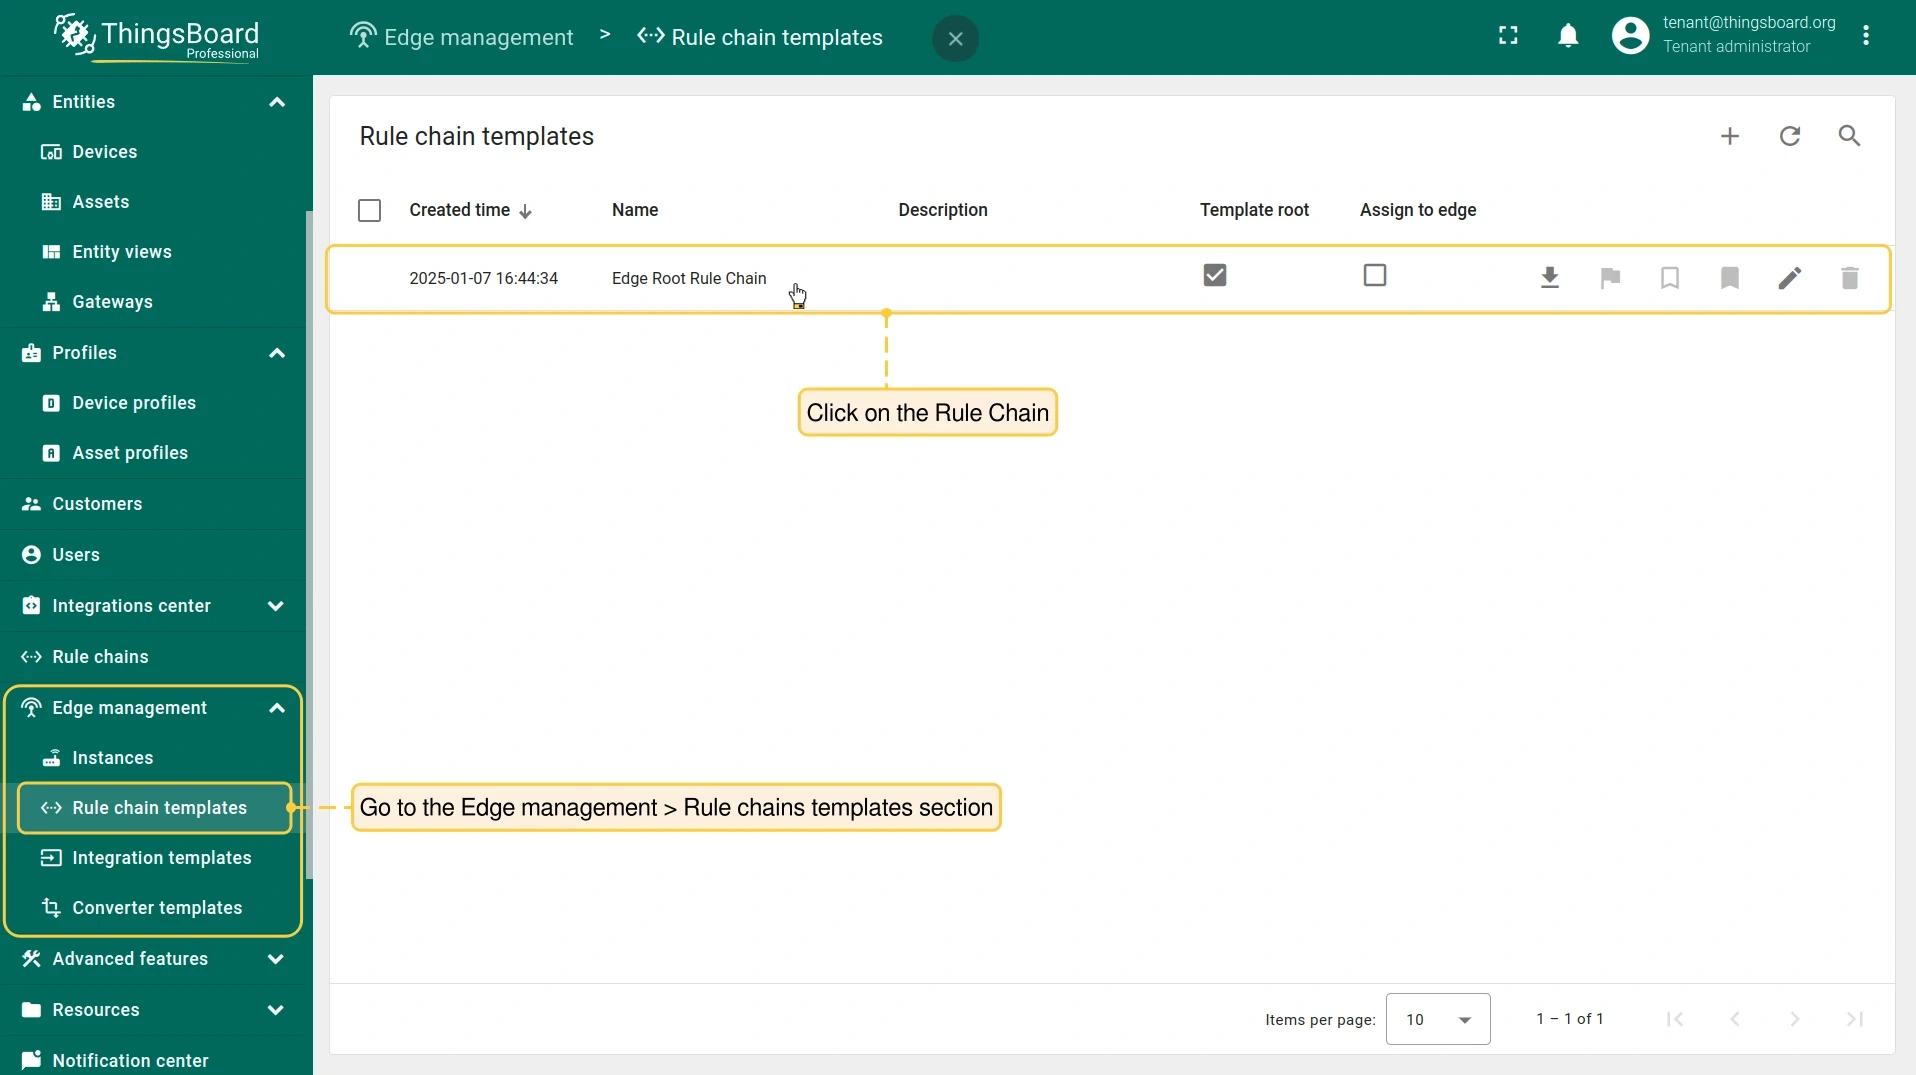
Log in to the server. Go to Edge management → Rule chain templates and open the rule chain.
-
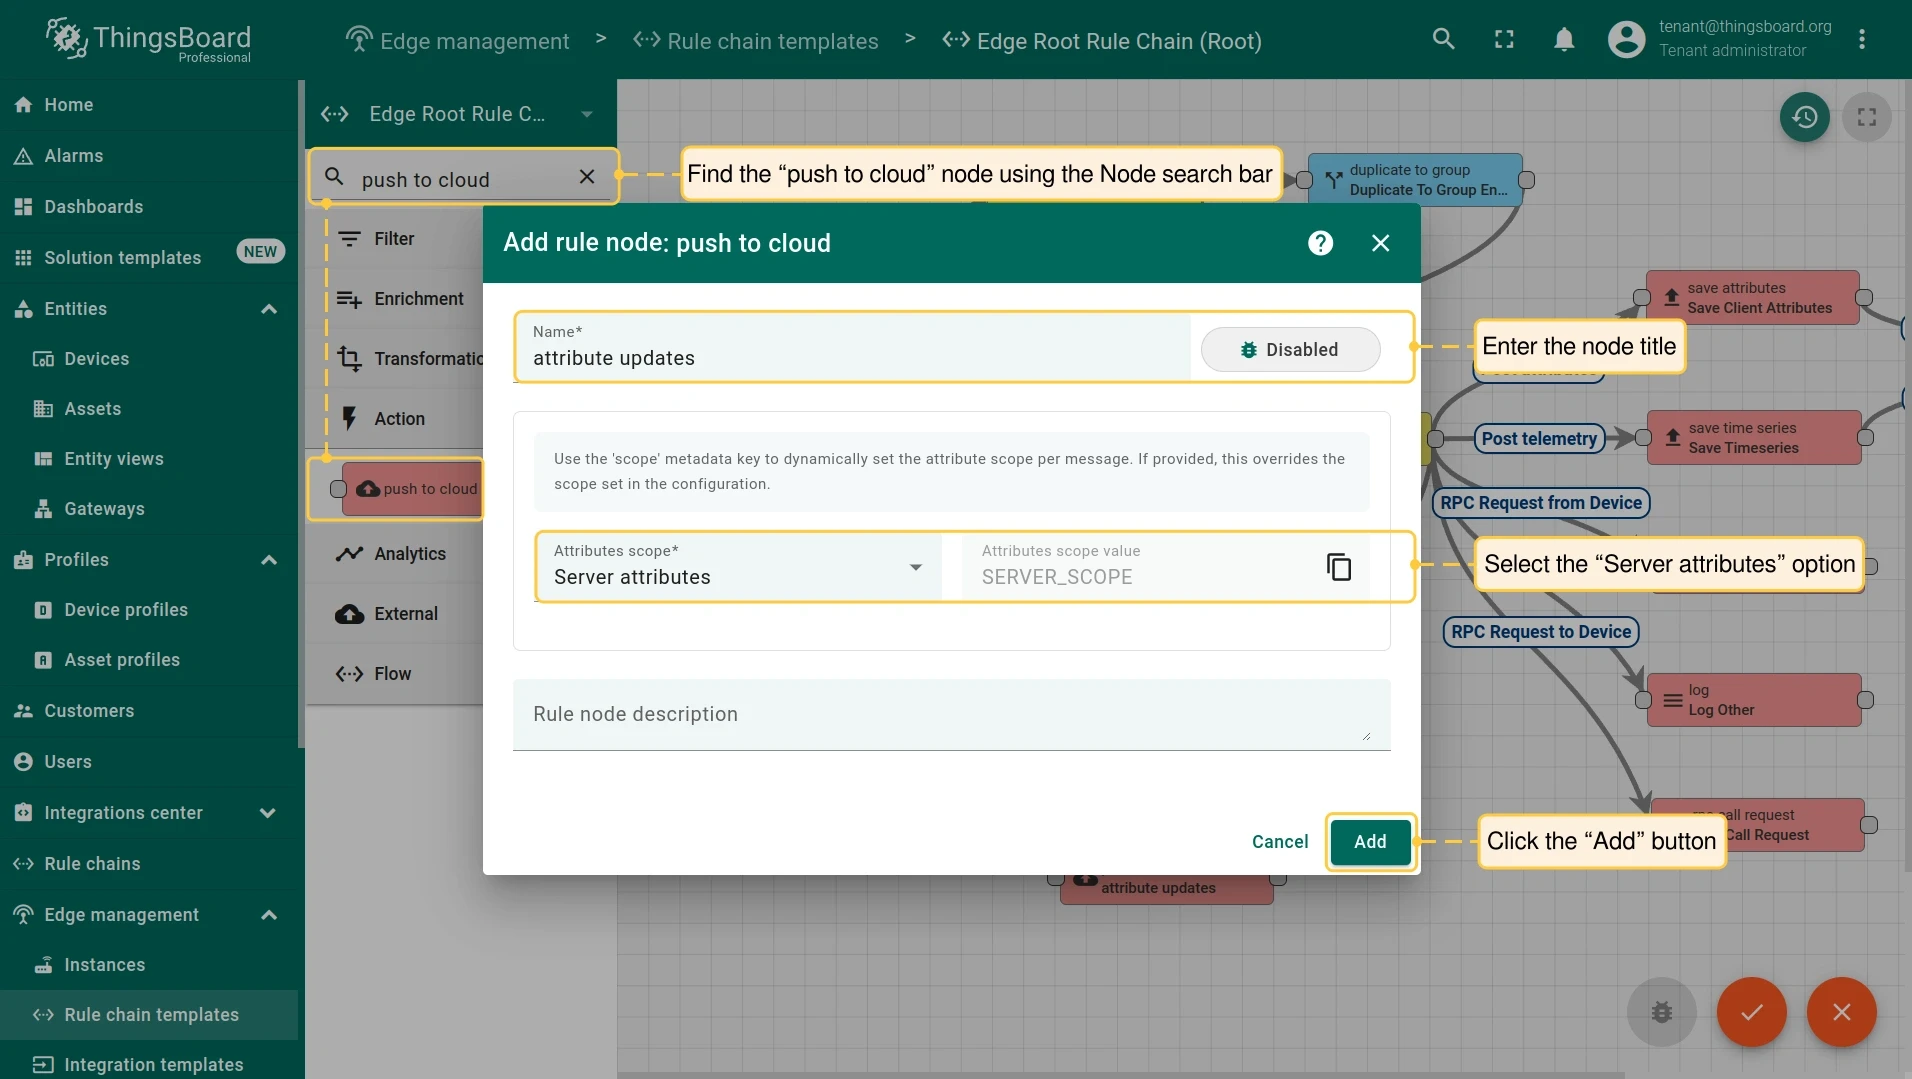
Search for the push to cloud node in the Node search bar. Drag it onto the rule chain sheet. In the Add rule node dialog, enter a name and select Server attributes in the Entity attributes scope field. Click Add.
-
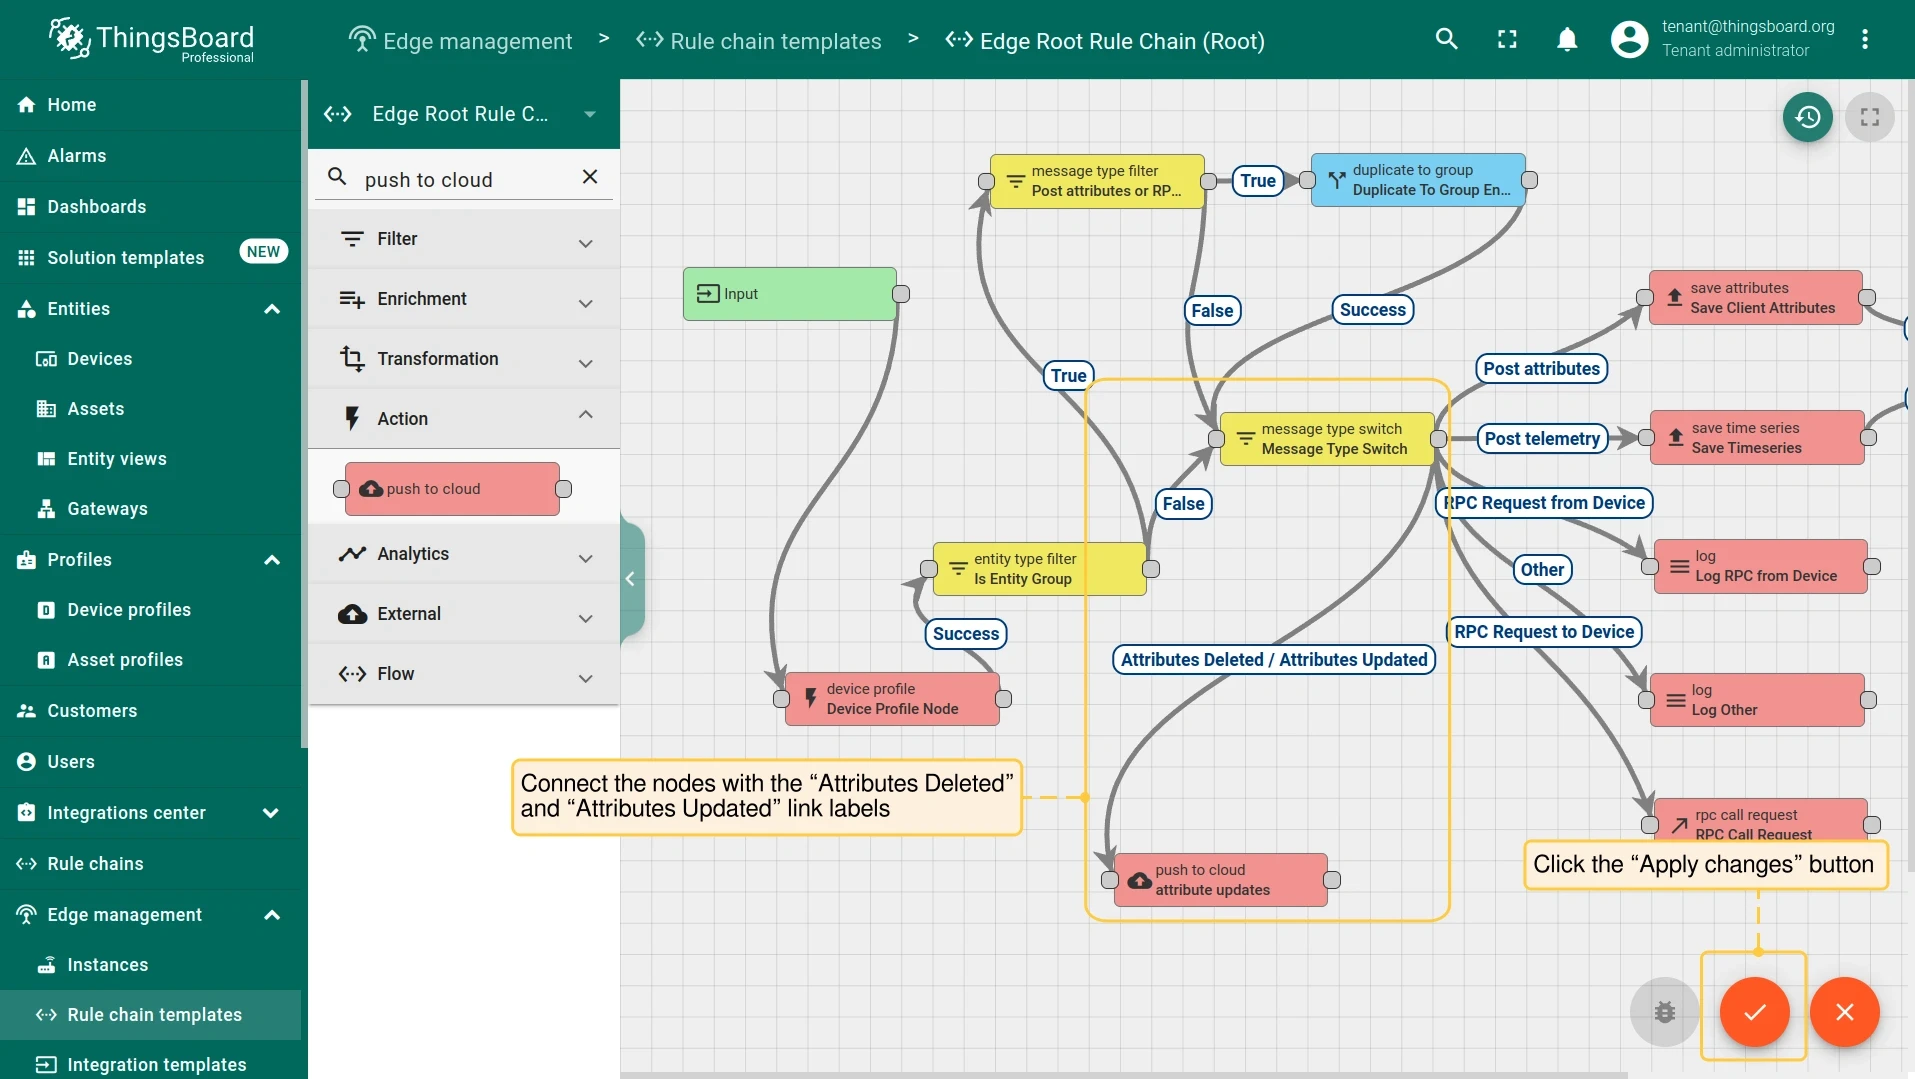
Connect the message type switch node to the push to cloud node with the Attributes Deleted and Attributes Updated link labels. Click Apply changes.
Custom attributes for Edge instances
Section titled “Custom attributes for Edge instances”This section covers attributes assigned to the Edge instance itself — introduced in release 3.9. Edge instance attributes act as placeholders in rule chains, letting a single rule chain template serve multiple Edge instances with different configurations at runtime.
Assign a custom attribute to an Edge instance
Section titled “Assign a custom attribute to an Edge instance”-
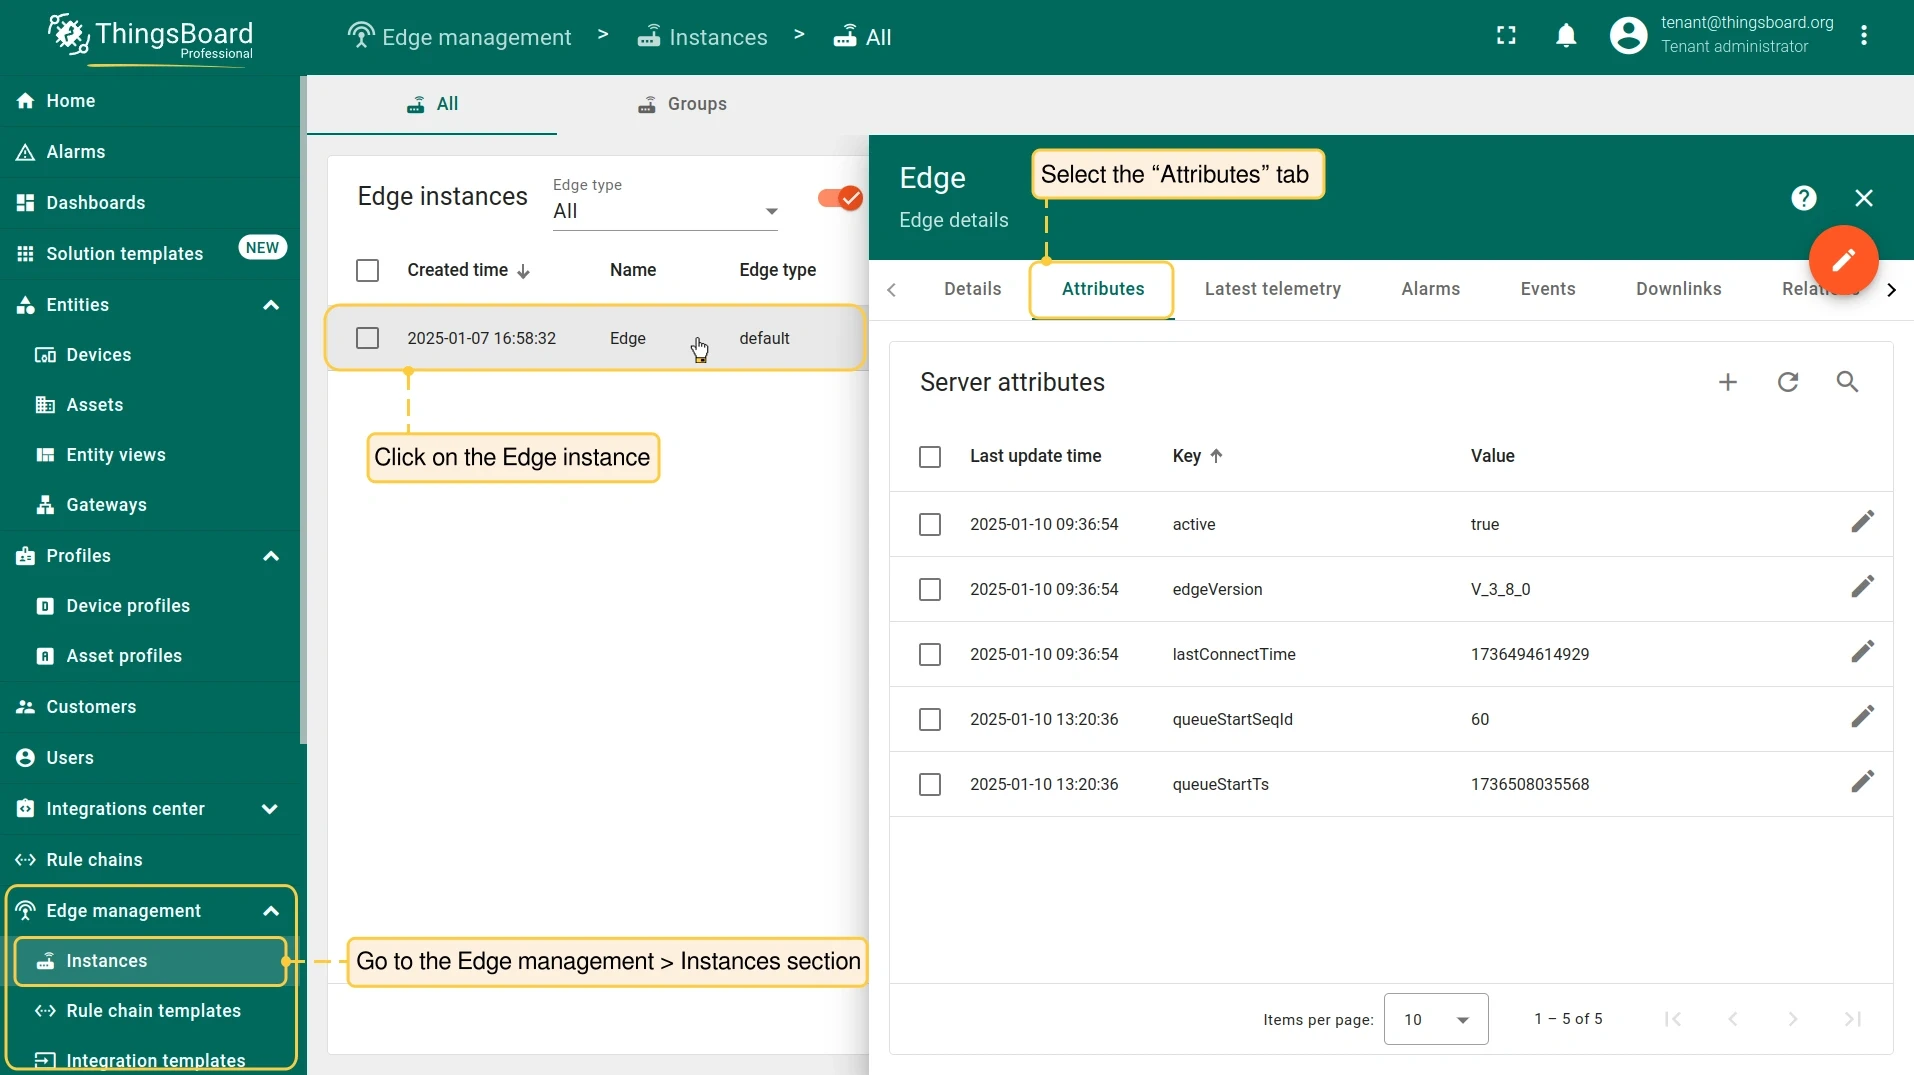
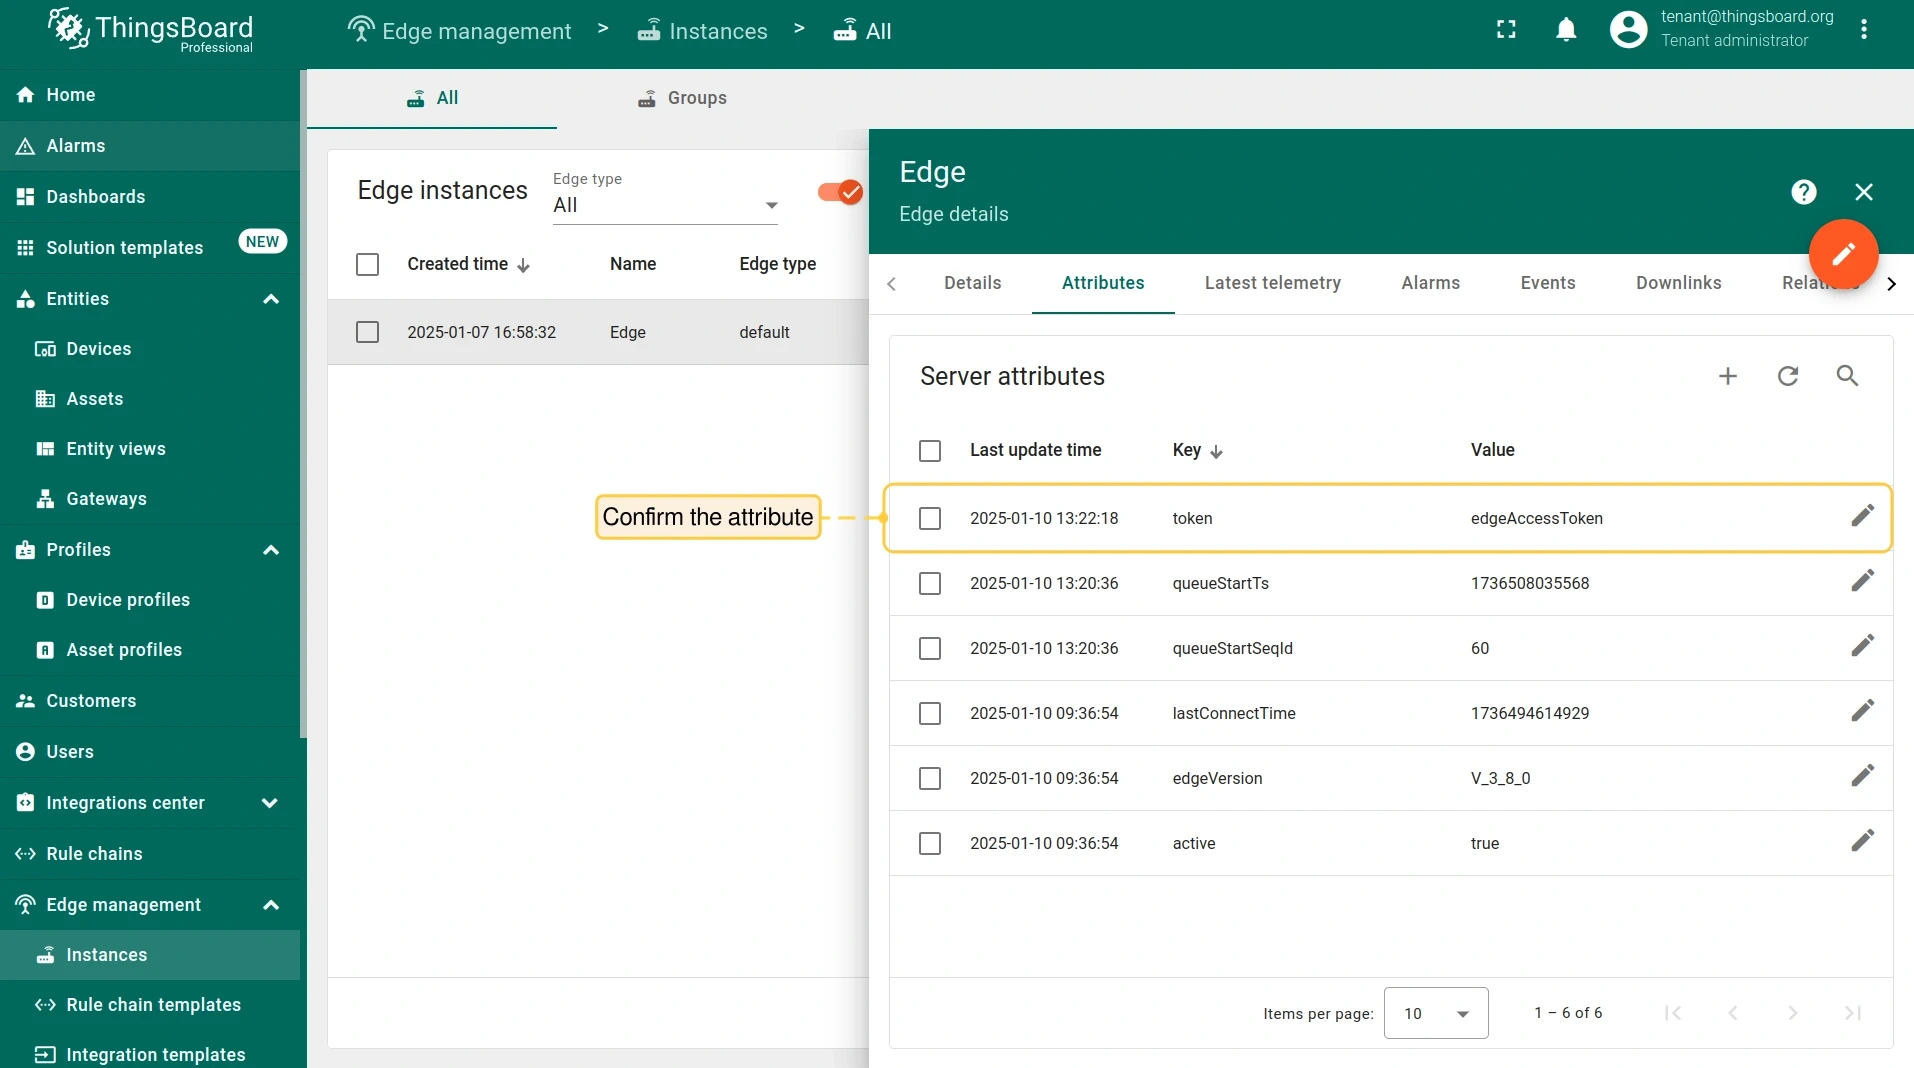
Log in to the server. Go to Edge management → Instances and click the Edge instance.
-
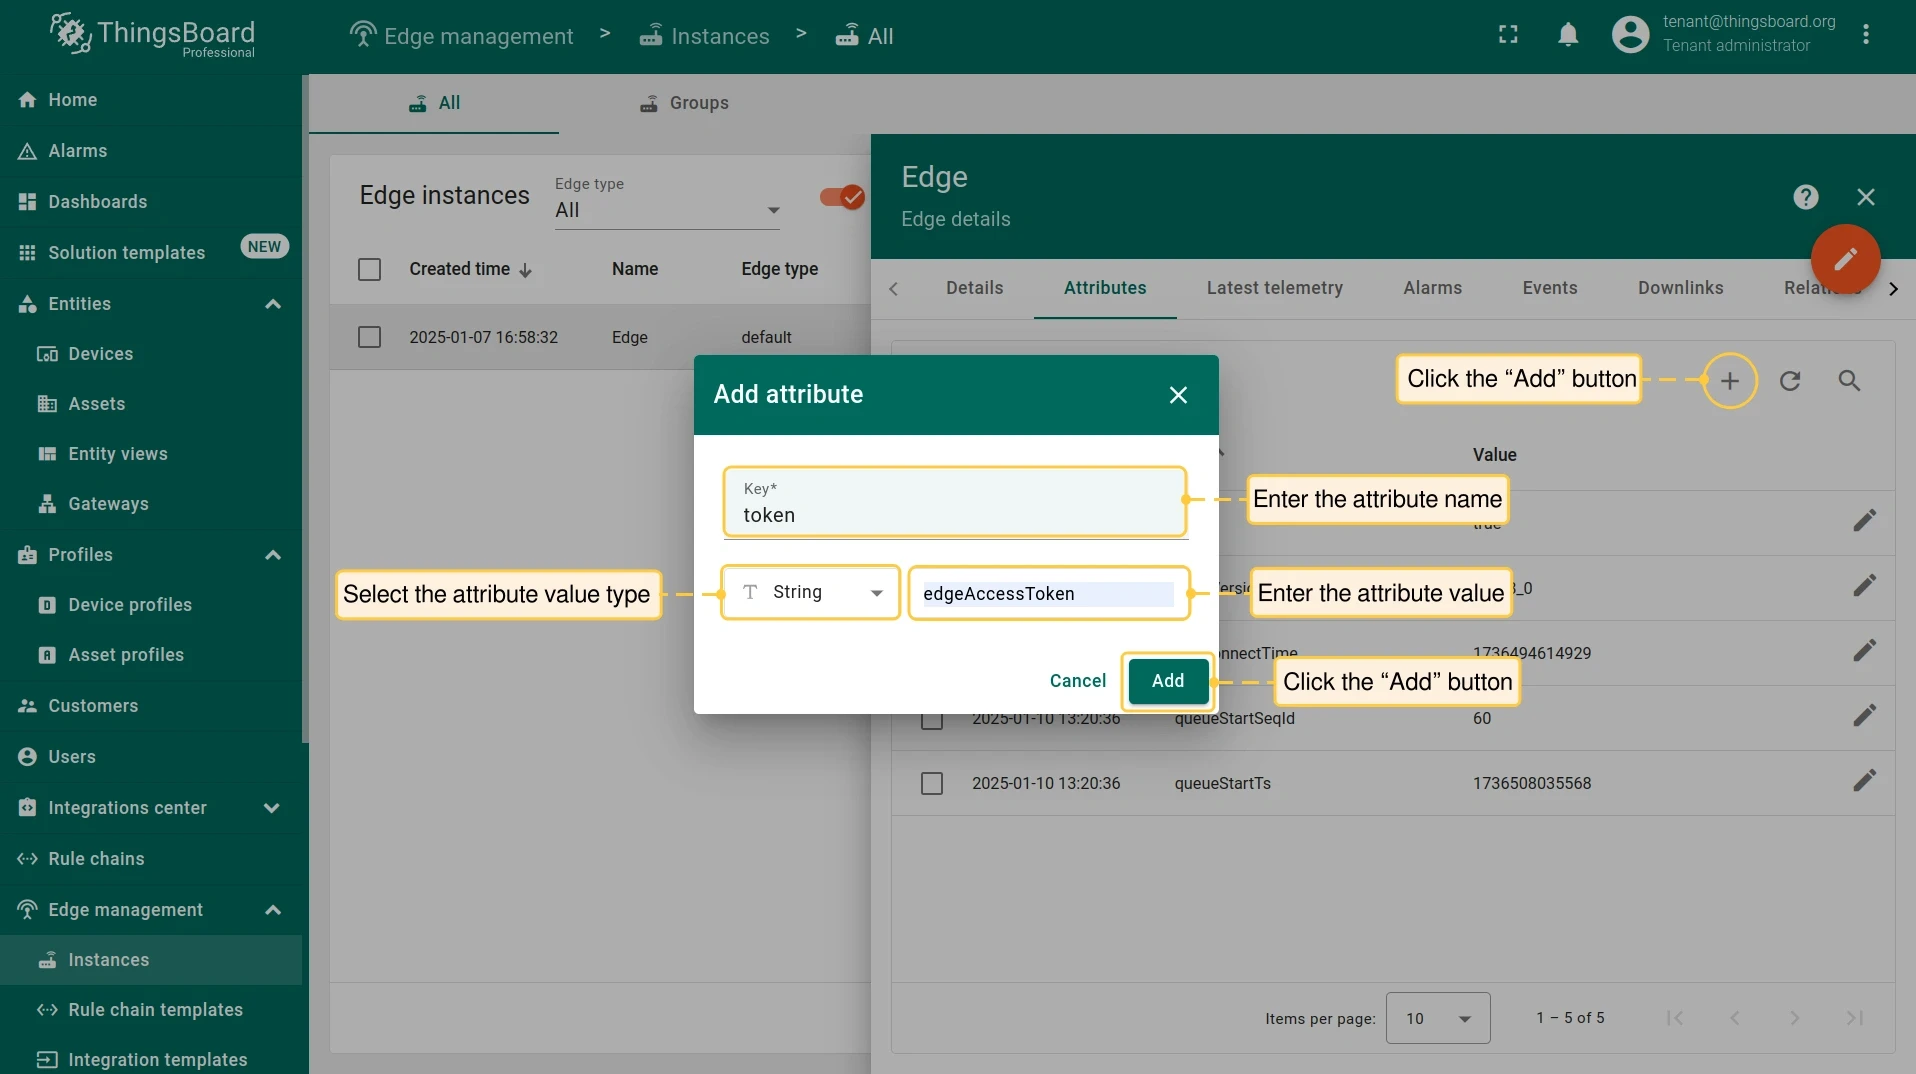
On the Edge details page, select the Attributes tab. Click Add (+) and enter the attribute name and value — for example,
edgeAccessToken. Click Add. -
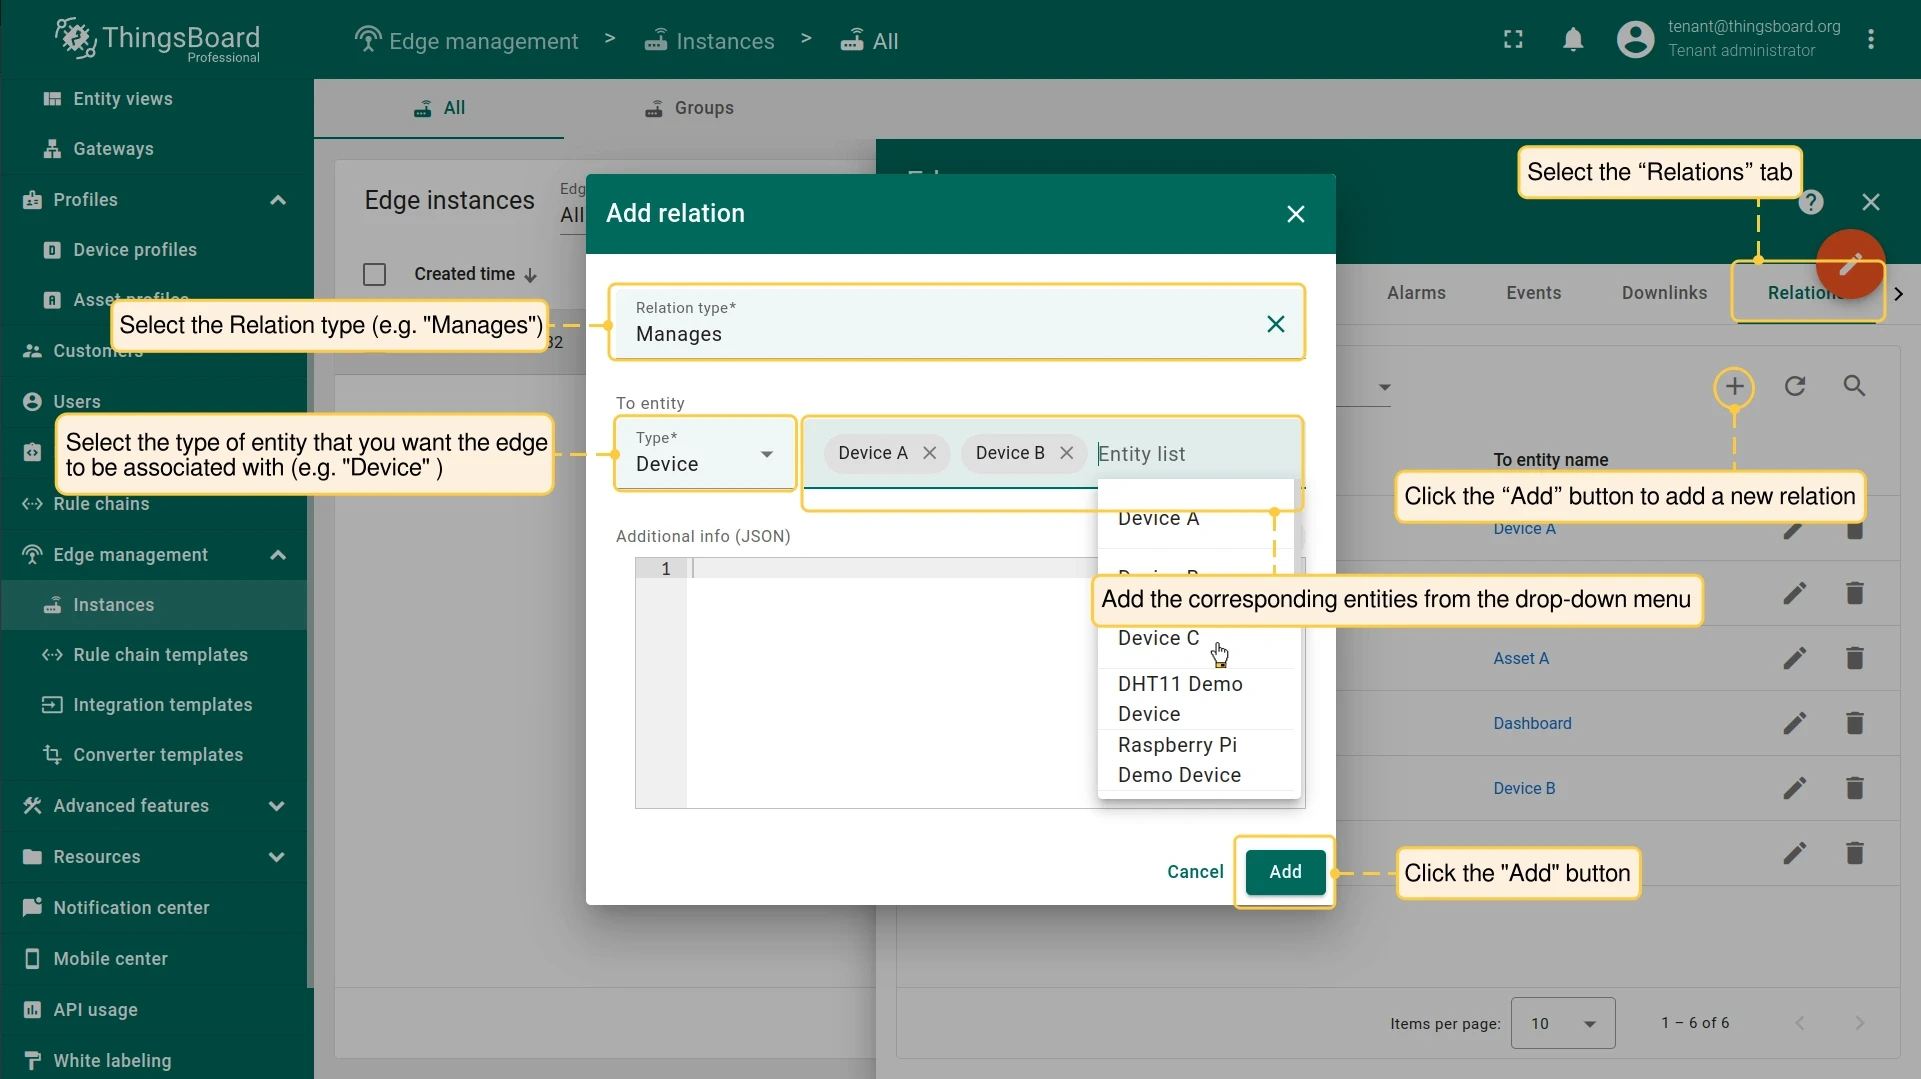
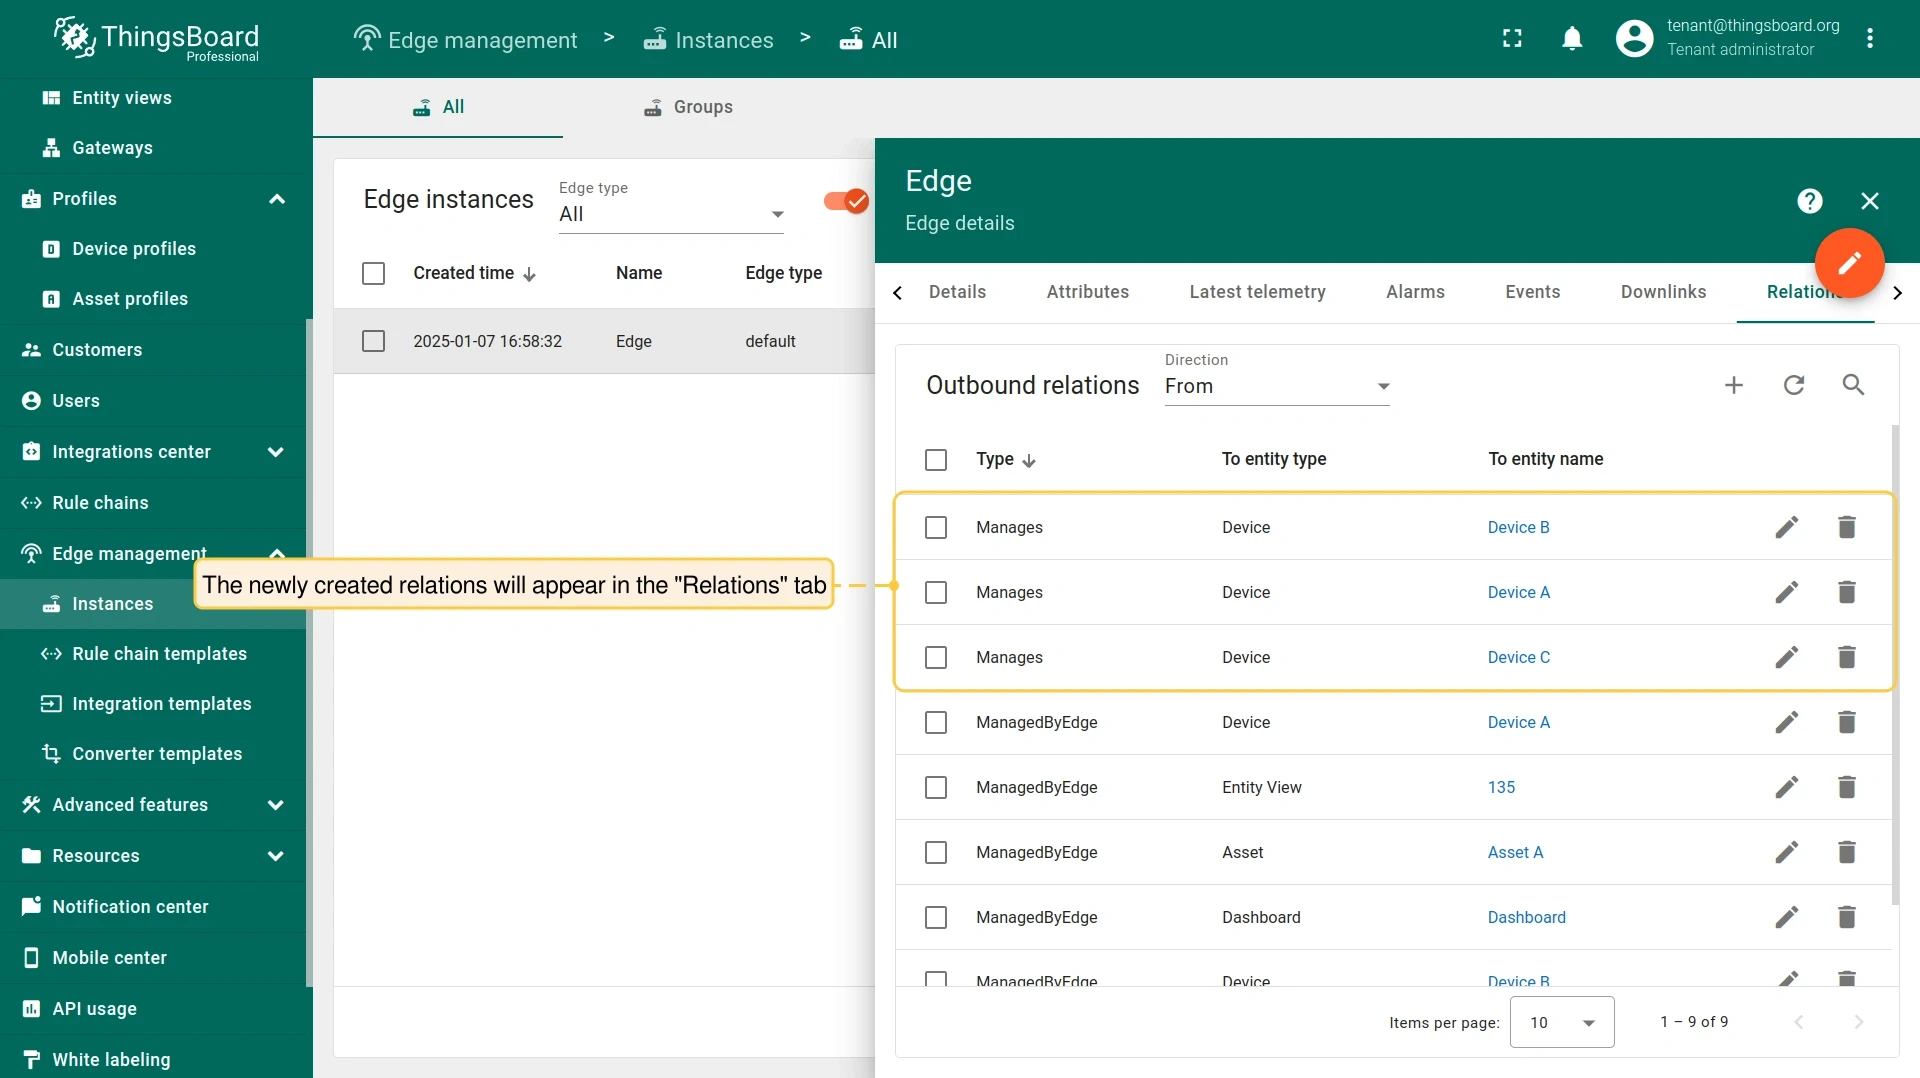
Select the Relations tab. Click Add (+) to create a relation between the Edge and its devices. Click Add.
Use attributes as rule chain placeholders
Section titled “Use attributes as rule chain placeholders”-
On the server, go to Edge management → Rule chain templates and open the rule chain. If you are running Edge 4.0 or later, you can edit the rule chain directly on the Edge under Rule chains.
-
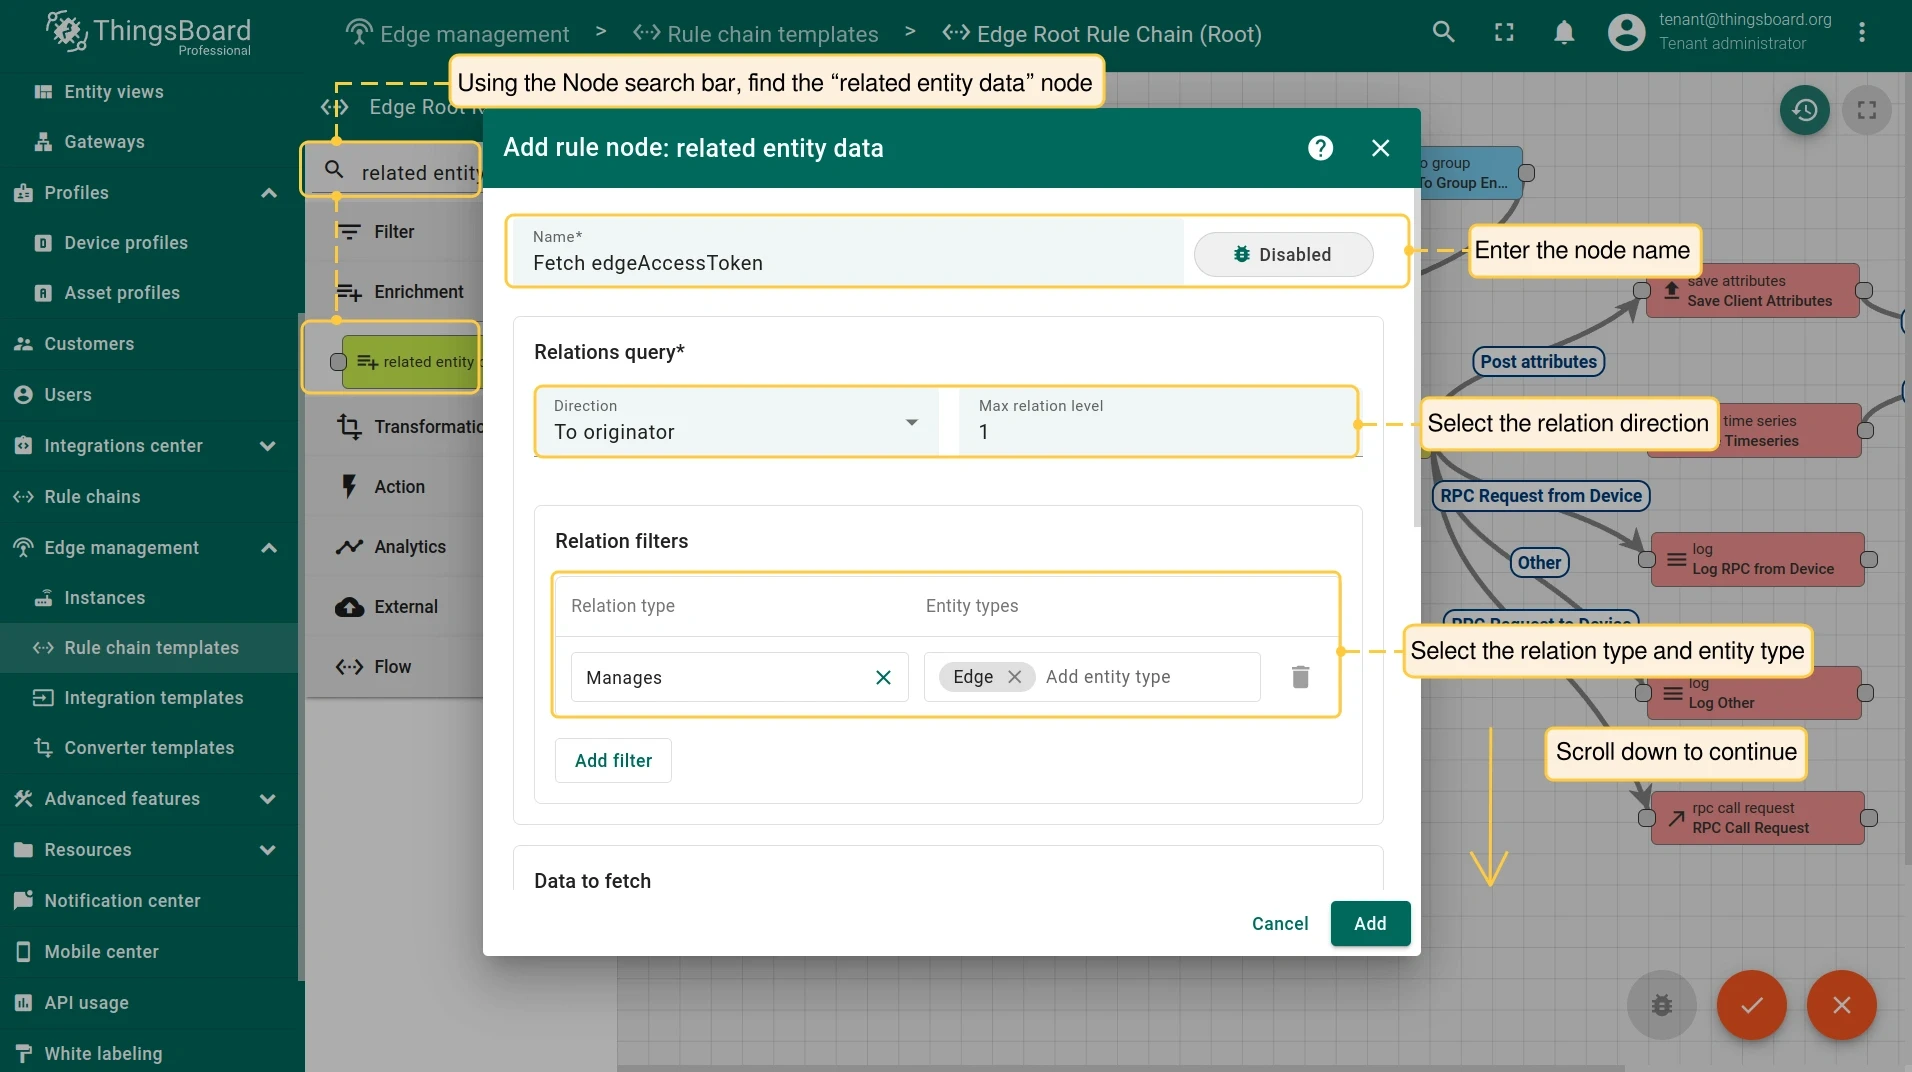
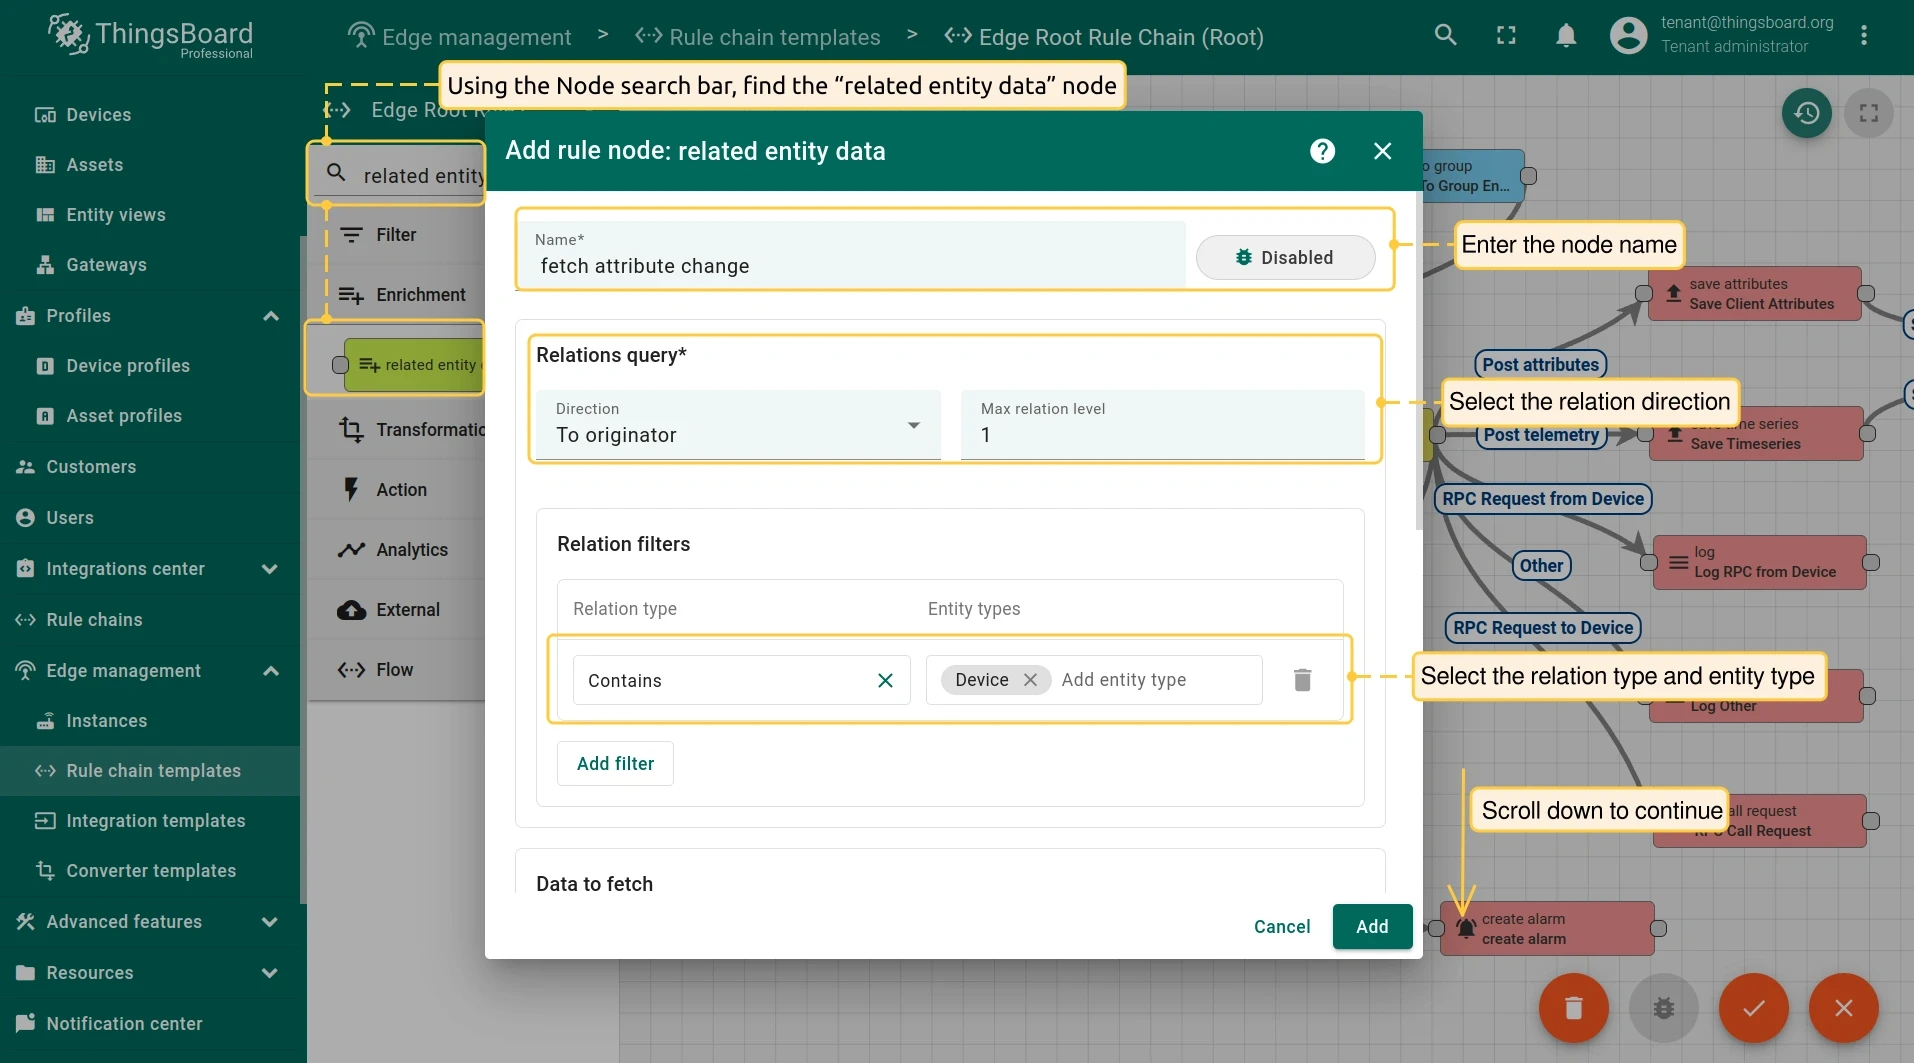
Search for the related entity data node in the Node search bar. Drag it onto the rule chain sheet. Fill in the fields in the dialog:
- Name: Enter the node name.
- Direction: Select From originator or To originator.
- Relation type: Select Contains or Manages.
- Entity types: Add the entity type.
-
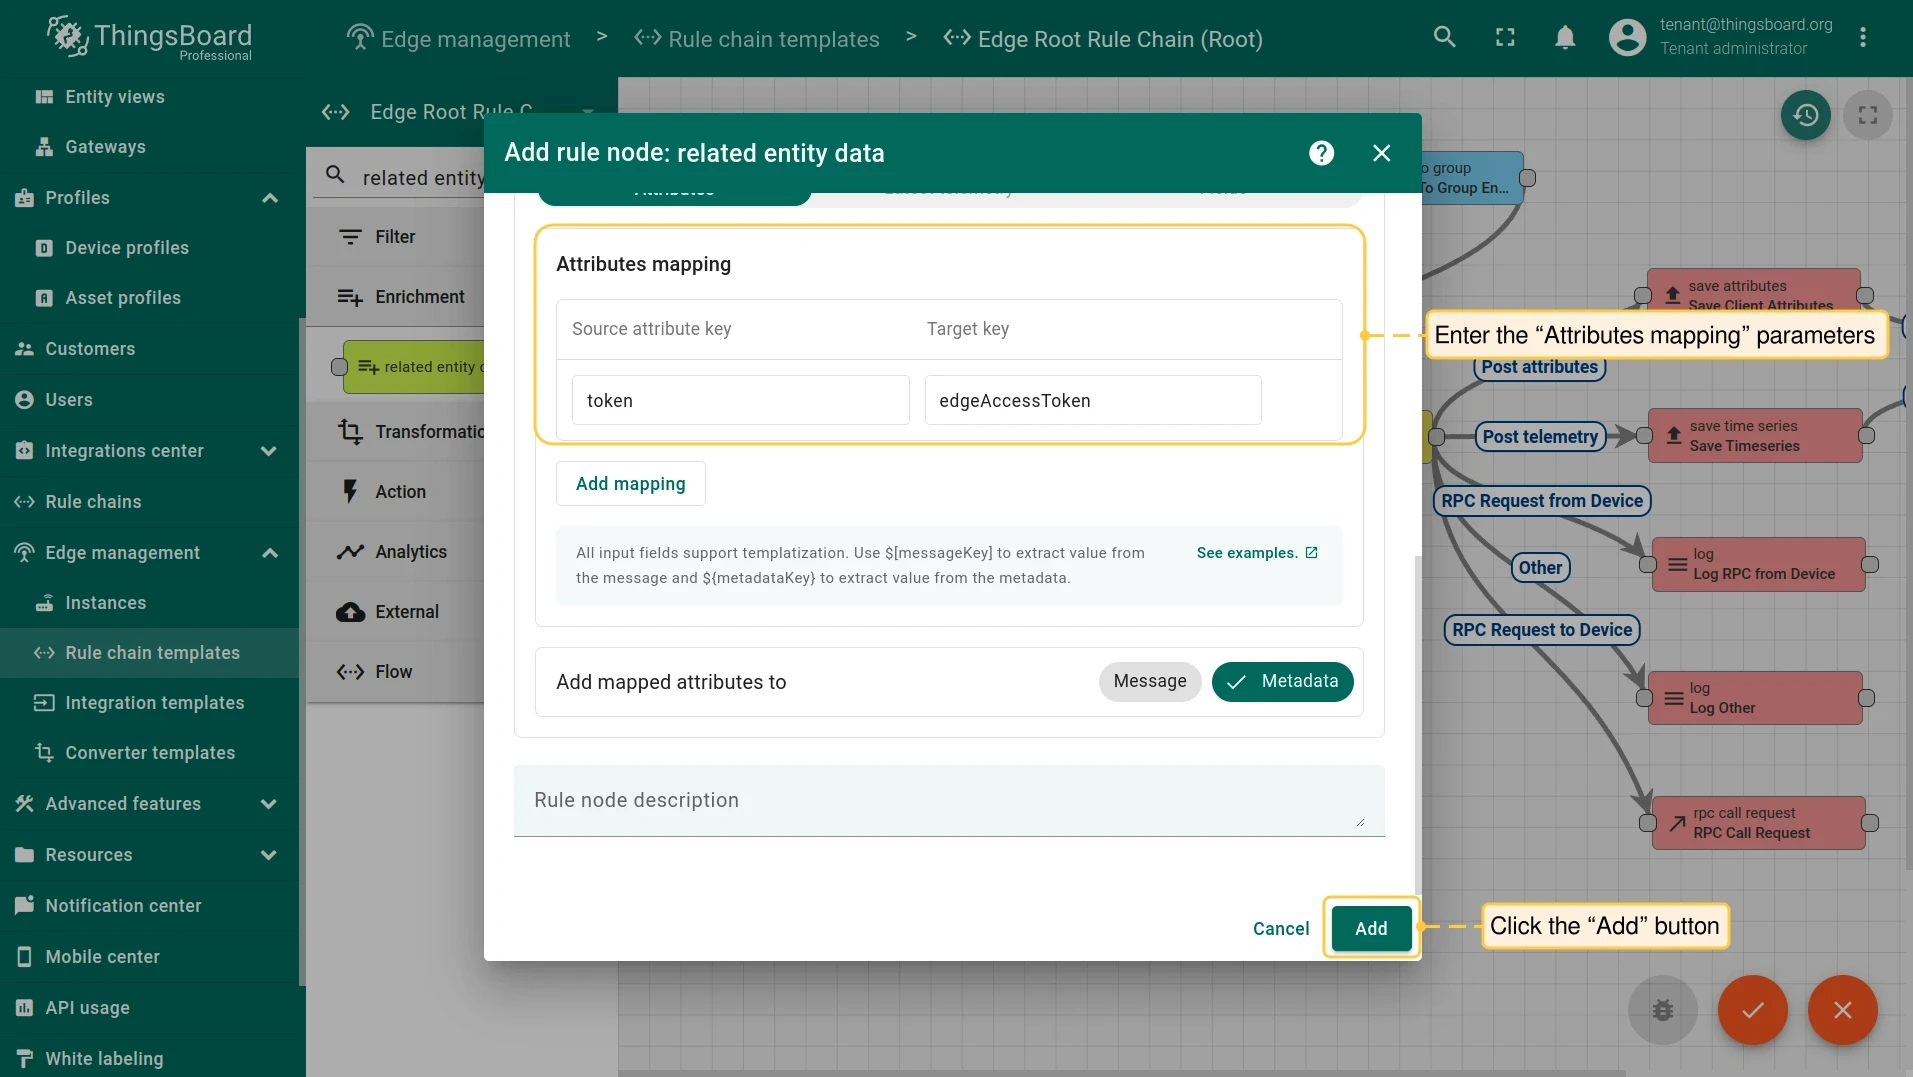
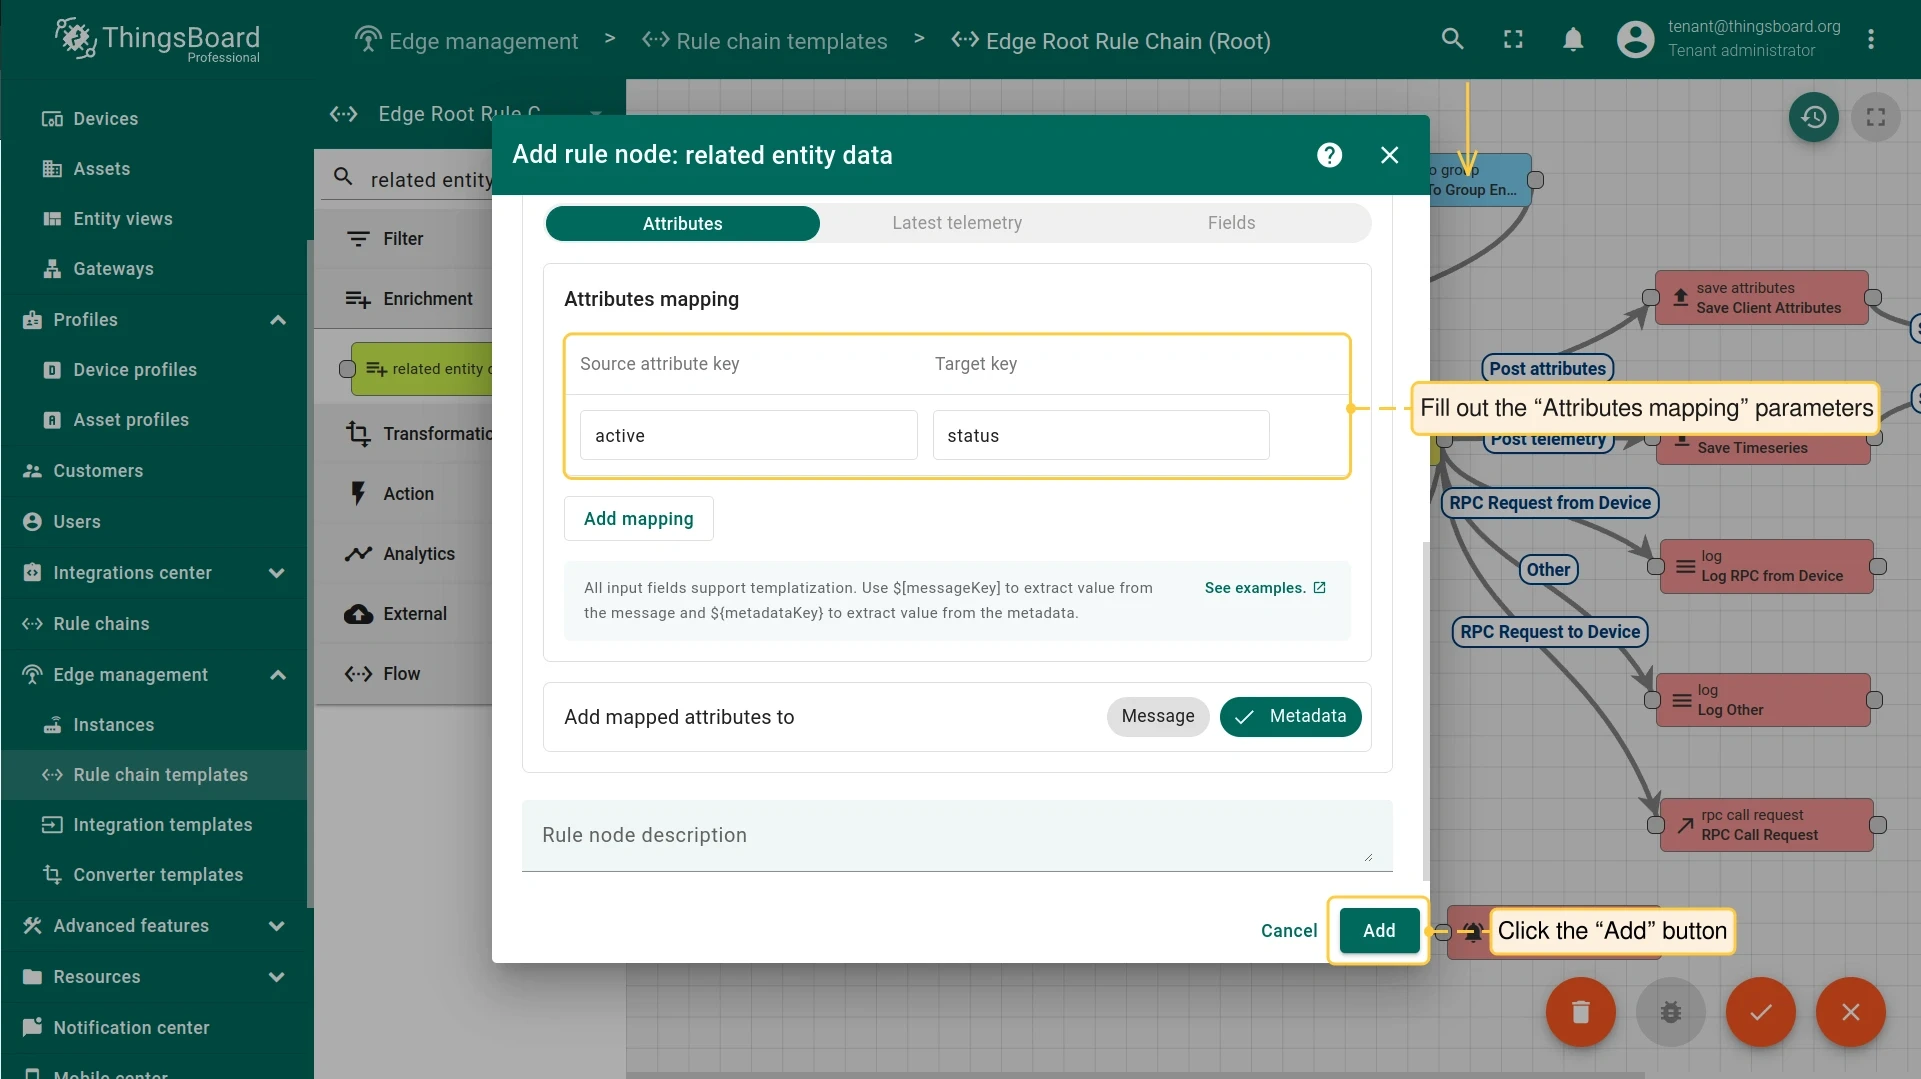
In the Data to fetch block, select the Attributes tab and configure the Attributes mapping:
- Source attribute key: Enter the entity attribute key to track.
- Target key: Enter the target key name. Click Add.
-
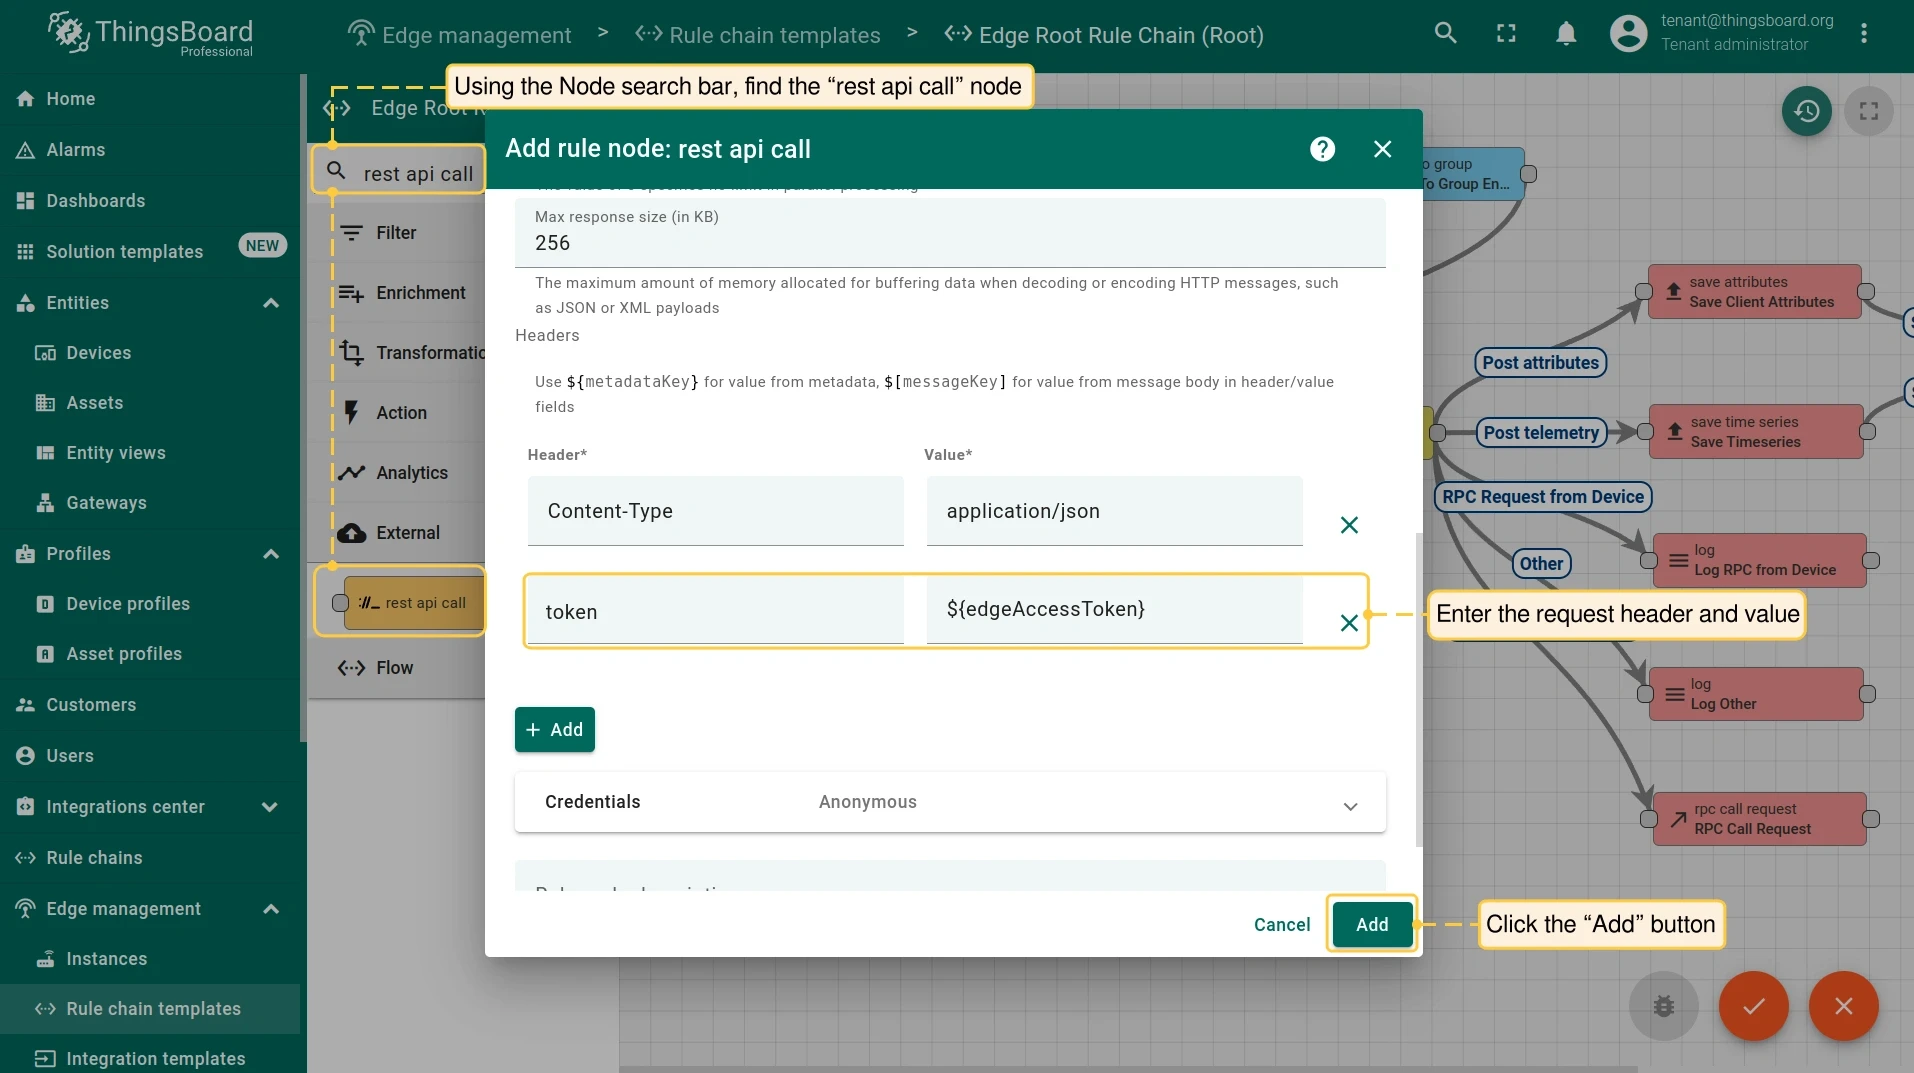
Search for the rest api call node. Drag it onto the sheet and configure it:
- Name: Enter the node name.
- Headers: Enter the request header and value. The value can be a static string or a pattern resolved from message metadata. Click Add.
-
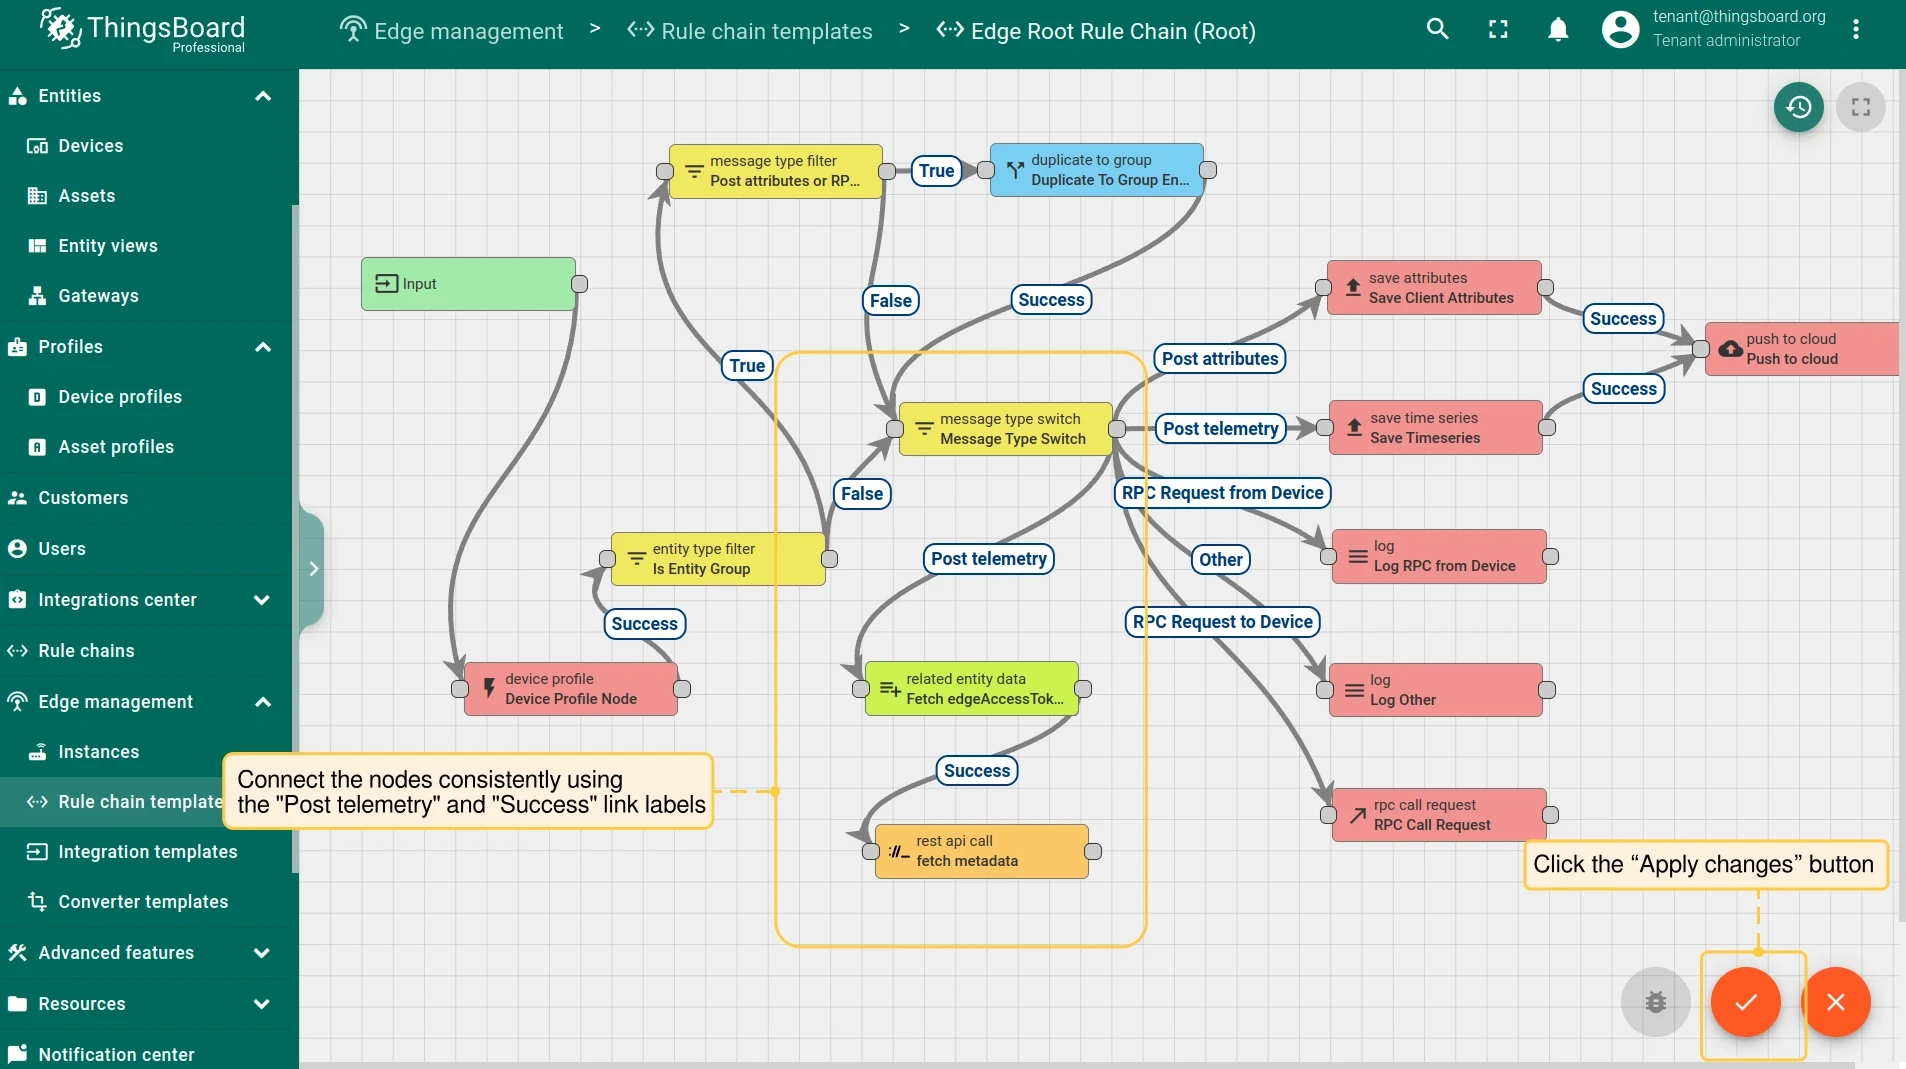
Connect message type switch → related entity data with the Post telemetry label. Connect related entity data → rest api call with the Success label. Click Apply changes.
Using attributes in rule chains
Section titled “Using attributes in rule chains”This section shows how to use device or asset attributes directly in rule chain logic — for example, triggering an alarm whenever a specific device attribute changes.
Before configuring alarm notifications, complete the following:
- Add a device to the Edge instance. For details, see Entities and relations.
- Add a custom attribute to the device using the steps in the Assigning attributes to entities section above.
- Create an asset and set a Contains or Manages relation between the asset and the device.
-
On the server, go to Edge management → Rule chain templates and open the rule chain. If you are running Edge 4.0 or later, edit the rule chain directly on the Edge under Rule chains.
-
Search for the related entity data node. Drag it onto the sheet and fill in the fields:
- Name: Enter the node name.
- Direction: Select From originator or To originator.
- Relation type: Select Contains or Manages.
- Entity types: Add the entity type.
-
In the Data to fetch block, select the Attributes tab and configure the Attributes mapping:
- Source attribute key: Enter the attribute key to track.
- Target key: Enter the target key name. Click Add.
-
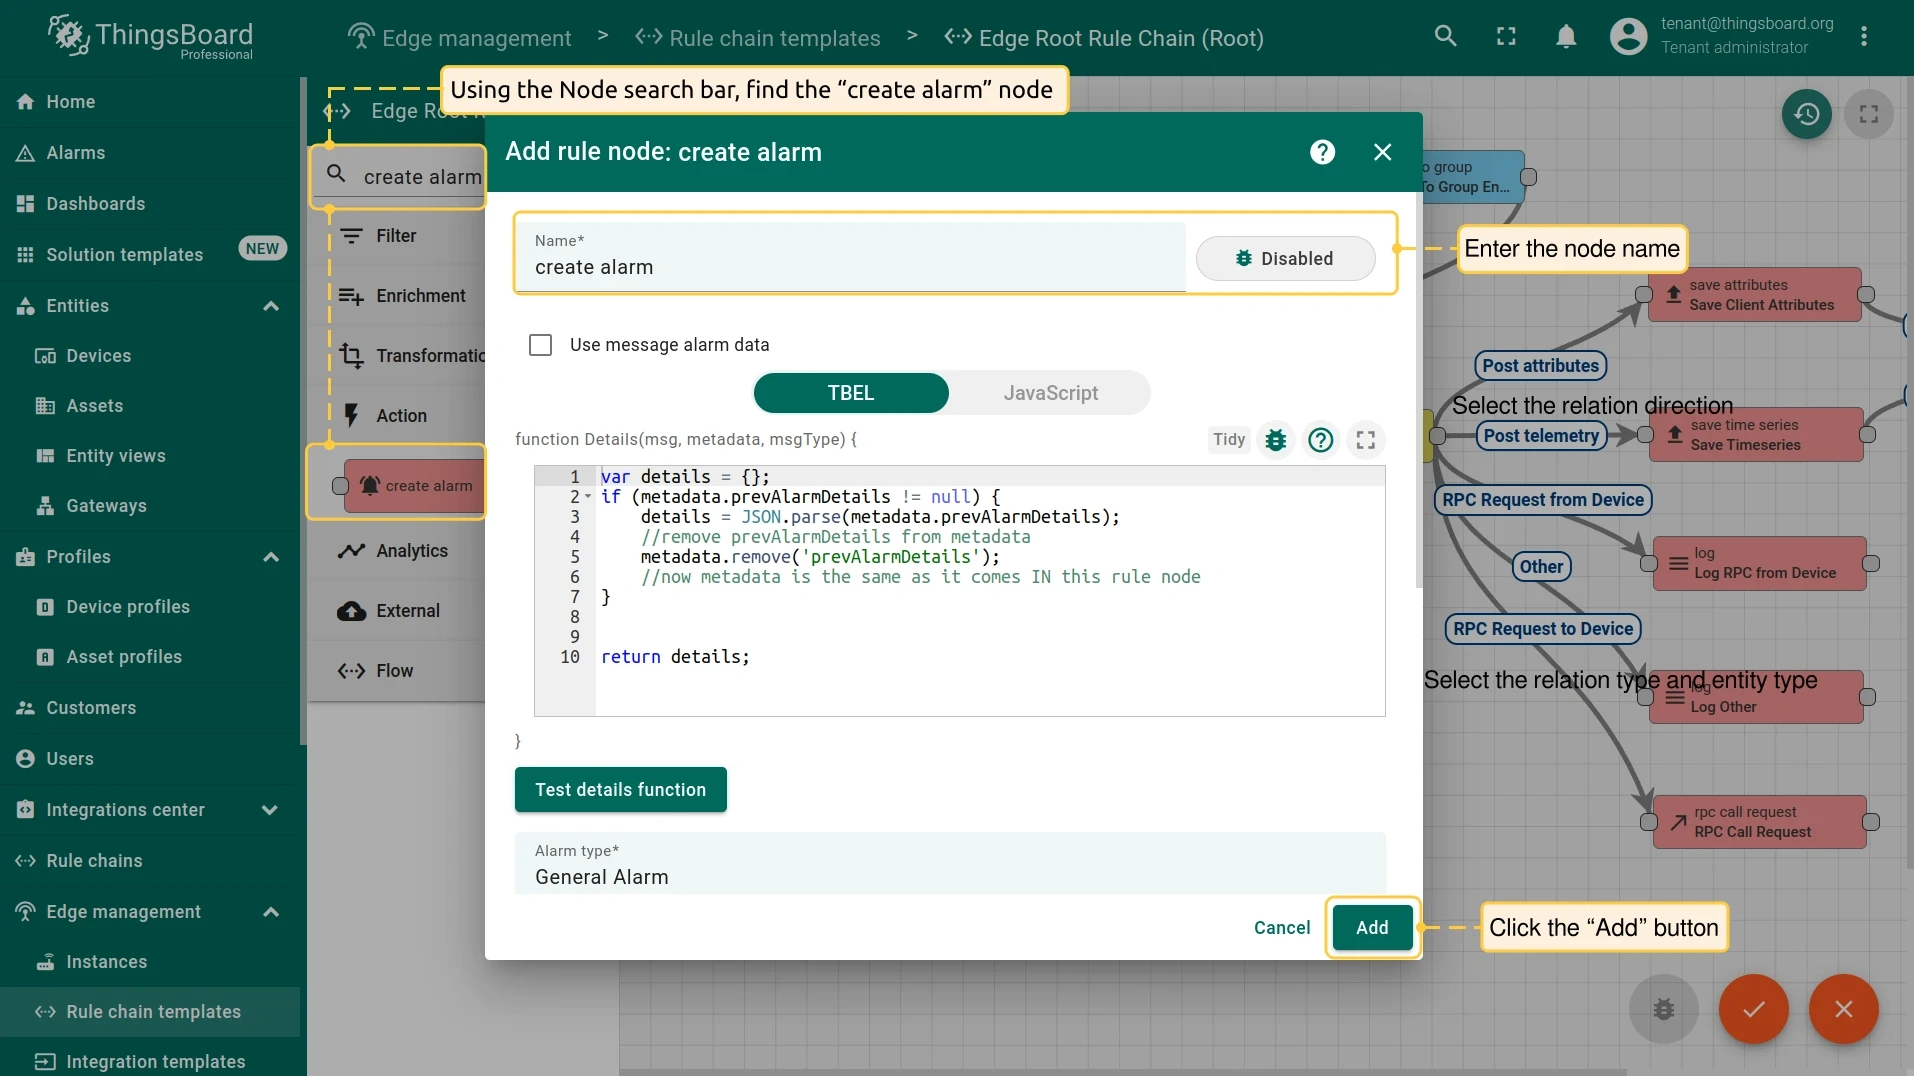
Search for the create alarm node. Drag it onto the sheet, enter a name, and click Add.
-
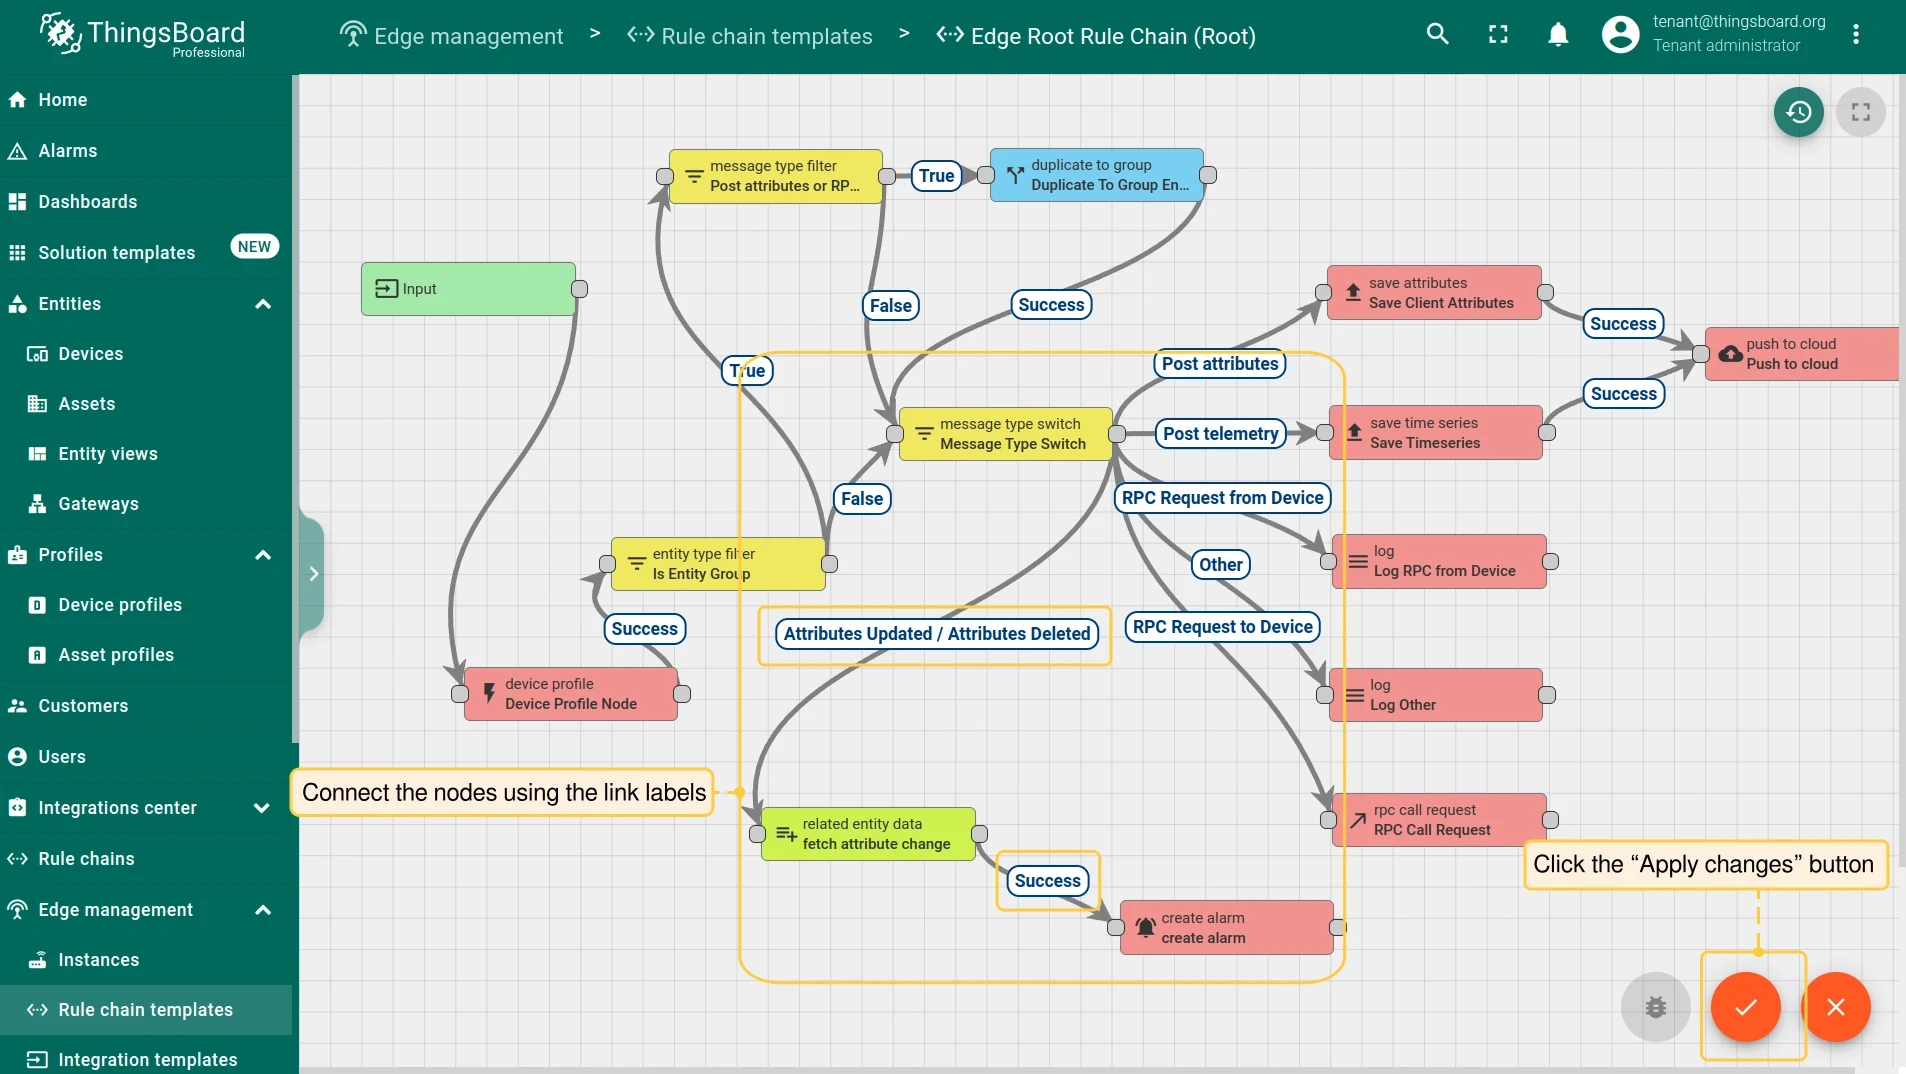
Connect message type switch → related entity data with the Attributes Updated and Attributes Deleted labels. Connect related entity data → create alarm with the Success label. Click Apply changes.
-
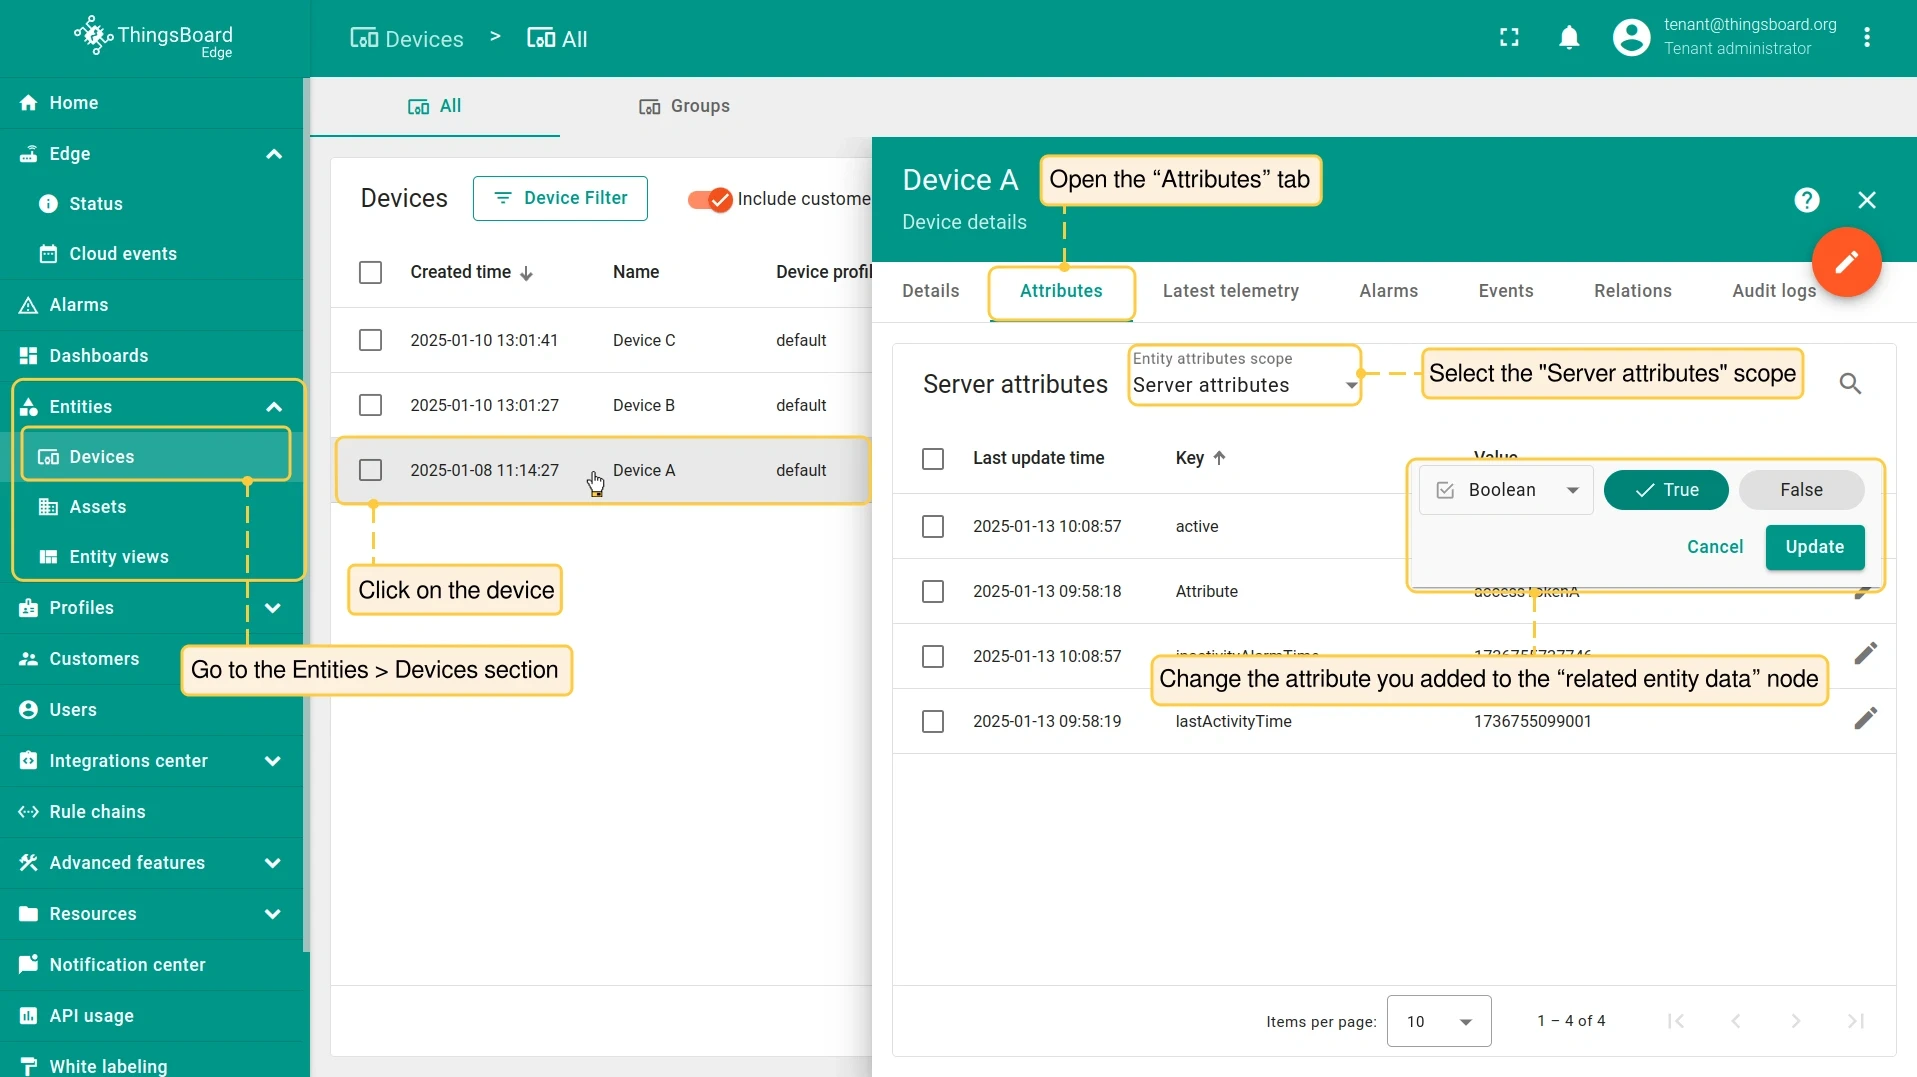
Go to Entities → Devices, open the Attributes tab on the device details page, and change the attribute you configured in the related entity data node. Confirm the alarm notification is received.
Was this helpful?