AI Solution Creator
AI Solution Creator is an intelligent agent that converts a plain-language description of your use case into a working IoT prototype. No setup guides, no configuration manuals, no prior platform knowledge needed.
Describe what you need, review the proposed configuration, and get a ready-to-explore foundational solution in minutes. Think of it as working with a ThingsBoard solution architect who asks the right questions, understands your goals, and builds a solution tailored to your use case.
How it works
Section titled “How it works”AI Solution Creator guides you through a three-step process where you collaborate with the AI Agent to design and generate a foundational prototype of your IoT solution in your tenant.
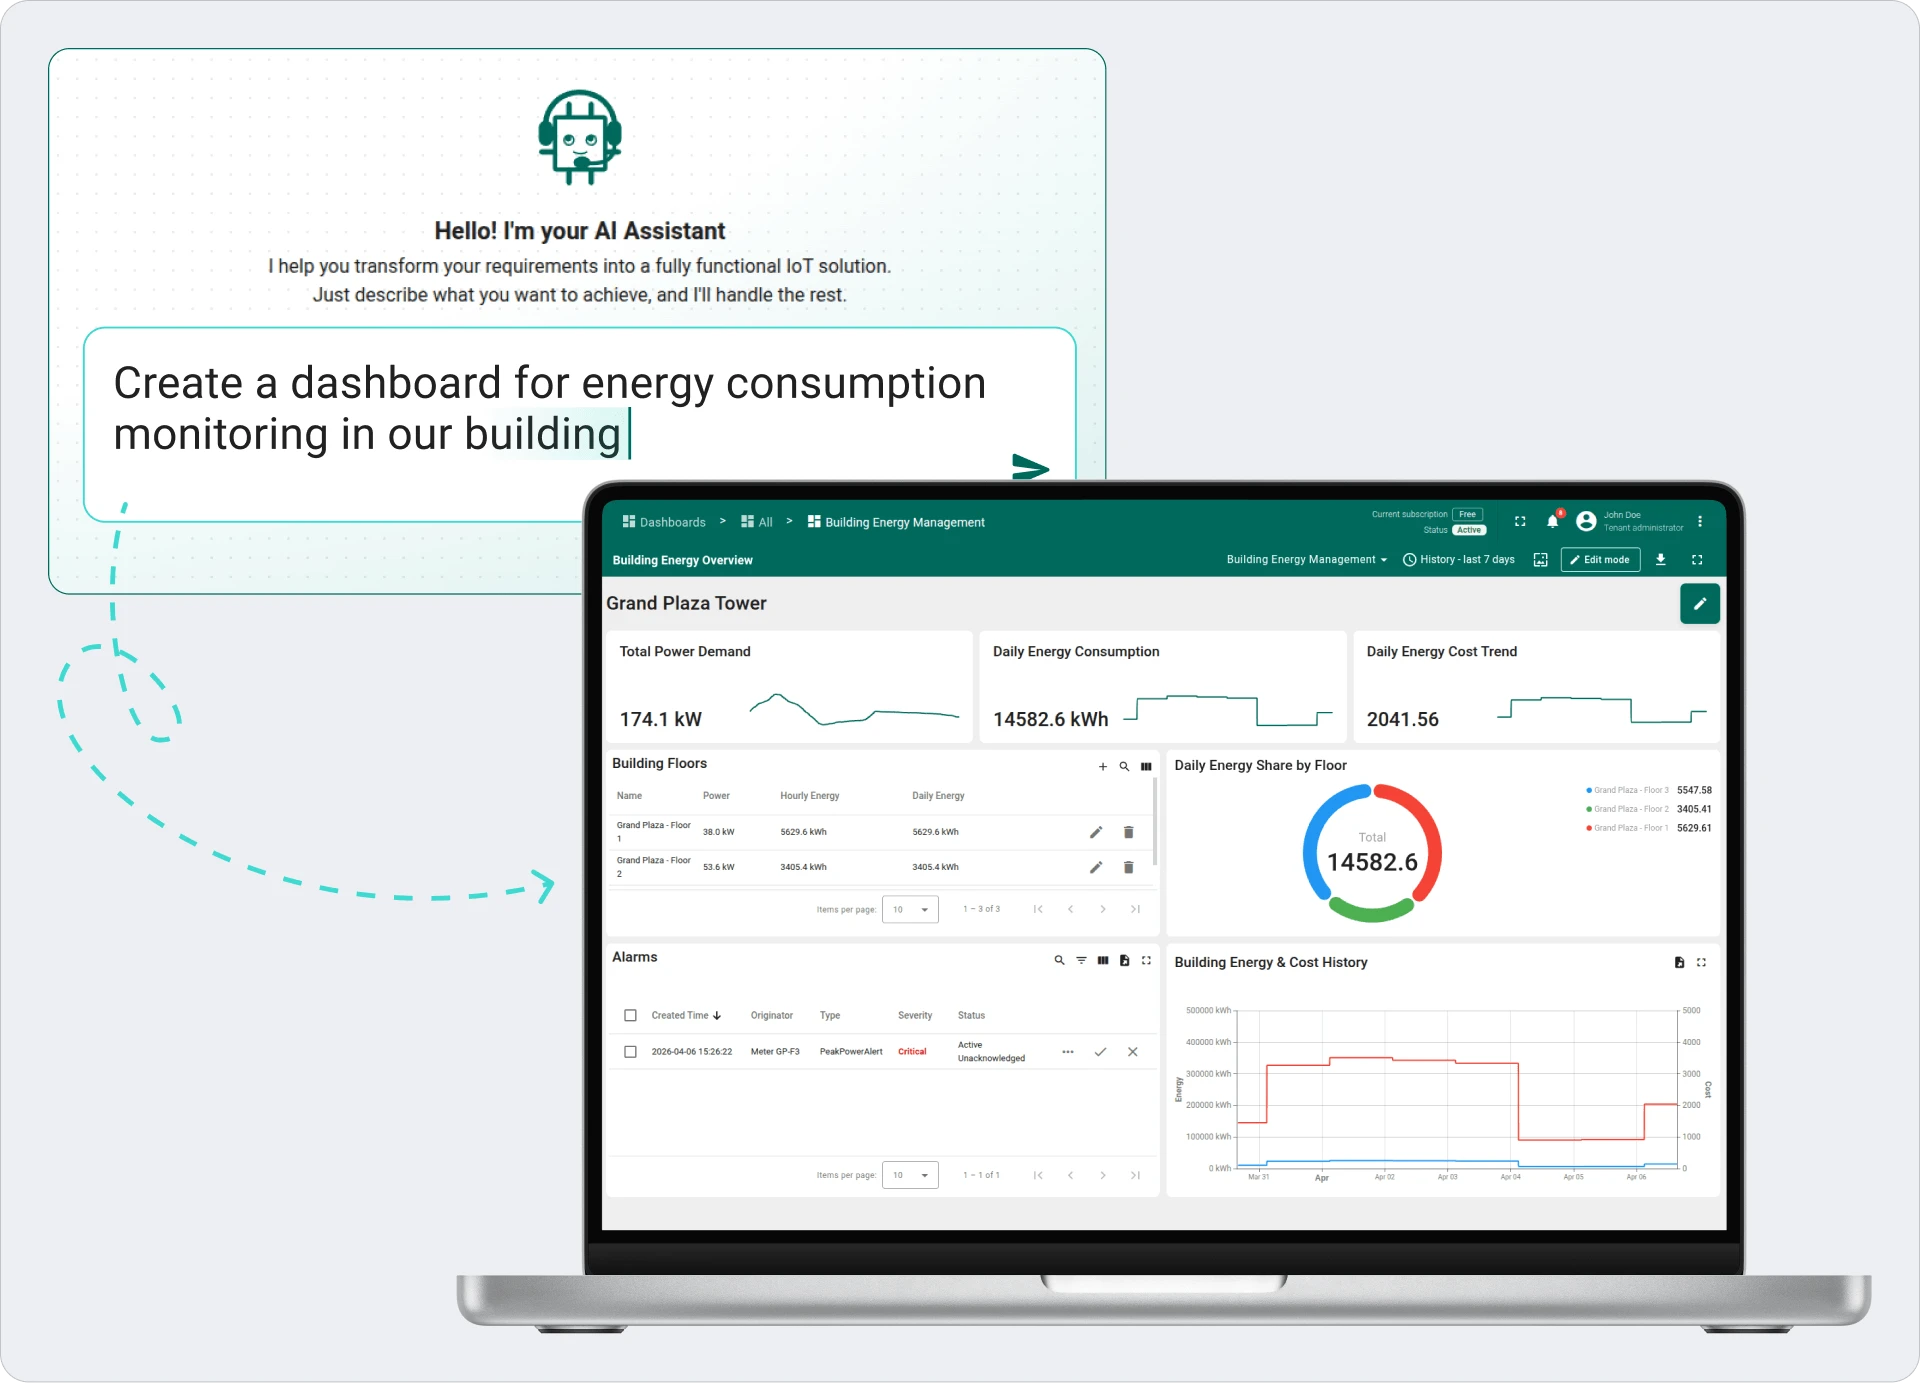
The example below demonstrates the process using an energy monitoring solution.
-
Architecture Design
In this step, the AI Assistant designs the solution architecture: entities, alarm rules, calculated fields, and access control. You describe your use case, review the proposed architecture, and refine it if needed. Dashboard configuration happens in the next step, so focus on your data model and business logic here.
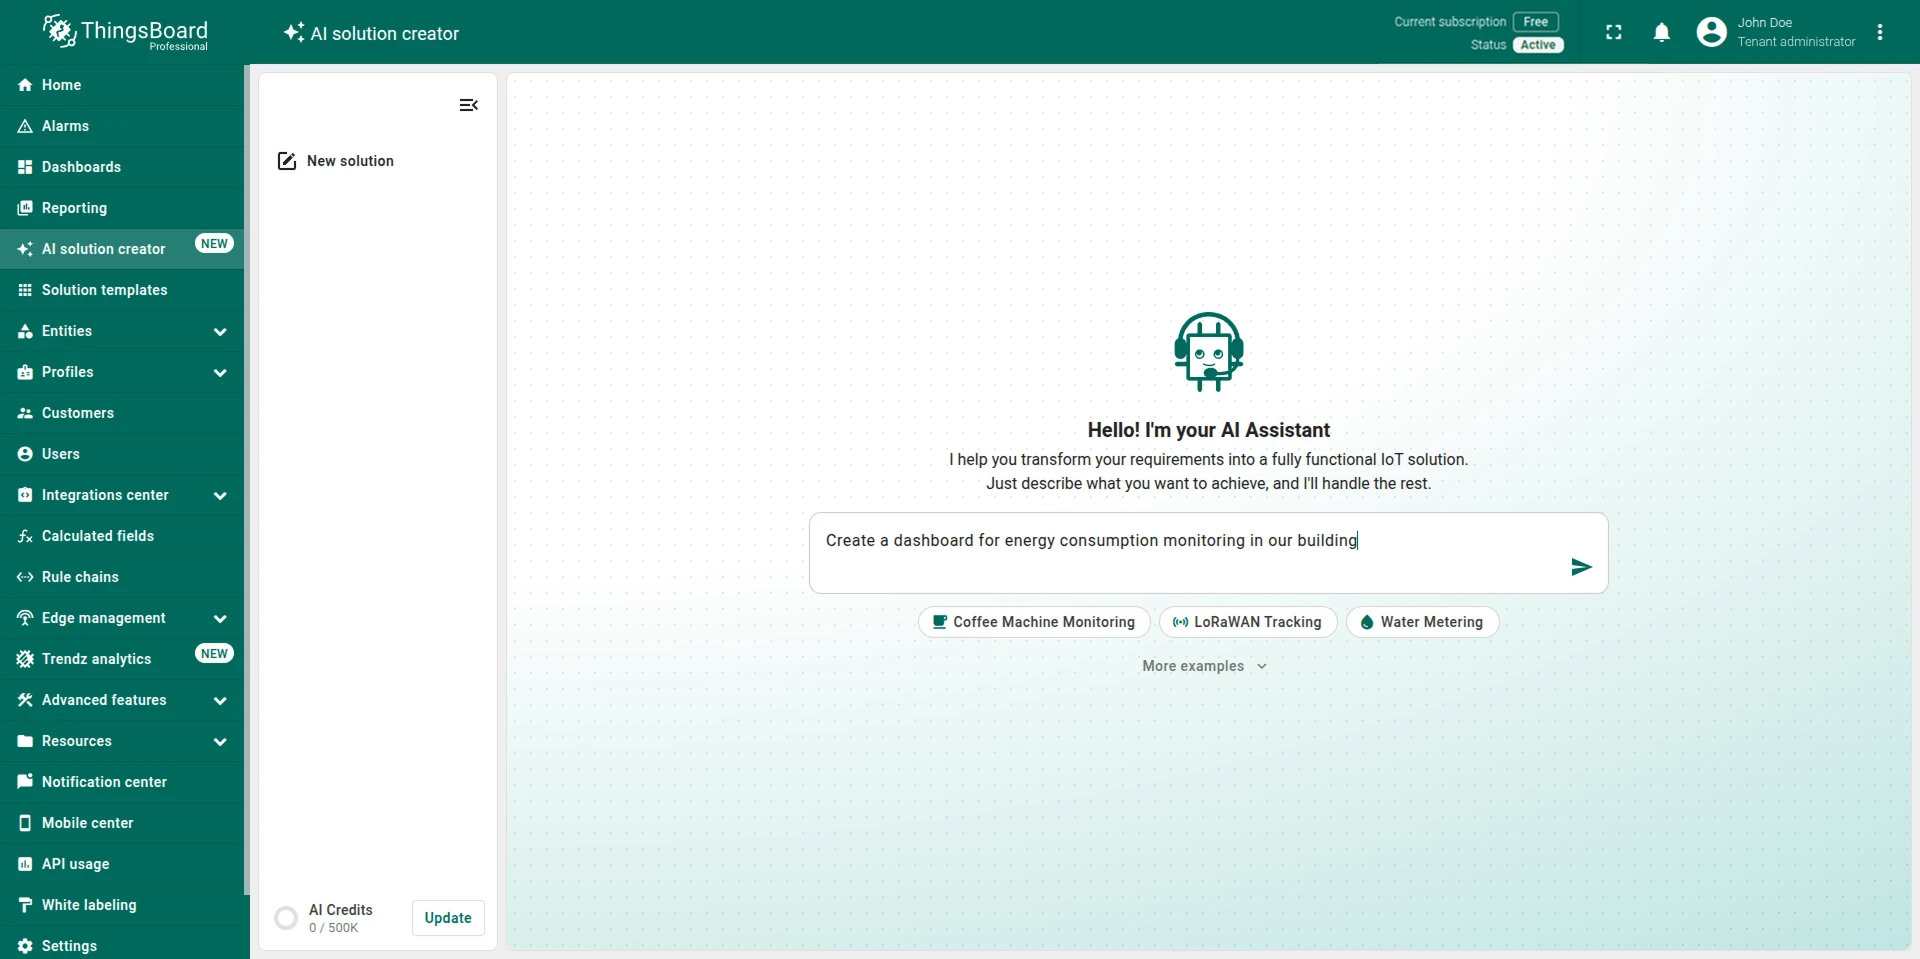
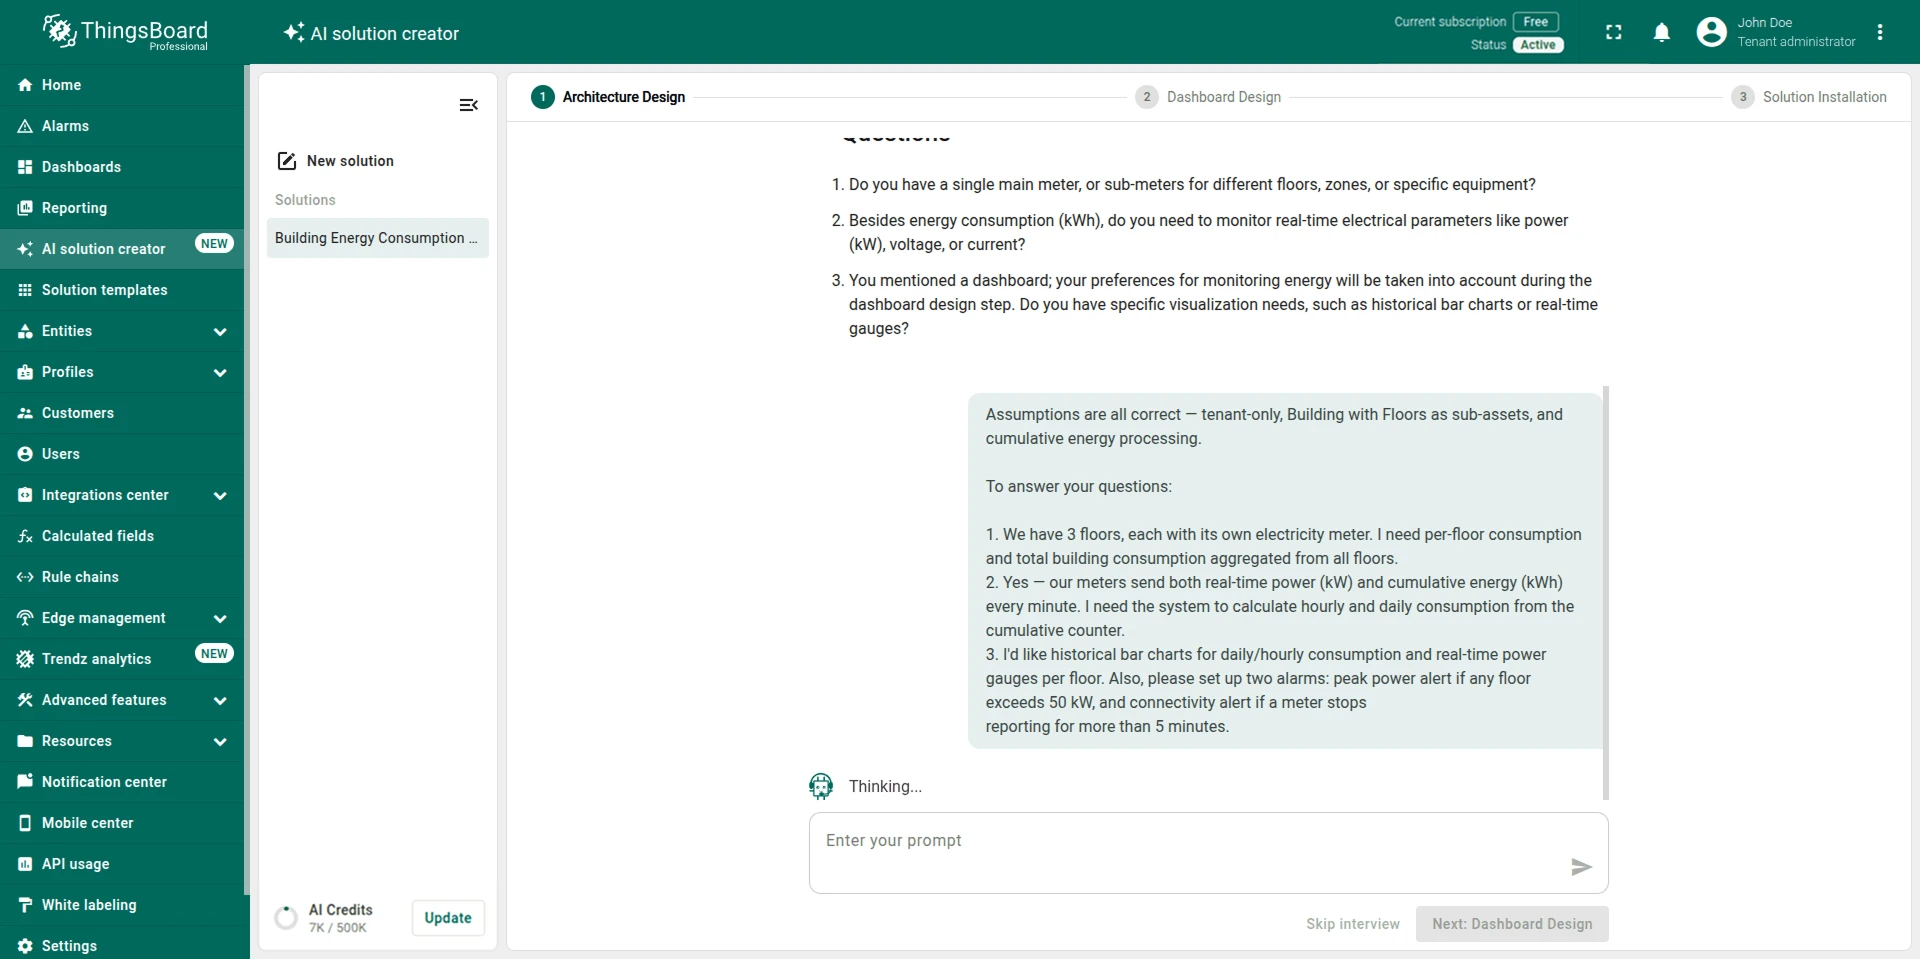
Describe your use case. Tell the AI Agent what you’re building. For example: “Create a dashboard for energy consumption monitoring in our building.”
The AI Assistant may ask clarifying questions about your devices, organizational structure, or business goals. If your description is detailed enough, it jumps straight to a proposed configuration. You can also click Skip interview to skip the clarifying questions and let the AI Assistant generate the architecture based on what it already understands. This button only appears when the AI Assistant understands at least the general topic of your use case.
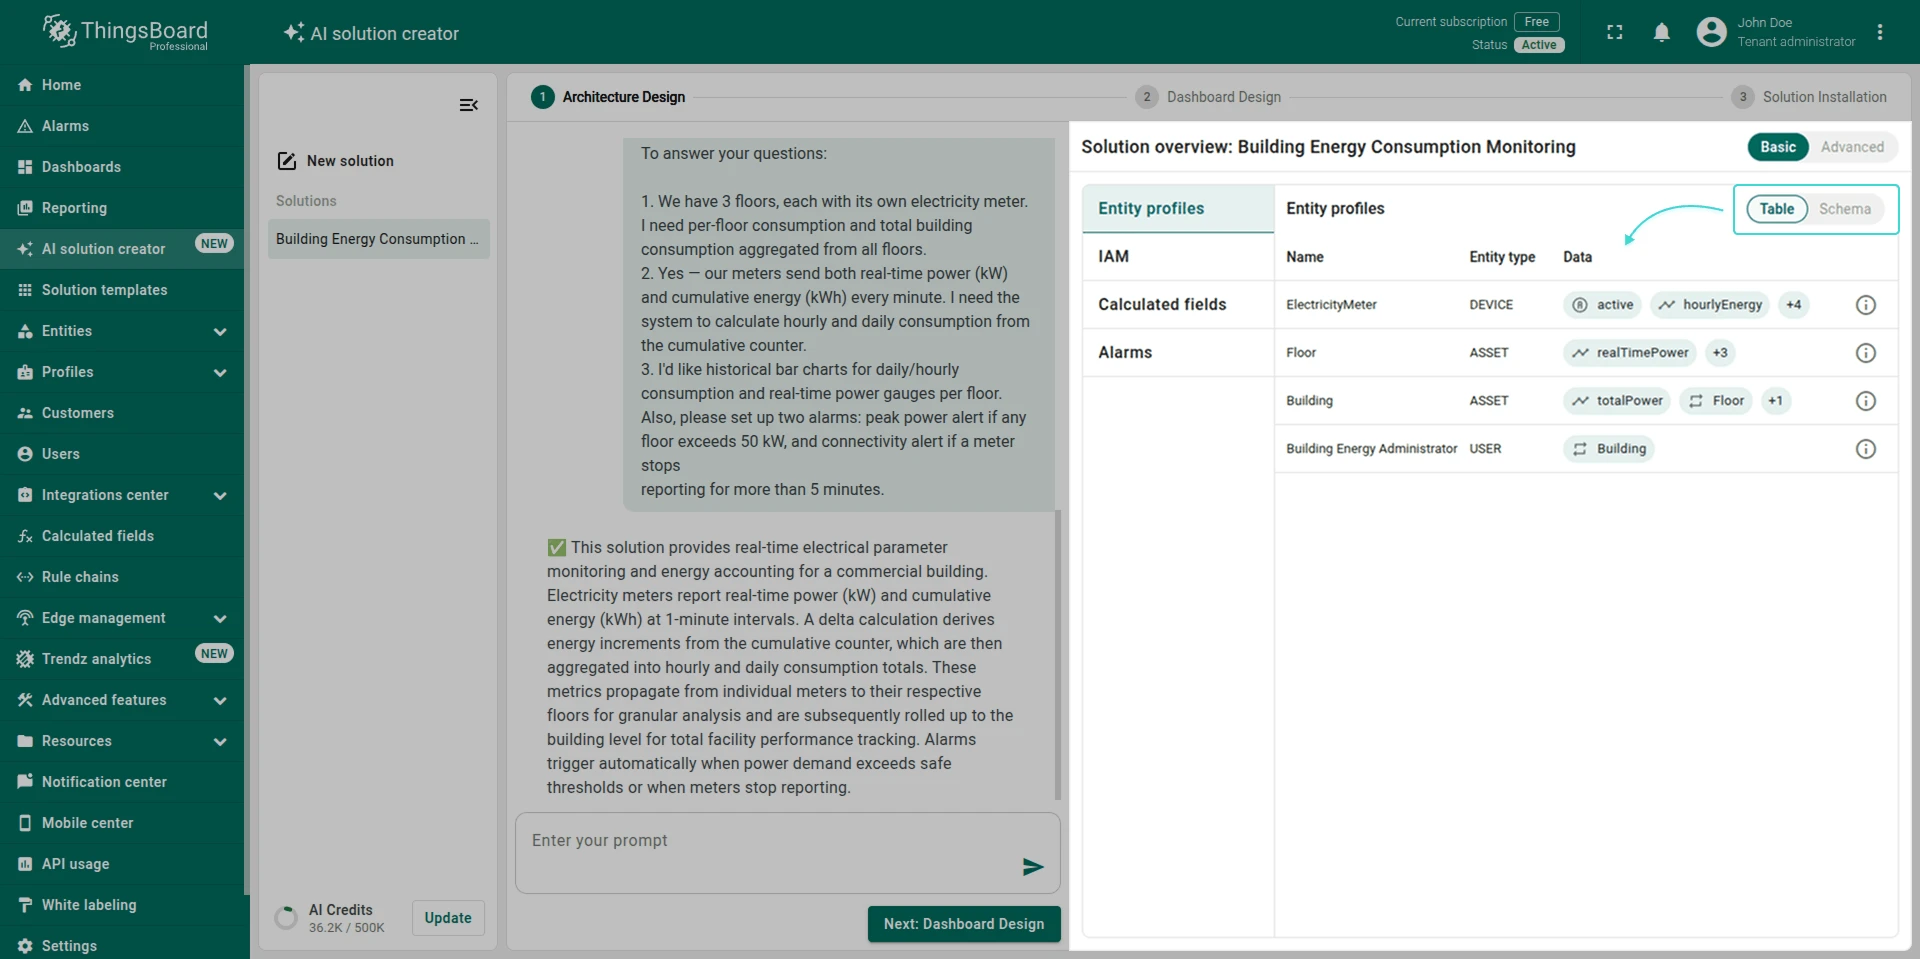
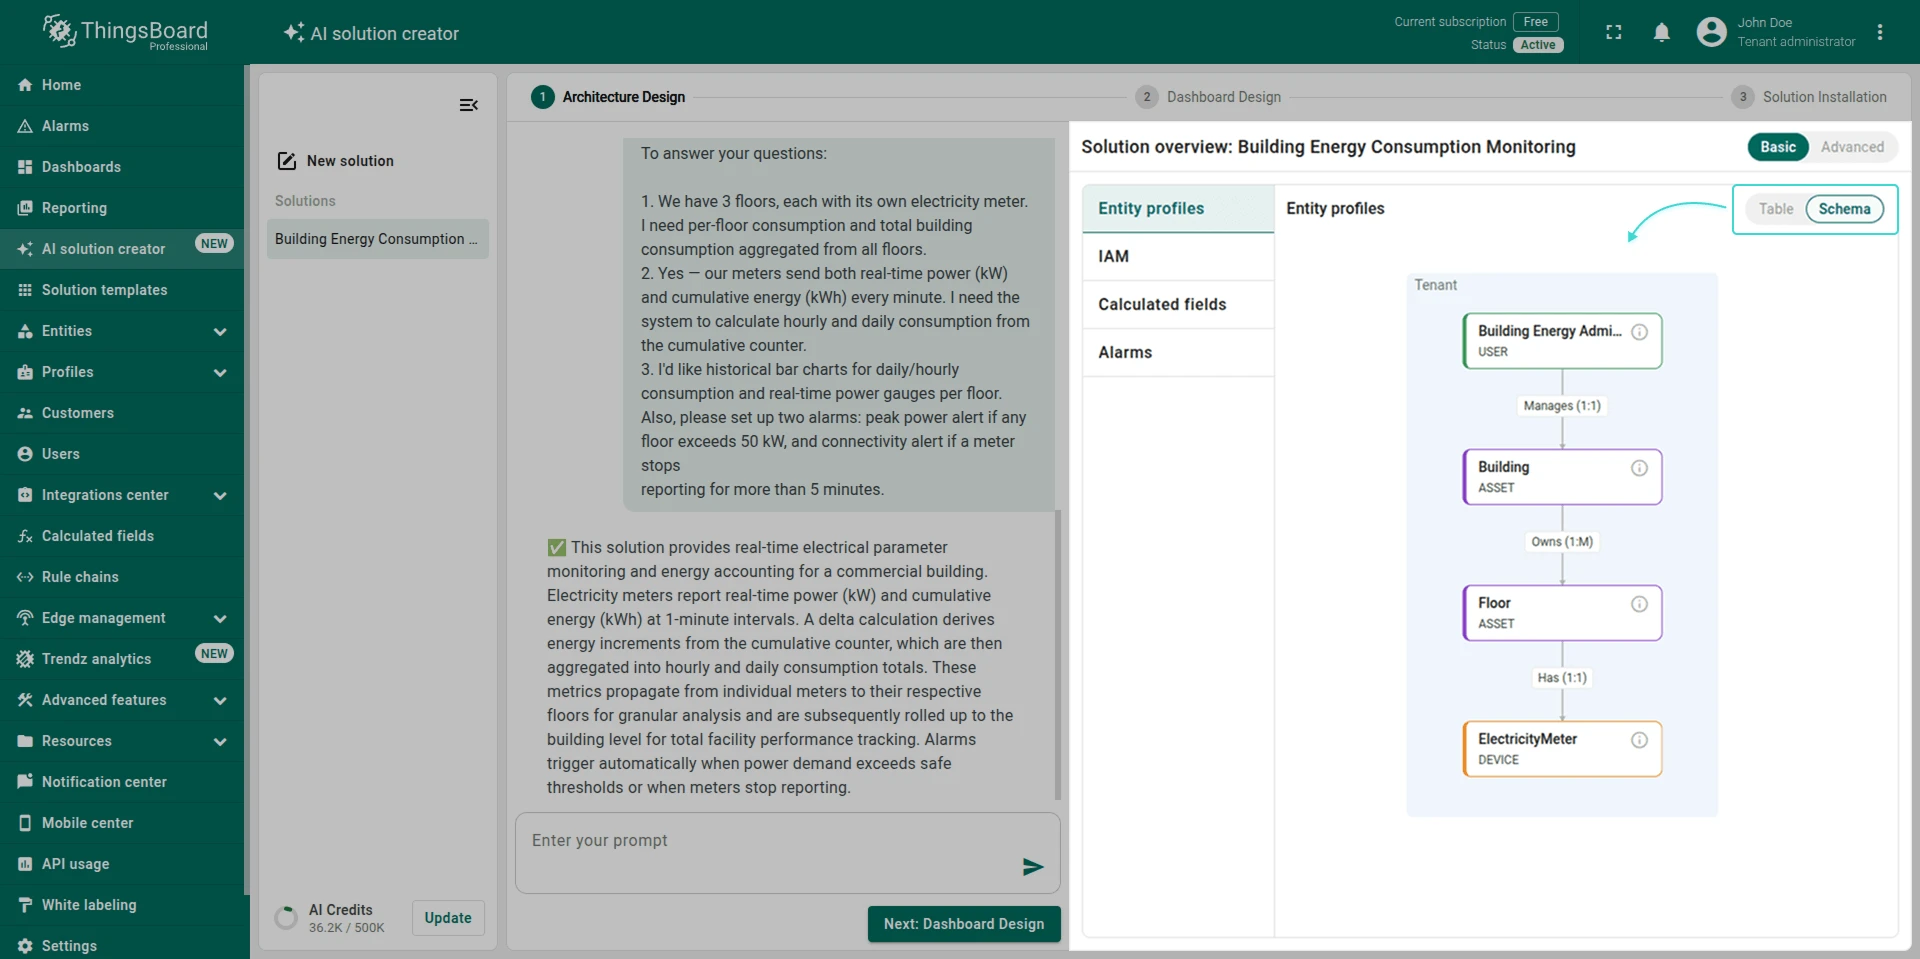
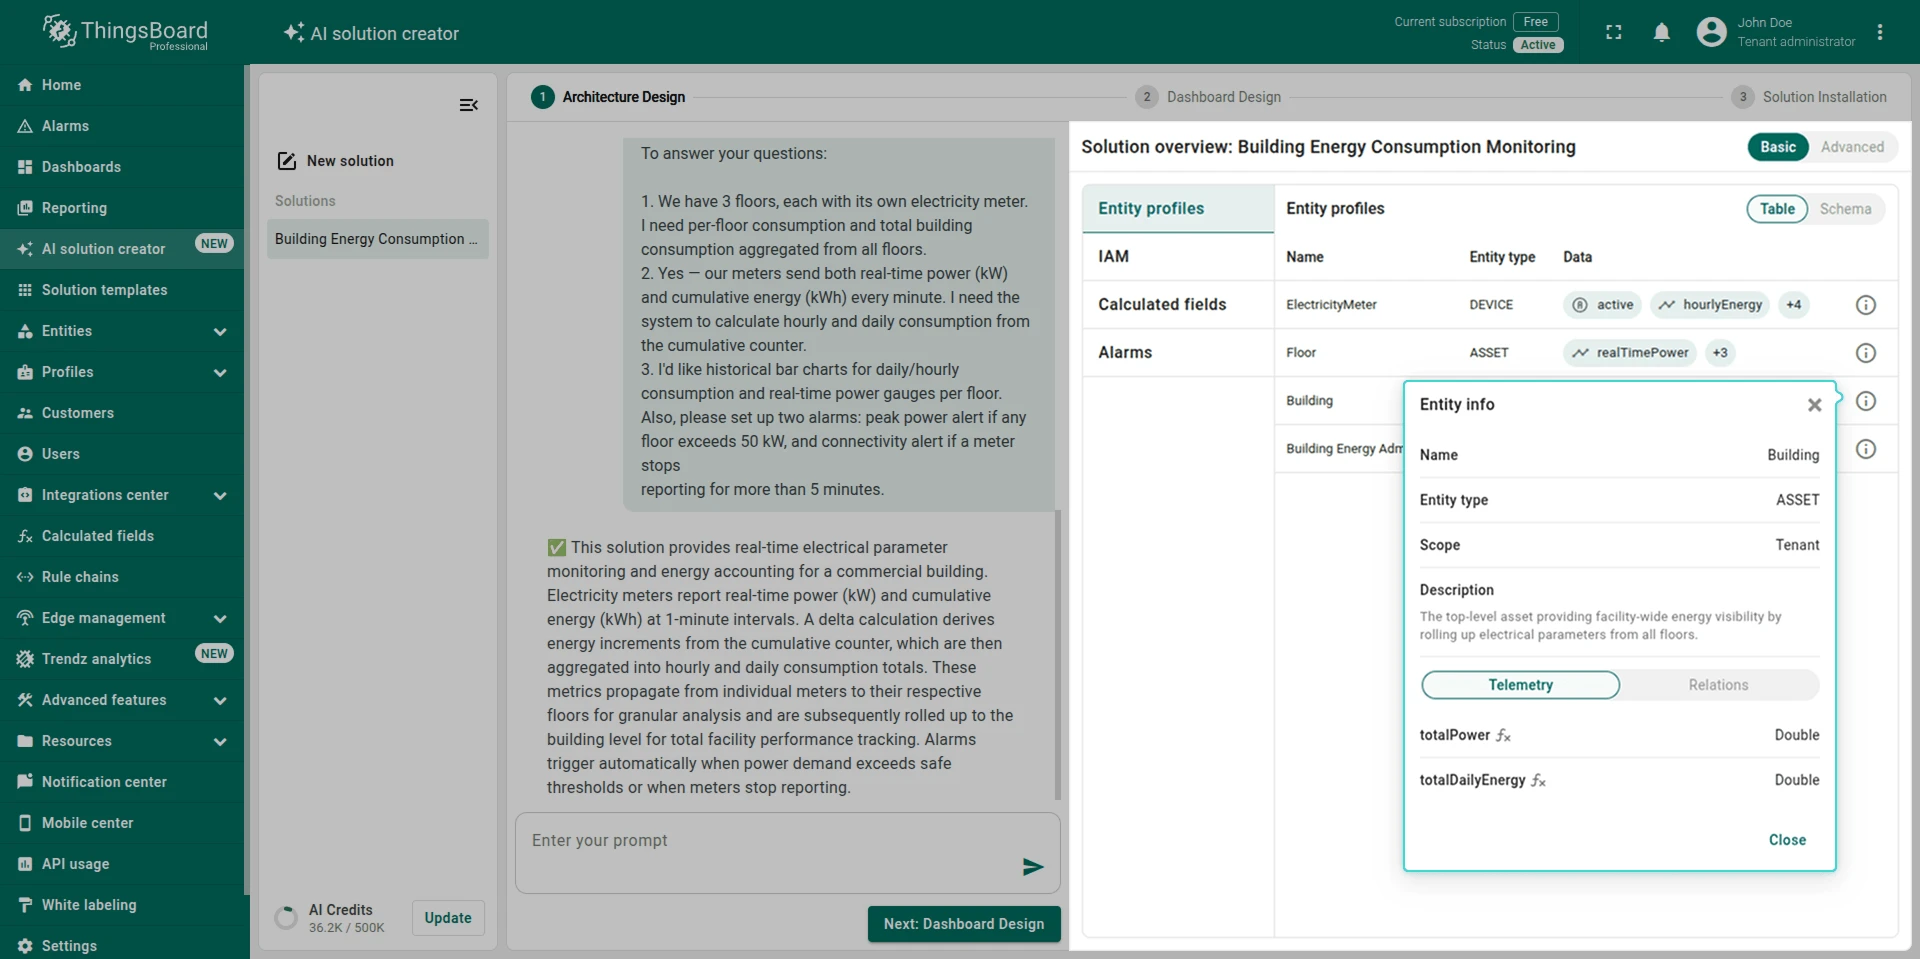
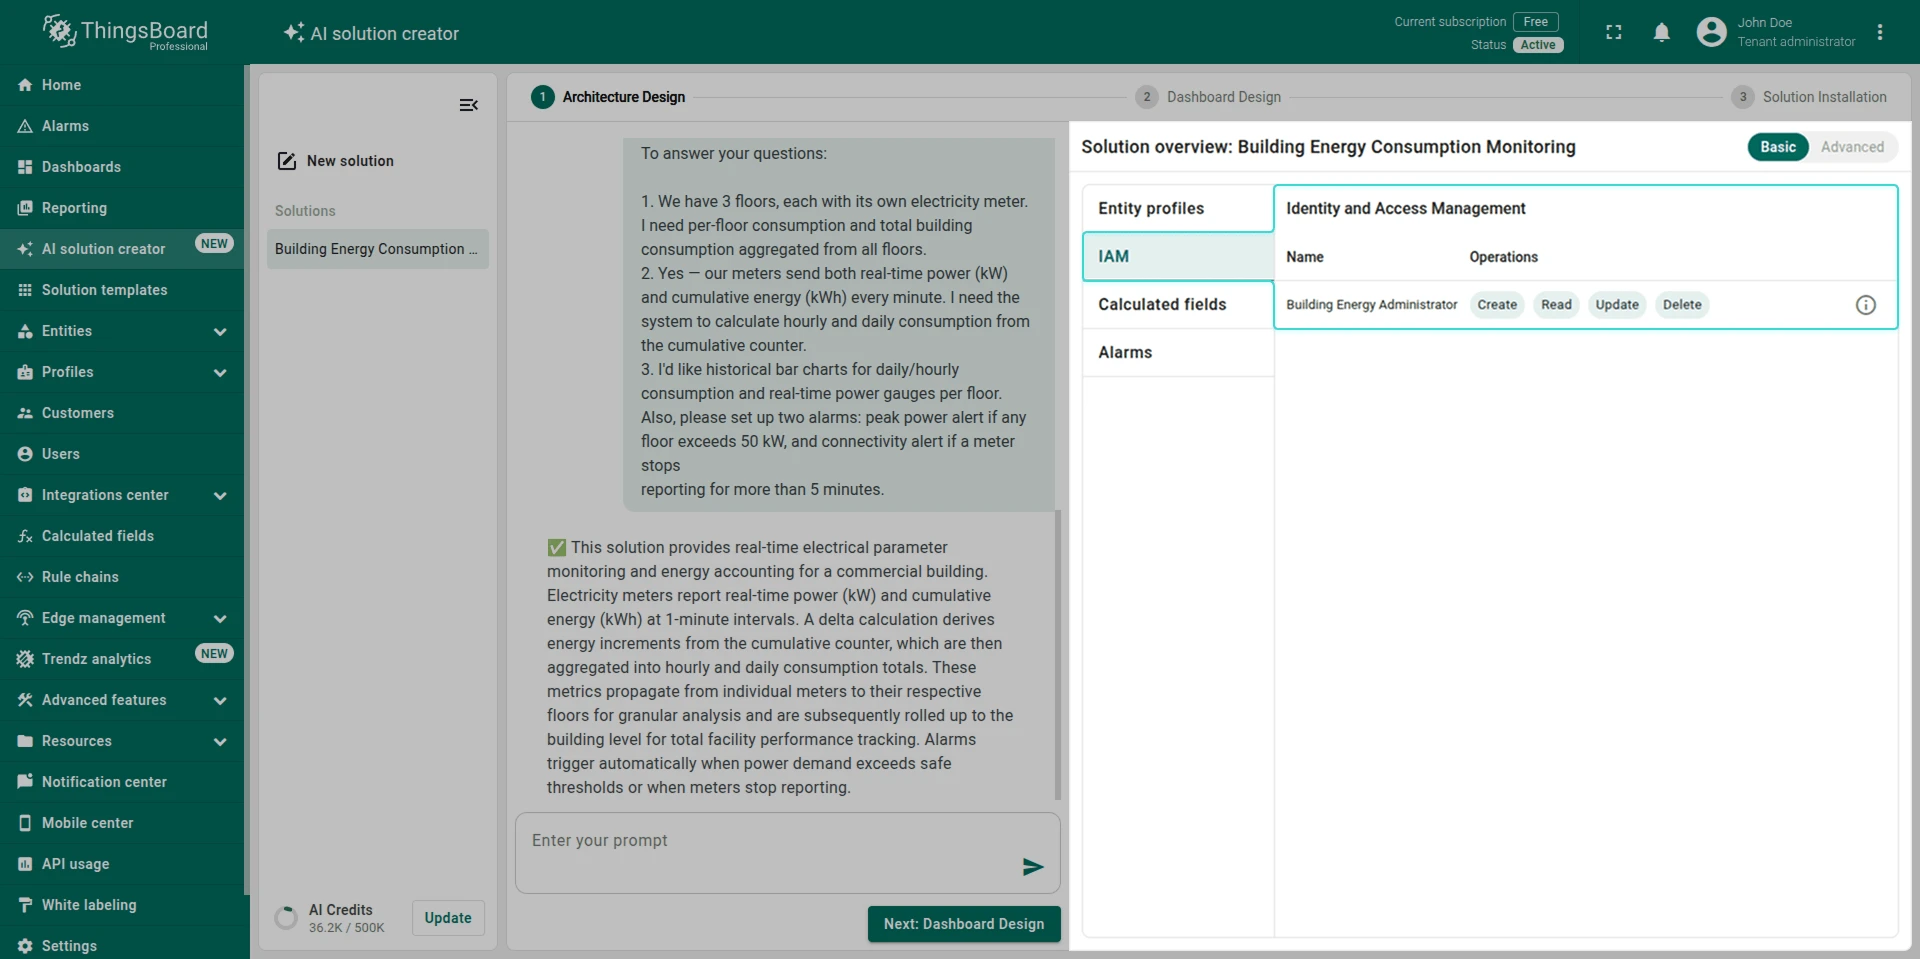
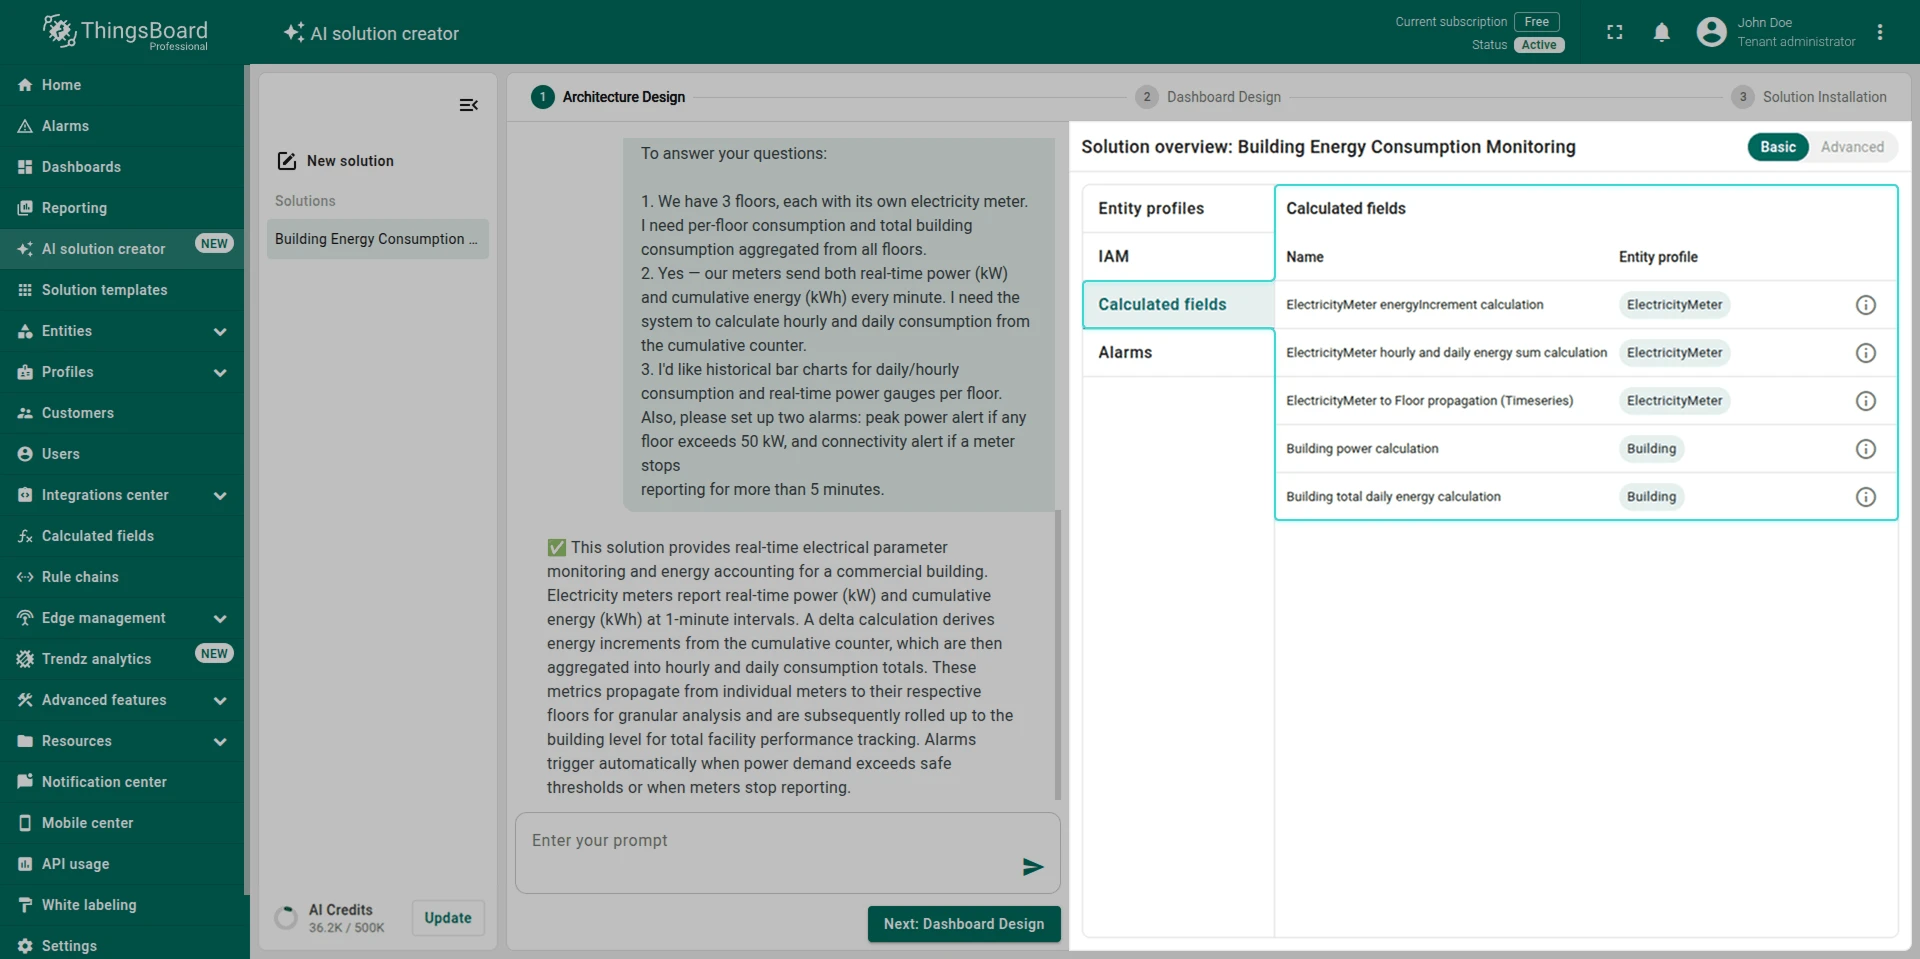
Review the proposed architecture. The AI Assistant generates a configuration proposal organized into four sections:
-
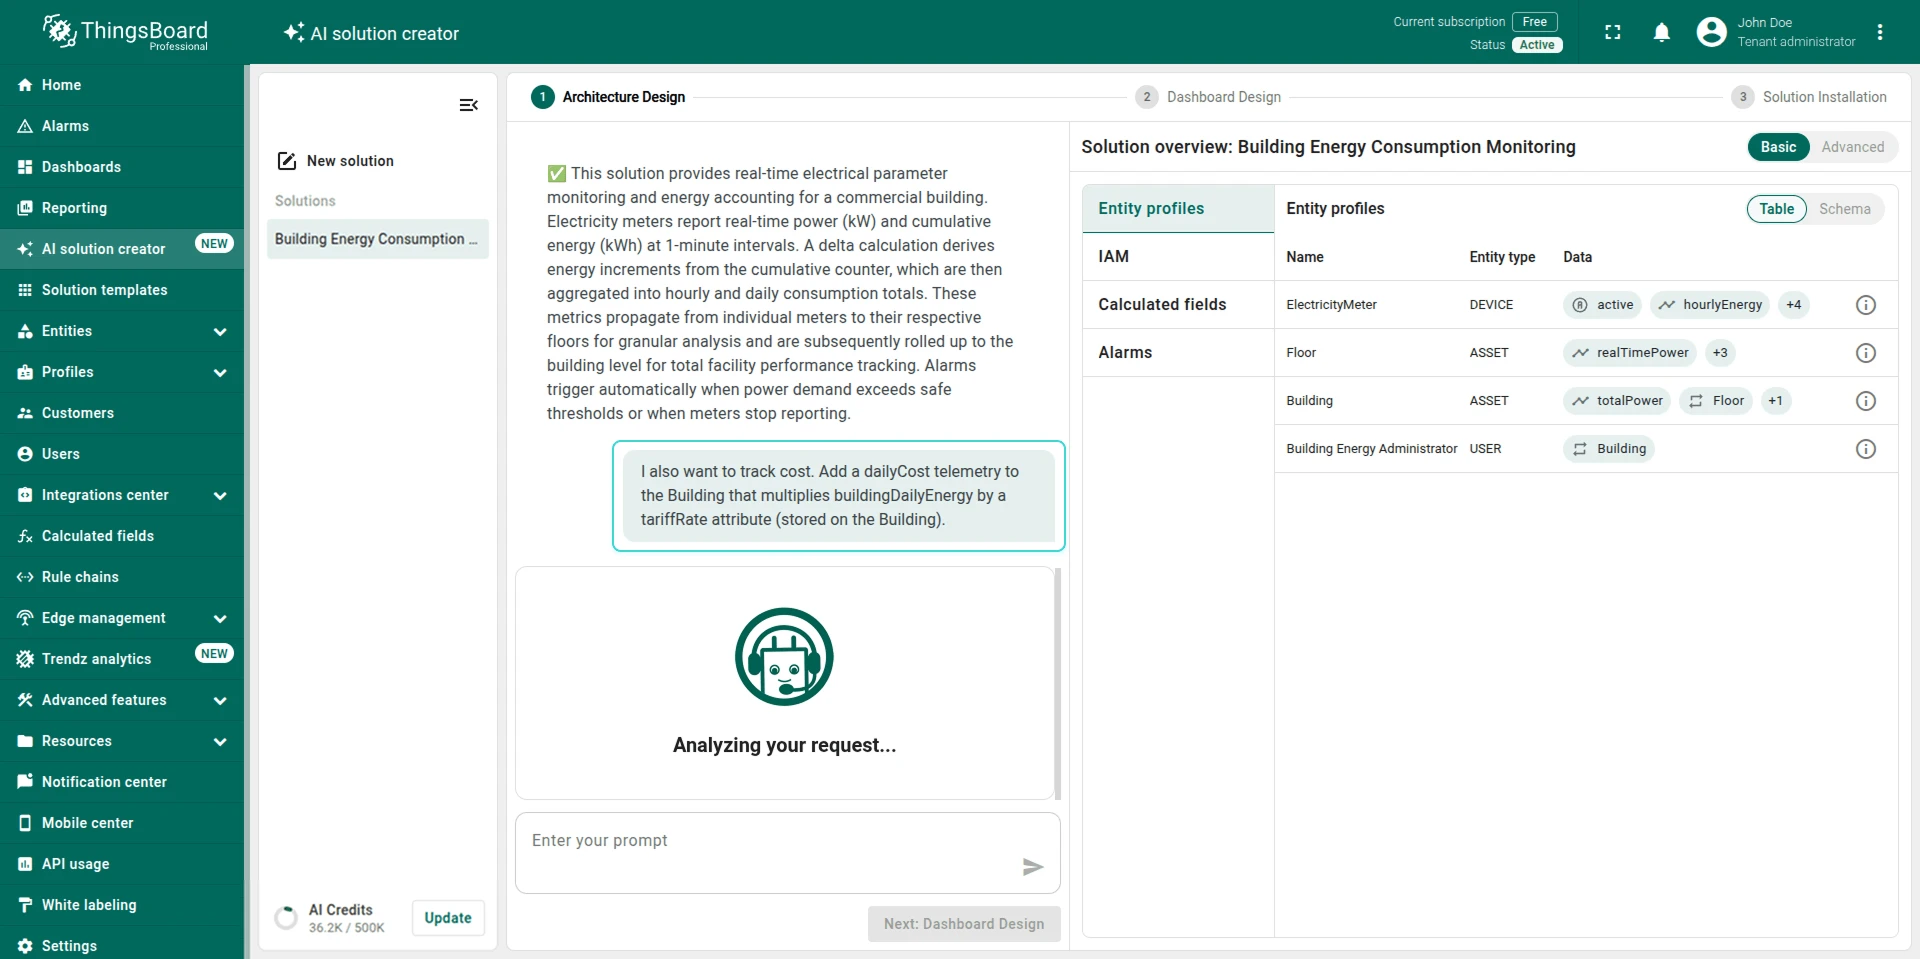
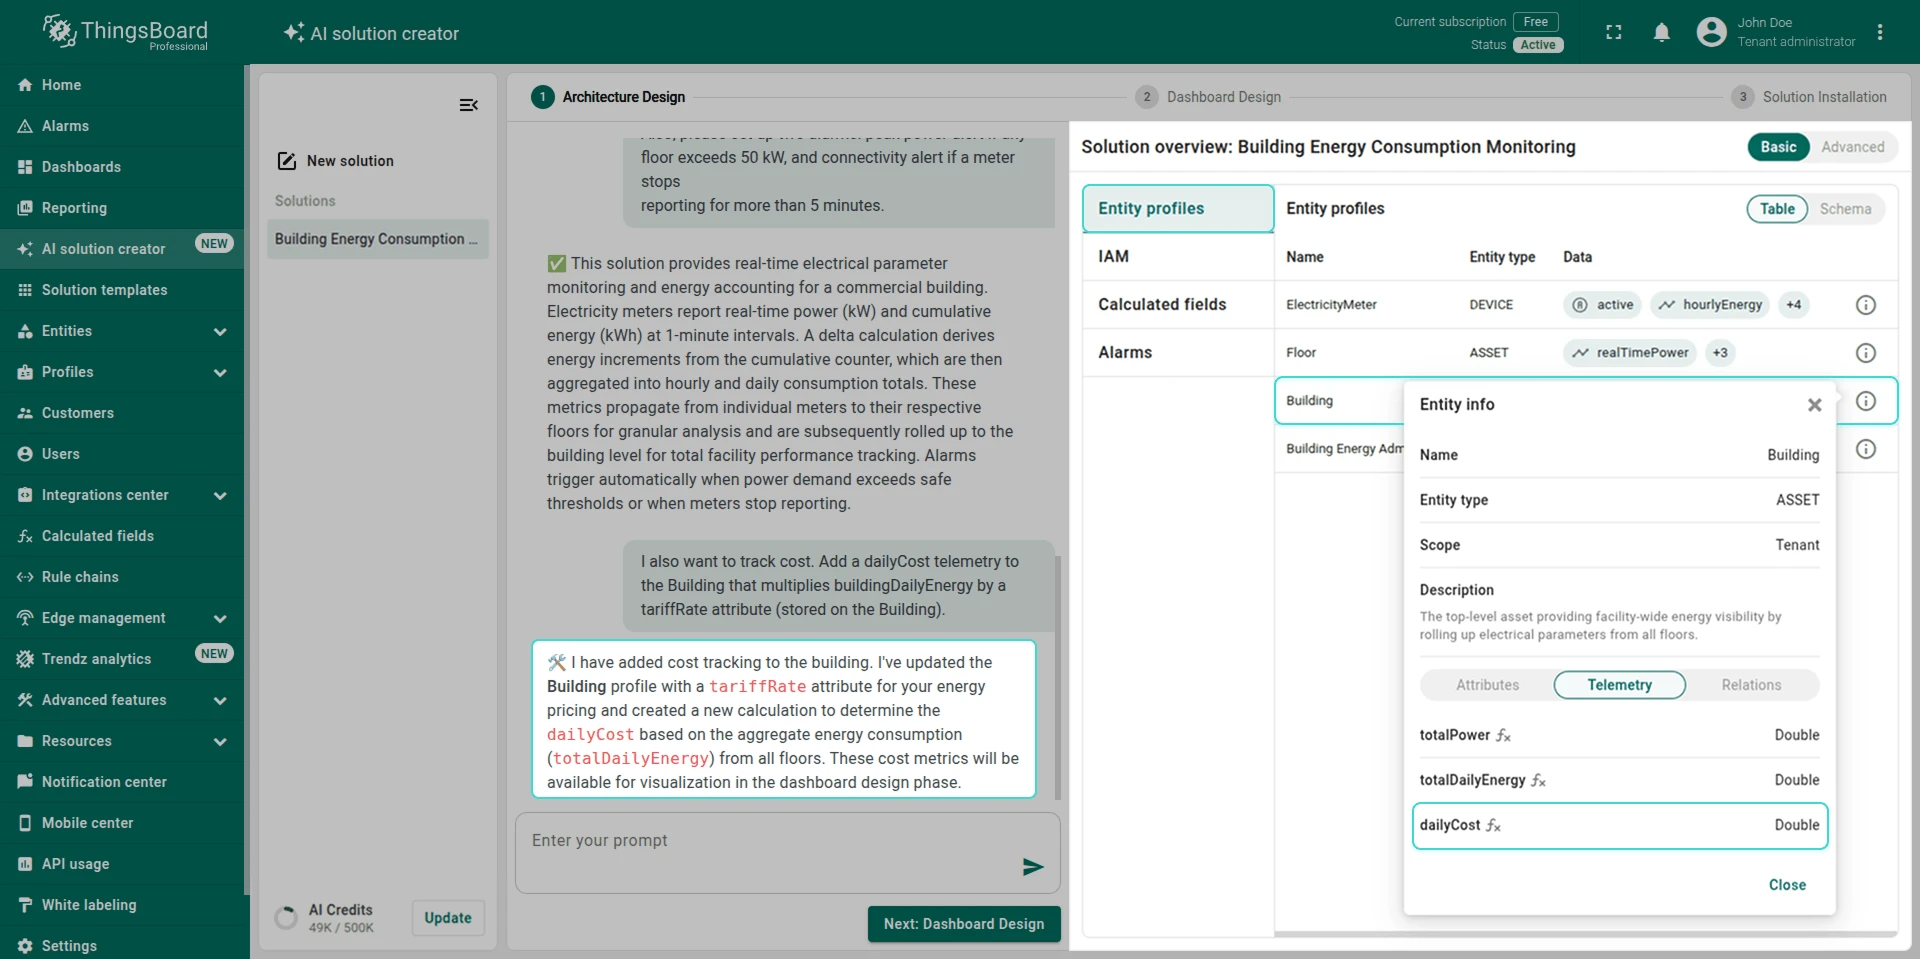
Entity Profiles: An overview of all devices, assets, customers, and users that will be created. Each profile includes name, entity type, scope (owner), description, attributes, telemetry keys, and relations. You can switch between a table view and a schema view to see the full hierarchy visually.
-
IAM (Identity and Access Management): Shows the user roles and permissions that will be created. Each entry includes a name, allowed operations (like Create, Read, Update, Delete), and a description.
-
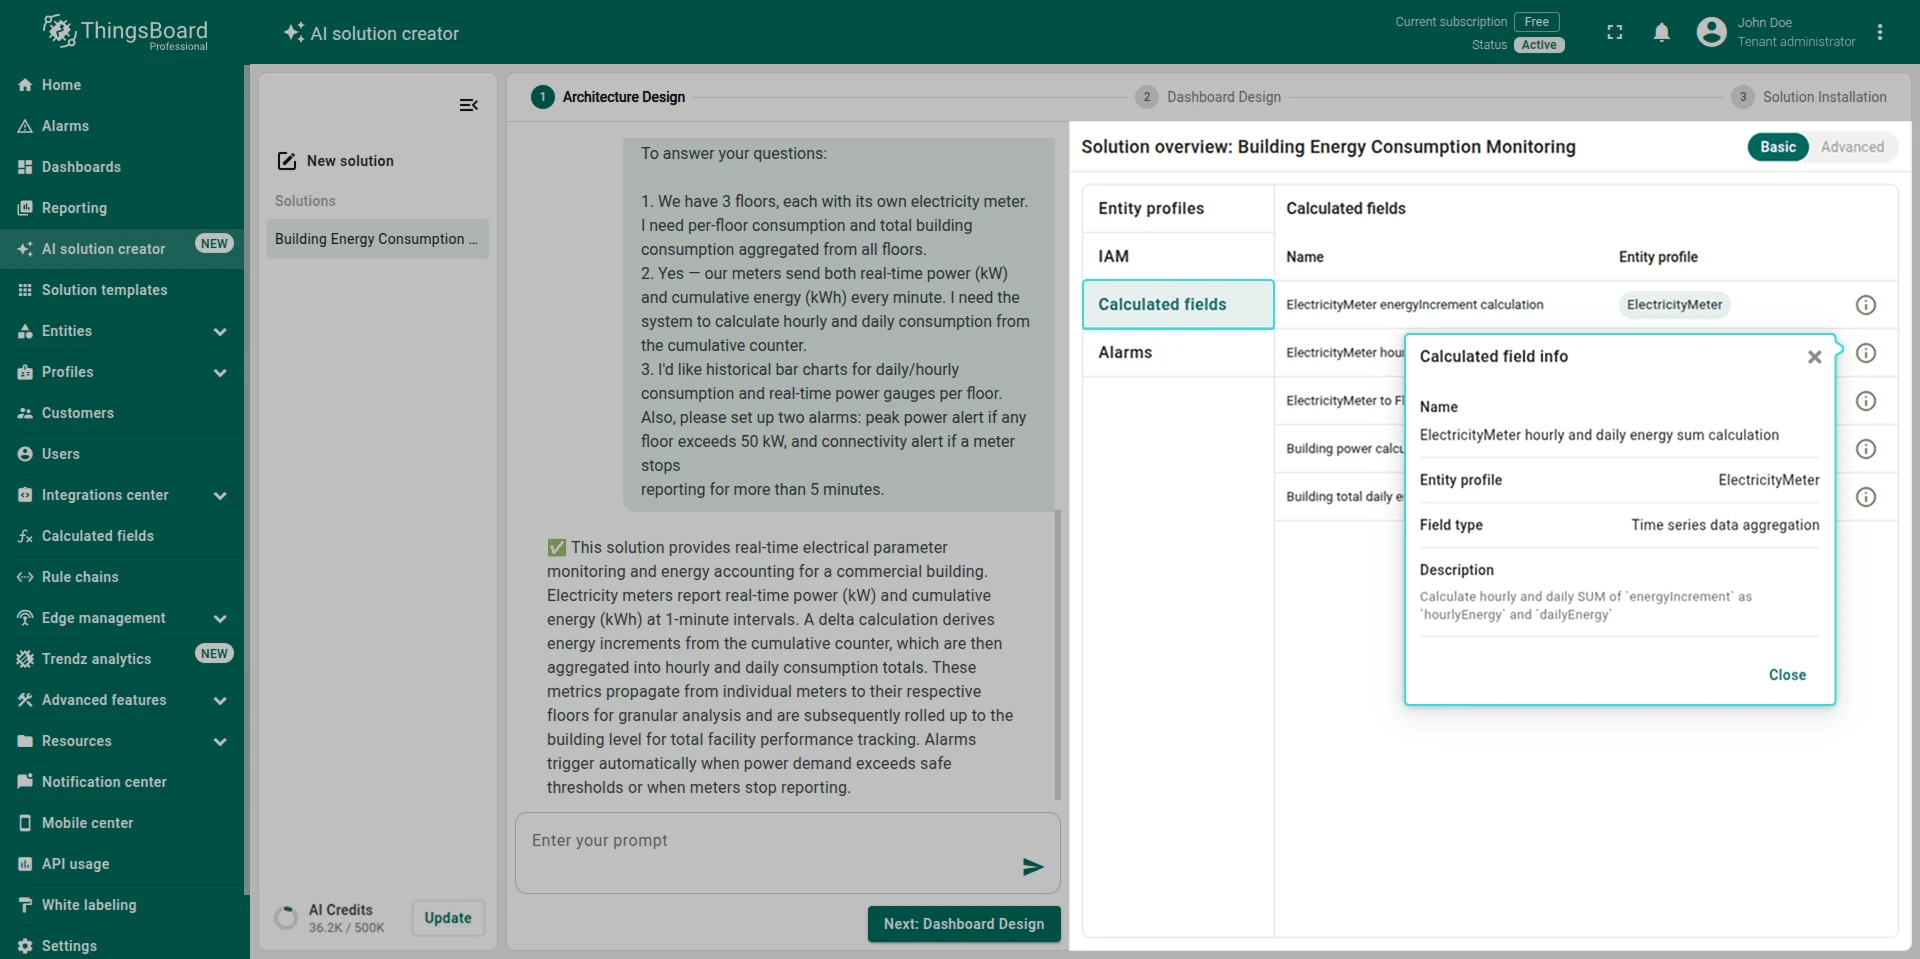
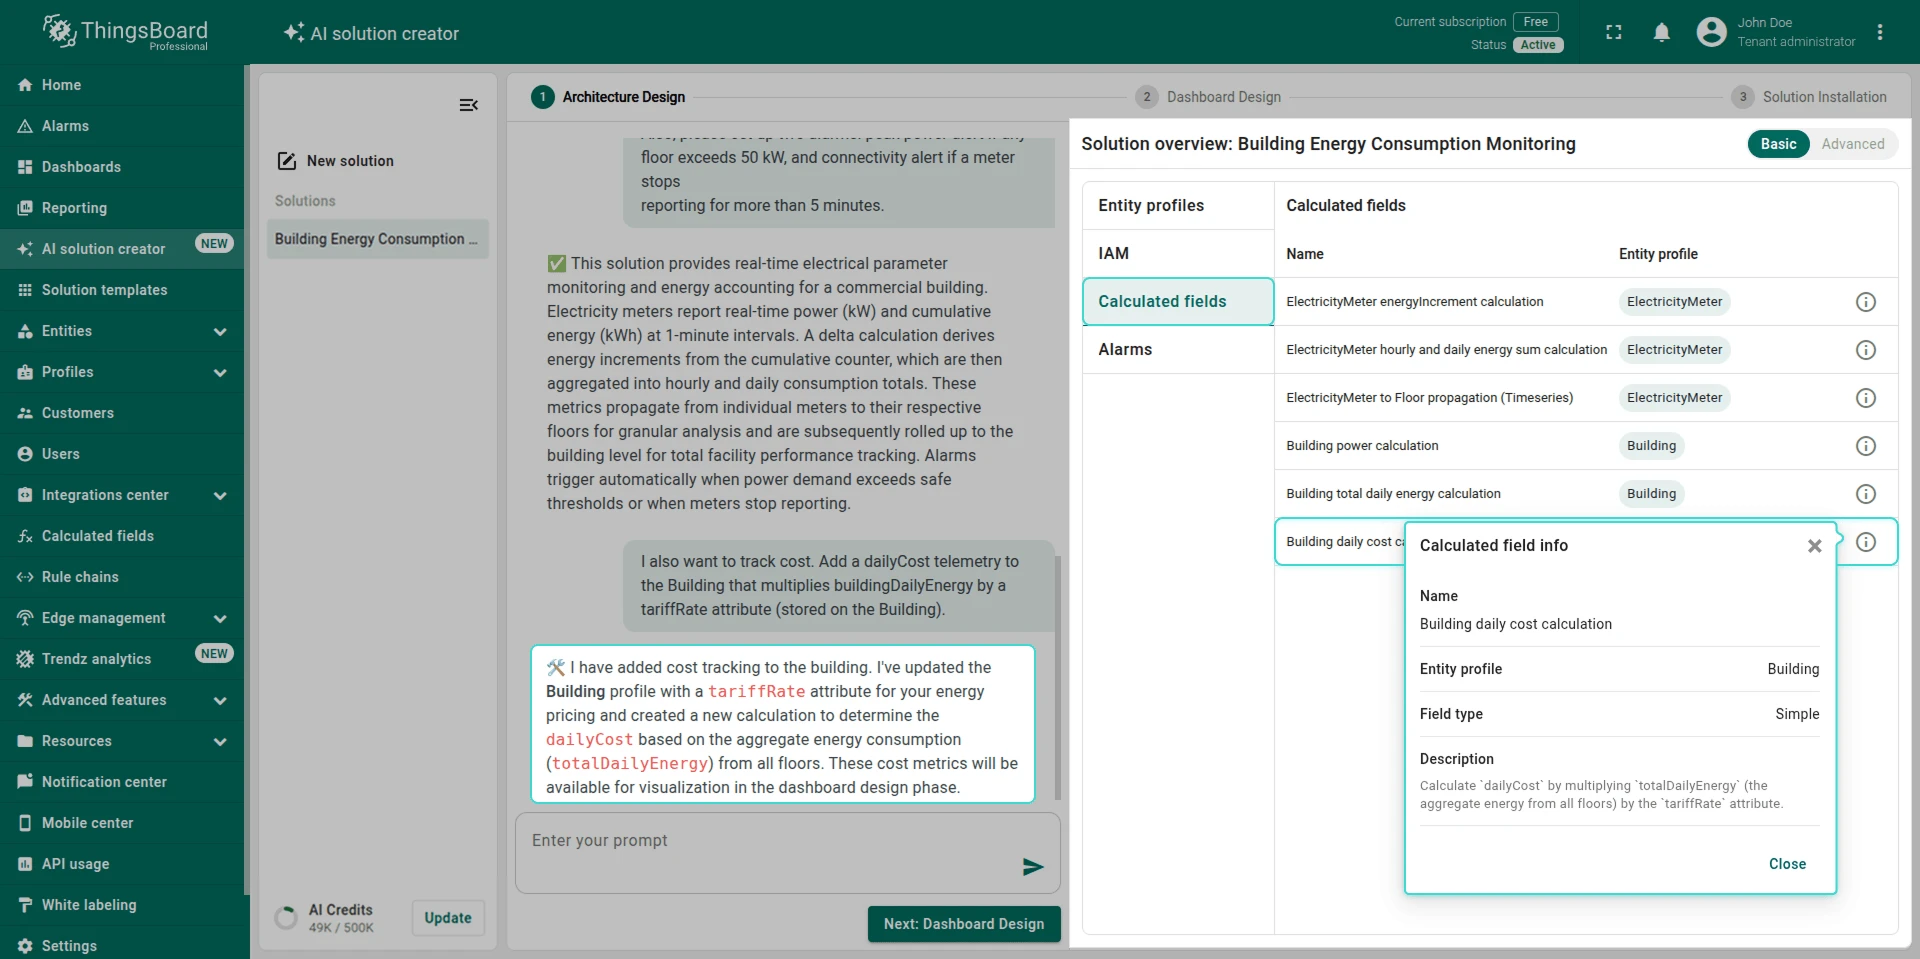
Calculated Fields: Lists the calculated fields that will be created to derive metrics from raw telemetry across your entities. Each entry includes a name, the entity profile it belongs to, the field type, and a description.
-
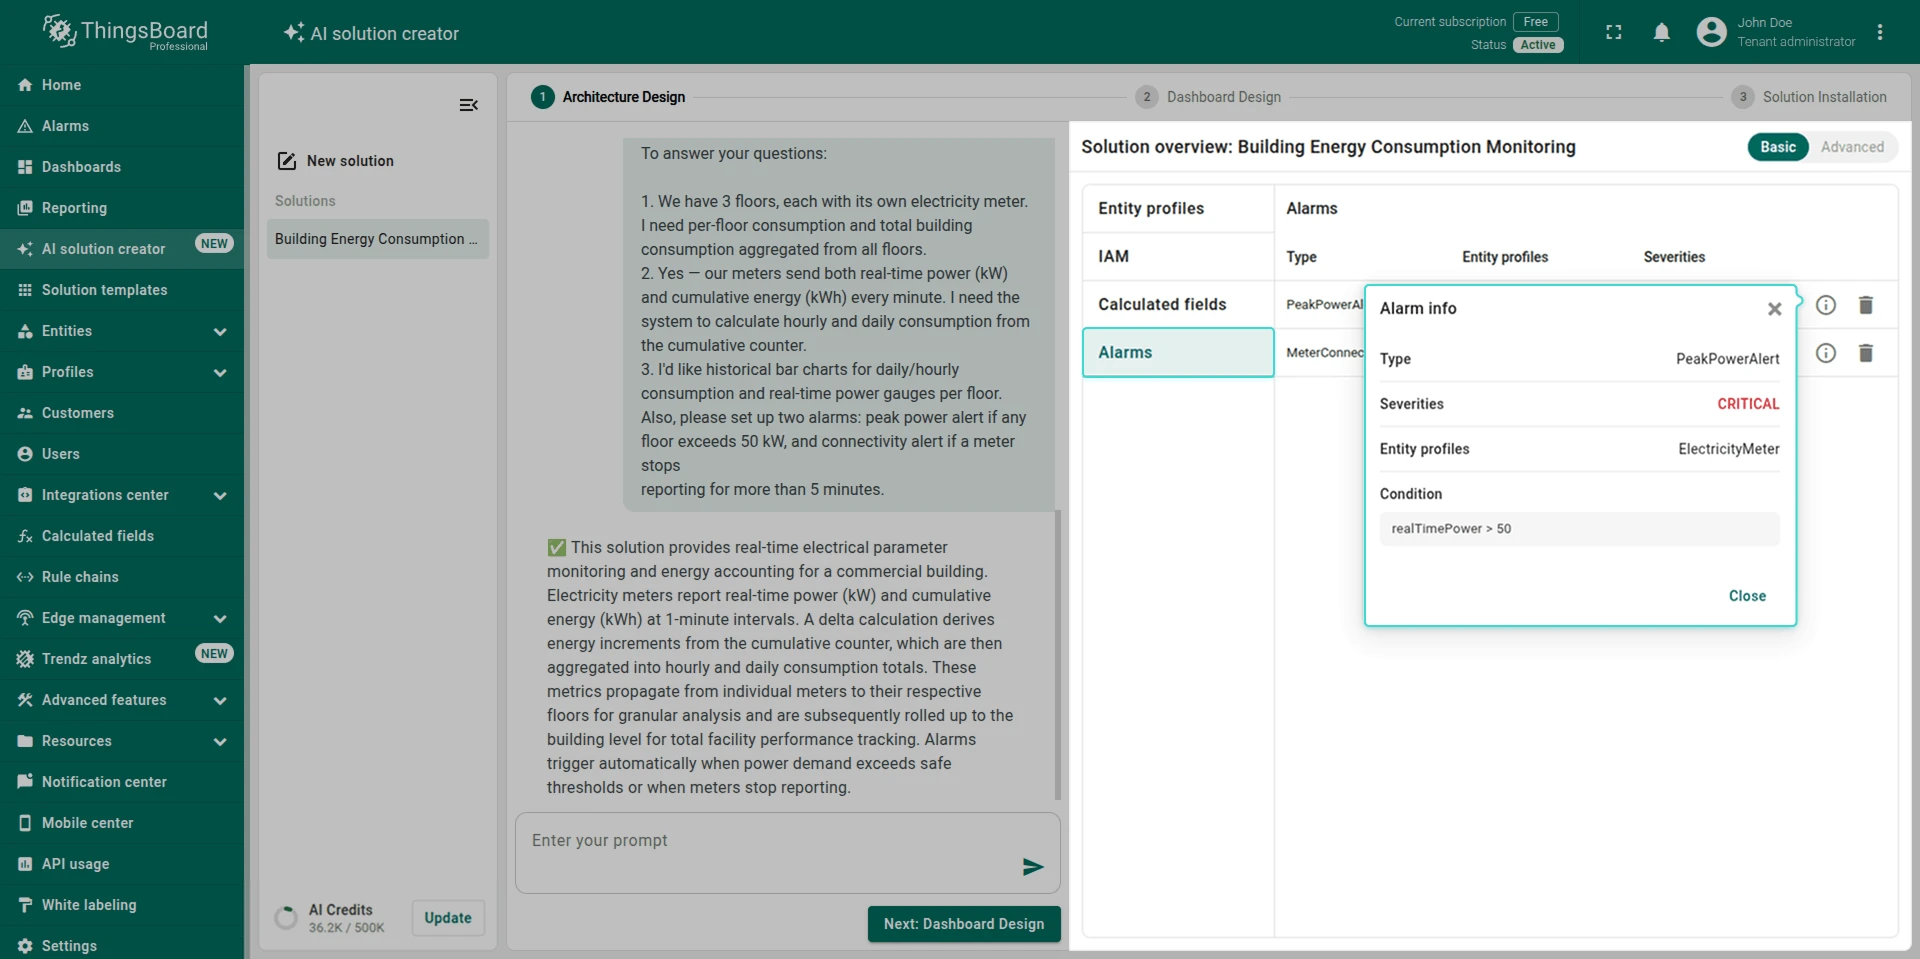
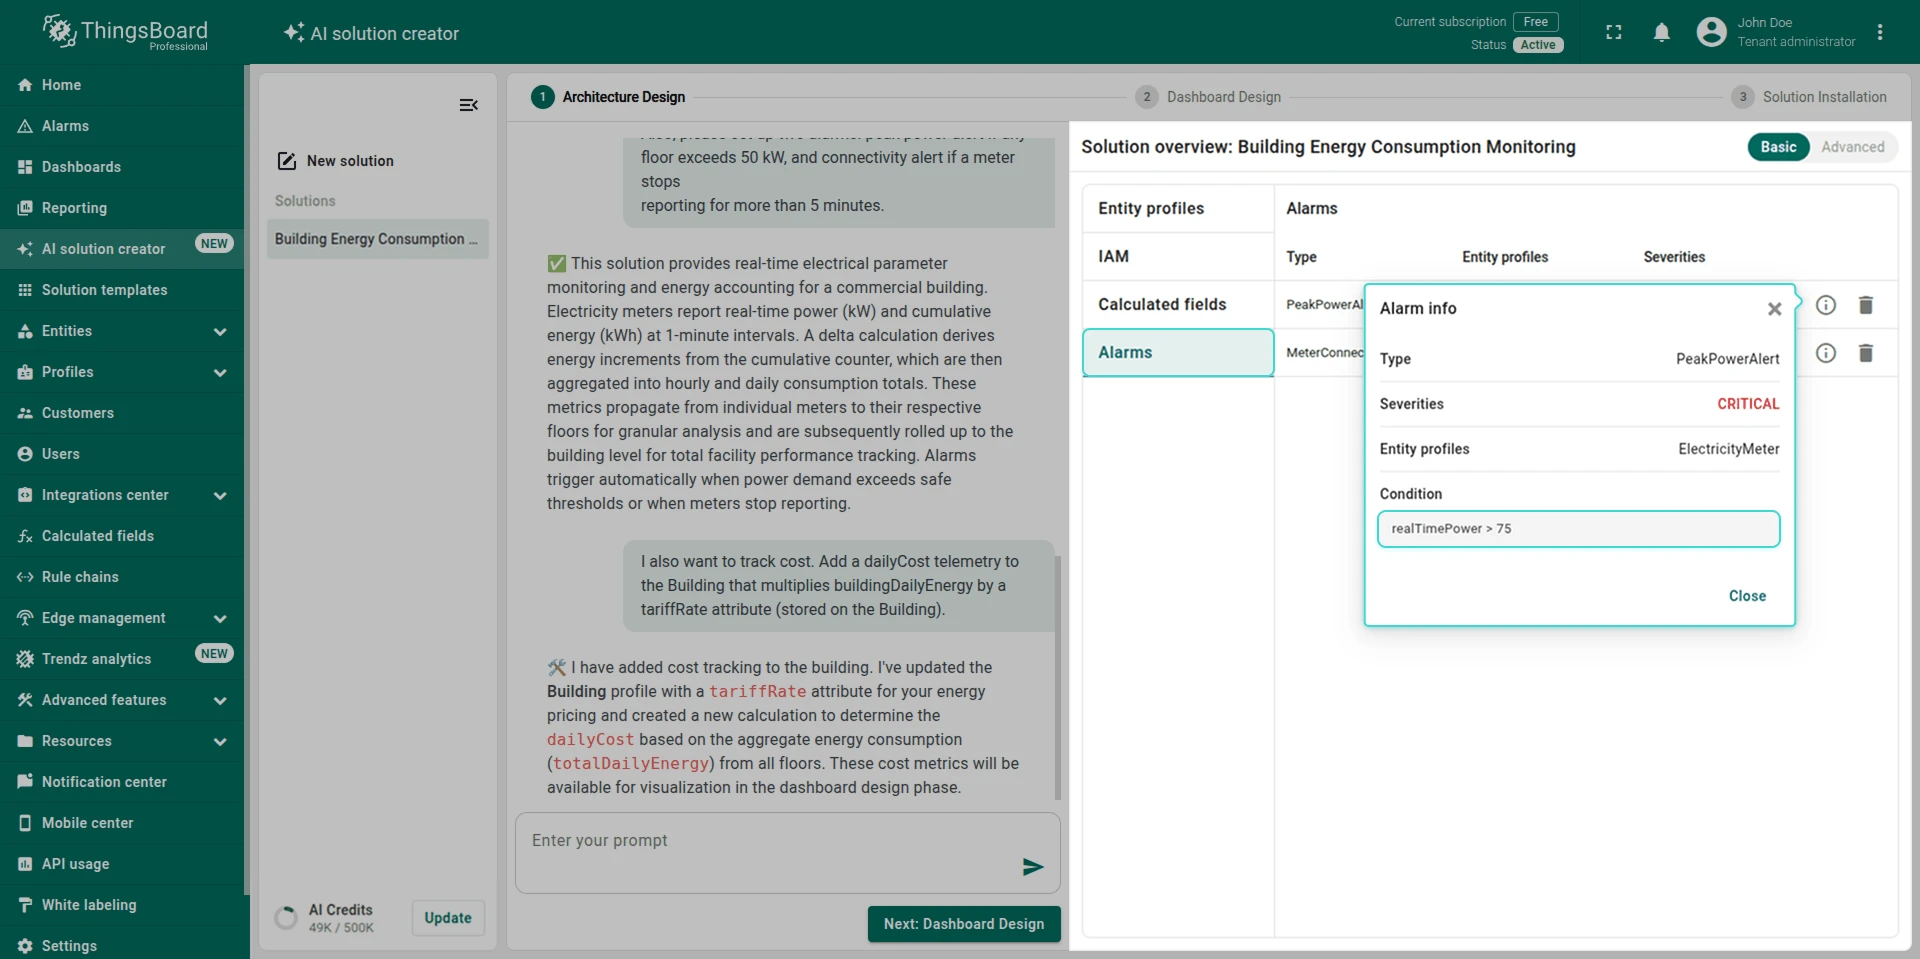
Alarms: Covers the alarm rules that will be created to monitor your devices and assets. Each entry includes the alarm type, severity, the entity profiles it applies to, and the trigger condition.
Refine if needed. You can adjust the proposed architecture in two ways:
-
Via chat: Describe what you’d like to change in natural language. The AI Assistant analyzes your request and applies changes to all necessary places, like entity profiles, iam, calculated fields, or alarm rules. For example: “I also want to track cost. Add a dailyCost telemetry to the Building that multiplies buildingDailyEnergy by a tariffRate attribute (stored on the Building).”
-
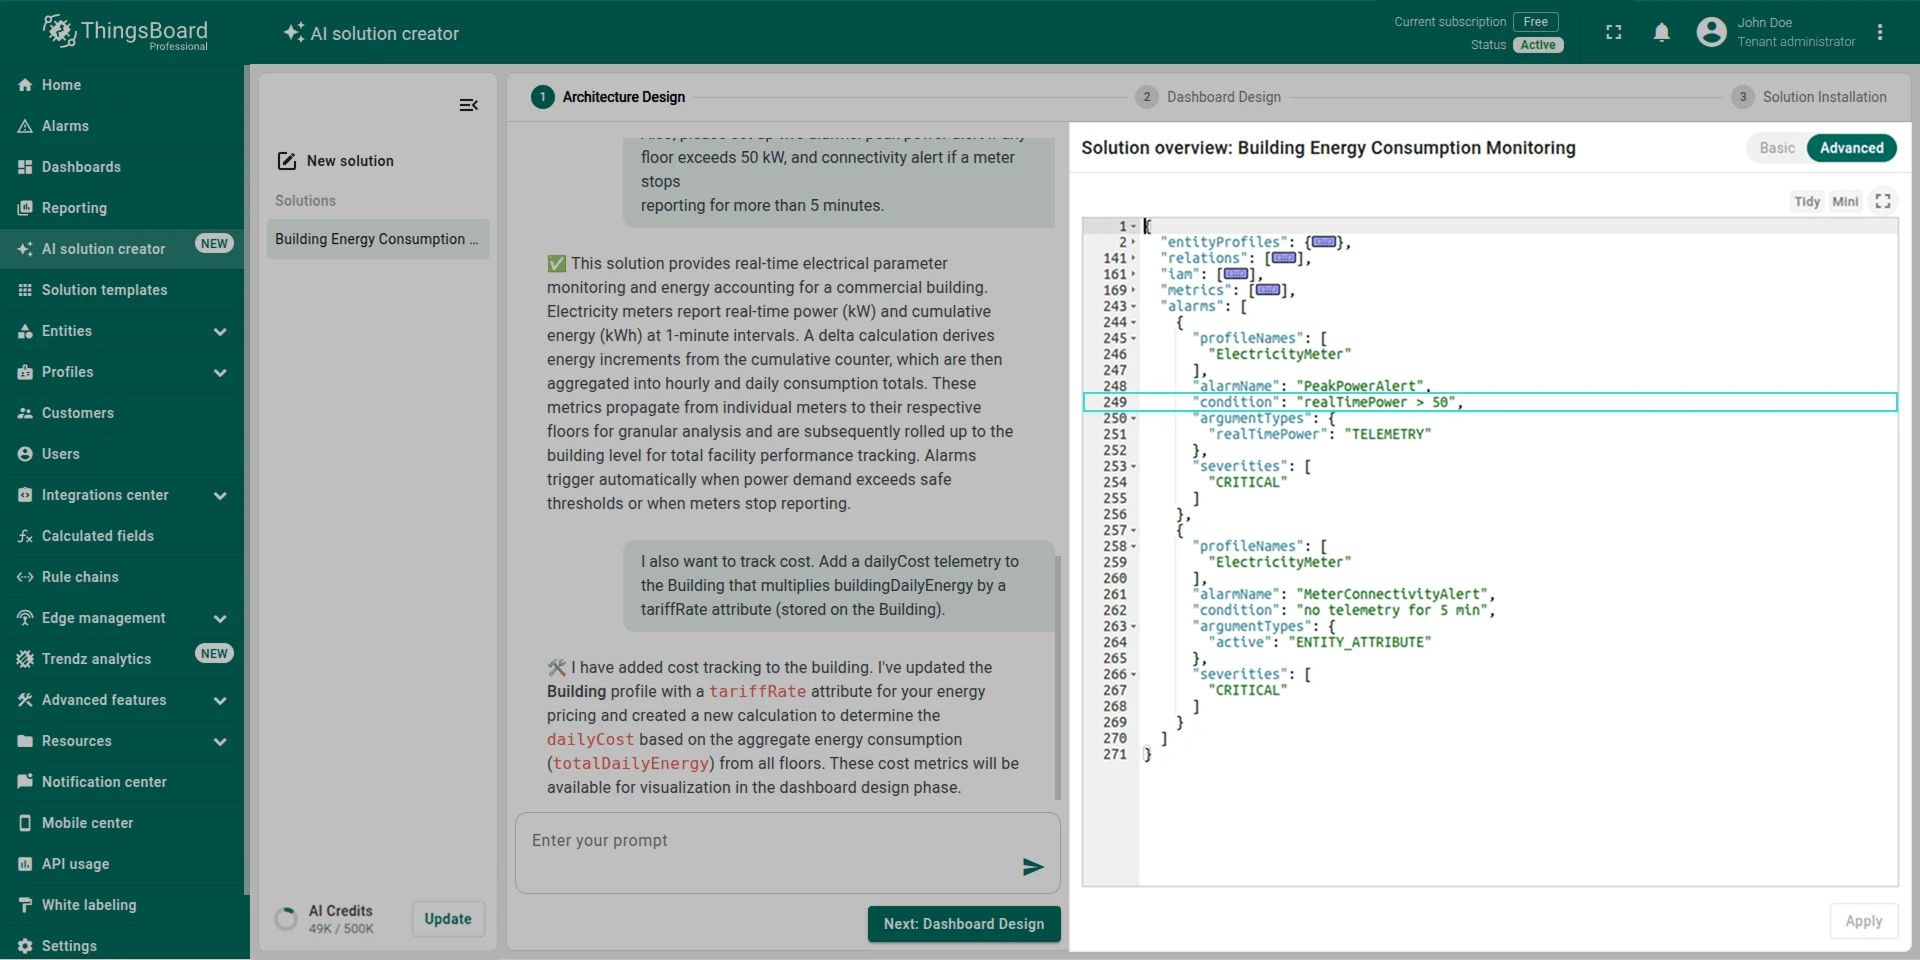
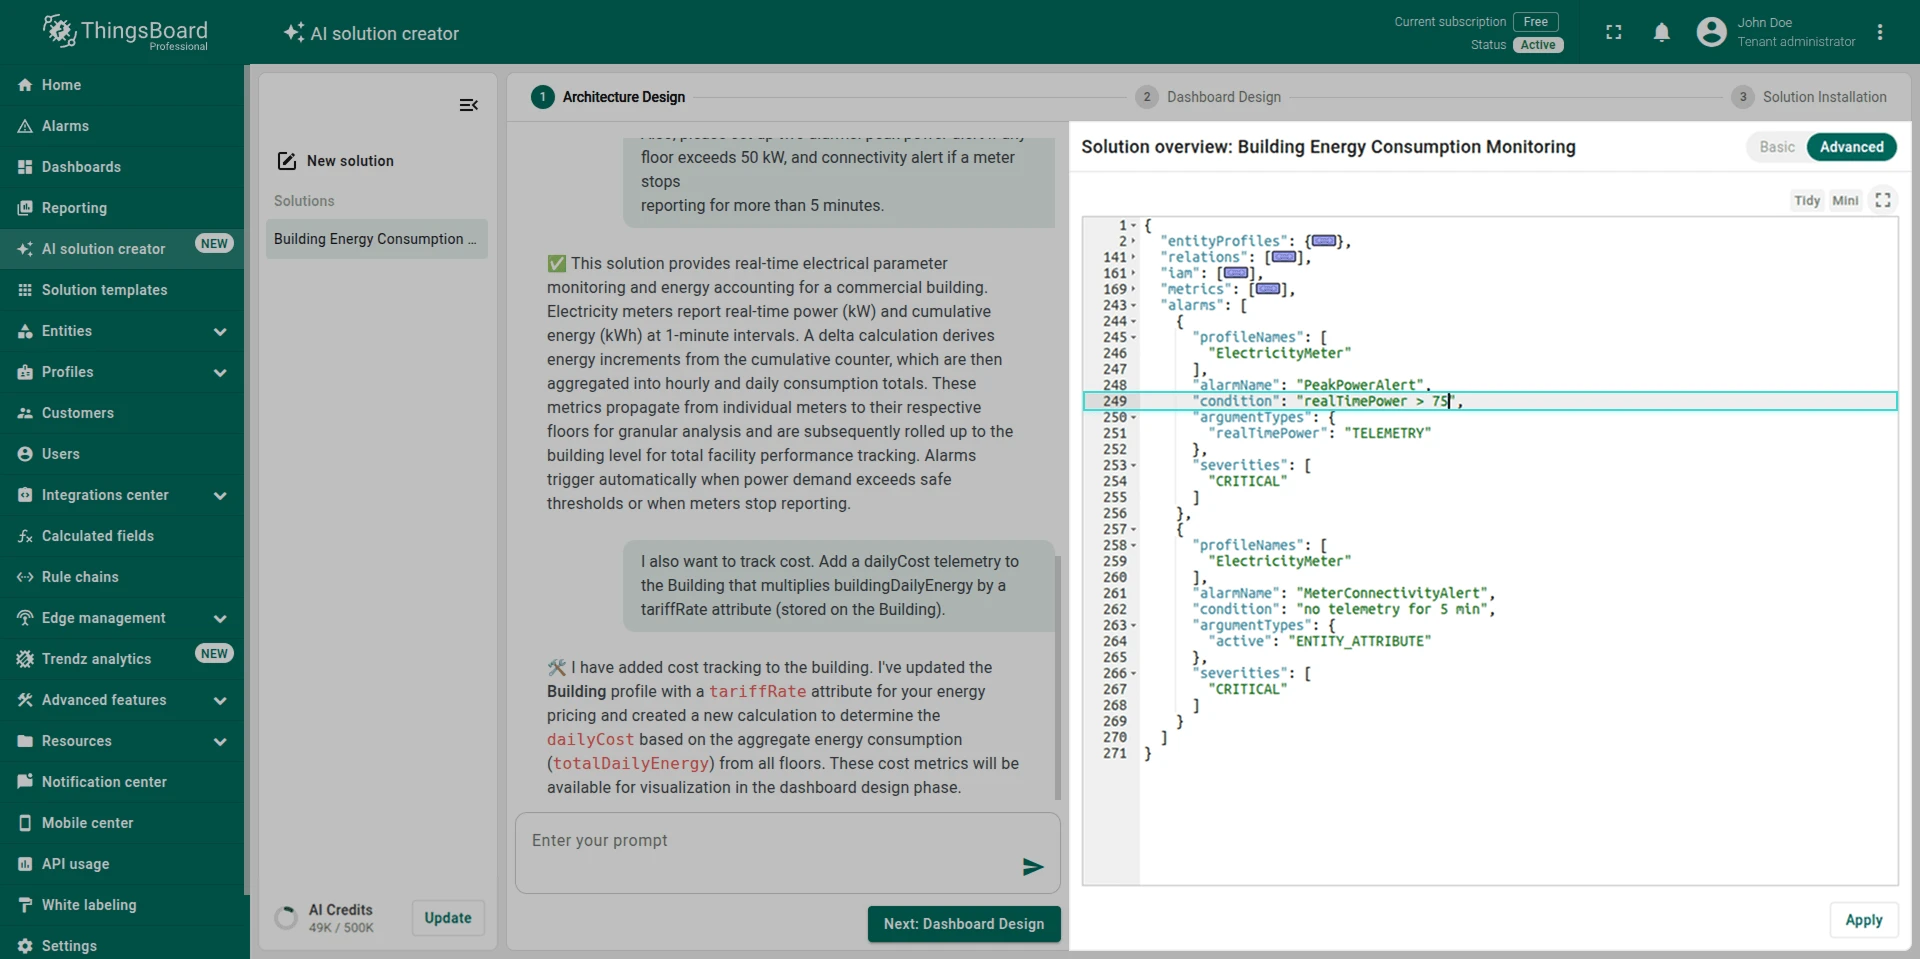
Via advanced mode: Switch to the JSON editor to make precise changes directly, then save. This is useful when you need to update values that don’t affect the overall architecture, like a description or a threshold.
For example, if 50 kW per floor triggers too many false alarms, you can open the JSON and change the PeakPowerExceeded threshold to 75 kW directly.
When you’re satisfied with the architecture, click Next: Dashboard Design to proceed.
-
-
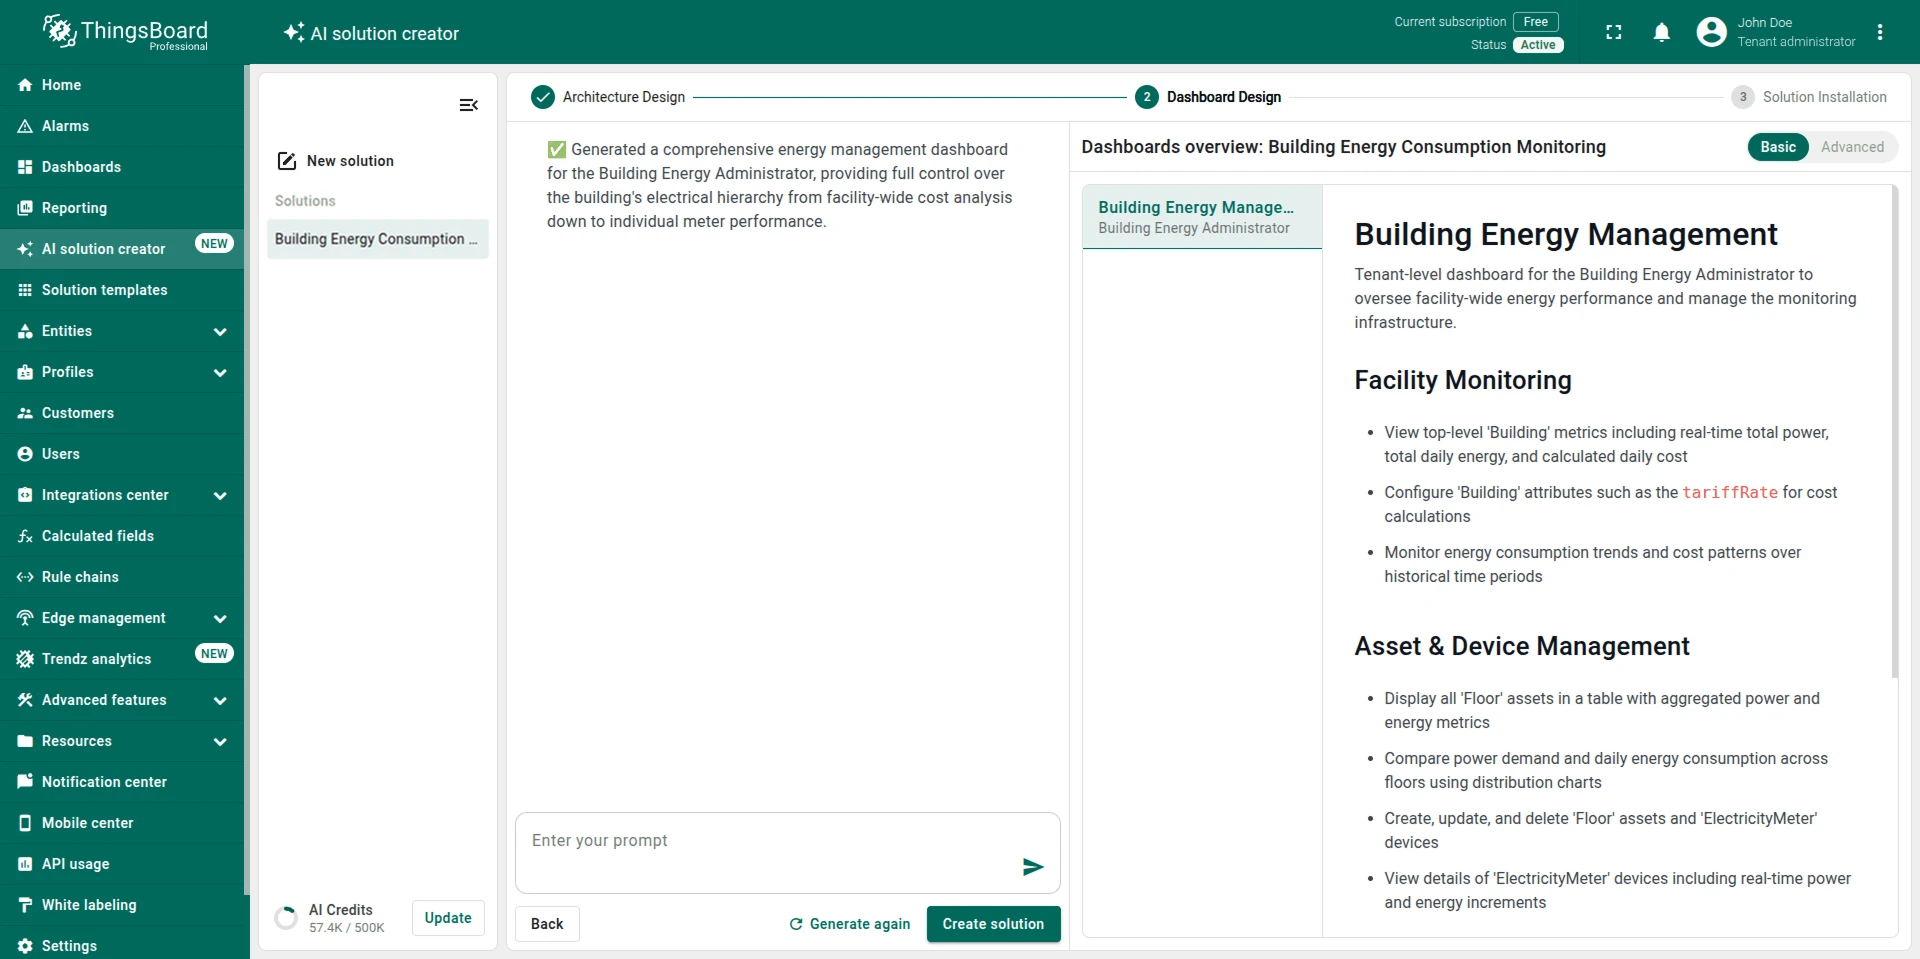
Dashboard Design
Once you approve the architecture, the AI Assistant immediately generates an overview of the proposed dashboards. This step focuses exclusively on dashboards. You review the proposals and refine them if needed.
Review proposed dashboards. The overview shows each dashboard that will be created: what it displays, how you navigate it, and which user role it targets.
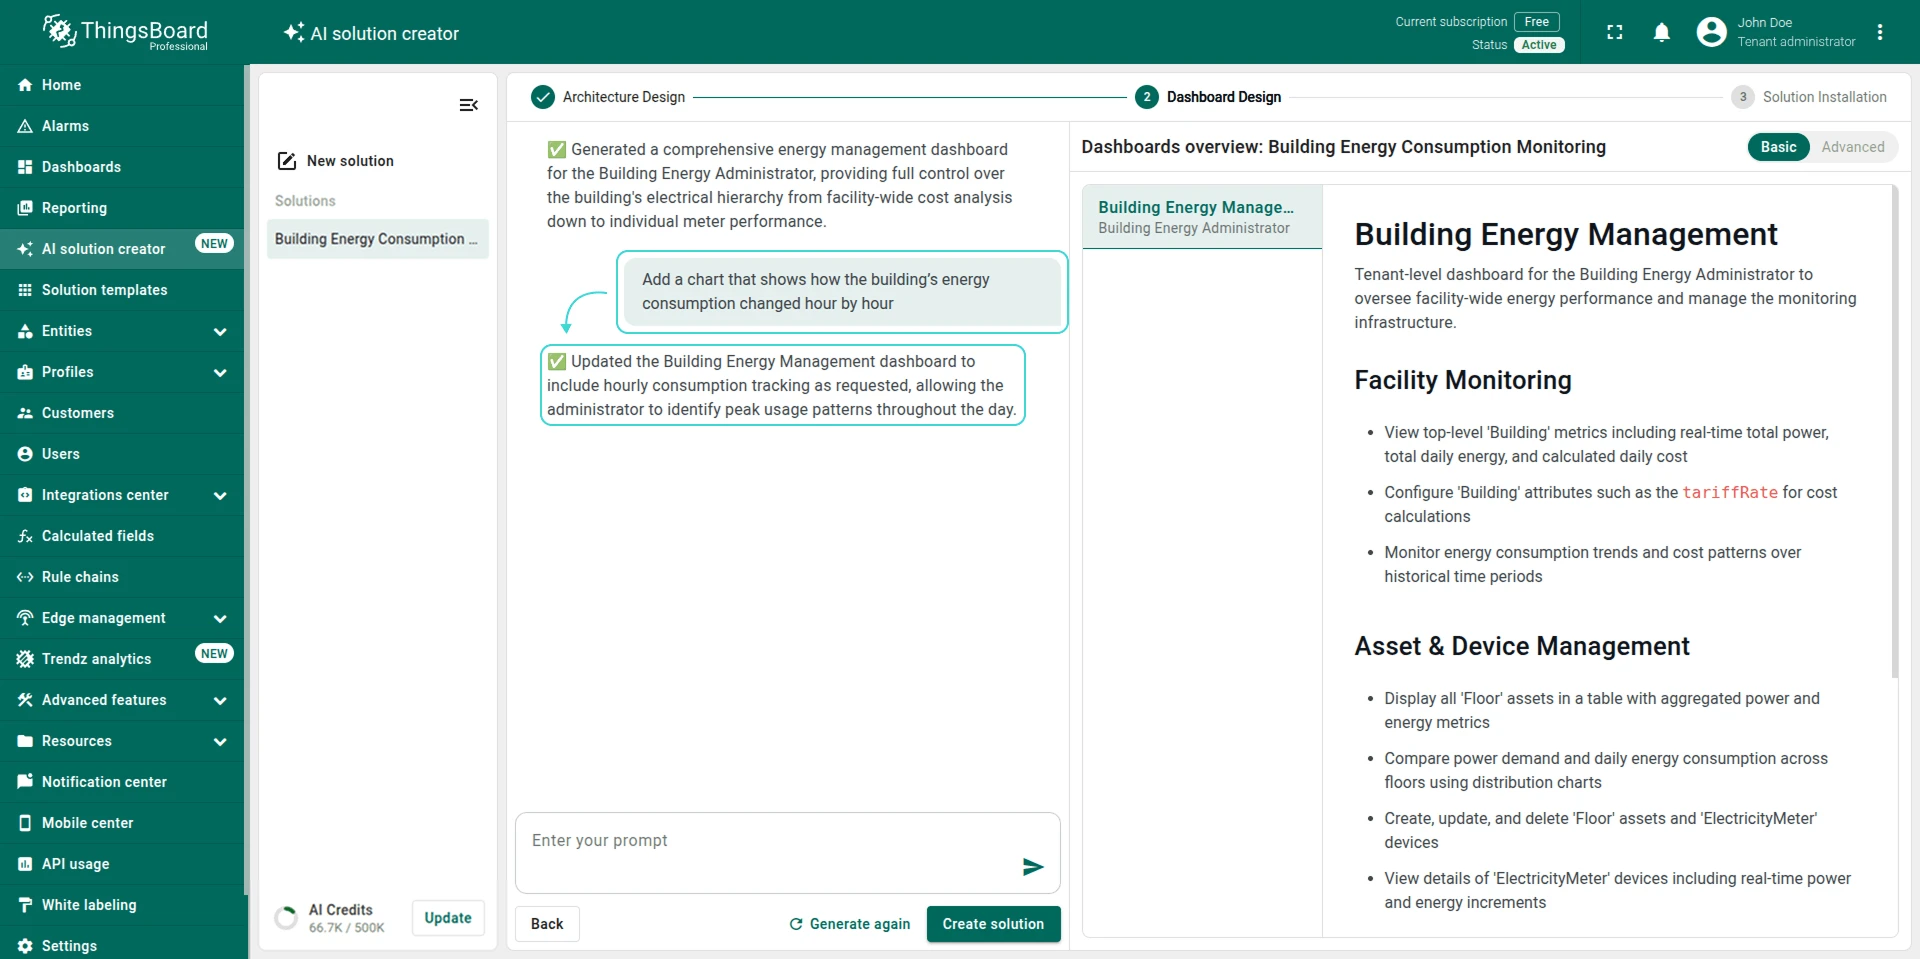
Refine if needed. You can adjust dashboards in two ways, same as in the previous step:
-
Via chat: Describe what you’d like to change in natural language. For example: “Add a chart that shows how the building’s energy consumption changed hour by hour.”
-
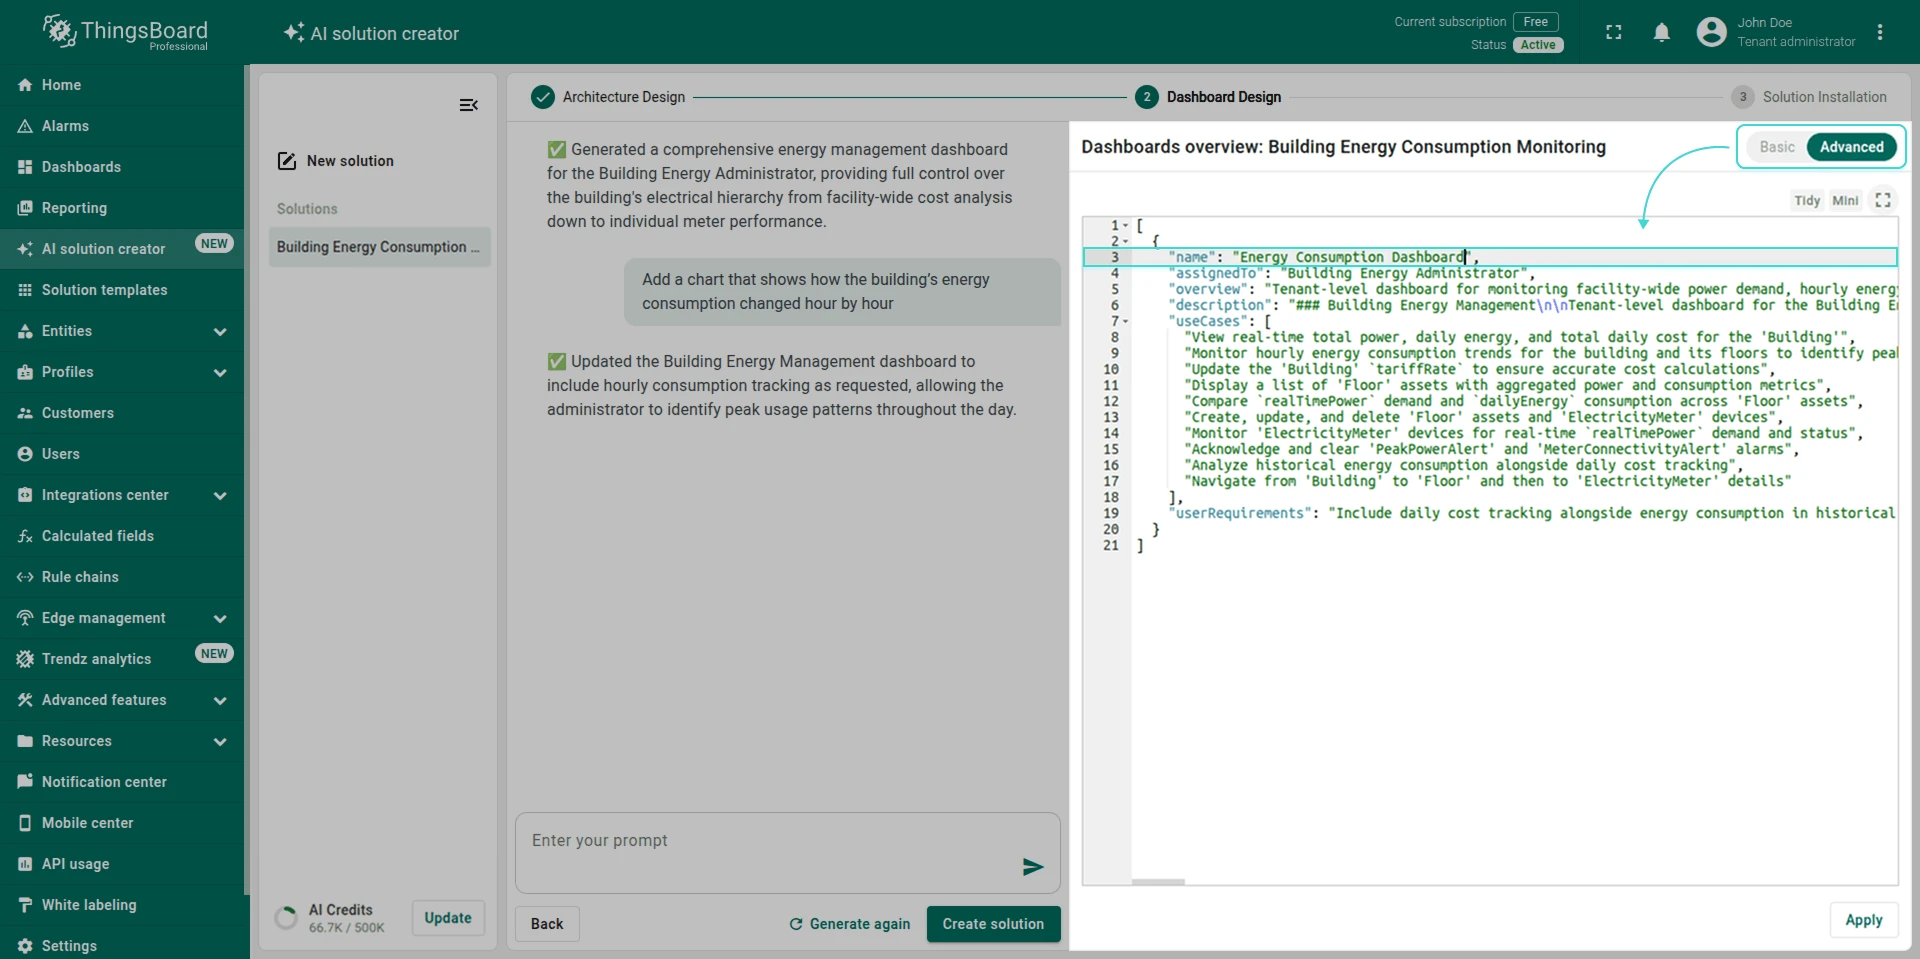
Via advanced mode: Switch to the JSON editor for quick edits. For more substantial changes to dashboard logic, the chat approach is more useful. For example, to rename a dashboard from “Building Energy Management” to “Energy Consumption Dashboard”, find the
"name"field in the JSON and change its value directly. -
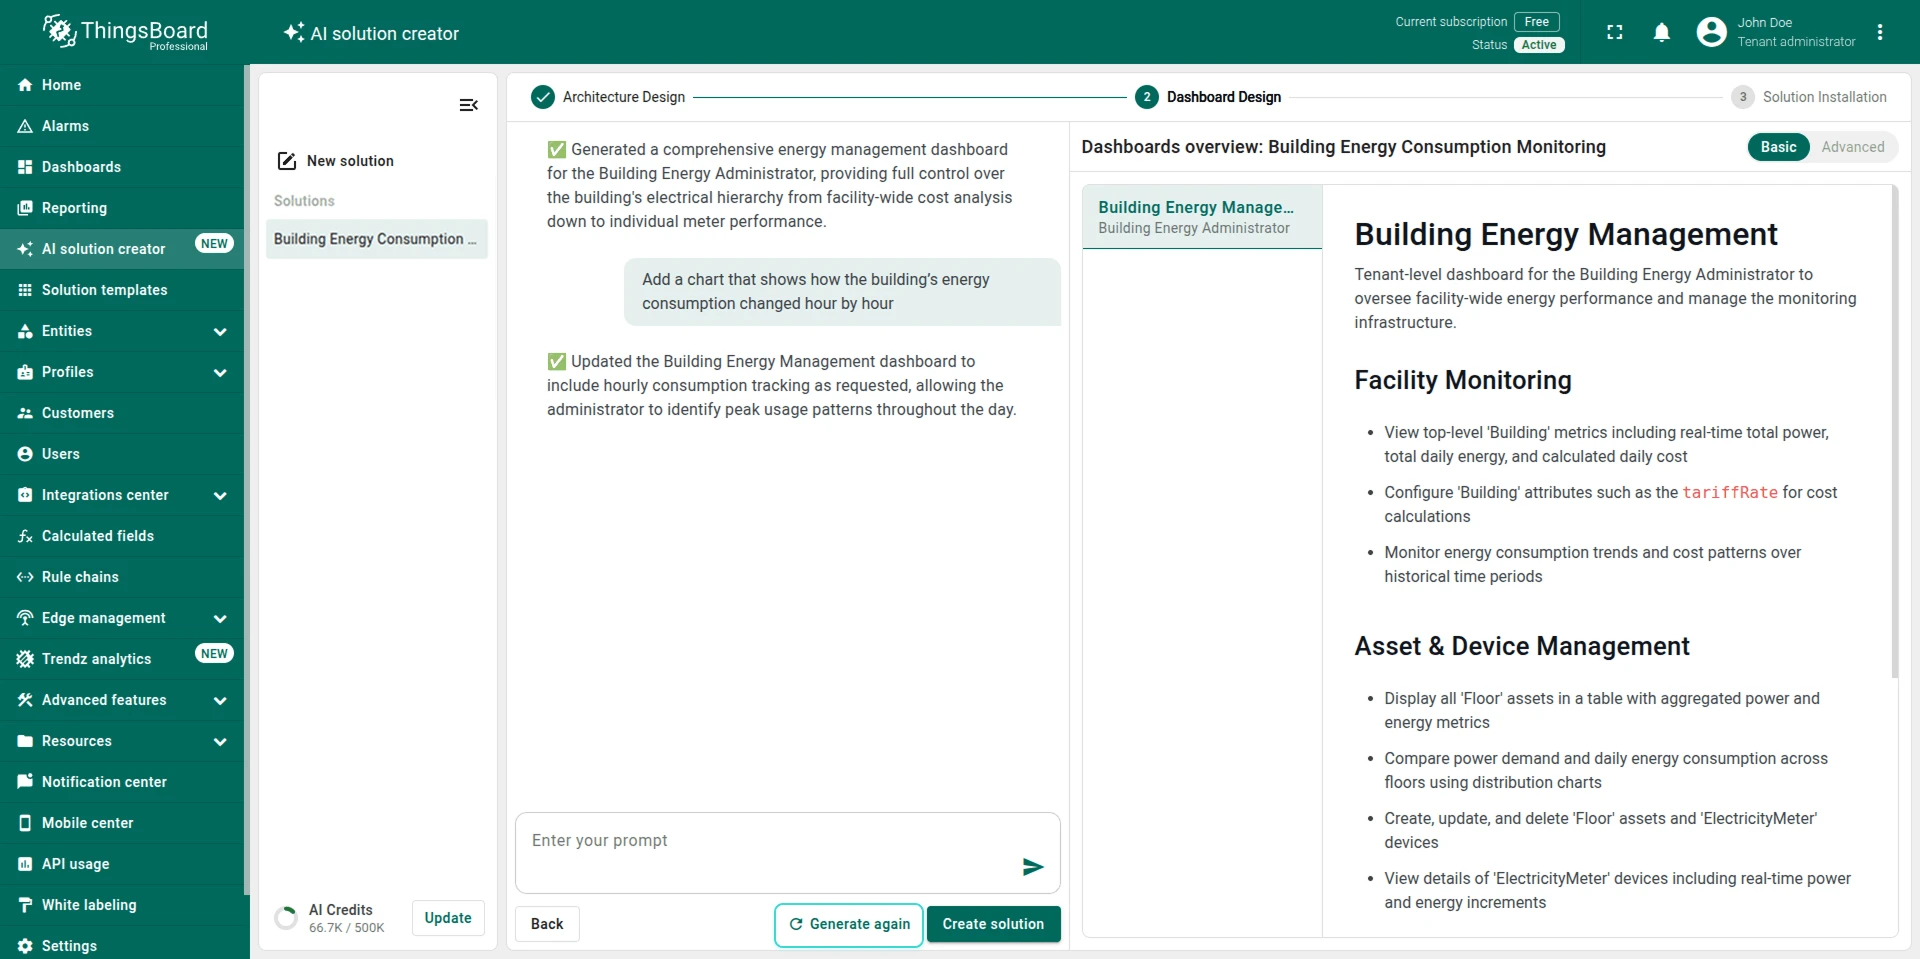
Regenerate: If the proposed dashboards don’t fit your needs and you’re not sure what to change, click Generate again to let the AI Assistant create a new set of dashboard proposals from scratch.
When everything looks right, click Create Solution to start the final step.
-
-
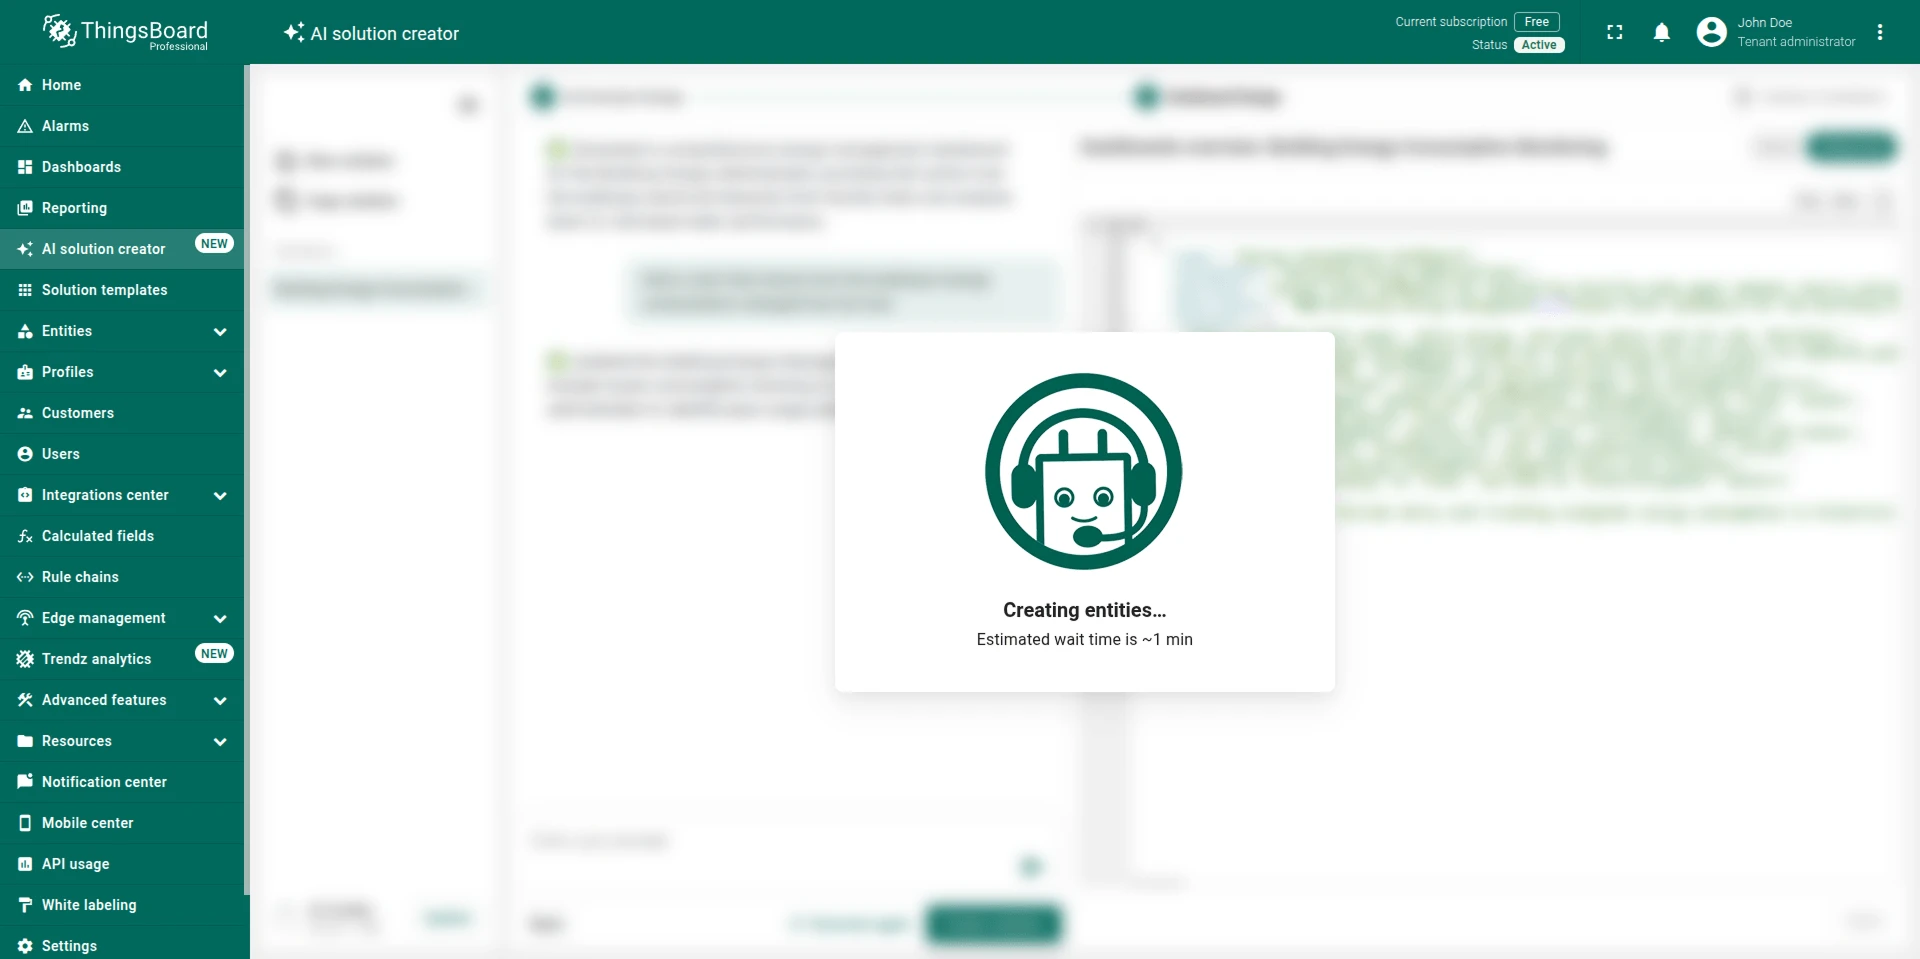
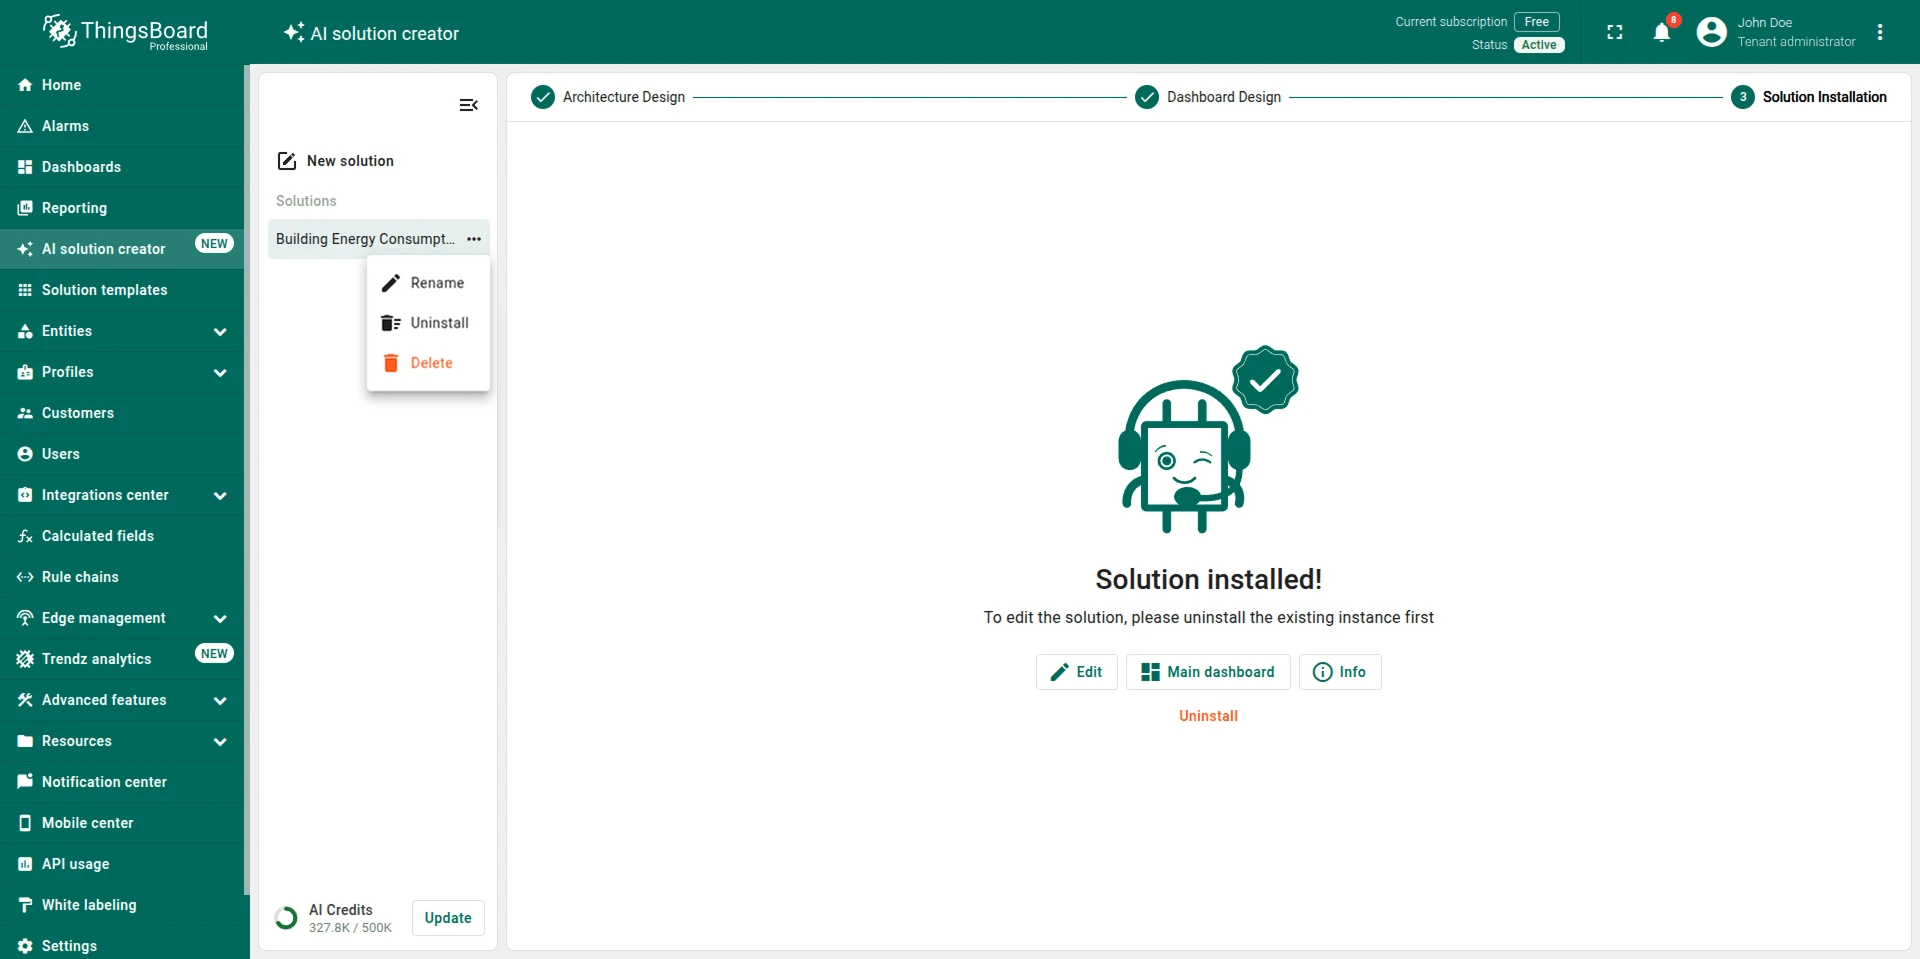
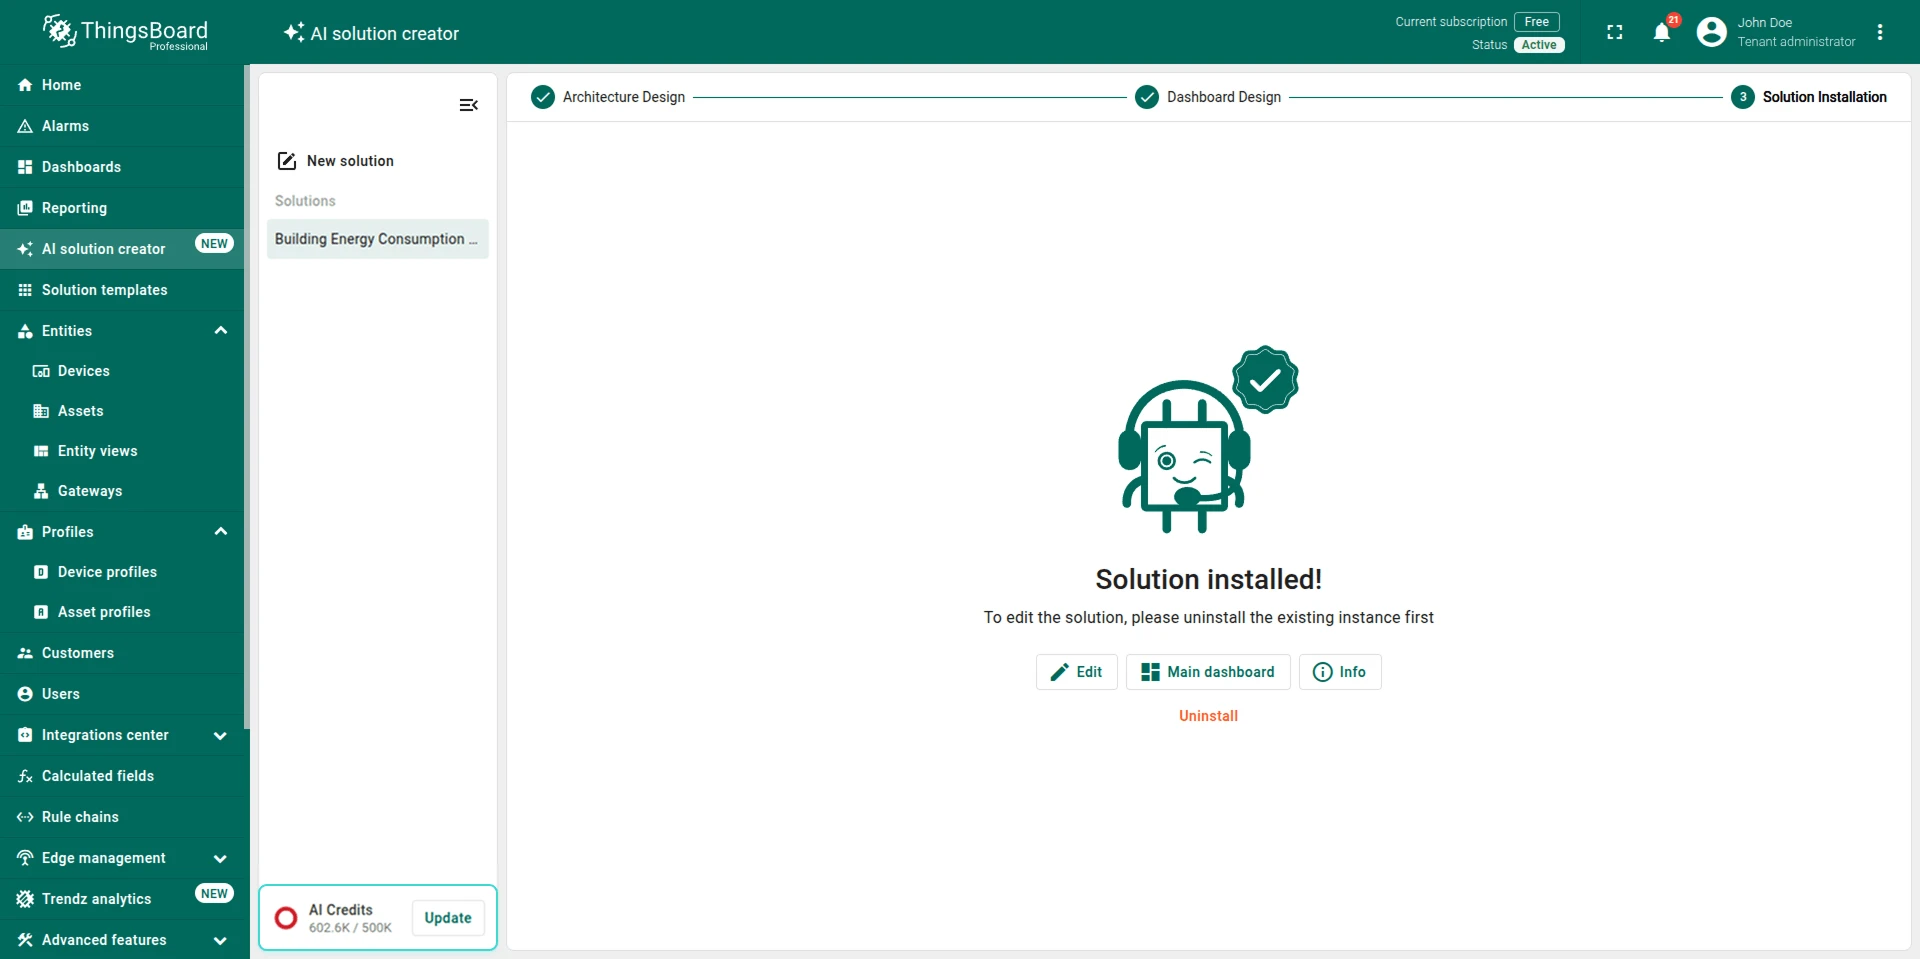
Solution Installation
The AI Assistant creates all entities, sets up roles and permissions, starts emulating telemetry data, and builds your dashboards in one go.
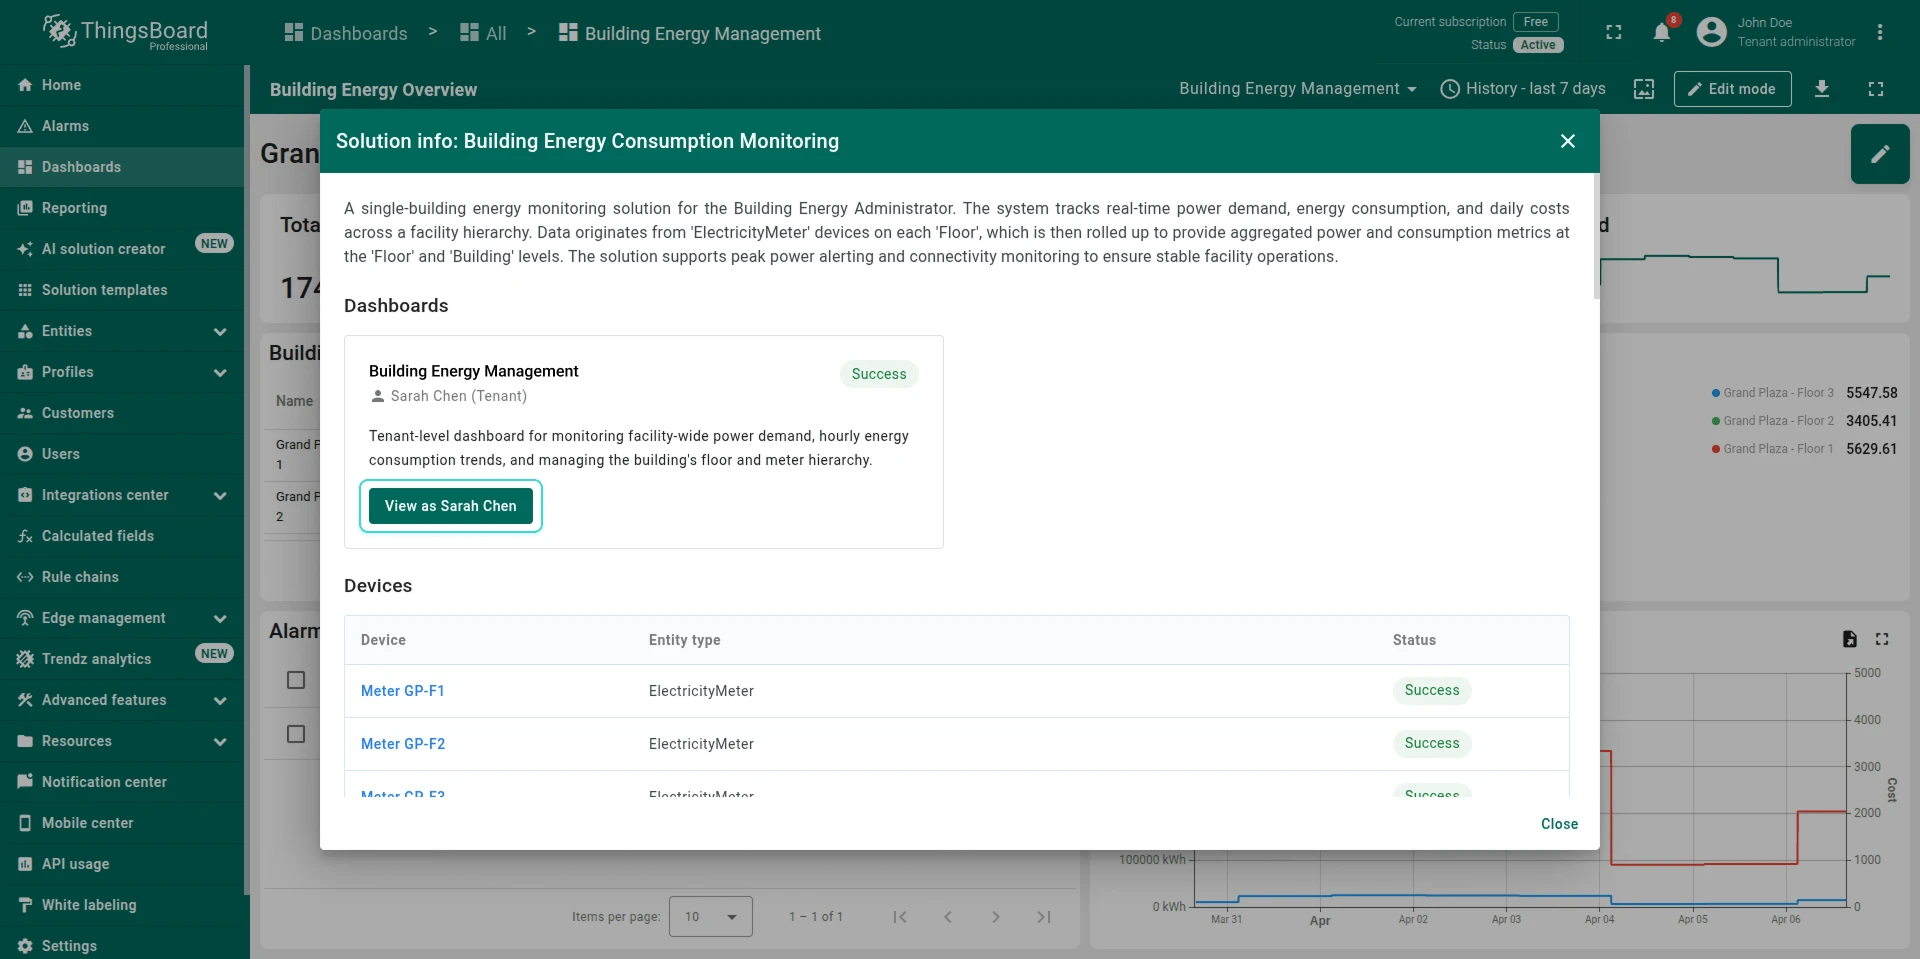
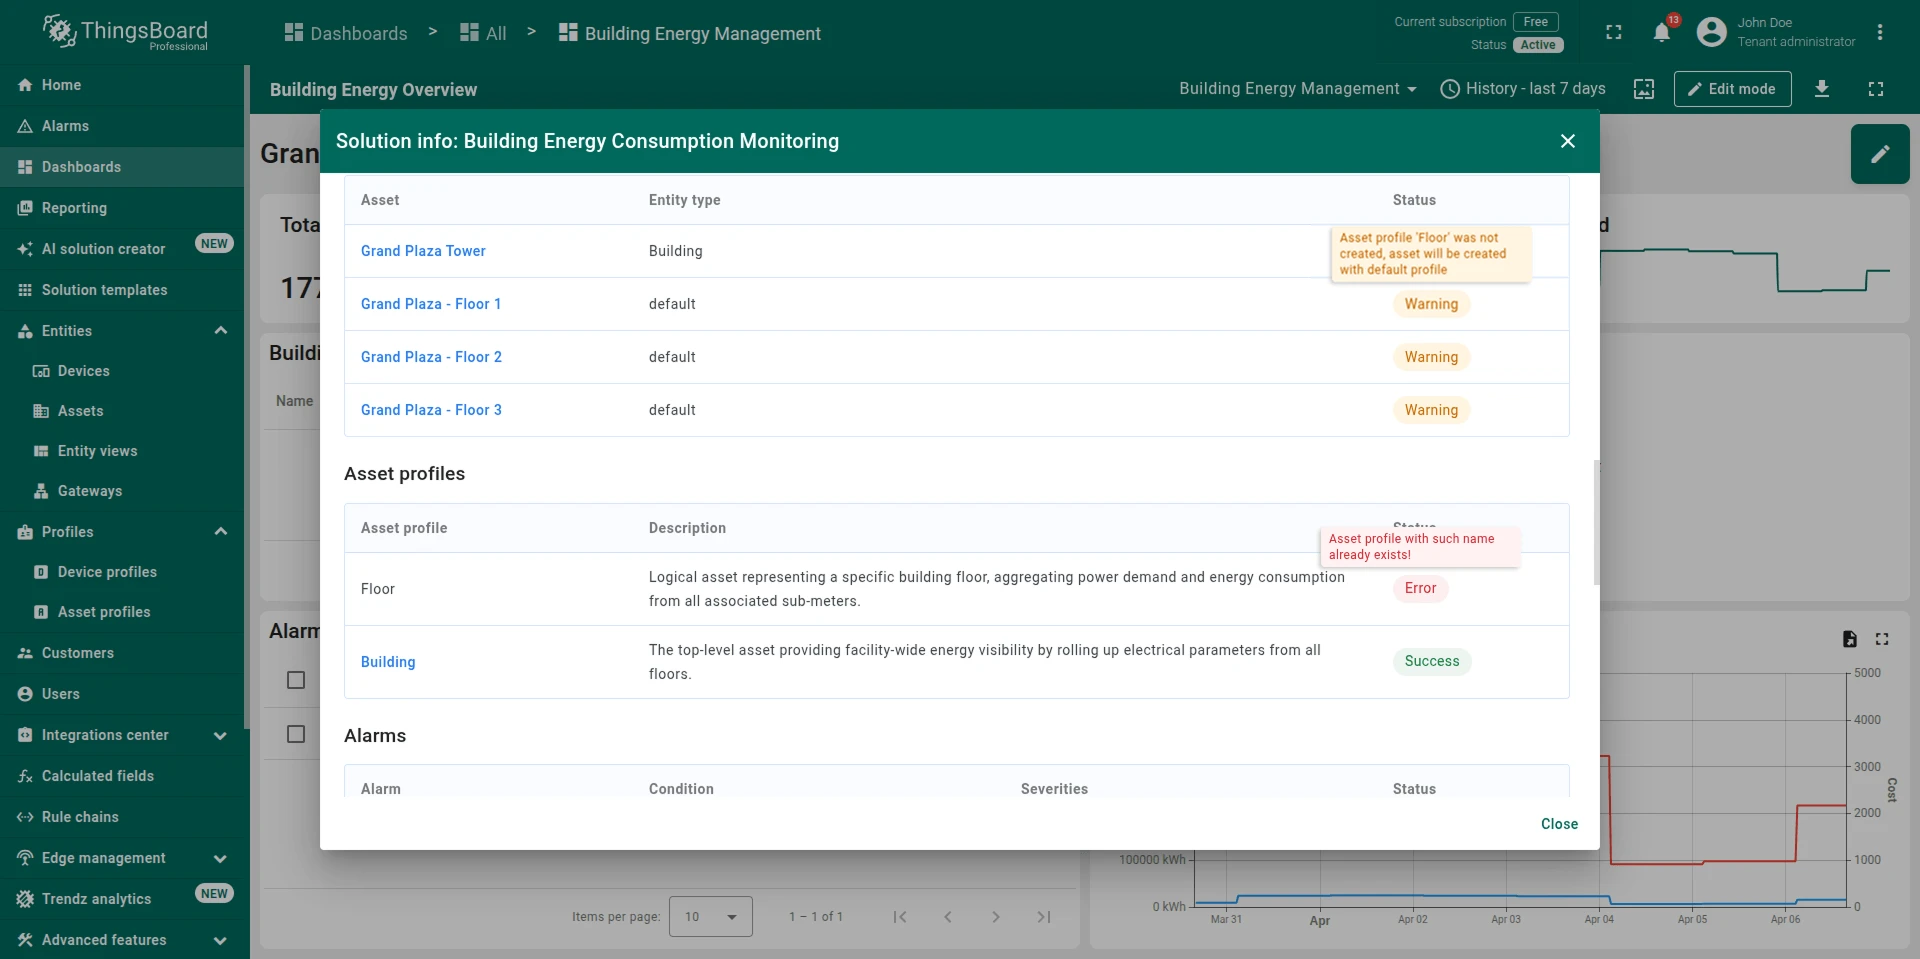
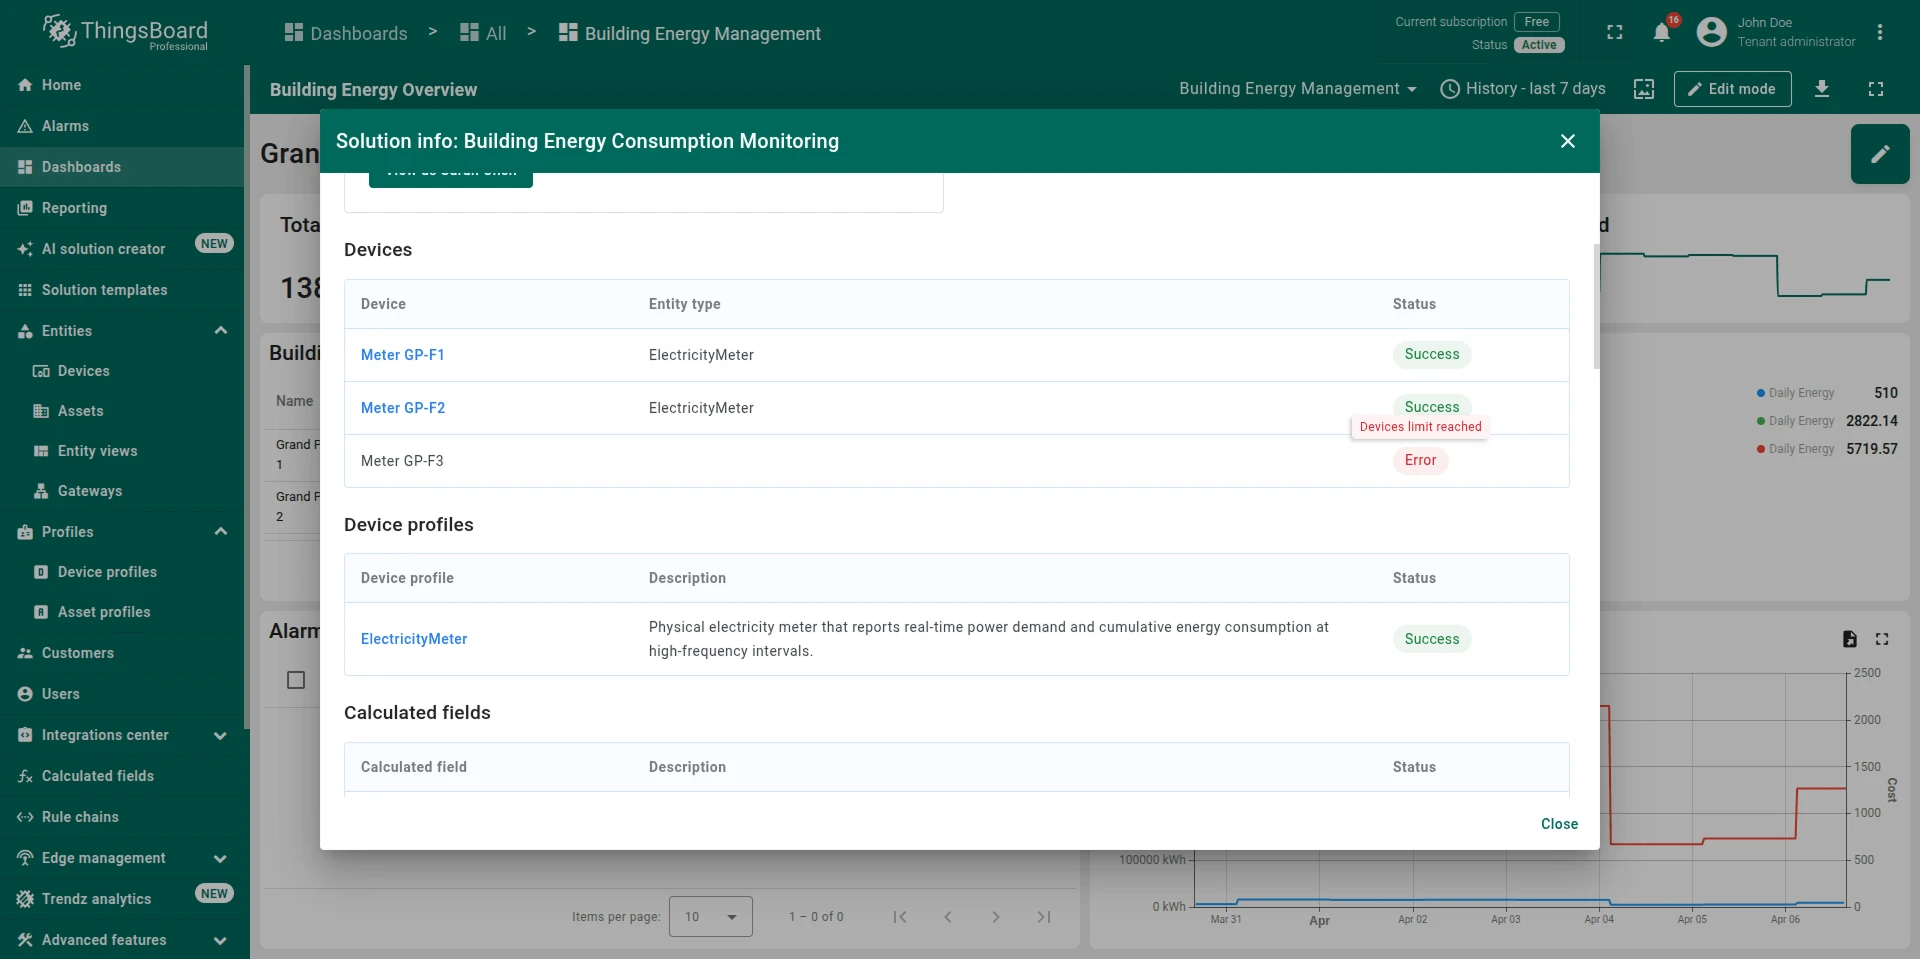
When it finishes, a summary window shows everything that was created: dashboards, devices, alarms, roles, and users, all with their status.
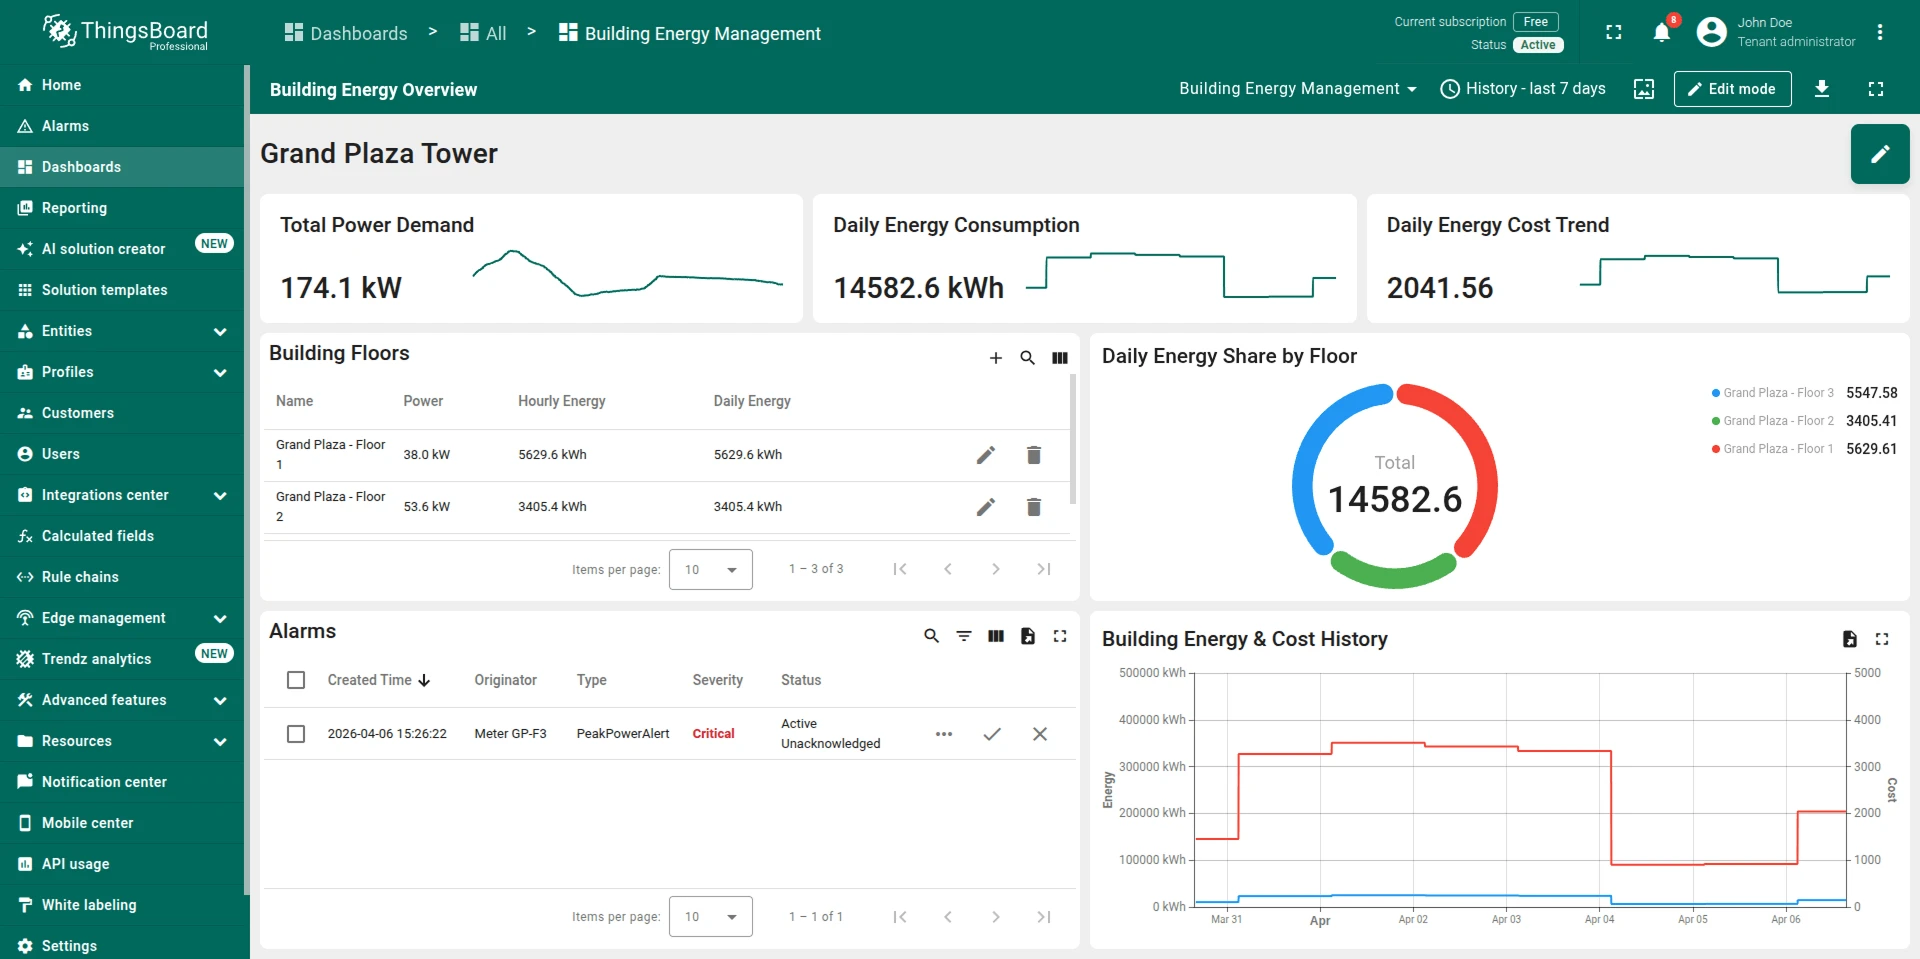
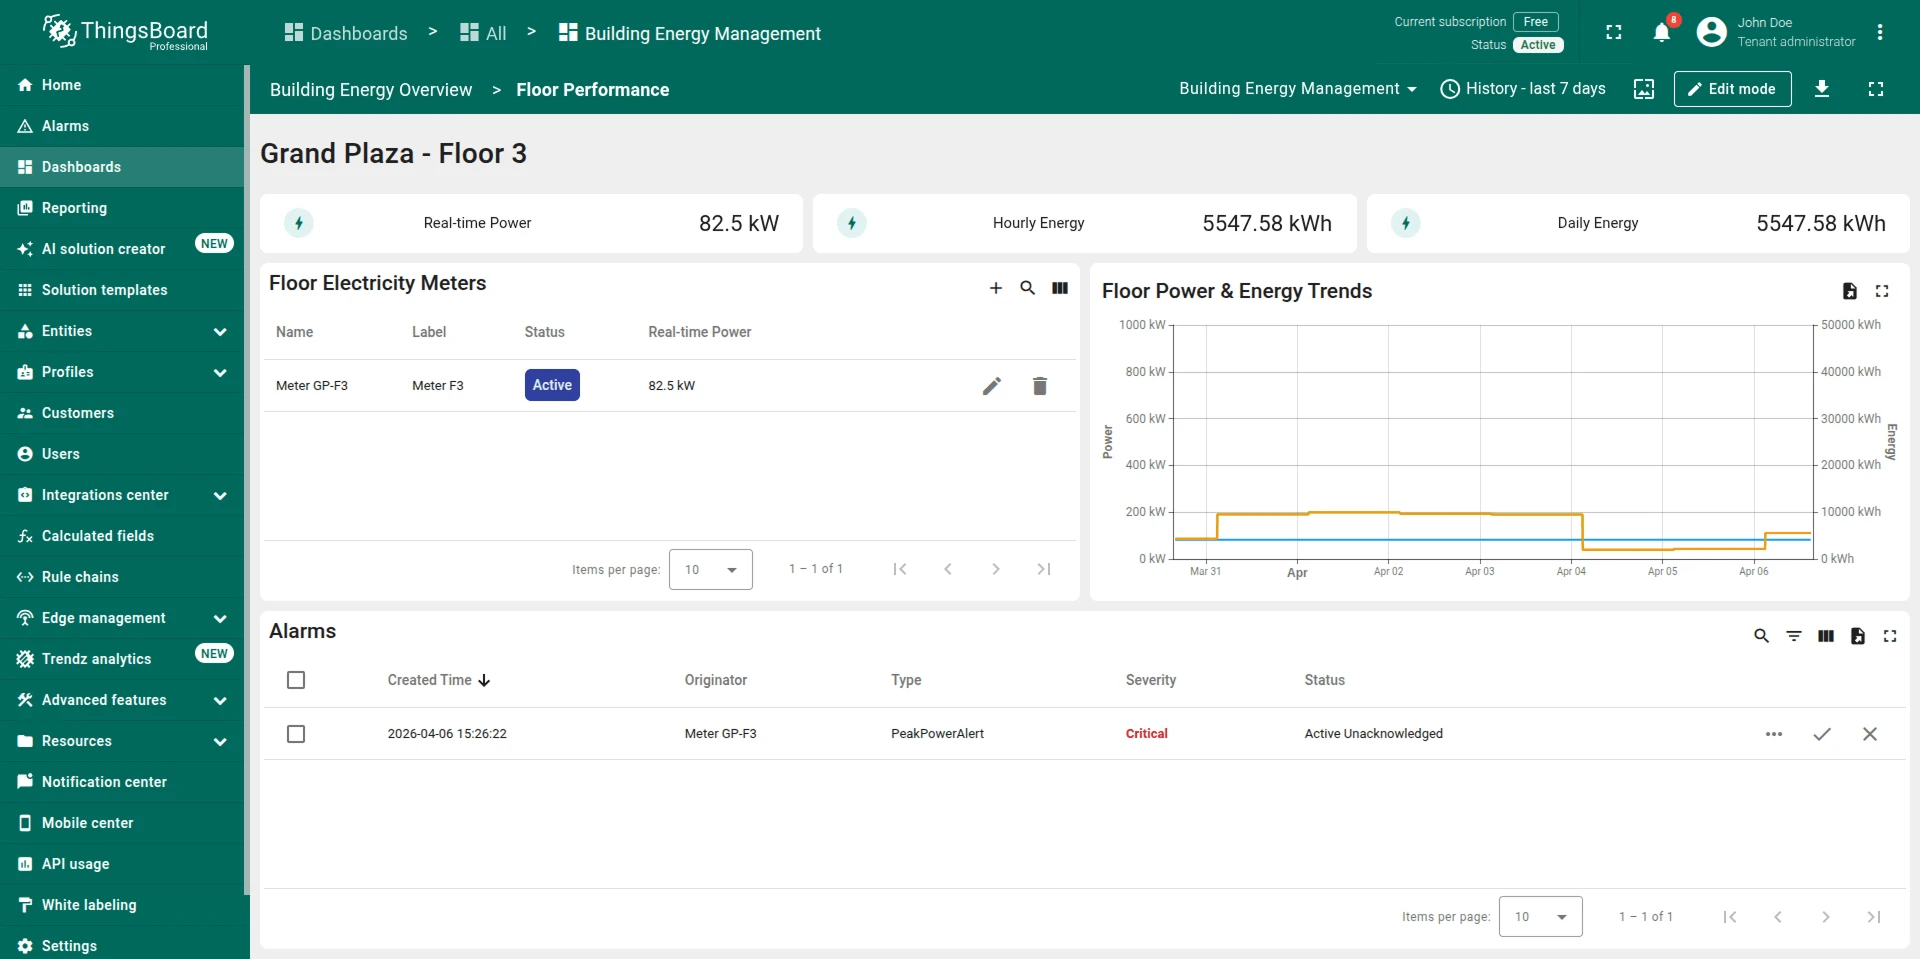
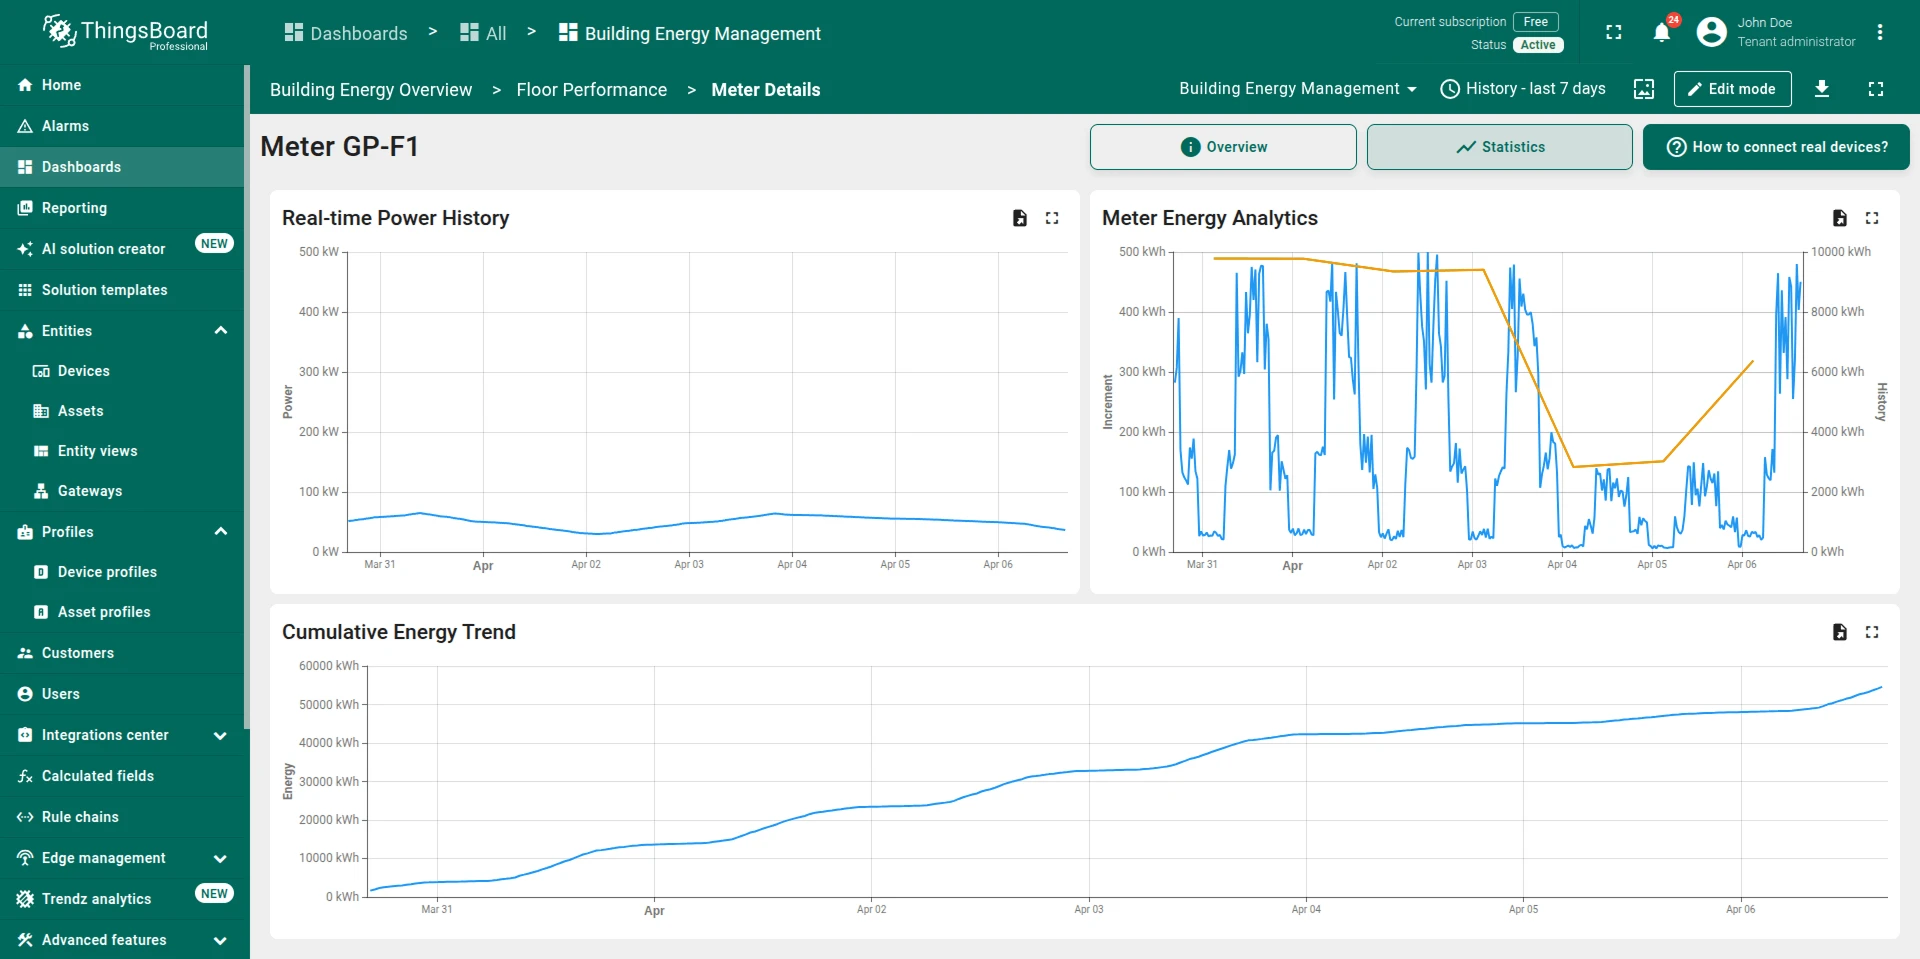
You can explore the generated dashboards straight away. Click View as user on any dashboard in the summary to log in as the target user and see the dashboard from their perspective:


How to describe your use case
Section titled “How to describe your use case”You don’t need to know ThingsBoard terminology to get started. Describe your project in your own words, and the AI Agent will ask follow-up questions if it needs more detail.
Here are four questions that help produce the best results:
What problem are you solving? Describe the main goals of your project. What do you want to monitor, control, or automate, and why?
“I want to track temperature in my cold storage facilities to prevent spoilage and get alerts when something goes wrong.”
How is your organization structured? Who owns or operates the system? Do you serve multiple clients or companies, or is this for your own internal use?
“We’re a logistics company that manages cold chain delivery for several restaurant chains.”
Who will use the system? Describe the different people who need access and what they should be able to see or do.
“Managers need to see everything and configure alert thresholds. Operators only need to monitor live dashboards and respond to alerts.”
What devices and sensors do you have? List the types of hardware you’re using and what data each one sends.
“Temperature sensors that report temperature and humidity every minute. GPS trackers on delivery trucks that send location coordinates.”
What gets generated
Section titled “What gets generated”Here is how each section of the architecture overview maps to the actual ThingsBoard entities created in your tenant:
-
Entity Profiles: For each entity profile, the AI creates the corresponding ThingsBoard entities based on the entity type:
- Device or Asset: Device profile or asset profile, an entity group, and the corresponding devices or assets within that group.
- Customer: Customer group and a customer within that group.
- User: User group and a user within that group.
-
IAM: For each role defined in the IAM section, the AI creates a role with the specified operations and permissions.
-
Calculated Fields: For each calculated field, the AI configures a calculated field on the device or asset profile that the field refers to.
-
Alarms: For each alarm, the AI configures an alarm rule on the device or asset profile that the alarm applies to.
-
Dashboards: For each dashboard, the AI creates a dashboard group, a dashboard with all configured widgets, and shares it with the user groups it is assigned to.
-
Live simulation: Device emulators producing realistic telemetry, so the solution is live and explorable from the moment it’s ready. Replace with real devices whenever you’re ready.
Limitations
Section titled “Limitations”The generated solution is a demonstration prototype, not a production deployment. Keep the following in mind:
- Demo-scale quantities: The AI creates a small number of devices and assets to demonstrate the use case, regardless of the real-world scale you describe. If you mention “1,000 sensors” or “500 buildings”, the AI will still generate a minimal set (typically up to five devices and five assets) that is enough to explore the solution. You can add more entities later.
- Single customer profile: If your solution uses a customer hierarchy, the AI creates one customer profile, even if your real-world scenario has multiple customer types. You can extend the hierarchy after generation.
- Customer hierarchy: The AI automatically determines whether your use case benefits from a customer hierarchy based on your description. You don’t need to mention it explicitly. Commercial scenarios typically include customer hierarchy with domain-specific roles (like “Fleet Manager” or “Store Supervisor”), while single-organization use cases keep everything at the tenant level.
- One dashboard per user group: Each dashboard is created once and shared with the user group it is assigned to. All users within that group see the same dashboard.
- One role per user profile: Each user profile maps to exactly one role. The AI generates at least one user for each user profile. In solutions with customer hierarchy, both tenant-level and customer-level users are generated.
- Required administrator: Every solution includes at least one tenant-level user profile with full (CRUD) permissions to manage the solution.
- Calculated fields limit: The AI creates up to 10 calculated fields per entity profile, prioritizing the most impactful metrics.
- Foundational prototype: The generated solution provides a starting point. Fine-tune alarm thresholds, calculated fields, dashboard layouts, and access control to match your production requirements.
Managing your solution
Section titled “Managing your solution”After the solution is installed, you can manage it from the AI Solution Creator page using the context menu on the solution chat:
- Edit: Go back to the architecture or dashboard design steps to make changes without uninstalling first. When you click Create Solution again, the previous solution is automatically uninstalled and replaced with the updated one.
- Rename: Rename the chat to make it easier to find among your solutions.
- Uninstall: Remove the solution and all created entities from your tenant. You can uninstall from the context menu in the chat list, or by opening the solution chat and clicking Uninstall.
- Delete: Deletes only the chat history, without uninstalling the solution. All created entities remain in your tenant, and you will need to remove them manually.
Troubleshooting
Section titled “Troubleshooting”Installation errors. After installation, the solution summary window shows the status of each created entity. If something goes wrong, hover over the status icon to see the details. There are two types of issues:
- Error: The entity failed to create entirely. For example, an entity group could not be created because one with the same name already exists.
- Warning: The entity was created but is not fully connected. For example, a device was created but could not be added to its entity group.
Most issues follow a cascade pattern: if a parent entity fails, dependent entities will also be affected. For example, if an entity group cannot be created, the devices that belong to that group will report a warning. Similarly, if a device or asset profile is not created, calculated fields and alarm rules configured on that profile will fail too.
The most common cause is a name conflict: an entity with the same name already exists in your tenant. To resolve it, delete or rename the existing entity, or go back and ask the AI Assistant to use a different name.
Subscription entity limit reached. Your subscription plan limits the number of entities you can create. For example, if your free plan supports five devices and you already have two, creating five more via AI Solution Creator will fail for the entities that exceed the limit. Free up space by removing unused entities, or upgrade your subscription.
Out of AI credits. This error appears when you try to send a request to the AI Assistant, not in the solution summary. To resolve it, click Update next to the AI credits bar chart on the AI Solution Creator page.
Next steps
Section titled “Next steps”Once your solution is ready, there’s plenty more to explore:
- Connect real devices: Your solution runs on simulated data by default. Follow the connectivity guide to connect your physical devices using MQTT, HTTP, CoAP, or other supported protocols.
- Enhance with AI Assistants: Use the built-in AI Assistants for calculated fields and alarm rules to refine your solution. Describe what you need in natural language and let the assistant configure it for you.
- Explore dashboards: Customize your dashboards by adding widgets, adjusting layouts, or creating new views.
Was this helpful?