One-way RPC over MQTT
A refrigeration controller (device SN-001) publishes temperature readings to the broker and subscribes to a command topic. An operator sets the target temperature on a dashboard Knob Control widget, and ThingsBoard sends a one-way RPC command to the device over MQTT — no device acknowledgment is expected.
Prerequisites
Section titled “Prerequisites”- A ThingsBoard Professional Edition instance installed locally;
- MQTT broker accessible by ThingsBoard:
broker.hivemq.com(port 1883); mosquitto_pubandmosquitto_subMQTT clients to send and receive messages.
The refrigeration controller:
- publishes temperature readings to
tb/mqtt-integration-tutorial/fridge/+/temperature - subscribes to
tb/mqtt-integration-tutorial/fridge/+/rx/set-temperaturefor incoming RPC commands.
Step 1. Create the integration
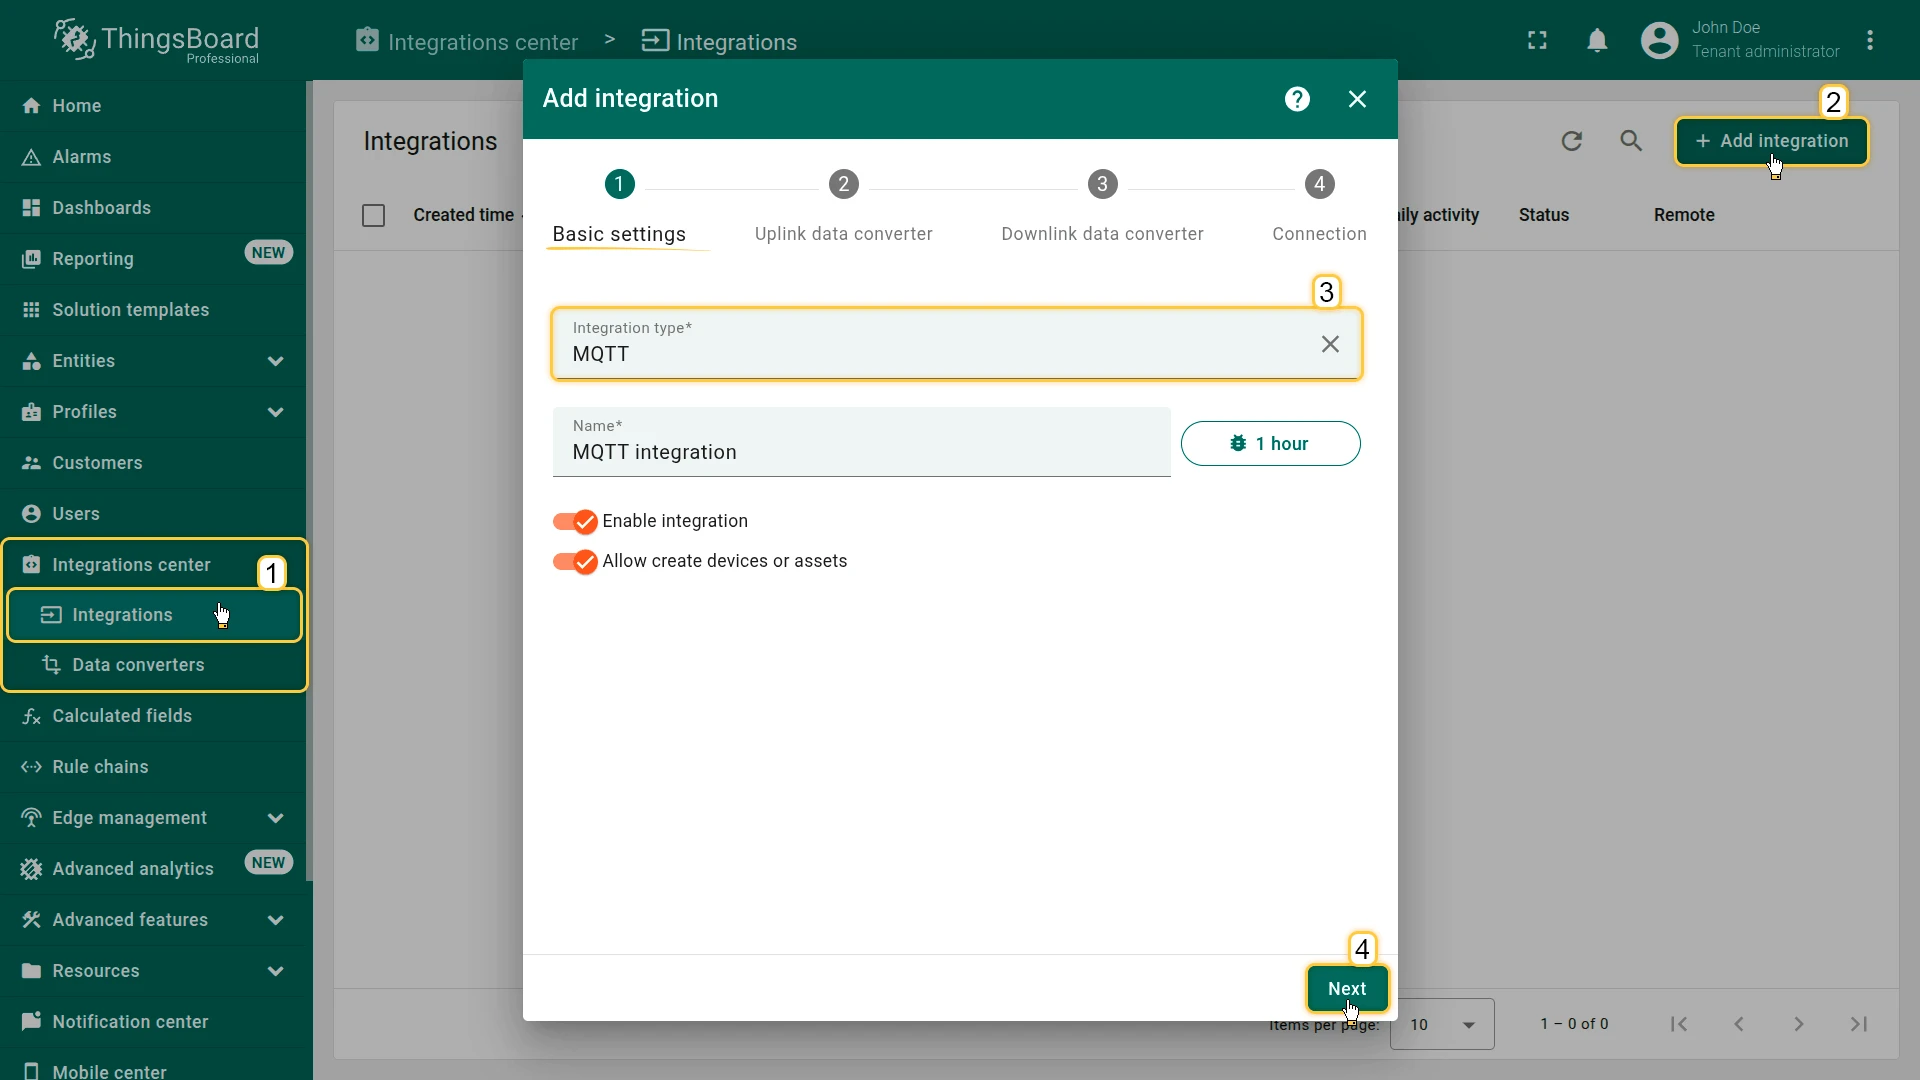
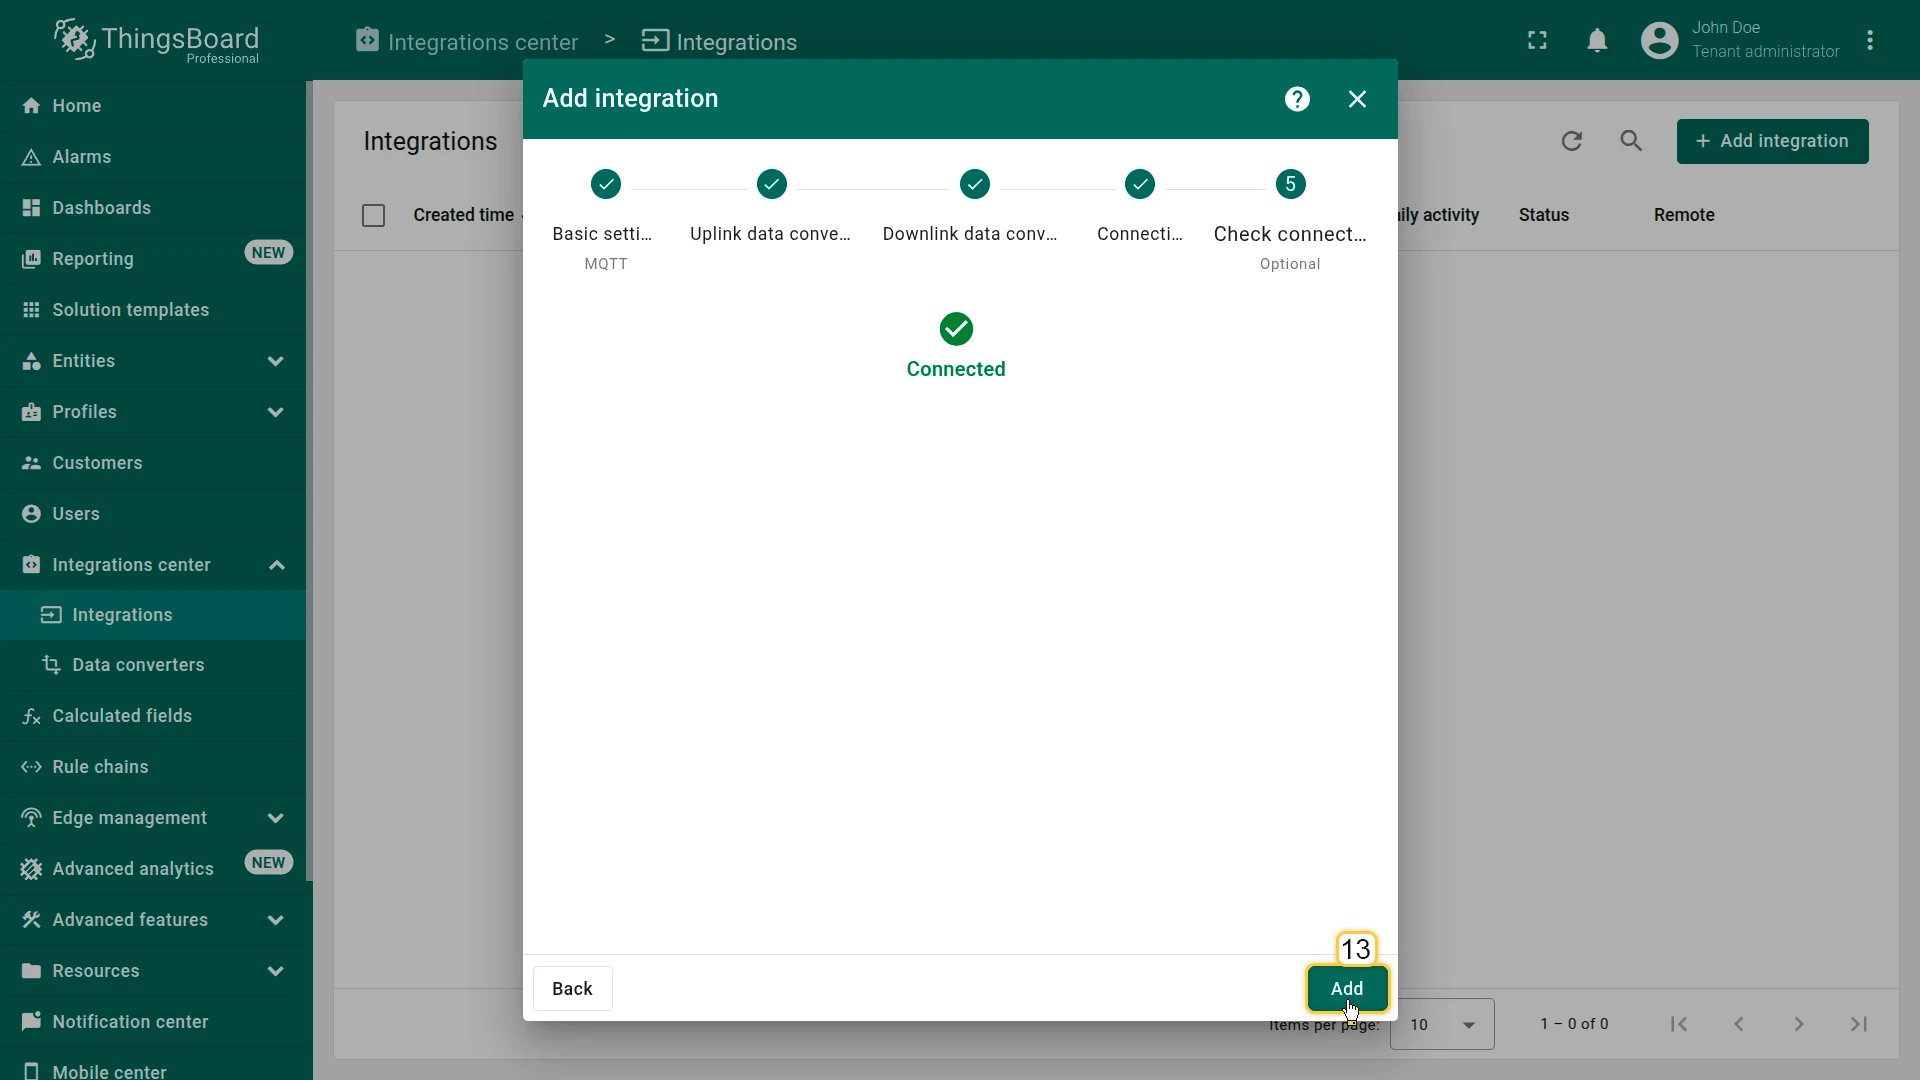
Section titled “Step 1. Create the integration”- Go to Integrations center ⇾ Integrations and click + Add integration.
- Basic settings:
- Set Integration type to MQTT and enter a name (e.g. “MQTT integration”).
- Enable integration and Allow create devices or assets are on by default.
- Click Next.
- Uplink data converter. The wizard creates the converter inline.
- The name is auto-generated.
- Paste the decoder script below and click Next.
/** Decoder **/
// decode payload to stringvar payloadStr = decodeToString(payload);var data = JSON.parse(payloadStr);
var deviceName = metadata.topic.split("/")[3];// decode payload to JSONvar deviceType = 'sensor';
// Result object with device attributes/telemetry datavar result = {  deviceName: deviceName,  deviceType: deviceType,  attributes: {    integrationName: metadata['integrationName'],  },  telemetry: {    temperature: data.temperature,  }};
/** Helper functions 'decodeToString' and 'decodeToJson' are already built-in **/
return result;
/** Decoder **/
// decode payload to stringvar payloadStr = decodeToString(payload);var data = JSON.parse(payloadStr);
var deviceName = metadata.topic.split("/")[3];// decode payload to JSONvar deviceType = 'sensor';
// Result object with device attributes/telemetry datavar result = { deviceName: deviceName, deviceType: deviceType, attributes: { integrationName: metadata['integrationName'], }, telemetry: { temperature: data.temperature, }};
/** Helper functions **/
function decodeToString(payload) { return String.fromCharCode.apply(String, payload);}
function decodeToJson(payload) {// convert payload to string.var str = decodeToString(payload);
// parse string to JSONvar data = JSON.parse(str); return data;}
return result;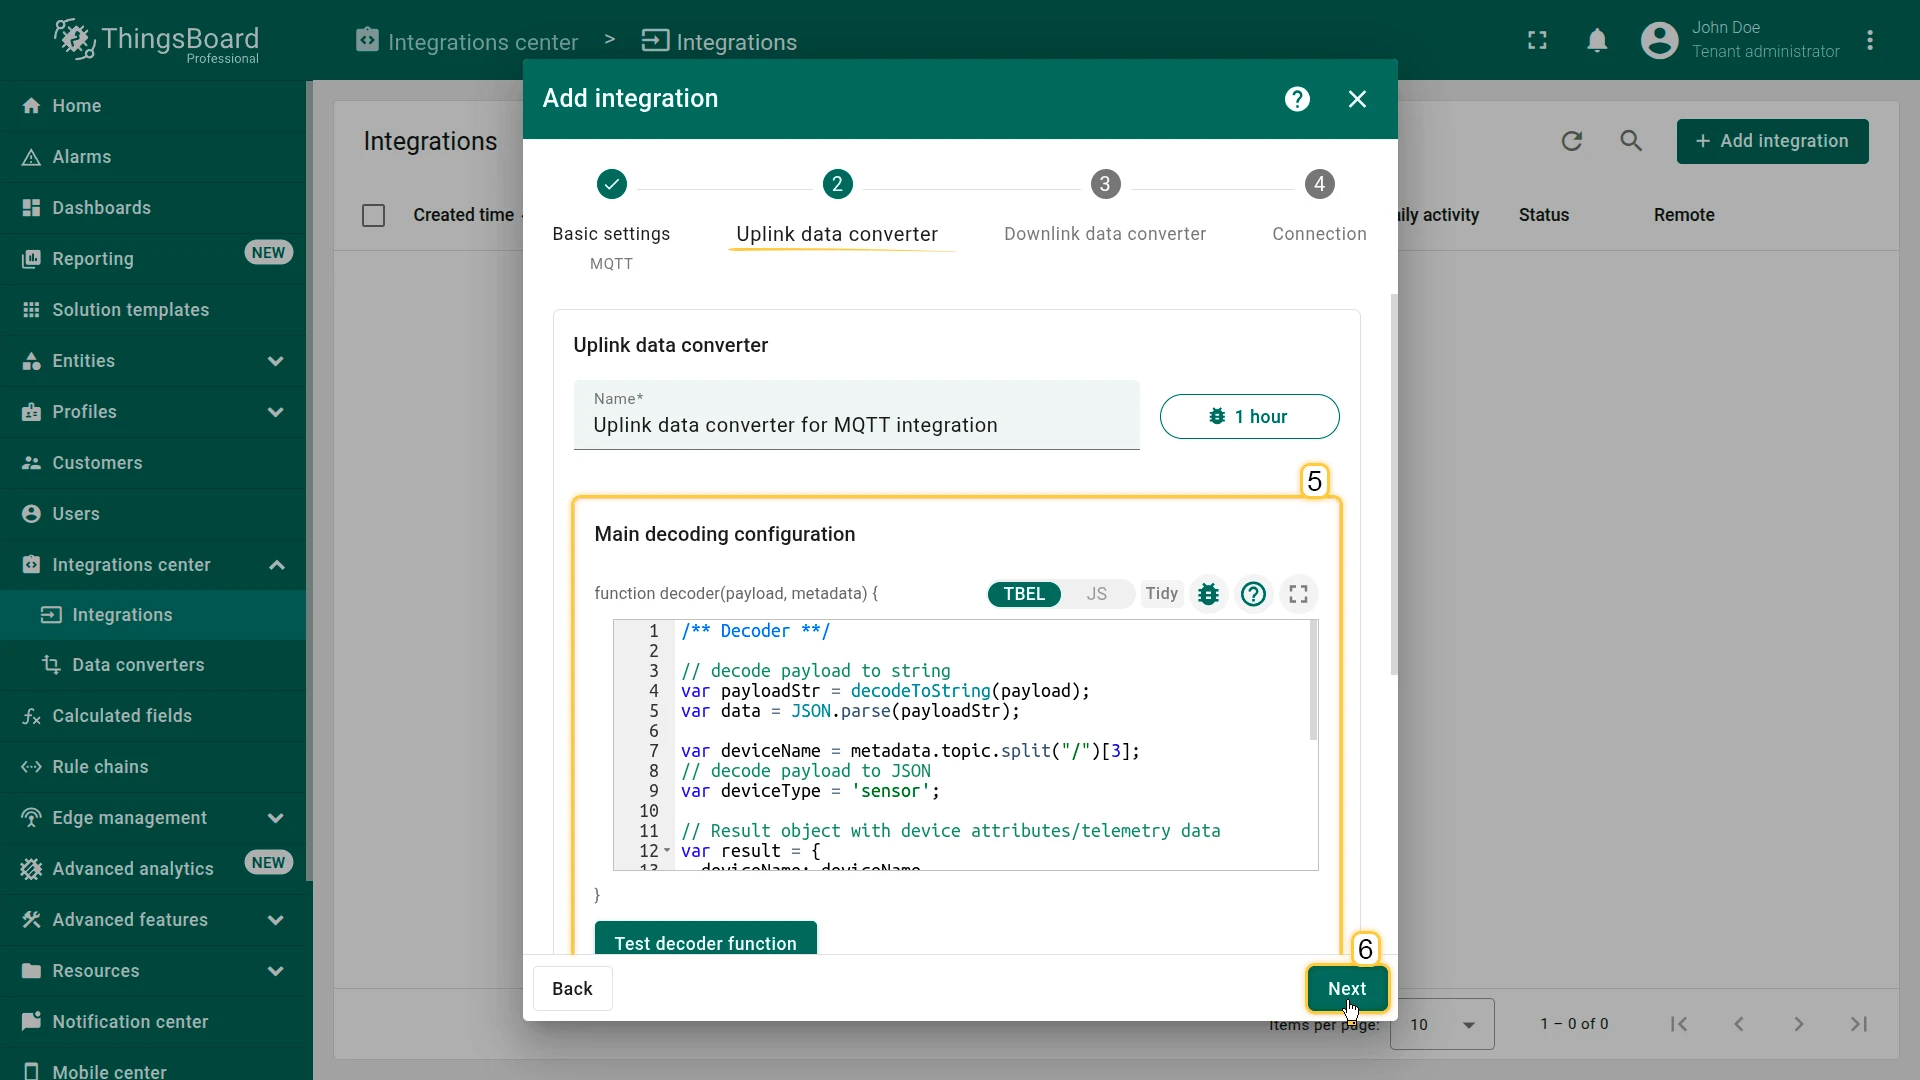
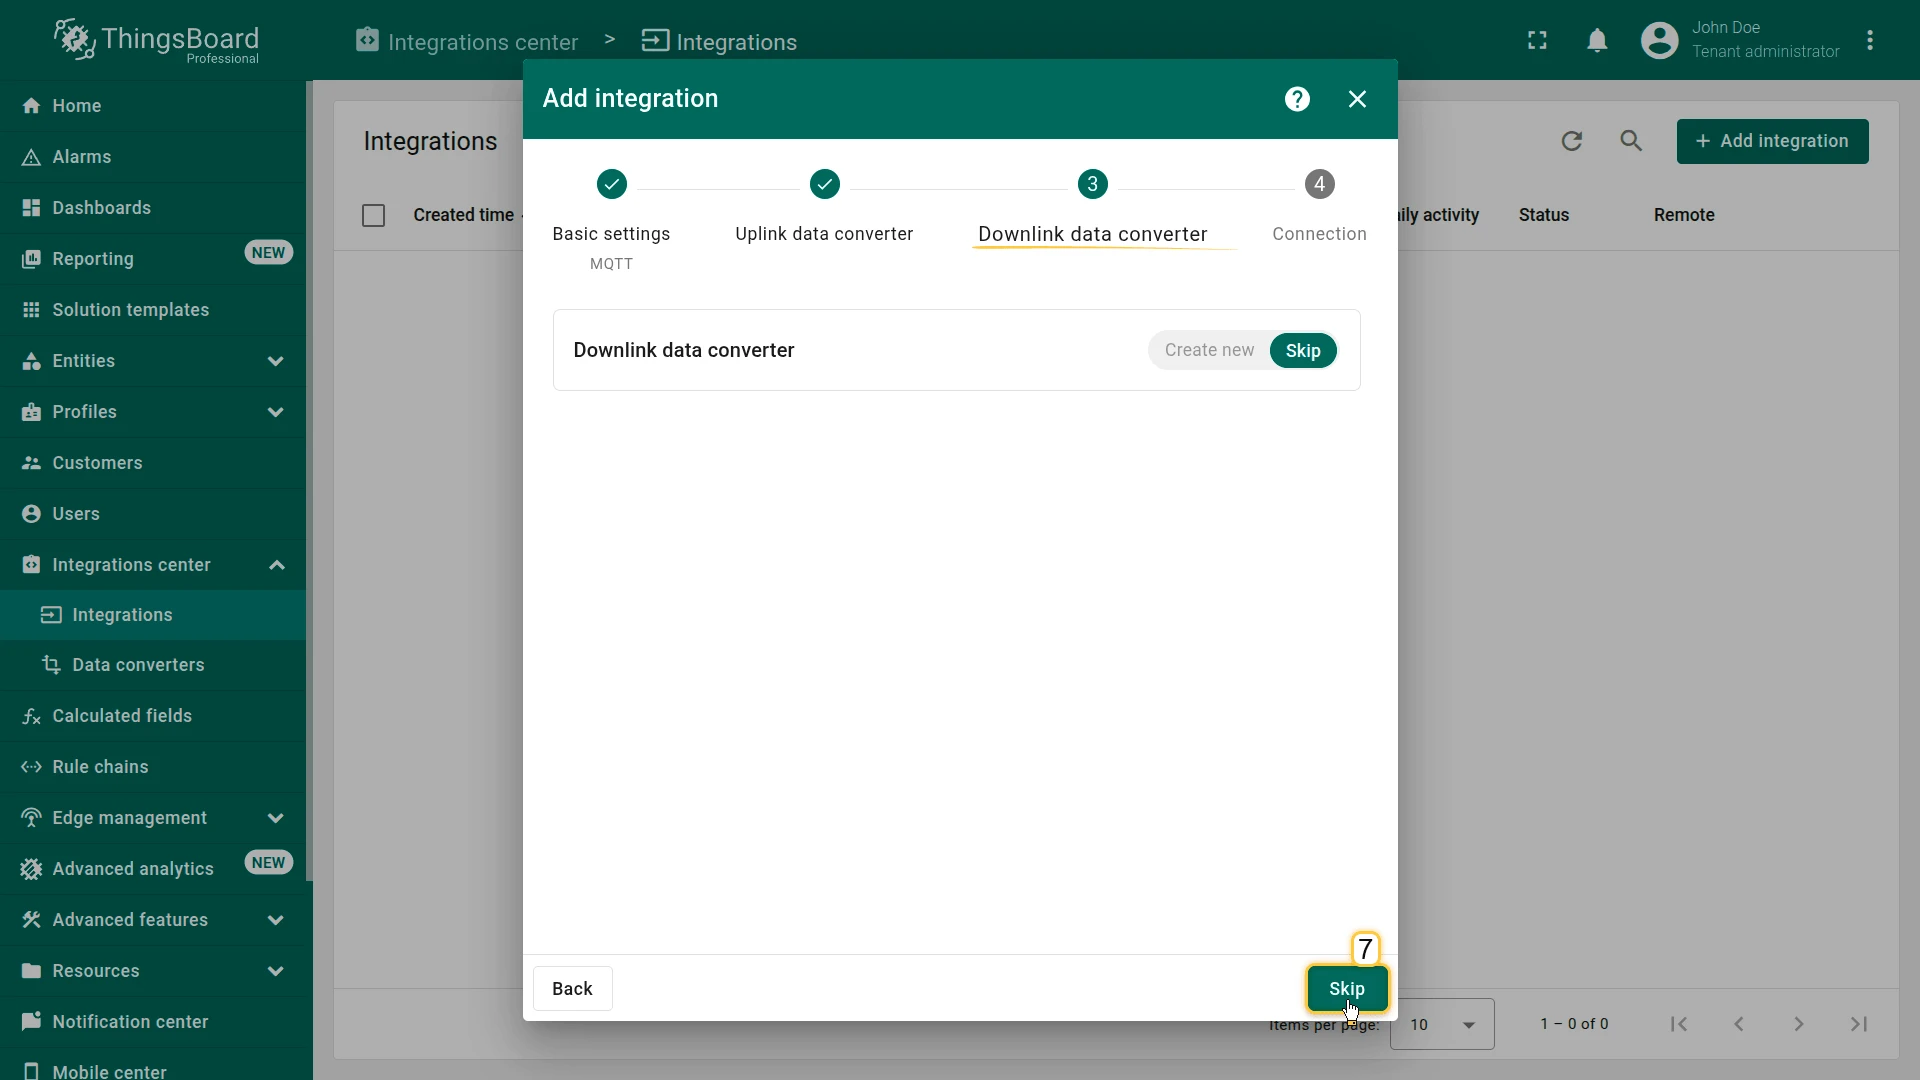
- Downlink data converter:
- Click Skip — the downlink converter will be added in Step 5.
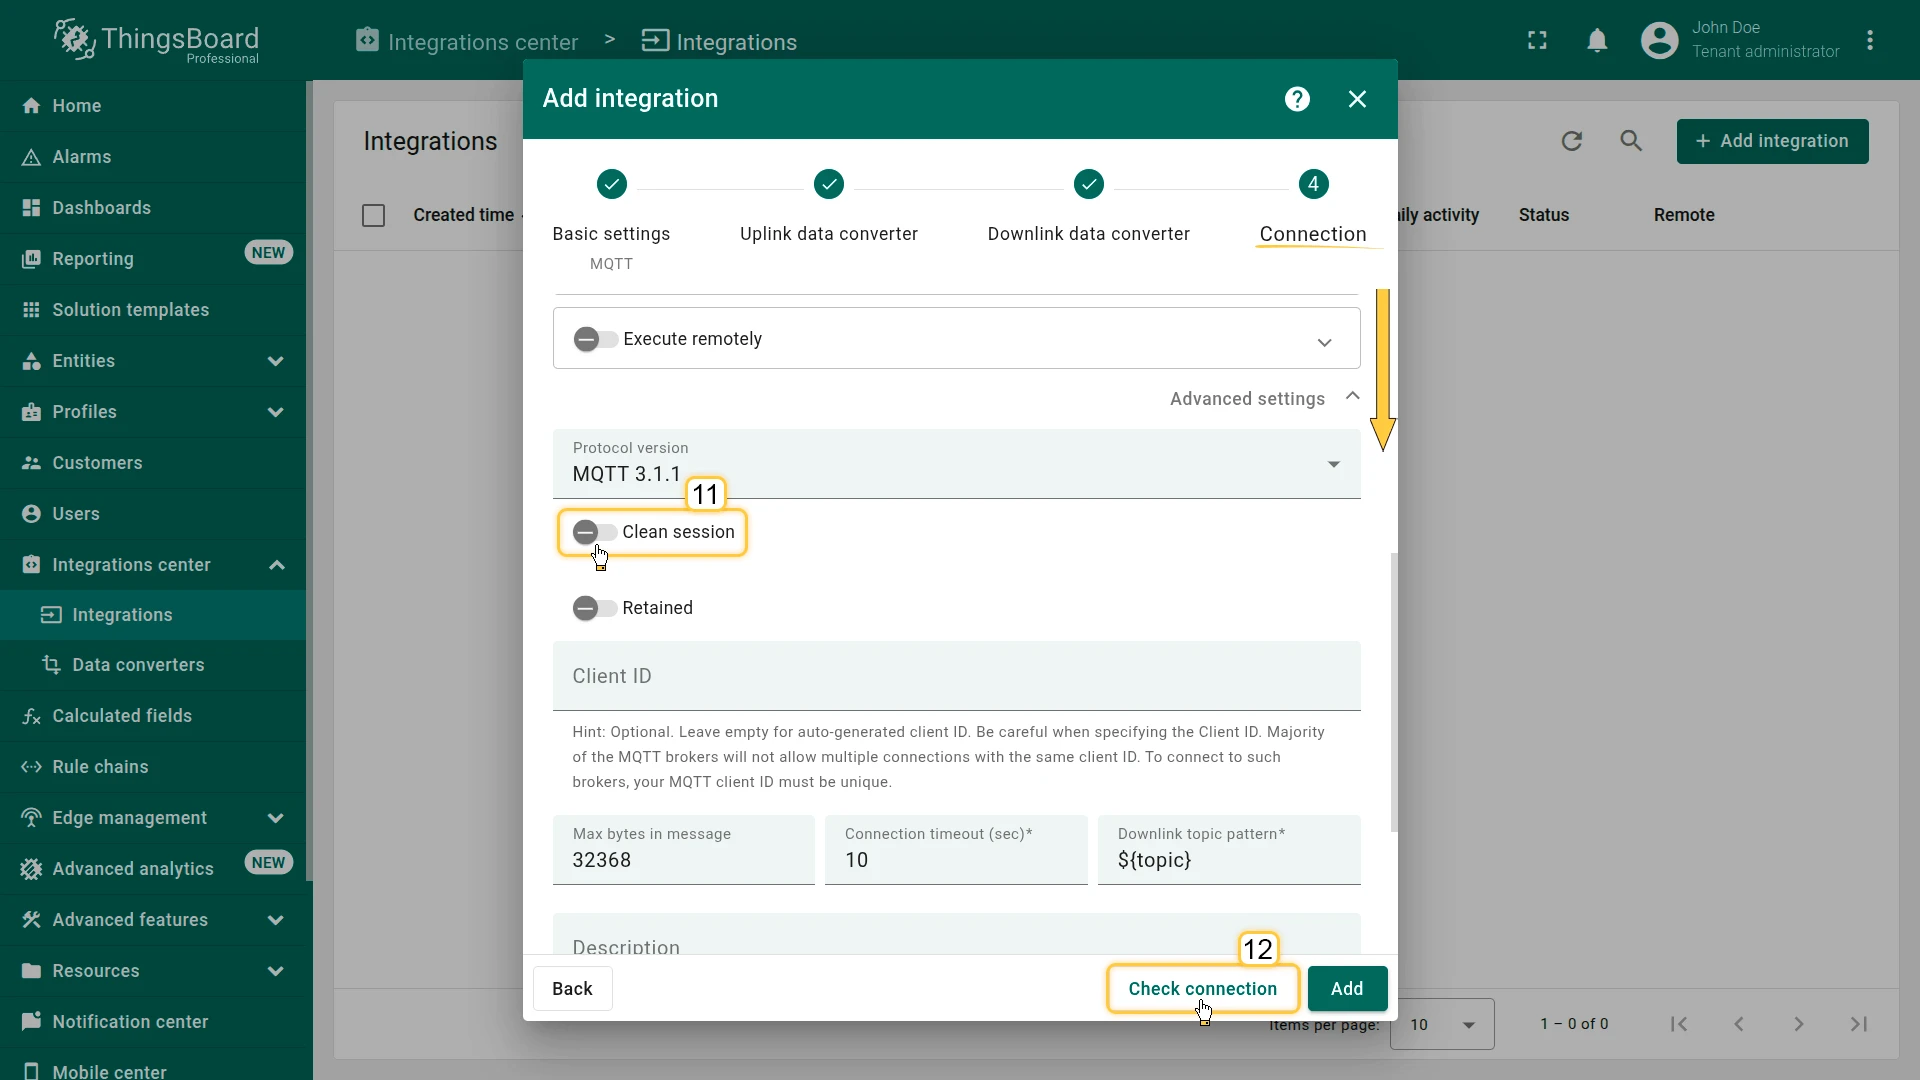
- Connection:
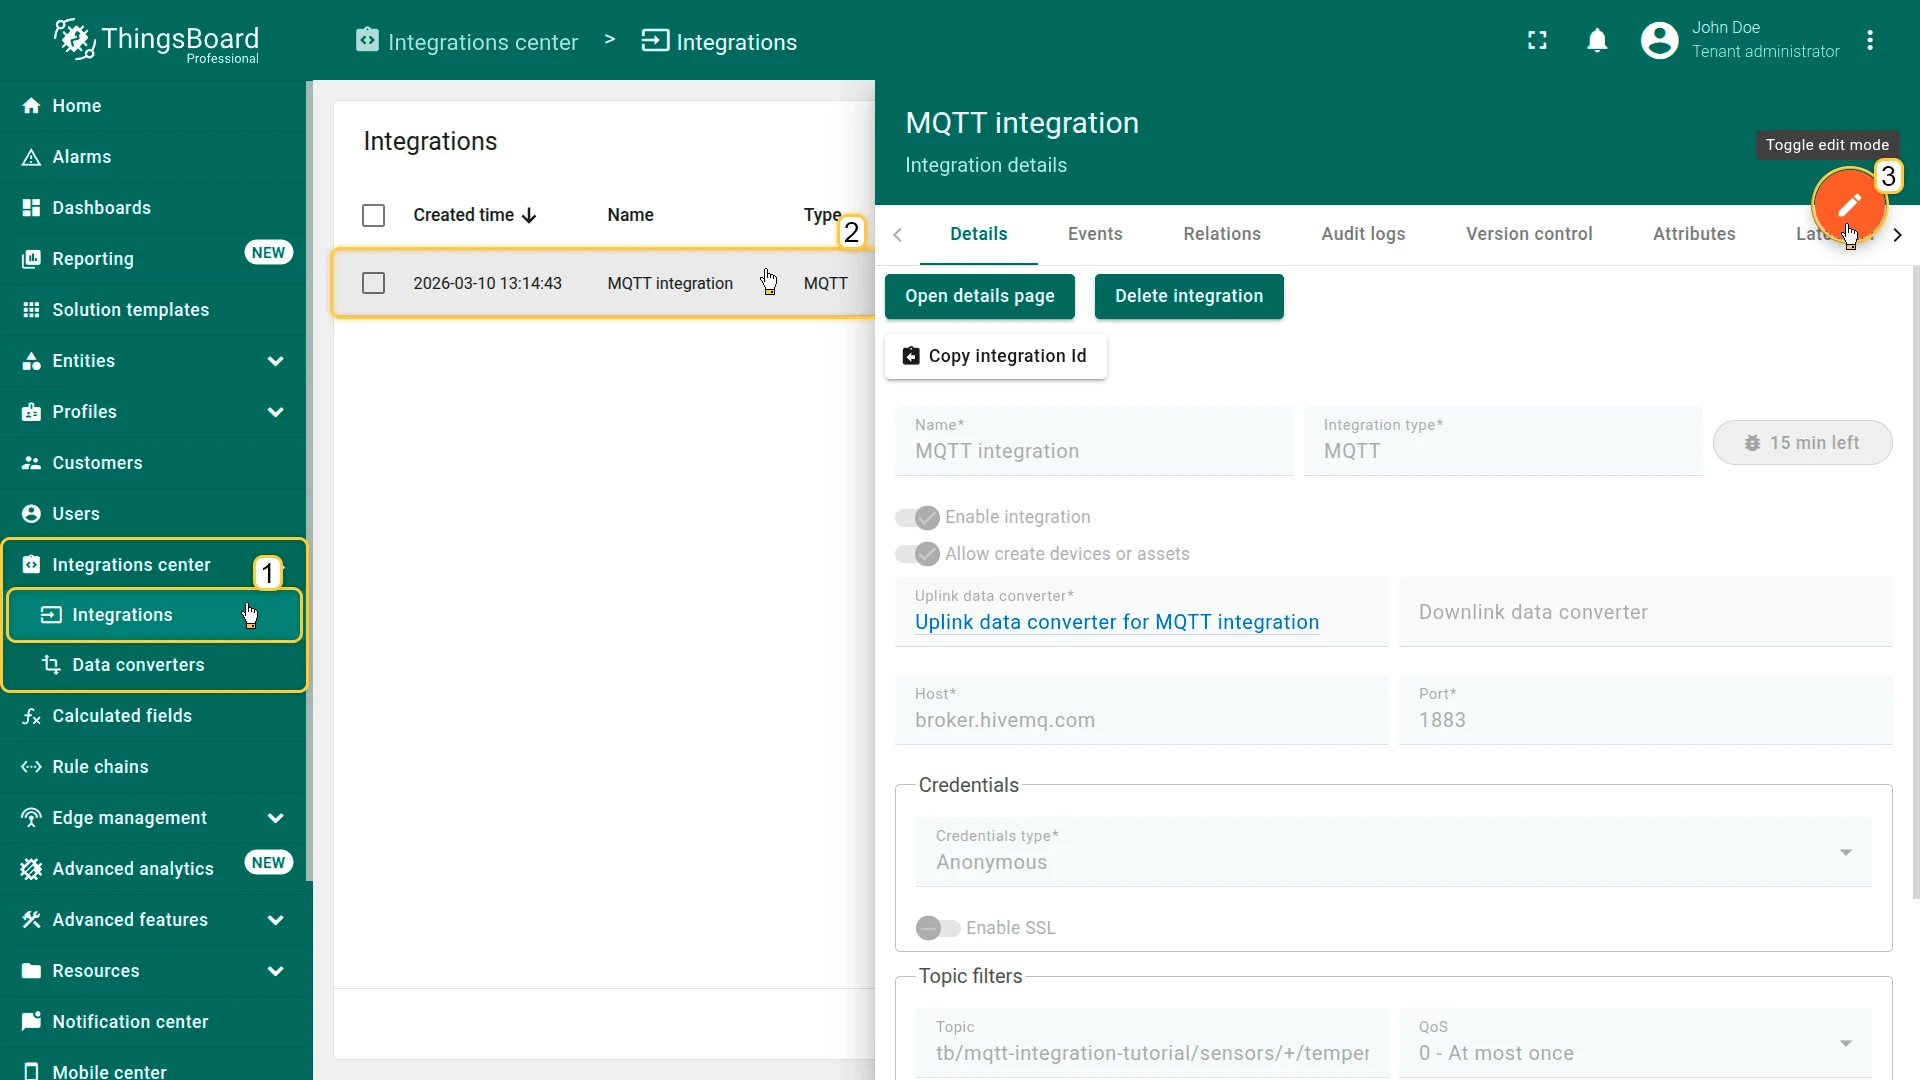
- Set Host to
broker.hivemq.com - Port to
1883 - Credentials type to Anonymous
- Add a topic filter
tb/mqtt-integration-tutorial/fridge/+/temperaturewith QoS 0 — At most once (+matches the device name segment)
- Uncheck Clean session
- Leave Downlink topic pattern at
${topic}— the integration will publish tometadata.topicfrom the downlink converter output
- Set Host to
- Click Check connection — a confirmation step appears showing Connected.
- Click Add to complete the integration setup.

Step 2. Send uplink message
Section titled “Step 2. Send uplink message”Simulate a refrigeration controller device publishing a test temperature reading to the broker:
mosquitto_pub -h broker.hivemq.com -p 1883 -t "tb/mqtt-integration-tutorial/fridge/SN-001/temperature" -m '{"temperature":3}'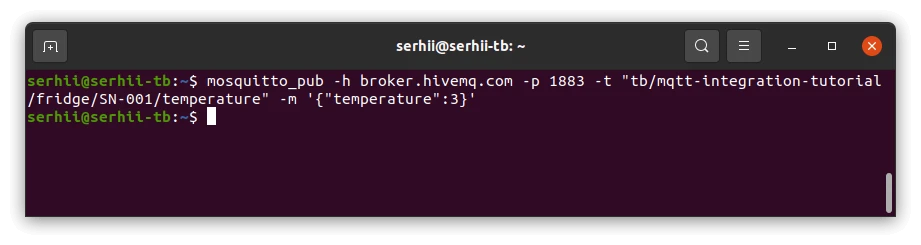
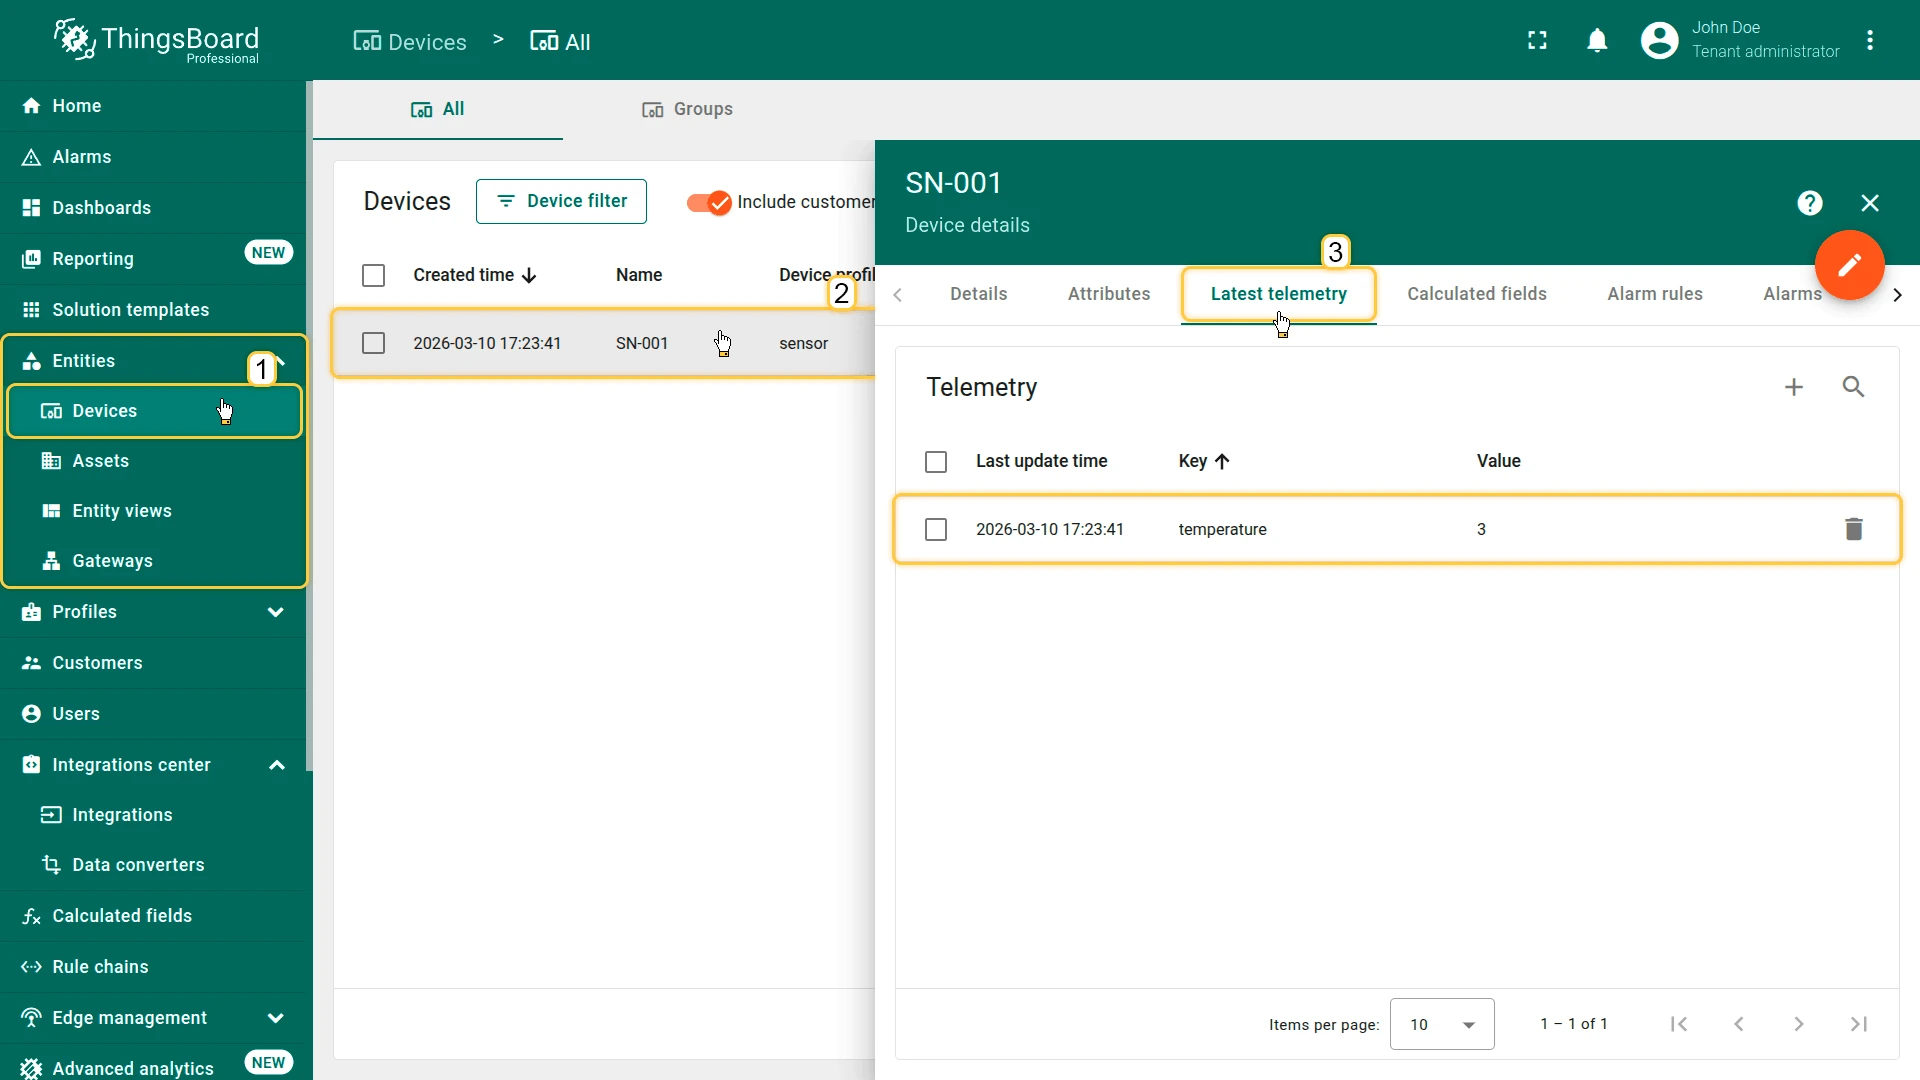
Go to Entities ⇾ Devices. The SN-001 device is created automatically on the first uplink message.
Click it and open the Latest telemetry tab to verify that temperature = 3 has been published.
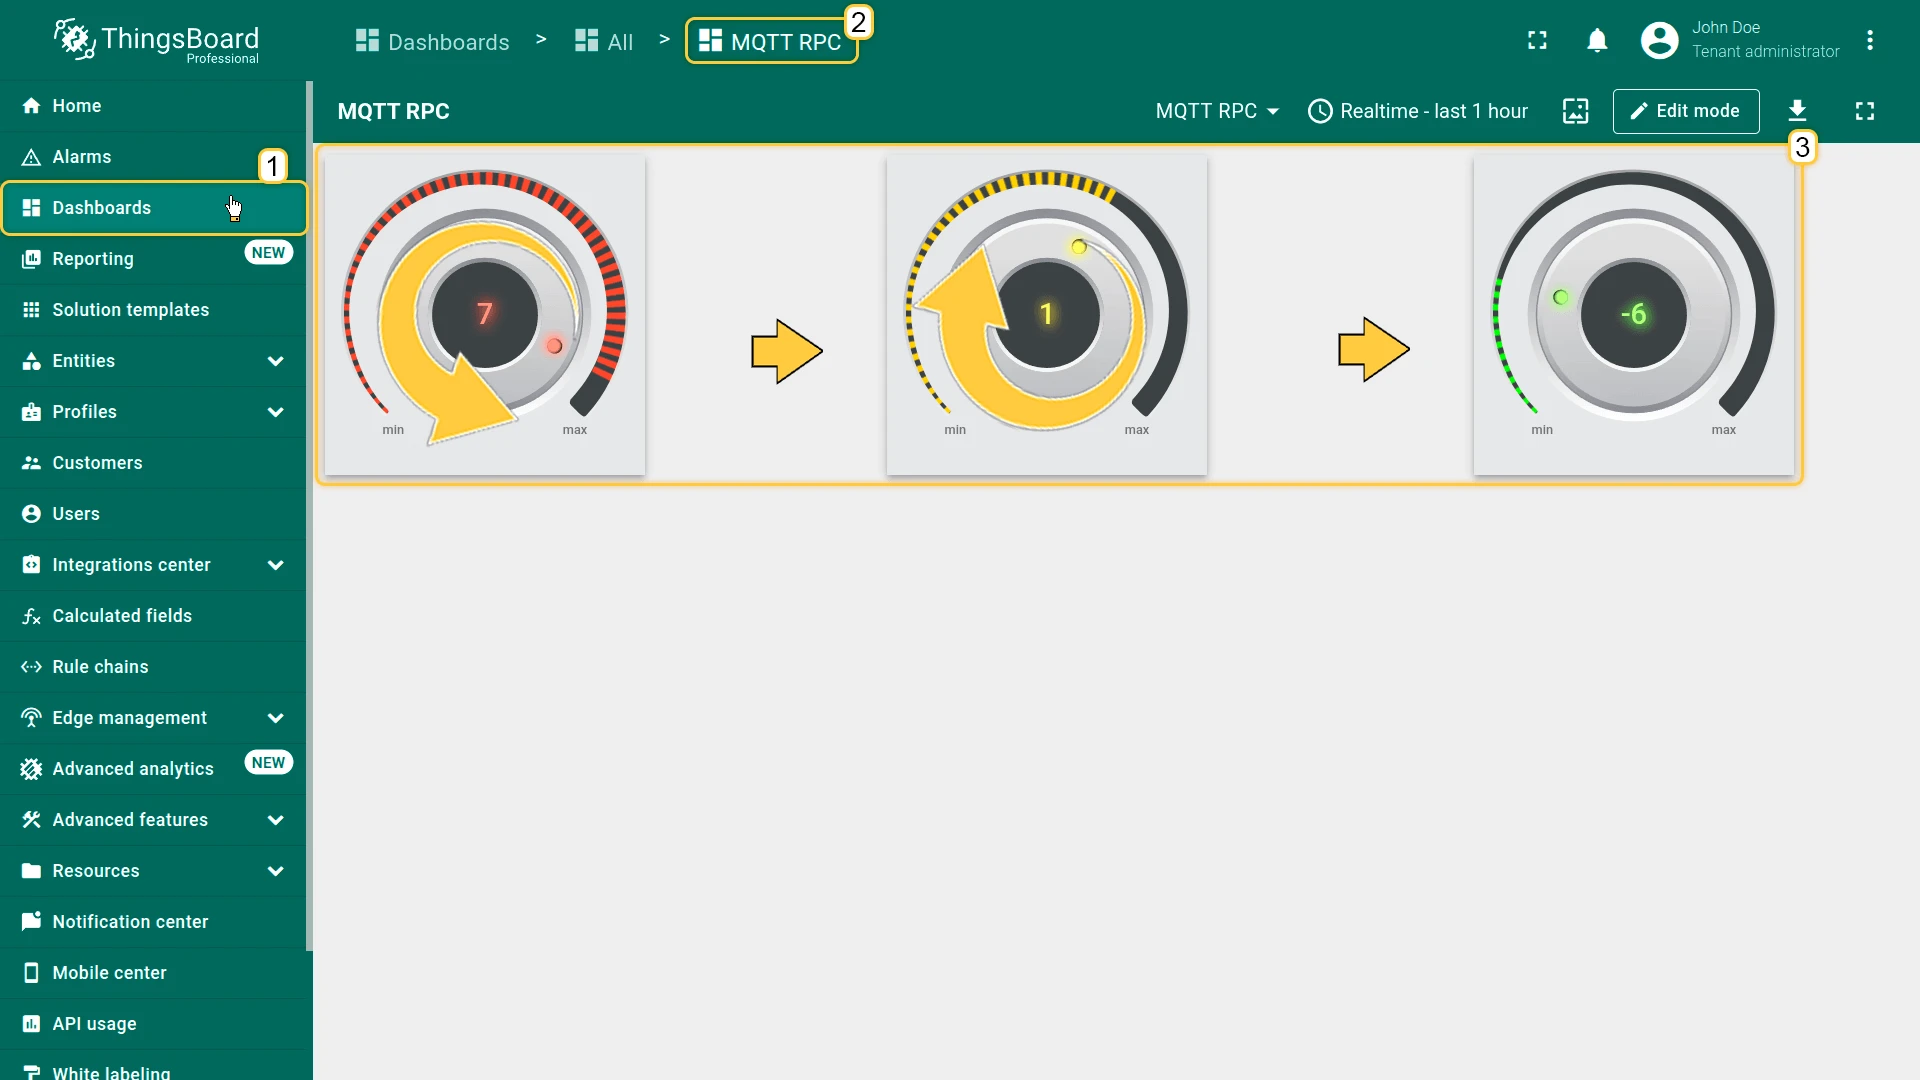
Step 3. Add the dashboard control widget
Section titled “Step 3. Add the dashboard control widget”Add a control widget to the dashboard that allows the operator to change the target temperature.
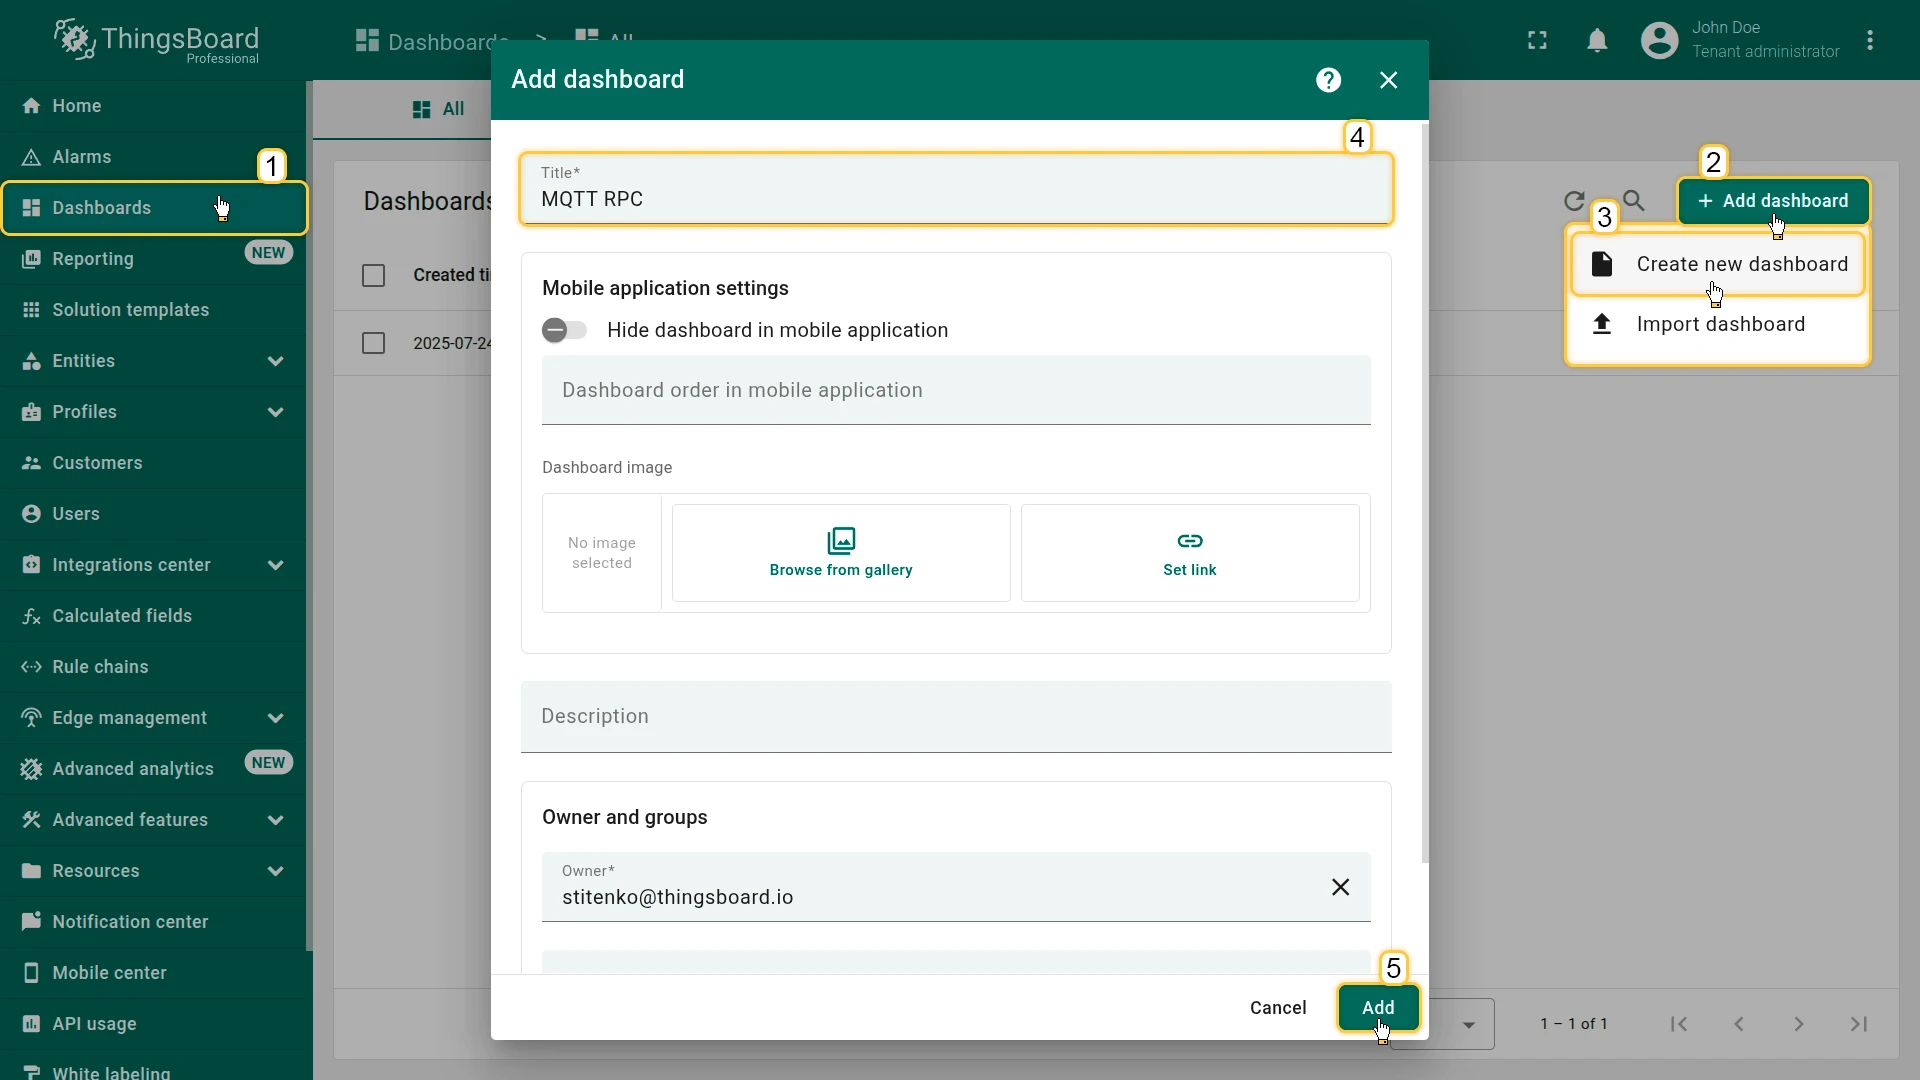
- Go to Dashboards and create a new dashboard named MQTT RPC.
- Click + Add new widget.
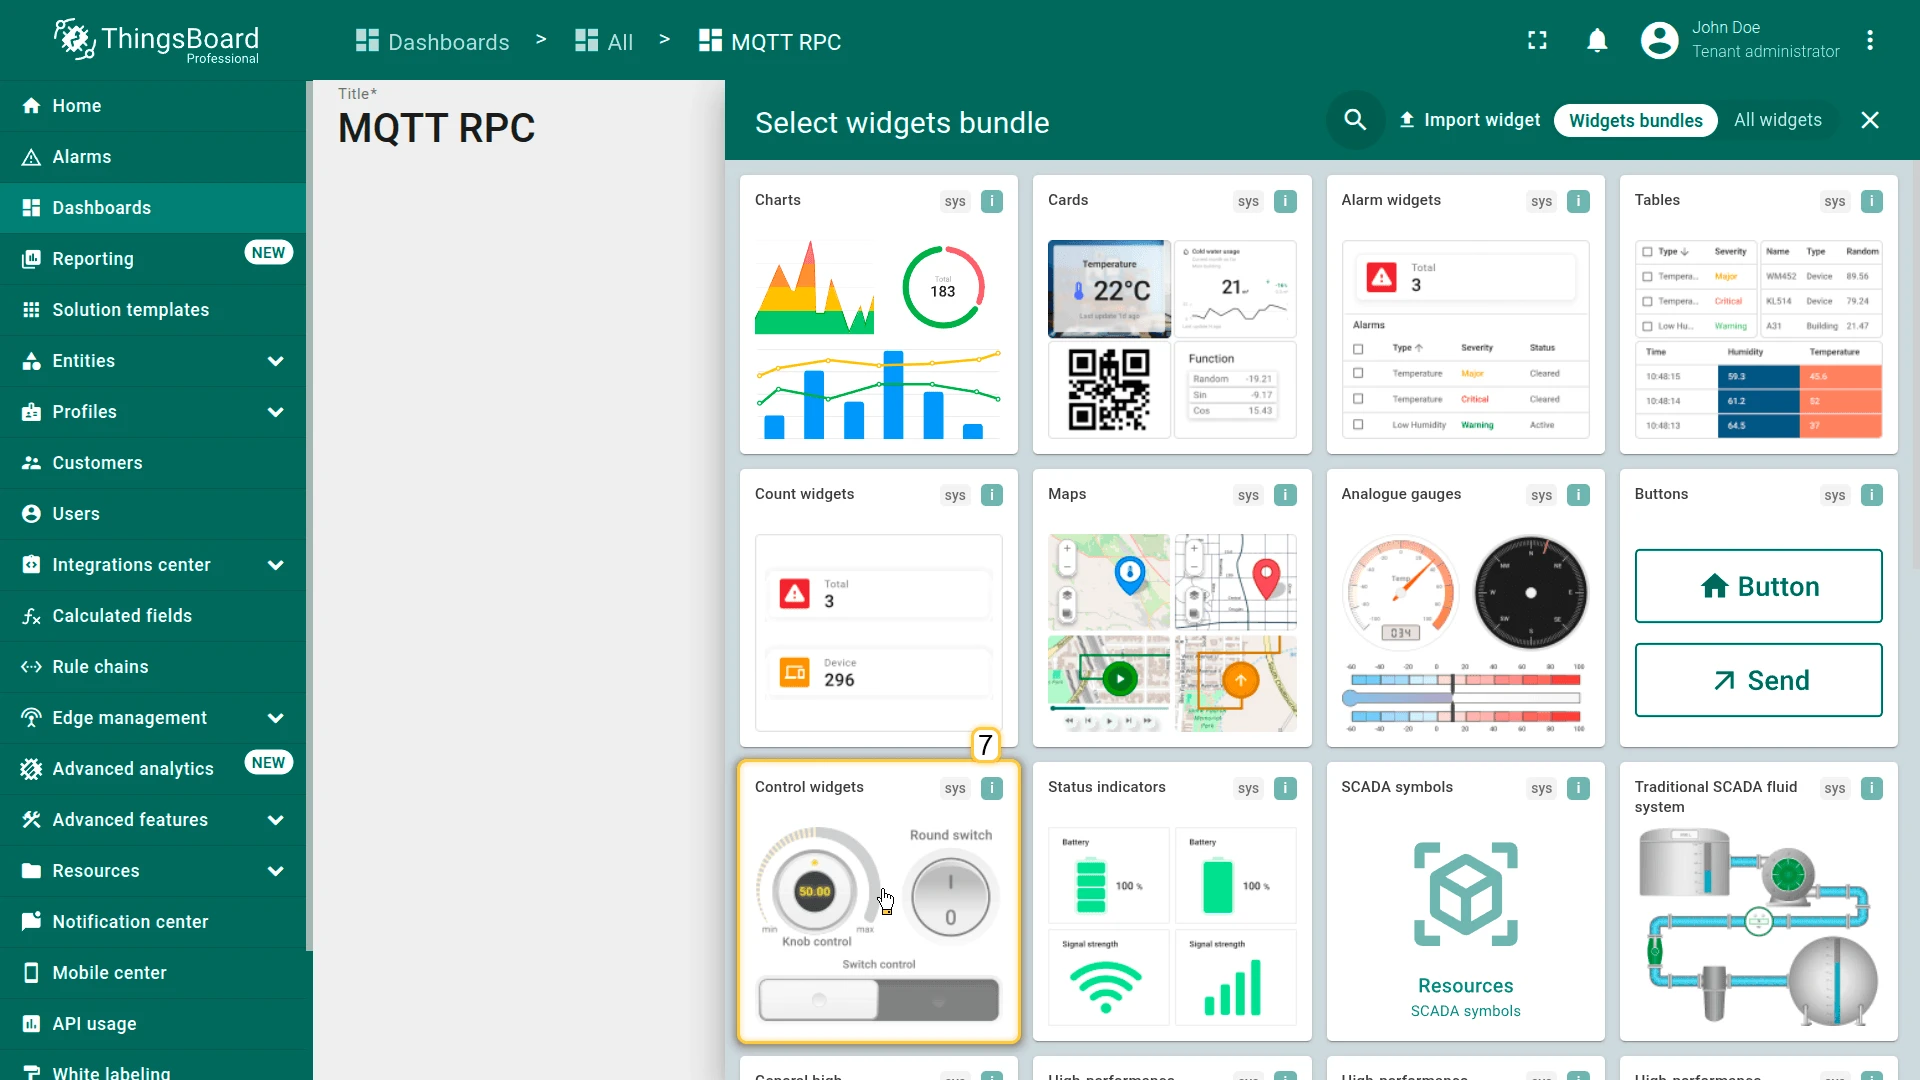
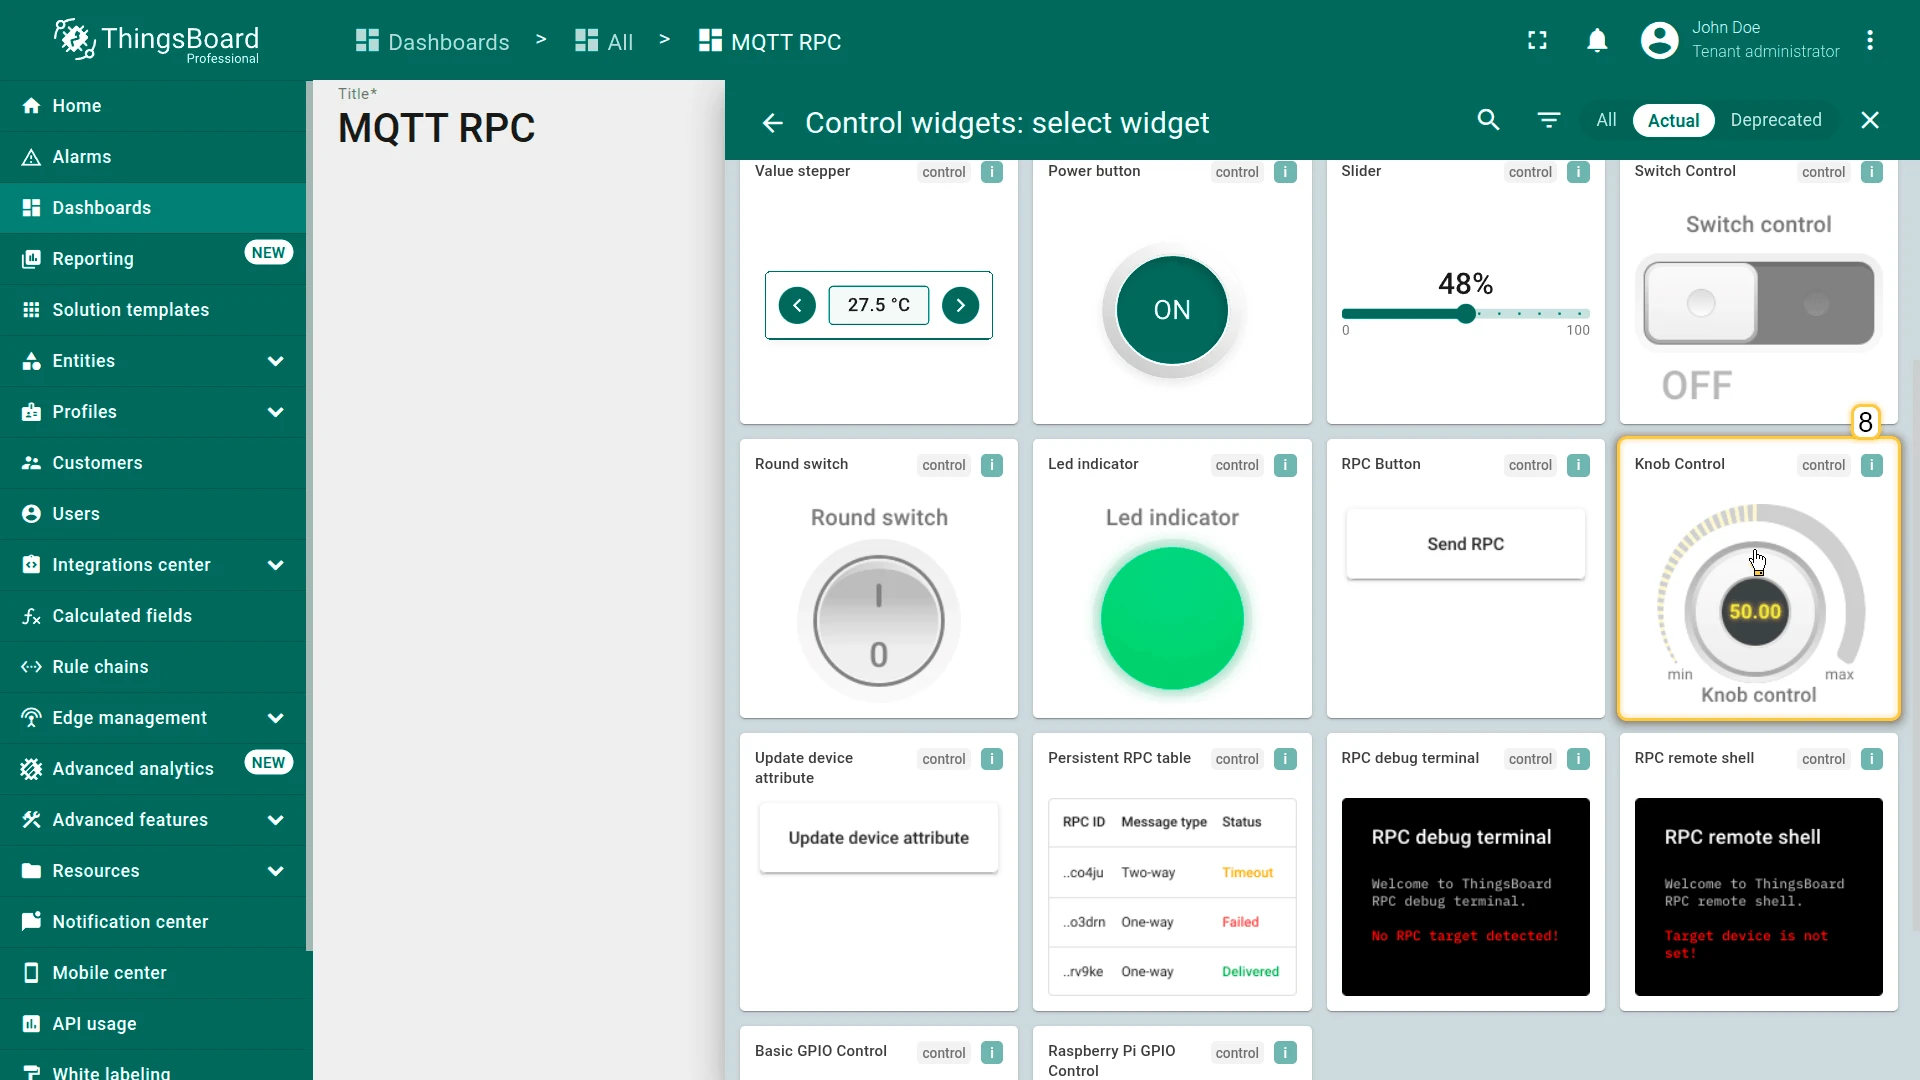
- Select Control widgets → Knob Control.
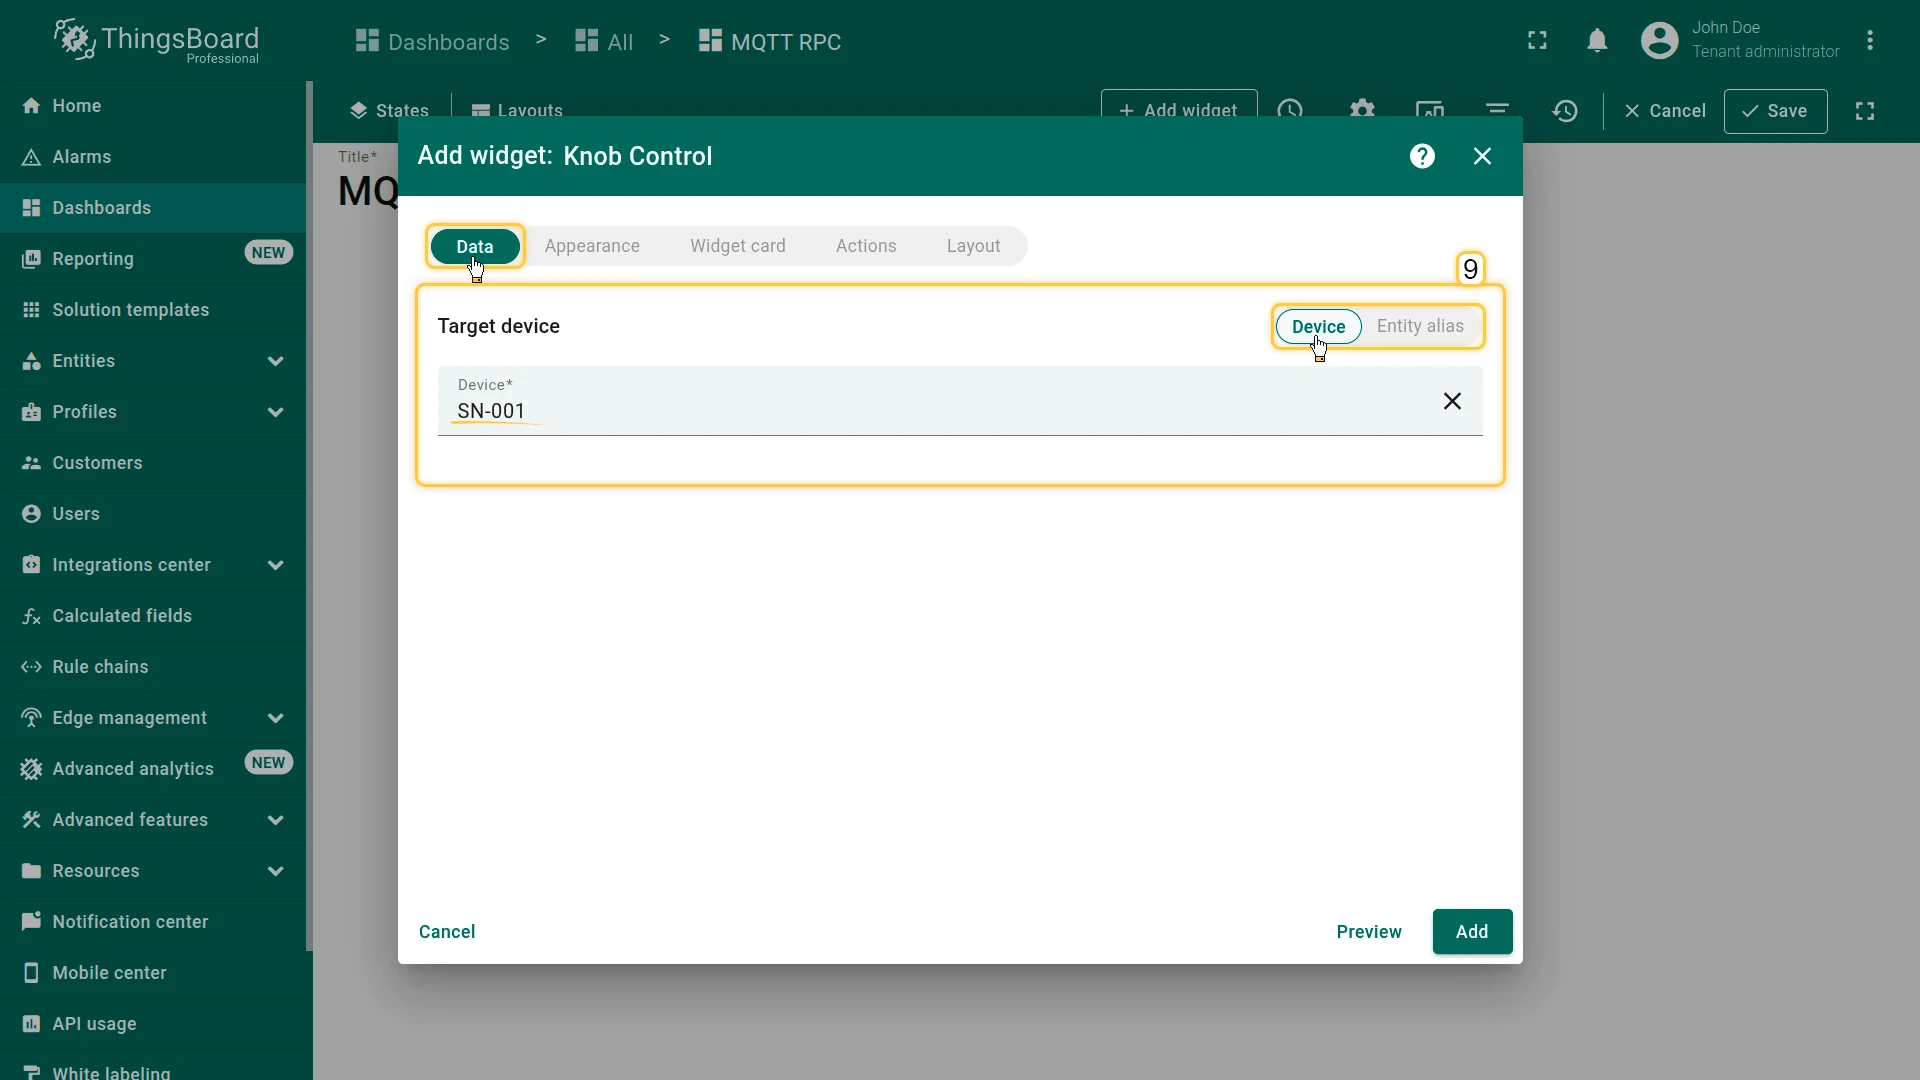
- On the Data tab, set Target device to SN-001.
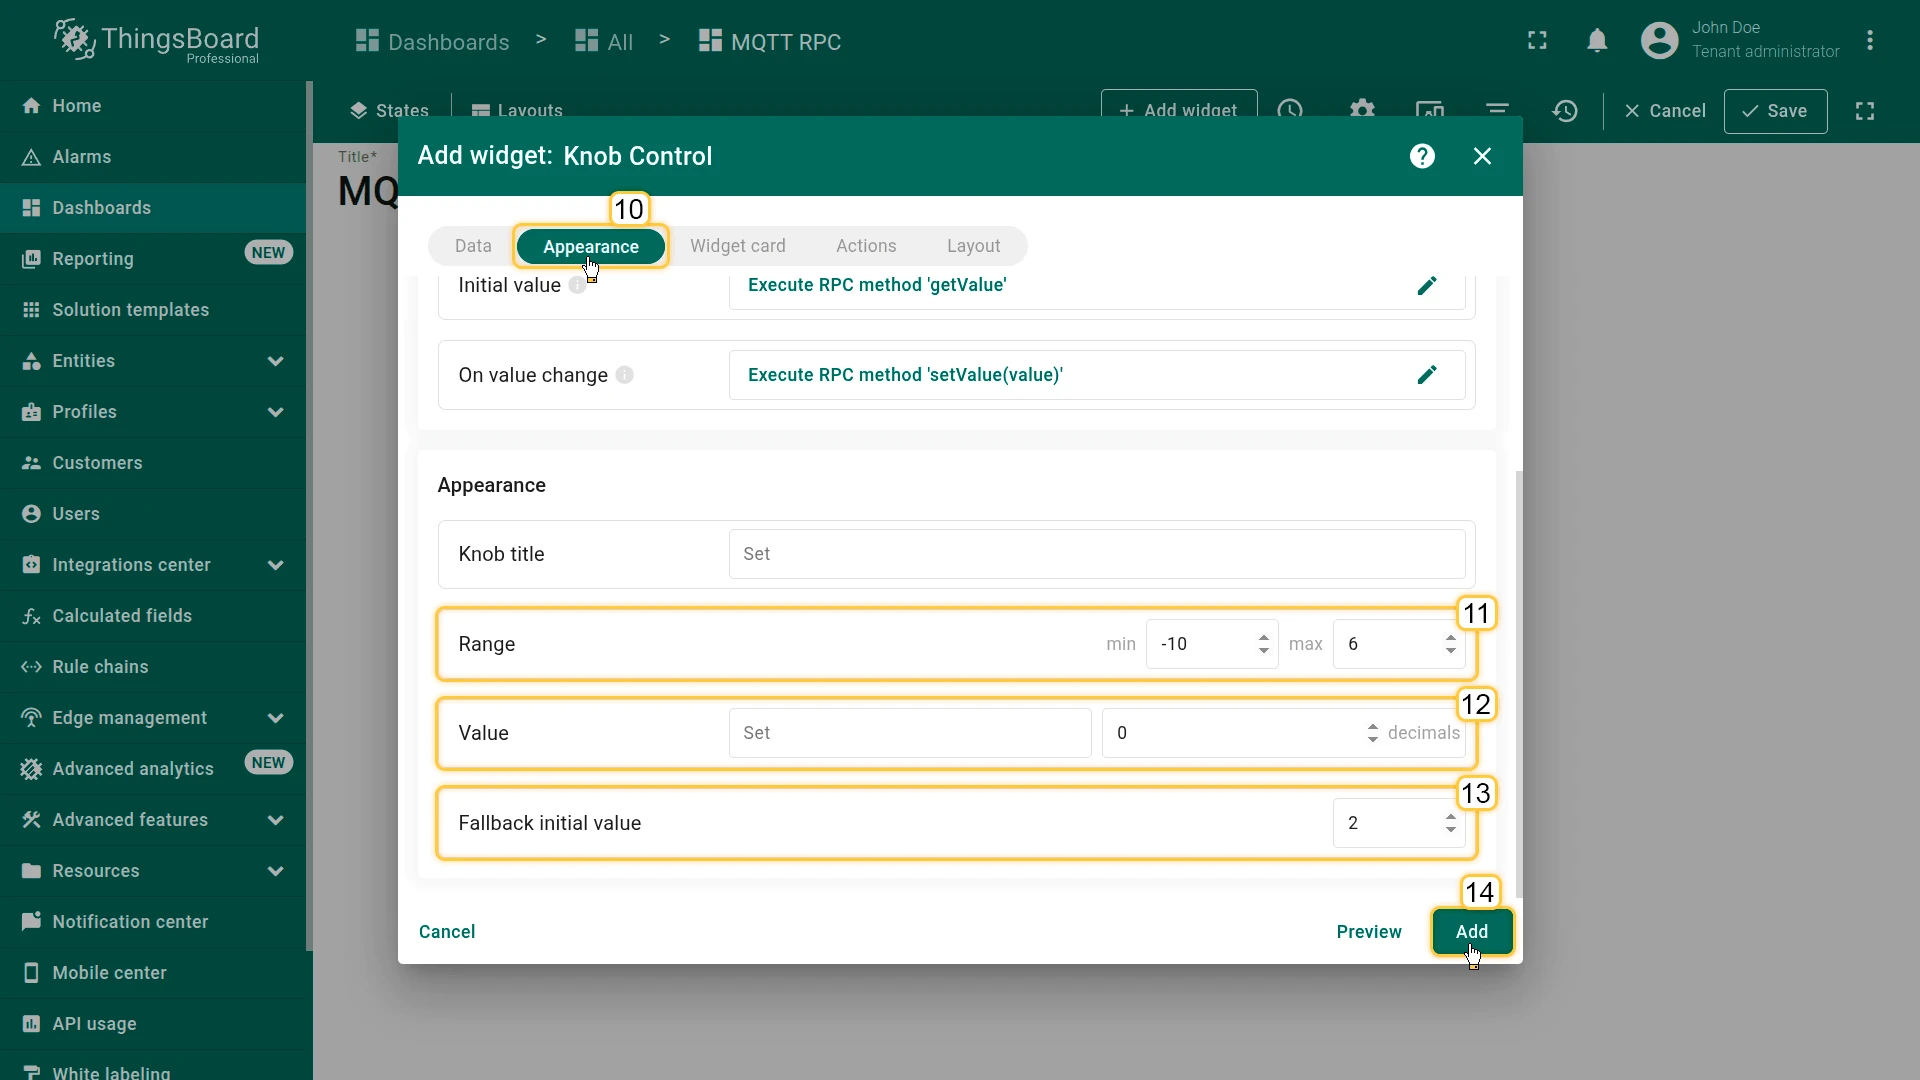
- On the Appearance tab, set:
- minimum value to
-10 - maximum value to
6 - number of decimal places:
0 - fallback initial value to
2.
- minimum value to
- Click Add.
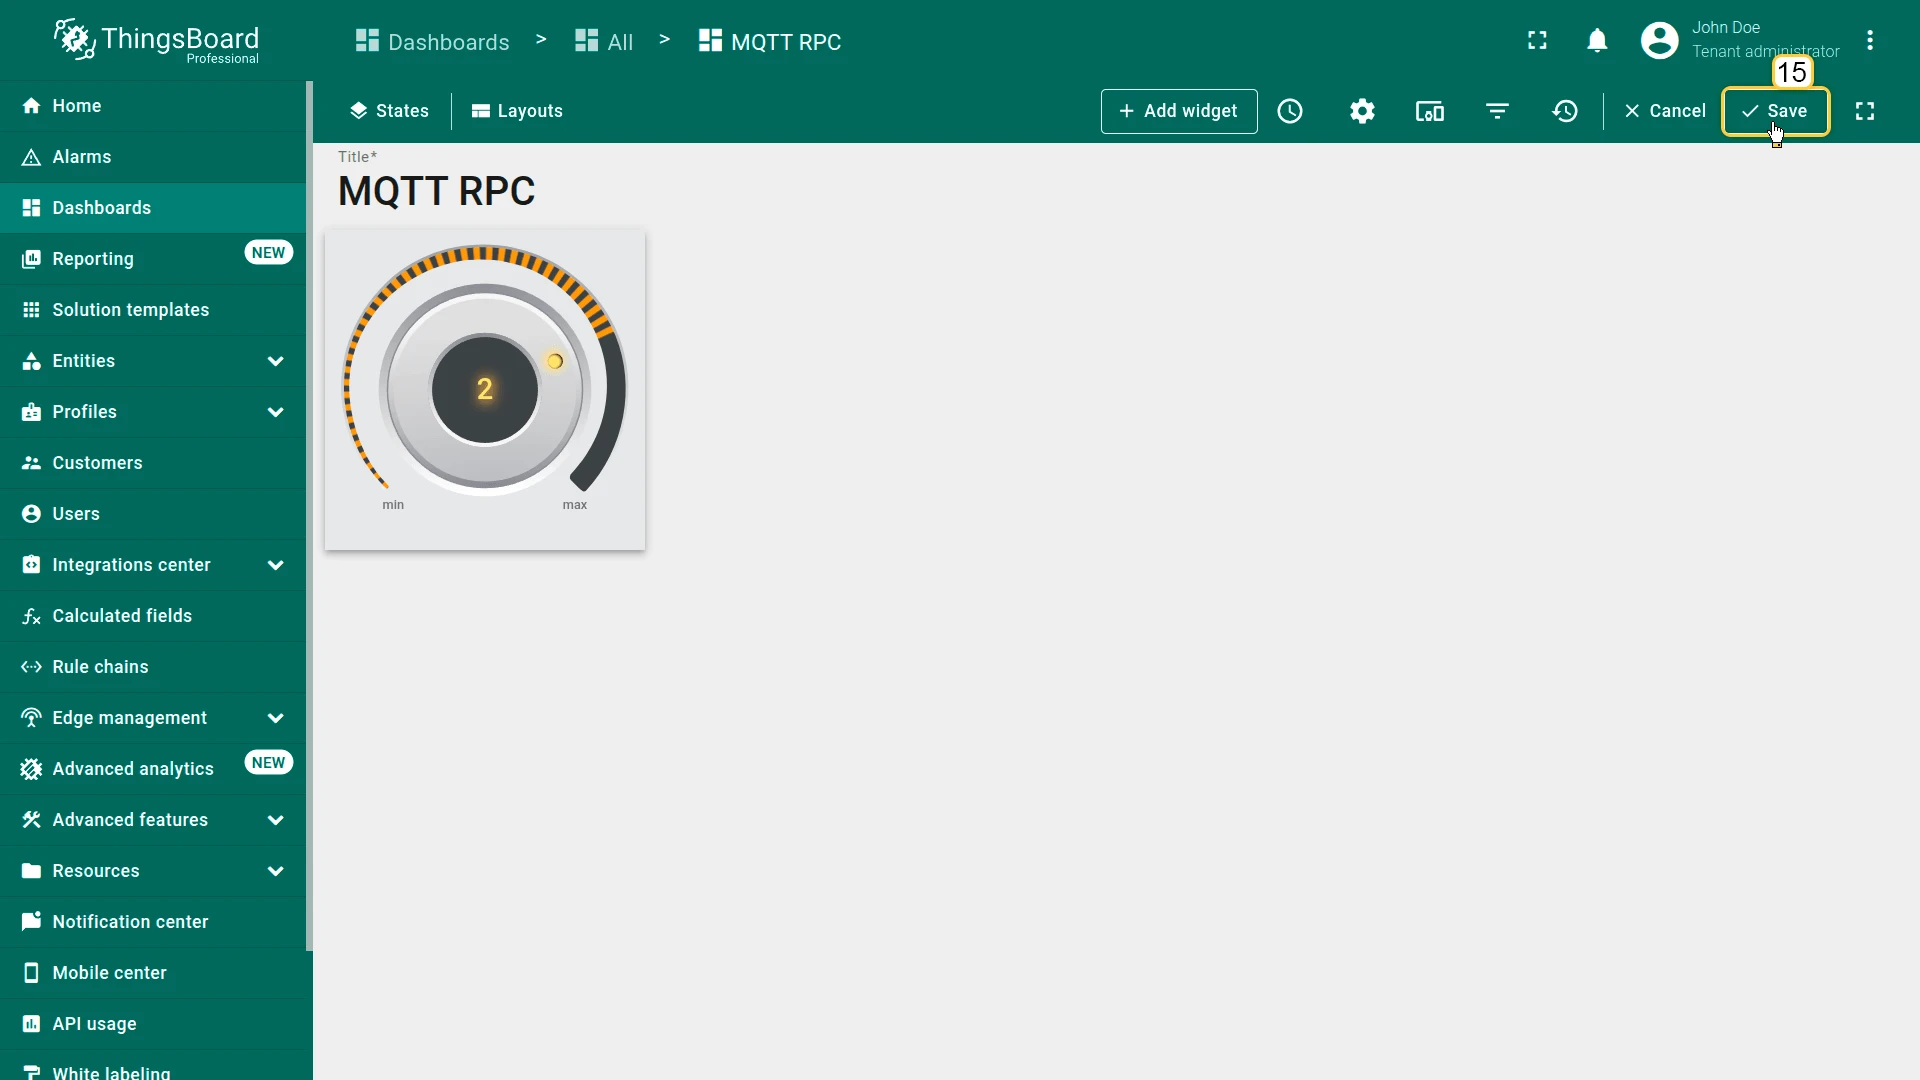
- Save the dashboard.
For example, the operator sets the value to 4. This value will be sent as an RPC command.
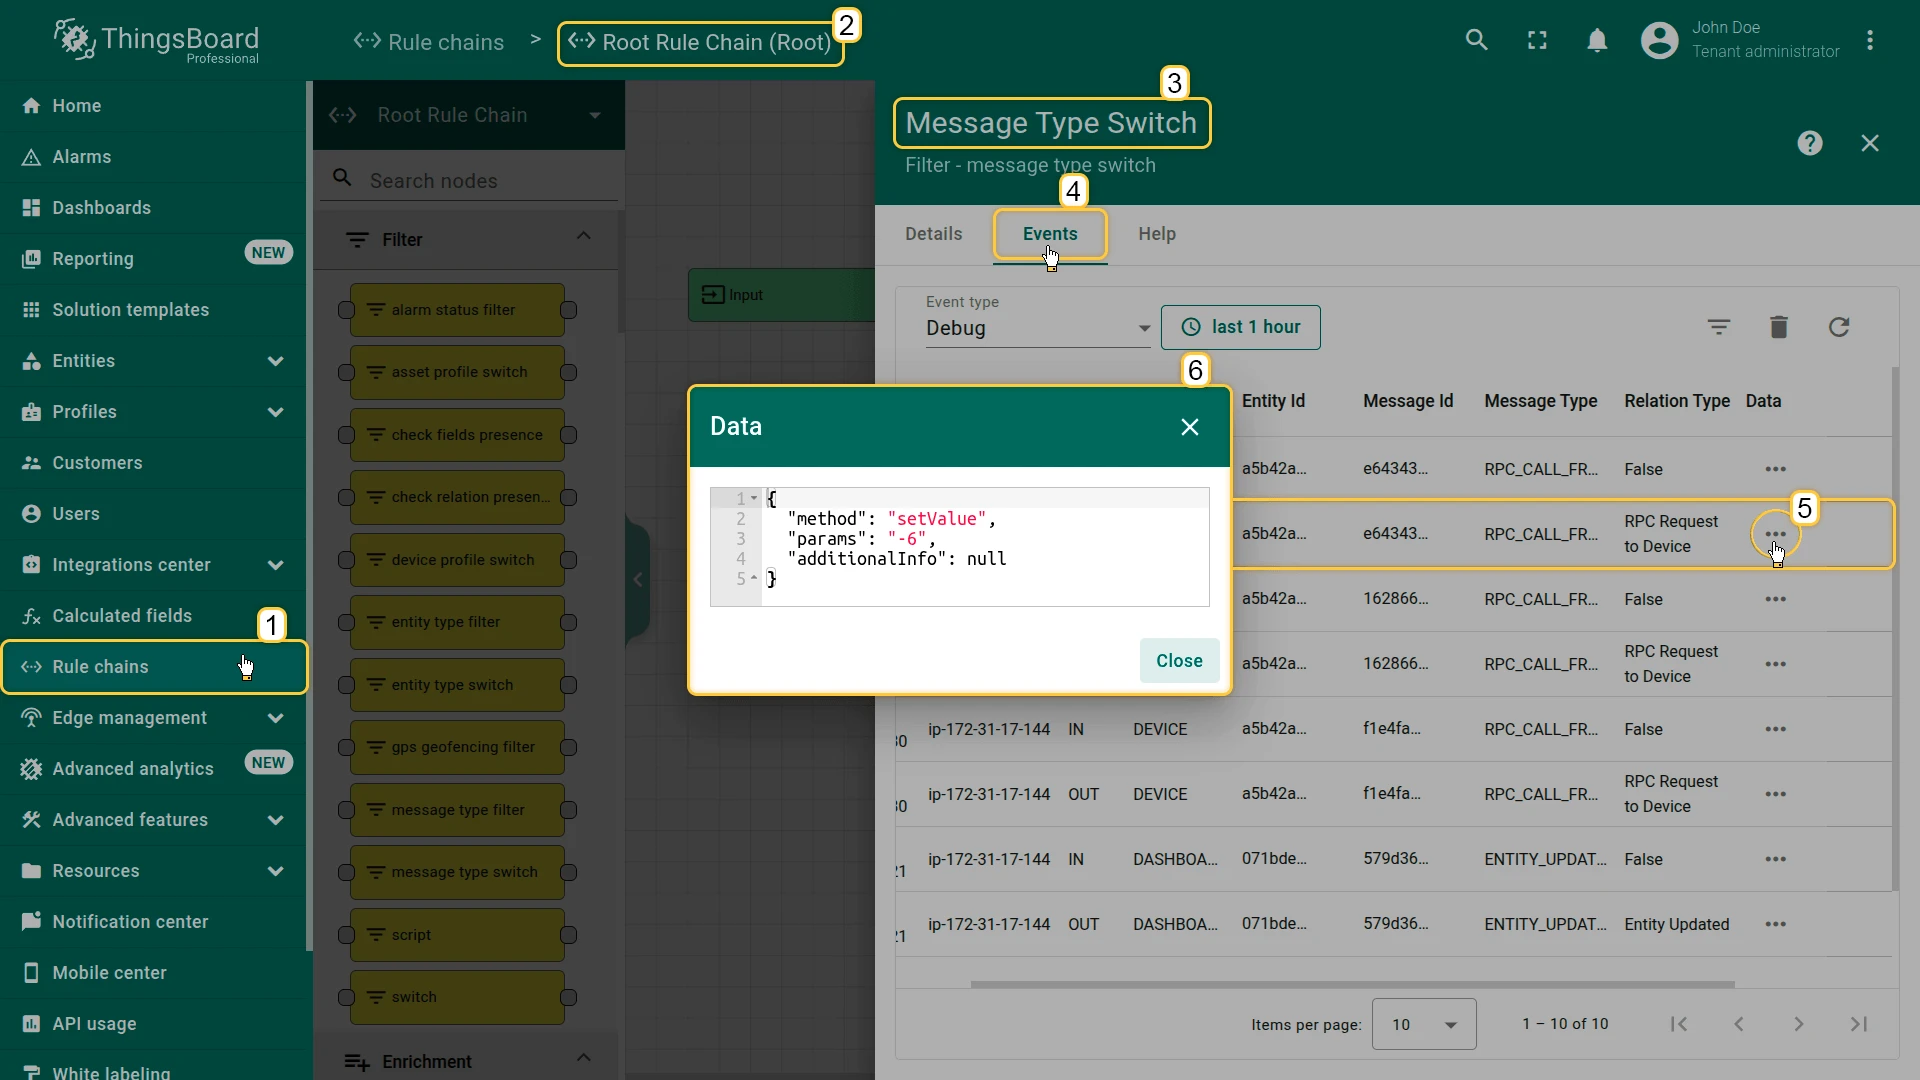
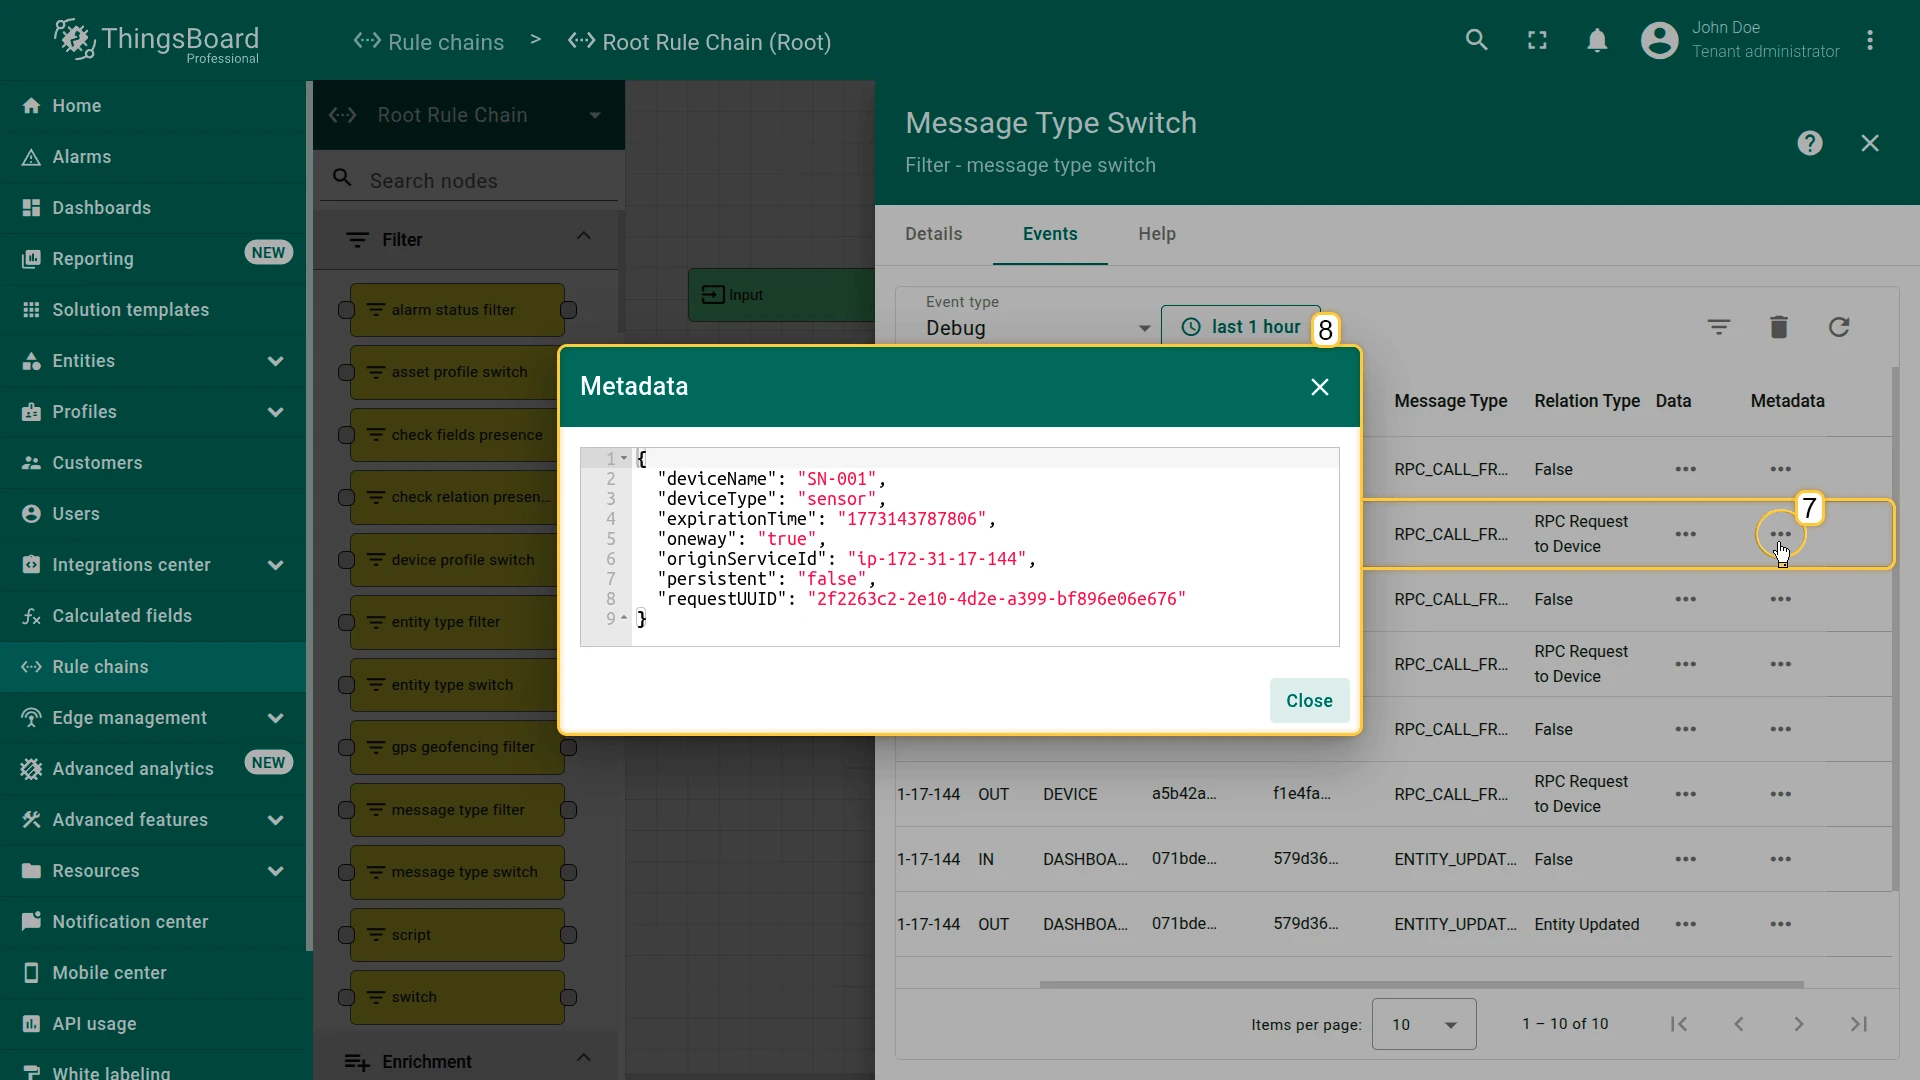
Step 4. Inspect RPC messages
Section titled “Step 4. Inspect RPC messages”Before adding the downlink converter, verify that knob turns generate RPC messages by inspecting the Rule Engine event log.
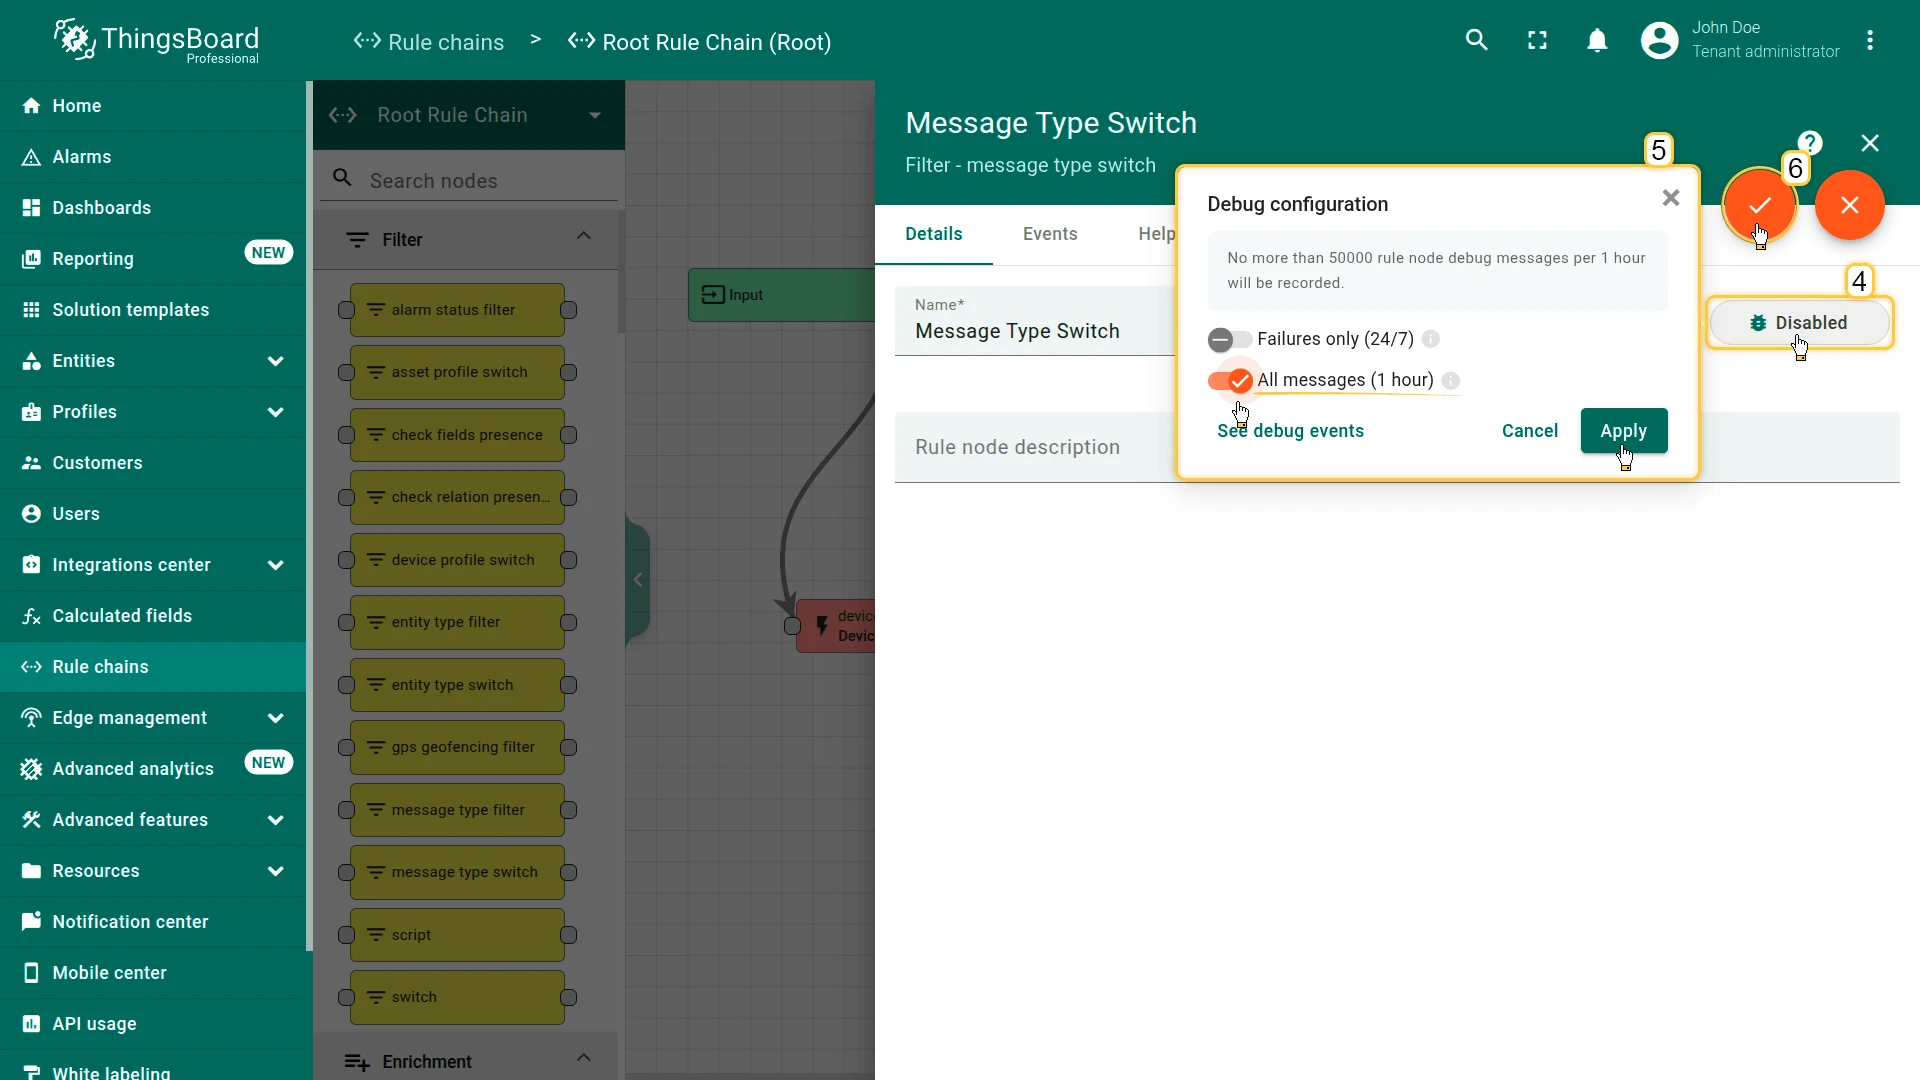
Go to Rule Chains and open the Root Rule Chain. Open the message type switch node and enable Debug mode.
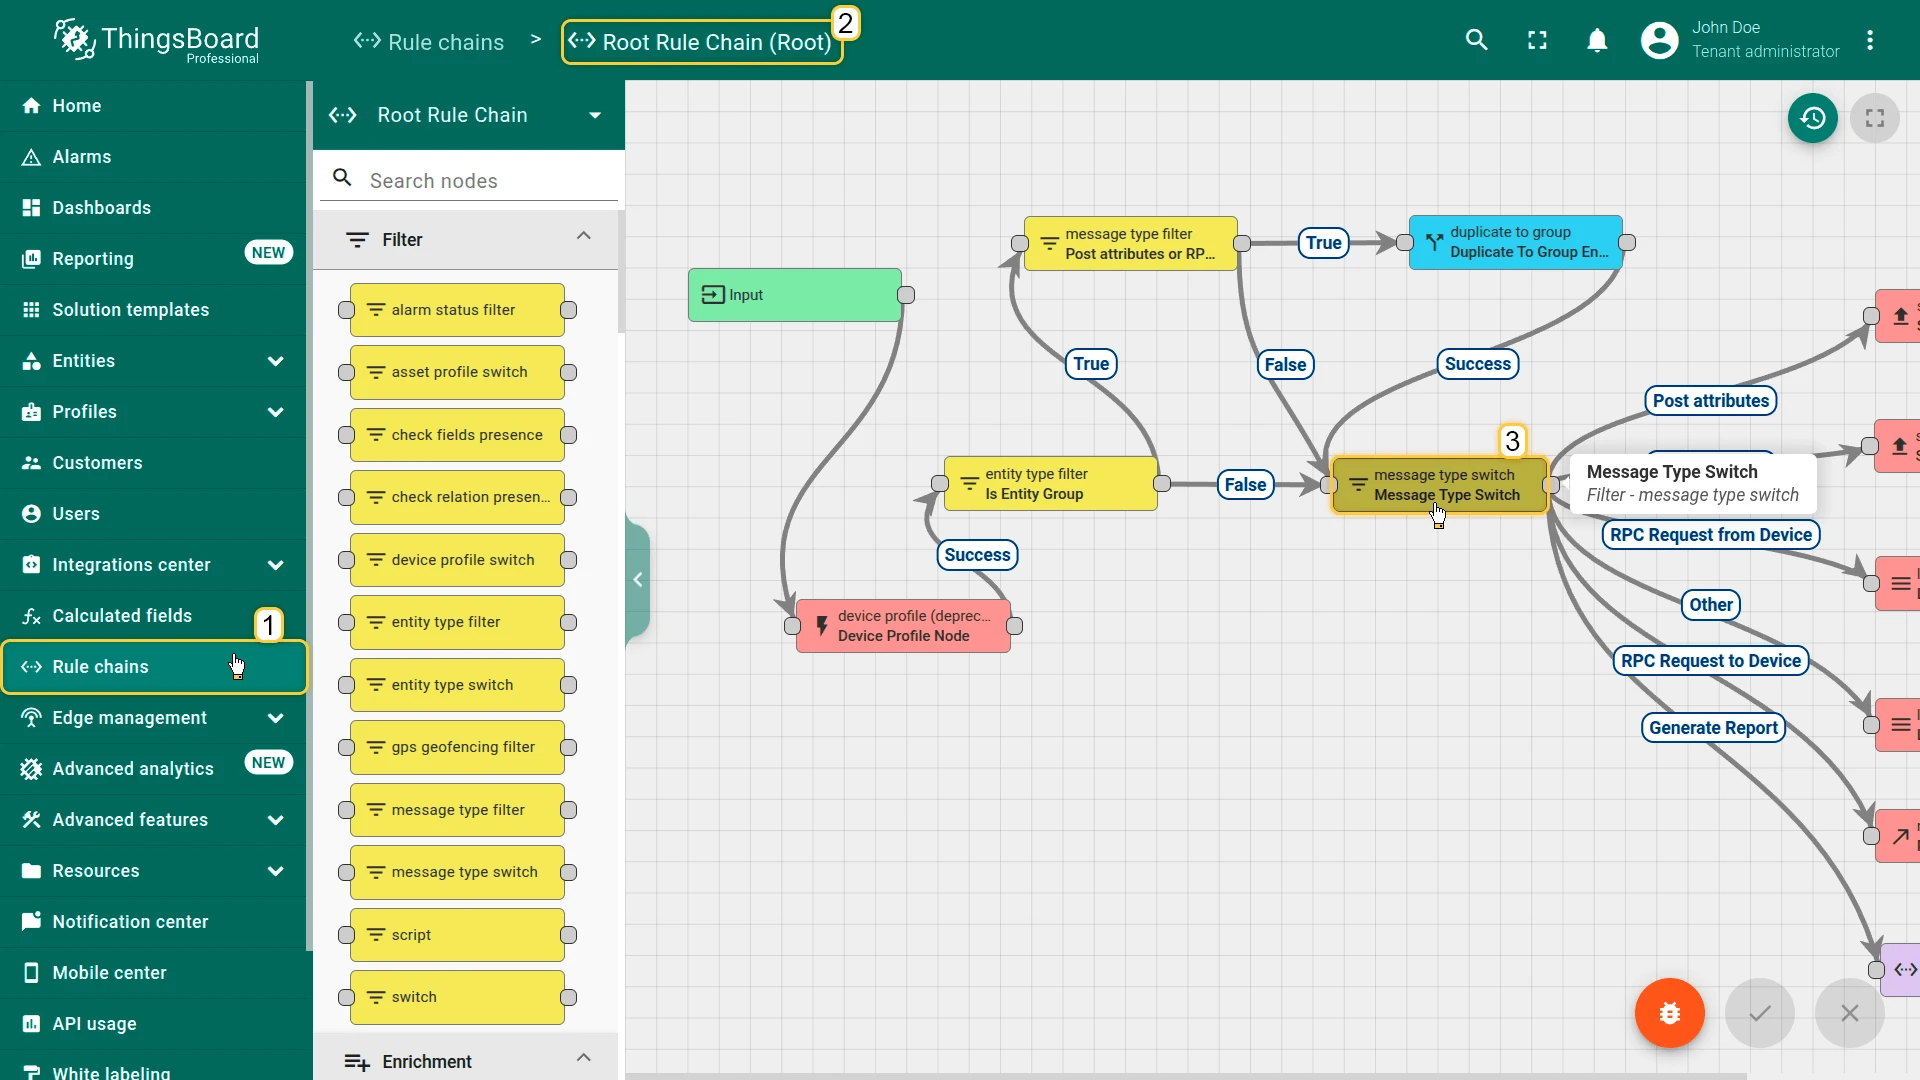
Turn the knob a few times on the dashboard.
In the message type switch node on the Events tab you should then see incoming messages with the message type RPC_CALL_FROM_SERVER_TO_DEVICE and relation type RPC Request to Device.
You can check out what data and metadata was sent by the Knob Control to the Rule Engine.
Step 5. Configure the downlink converter
Section titled “Step 5. Configure the downlink converter”The downlink converter must transform the RPC request into:
- the MQTT topic expected by the device;
- the JSON payload with the target temperature.
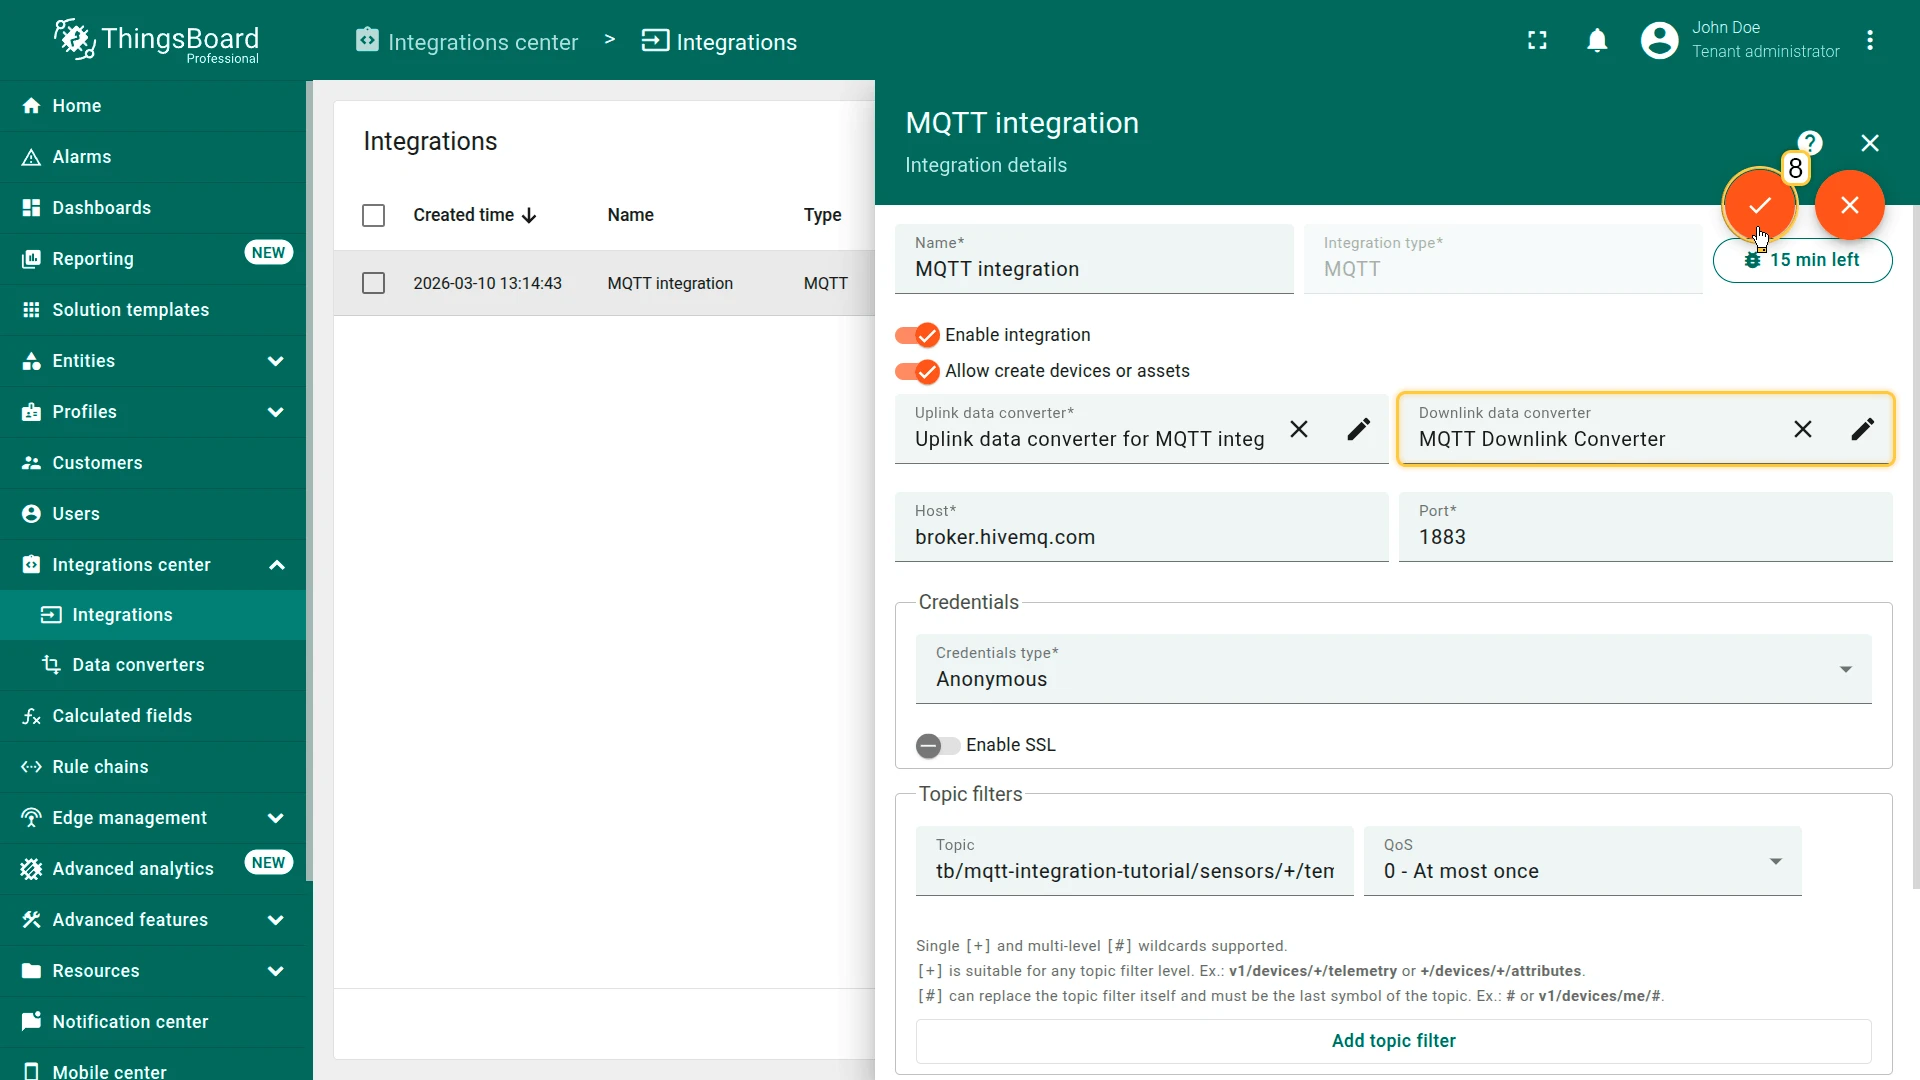
- Go to Integrations center ⇾ Integrations and open the MQTT integration.
- Click Toggle edit mode.
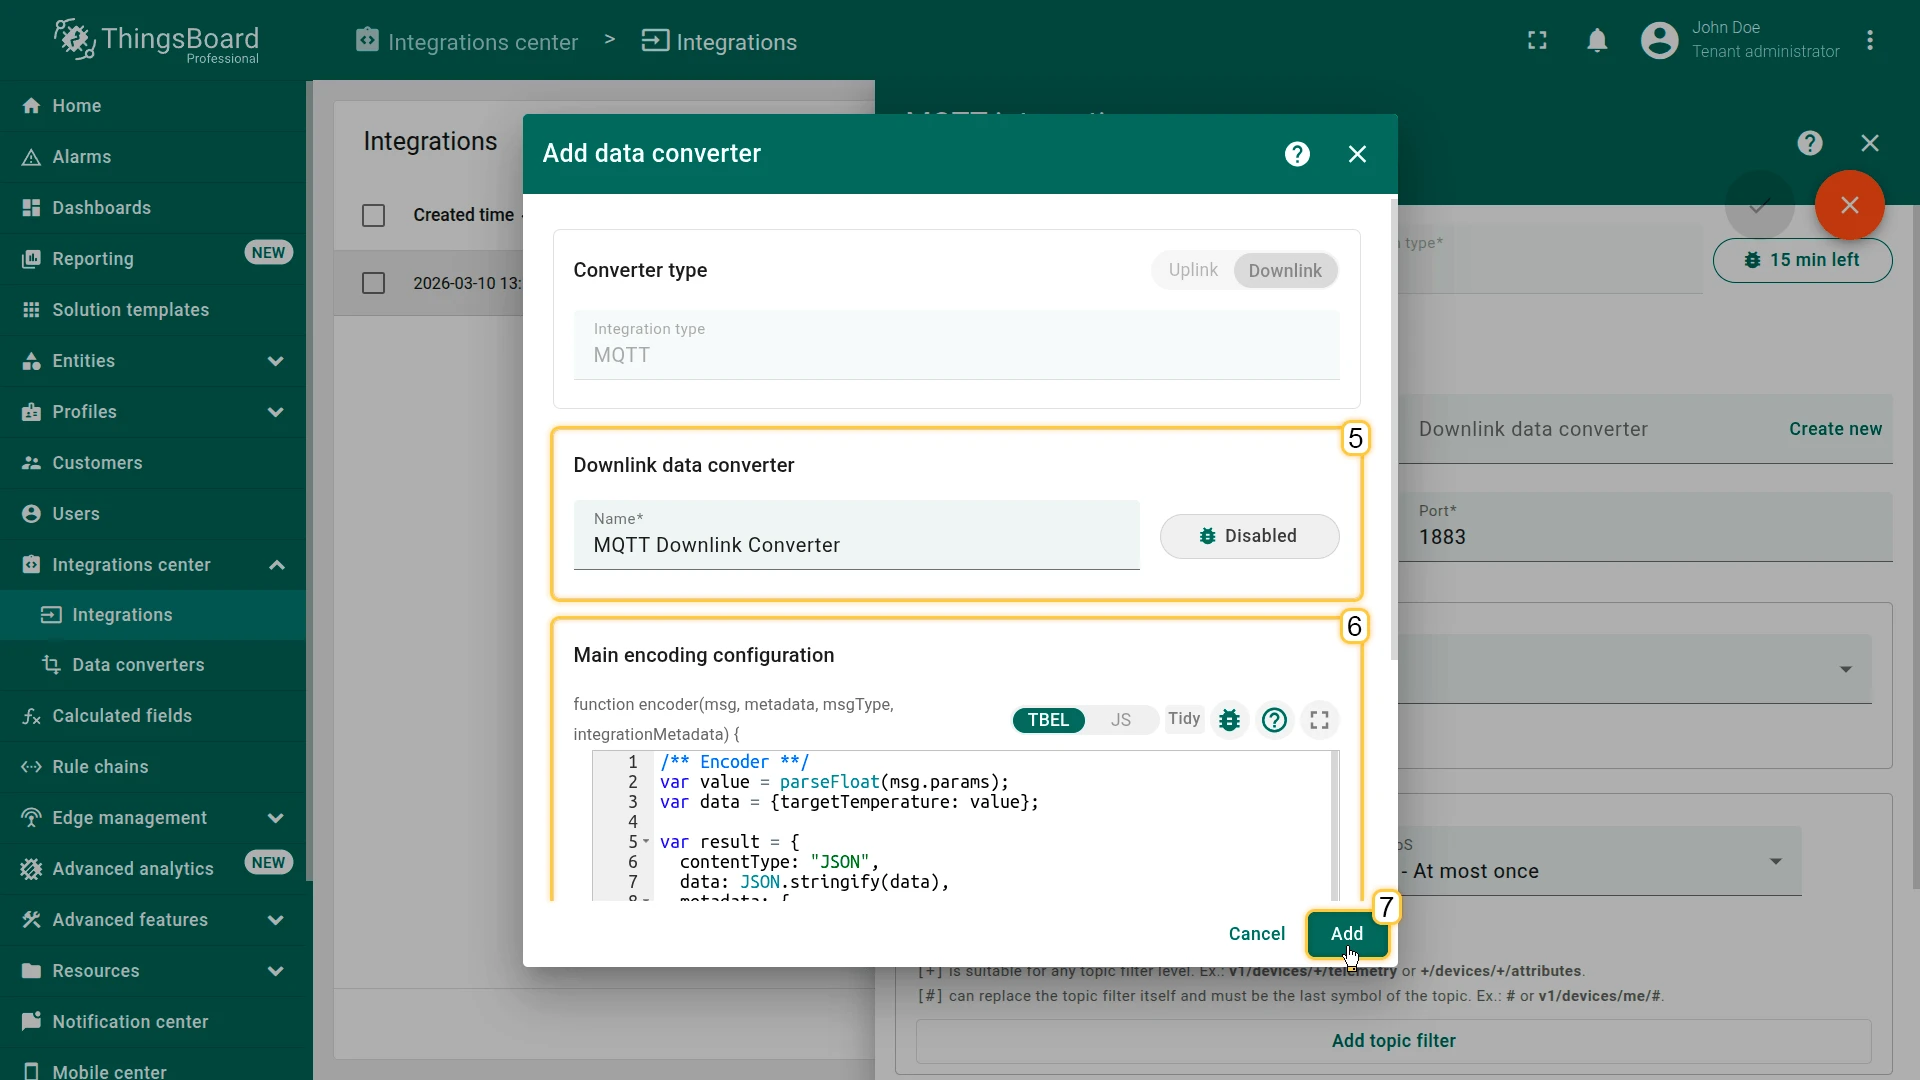
- In the Downlink data converter field, click Create new.
- Name it MQTT Downlink Converter.
Paste the encoder script.
/** Encoder **/var value = parseFloat(msg.params);var data = {targetTemperature: value};var result = {contentType: "JSON",data: JSON.stringify(data),metadata: {topic: 'tb/mqtt-integration-tutorial/fridge/' + metadata['deviceName'] + '/rx/set-temperature'}};return result;/** Encoder **/var value = parseFloat(msg.params);var data = {targetTemperature: value};var result = {contentType: "JSON",data: JSON.stringify(data),metadata: {topic: 'tb/mqtt-integration-tutorial/fridge/' + metadata['deviceName'] + '/rx/set-temperature'}};return result;- Click Add.
- Click Apply changes.

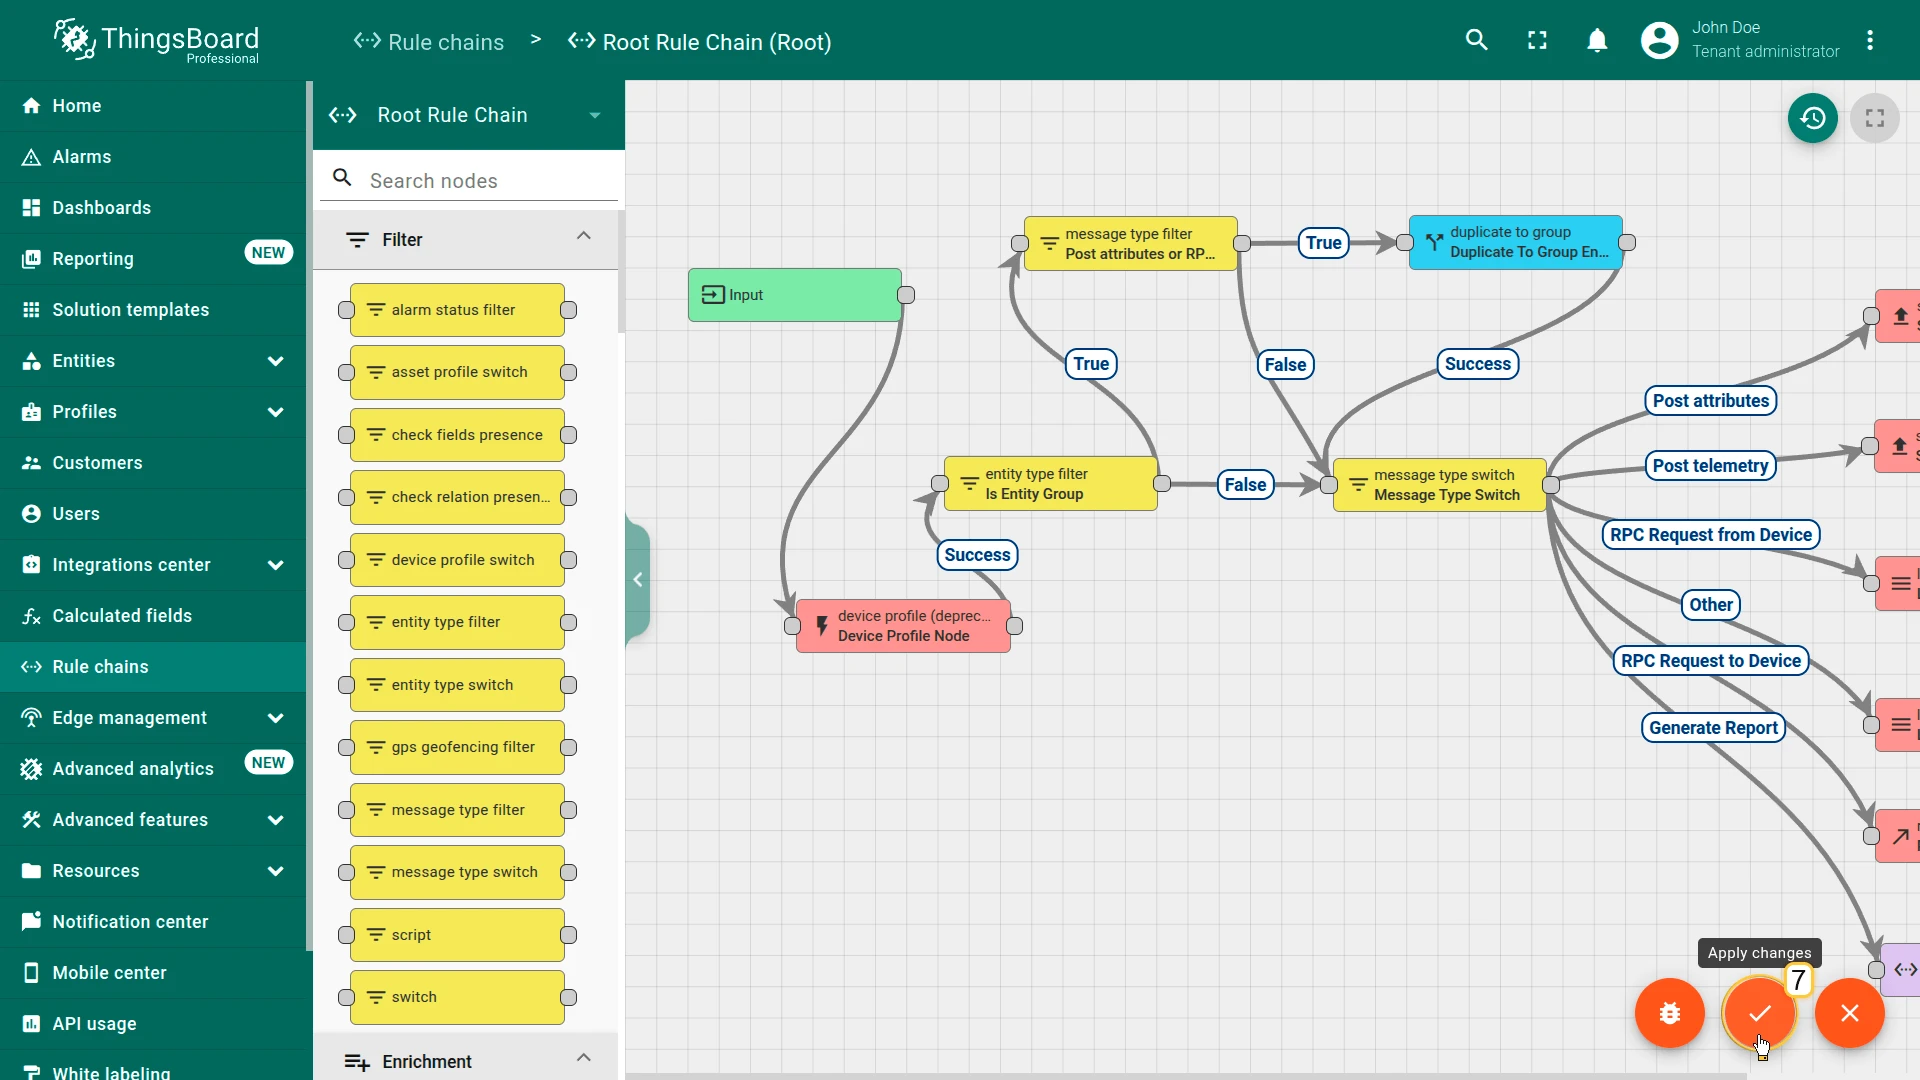
Step 6. Route RPC messages in the Rule Chain
Section titled “Step 6. Route RPC messages in the Rule Chain”When the widget value changes, ThingsBoard generates the message type: RPC_CALL_FROM_SERVER_TO_DEVICE
To forward this message to the MQTT broker:
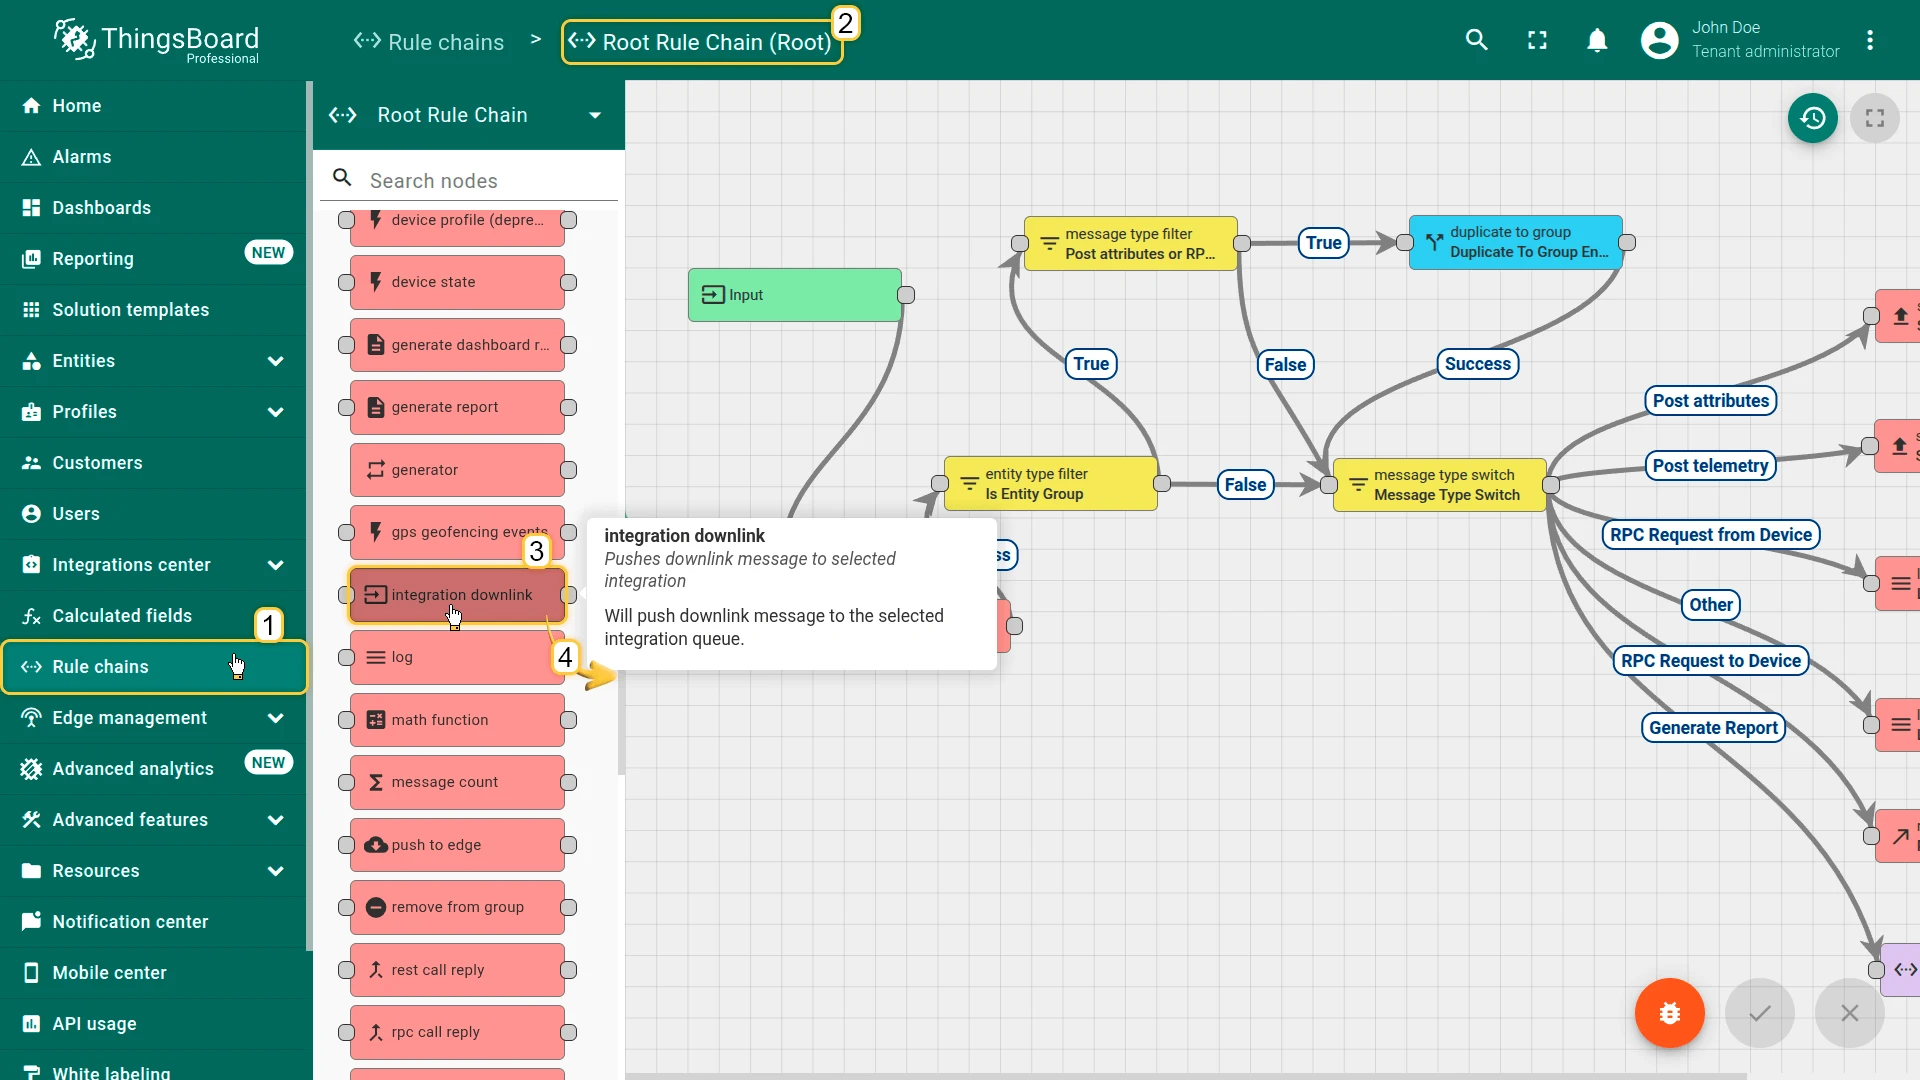
- Open the Root Rule Chain.
- Add an integration downlink node: Name it MQTT Integration Downlink, select your MQTT Integration, and click Add.
- Draw a relation from Message Type Switch to MQTT Integration Downlink with relation type RPC Request to Device.
- Apply changes.
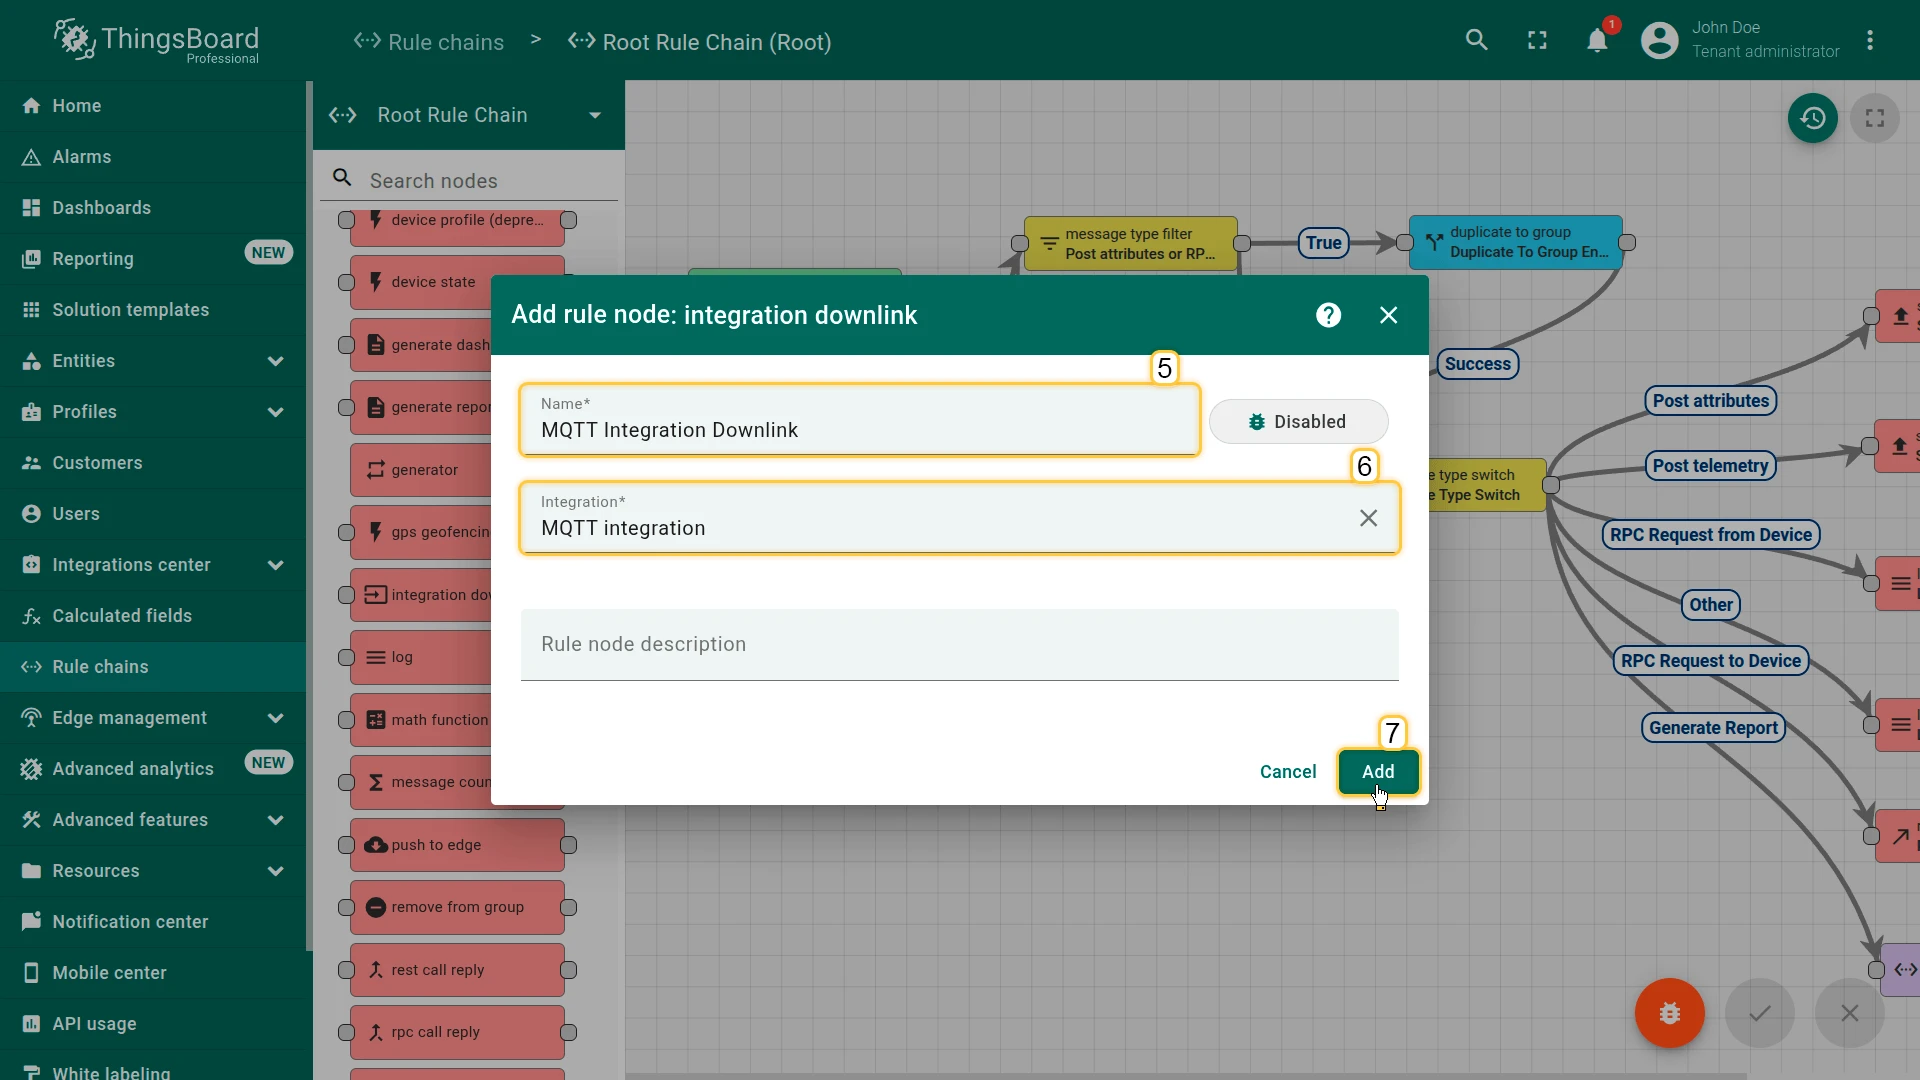

After this configuration, every dashboard RPC command is forwarded to the MQTT Integration downlink converter.
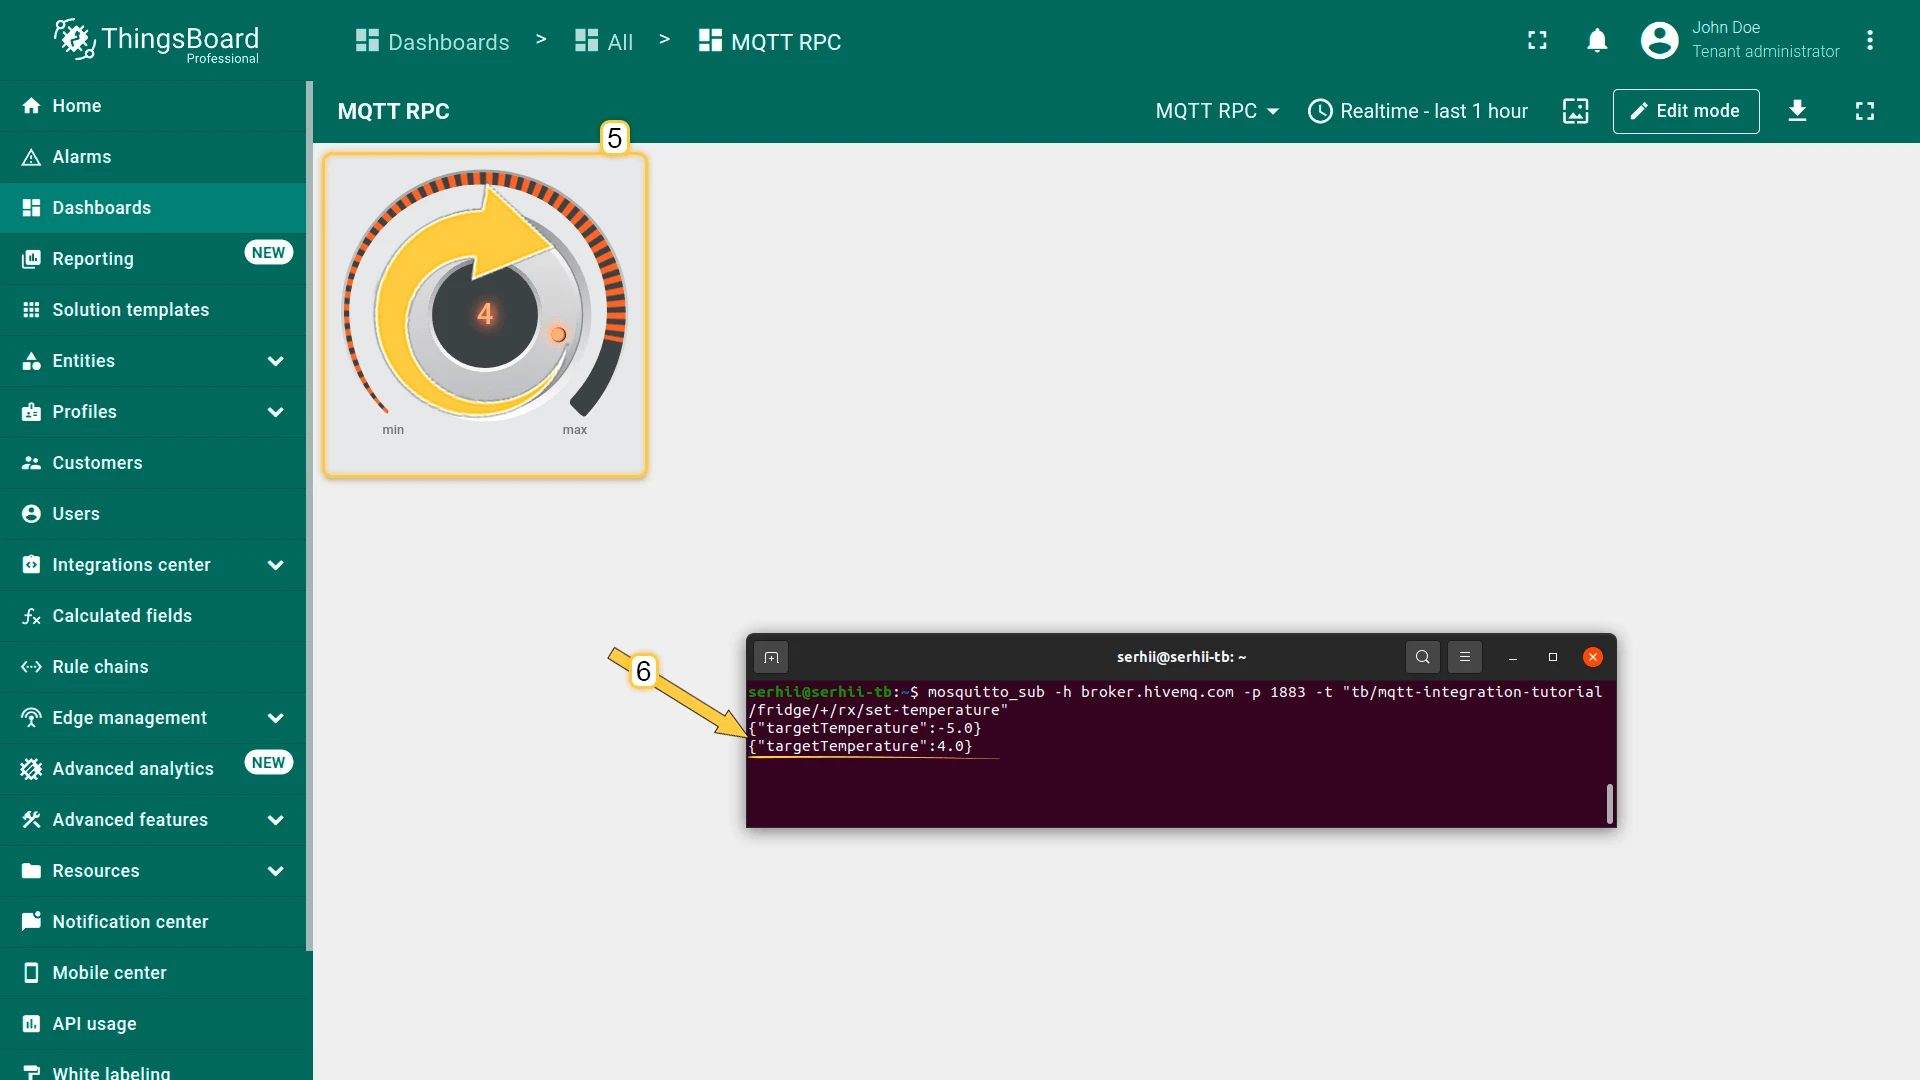
Step 7. Test the downlink flow
Section titled “Step 7. Test the downlink flow”The device subscribes to tb/mqtt-integration-tutorial/fridge/+/rx/set-temperature for incoming commands. Verify the downlink using mosquitto_sub:
mosquitto_sub -h broker.hivemq.com -p 1883 -t "tb/mqtt-integration-tutorial/fridge/+/rx/set-temperature"
Turn the knob on the dashboard. The terminal will receive messages like:
{"targetTemperature":-5.0}{"targetTemperature":4.0}
How it works
Section titled “How it works”The Knob Control widget generates an RPC_CALL_FROM_SERVER_TO_DEVICE message with method: setValue and the knob value as params. The oneway: true flag is set automatically by the widget — ThingsBoard neither tracks the delivery nor waits for a reply, and no timeout or retry applies.
params is always a string in the RPC payload — the encoder uses parseFloat(msg.params) to convert it to a number before building the JSON payload.
The Rule Engine routes the message via the RPC Request to Device relation to the Integration Downlink node, which passes it to the downlink converter. The encoder wraps the value into {targetTemperature: value} JSON and sets metadata.topic to the device-specific command topic. Because the integration’s Downlink topic pattern is ${topic}, the MQTT integration reads metadata.topic and publishes the payload to exactly that topic.
Was this helpful?