OAuth 2.0
ThingsBoard supports OAuth 2.0 authentication for Single Sign-On (SSO), allowing users to log in using external identity providers such as Google, Auth0, Keycloak, and others. Administrators can configure multiple providers per domain and control how external accounts are mapped to ThingsBoard tenants, customers, and user groups.
Authentication Flow
Section titled “Authentication Flow”ThingsBoard uses the Authorization Code grant type. The flow works as follows:
- The user selects an external provider on the ThingsBoard login page.
- The browser redirects to the provider’s authentication page.
- After successful authentication, the provider redirects back to ThingsBoard with an authorization code.
- ThingsBoard exchanges the code for an access token.
- The access token is used to retrieve user information from the provider.
- The user information is mapped to a ThingsBoard account via a configured mapper.
- Standard ThingsBoard authorization applies and the user is logged in.
Configuring OAuth 2.0
Section titled “Configuring OAuth 2.0”Two components are required to enable OAuth 2.0 login: an OAuth 2.0 client that stores provider credentials and mapping rules, and a domain that ties one or more clients to a specific ThingsBoard URL.
OAuth 2.0 Client
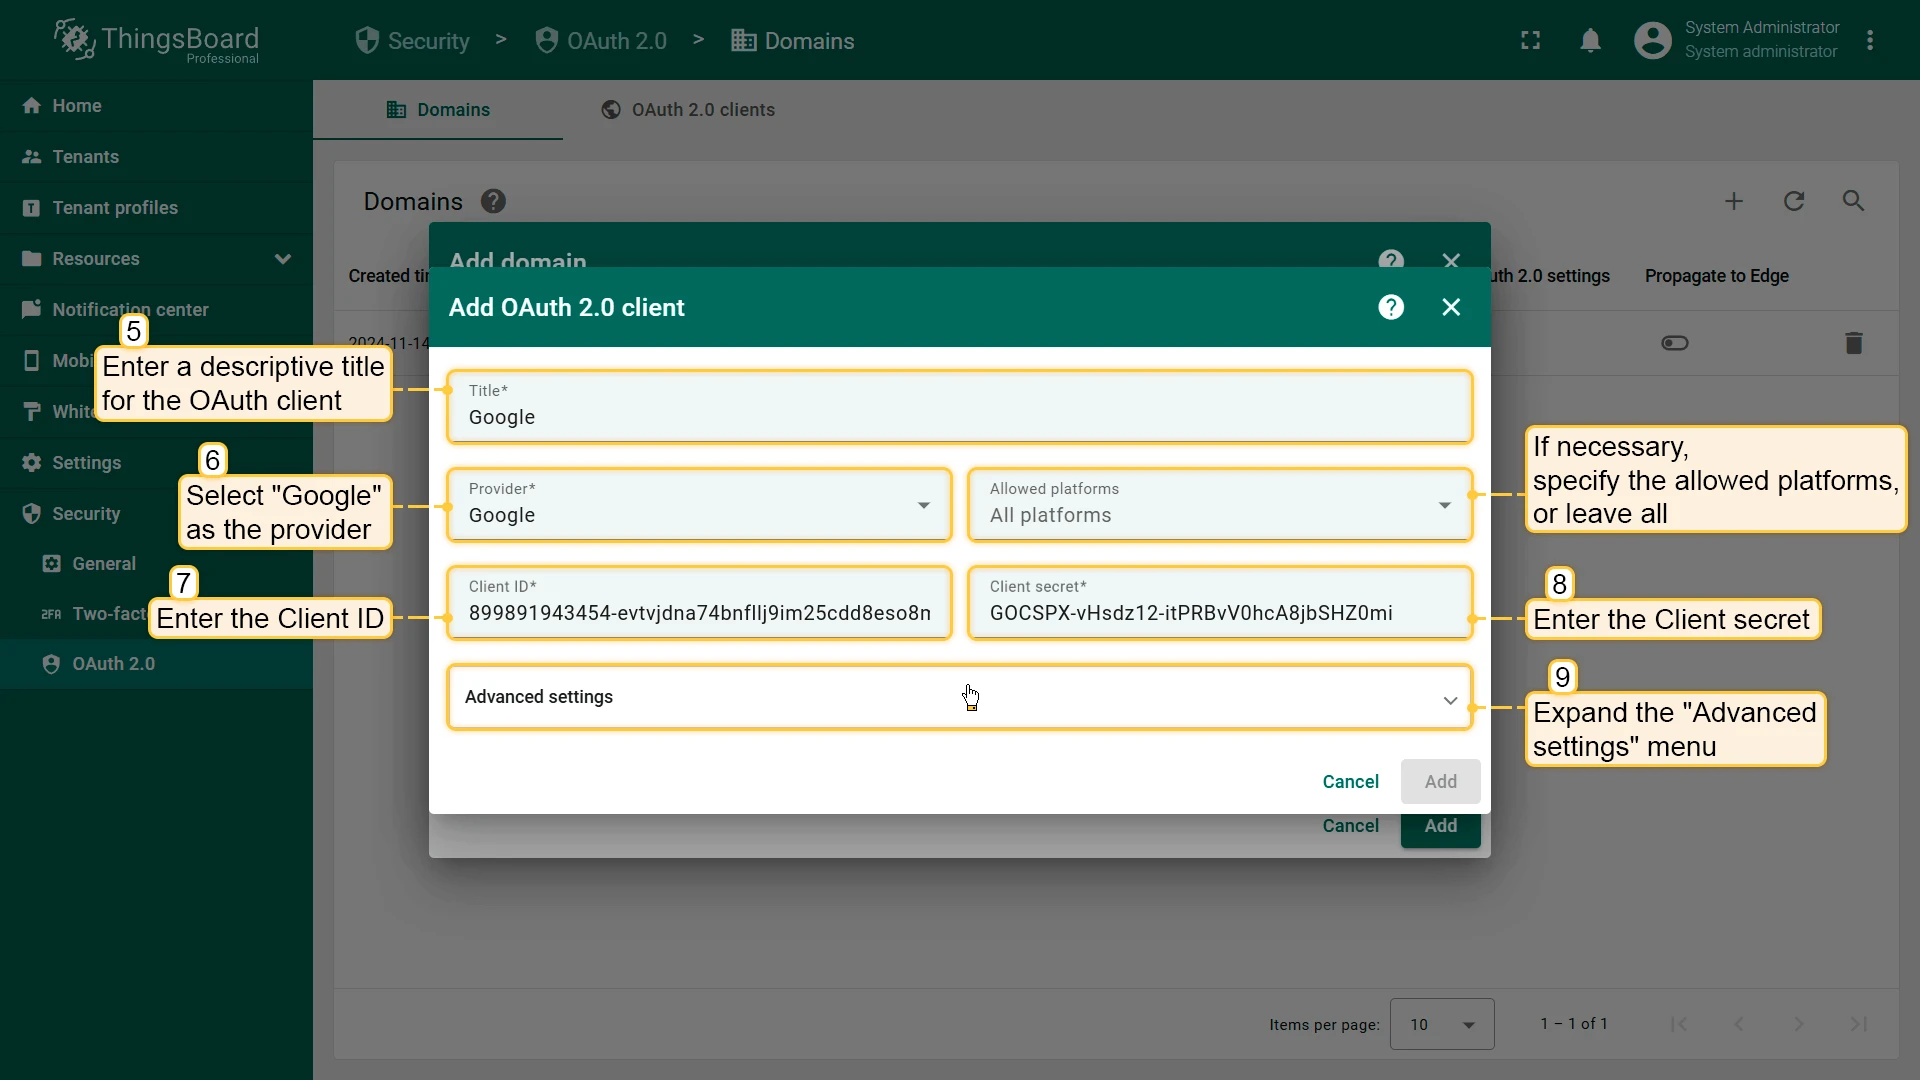
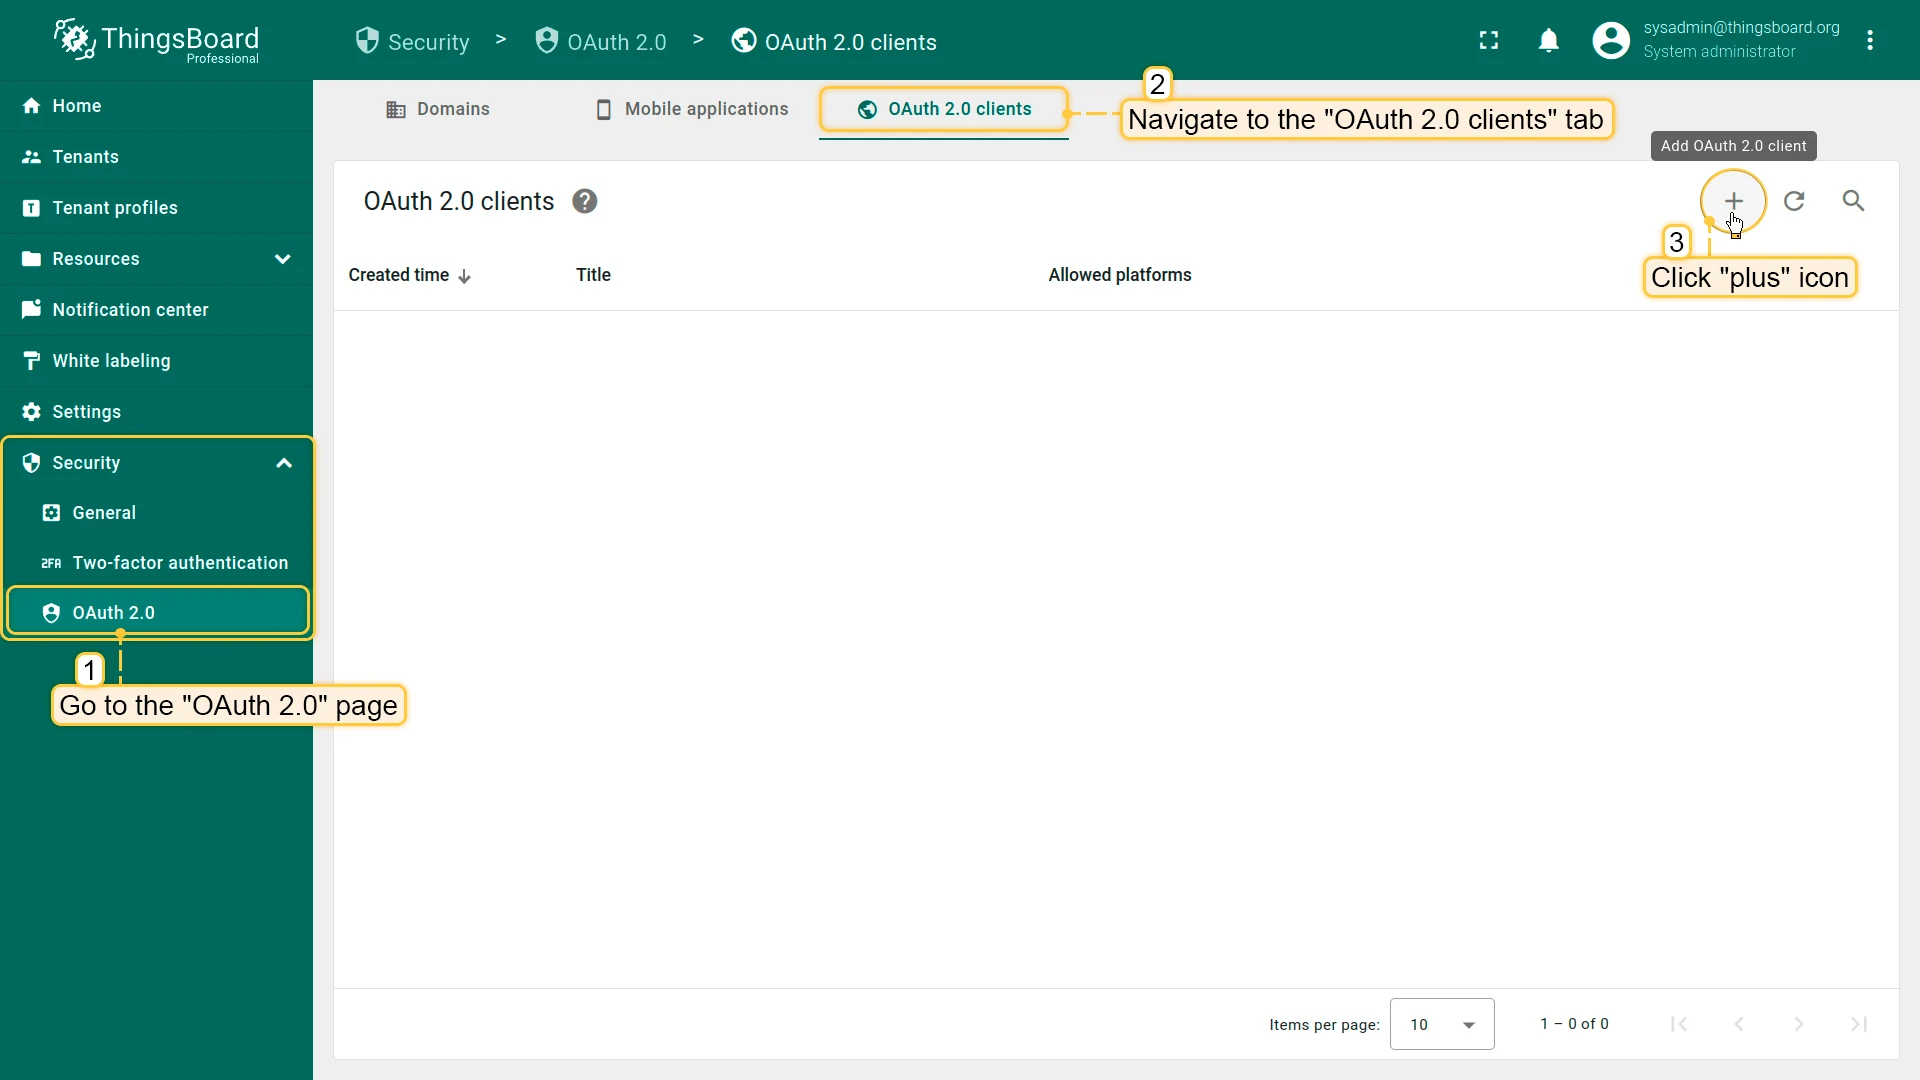
Section titled “OAuth 2.0 Client”Navigate to Security ⇾ OAuth 2.0 ⇾ OAuth 2.0 clients and click + Add OAuth 2.0 client.
General Settings
Section titled “General Settings”| Field | Description |
|---|---|
| Title | Display name for the client, shown as a button label on the login page. |
| Provider | Predefined provider (Apple, Facebook, GitHub, Google) or Custom for any OpenID Connect-compatible provider. Select Custom if your provider is not listed (for example, Keycloak, Okta, Azure AD, Auth0). |
| Allowed platforms | Restricts the client to Web UI only, Mobile app only, or All platforms. |
| Client ID | OAuth client identifier obtained from the identity provider. |
| Client Secret | OAuth client secret obtained from the identity provider. |
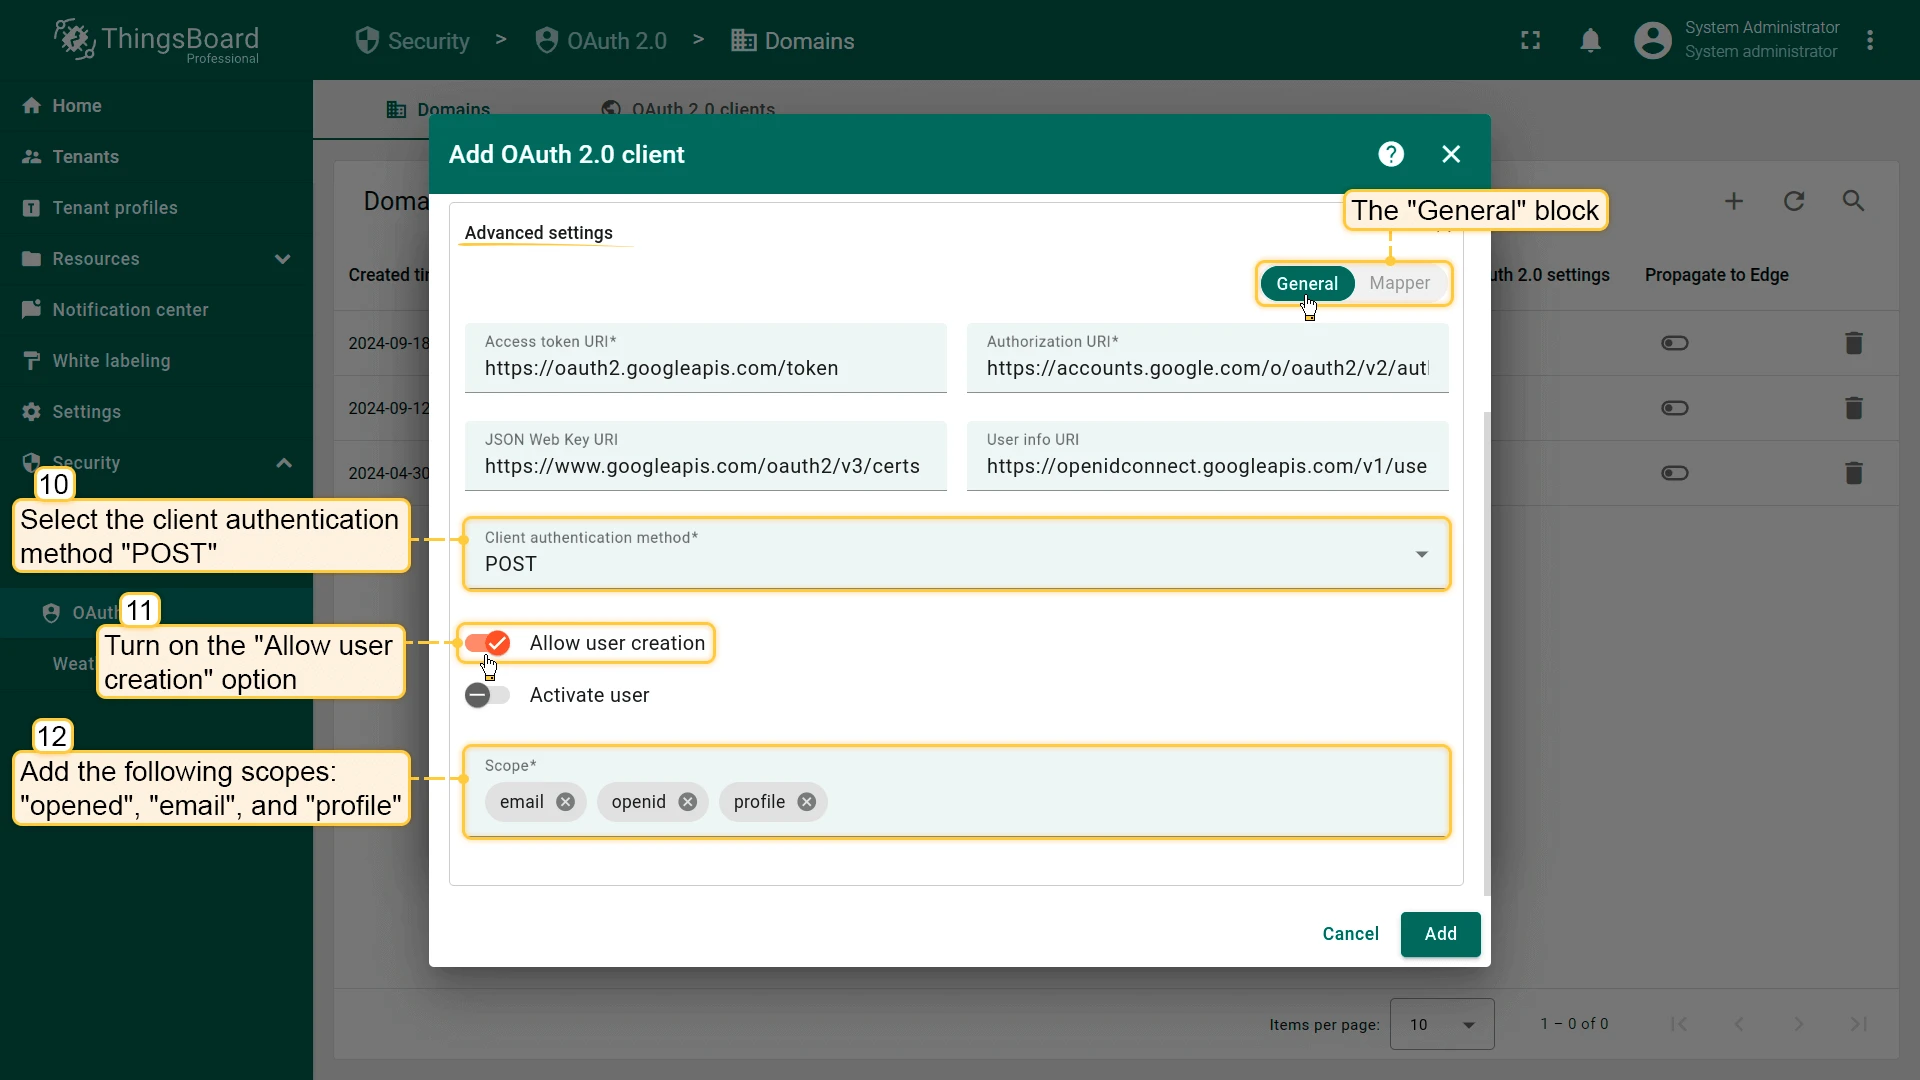
Advanced Settings — General Tab
Section titled “Advanced Settings — General Tab”| Field | Description |
|---|---|
| Access Token URI | Provider endpoint used to exchange the authorization code for an access token. |
| Authorization URI | Provider endpoint where the user authenticates and grants access. |
| JSON Web Key URI | Provider JWKS endpoint supplying public keys for JWT validation. |
| User Info URI | Provider endpoint for retrieving user profile attributes. |
| Client Authentication Method | How the client authenticates with the provider: BASIC (recommended), POST, or NONE. If authentication fails during token exchange (e.g. invalid_client error), verify that the selected method matches the identity provider configuration. |
| Allow User Creation | When enabled, ThingsBoard automatically creates a new account on first login if no matching user exists. |
| Activate User | When enabled, newly created accounts are activated immediately without requiring email confirmation. |
| Scope | Space-separated list of OAuth scopes to request. Typical value: email openid profile. |
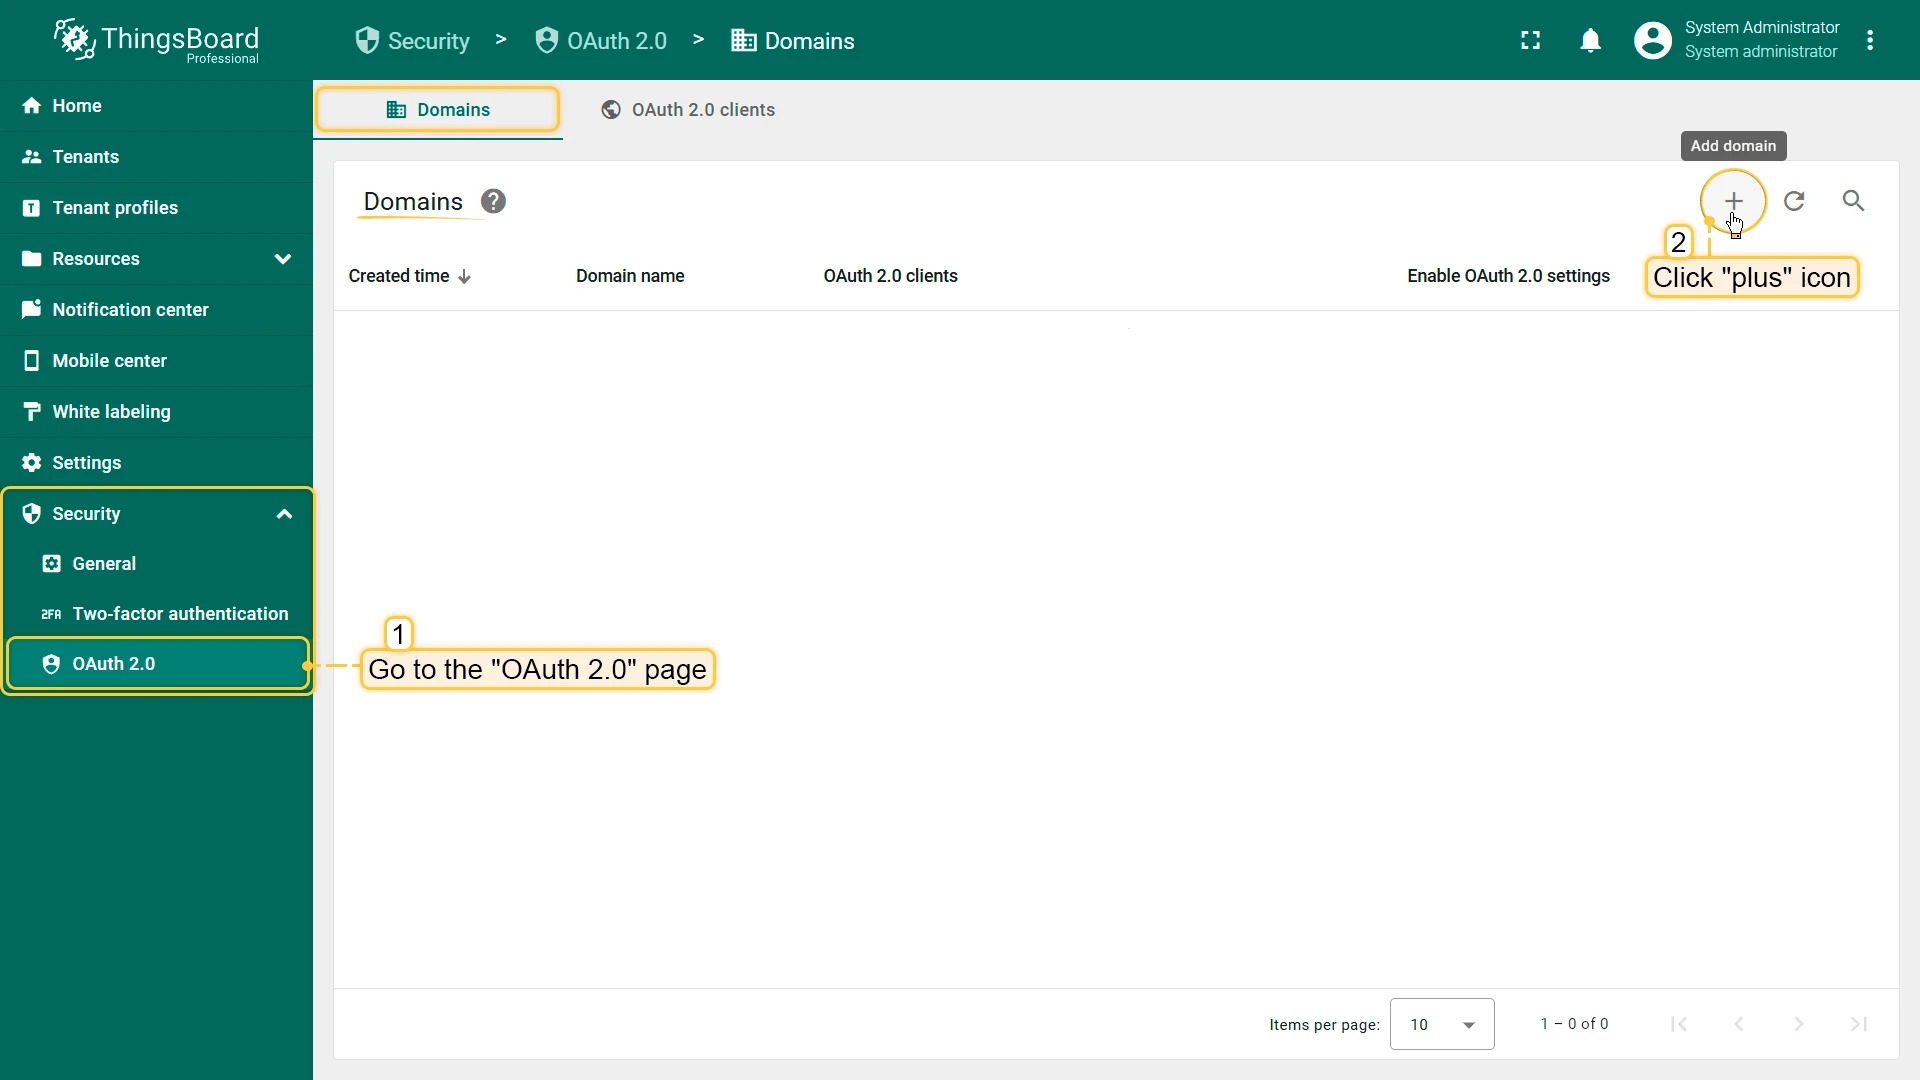
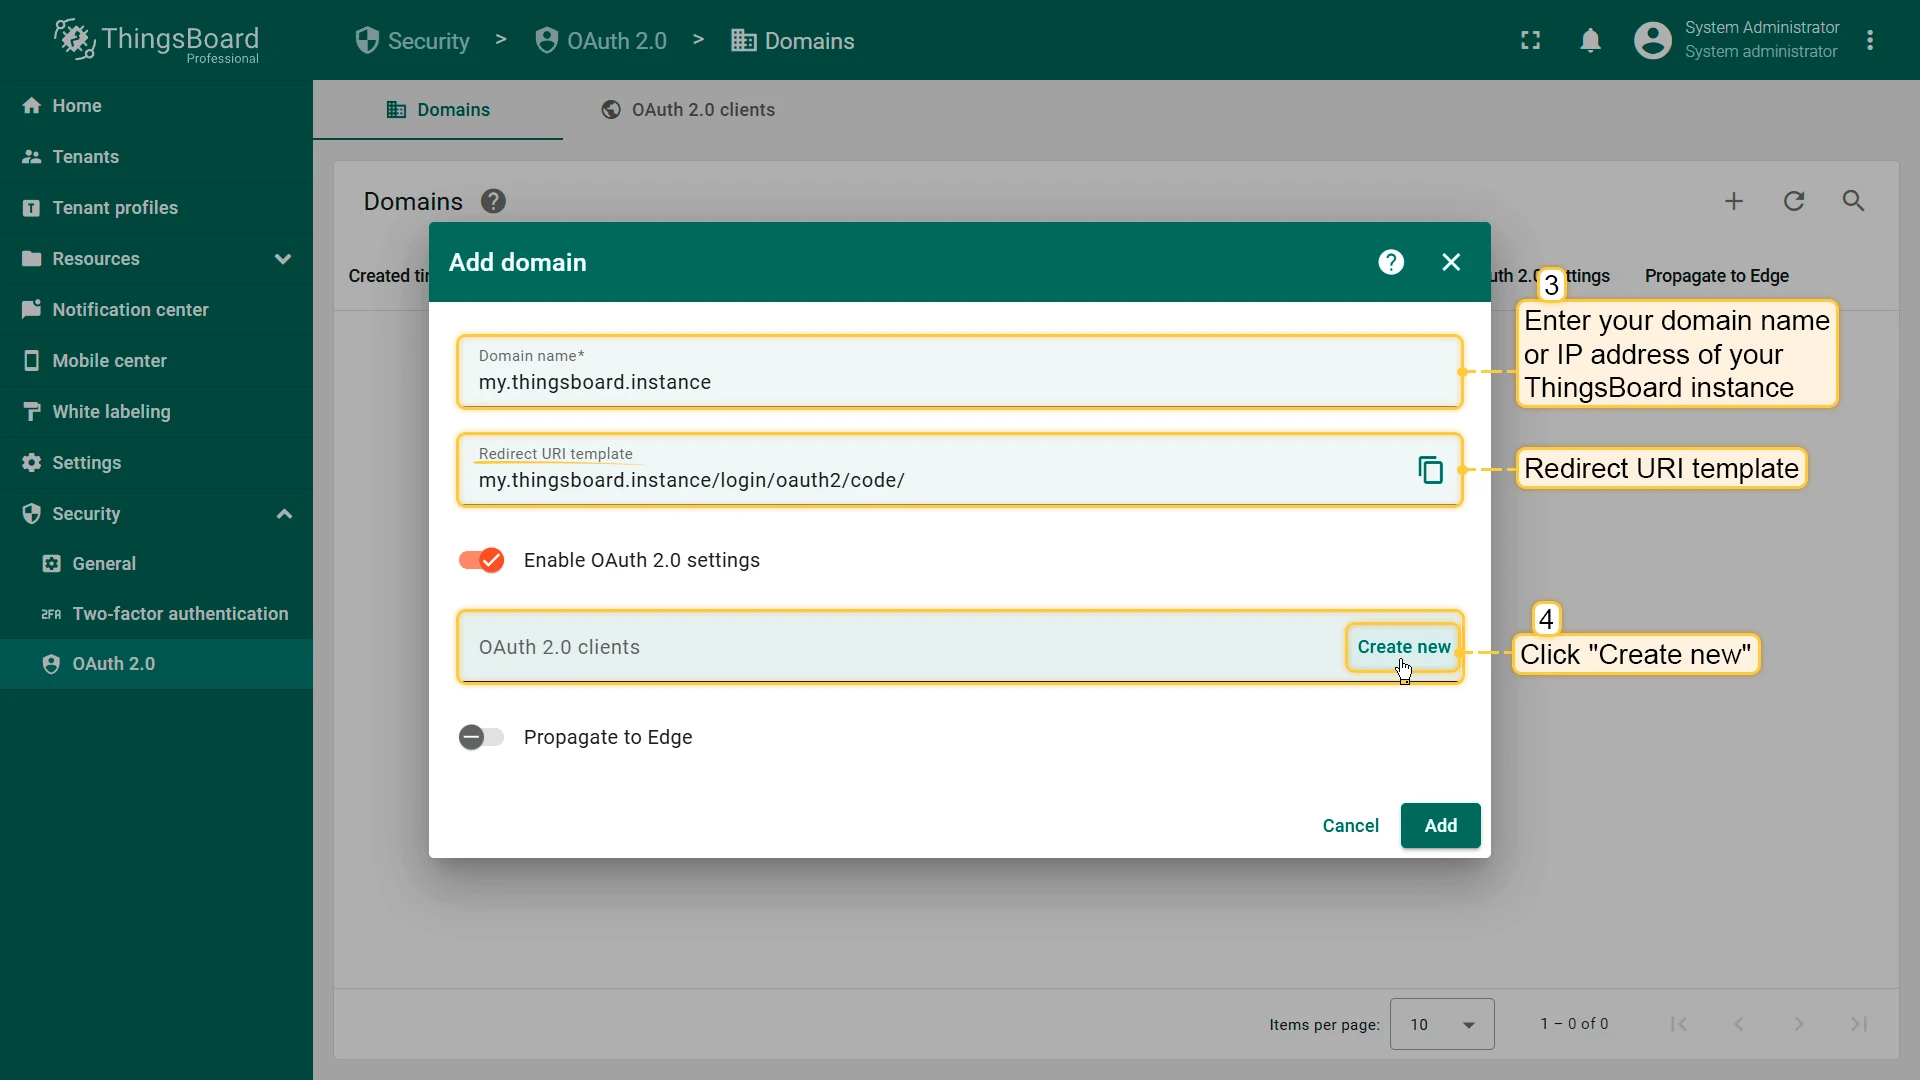
Domain Configuration
Section titled “Domain Configuration”Navigate to Security ⇾ OAuth 2.0 ⇾ Domains and click + Add domain.
| Field | Description |
|---|---|
| Domain Name | The domain users access ThingsBoard from (e.g. my.thingsboard.instance). Must match the actual DNS-configured domain. |
| Redirect URI Template | Auto-generated callback URL to register with your OAuth provider. Format: http(s)://$DOMAIN:$PORT/login/oauth2/code/. |
| OAuth 2.0 Clients | Select one or more existing clients to make available for this domain. |
| Enable OAuth 2.0 | Toggles OAuth login availability for the domain. |
Mapper Configuration
Section titled “Mapper Configuration”Each OAuth 2.0 client includes a mapper that defines how provider user attributes are translated into ThingsBoard account properties. Two mapper types are available.
Basic Mapper
Section titled “Basic Mapper”The Basic mapper handles standard OpenID Connect providers that return email, given_name, and family_name attributes.
| Field | Description |
|---|---|
| Email Attribute Key | Provider attribute containing the user’s email address. Default: email. |
| First Name Attribute Key | Provider attribute for the user’s first name. |
| Last Name Attribute Key | Provider attribute for the user’s last name. |
| User Name Attribute Key | Provider attribute used as the username. Most OAuth providers return the email address as the most stable identifier; the recommended value is email. |
| Tenant Name Strategy | How the tenant is determined for the authenticated user: DOMAIN (derives tenant name from the email domain), EMAIL (uses the full email address), or CUSTOM (uses the pattern defined in Tenant Name Pattern). |
| Tenant Name Pattern | Custom pattern used when strategy is CUSTOM. Supports %{attribute_key} placeholders. Examples: Demo Tenant (hard-coded), %{email} (full email), %{givenName} (first name). |
| Customer Name Pattern | If set, the user is created under a customer matching this pattern. Supports %{attribute_key} placeholders. Examples: Demo Customer (hard-coded), %{email} (full email), %{city} (city from profile). |
| Default Dashboard | Dashboard opened automatically after login. |
| Always Full Screen | Opens the default dashboard in full-screen mode. |
| User Groups Name Pattern | Comma-separated list of user group name patterns. The user is added to matching groups on each login. Supports %{attribute_key} placeholders.
PE / Cloud only
|
| Parent Customer Name Pattern | Pattern for an optional parent customer. Creates a customer hierarchy automatically. PE / Cloud only |
Custom Mapper
Section titled “Custom Mapper”The Custom mapper delegates all mapping logic to an external HTTP service. ThingsBoard sends user attribute data to the configured endpoint, and the service returns the ThingsBoard account details. Use this type when you need complex logic such as role mapping based on IdP groups, custom tenant or customer creation rules, or attribute validation.
Examples
Section titled “Examples”Login with Google
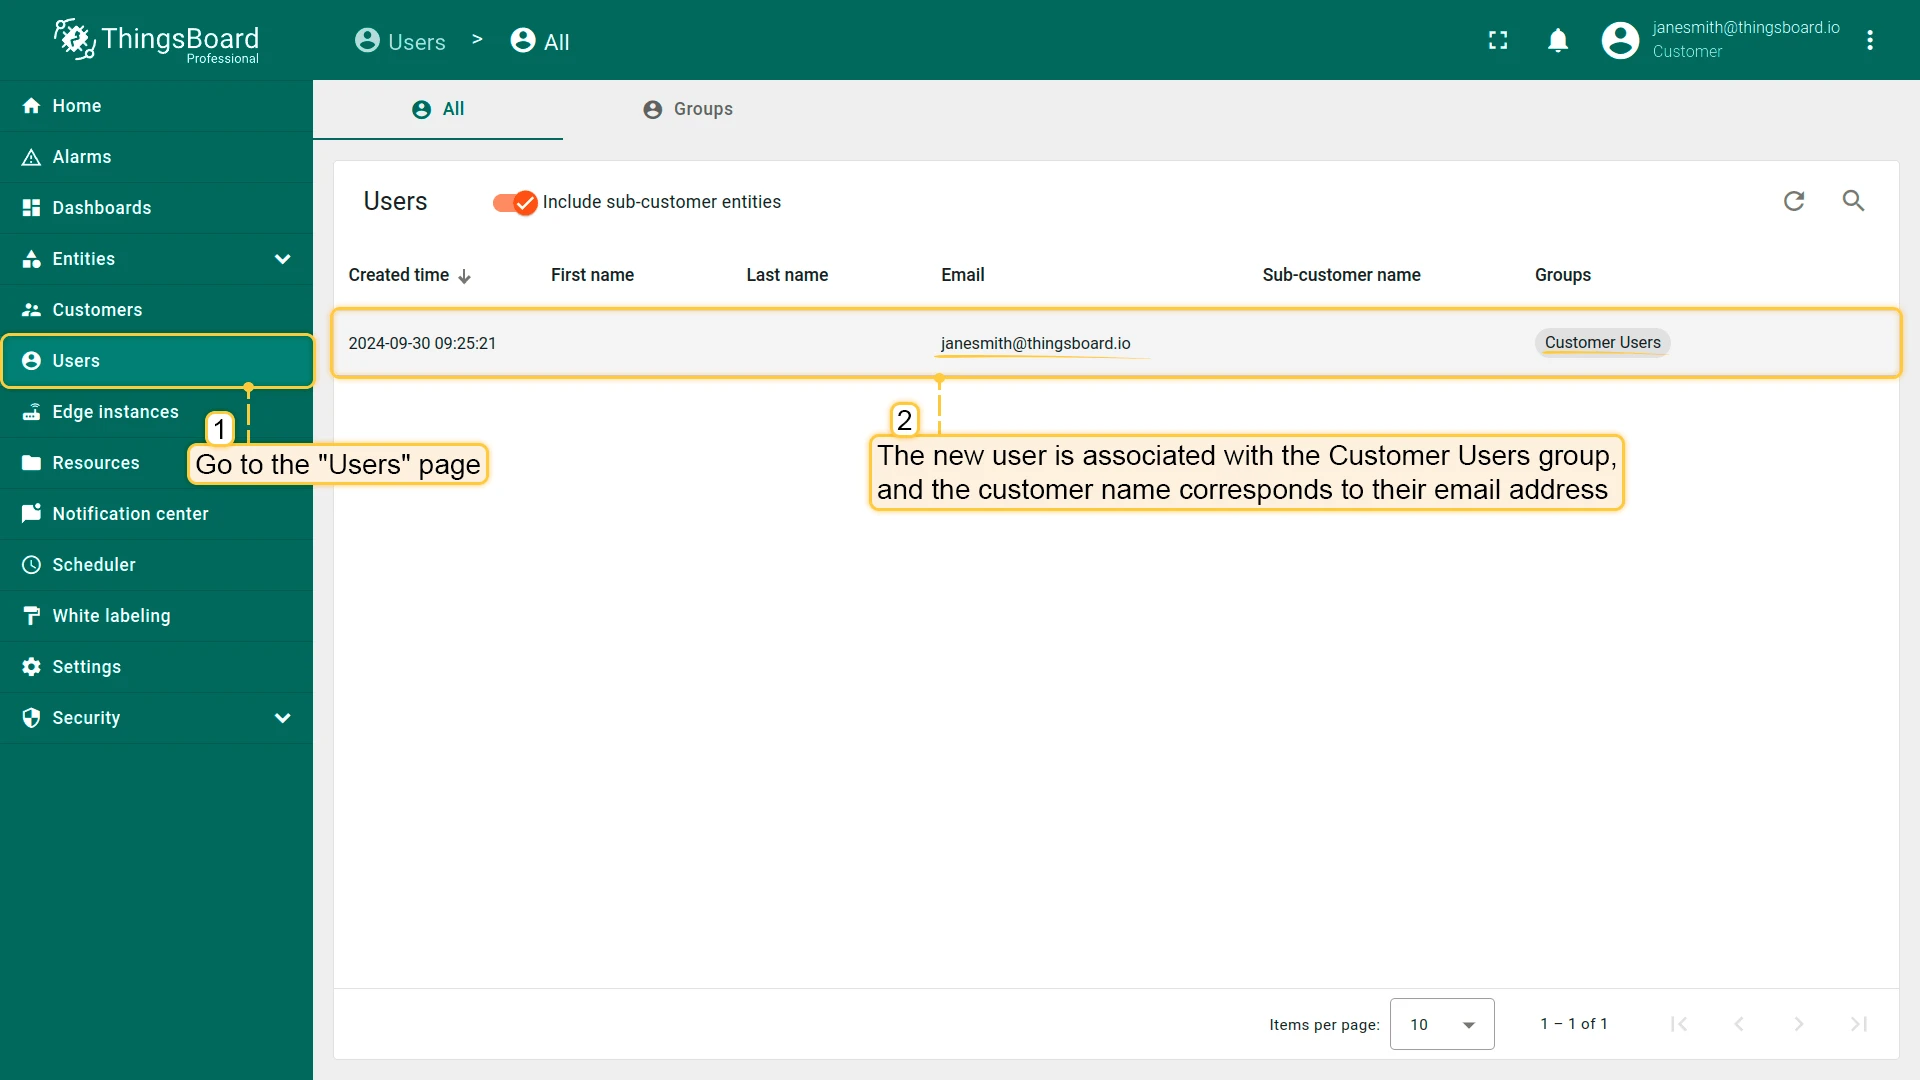
Section titled “Login with Google”This example creates a ThingsBoard tenant user from a Google account. Each user is placed under a tenant whose name matches the user’s email address.
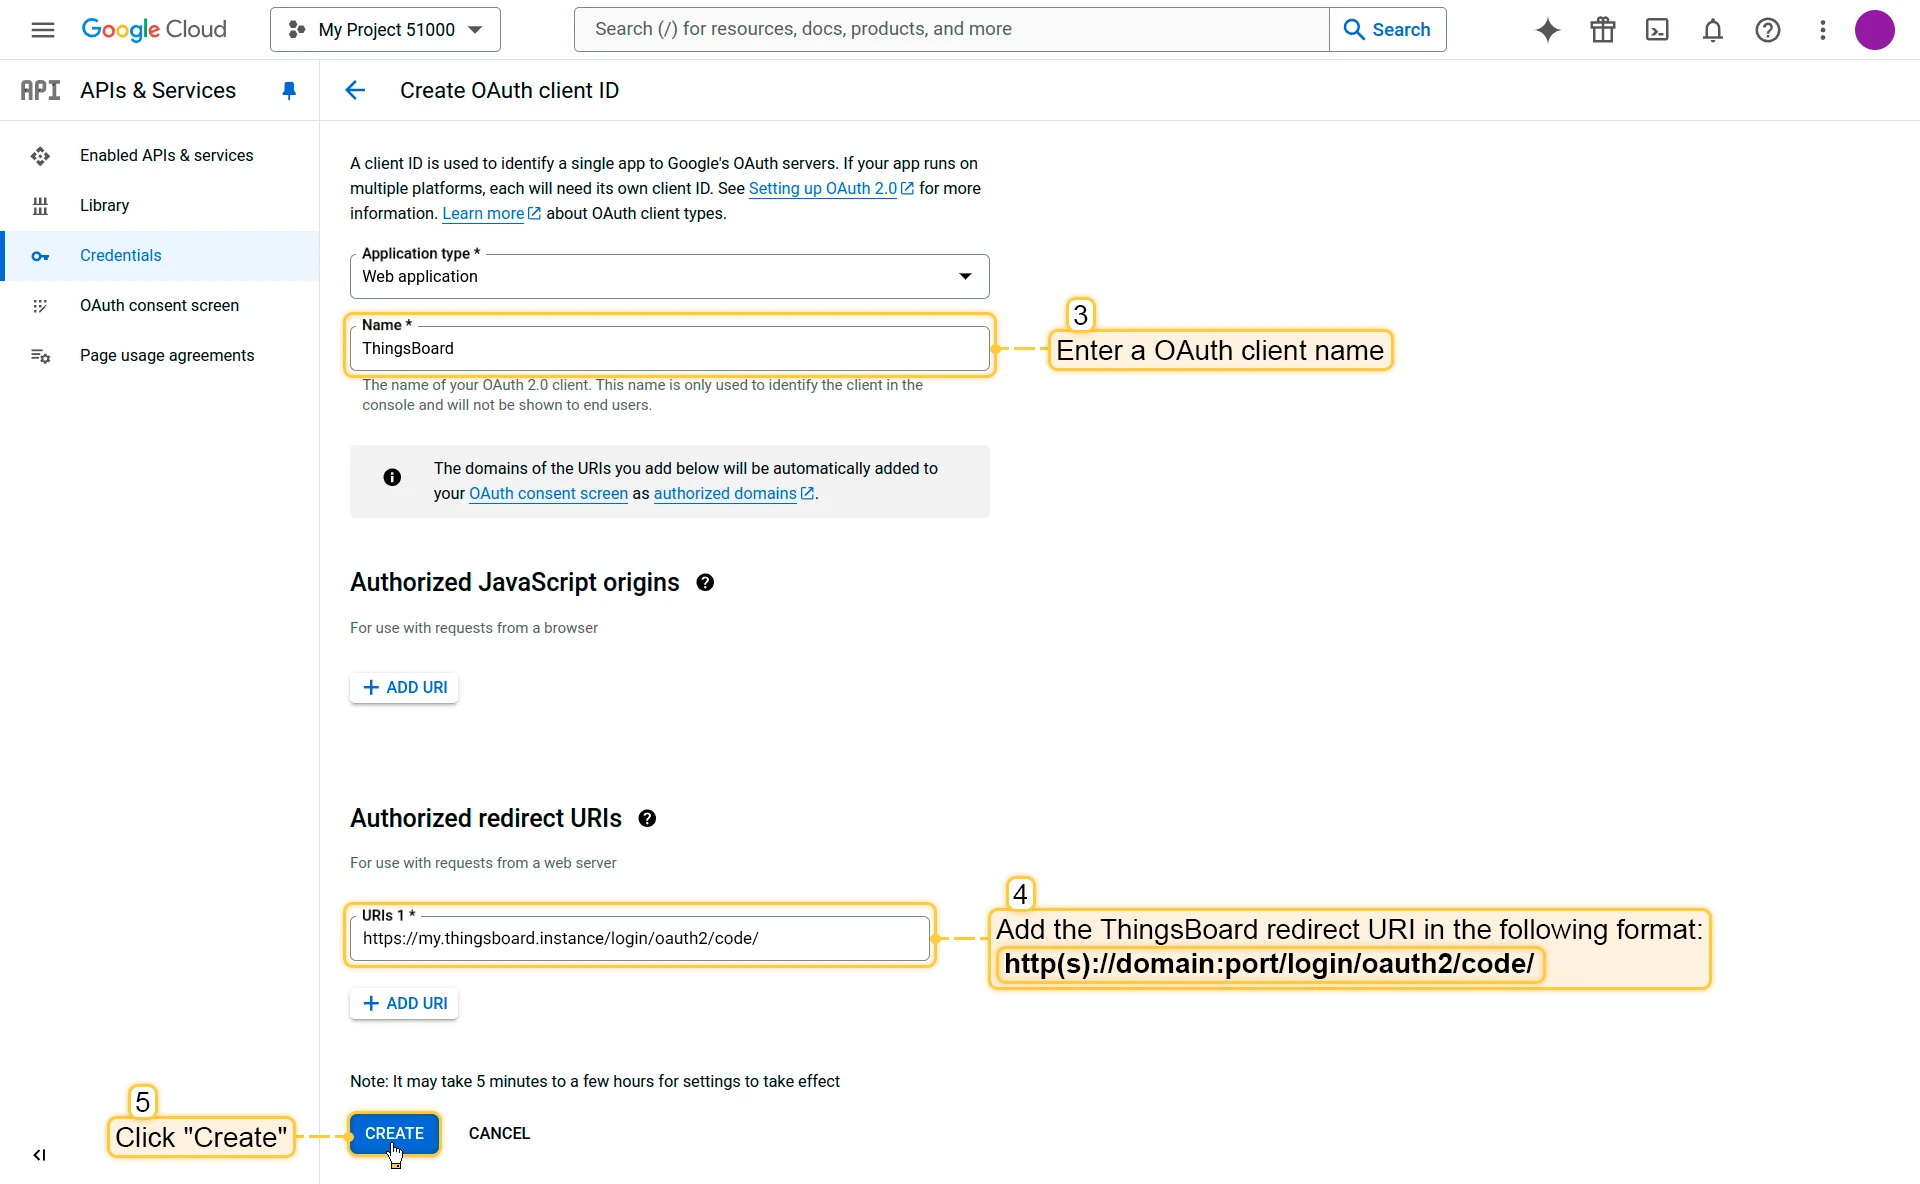
Step 1: Create Google OAuth credentials
Section titled “Step 1: Create Google OAuth credentials”-
Open the Google Cloud Console and create or select a project.
-
Navigate to APIs & Services → Credentials and click Create credentials → OAuth client ID.

-
Select Web application as the application type, enter a name, and add your ThingsBoard redirect URI under Authorized redirect URIs:
http(s)://$DOMAIN:$PORT/login/oauth2/code/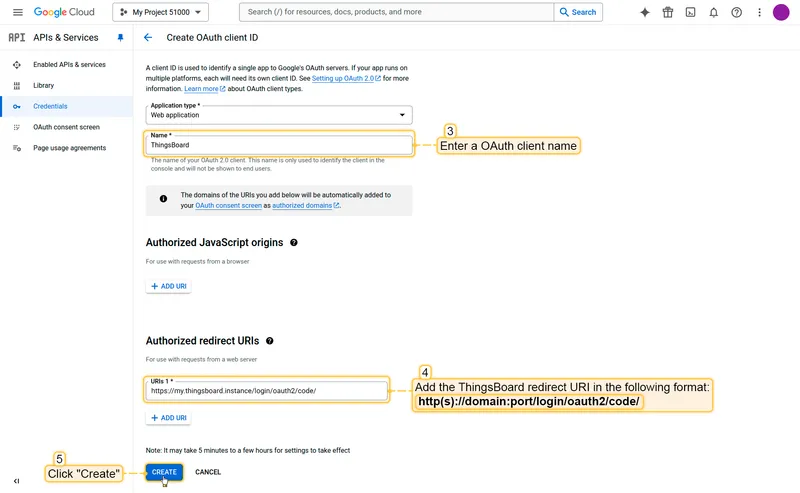
-
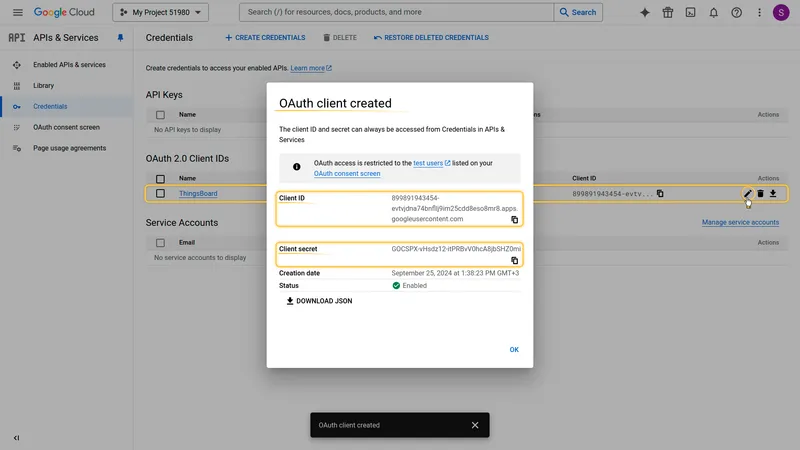
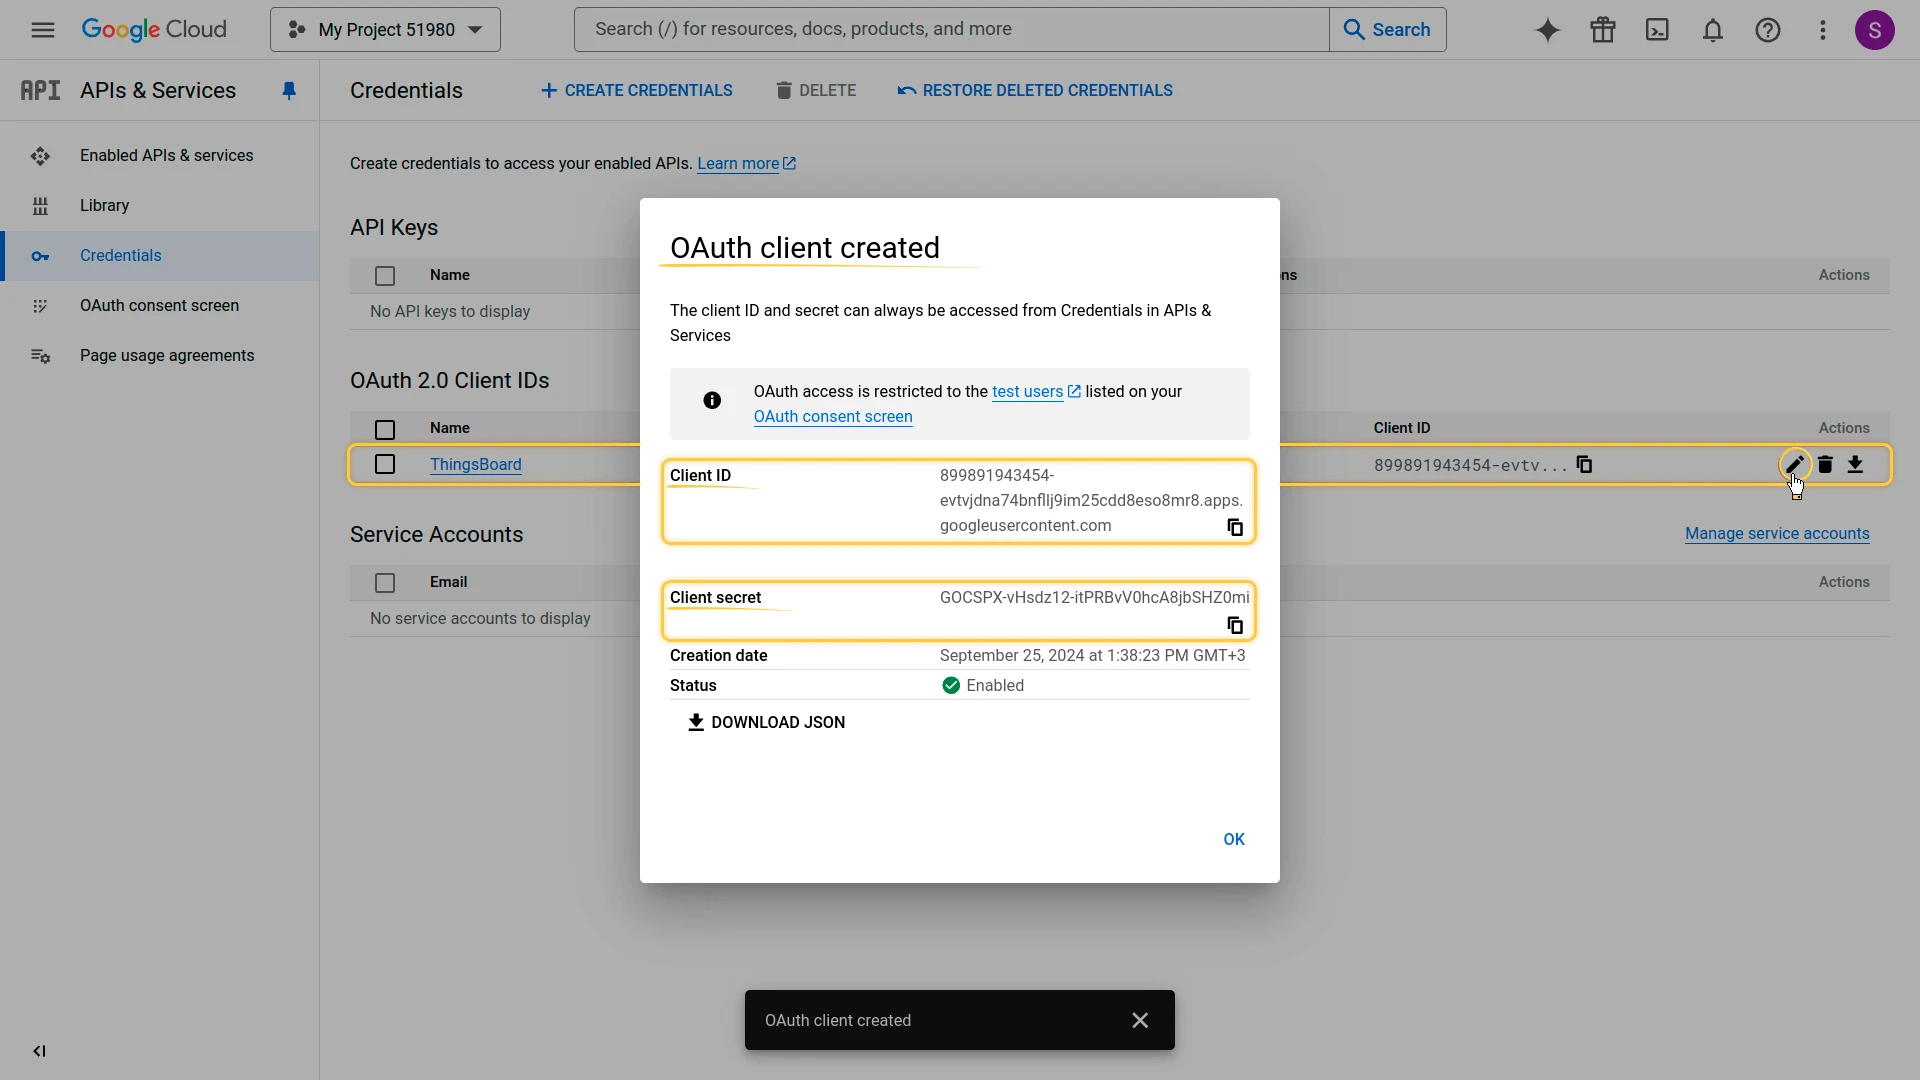
Click Create. Copy the generated Client ID and Client Secret.

Step 2: Configure ThingsBoard
Section titled “Step 2: Configure ThingsBoard”-
In ThingsBoard, navigate to Security ⇾ OAuth 2.0 ⇾ Domains and click + Add domain to add a domain. Enter your domain name.
-
In the OAuth 2.0 clients section of the domain form, click Create new to create a new client. Set:
- Title:
Google - Provider:
Google - Client ID and Client Secret: paste the values from Google Console.
- Title:
-
Open Advanced settings ⇾ General and configure:
- Client authentication method:
POST - Allow user creation: enabled
- Activate user: enabled
- Scope:
emailopenidprofile
- Client authentication method:
-
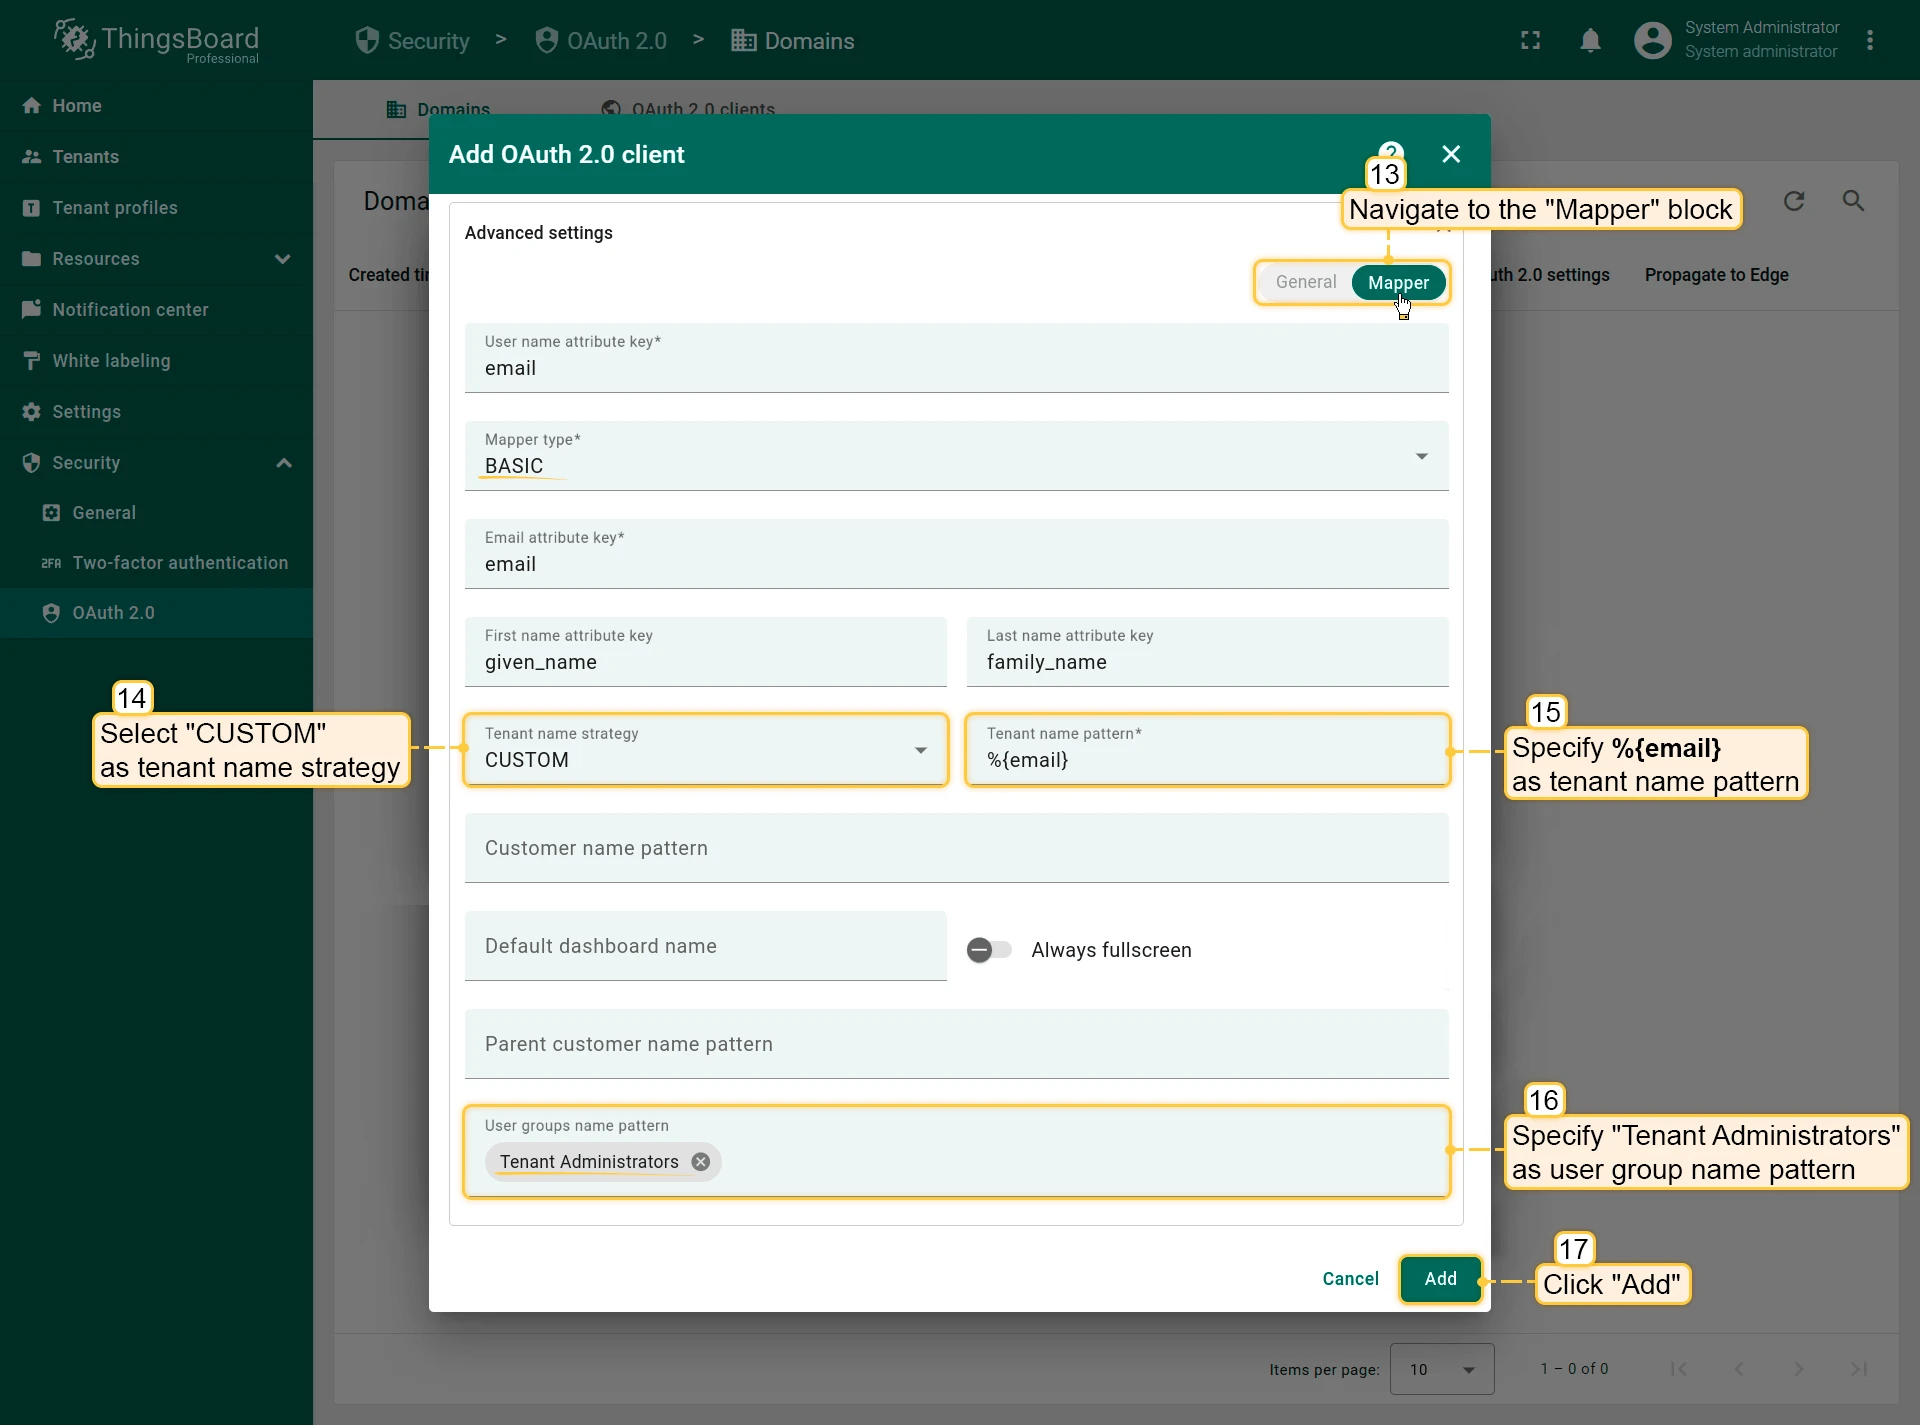
Open the Mapper tab and configure:
- Mapper type:
BASIC - Tenant name strategy:
CUSTOM - Tenant name pattern:
%{email}
- Mapper type:
-
Save the client, then save the domain.

Verify Login
Section titled “Verify Login”Navigate to your ThingsBoard login page. A Login with Google button should appear. Click it to authenticate with your Google account.


Login with Auth0
Section titled “Login with Auth0”This example creates a ThingsBoard customer user from an Auth0 account. The tenant is determined from the email domain, and the user is placed under a customer whose name matches the full email address.
Step 1: Create Auth0 application credentials
Section titled “Step 1: Create Auth0 application credentials”-
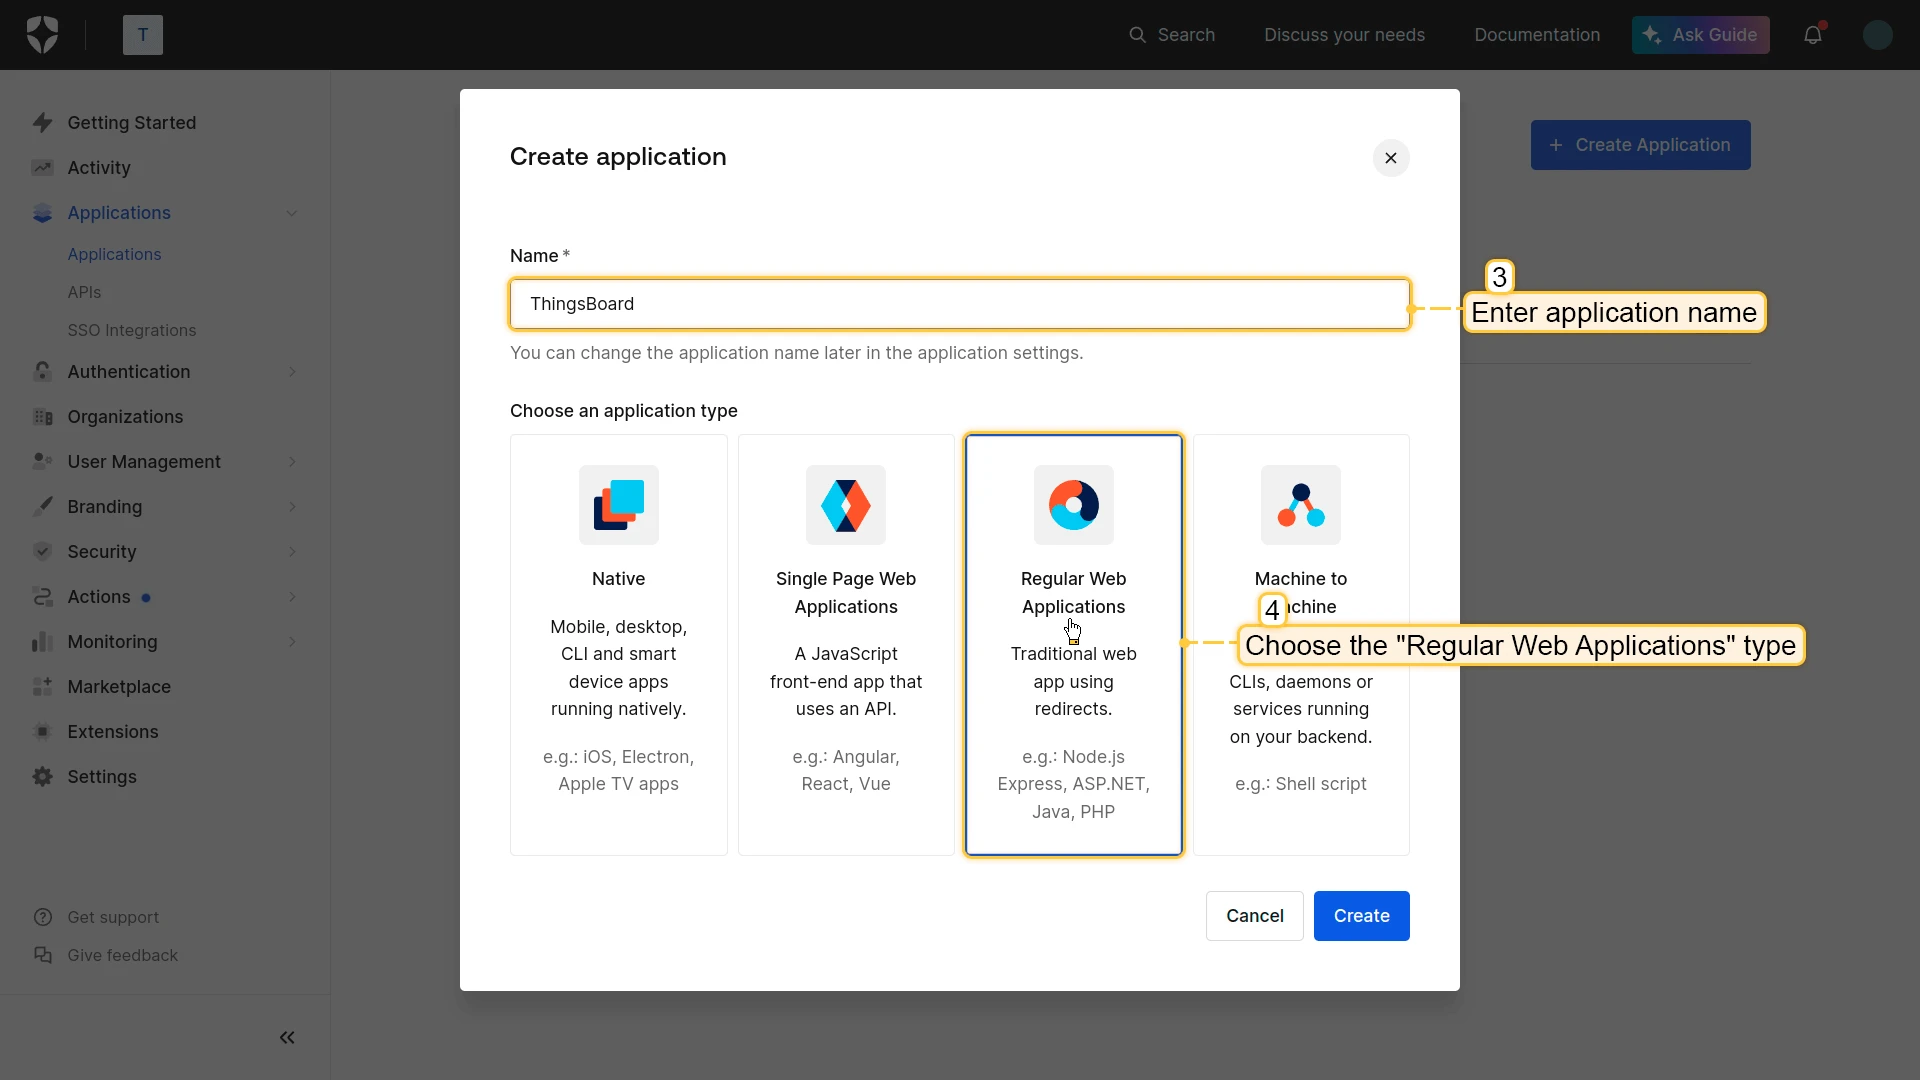
Log in to the Auth0 Management Console and navigate to Applications → Applications. Click Create Application.

-
Select Regular Web Applications as the application type.
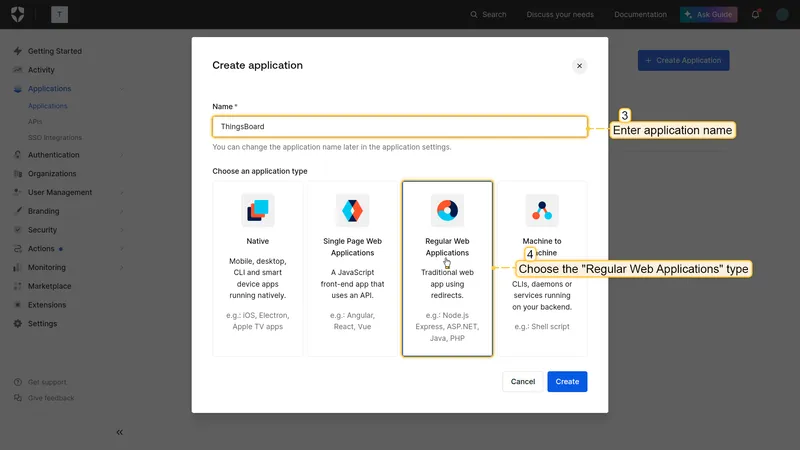
-
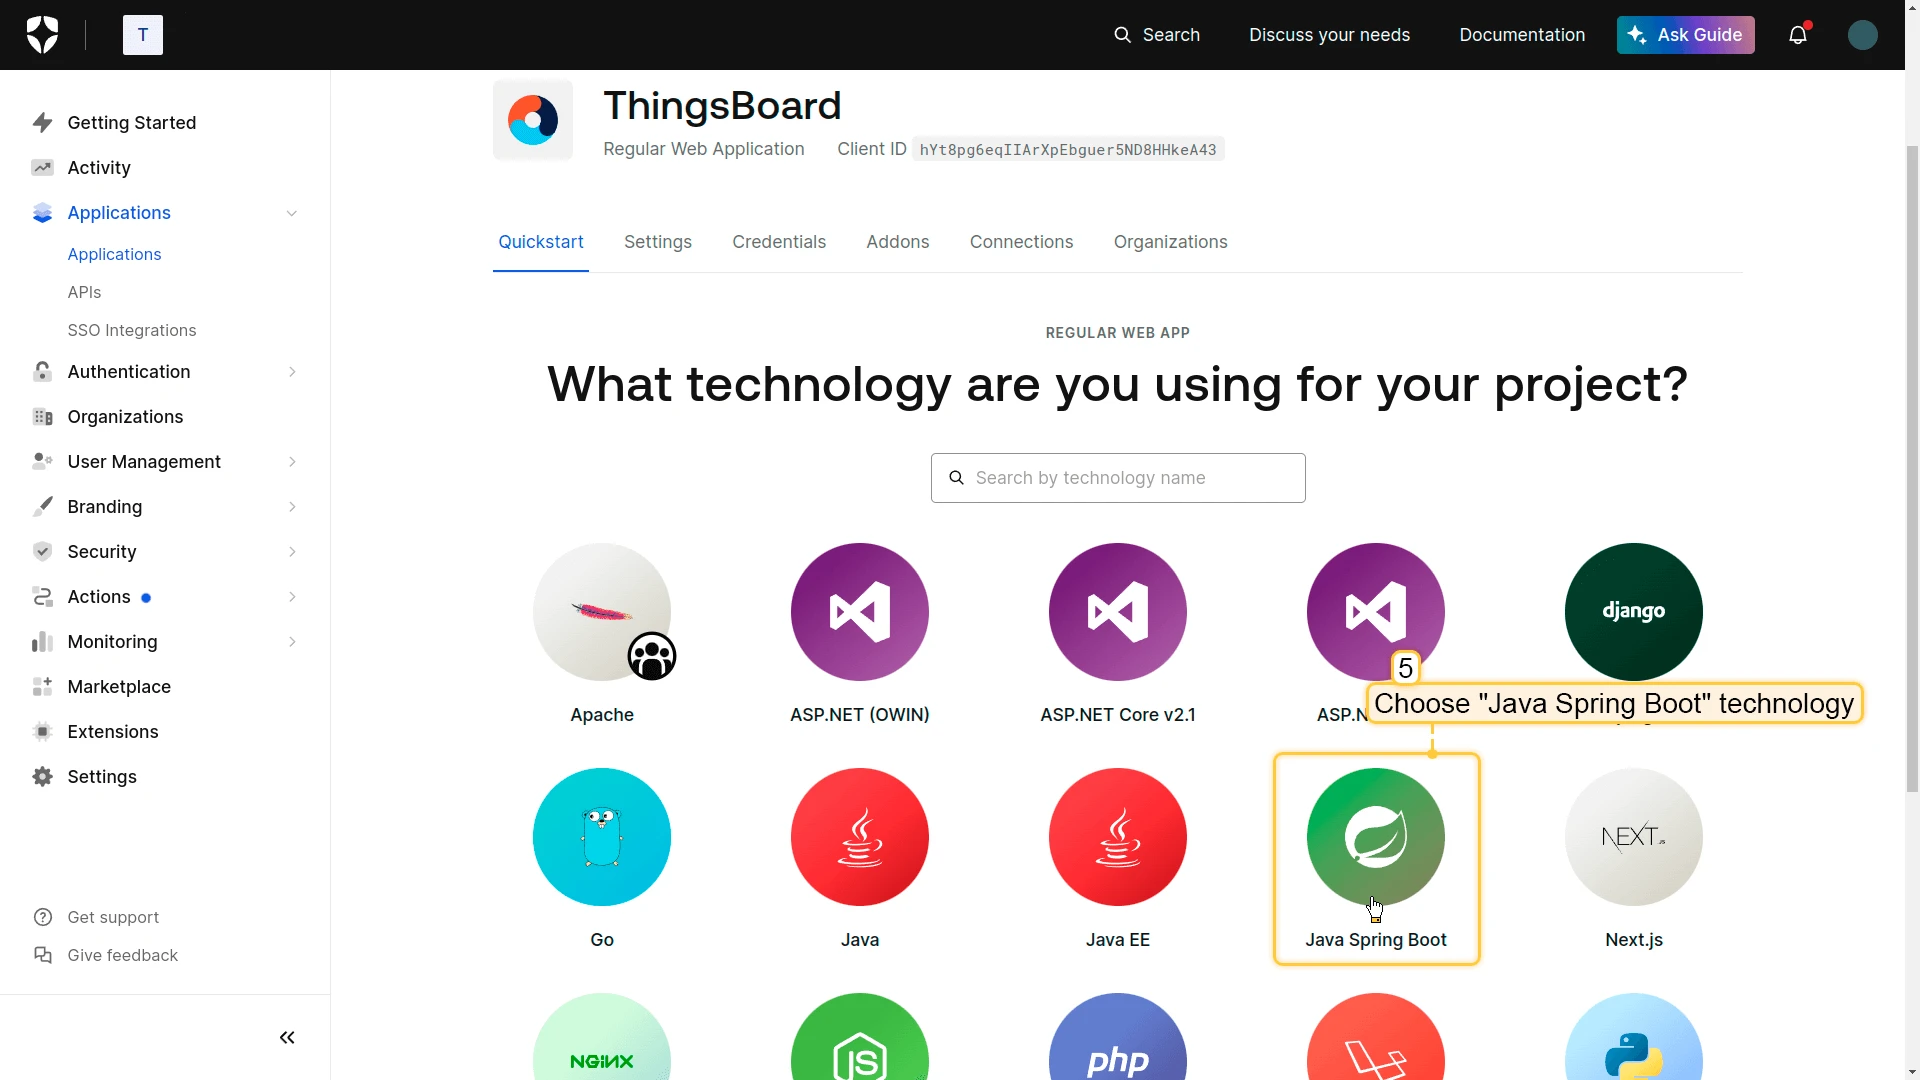
Choose a technology (e.g. Java Spring Boot) and proceed.

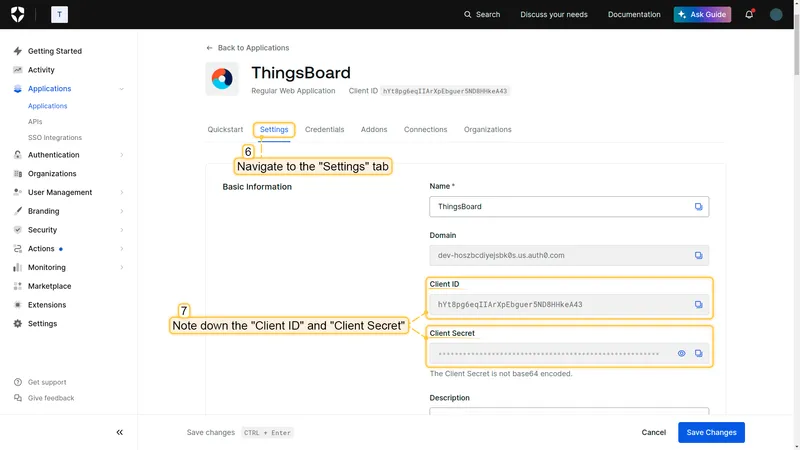
-
Open the application Settings tab. Copy the Client ID and Client Secret.
-
Scroll to Allowed Callback URLs and add your ThingsBoard redirect URI:
http(s)://$DOMAIN:$PORT/login/oauth2/code/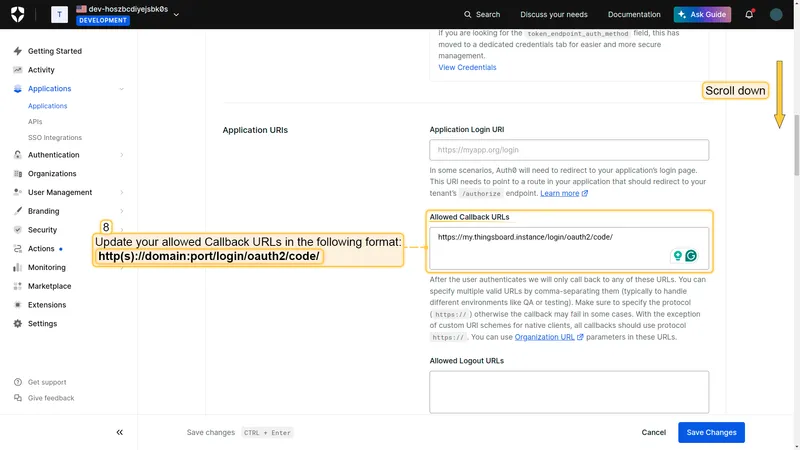
-
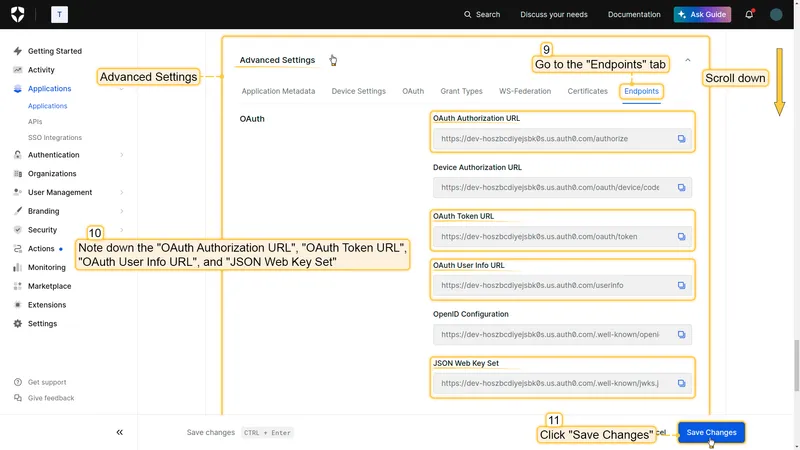
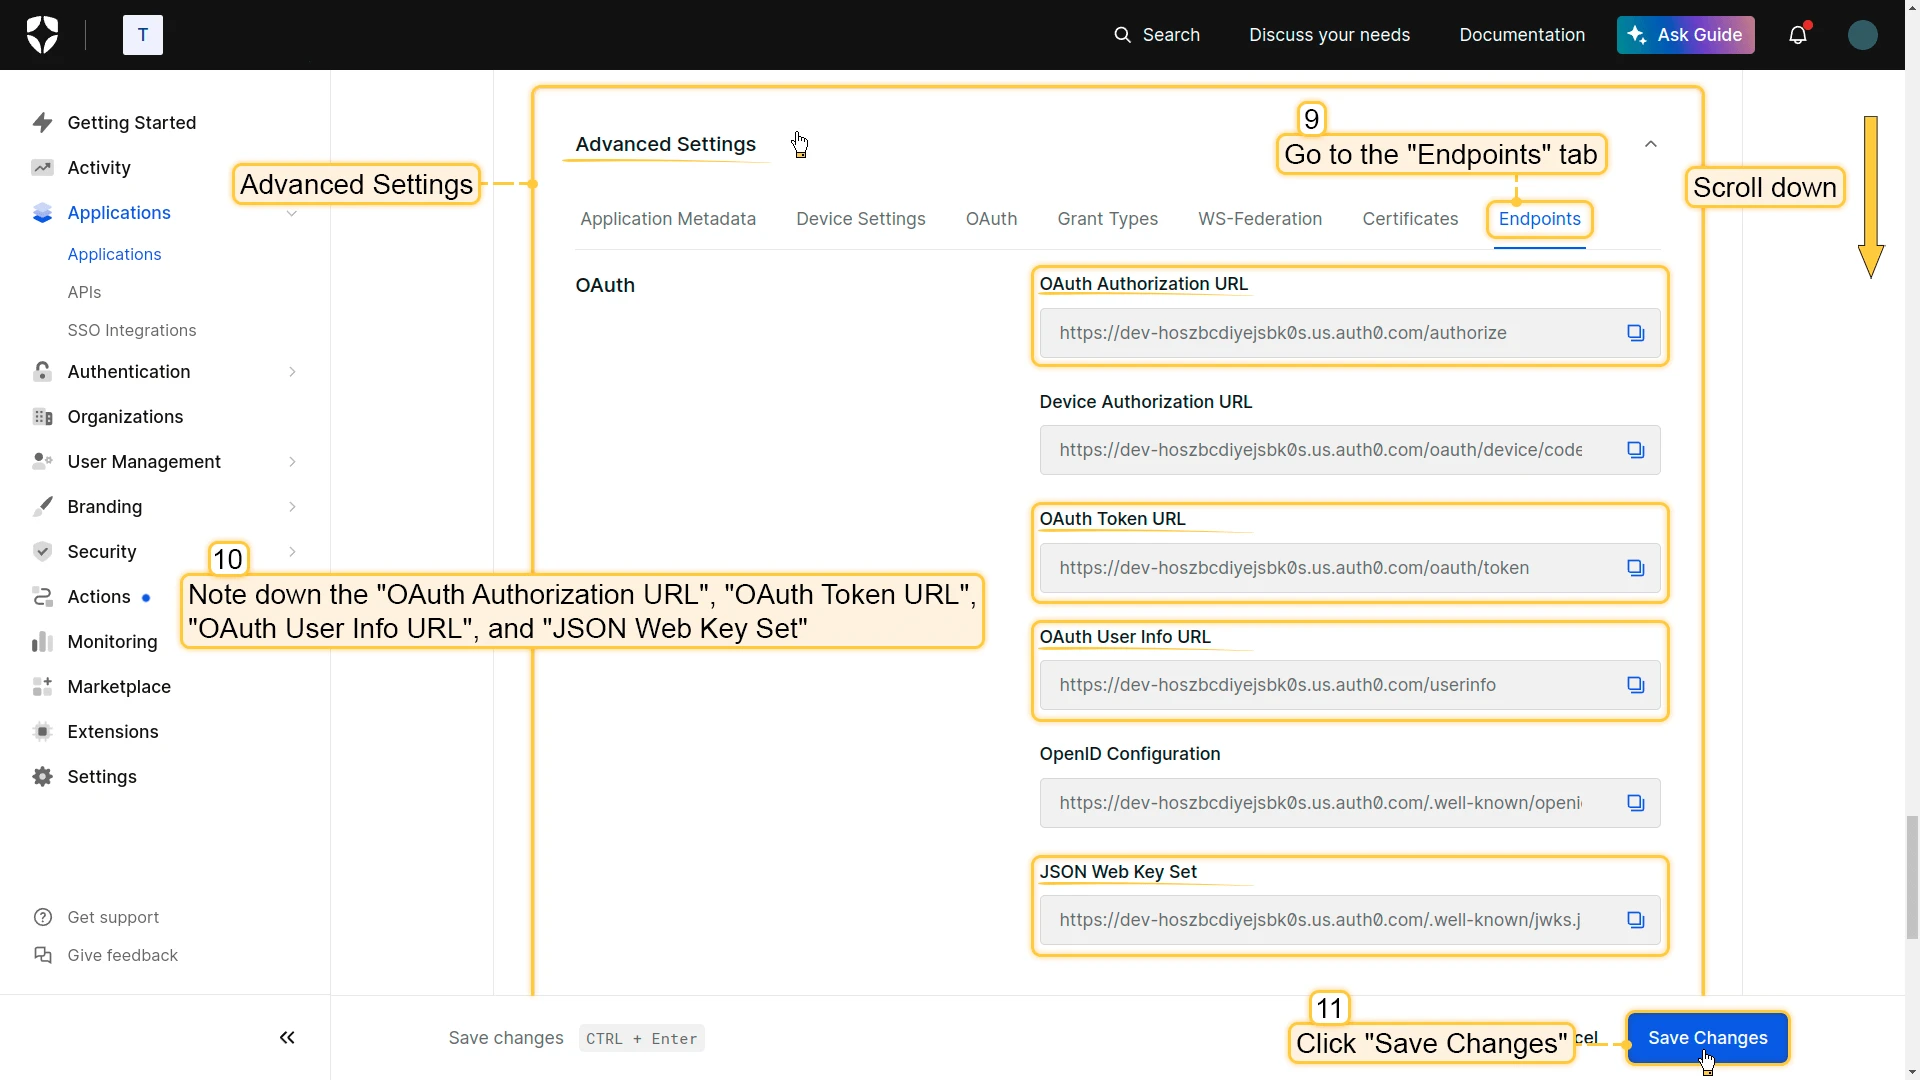
Open Advanced Settings → Endpoints to get the OpenID Connect endpoint URLs for ThingsBoard.


Step 2: Configure ThingsBoard
Section titled “Step 2: Configure ThingsBoard”-
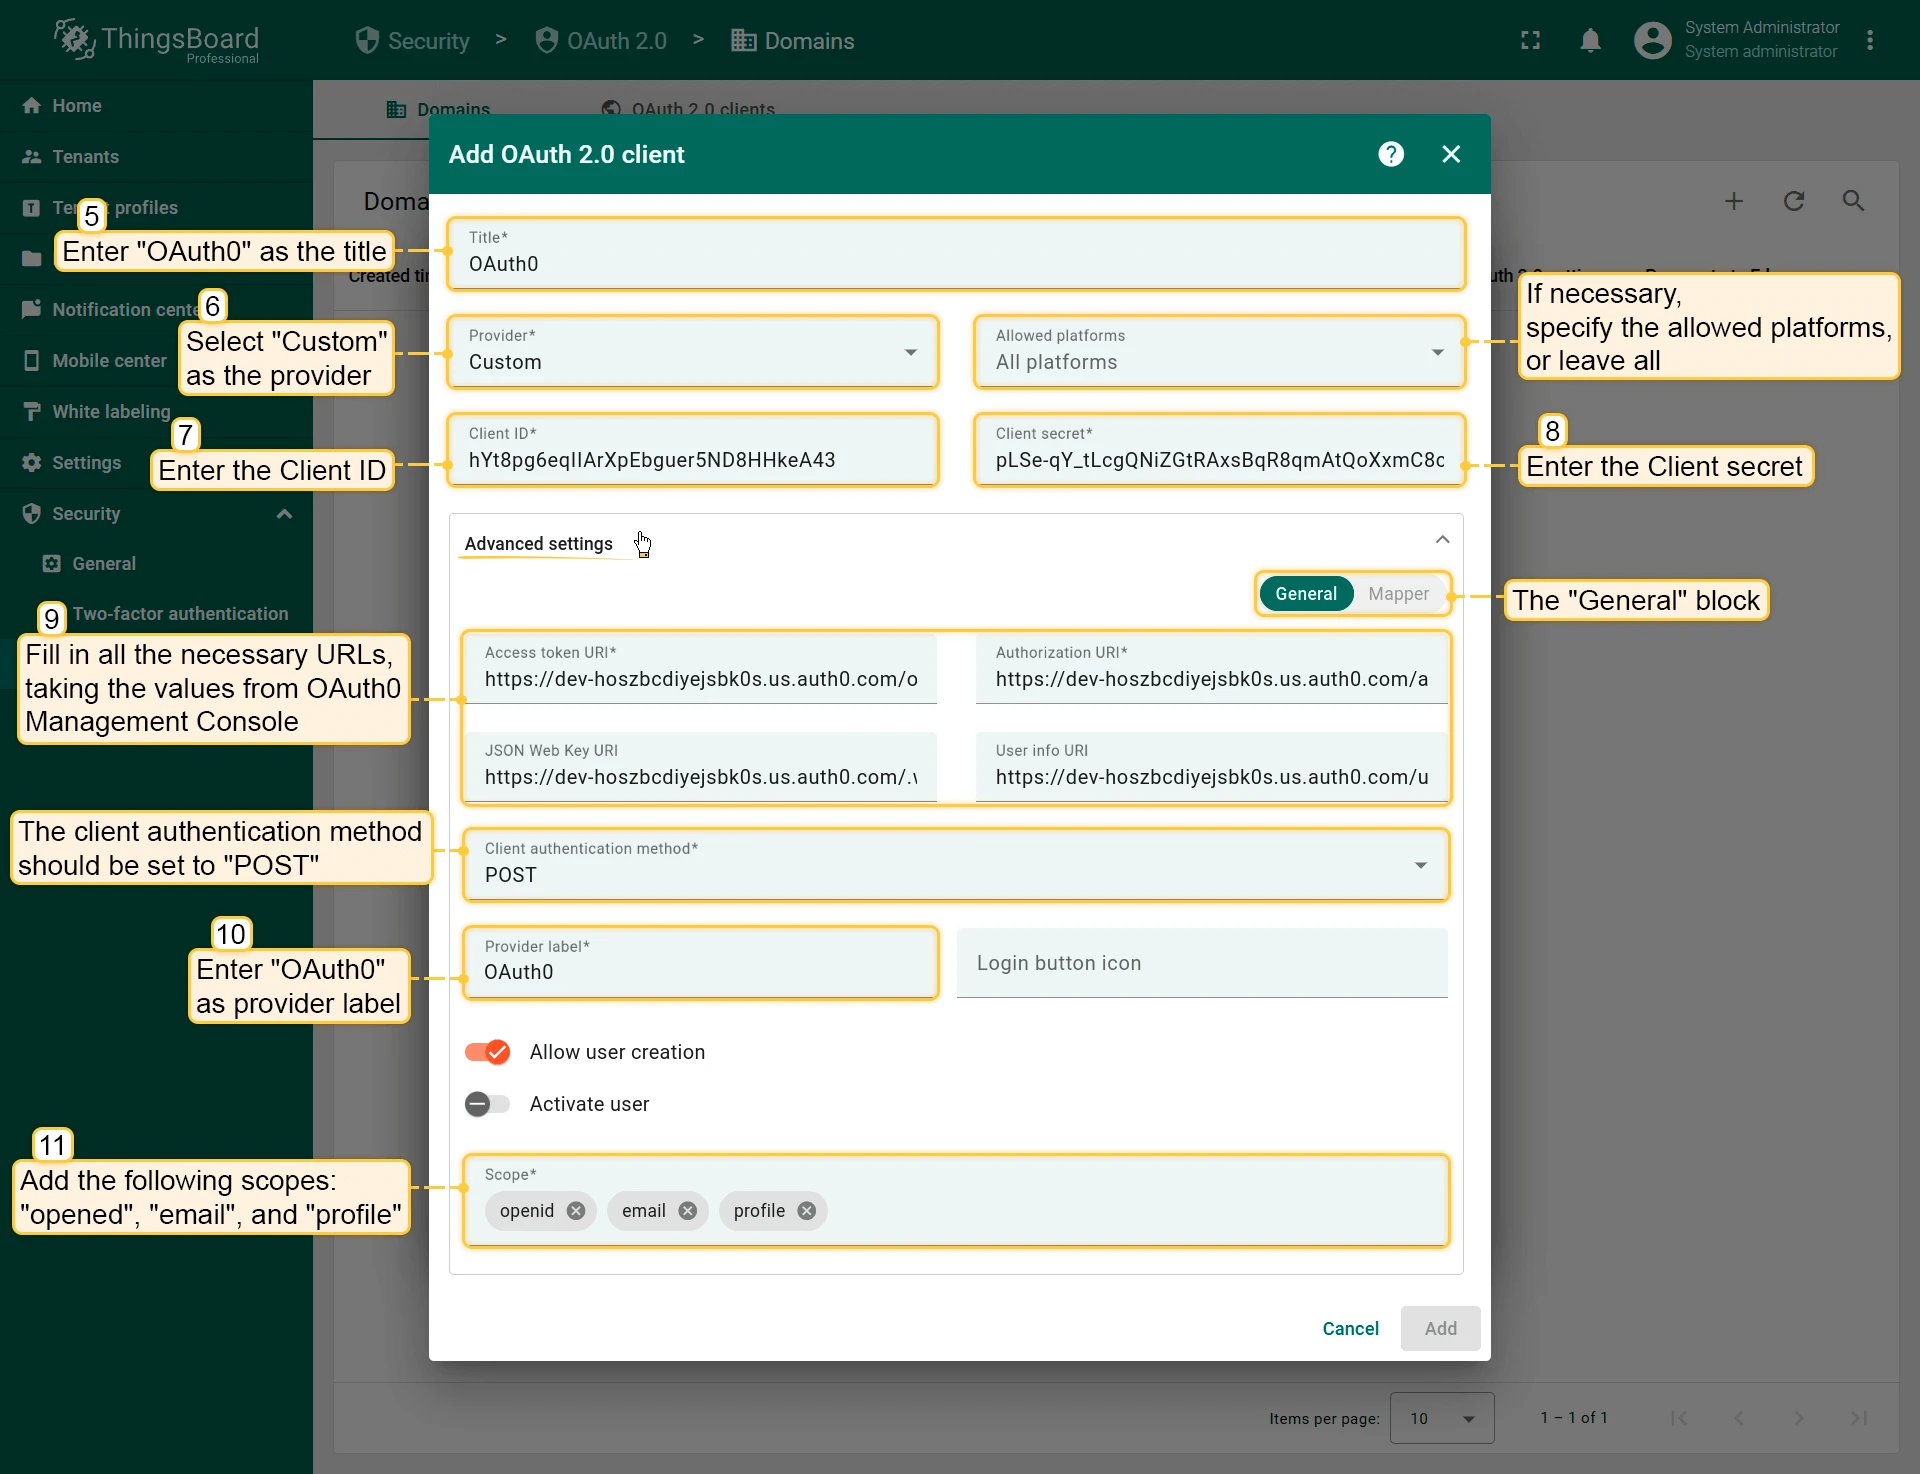
In ThingsBoard, open the domain created in the Google example (or create a new one). In the OAuth 2.0 Clients section, click Create new to add a new client. Set:
- Title:
Auth0 - Provider:
Custom - Client ID and Client Secret: paste the values from Auth0.
- Fill in Access Token URI, Authorization URI, JSON Web Key URI, and User Info URI from Auth0 endpoint settings.
- Client Authentication Method:
POST - Scope:
openid email profile
- Title:
-
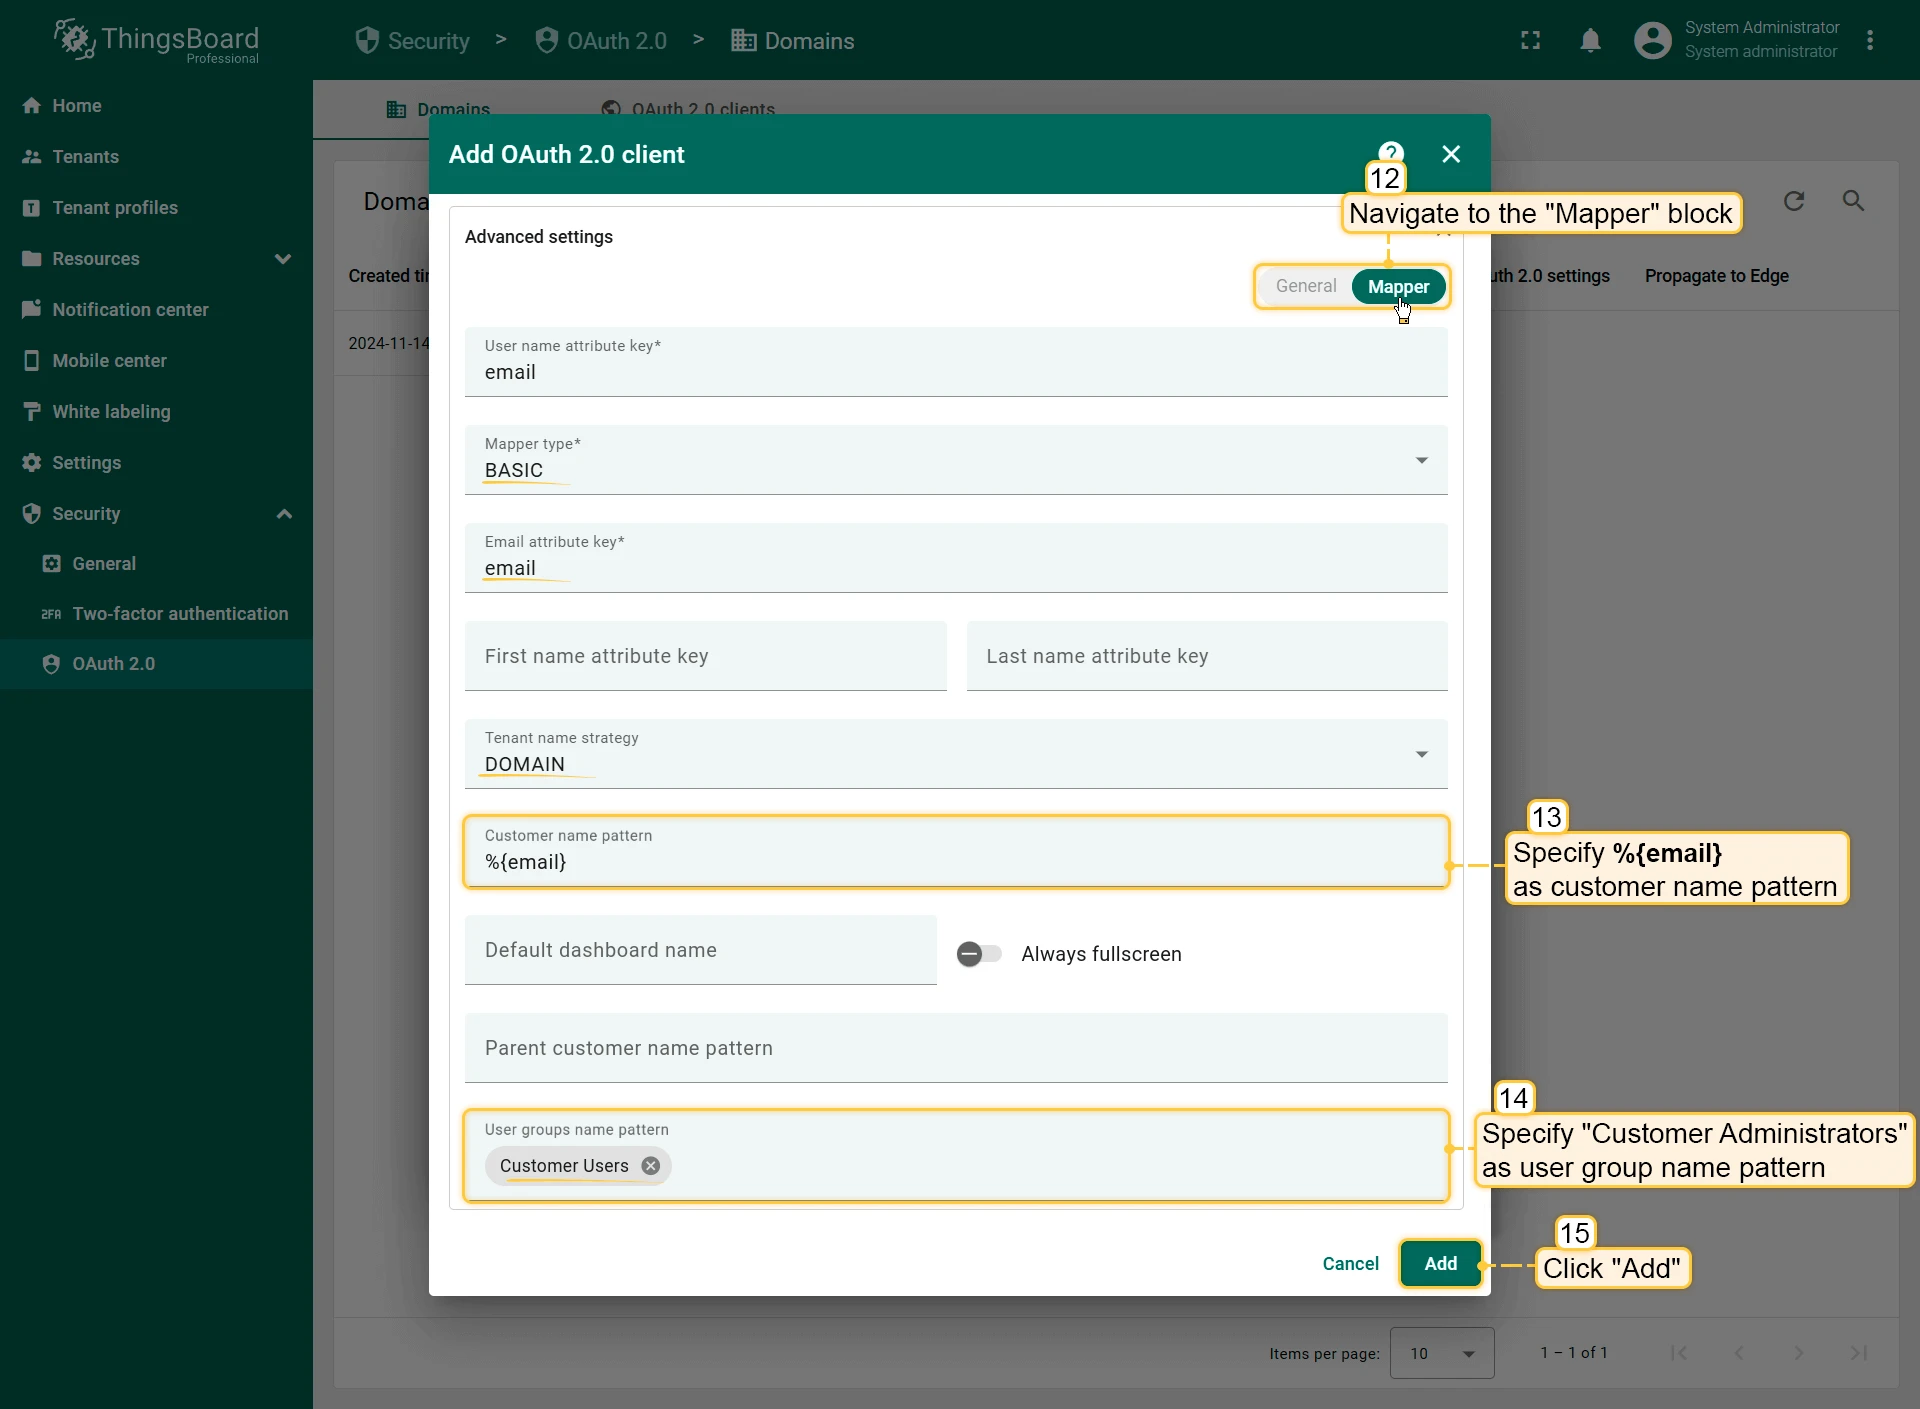
Open the Mapper tab and configure:
- Mapper type:
BASIC - Tenant name strategy:
DOMAIN - Customer name pattern:
%{email}
- Mapper type:
-
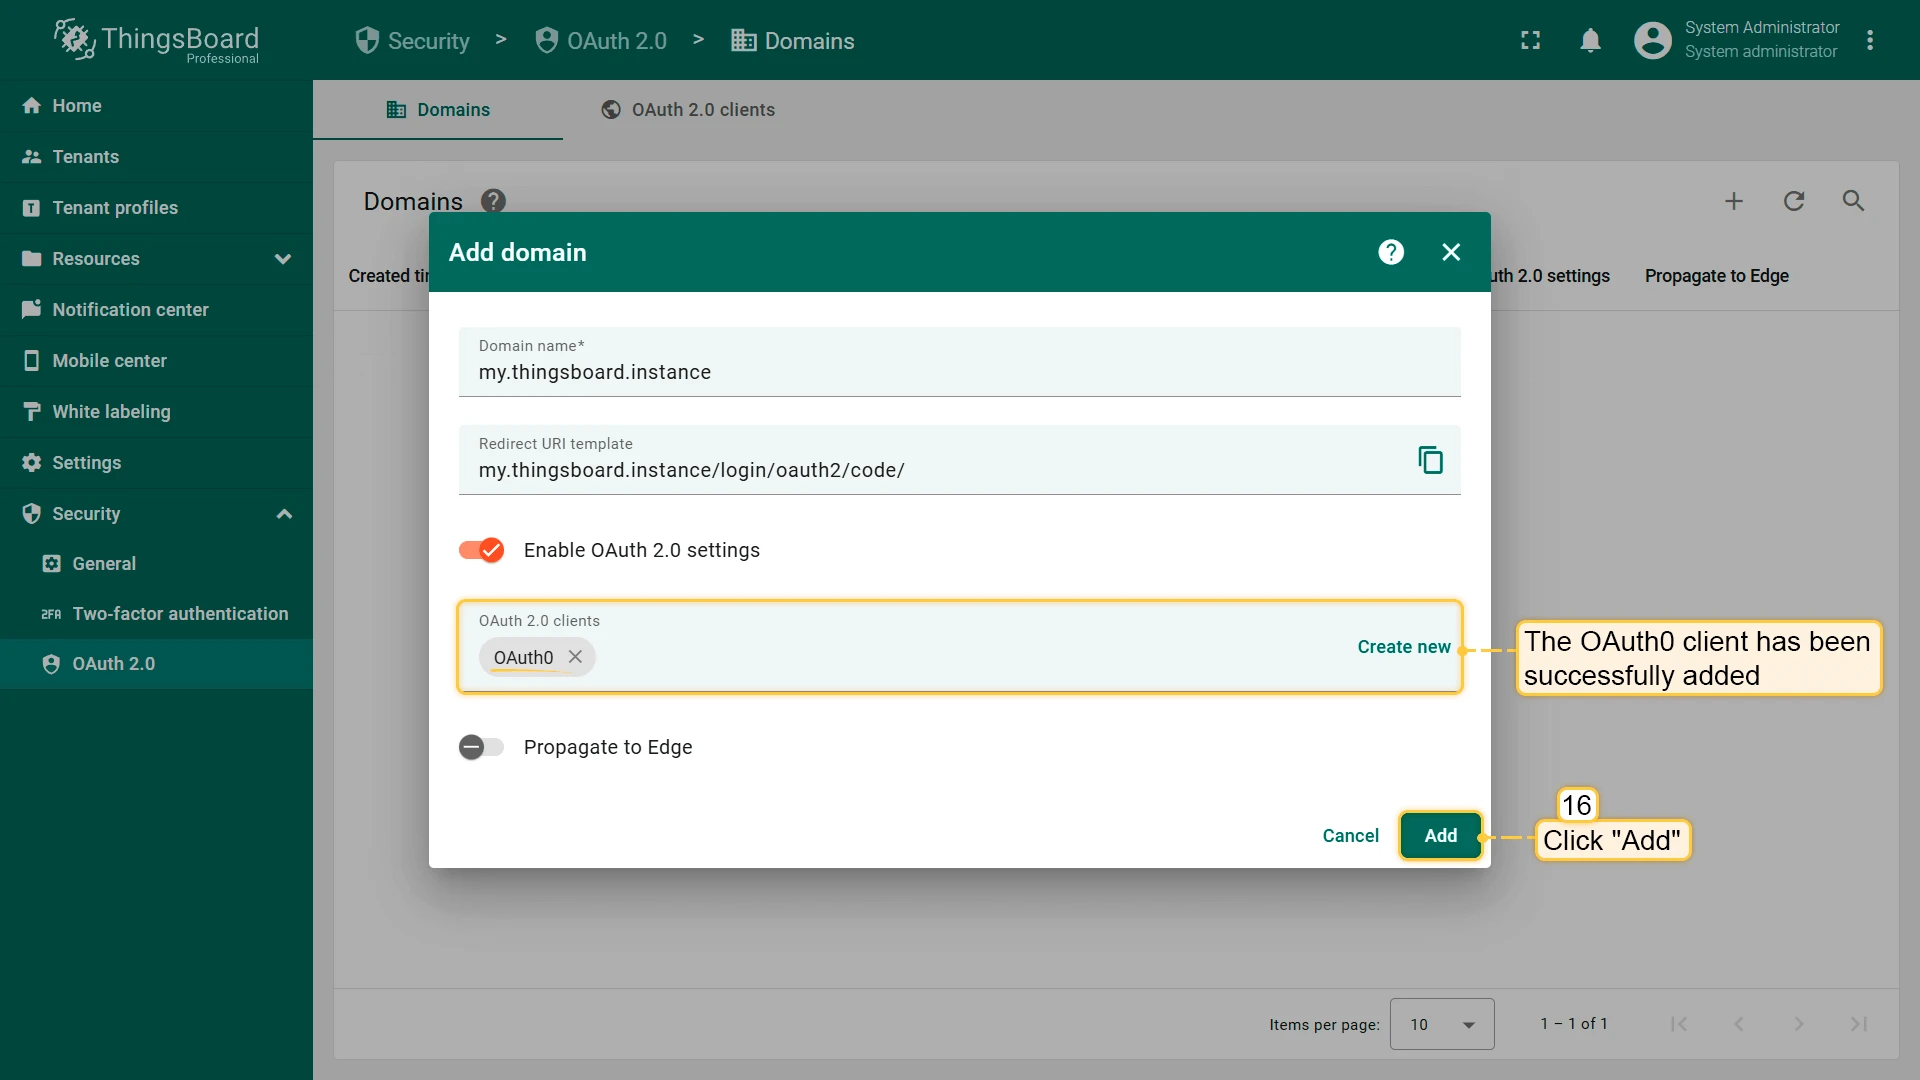
Save the client, then save the domain.

Verify Login
Section titled “Verify Login”Navigate to your ThingsBoard login page. Both Login with Google and Login with Auth0 buttons should now appear.


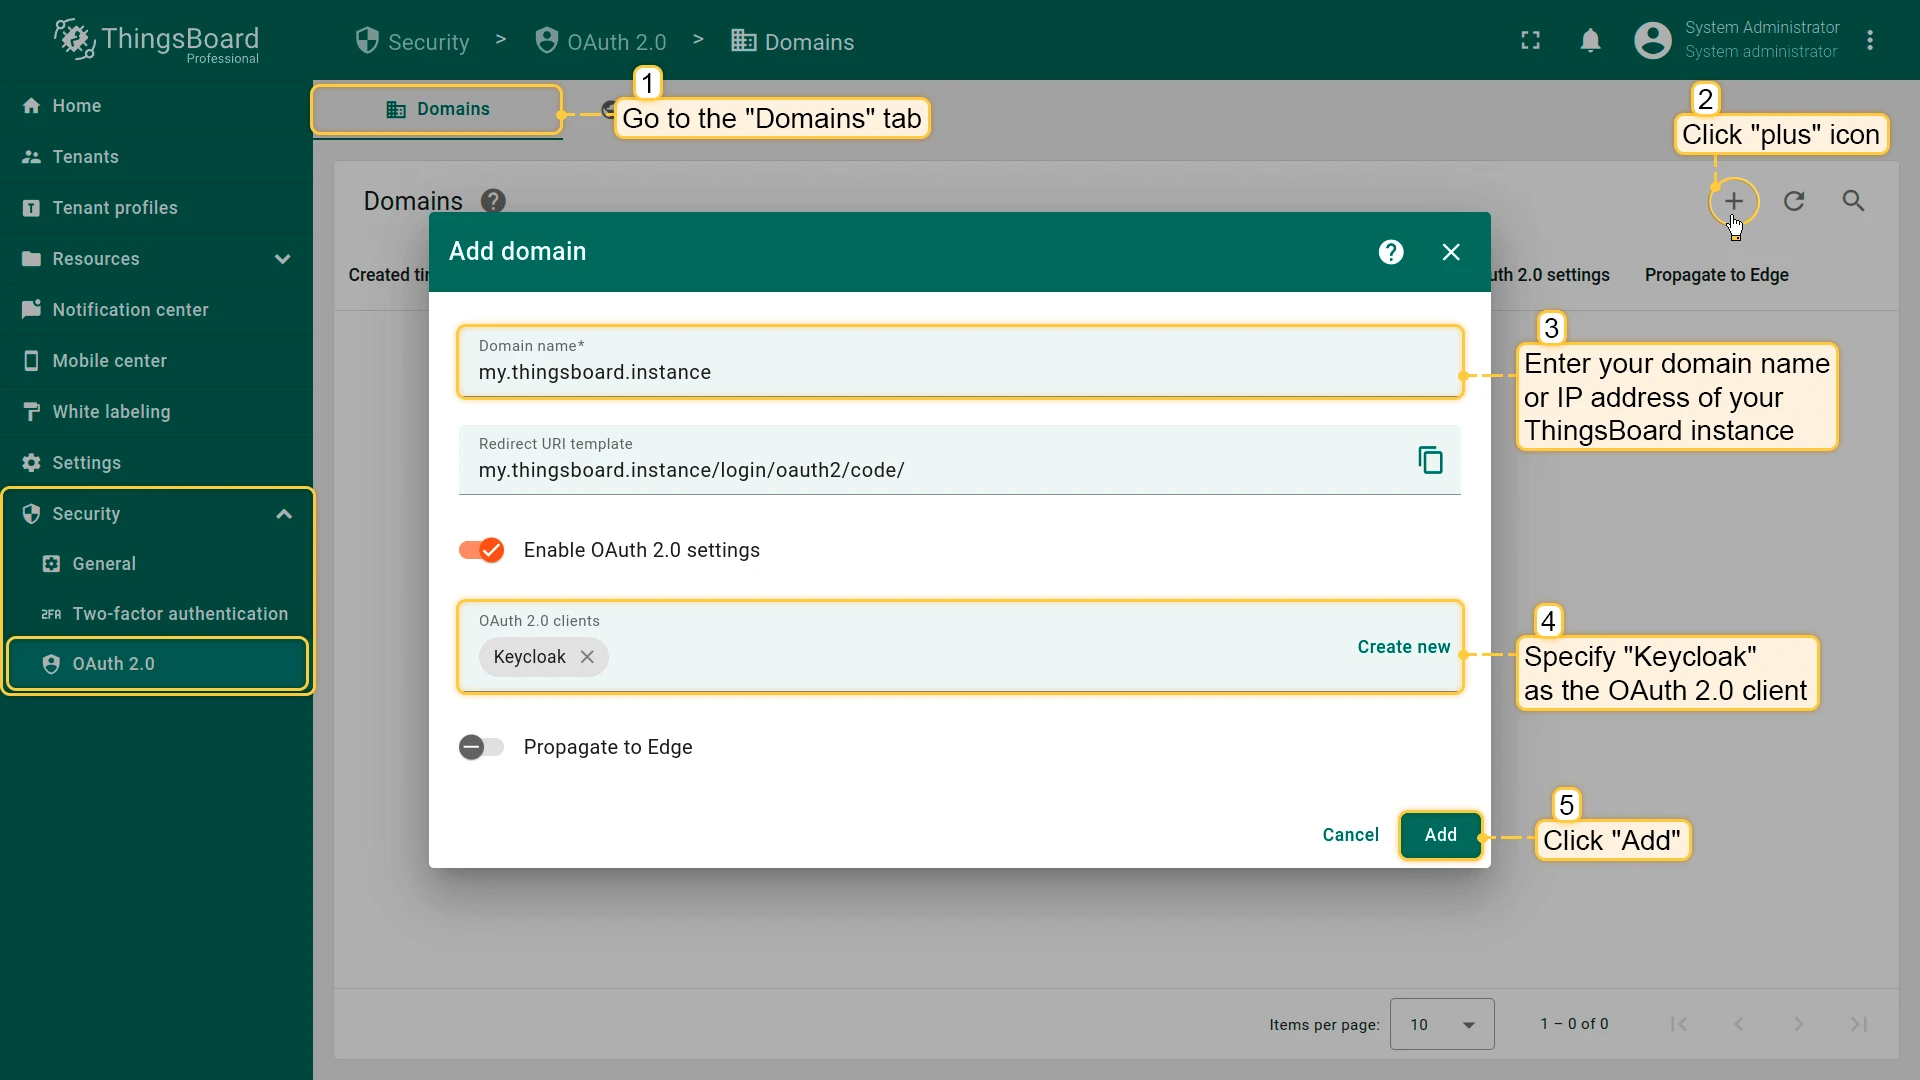
Login with Keycloak
Section titled “Login with Keycloak”This example uses a self-hosted Keycloak instance as an identity provider.
Step 1: Start Keycloak
Section titled “Step 1: Start Keycloak”-
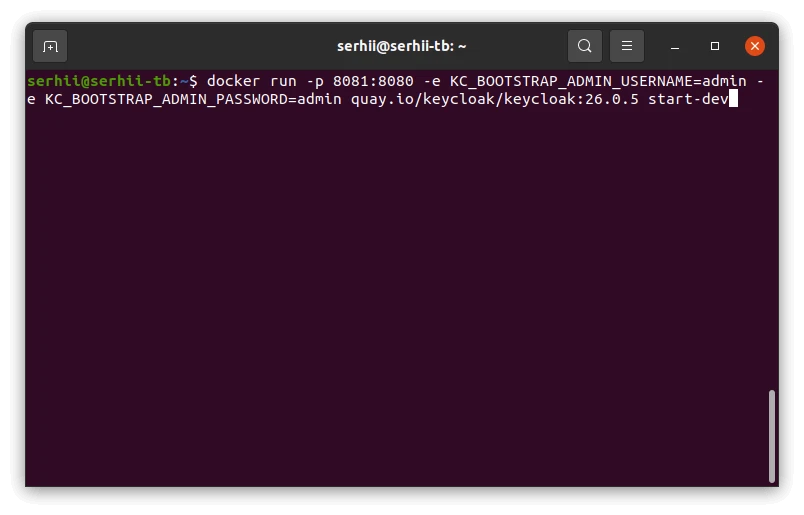
Start Keycloak using Docker:
Terminal window docker run -p 8081:8080 -e KC_BOOTSTRAP_ADMIN_USERNAME=admin -e KC_BOOTSTRAP_ADMIN_PASSWORD=admin quay.io/keycloak/keycloak:26.0.5 start-dev
Step 2: Log In to the Admin Console
Section titled “Step 2: Log In to the Admin Console”-
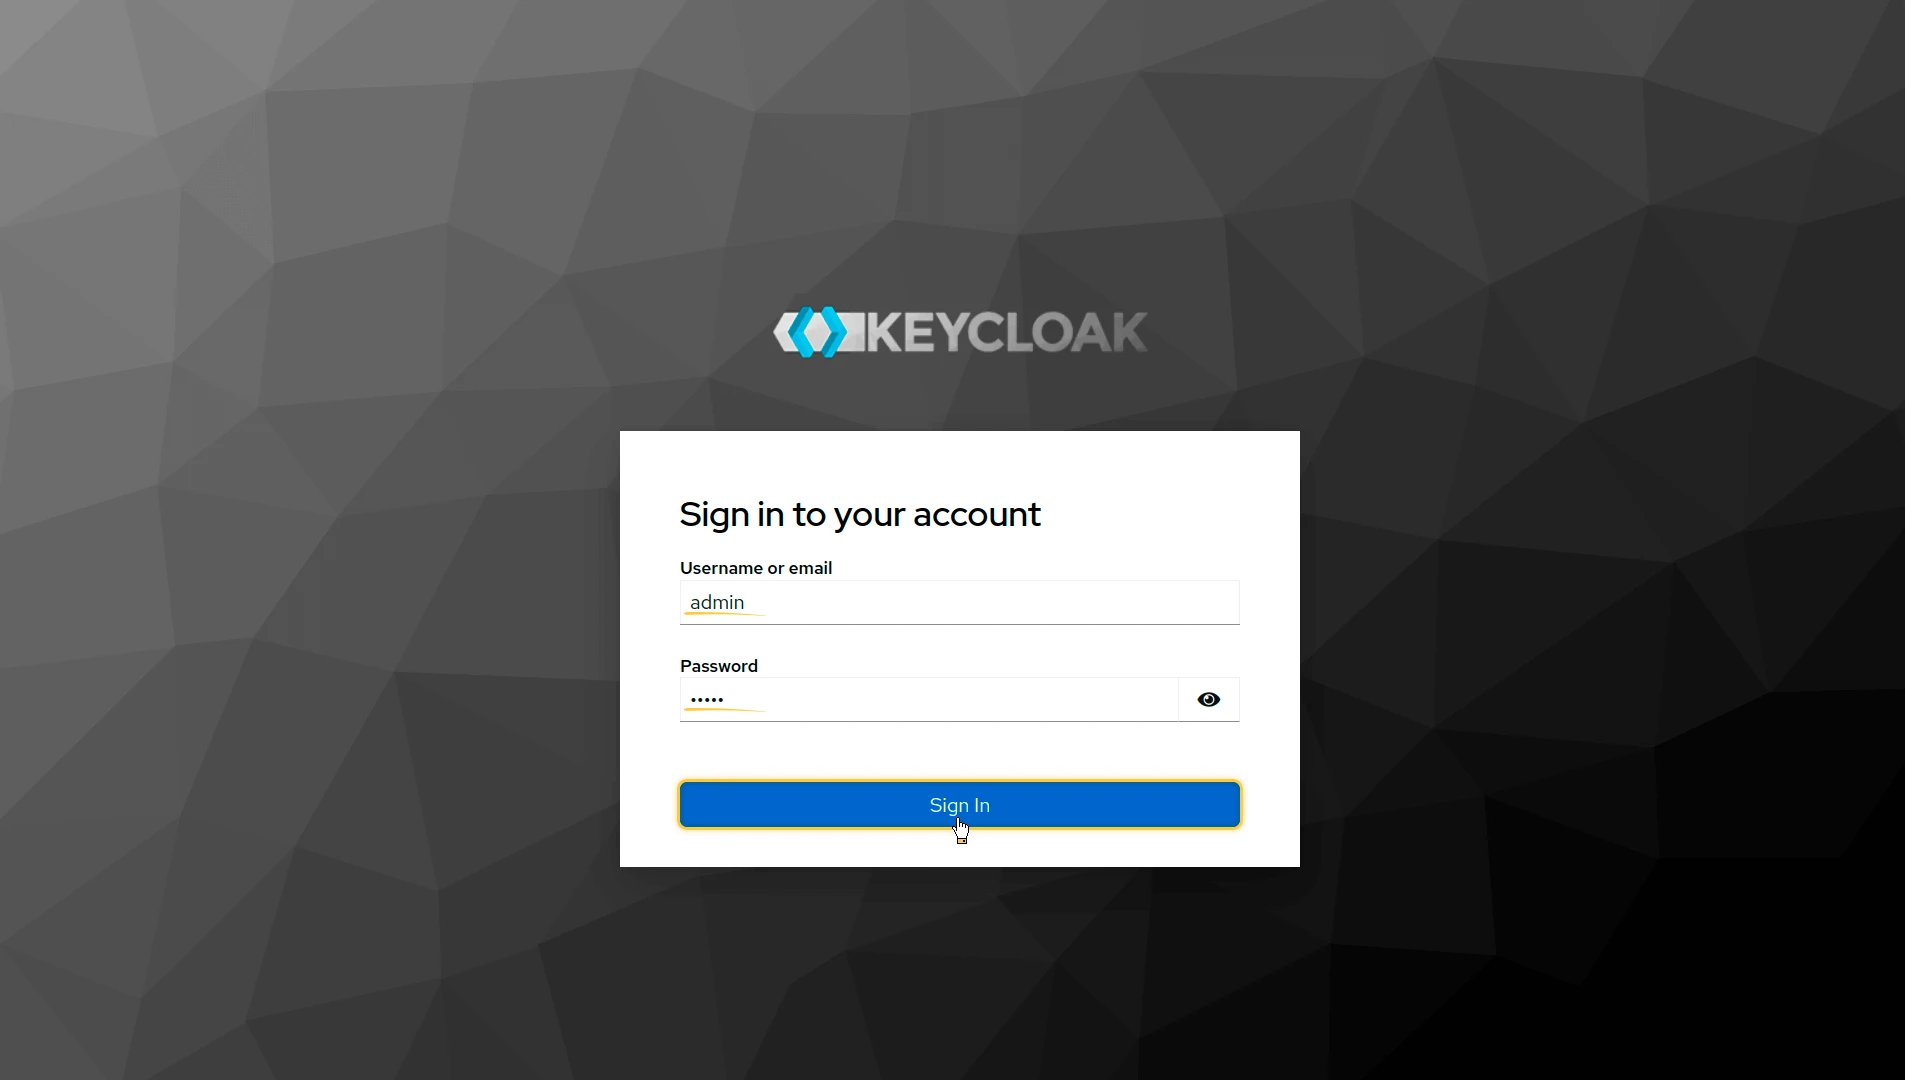
Open
http://localhost:8081/adminand log in withadmin/admin.
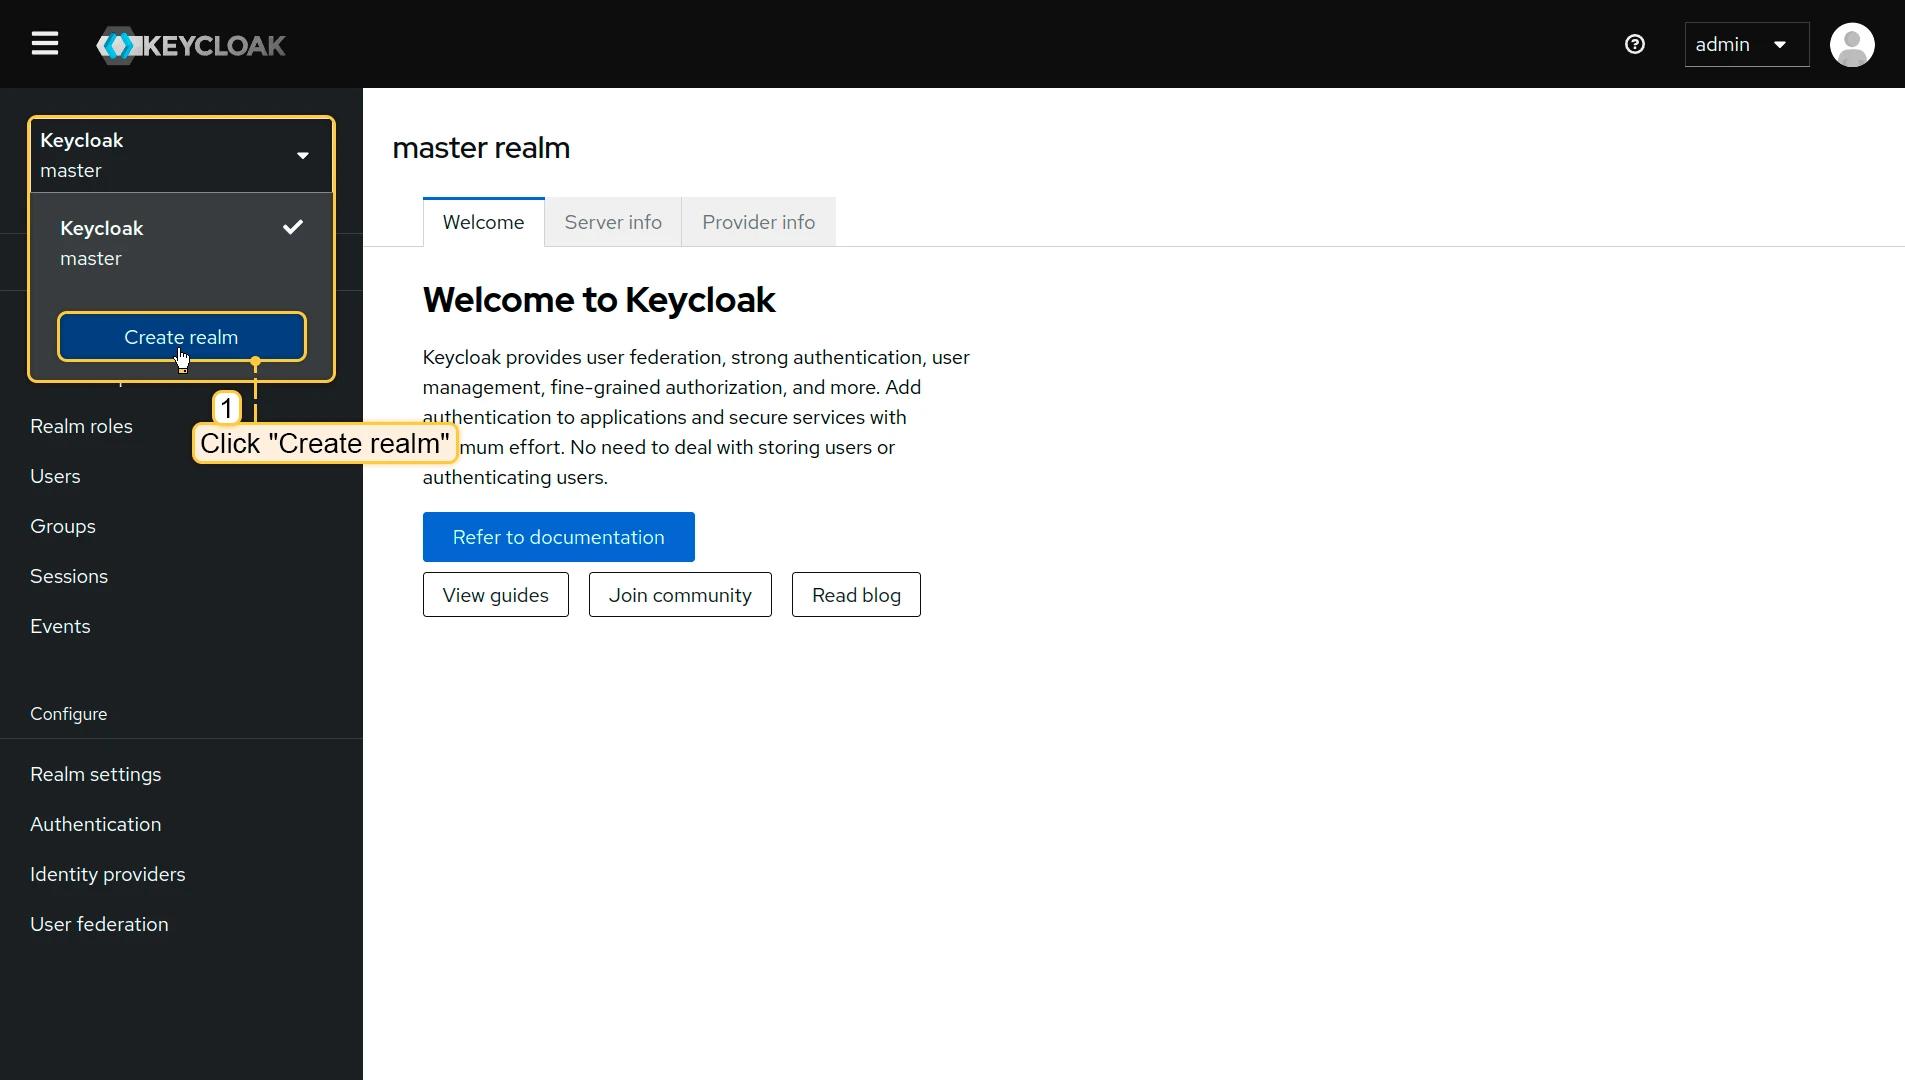
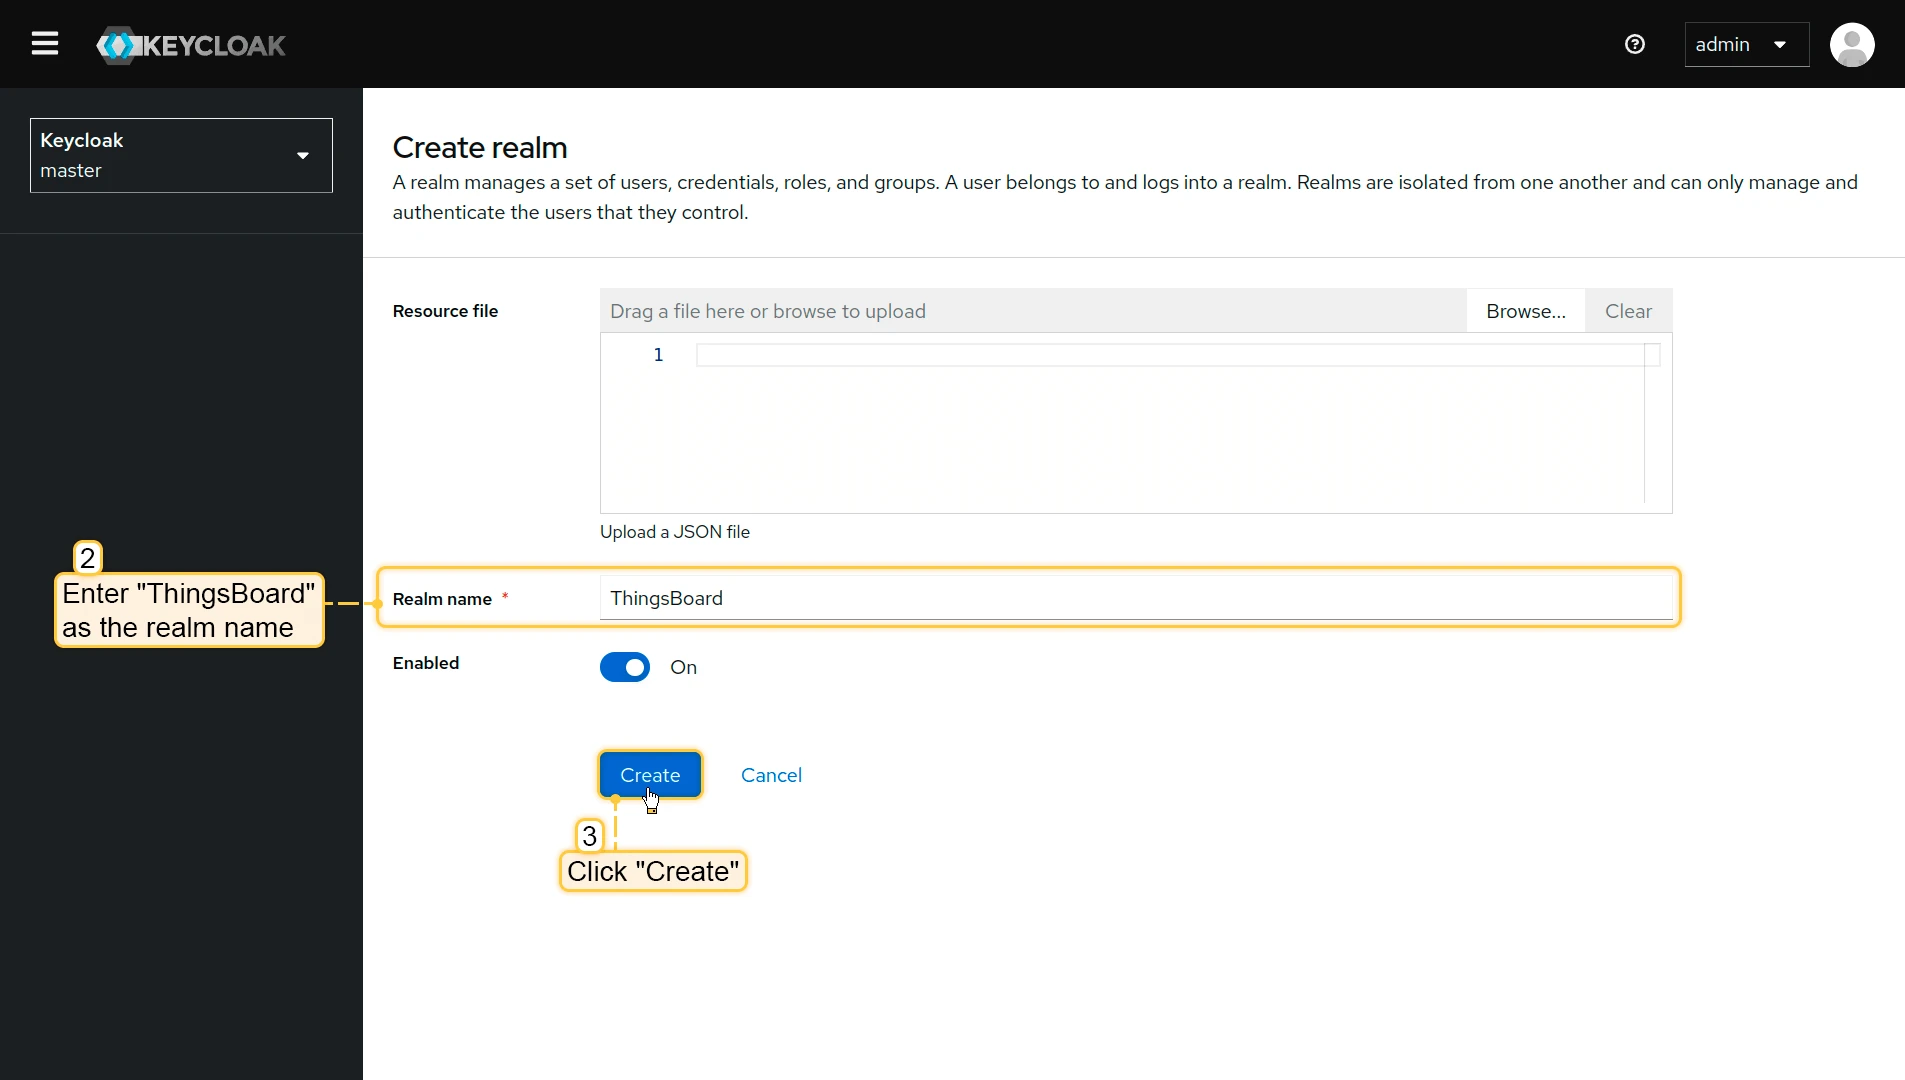
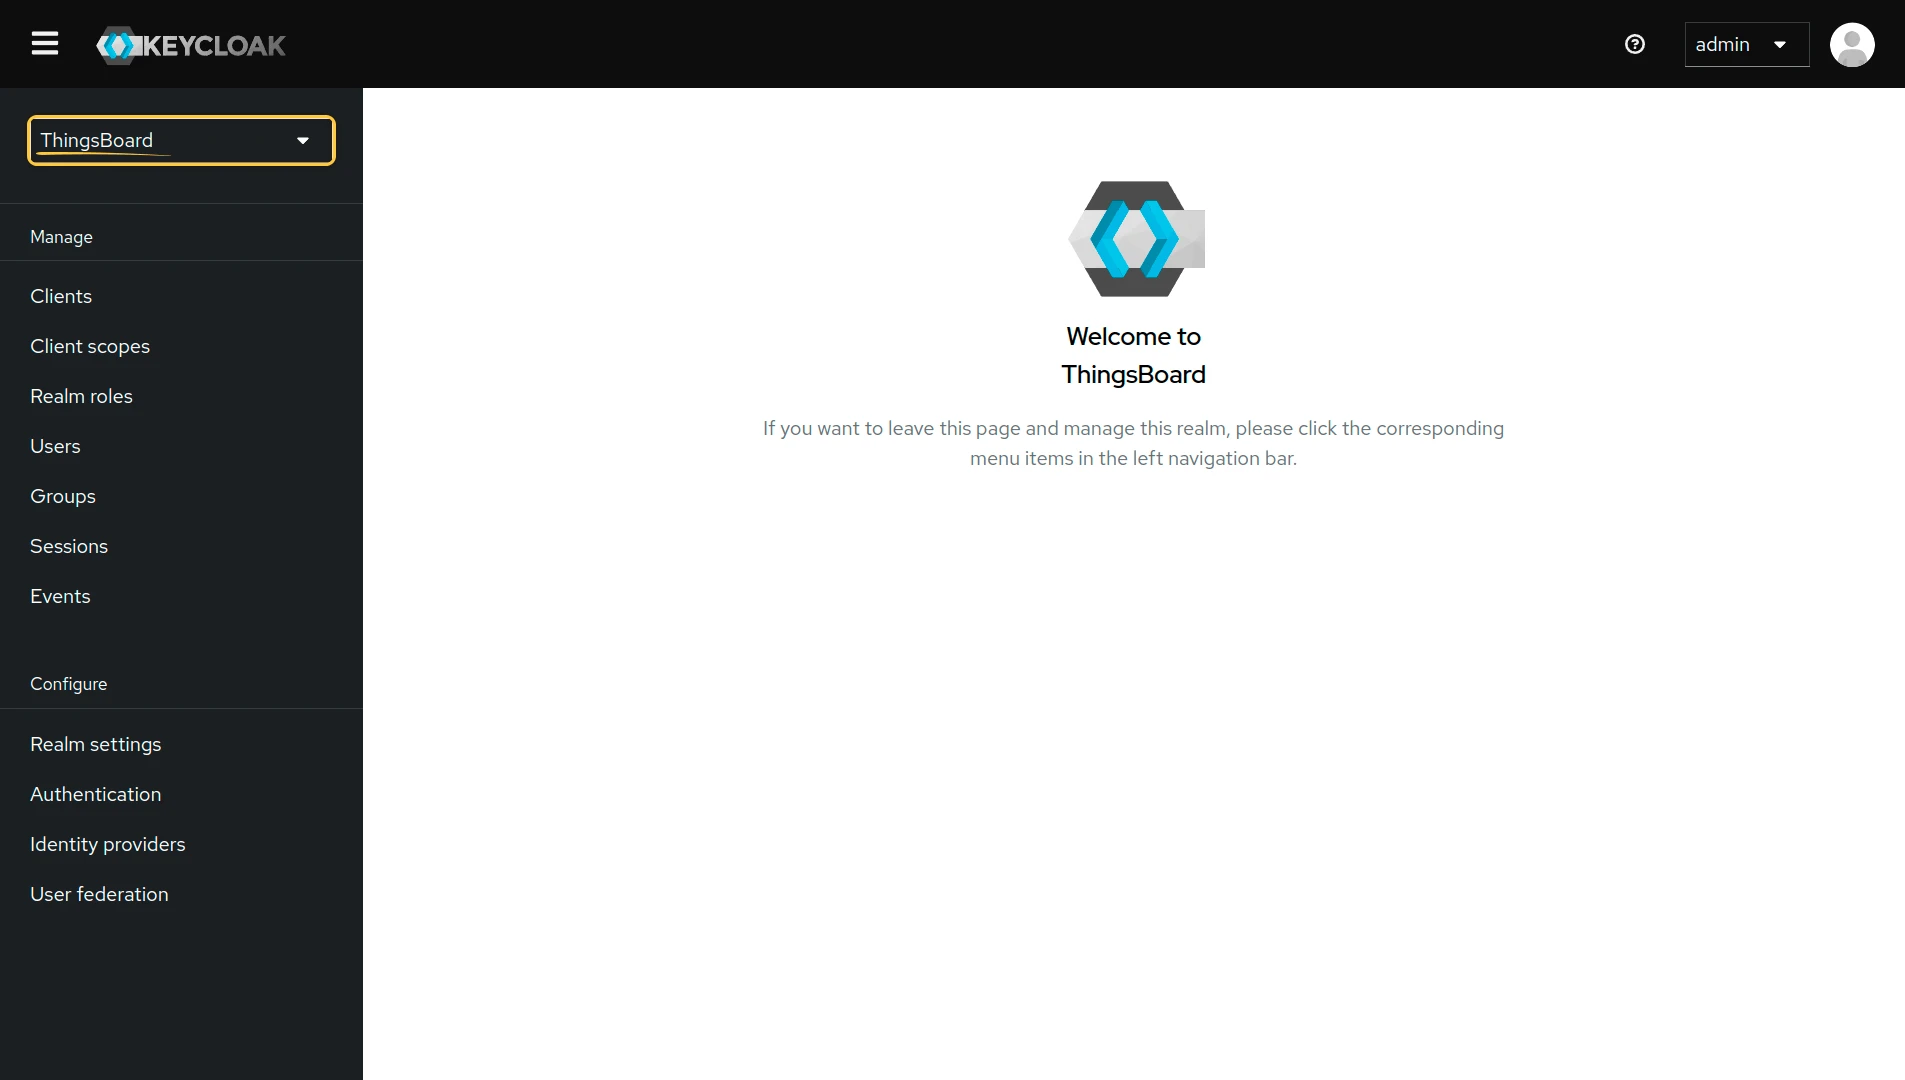
Step 3: Create a Realm
Section titled “Step 3: Create a Realm”-
In the top-left dropdown, click Create realm.

-
Enter
ThingsBoardas the realm name and click Create.
Step 4: Create a Client
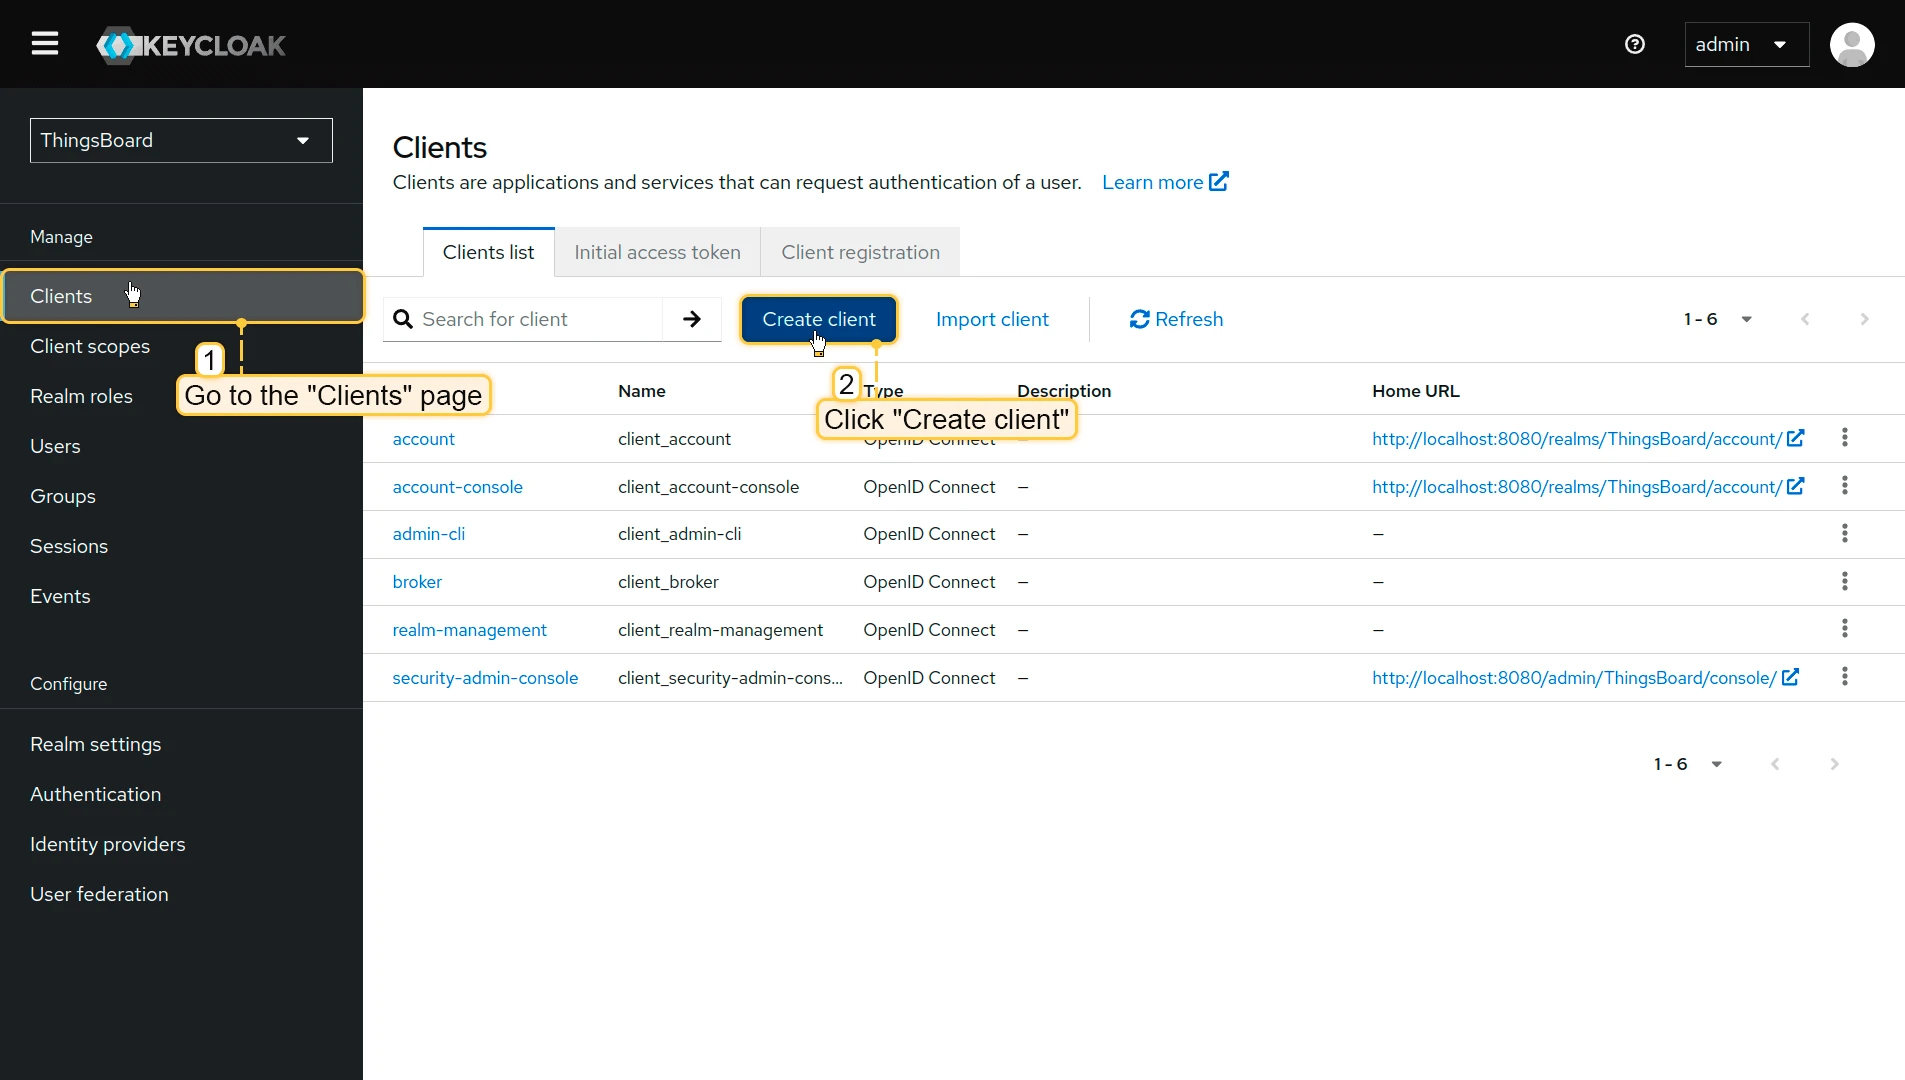
Section titled “Step 4: Create a Client”-
Navigate to Clients and click Create client.

-
Set Client type to
OpenID Connectand enterthingsboardas the Client ID. Click Next.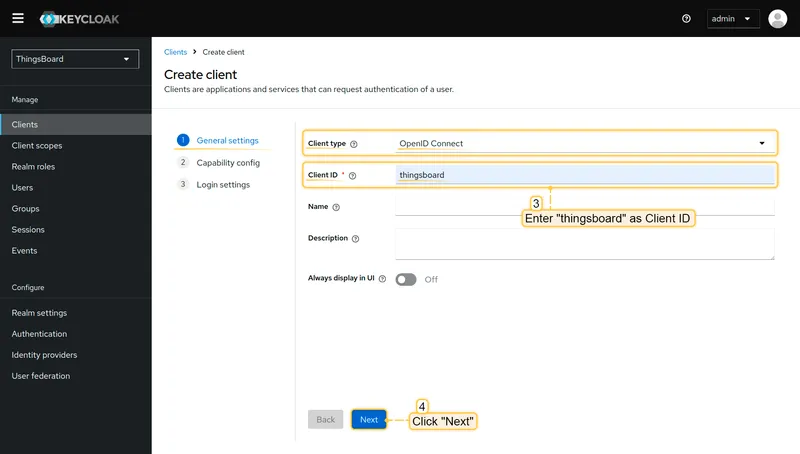
-
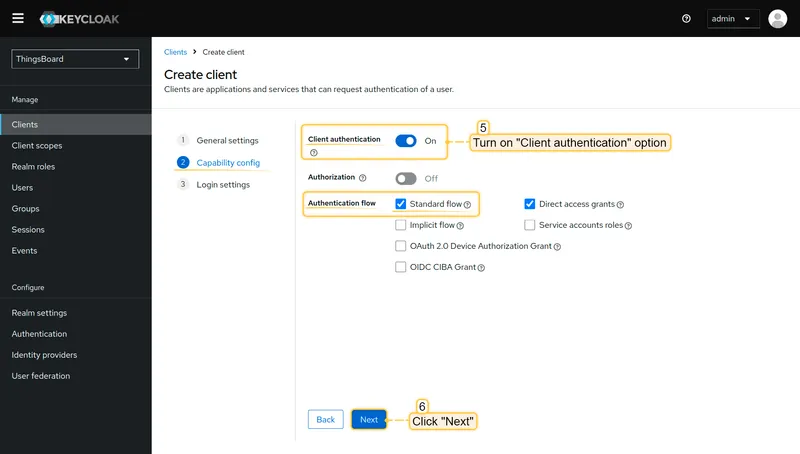
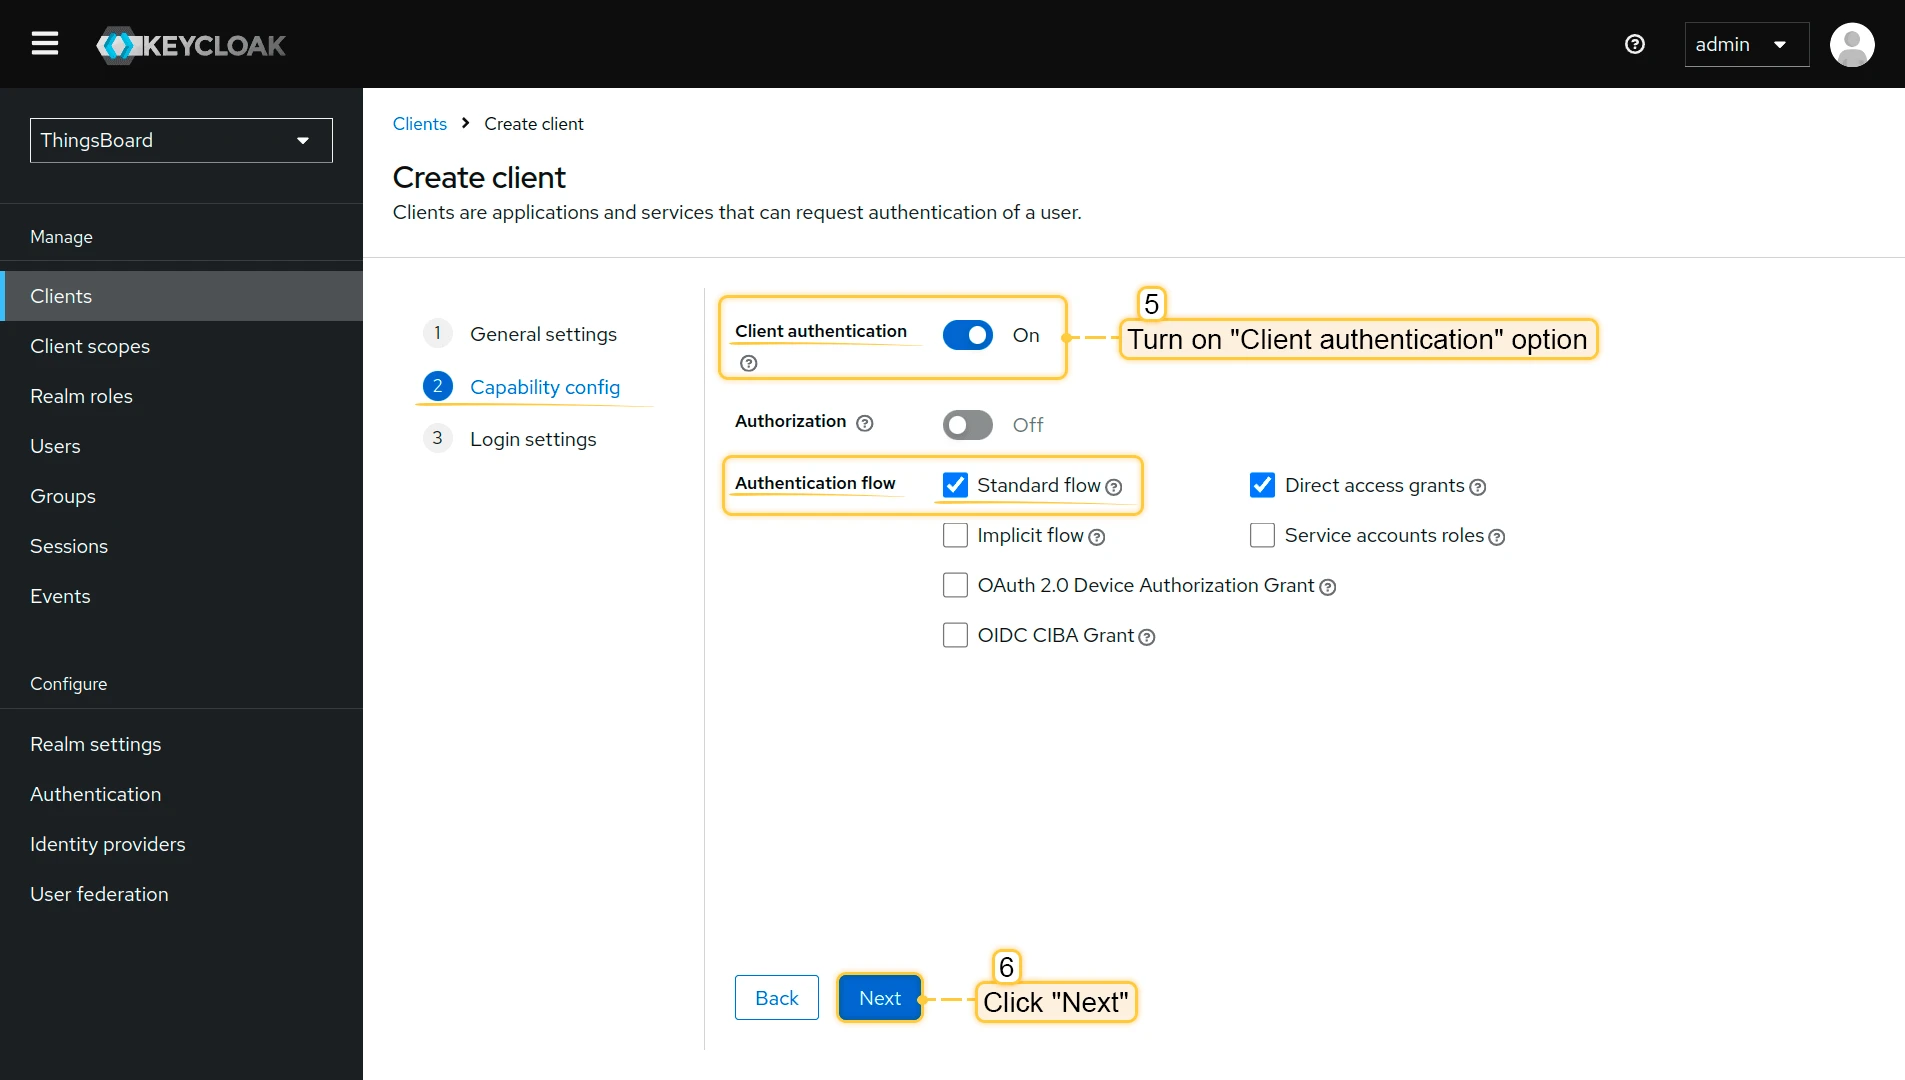
Enable Client authentication and ensure Standard flow is checked. Click Next.
-
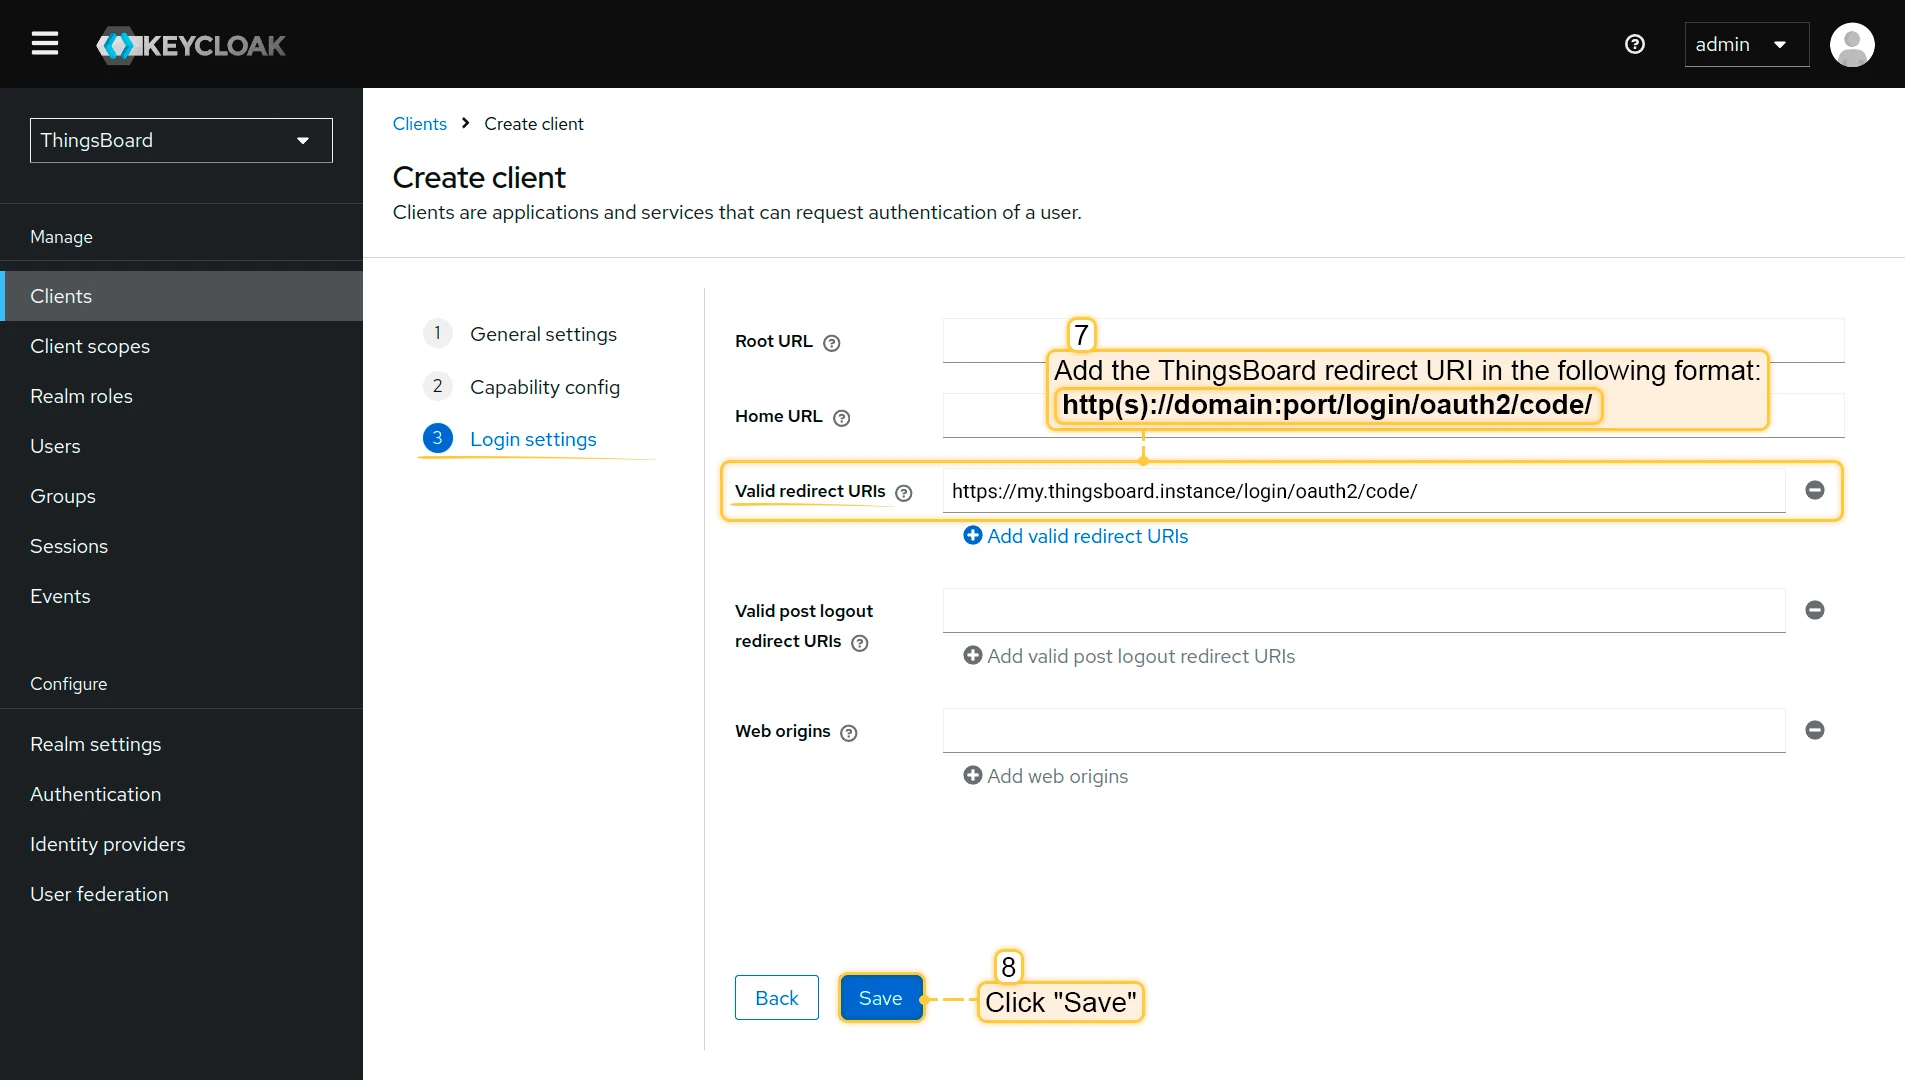
Under Login settings, add your ThingsBoard redirect URI to Valid redirect URIs:
http(s)://$DOMAIN:$PORT/login/oauth2/code/Click Save.

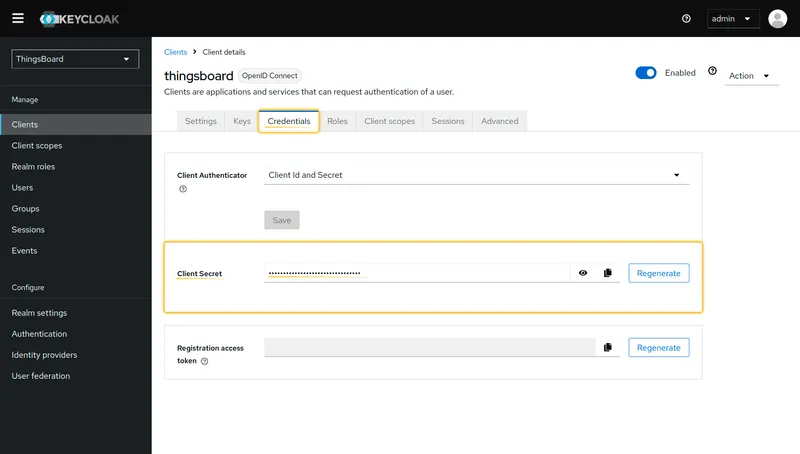
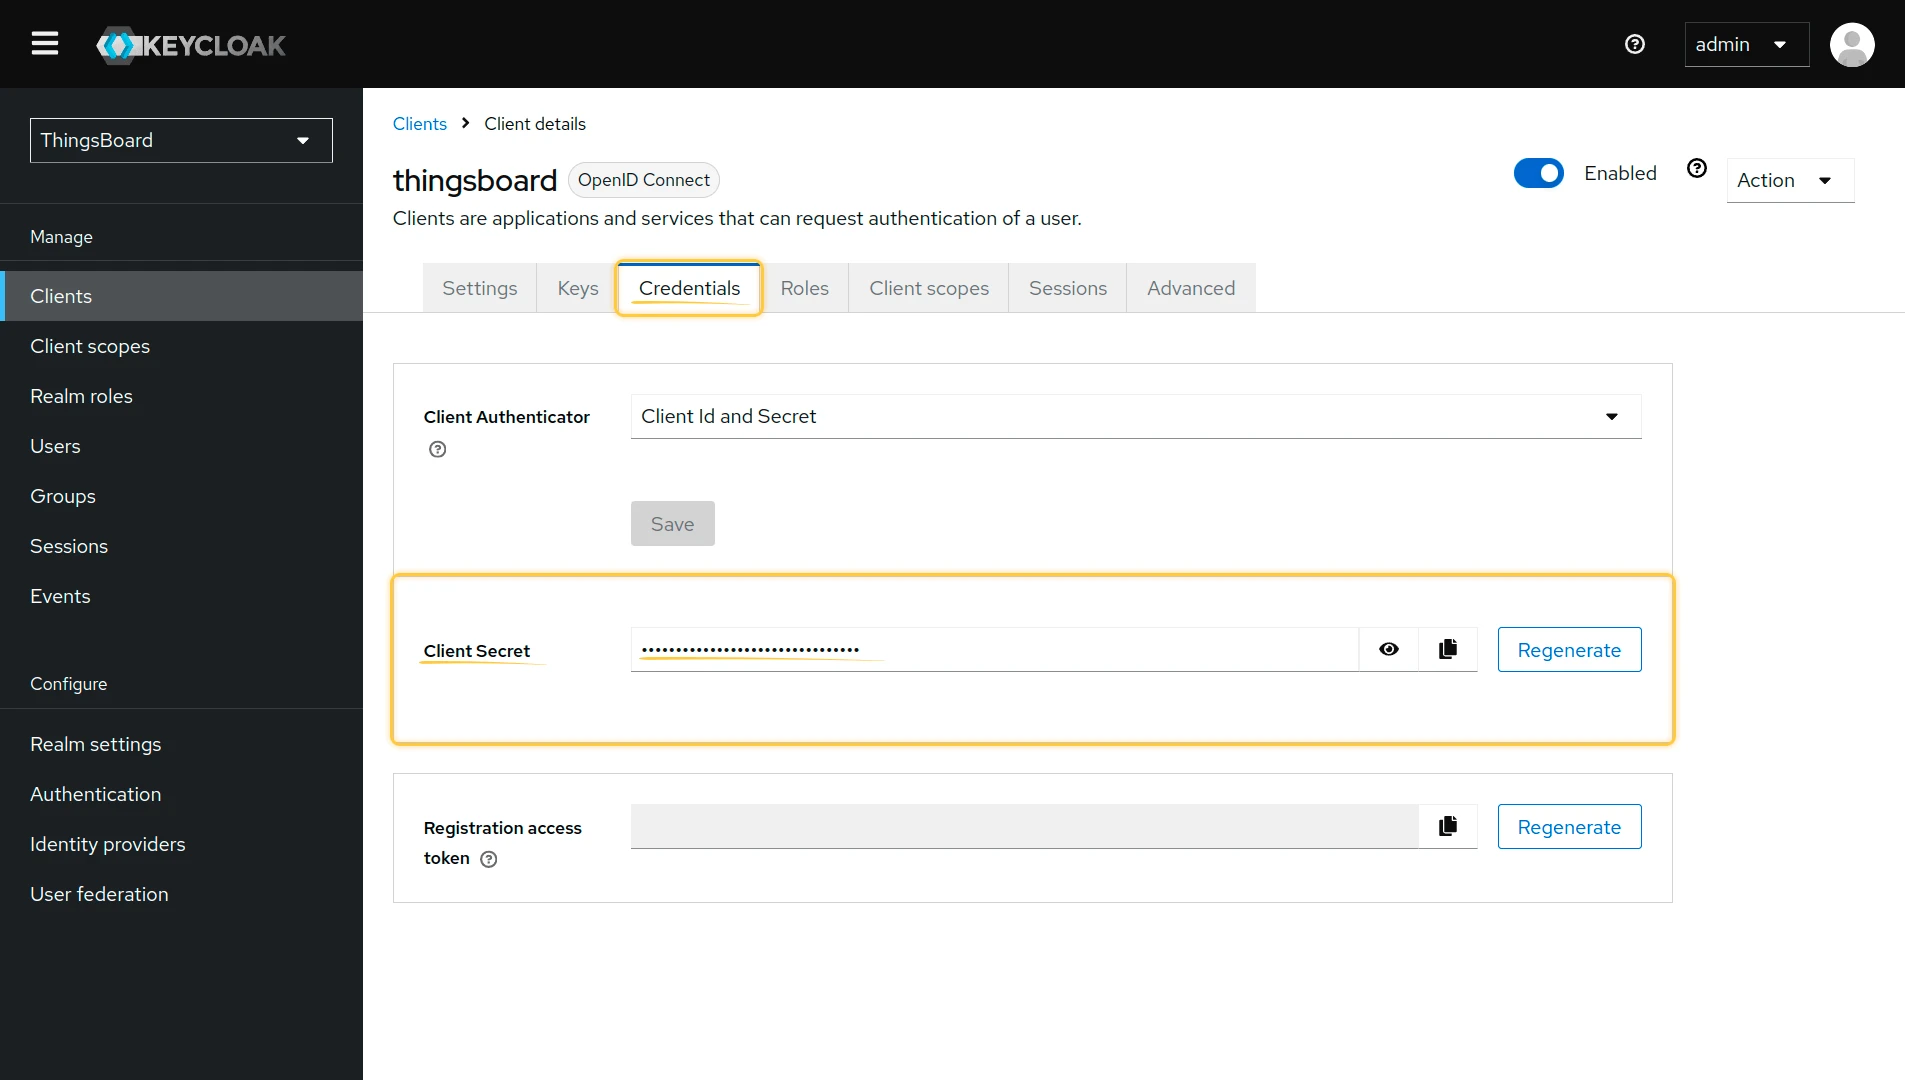
Step 5: Get Client Credentials
Section titled “Step 5: Get Client Credentials”-
Open the client’s Settings tab and copy the Client ID.

-
Open the Credentials tab and copy the Client Secret.
Step 6: Get OpenID Endpoint Configuration
Section titled “Step 6: Get OpenID Endpoint Configuration”-
Navigate to Realm settings and click the OpenID Endpoint Configuration link.
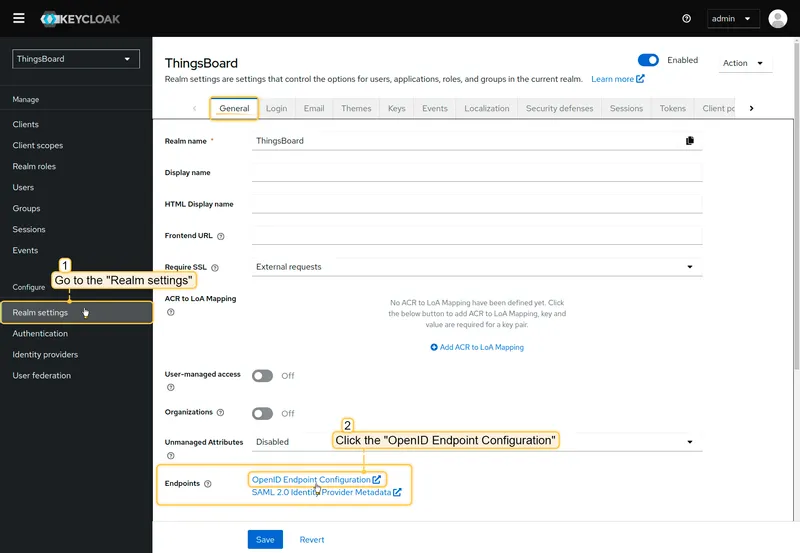
-
Enable the Pretty-print toggle for better readability, then copy the values of
token_endpoint,authorization_endpoint,jwks_uri, anduserinfo_endpoint.

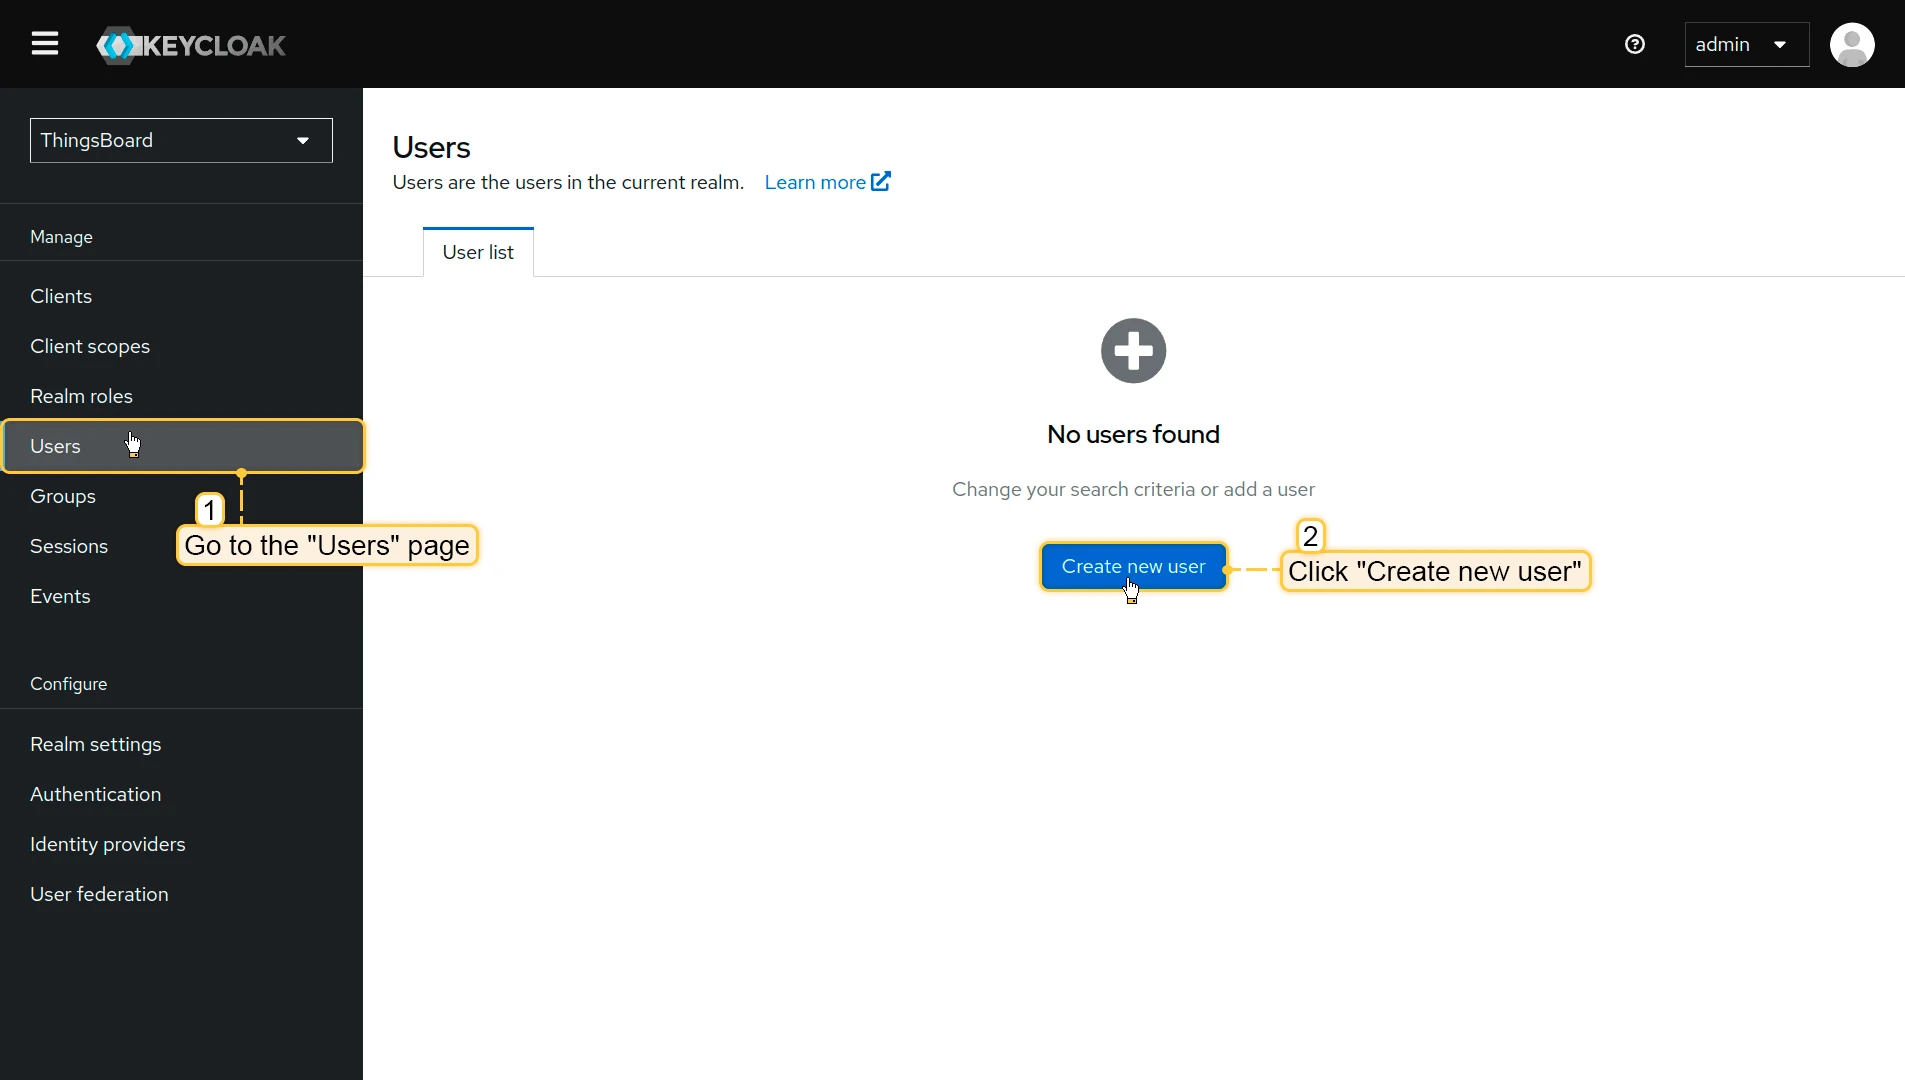
Step 7: Create a Test User
Section titled “Step 7: Create a Test User”-
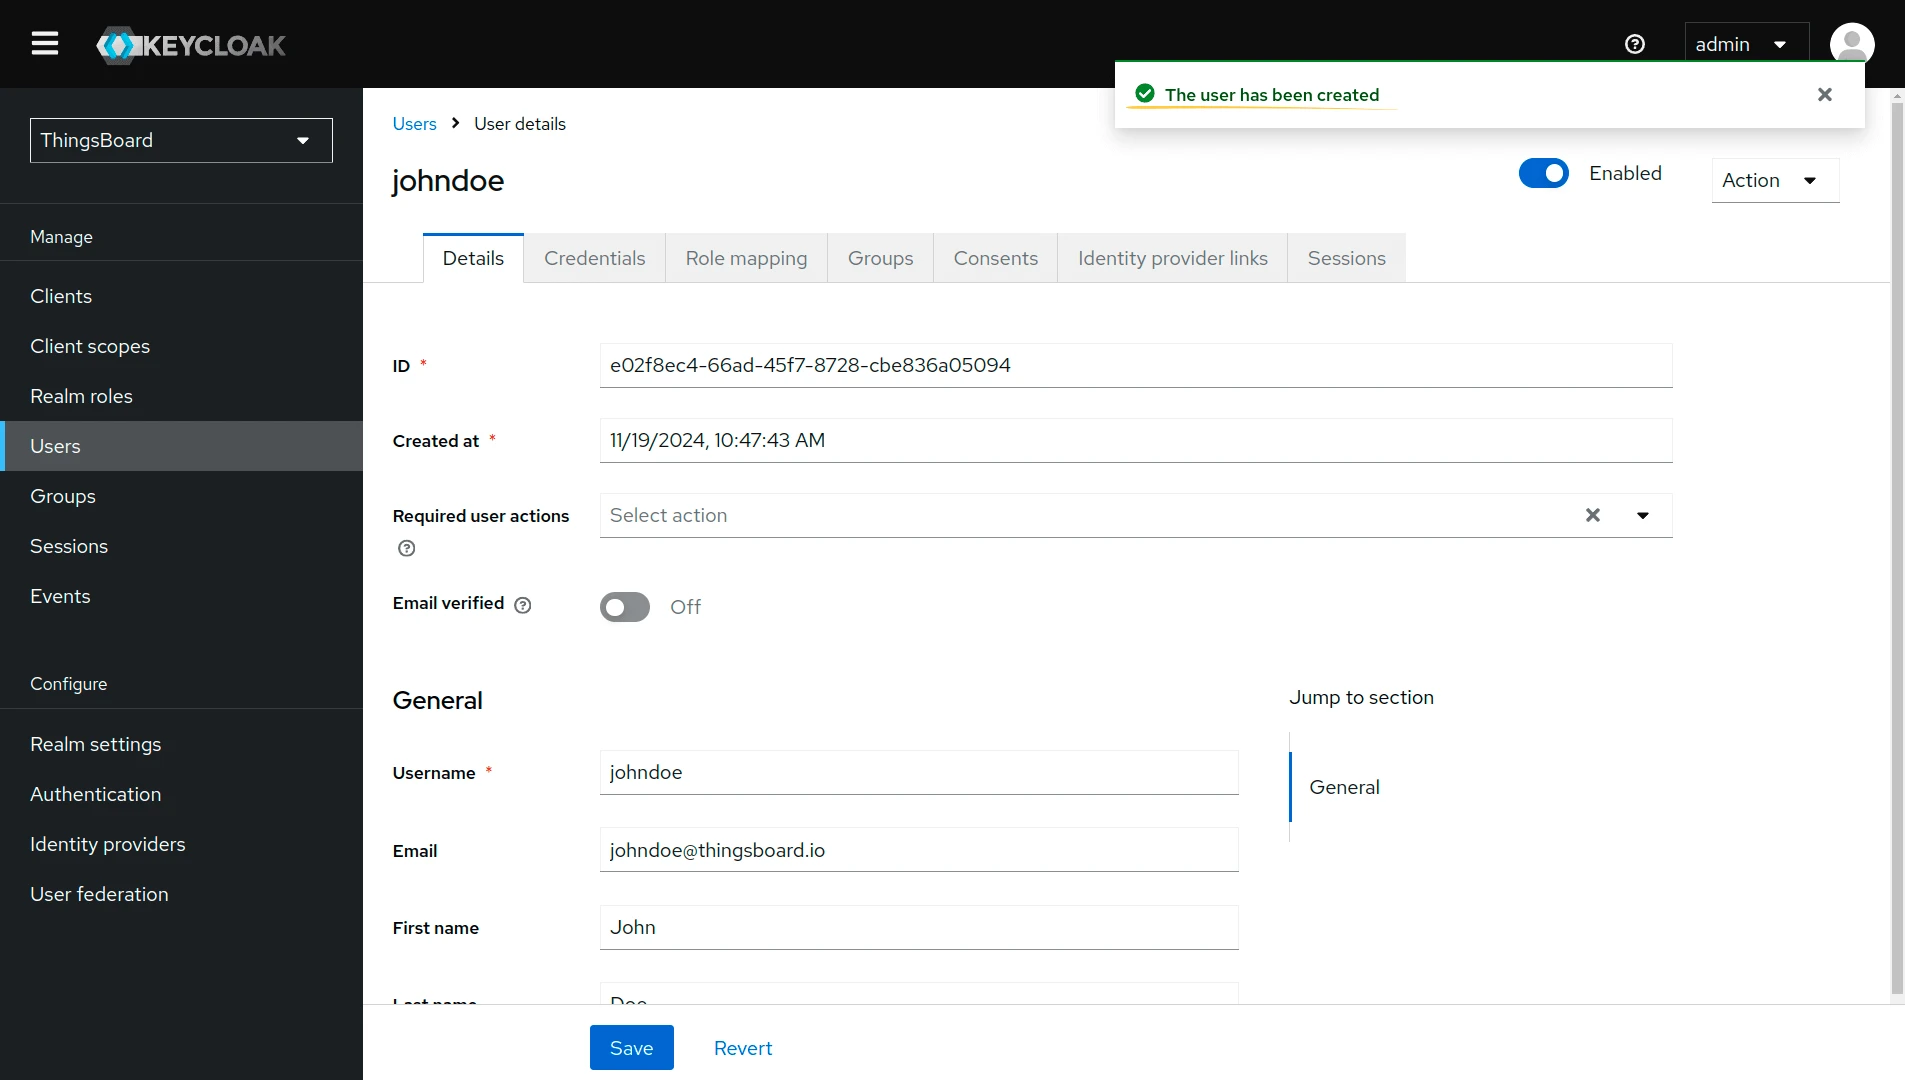
Navigate to Users and click Create new user.

-
Enter a Username and Email for the test user. Click Create.
-
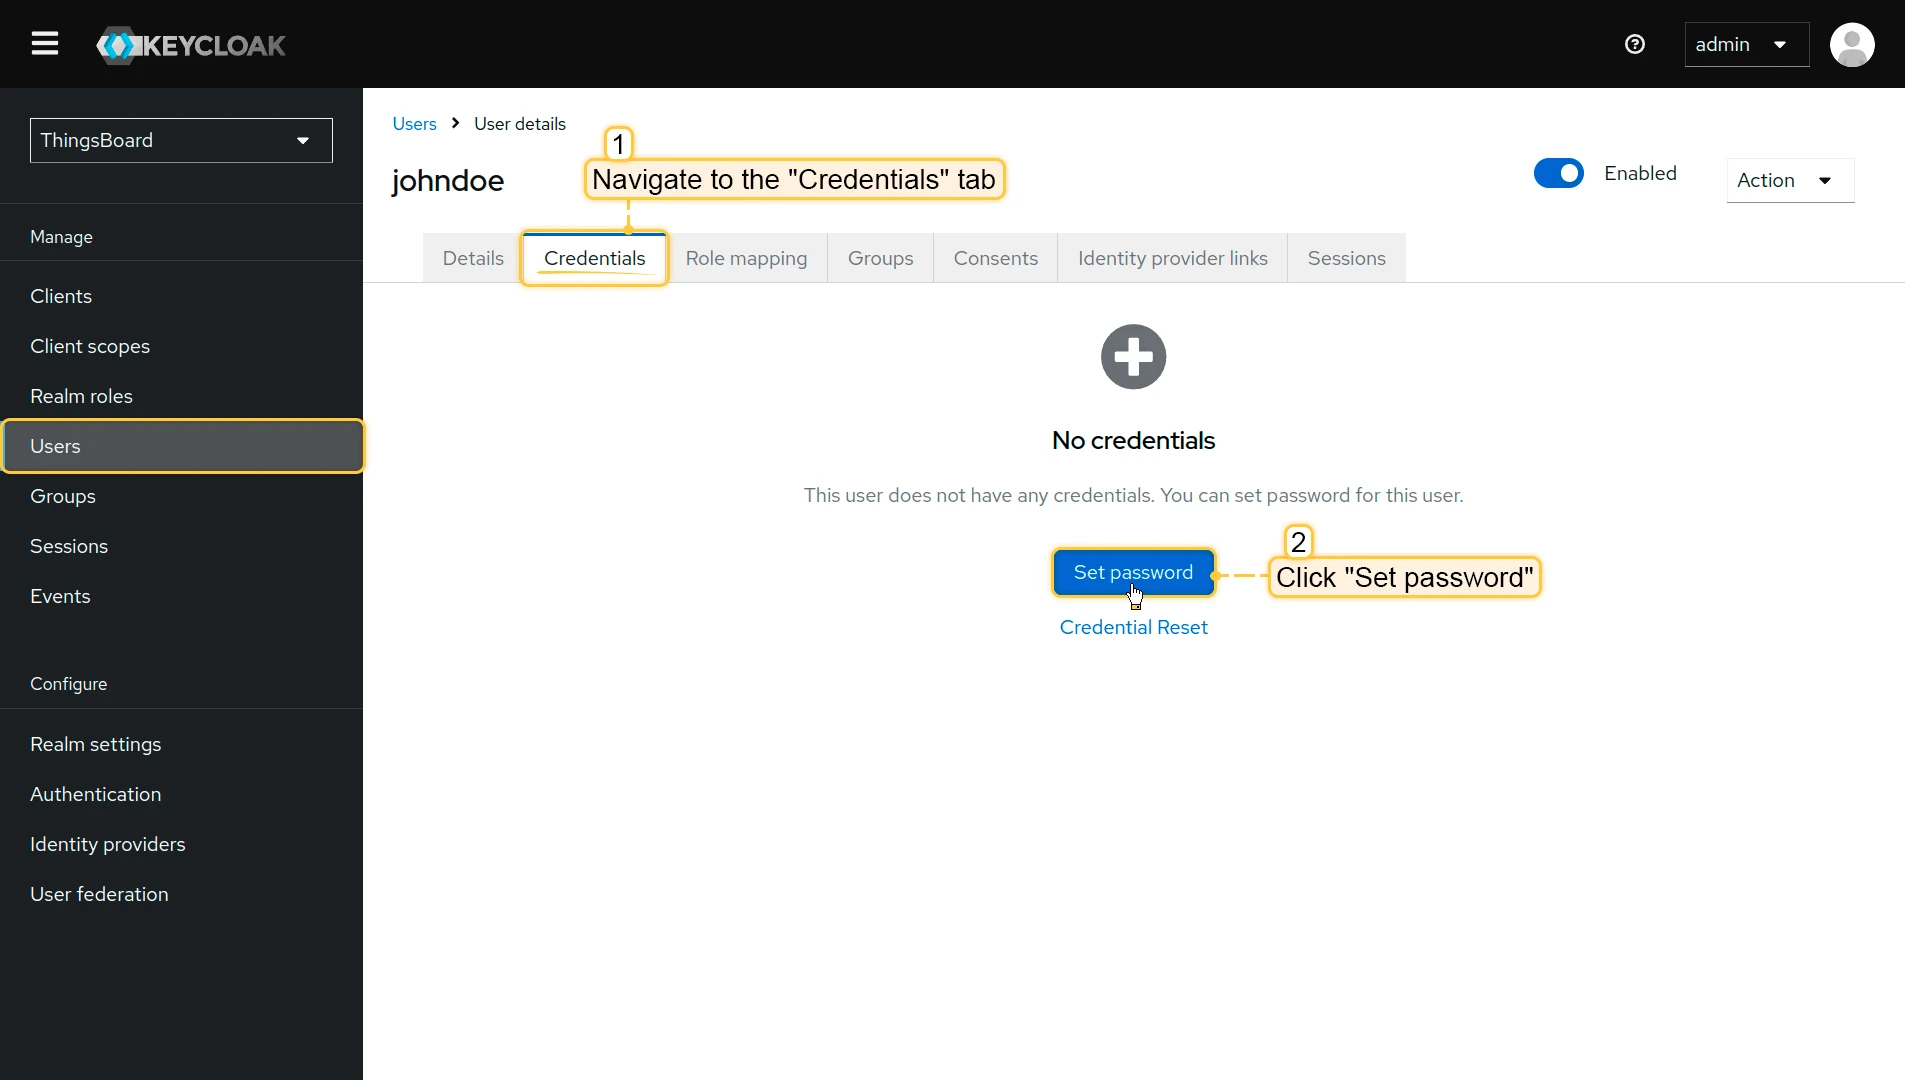
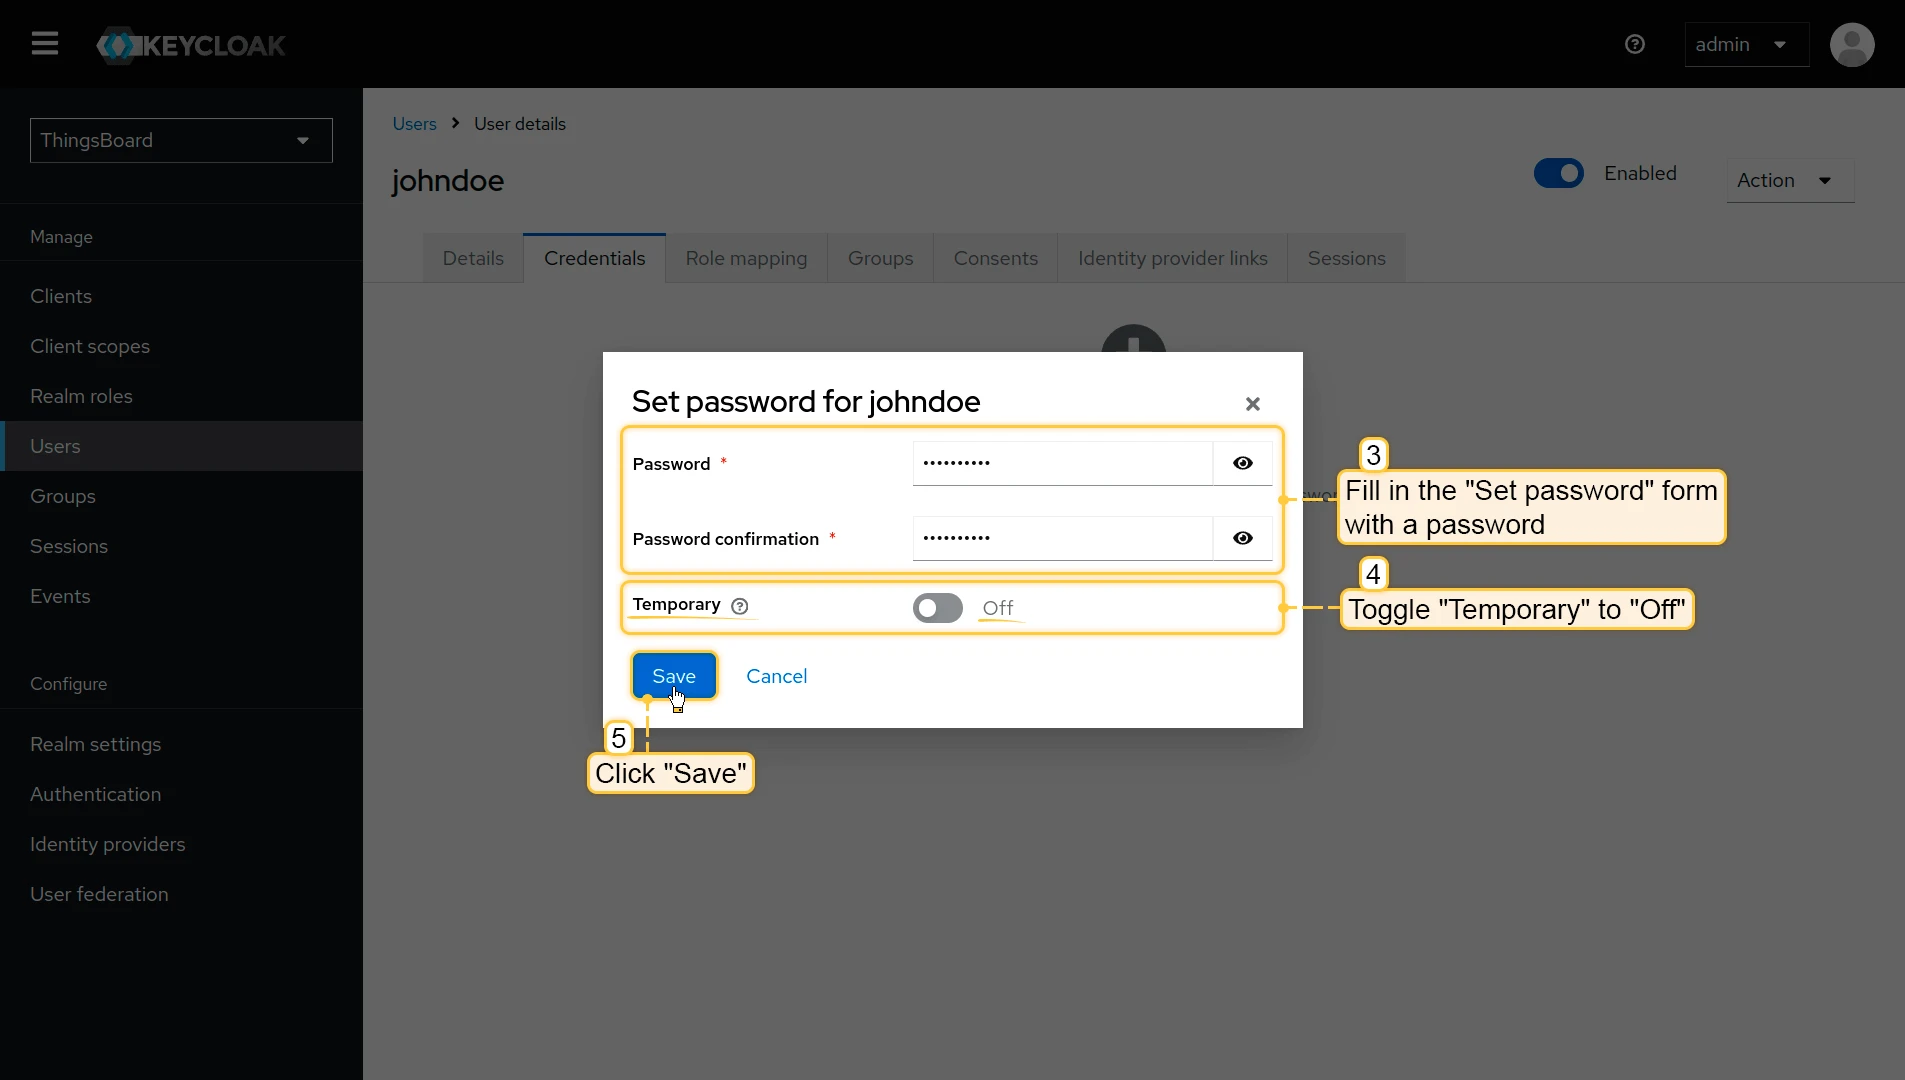
Open the user’s Credentials tab and click Set password.

-
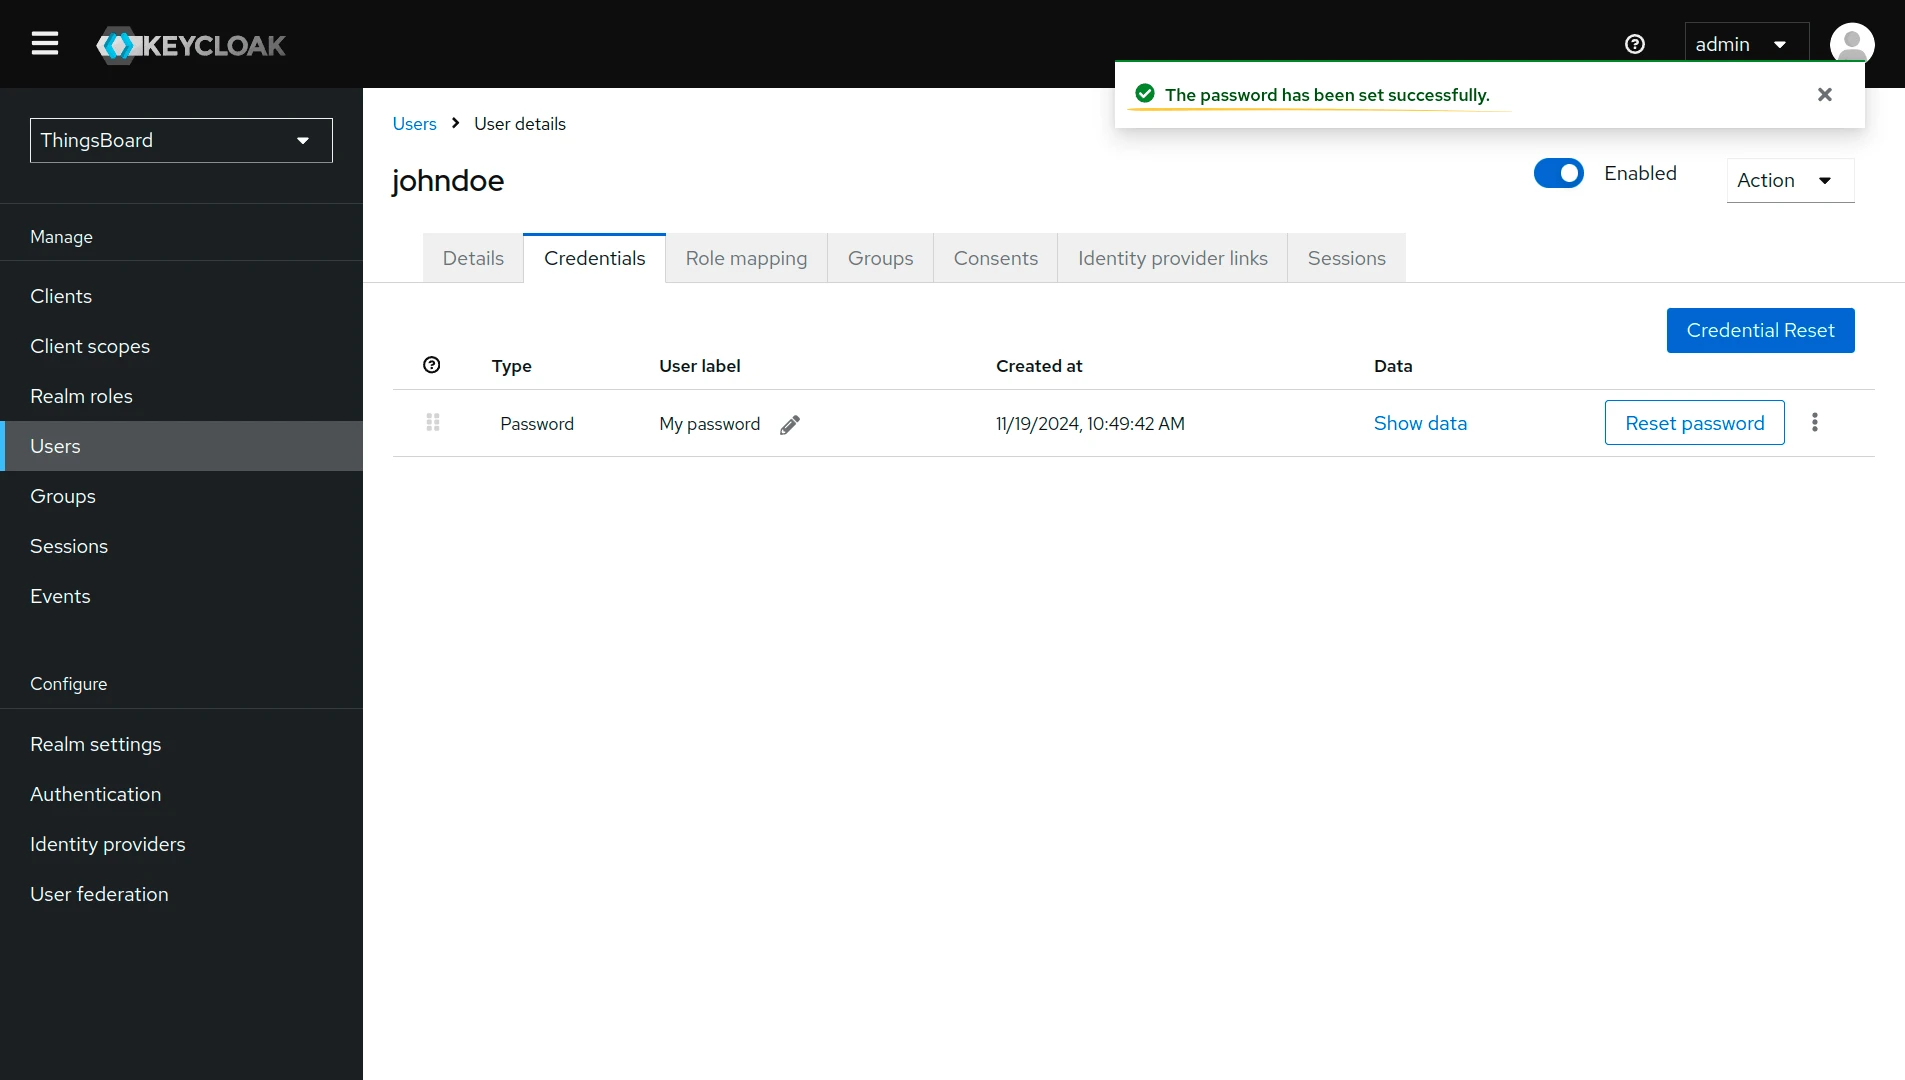
Enter a password, disable the Temporary toggle, and click Save → Save password.


Step 8: Configure ThingsBoard
Section titled “Step 8: Configure ThingsBoard”-
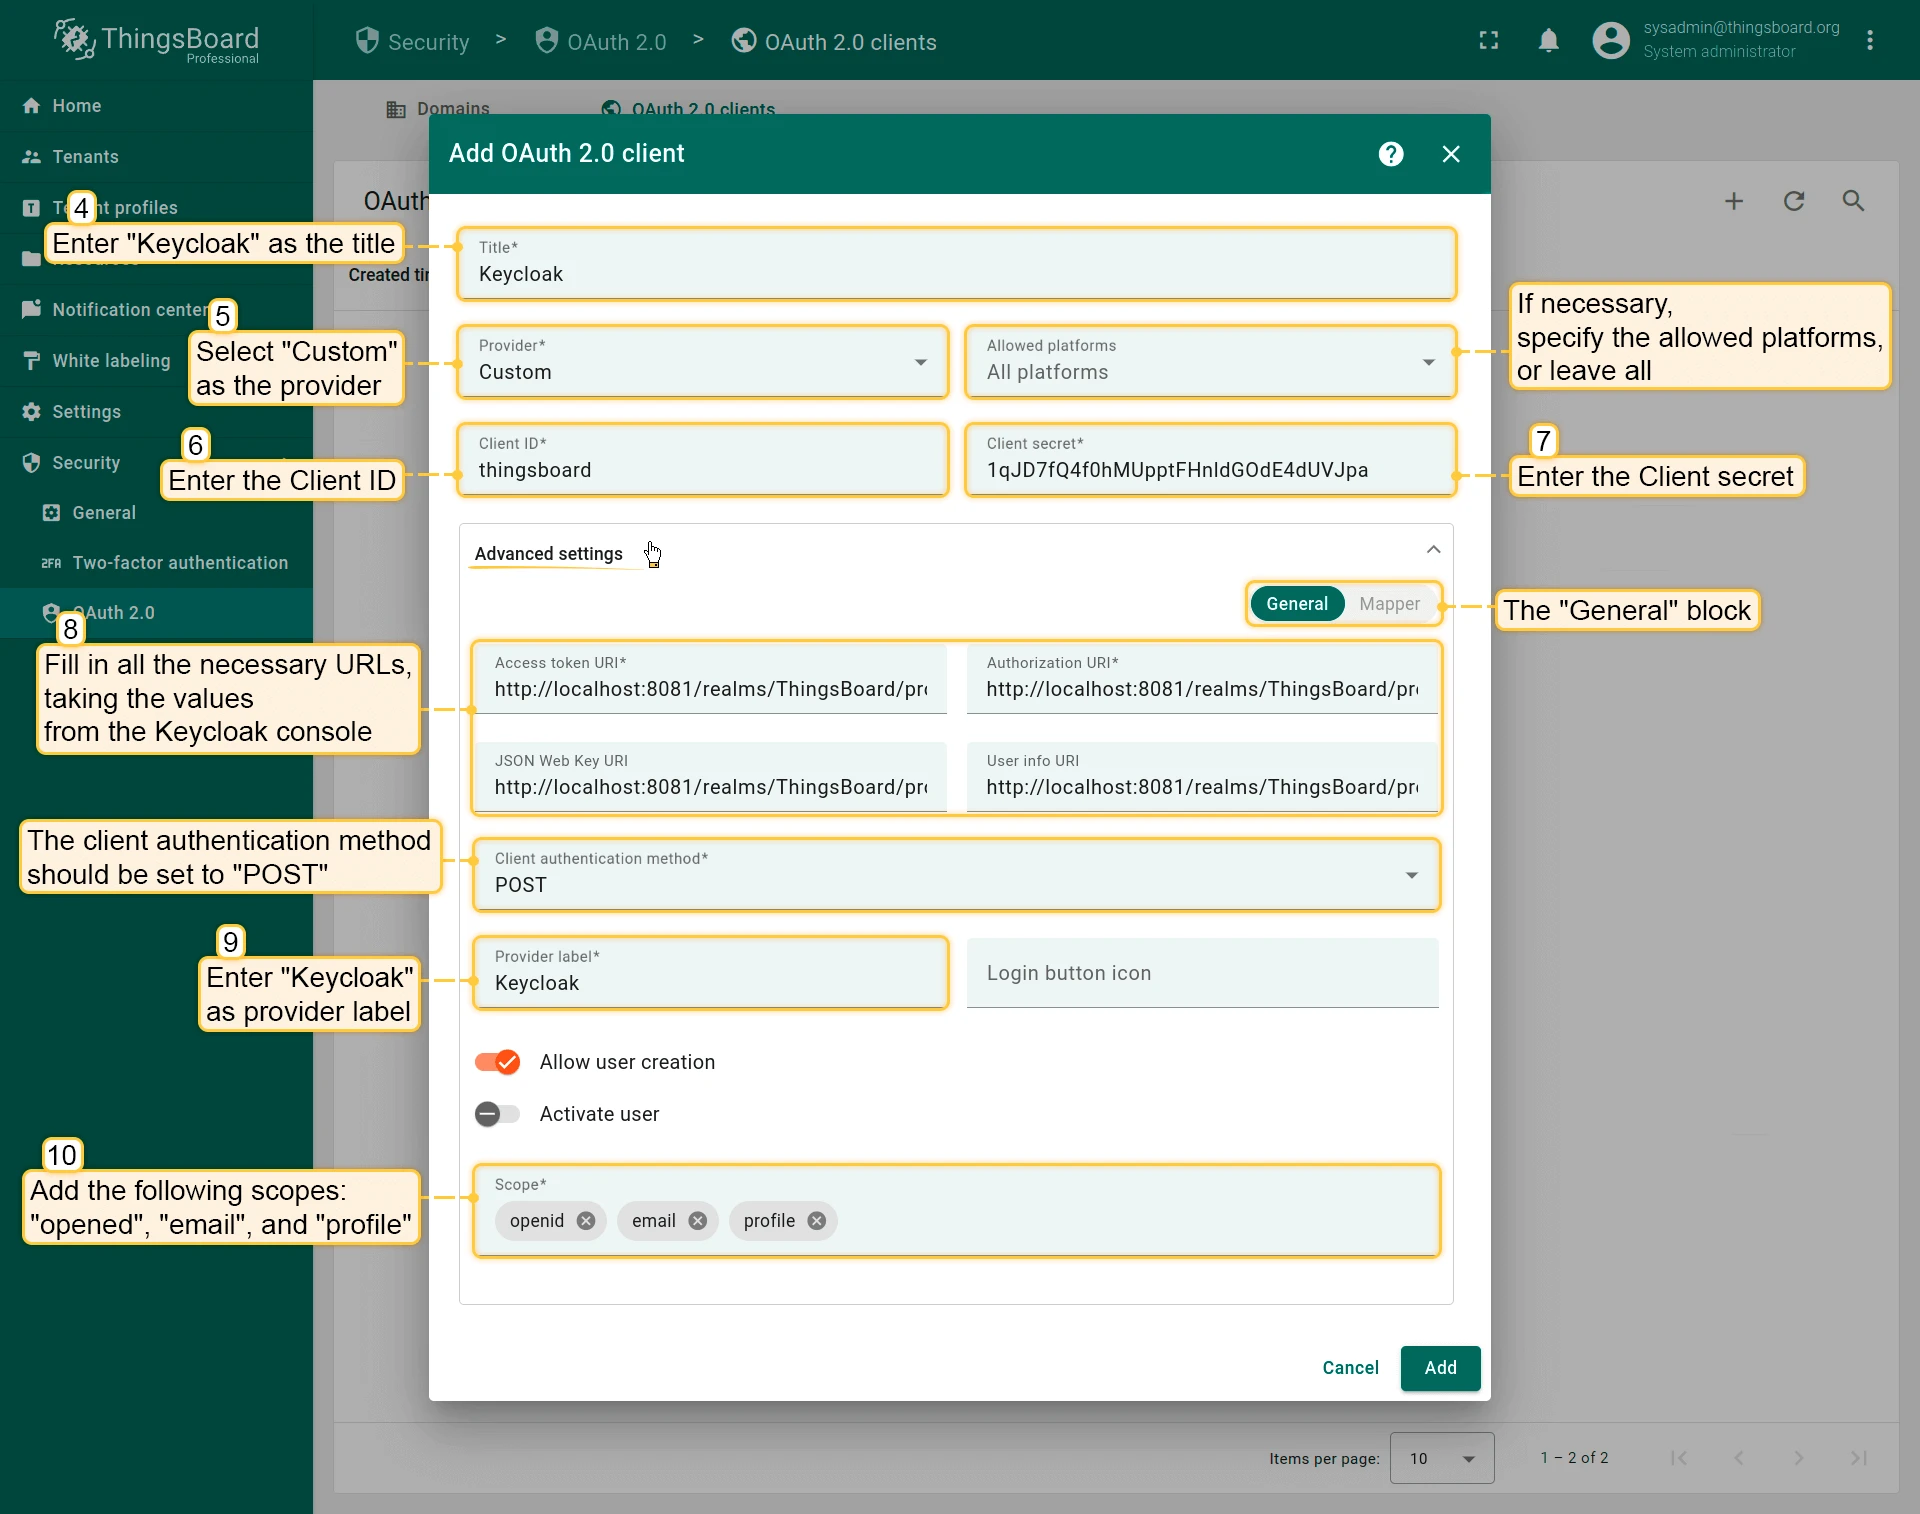
In ThingsBoard, navigate to Security ⇾ OAuth 2.0 ⇾ OAuth 2.0 clients and click + Add OAuth 2.0 client to create a new client. Set:
- Title:
Keycloak - Provider:
Custom - Client ID and Client secret: paste the values from Keycloak.
- Fill in the endpoint URLs from the OpenID endpoint configuration JSON.
- Client authentication method:
POST - Scope:
openid email profile
- Title:
-
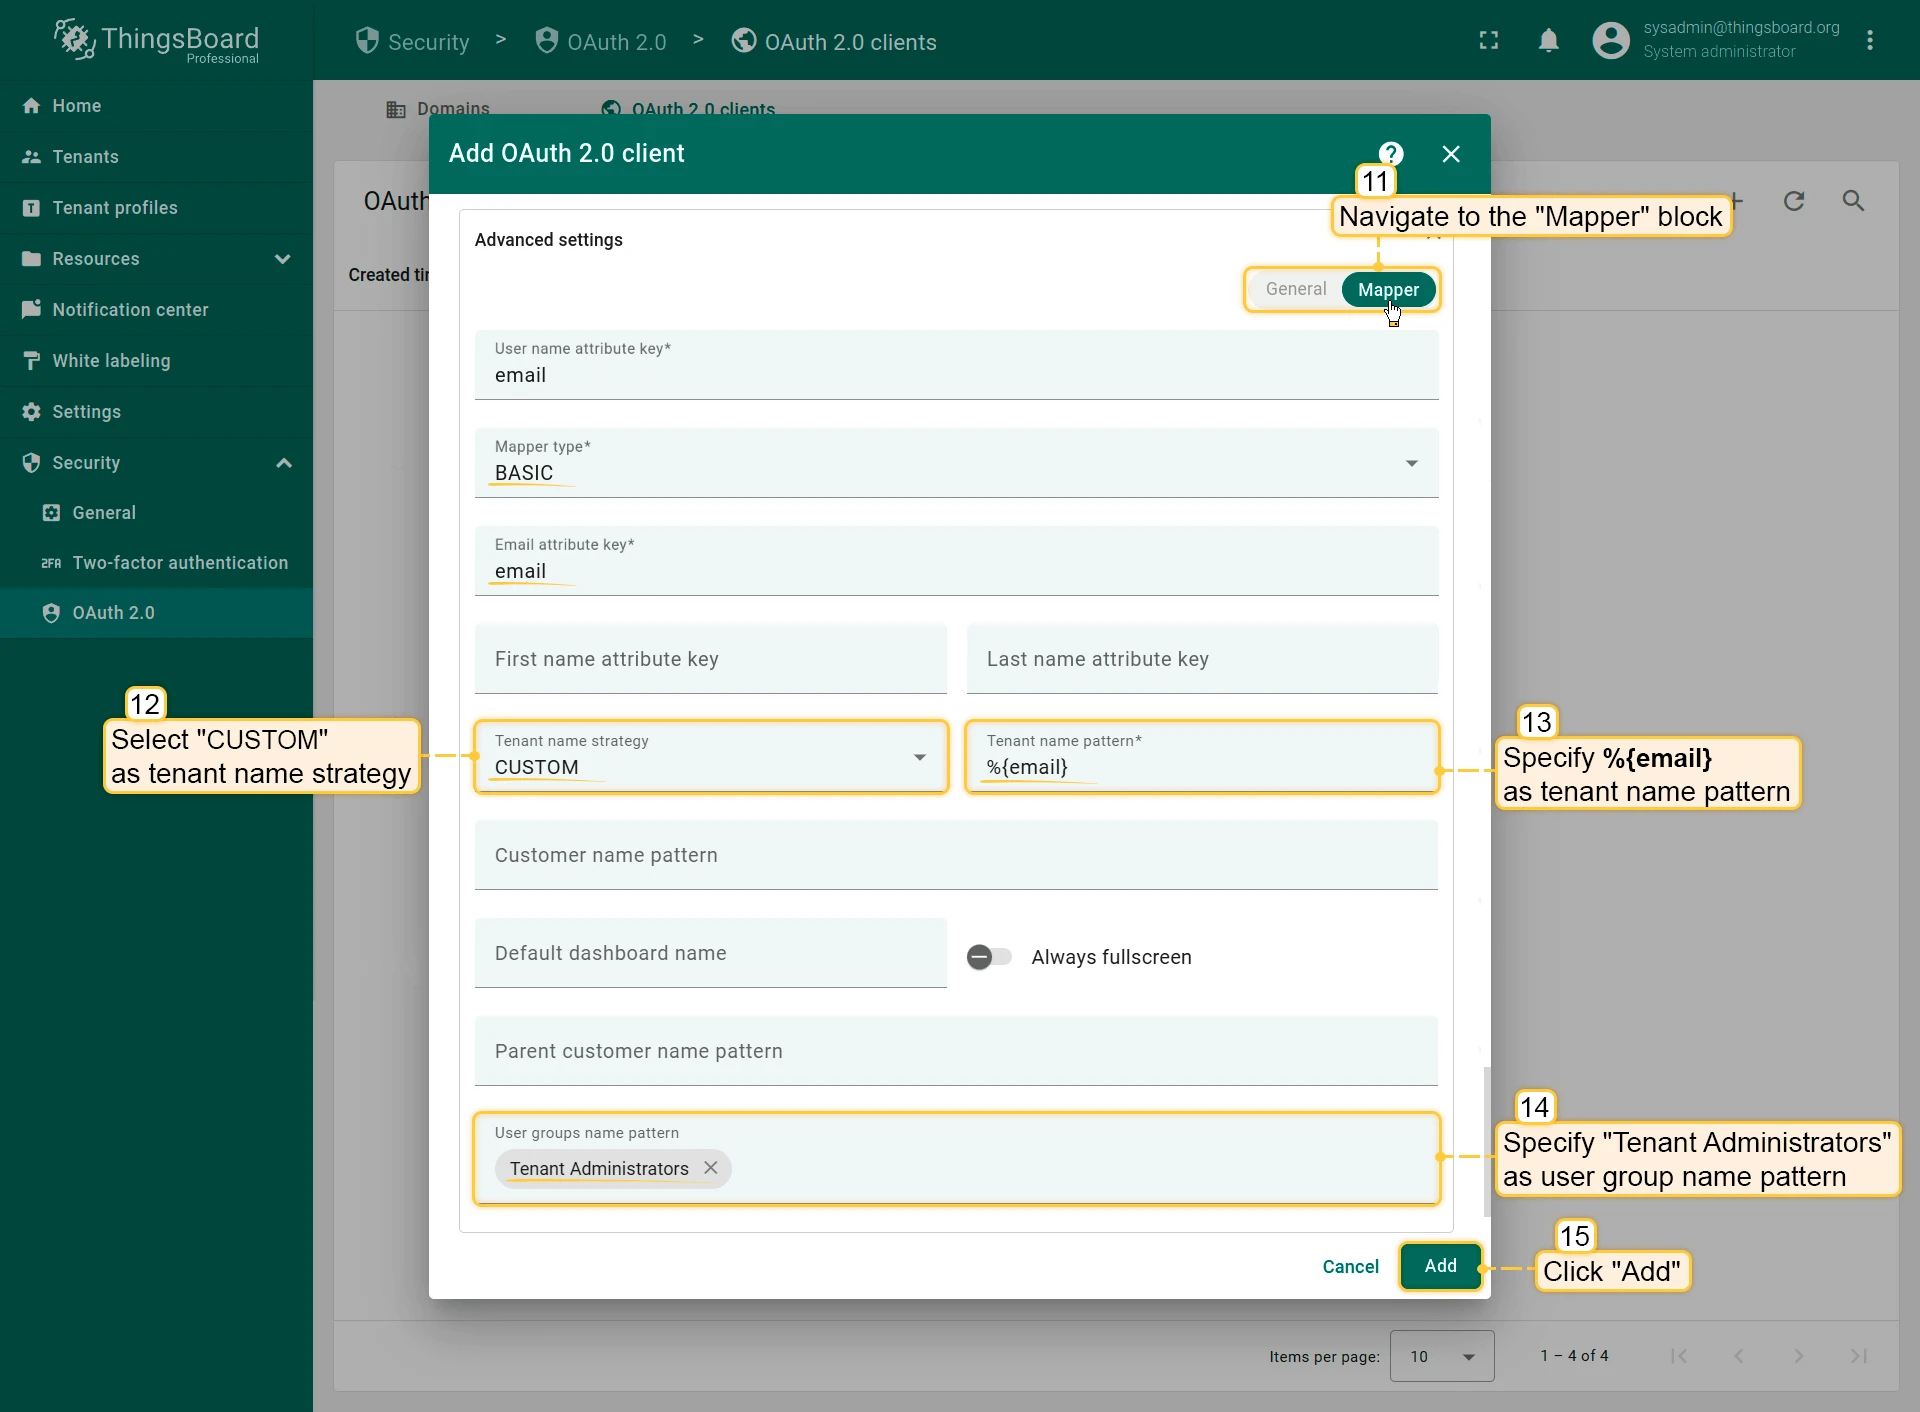
Open the Mapper tab and configure:
- Mapper type:
BASIC - Tenant name strategy:
CUSTOM - Tenant name pattern:
%{email}
- Mapper type:
-
Navigate to Security ⇾ OAuth 2.0 ⇾ Domains, open your domain, and add the Keycloak client. Save the domain.

Verify Login
Section titled “Verify Login”Navigate to your ThingsBoard login page. A Login with Keycloak button should appear. Click it and authenticate with the test user credentials.


Login with Okta
Section titled “Login with Okta”This example configures ThingsBoard to authenticate users via their Okta account. After authentication, the user is logged in as a Tenant Administrator. The tenant is named after the user’s email address and is created automatically if it does not already exist.
Step 1: Create an OAuth 2.0 application in Okta
Section titled “Step 1: Create an OAuth 2.0 application in Okta”-
Open the Okta Developer Console and navigate to Applications → Applications. Click + Create Application.
-
Enter an application name (e.g.
ThingsBoard) and choose the Regular Web Application type. Click Create. -
In the Application Login URIs settings, add the ThingsBoard redirect URI:
http(s)://$DOMAIN:$PORT/login/oauth2/code/Click Save.
-
Copy the generated Client ID and Client Secret from the application page. Note your Okta domain (e.g.
https://example.okta.com).
Step 2: Configure ThingsBoard
Section titled “Step 2: Configure ThingsBoard”-
In ThingsBoard, navigate to Security ⇾ OAuth 2.0 ⇾ OAuth 2.0 clients and click + Add OAuth 2.0 client to create a new client. Set:
- Title:
Okta - Provider:
Custom - Client ID and Client secret: paste the values from Okta.
- Title:
-
Open Advanced Settings → General and configure:
- Access Token URI:
https://<your-okta-domain>/oauth2/v1/token - Authorization URI:
https://<your-okta-domain>/oauth2/v1/authorize - User Info URI:
https://<your-okta-domain>/oauth2/v1/userinfo - JSON Web Key URI:
https://<your-okta-domain>/oauth2/v1/keys - Client Authentication Method:
BASIC - Allow User Creation: enabled
- Scope:
email openid profile
- Access Token URI:
-
Open the Mapper tab and configure:
- Mapper type:
BASIC - Tenant name strategy:
CUSTOM - Tenant name pattern:
%{email}
- Mapper type:
-
Click Add to save the client.
Step 3: Assign the client to a domain
Section titled “Step 3: Assign the client to a domain”-
Navigate to Security ⇾ OAuth 2.0 ⇾ Domains and click + Add domain to add a domain (or open an existing one).
-
Enter your domain name and select Okta in the OAuth 2.0 clients section.
-
Click Add.
Verify Login
Section titled “Verify Login”Navigate to your ThingsBoard login page. A Login with Okta button should appear. Click it and authenticate with your Okta credentials to log in as a Tenant Administrator.
Login with Azure
Section titled “Login with Azure”This example configures ThingsBoard to authenticate users via Microsoft Azure Active Directory (Microsoft Entra ID). After authentication, the user is logged in as a Tenant Administrator. The tenant is named after the user’s email address and is created automatically if it does not already exist.
Step 1: Create an OAuth 2.0 client in Azure
Section titled “Step 1: Create an OAuth 2.0 client in Azure”-
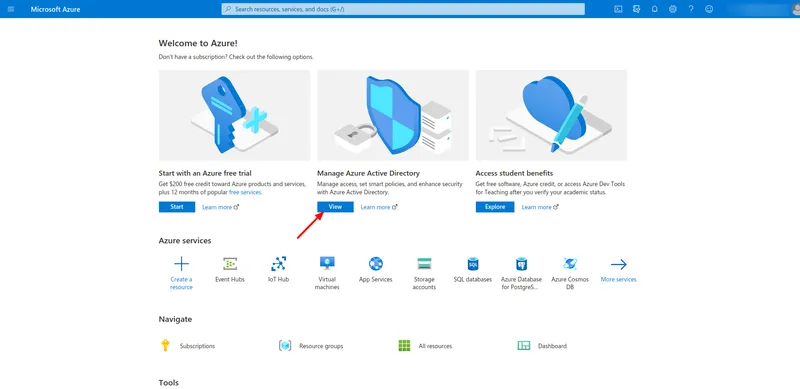
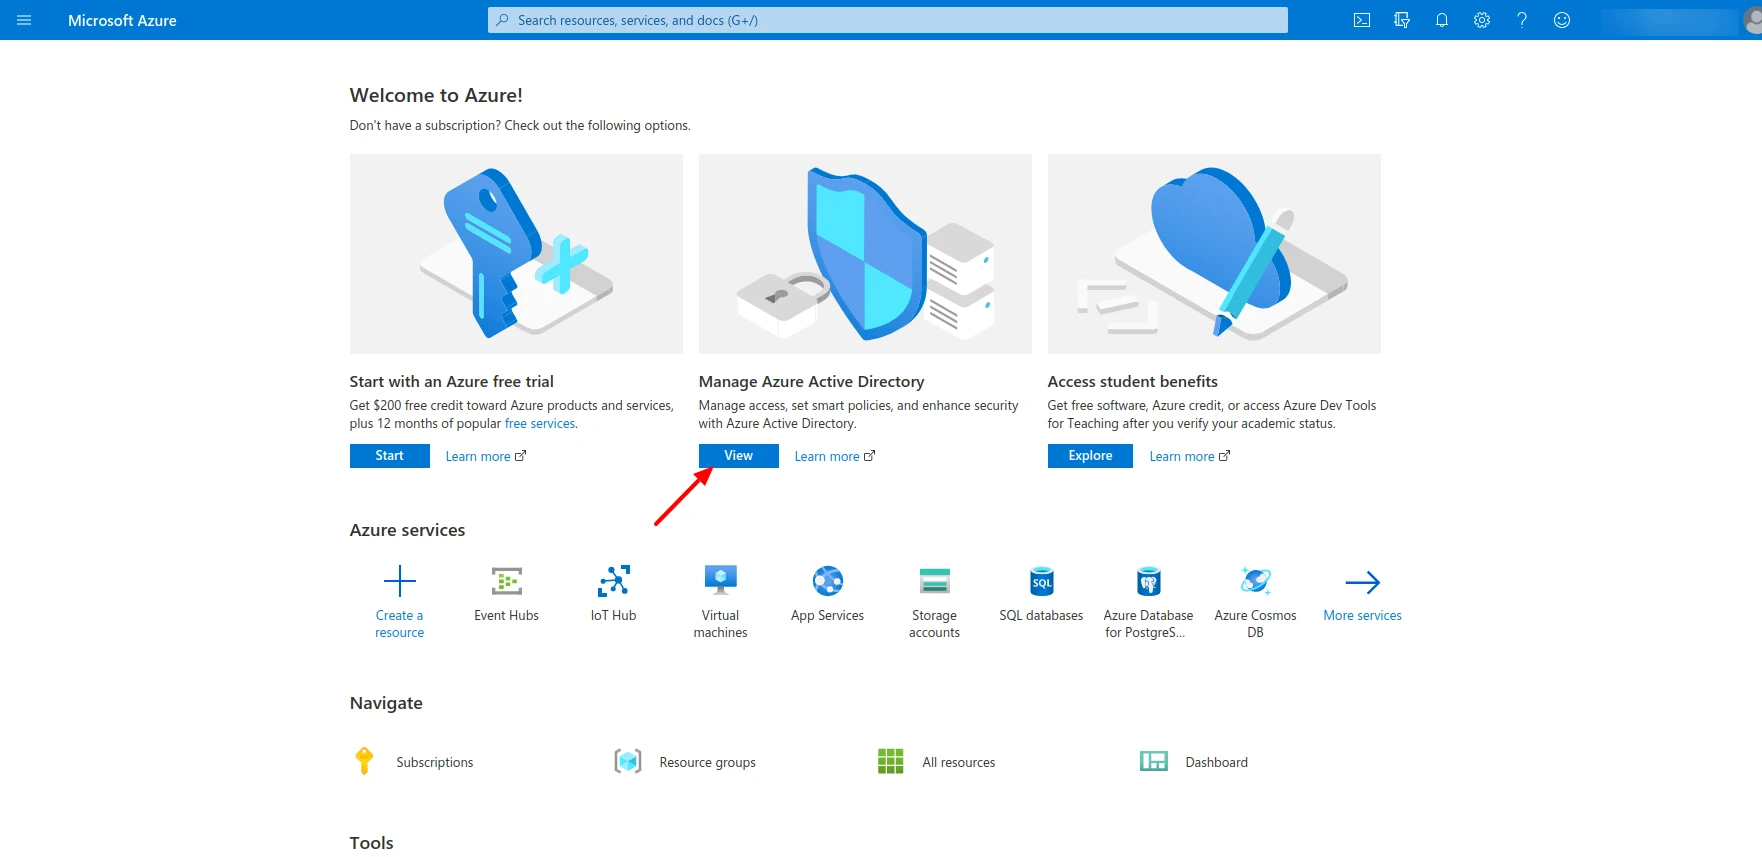
Open the Azure Portal. On the home page, click View under Manage Azure Active Directory.
-
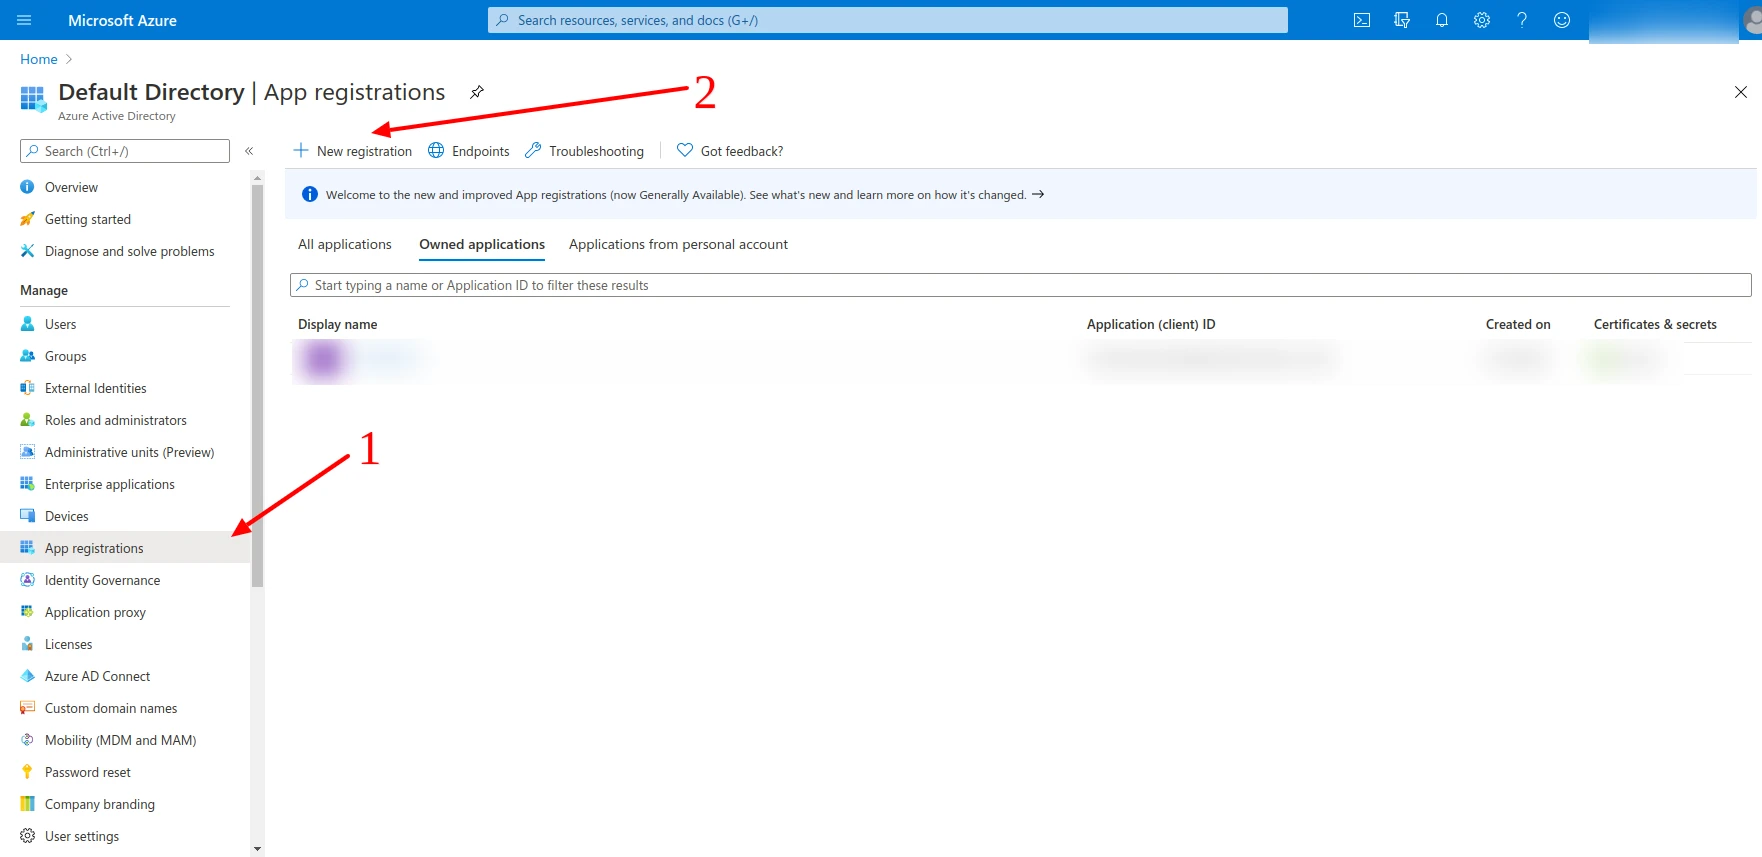
Navigate to App registrations in the left sidebar, then click + New registration.

-
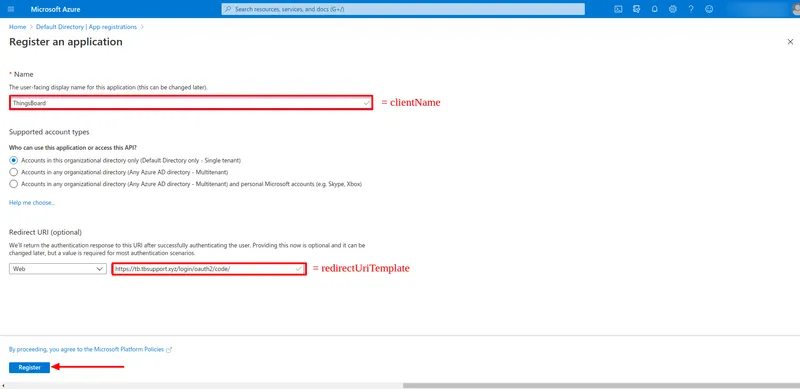
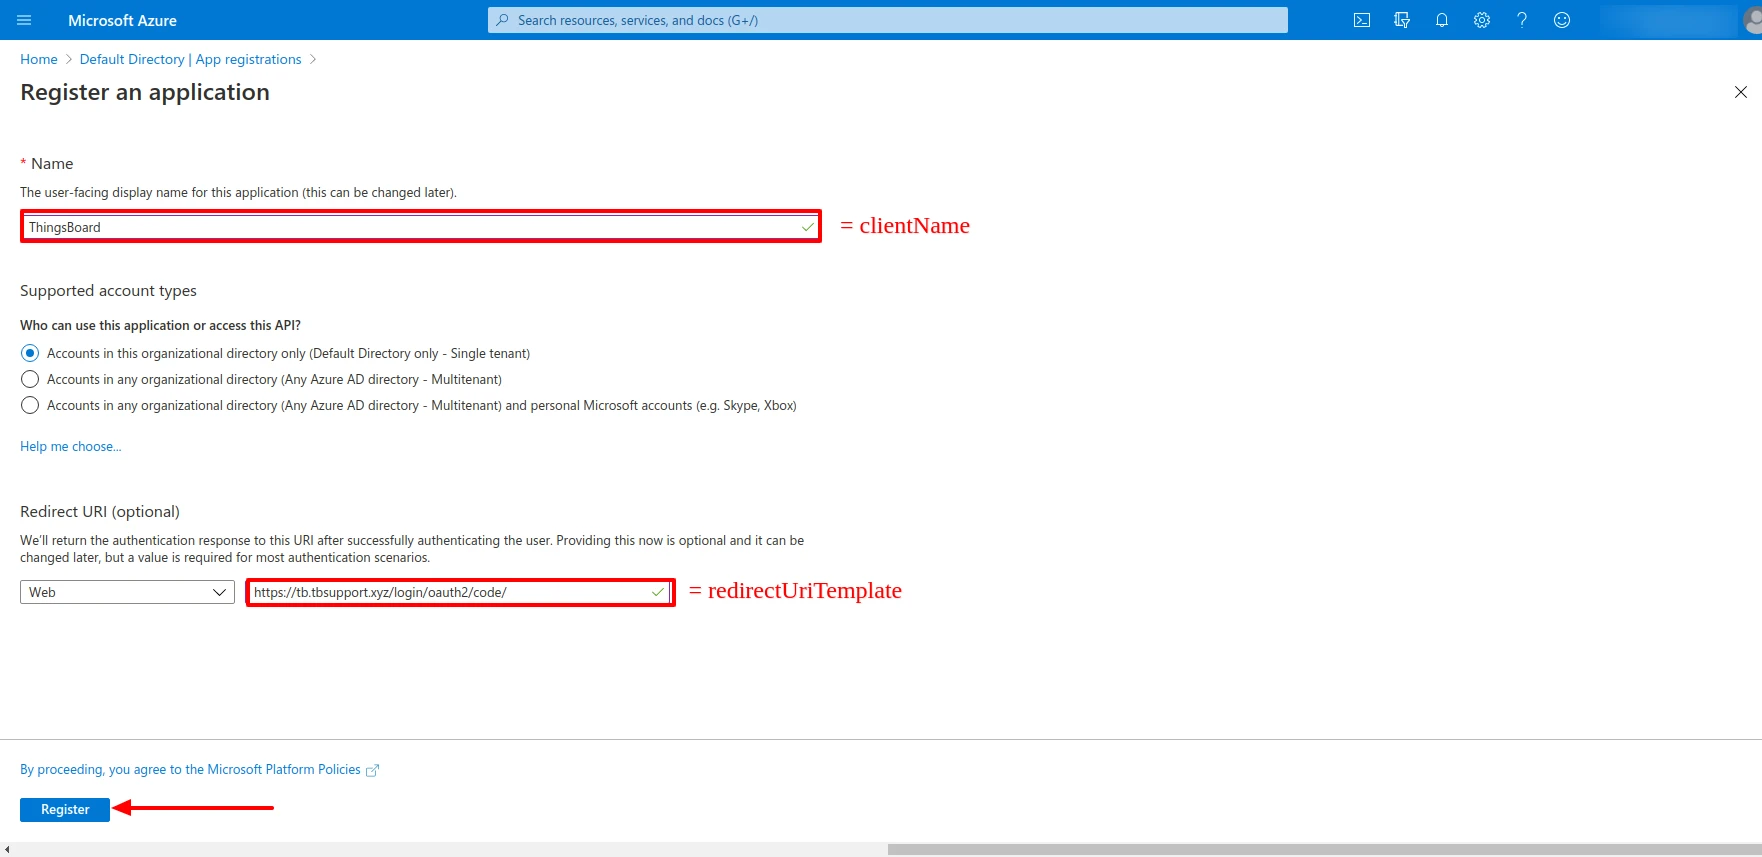
Configure the application:
- Name:
ThingsBoard(or any descriptive name) - Redirect URI: select platform Web and enter:
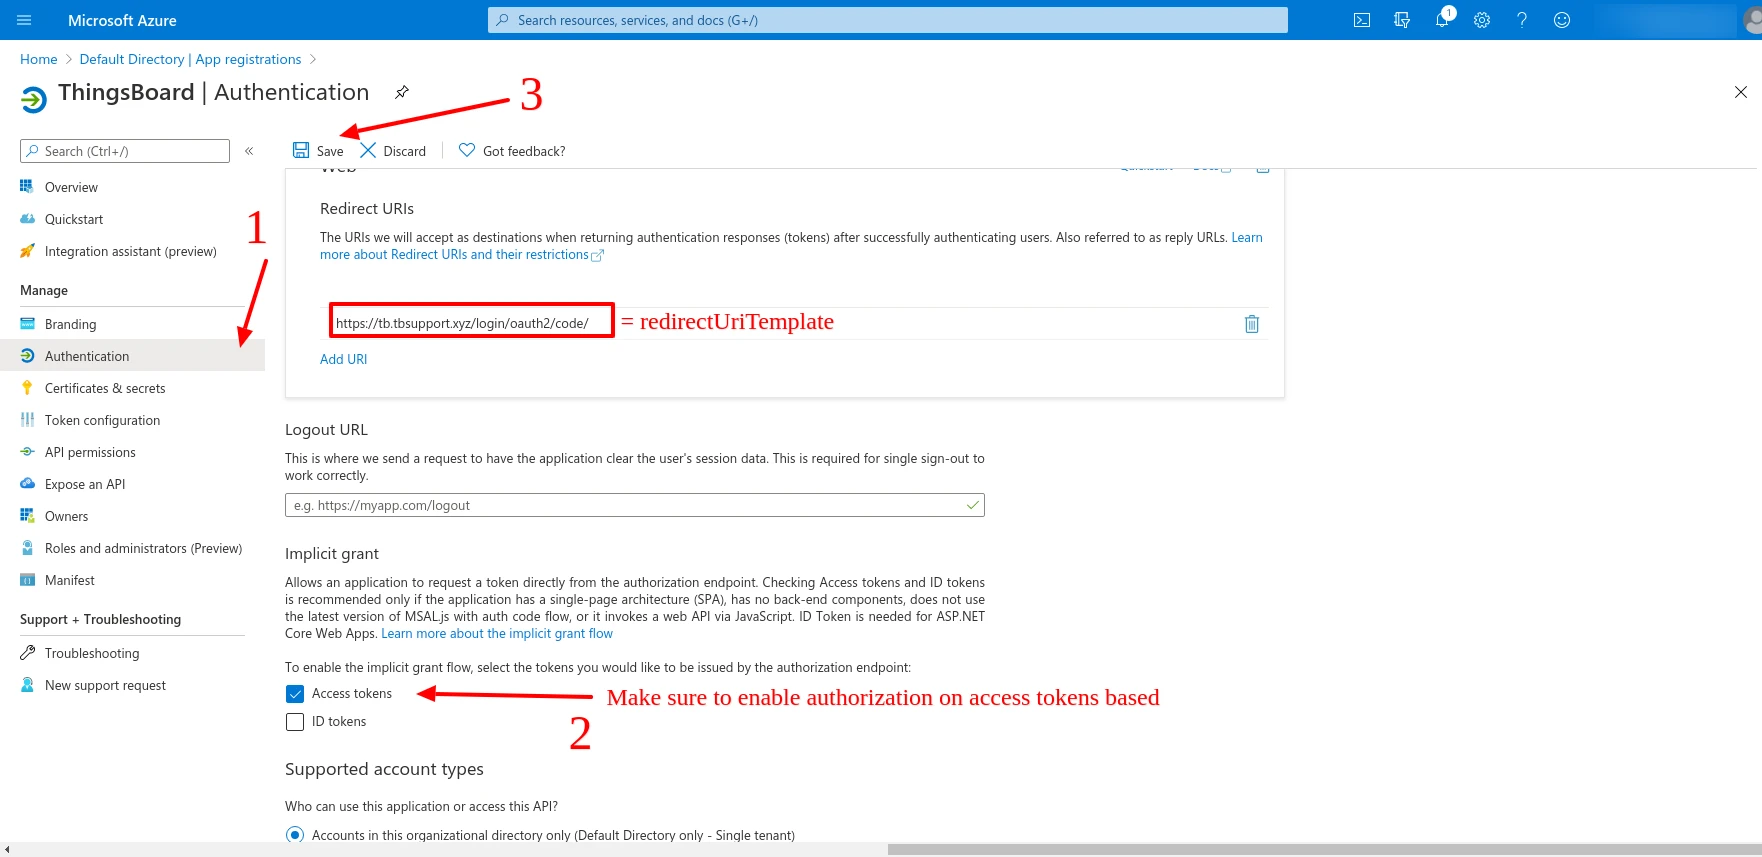
http(s)://$DOMAIN:$PORT/login/oauth2/code/Click Register.
- Name:
-
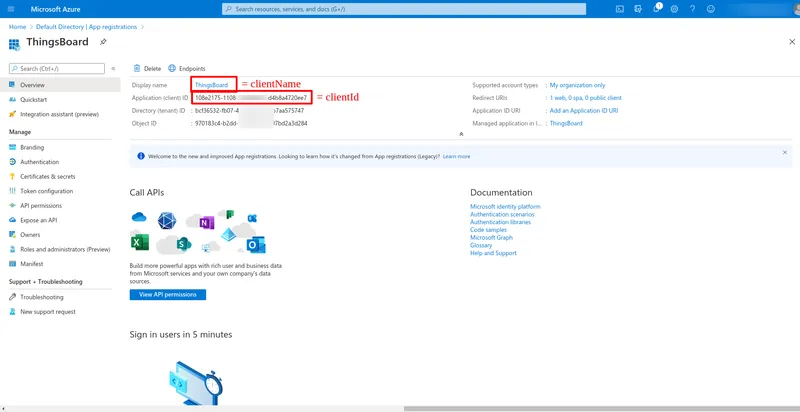
On the application Overview page, copy the Application (client) ID and the Directory (tenant) ID — you will need both when configuring ThingsBoard.
-
Open the Authentication tab. Under Implicit grant, enable the Access tokens checkbox and click Save.

-
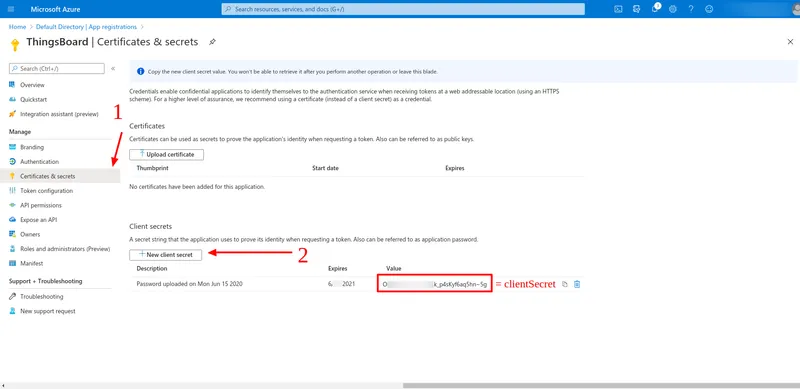
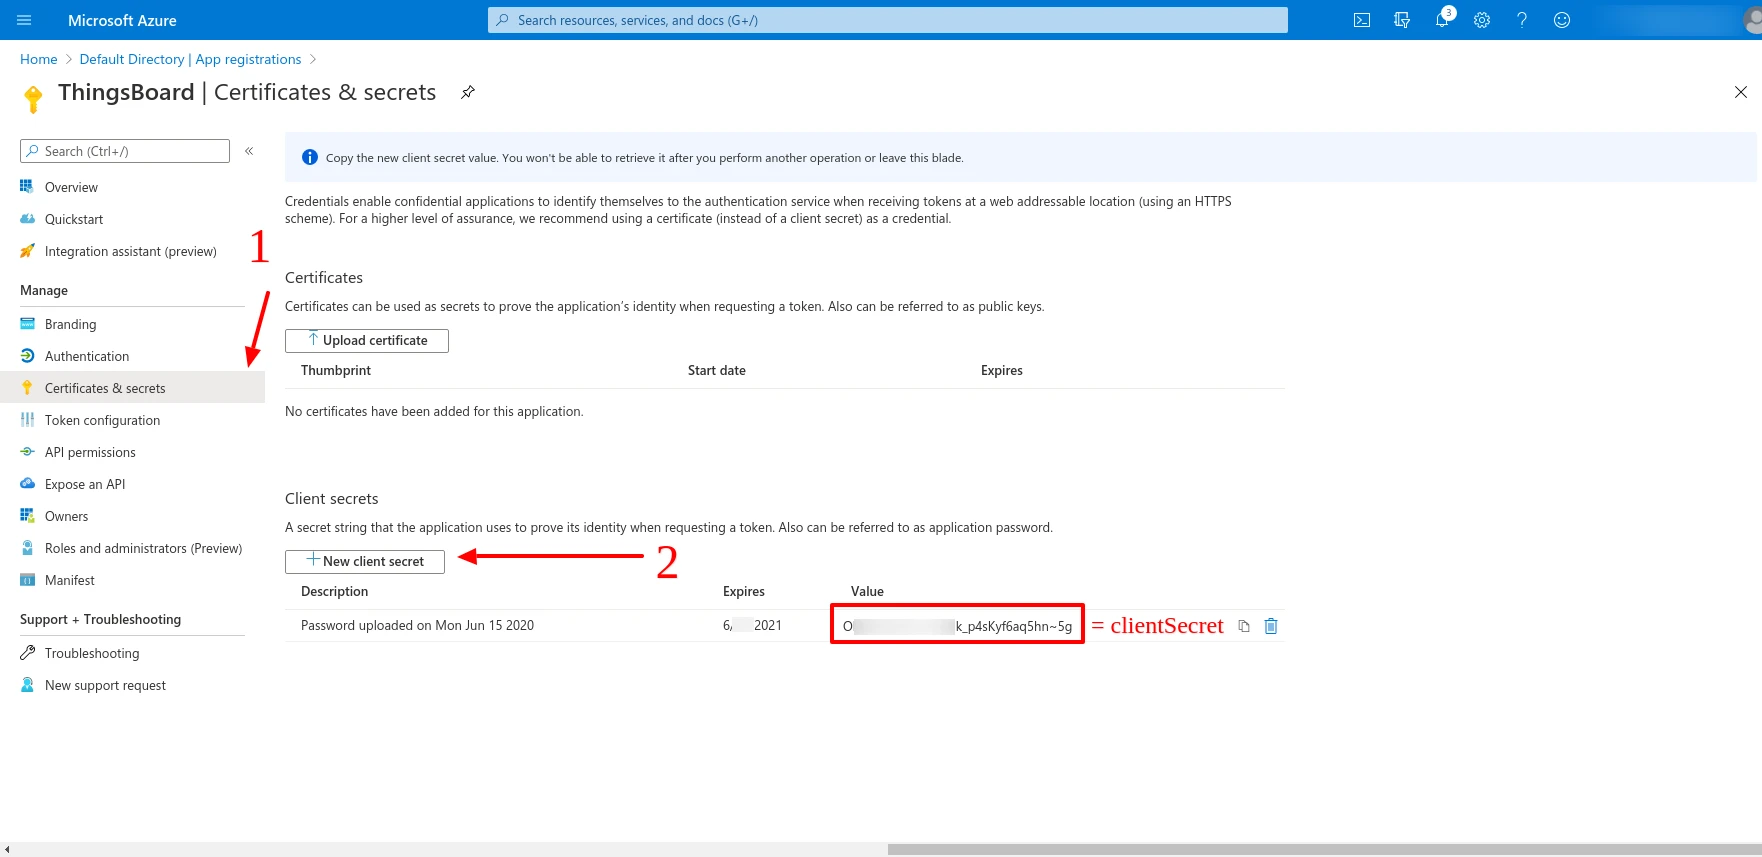
Open the Certificates & secrets tab. Click + New client secret, enter a description and expiration period, and click Add. Copy the generated Value — this is your Client Secret.
-
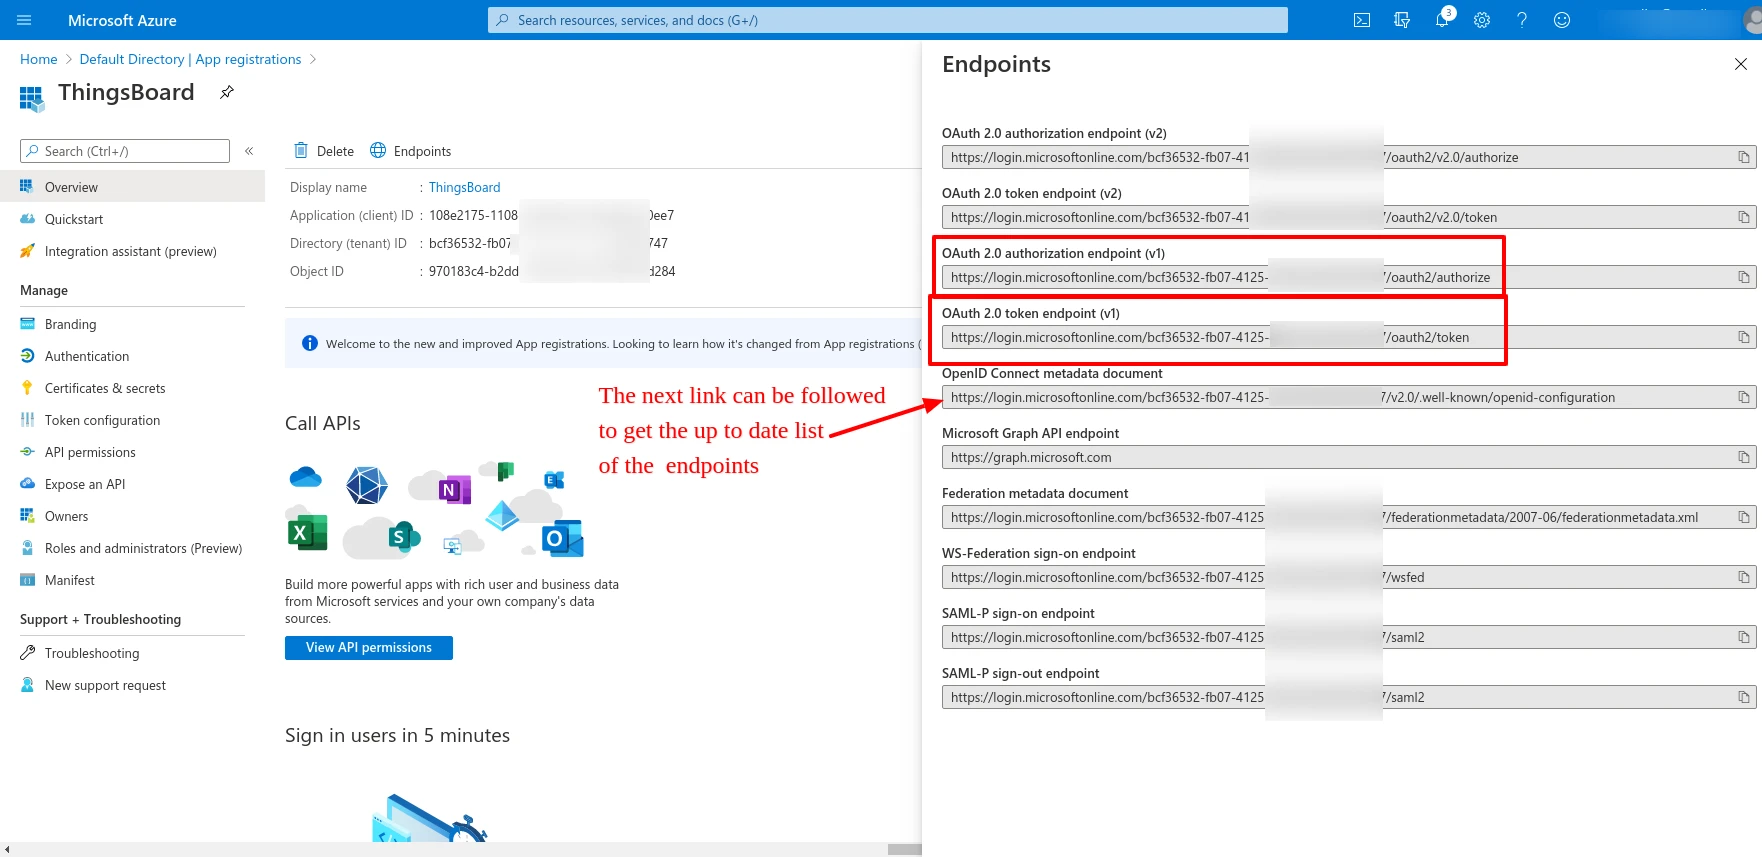
Return to the Overview tab and click Endpoints. Follow the OpenID Connect metadata document link to get the current authorization, token, and JWKS endpoint URLs for your directory.


Step 2: Configure ThingsBoard
Section titled “Step 2: Configure ThingsBoard”-
In ThingsBoard, navigate to Security ⇾ OAuth 2.0 ⇾ OAuth 2.0 clients and click + Add OAuth 2.0 client to create a new client. Set:
- Title:
Azure Active Directory - Provider:
Custom - Client ID: the Application (client) ID from Azure.
- Client secret: the secret value from Azure.
- Title:
-
Open Advanced settings ⇾ General and configure (replace
<directory-id>with your Azure Directory/Tenant ID):- Authorization URI:
https://login.microsoftonline.com/<directory-id>/oauth2/v2.0/authorize - Access Token URI:
https://login.microsoftonline.com/<directory-id>/oauth2/v2.0/token - JSON Web Key URI:
https://login.microsoftonline.com/common/discovery/v2.0/keys - User Info URI:
https://graph.microsoft.com/oidc/userinfo - Client Authentication Method:
POST - Allow User Creation: enabled
- Activate User: enabled
- Scope:
email openid profile
- Authorization URI:
-
Open the Mapper tab and configure:
- Mapper type:
BASIC - User name attribute key:
email - Tenant name strategy:
CUSTOM - Tenant name pattern:
%{email}
- Mapper type:
-
Click Add to save the client.
Step 3: Assign the client to a domain
Section titled “Step 3: Assign the client to a domain”- Navigate to Security ⇾ OAuth 2.0 ⇾ Domains and click + Add domain to add a domain (or open an existing one).
- Enter your domain name and select Azure Active Directory in the OAuth 2.0 clients section.
- Click Add.
Verify Login
Section titled “Verify Login”Navigate to your ThingsBoard login page. A Login with Azure Active Directory button should appear. Click it and authenticate with your Azure AD credentials to log in as a Tenant Administrator.
Managing OAuth 2.0 Clients
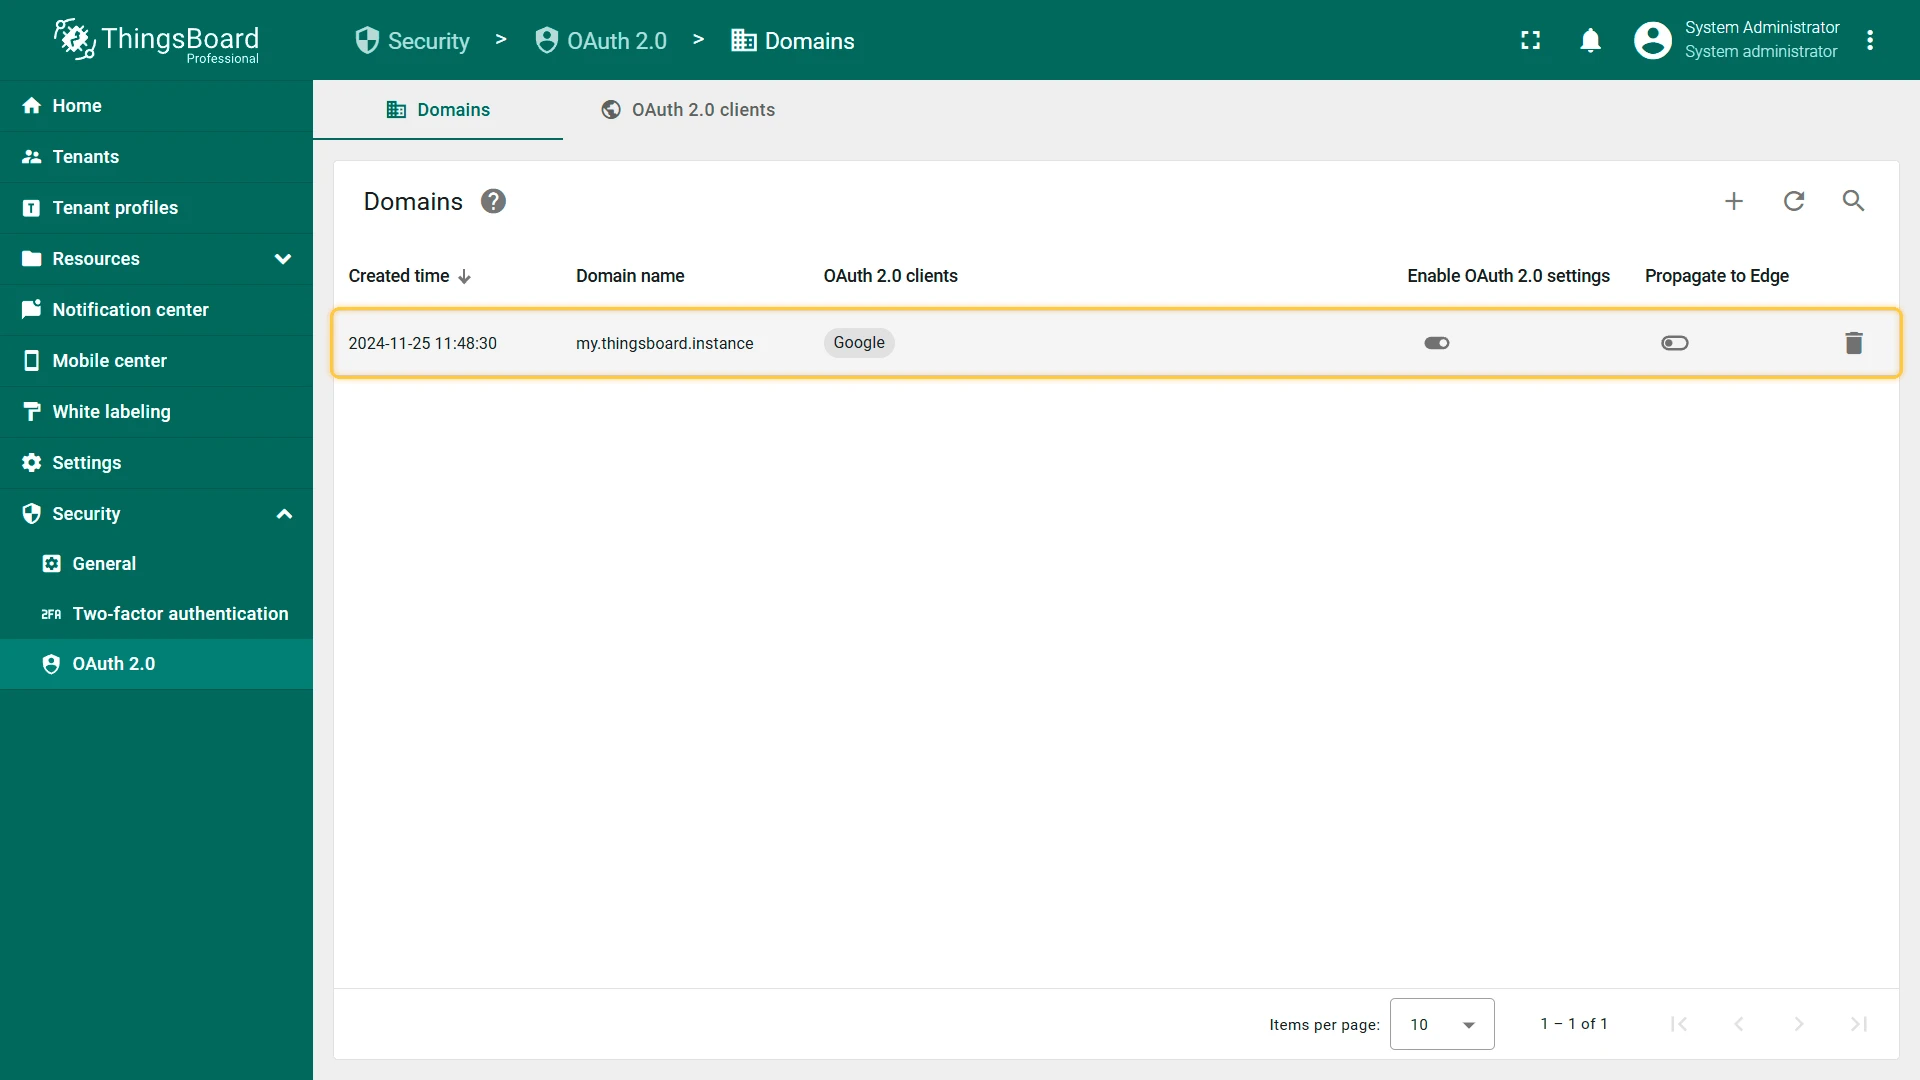
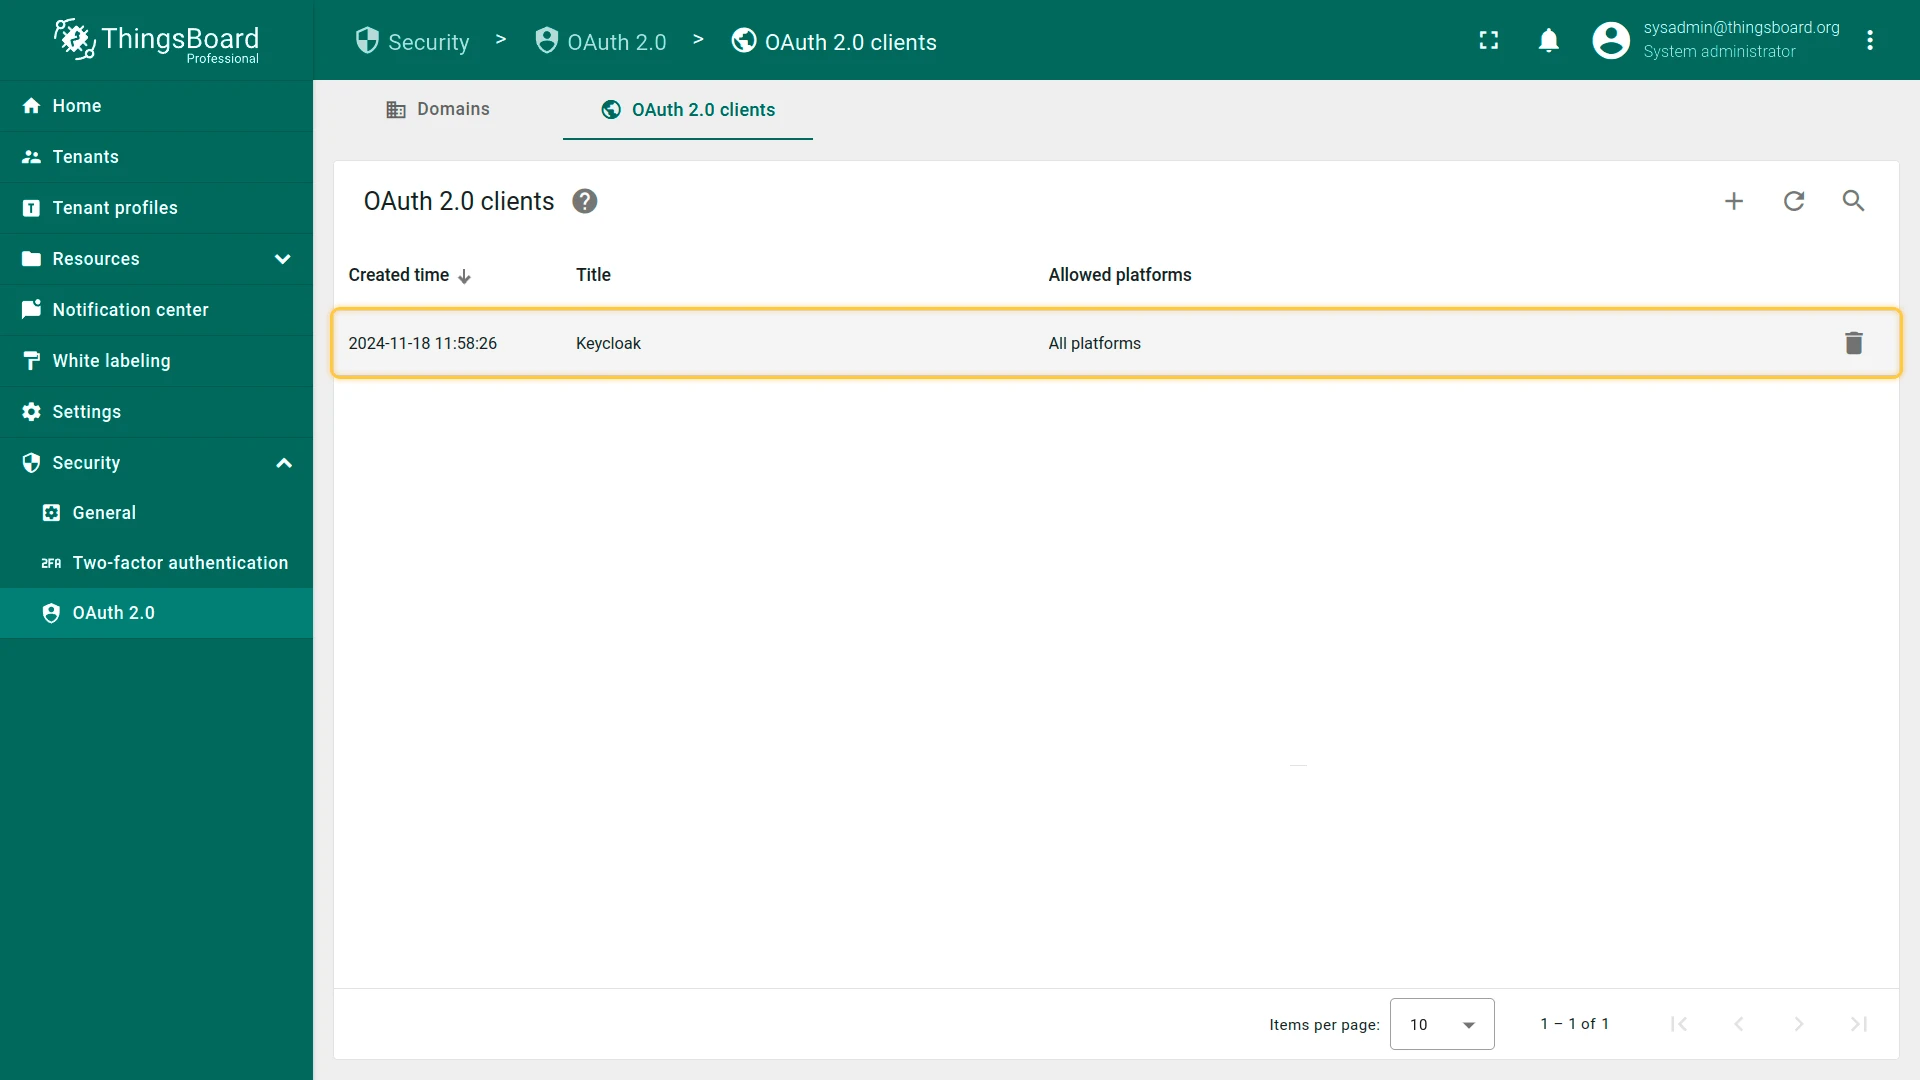
Section titled “Managing OAuth 2.0 Clients”After creating OAuth 2.0 clients, you can manage them from Security ⇾ OAuth 2.0 ⇾ OAuth 2.0 clients. The clients table lists all configured clients with their title, provider, and enabled state.
To edit a client, click the pencil icon in its row, make your changes, and click Save.
To delete a client, click the trash icon in its row and confirm the deletion. Deleting a client removes it from all domains it was assigned to.
Managing Domains
Section titled “Managing Domains”Domains are managed from Security ⇾ OAuth 2.0 ⇾ Domains. The domains table lists all registered domains with their name and assigned clients.
To edit a domain, click the pencil icon in its row. You can update the domain name, add or remove OAuth 2.0 clients, and toggle the Enable OAuth 2.0 switch.
To delete a domain, click the trash icon in its row and confirm the deletion. Deleting a domain removes the OAuth 2.0 login option for users accessing ThingsBoard from that domain.
HAProxy Configuration
Section titled HAProxy ConfigurationIf you use HAProxy as a reverse proxy in front of ThingsBoard, configure it to forward the original protocol and host information so that the redirect URI generated by ThingsBoard matches what your OAuth provider expects.
Add the following configuration to your HAProxy frontend and backend sections:
frontend http-in  bind *:80  bind *:443 ssl crt /etc/haproxy/ssl/server.pem  option forwardfor  http-request set-header X-Forwarded-Proto https if { ssl_fc }  http-request set-header X-Forwarded-Proto http if !{ ssl_fc }  default_backend tb-backend
backend tb-backend  option forwardfor  http-request set-header X-Forwarded-Port %[dst_port]  server tb1 127.0.0.1:8080 check
Ensure ThingsBoard is configured to use the forwarded headers by setting the following in thingsboard.yml:
server: forward_headers_strategy: NATIVEThis allows ThingsBoard to construct the correct redirect URI (https://yourdomain/login/oauth2/code/) from the forwarded headers rather than the internal HTTP address.
Was this helpful?