AWS EKS Microservices Setup
This guide walks you through deploying ThingsBoard CE in microservices mode on AWS EKS. We use Amazon RDS for managed PostgreSQL, Amazon MSK for managed Kafka, and Amazon ElastiCache for managed Redis.
Prerequisites
Section titled “Prerequisites”Install and configure tools
Section titled “Install and configure tools”Install kubectl, eksctl, and AWS CLI.
Configure your AWS credentials. To get Access and Secret keys, follow this guide. The default region should be the ID of the region where you want to deploy the cluster.
aws configureStep 1. Clone ThingsBoard CE K8S scripts repository
Section titled “Step 1. Clone ThingsBoard CE K8S scripts repository”git clone -b release-4.3.1.3 https://github.com/thingsboard/thingsboard-ce-k8s.git --depth 1cd thingsboard-ce-k8s/aws/microservicesStep 2. Configure and create EKS cluster
Section titled “Step 2. Configure and create EKS cluster”In the cluster.yml file you can find the suggested cluster configuration. Key fields you can change:
| Field | Default | Description |
|---|---|---|
region | us-east-1 | AWS region for the cluster |
availabilityZones | [us-east-1a, us-east-1b, us-east-1c] | Region availability zones |
instanceType | m5.xlarge | EC2 instance type for nodes |
Create the cluster:
eksctl create cluster -f cluster.ymlStep 3. Create AWS load-balancer controller
Section titled “Step 3. Create AWS load-balancer controller”Once the cluster is ready, create the AWS load-balancer controller by following this guide.
The cluster provisioning scripts create several load balancers:
| Load Balancer | Type | Purpose |
|---|---|---|
tb-http-loadbalancer | ALB | Web UI, REST API, HTTP transport |
tb-mqtt-loadbalancer | NLB | MQTT transport |
tb-coap-loadbalancer | NLB | CoAP transport |
tb-edge-loadbalancer | NLB | Edge instances connectivity |
Step 4. Provision databases
Section titled “Step 4. Provision databases”4.1 Amazon PostgreSQL DB configuration
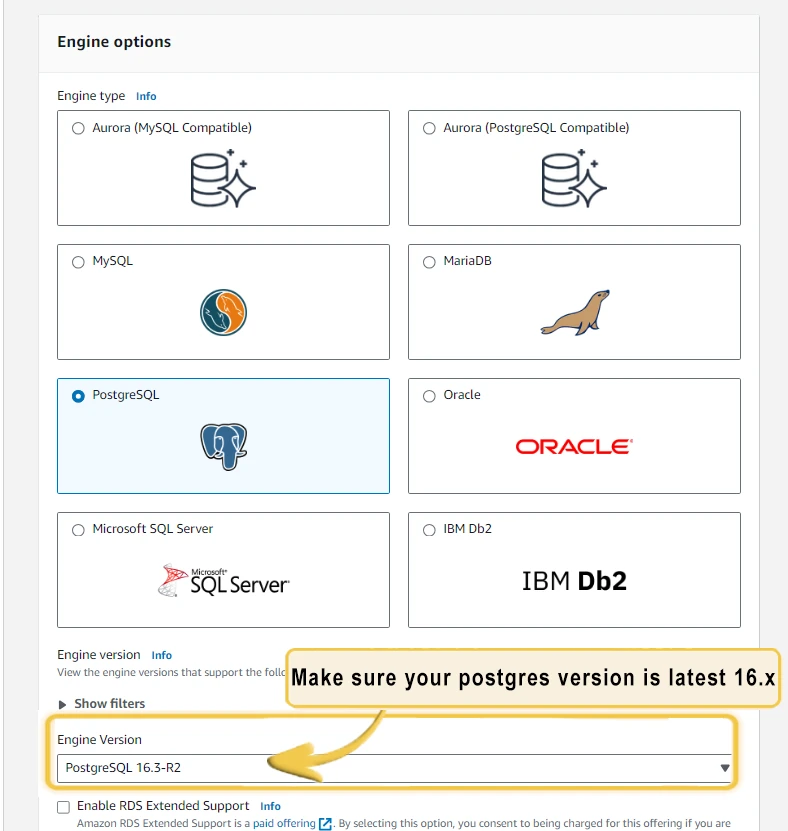
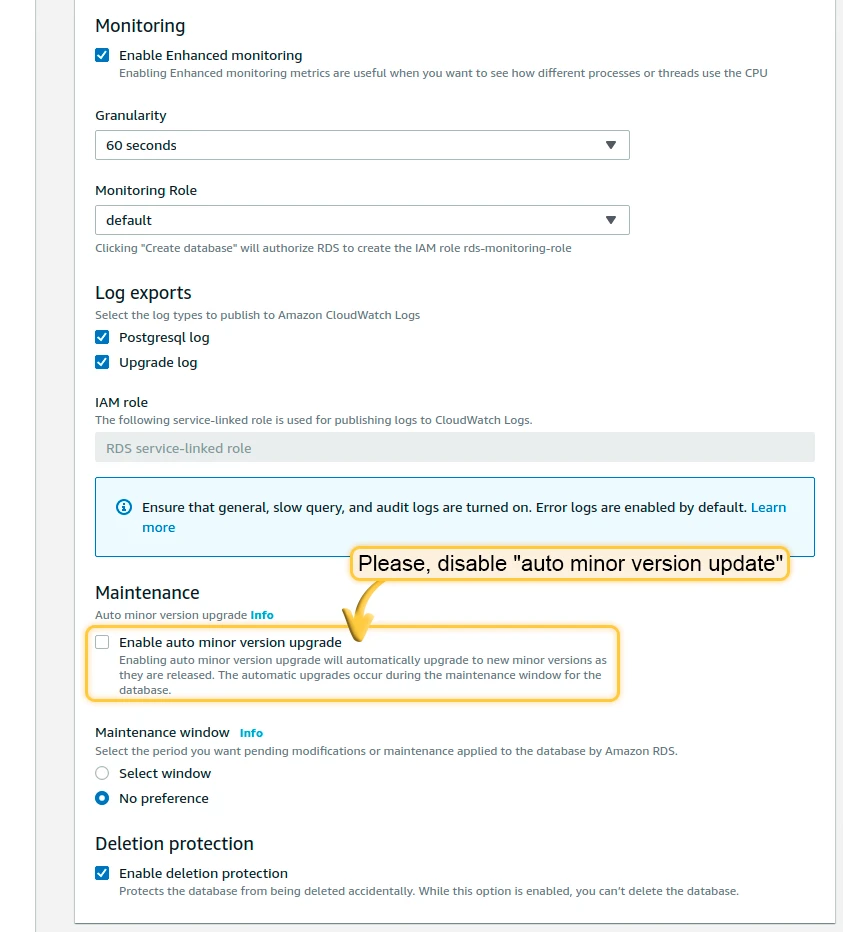
Section titled “4.1 Amazon PostgreSQL DB configuration”Set up PostgreSQL on Amazon RDS. Follow this guide, but take into account the following requirements:
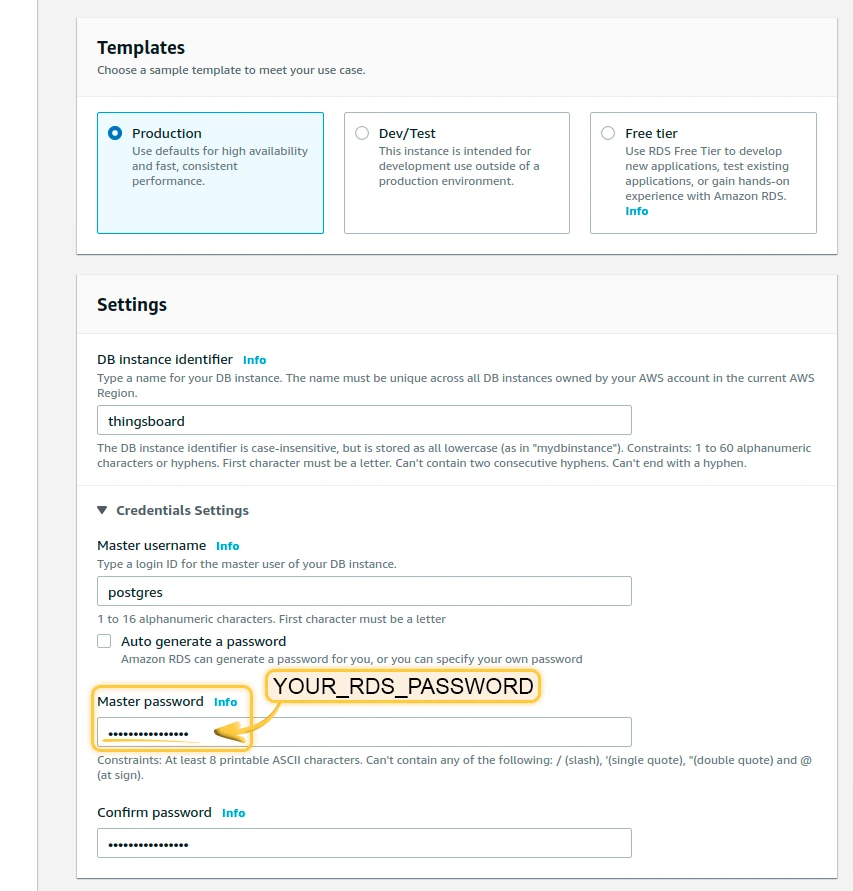
- Keep your PostgreSQL password in a safe place. We will refer to it later as YOUR_RDS_PASSWORD.
- Make sure your PostgreSQL version is latest 16.x.
- Deploy the RDS instance in the same VPC and use the
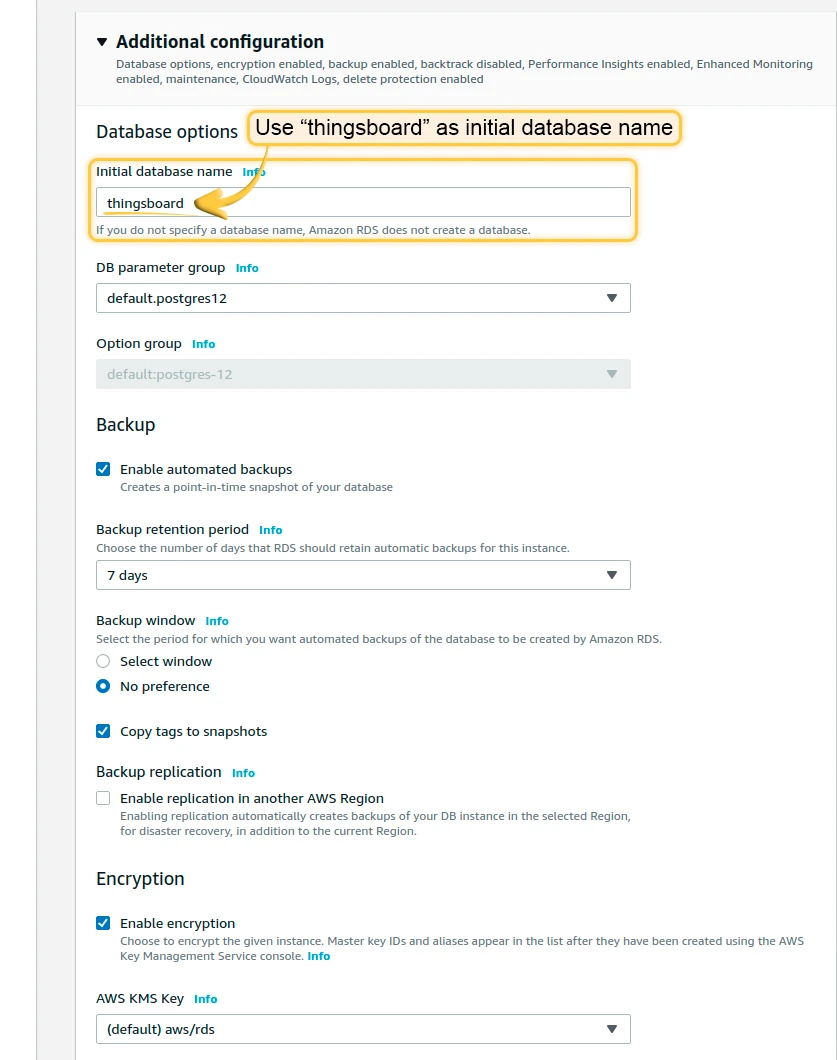
eksctl-thingsboard-cluster-ClusterSharedNodeSecurityGroup-*security group. - Use “thingsboard” as the initial database name.

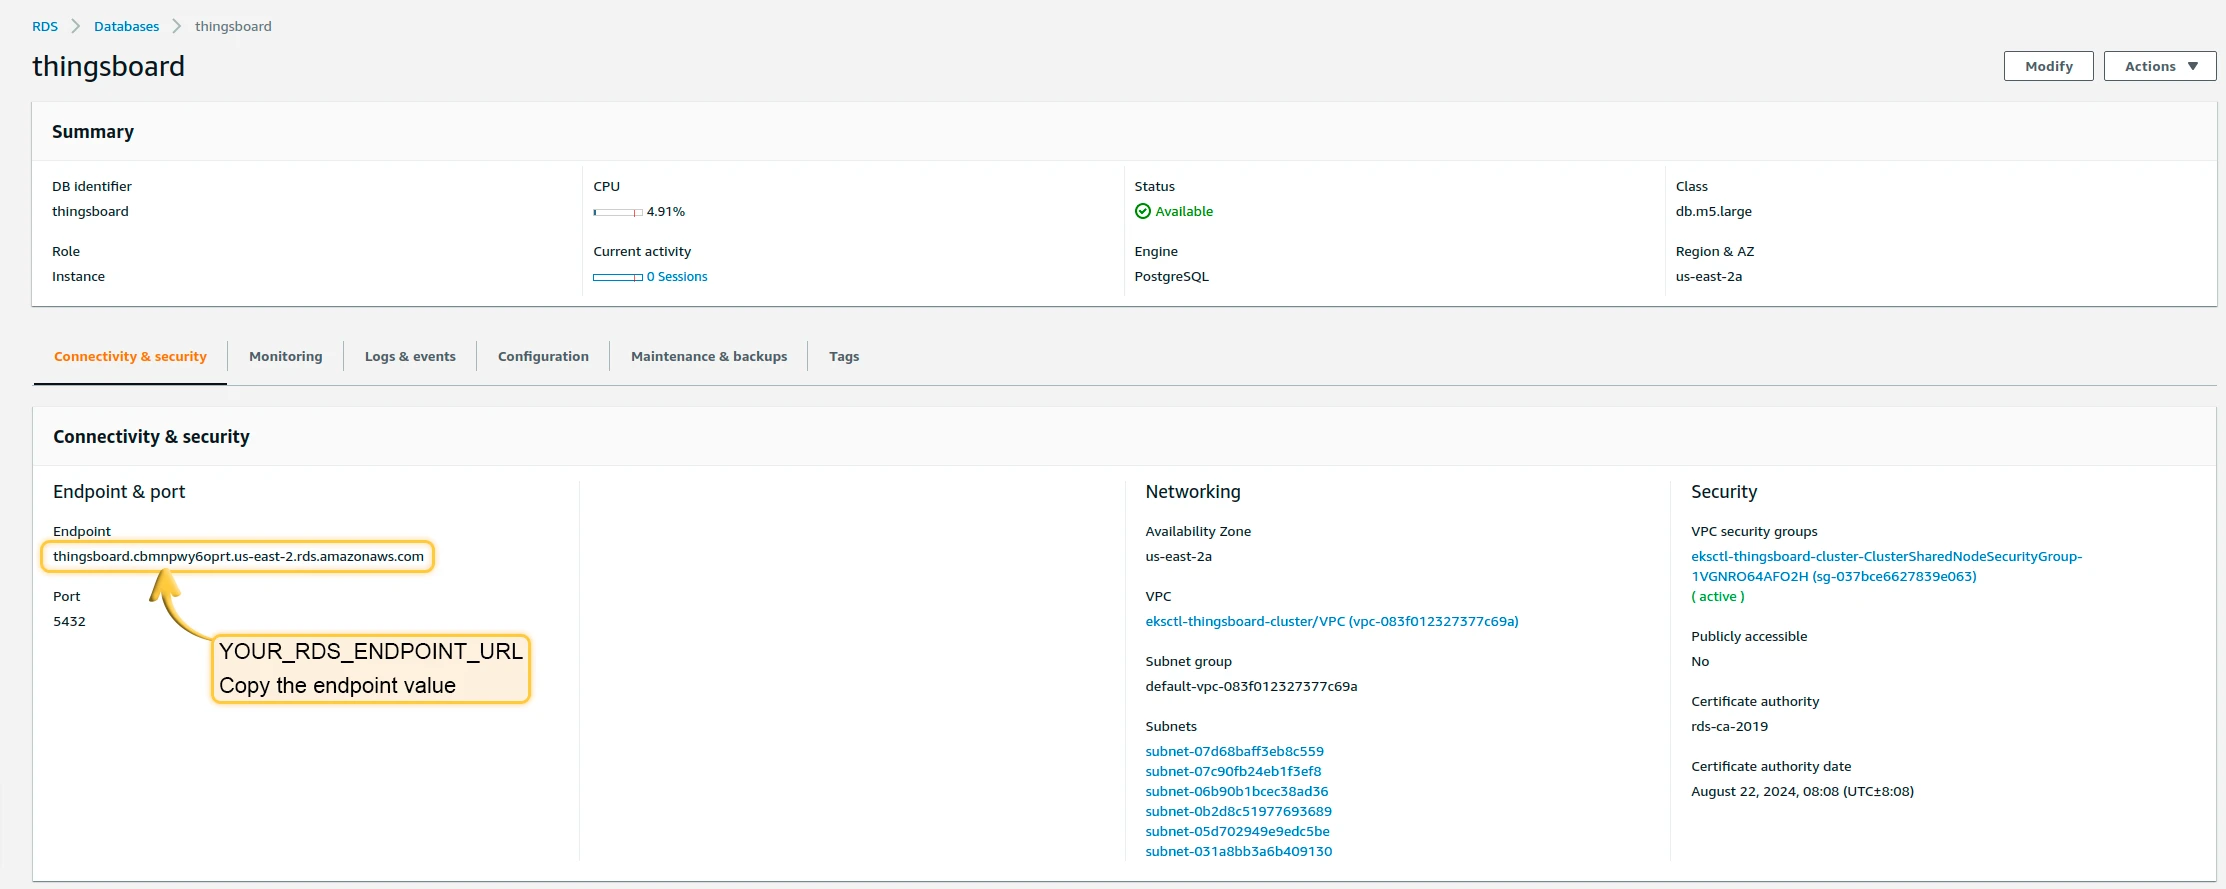
Once the database switches to the Available state, navigate to Connectivity and Security and copy the endpoint value (YOUR_RDS_ENDPOINT_URL).
4.2 Cassandra (optional)
Section titled “4.2 Cassandra (optional)”Using Cassandra is optional. We recommend it if you plan to insert more than 5K data points per second or want to optimize storage space.
Create 3 separate node pools with 1 node per zone:
eksctl create nodegroup --config-file=<path> --include='cassandra-*'Deploy Cassandra:
kubectl apply -f tb-namespace.ymlkubectl config set-context $(kubectl config current-context) --namespace=thingsboardkubectl apply -f receipts/cassandra.ymlUpdate DB settings (replace YOUR_AWS_REGION):
echo " DATABASE_TS_TYPE: cassandra" >> tb-node-db-configmap.ymlecho " CASSANDRA_URL: cassandra:9042" >> tb-node-db-configmap.ymlecho " CASSANDRA_LOCAL_DATACENTER: YOUR_AWS_REGION" >> tb-node-db-configmap.ymlCreate keyspace:
kubectl exec -it cassandra-0 -- bash -c "cqlsh -e \ \"CREATE KEYSPACE IF NOT EXISTS thingsboard \ WITH replication = { \ 'class' : 'NetworkTopologyStrategy', \ 'us-east' : '3' \ };\""Step 5. Amazon MSK configuration (optional)
Section titled “Step 5. Amazon MSK configuration (optional)”ThingsBoard uses Kafka as an external queue for exchanging data between microservices. By default, the deployment uses local Kafka, but ThingsBoard is also compatible with Amazon MSK.
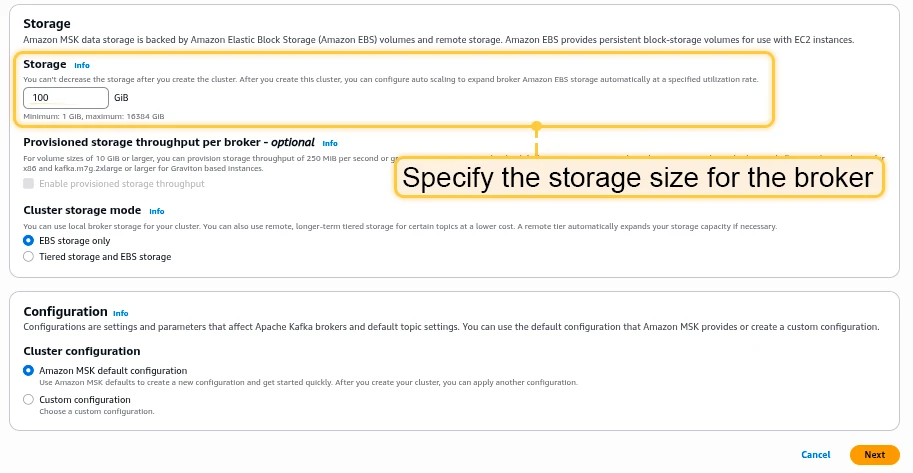
Steps to create a basic Kafka MSK cluster:
- Open the AWS console, go to MSK and click Create Cluster.
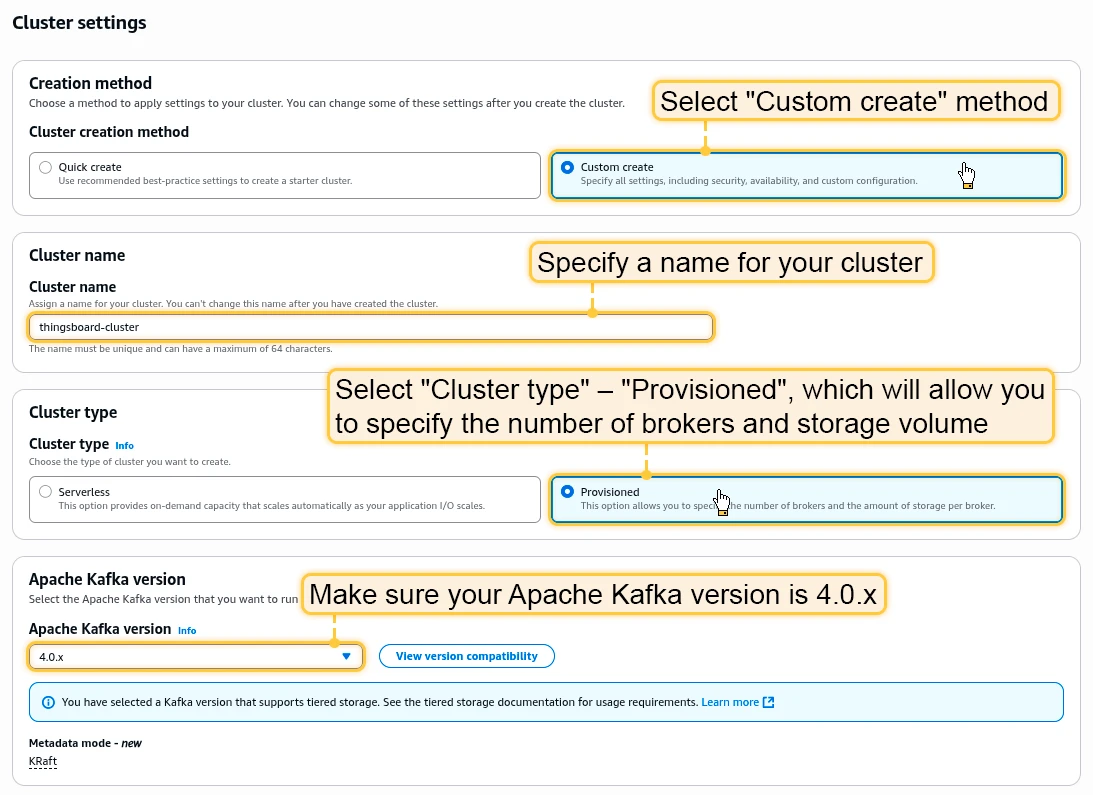
- Select Custom creation method.
- Specify a name and select Cluster type → Provisioned.
- Select Apache Kafka version 3.8.x (Express brokers) or 4.0.x (Standard brokers).
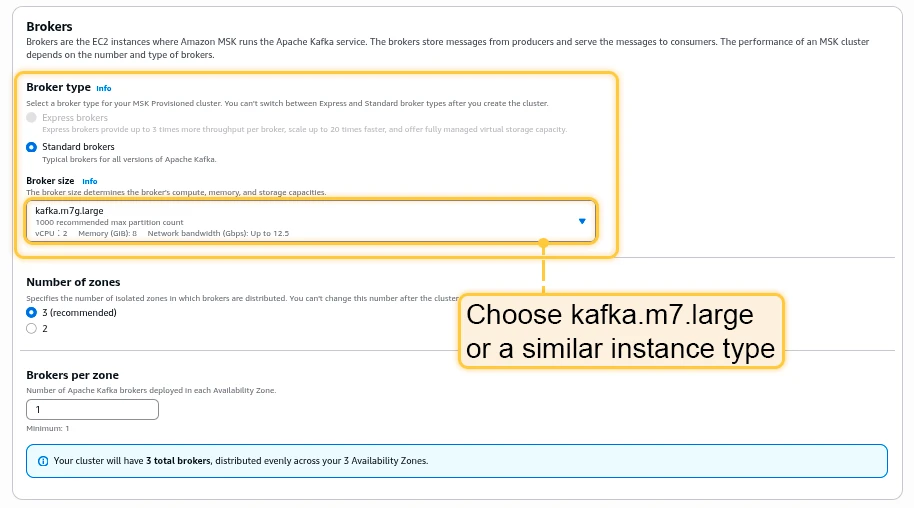
- Choose kafka.m7.large or similar instance types.
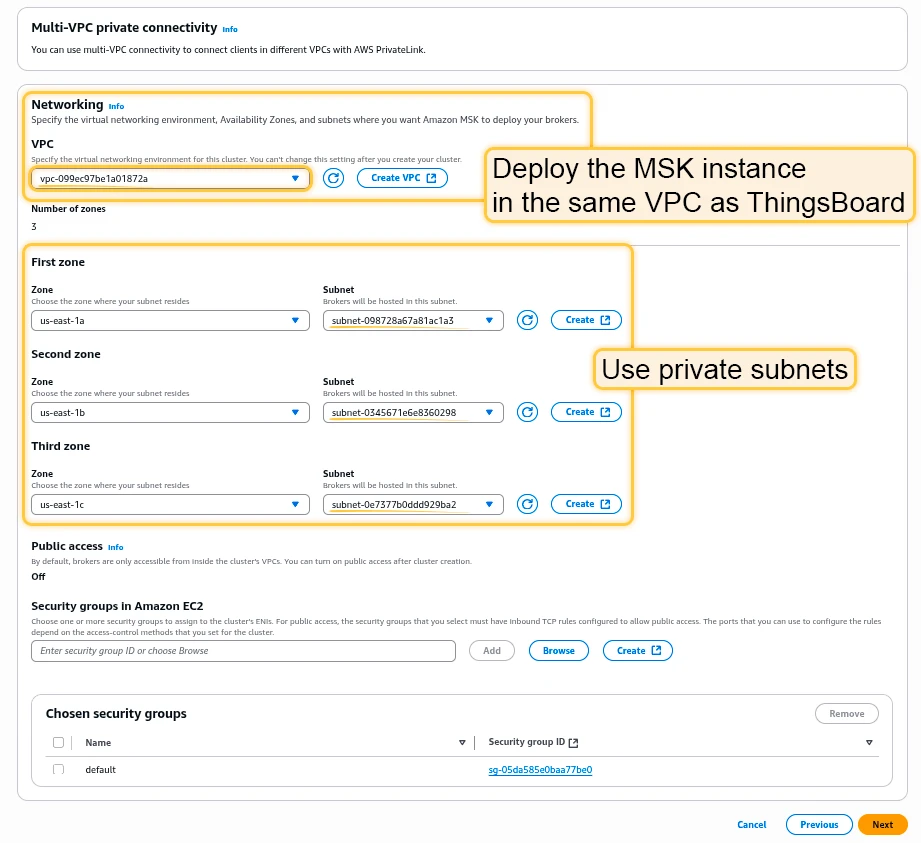
- Deploy the MSK instance in the same VPC as the ThingsBoard cluster.
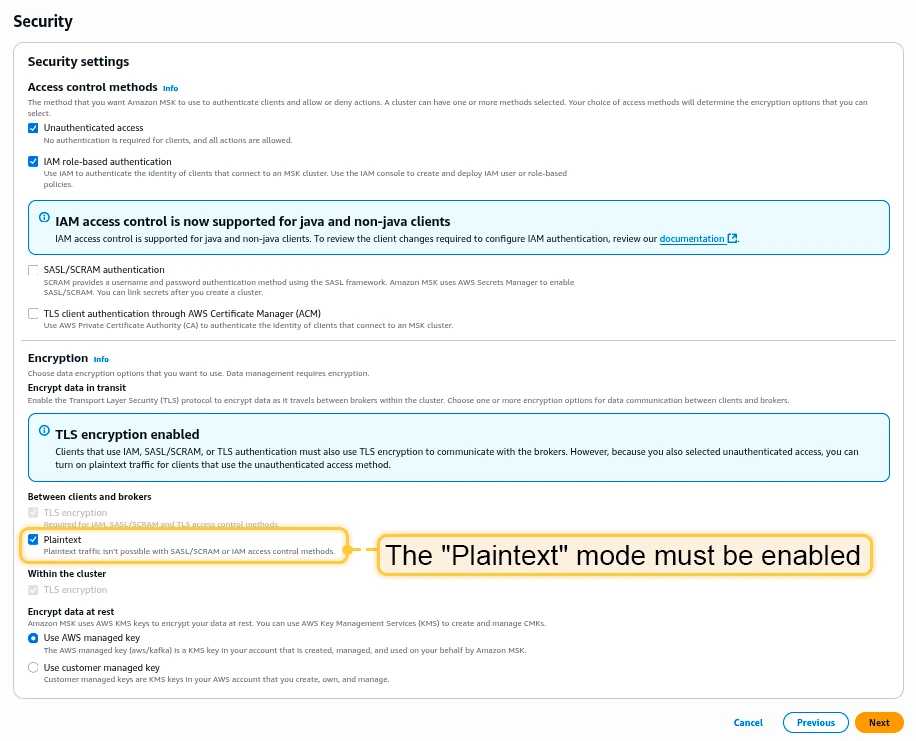
- Use the default security settings with Plaintext mode enabled.
Once the MSK cluster switches to the Active state, navigate to Details and click View client information. Copy the bootstrap server information in plaintext.

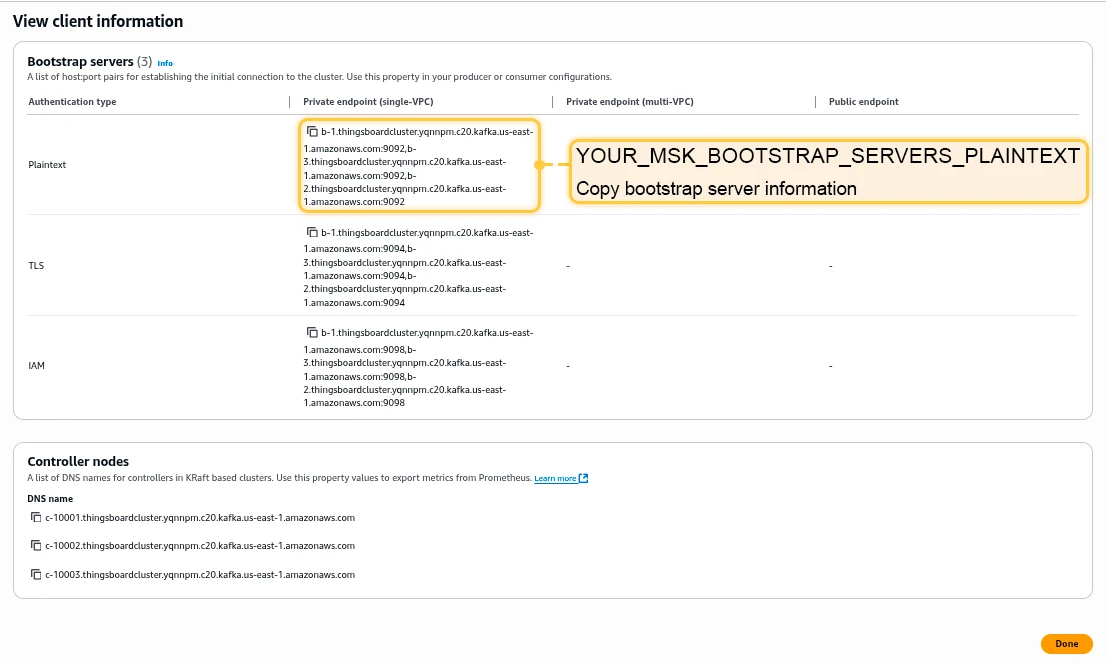
Edit tb-kafka.yml, find the StatefulSet tb-kafka, and set spec.replicas to 0. Edit tb-kafka-configmap.yml and replace TB_KAFKA_SERVERS with your MSK endpoint.
Step 6. Amazon ElastiCache configuration (optional)
Section titled “Step 6. Amazon ElastiCache configuration (optional)”ThingsBoard uses cache to improve performance. By default, the deployment uses a local Valkey cache, but ThingsBoard is also compatible with Amazon ElastiCache.
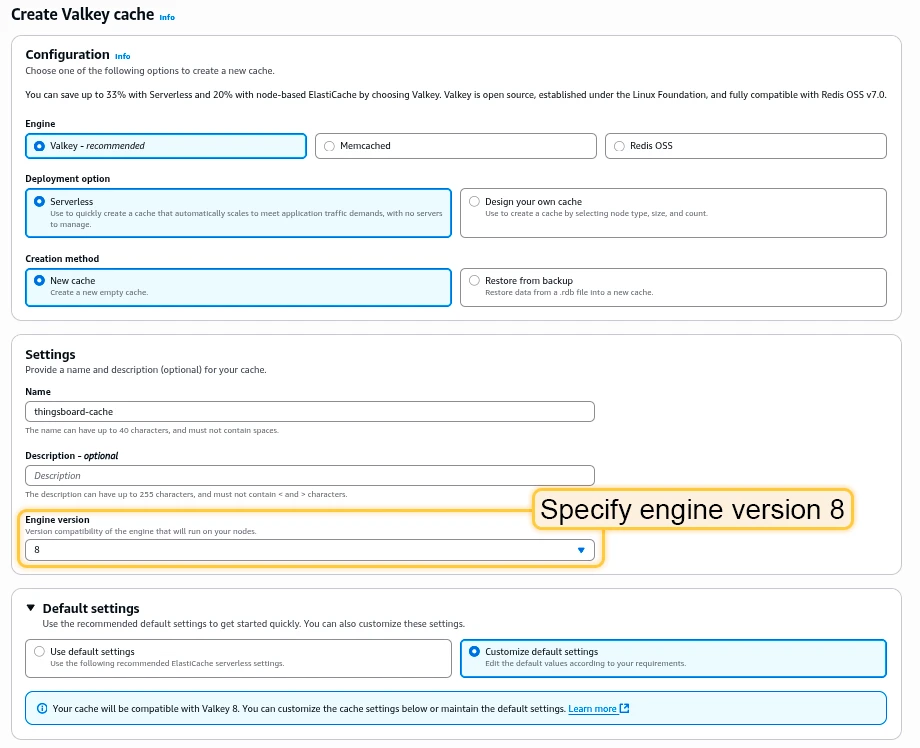
- Navigate to ElastiCache Valkey caches and click Create.
- Specify Valkey Engine version 8.x and a node type with at least 1 GB of RAM.
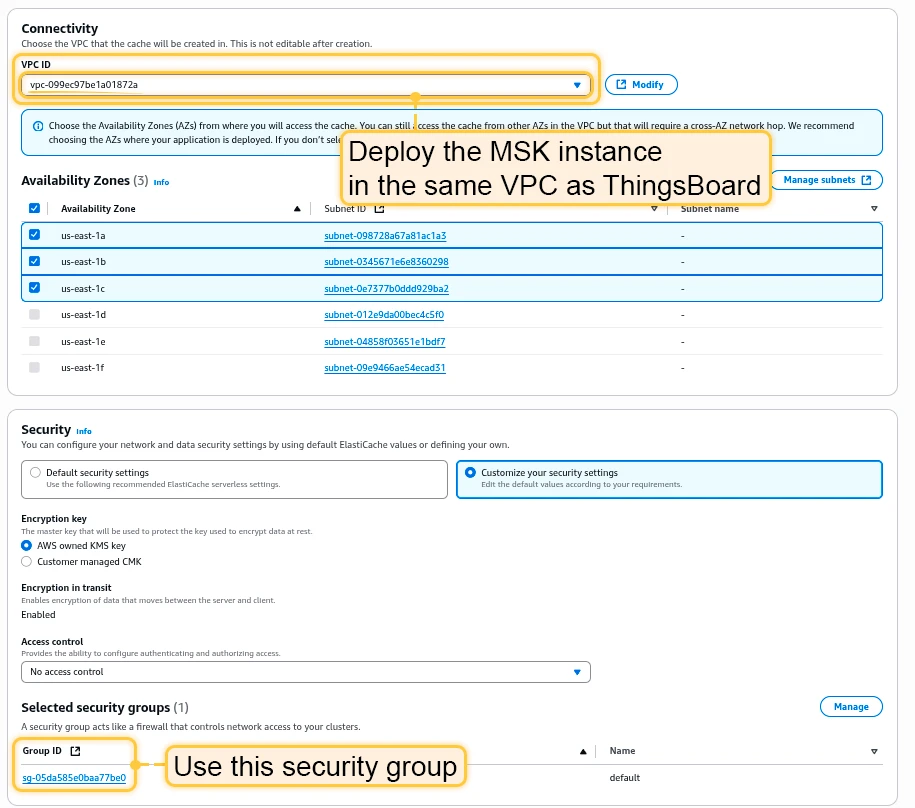
- Deploy in the same VPC as the ThingsBoard cluster.
- Disable Enable automatic backups.
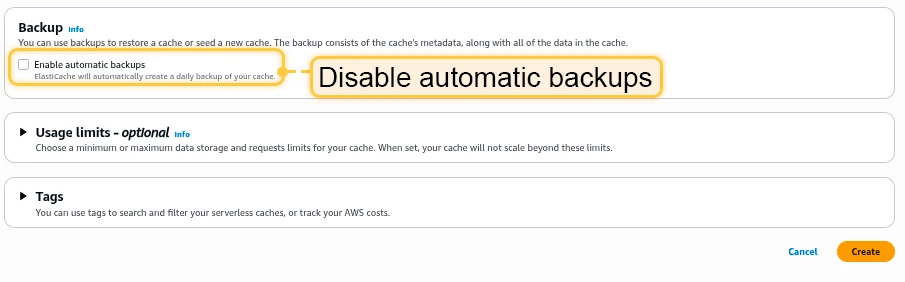
Once the Valkey cluster switches to Available, copy the Endpoint field without the ":6379" port suffix.
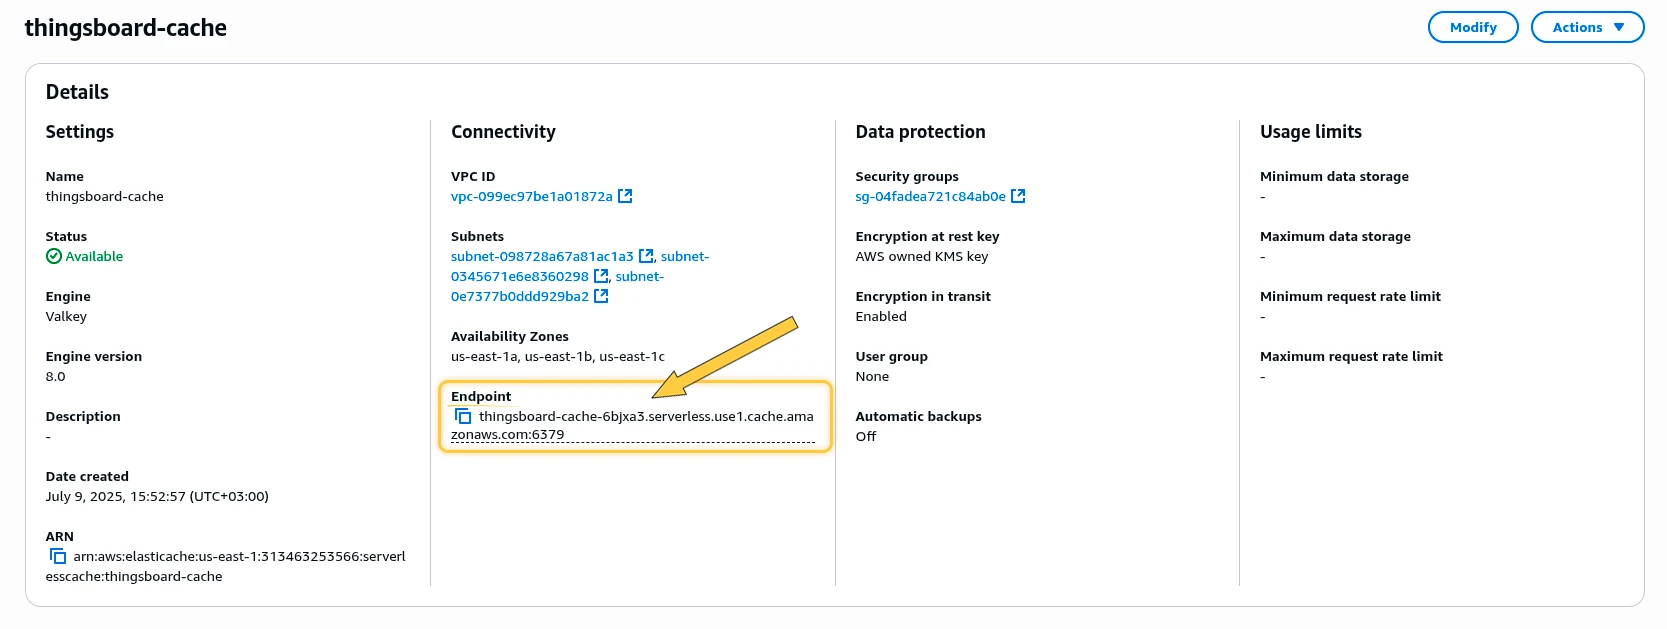
Edit tb-valkey.yml and set spec.replicas to 0. Edit tb-cache-configmap.yml and replace REDIS_HOST with your Valkey endpoint.
Step 7. CPU and memory resources allocation
Section titled “Step 7. CPU and memory resources allocation”The scripts have preconfigured values of resources for each service. You can change them in .yml files under the resources section.
| Service | CPU | Memory |
|---|---|---|
| TB Node | 1.0 | 2Gi |
| TB HTTP Transport | 0.5 | 0.5Gi |
| TB MQTT Transport | 0.5 | 0.5Gi |
| TB CoAP Transport | 0.5 | 0.5Gi |
| TB Web UI | 0.1 | 100Mi |
| JS Executor | 0.1 | 100Mi |
| Zookeeper | 0.1 | 0.5Gi |
Step 8. Installation
Section titled “Step 8. Installation”./k8s-install-tb.sh --loadDemoWhere --loadDemo is an optional argument to load additional demo data.
After this command finishes you should see:
Installation finished successfully!Step 9. Starting
Section titled “Step 9. Starting”Deploy ThingsBoard services:
./k8s-deploy-resources.shAfter a few minutes, call kubectl get pods. You should see:
- 5x
tb-pe-js-executor - 2x
tb-pe-web-ui - 1x
tb-pe-node - 1x
tb-pe-web-report - 3x
zookeeper
Every pod should be in the READY state.
Deploy transport microservices
Section titled “Deploy transport microservices”Deploy the transport microservices you need:
# HTTP Transport (optional)kubectl apply -f transports/tb-http-transport.yml
# MQTT Transport (optional)kubectl apply -f transports/tb-mqtt-transport.yml
# CoAP Transport (optional)kubectl apply -f transports/tb-coap-transport.yml
# LwM2M Transport (optional)kubectl apply -f transports/tb-lwm2m-transport.yml
# SNMP Transport (optional)kubectl apply -f transports/tb-snmp-transport.yml
Step 10. Configure load balancers
Section titled “Step 10. Configure load balancers”10.1 Configure HTTP(S) load balancer
Section titled “10.1 Configure HTTP(S) load balancer”HTTP load balancer
Section titled “HTTP load balancer”kubectl apply -f receipts/http-load-balancer.ymlCheck the status:
kubectl get ingressUse the address to access the HTTP web UI (port 80) and connect devices via HTTP API.
Default credentials:
- System Administrator: sysadmin@thingsboard.org / sysadmin
- Tenant Administrator: tenant@thingsboard.org / tenant (if demo data loaded)
- Customer User: customer@thingsboard.org / customer (if demo data loaded)
HTTPS load balancer
Section titled “HTTPS load balancer”Use AWS Certificate Manager to create or import an SSL certificate. Replace YOUR_HTTPS_CERTIFICATE_ARN in receipts/https-load-balancer.yml, then deploy:
kubectl apply -f receipts/https-load-balancer.yml10.2 Configure MQTT load balancer (optional)
Section titled “10.2 Configure MQTT load balancer (optional)”kubectl apply -f receipts/mqtt-load-balancer.ymlThe load balancer forwards all TCP traffic for ports 1883 and 8883.
For one-way TLS, use AWS Certificate Manager and edit receipts/mqtts-load-balancer.yml. For two-way TLS, follow the MQTT over SSL guide.
10.3 Configure UDP load balancer (optional)
Section titled “10.3 Configure UDP load balancer (optional)”kubectl apply -f receipts/udp-load-balancer.ymlThe load balancer forwards UDP traffic for ports 5683–5688 (CoAP and LwM2M protocols).
10.4 Configure Edge load balancer (optional)
Section titled “10.4 Configure Edge load balancer (optional)”kubectl apply -f receipts/edge-load-balancer.ymlThe load balancer forwards all TCP traffic on port 7070.
Step 11. Validate the setup
Section titled “Step 11. Validate the setup”Validate Web UI access
Section titled “Validate Web UI access”kubectl get ingressValidate MQTT/CoAP access
Section titled “Validate MQTT/CoAP access”kubectl get serviceTroubleshooting
Section titled “Troubleshooting”kubectl logs -f tb-node-0See the kubectl Cheat Sheet for more details.
Upgrading
Section titled “Upgrading”Merge your local changes with the latest release branch. If a database upgrade is needed:
./k8s-upgrade-tb.sh --fromVersion=[FROM_VERSION]See Upgrade Instructions for valid fromVersion values. Upgrade versions one by one.
Once completed, re-deploy resources:
./k8s-deploy-resources.shCluster deletion
Section titled “Cluster deletion”./k8s-delete-resources.sh./k8s-delete-all.sheksctl delete cluster -r us-east-1 -n thingsboard -wWas this helpful?