Uplink Data Converter
An Uplink Data Converter is a decoding function that transforms raw incoming data from an external system — MQTT broker, LoRaWAN network server, HTTP endpoint, and others — into the format ThingsBoard understands: devices, assets, telemetry, and attributes. Every integration requires at least one uplink converter to translate incoming messages into ThingsBoard entities. The converter runs server-side on every uplink message. It:
- receives the raw payload and associated metadata (device EUI, timestamps, gateway info, etc.),
- parses the payload into meaningful values (temperature, humidity, GPS coordinates, battery level, etc.),
- returns a structured object that tells ThingsBoard which device to update, what telemetry to save, and which attributes to set.
Converter Types
Section titled “Converter Types”A converter is created and managed in Integrations center ⇾ Data converters, but it only becomes active when assigned to an integration. You can create a converter in advance and select it during integration setup, or create it inline as part of the integration wizard.
ThingsBoard offers three approaches for writing the decoding logic. Choose based on your integration type and how standard your device payload is:
| Method | Best for | Scripting required |
|---|---|---|
| Typed | LoRaWAN platforms (ChirpStack, TTN, Loriot, ThingPark) — when the network server sends a structured JSON envelope and you want UI-guided setup | Optional — pre-filled |
| Library | Commercially manufactured LoRaWAN sensors from known vendors (Milesight, Bosch, Elsys, and others) — when your exact device model is in the catalog | No |
| Generic | Any integration type (MQTT, HTTP, TCP, AWS IoT, etc.) — when you need full control over a custom binary protocol or non-standard payload structure | Yes |
Typed Uplink Converter
Section titled “Typed Uplink Converter”The Typed converter is available for six LoRaWAN platforms. ThingsBoard knows the exact JSON envelope each platform sends and pre-fills a decoder script accordingly. For structured JSON payloads, no script changes are needed. For binary payloads, modify the pre-filled decoder to match your device’s format.
Supported integrations:
| Integration | Notes |
|---|---|
| ChirpStack | LoRaWAN network configuration server |
| Loriot | Commercial LoRaWAN network |
| The Things Stack Community | Open and decentralized LoRaWAN network (TTN) |
| The Things Stack Industries | Private LoRaWAN network deployment |
| ThingPark | Actility’s enterprise LoRaWAN platform |
| ThingPark Enterprise | On-premise Actility deployment |
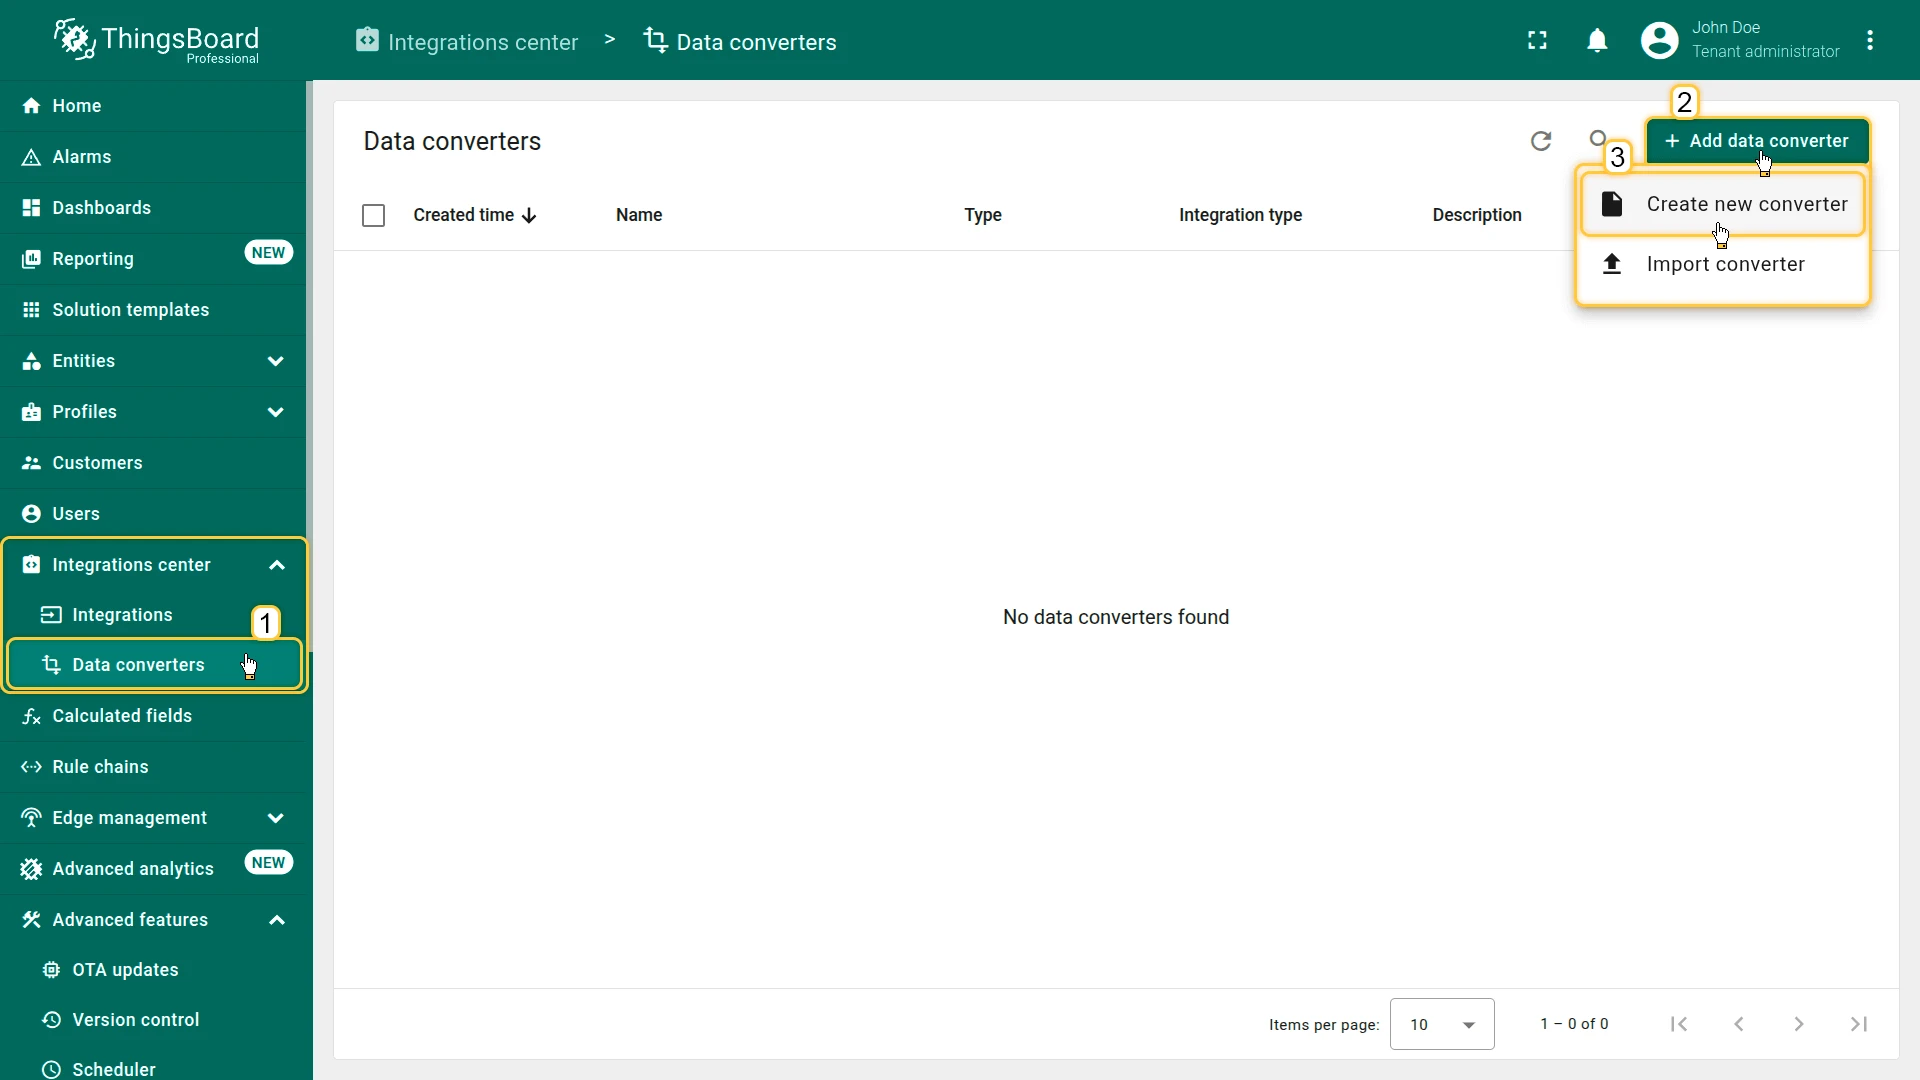
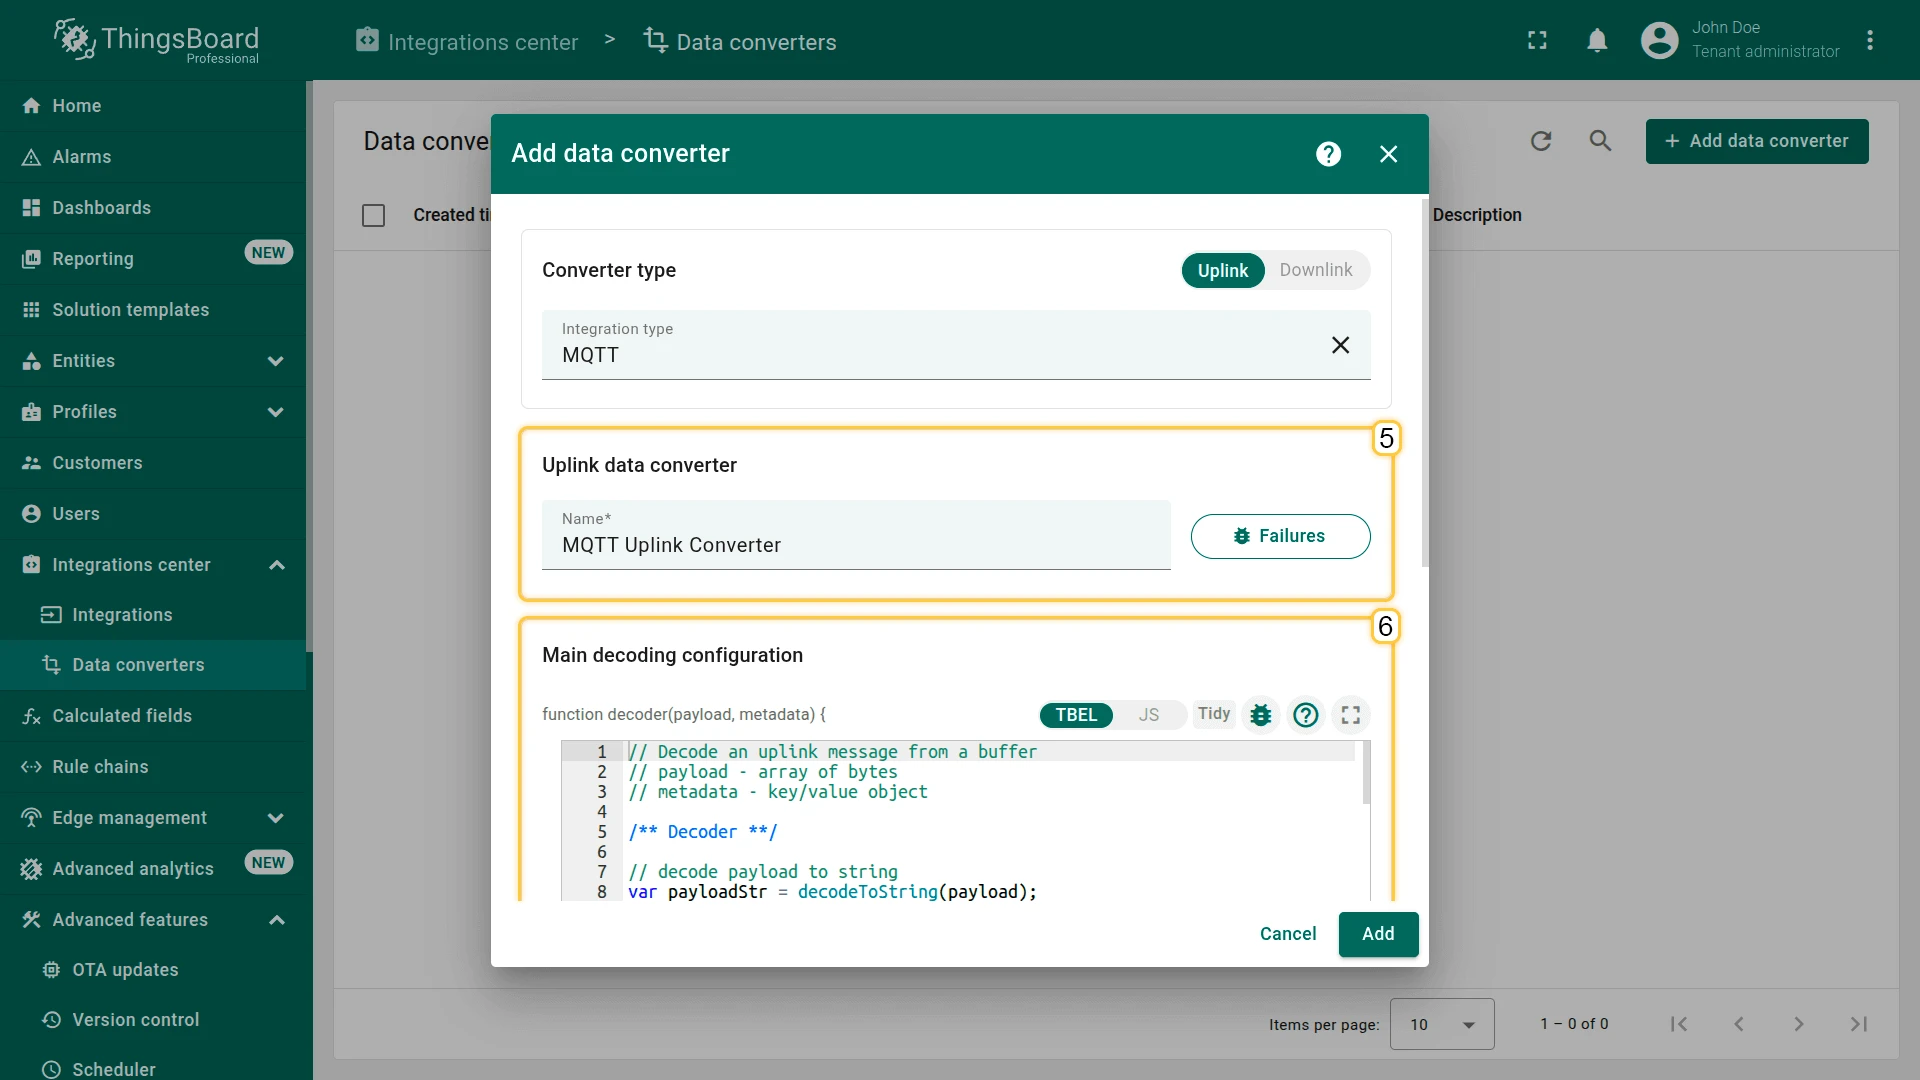
- Go to Integrations center ⇾ Data converters.
- Click + Add data converter ⇾ Create new converter.
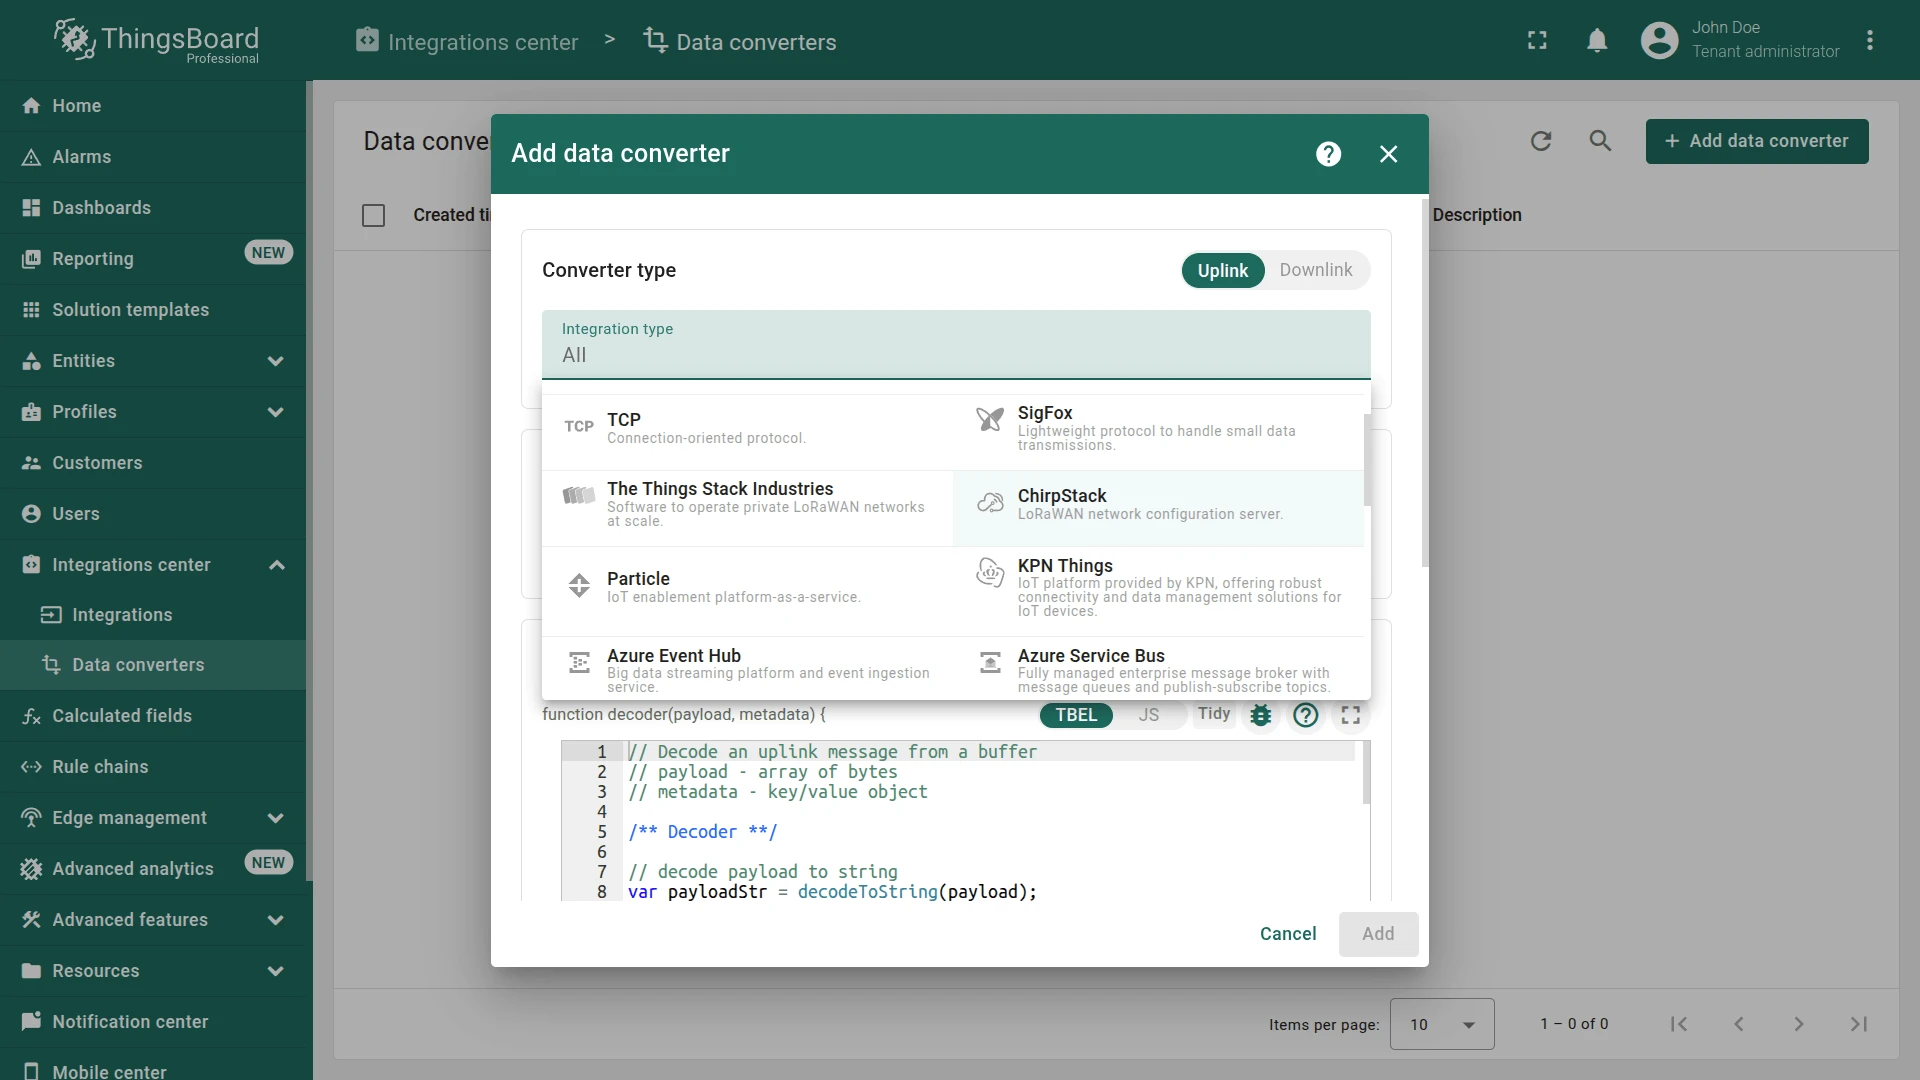
- Converter type — leave Uplink (selected by default).
- Integration type — select a supported integration from the list.
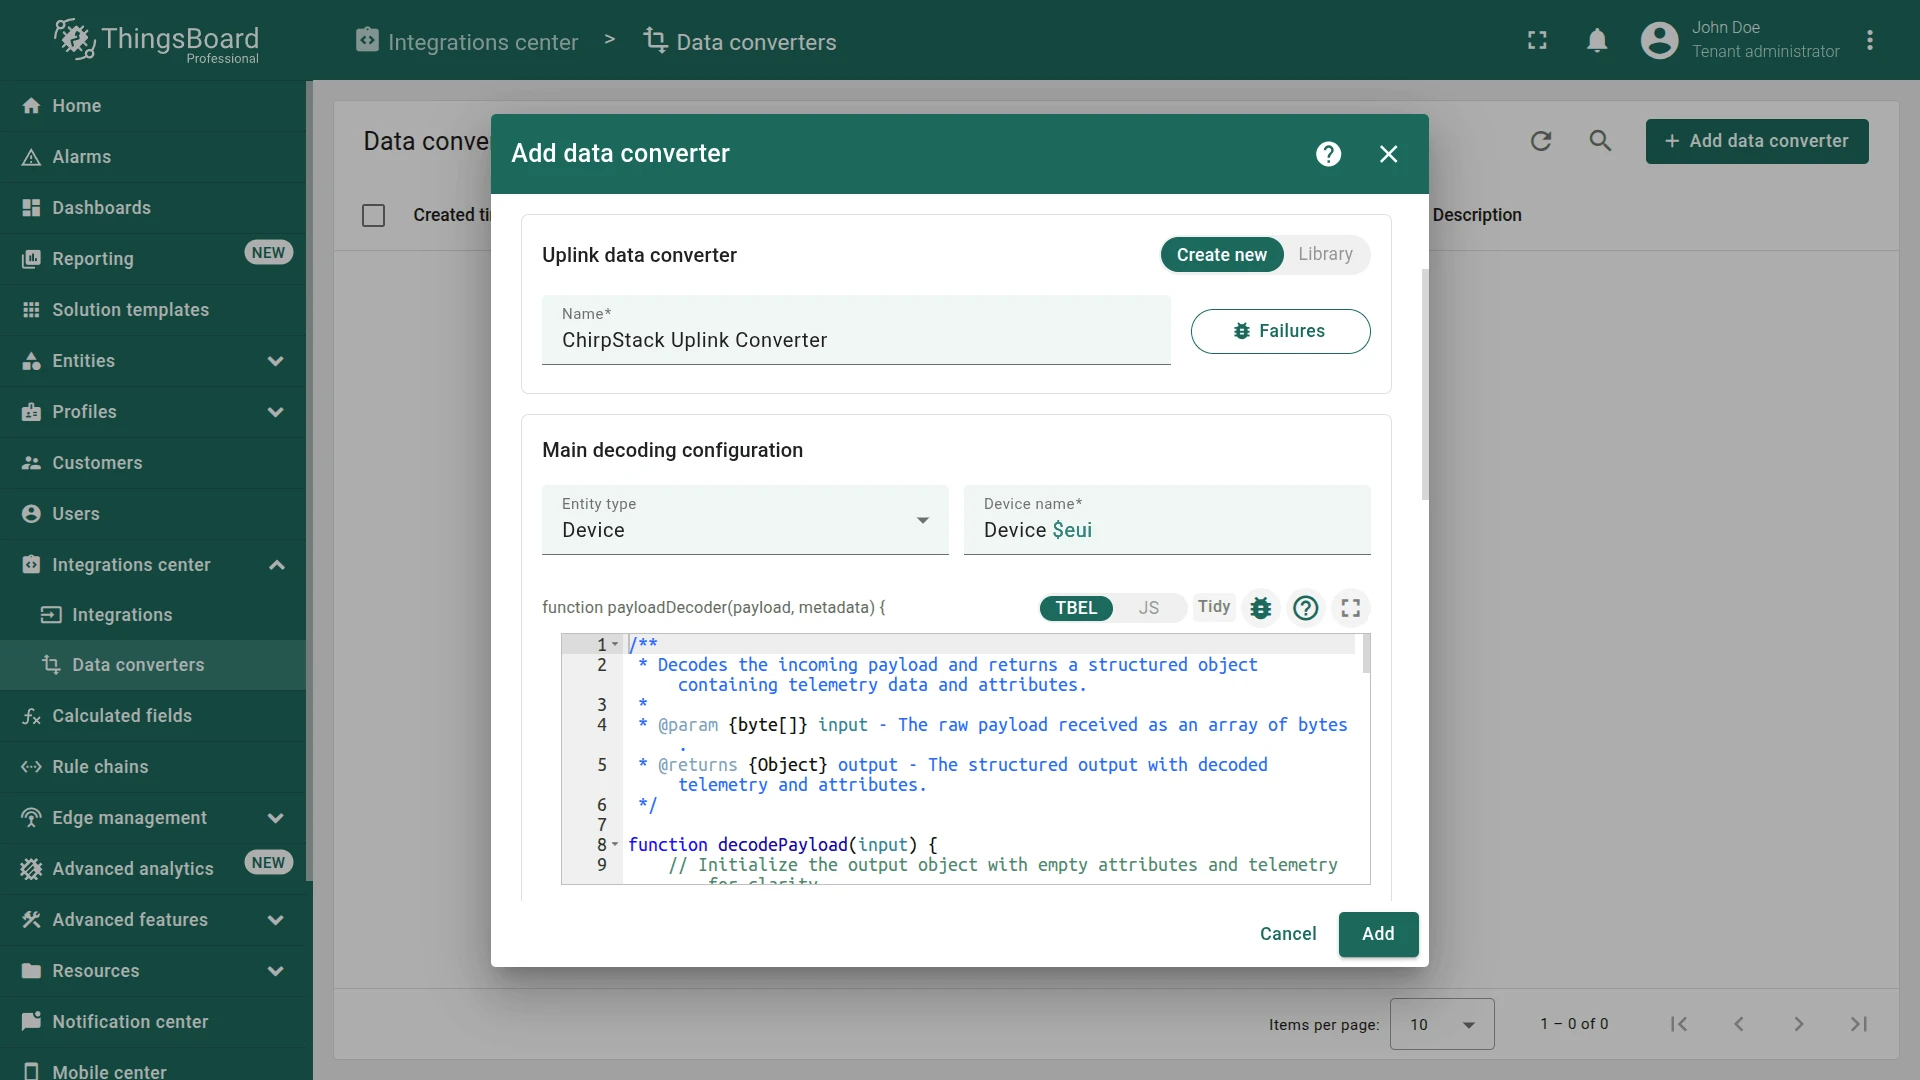
- Enter a converter name.
- Main decoding configuration:
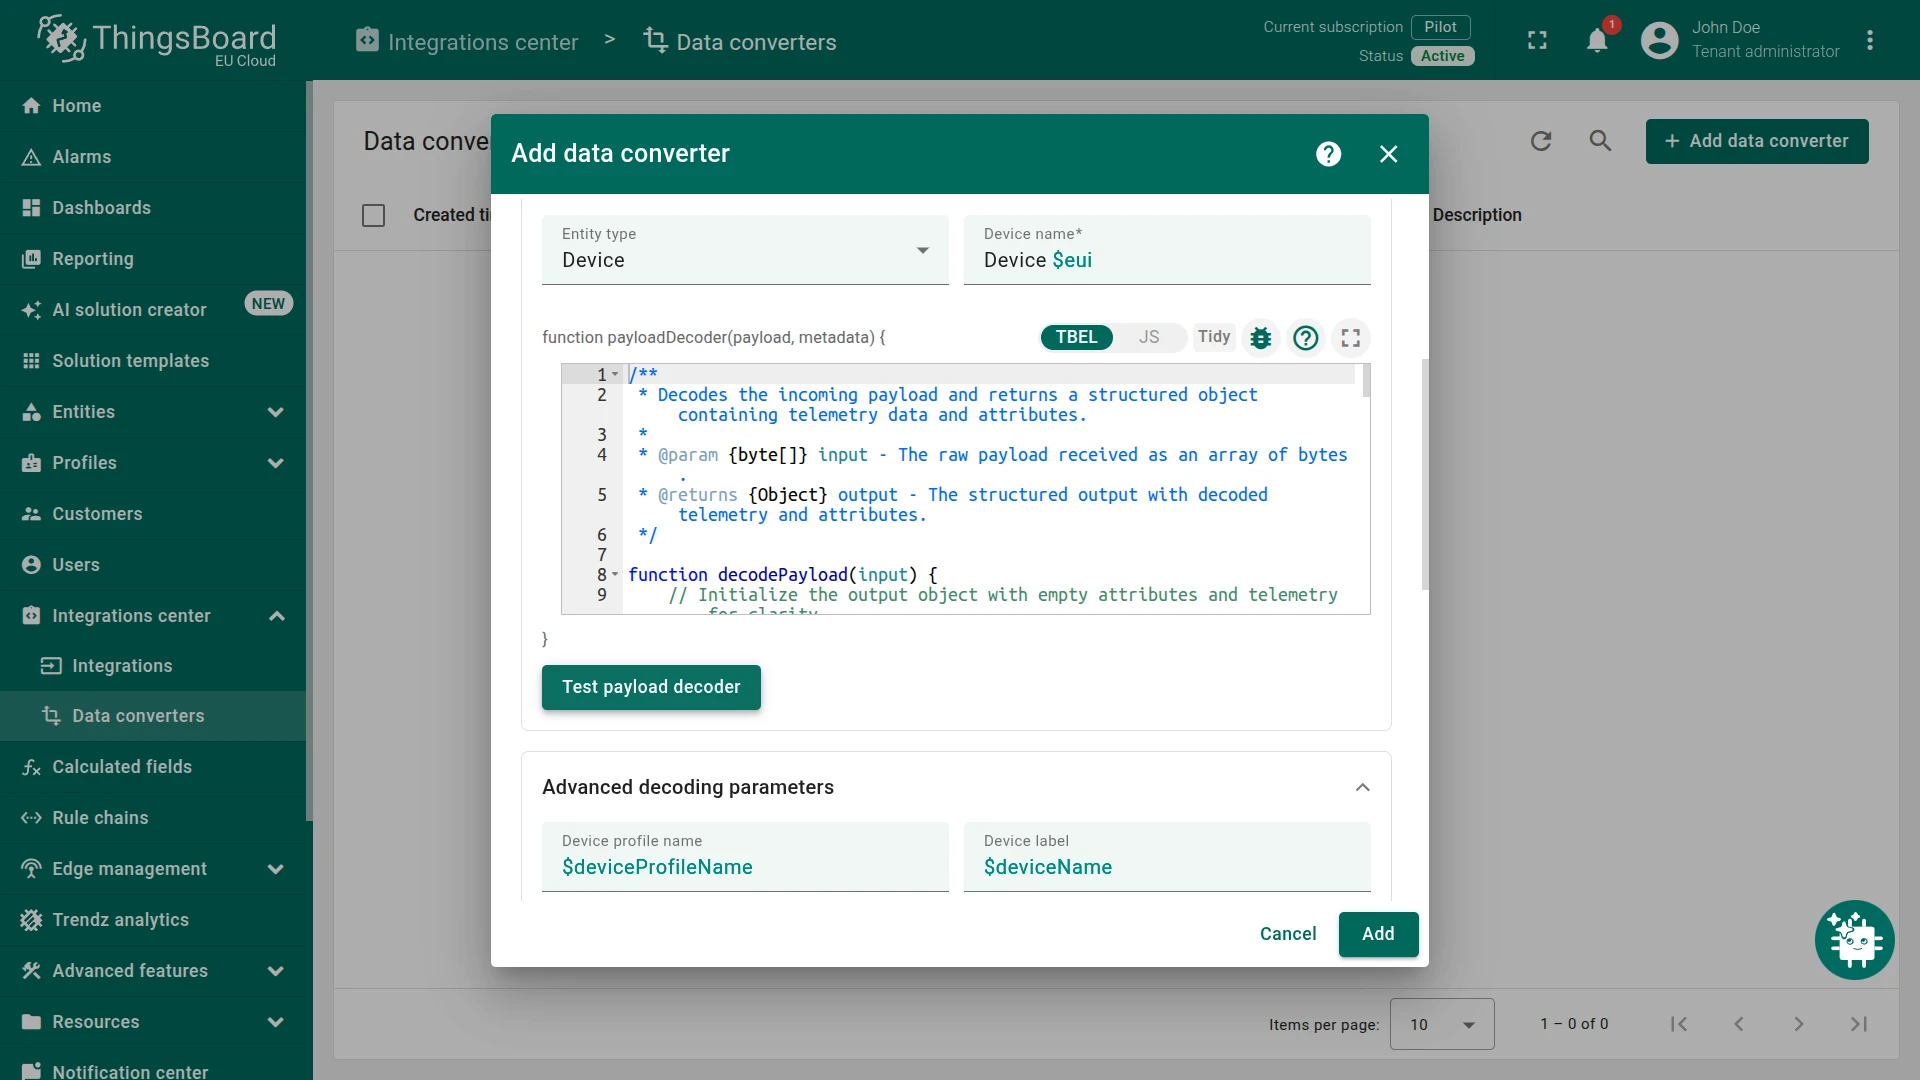
- Entity type — choose
Device(default) orAsset. - Entity name — a template string for the device name. The default is
Device $eui, where$euiis substituted at runtime with the actual EUI from the message. - Auto-generated decoder script that receives the already-parsed JSON from the network server and a metadata object. You can modify it or leave the default. Optionally, use Test payload decoder to validate against a sample message.
- Entity type — choose
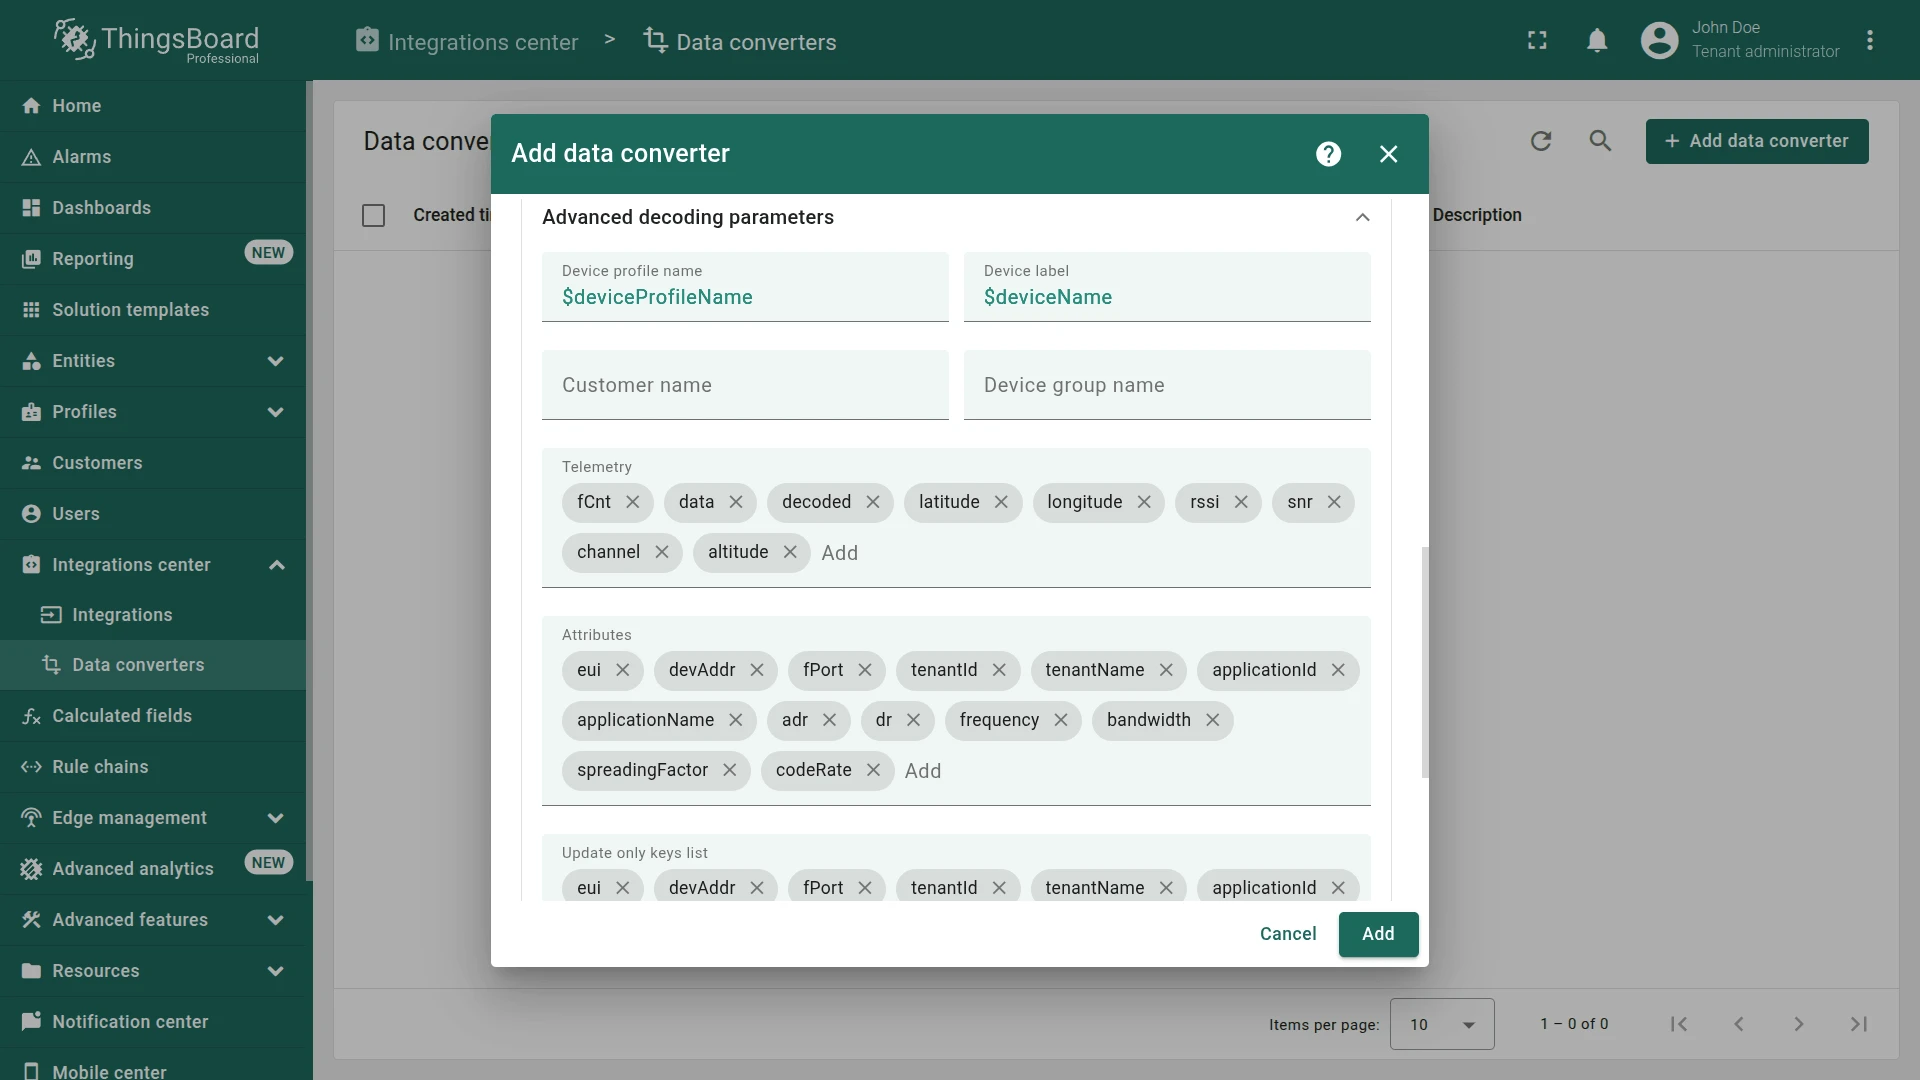
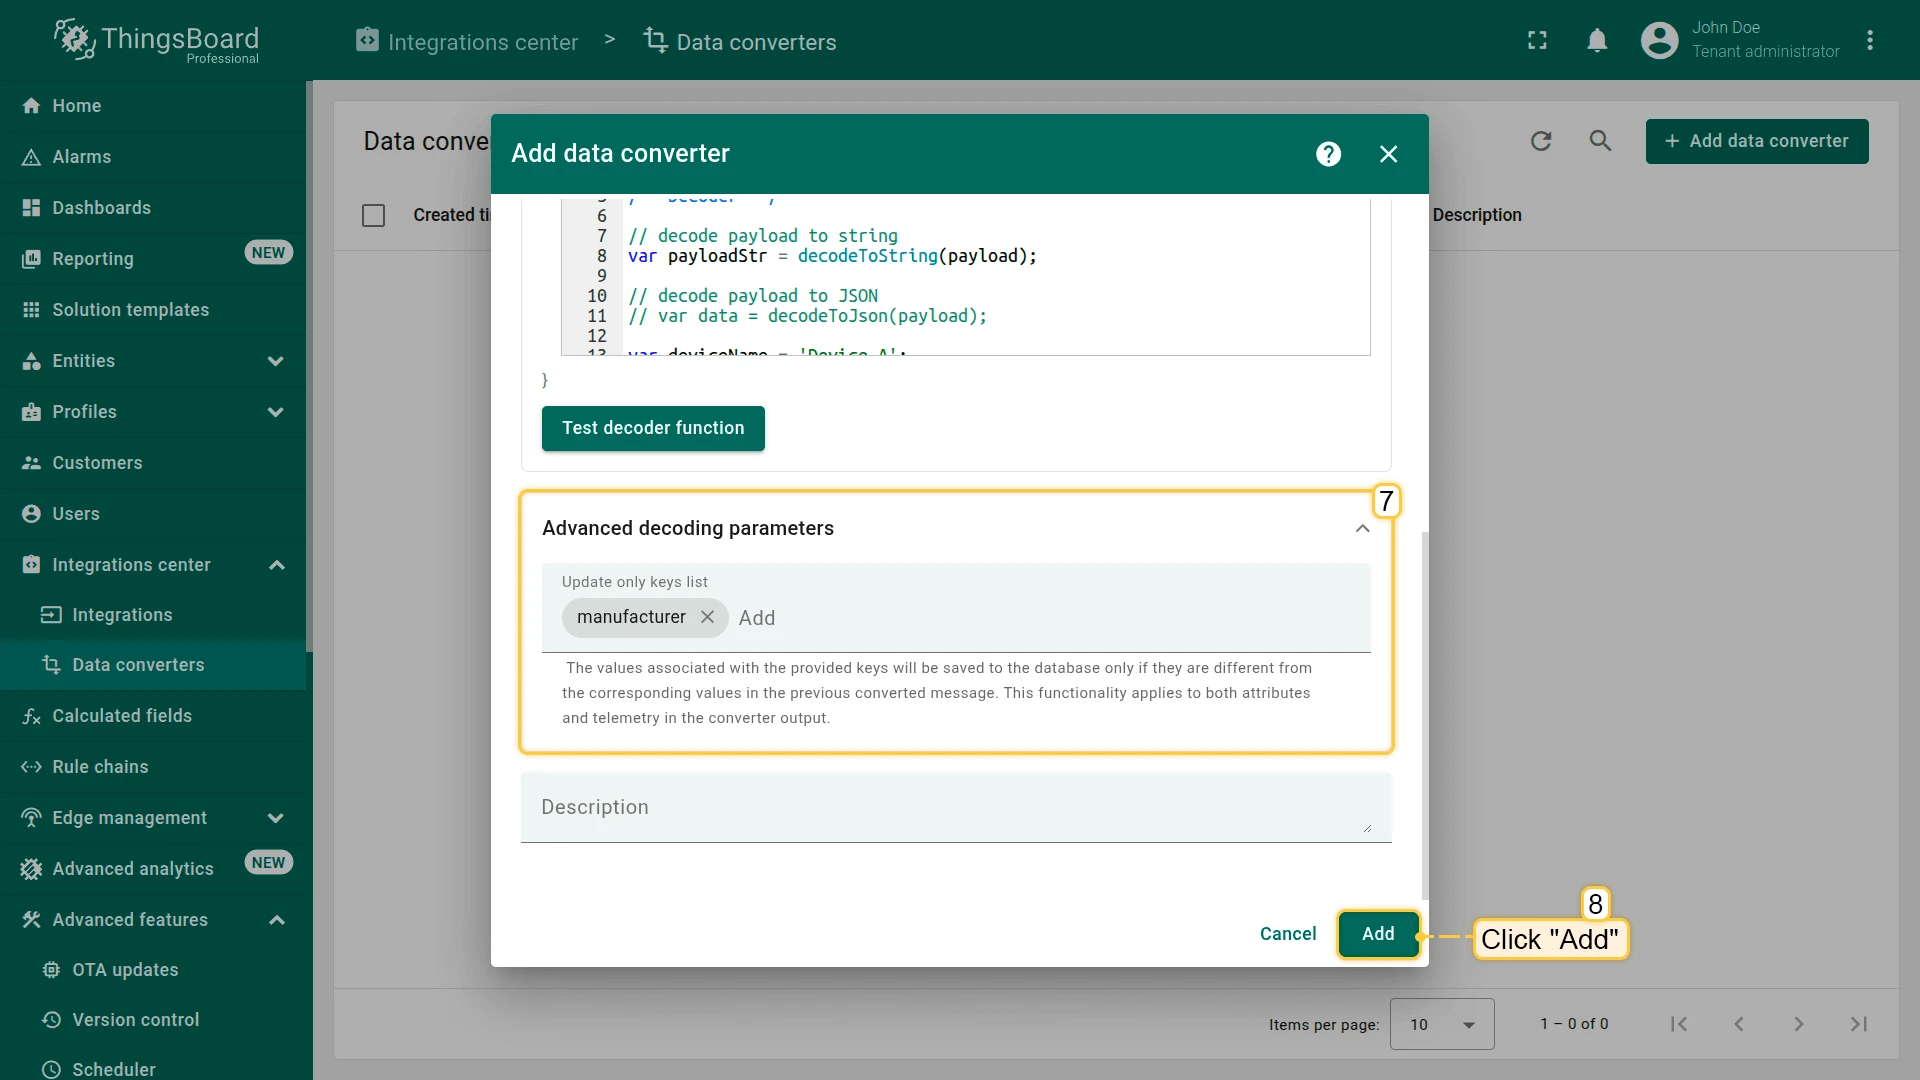
- Advanced decoding parameters
- Review and adjust the pre-populated device (asset) profile name, label, customer, group, telemetry keys, attribute keys, and update-only keys list.
- Click Add.
Main Decoding Configuration
Section titled “Main Decoding Configuration”Entity type
The type of entity the converter creates or updates — Device (default) or Asset.
Device/Asset name
Name pattern for the entity. Use any $key variable (where key is an auto-extracted field name) to substitute values from the incoming message — for example, Device $eui. Available fields vary by integration type; common LoRaWAN fields include $eui, $deviceId, $applicationId, $devAddr. The full set for each integration is listed in the integration-specific guide and visible in the test decoder’s Metadata panel.
Decoder script
Auto-generated payloadDecoder(payload, metadata) function (TBEL or JavaScript) that decodes the raw device payload and returns sensor data as attributes and telemetry. You can modify or fully replace it.
The function receives:
payload— the raw device payload, already parsed by ThingsBoard from the network server’s JSON envelope and passed as a JavaScript object. Unlike the Generic converter wherepayloadis a byte array, here you access fields directly on the object. The exact structure depends on the integration type — refer to the integration-specific guide for the field layout.metadata— auto-extracted network fields, includingts(message timestamp in ms) and integration-specific keys such aseui,devAddr,fPort,rssi,snr, and others. The full set of available fields is visible in the test decoder’s Metadata panel and listed in Advanced decoding parameters.
The function must return:
return { attributes: { key: 'value' }, telemetry: { ts: metadata.ts, values: { temperature: 23.5 } }};Do not return deviceName or deviceType — ThingsBoard resolves those from the entity type and name pattern above. To override entity properties from the script (for example, when the device name is encoded in the payload), declare a result object, set the fields you want to override, and return it:
var result = {};result.attributes = {};result.telemetry  = {};
// Uncomment and set any of the following to override the UI configuration:// result.name     = 'MySensor';         // overrides the Device name pattern// result.type     = 'ASSET';            // overrides Entity type// result.profile  = 'SensorProfile';   // overrides Device profile name// result.customer = 'Acme Corp';        // assigns device to a customer// result.group    = 'SensorsGroup';     // adds device to an entity group
return result;
Converters Library
Section titled “Converters Library”ThingsBoard maintains a catalog of ready-made decoders for 100+ devices from vendors including AgroSense, Bosch, Decentlab, Elsys, Lansitec, Milesight, and others. Selecting a model auto-populates the name and the full decoding function — you can use it as-is or edit it.
Supported integrations: HTTP, ChirpStack, Loriot, The Things Stack Community, The Things Stack Industries, ThingPark, and ThingPark Enterprise.
Setup steps:
- Go to Integrations center ⇾ Data converters.
- Click + Add data converter ⇾ Create new converter.
- Converter type — leave Uplink (selected by default).
- Integration type — select supported platform (e.g., ChirpStack).
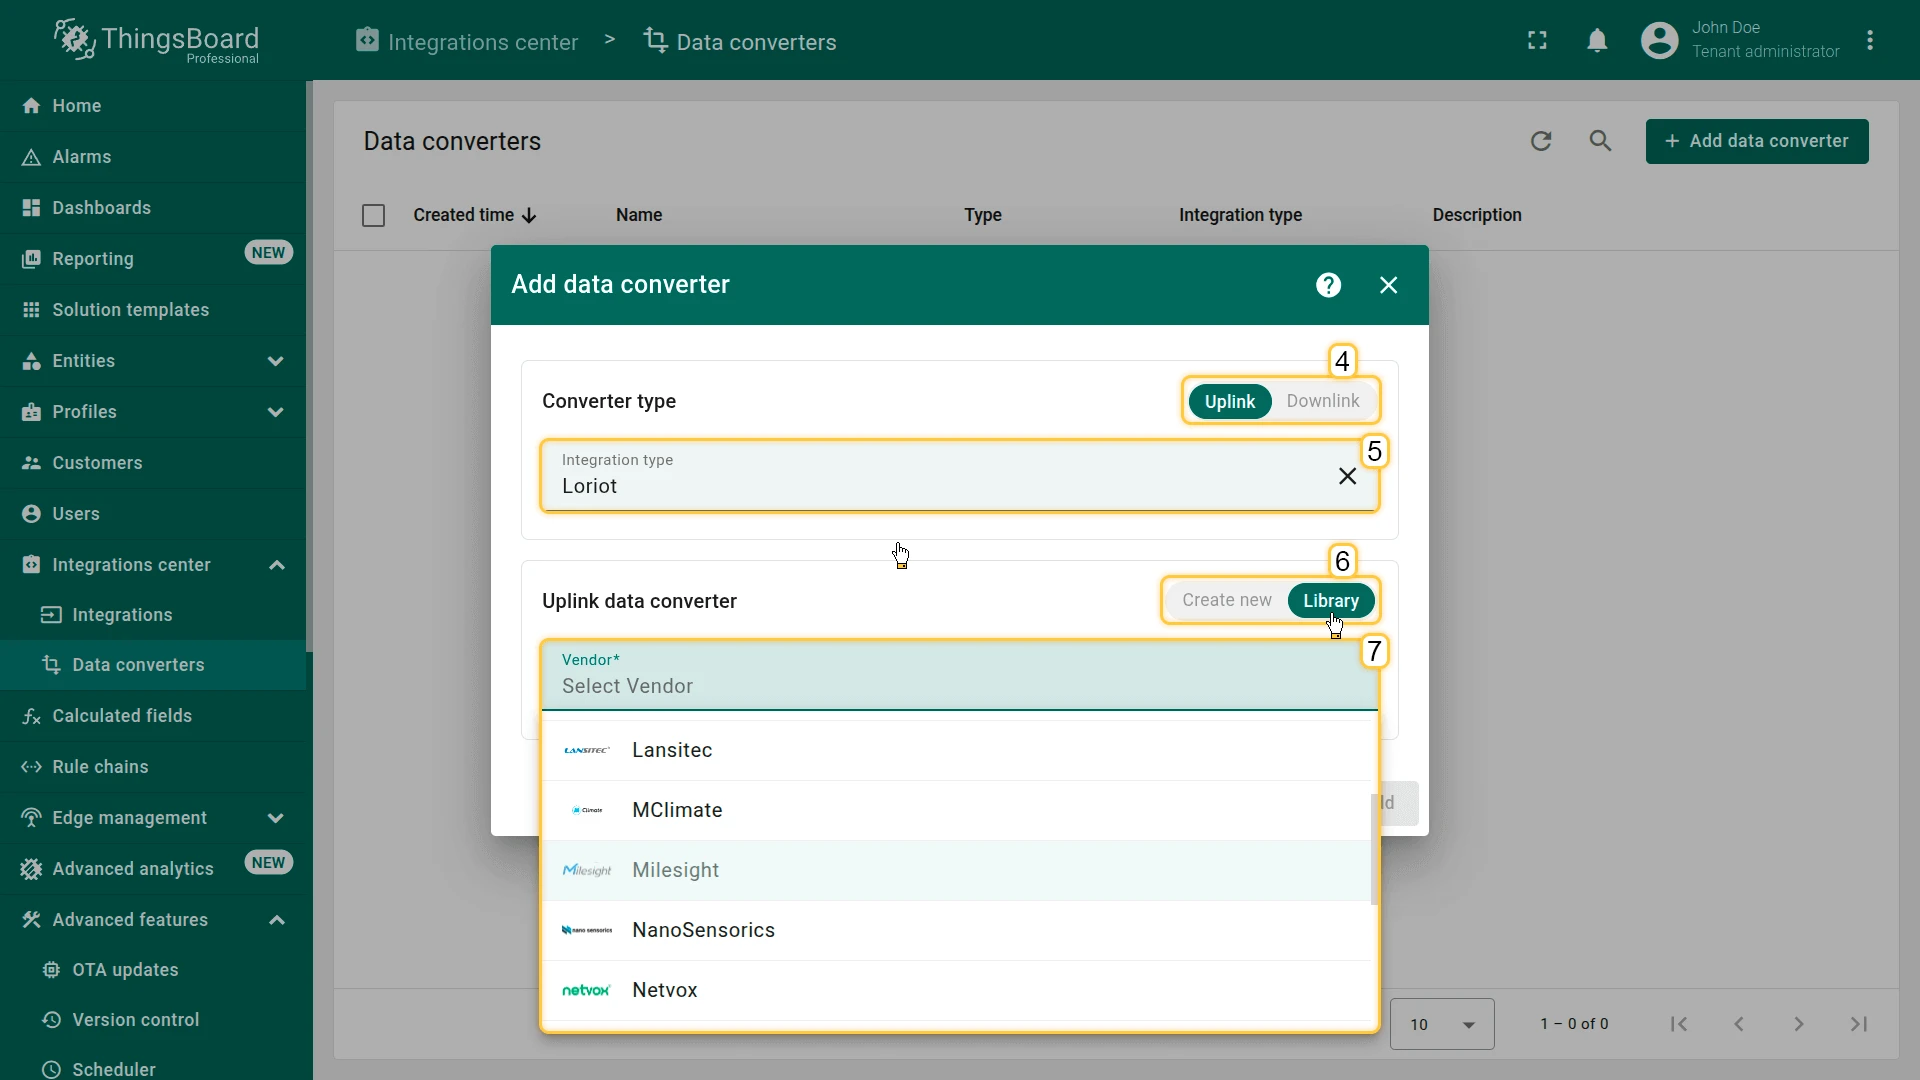
- In the Uplink data converter section, toggle to Library (instead of “Create new”).
- In the Vendor dropdown, select your device manufacturer (e.g.,
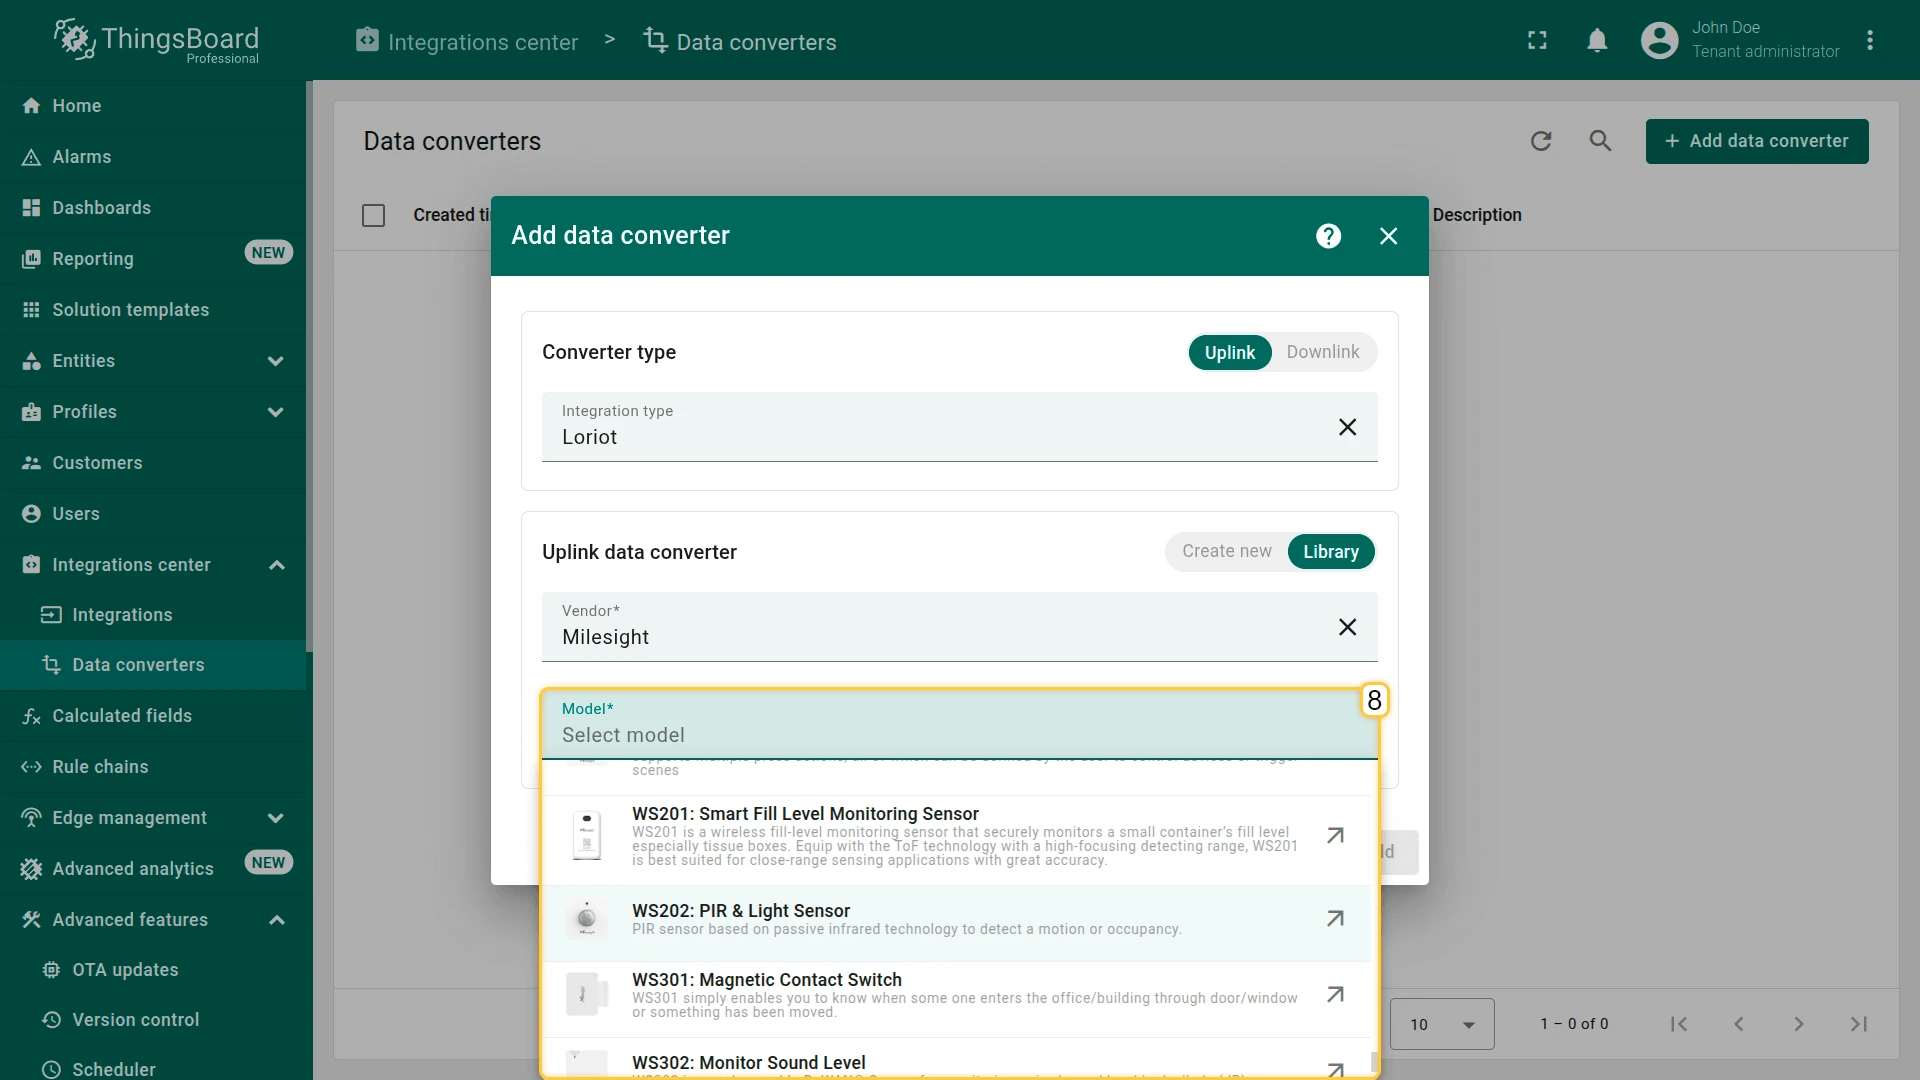
Milesight). - In the Model dropdown, select your specific device model (e.g.,
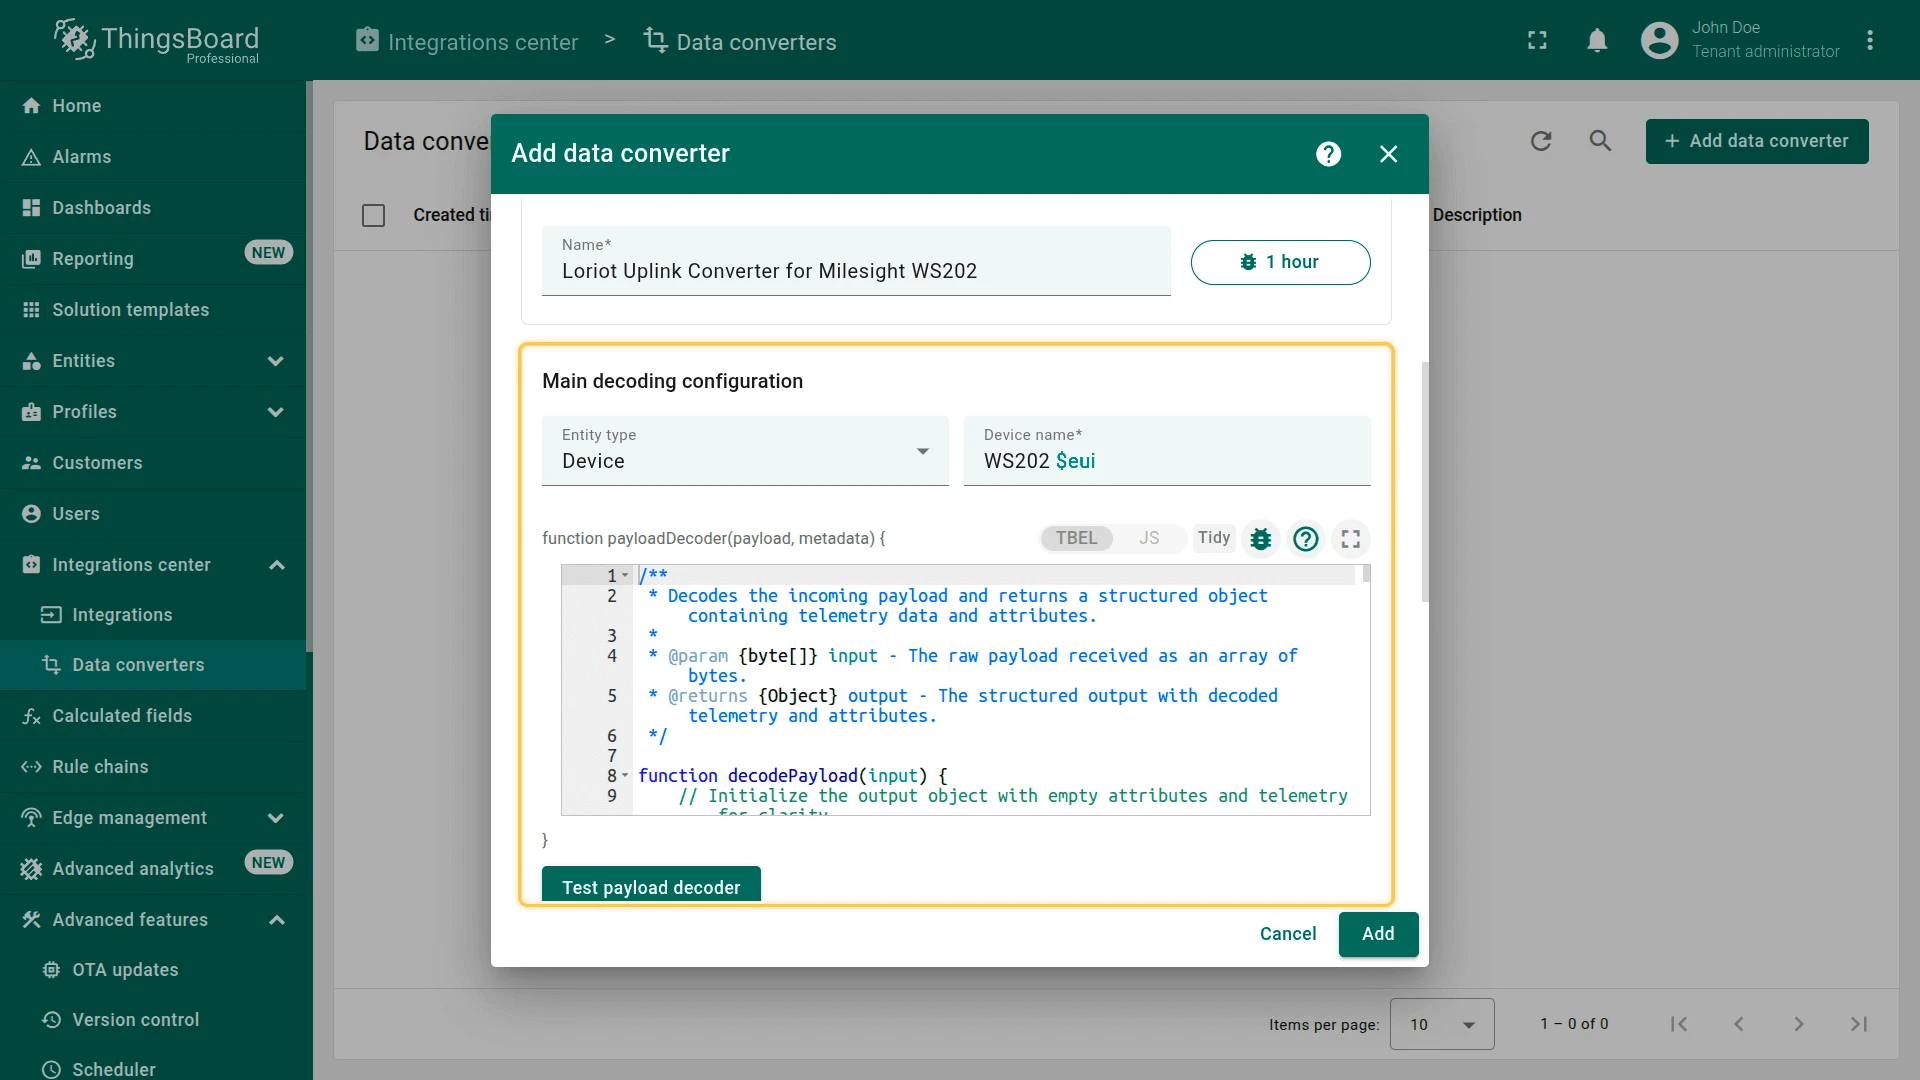
AM102L: 2-in-1 Environment Sensor). A description of each model is shown to help you identify the right one. - The converter name is auto-filled (e.g.,
ChirpStack Uplink Converter for Milesight AM102L) and the decoding function is auto-populated. - Optionally review and modify the generated code.
- Review the pre-filled Advanced decoding parameters (the library pre-configures the correct Update only keys list).
- Click Add.

The library is open-source and maintained on GitHub.
Generic Uplink Converter
Section titled “Generic Uplink Converter”The Generic converter works with any integration type and gives you full control over the decoding logic — custom binary protocols, non-standard JSON structures, multi-sensor payloads.
ThingsBoard supports two scripting languages for the decoder:
| Language | When to use |
|---|---|
| TBEL (default, recommended) | All new converters. TBEL runs as a compiled expression inside ThingsBoard — significantly faster than JS and the safer choice for production. Includes all the same built-in helpers. |
| JavaScript | When migrating an existing converter written in JS, or when you need a JavaScript-only feature not available in TBEL. |
Setup steps:
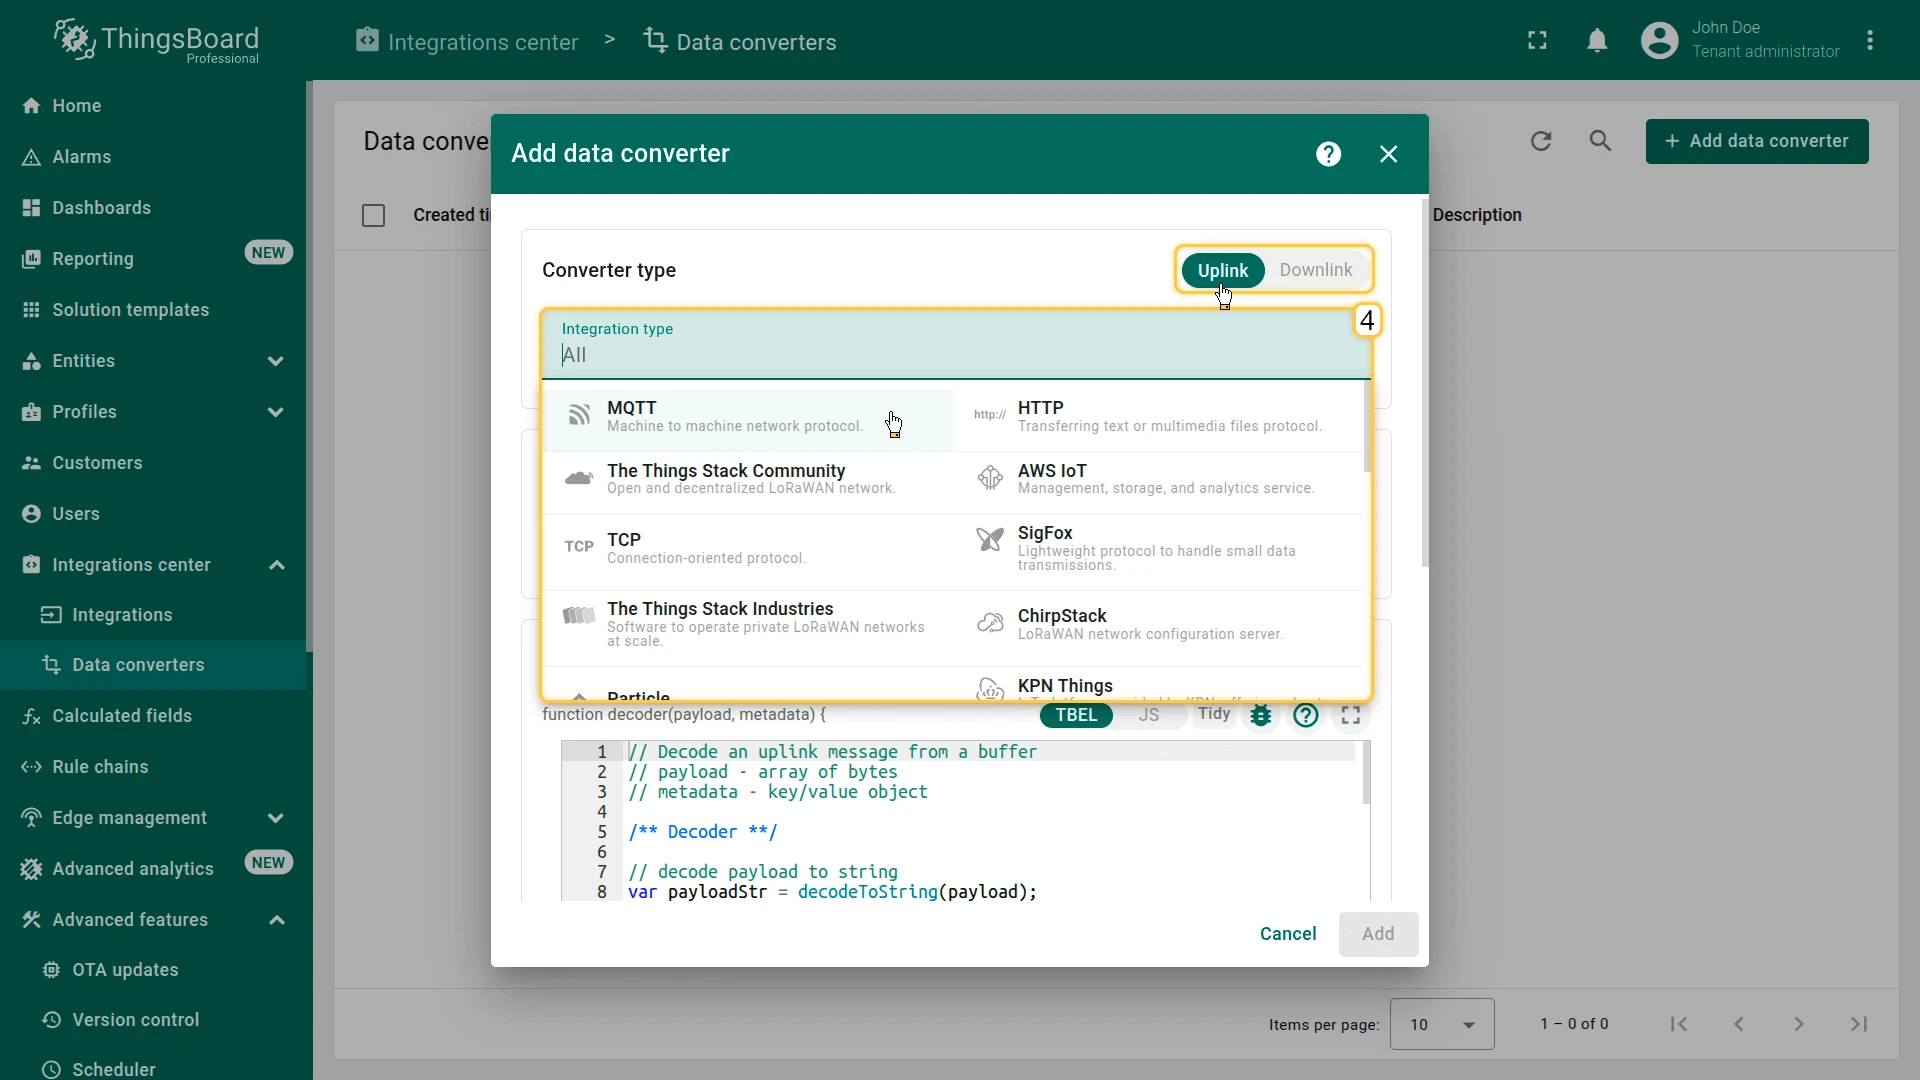
- Go to Integrations center ⇾ Data converters.
- Click + Add data converter ⇾ Create new converter.
- Converter type — leave Uplink (selected by default).
- Integration type — leave as
All(or select a specific type — the Generic approach works regardless). - Enter a converter name.
- Main decoding configuration:
- Select the scripting language: TBEL (default, recommended) or JS.
- Write your decoding logic. Use Test payload decoder to validate against a sample message.
- Optionally add keys to the Update only keys list in Advanced decoding parameters.
- Click Add.
Decoder Function
Section titled “Decoder Function”The decoder function receives two parameters:
| Parameter | Description |
|---|---|
payload | Raw message payload. Its type depends on the Payload content type configured in the converter: JSON → already-parsed JS object; Text → UTF-8 string; Binary (Base64) → byte array (integers 0–255). |
metadata | Key-value map with integration-level fields. integrationName is always present. Additional keys can be defined in the integration’s metadata settings. |
The payload type in more detail:
| Payload content type | What payload is in the script |
|---|---|
| JSON | A parsed JavaScript object — access fields directly: payload.temperature |
| Text | A UTF-8 string — split, parse, or use regex as needed |
| Binary (Base64) | A byte array (integer values 0–255) — use decodeToString, decodeToJson, parseBytesToInt, or similar helpers |
Function signature:
function decoder(payload, metadata) {  // payload  — type depends on Payload content type: JSON object, string, or byte array  // metadata — key/value object with integration-level metadata
  // Your logic here
  return result; // see Decoder Output Structure}
Useful built-in helper functions:
| Function | Description |
|---|---|
decodeToString(payload) | Converts the byte array to a UTF-8 string |
decodeToJson(payload) | Parses the byte array as a UTF-8 JSON string and returns a JS object |
base64ToBytes(str) | Decodes a base64 string to a byte array |
bytesToBase64(bytes) | Encodes a byte array to base64 |
bytesToHex(bytes) | Converts bytes to hex string |
hexToBytes(str) | Converts hex string to byte array |
parseBytesToInt(bytes, offset, length, bigEndian) | Reads an integer from a byte slice |
toFixed(value, precision) | Rounds a float to given decimal places |
The function must return an object — see Decoder Output Structure for the full field reference.
Example decoder:
var data = decodeToJson(payload);return { deviceName: data.deviceId, deviceType: 'thermometer', attributes: { serialNumber: data.sn }, telemetry: { ts: data.timestamp, values: { temperature: data.temp, humidity: data.rh } }};For a batch of readings with per-entry timestamps, see Array of measurements in Common Scripting Patterns below.
Common Scripting Patterns
Section titled “Common Scripting Patterns”Device name from a different field
Replace the field reference to match whatever field carries the device identifier in your payload:
var deviceName = data.serial; // if your field is "serial"var deviceName = data.id; // if your field is "id"var deviceName = 'Gateway-01'; // hardcoded — all data goes to one deviceHardcoded device type
If all devices share the same profile, use a string literal instead of reading it from the payload:
var deviceType = 'thermostat';Rename a field
Map a source field to a different ThingsBoard key using newName: data.originalField:
attributes: { serialNumber: data.param2, // renames param2 → serialNumber firmwareVersion: data.fw, // renames fw → firmwareVersion}Extract nested values
If your payload contains nested objects, access them with dot notation:
{ "sensor": { "temperature": 22.5, "humidity": 60 } }telemetry: { temperature: data.sensor.temperature, humidity: data.sensor.humidity}Separate telemetry from attributes
Put values that change over time in telemetry, and device metadata in attributes:
attributes: { firmware: data.fw, // rarely changes — store as attribute model: data.model},telemetry: { temperature: data.temp, // changes over time — store as telemetry battery: data.bat, rssi: data.signal}Normalize or transform values
Transform values inside the decoder before mapping them:
telemetry: { temperature: data.tempC * 9/5 + 32, // Celsius → Fahrenheit batteryPercent: Math.round(data.bat * 100) // 0–1 float → 0–100 integer}Array of measurements
If the device sends a batch of readings in one message, map each entry to a timestamped telemetry object:
// Example payload: { "deviceId": "sensor-01", "readings": [{ "ts": 1718000000000, "temp": 22.5 }, { "ts": 1718000060000, "temp": 22.8 }] }var data = decodeToJson(payload);var telemetry = [];for (var i = 0; i < data.readings.length; i++) { telemetry.push({ ts: data.readings[i].ts, values: { temperature: data.readings[i].temp } });}return { deviceName: data.deviceId, deviceType: 'thermometer', telemetry: telemetry};ThingsBoard stores each entry at its own timestamp — no readings are collapsed or overwritten.
Guard against missing fields
If a field may be absent in some messages, check before use to avoid a TypeError:
var temperature = typeof data.temperature !== 'undefined' ? data.temperature : null;var deviceName = data.id || 'unknown-' + metadata['integrationName'];Or use a helper function when many fields need the same treatment:
function safeGet(obj, key) { return typeof obj[key] !== 'undefined' ? obj[key] : null; }
telemetry: {    temperature: safeGet(data, 'temperature'),    humidity:    safeGet(data, 'humidity')}
Non-JSON payload
If the device sends plain text or CSV, choose the Payload content type that matches:
- Binary (Base64) — device sends raw bytes.
payloadarrives as a byte array; calldecodeToStringto convert it to a string first.// Binary (Base64): payload is a byte array — decode to string first// Example payload (after Base64 decode): "Sensor-01,22.5,60"var str = decodeToString(payload);var parts = str.split(',');return {deviceName: parts[0],telemetry: {temperature: parseFloat(parts[1]),humidity: parseFloat(parts[2])}}; - Text — device sends a plain UTF-8 string.
payloadis already a string; no decoding step is needed.// Text: payload is already a UTF-8 string — use it directly// Example payload: "Sensor-01,22.5,60"var parts = payload.split(',');return {deviceName: parts[0],telemetry: {temperature: parseFloat(parts[1]),humidity: parseFloat(parts[2])}};
Advanced Decoding Parameters
Section titled “Advanced Decoding Parameters”All fields are pre-populated for the selected integration type. Adjust as needed.
ThingsBoard automatically extracts standard fields from the raw integration payload — deviceId, devEui, devAddr, fPort, rssi, snr, latitude, longitude, firmwareVersion, and many others — and makes them available as named keys. For Generic converters, the decoder script receives the raw device payload bytes; for Typed converters, it receives the already-parsed network server envelope. The fields below control how the auto-extracted network metadata keys are stored.
The decoder script output (result.attributes, result.telemetry.values) is independent from these fields — it carries device sensor data and is always stored. The Telemetry and Attributes lists here control only the auto-extracted network metadata, not the script output.
Device profile name
Overrides the device profile (type) used when auto-creating a device. Supports $key substitution using auto-extracted keys (e.g. $deviceProfileName, $applicationId).
Device label
Optional label attached to the device. Supports $key substitution (e.g. $deviceId, $deviceName).
Customer name
Assigns the auto-created device to an existing customer. ThingsBoard creates the customer if it does not exist.
Device group name
Adds the device to a named entity group. The group is created automatically if it does not exist.
Telemetry
A list of telemetry key names. When configured, only the listed keys from the decoder’s telemetry output are saved. All other keys are discarded. Use this to prevent accidental storage of debug fields or to reduce database writes.
Example: only store temperature and humidity, discard everything else:
temperature, humidityAttributes
Same concept as the telemetry filter, but for attributes. When configured, only the listed keys from the decoder’s attributes output are saved. All other keys are discarded.
Example: only store serialNumber and firmware, discard everything else:
serialNumber, firmwareUpdate only keys list
Keys in this list are written to the database only when their value has changed since the last message — identical values are skipped. This is useful for slow-changing fields like device profile, firmware version, or LoRaWAN network parameters that are transmitted on every uplink but rarely change. Applies to both telemetry and attribute keys.
Decoder Output Structure
Section titled “Decoder Output Structure”Regardless of which approach you use, the decoder function must return a JavaScript object with a specific structure. ThingsBoard reads this object to decide what to create or update.
| Field | Required | Description |
|---|---|---|
deviceName | Yes — Generic only | Name of the device to create or update. Typed converters: do not return this field — entity name is resolved from the UI name pattern. |
deviceType | Yes — Generic only | Device profile name. Typed converters: do not return this field — entity type is resolved from the UI configuration. |
assetName | Yes (asset) | Name of the asset (alternative to deviceName). |
assetType | Yes (asset) | Asset profile name. |
customerName | No | The entity is assigned to this customer. ThingsBoard creates the customer if it does not exist. |
groupName | No | The entity is added to this entity group. ThingsBoard creates the group if it does not exist. |
attributes | No | Key-value map of attribute values. Values must be scalars — nested objects are not supported. |
telemetry | No | Key-value map of telemetry values, or a { ts, values } object with an explicit timestamp, or an array of { ts, values } objects to report multiple timestamps in one message. Values must be scalars — nested objects are not supported. |
telemetry[].ts | No | Unix timestamp in milliseconds. |
Full output example
{  // --- Entity identification (required) ---  deviceName:  "My Sensor 001",   // string — unique device name in ThingsBoard  deviceType:  "temperature-sensor", // string — device profile name to assign on auto-create
  // --- OR use asset instead of device ---  // assetName: "Building A",  // assetType: "building",
  // --- Optional entity metadata ---  groupName:    "Floor 3 Sensors",  // string or null — entity group to add the device to  customerName: "Tenant Corp",      // string or null — customer to assign on auto-create
  // --- Telemetry (time-series data) ---  telemetry: {    // Simple form — uses the server timestamp    temperature: 22.5,    humidity: 61,    battery: 3.7  },
  // --- OR telemetry with explicit timestamp ---  // telemetry: {  //   ts: 1718000000000,   // Unix timestamp in milliseconds  //   values: {  //     temperature: 22.5,  //     humidity: 61  //   }  // },
  // --- OR array of multiple timestamped entries ---  // telemetry: [  //   { ts: 1718000000000, values: { temperature: 22.5 } },  //   { ts: 1718000060000, values: { temperature: 22.8 } }  // ],
  // --- Attributes (static/slow-changing metadata) ---  attributes: {    firmware:  "v2.1.0",    location:  "Warehouse B",    serialNumber: "SN-00412"  }}
Auto-Create Behavior
Section titled “Auto-Create Behavior”On every uplink ThingsBoard looks up the entity by deviceName (or assetName for asset converters):
- Entity found — only
telemetryandattributesare updated.deviceTypeorassetType(profile),customerName, andgroupNameare not changed on subsequent messages, even if the decoder returns different values for them. - Entity not found — a new device (or asset) is created using
deviceType(orassetType) as the profile name, and customer/group from the converter output if provided — but only if the integration is configured to allow device (or resource) creation. No manual entity creation is needed when creation is permitted.
To change the profile, customer, or group of an existing entity, update it manually in the entity settings.
Testing the Decoder
Section titled “Testing the Decoder”ThingsBoard provides a built-in test environment directly in the converter editor. Use it before saving to catch errors early and verify the script produces the expected attributes and telemetry.
Click Test decoder function (or Test payload decoder for Typed converters) in the converter dialog to open the test panel.
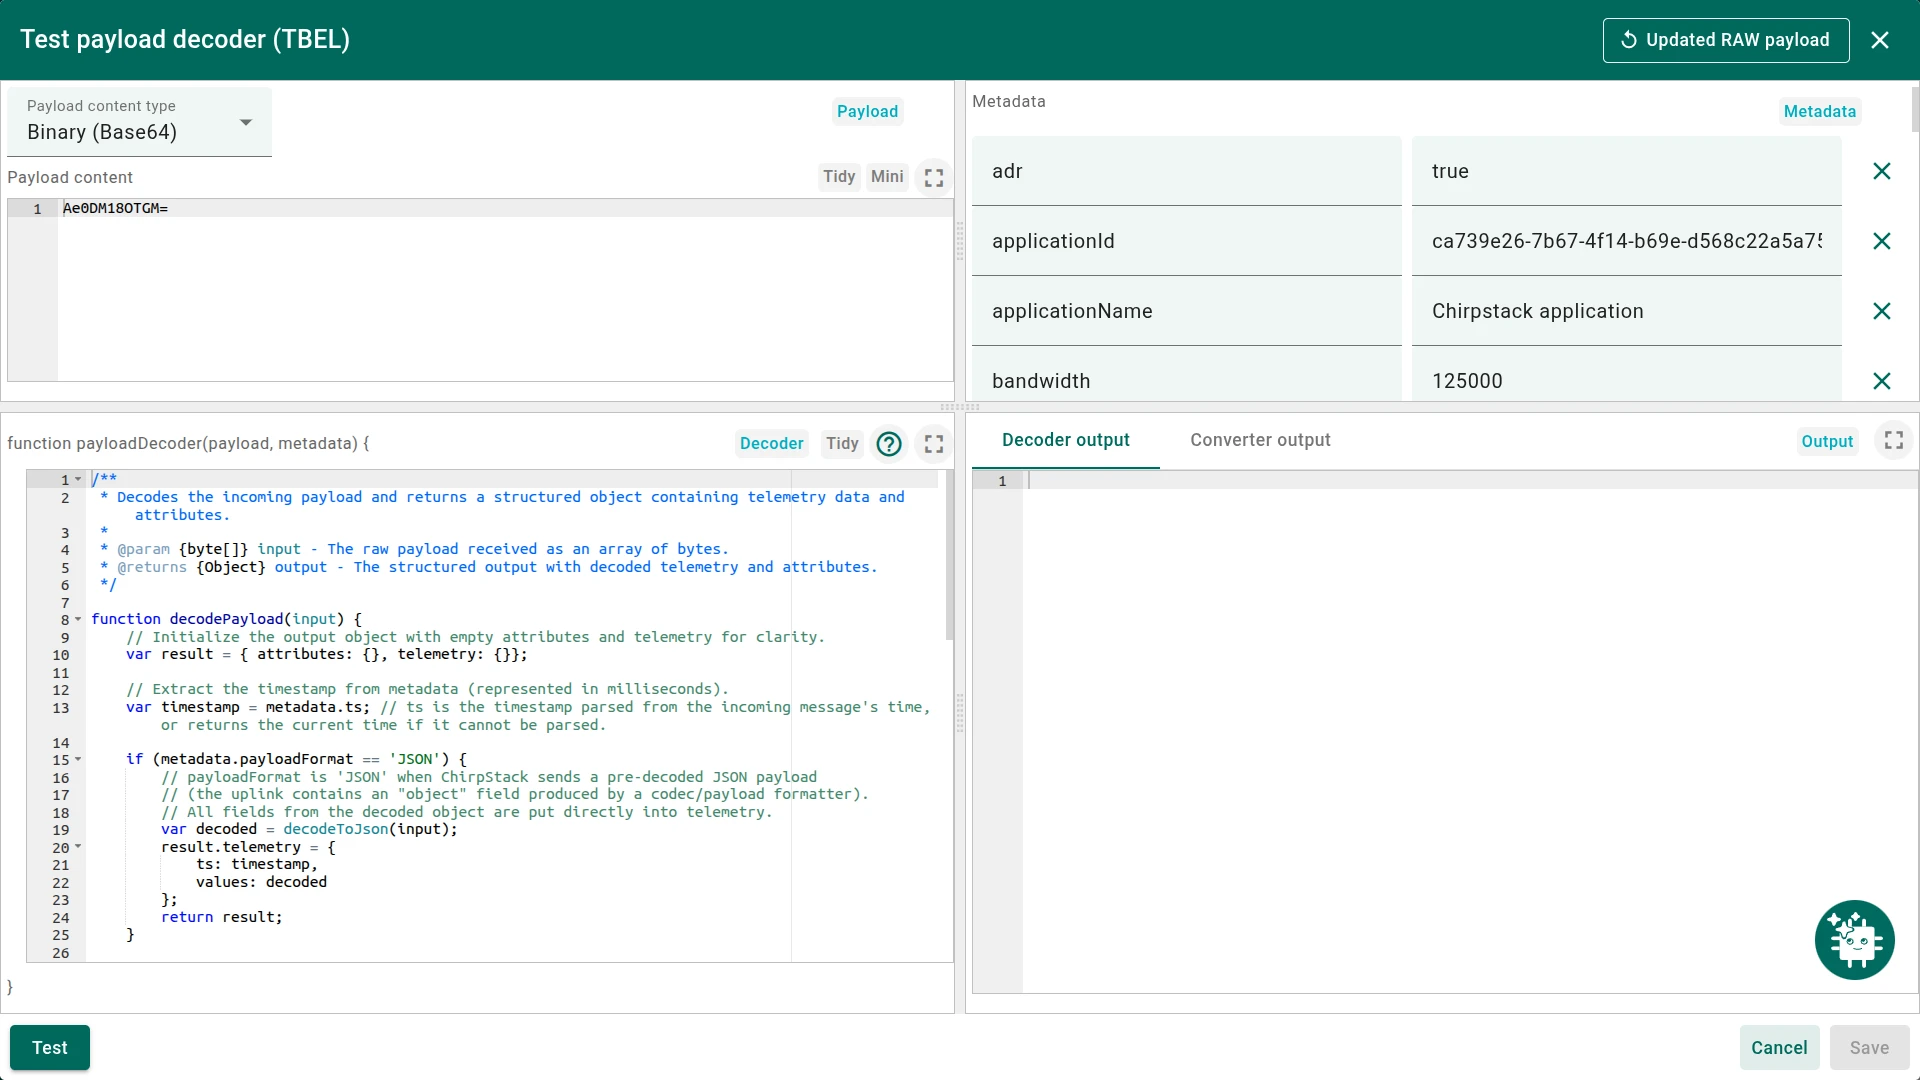
The test dialog has four areas:
Payload (top left)
Select the Payload content type that matches what your device sends:
- JSON — the payload is parsed as a JSON object before being passed to the decoder.
- Text — passed as a plain UTF-8 string.
- Binary (Base64) — Base64-encoded bytes; automatically decoded to a byte array.
Enter the sample payload in the editor below the dropdown. Or use a pre-populated representative example for the selected integration type.
Metadata (top right)
Key-value pairs available in the decoder via the metadata object. Pre-populated from the last received message if one exists — edit, add, or remove rows to simulate different scenarios.
Updated RAW payload (top right button)
Opens a side panel with the full raw JSON of the last received message — every field ThingsBoard receives at the integration endpoint. Edit the payload and click Apply to use it as the new test input, useful for testing specific field values without sending real device traffic.
Decoder script (bottom left)
The function payloadDecoder(payload, metadata) script loaded from the converter. You can edit it directly in the test dialog to try changes without saving the converter.
Output (bottom right)
Click Test to run the function. Two tabs show the results:
- Decoder output — the raw object returned by the decoder:
attributesandtelemetryas they would be stored in ThingsBoard. - Converter output — the fully assembled message: entity type, name, profile, telemetry array, and attributes, exactly as ThingsBoard will process it.
Edits made to the script inside the test panel are not saved automatically. To save the decoder script, click Save.
Failures
Section titled “Failures”When a decoder throws an exception or returns an invalid result, ThingsBoard drops the message and records the failure. The integration continues processing subsequent messages normally — no retry occurs.
Viewing the error log
Open the converter details panel, go to the Events tab, and set Event type to Error. Each entry shows the event time, the server that processed the message, the method that failed, and the error message.
To also inspect the raw payload and output for each processed message, set Event type to Debug — this view adds In, Out, and Metadata columns. Debug events are only recorded when debug mode is enabled (see the Failures button in the converter row).
Common causes:
| Symptom | Likely cause | Fix |
|---|---|---|
TypeError: Cannot read property 'X' of undefined | Payload structure differs from expected | Enable debug mode, reproduce the message, and inspect the In column to see the actual payload; add null checks |
deviceName is empty | Template variable resolved to empty | Add a fallback: var name = data.id || 'unknown-' + metadata['integrationName']; |
SyntaxError | Typo in the function body | Use the Tidy button to reformat |
| Failures only for some messages | Some devices send a different payload format | Add conditional branches based on a type field or payload length |
| Telemetry values stored as strings | Decoder returns string instead of number | Coerce with parseFloat(data.temperature) or parseInt(data.count) |
Import and Export
Section titled “Import and Export”Converters can be exported as JSON and imported into any ThingsBoard instance, which is useful for sharing custom decoders across environments or team members.
Export: On the Data converters list, click the export icon on a converter row — downloads the converter as a JSON file. Alternatively, open the converter details and click Export converter in the panel header.
Import: Click + Add data converter ⇾ Import converter, drag and drop the JSON file or click Browse file to select it, then click Import. All settings are restored: name, type, integration type, script, and advanced parameters.
Managing Data Converters
Section titled “Managing Data Converters”All converters are listed in Integrations center ⇾ Data converters. The list shows each converter’s created time, name, type (Uplink or Downlink), and integration type.
Row actions:
- Export (download icon) — downloads the converter as a JSON file.
- Debug (bug icon) — opens the Debug configuration popup. Choose a logging mode and click Apply. Click See debug events in the popup to jump directly to the Events log for this converter.
- Delete (trash icon) — opens a confirmation dialog before deletion.
Editing a converter
Click the converter name to open its details panel. Click the pencil icon in the top-right corner to enter edit mode. You can modify any field — name pattern, scripting language, decoder script, and Advanced decoding parameters — then click Apply changes to save, or the ✕ button to discard.
Deleting a converter
Hover the row and click the trash icon, or open the details panel and click Delete converter. Confirm the deletion in the dialog box.
See Also
Section titled “See Also”- Downlink Data Converter — sending commands from ThingsBoard back to devices via an integration
- Integrations Overview — how ThingsBoard connects to external platforms and how uplink/downlink flow works
- TBEL scripting reference — built-in functions, operators, and limits for the ThingsBoard Expression Language
Was this helpful?