RPC Control Widget
RPC (Control) widgets send commands to devices instead of subscribing to data. They are the mechanism for pushing instructions — toggle a relay, set a target temperature, trigger a firmware update. The device must implement an RPC handler for each method you send.
Commands are sent through self.ctx.controlApi and can be:
- One-way (
sendOneWayCommand) — fire-and-forget; the widget doesn’t wait for a device response - Two-way (
sendTwoWayCommand) — request-response; the widget waits for the device to reply
When to Use RPC Control
Section titled “When to Use RPC Control”Use this type when the widget’s primary purpose is to issue a command, not to read telemetry:
- Power on/off buttons for devices or circuits
- Setpoint controls (target temperature, fan speed, brightness)
- Trigger buttons (open valve, start pump, reboot device)
- Configuration panels that push settings to the device
RPC widgets can still read Latest Values or attribute data alongside command functionality — add data keys as normal and implement self.onDataUpdated() if needed.
Example 1: ON/OFF Control Panel
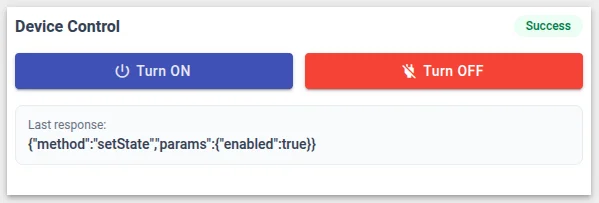
Section titled “Example 1: ON/OFF Control Panel”A two-button panel that sends an RPC command to turn a device on or off, with a status badge showing the result of the last command.
-
Open Widget Library → open your bundle → click + → select RPC (Control) as the type.
-
In the HTML tab, paste:
<div class="rpc-panel"><div class="header"><div class="title">Device Control</div><div class="status-indicator" [ngClass]="statusClass">{{statusText}}</div></div><div class="controls"><button mat-raised-button color="primary"(click)="sendCommand(true)"[disabled]="executing"><mat-icon>power_settings_new</mat-icon>Turn ON</button><button mat-raised-button color="warn"(click)="sendCommand(false)"[disabled]="executing"><mat-icon>power_off</mat-icon>Turn OFF</button></div>@if (lastResponse) {<div class="response-panel"><div class="response-label">Last response:</div><div class="response-value">{{lastResponse}}</div></div>}</div> -
In the CSS tab, paste:
.rpc-panel {width: 100%;height: 100%;display: flex;flex-direction: column;gap: 16px;padding: 8px;}.header {display: flex;justify-content: space-between;align-items: center;}.title {font-size: 16px;font-weight: 600;color: #344054;}.status-indicator {font-size: 12px;font-weight: 500;padding: 4px 12px;border-radius: 999px;}.status-idle { background: #f2f4f7; color: #667085; }.status-executing { background: #eff8ff; color: #175cd3; }.status-success { background: #ecfdf3; color: #027a48; }.status-error { background: #fef3f2; color: #b42318; }.controls {display: flex;gap: 12px;}.controls button { flex: 1; }.response-panel {padding: 12px;background: #f9fafb;border-radius: 8px;border: 1px solid #eaecf0;}.response-label {font-size: 12px;color: #667085;margin-bottom: 4px;}.response-value {font-size: 14px;font-weight: 500;color: #344054;word-break: break-all;} -
In the JavaScript tab, paste:
let settings;self.onInit = function() {let utils = self.ctx.$scope.$injector.get(self.ctx.servicesMap.get('utils'));settings = utils.deepClone(self.ctx.settings) || {};self.ctx.$scope.executing = false;self.ctx.$scope.statusText = 'Idle';self.ctx.$scope.statusClass = 'status-idle';self.ctx.$scope.lastResponse = null;self.ctx.$scope.sendCommand = function(turnOn) {let methodName = settings.rpcMethod || 'setState';let timeout = settings.rpcTimeout || 5000;let params = { enabled: turnOn };self.ctx.$scope.executing = true;self.ctx.$scope.statusText = 'Executing...';self.ctx.$scope.statusClass = 'status-executing';self.ctx.detectChanges();if (settings.oneWay) {self.ctx.controlApi.sendOneWayCommand(methodName, params, timeout).subscribe(function() { onSuccess('Command sent (one-way)'); },function(err) { onError(err); });} else {self.ctx.controlApi.sendTwoWayCommand(methodName, params, timeout).subscribe(function(response) { onSuccess(JSON.stringify(response)); },function(err) { onError(err); });}};};function onSuccess(response) {self.ctx.$scope.executing = false;self.ctx.$scope.statusText = 'Success';self.ctx.$scope.statusClass = 'status-success';self.ctx.$scope.lastResponse = response;self.ctx.controlApi.completedCommand();self.ctx.detectChanges();}function onError(err) {self.ctx.$scope.executing = false;self.ctx.$scope.statusText = 'Error';self.ctx.$scope.statusClass = 'status-error';self.ctx.$scope.lastResponse =err.error?.message || err.message || 'Request failed';self.ctx.detectChanges();}self.typeParameters = function() {return {singleEntity: true,dataKeysOptional: true};};Key concepts:
sendTwoWayCommand(method, params, timeout)— sends an RPC request and waits for a device response. Themethodmust match an RPC handler implemented by the device.paramsis a JSON object sent as the payload.timeoutis in milliseconds.sendOneWayCommand(method, params, timeout)— sends without waiting for a response. Use when you don’t need confirmation from the device.completedCommand()— call after a successful command to notify the platform that execution is complete and reset internal RPC tracking state.Error handling — the error callback receives an error object. Timeout errors occur when the device doesn’t respond within the configured window. Check
err.error?.messagefor the server’s error description. -
In the Settings form tab, click Import from JSON → select the JSON content tab → paste:
[{"id": "rpcMethod","name": "RPC method name","group": "RPC configuration","type": "text","default": "setState","required": true},{"id": "rpcTimeout","name": "Timeout (ms)","group": "RPC configuration","type": "number","default": 5000,"required": true},{"id": "oneWay","name": "One-way command (no response)","group": "RPC configuration","type": "switch","default": false,"required": false}] -
Click Save → name it “ON/OFF Control Panel”.
-
Add the widget to a dashboard and select a target device. The device must handle the configured RPC method (default:
setState). Click Turn ON — the status badge shows “Executing…”, then “Success” with the device response, or “Error” if the device doesn’t respond within the timeout.
Example 2: Numeric Value Input
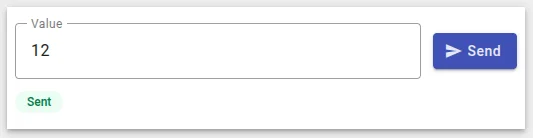
Section titled “Example 2: Numeric Value Input”A form field with a numeric input and a Send button. Useful for setpoint controls where the user types a value (target temperature, fan speed percentage, brightness level) and pushes it to the device.
This example introduces Angular Reactive Forms (fb.control) for input binding inside an RPC widget.
-
Open Widget Library → open your bundle → click + → select RPC (Control) as the type.
-
In the HTML tab, paste:
<div class="input-panel"><div class="input-row" *ngIf="valueControl"><mat-form-field appearance="outline" color="primary" class="input-field"><mat-label>{{label}}</mat-label><input matInputtype="number"[formControl]="valueControl"[step]="step"><span matSuffix *ngIf="units">{{units}}</span></mat-form-field><button mat-raised-button color="primary"(click)="sendValue()"[disabled]="executing || valueControl.invalid"><mat-icon>send</mat-icon>Send</button></div><div class="status-badge" [ngClass]="statusClass" *ngIf="statusText">{{statusText}}</div></div>[formControl]="valueControl"— binds the input to a Reactive Forms control so you can read its value in JavaScript without querying the DOM.[disabled]="executing || valueControl.invalid"— disables the button while a command is in flight or the input is invalid. -
In the CSS tab, paste:
.input-panel {width: 100%;height: 100%;display: flex;flex-direction: column;justify-content: center;gap: 12px;padding: 8px;box-sizing: border-box;}.input-row {display: flex;align-items: center;gap: 12px;}.input-field { flex: 1; }.mat-mdc-form-field-subscript-wrapper {display: none !important;}.status-badge {font-size: 12px;font-weight: 500;padding: 4px 12px;border-radius: 999px;align-self: flex-start;}.status-executing { background: #eff8ff; color: #175cd3; }.status-success { background: #ecfdf3; color: #027a48; }.status-error { background: #fef3f2; color: #b42318; } -
In the JavaScript tab, paste:
let settings;self.onInit = function() {let utils = self.ctx.$scope.$injector.get(self.ctx.servicesMap.get('utils'));settings = utils.deepClone(self.ctx.settings) || {};self.ctx.$scope.label = settings.label || 'Value';self.ctx.$scope.units = settings.units || '';self.ctx.$scope.step = settings.step || 1;self.ctx.$scope.executing = false;self.ctx.$scope.statusText = '';self.ctx.$scope.statusClass = '';// Create a form control initialized with the default value from settingsself.ctx.$scope.valueControl = self.ctx.$scope.fb.control(settings.defaultValue ?? 0);self.ctx.$scope.sendValue = function() {let method = settings.rpcMethod || 'setValue';let timeout = settings.rpcTimeout || 5000;let params = { value: self.ctx.$scope.valueControl.value };self.ctx.$scope.executing = true;self.ctx.$scope.statusText = 'Sending...';self.ctx.$scope.statusClass = 'status-executing';self.ctx.detectChanges();self.ctx.controlApi.sendTwoWayCommand(method, params, timeout).subscribe(function() {self.ctx.$scope.executing = false;self.ctx.$scope.statusText = 'Sent';self.ctx.$scope.statusClass = 'status-success';self.ctx.controlApi.completedCommand();self.ctx.detectChanges();},function(err) {self.ctx.$scope.executing = false;self.ctx.$scope.statusText = err.error?.message || 'Error';self.ctx.$scope.statusClass = 'status-error';self.ctx.detectChanges();});};};self.typeParameters = function() {return {singleEntity: true,dataKeysOptional: true};};self.ctx.$scope.fb.control(initialValue)— creates an Angular Reactive FormsFormControl.fb(FormBuilder) is available in all widgets via$scope. The control’s current value is read asvalueControl.valuewhen the user clicks Send.The device receives
{ "value": <number> }as the RPC params object. The method name and timeout are configurable from the settings form. -
In the Settings form tab, click Import from JSON → select the JSON content tab → paste:
[{"id": "label","name": "Input label","group": "Input","type": "text","default": "Target value","required": false},{"id": "units","name": "Units suffix","group": "Input","type": "text","default": "","required": false},{"id": "step","name": "Step","group": "Input","type": "number","default": 1,"required": false},{"id": "defaultValue","name": "Default value","group": "Input","type": "number","default": 0,"required": false},{"id": "rpcMethod","name": "RPC method name","group": "RPC configuration","type": "text","default": "setValue","required": true},{"id": "rpcTimeout","name": "Timeout (ms)","group": "RPC configuration","type": "number","default": 5000,"required": true}] -
Click Save → name it “Numeric Value Input”.
-
Add to a dashboard → select a device → open widget settings. Configure the label (e.g., “Target temperature”), units (“°C”), and RPC method (e.g.,
setTemperature). The device receives{ "value": <number> }when the user clicks Send.
Control API Reference
Section titled “Control API Reference”| Method | Description |
|---|---|
sendOneWayCommand(method, params, timeout) | Fire-and-forget. Returns an Observable that completes when the command is sent. |
sendTwoWayCommand(method, params, timeout) | Request-response. Returns an Observable that emits the device’s response. |
completedCommand() | Notifies the platform that RPC execution is complete. Resets internal tracking state. |
Next Steps
Section titled “Next Steps”- Alarm Widget — display and manage active alarms
- Latest Values — display current device state alongside RPC controls
- Widget API Reference — full Control API documentation
Was this helpful?