Lesson 3. Device States & Telemetry
This lesson adds synthetic telemetry via a rule chain, builds a colorful sensors table, configures time-window aggregation for consumption metrics, creates device-type states (air, energy, water), and populates each with custom visualization cards and charts.
Step 3.1 Simulate Device Telemetry
Section titled “Step 3.1 Simulate Device Telemetry”ThingsBoard rule chains can generate synthetic telemetry via Generator nodes — useful for demos, prototyping, and testing dashboards before real hardware is connected.
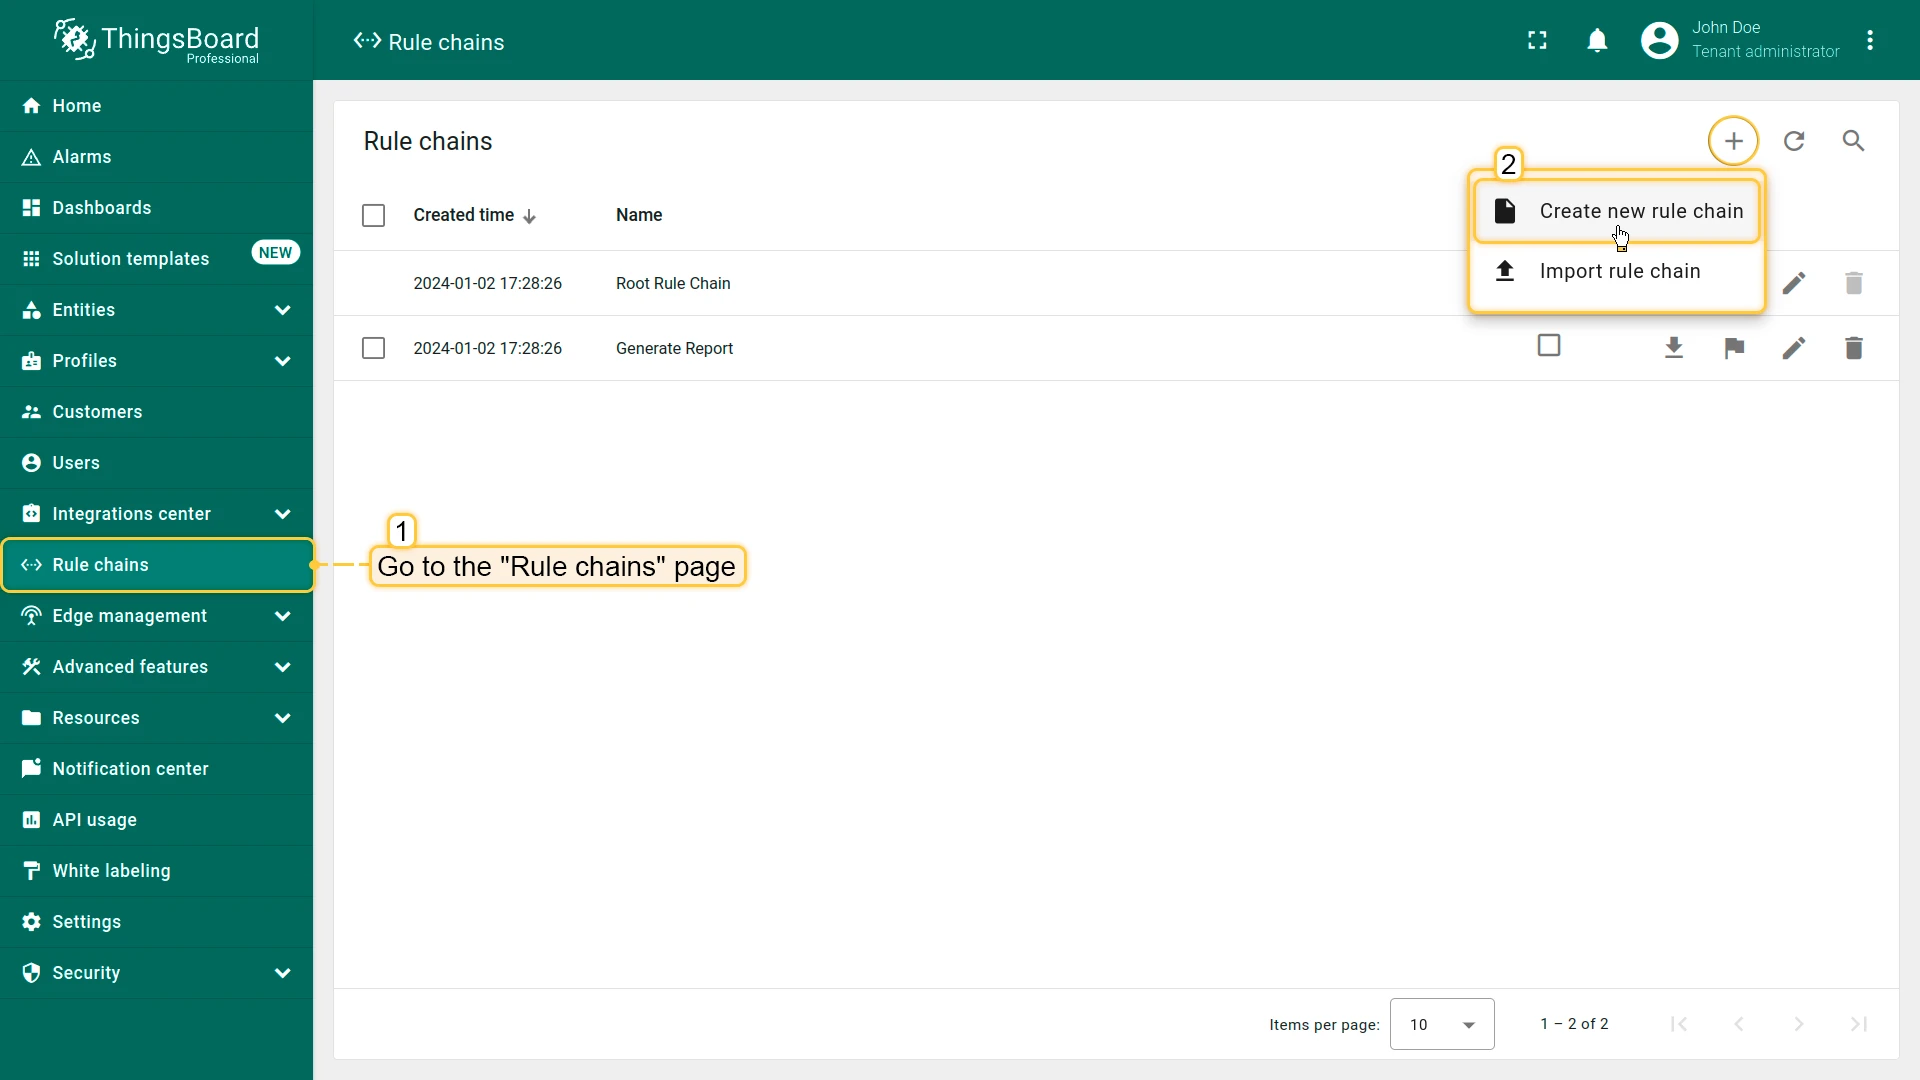
Create a new rule chain:
- Go to Rule chains and click + Add rule chain ⇾ Create new rule chain.
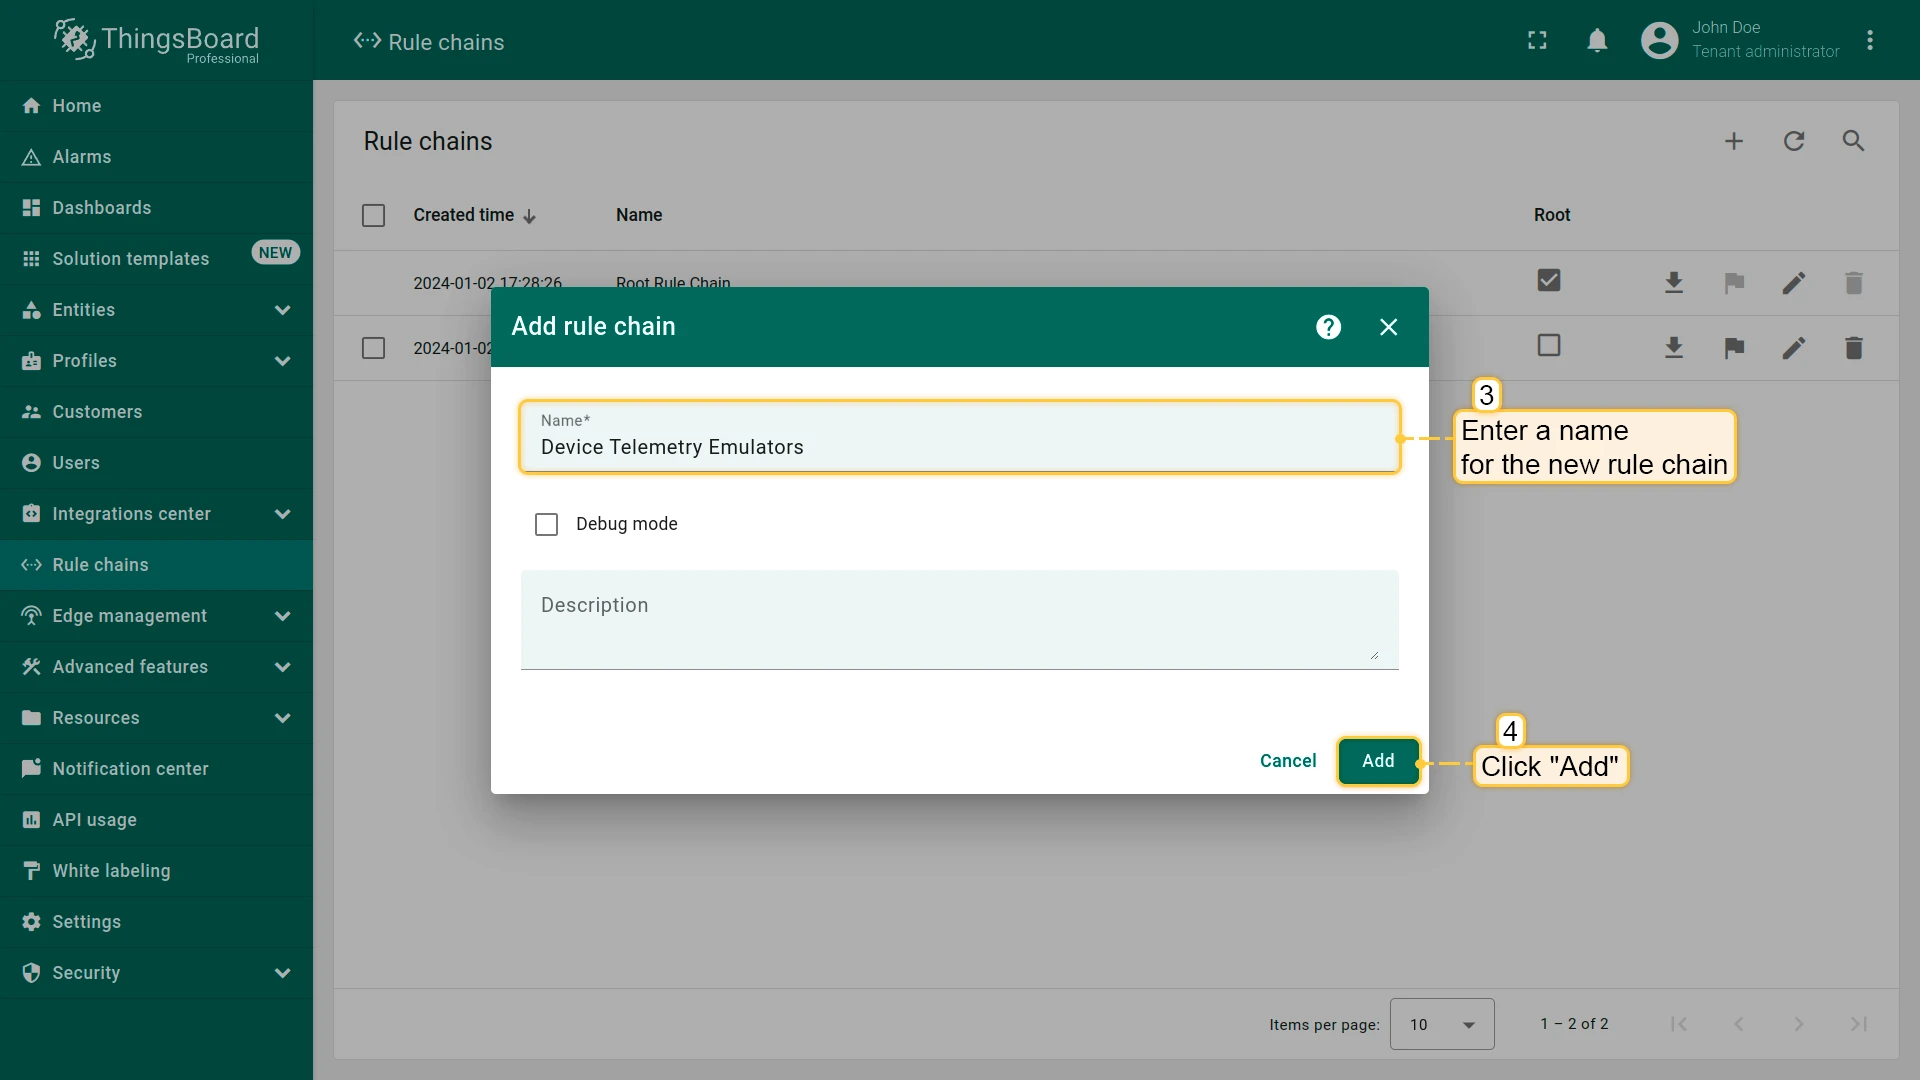
- Name it
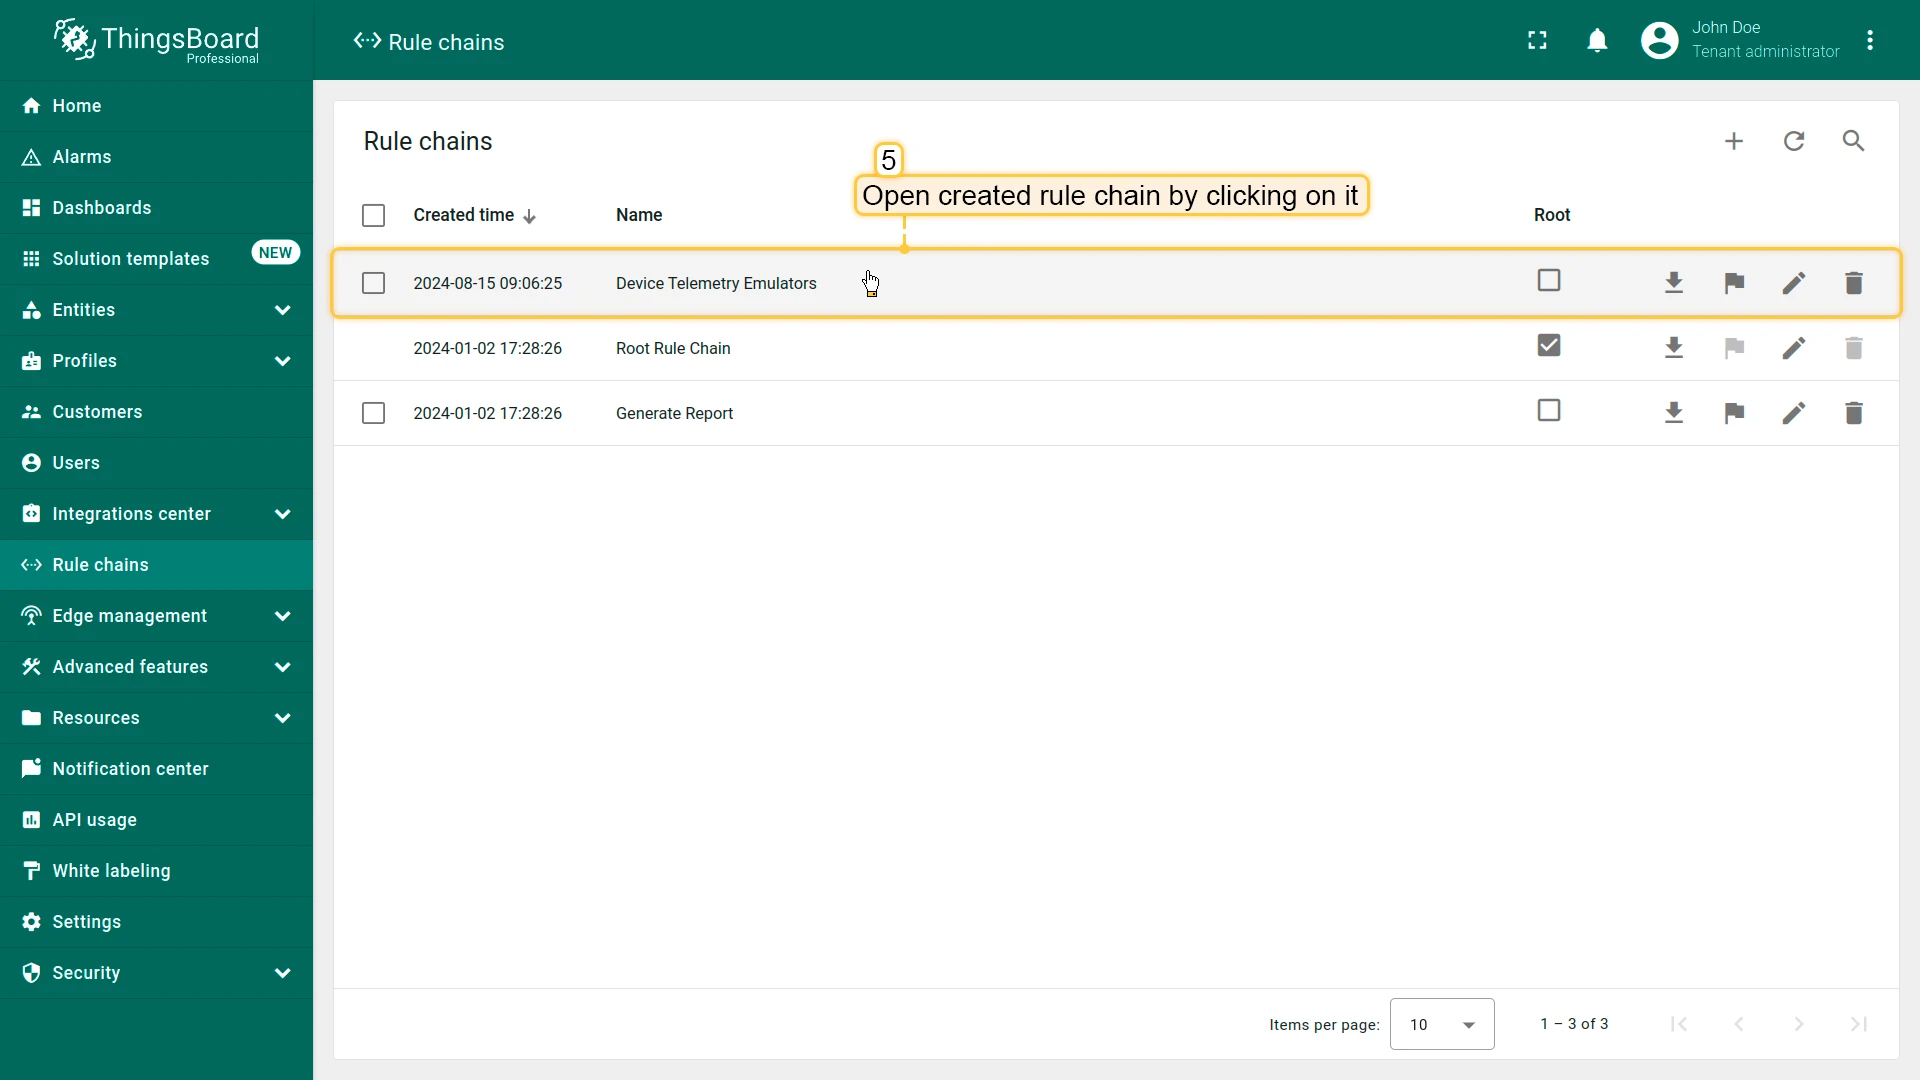
Device Telemetry Emulatorsand click Add. - Open the rule chain by clicking on it.
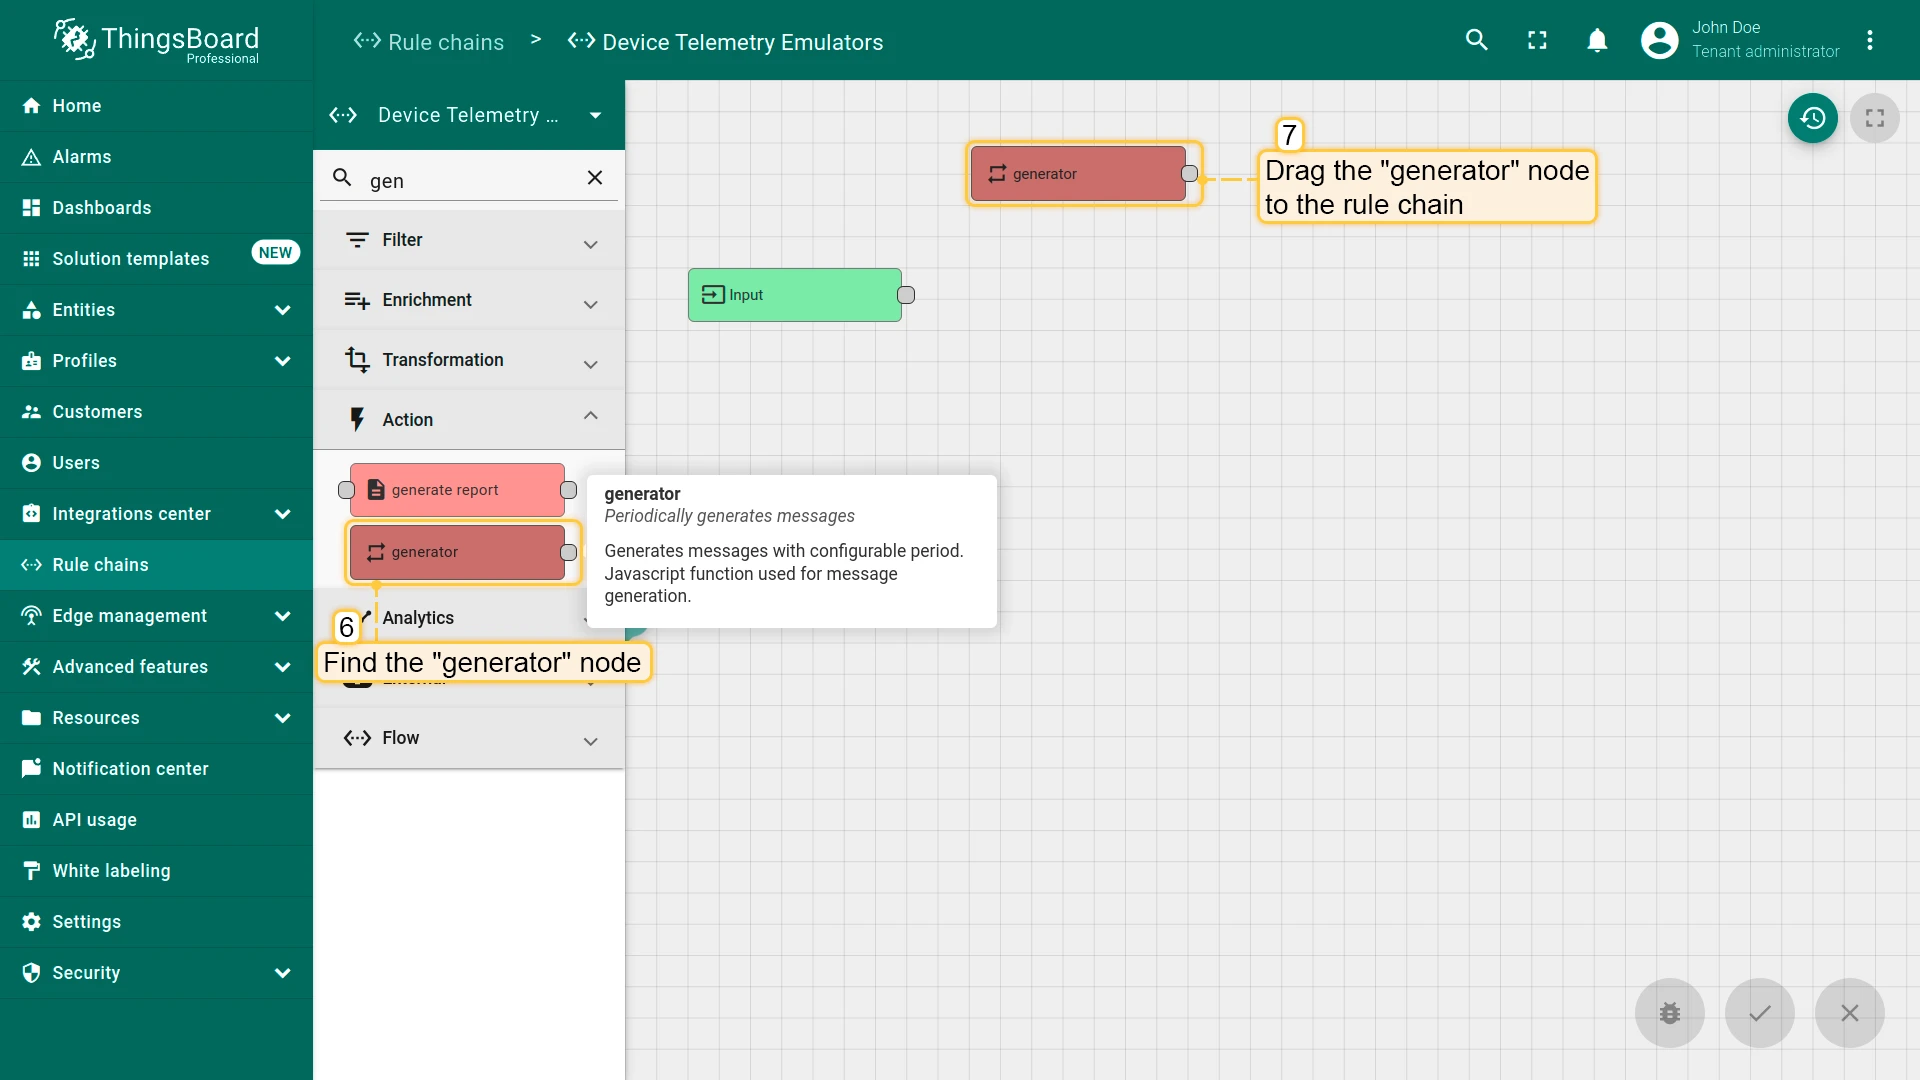
Add four generator nodes (one per device) and a save time series sink to post telemetry every 10 minutes.
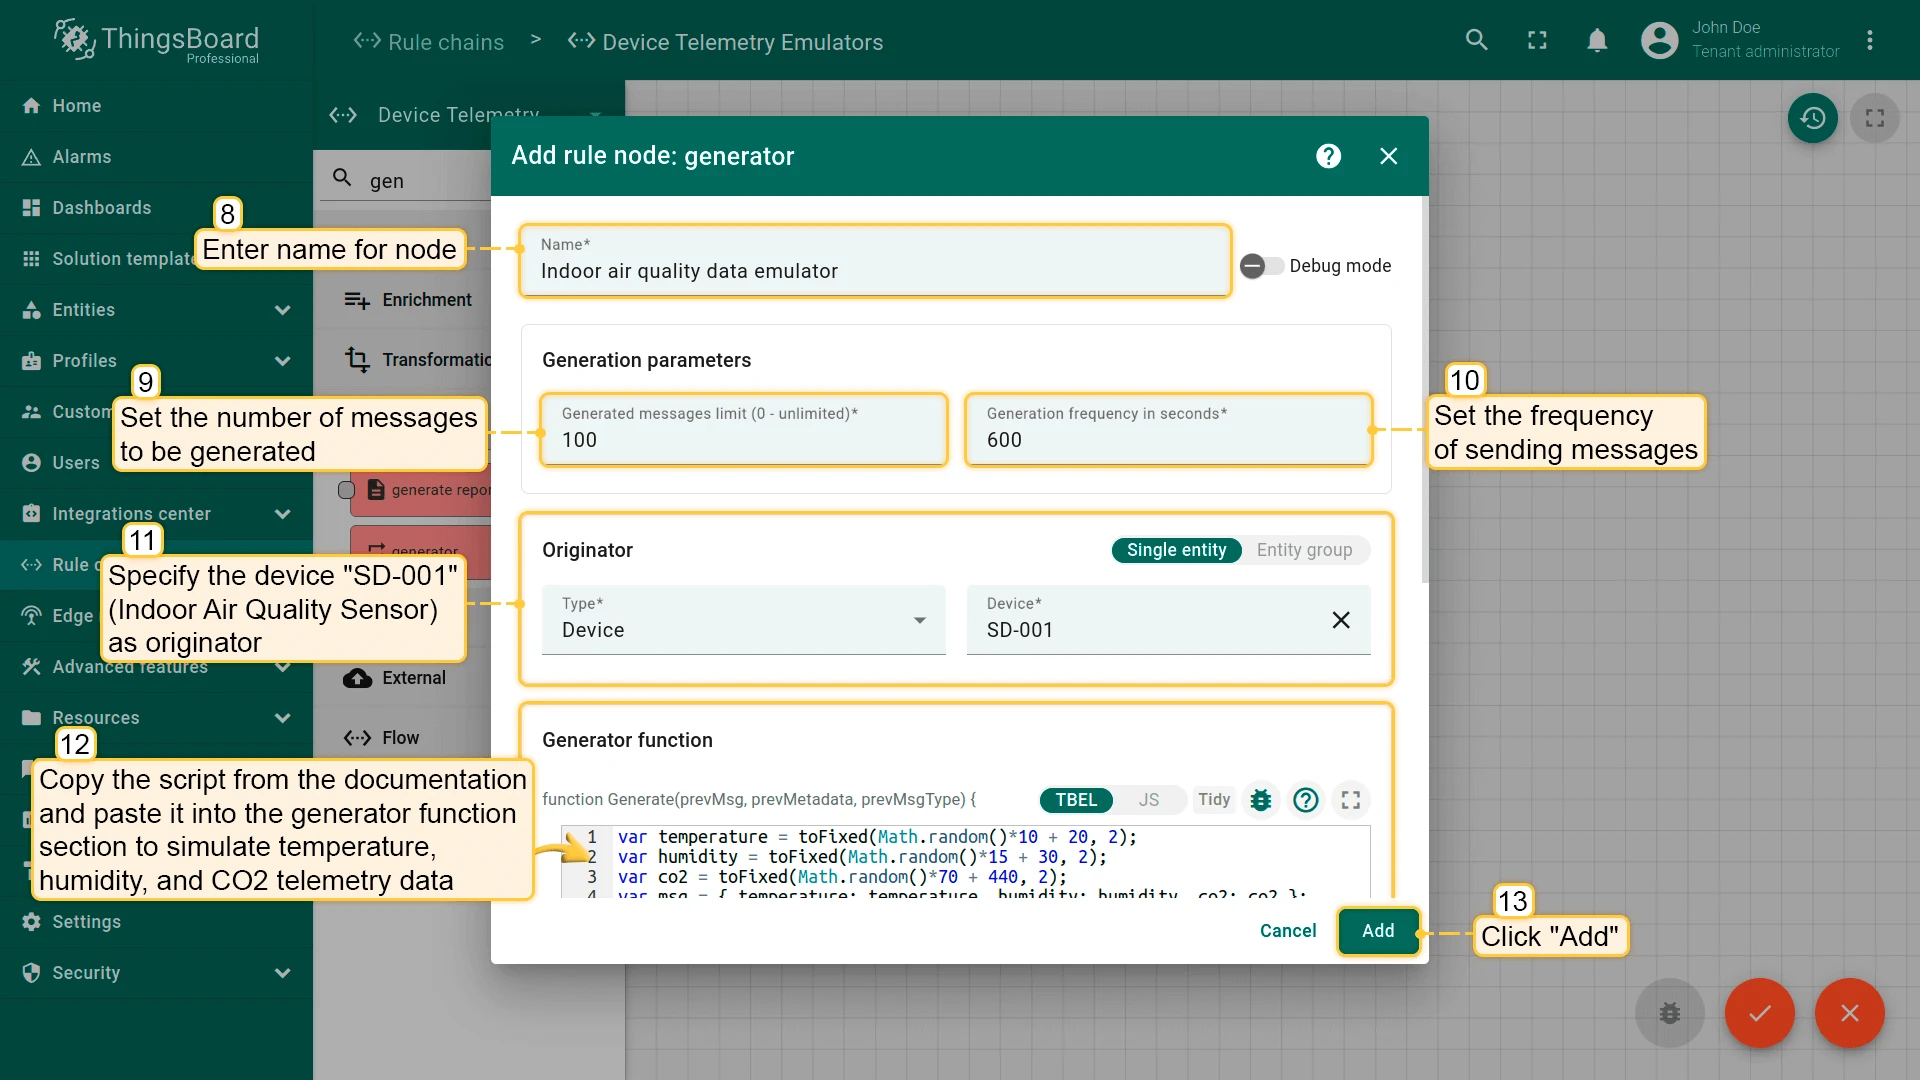
- Find the generator node in the node palette and drag it onto the canvas.
- Name it
Indoor air quality data emulator. Set Message count to100and Period (seconds) to600. - Set Originator to device SD-001 (Indoor Air Quality Sensor).
- Paste the generator script (see below), then click Add.
var temperature = toFixed(Math.random() * 10 + 18, 2);var humidity = toFixed(Math.random() * 15 + 40, 2);var co2 = toFixed(Math.random() * 70 + 440, 2);var msg = { temperature: temperature, humidity: humidity, co2: co2 };var metadata = { data: 40 };var msgType = 'POST_TELEMETRY_REQUEST';return { msg: msg, metadata: metadata, msgType: msgType };
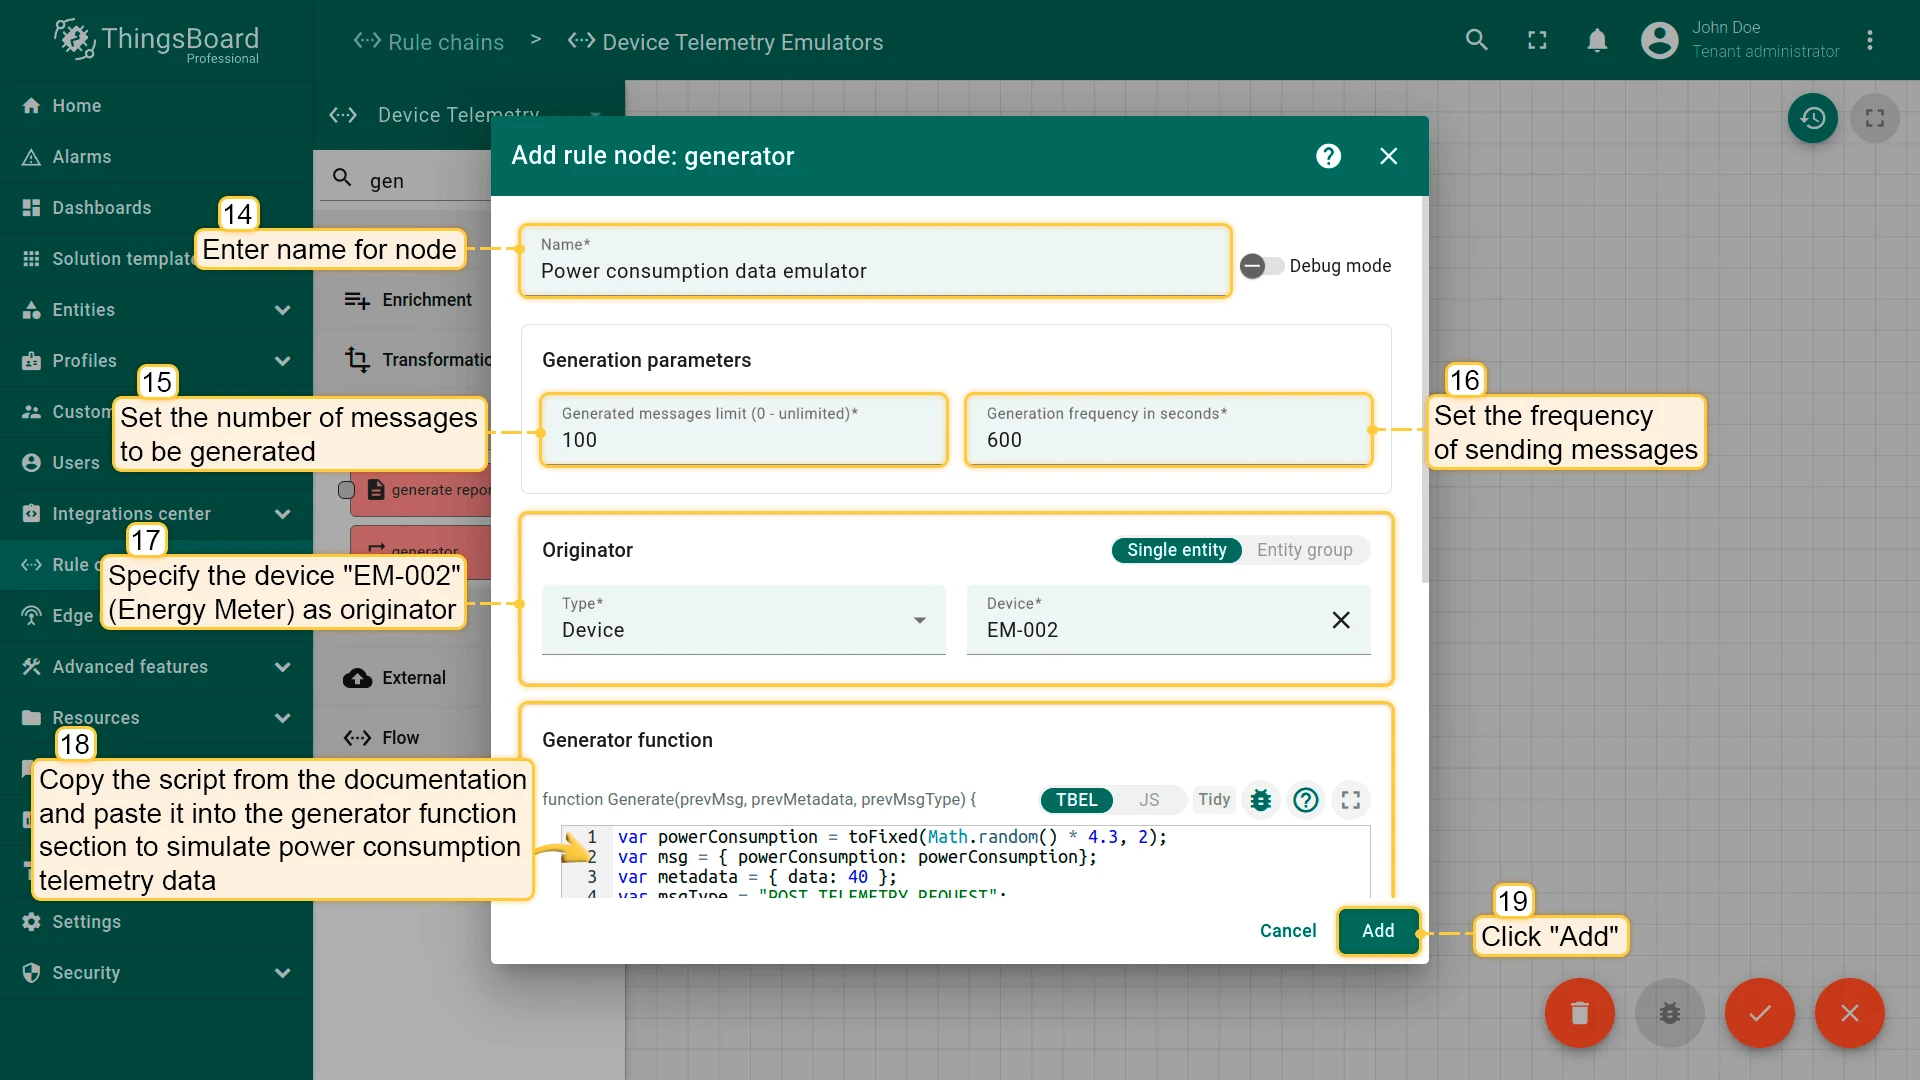
- Add a second generator node named
Power consumption data emulator. Set count100, period600, originator EM-002. - Paste the energy script, then click Add.
var powerConsumption = toFixed(Math.random() * 2.2, 2);var msg = { powerConsumption: powerConsumption };var metadata = { data: 40 };var msgType = 'POST_TELEMETRY_REQUEST';return { msg: msg, metadata: metadata, msgType: msgType };
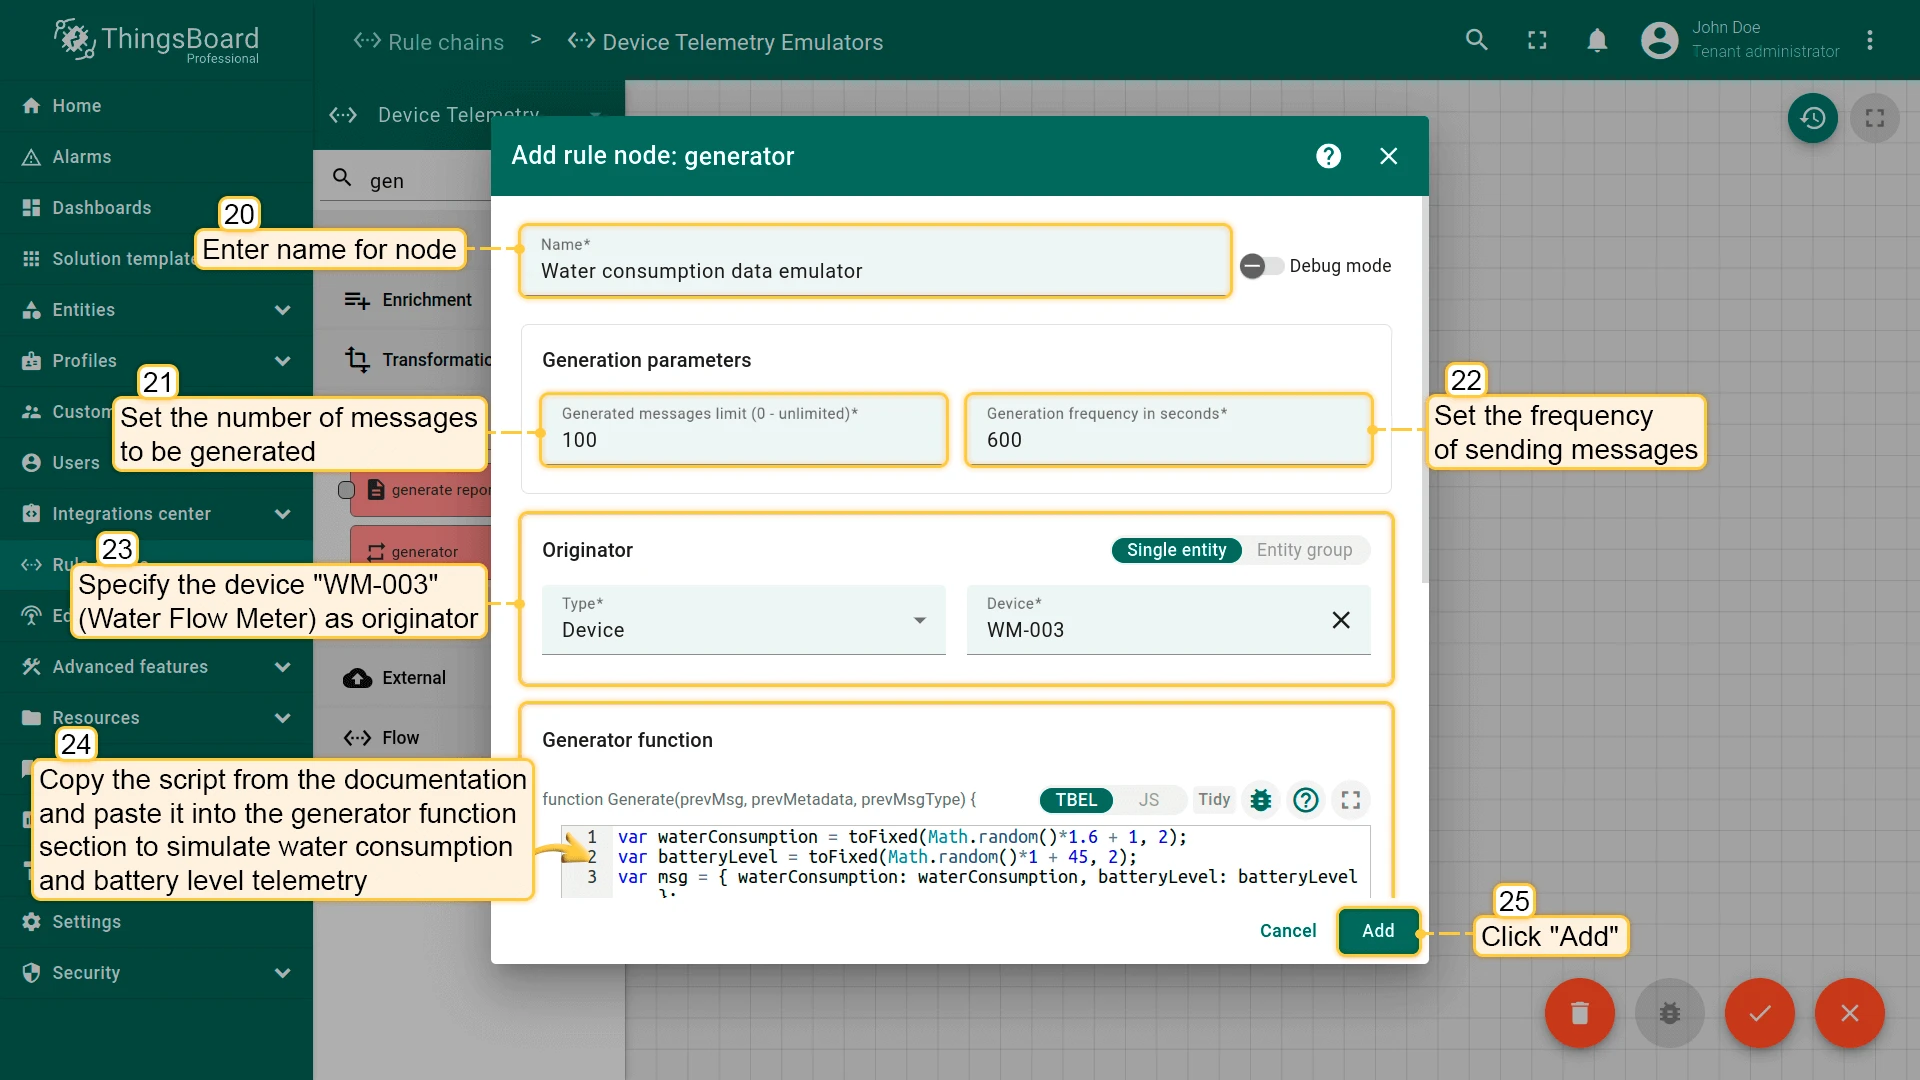
- Add a third generator node named
Water consumption data emulator. Set count100, period600, originator WM-003. - Paste the water script, then click Add.
var waterConsumption = toFixed(Math.random() * 1.3, 2);var batteryLevel = toFixed(Math.random() * 1 + 45, 2);var msg = { waterConsumption: waterConsumption, batteryLevel: batteryLevel };var metadata = { data: 40 };var msgType = 'POST_TELEMETRY_REQUEST';return { msg: msg, metadata: metadata, msgType: msgType };
- Add a fourth generator node named
IAQ data emulator. Set count100, period600, originator AM-307. - Paste the IAQ script, then click Add.
var temperature = toFixed(Math.random() * 10 + 18, 2);var humidity = toFixed(Math.random() * 15 + 40, 2);var co2 = toFixed(Math.random() * 70 + 440, 2);var msg = { temperature: temperature, humidity: humidity, co2: co2 };var metadata = { data: 40 };var msgType = 'POST_TELEMETRY_REQUEST';return { msg: msg, metadata: metadata, msgType: msgType };
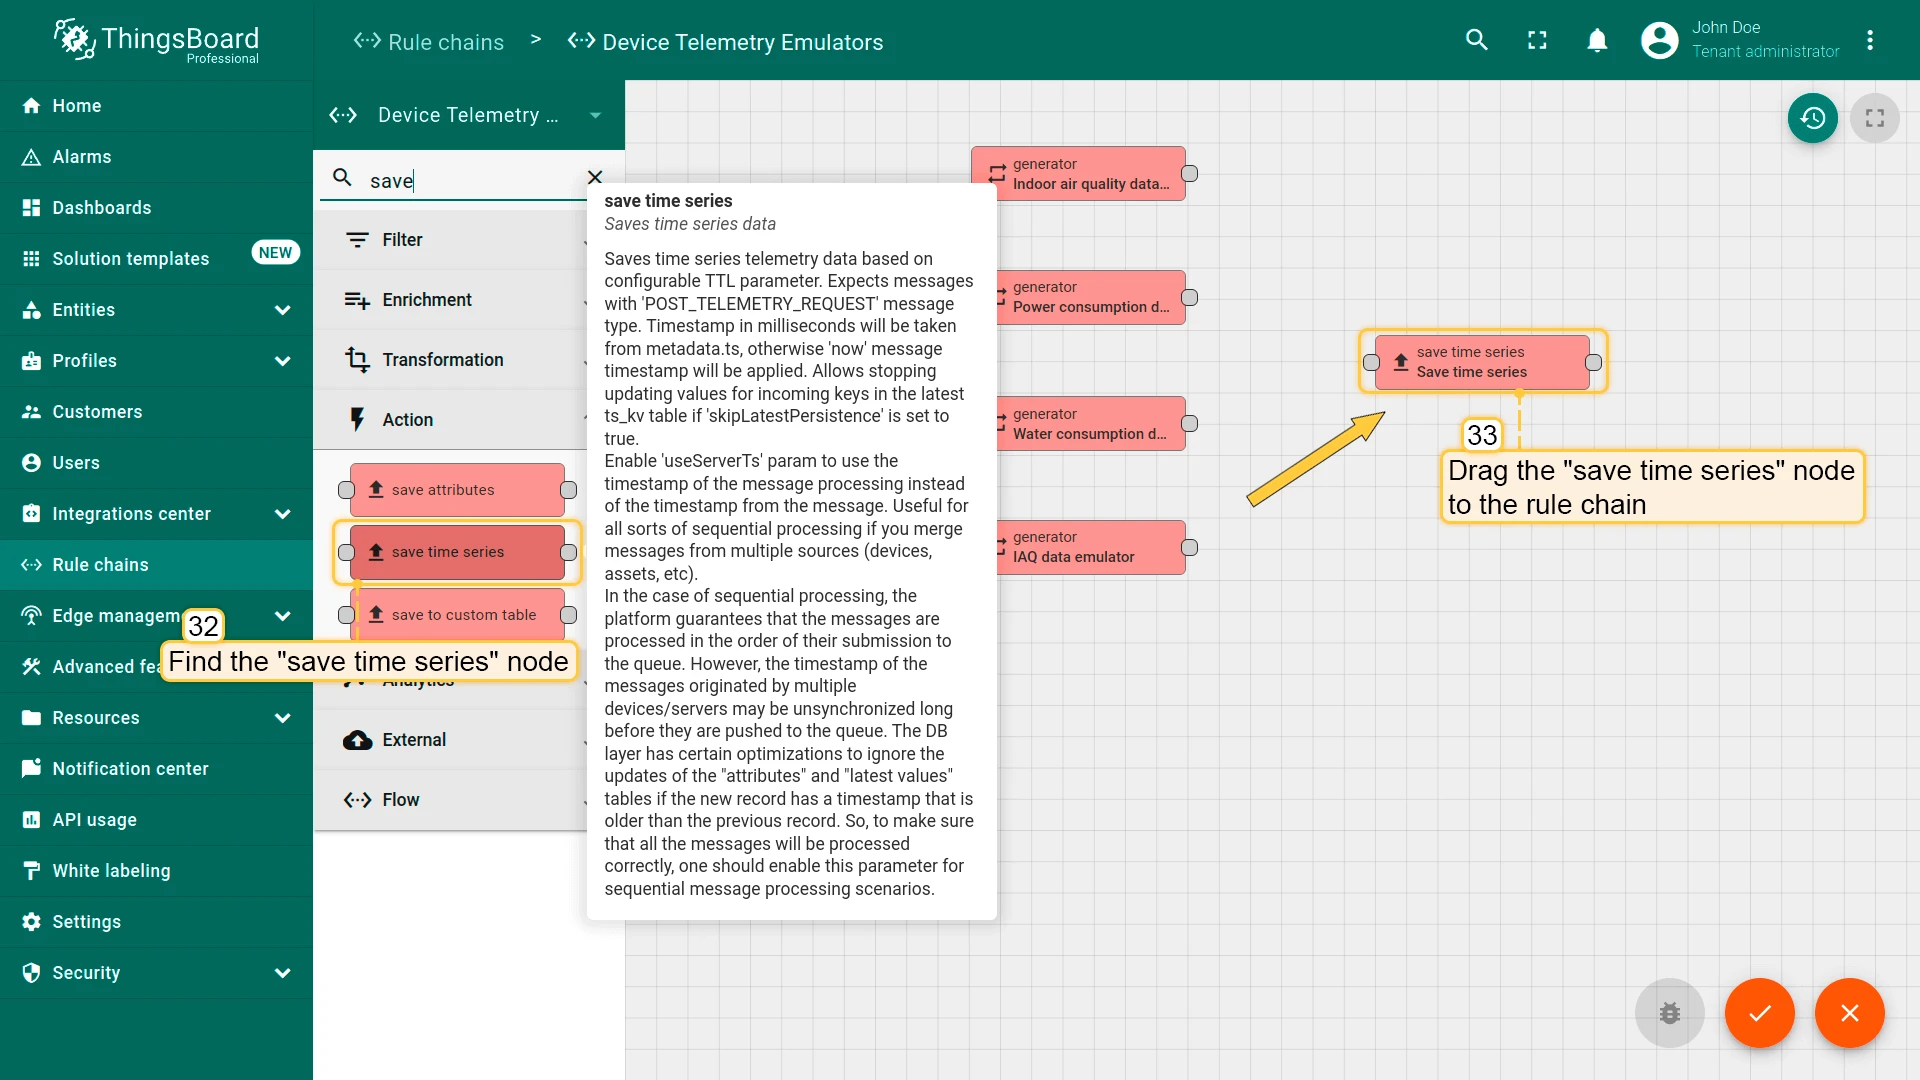
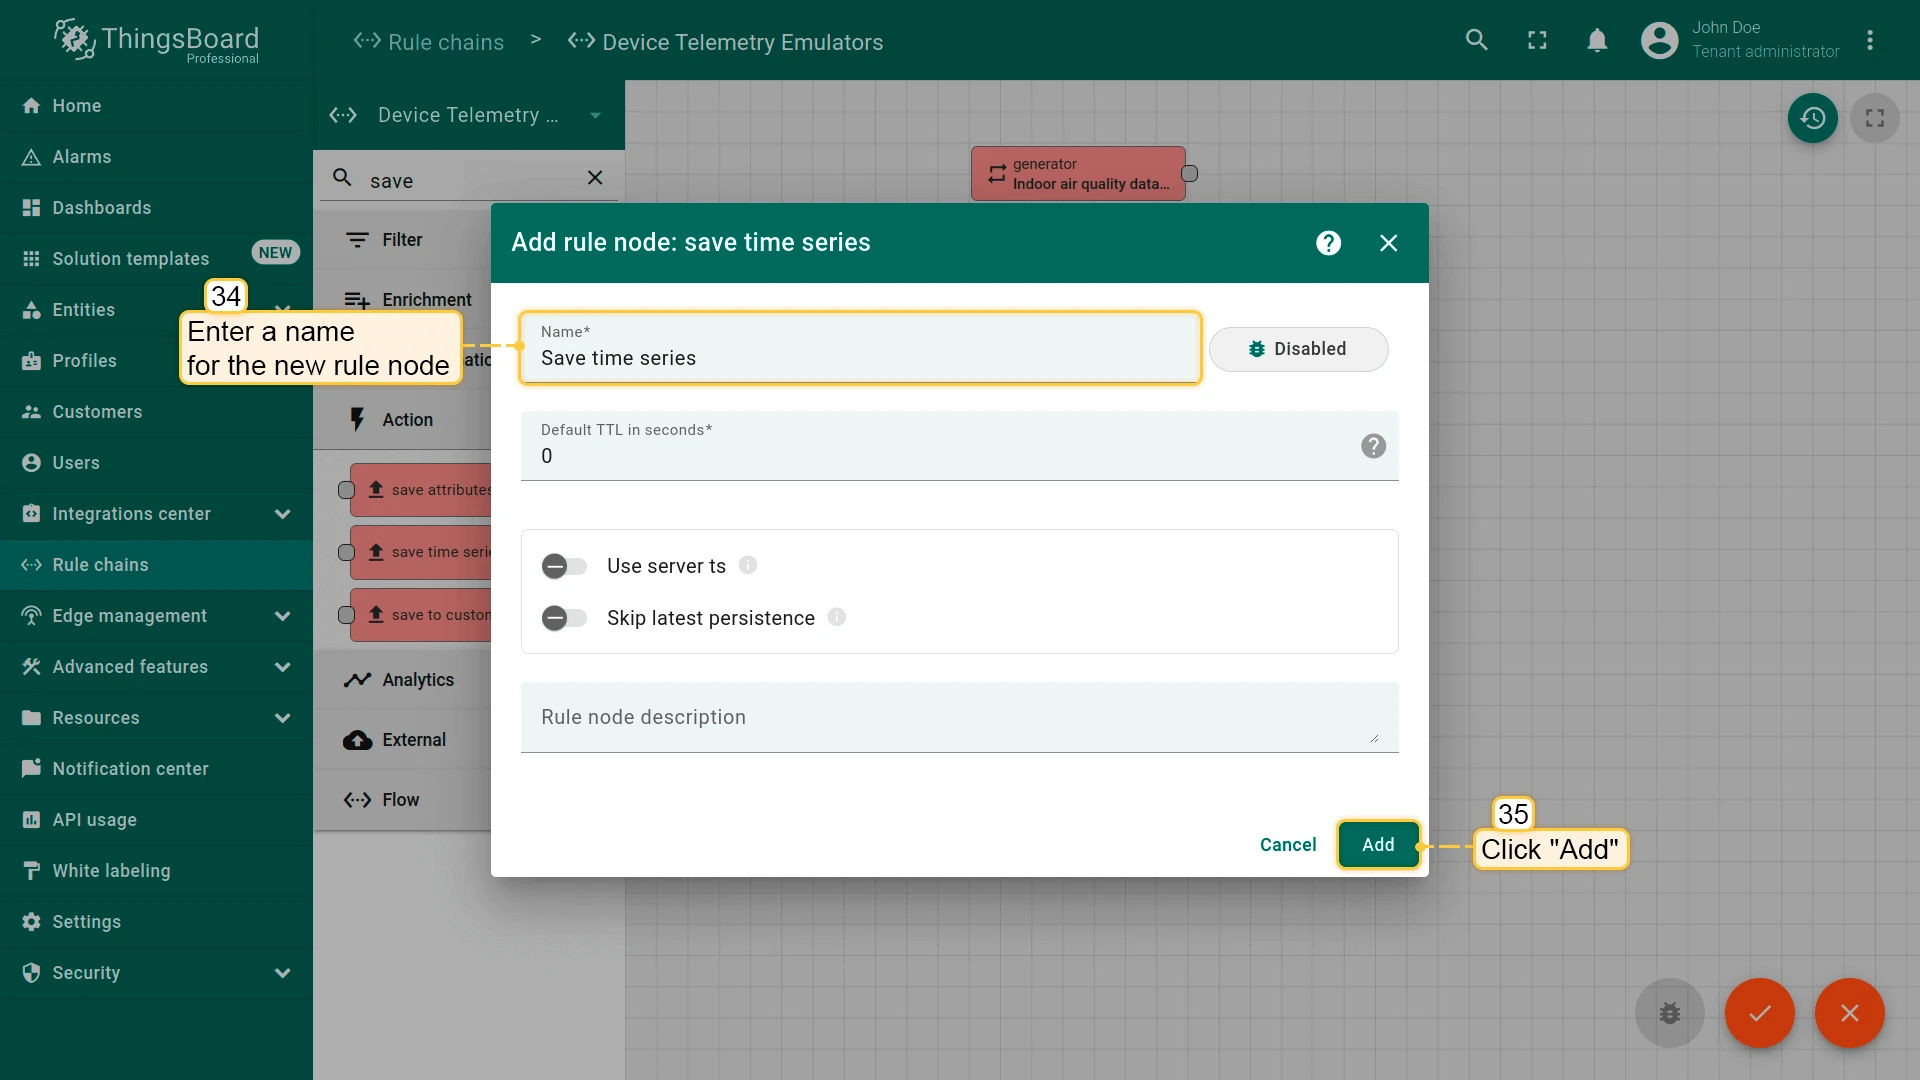
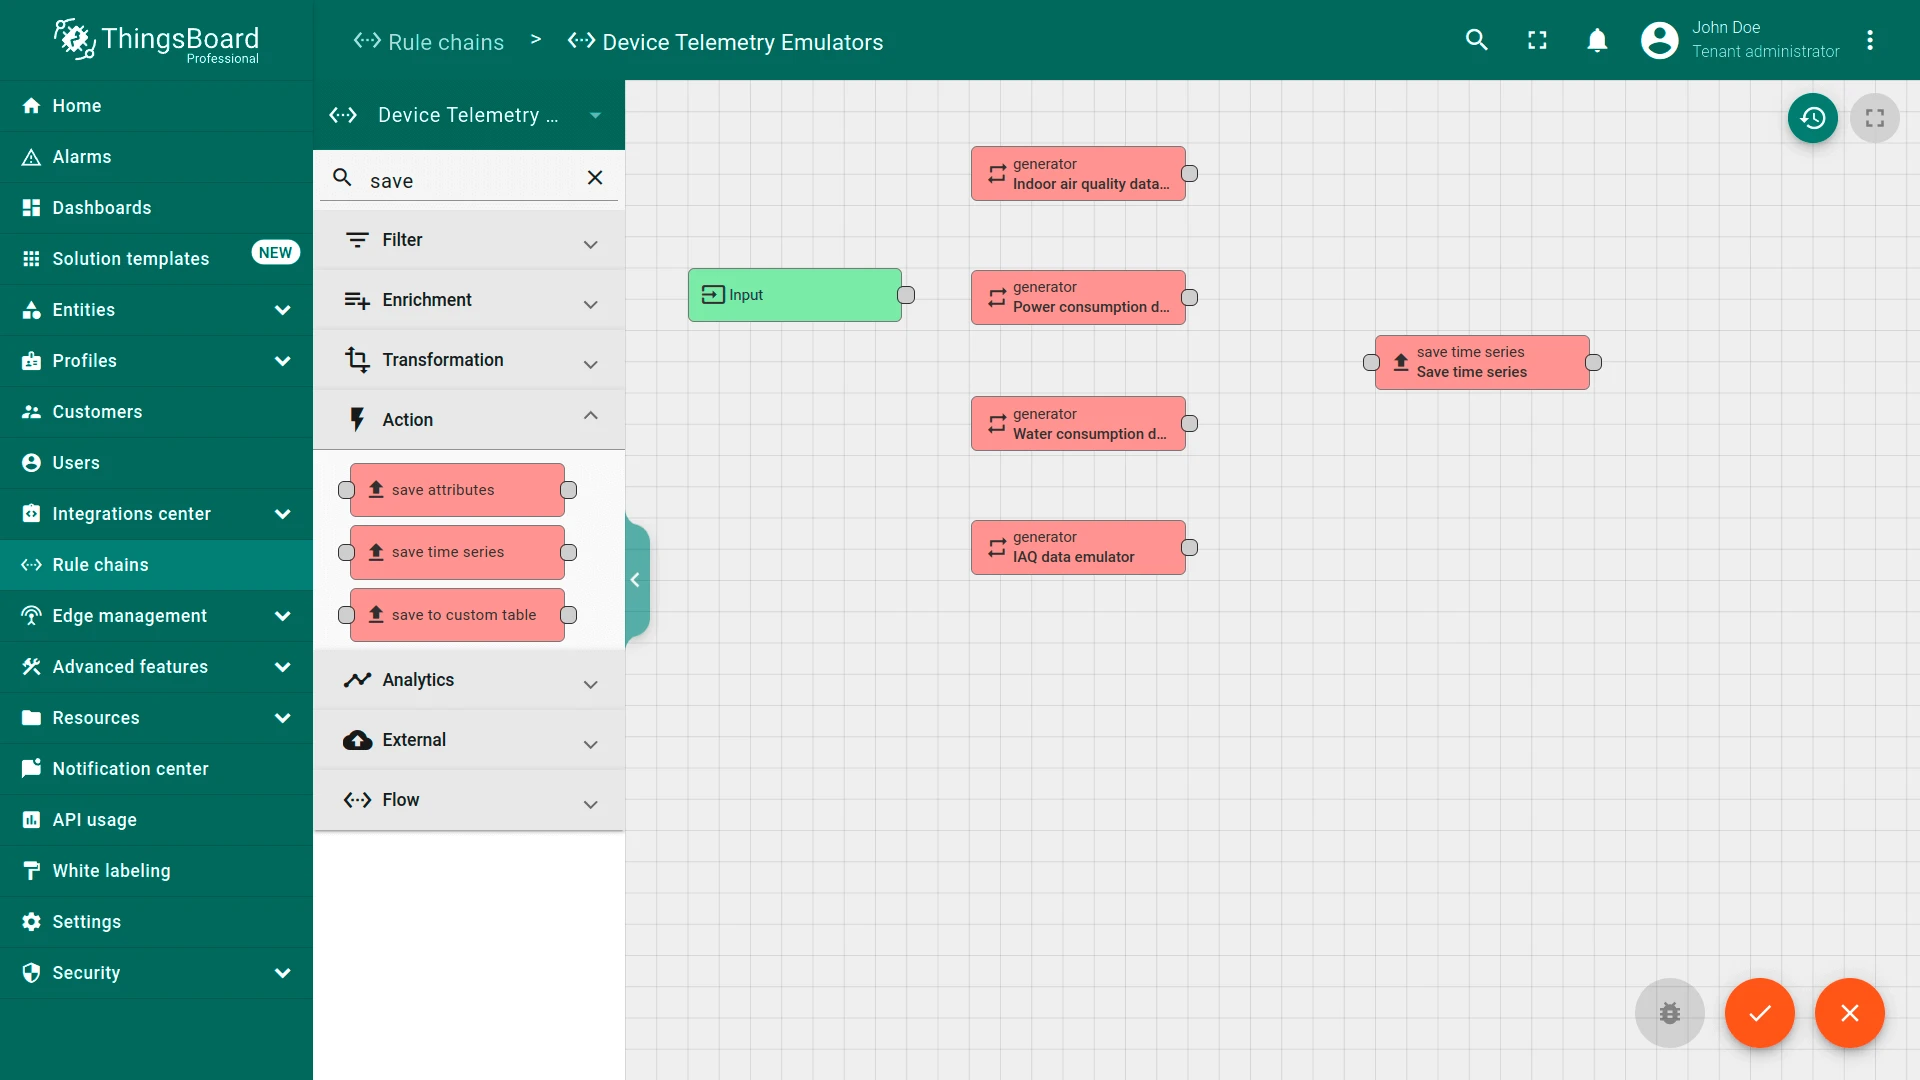
- Drag a save time series node onto the canvas and click Add.
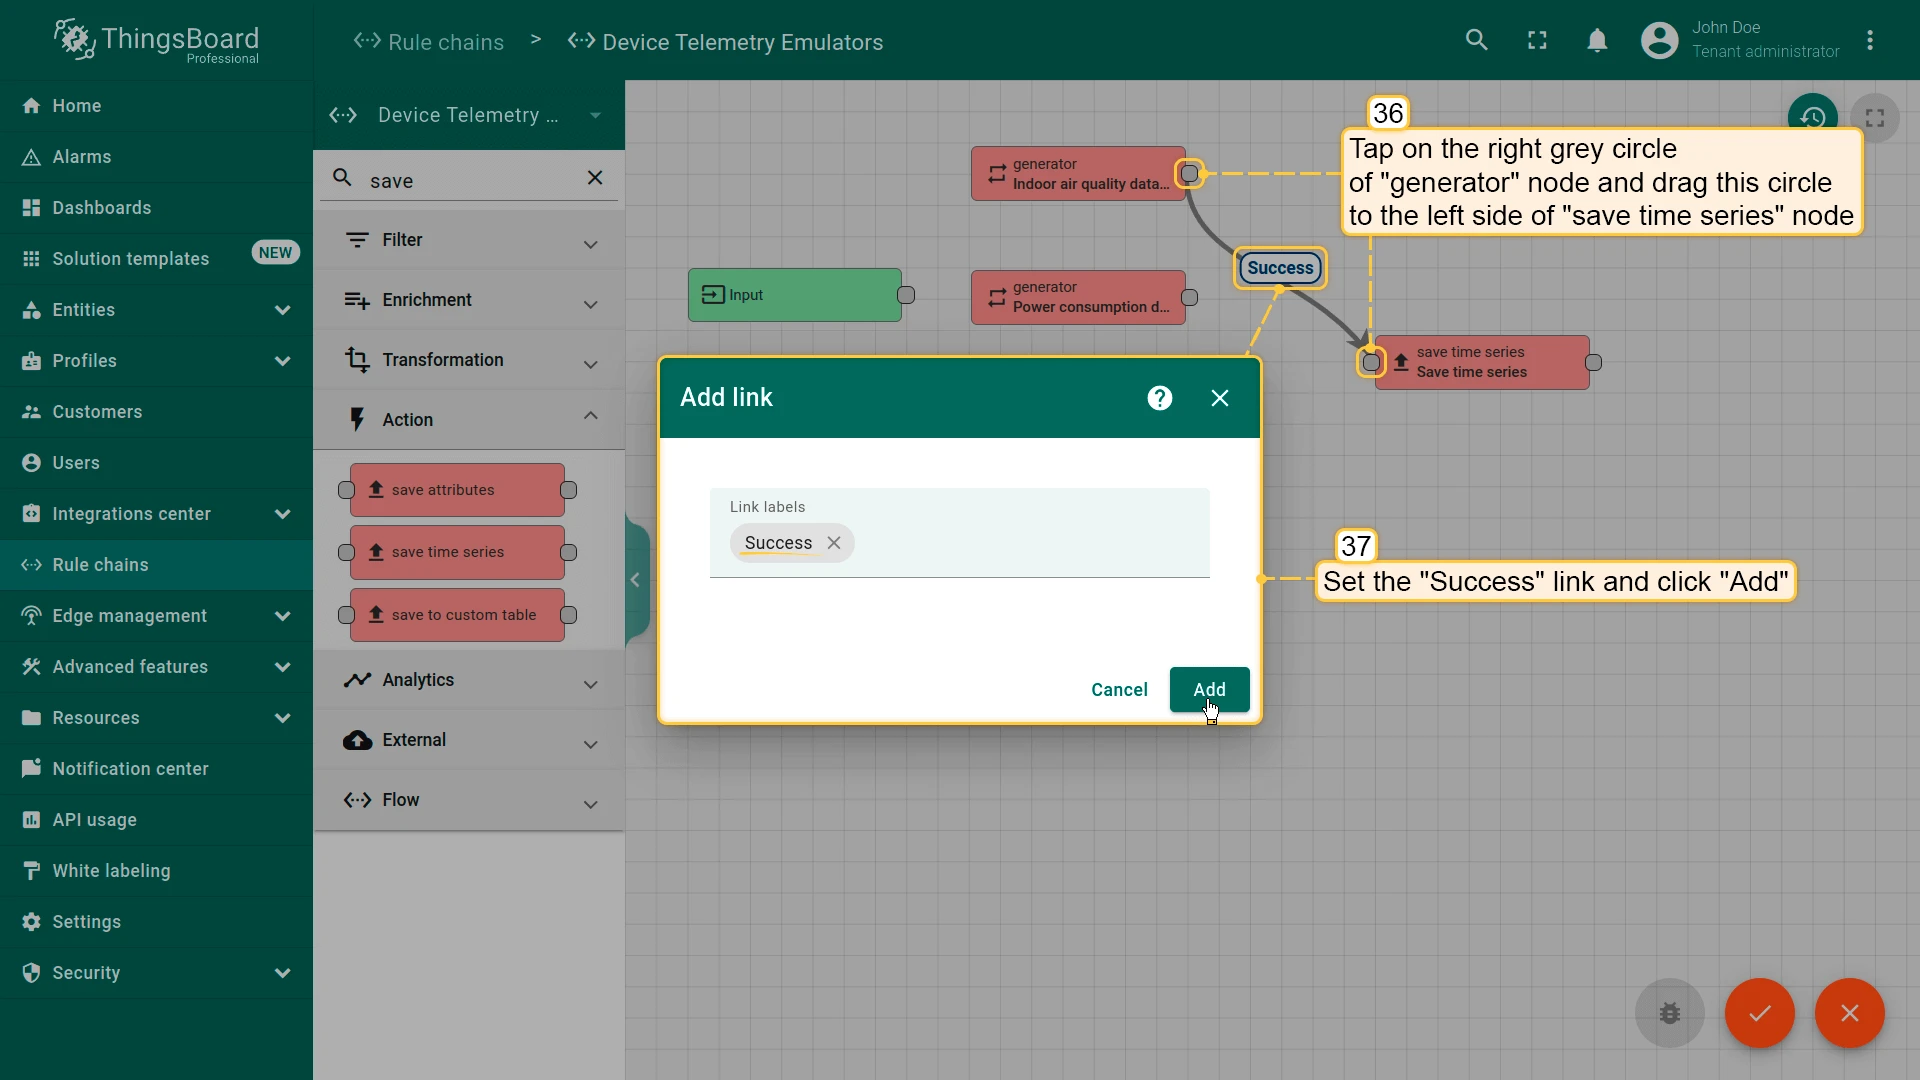
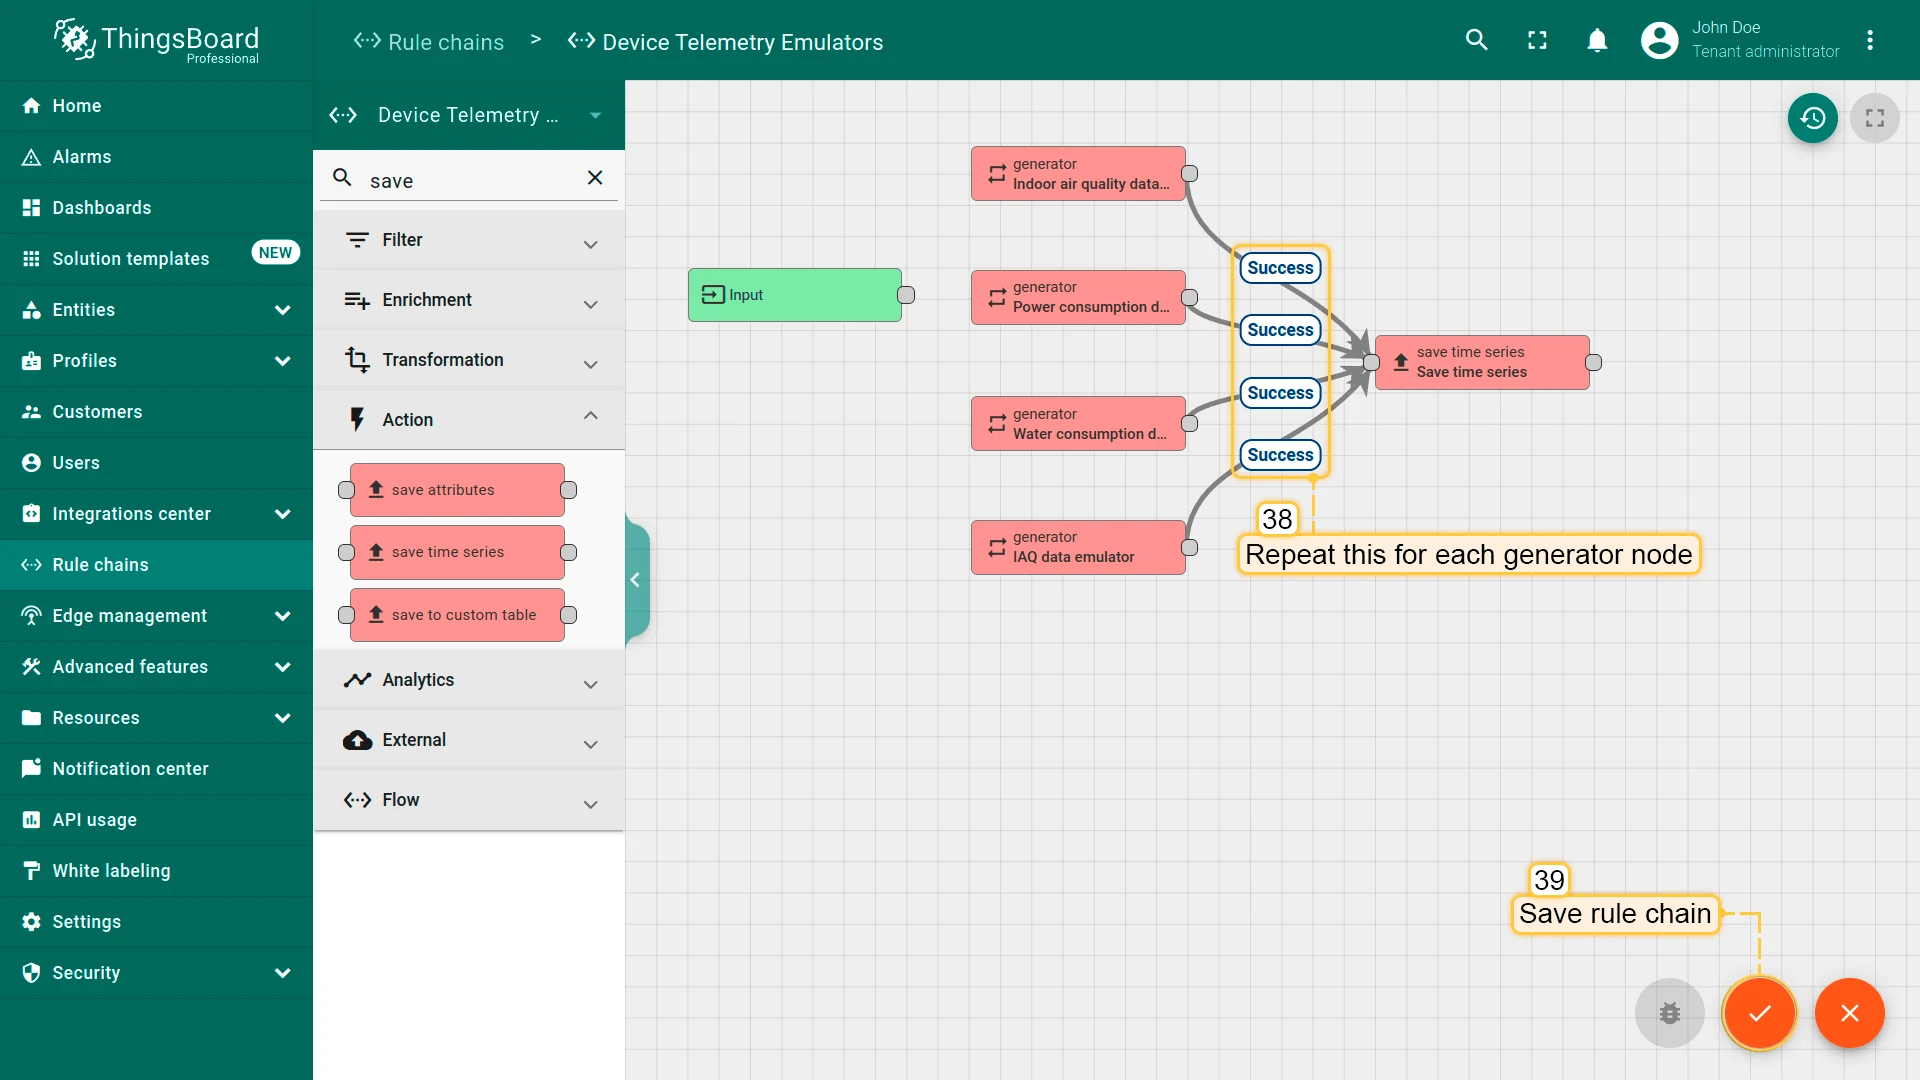
- Connect the Success output of each Generator to the Save time series node.
- Save the rule chain.

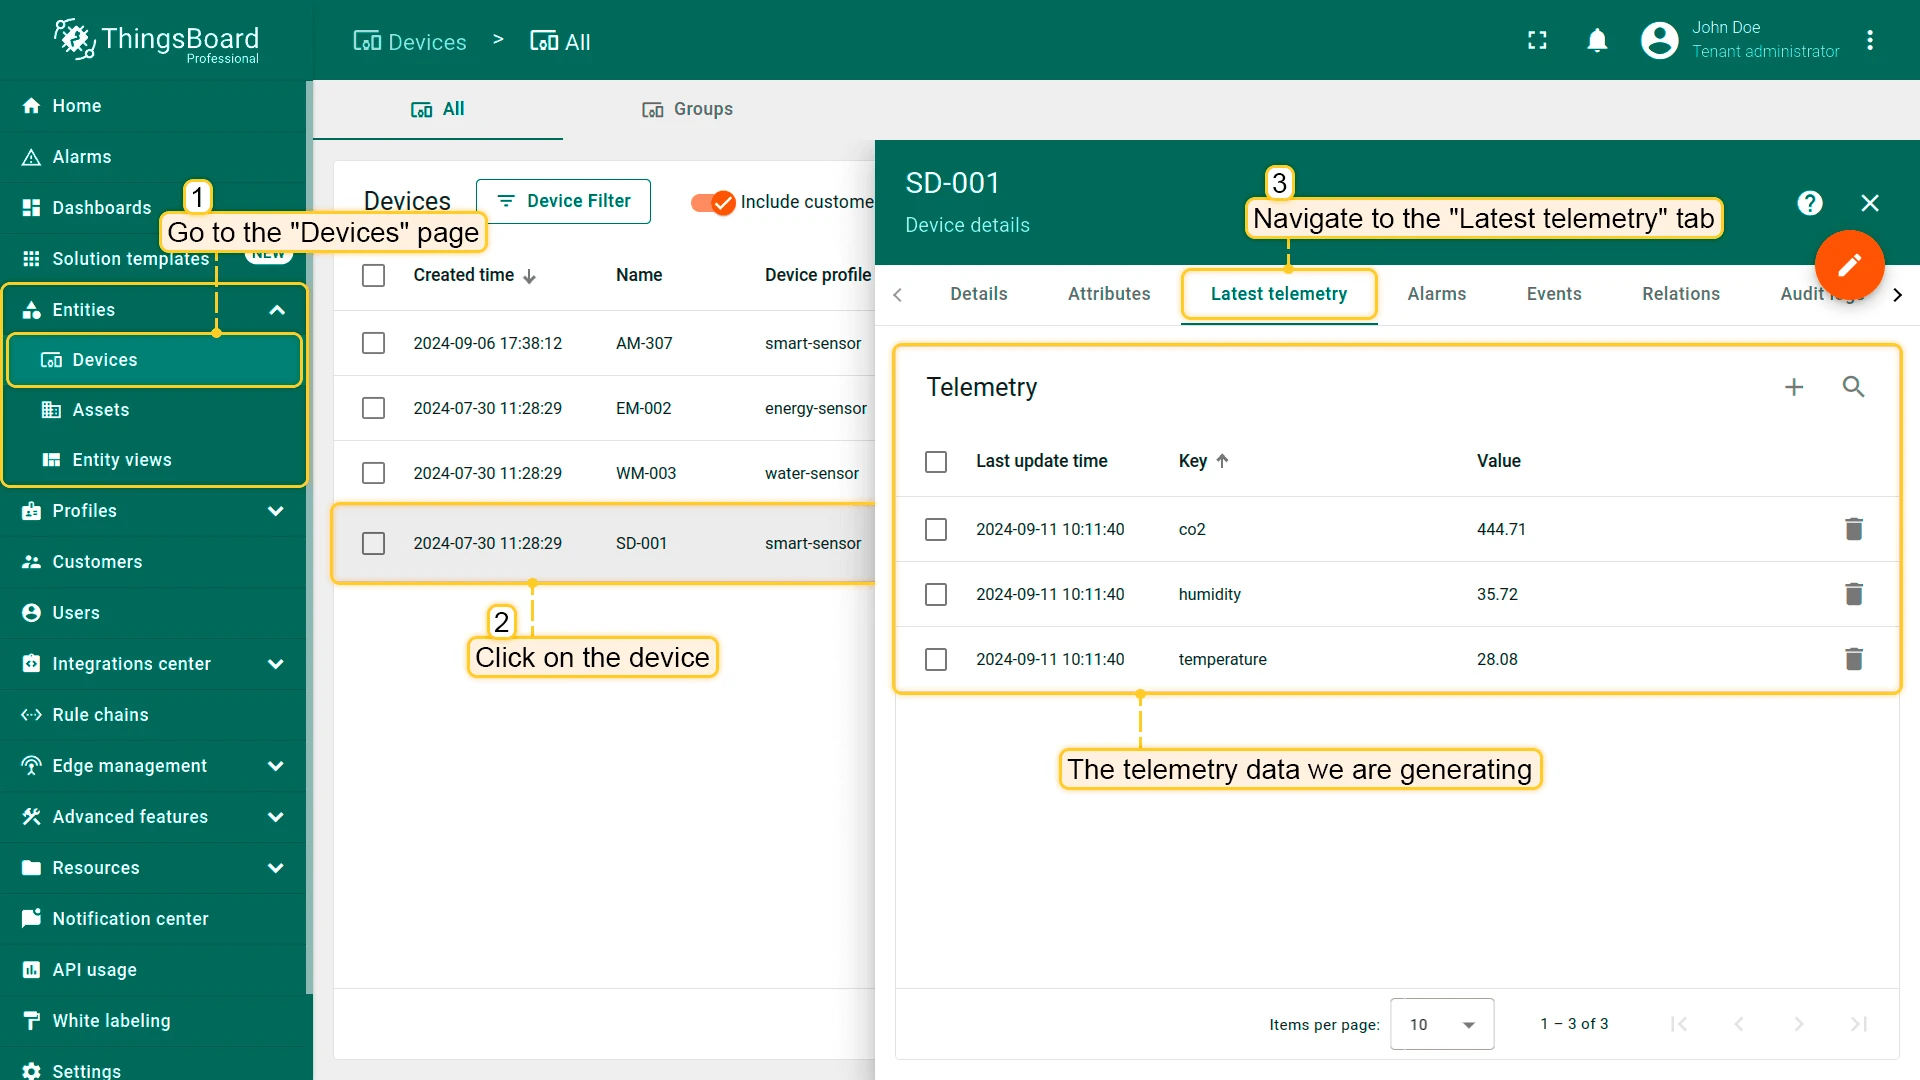
To verify the rule chain is working, open any device’s Latest telemetry tab — you should see values arriving within the first 600-second interval.
Step 3.2 Sensors List — Display Telemetry
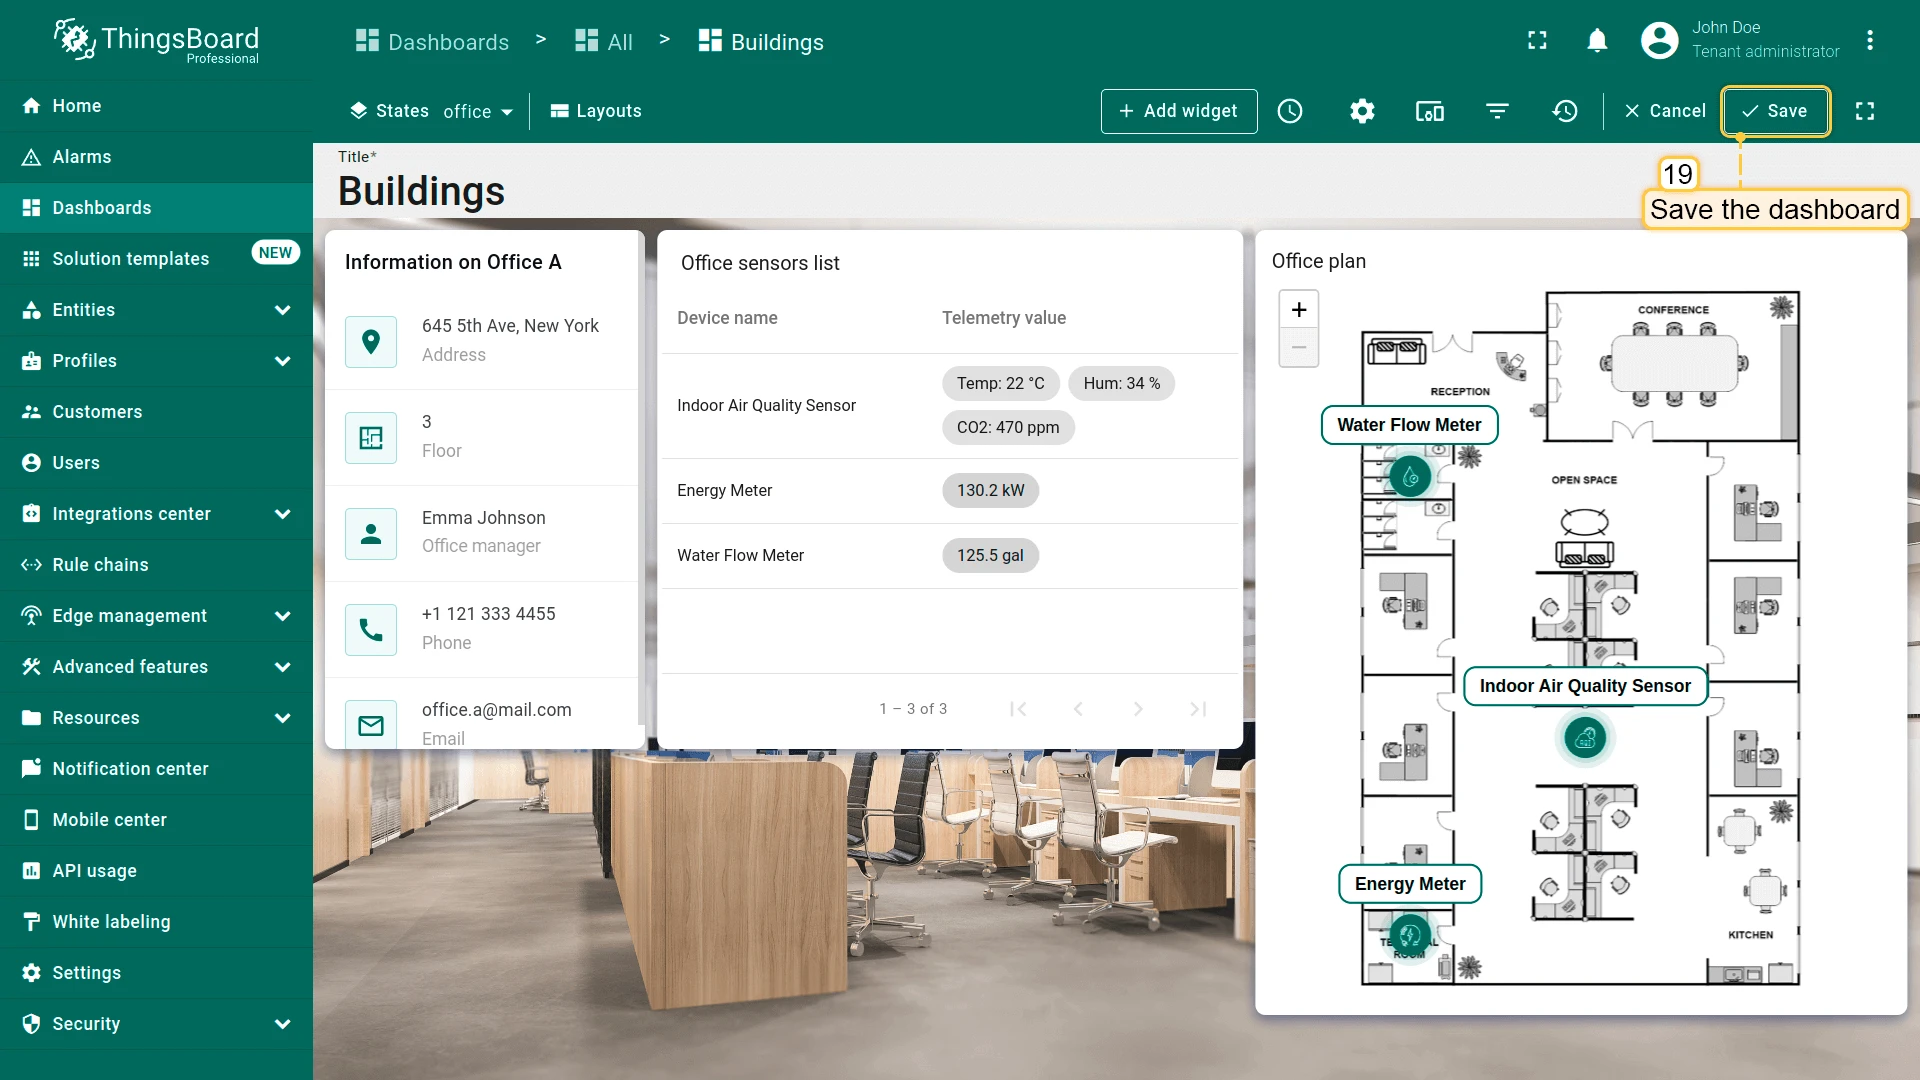
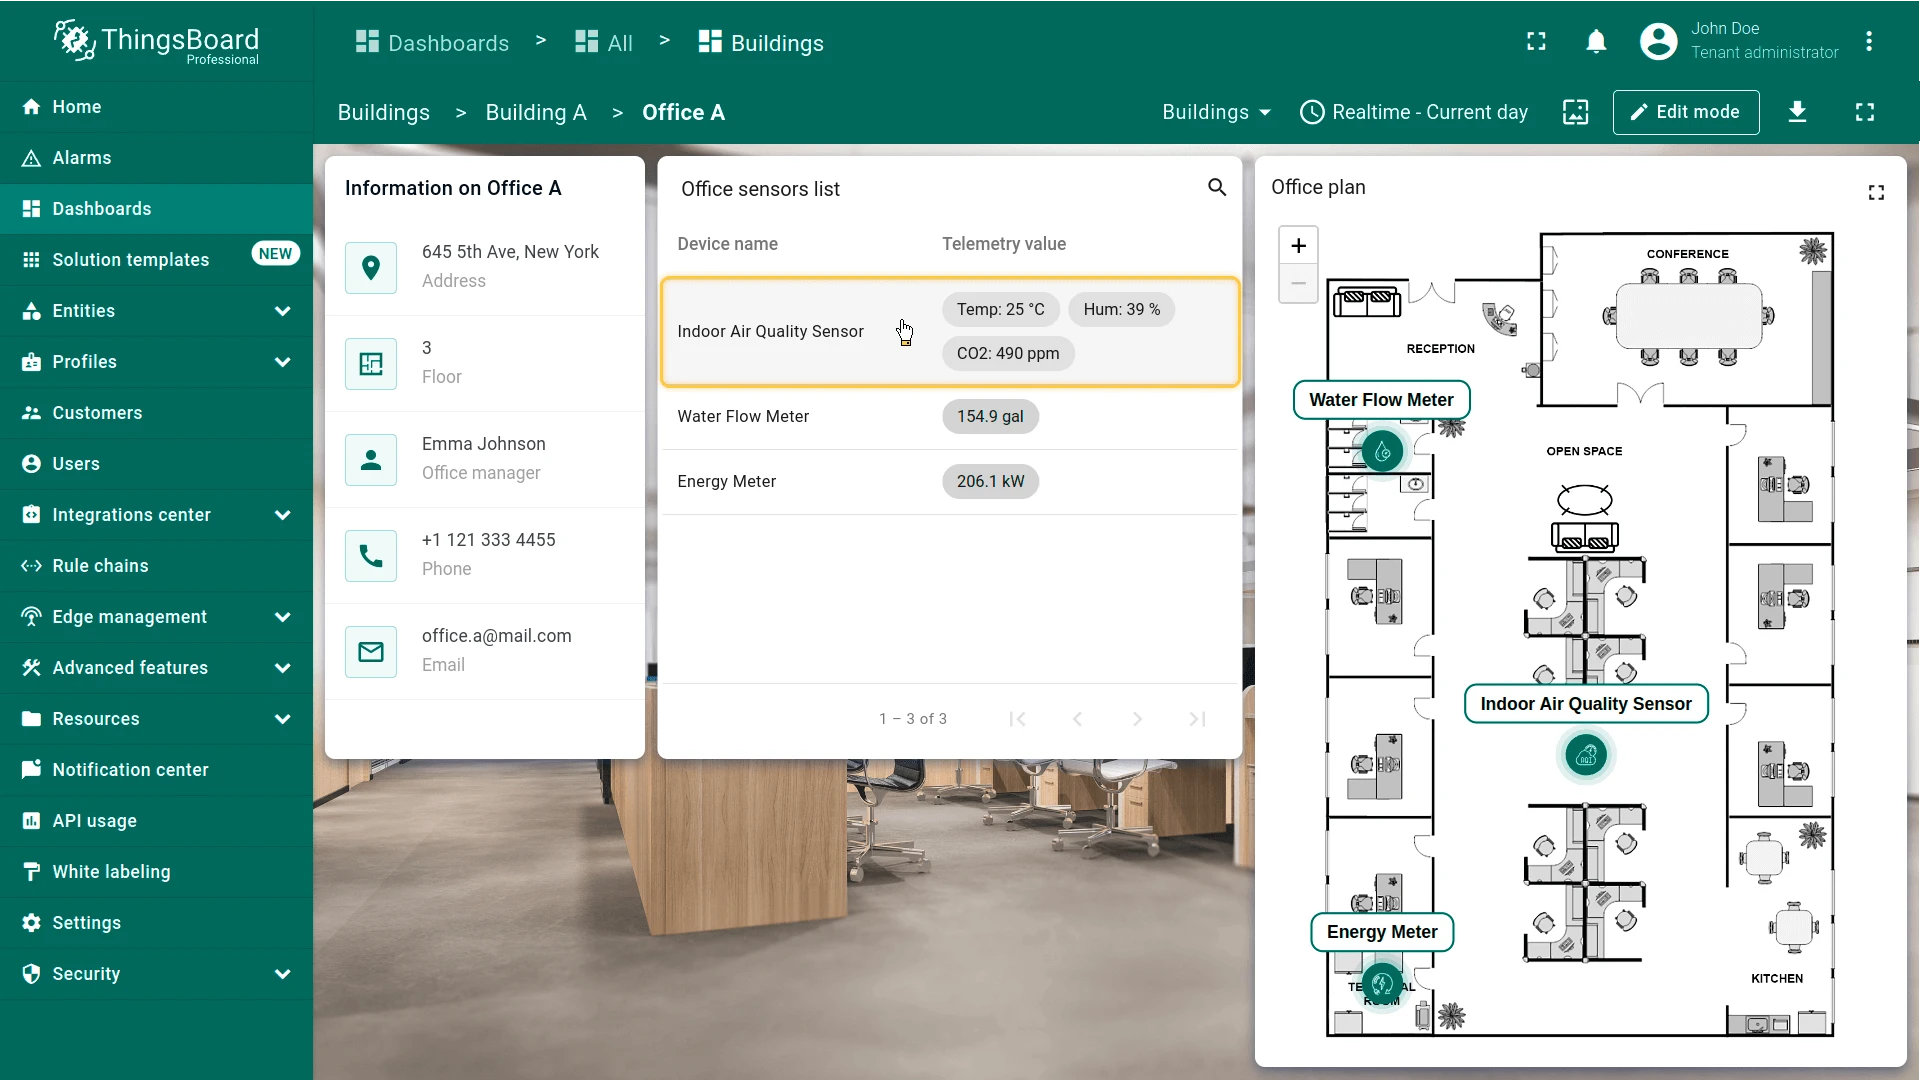
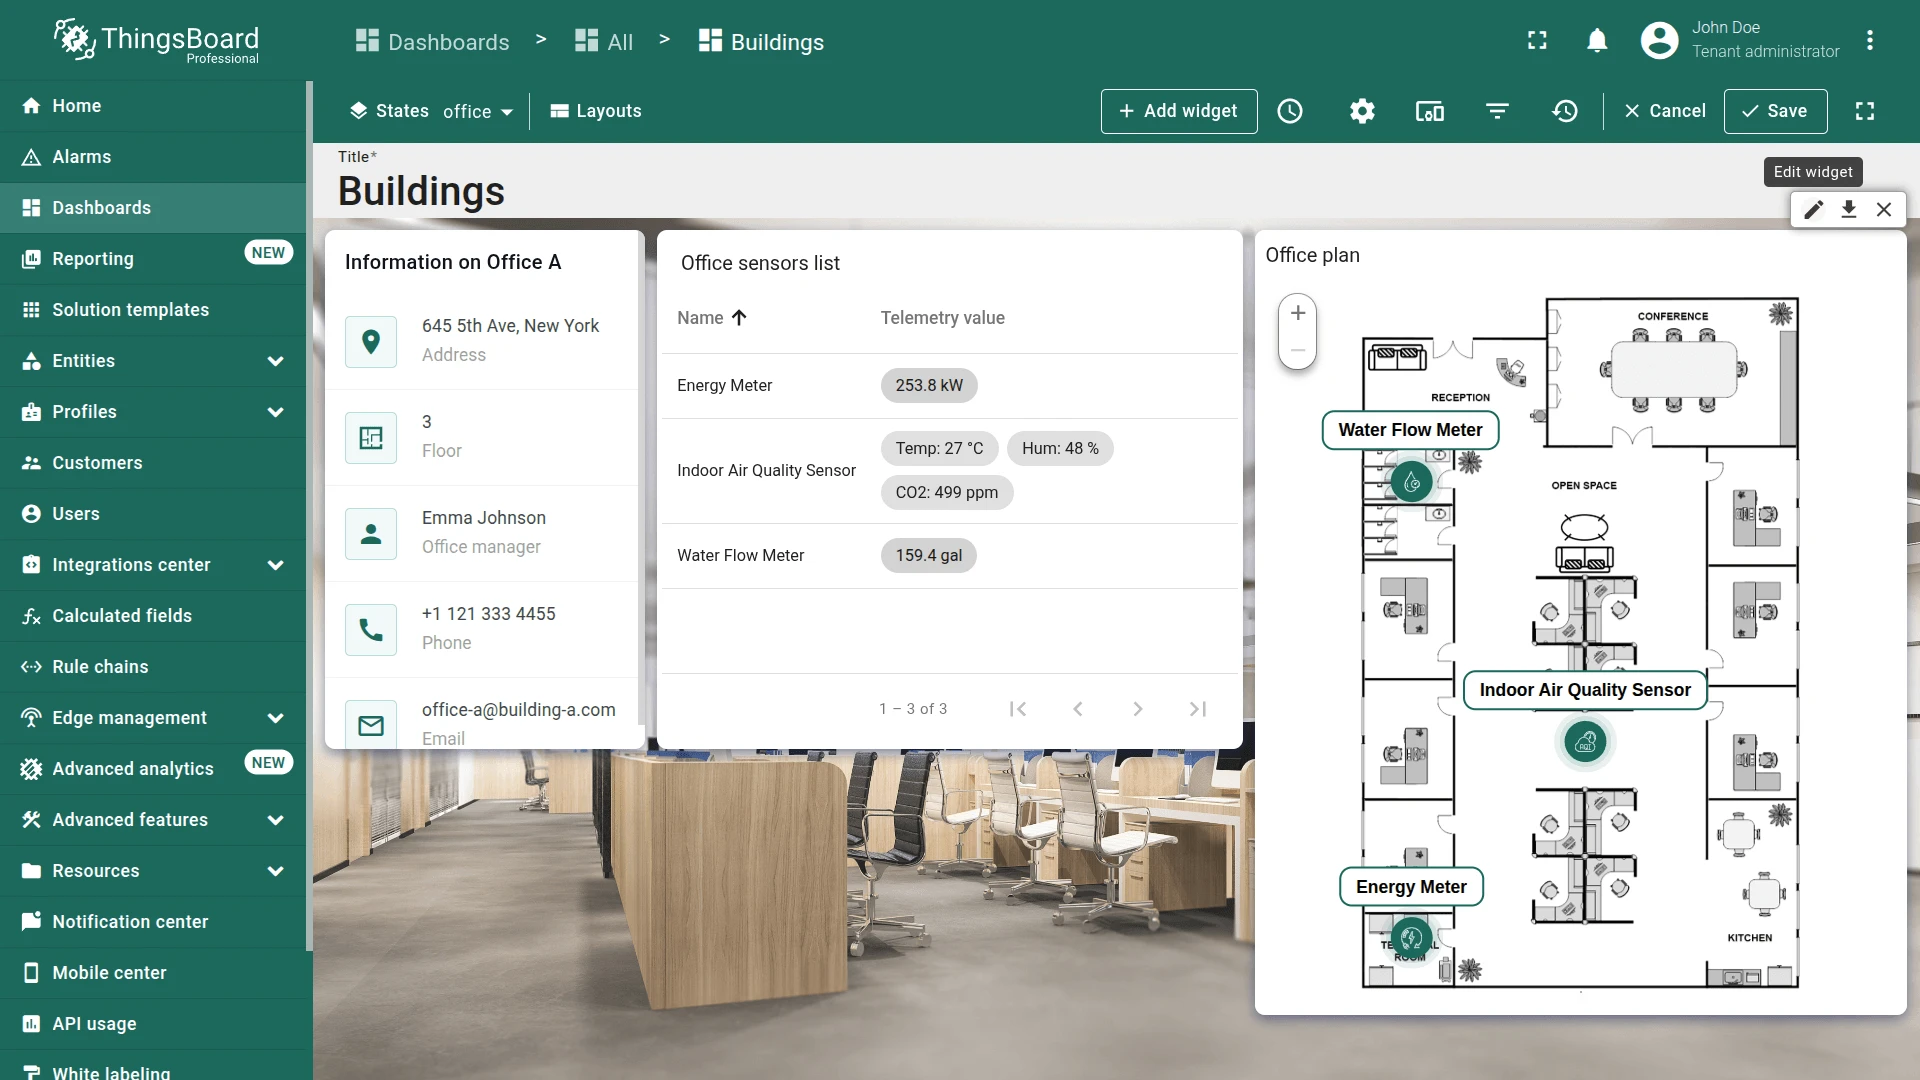
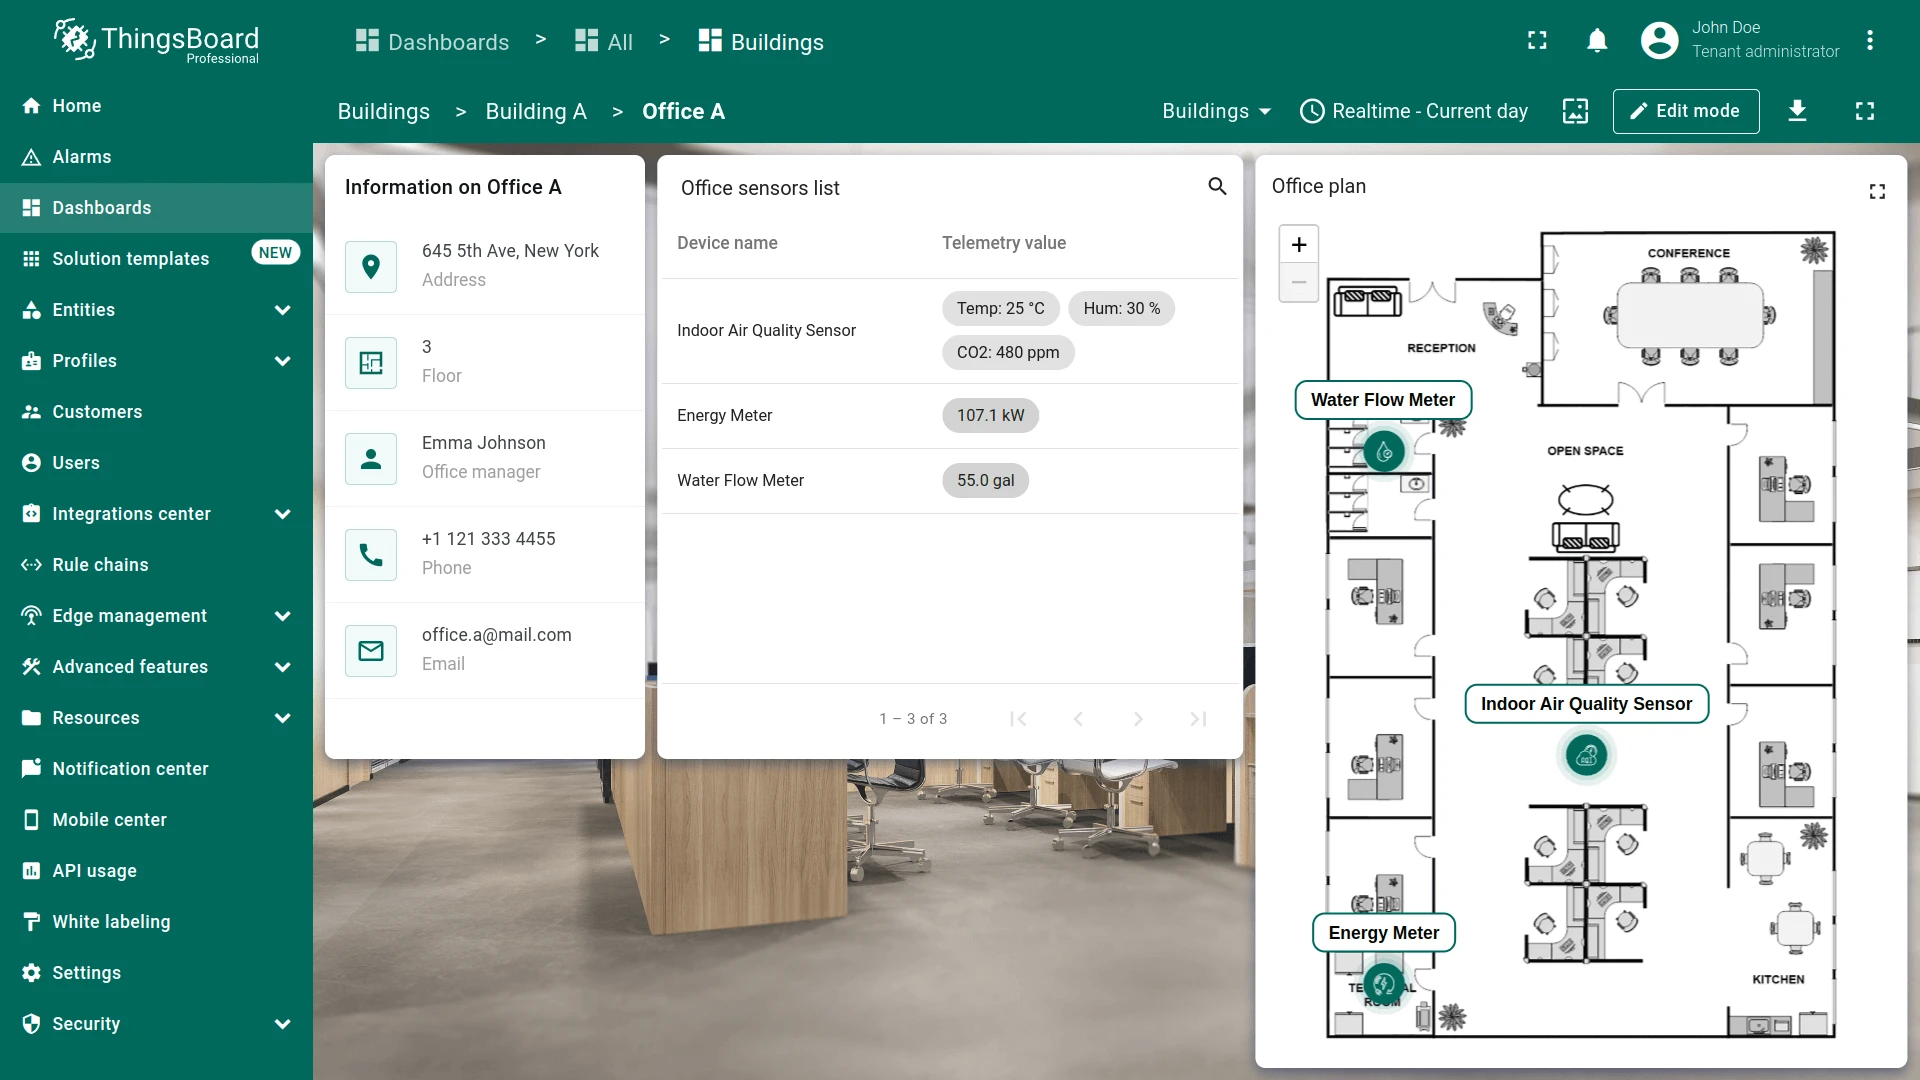
Section titled “Step 3.2 Sensors List — Display Telemetry”Update the Office sensors list widget: add all telemetry keys, hide the raw columns, then combine readings into one styled Telemetry column using a Cell content function.
Add telemetry keys:
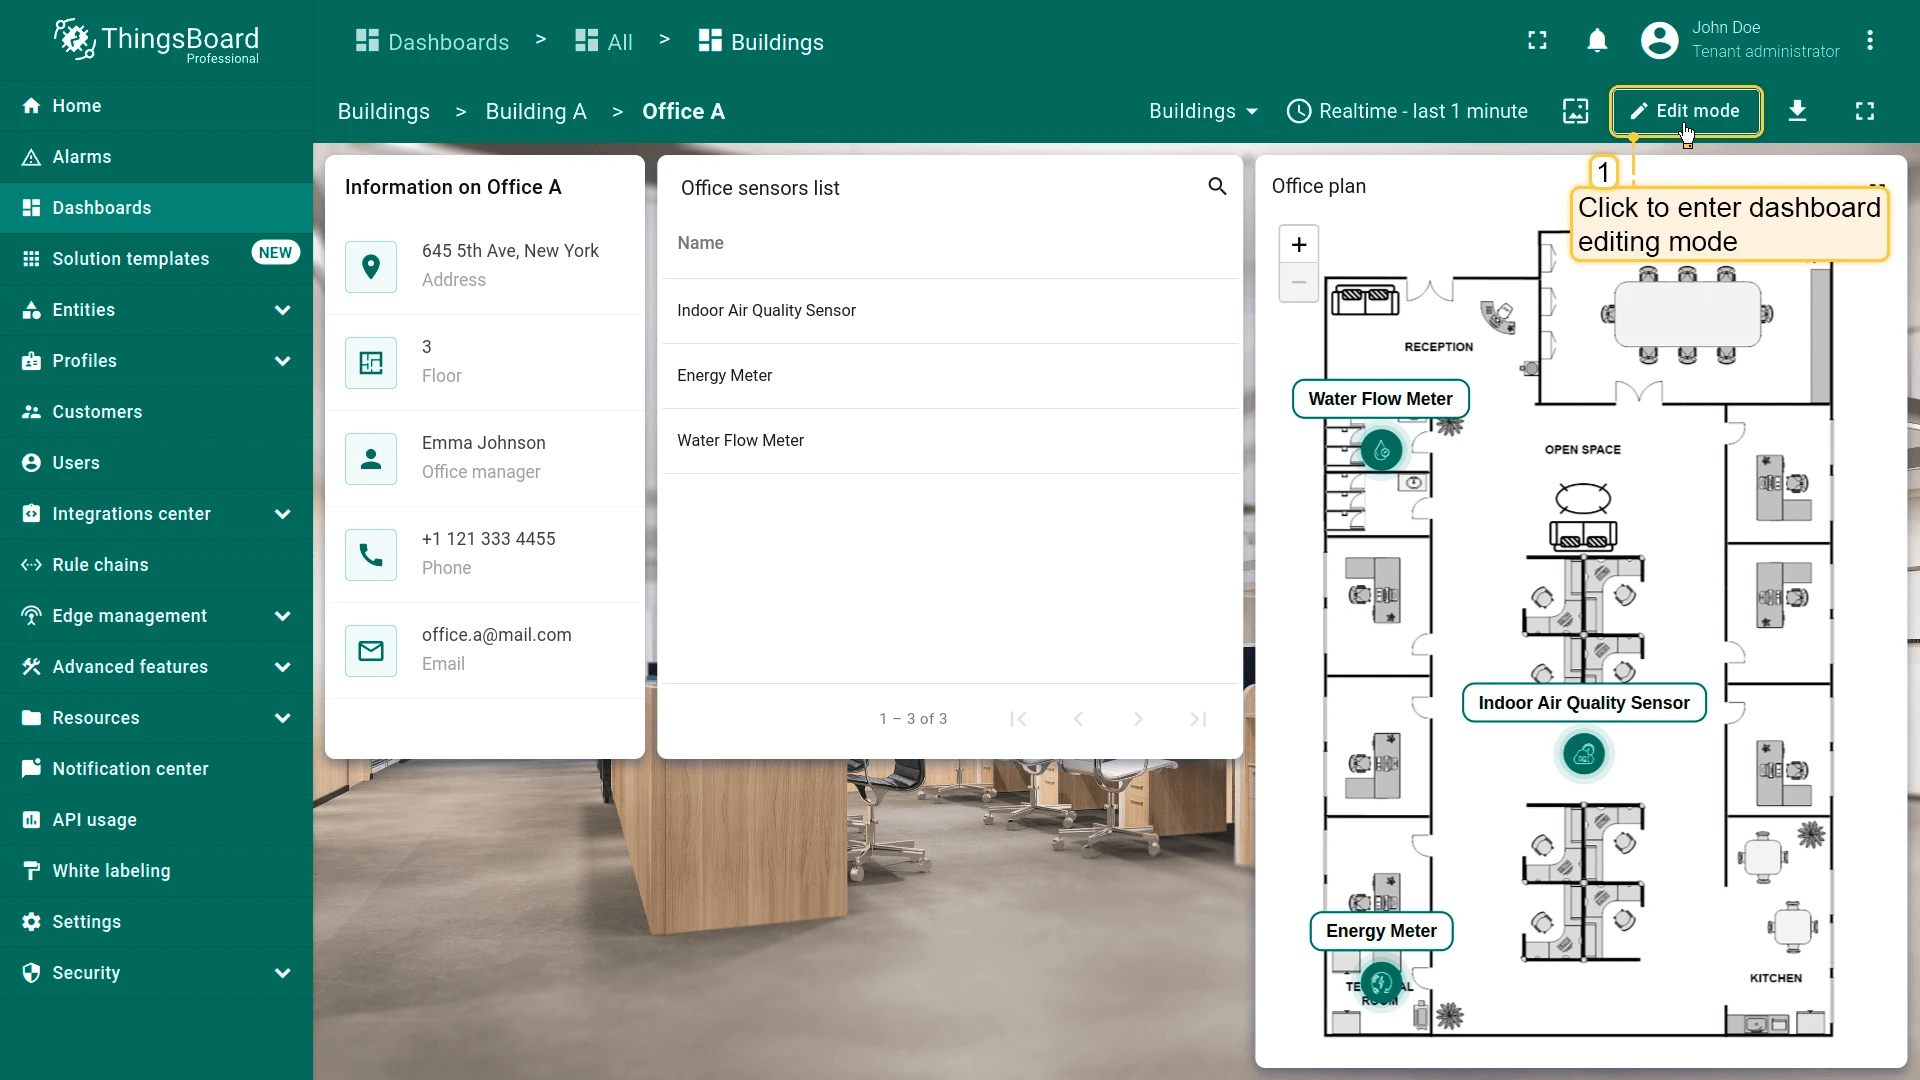
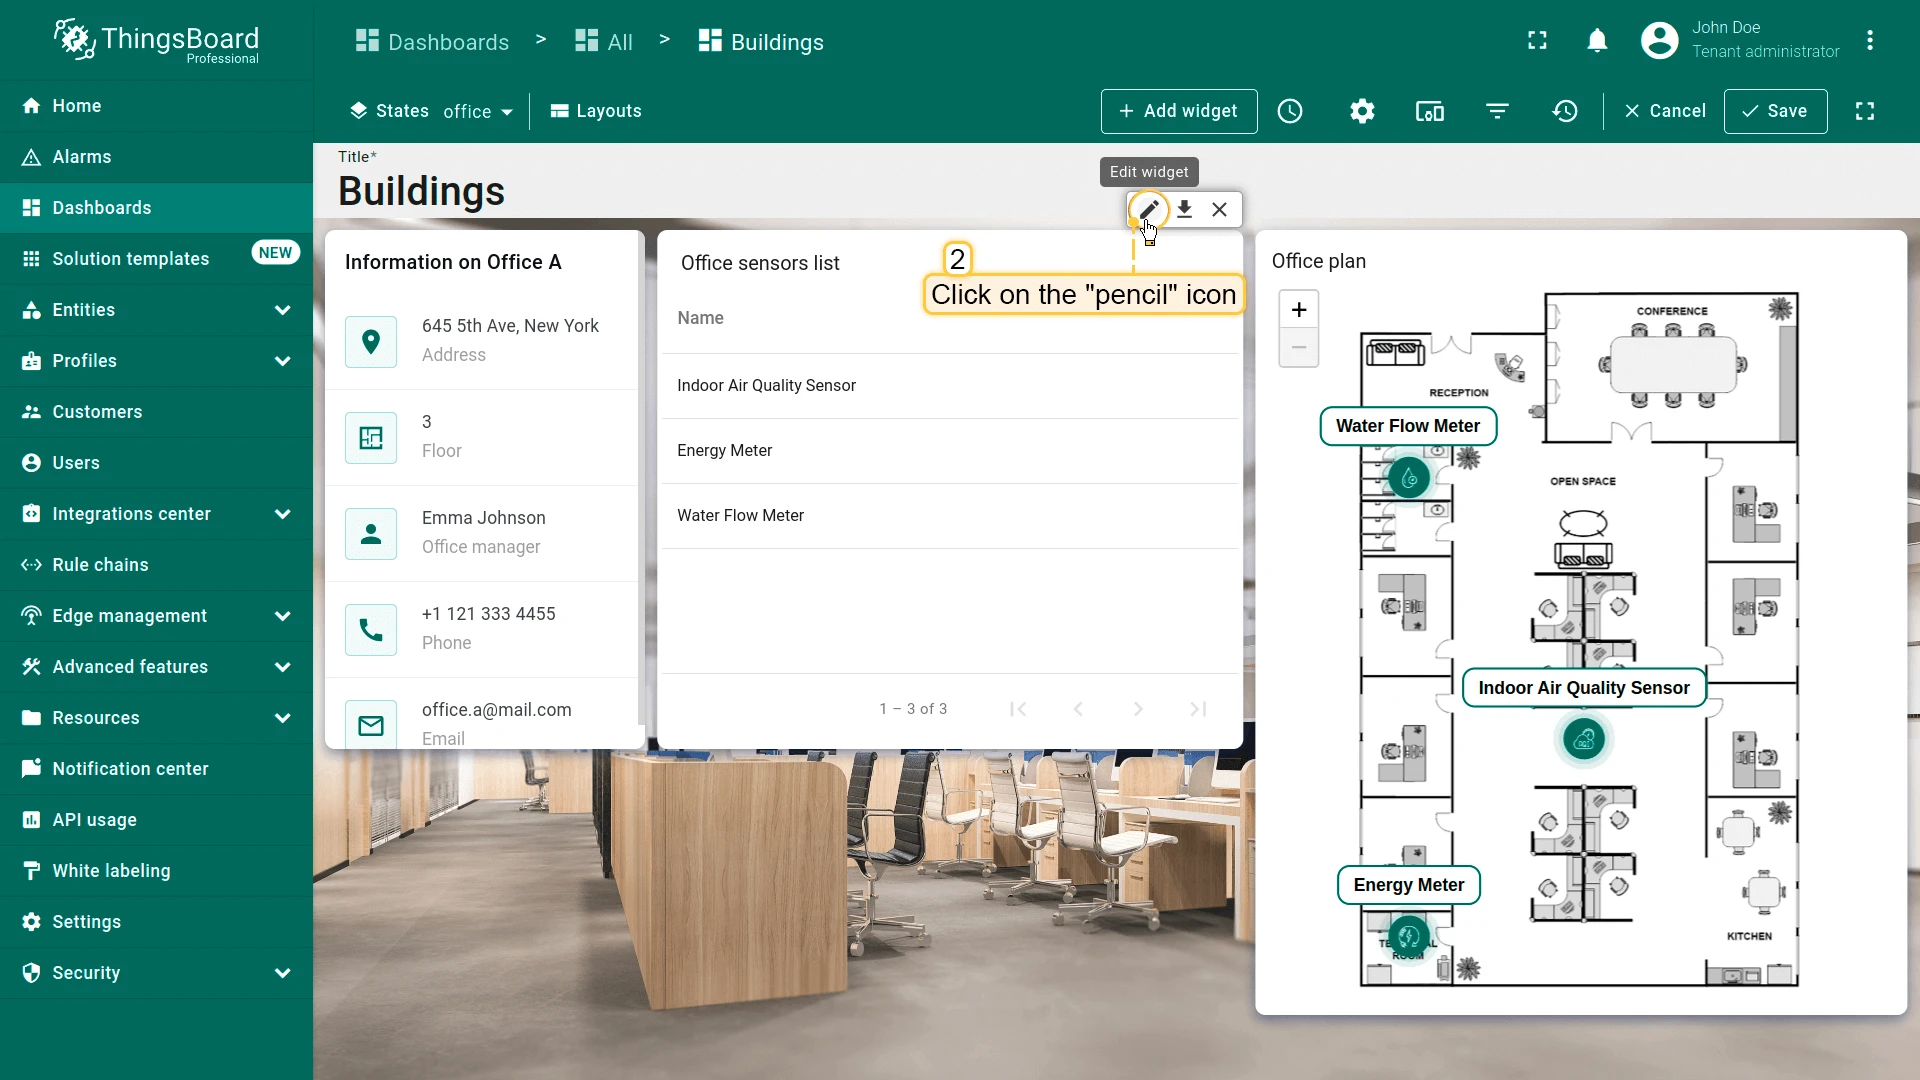
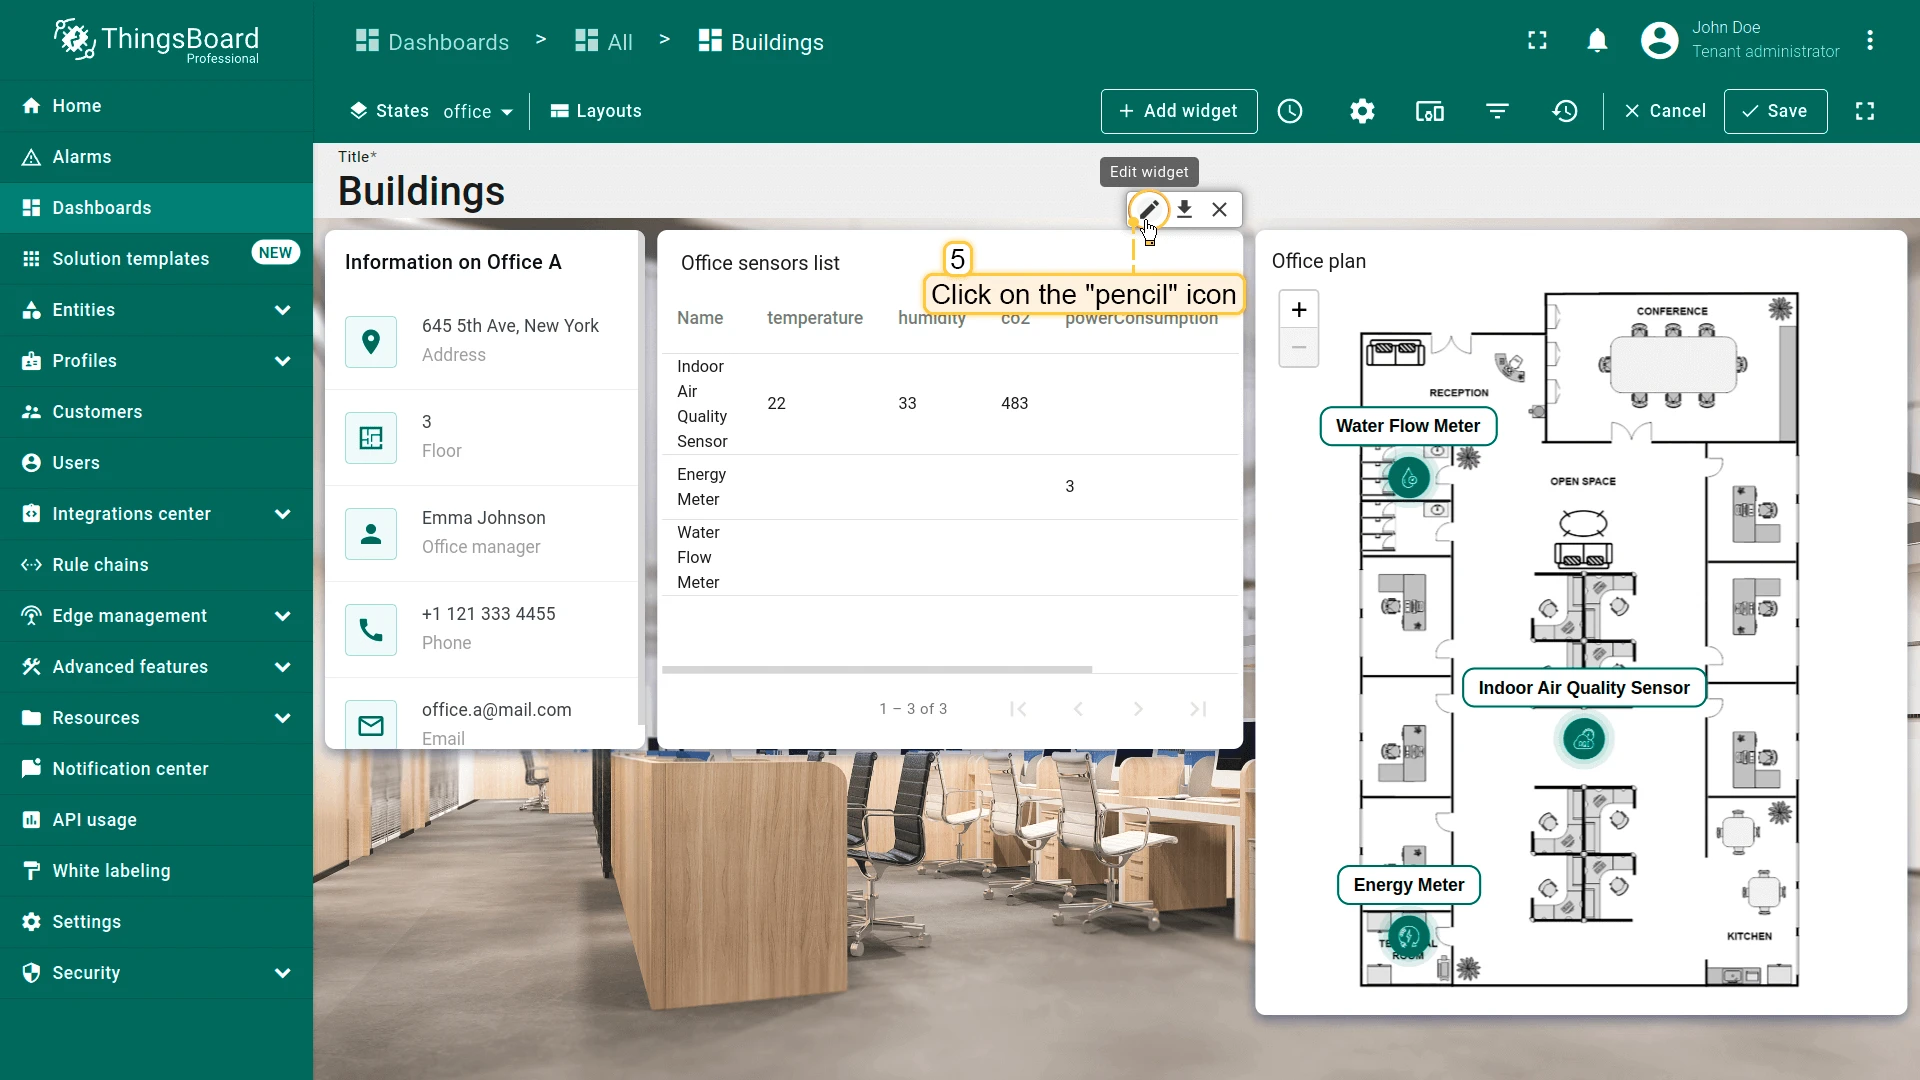
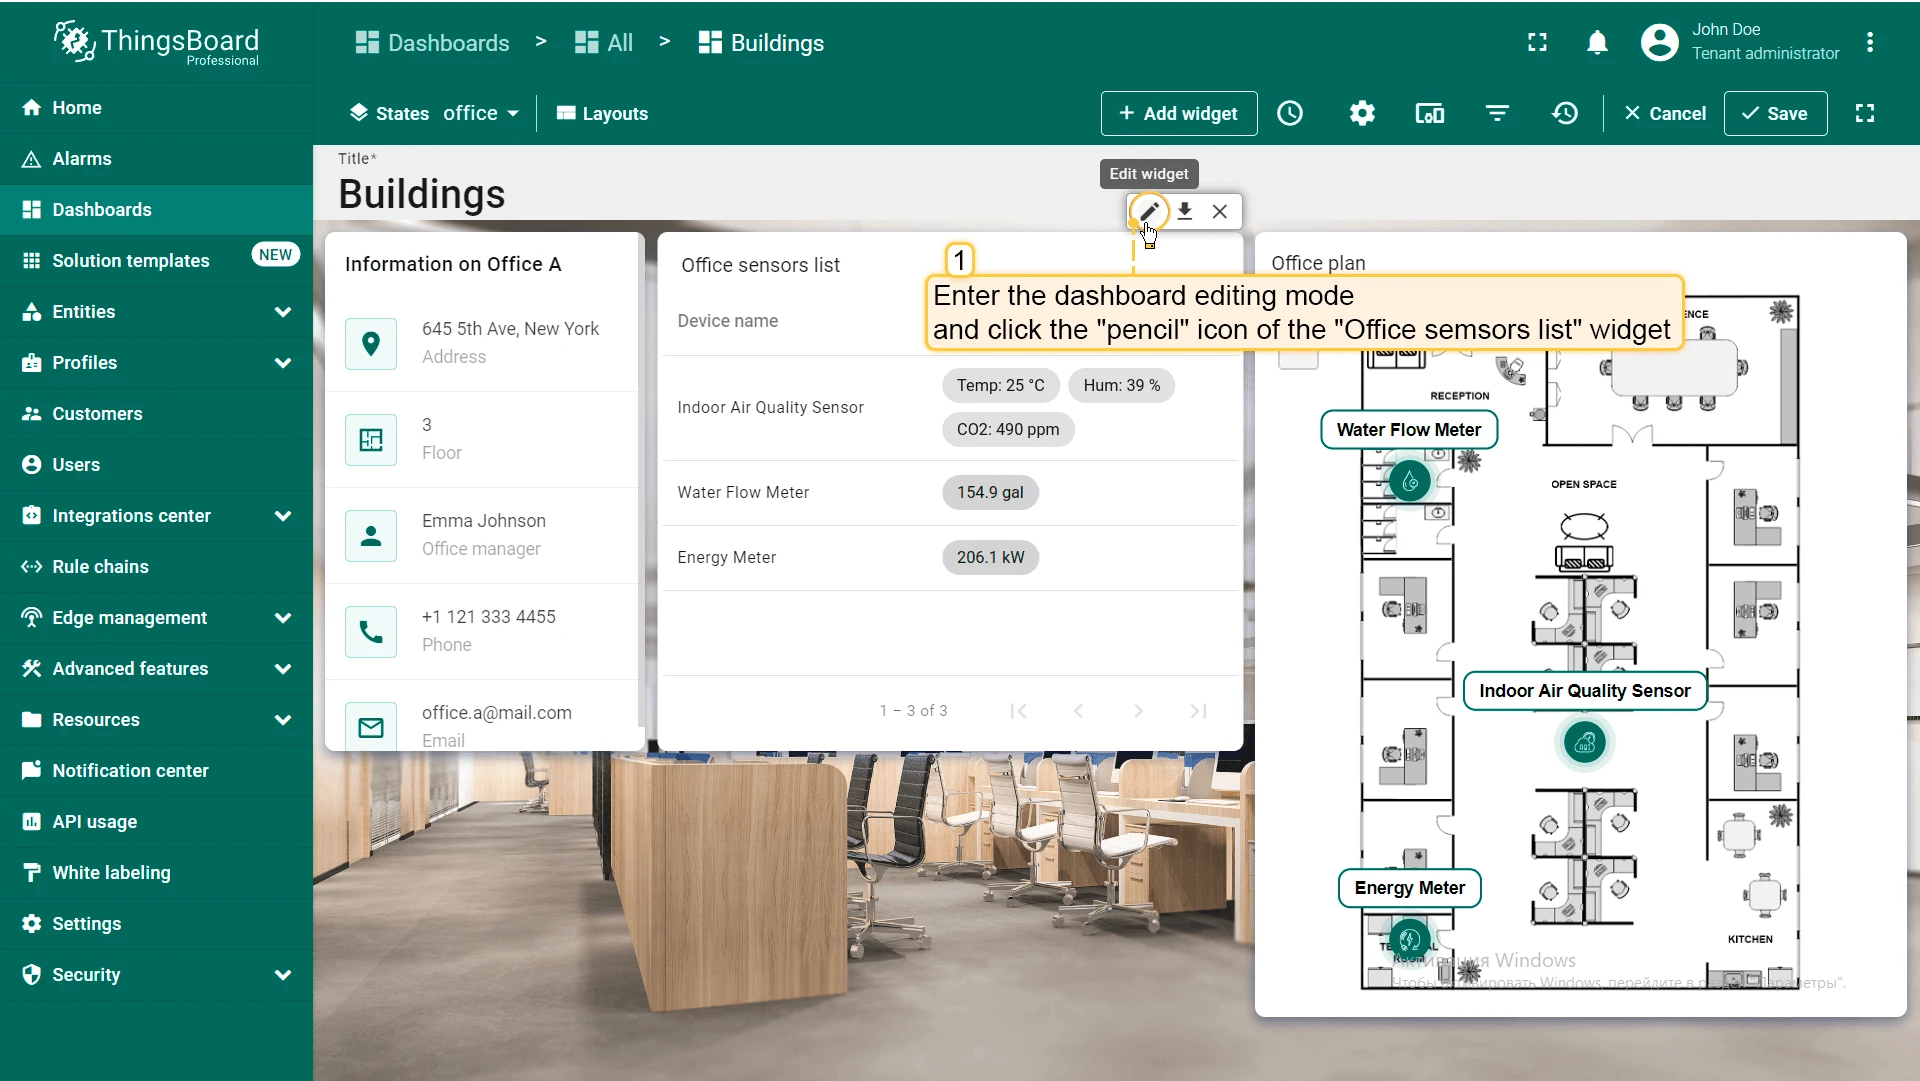
- Open the office state, enter edit mode, and click the pencil icon on the Office sensors list widget.
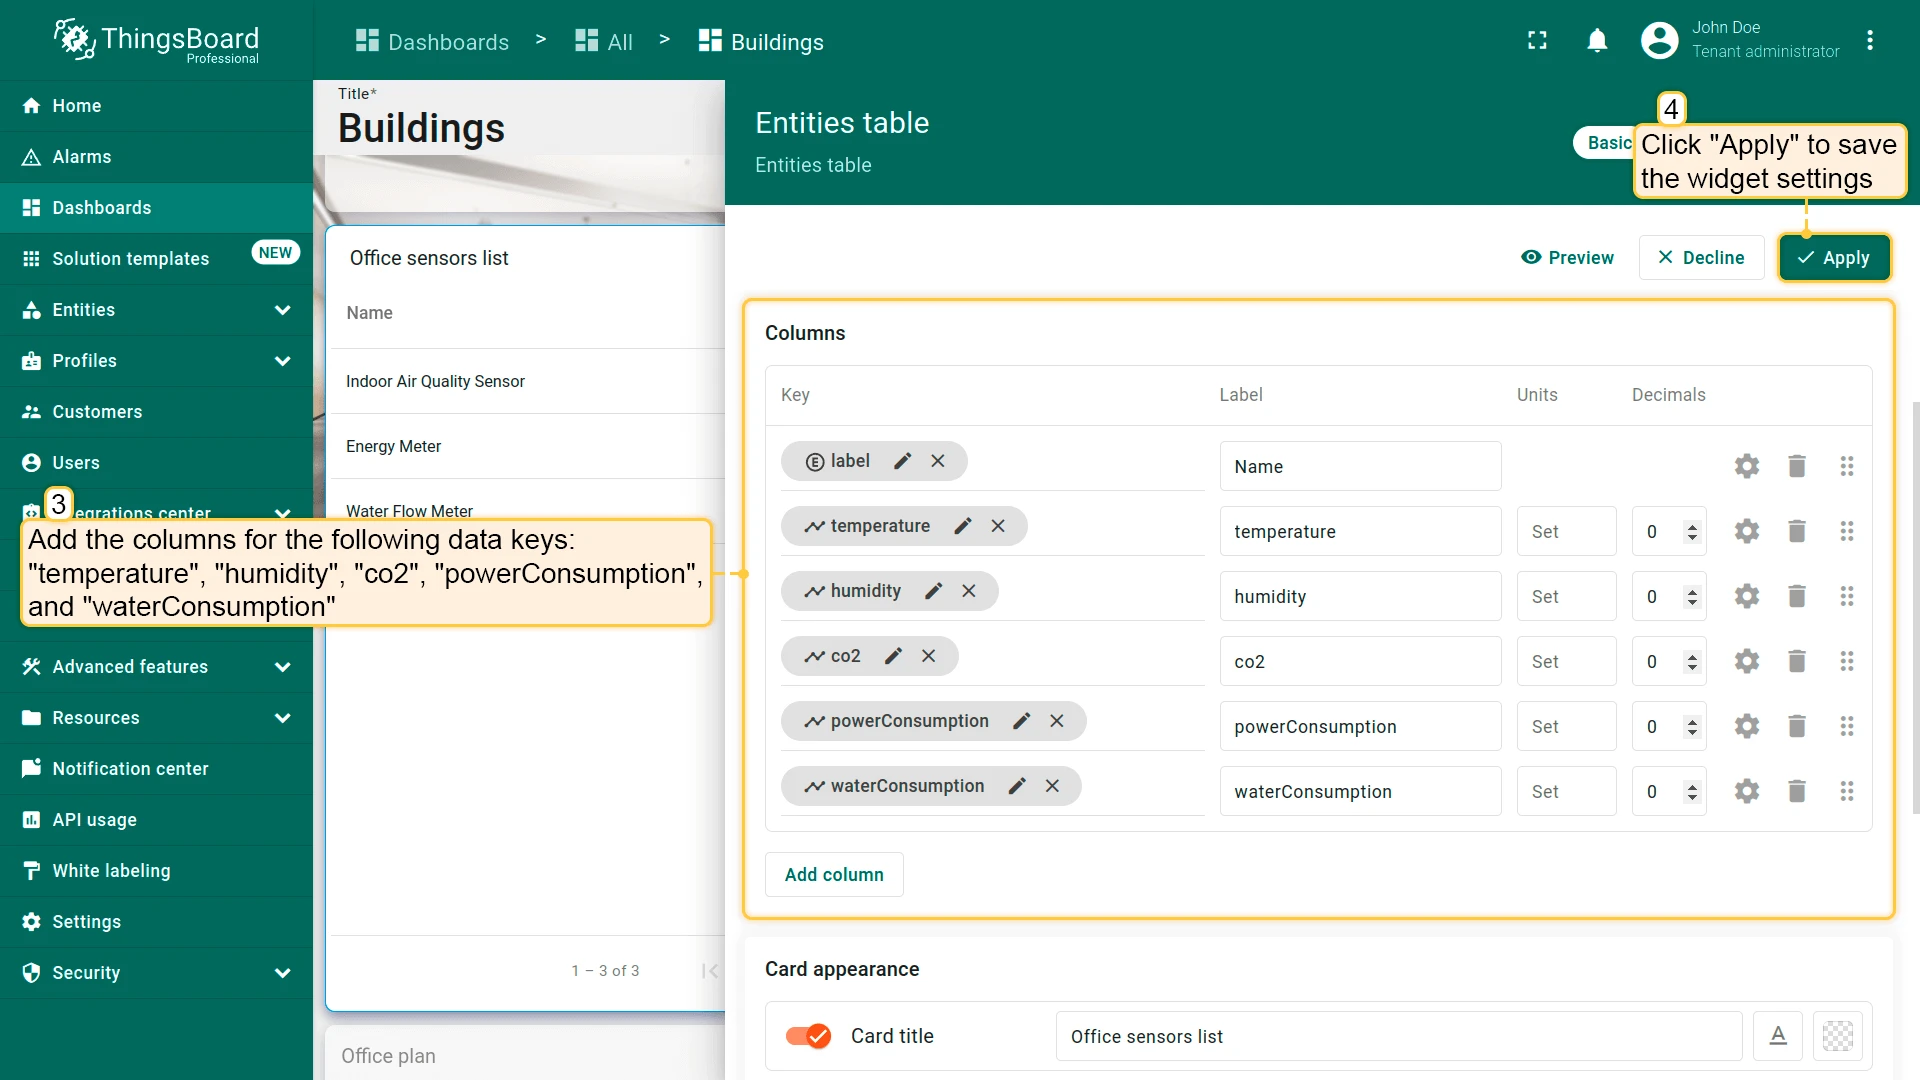
- Add the following data keys:
temperature,humidity,co2,powerConsumption,waterConsumption. - Click Apply to save, then close the widget editor.
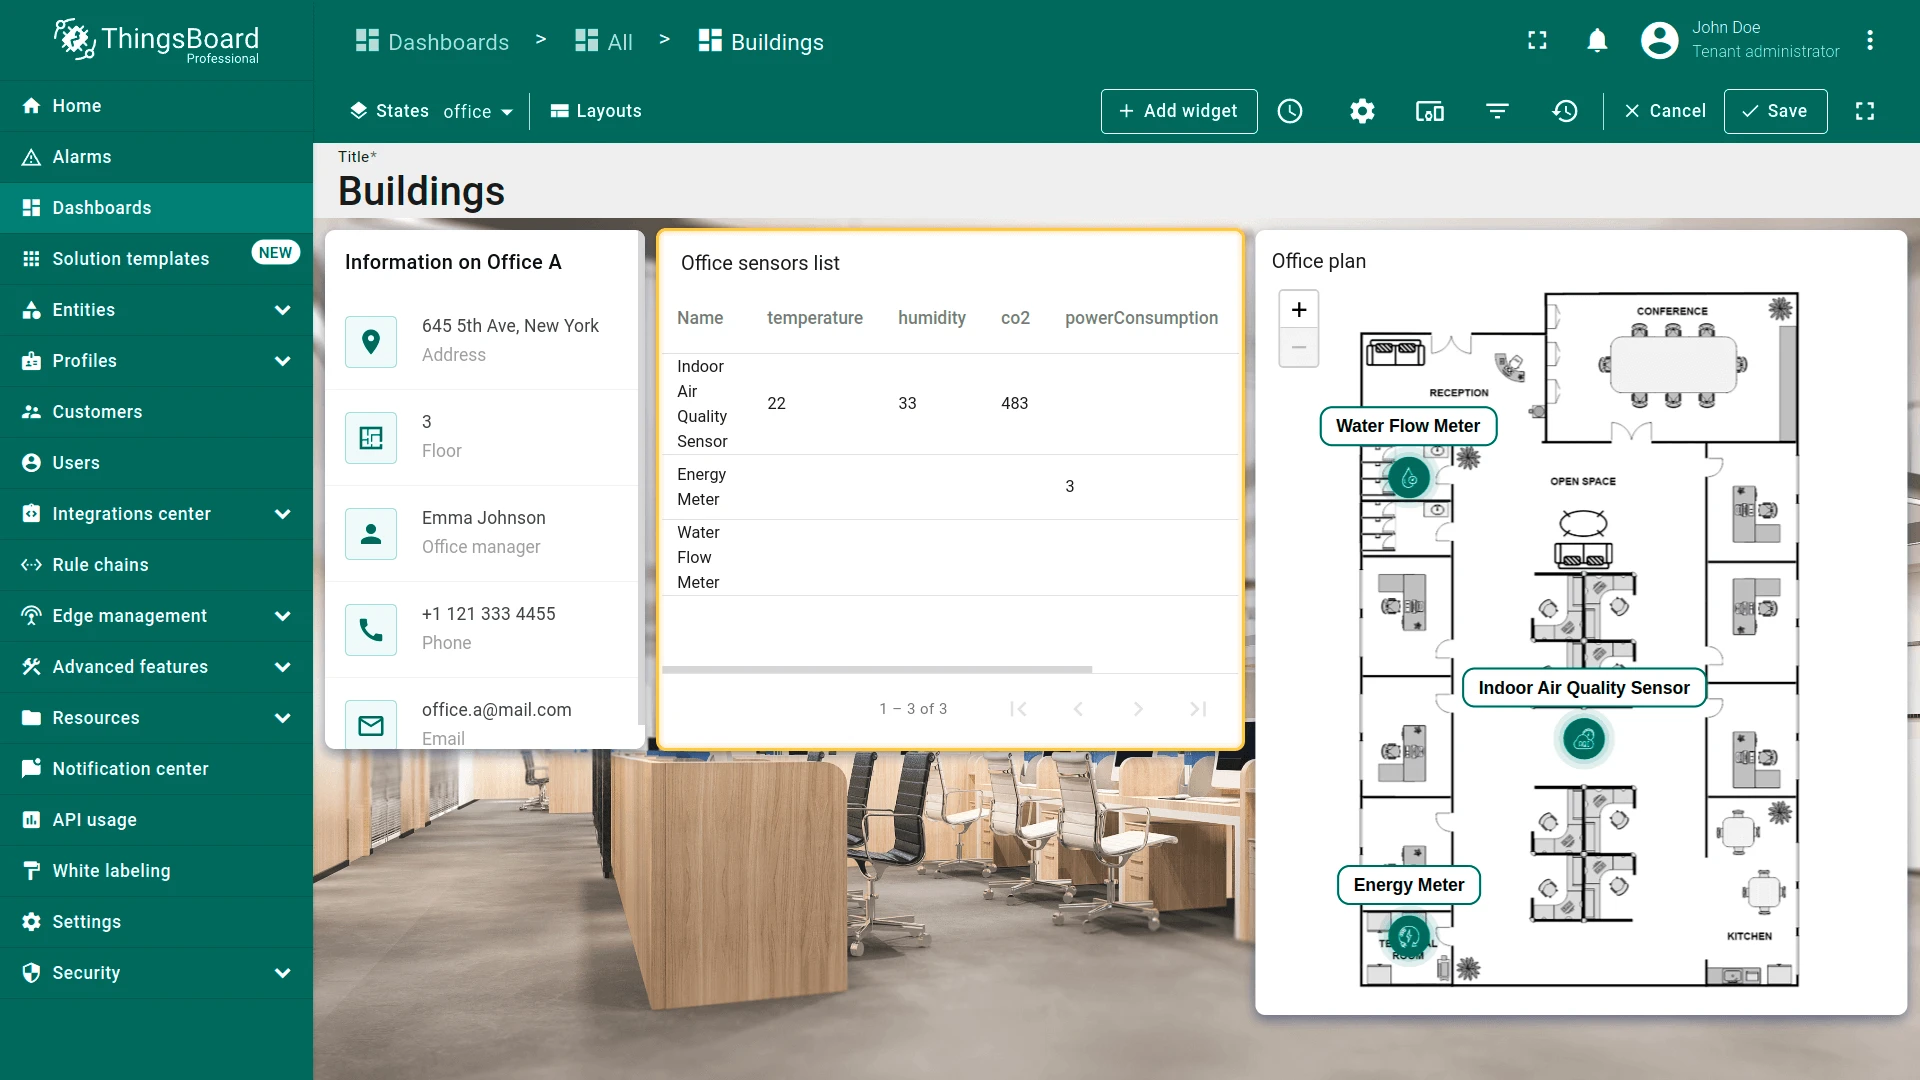
Devices can send multiple telemetry values. For example, an Indoor Air Quality Sensor reports temperature, humidity, and CO2 level.
By default, each telemetry key appears in a separate table column. To make the table cleaner, combine related telemetry values into a single column and hide unnecessary columns.
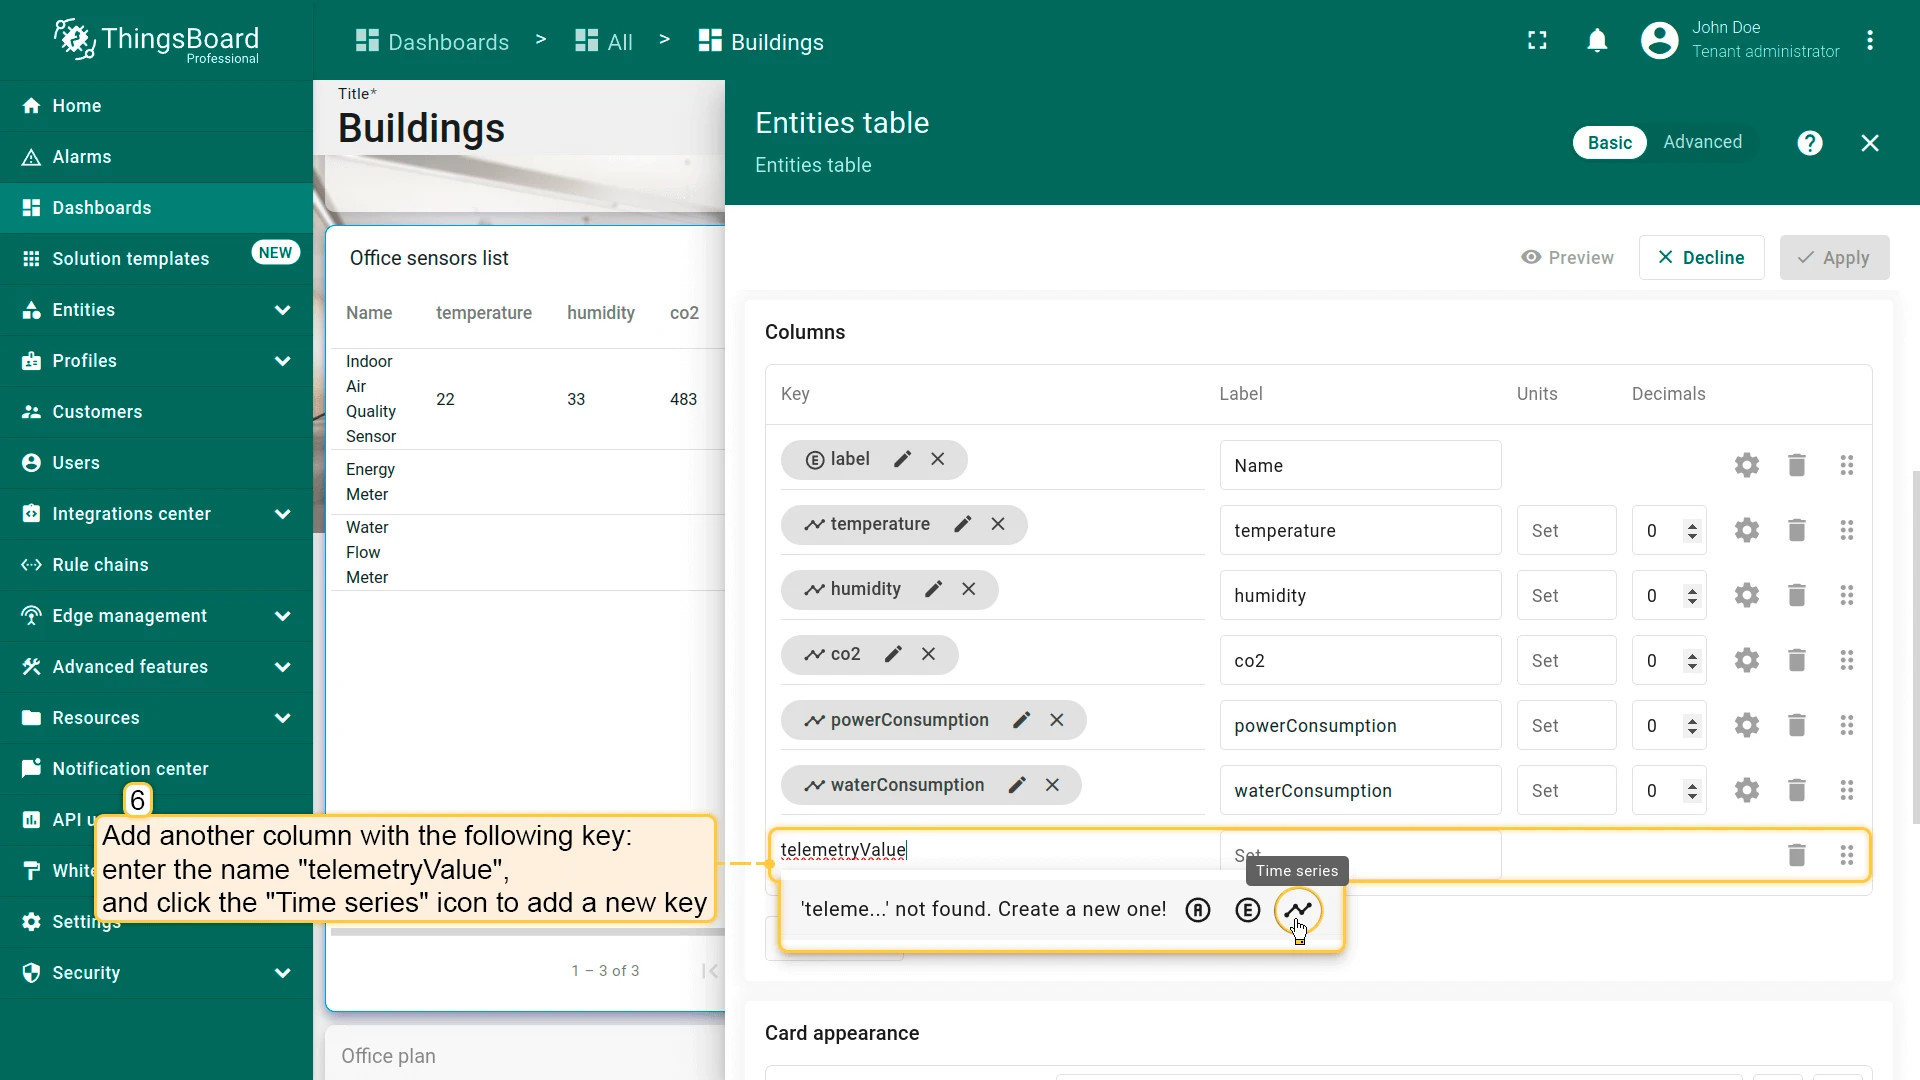
Add the combined telemetry column:
-
Re-open the widget editor.
-
Click the Time series icon to add a new key and name it
telemetryValue. -
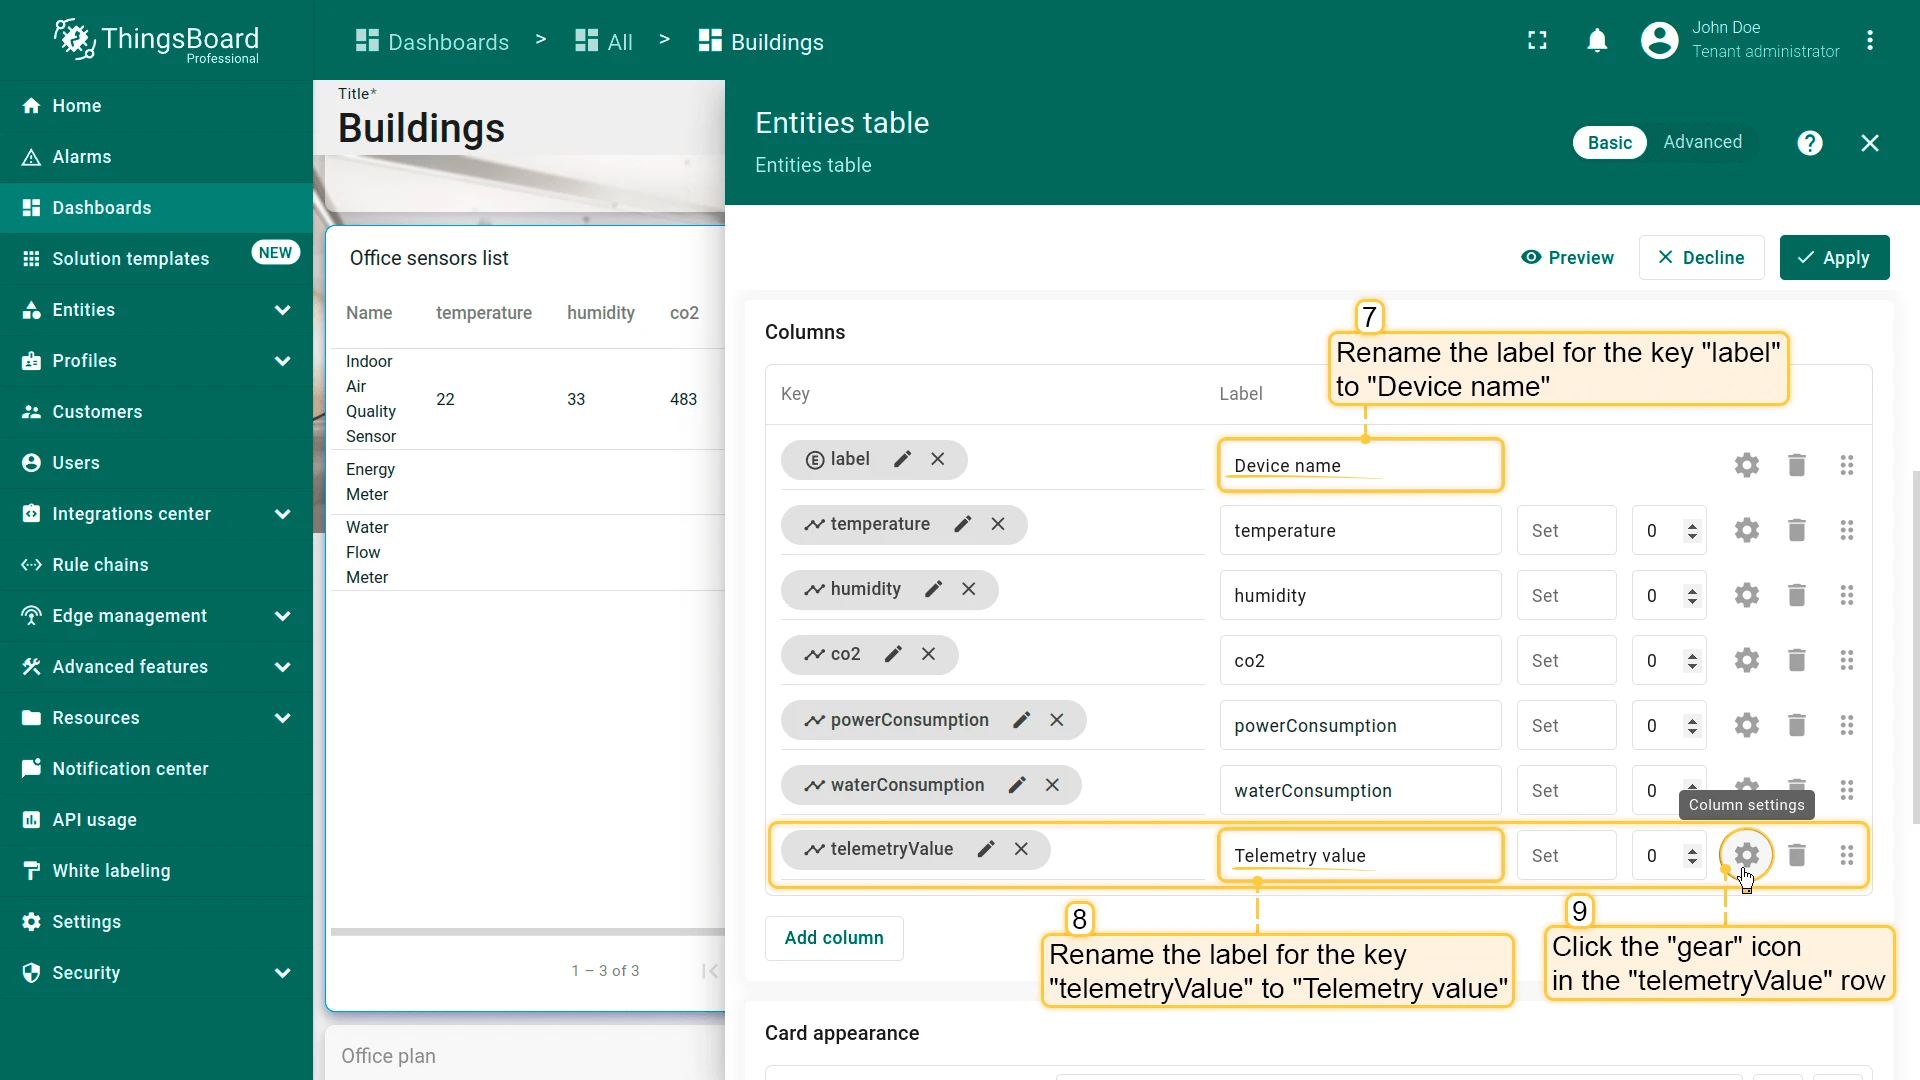
Rename the column label to something like Telemetry.
-
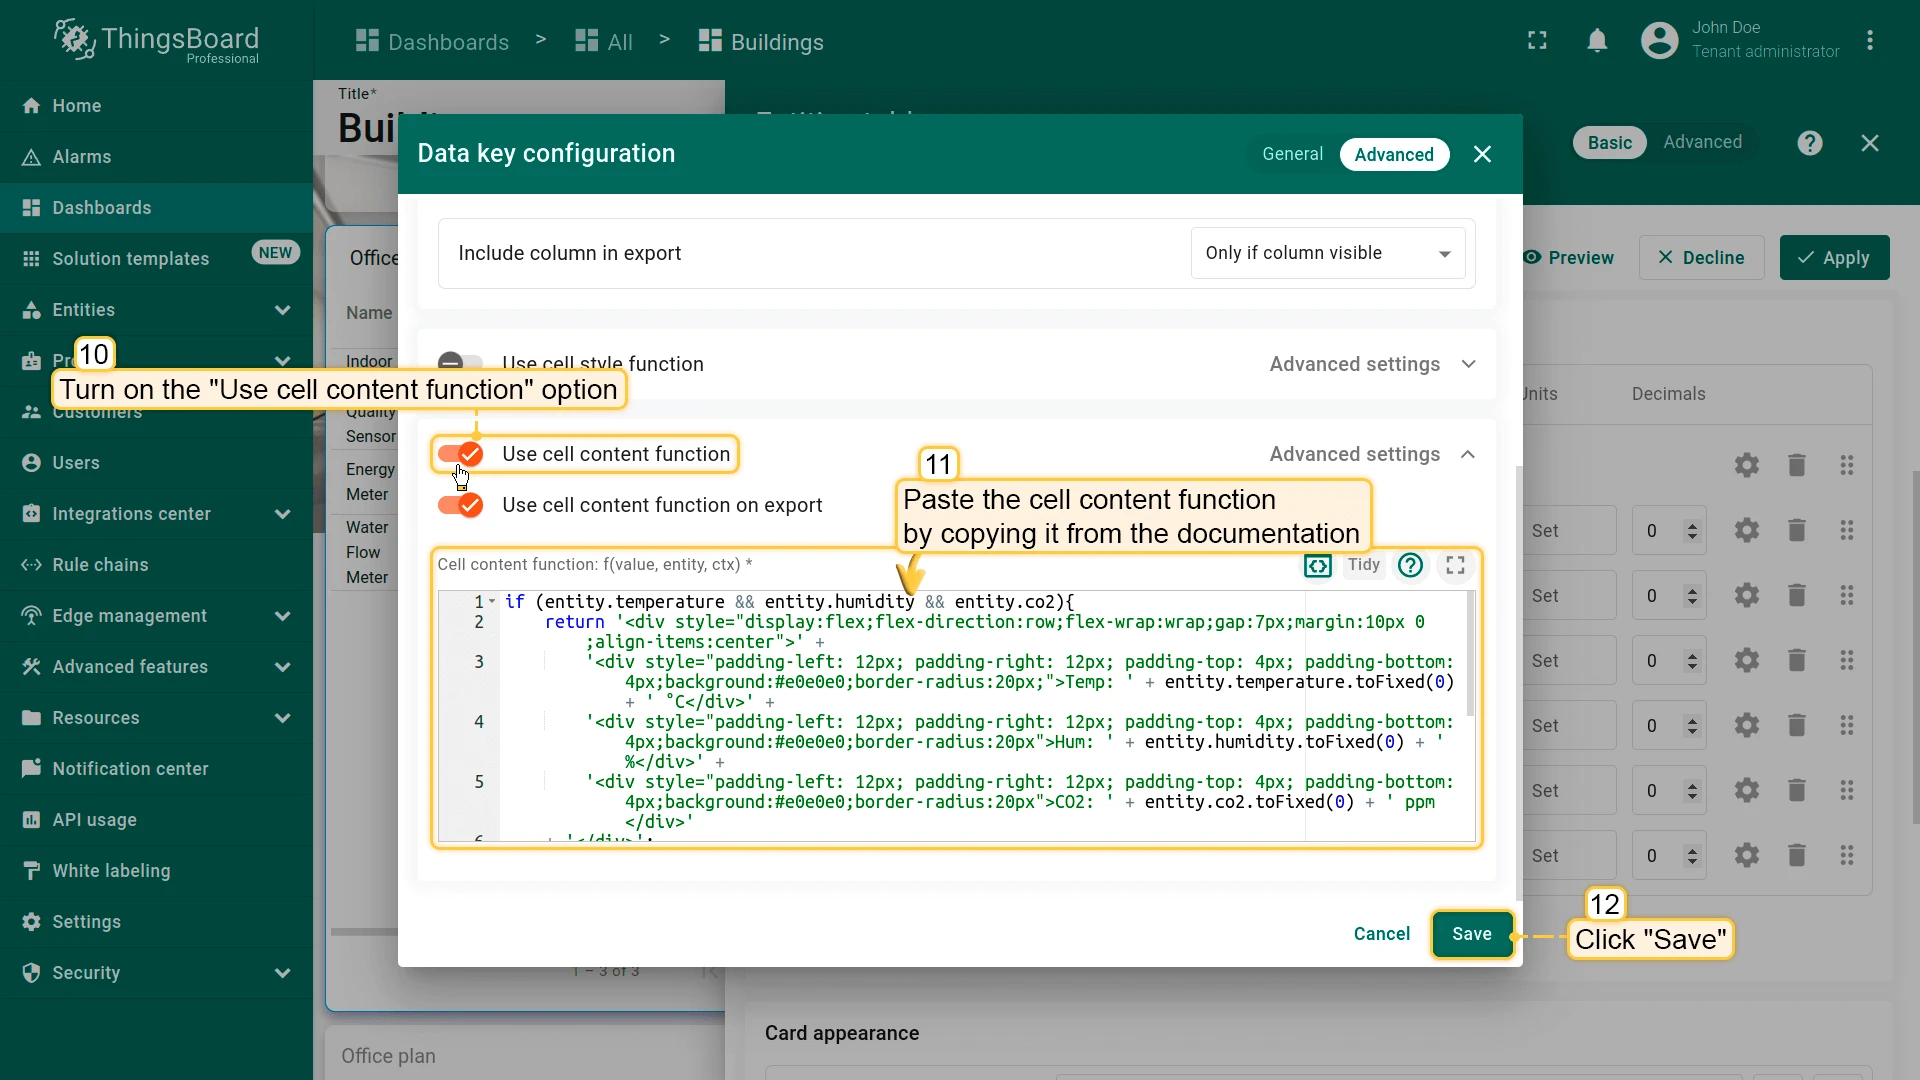
Click the gear icon next to the
telemetryValuerow, enable Use cell content function, and paste the following:if (entity.temperature && entity.humidity && entity.co2) {return '<div style="display:flex;flex-direction:row;flex-wrap:wrap;gap:7px;margin:10px 0;align-items:center">' +'<div style="padding: 4px 12px;background:#e0e0e0;border-radius:20px;">Temp: ' + entity.temperature.toFixed(0) + ' °C</div>' +'<div style="padding: 4px 12px;background:#e0e0e0;border-radius:20px;">Hum: ' + entity.humidity.toFixed(0) + ' %</div>' +'<div style="padding: 4px 12px;background:#e0e0e0;border-radius:20px;">CO2: ' + entity.co2.toFixed(0) + ' ppm</div>' +'</div>';} else if (entity.powerConsumption) {return '<div style="display:inline-block;padding: 4px 12px;background:#d3d3d3;border-radius:20px;">' + entity.powerConsumption.toFixed(1) + ' kW</div>';} else if (entity.waterConsumption) {return '<div style="display:inline-block;padding: 4px 12px;background:#d3d3d3;border-radius:20px;">' + entity.waterConsumption.toFixed(1) + ' gal</div>';}return value; -
Click Save.
Hide the raw columns:
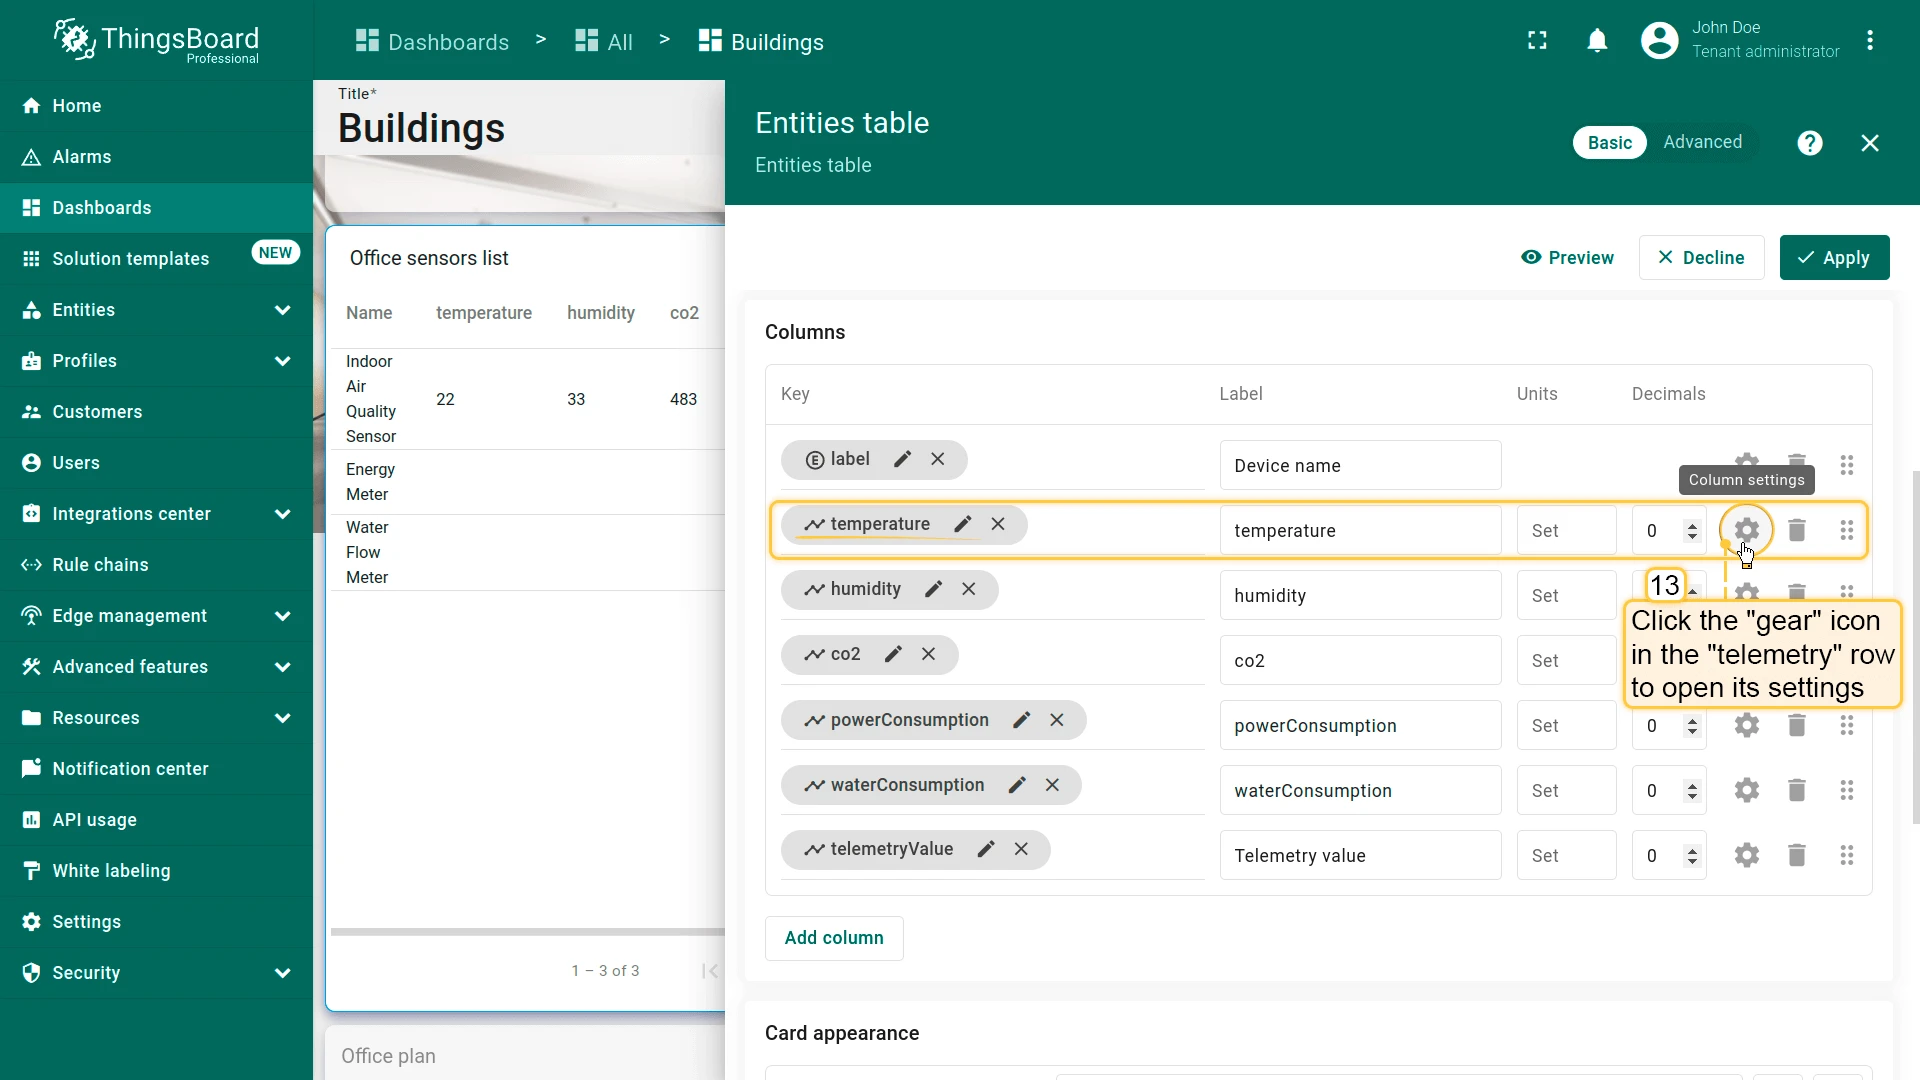
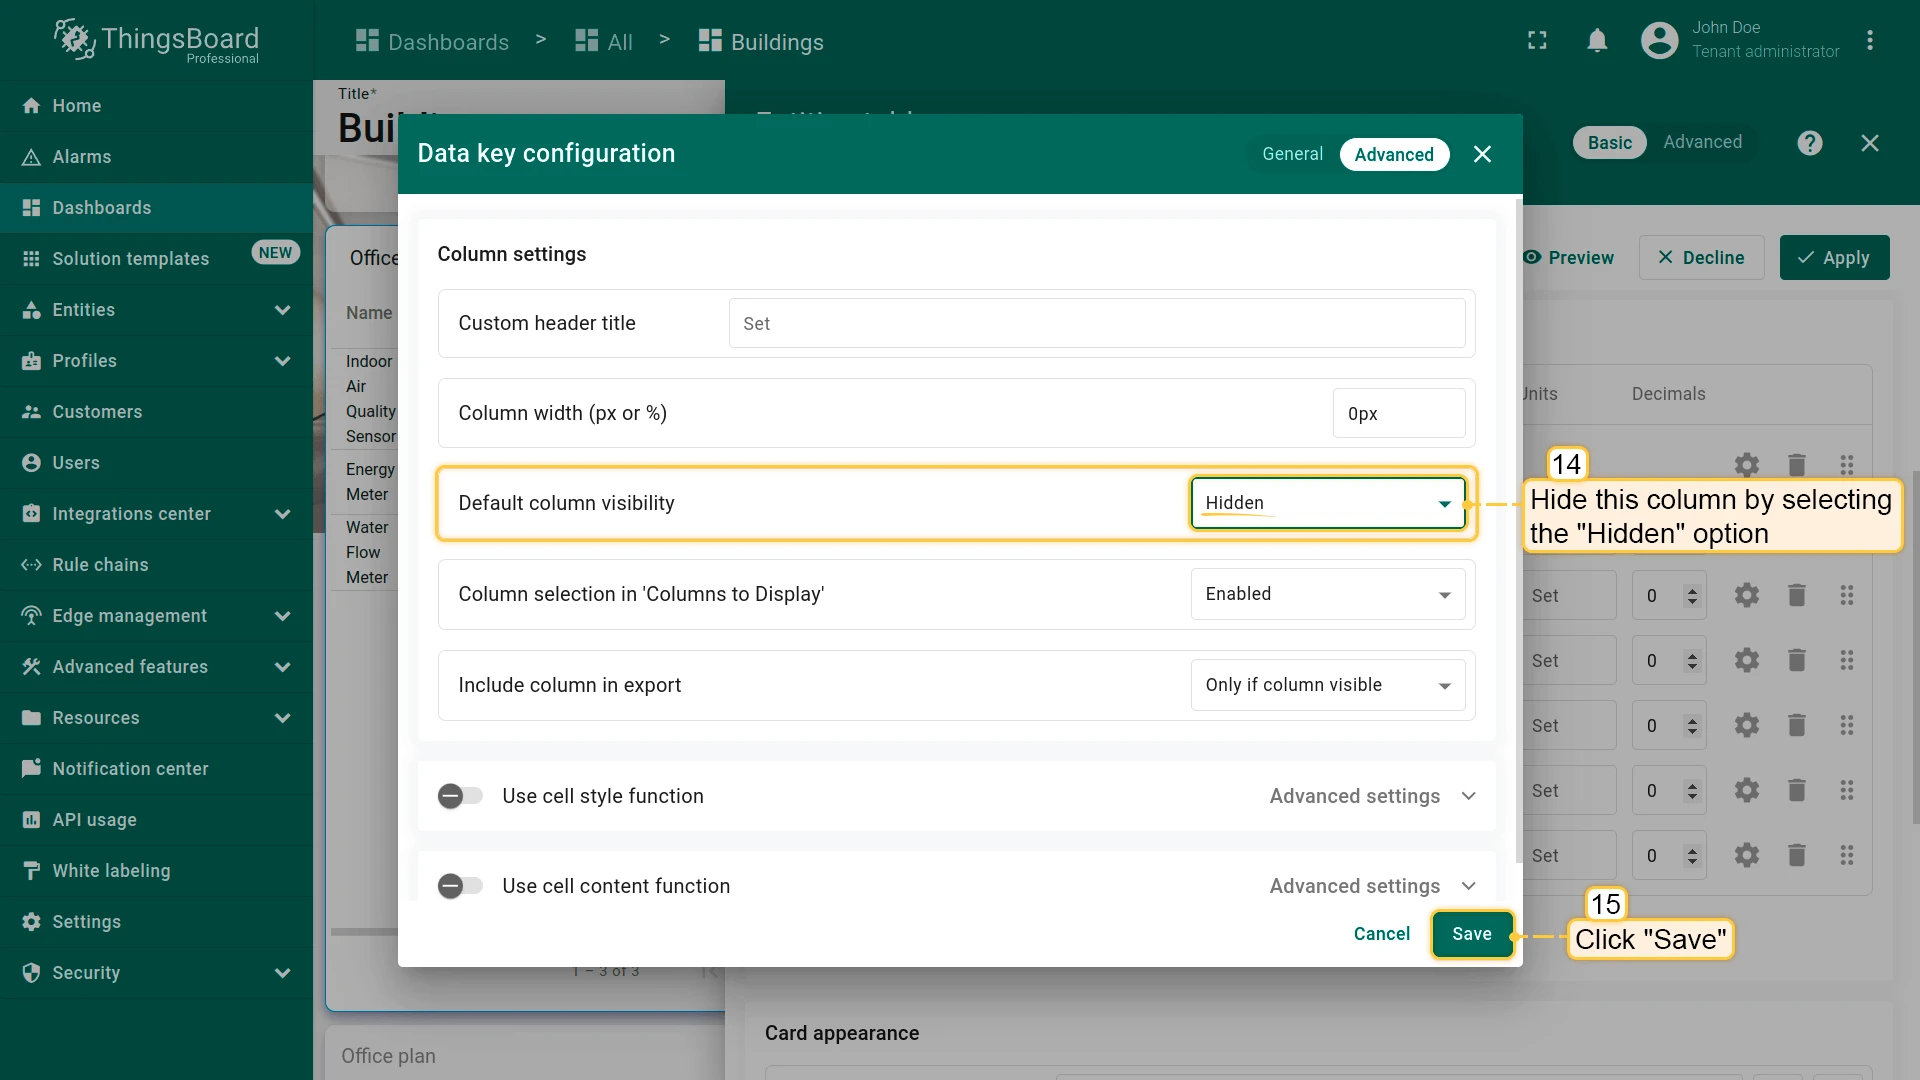
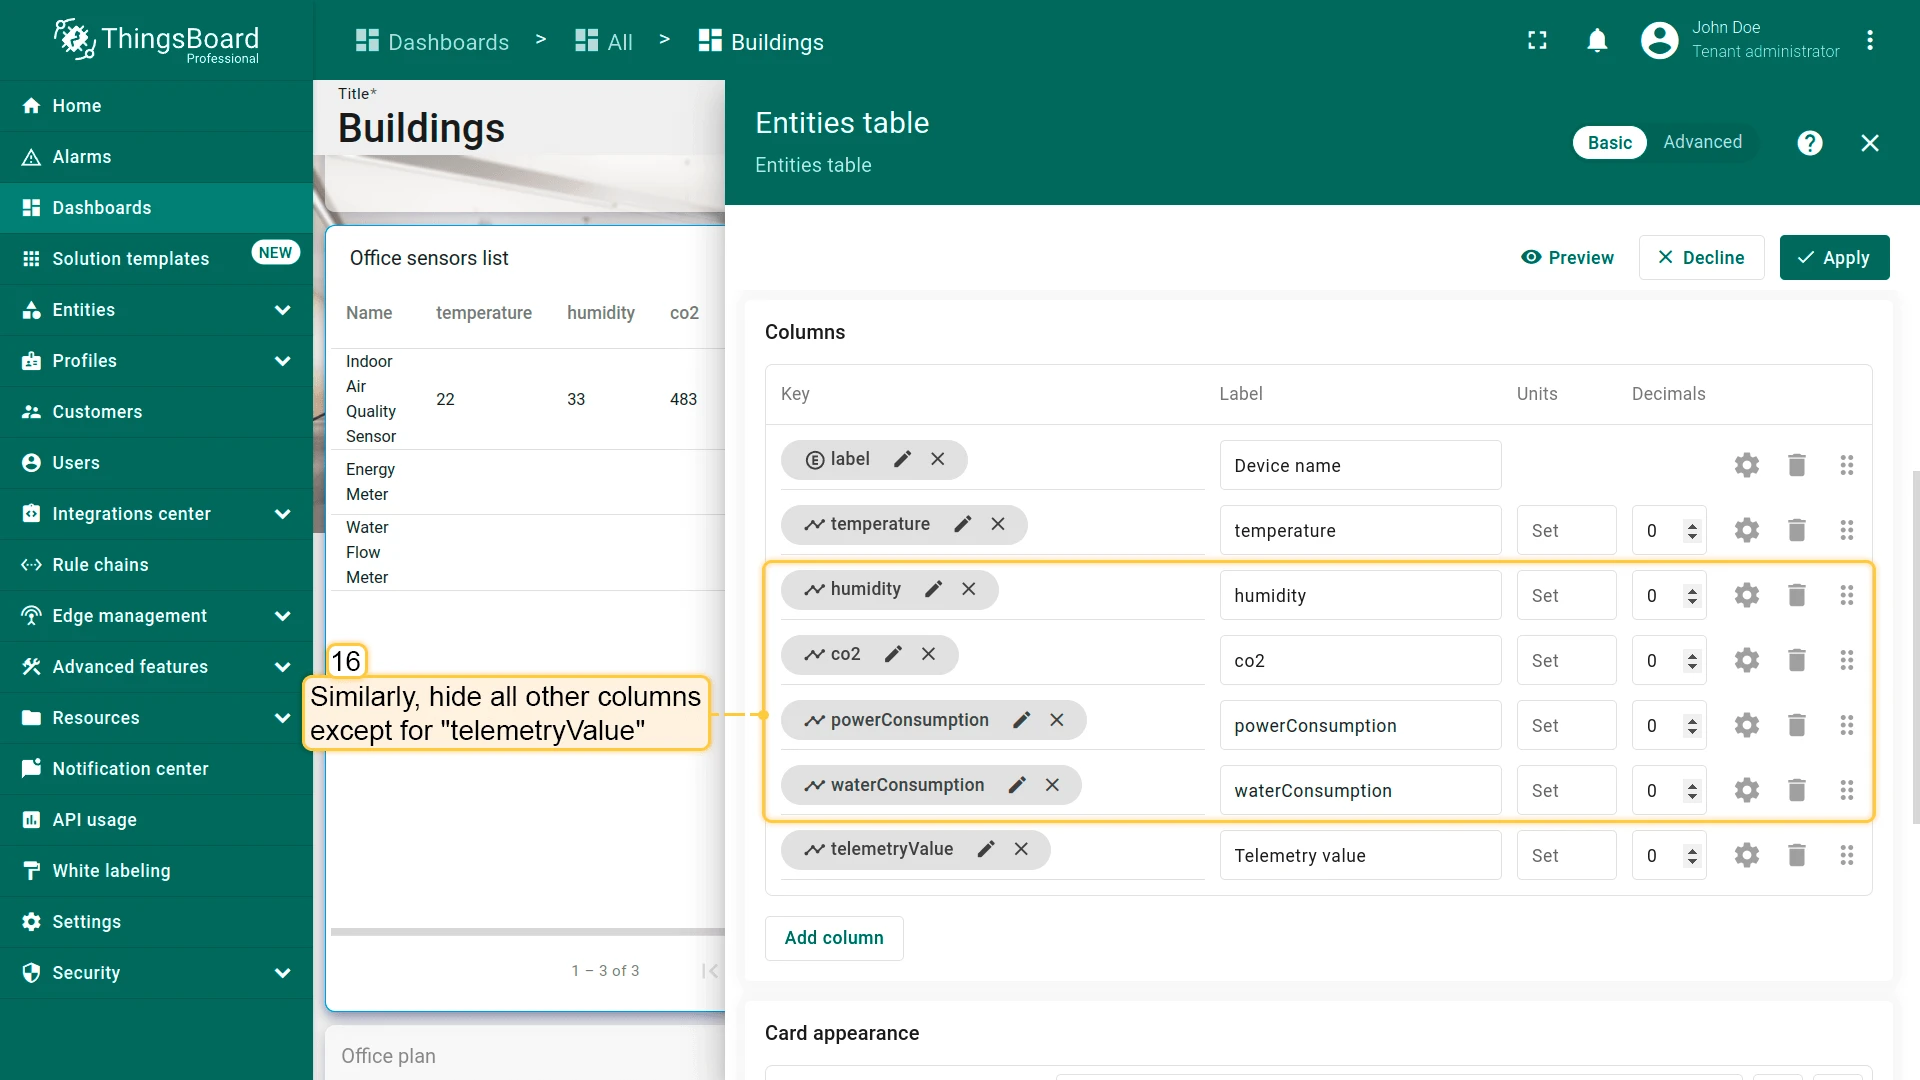
- Click the gear icon next to each of the five raw keys (
temperature,humidity,co2,powerConsumption,waterConsumption). - Set Default column visibility to Hidden for each one.
- Click Save after each change.
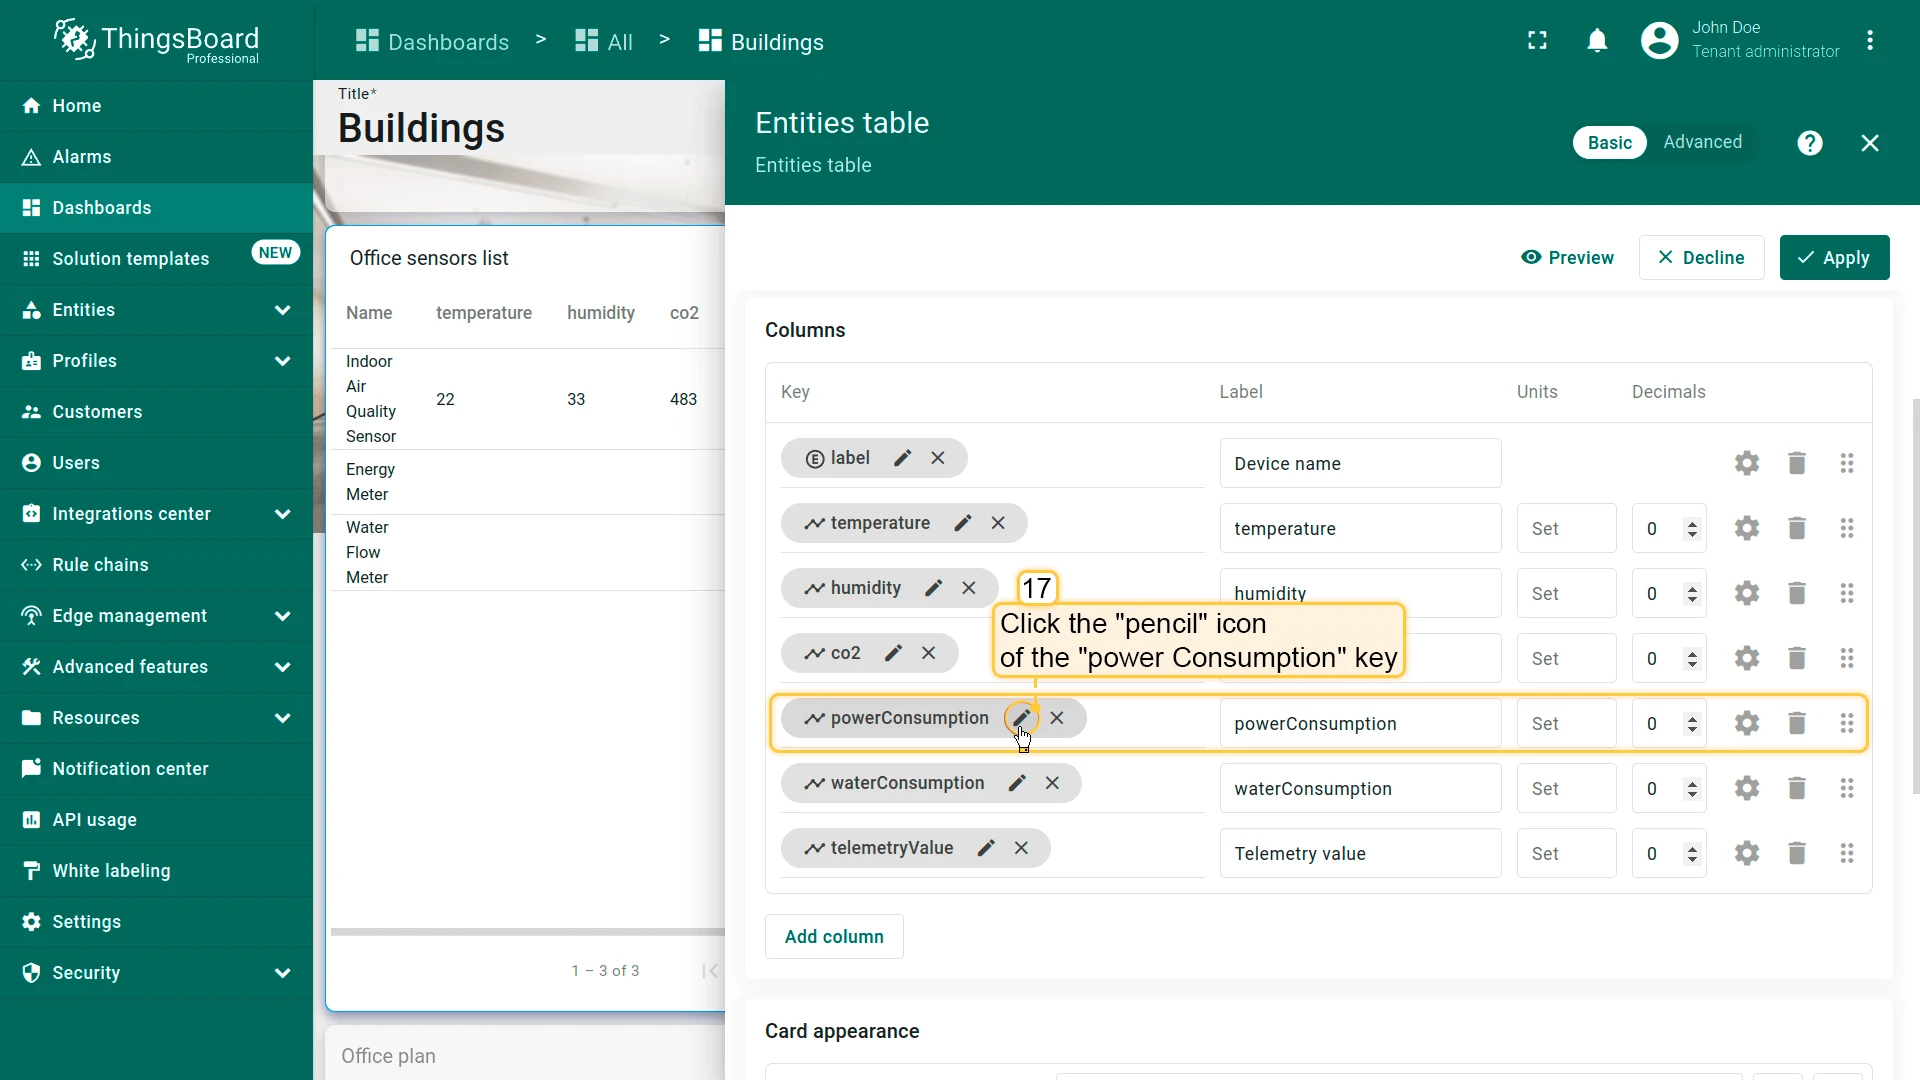
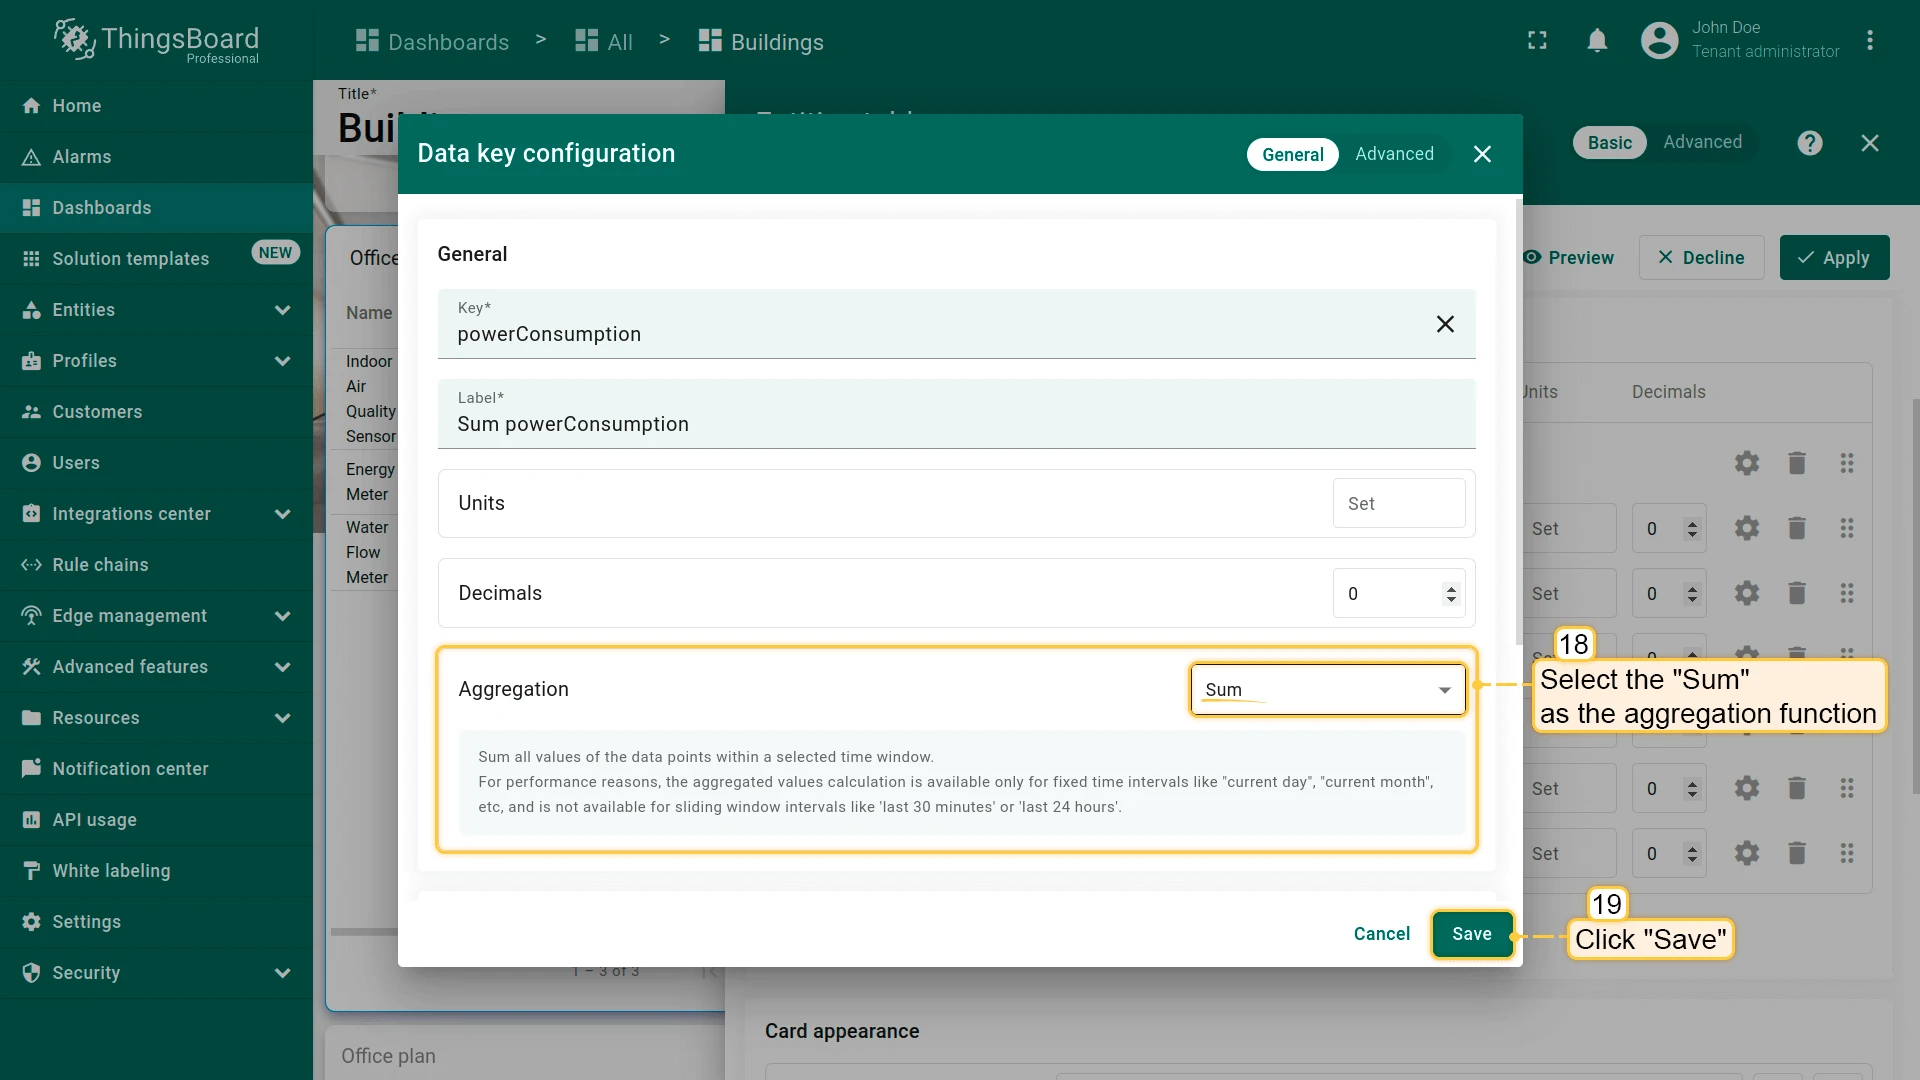
Set aggregation for consumption keys:
- Click the pencil icon next to
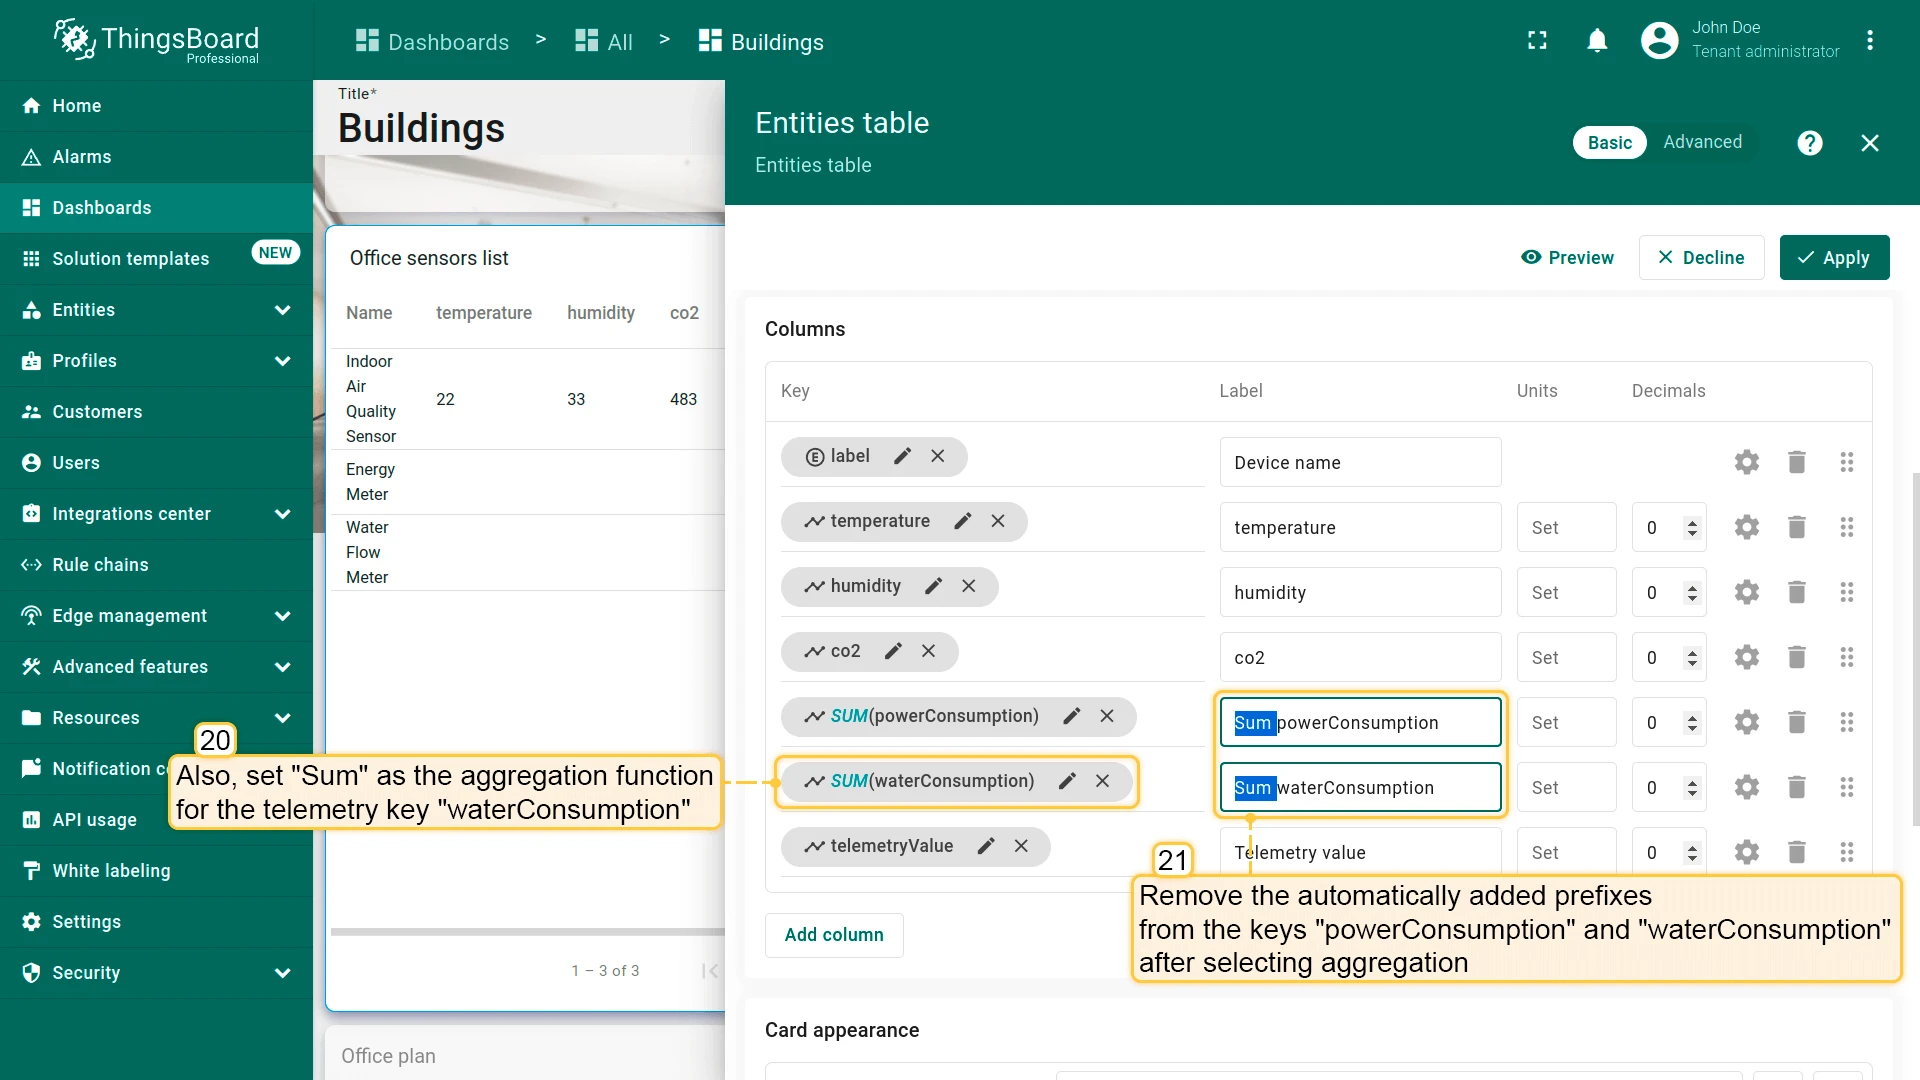
powerConsumptionand set Aggregation to Sum. - Do the same for
waterConsumption. - Remove any auto-generated prefixes from column labels if needed.
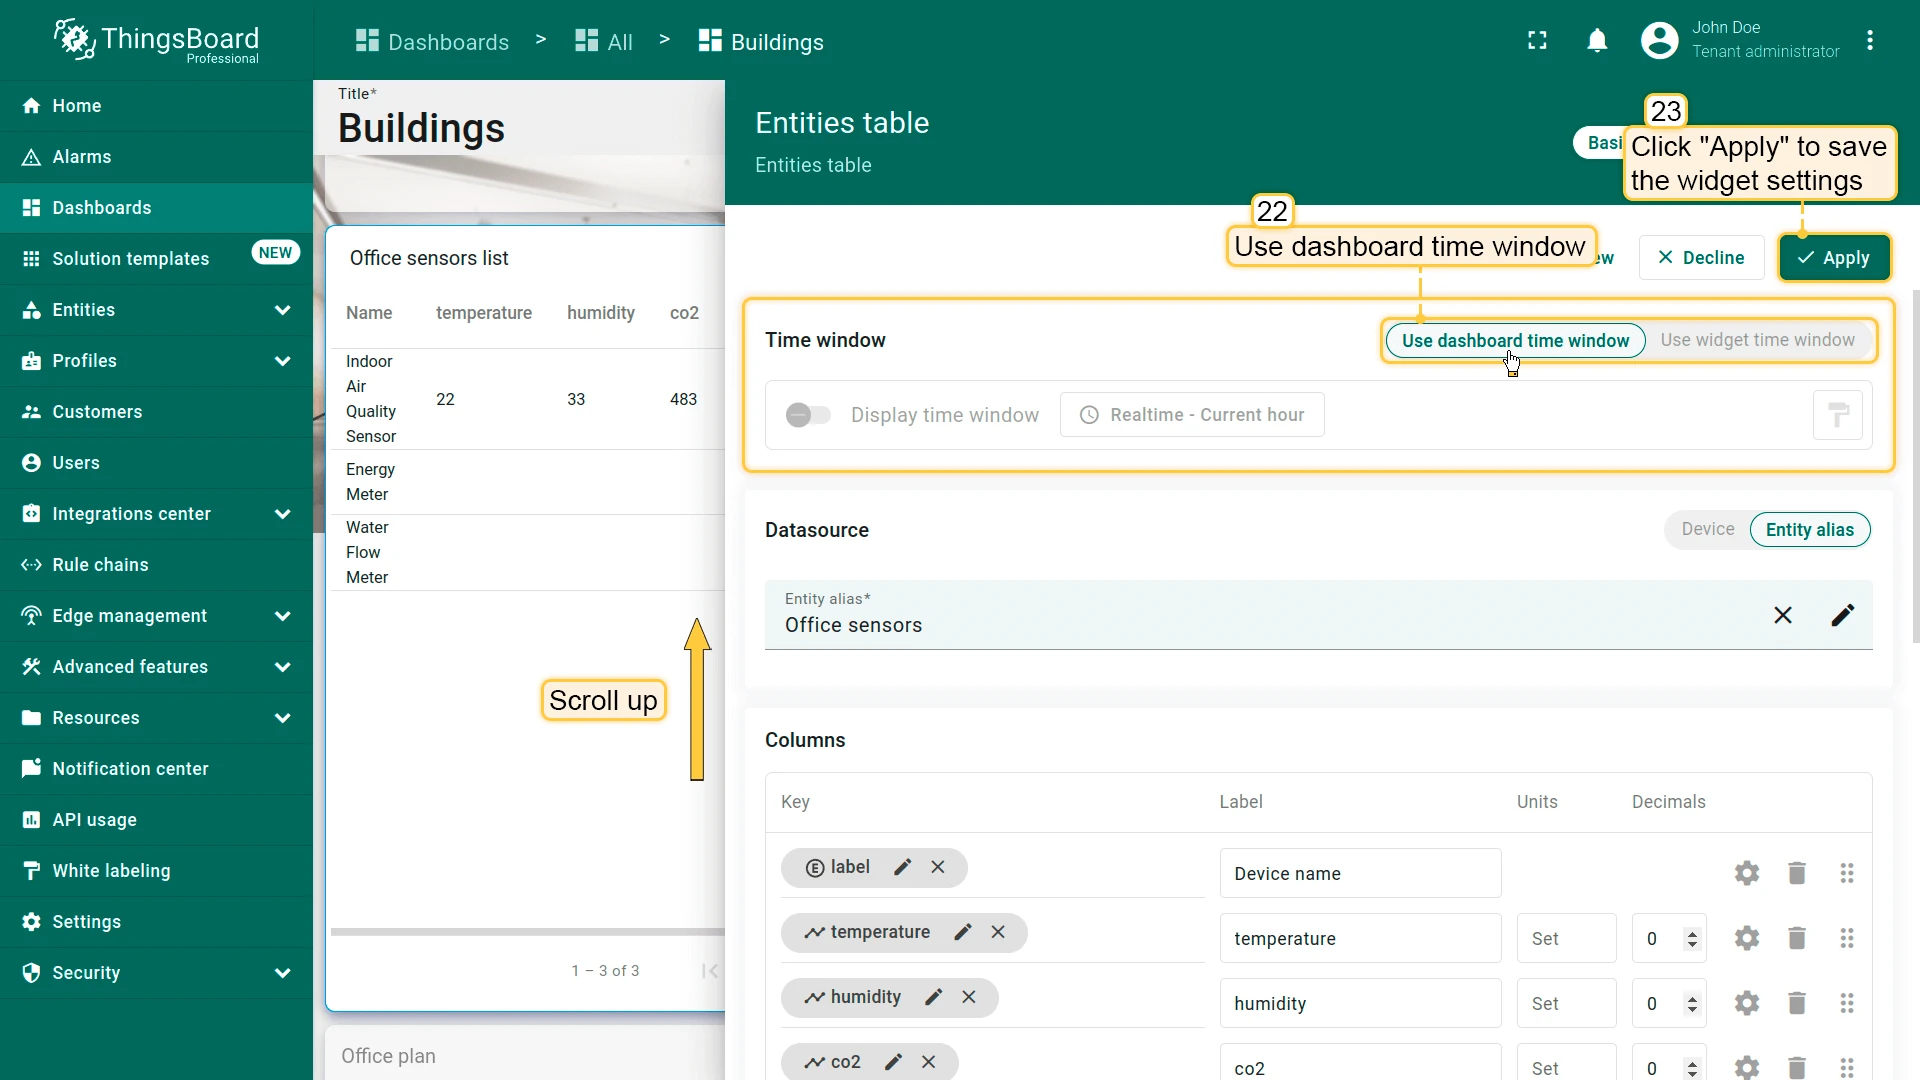
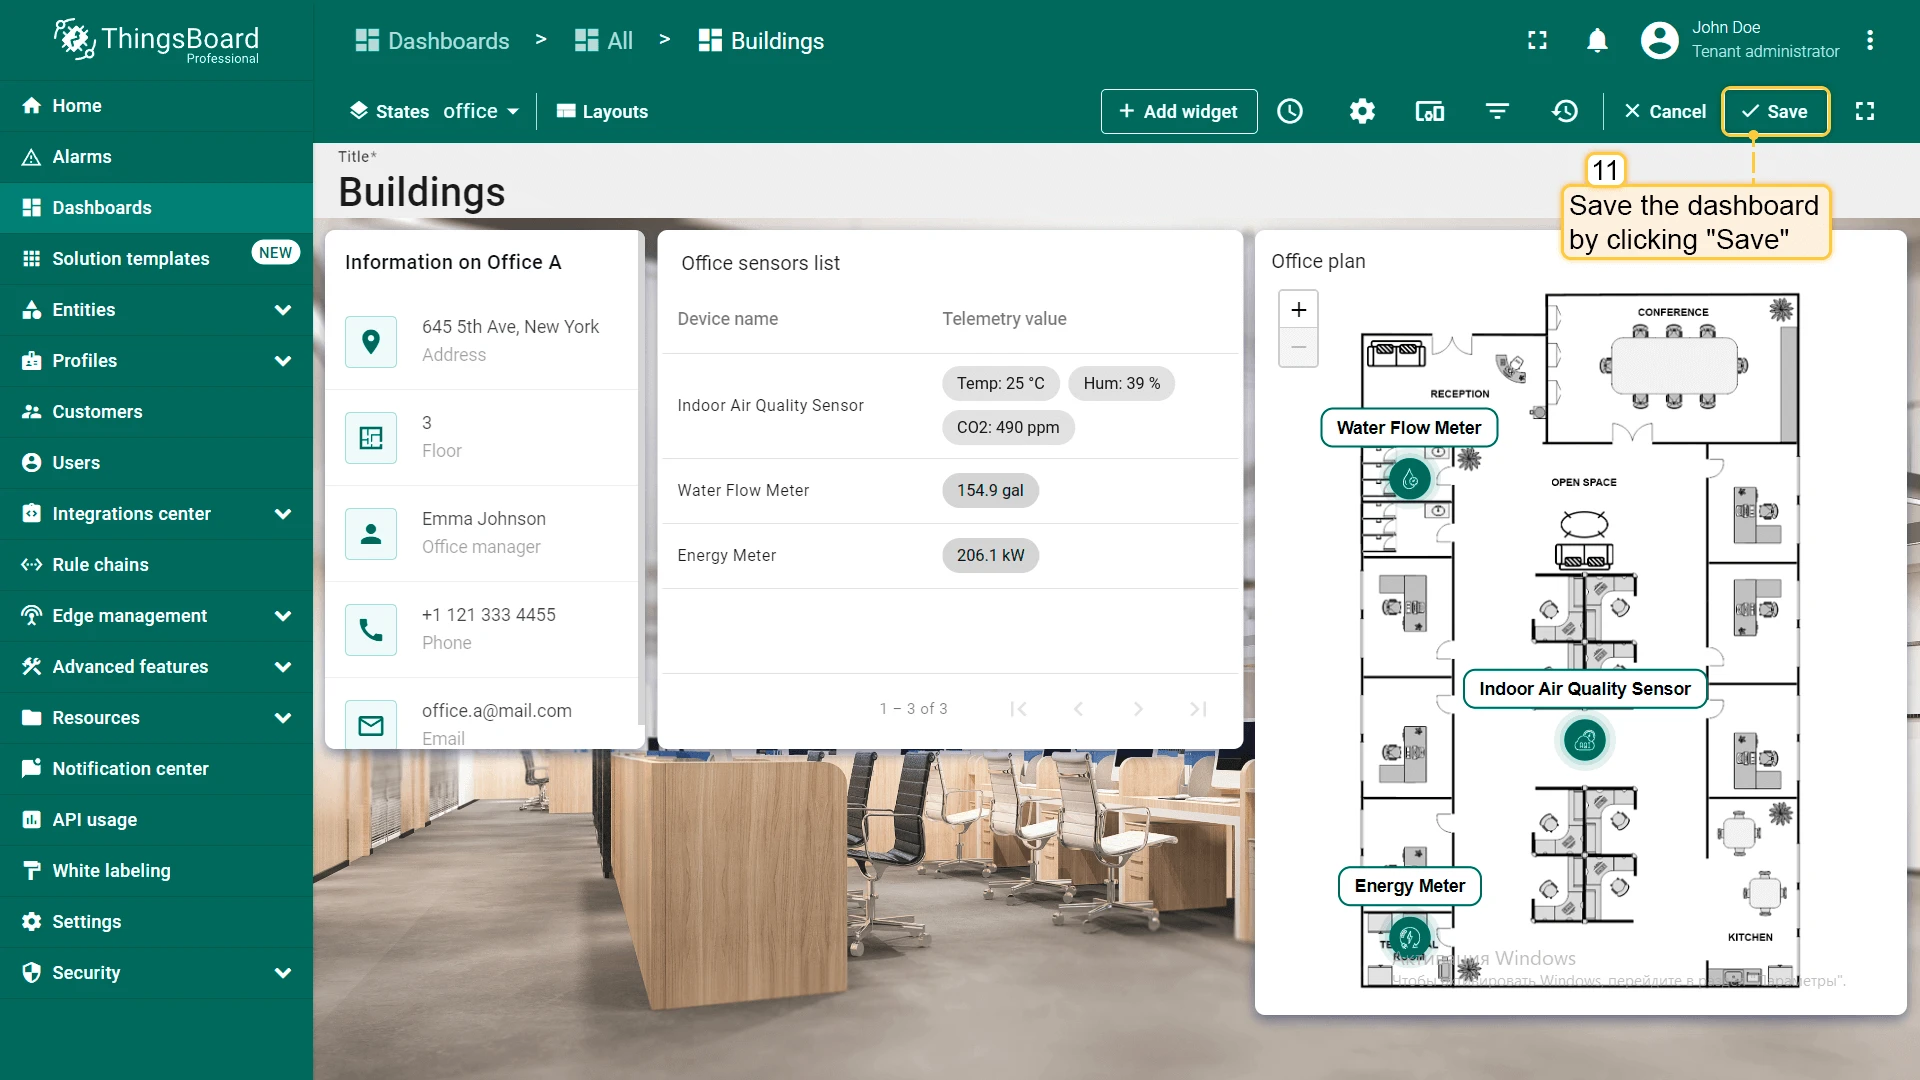
- Enable Use dashboard time window for the widget.
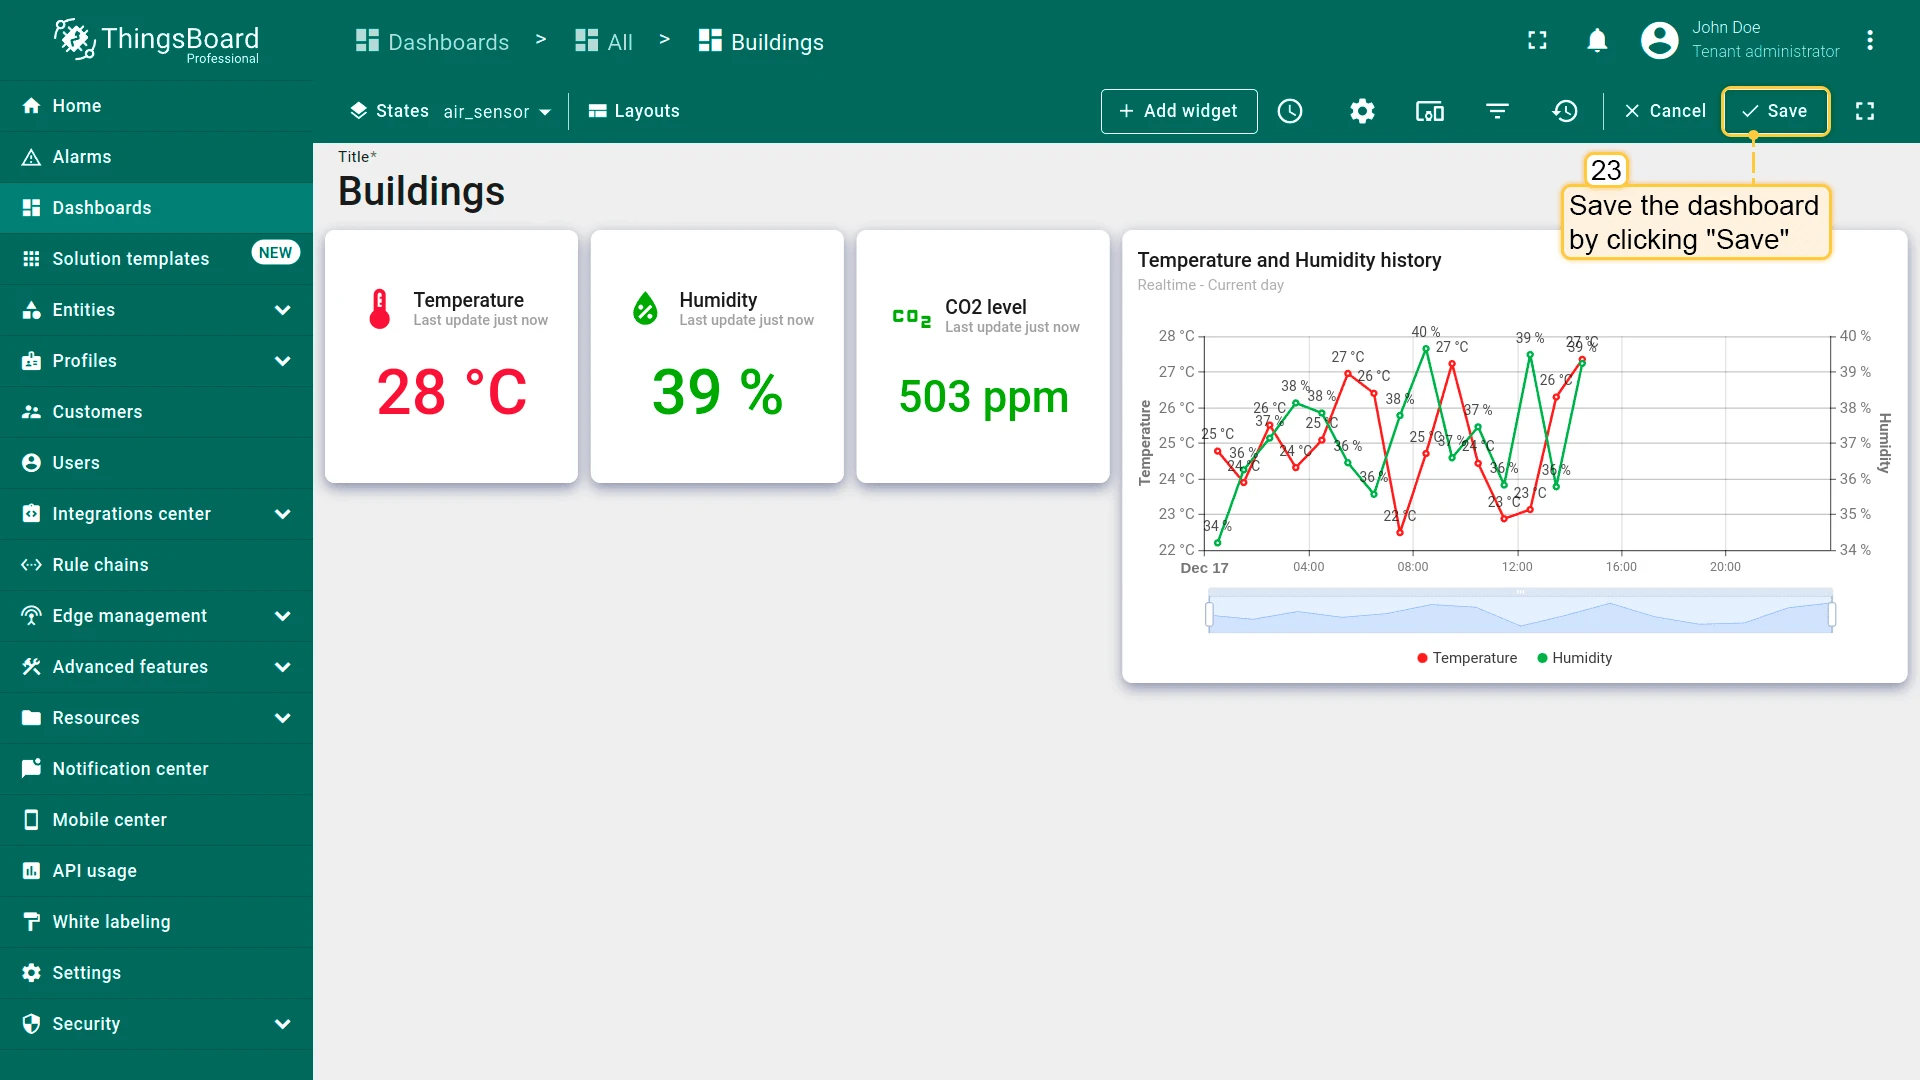
- Click Apply, then save the dashboard.
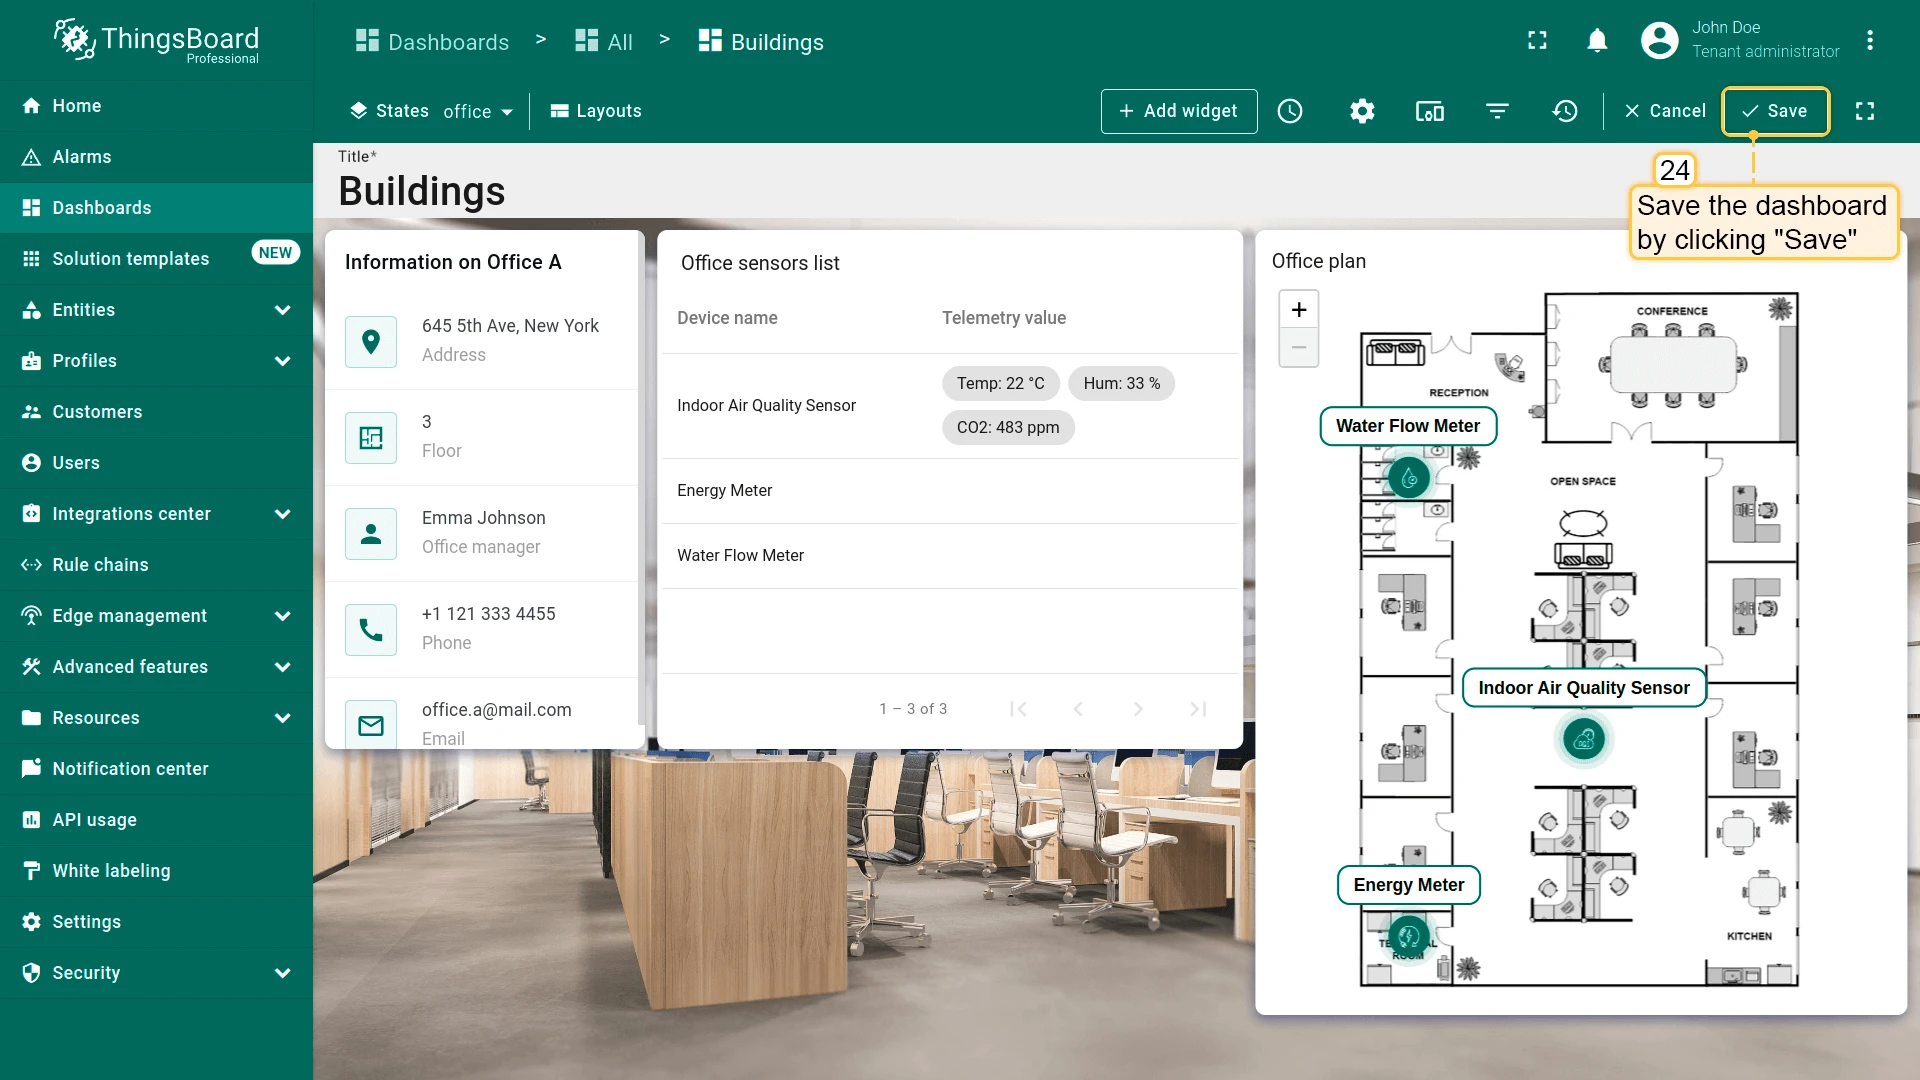

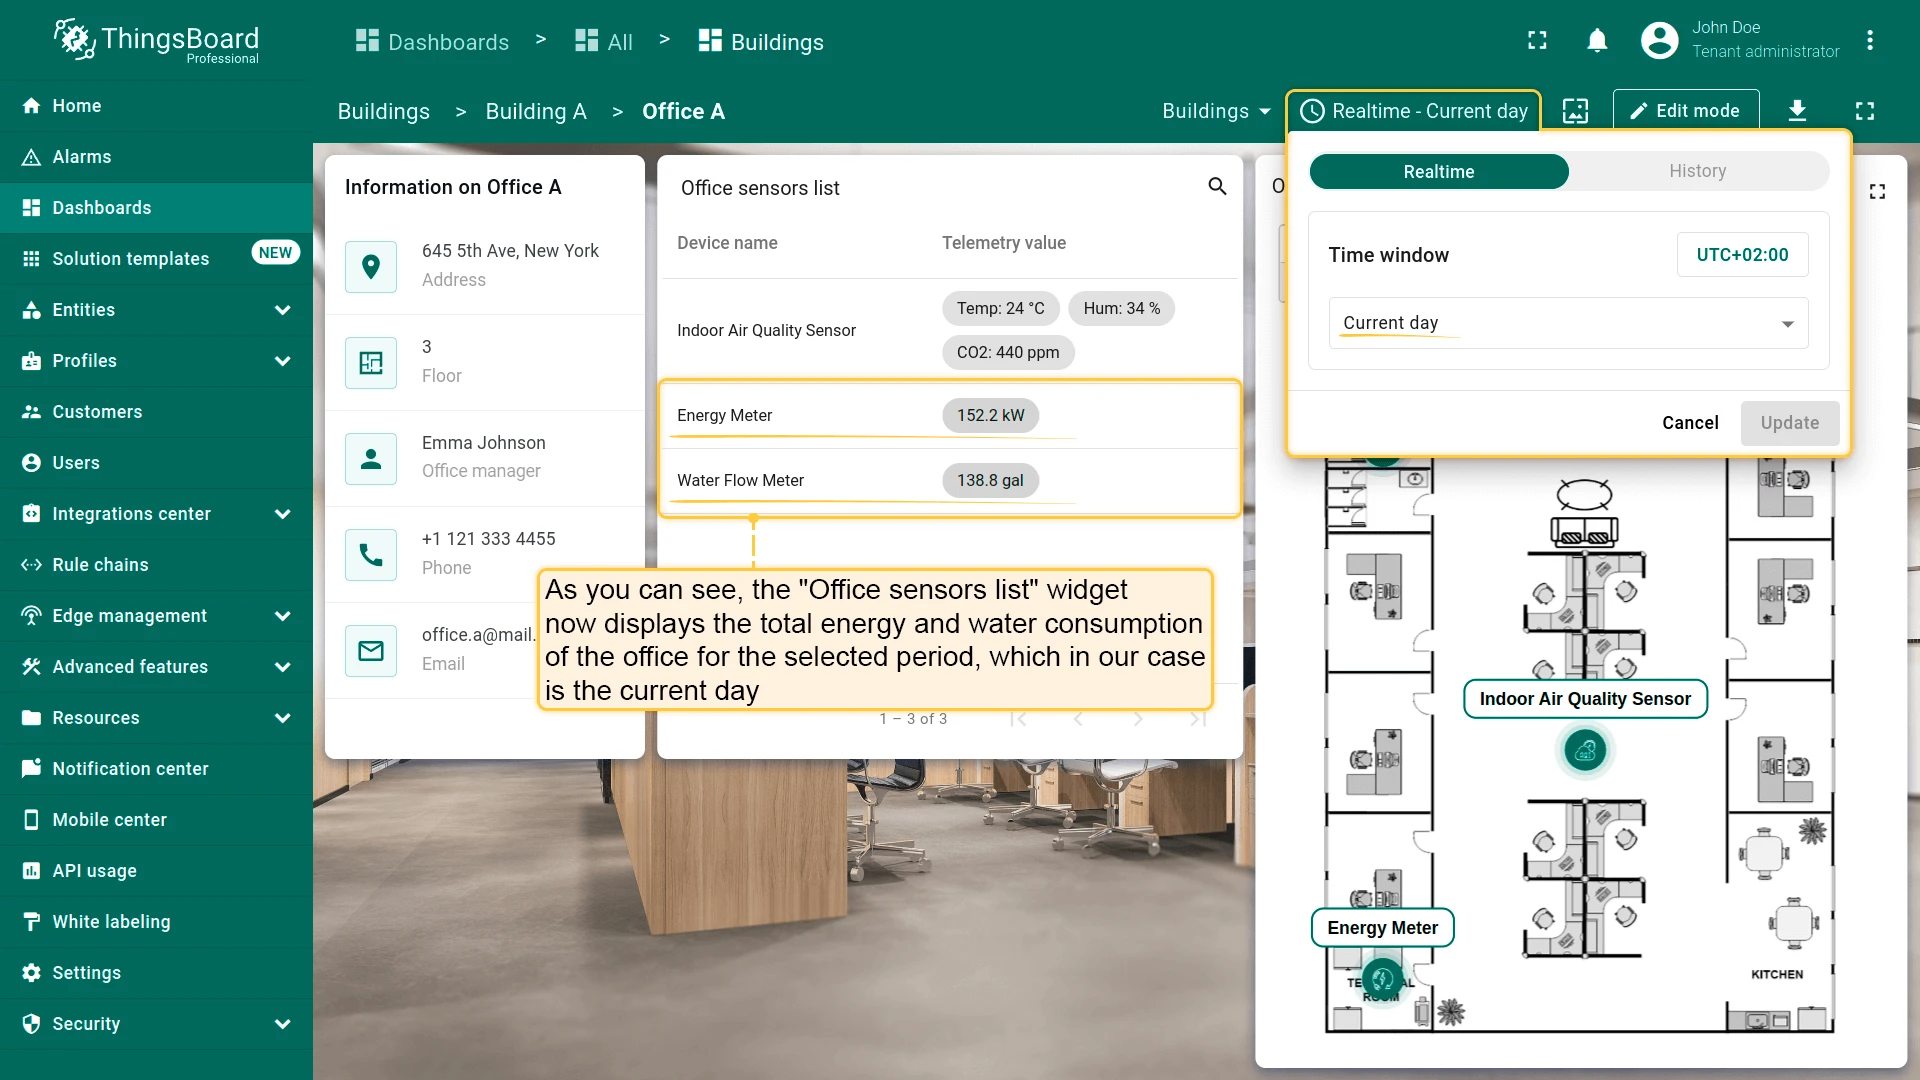
Step 3.3 Configure the Dashboard Time Window
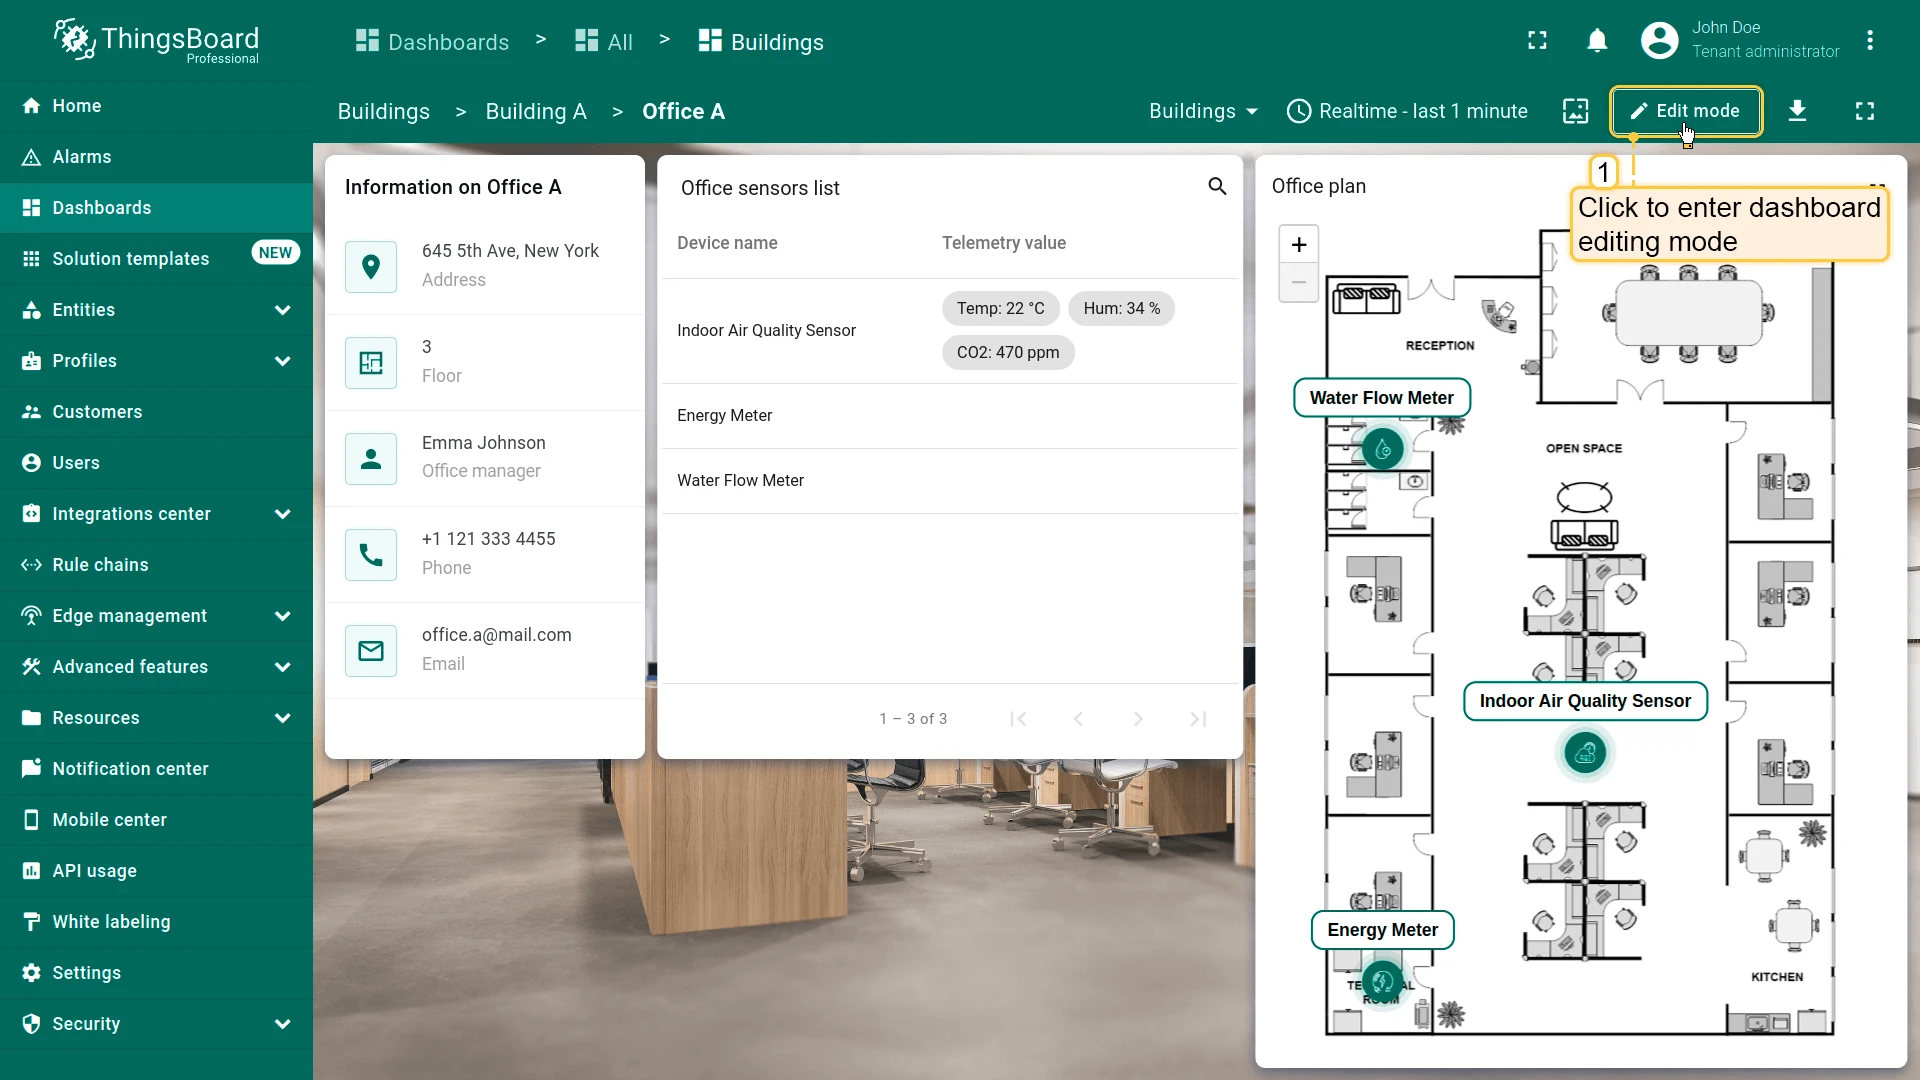
Section titled “Step 3.3 Configure the Dashboard Time Window”Meters emit rates (kW, gallons/min), not totals. Configure the dashboard time window to use Sum aggregation in history mode and appropriate grouping intervals (1 hour for rates → totals per hour).
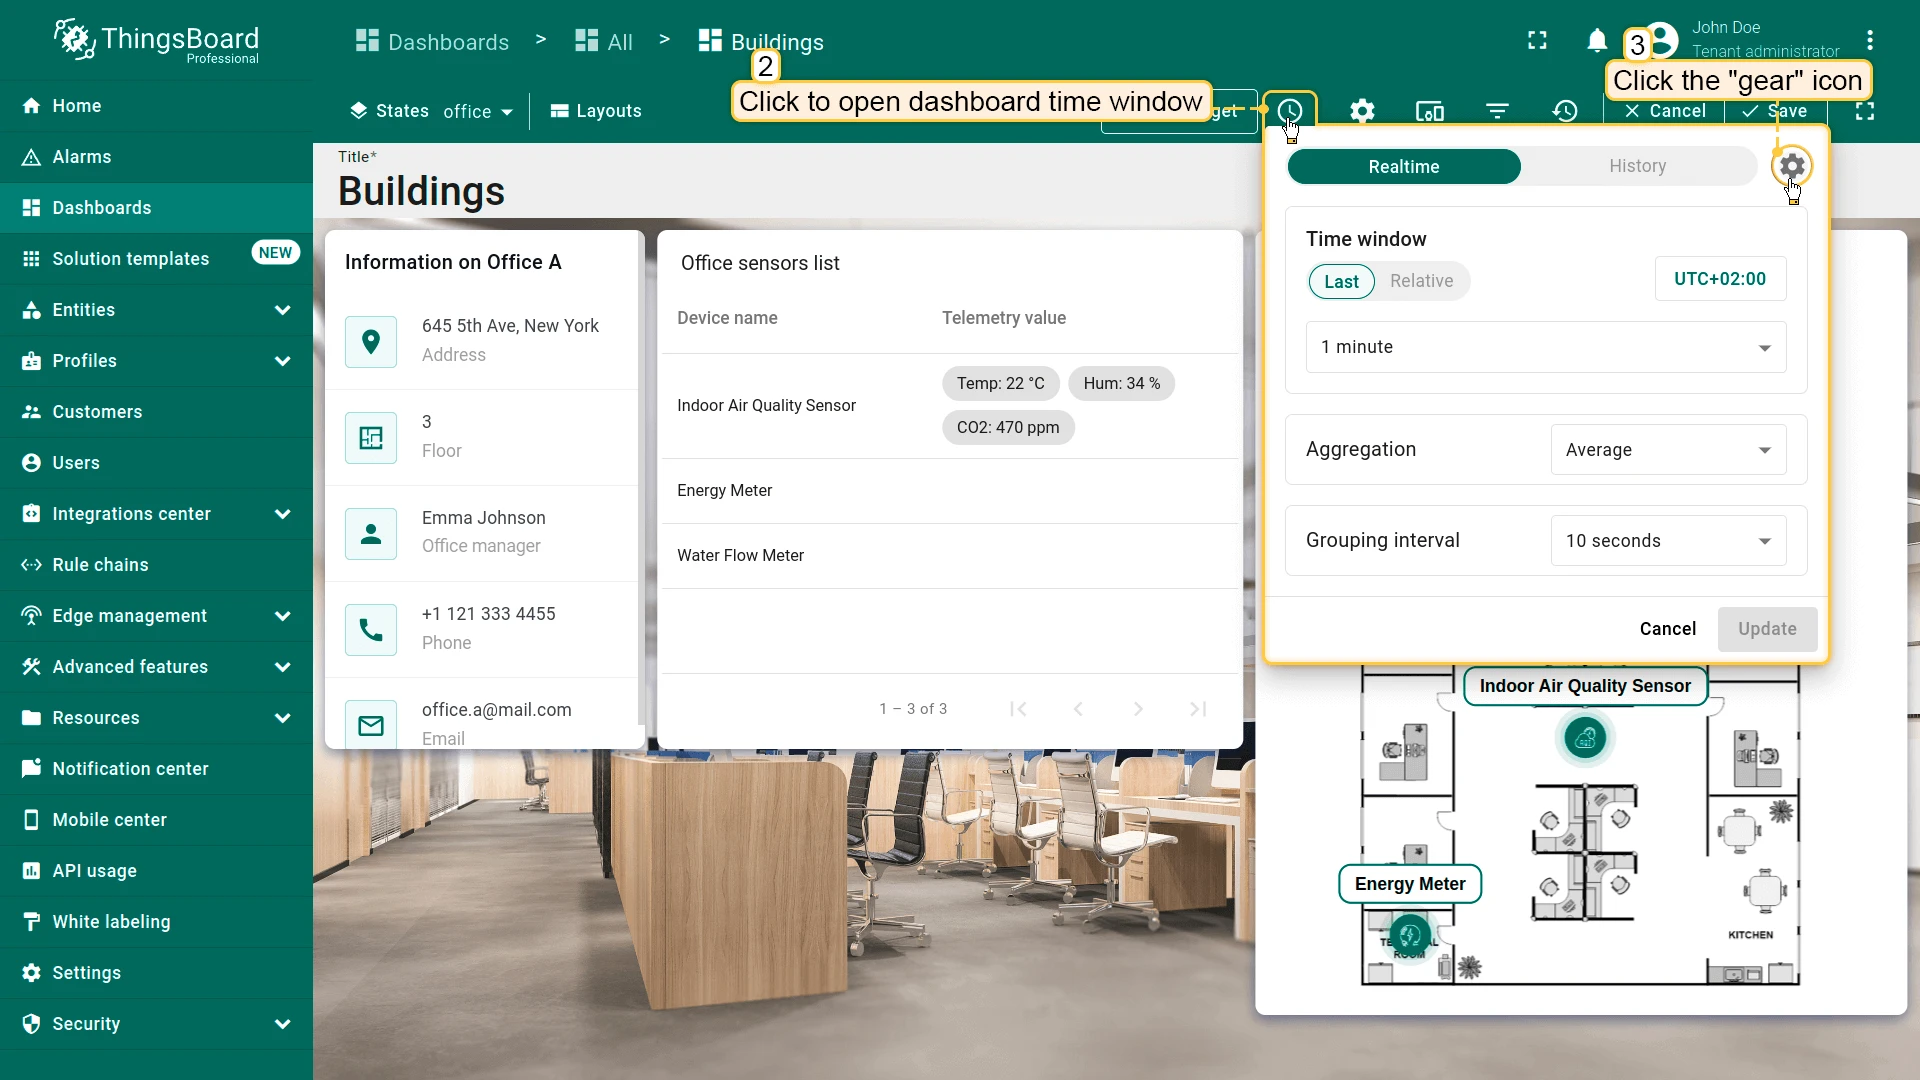
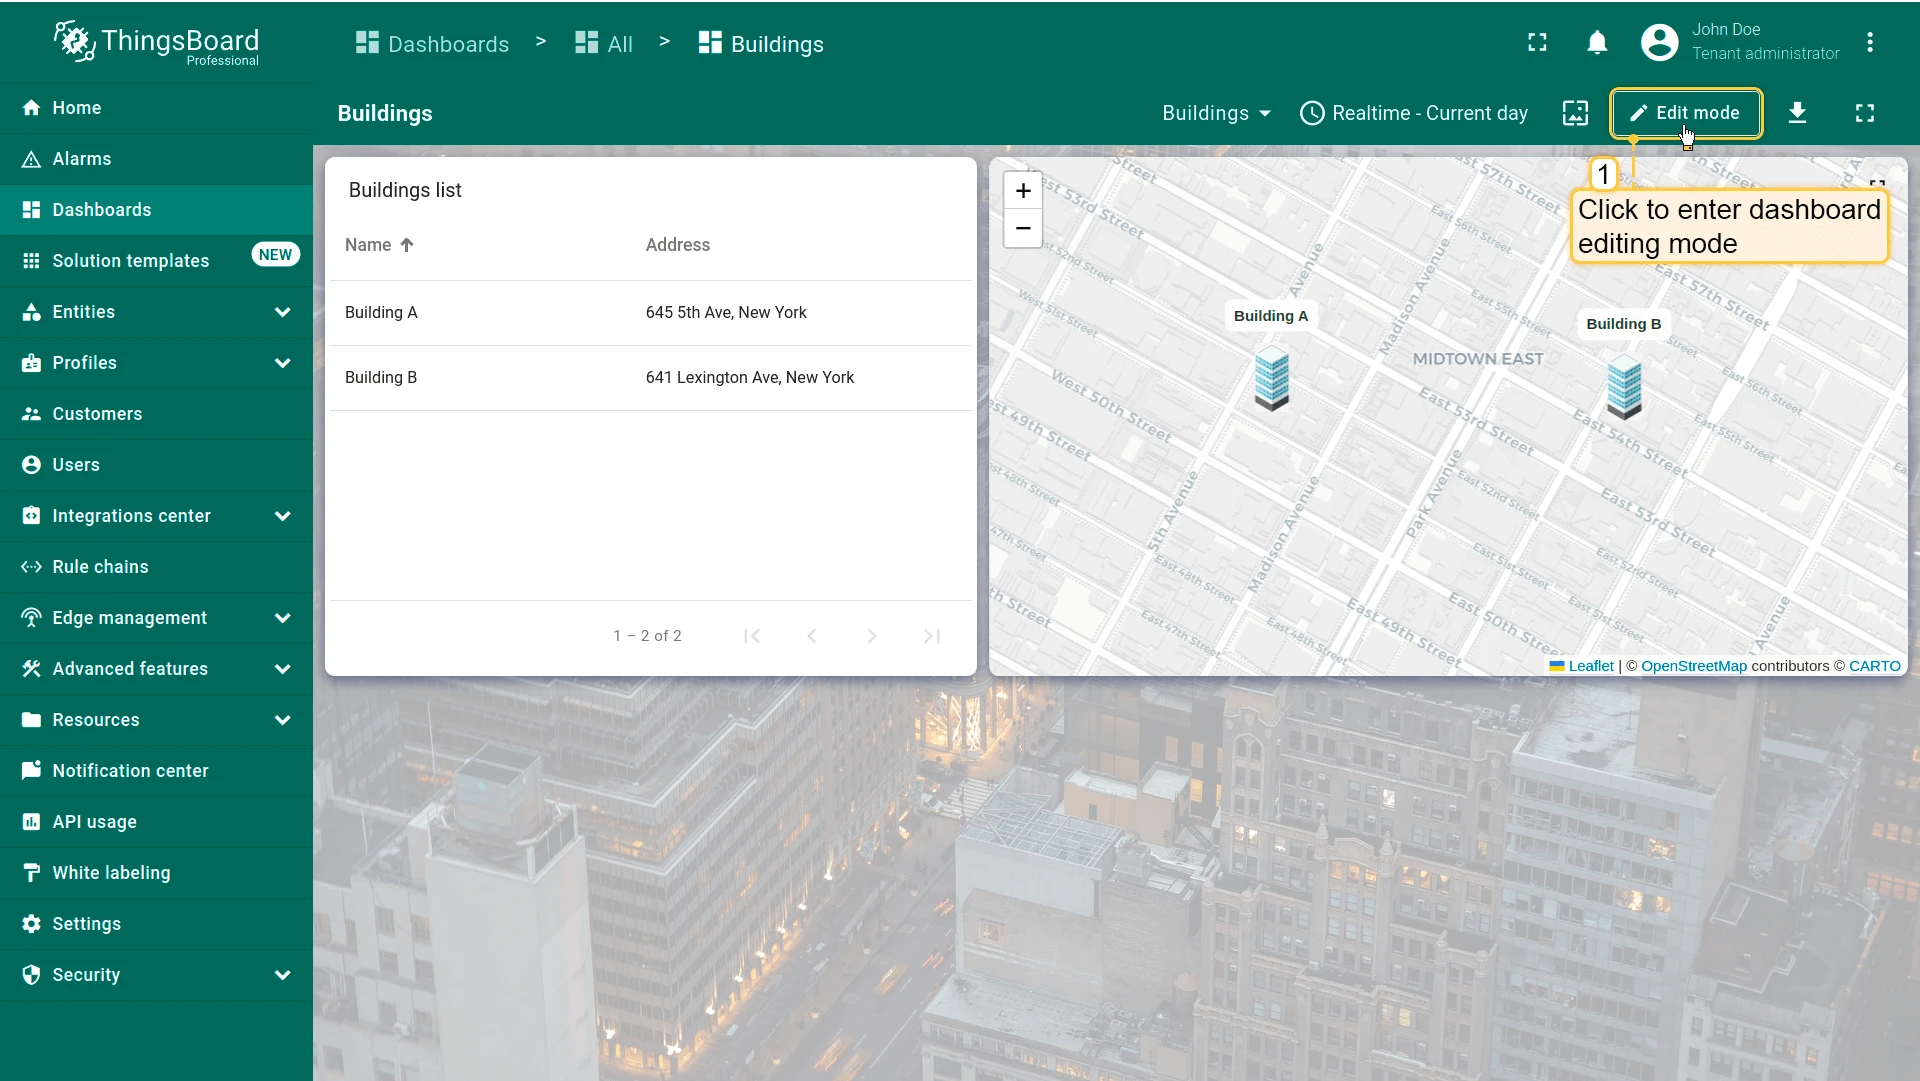
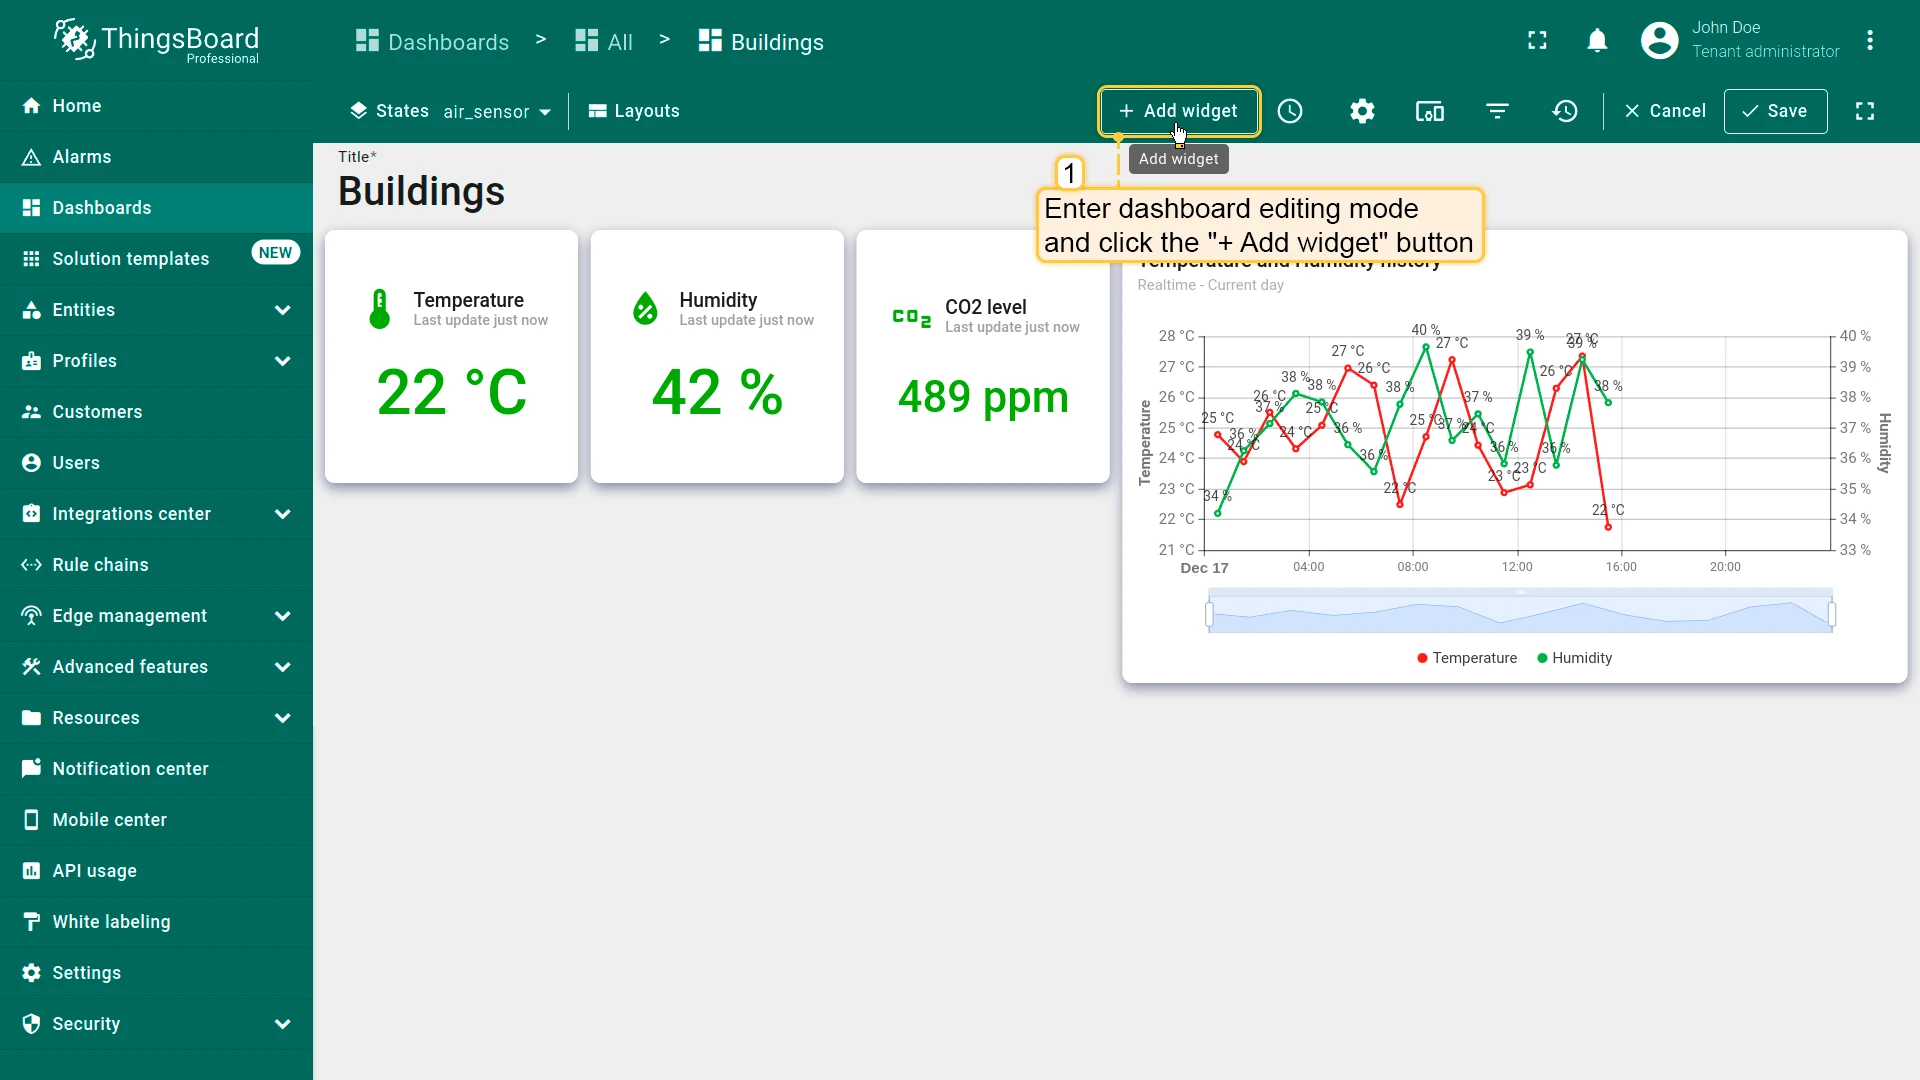
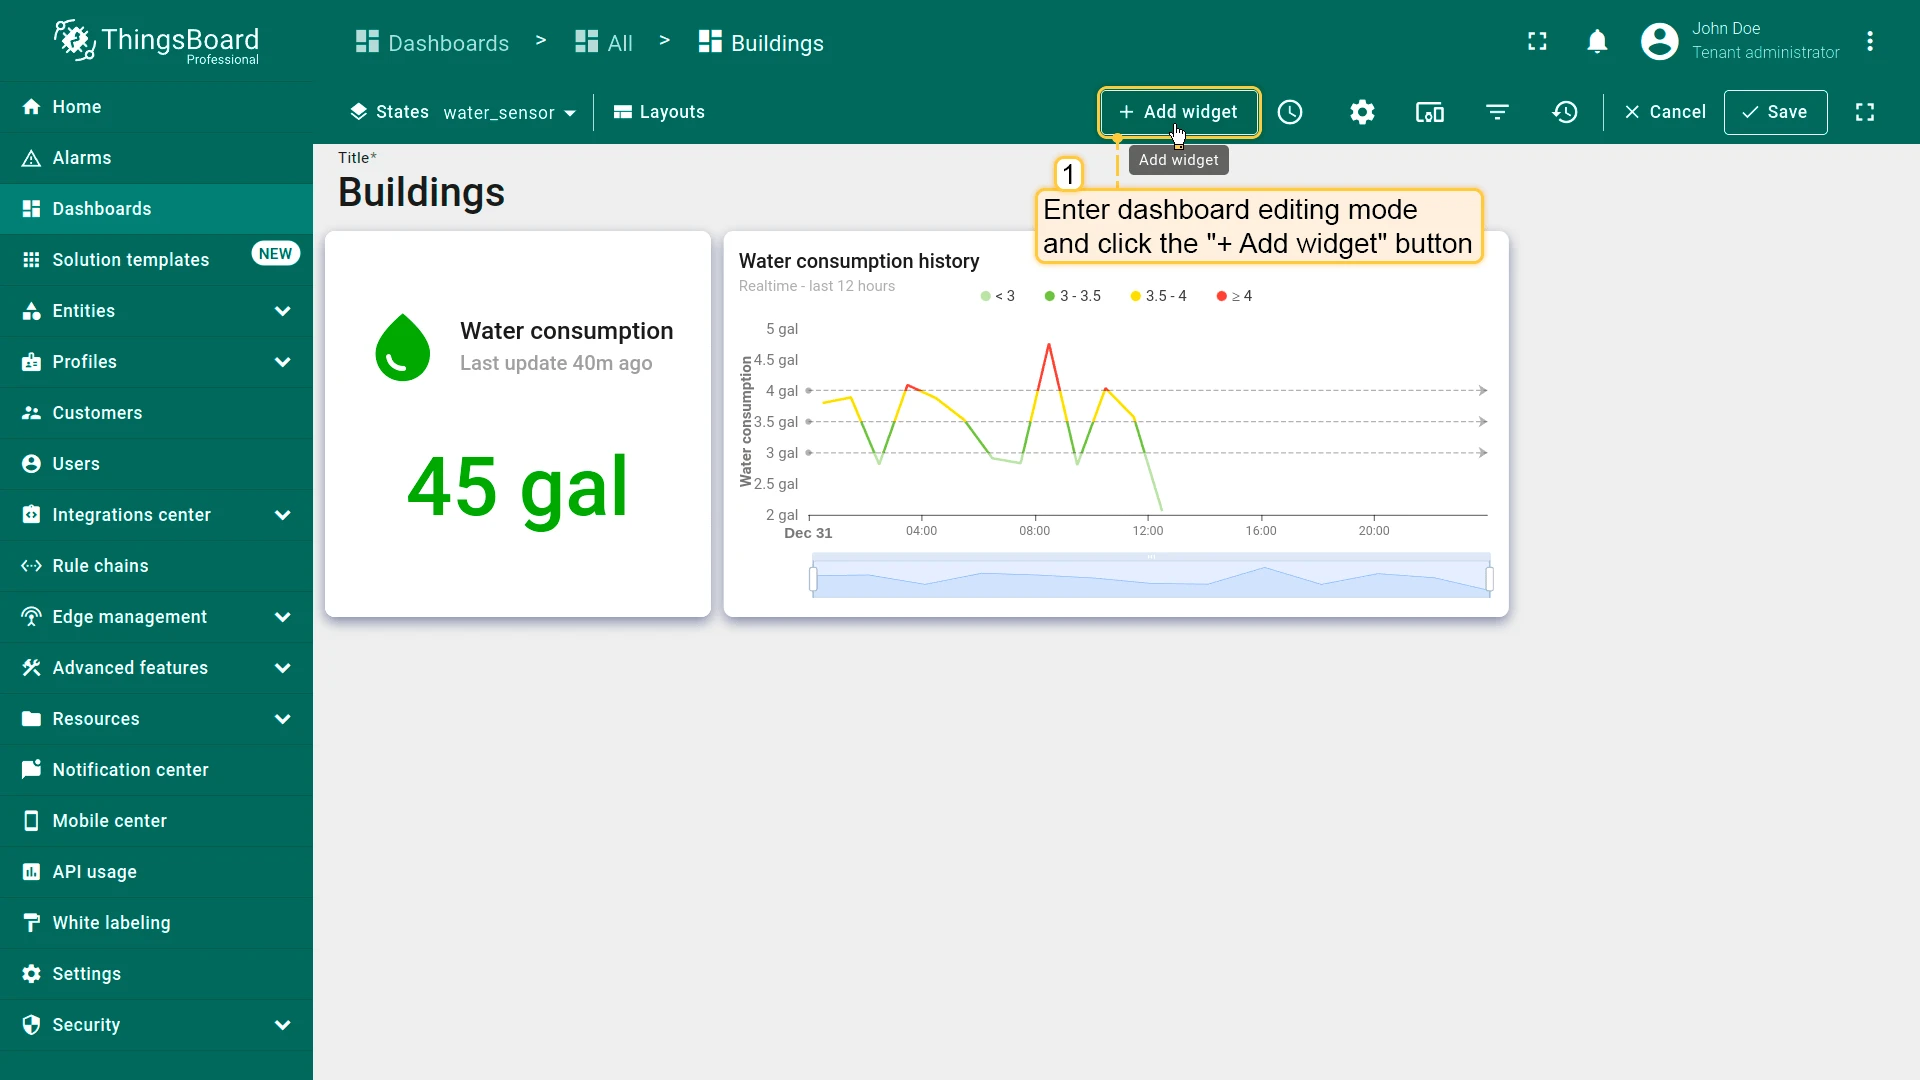
- Enter dashboard edit mode and click the Edit time window icon on the toolbar.
- Click the gear icon to open the time window settings.
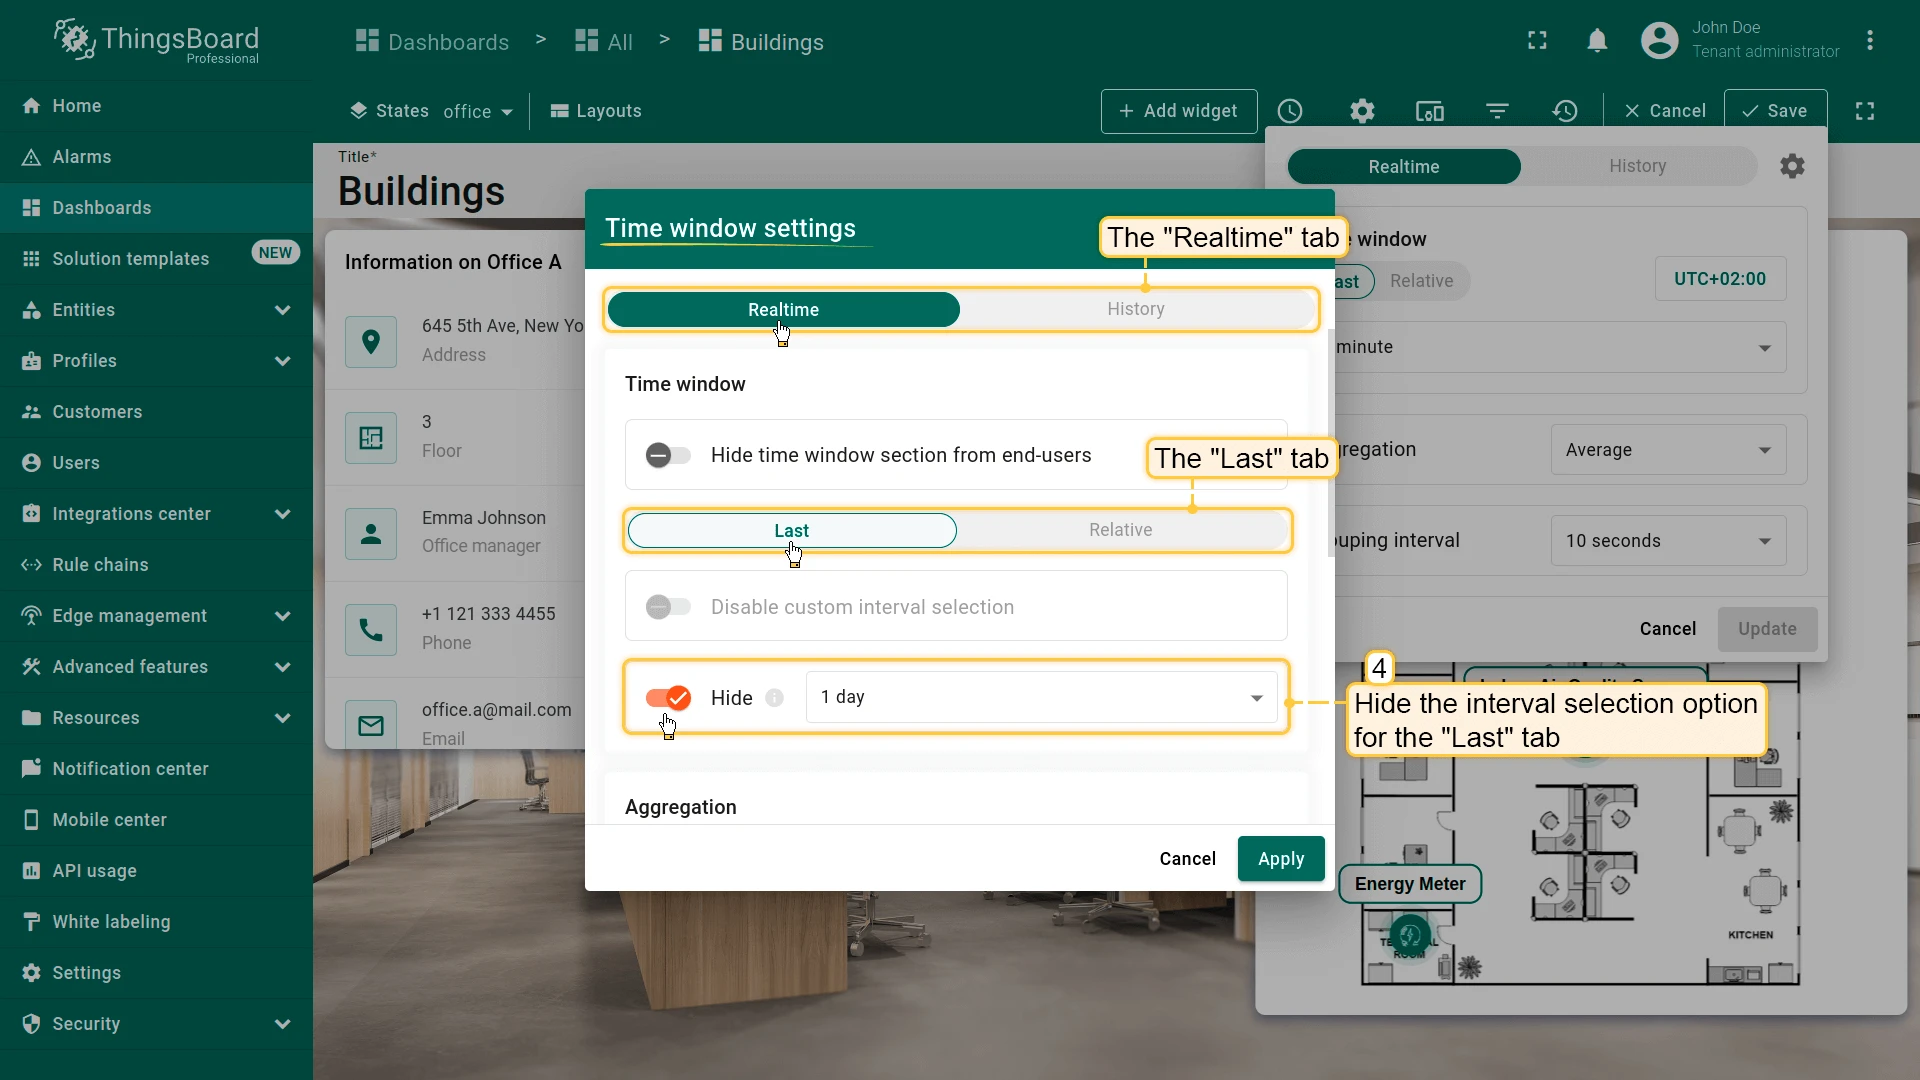
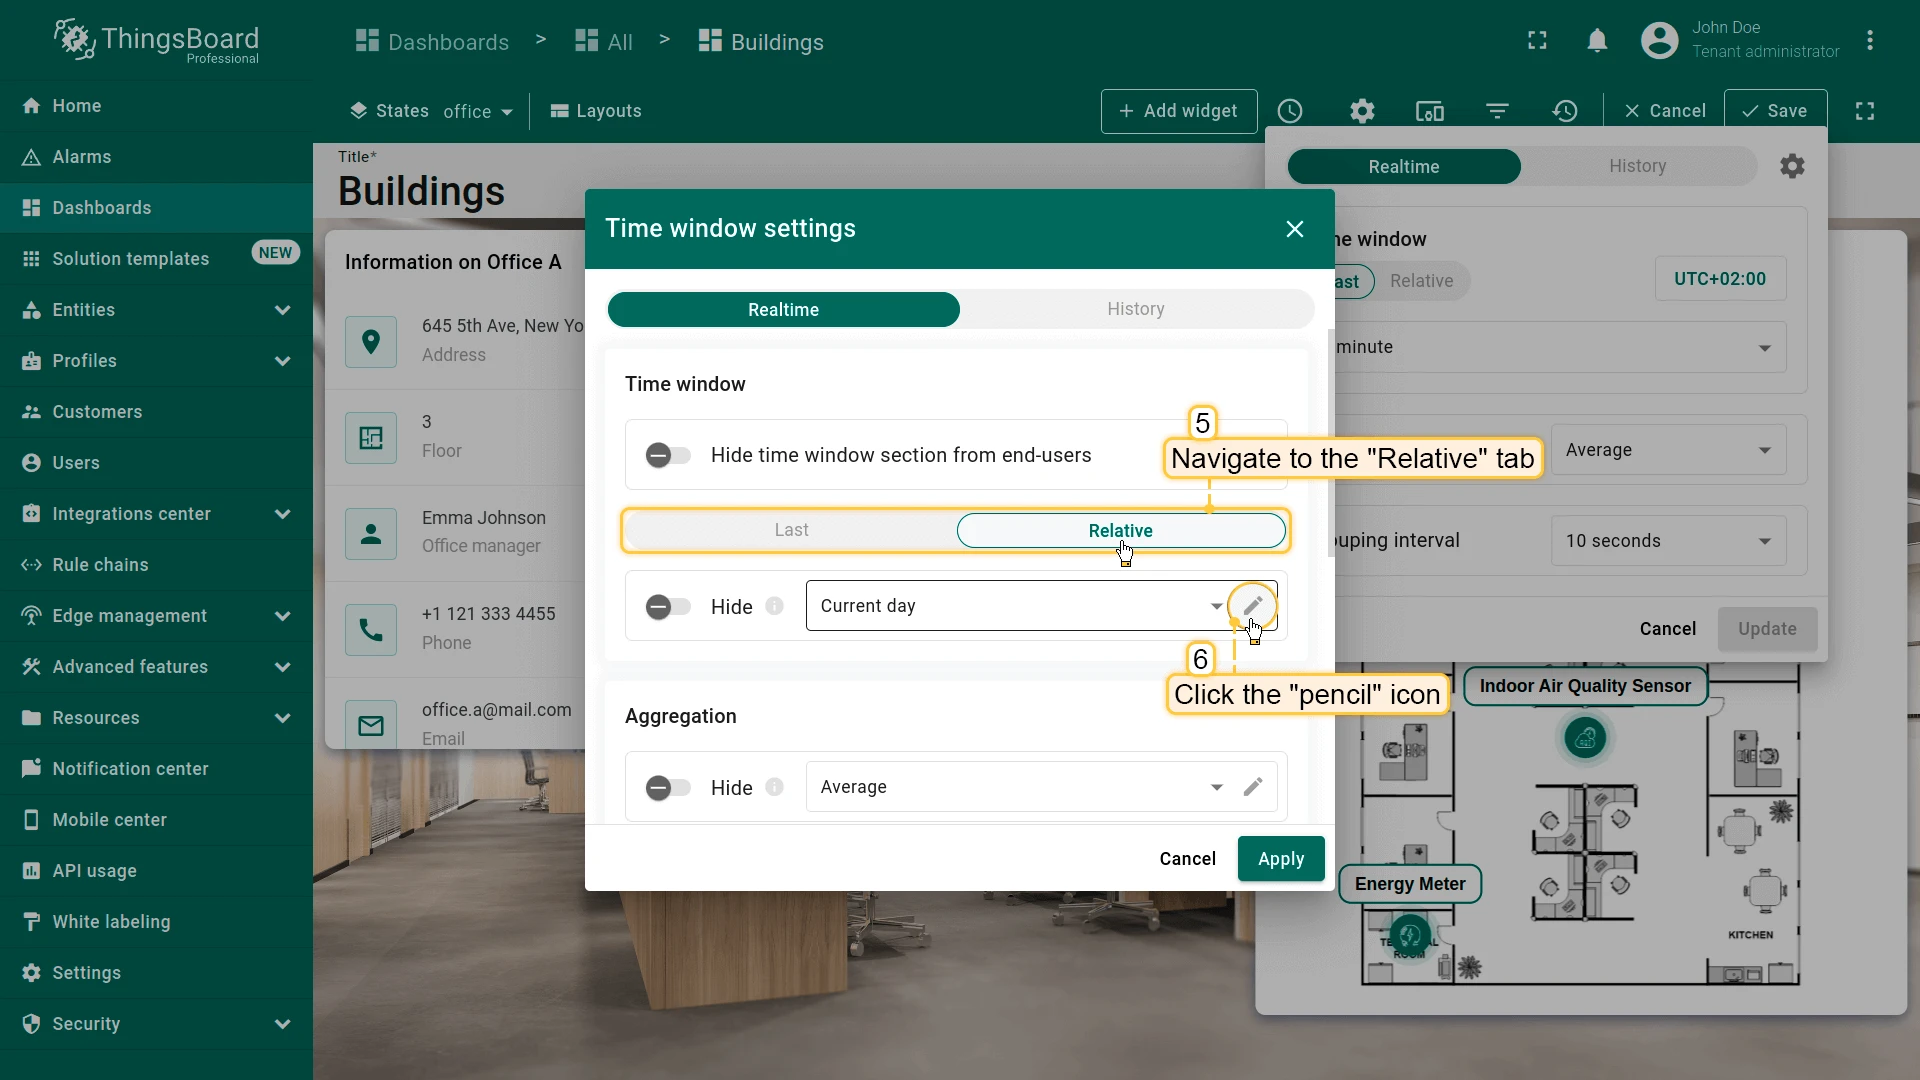
- On the Realtime tab:
- Last interval: hide this option from users.
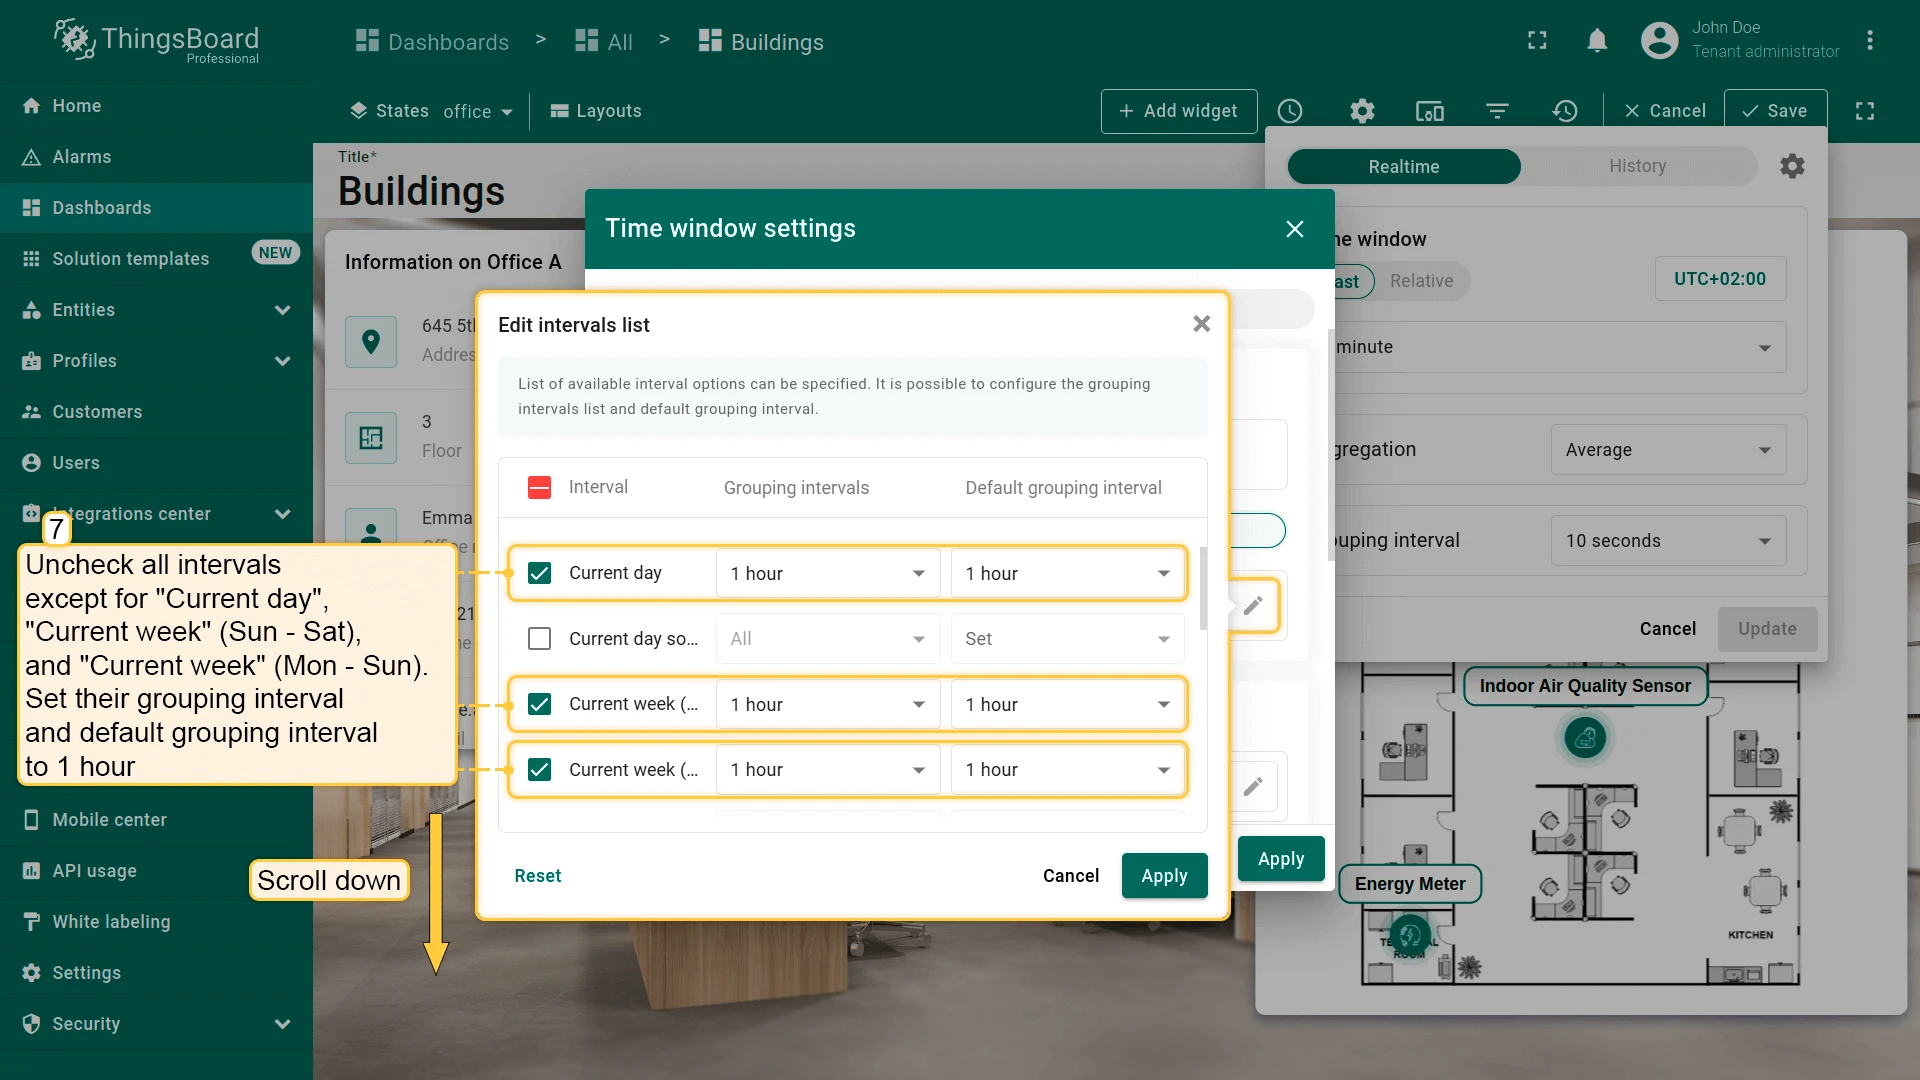
- Relative tab: click the pencil icon and uncheck all intervals except Current day, Current week (Sun–Sat), and Current week (Mon–Sun). Set their grouping interval and default grouping interval to 1 hour.
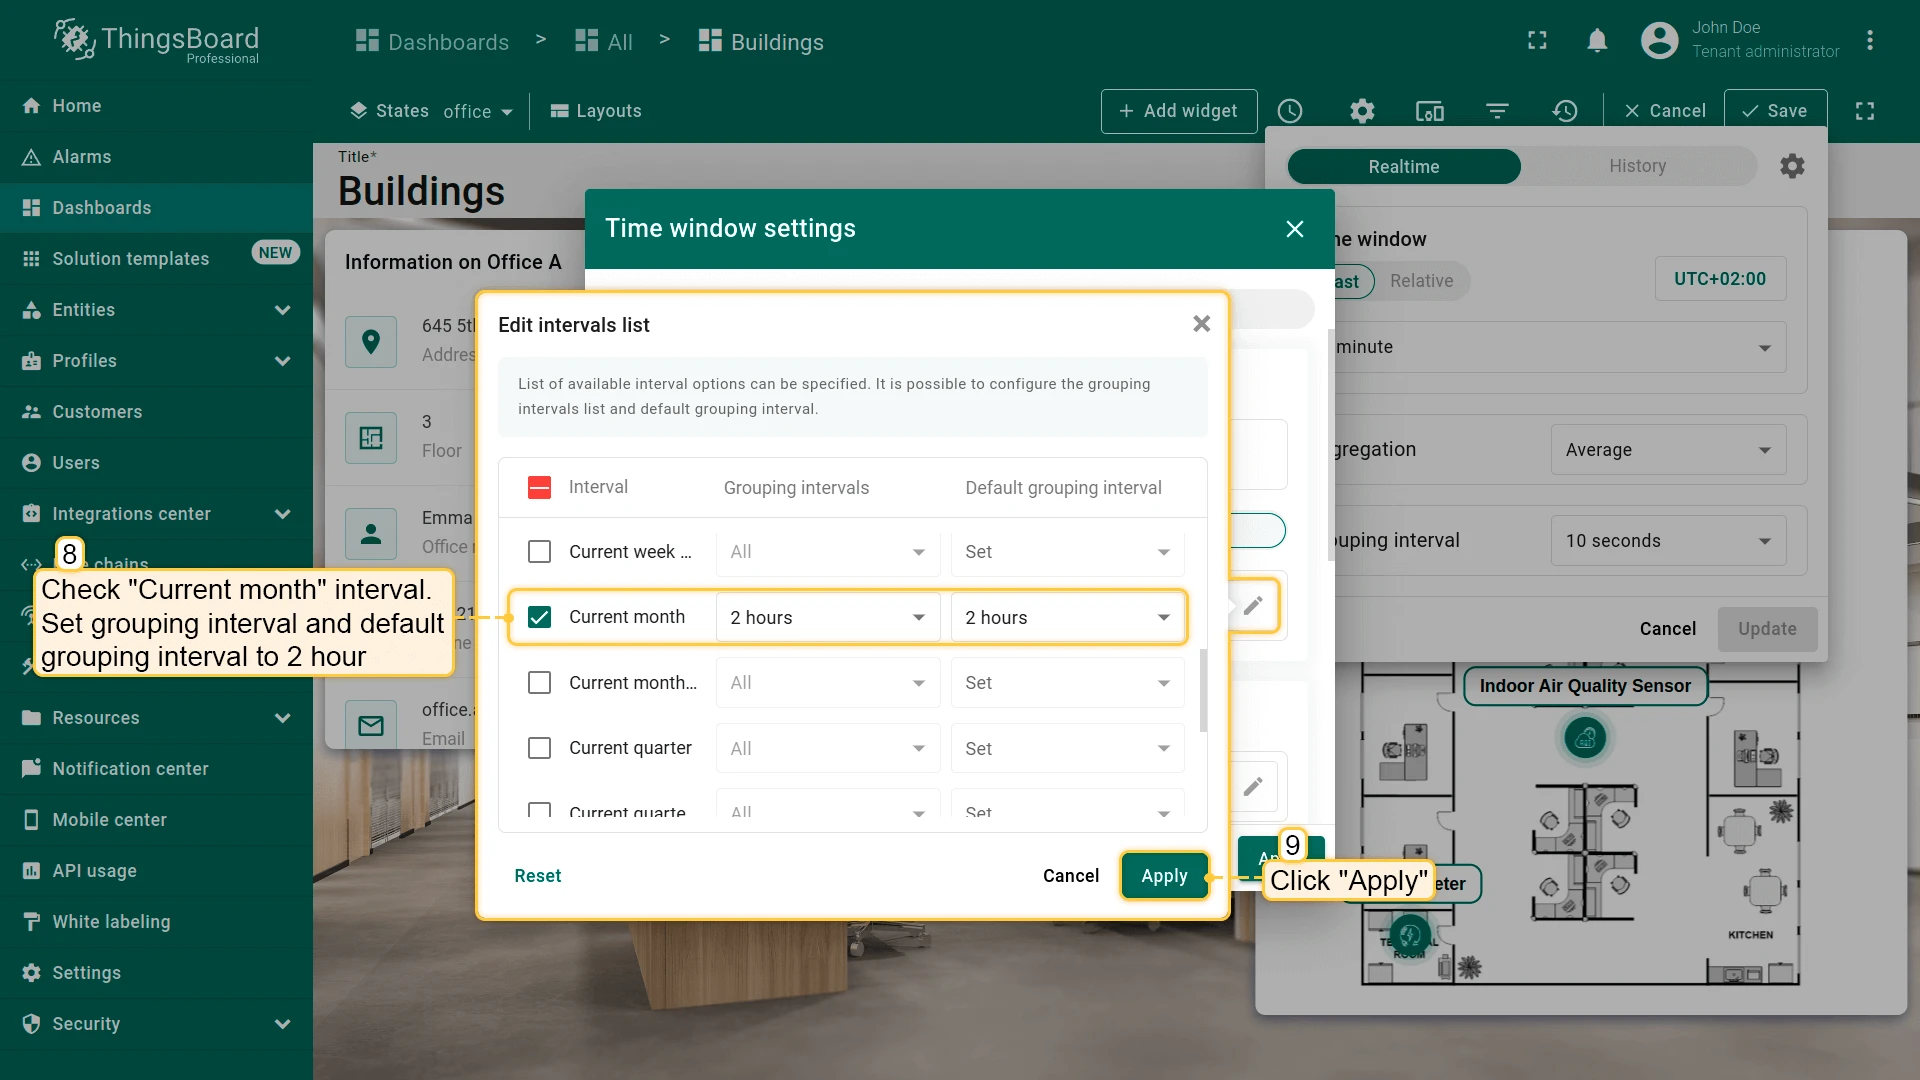
- Check Current month and set its grouping to 2 hours.
- Click Apply.
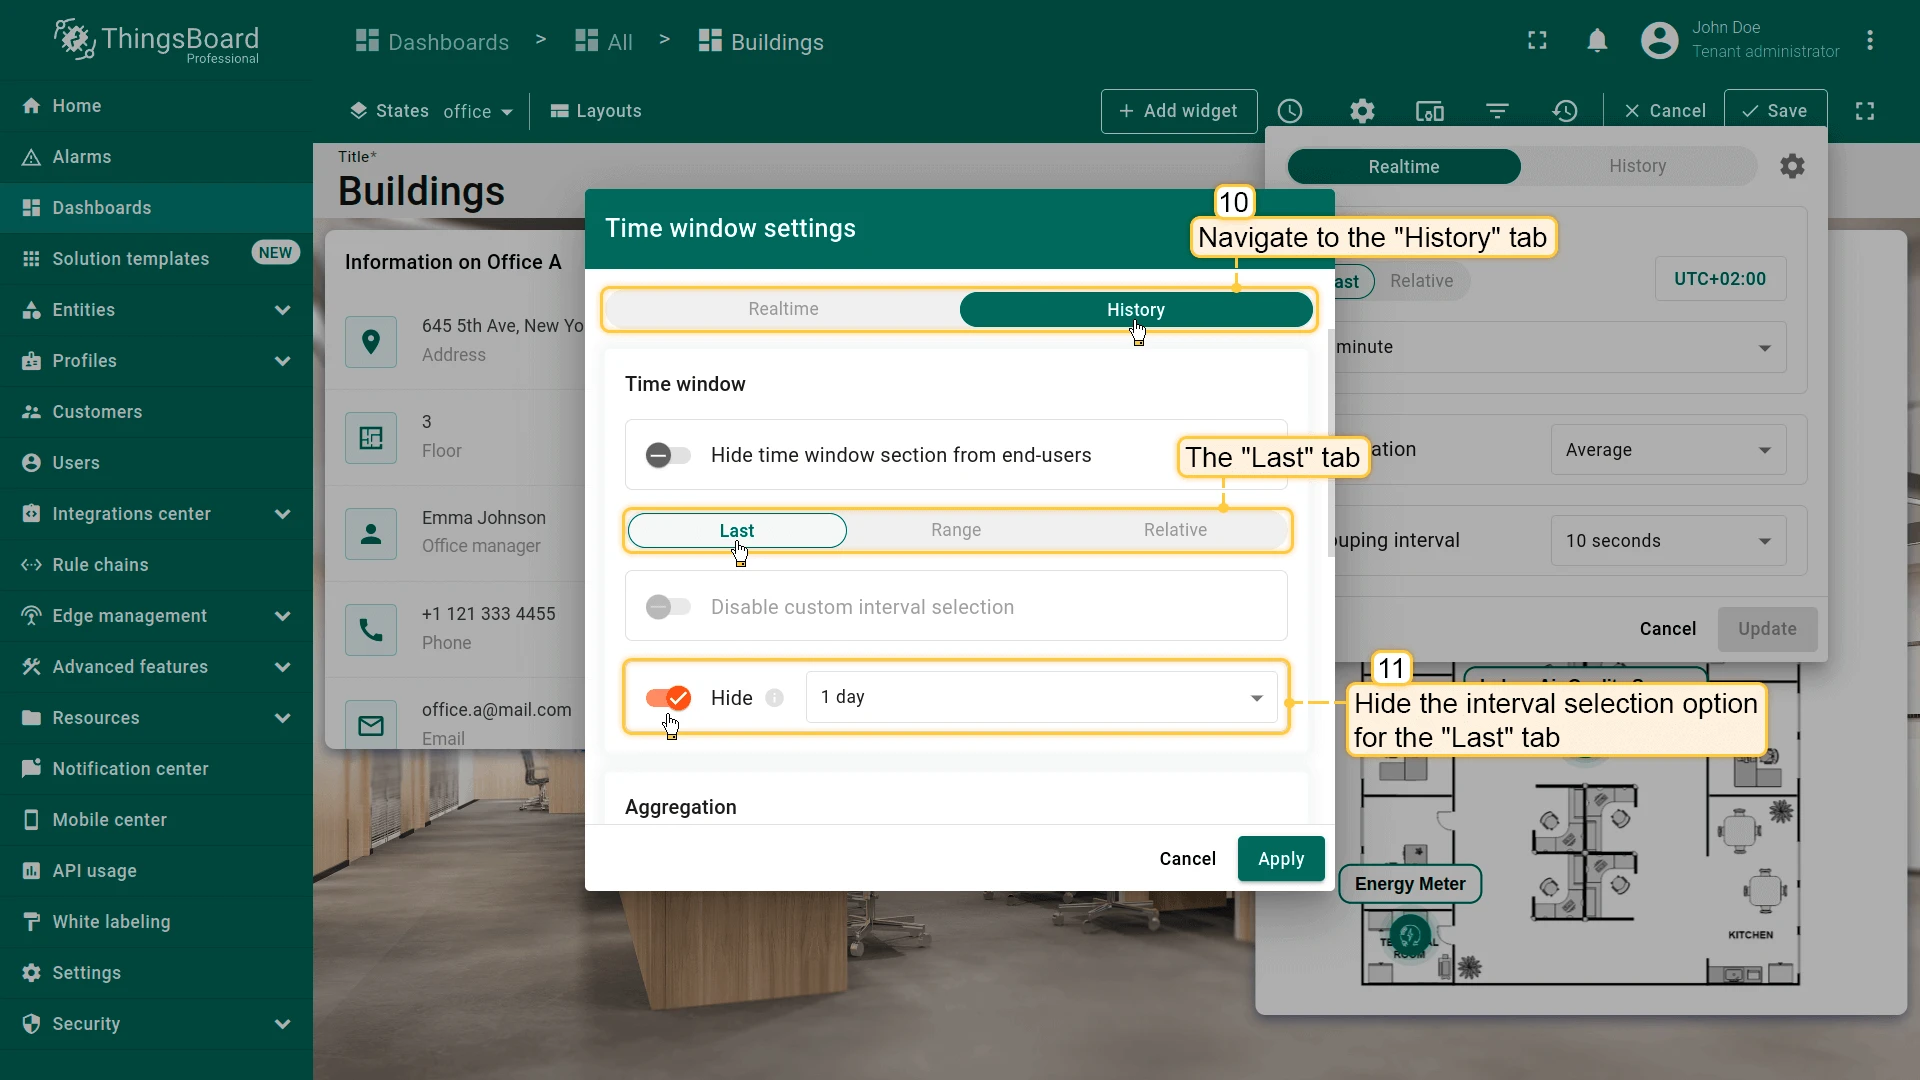
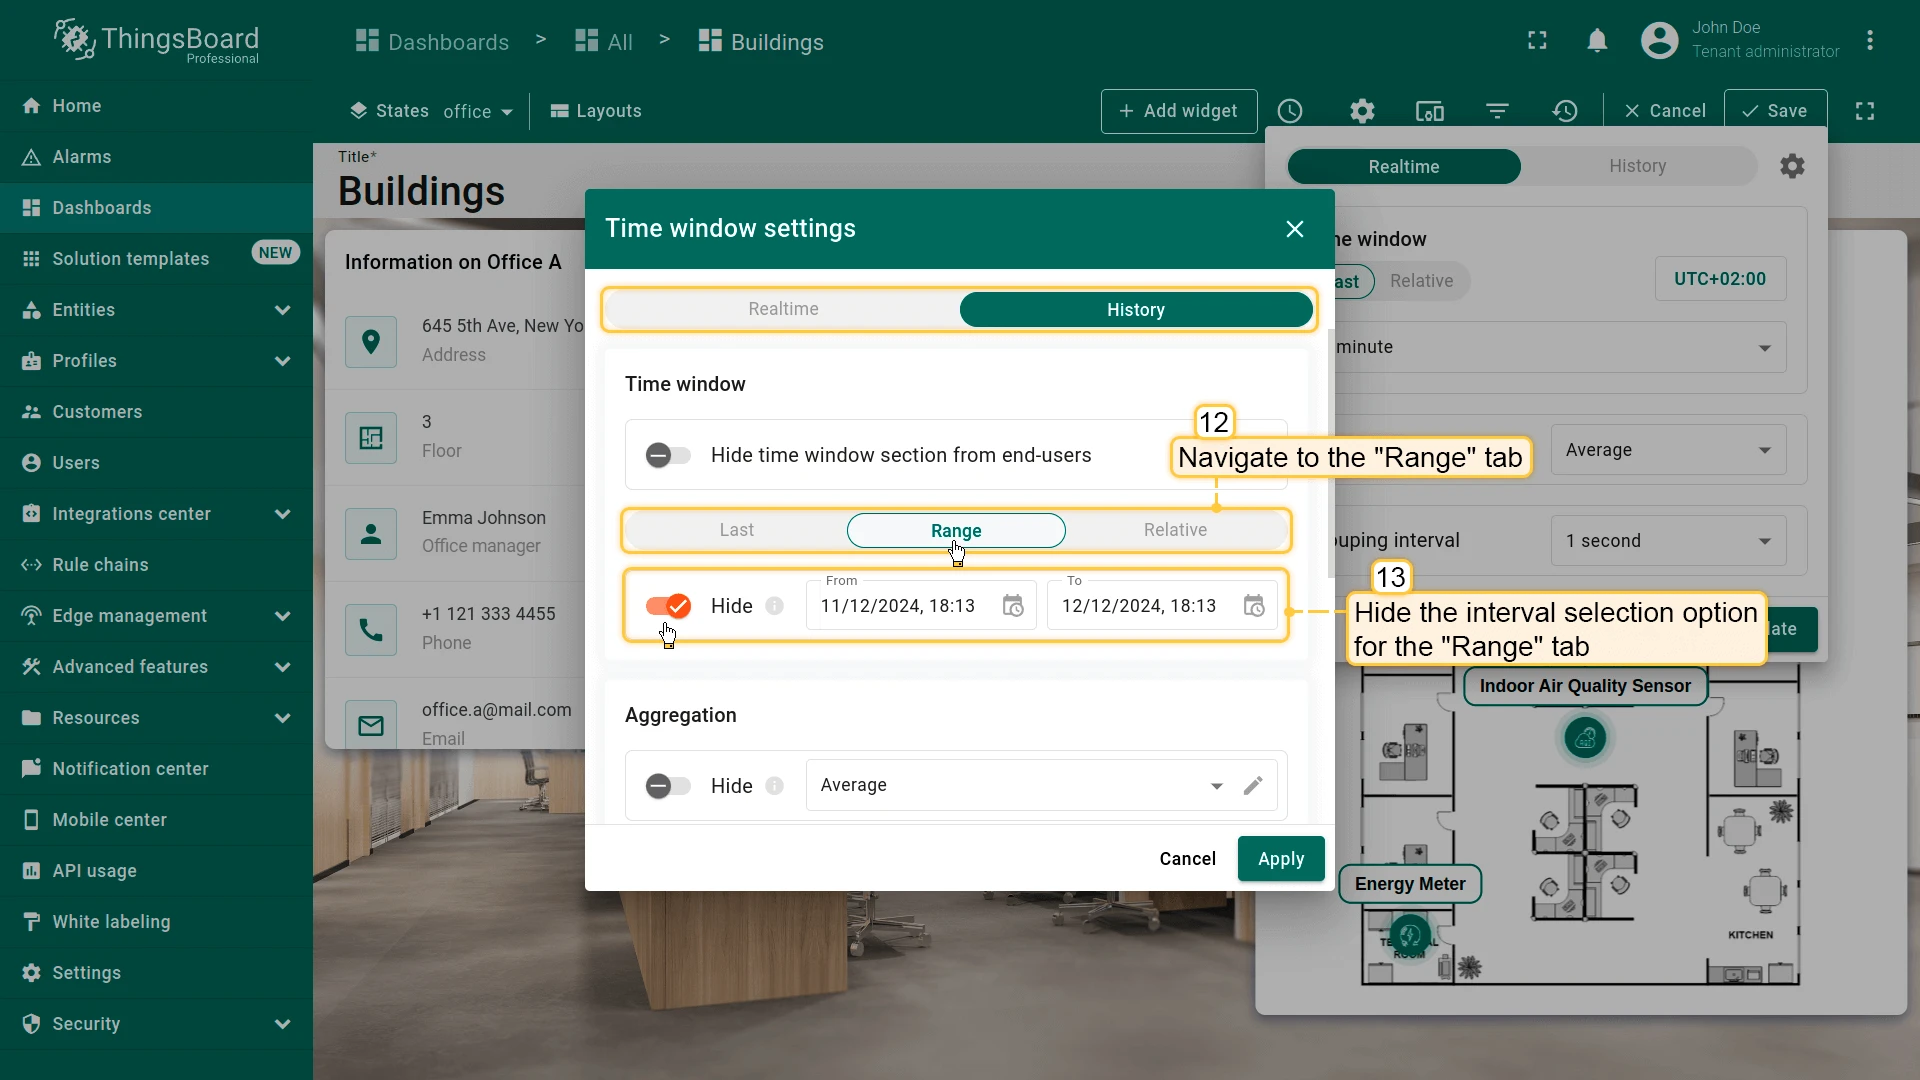
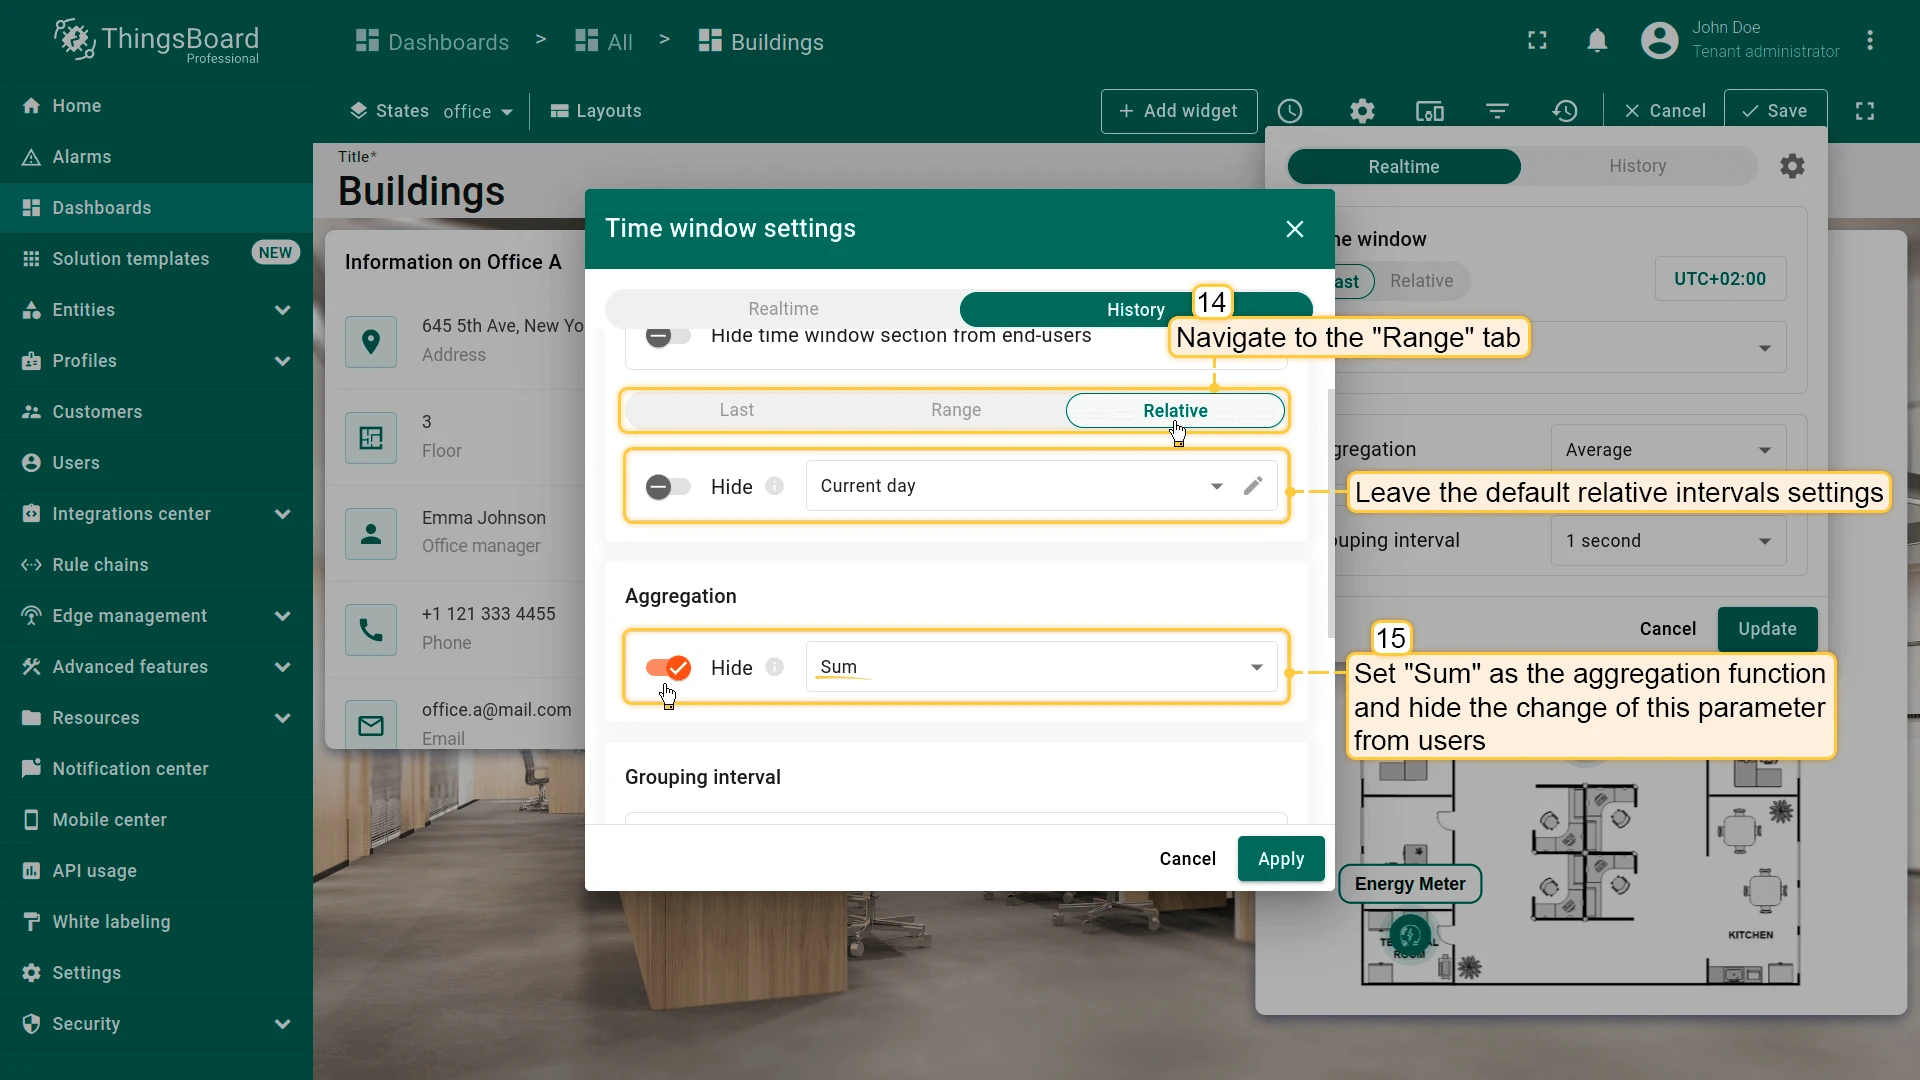
- On the History tab:
- Hide the Last and Range interval options.
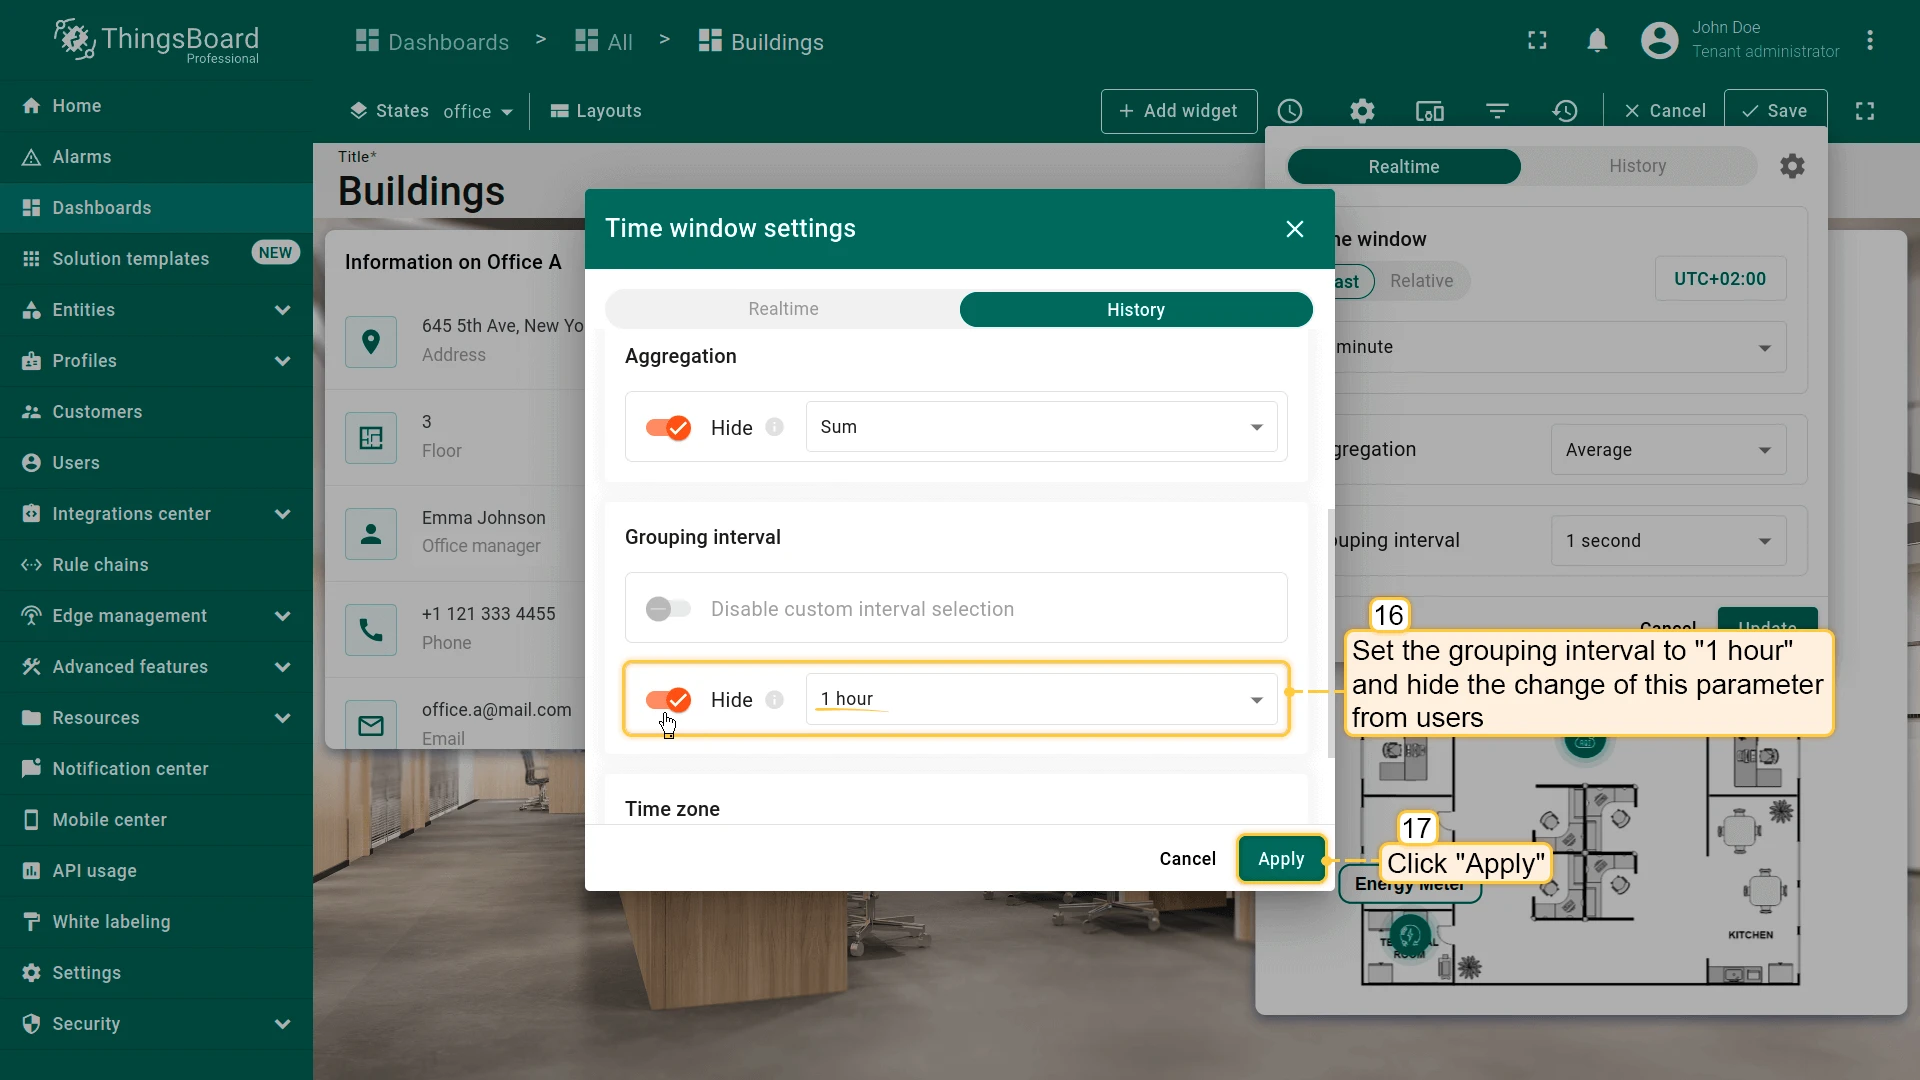
- Set Aggregation to Sum and hide the aggregation selector.
- Set grouping interval to 1 hour and lock it (prevent users from changing it).
- Click Apply.
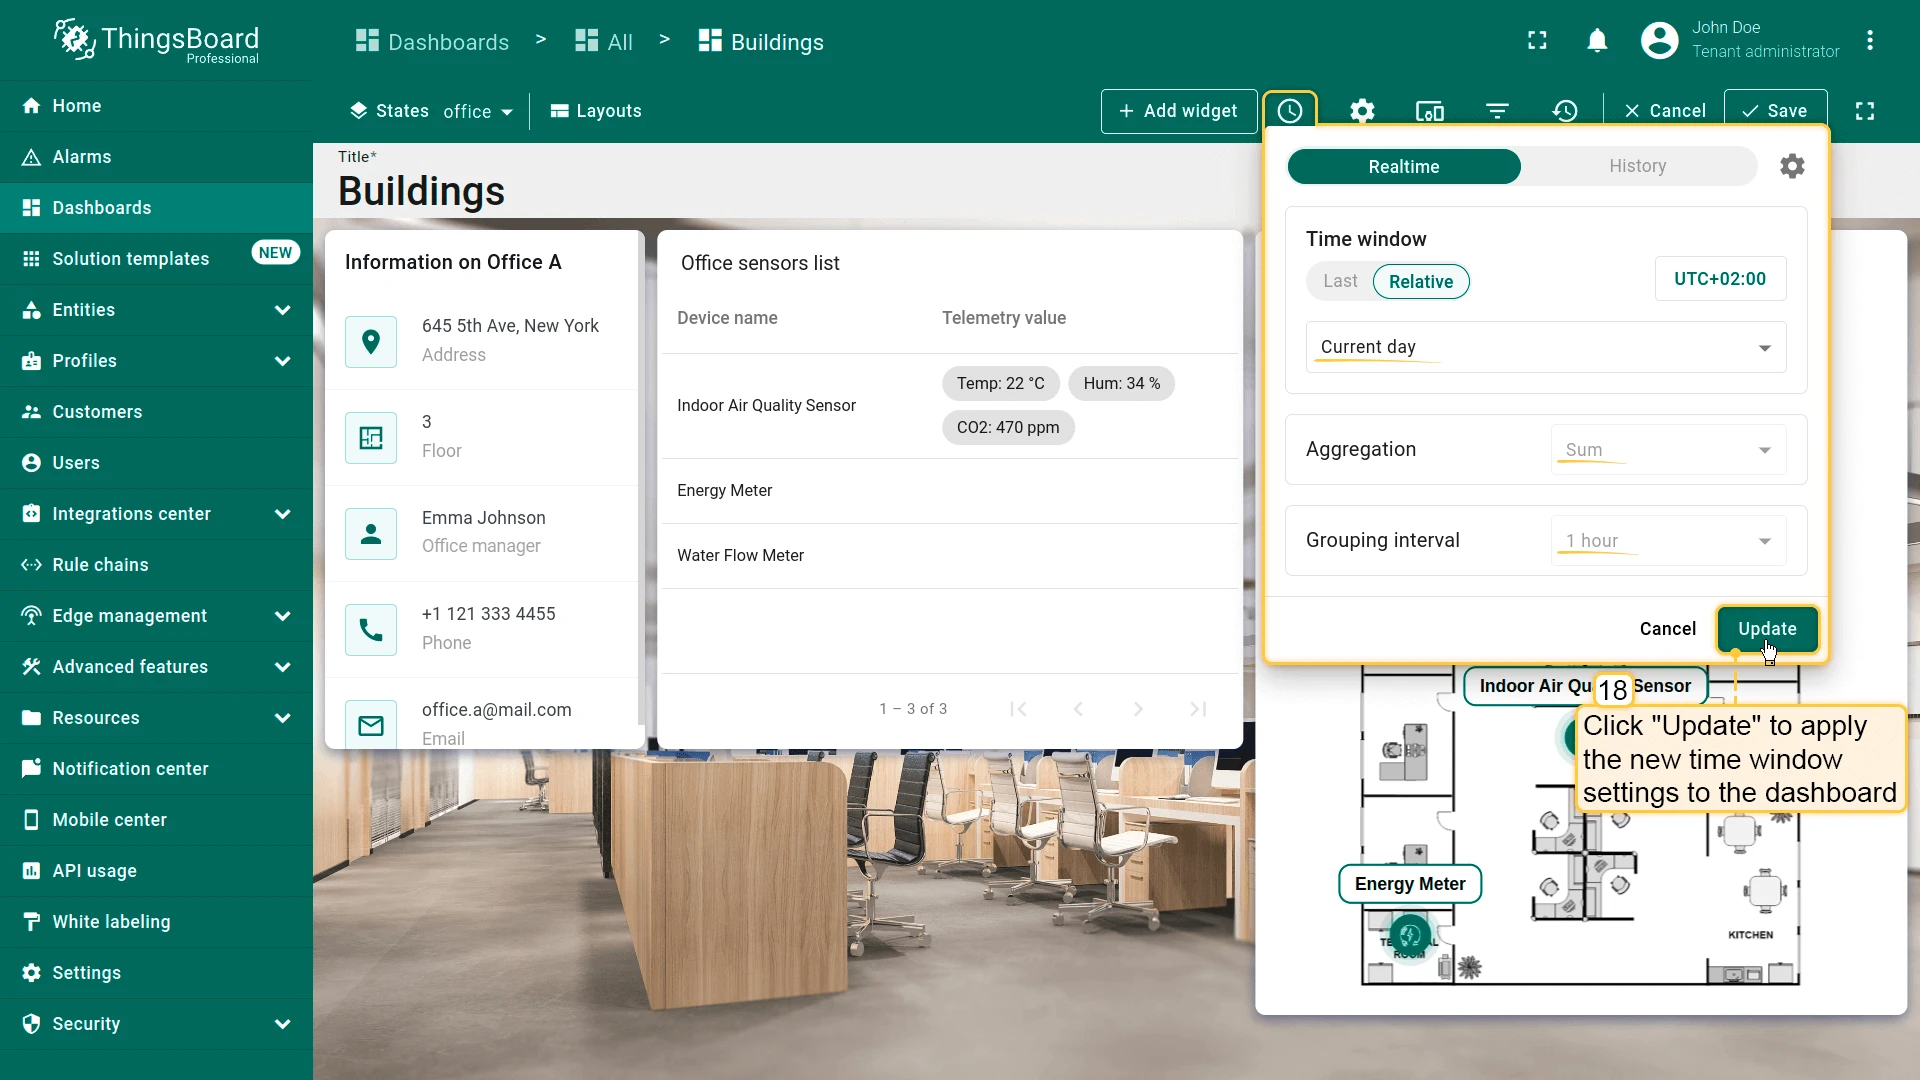
- Click Update to apply the time window settings, then save the dashboard.
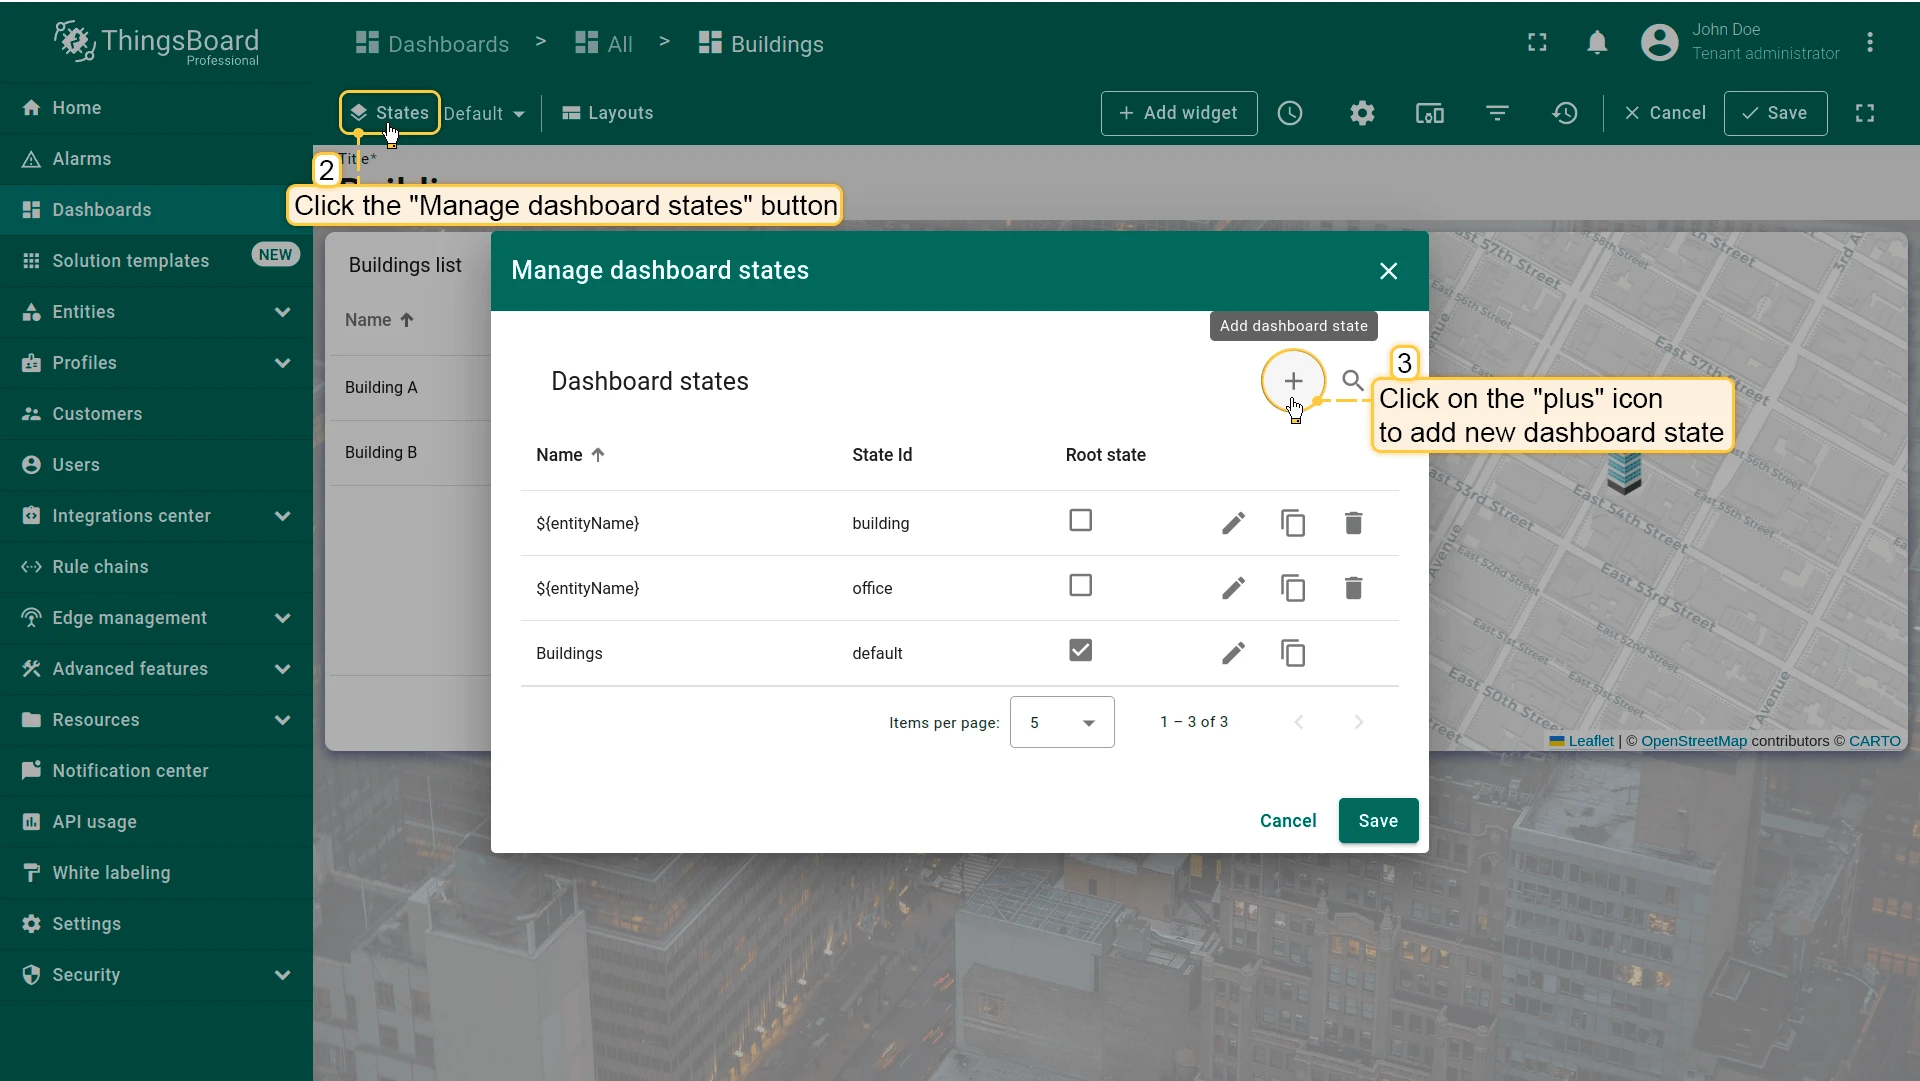
Step 3.4 Add Device States
Section titled “Step 3.4 Add Device States”Add three dashboard states — one for each device type. Clicking a row in the sensors list or a marker in the Image Map will navigate to the matching state.
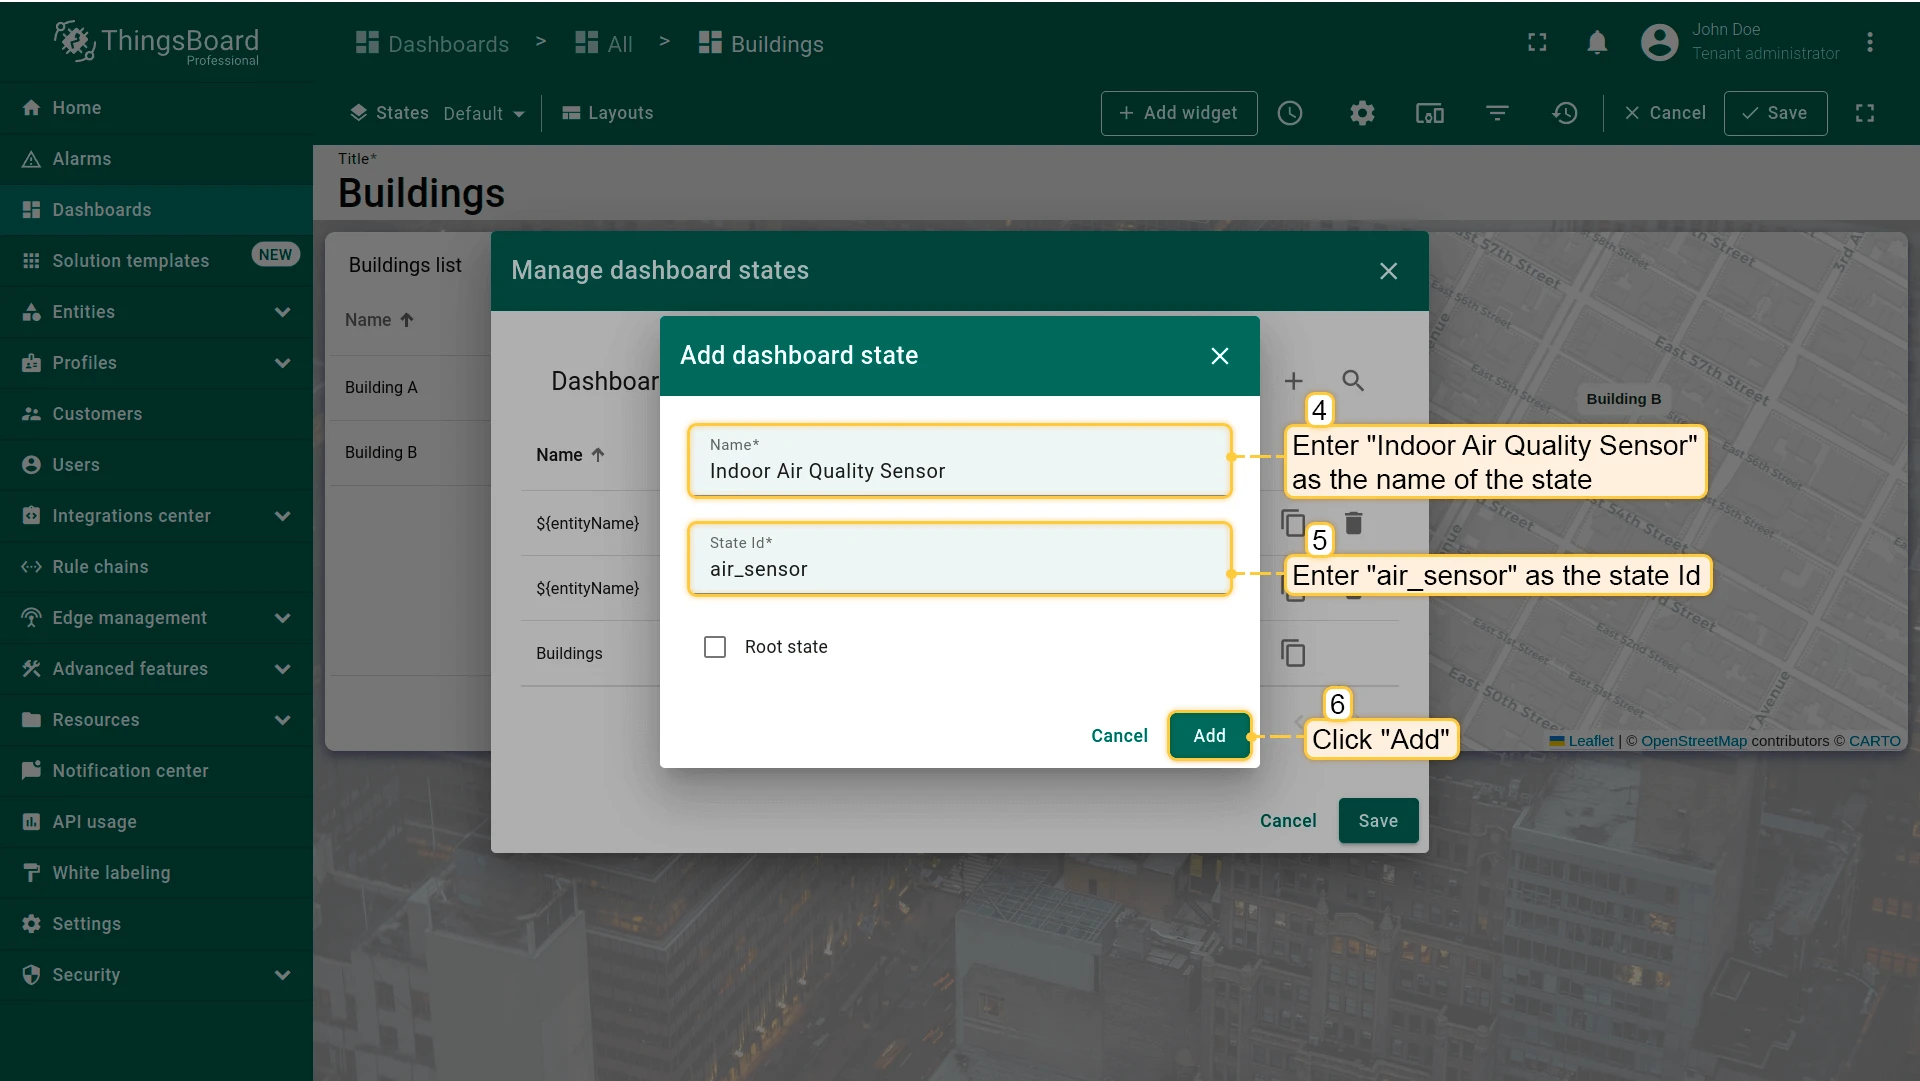
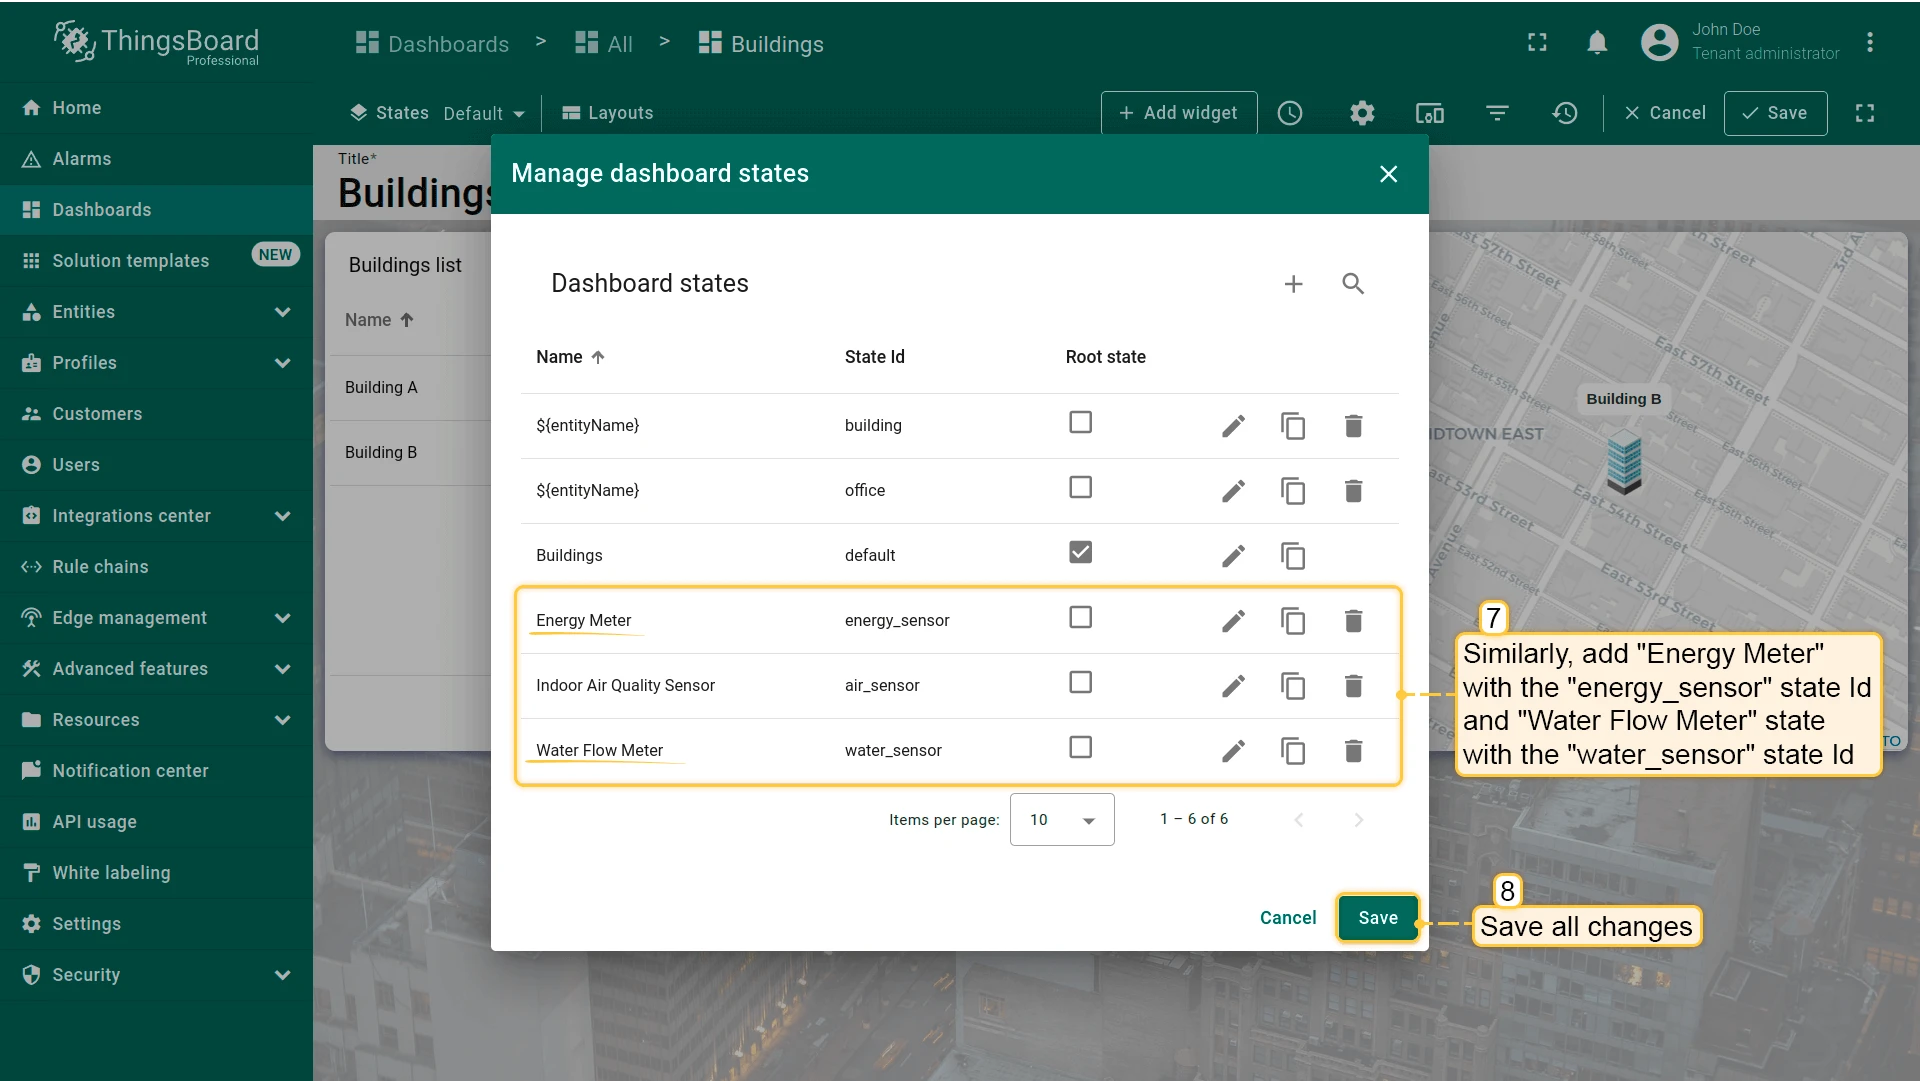
- Enter edit mode and click Manage dashboard states ⇾ +.
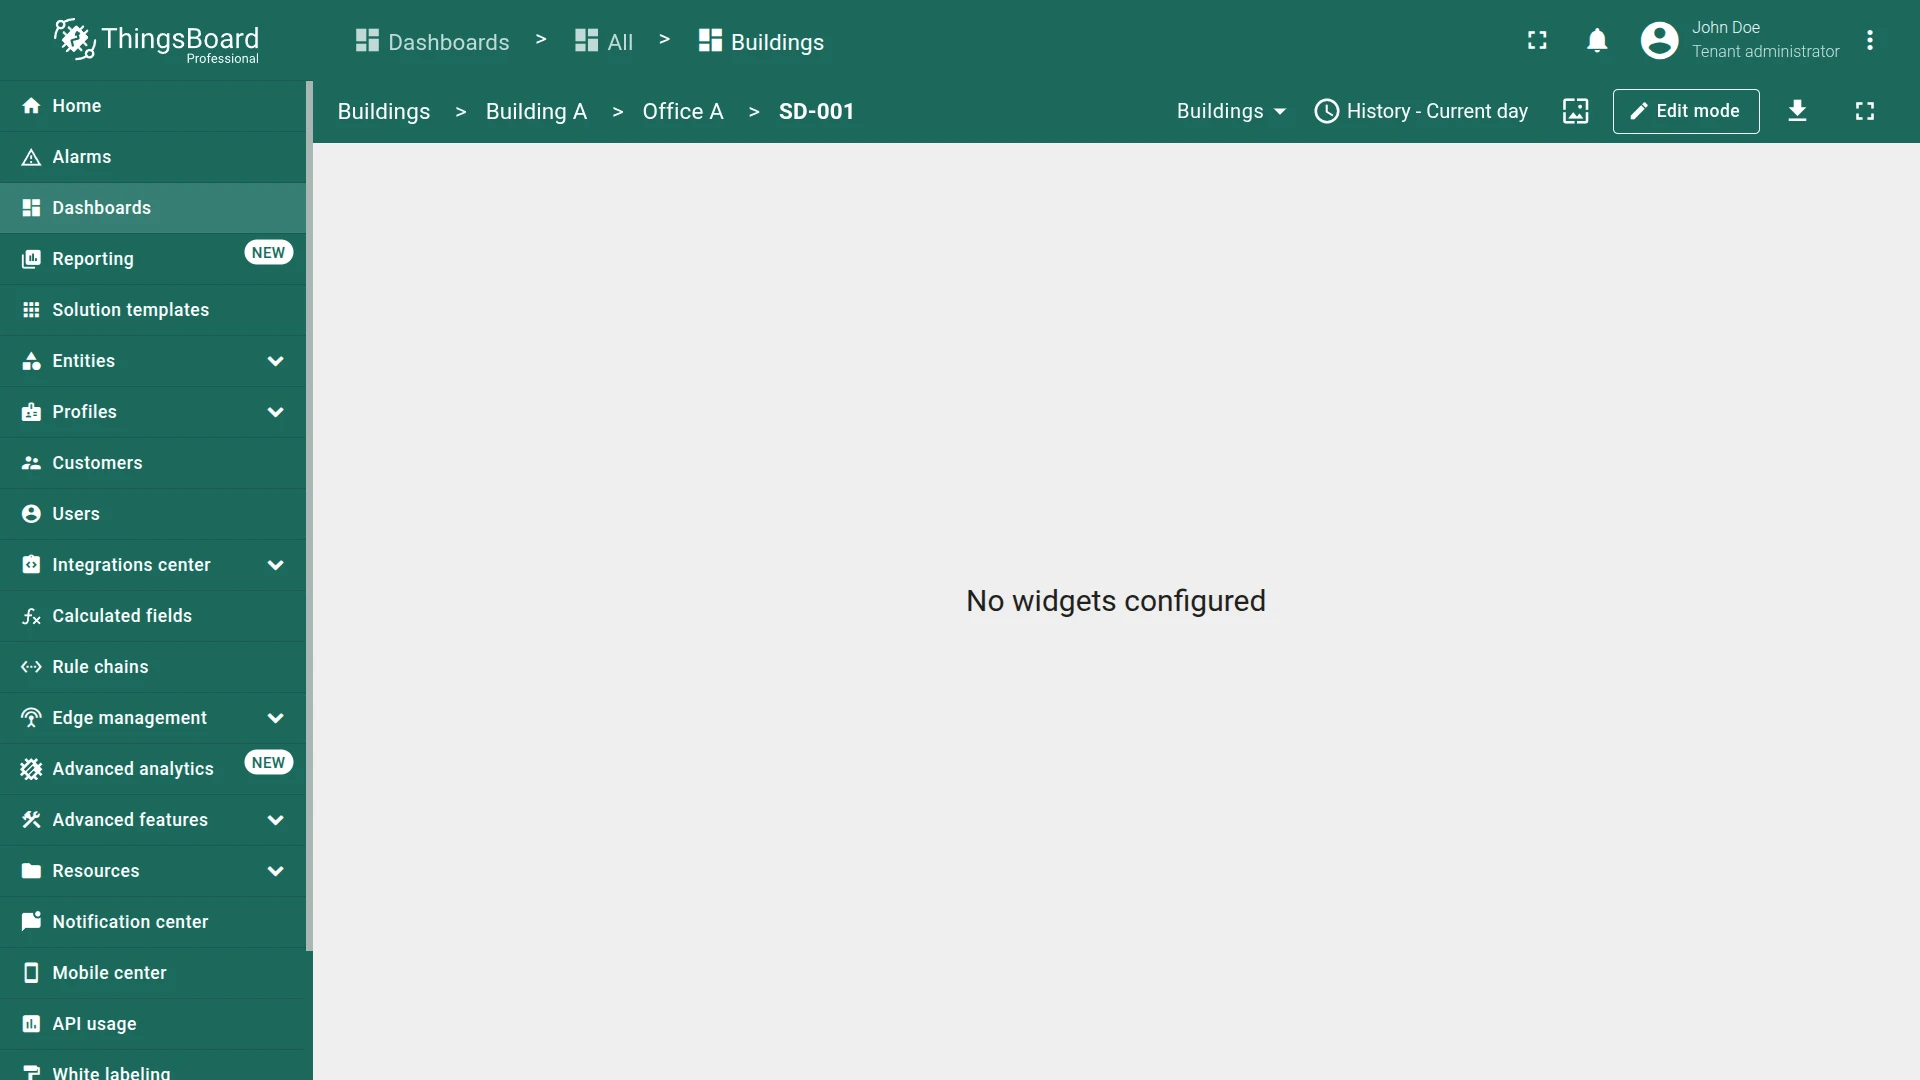
- Add state: name
${entityName}, IDair_sensor. Click Add. - Add state: name
${entityName}, IDenergy_sensor. Click Add. - Add state: name
${entityName}, IDwater_sensor. Click Add. - Click Save.
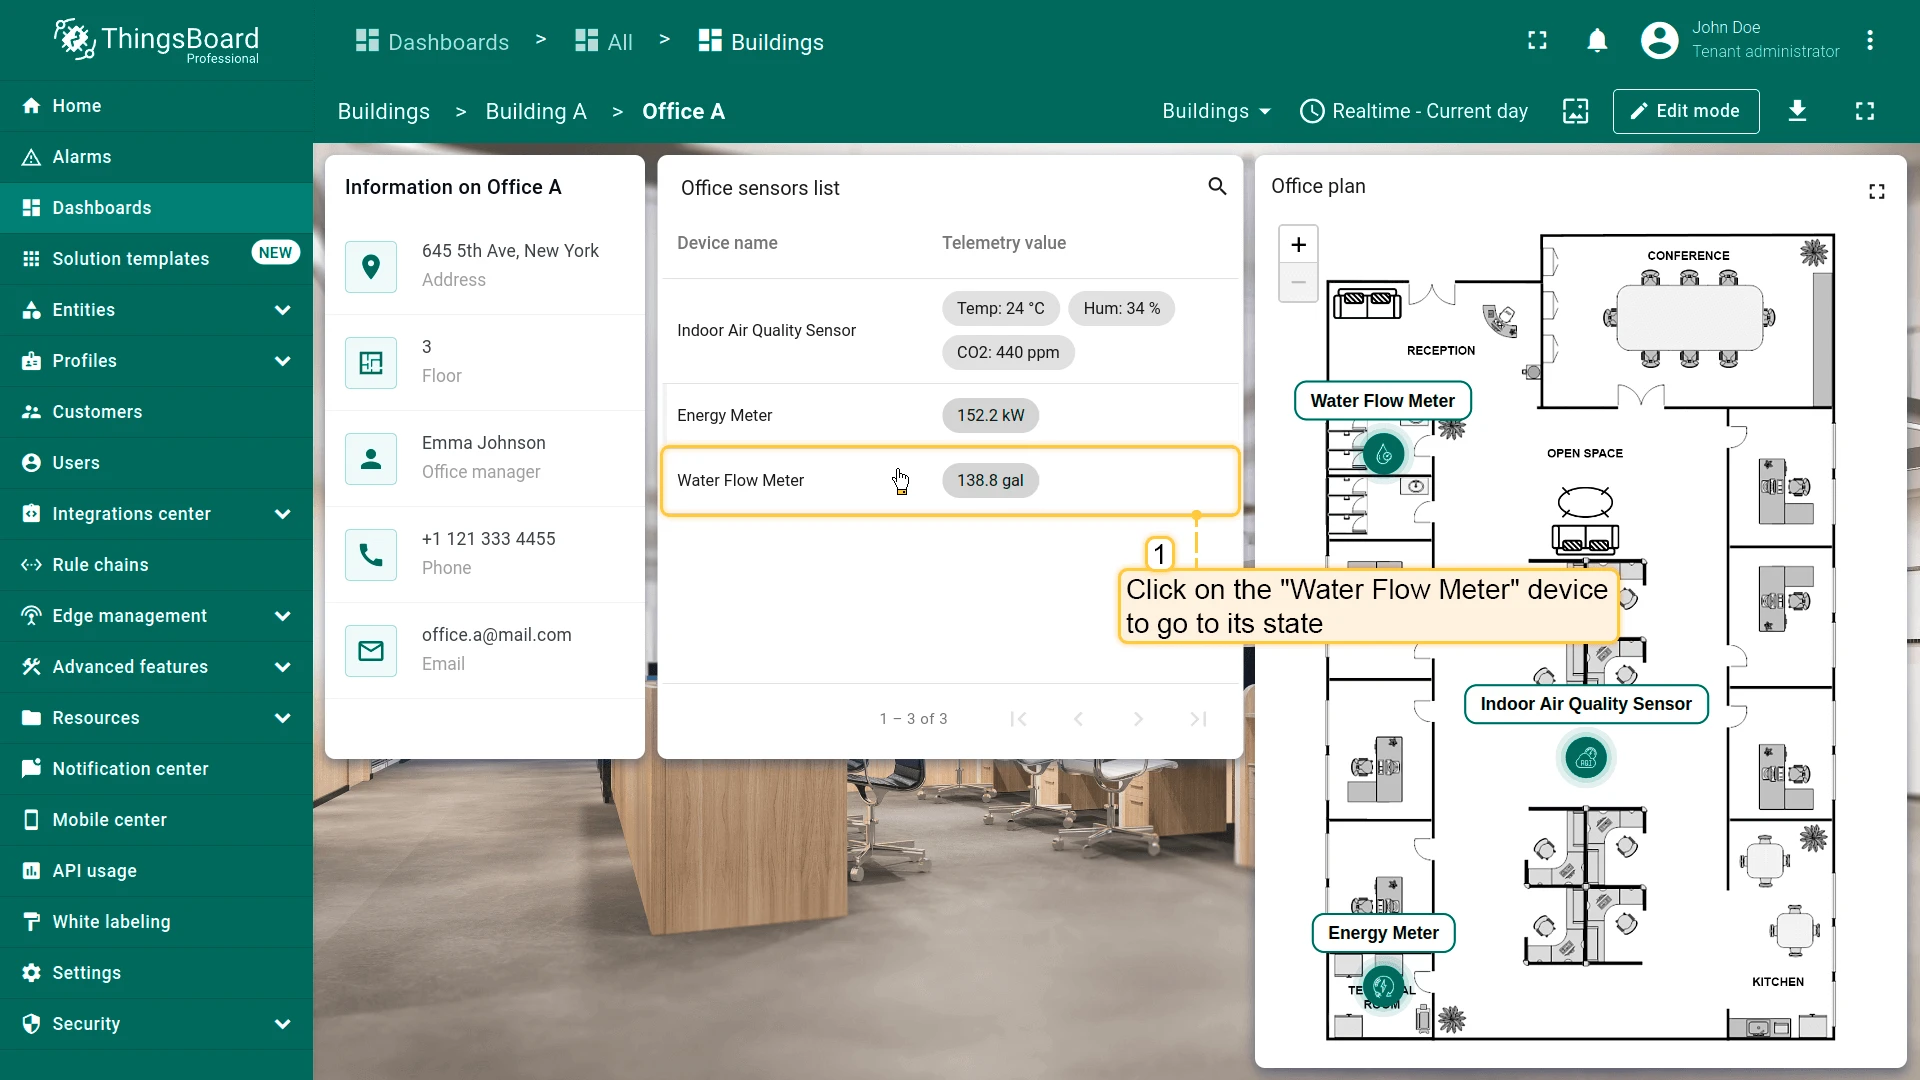
Step 3.5 Sensors List — Navigation to Device States
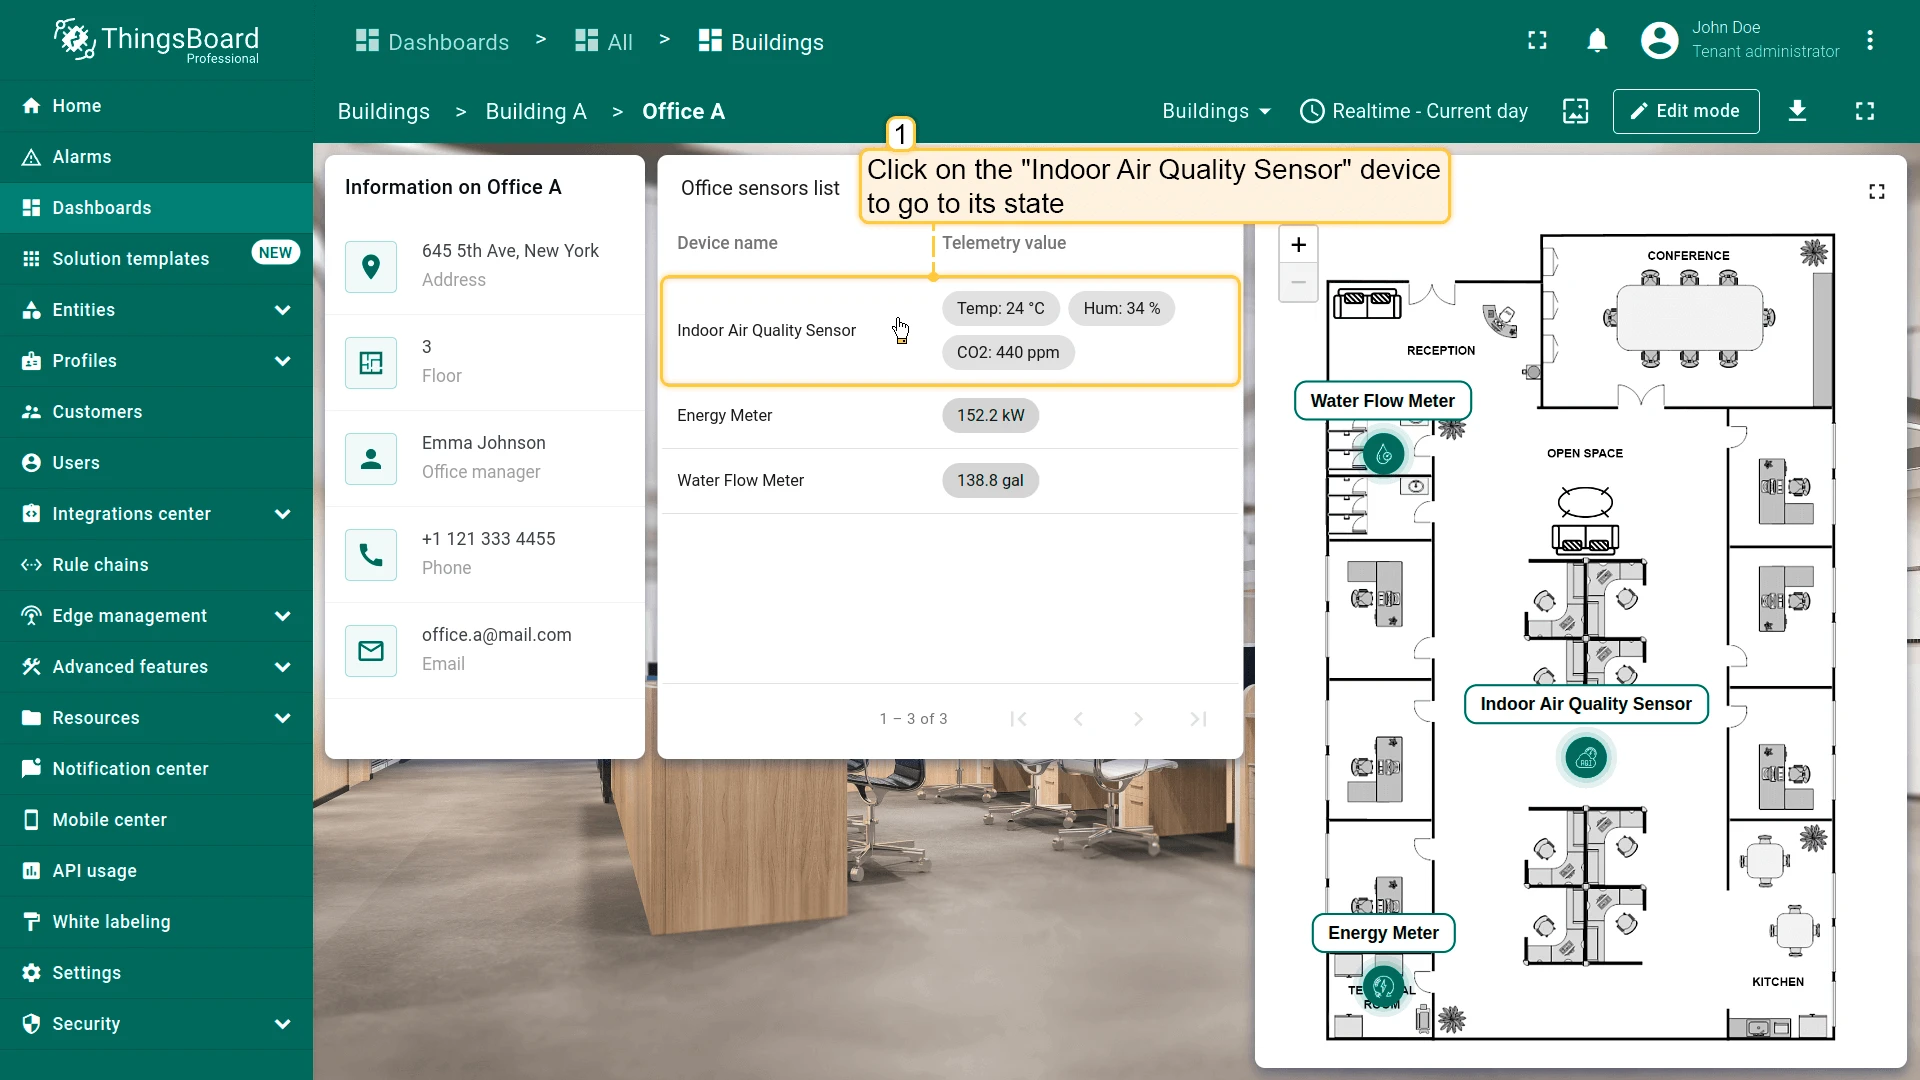
Section titled “Step 3.5 Sensors List — Navigation to Device States”Each device type has its own state (air_sensor, energy_sensor, water_sensor). Use a Custom action with on-row-click that reads the device type and routes to the correct state.
-
In the office state (edit mode), click the pencil icon on the Office sensors list widget.
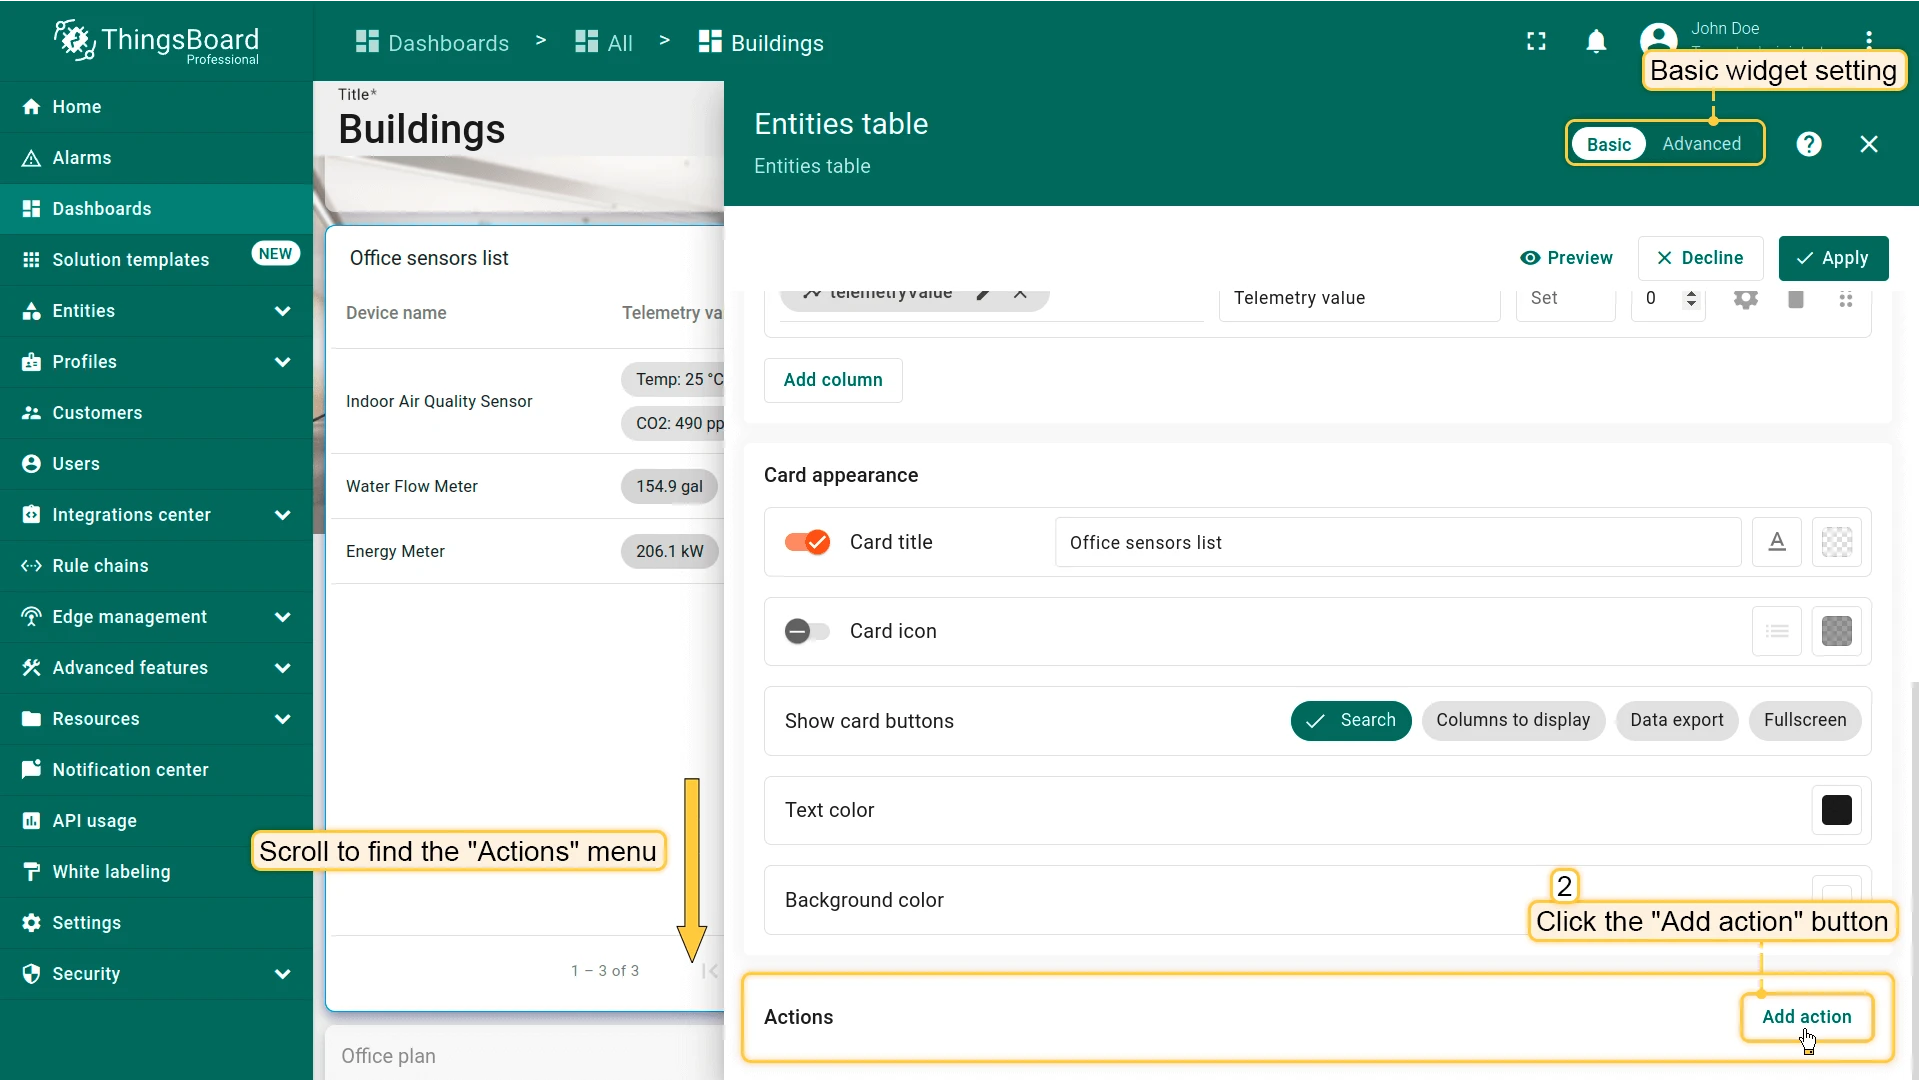
-
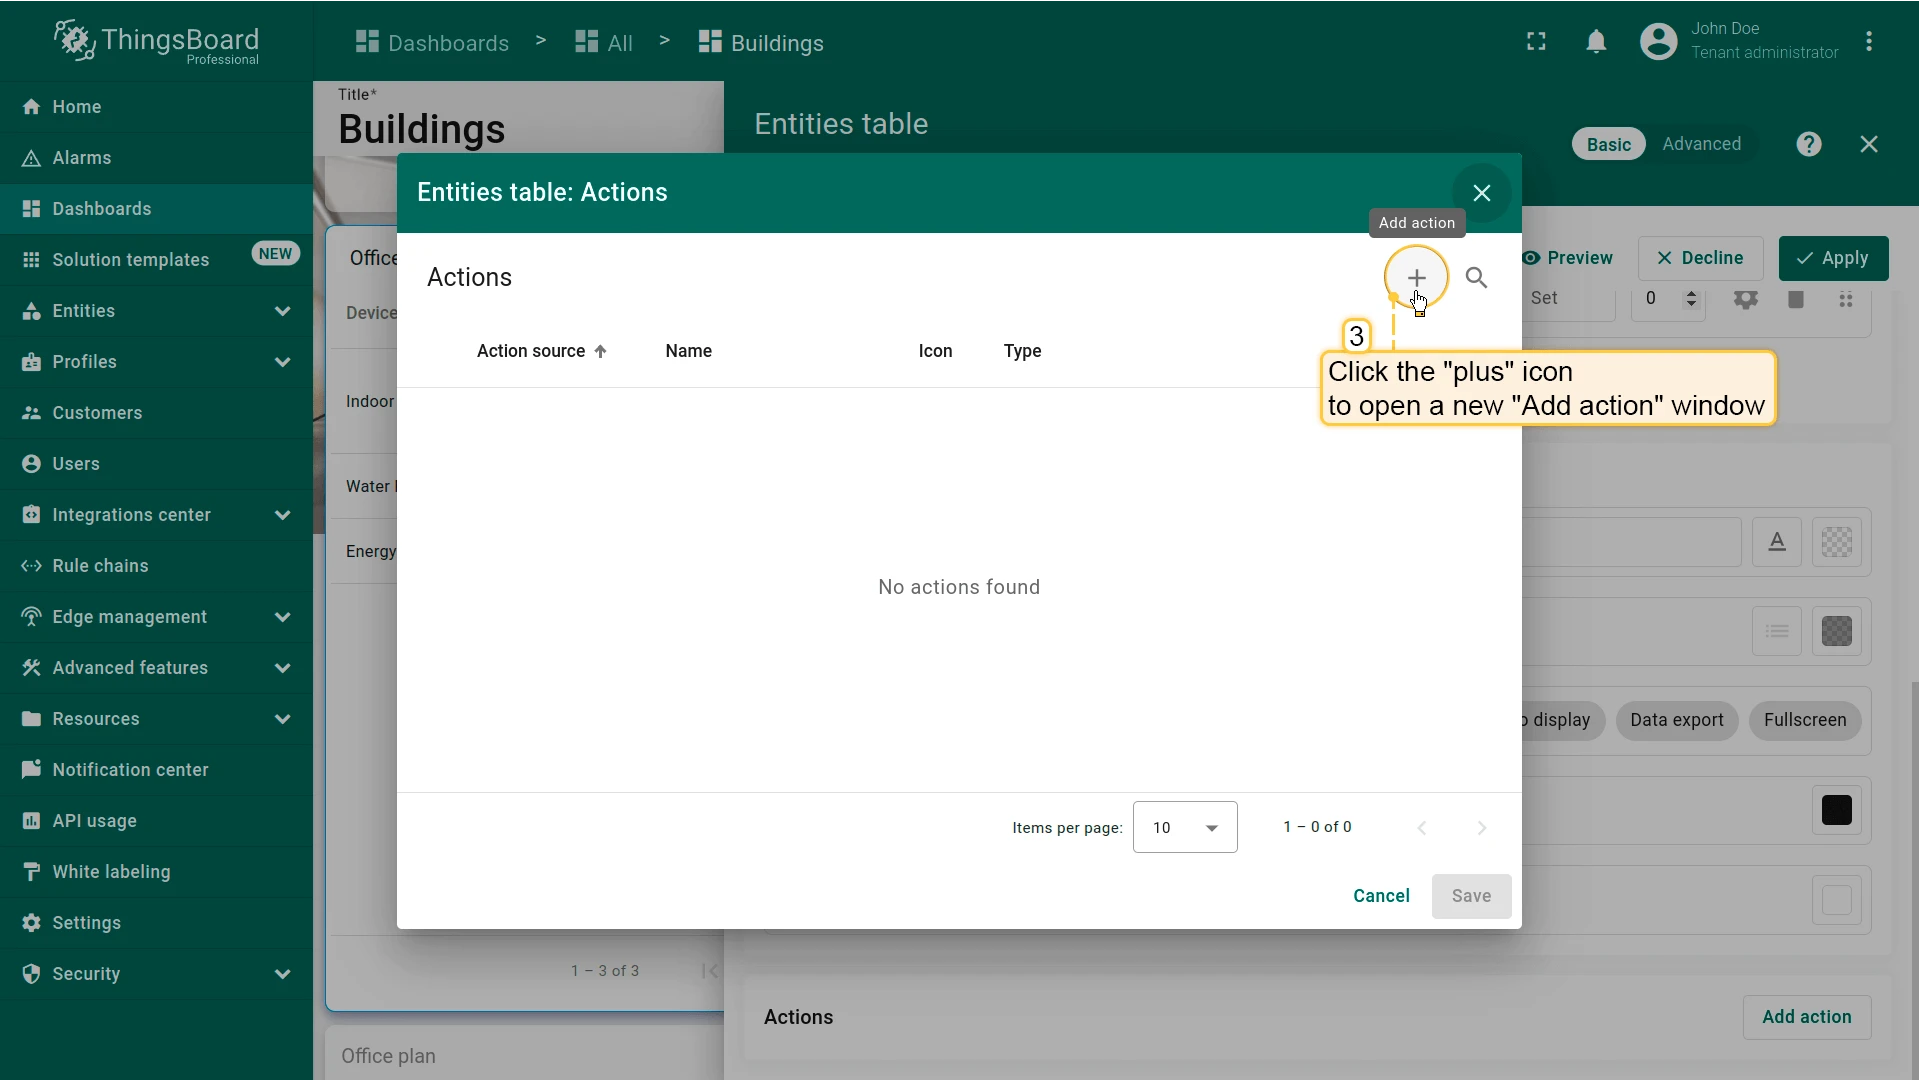
Scroll to Actions and click Add action ⇾ +.
-
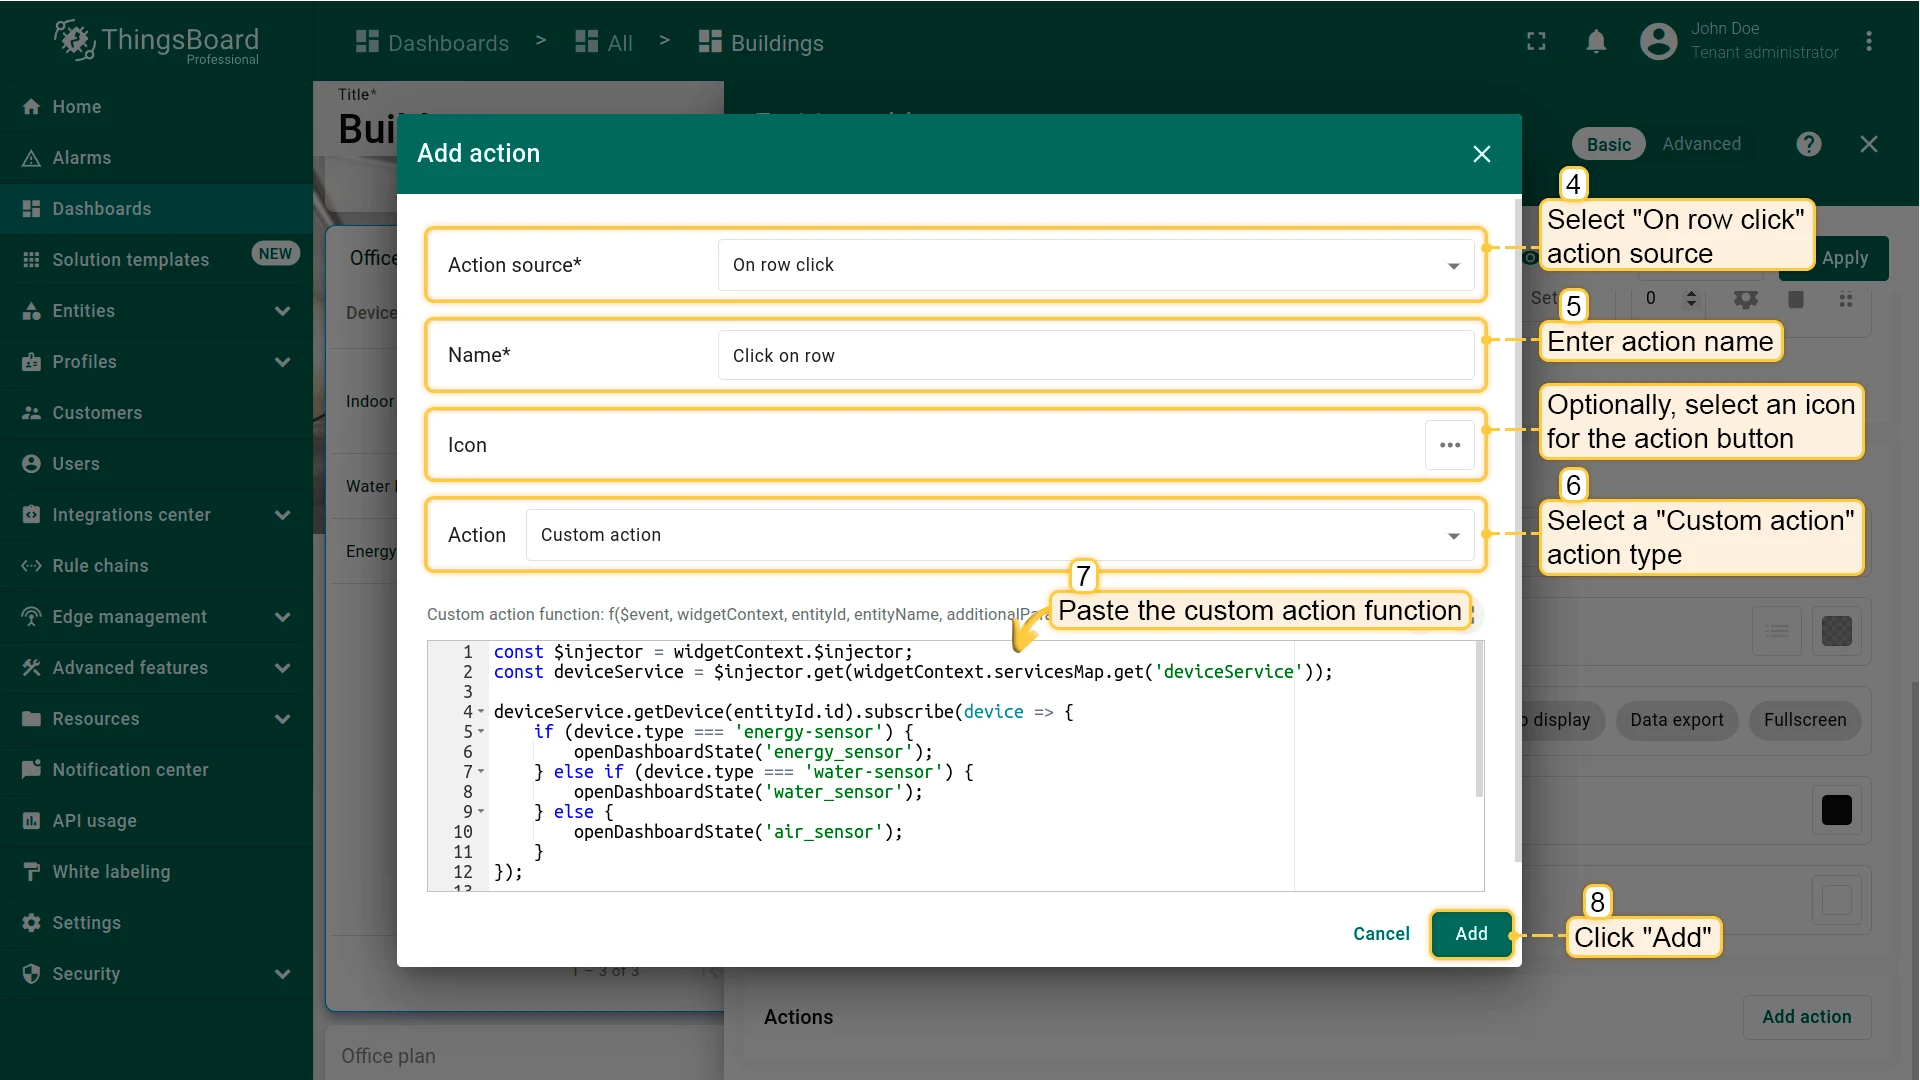
Set source to On row click and enter an action name (e.g.
go_to_device). -
Set action type to Custom action.
-
Paste the following function:
const $injector = widgetContext.$injector;const deviceService = $injector.get(widgetContext.servicesMap.get('deviceService'));deviceService.getDevice(entityId.id).subscribe(device => {if (device.type === 'energy-sensor') {openDashboardState('energy_sensor');} else if (device.type === 'water-sensor') {openDashboardState('water_sensor');} else {openDashboardState('air_sensor');}});function openDashboardState(stateId) {const params = {entityId: entityId,entityName: entityName};widgetContext.stateController.openState(stateId, params, false);} -
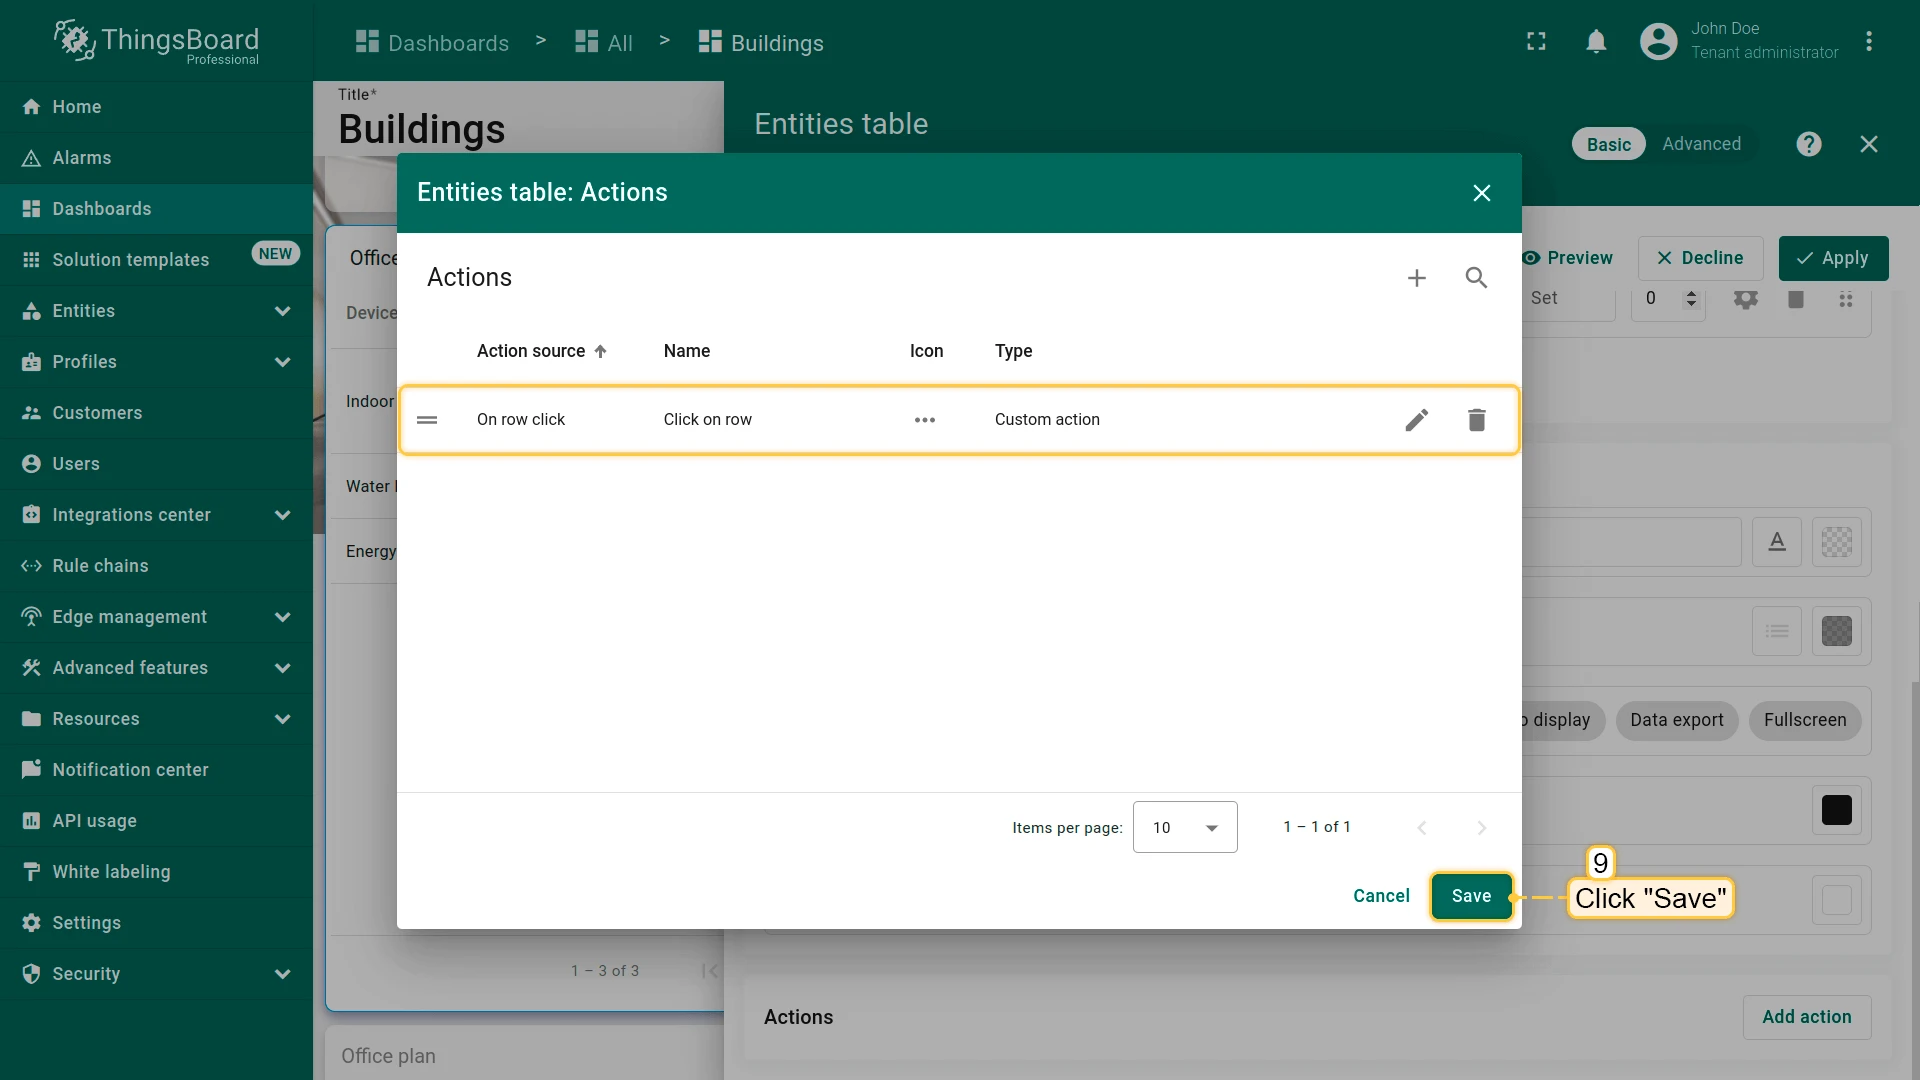
Click Add, review the action, then click Save.
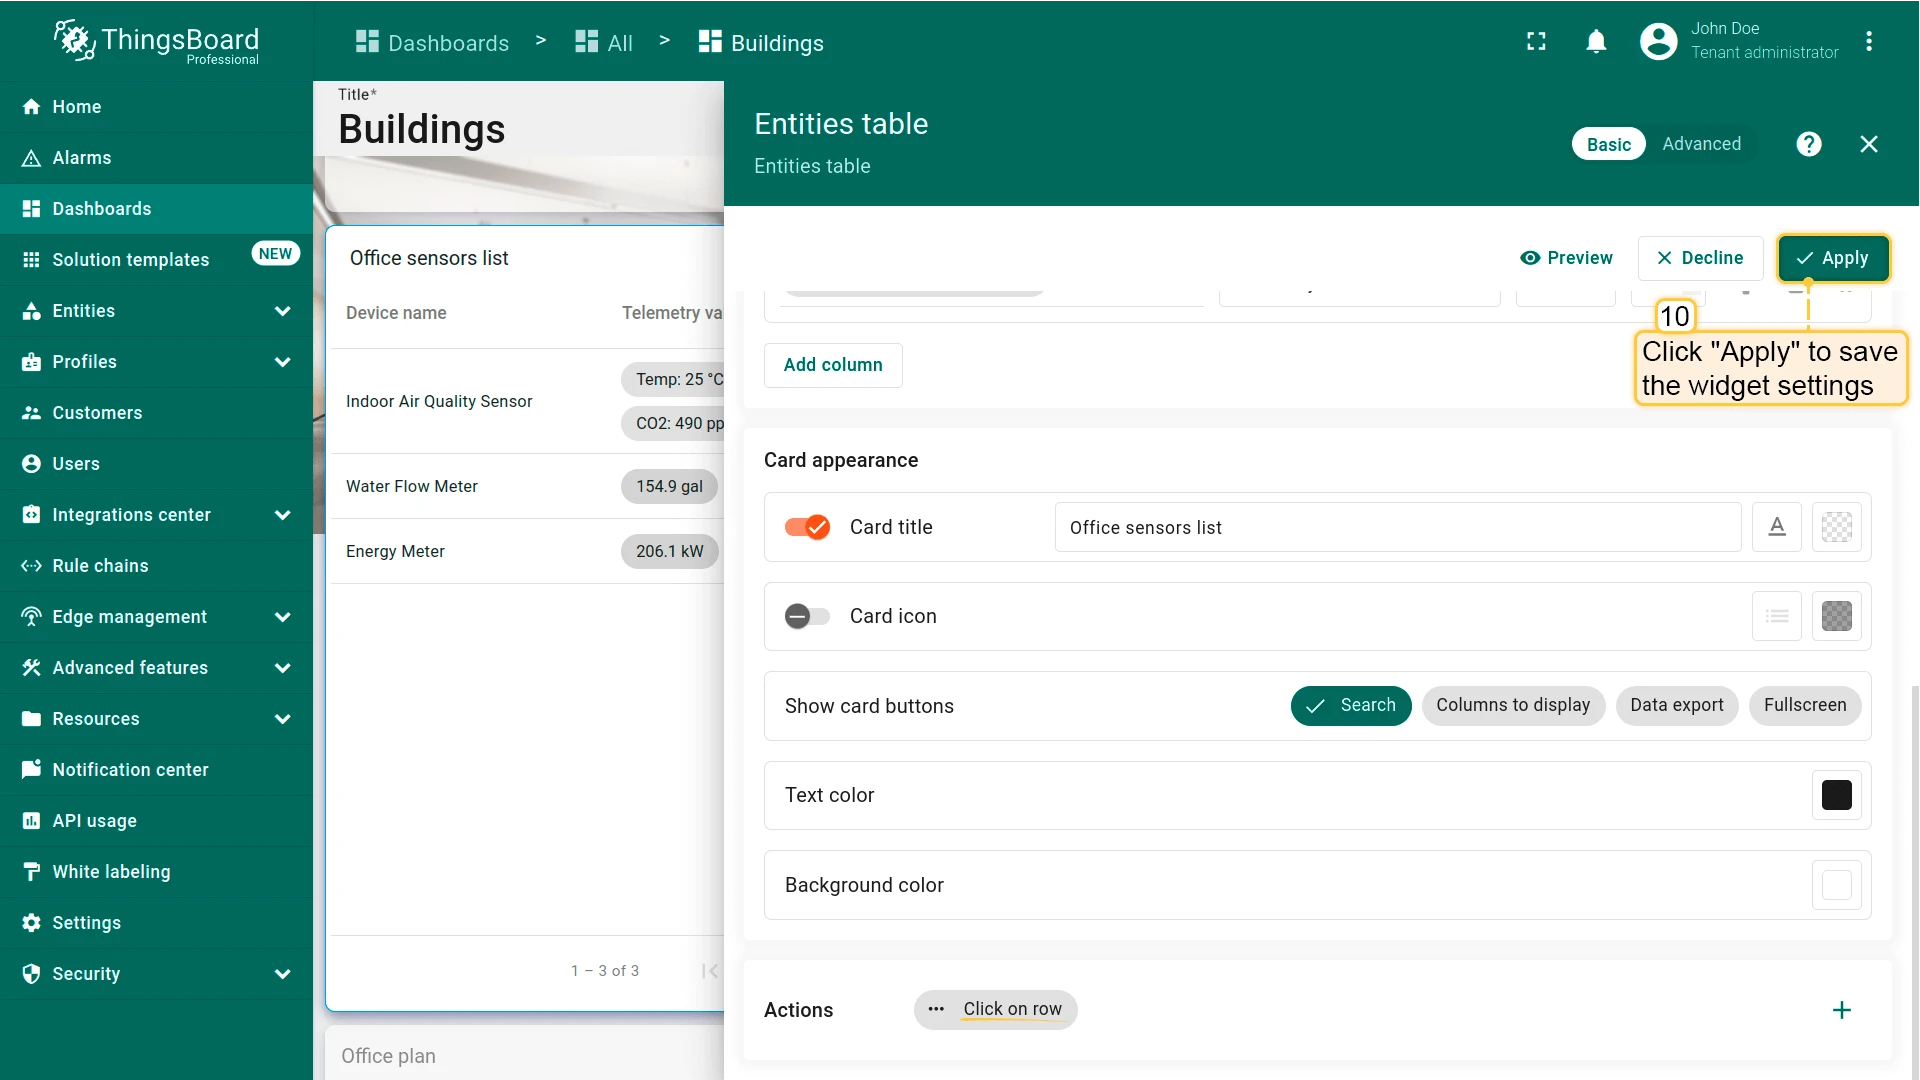
-
Click Apply, then save the dashboard.
Step 3.6 Image Map — Telemetry Tooltips and Navigation
Section titled “Step 3.6 Image Map — Telemetry Tooltips and Navigation”Update the Image Map widget: add telemetry keys and a custom tooltip showing device-specific readings, then add a Tooltip tag action with the same routing logic as the sensors list.
Add telemetry keys to the Image Map:
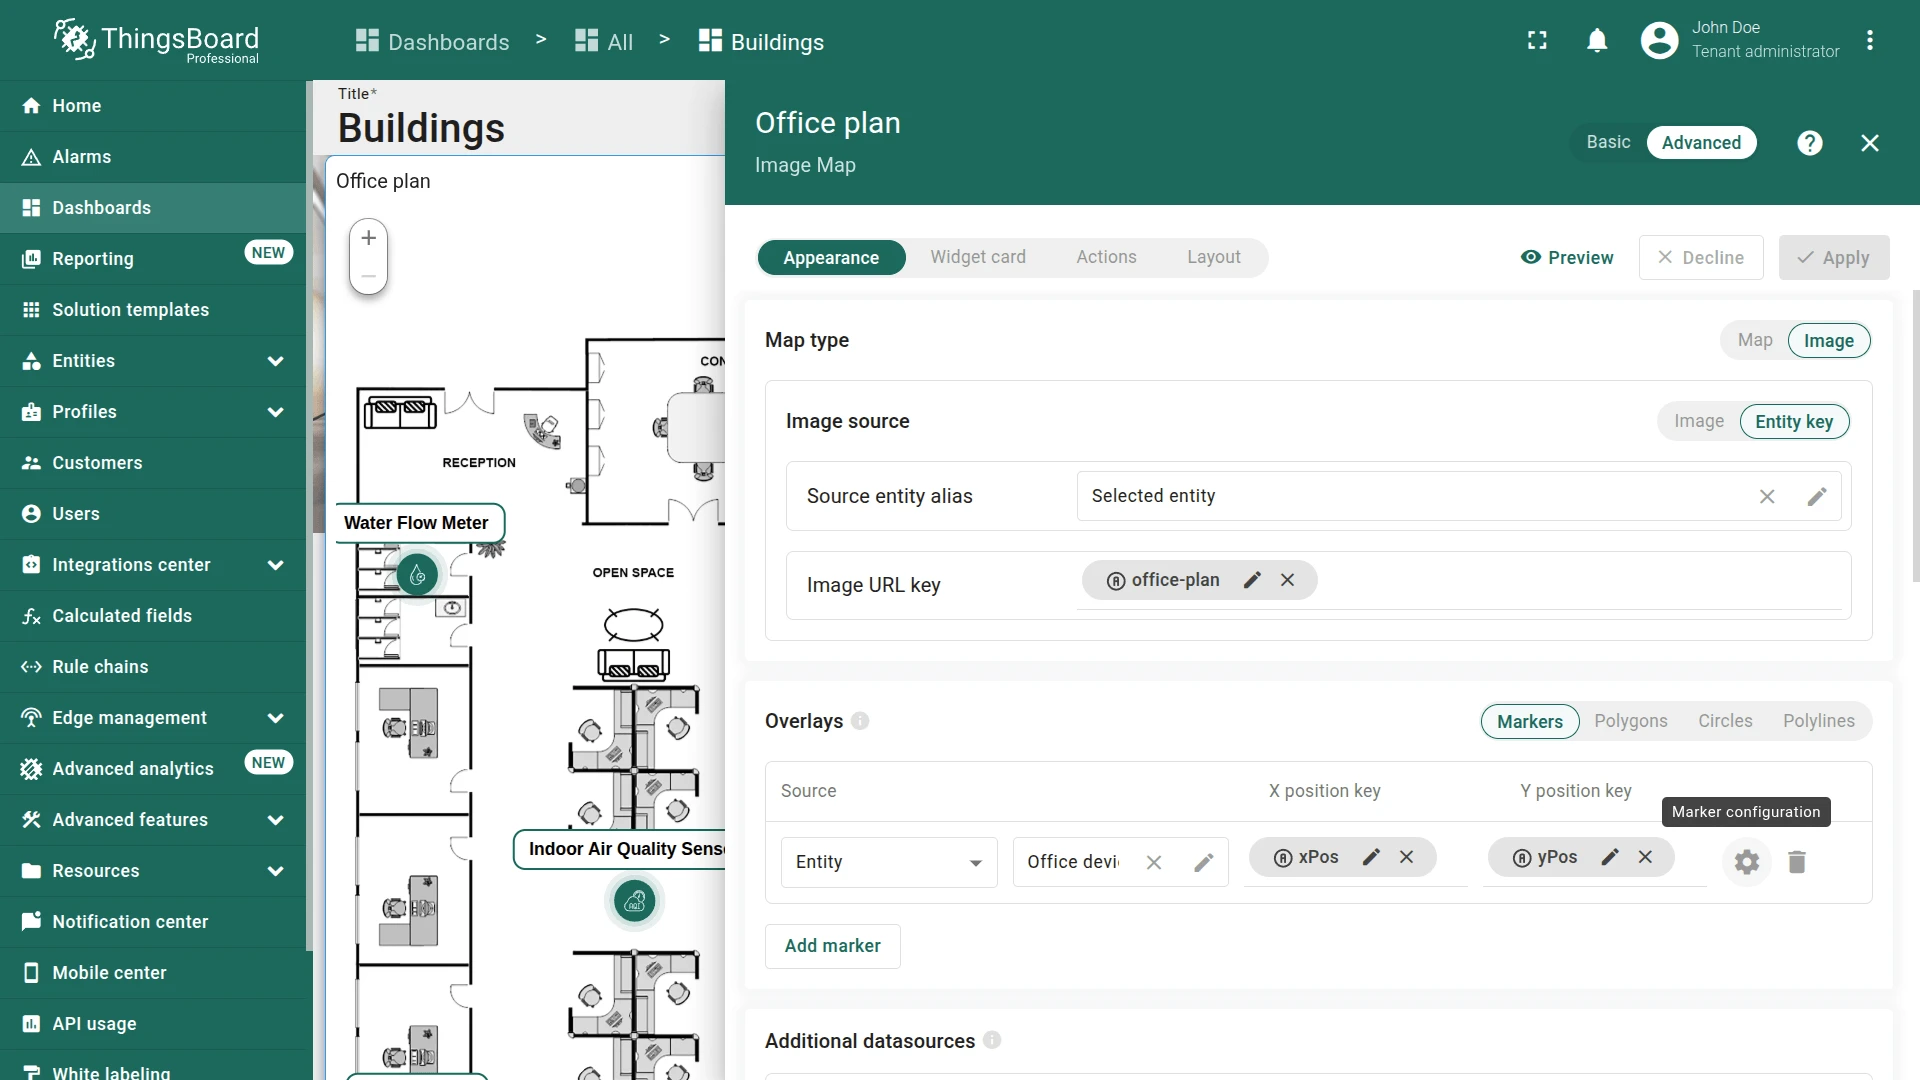
- In the office state (edit mode), click the pencil icon on the Image Map widget.
- In the Overlays -> Marker open marker configuration.
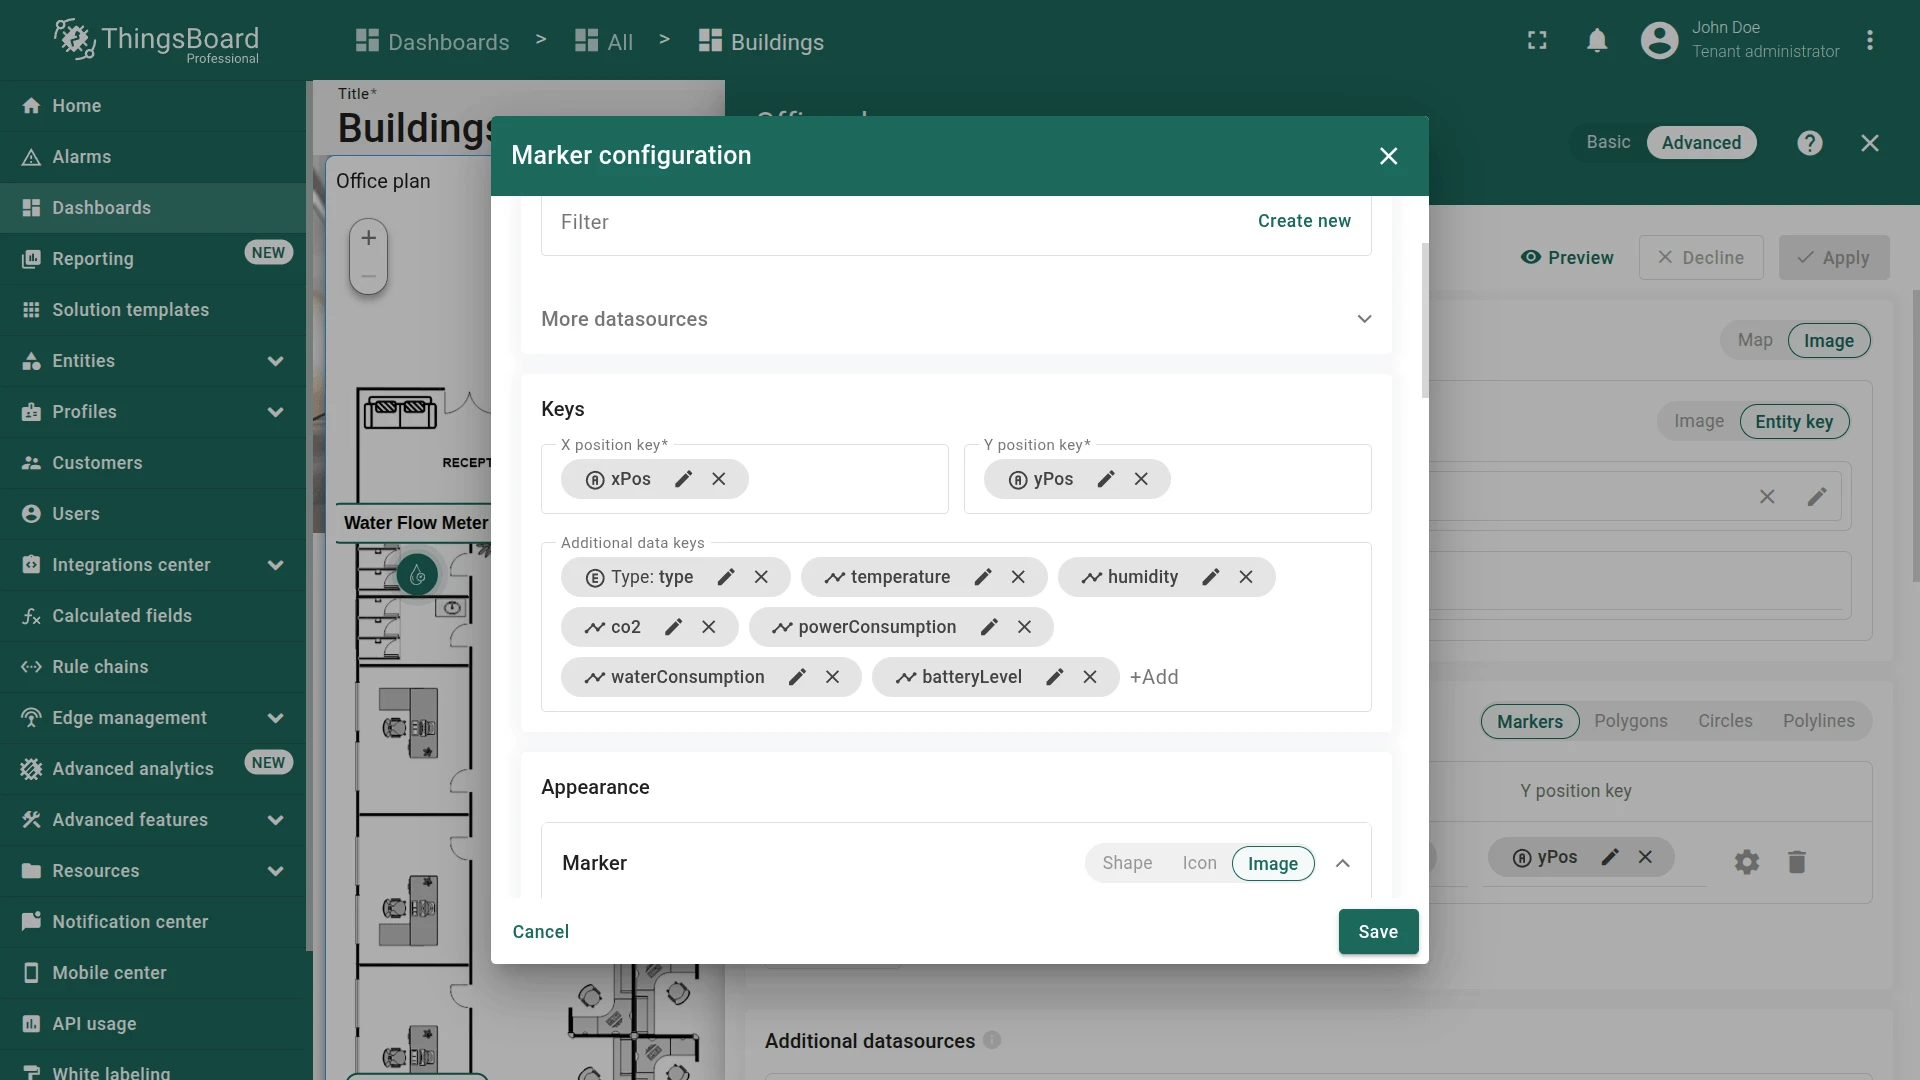
- Add additional data keys to the existing data source:
temperature,humidity,co2,powerConsumption,waterConsumption,batteryLevel,deviceType. - Edit the Tooltip:
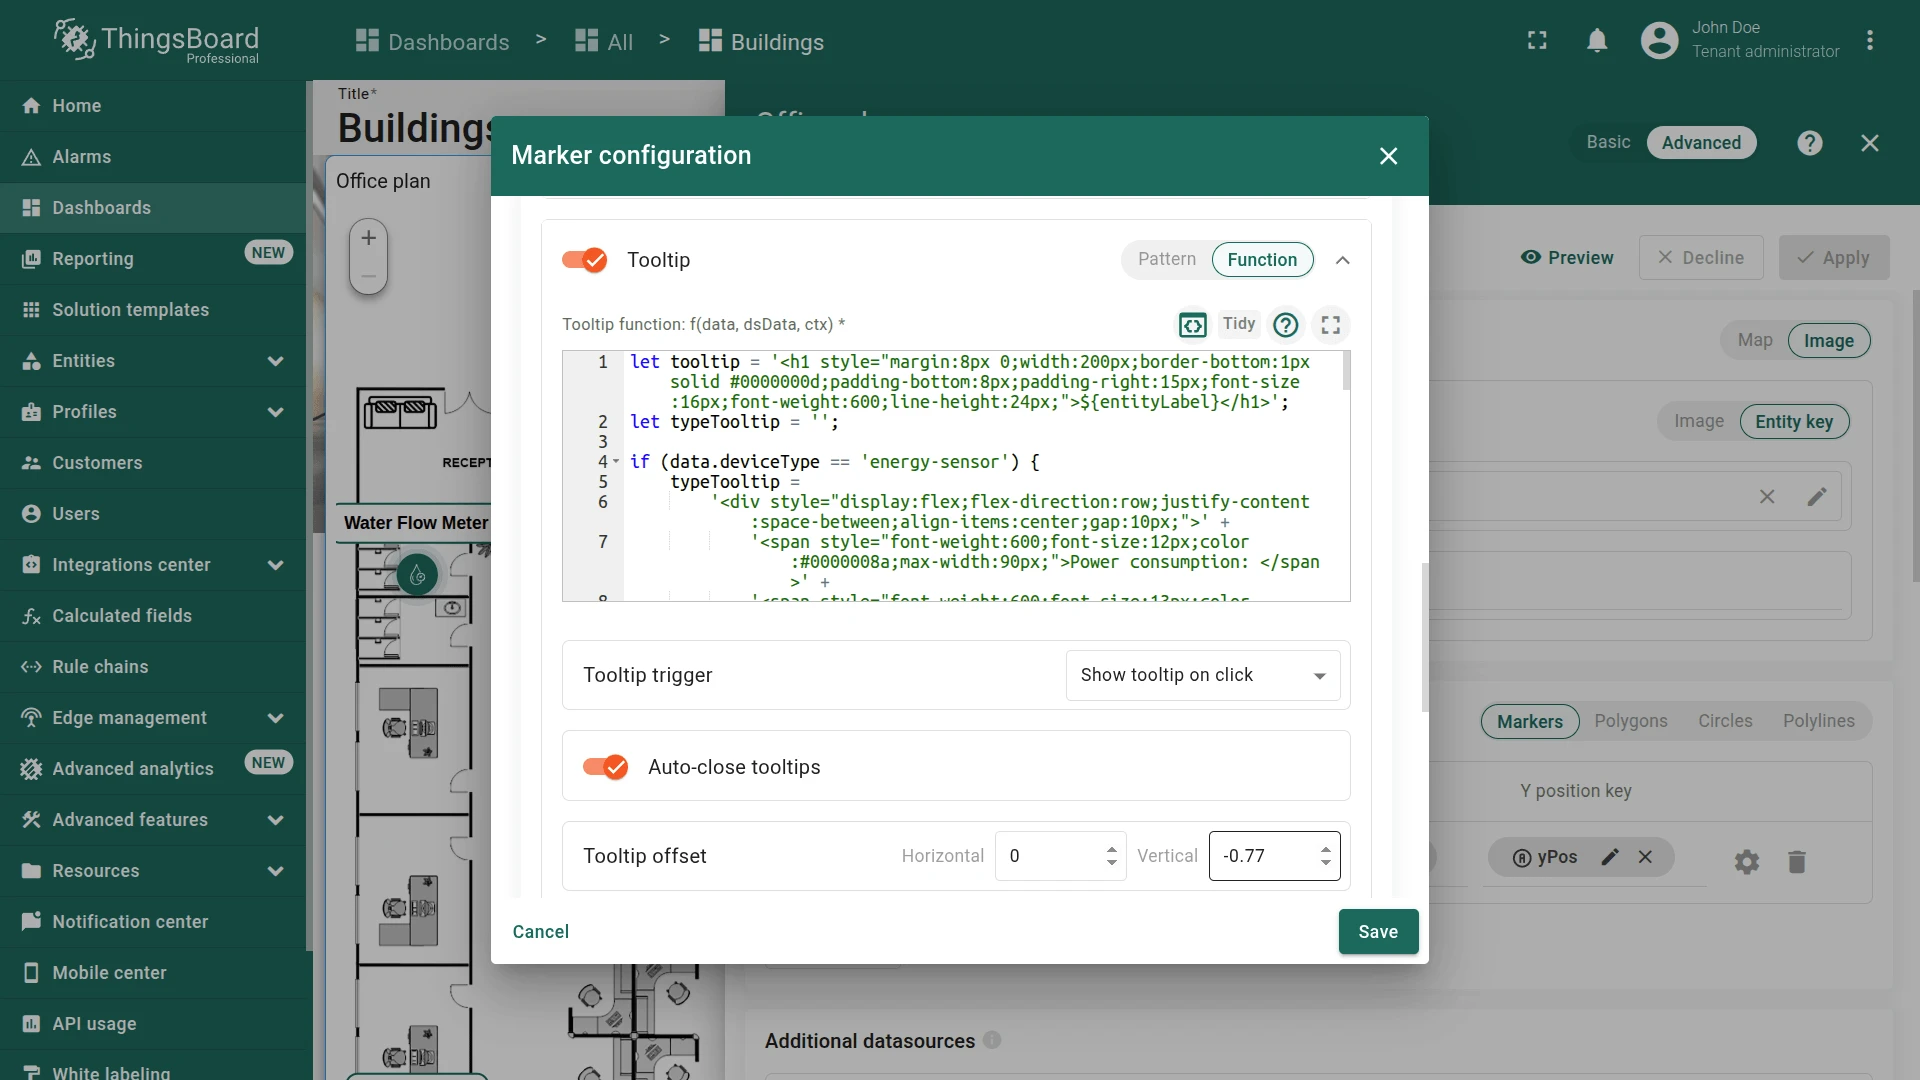
- Enable Use tooltip function
- Paste the following tooltip function:
let tooltip = '<h1 style="margin:8px 0;width:200px;border-bottom:1px solid #0000000d;padding-bottom:8px;padding-right:15px;font-size:16px;font-weight:600;line-height:24px;">${entityLabel}</h1>';let typeTooltip = '';if (data.deviceType == 'energy-sensor') {typeTooltip ='<div style="display:flex;flex-direction:row;justify-content:space-between;align-items:center;gap:10px;">' +'<span style="font-weight:600;font-size:12px;color:#0000008a;max-width:90px;">Power consumption: </span>' +'<span style="font-weight:600;font-size:13px;color:#000000de">${powerConsumption:1} kW</span>' +'</div>';typeTooltip += '<div style="margin-top:17px;text-align:center;background:var(--tb-primary-50,#87CEEB);border-radius:6px;"><link-act name="sensor_details">Details ></link-act></div>';} else if (data.deviceType == 'air-sensor') {typeTooltip ='<div style="display:flex;flex-direction:column;">' +'<div style="display:flex;flex-direction:row;justify-content:space-between;align-items:center;gap:10px;">' +'<span style="font-weight:600;font-size:12px;color:#0000008a;max-width:90px;">Temperature: </span>' +'<span style="font-weight:600;font-size:13px;color:#000000de">${temperature:0} °C</span>' +'</div>' +'<div style="display:flex;flex-direction:row;justify-content:space-between;align-items:center;gap:10px;">' +'<span style="font-weight:600;font-size:12px;color:#0000008a;max-width:90px;">Humidity: </span>' +'<span style="font-weight:600;font-size:13px;color:#000000de">${humidity:0} %</span>' +'</div>' +'<div style="display:flex;flex-direction:row;justify-content:space-between;align-items:center;gap:10px;">' +'<span style="font-weight:600;font-size:12px;color:#0000008a;max-width:90px;">CO2: </span>' +'<span style="font-weight:600;font-size:13px;color:#000000de">${co2:0} ppm</span>' +'</div>' +'</div>';typeTooltip += '<div style="margin-top:17px;text-align:center;background:var(--tb-primary-50,#87CEEB);border-radius:6px;"><link-act name="sensor_details">Details ></link-act></div>';} else if (data.deviceType == 'water-sensor') {typeTooltip ='<div style="display:flex;flex-direction:column;">' +'<div style="display:flex;flex-direction:row;justify-content:space-between;align-items:center;gap:10px;">' +'<span style="font-weight:600;font-size:12px;color:#0000008a;max-width:90px;">Water consumption: </span>' +'<span style="font-weight:600;font-size:13px;color:#000000de">${waterConsumption:1} gal</span>' +'</div>' +'<div style="display:flex;flex-direction:row;justify-content:space-between;align-items:center;gap:10px;">' +'<span style="font-weight:600;font-size:12px;color:#0000008a;max-width:90px;">Battery Level: </span>' +'<span style="font-weight:600;font-size:13px;color:#000000de">${batteryLevel:0} %</span>' +'</div>' +'</div>';typeTooltip += '<div style="margin-top:17px;text-align:center;background:var(--tb-primary-50,#87CEEB);border-radius:6px;"><link-act name="sensor_details">Details ></link-act></div>';}return tooltip + typeTooltip;
-
Set the Tooltip Y offset to
-0.77. -
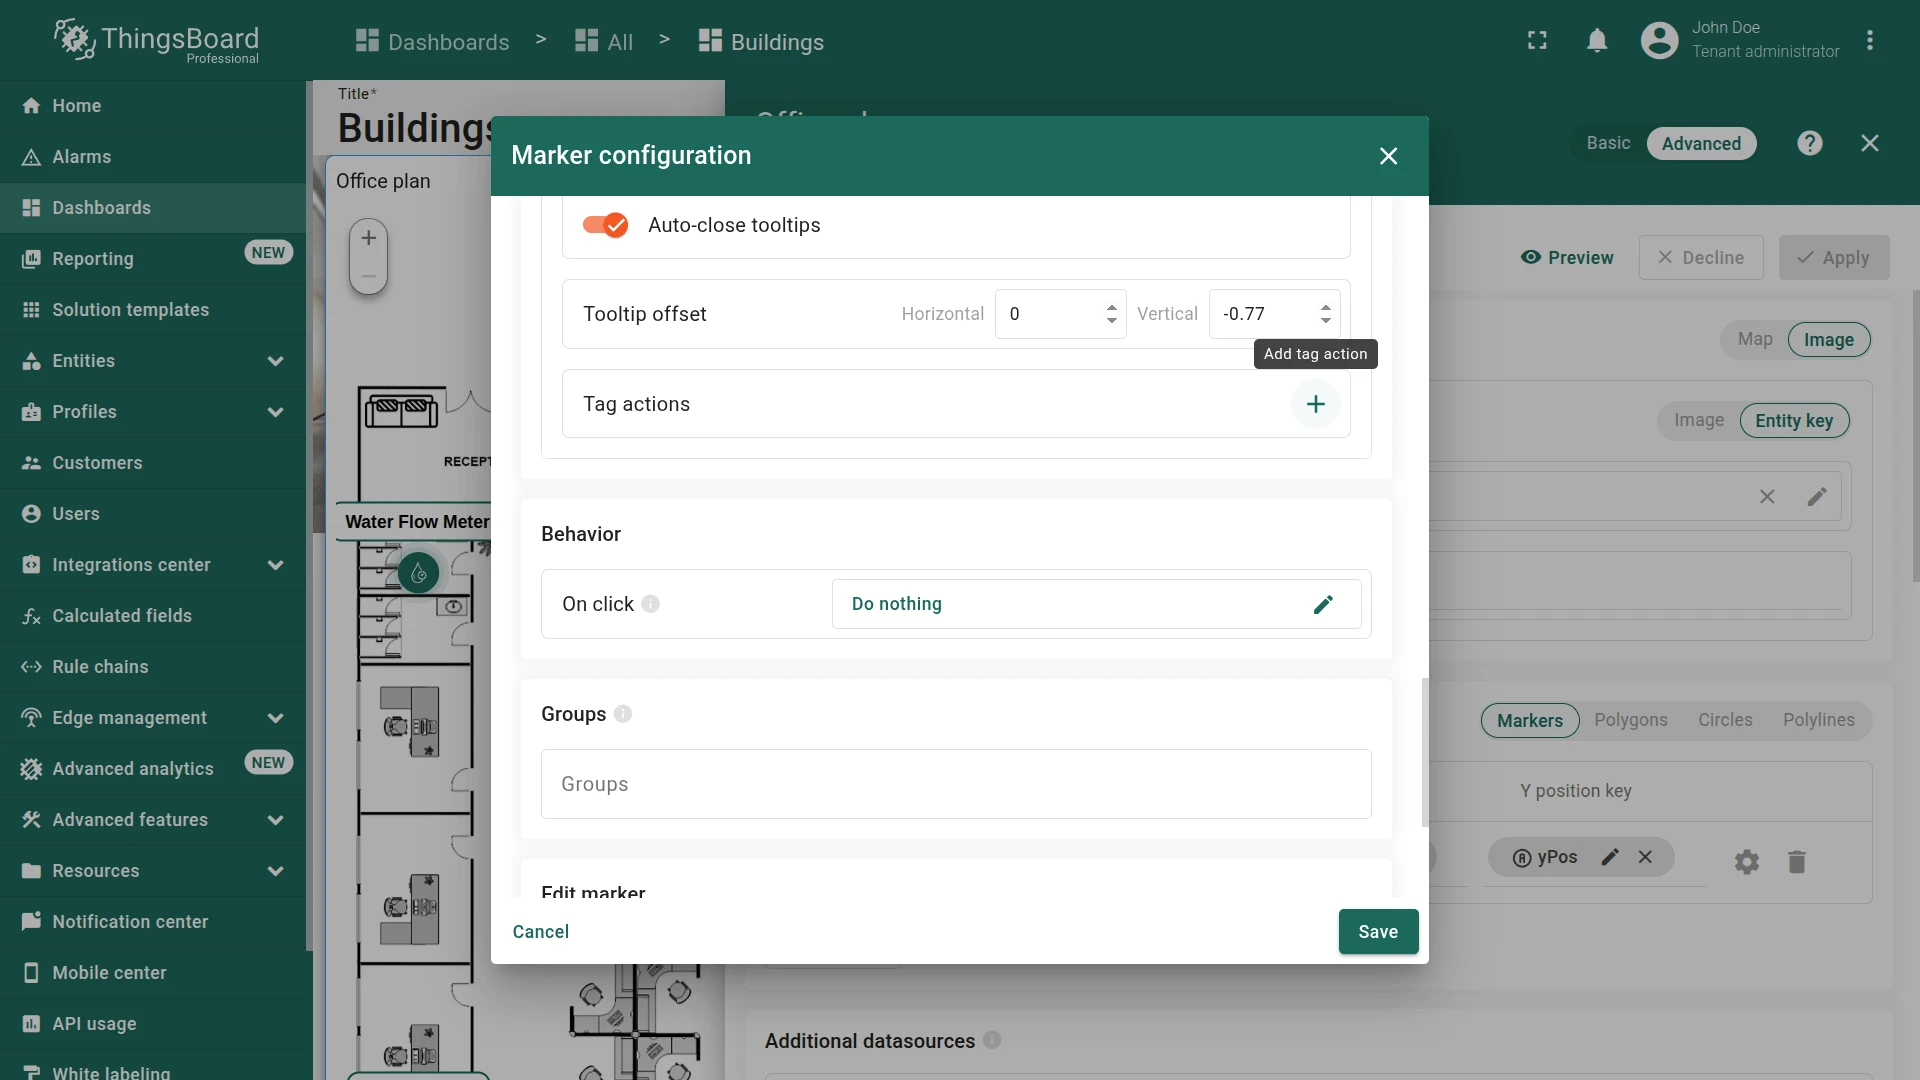
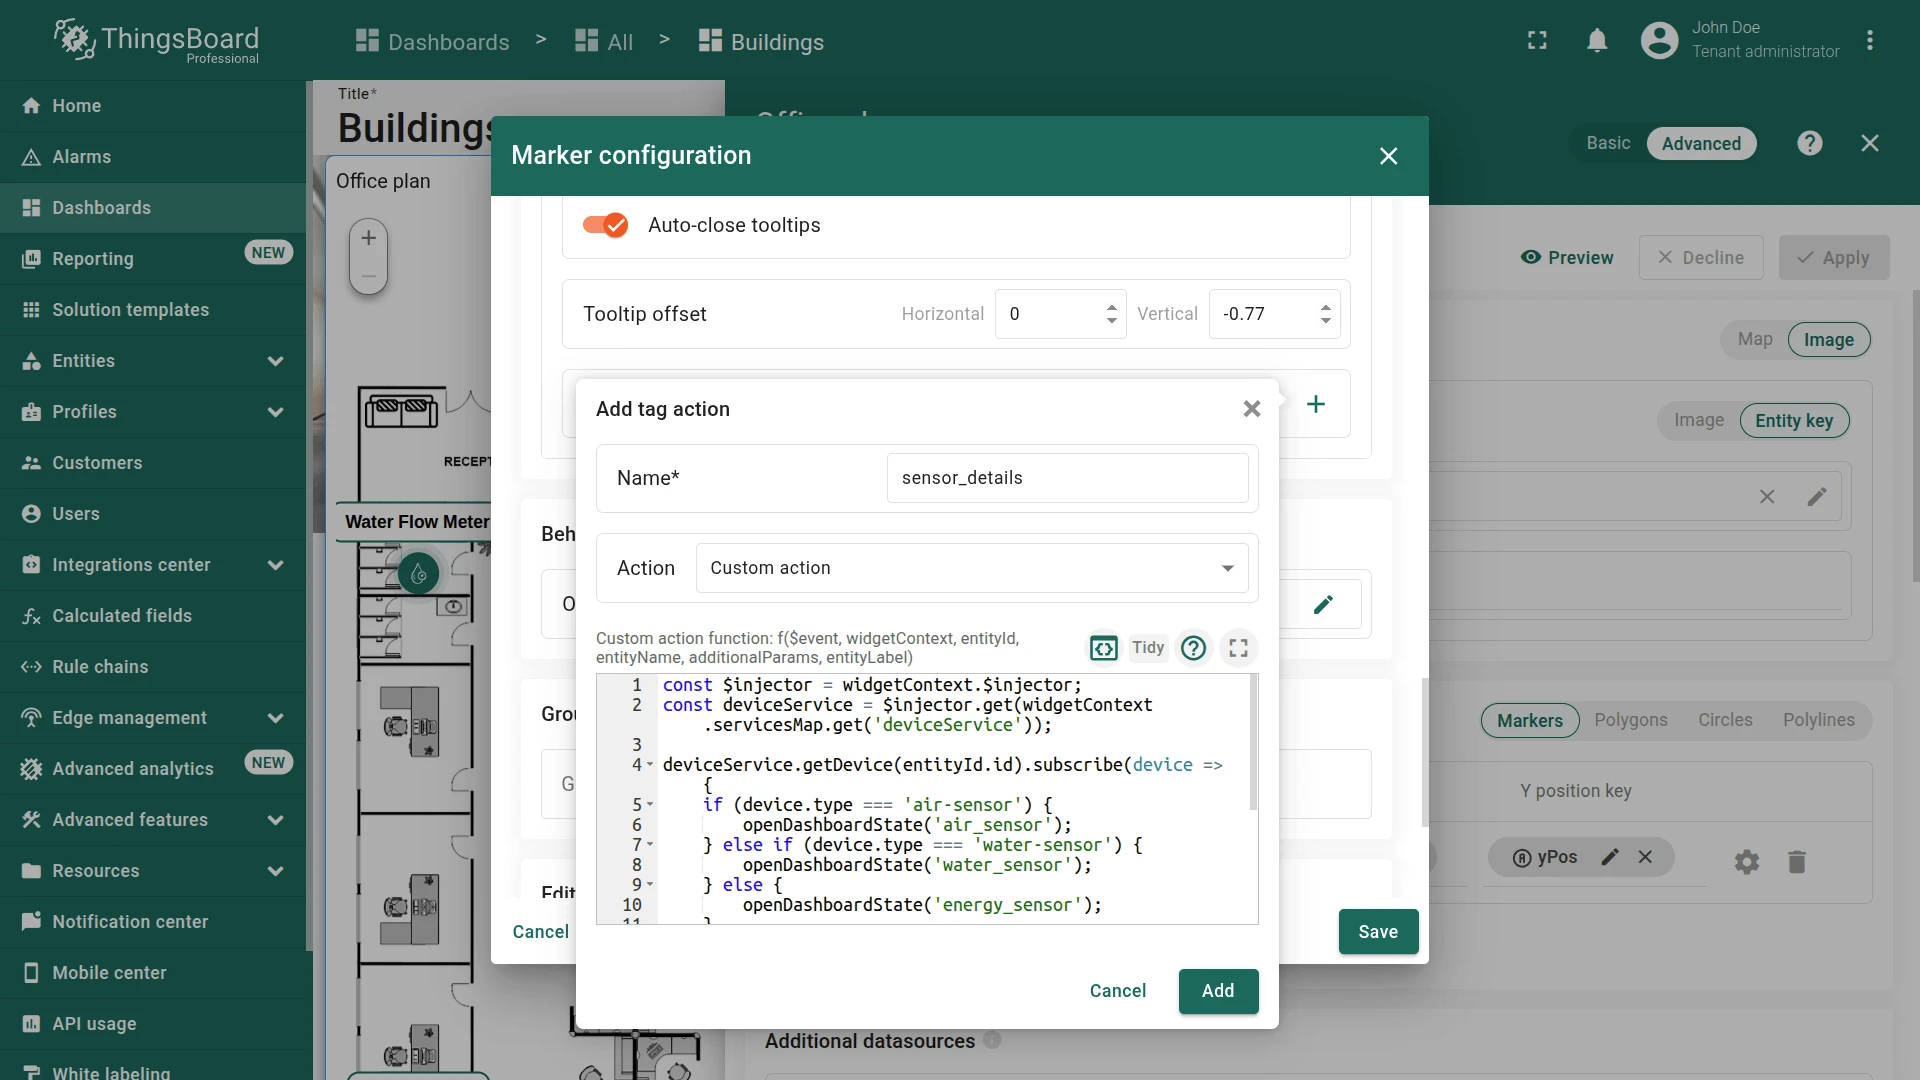
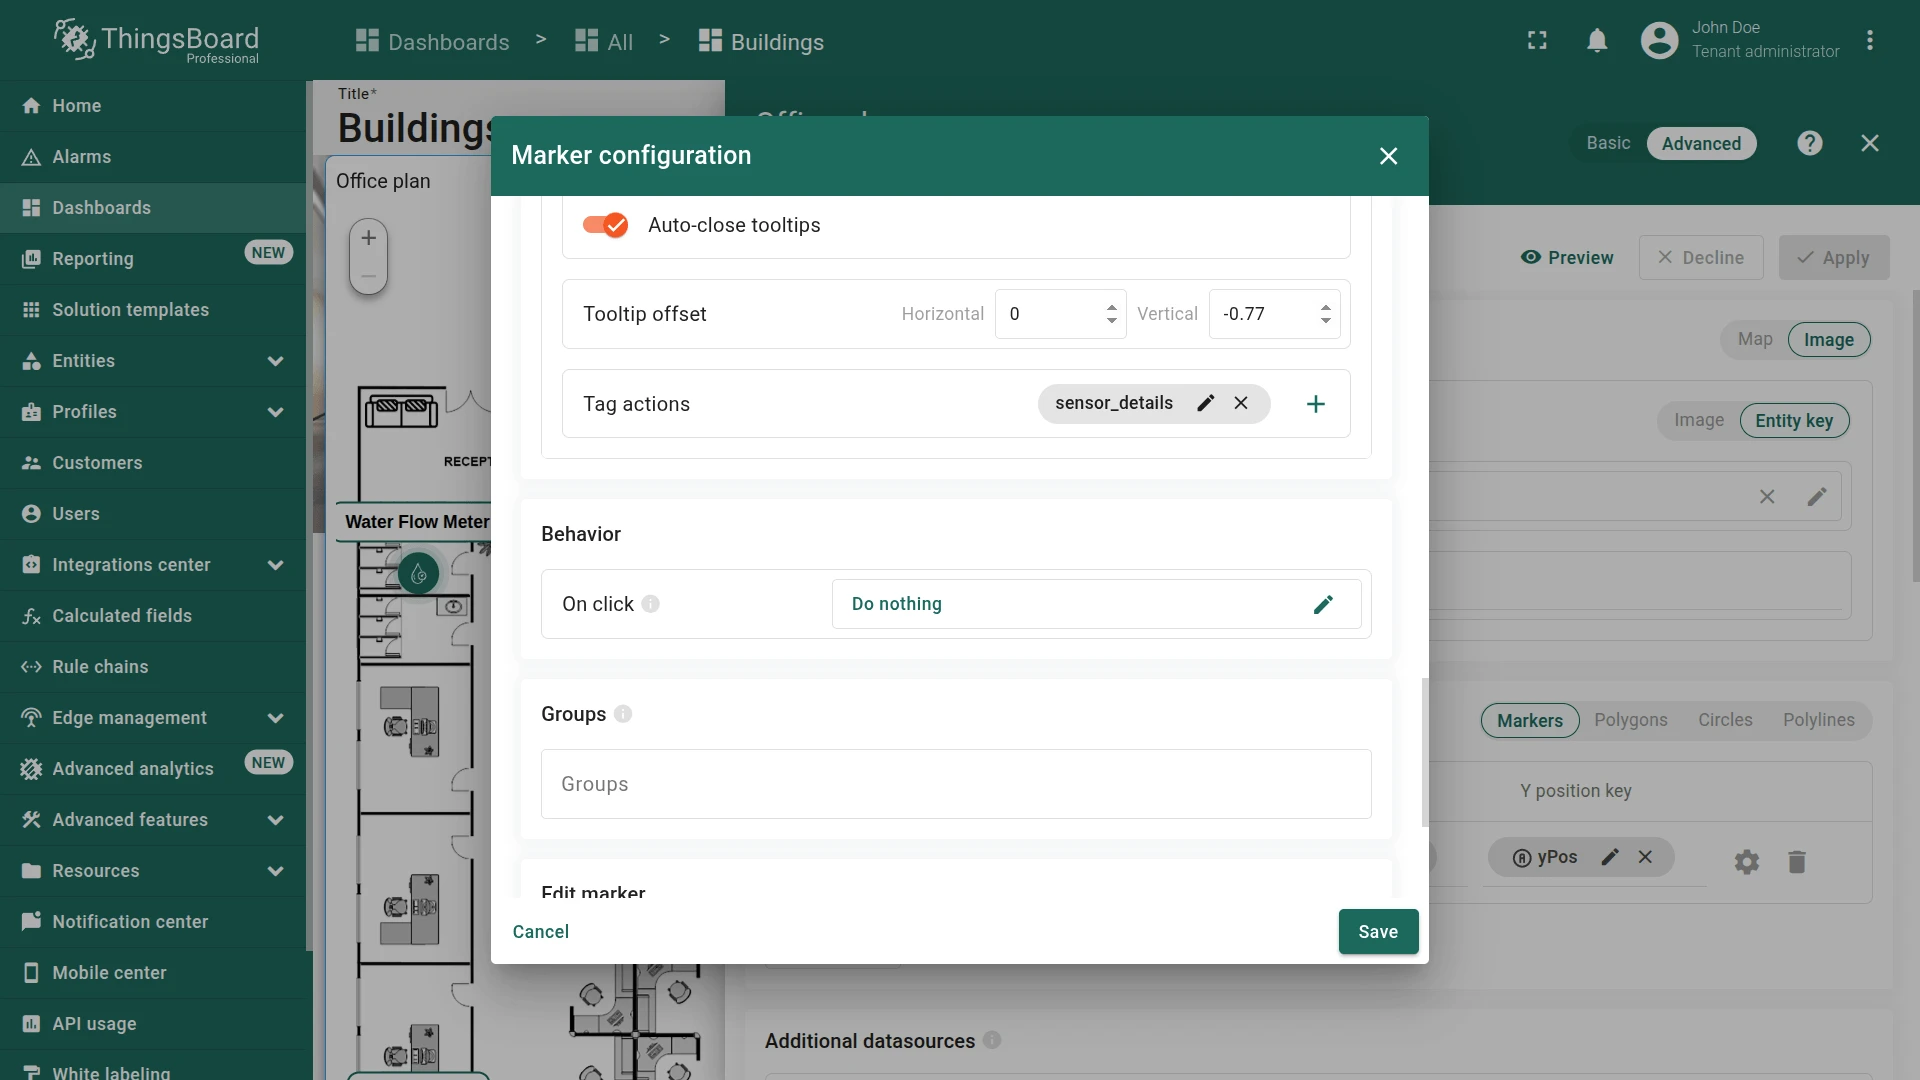
Add the tooltip tag action:
- Click + (Add tag action)
- Name it
sensor_details - Set action to Custom action
- Paste the following function:
const $injector = widgetContext.$injector;const deviceService = $injector.get(widgetContext.servicesMap.get('deviceService'));deviceService.getDevice(entityId.id).subscribe(device => {if (device.type === 'air-sensor') {openDashboardState('air_sensor');} else if (device.type === 'water-sensor') {openDashboardState('water_sensor');} else {openDashboardState('energy_sensor');}});function openDashboardState(stateId) {const params = {entityId: entityId,entityName: entityName};widgetContext.stateController.openState(stateId, params, false);} -
Click Add, then Save.
-
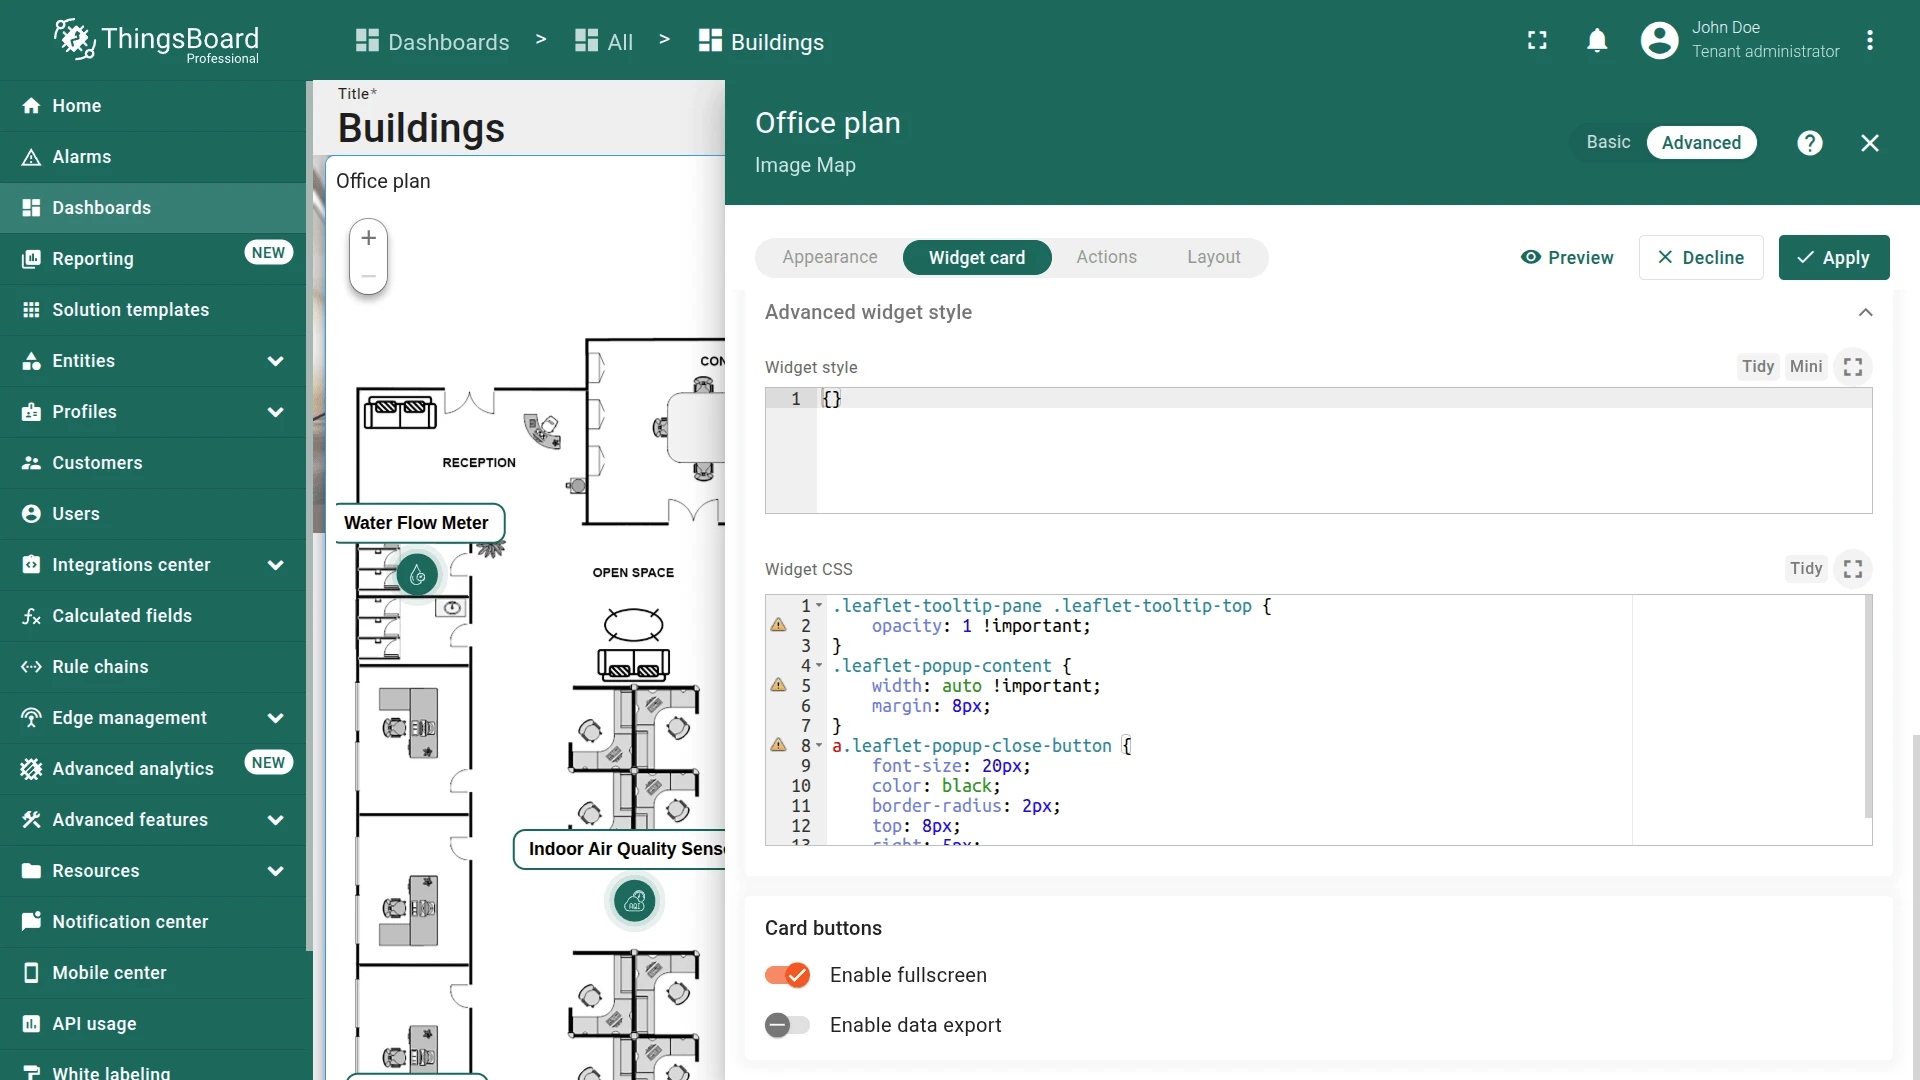
Go to the Widget card tab ⇾ Advanced widget style ⇾ Widget CSS and paste:
.leaflet-tooltip-pane .leaflet-tooltip-top {opacity: 1 !important;}.leaflet-popup-content {width: auto !important;margin: 8px;}a.leaflet-popup-close-button {font-size: 20px;color: black;border-radius: 2px;top: 8px;right: 5px;} -
Click Apply, then save the dashboard.
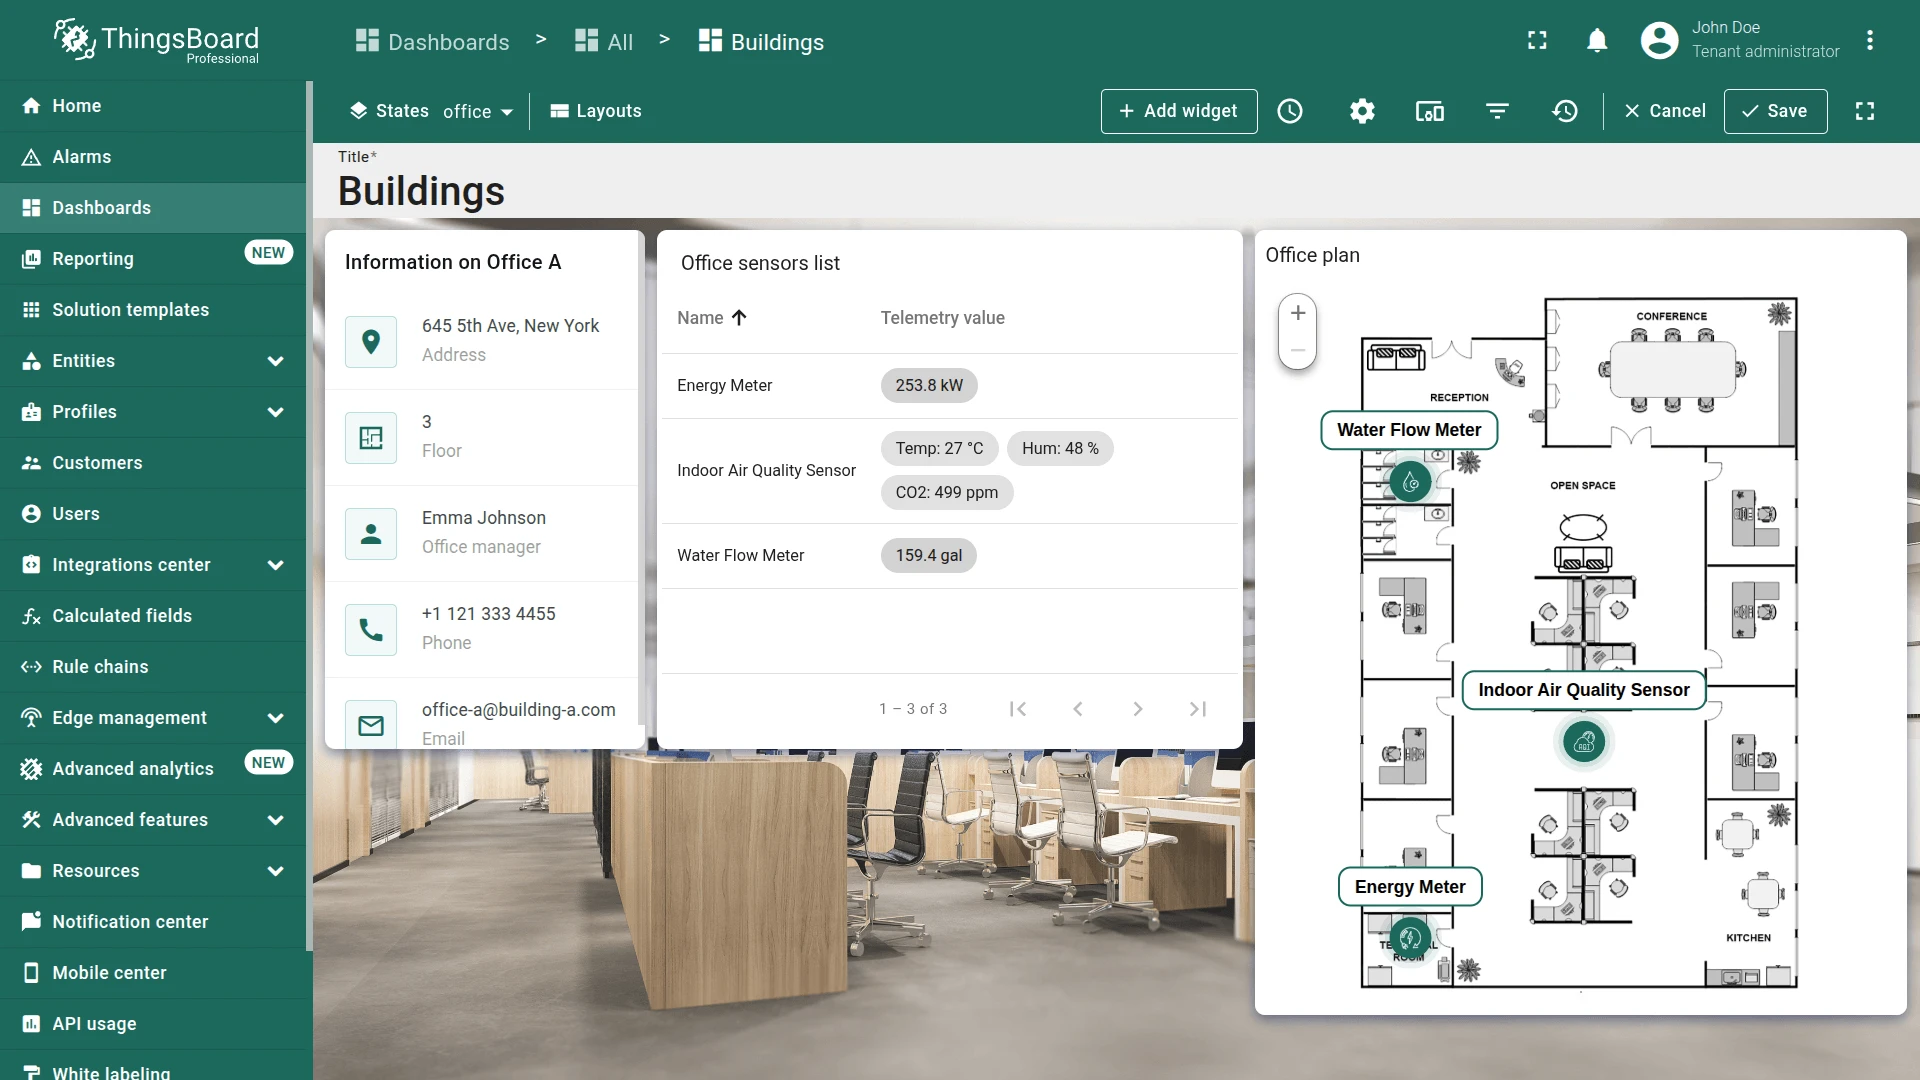
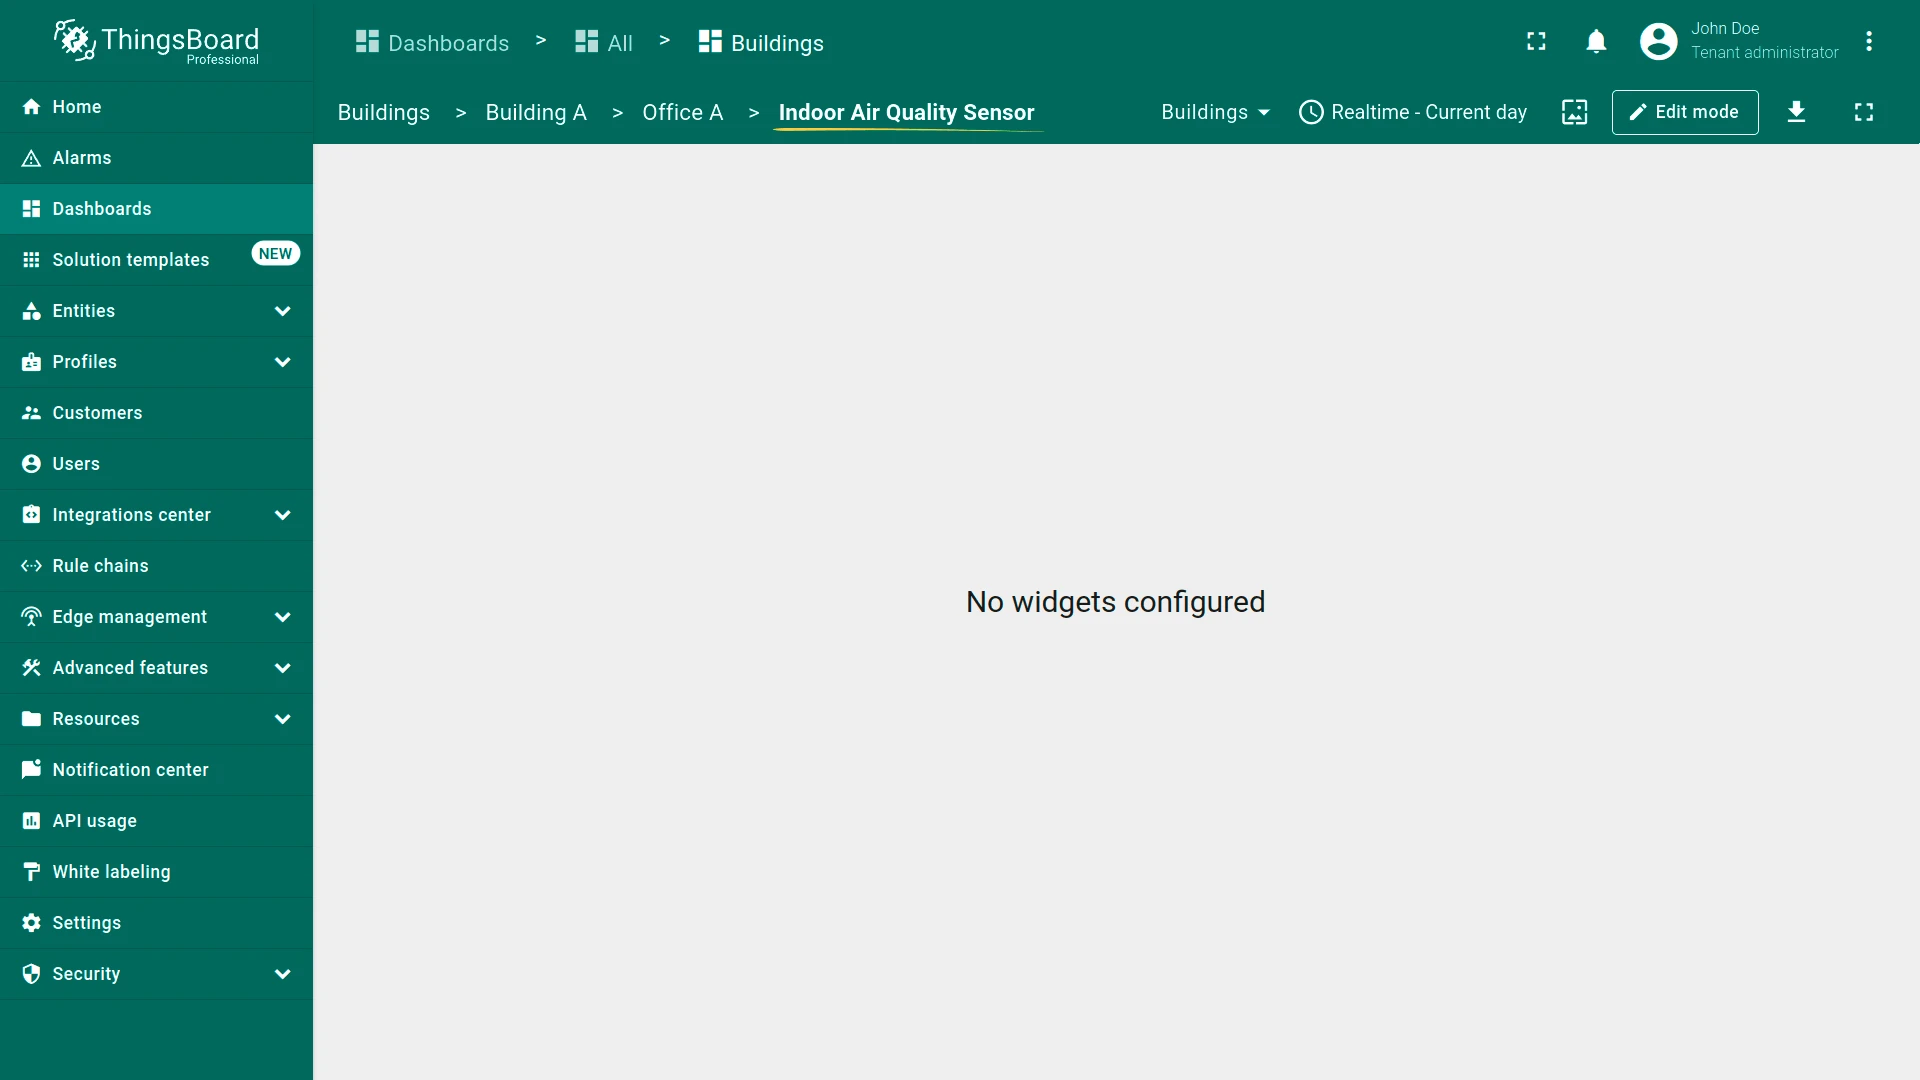
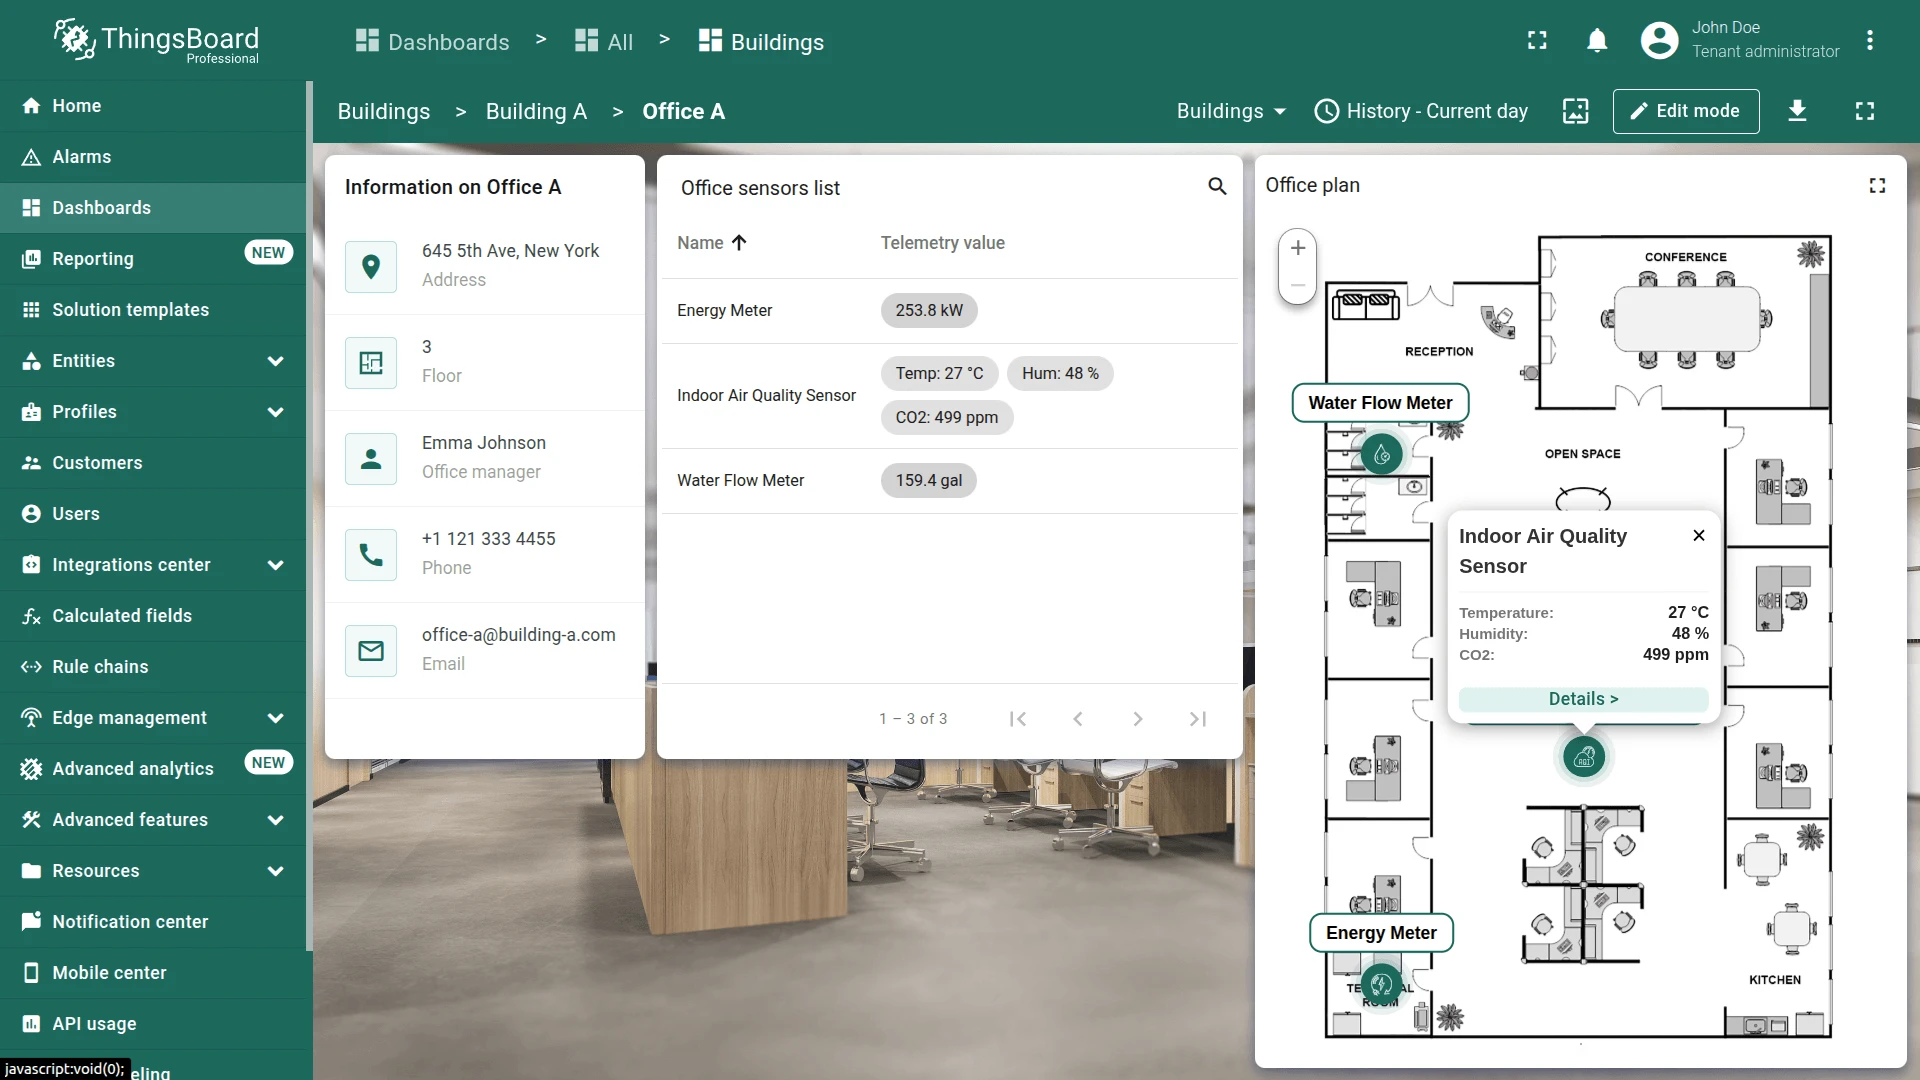
Click a marker to display tooltip with telemetry data and Details button. Click Details > to navigate to the corresponding device dashboard state
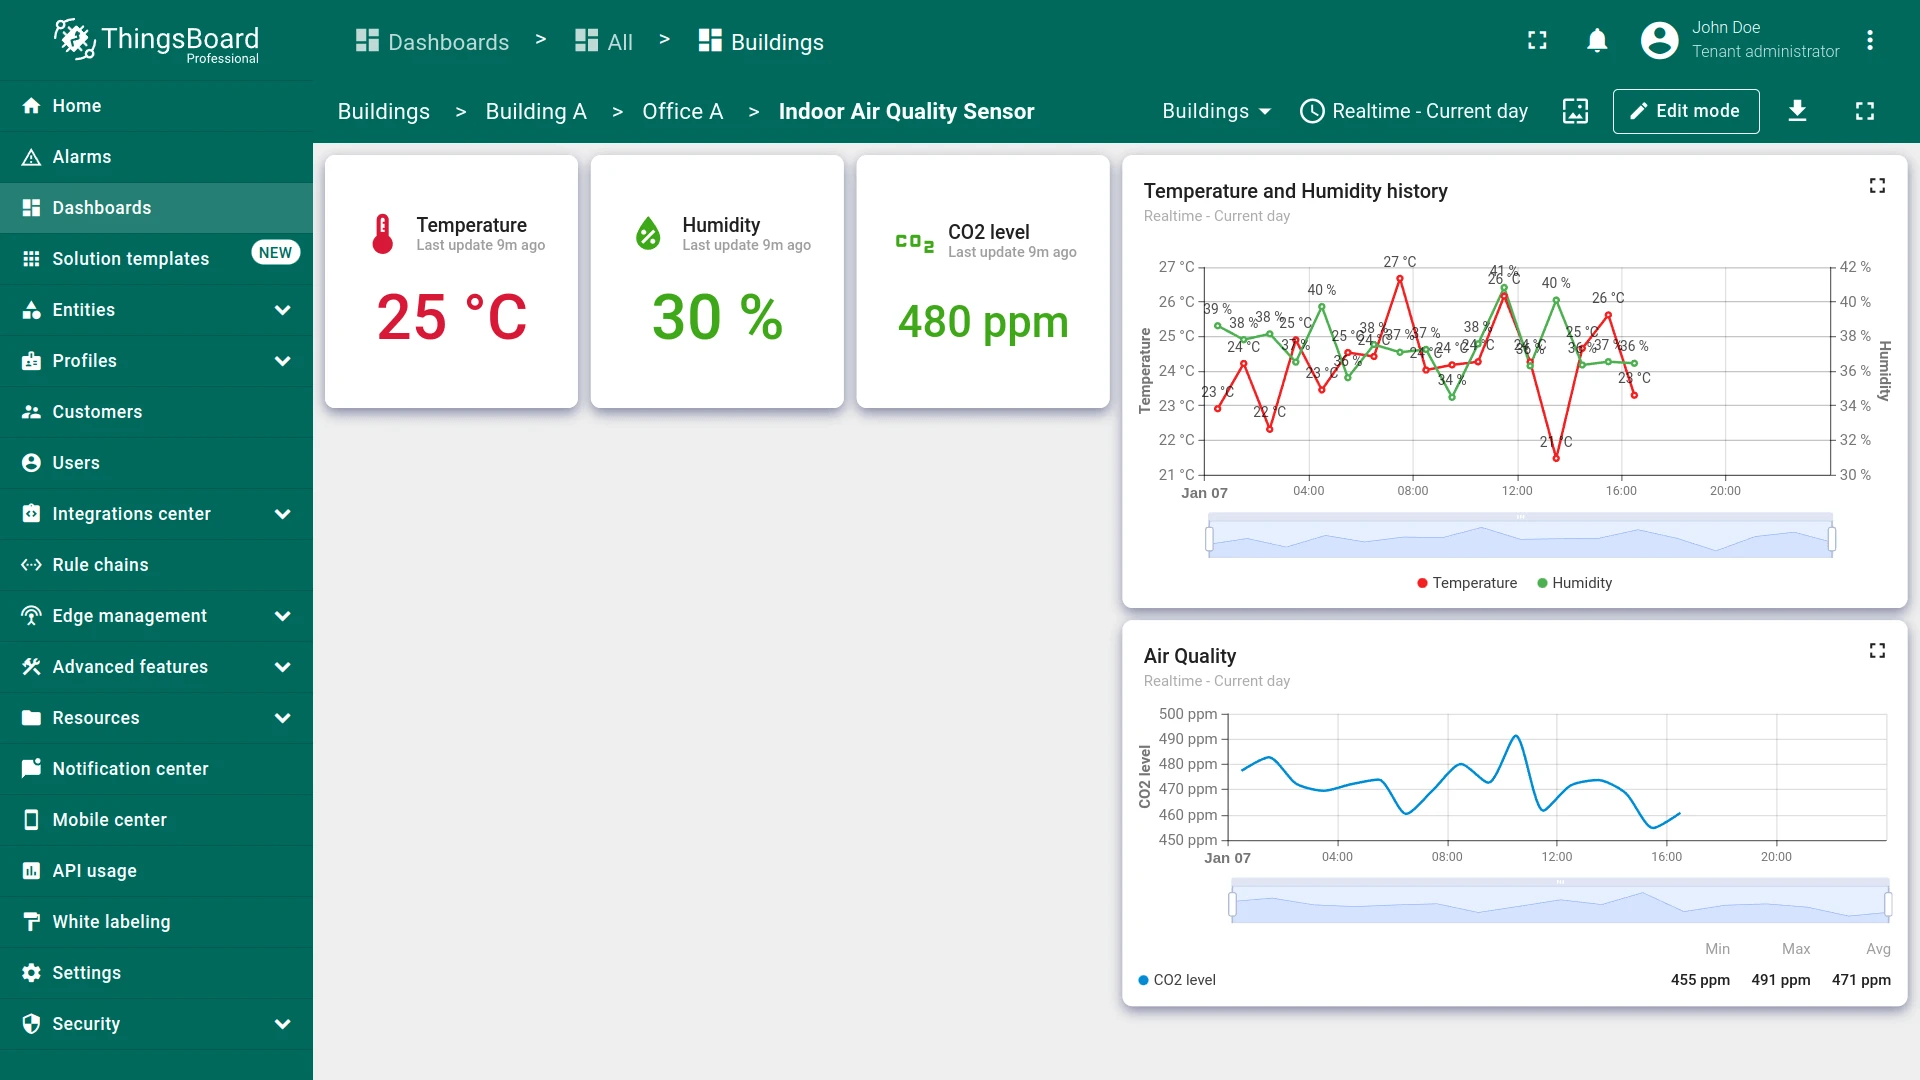
Step 3.7 Air Sensor State
Section titled “Step 3.7 Air Sensor State”Build the air_sensor state with three Indoor Environment cards (temperature, humidity, CO2) and two line charts showing trends.
Temperature Card
Section titled “Temperature Card”- Open Indoor Air Quality Sensor state.
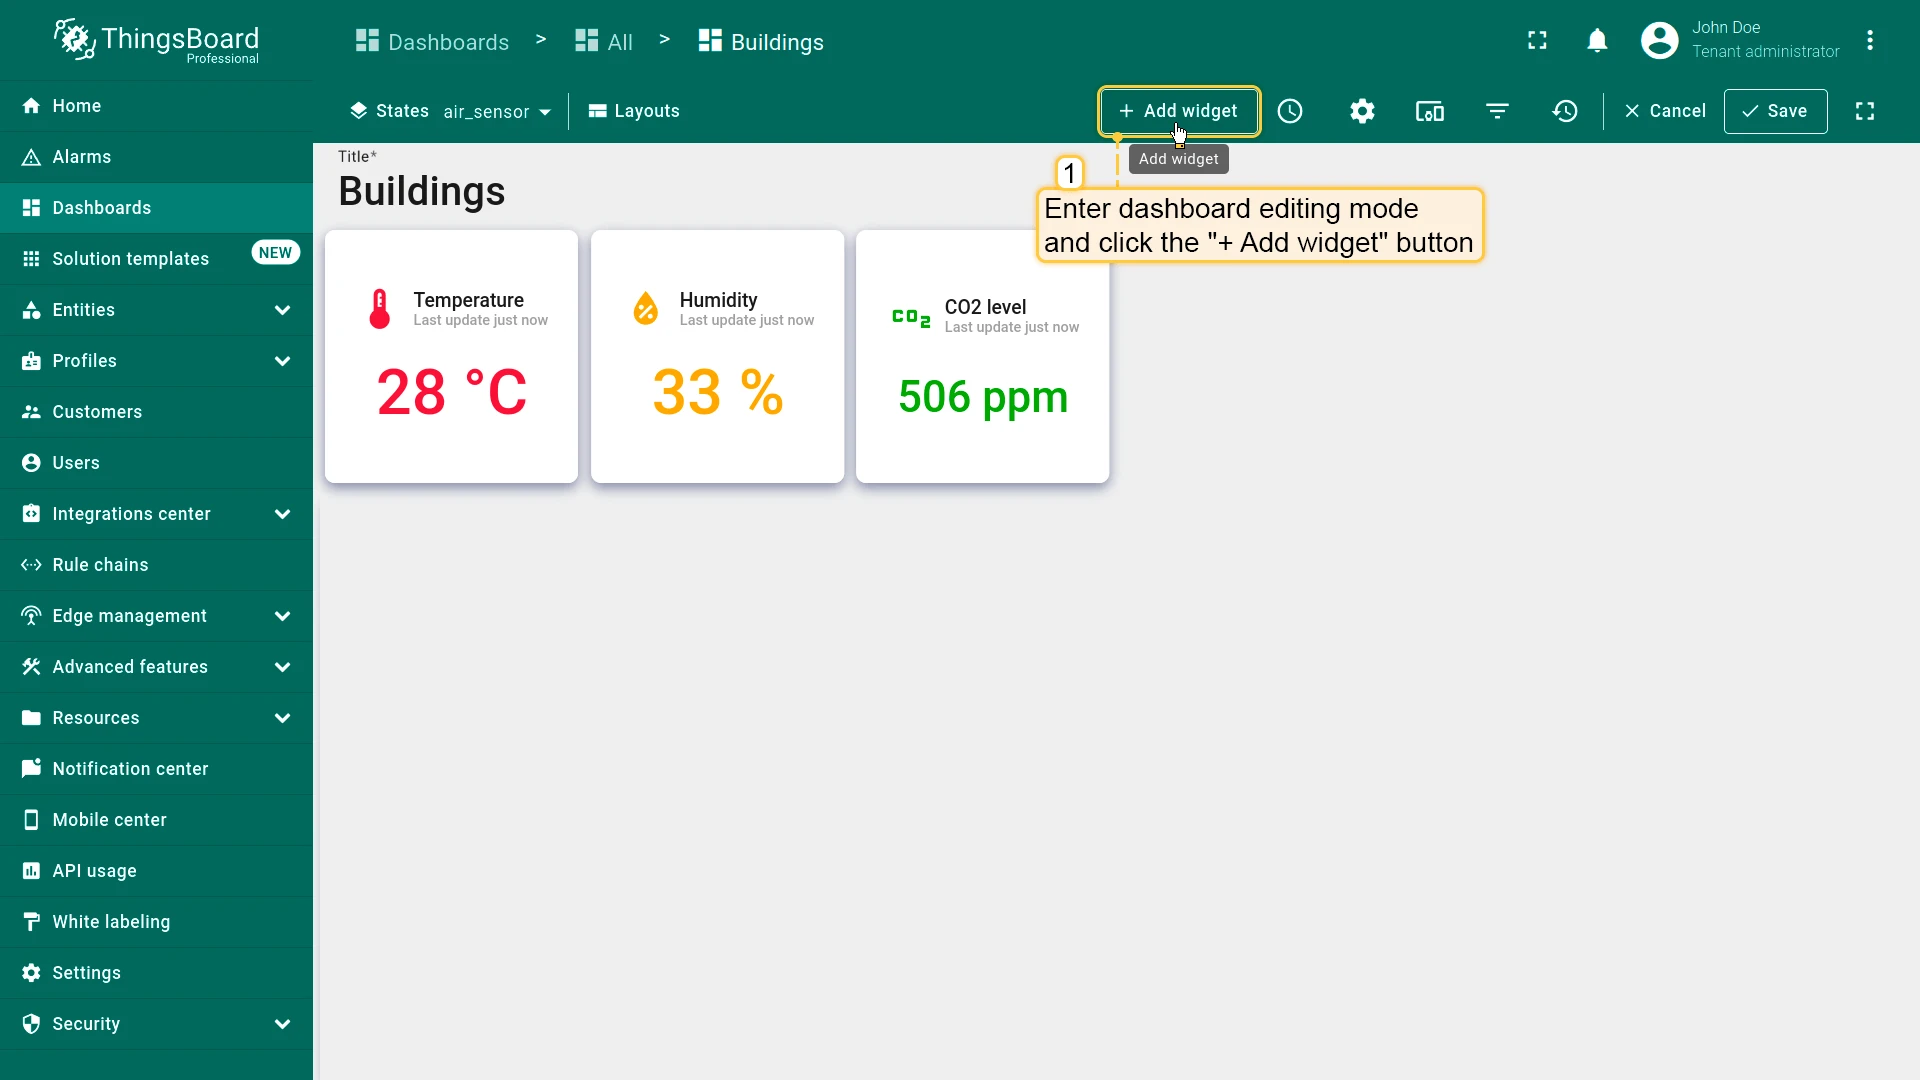
- Click + Add widget in edit mode.
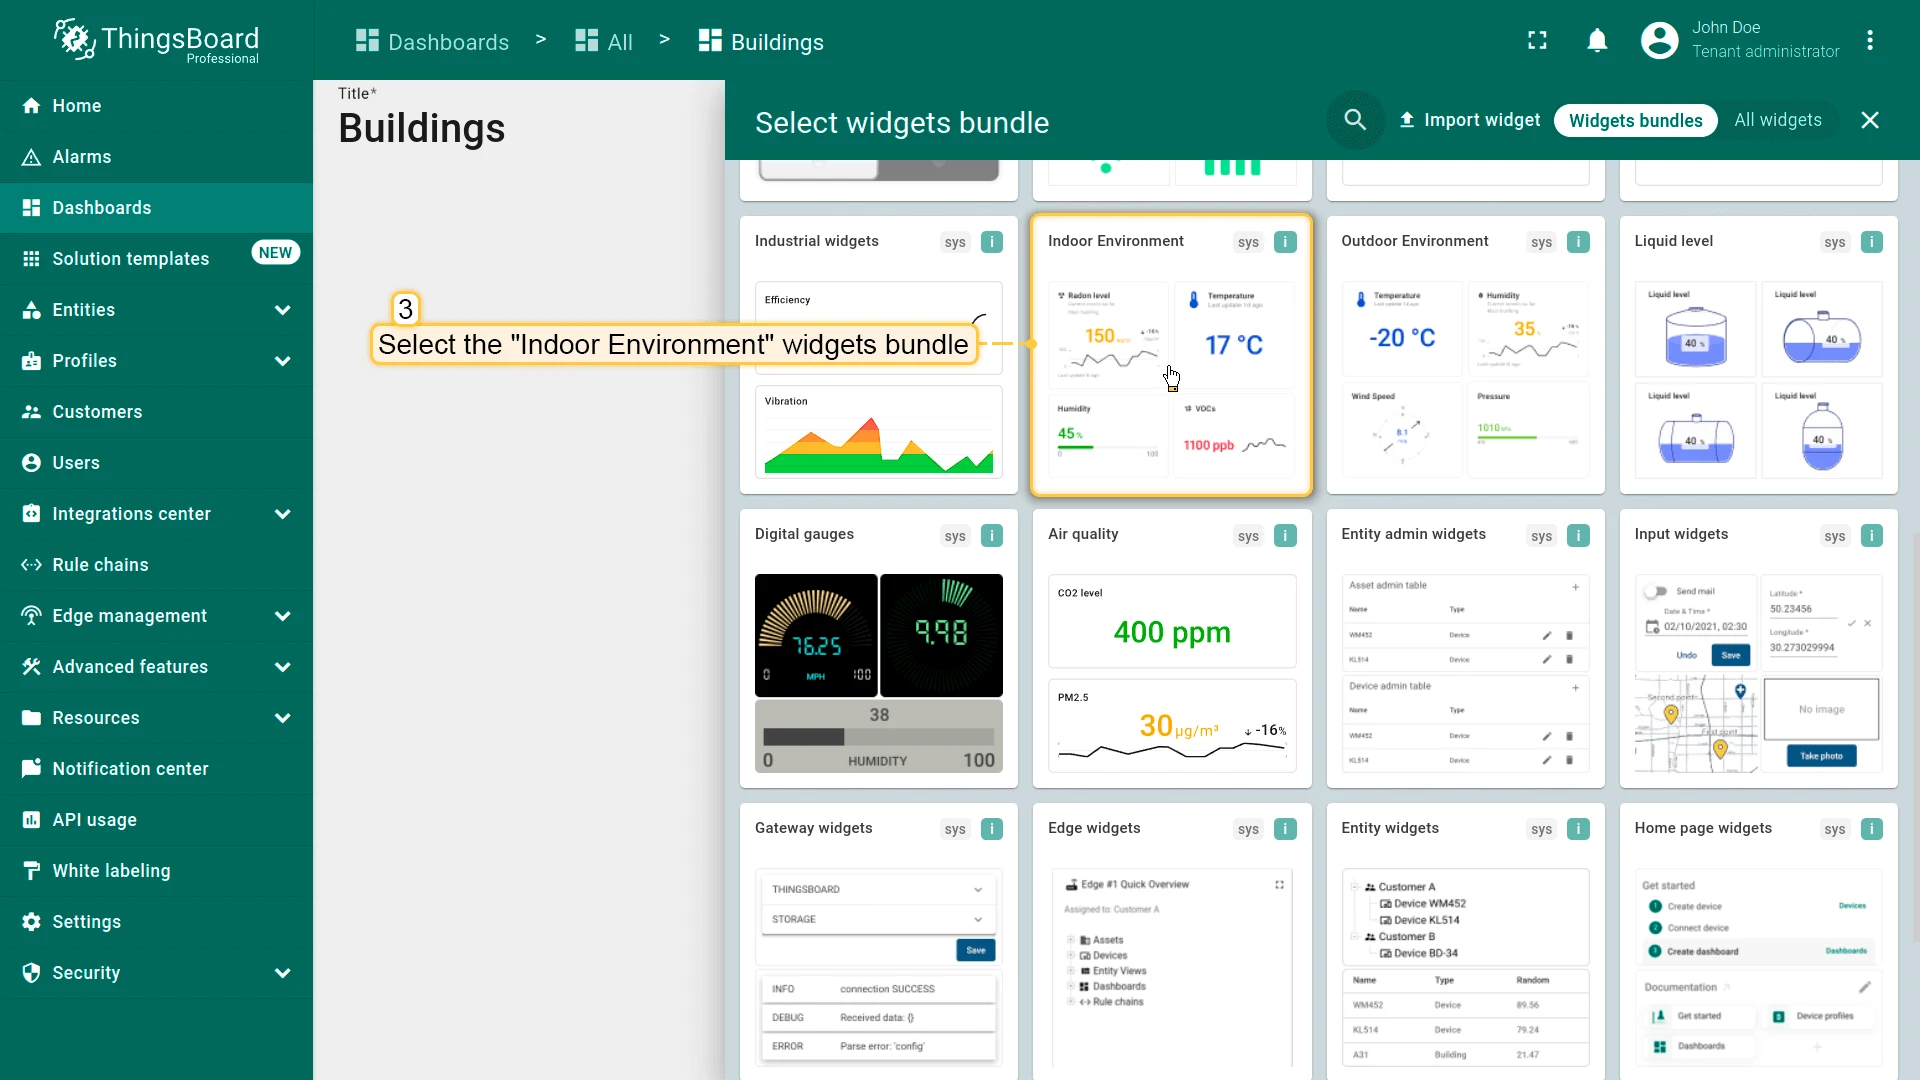
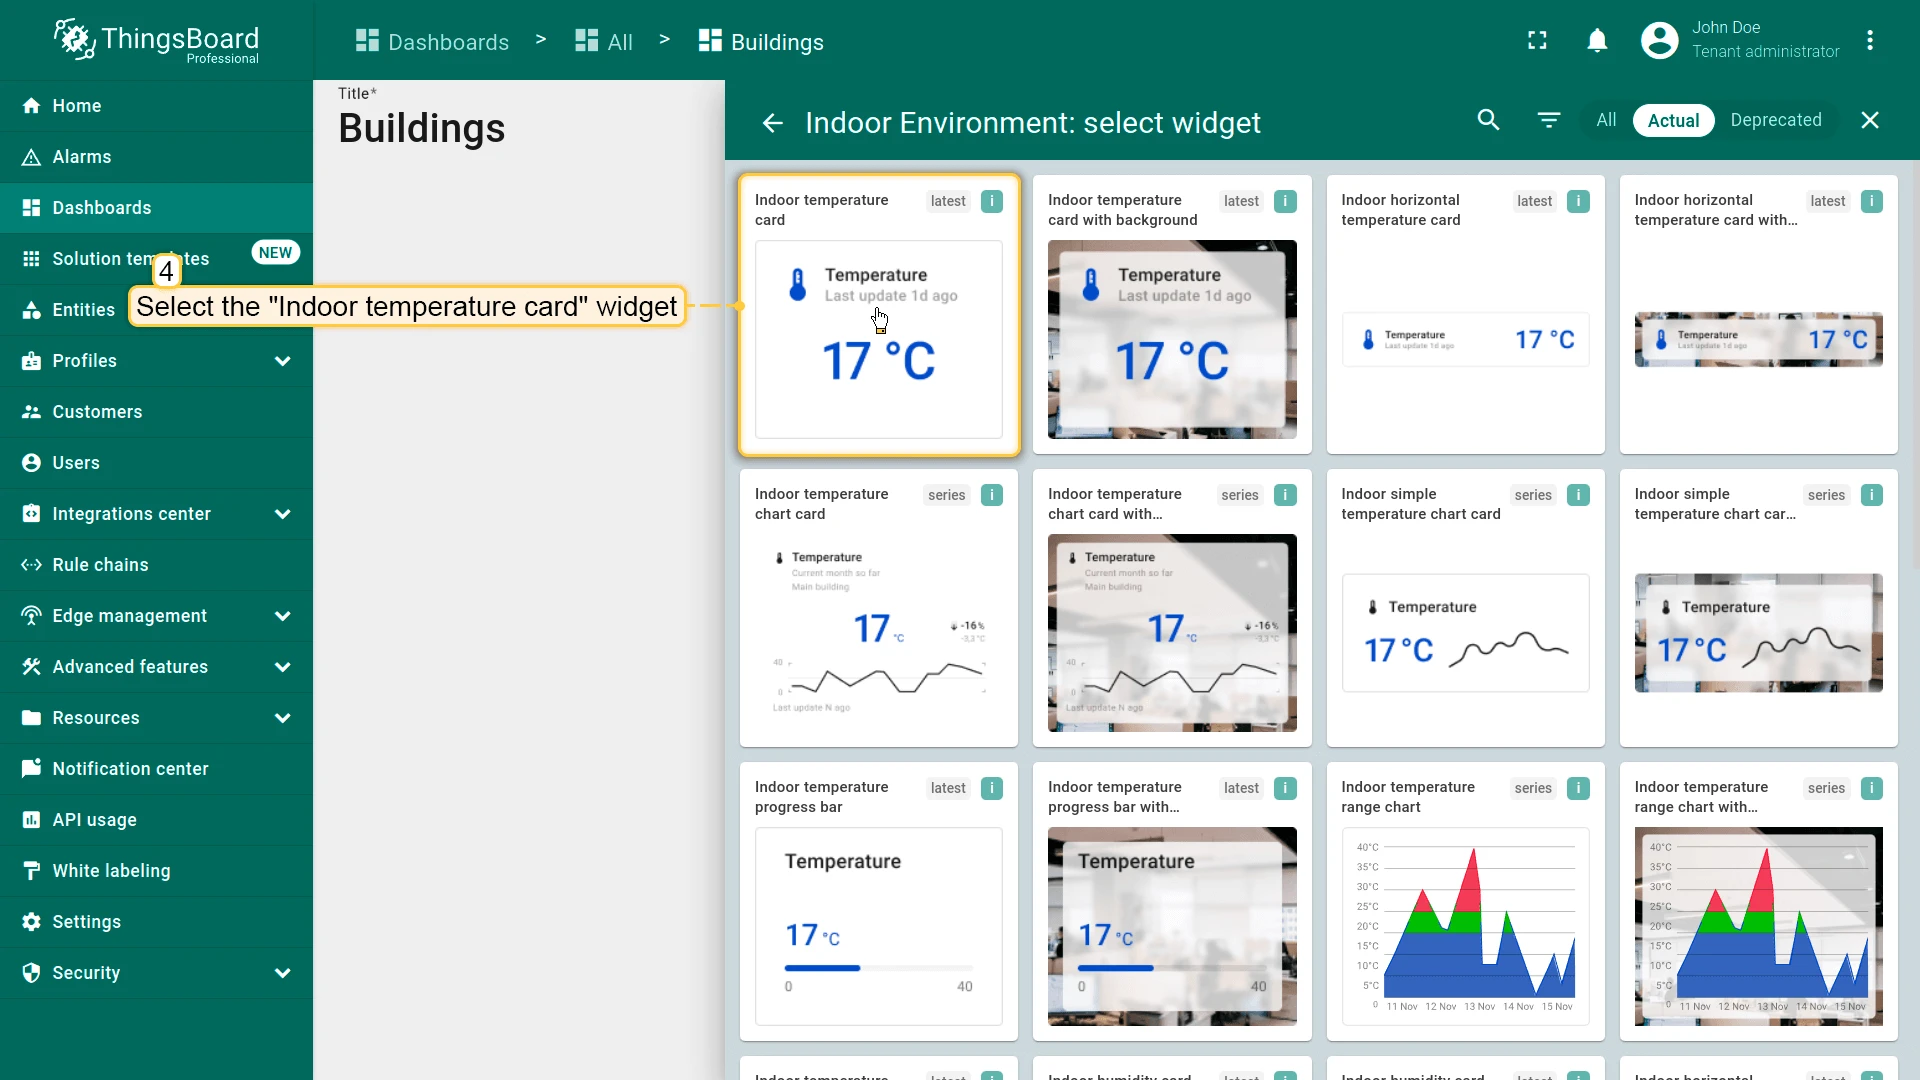
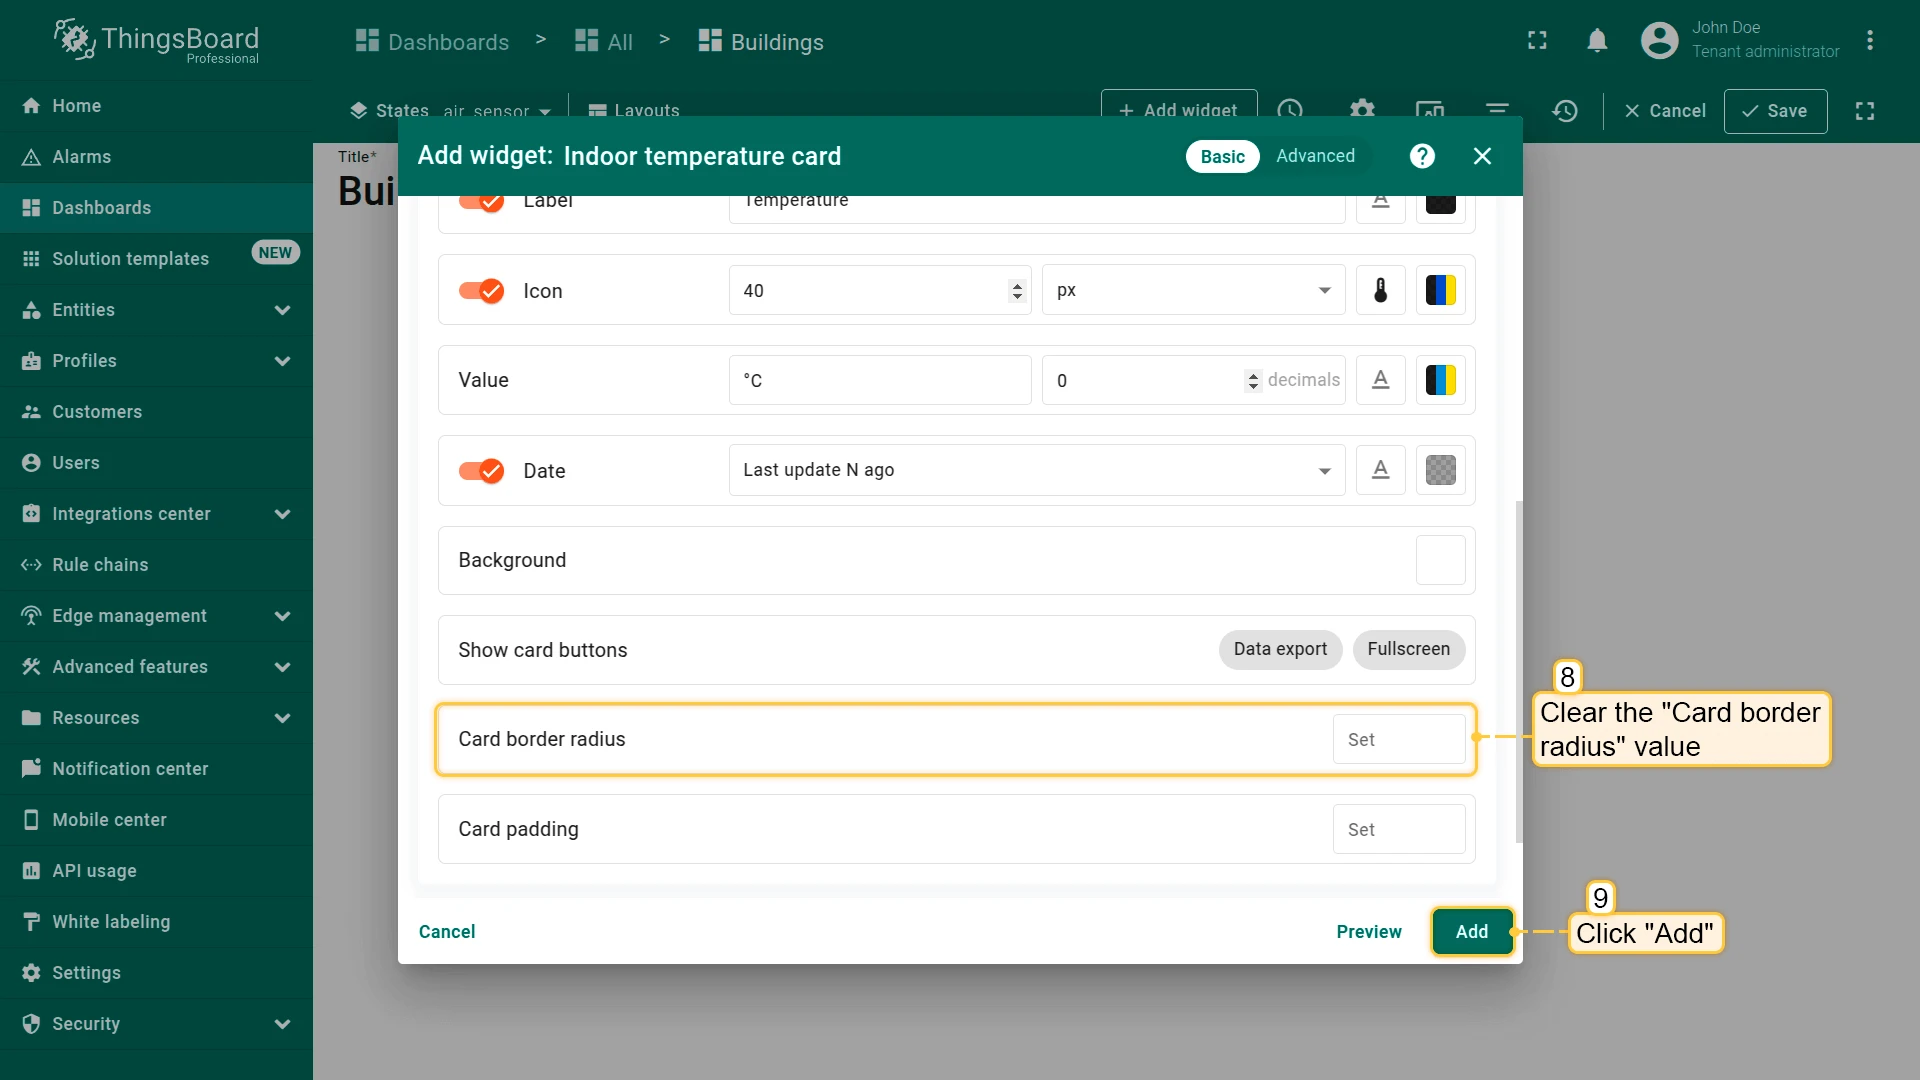
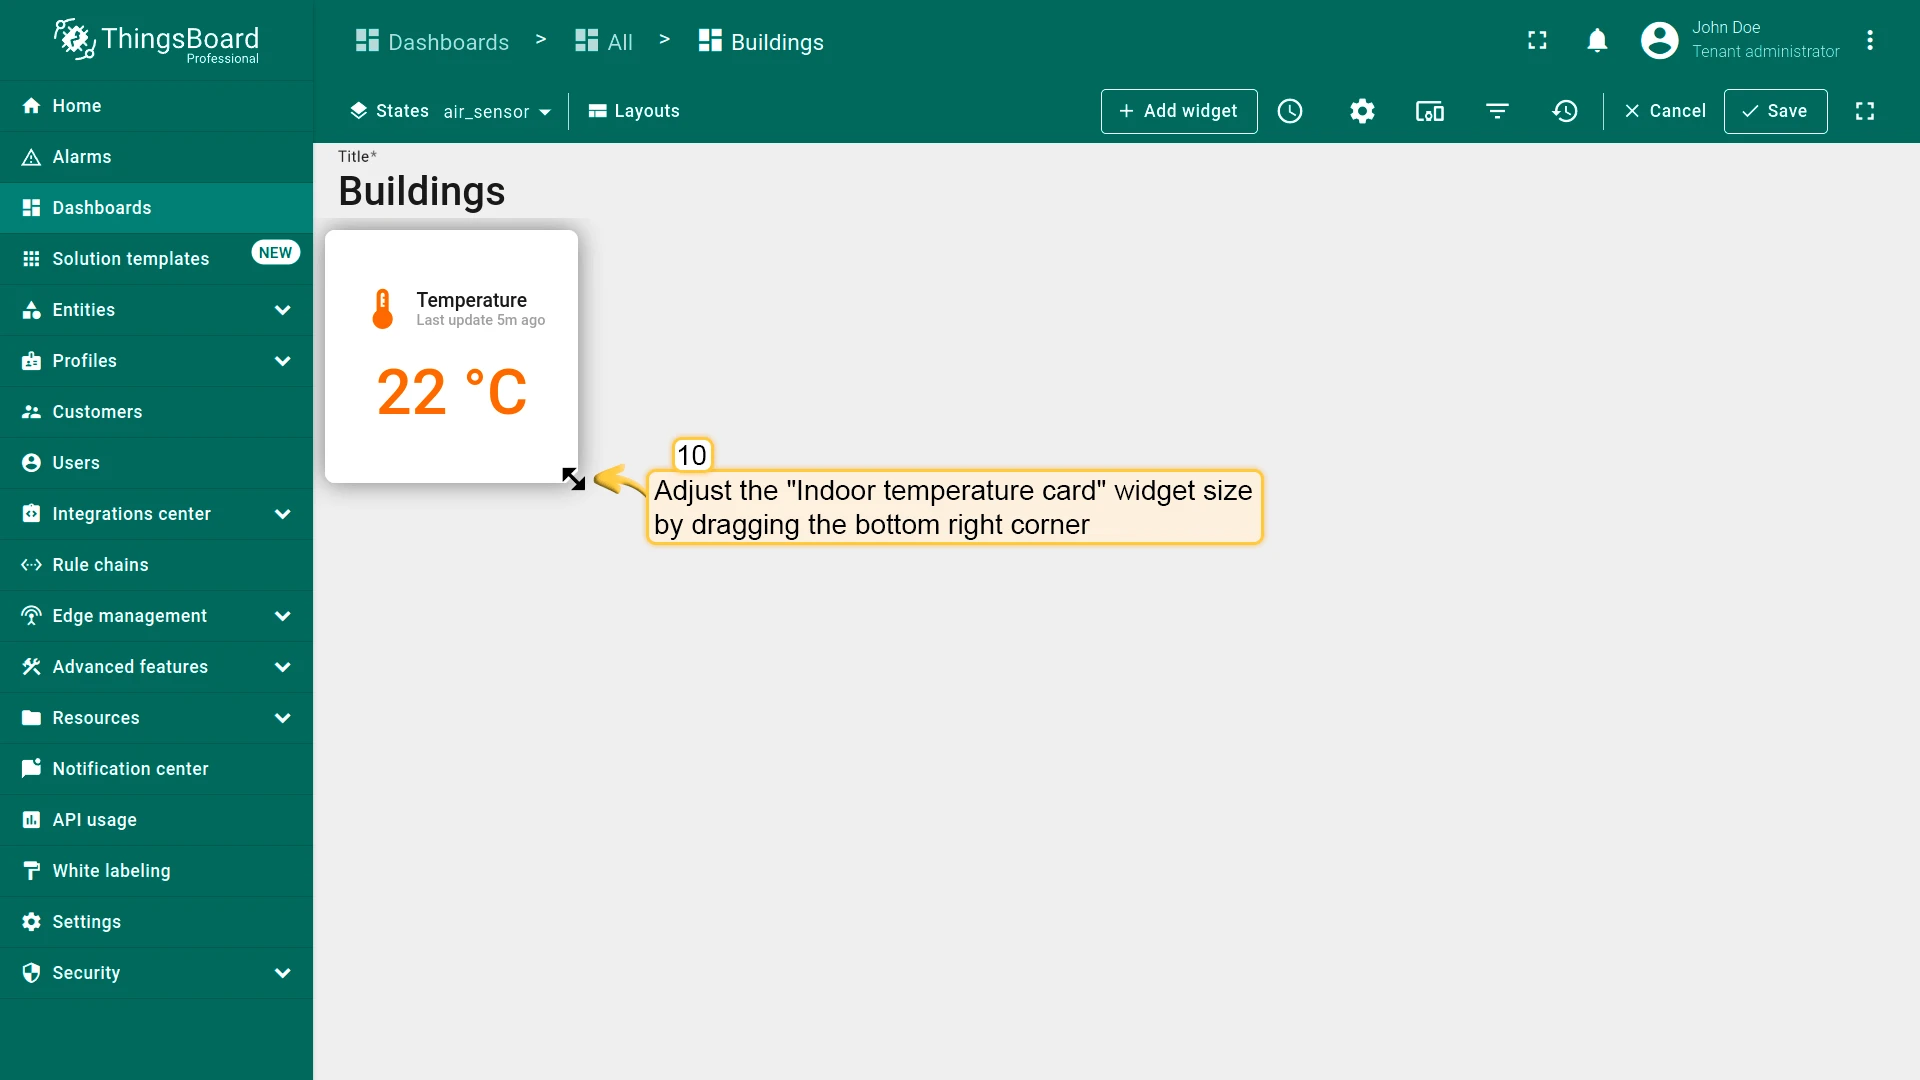
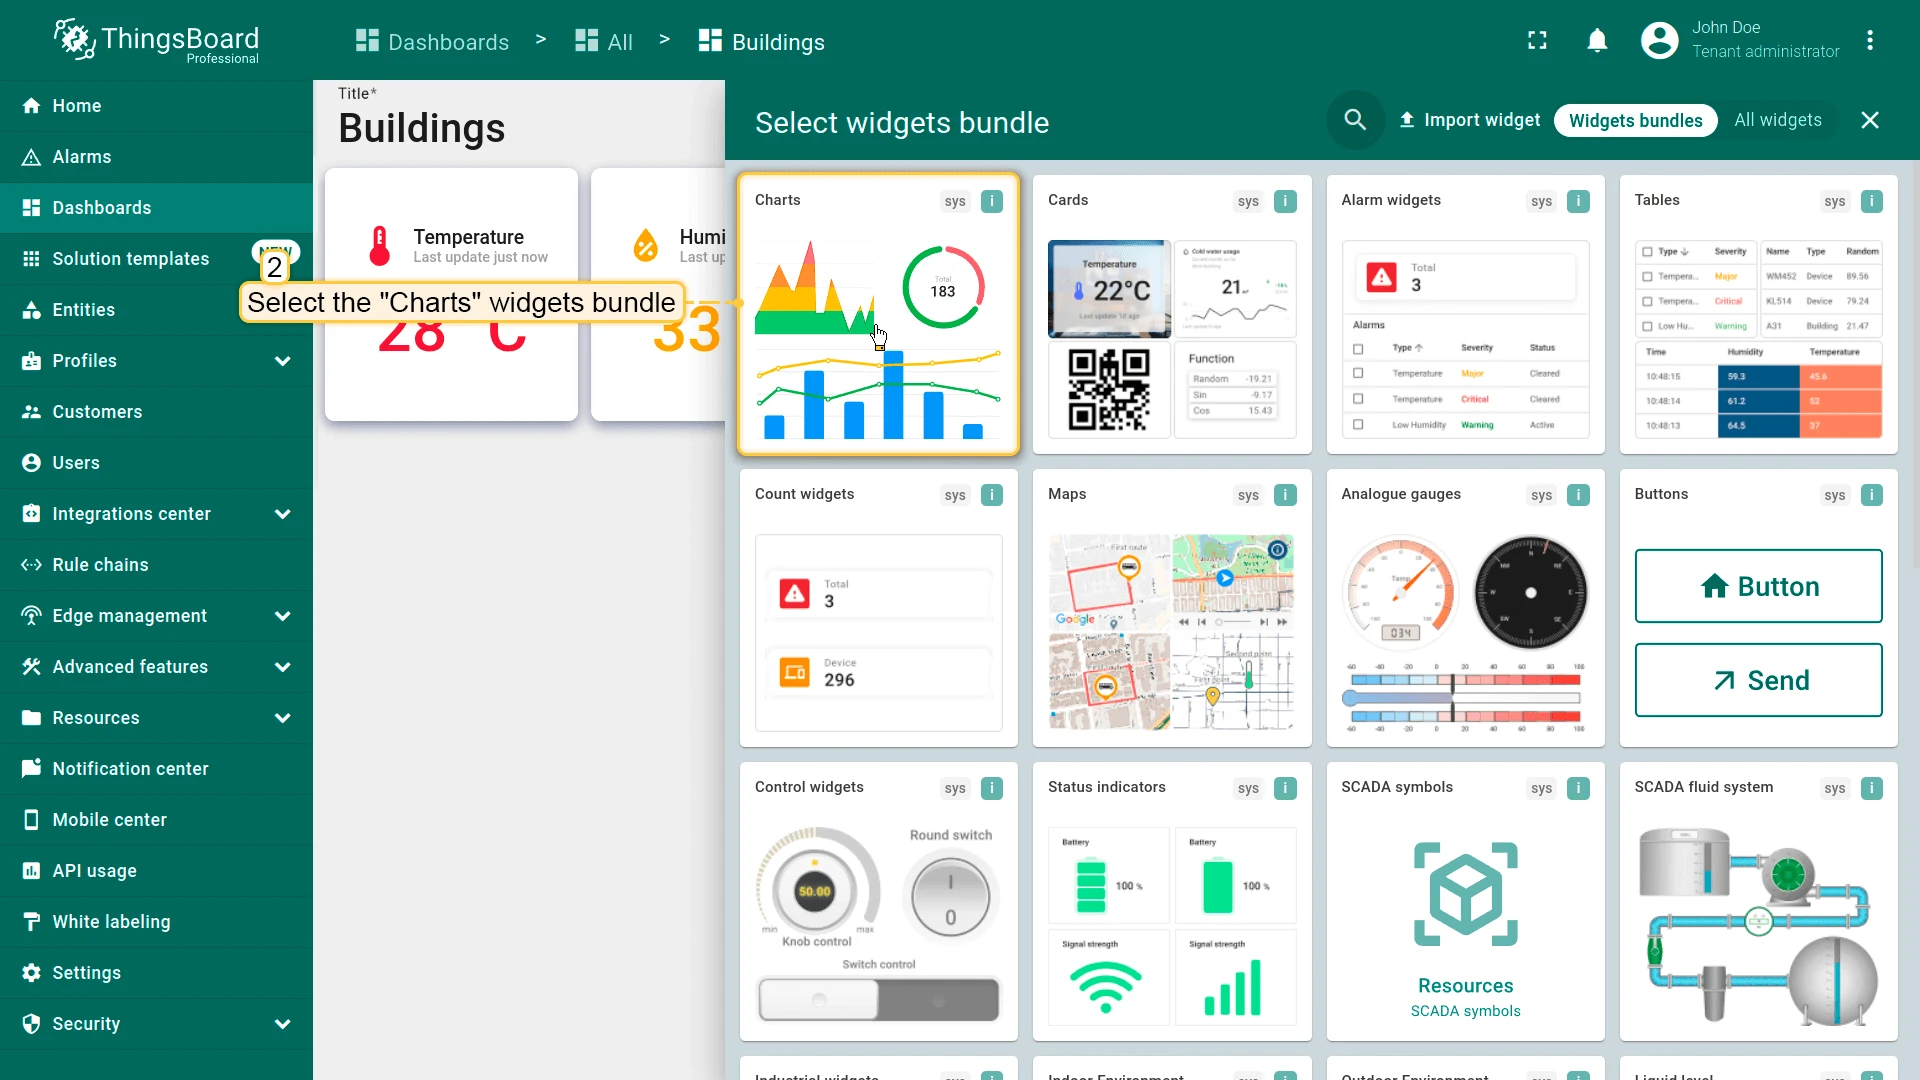
- Select Indoor Environment ⇾ Indoor temperature card.
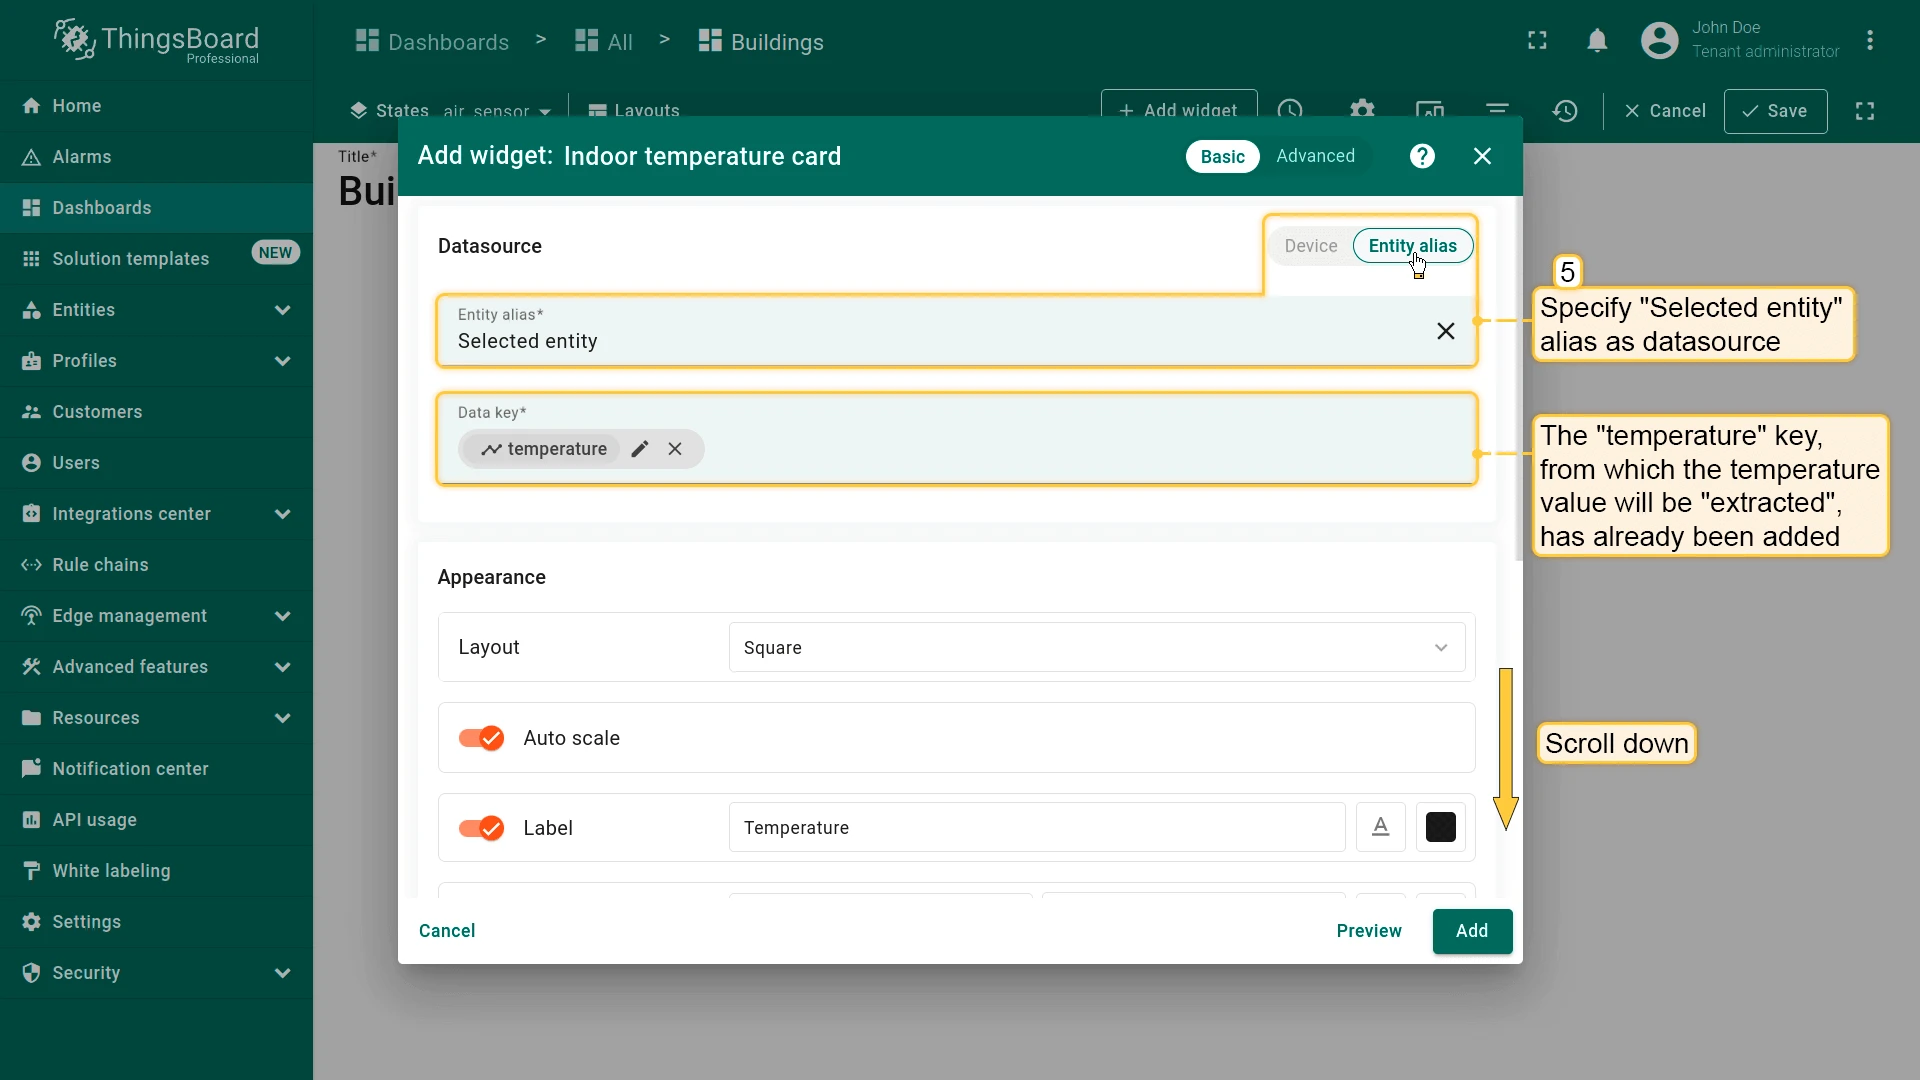
- Set datasource to Selected entity (use existing temperature key).
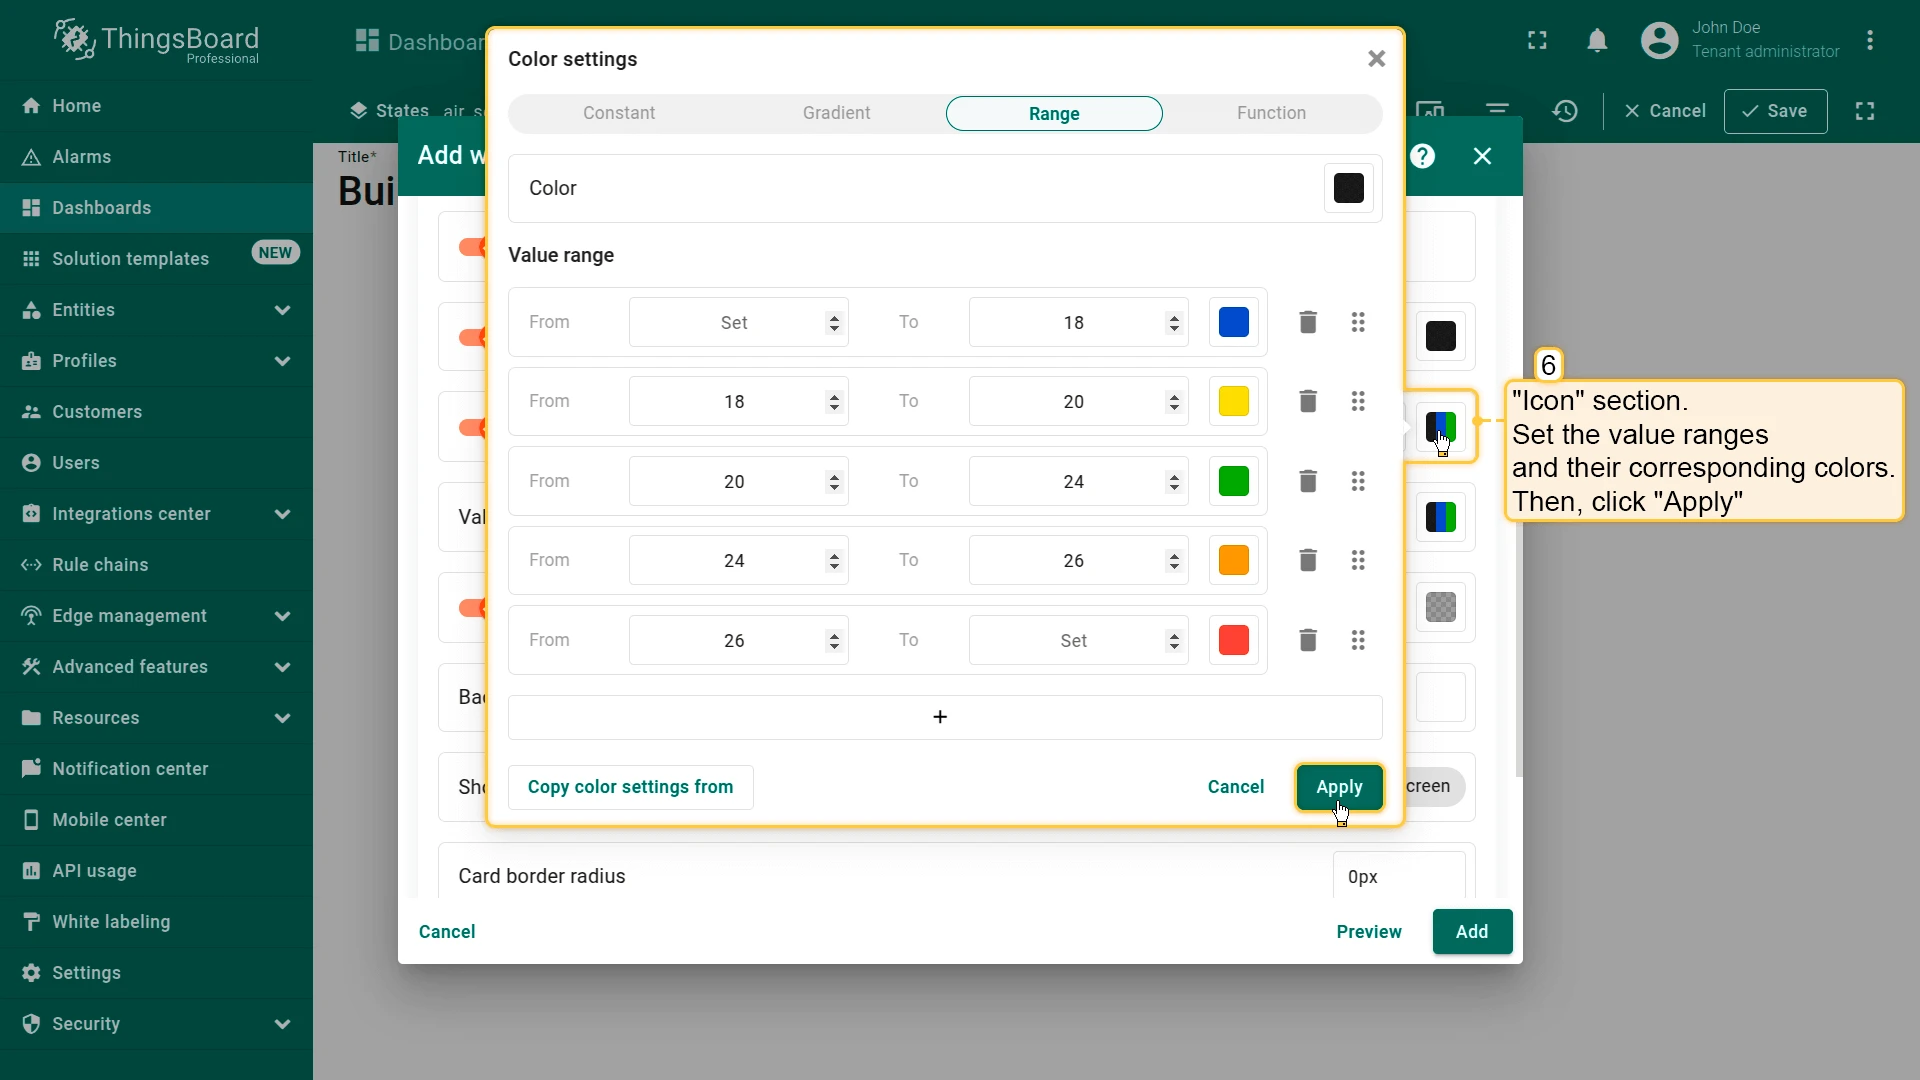
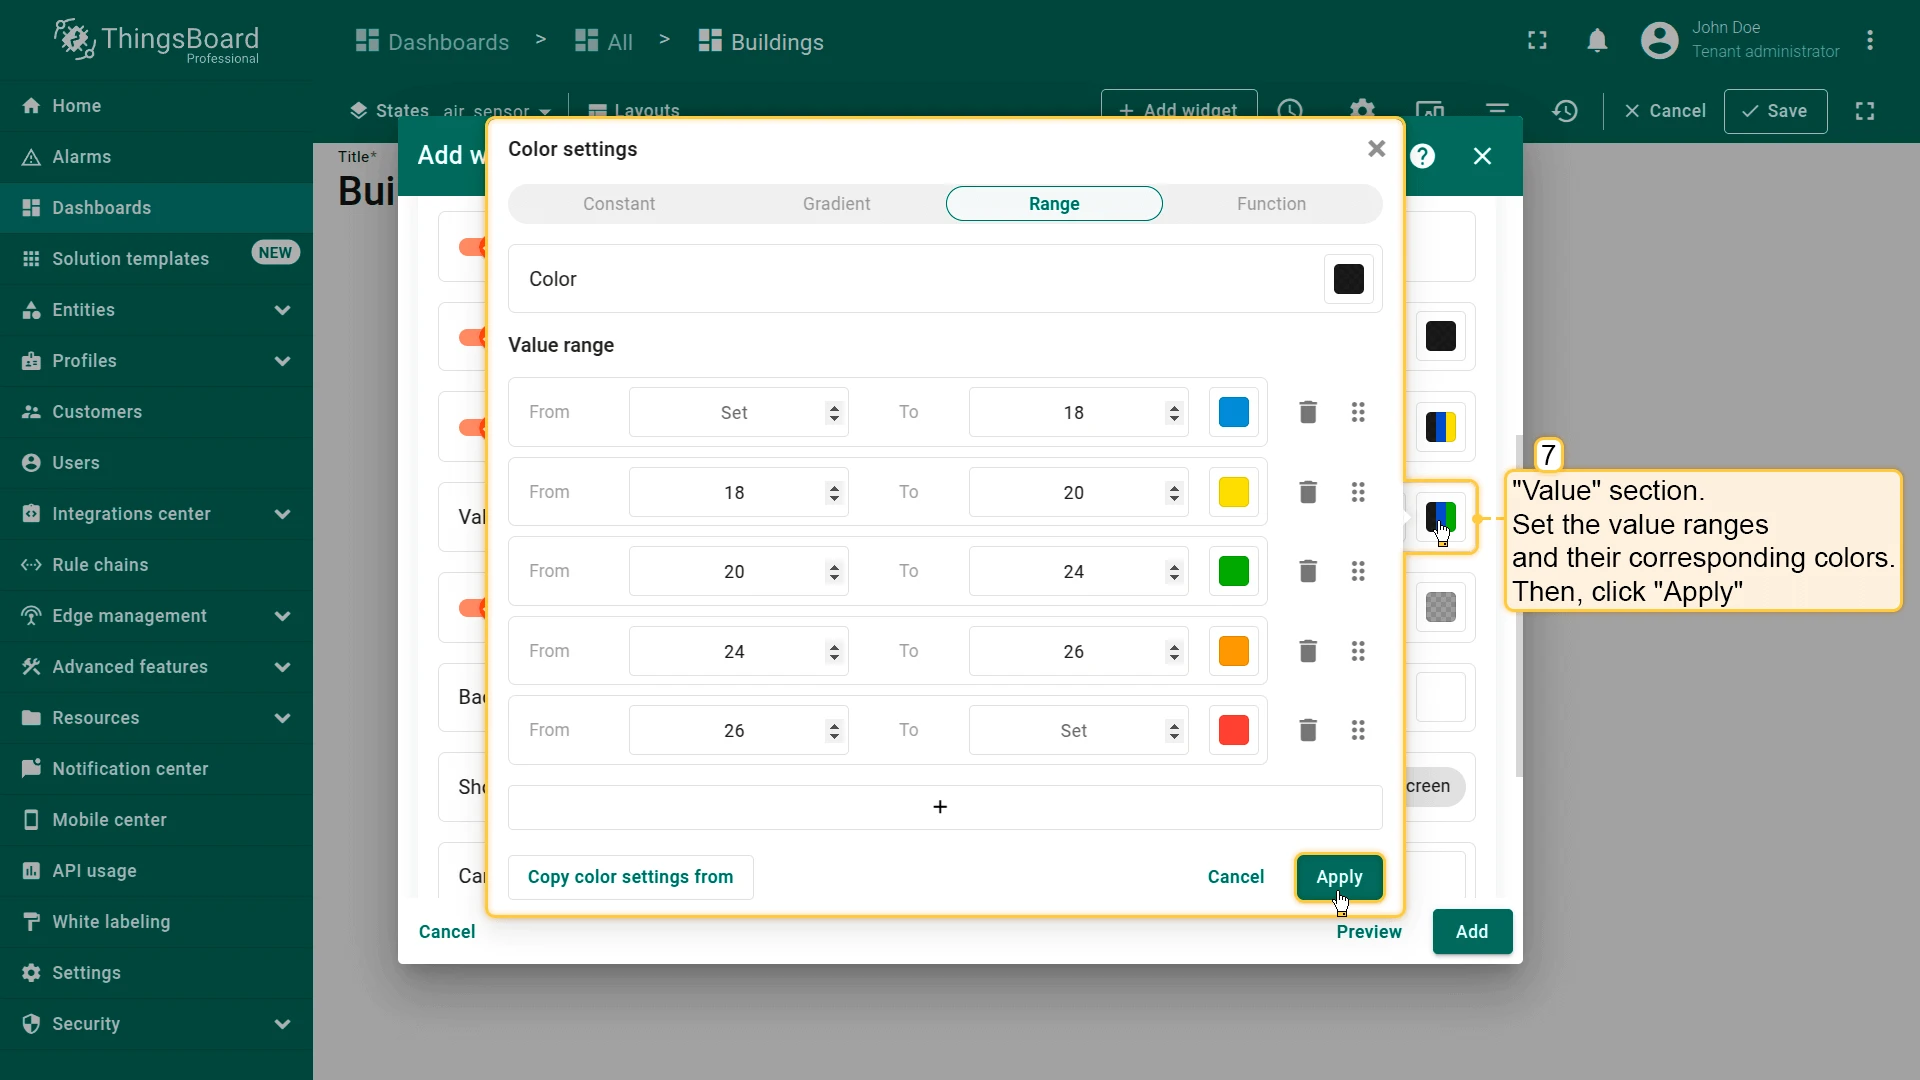
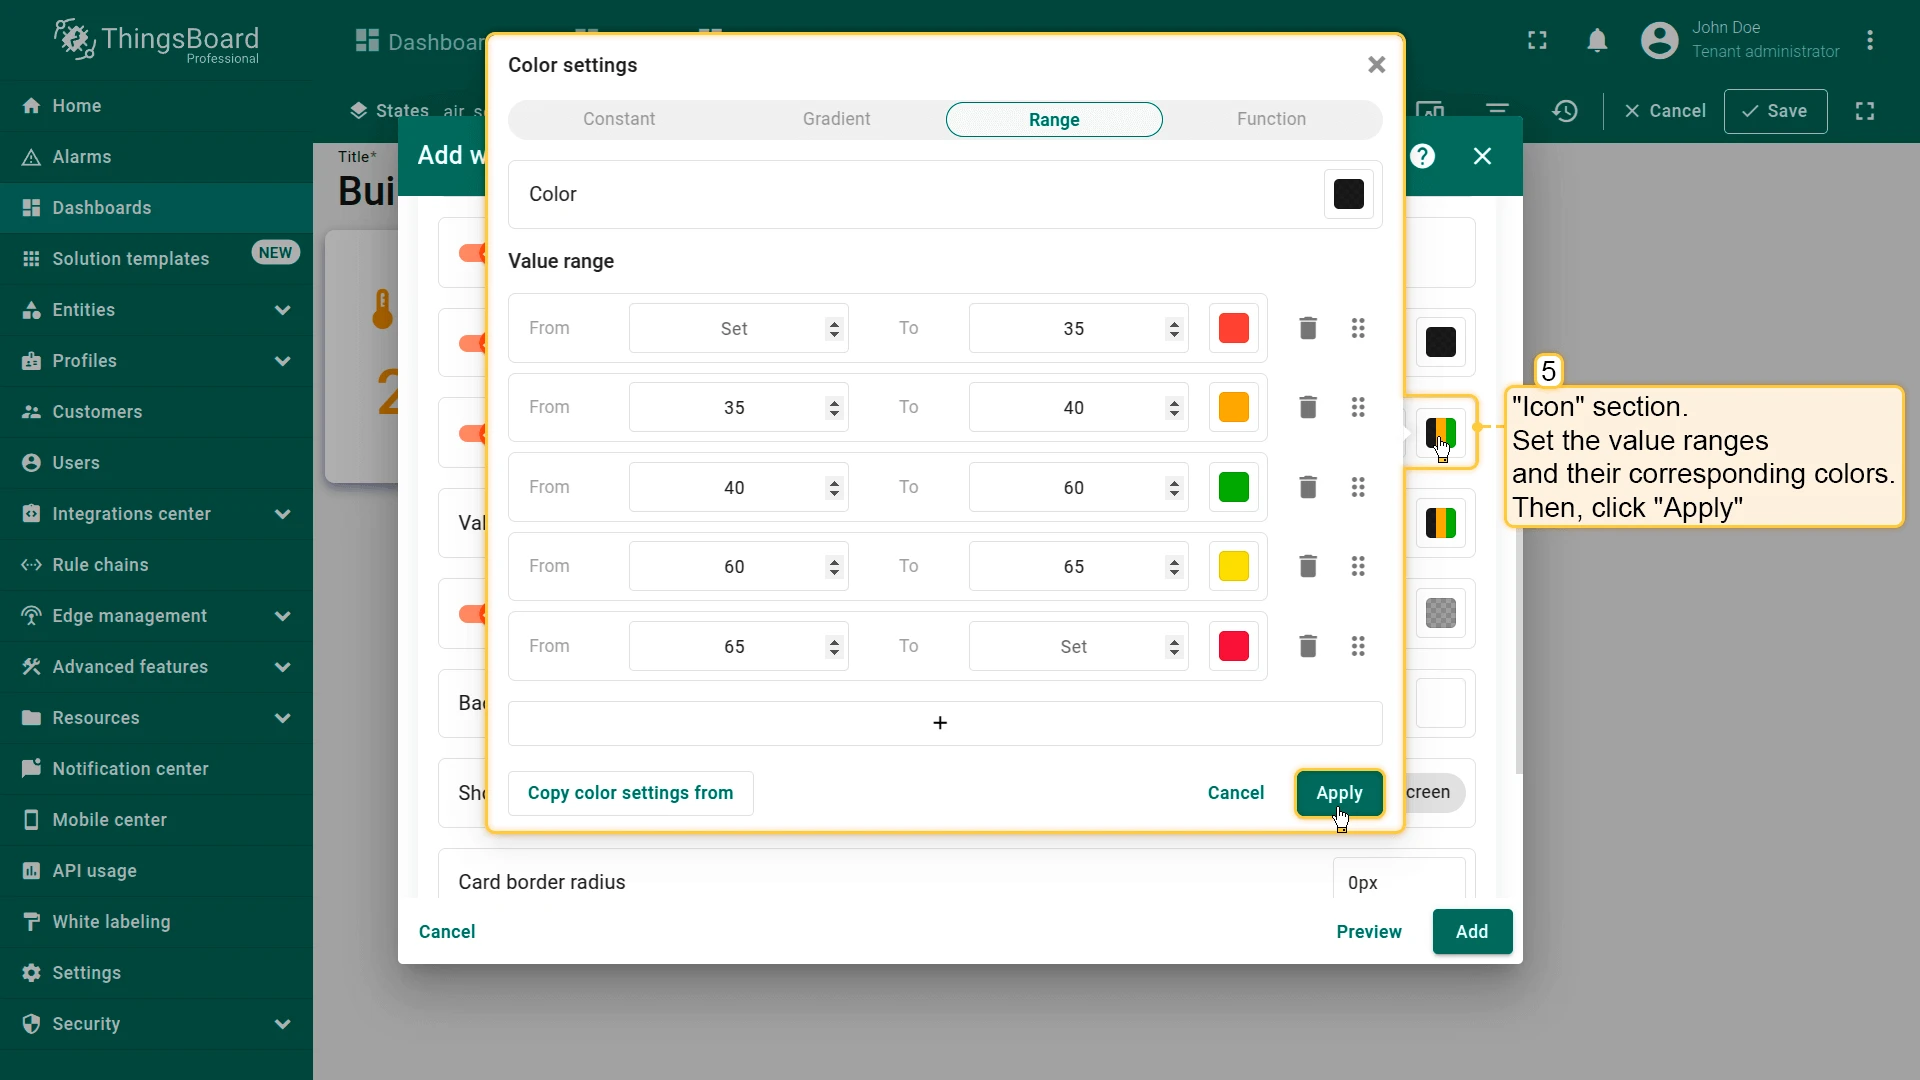
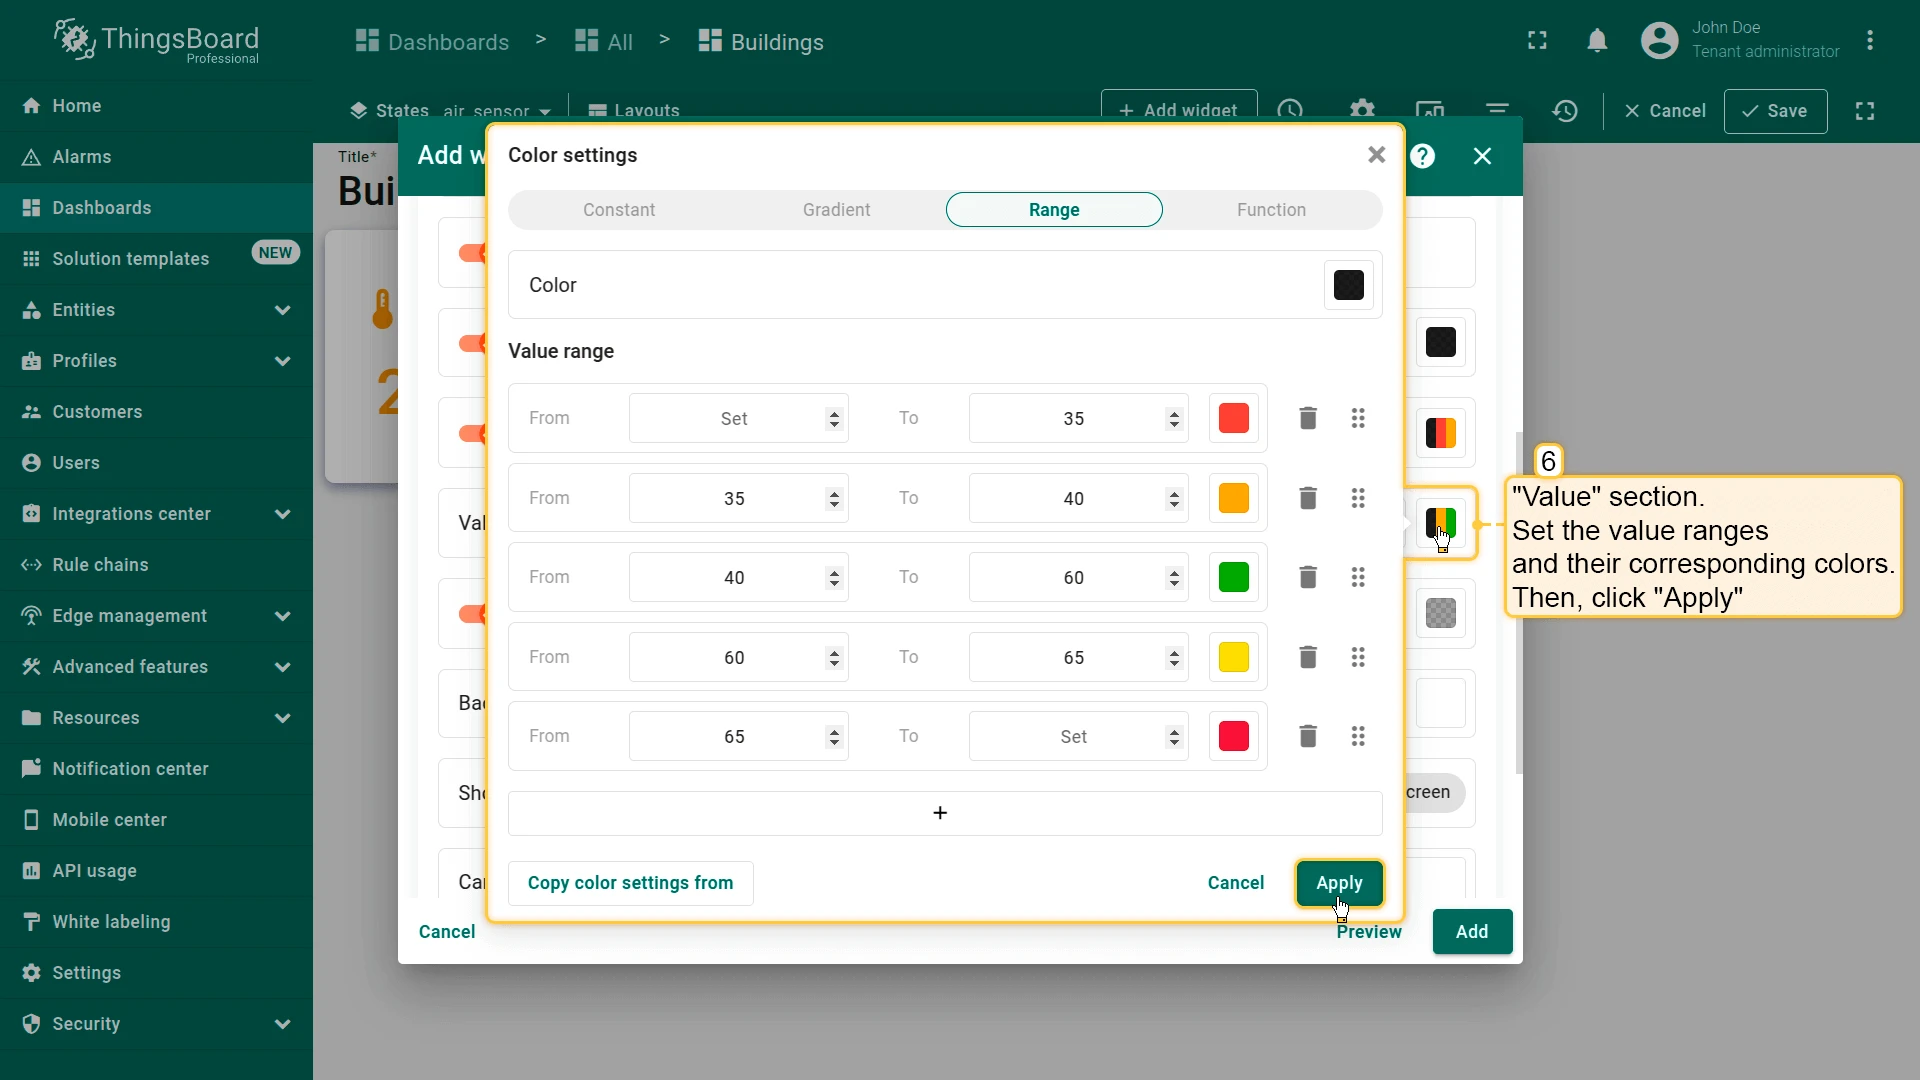
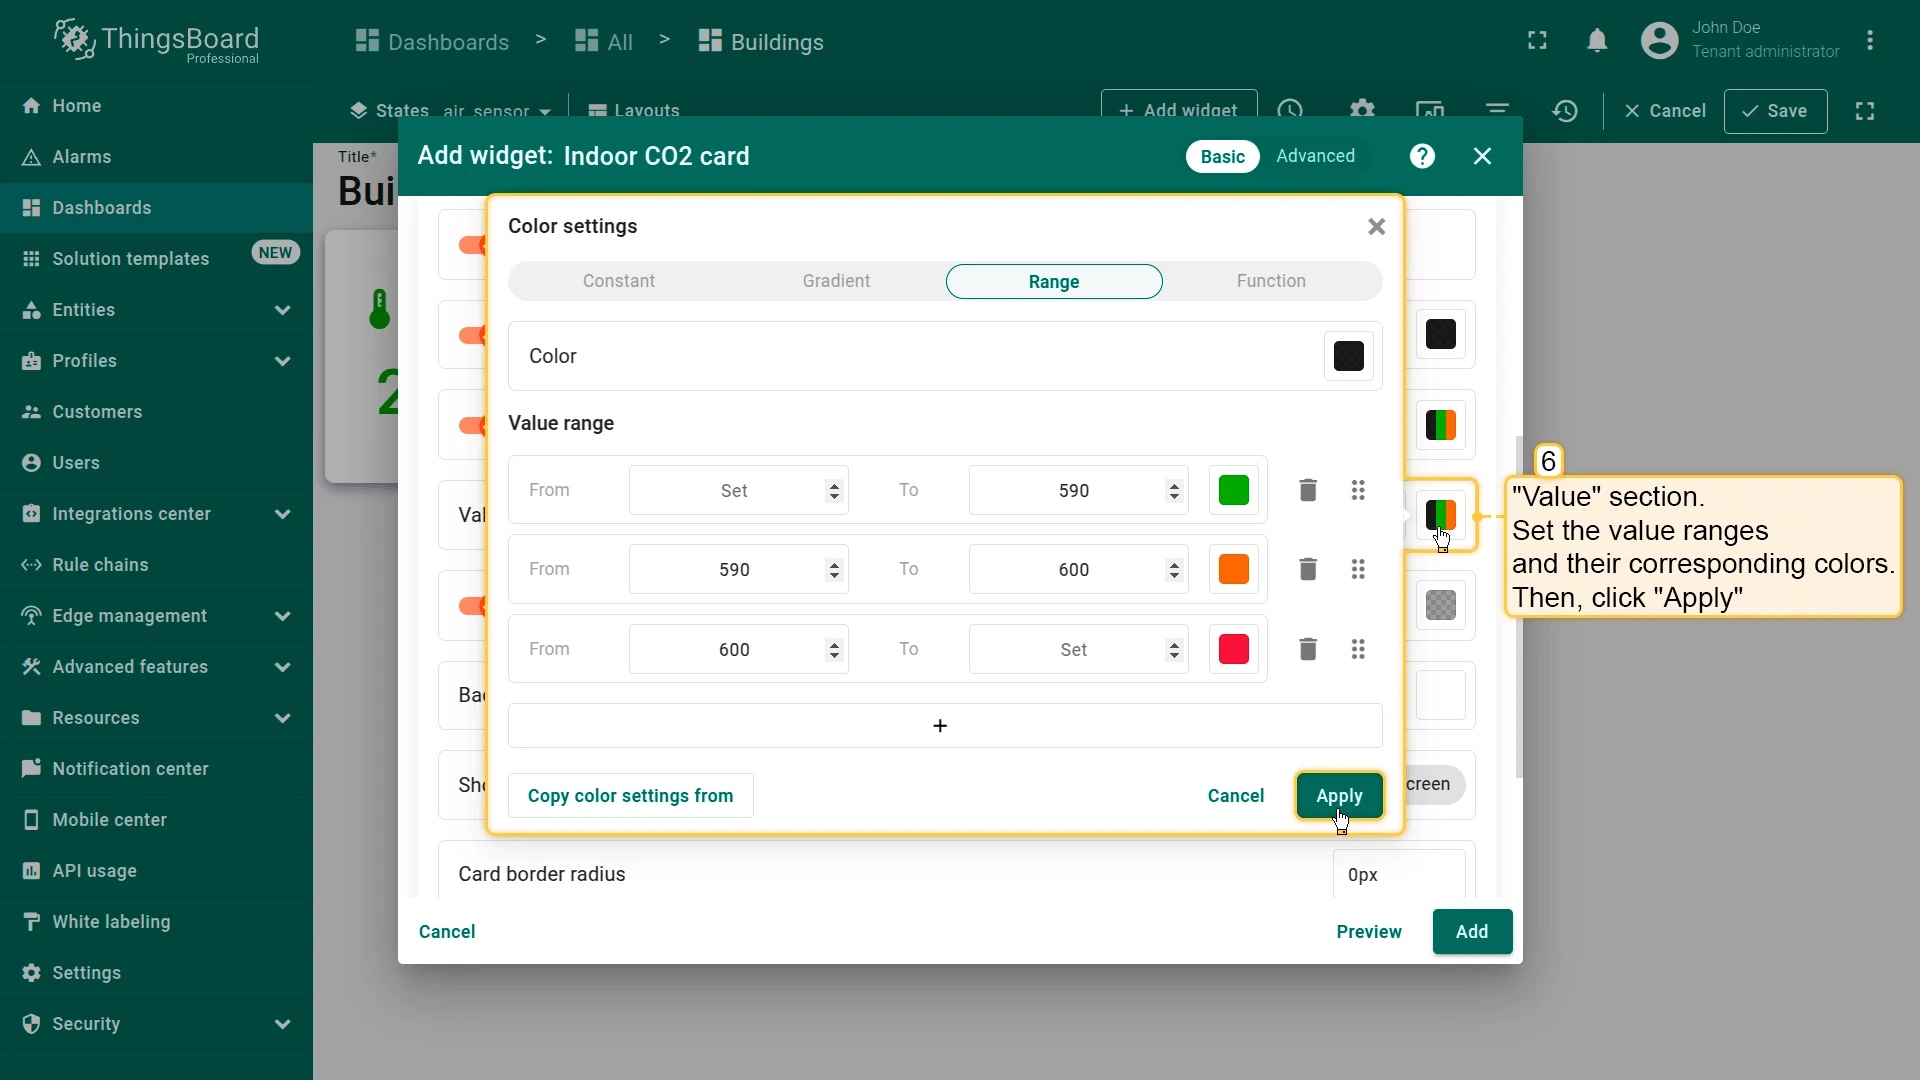
- Configure value ranges and colors for Icon and Value sections.
- Clear Card border radius and click Add.
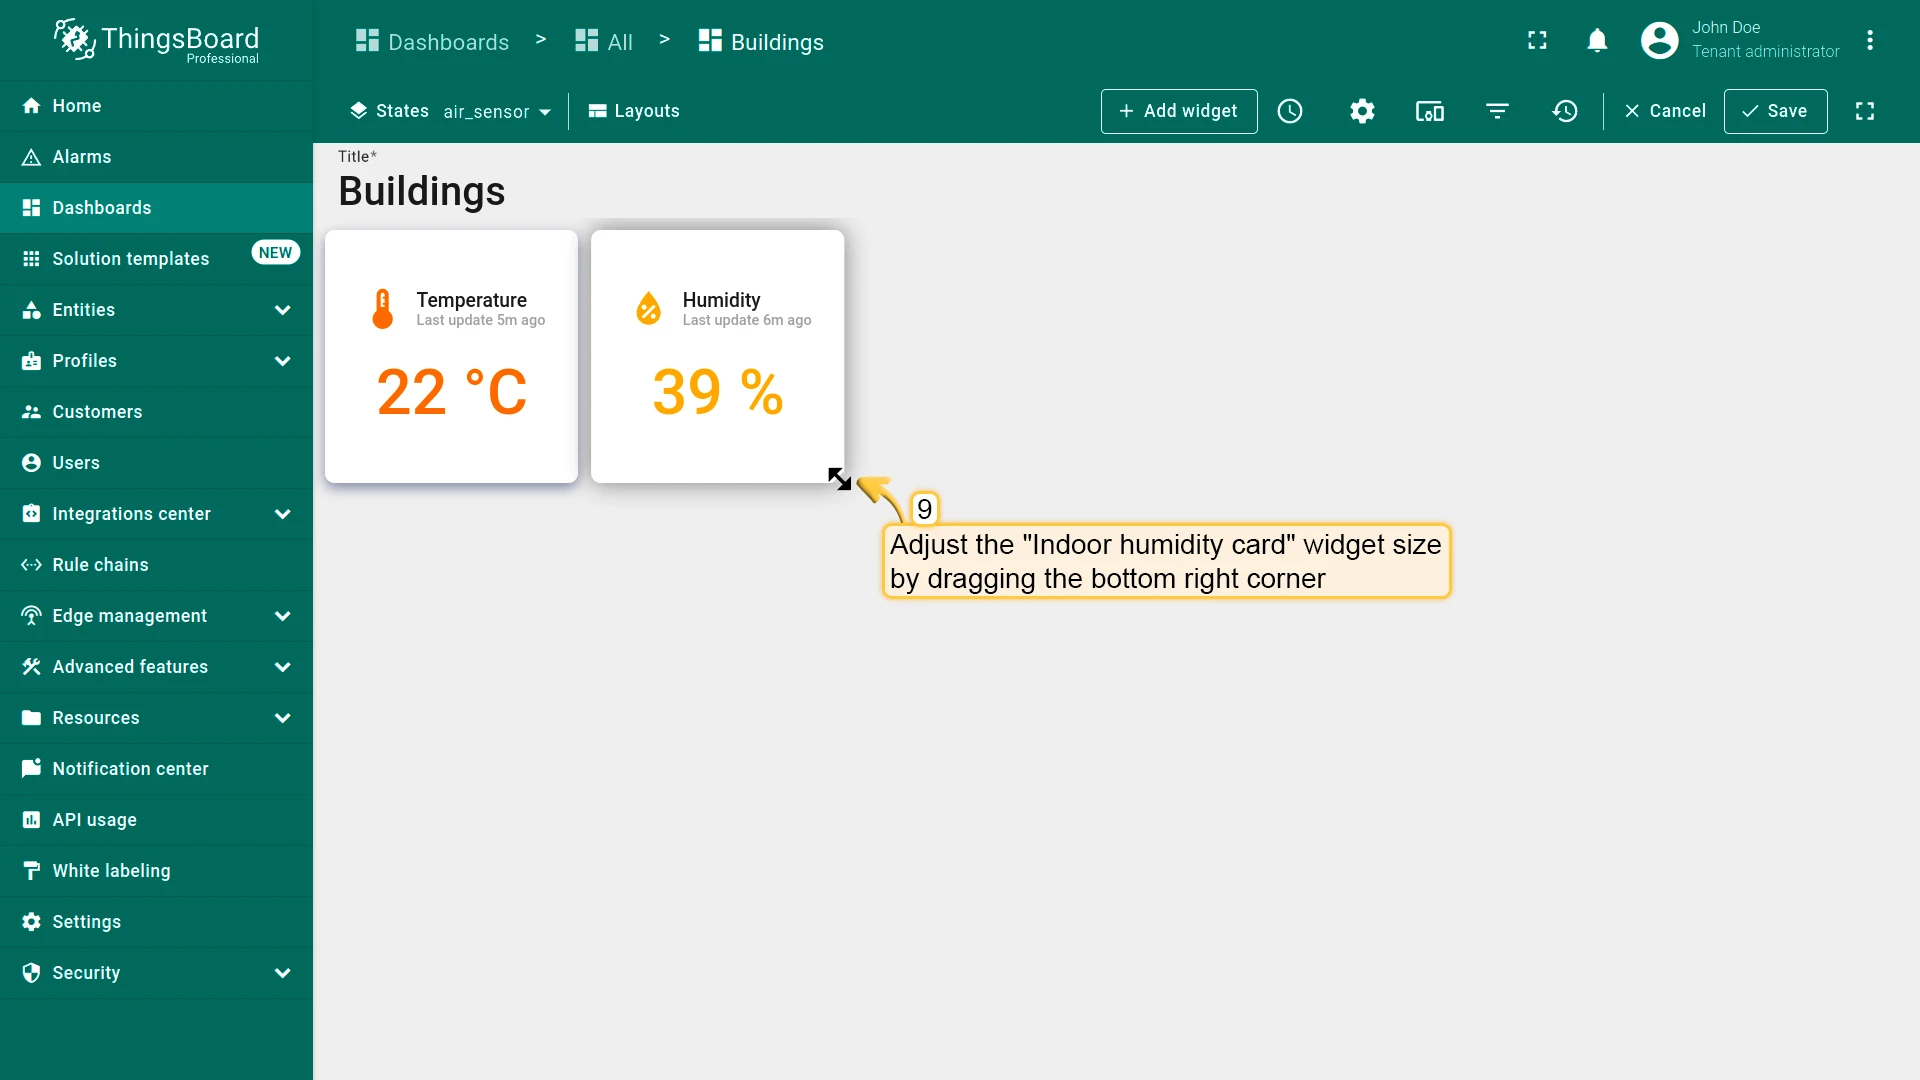
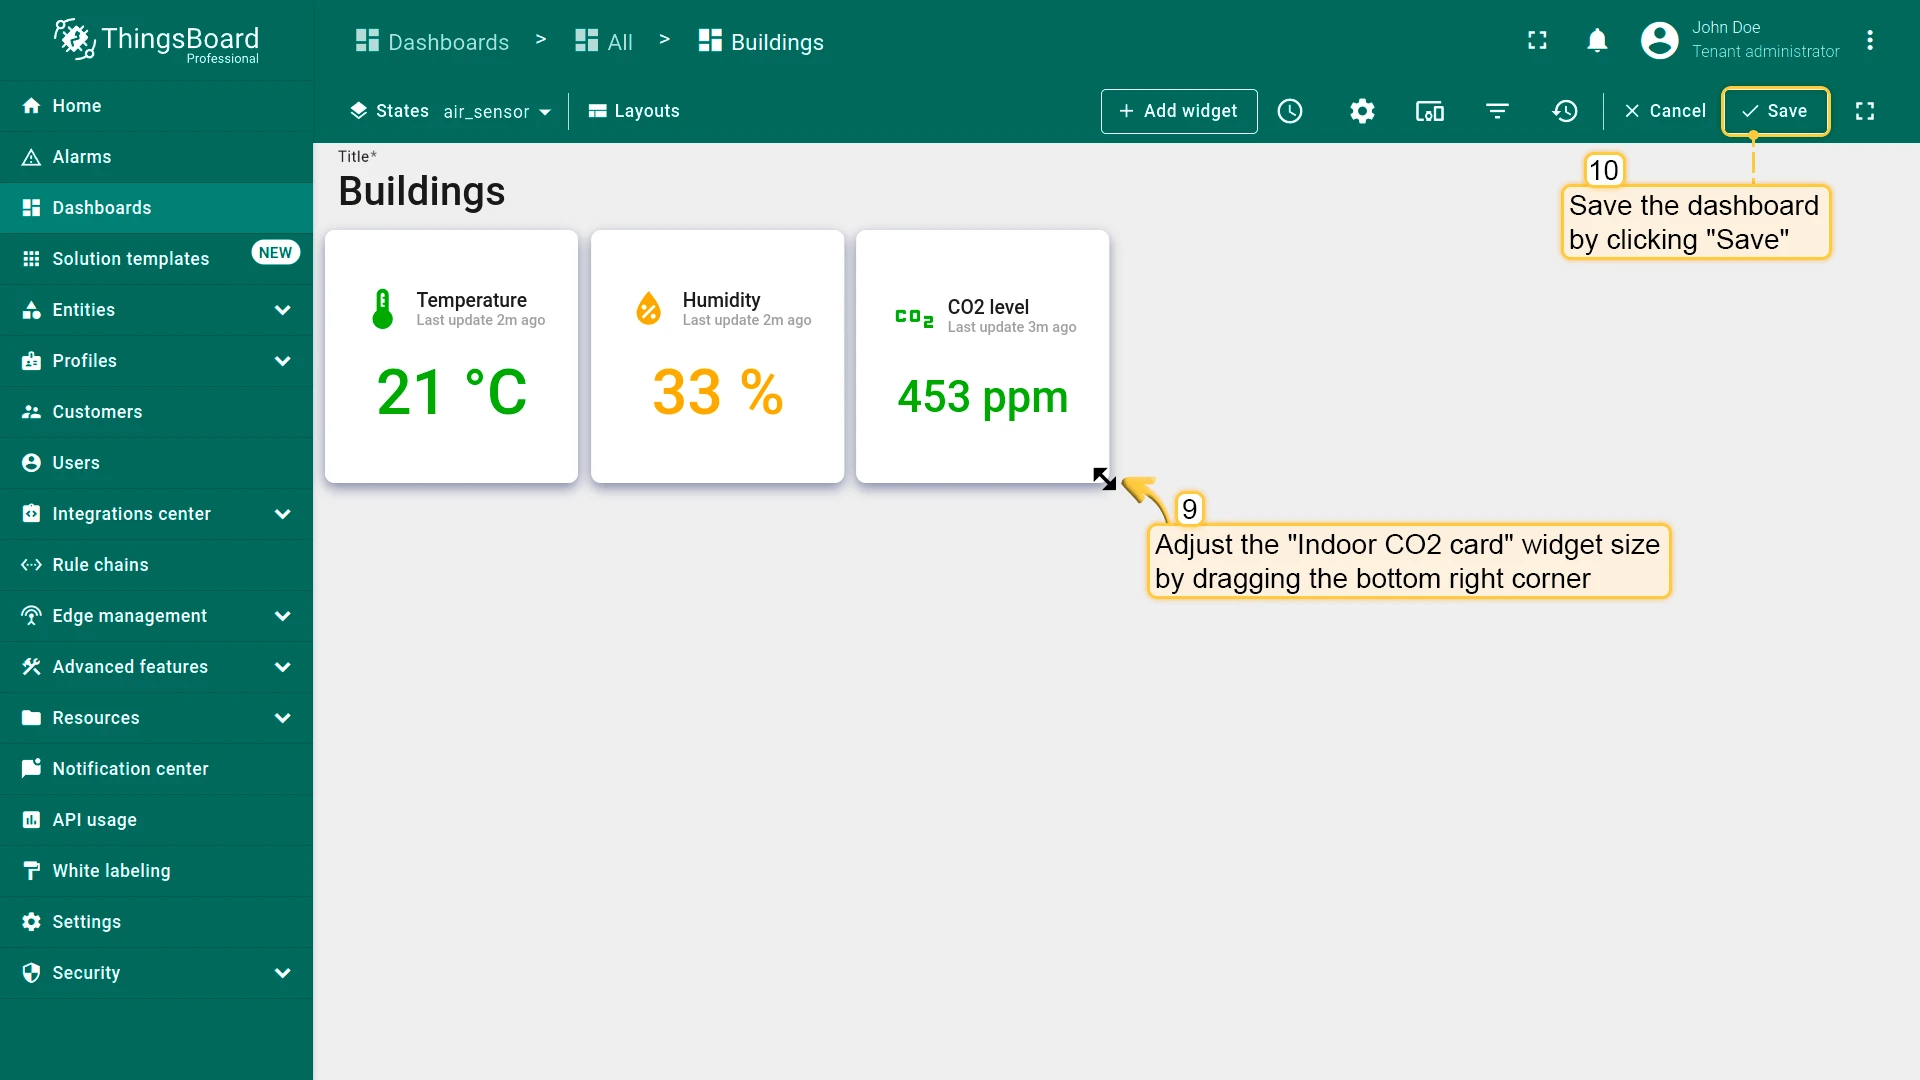
- Resize the widget as needed.

Humidity Card
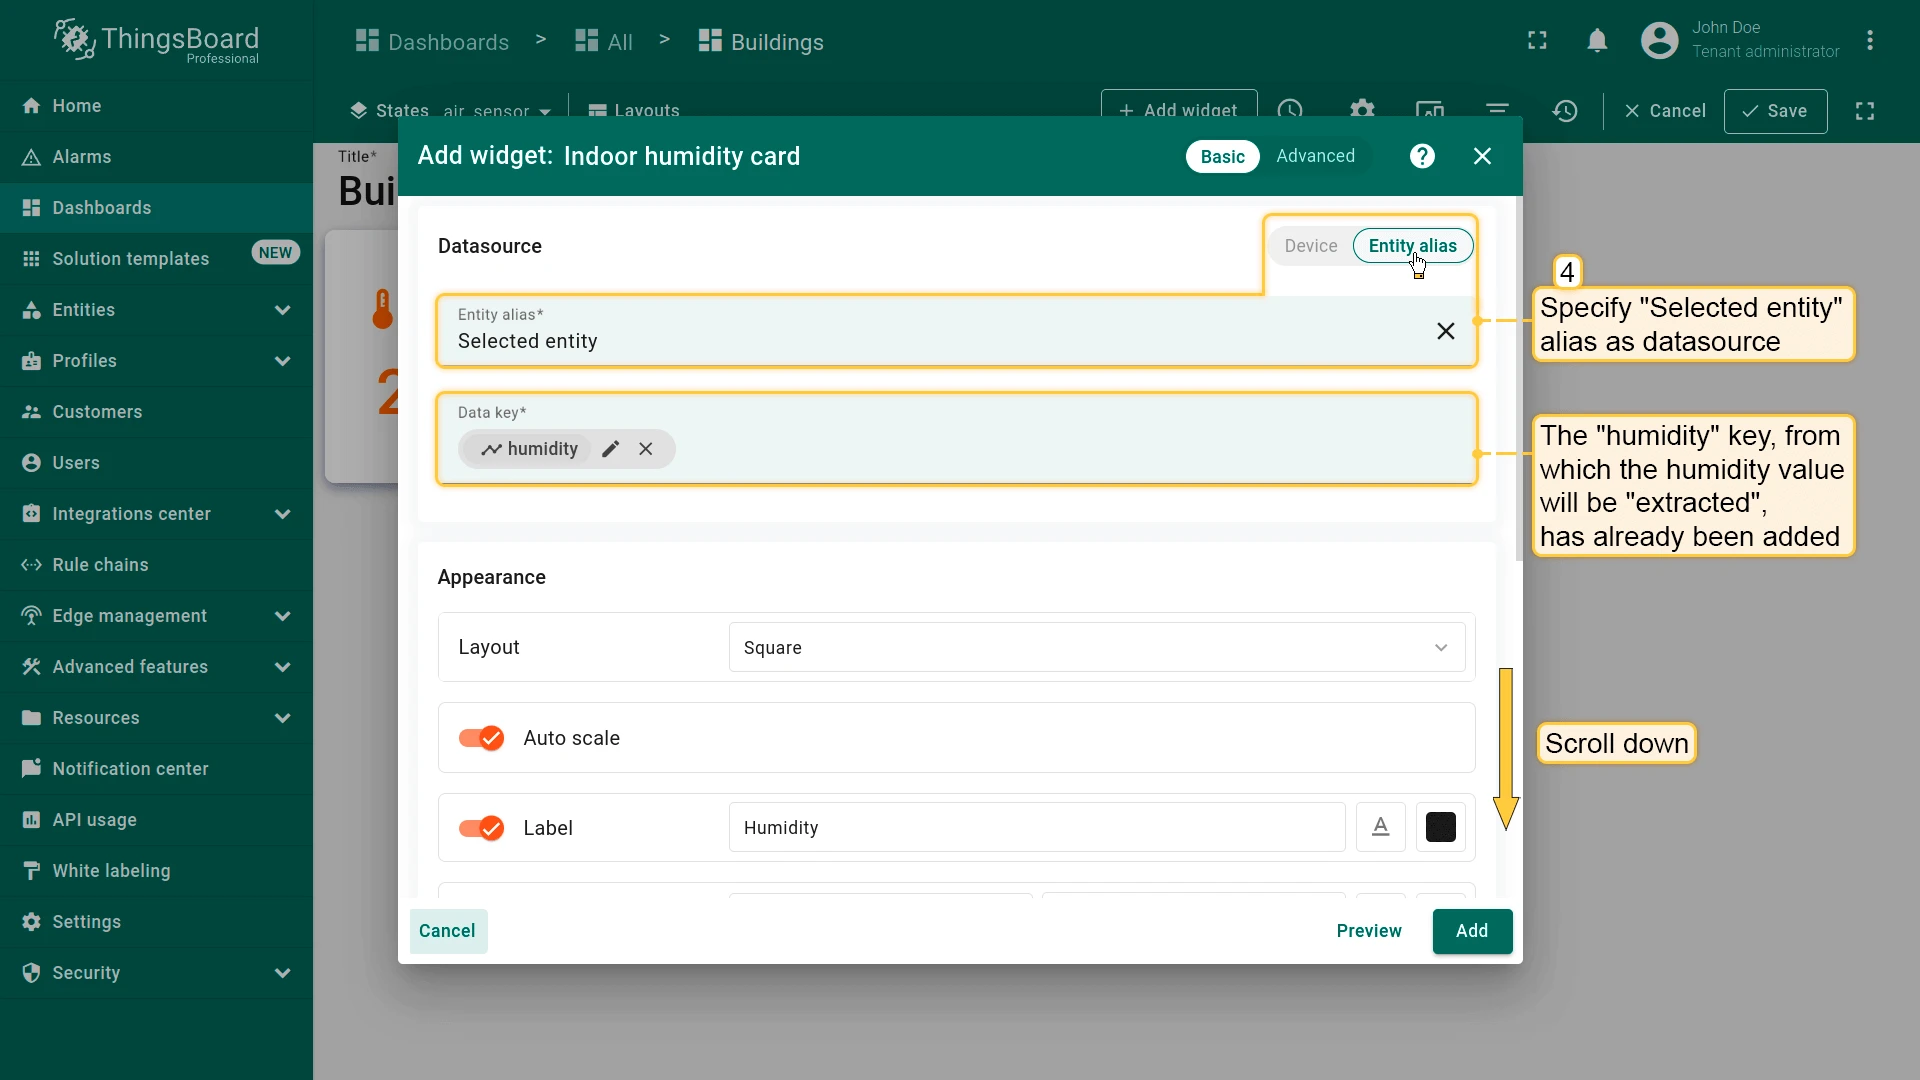
Section titled “Humidity Card”- Click + Add widget and select Indoor Environment ⇾ Indoor humidity card.
- Set datasource to Selected entity (use existing humidity key).
- Configure value ranges and colors for Icon and Value sections (e.g. normal 40–60 %, warning below 30 % or above 70 %).
- Clear Card border radius and click Add.
- Place the widget next to Temperature and resize.


CO2 Card
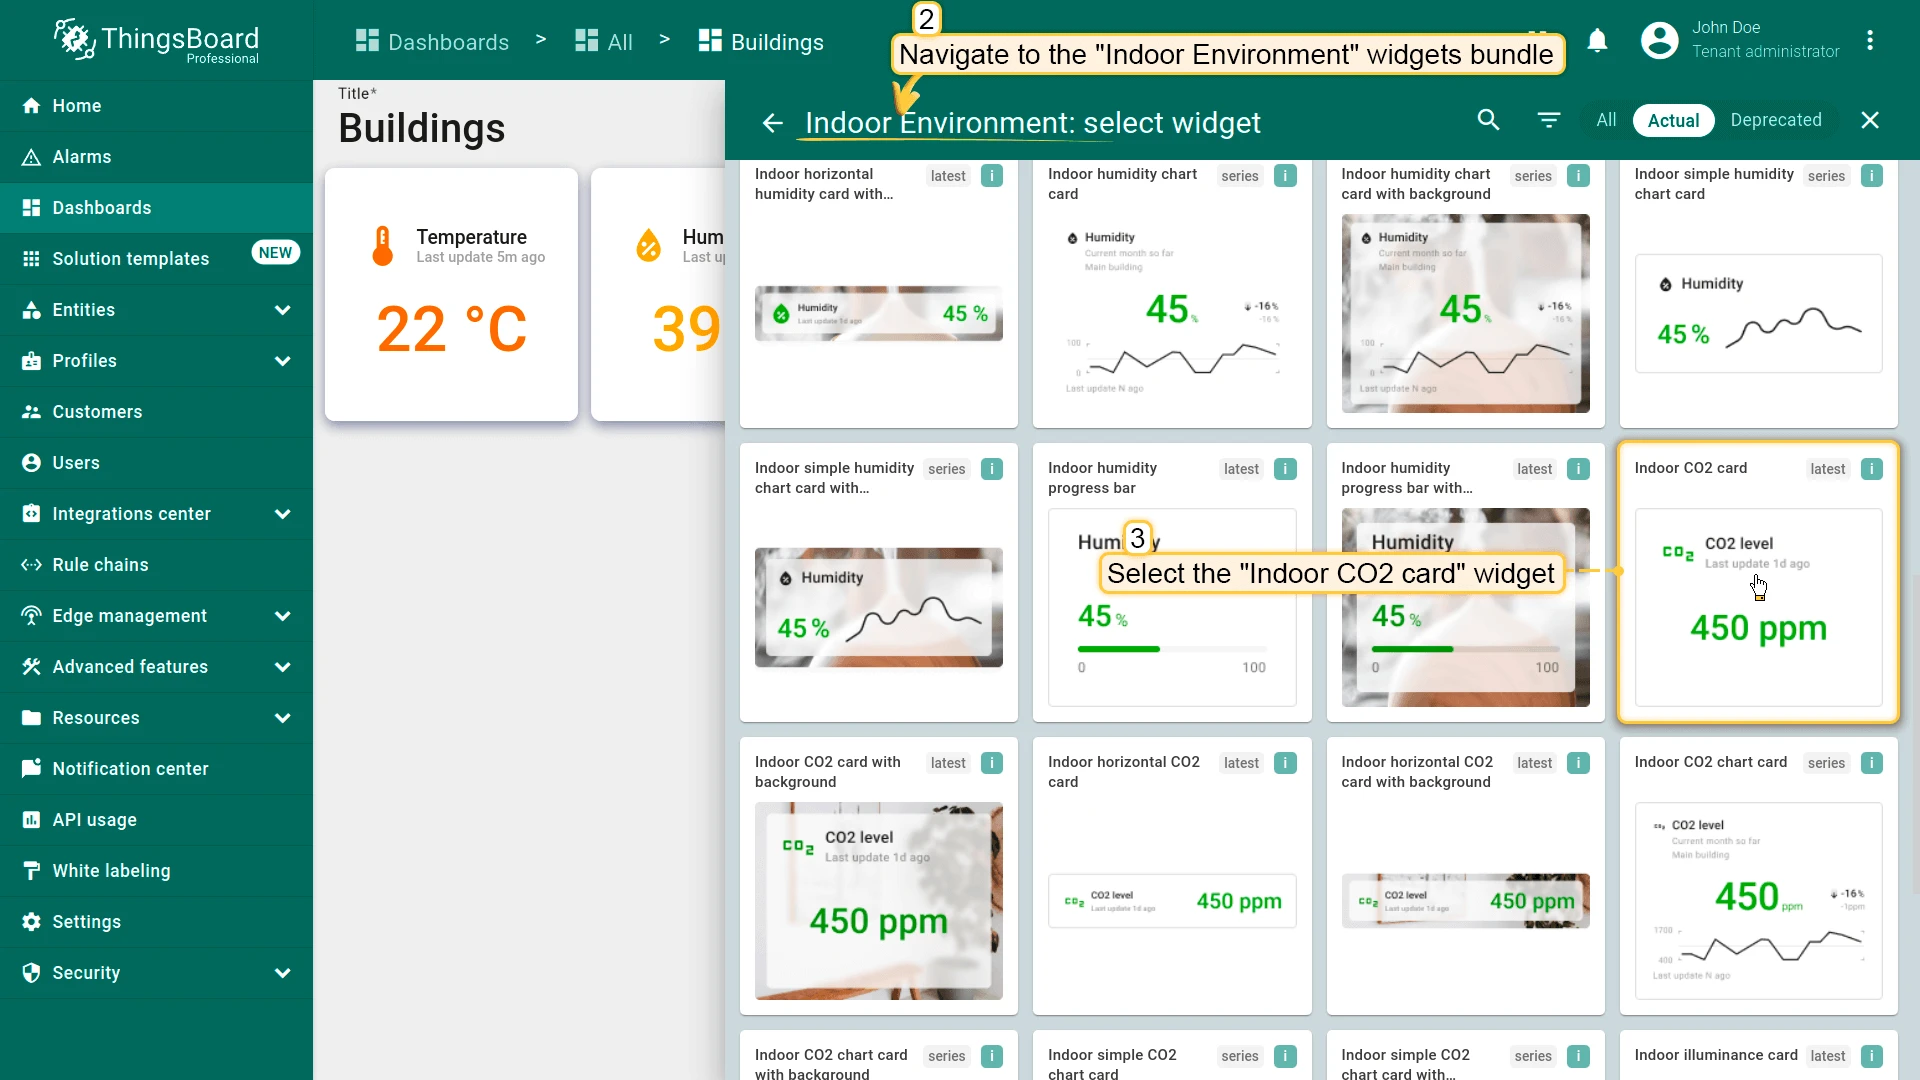
Section titled “CO2 Card”- Click + Add widget and select Indoor Environment ⇾ Indoor CO2 card.
- Set datasource to Selected entity (use existing CO2 key).
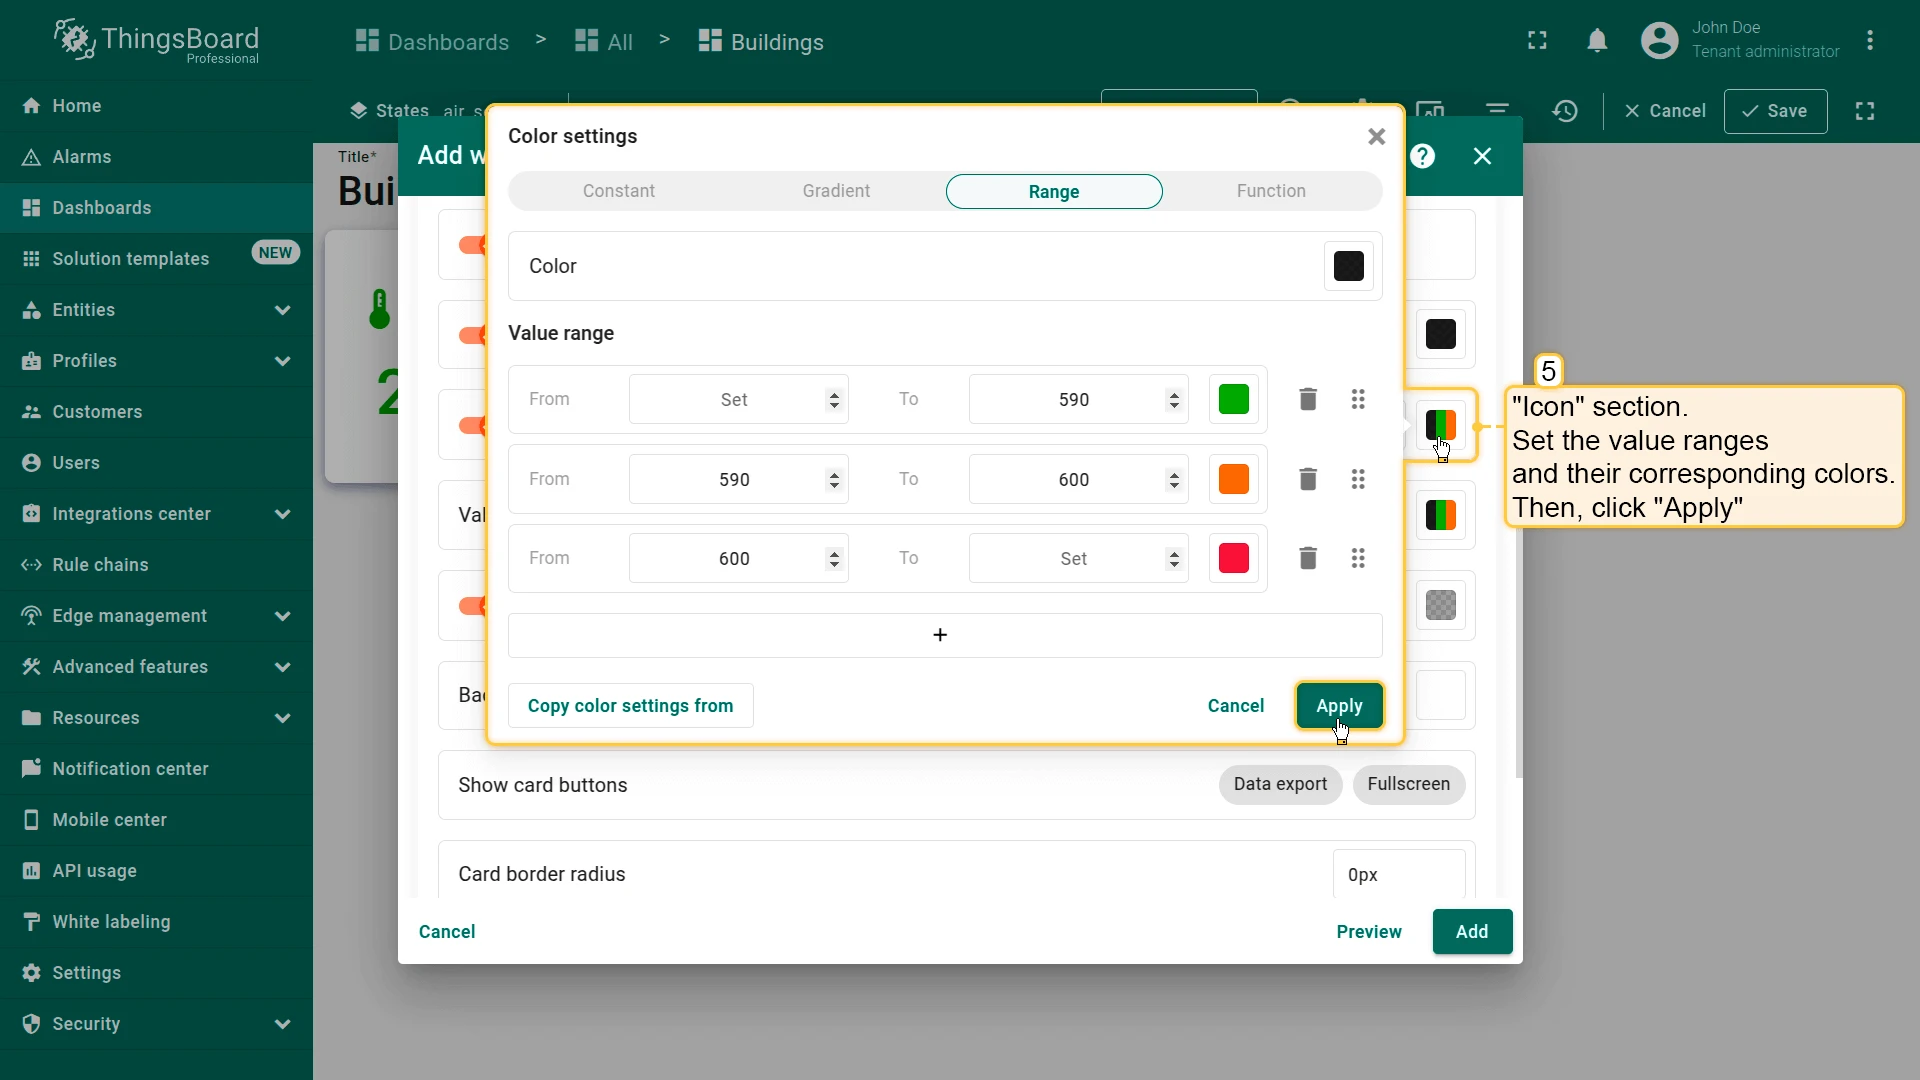
- Configure value ranges and colors for Icon and Value sections
- Clear Card border radius and click Add.
- Place the widget to the right of the humidity card, resize, and save the dashboard.


Temperature & Humidity Chart
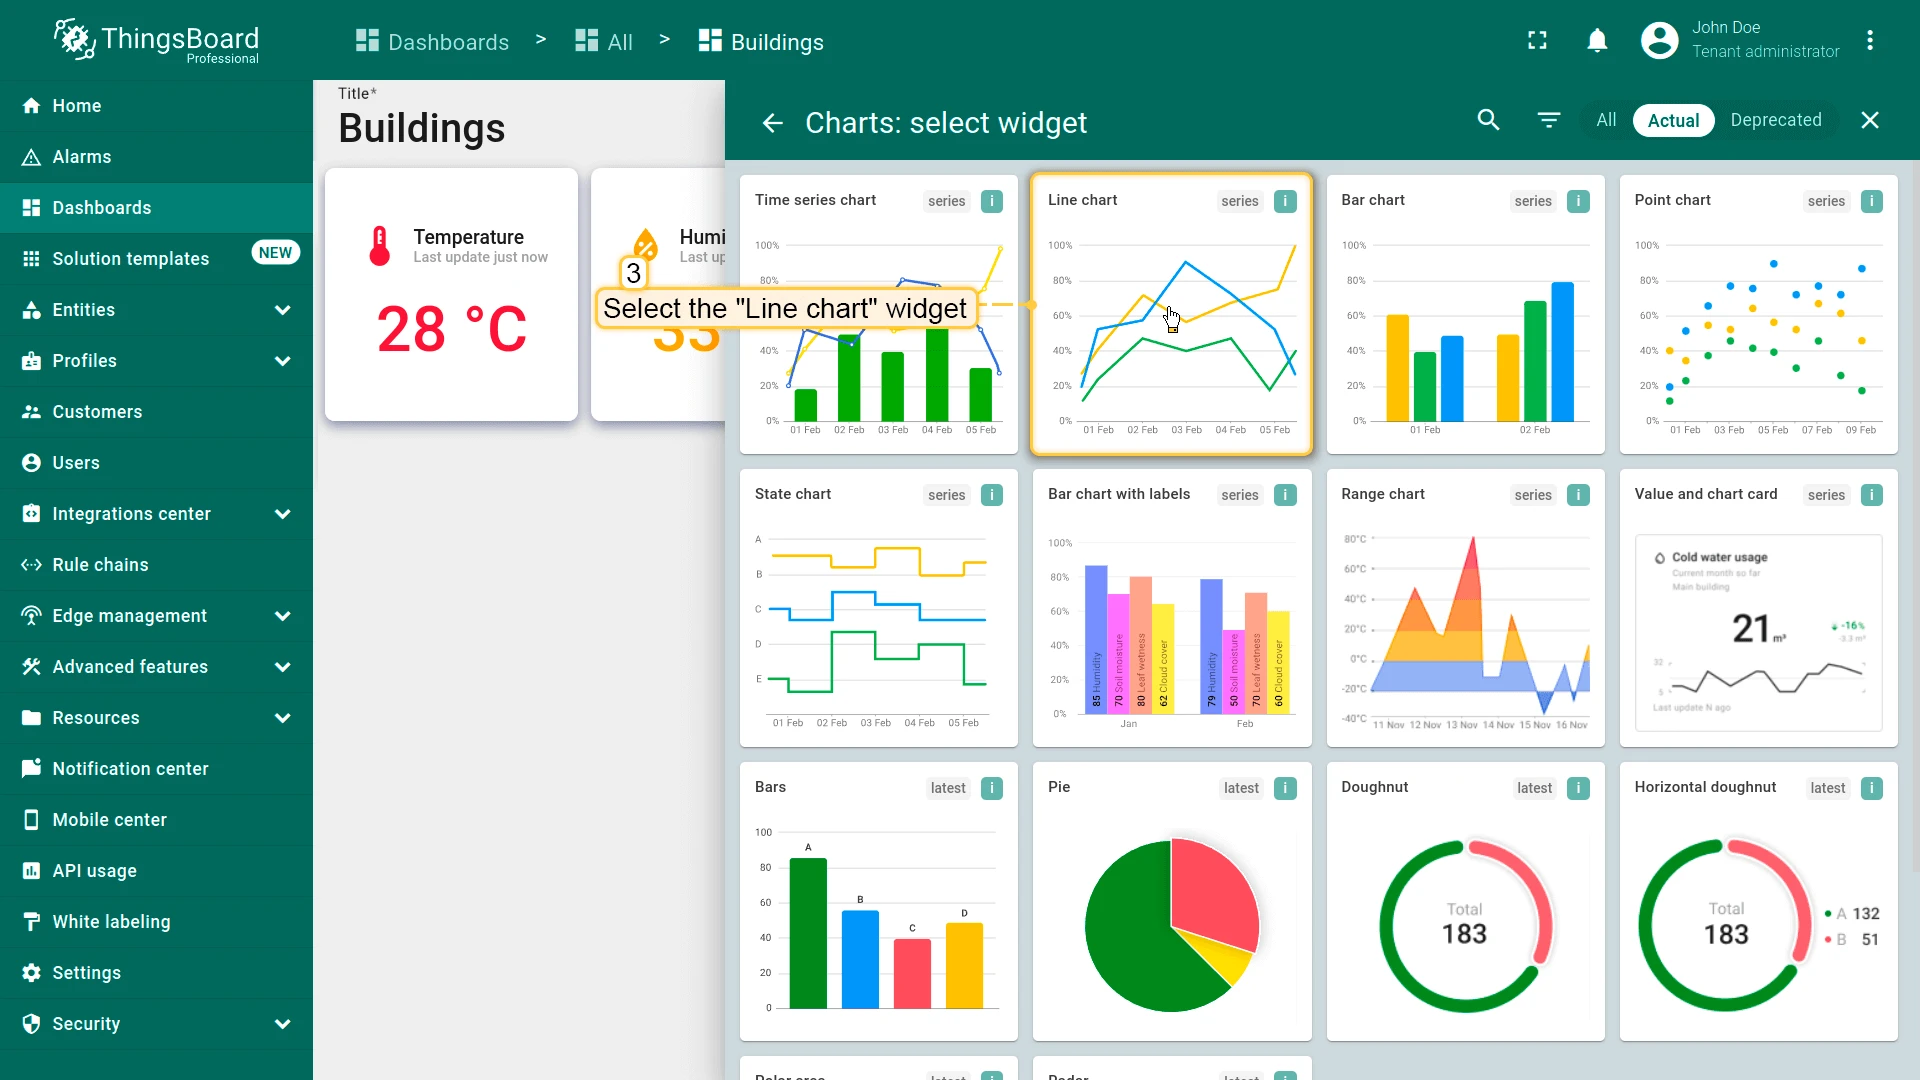
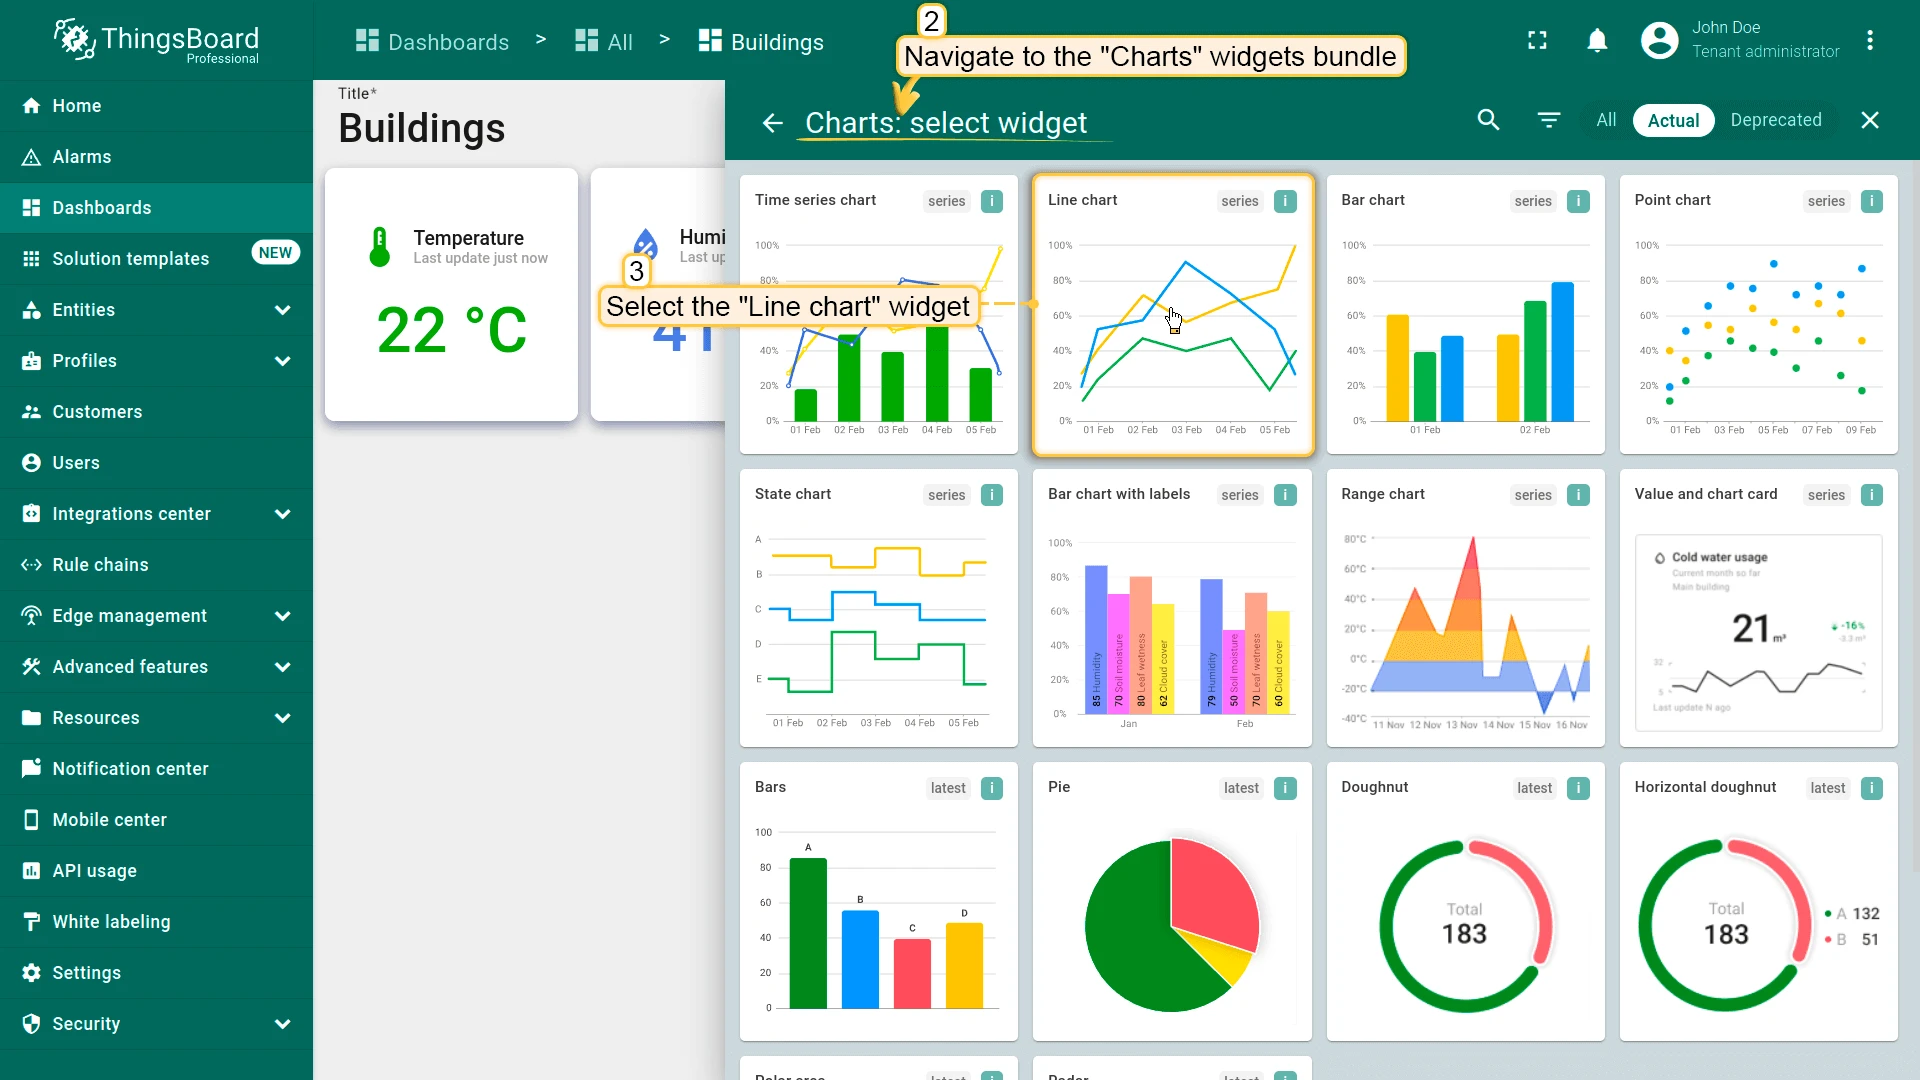
Section titled “Temperature & Humidity Chart”- Click + Add widget and select Charts ⇾ Line chart.
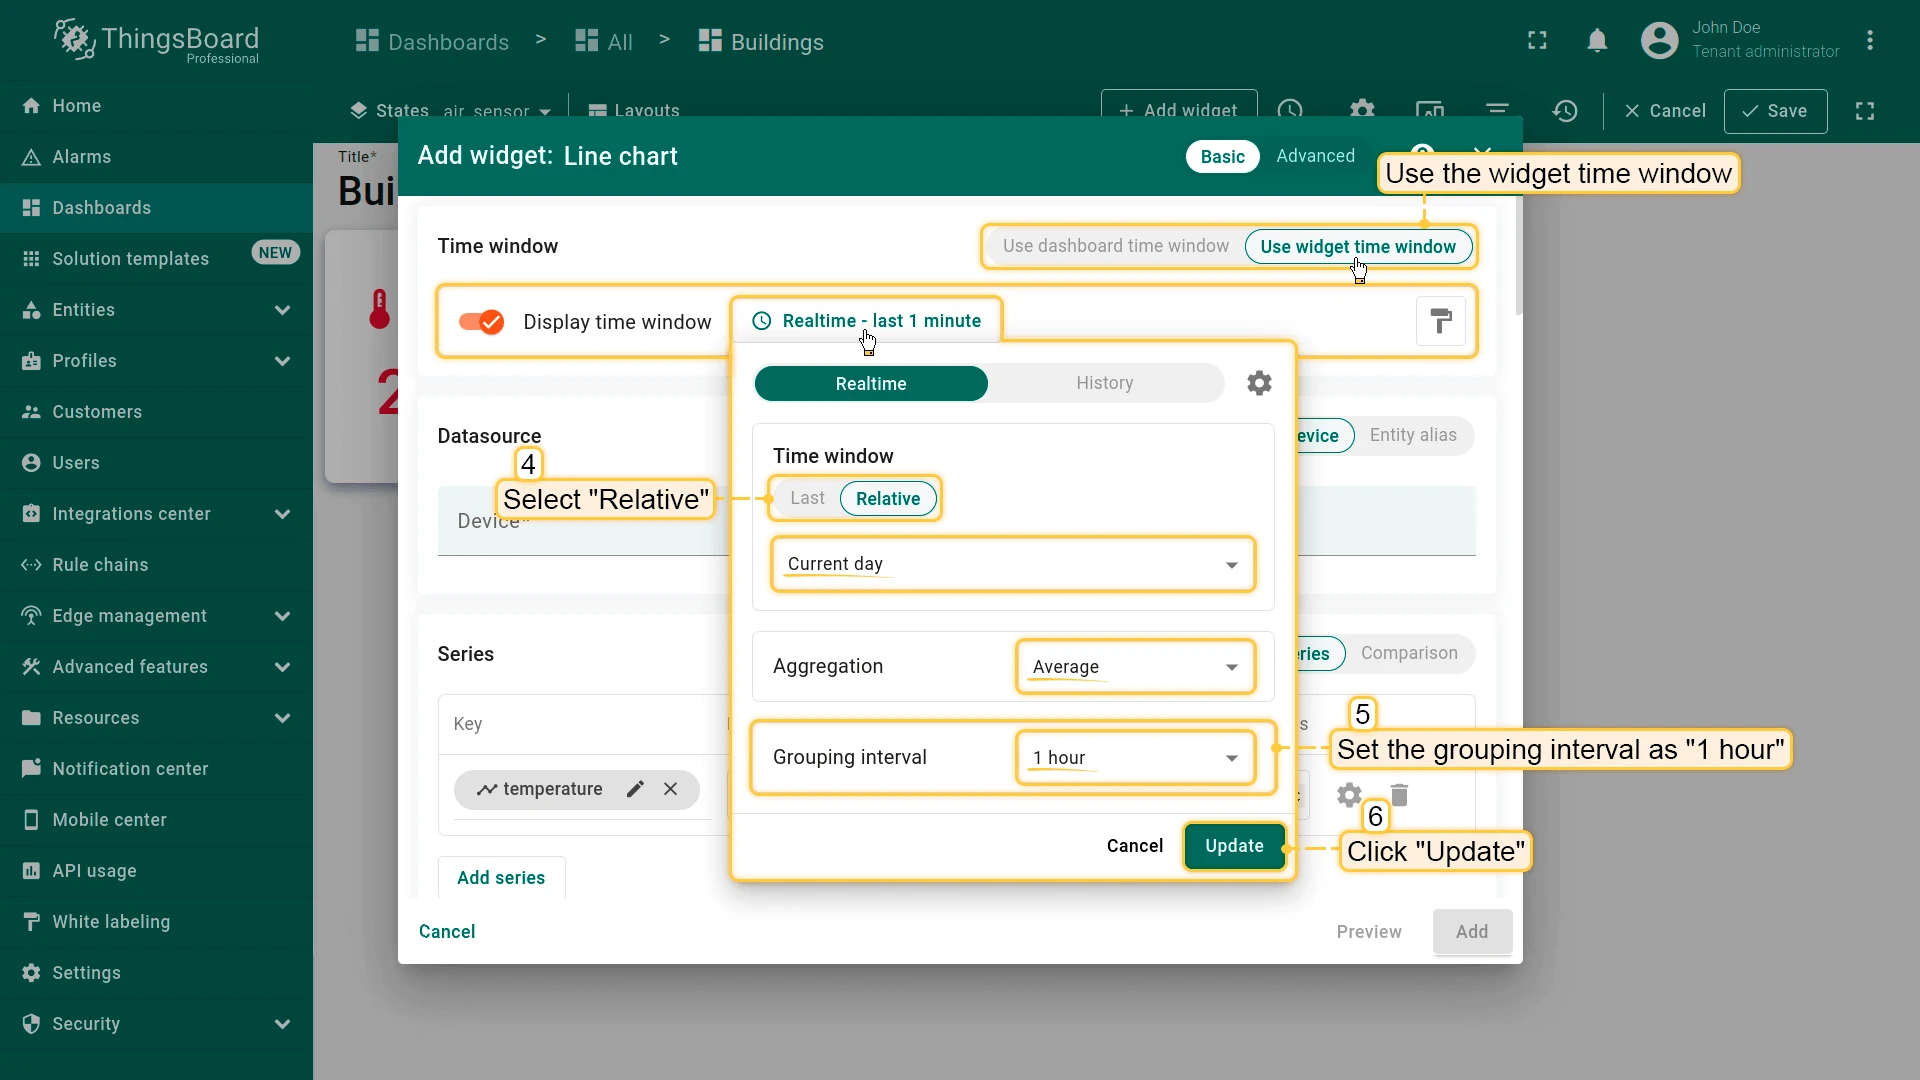
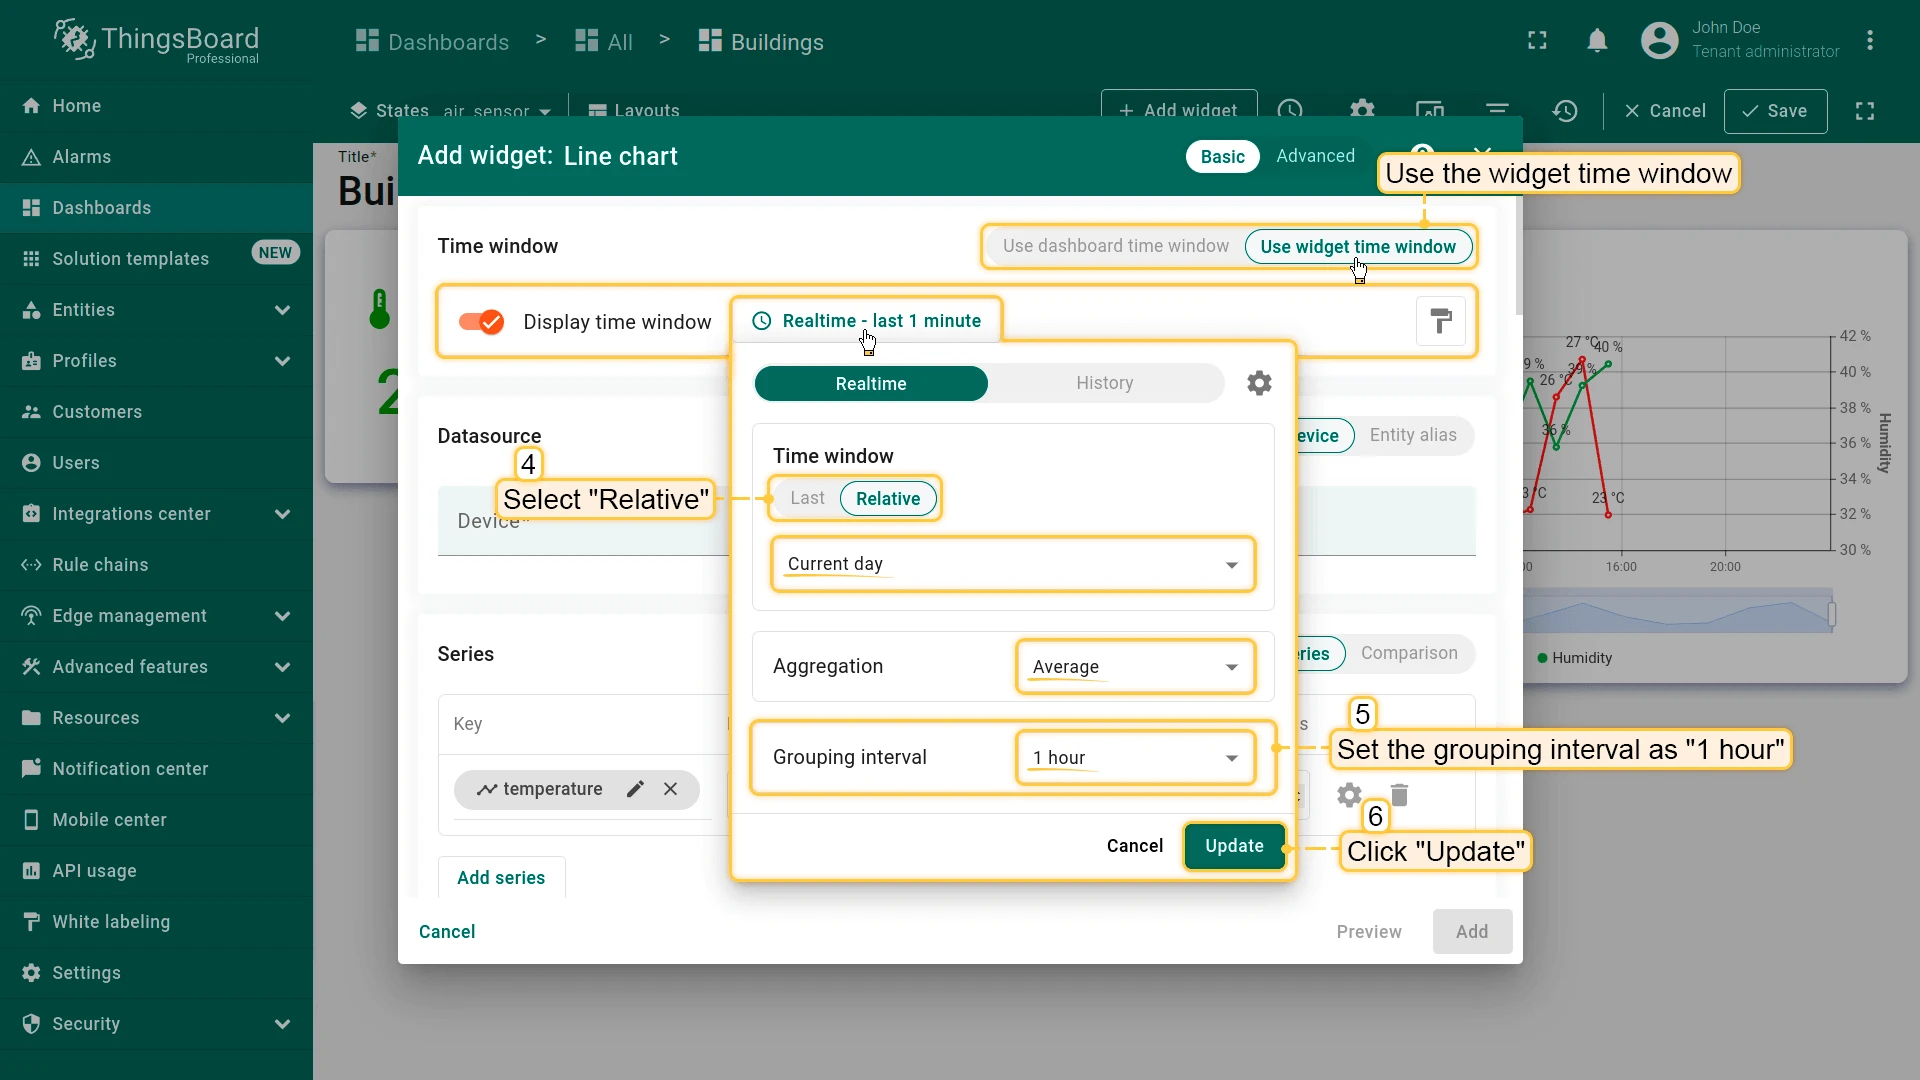
- Configure time window:
- Relative ⇾ Current day
- Average aggregation, 1 hour interval
- Click Update
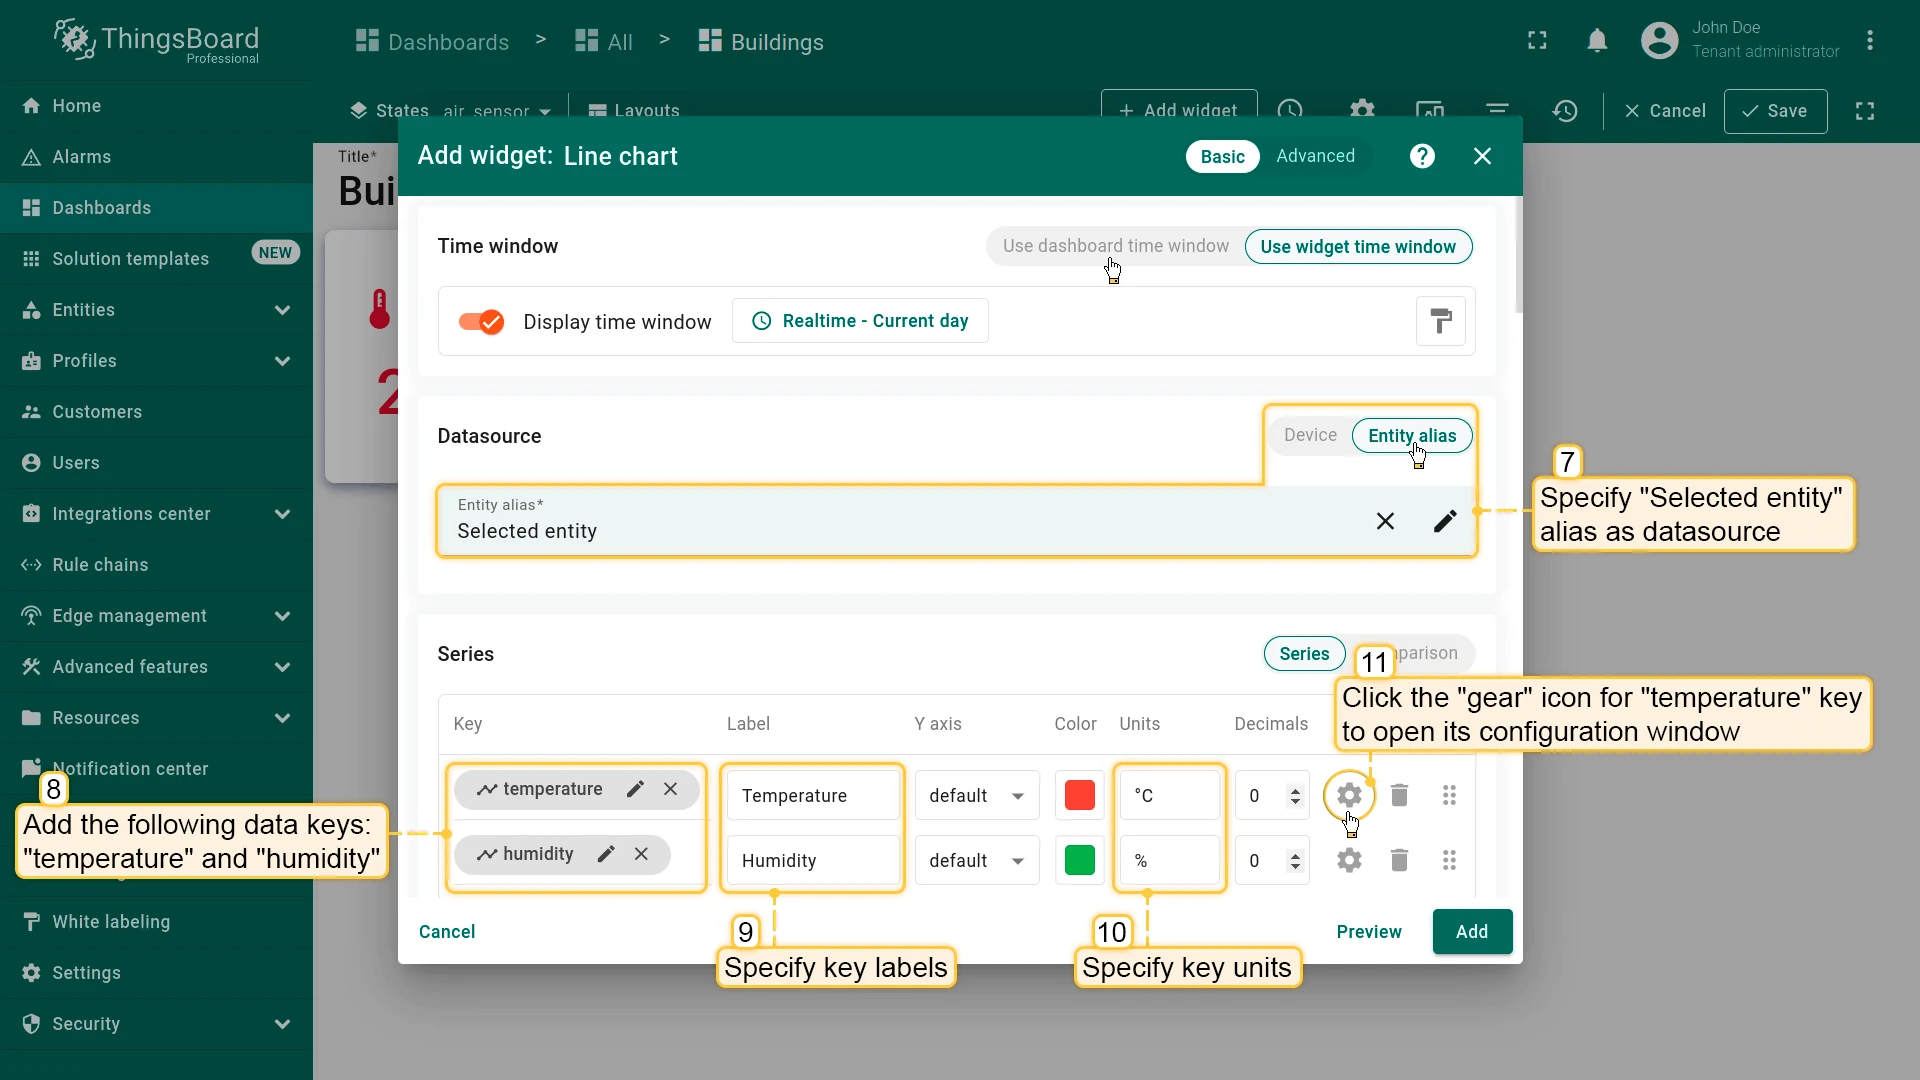
- Set datasource to Selected entity and add temperature and humidity keys with labels and units.
- Configure data keys: Enable Show points and Point label for both
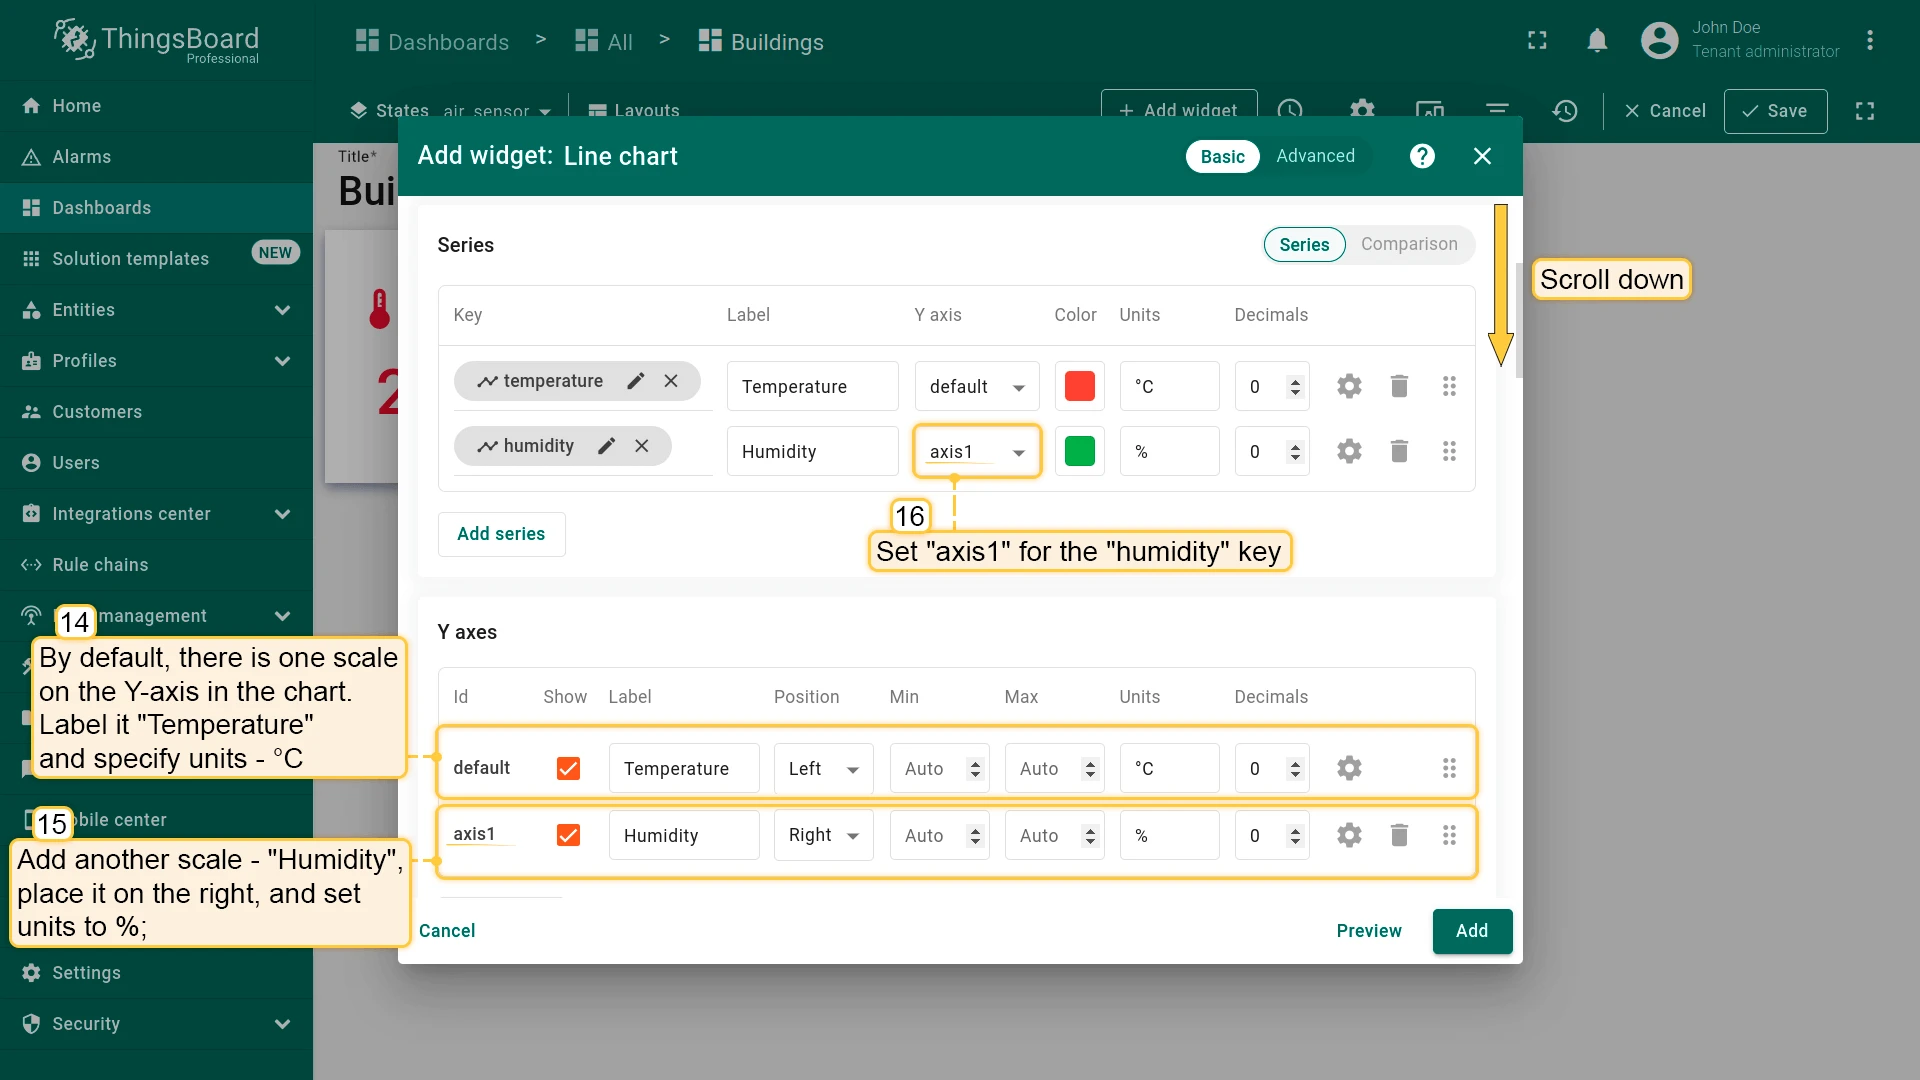
- Configure Y-axis:
- Left: Temperature (°C)
- Right: Humidity (%) (assign to humidity)
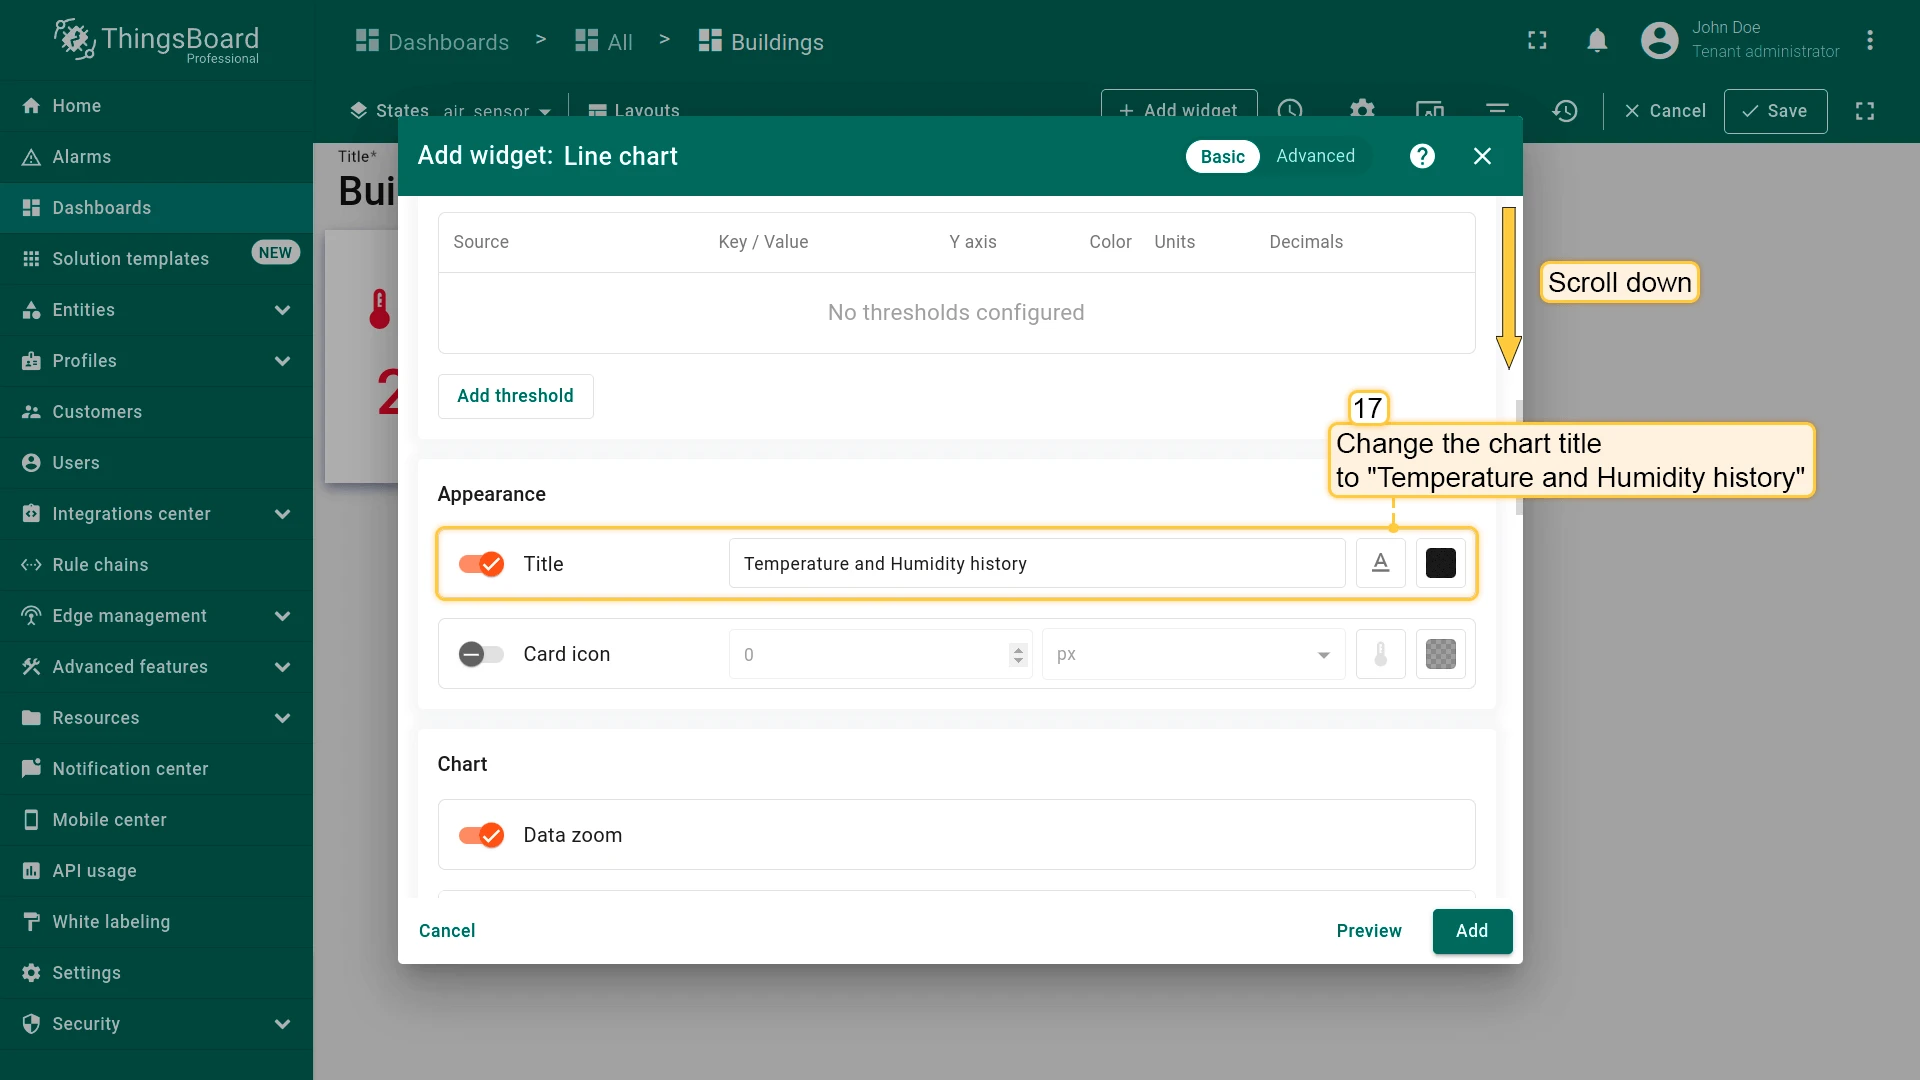
- Set title to Temperature and Humidity history.
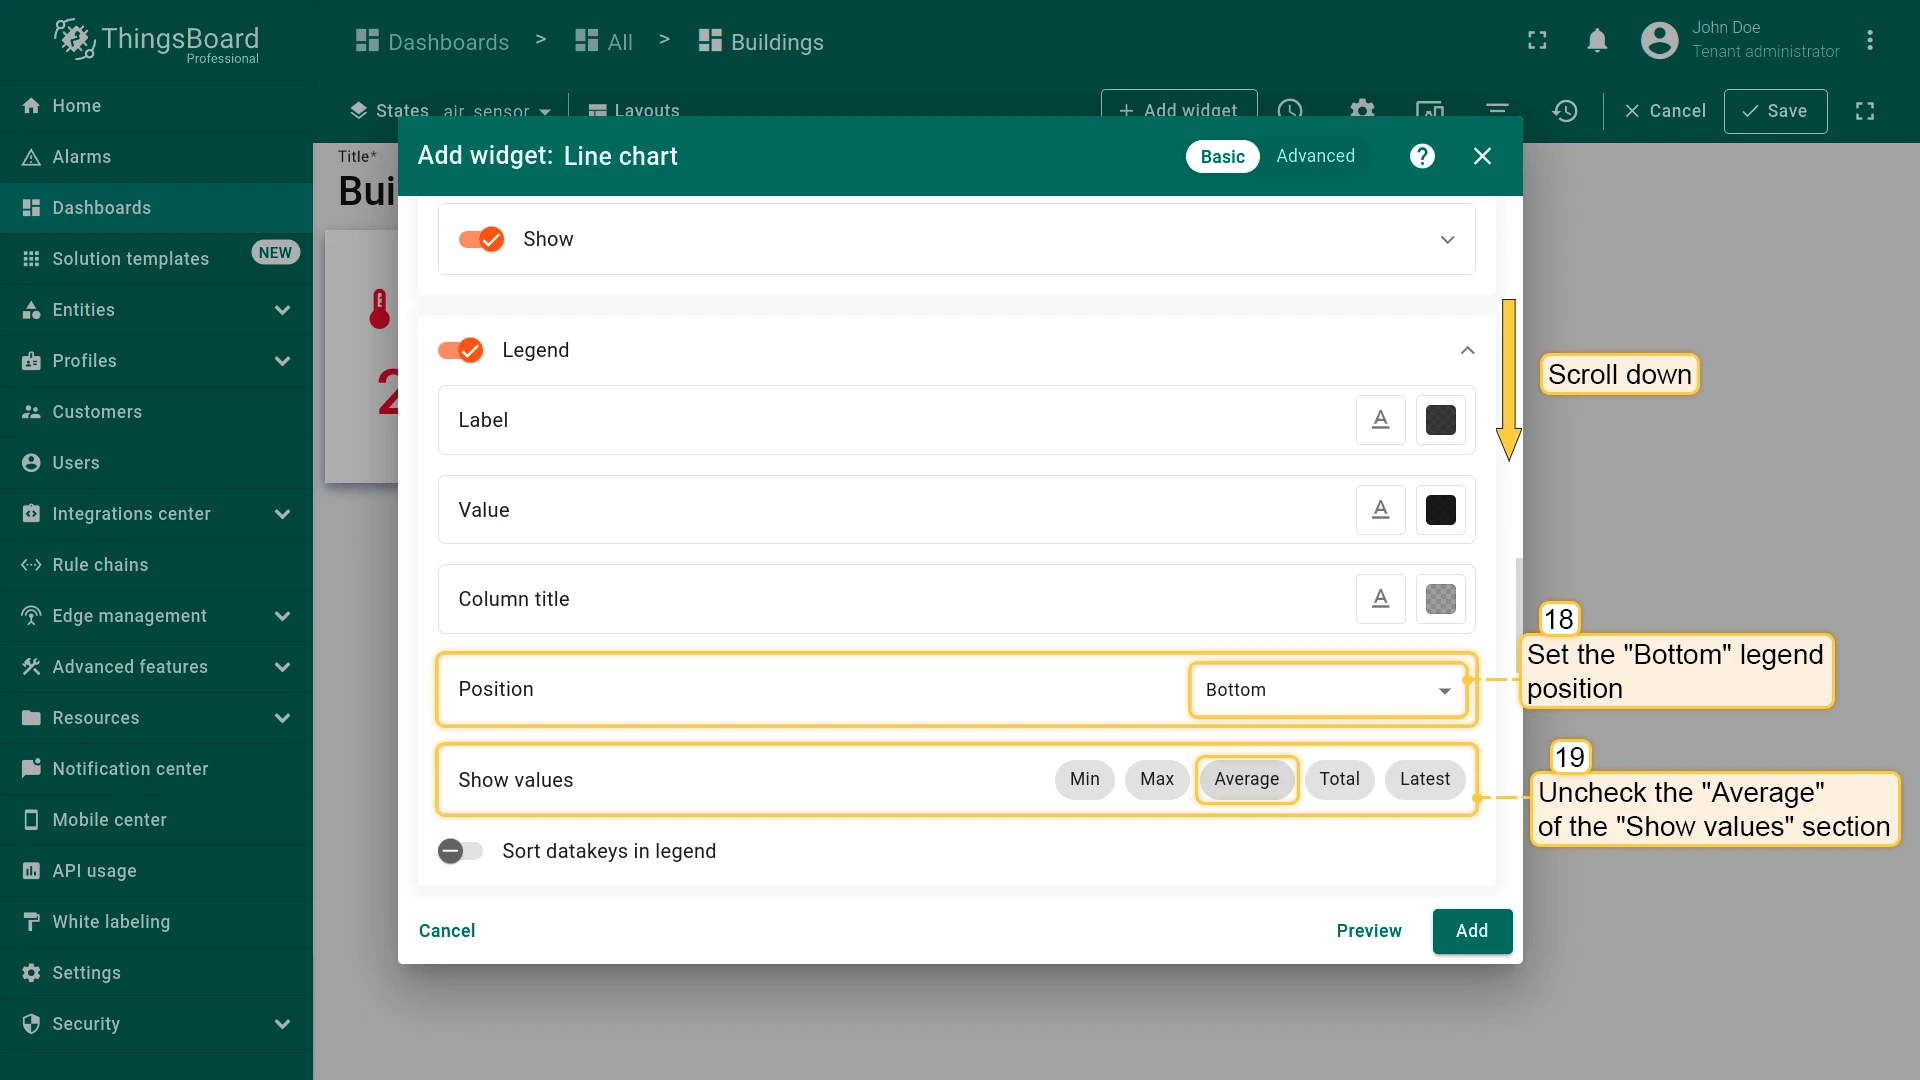
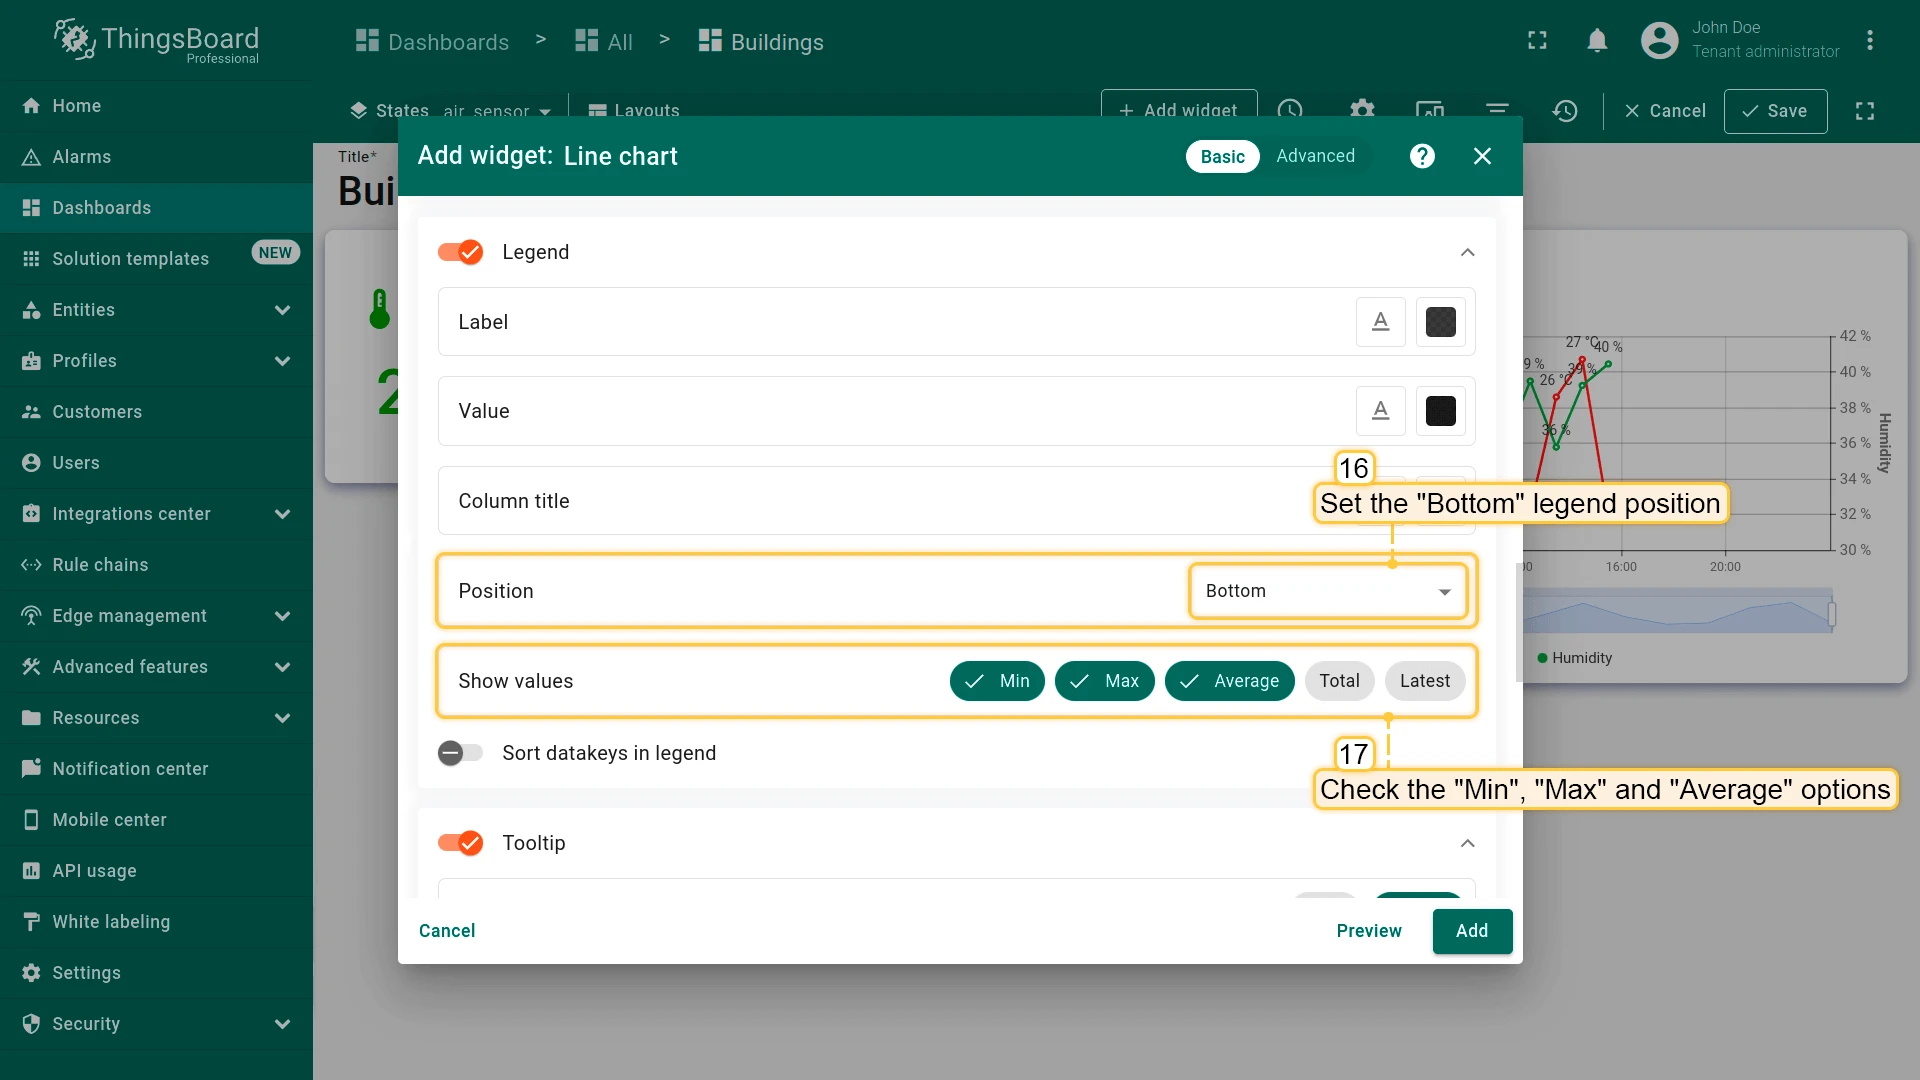
- Configure legend (Bottom, disable Average).
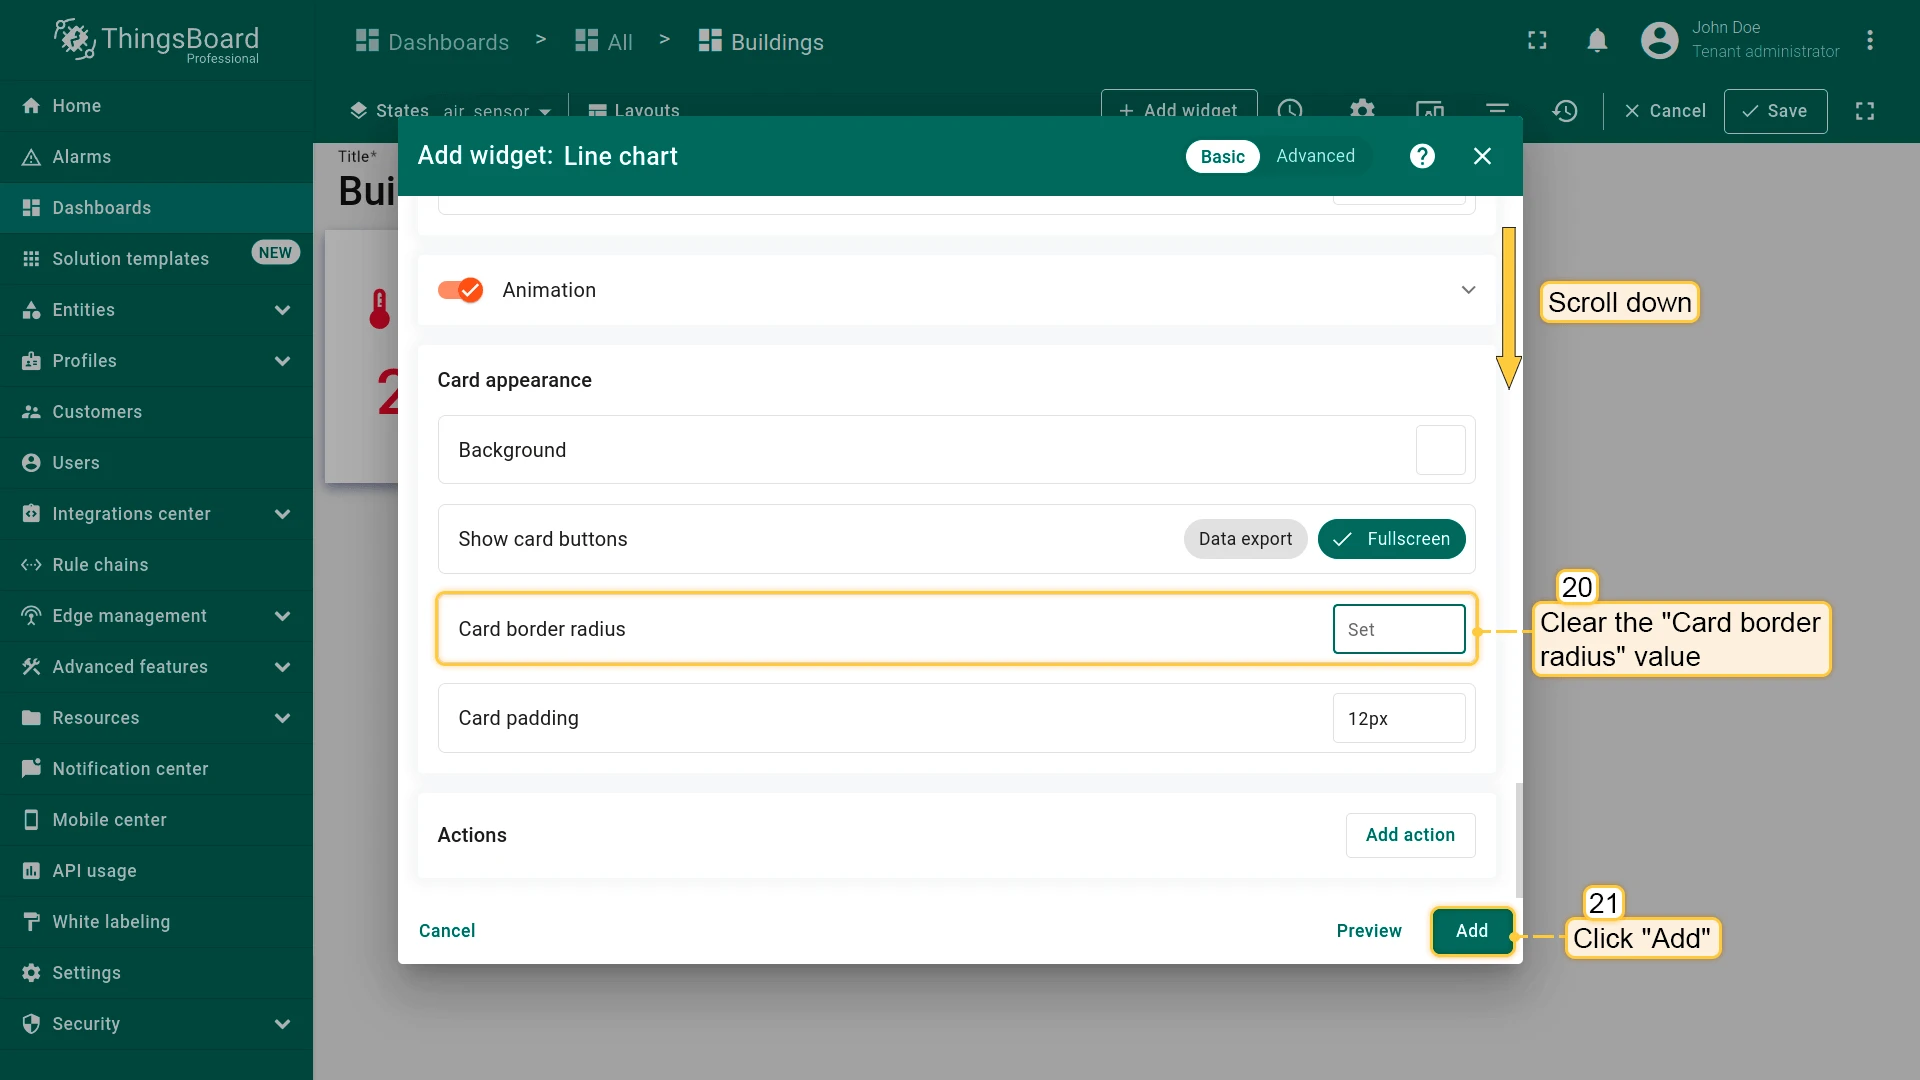
- Clear Card border radius and click Add.
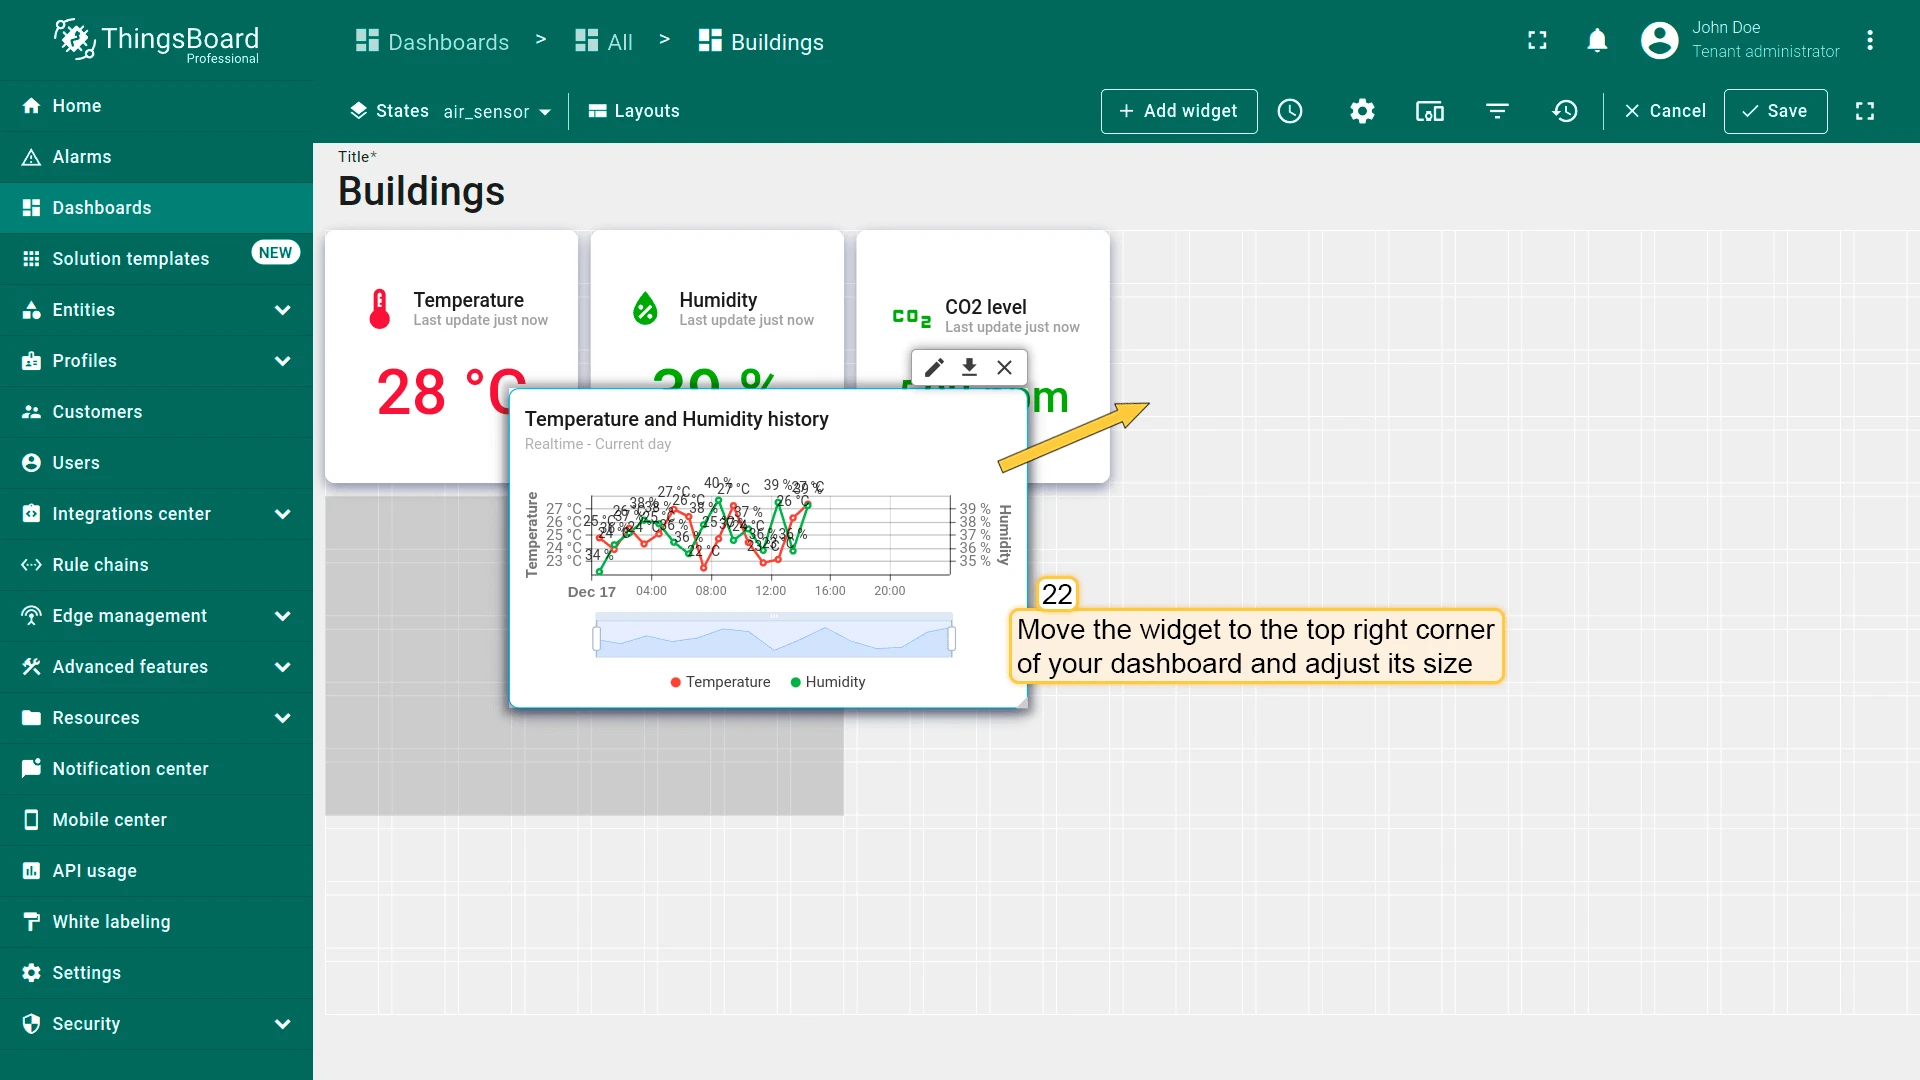
- Place the widget in the top-right corner, resize, and save the dashboard.

CO2 Chart
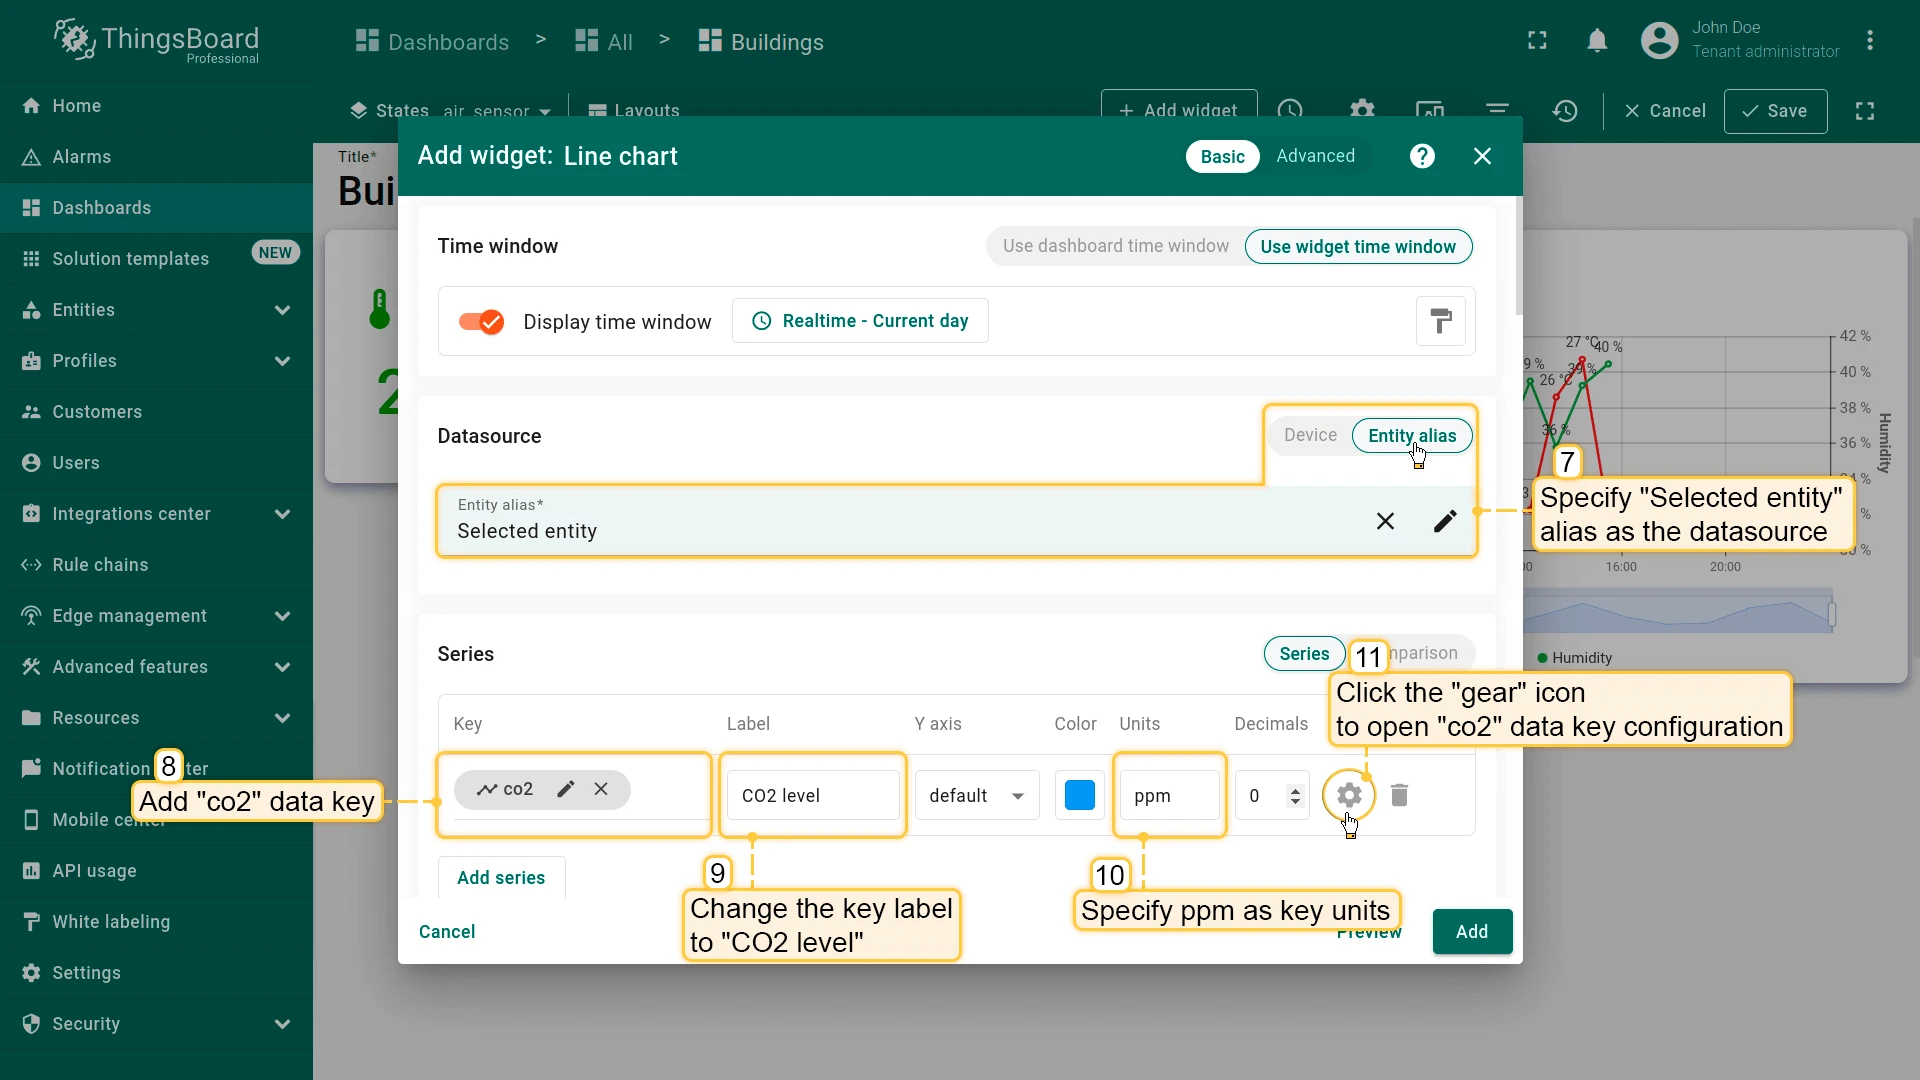
Section titled “CO2 Chart”- Click + Add widget and select Charts ⇾ Line chart.
- Configure time window:
- Relative ⇾ Current day
- Average aggregation, 1 hour interval
- Click Update
- Set datasource to Selected entity and add co2 key with label and units.
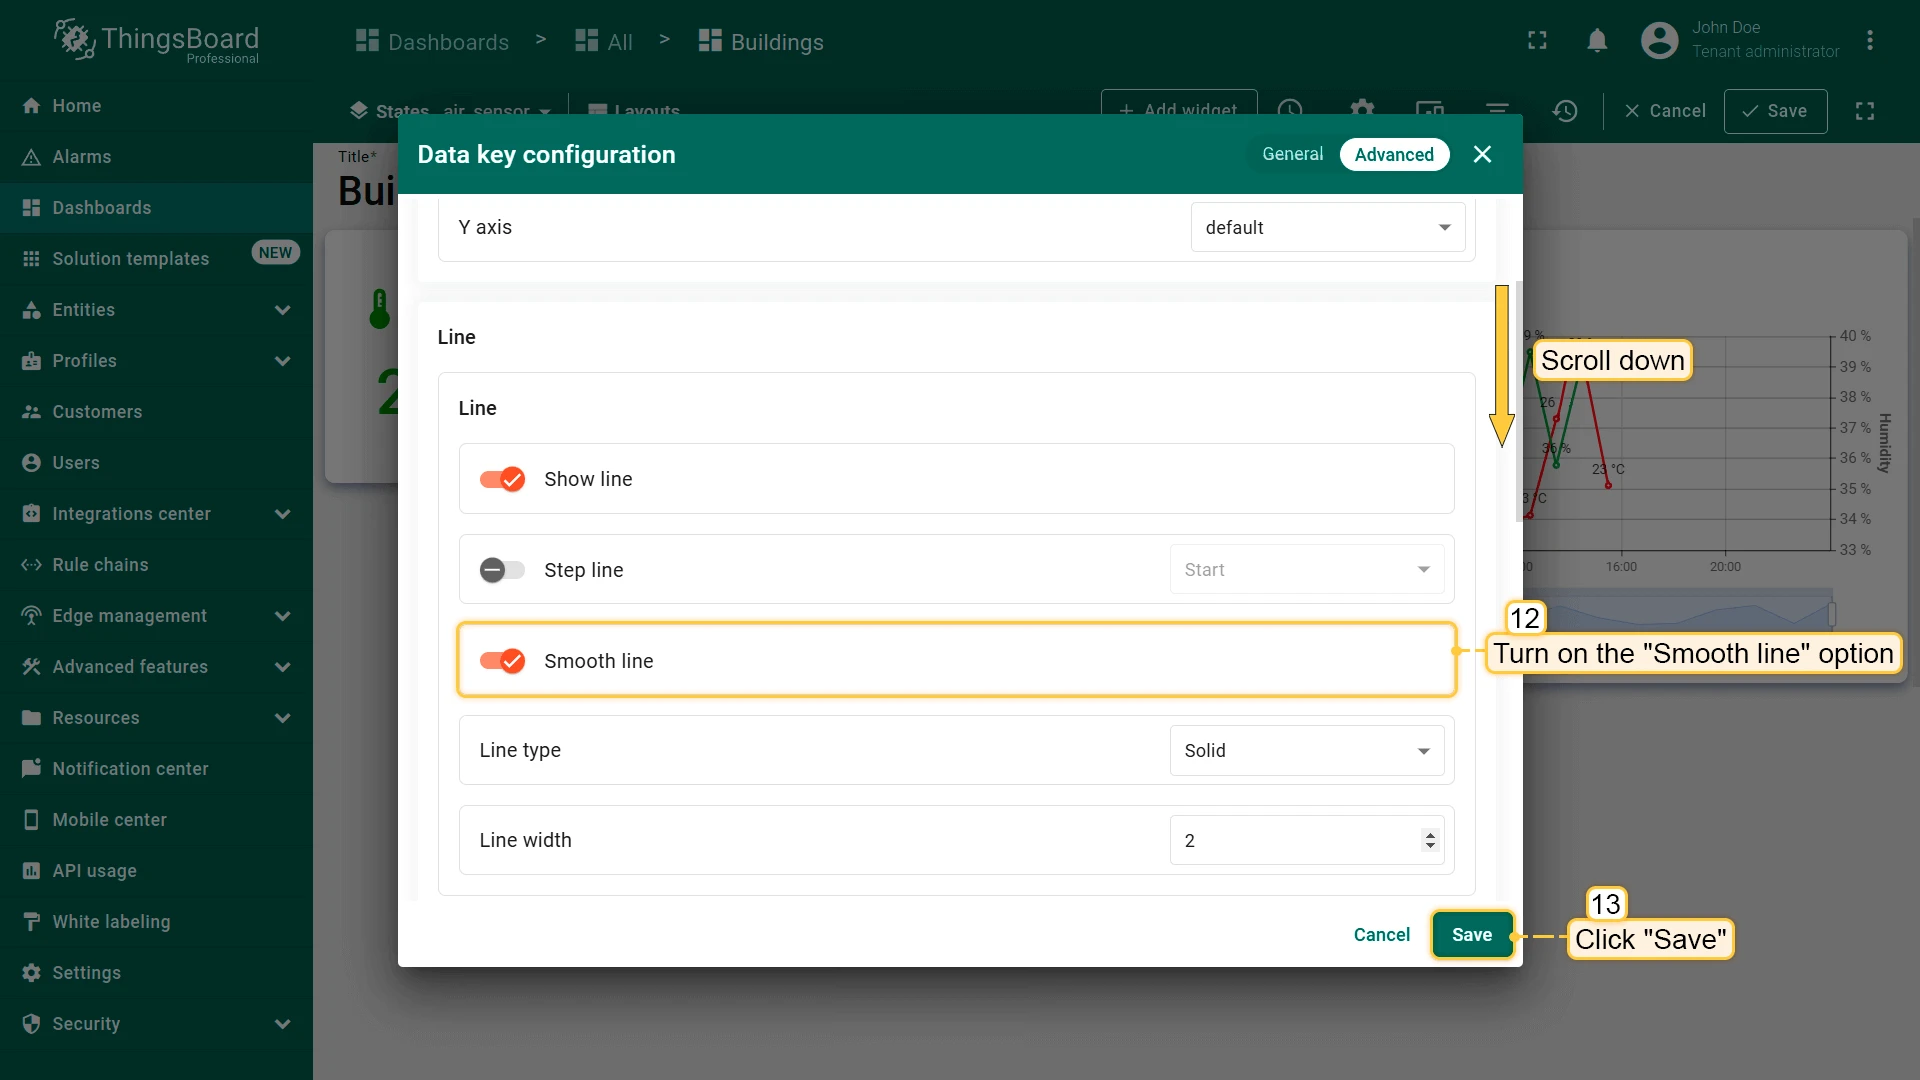
- Configure data key: - Enable Smooth line
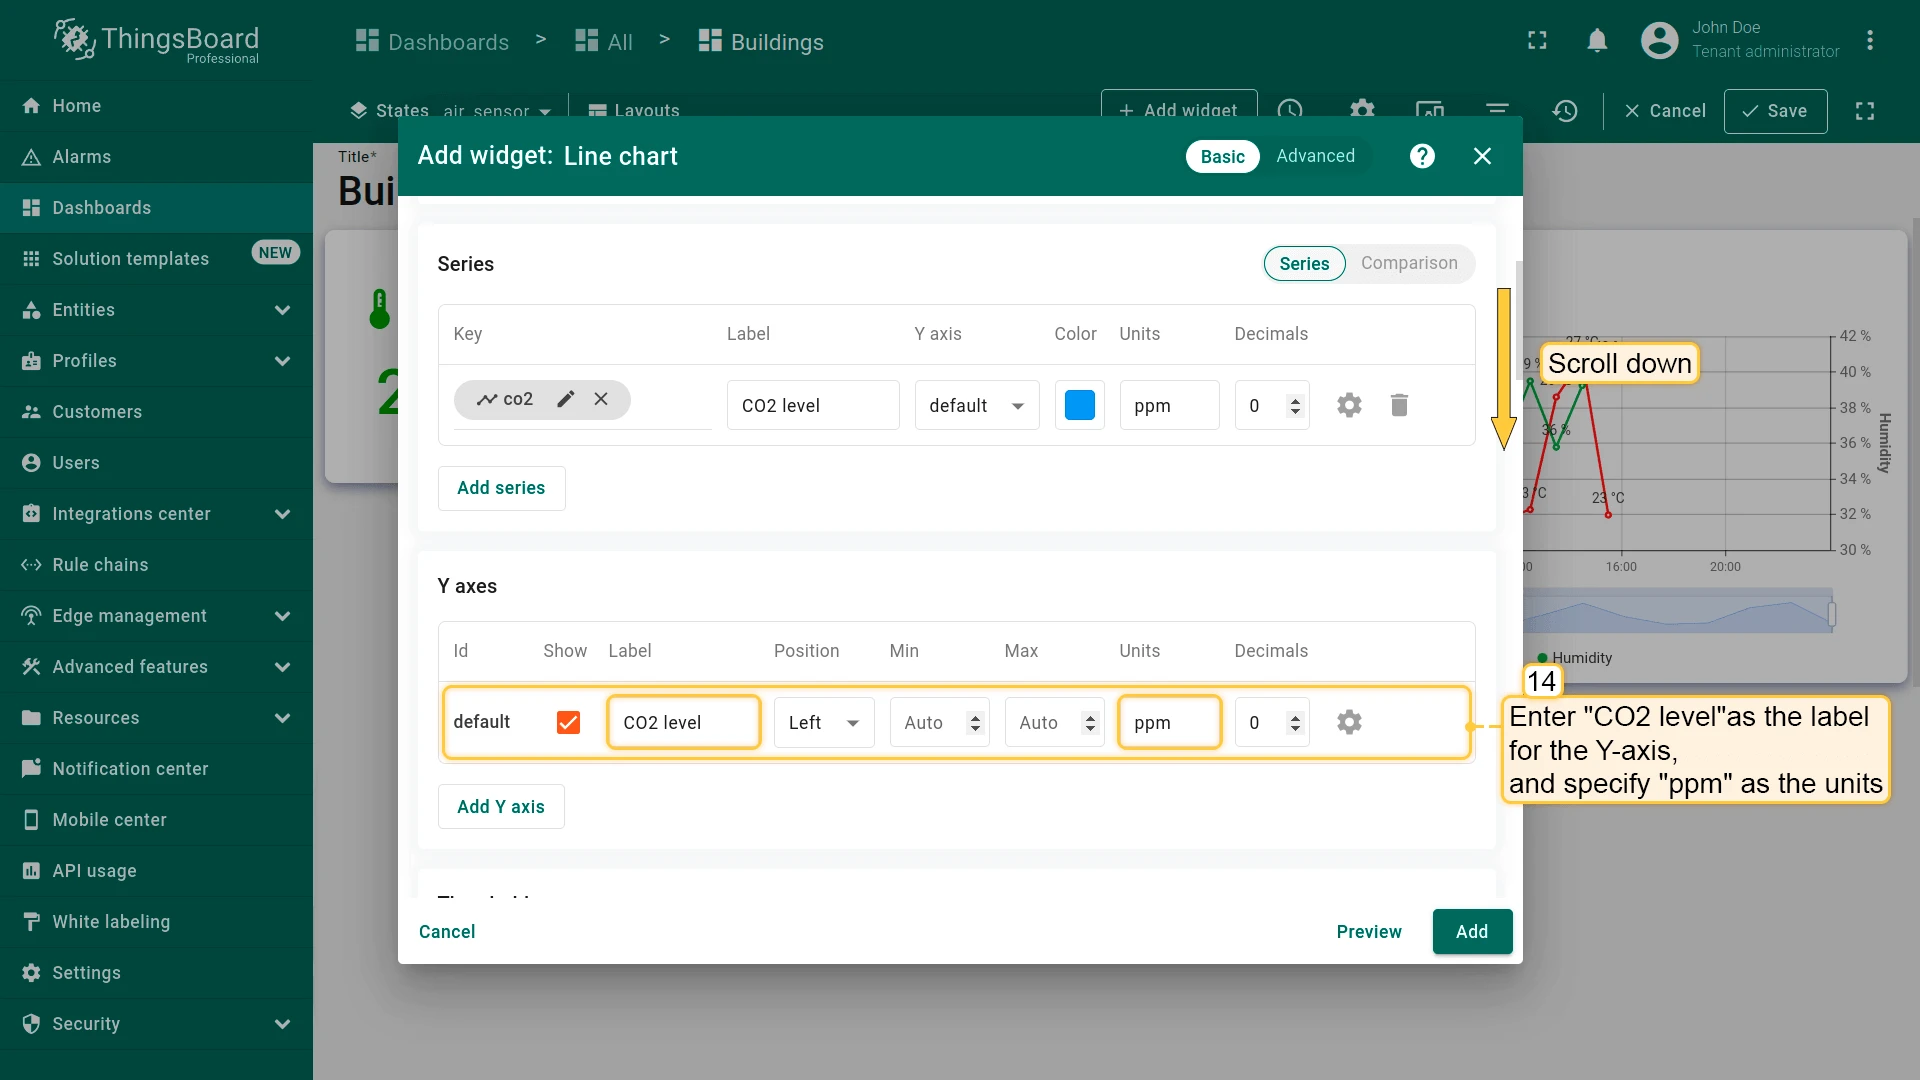
- Configure chart:
- Y-axis: CO2 level (ppm)
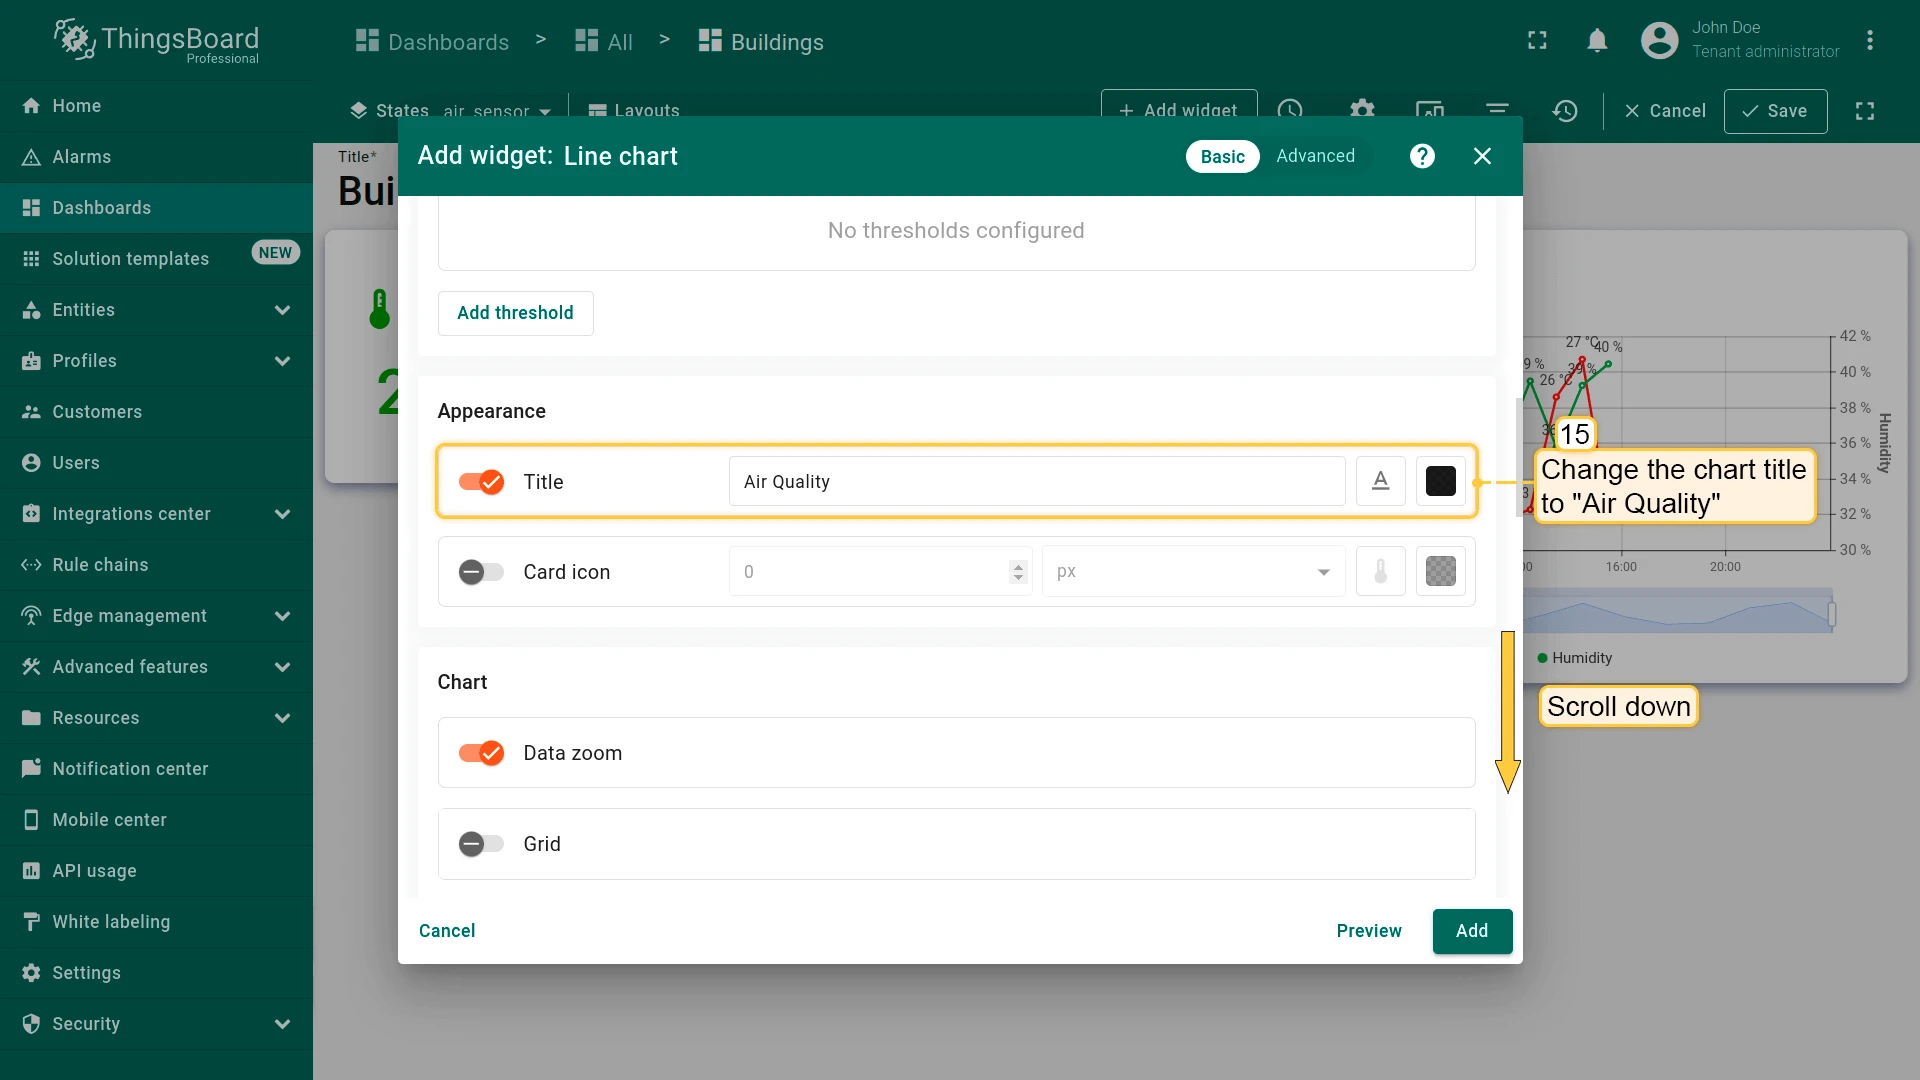
- Title: Air Quality
- Legend: Bottom, enable Min, Max, Average
- Clear Card border radius and click Add.
- Place the widget below Temperature and Humidity history, resize, and save the dashboard.


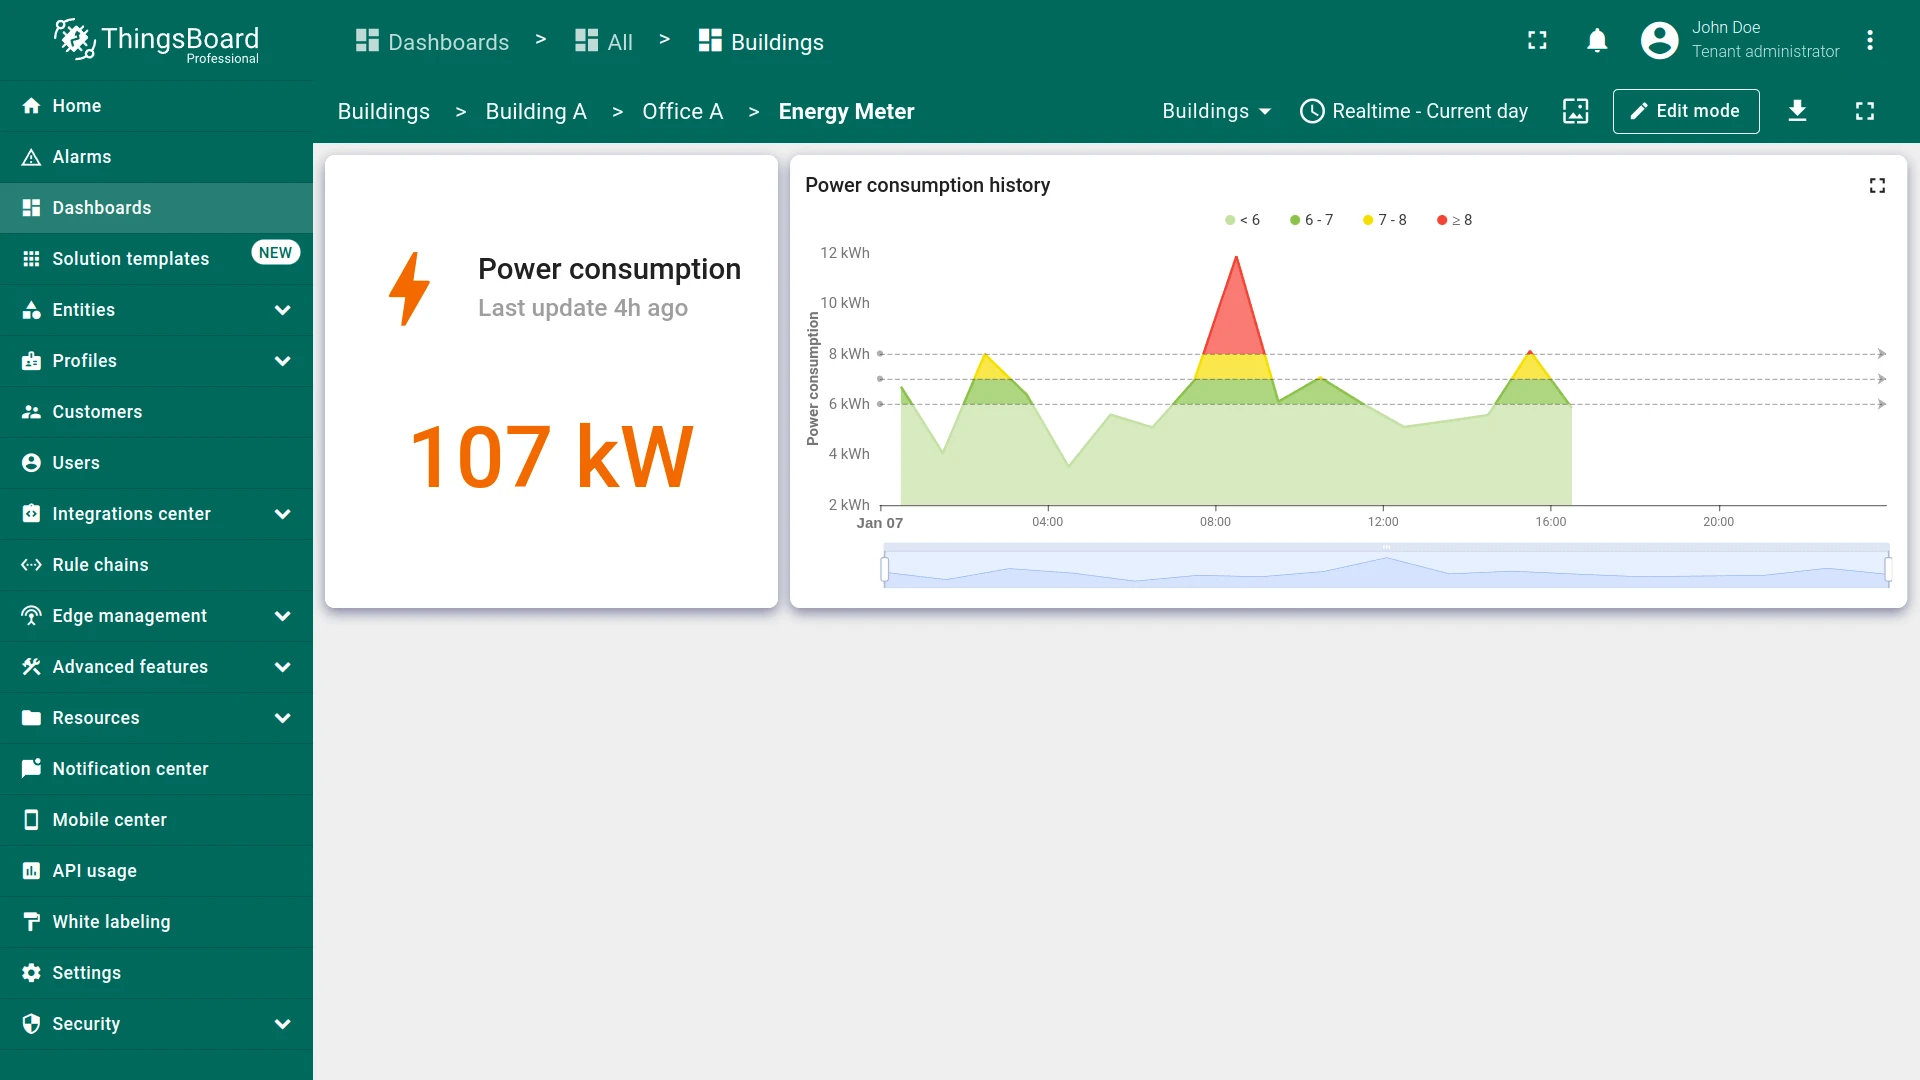
Step 3.8 Energy Sensor State
Section titled “Step 3.8 Energy Sensor State”Build the energy_sensor state with a power consumption value card (Sum aggregation) and a range chart showing hourly totals.
Current Power Consumption
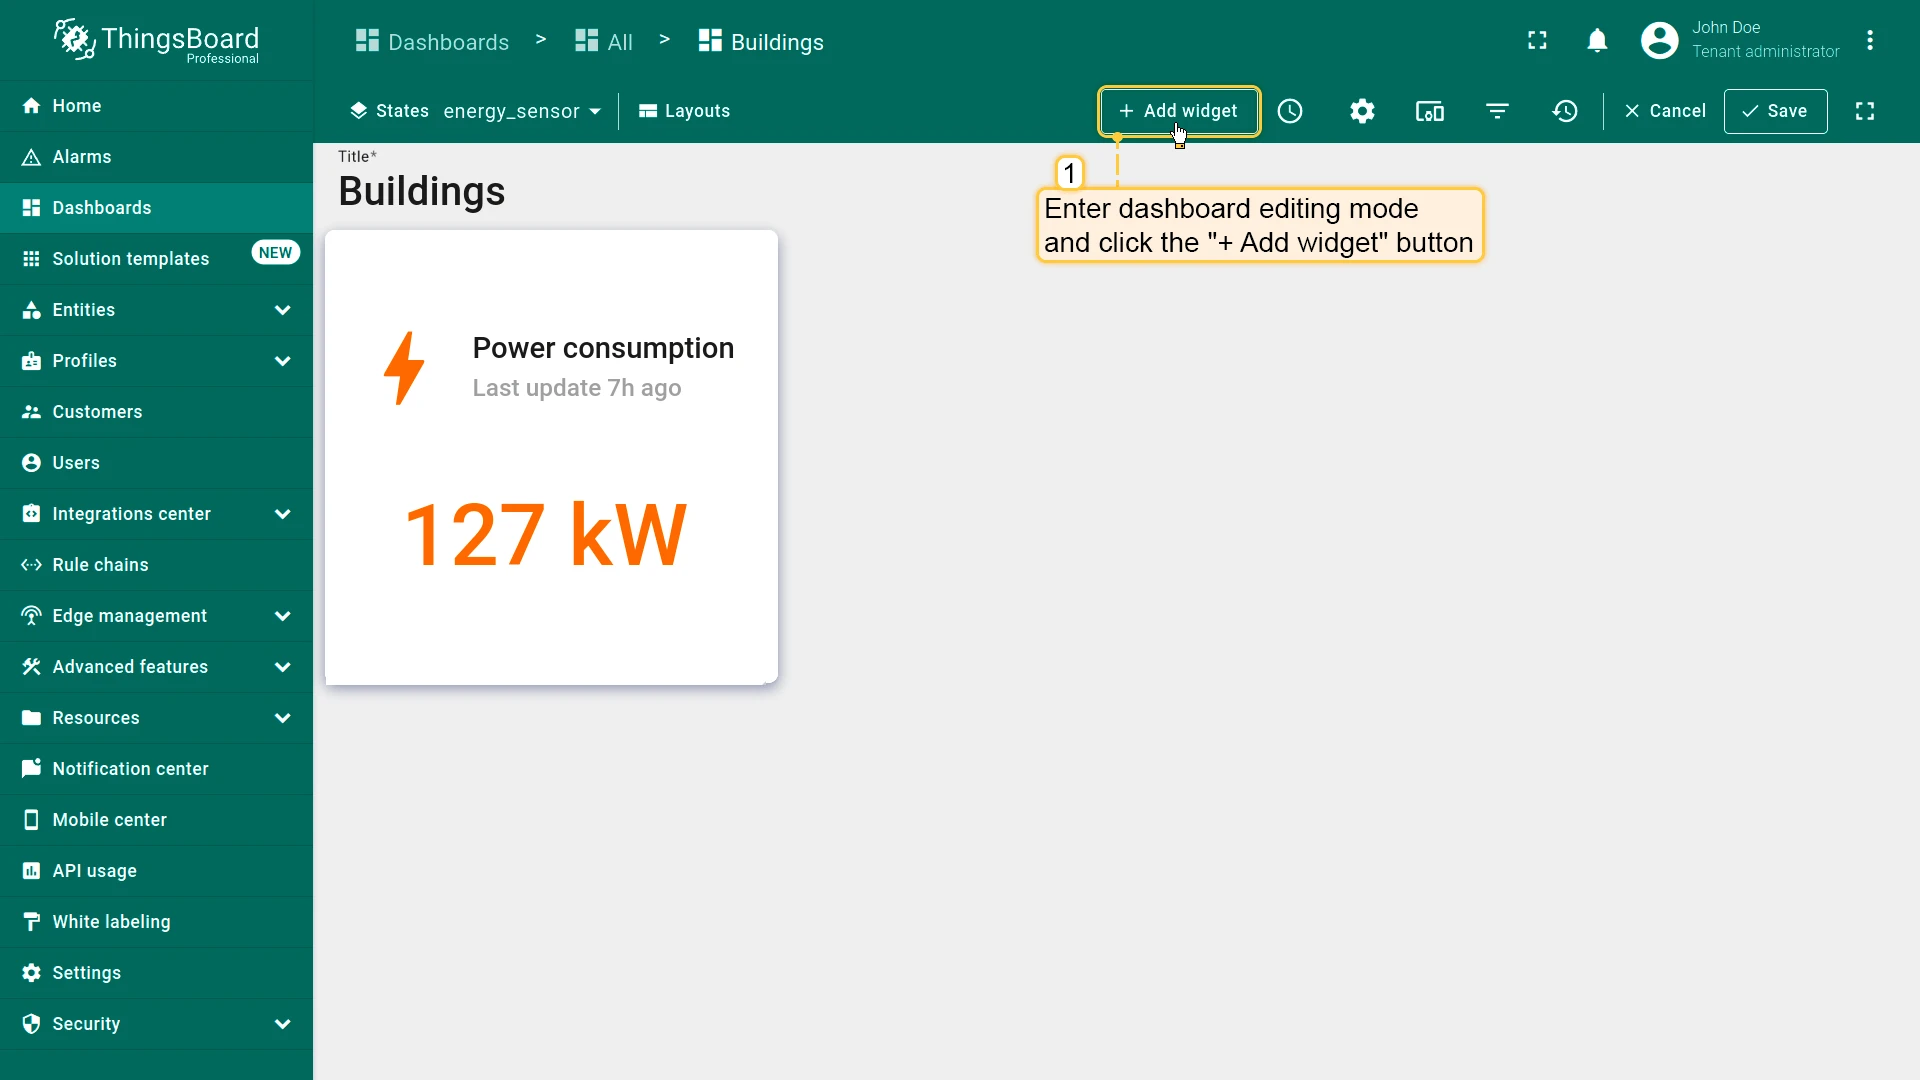
Section titled “Current Power Consumption”- Open Energy Meter state.
- Click + Add widget in edit mode.
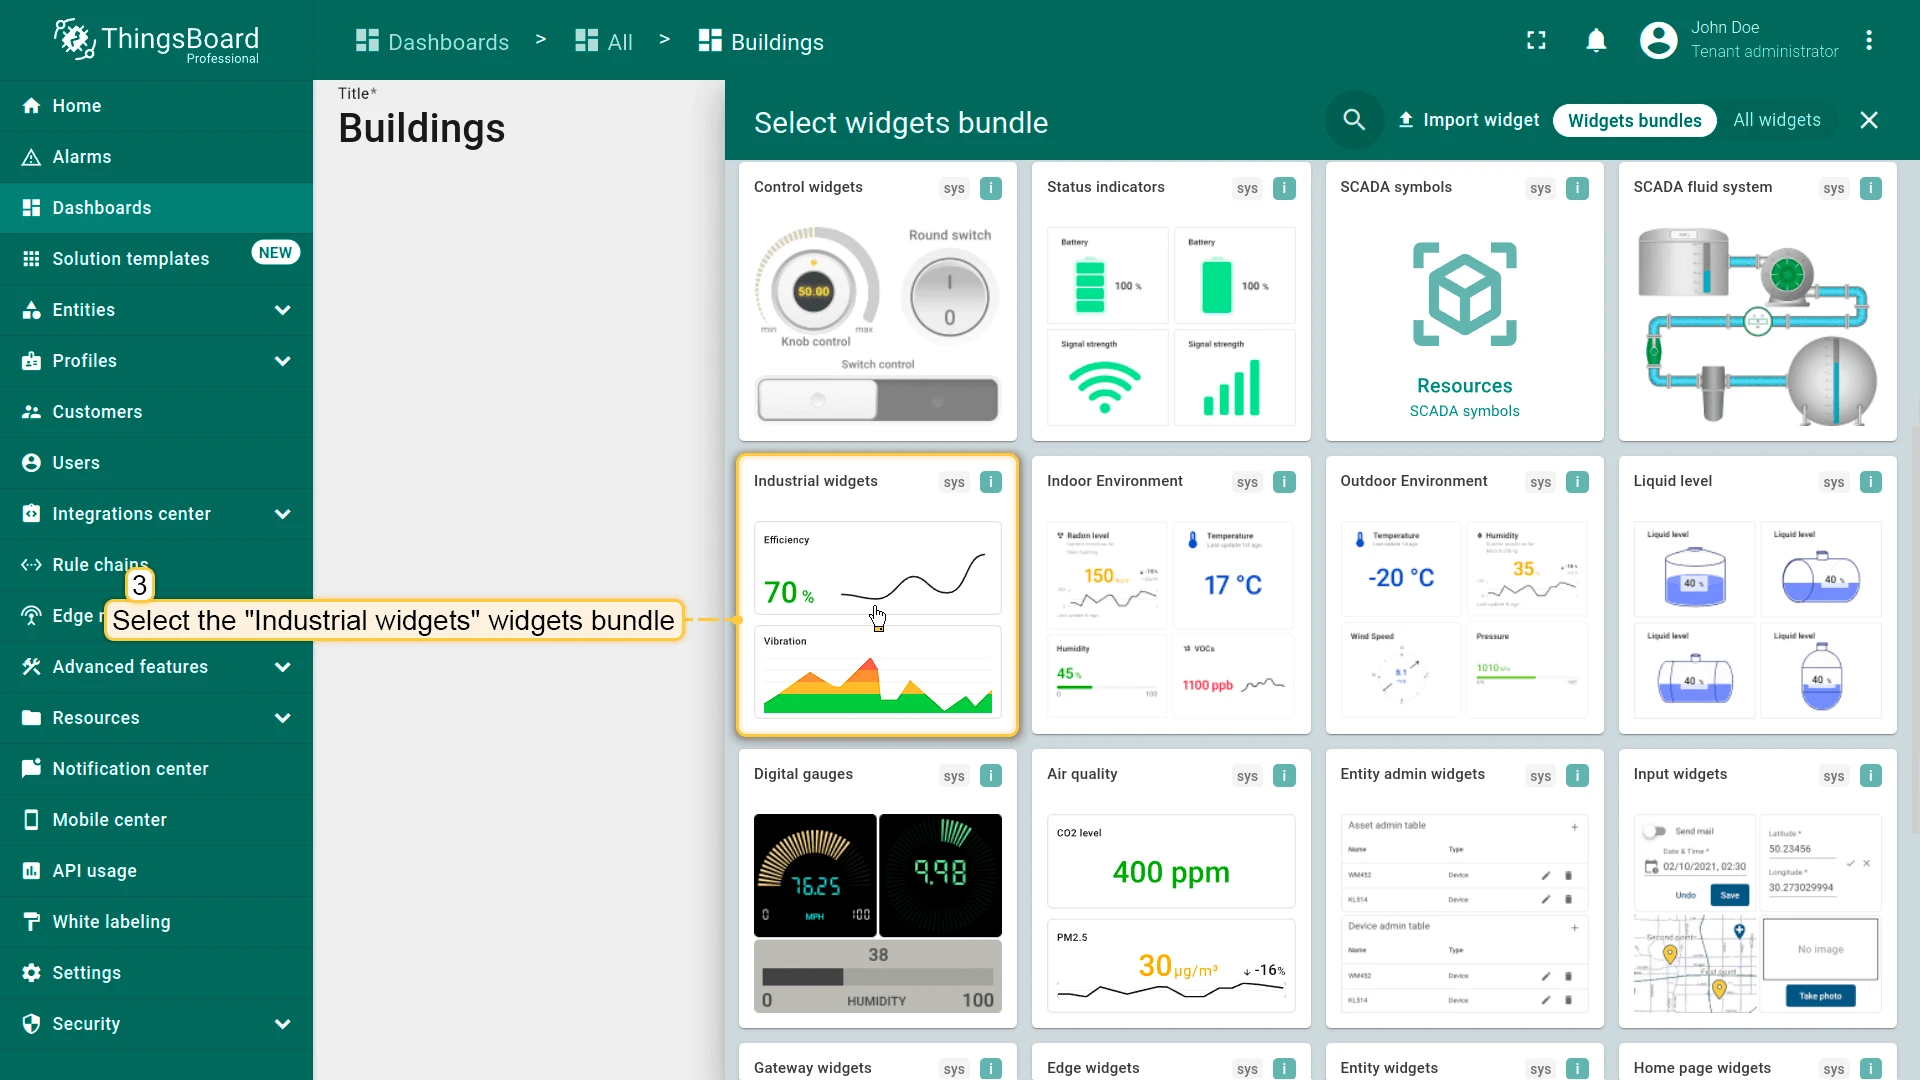
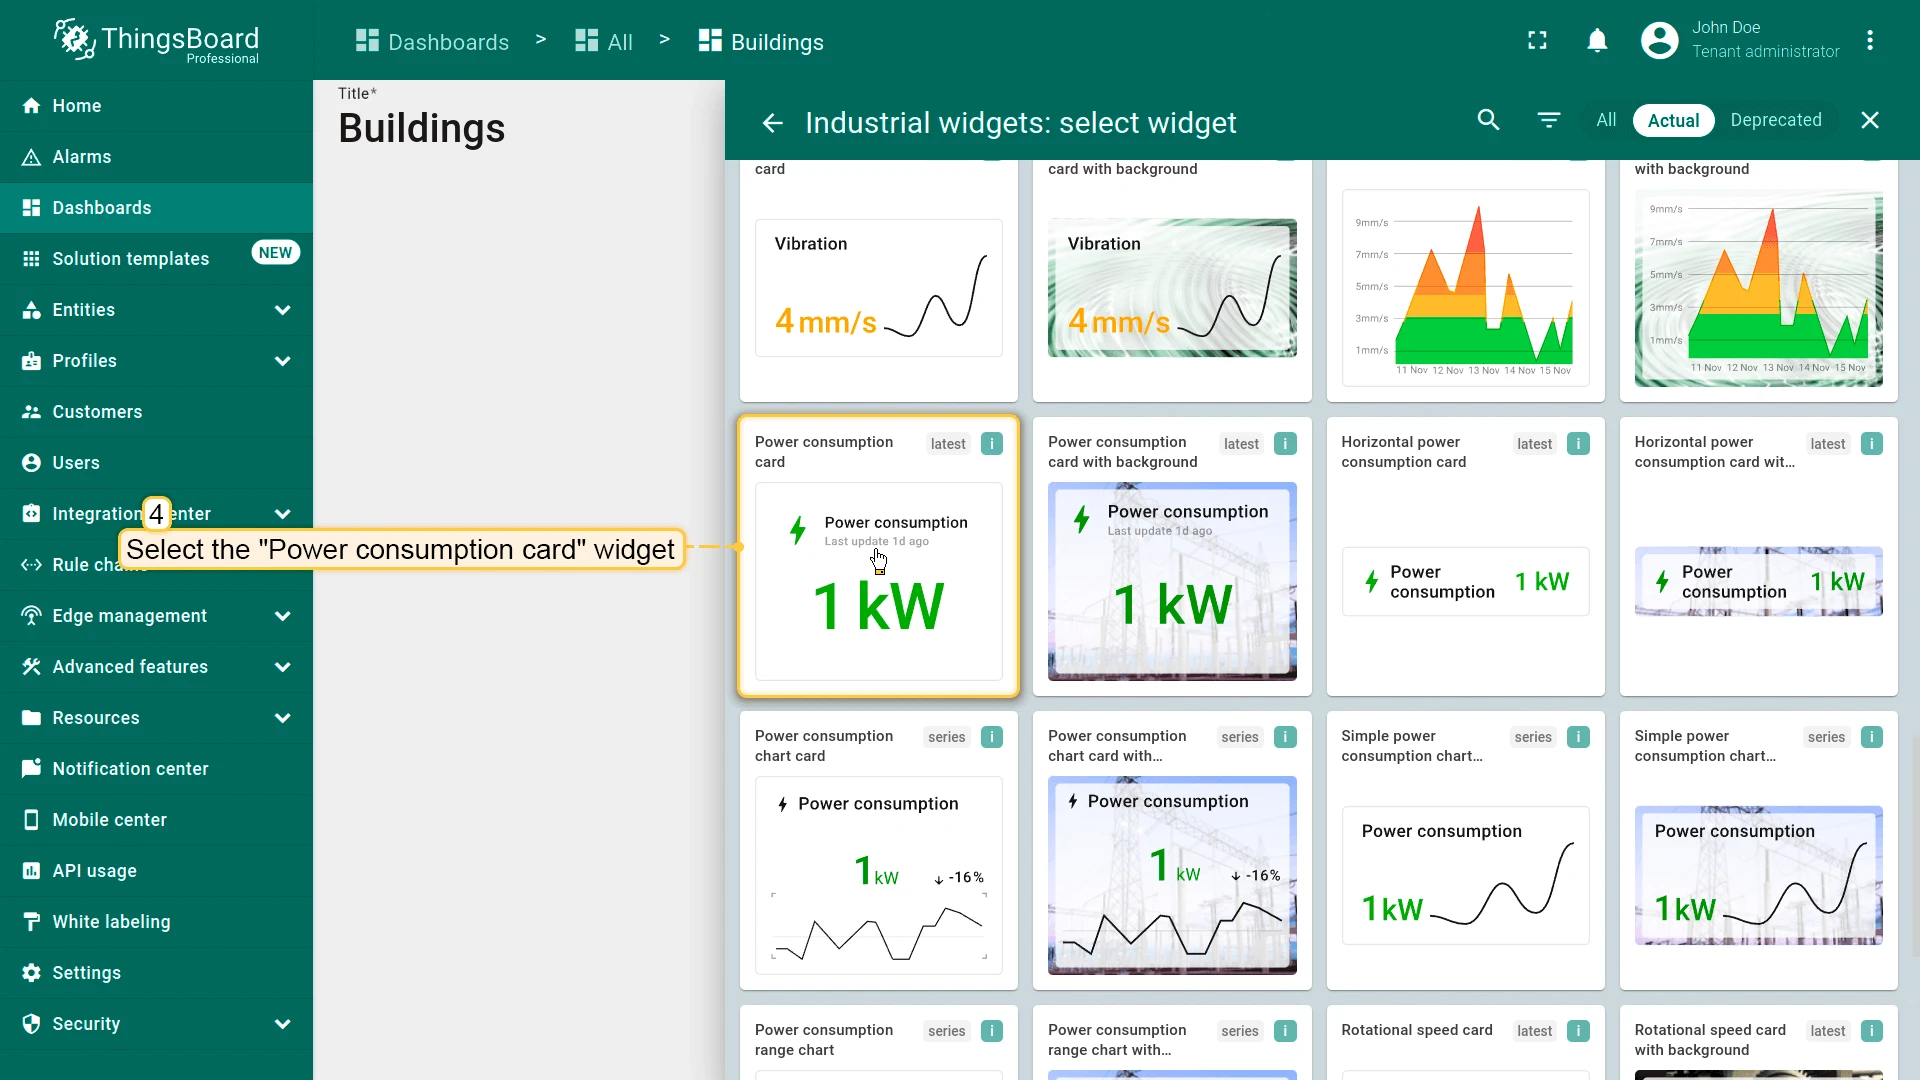
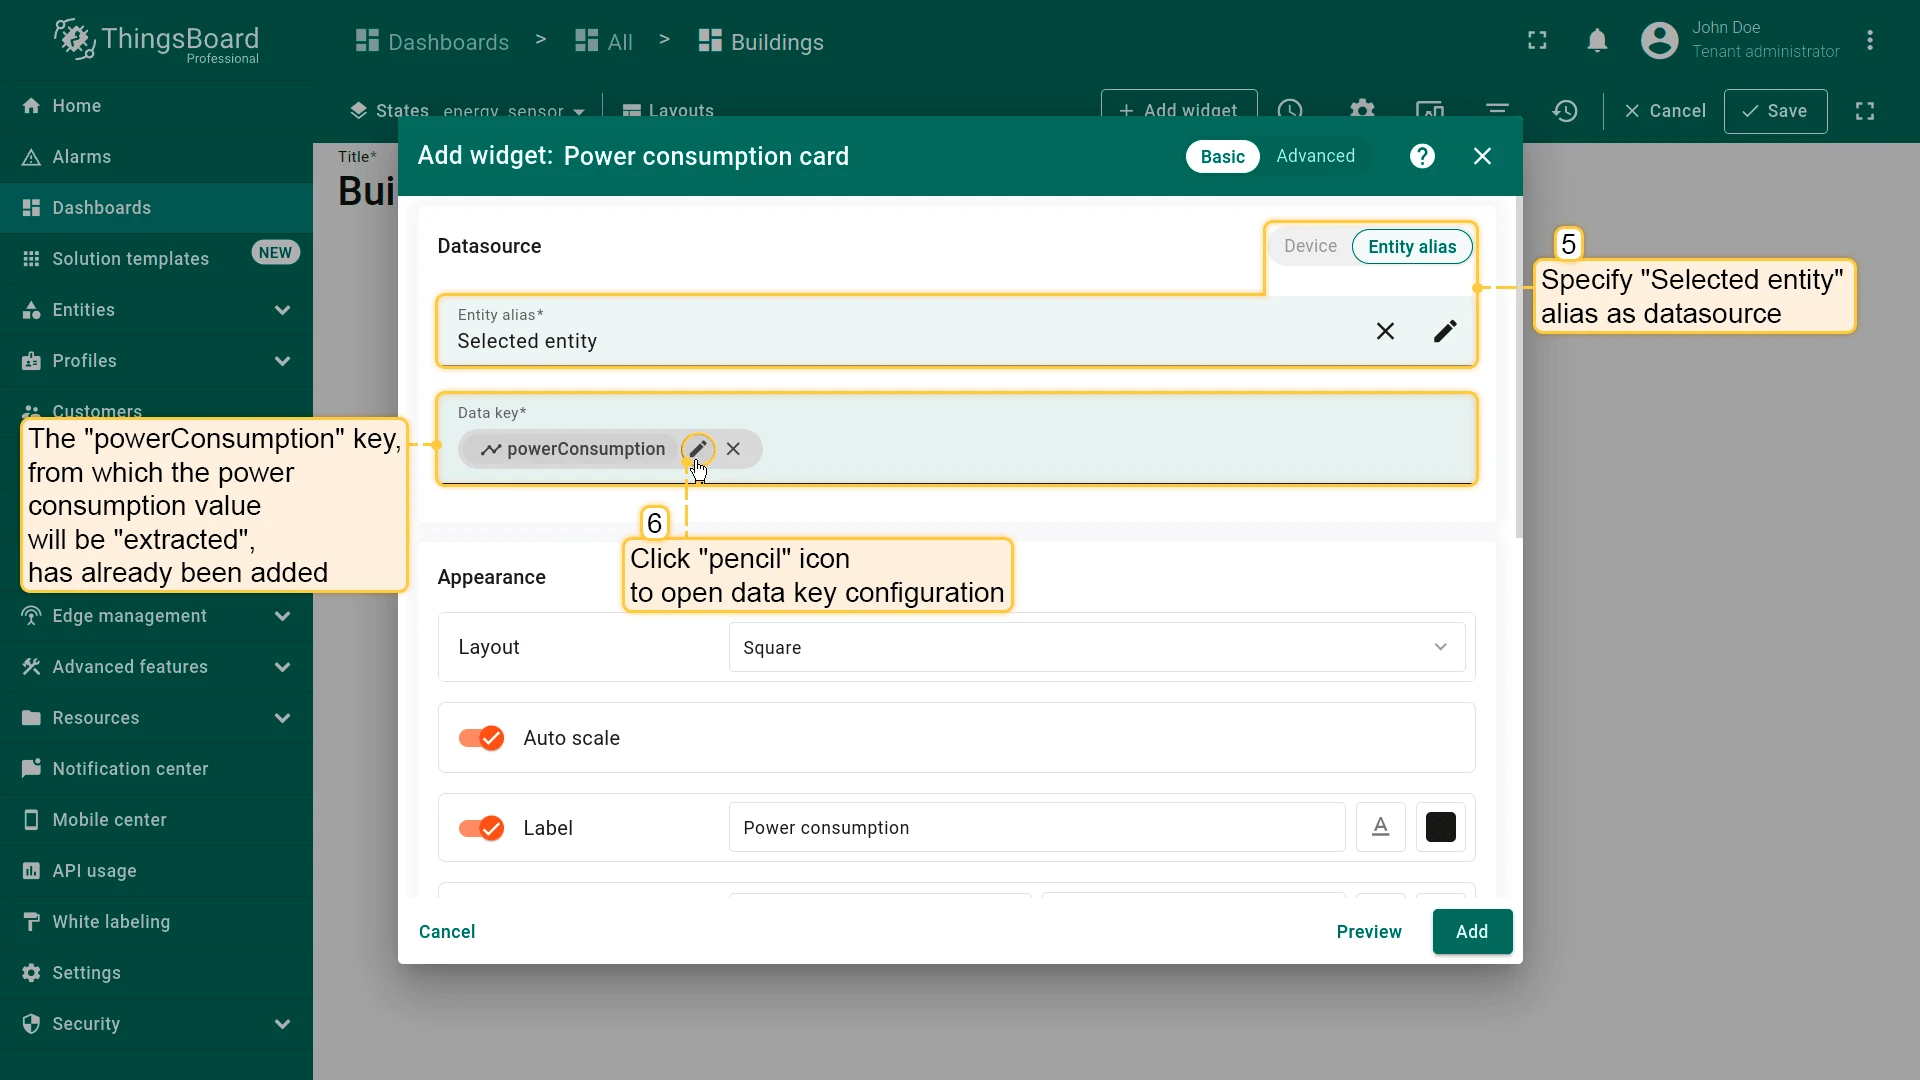
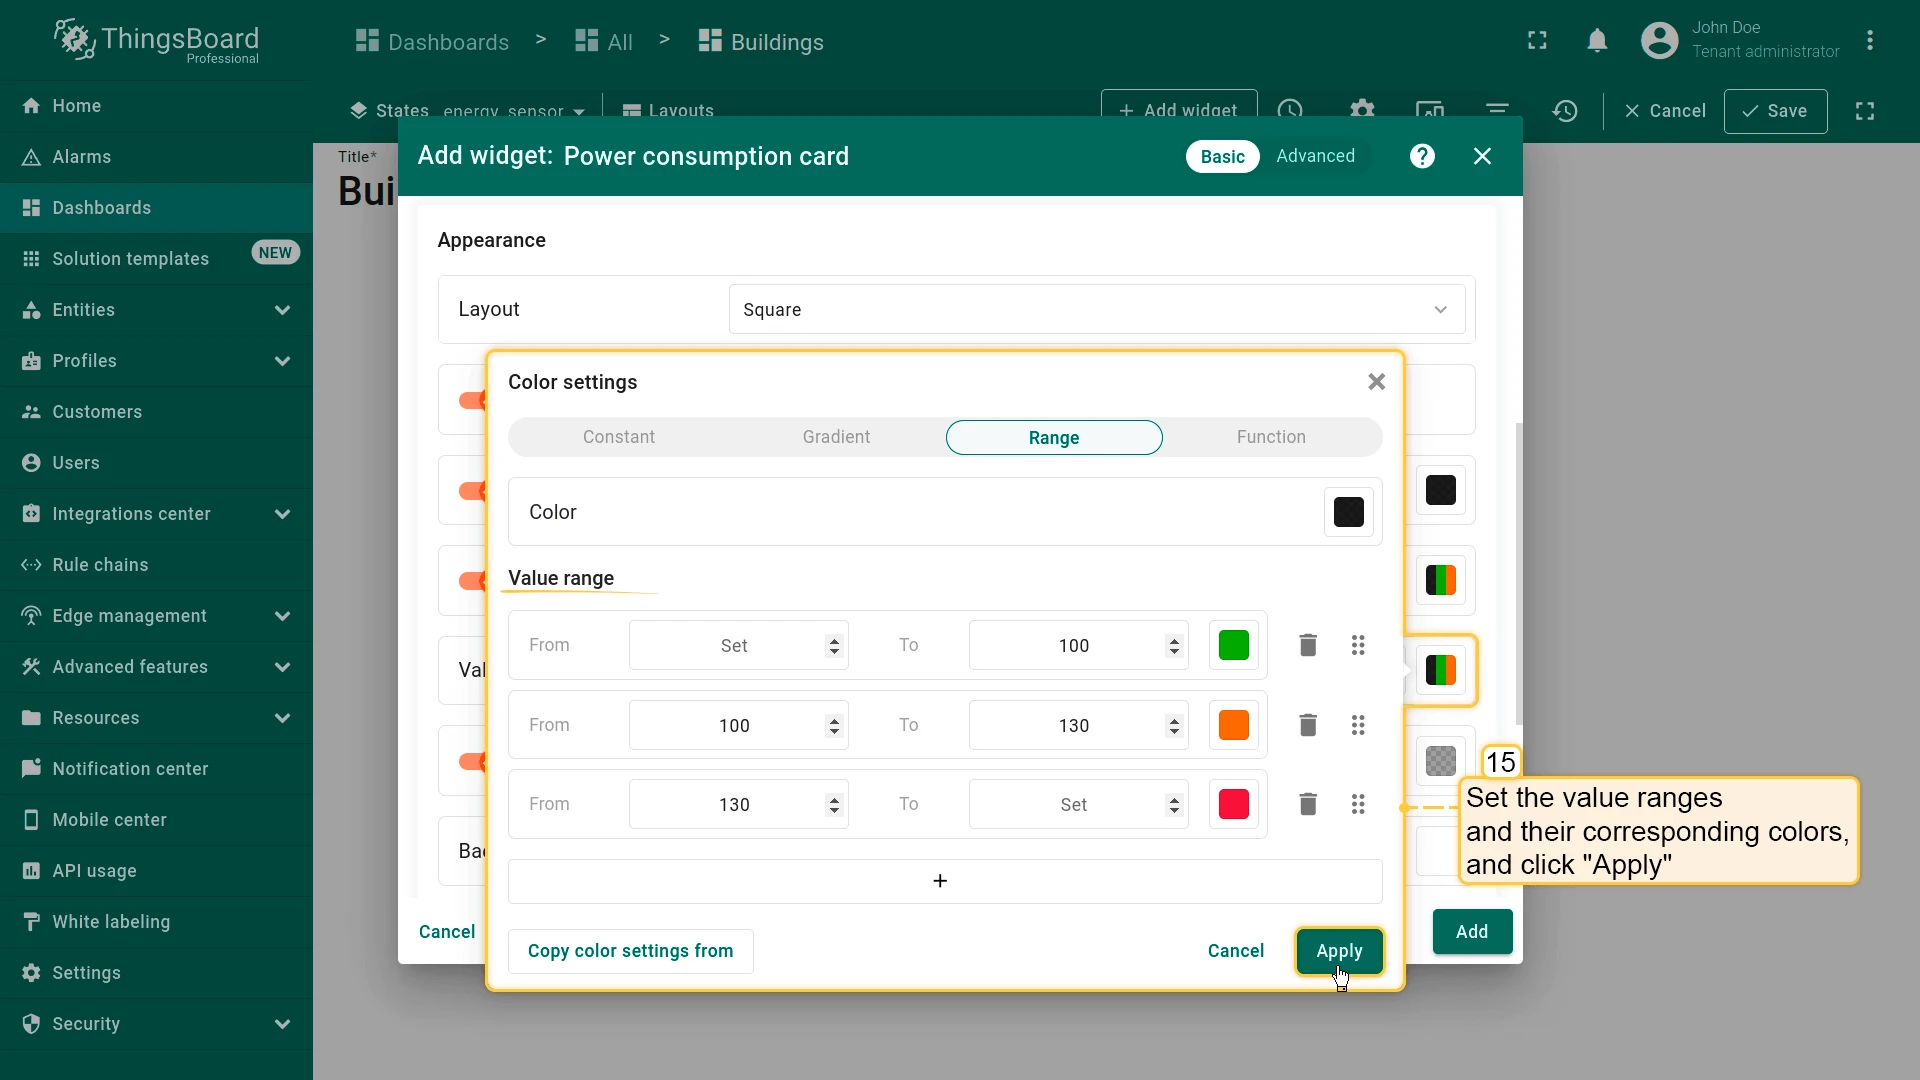
- Select Industrial widgets ⇾ Power consumption card.
- Set datasource to Selected entity (use powerConsumption key).
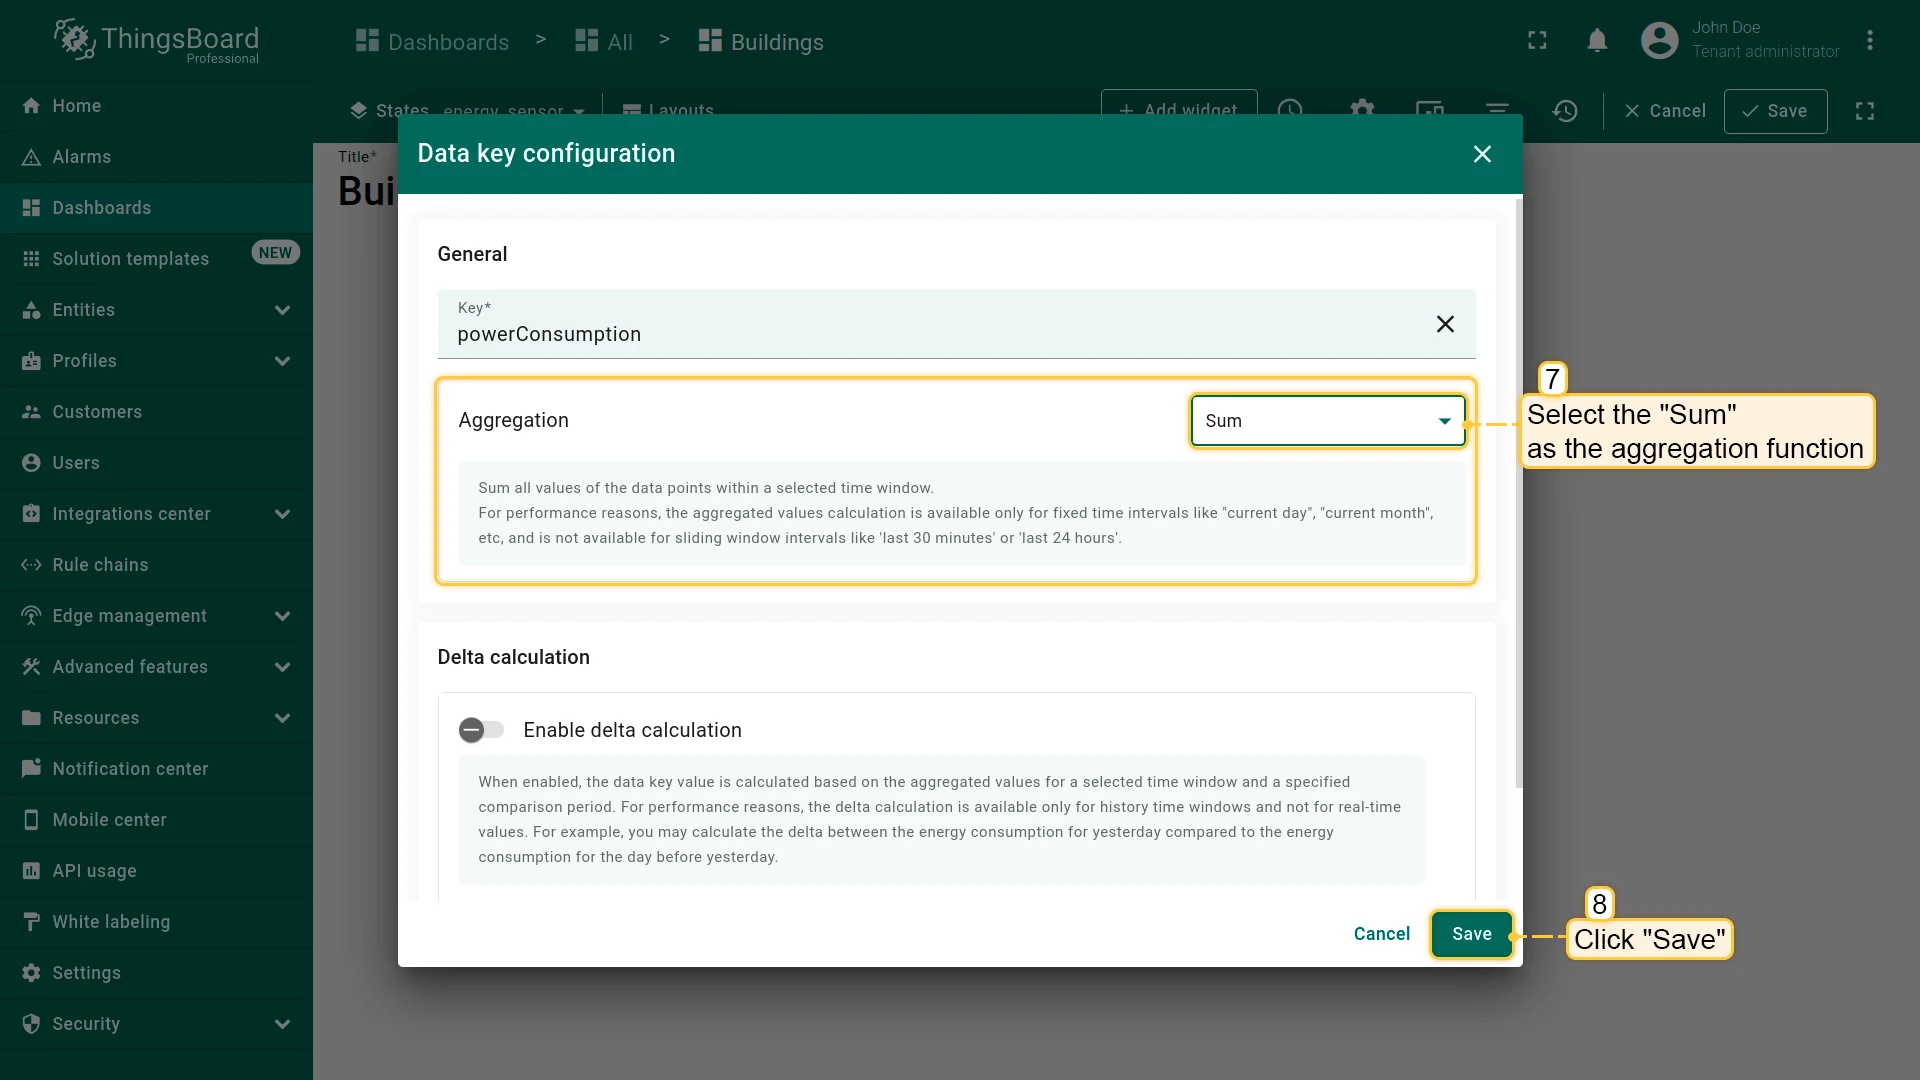
- Configure data key: Set aggregation to Sum
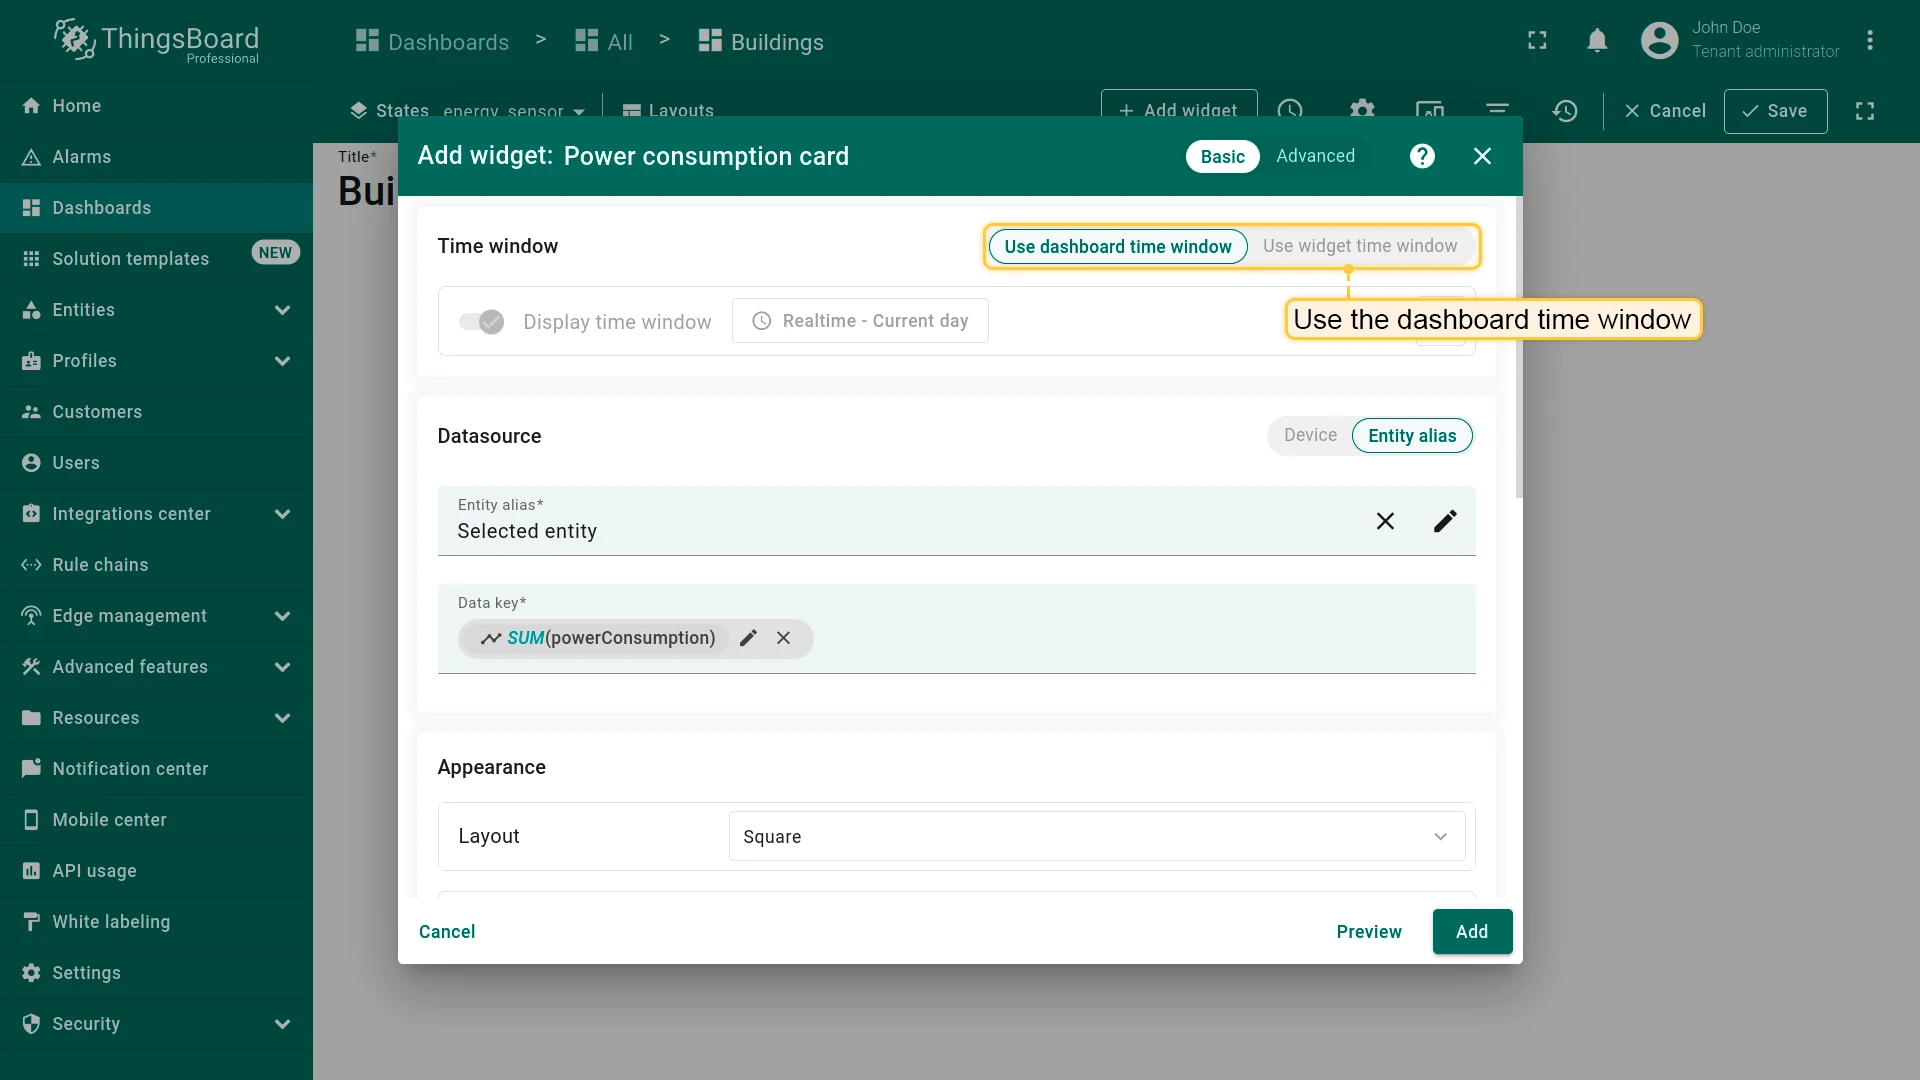
- Use the dashboard time window.
- Configure widget:
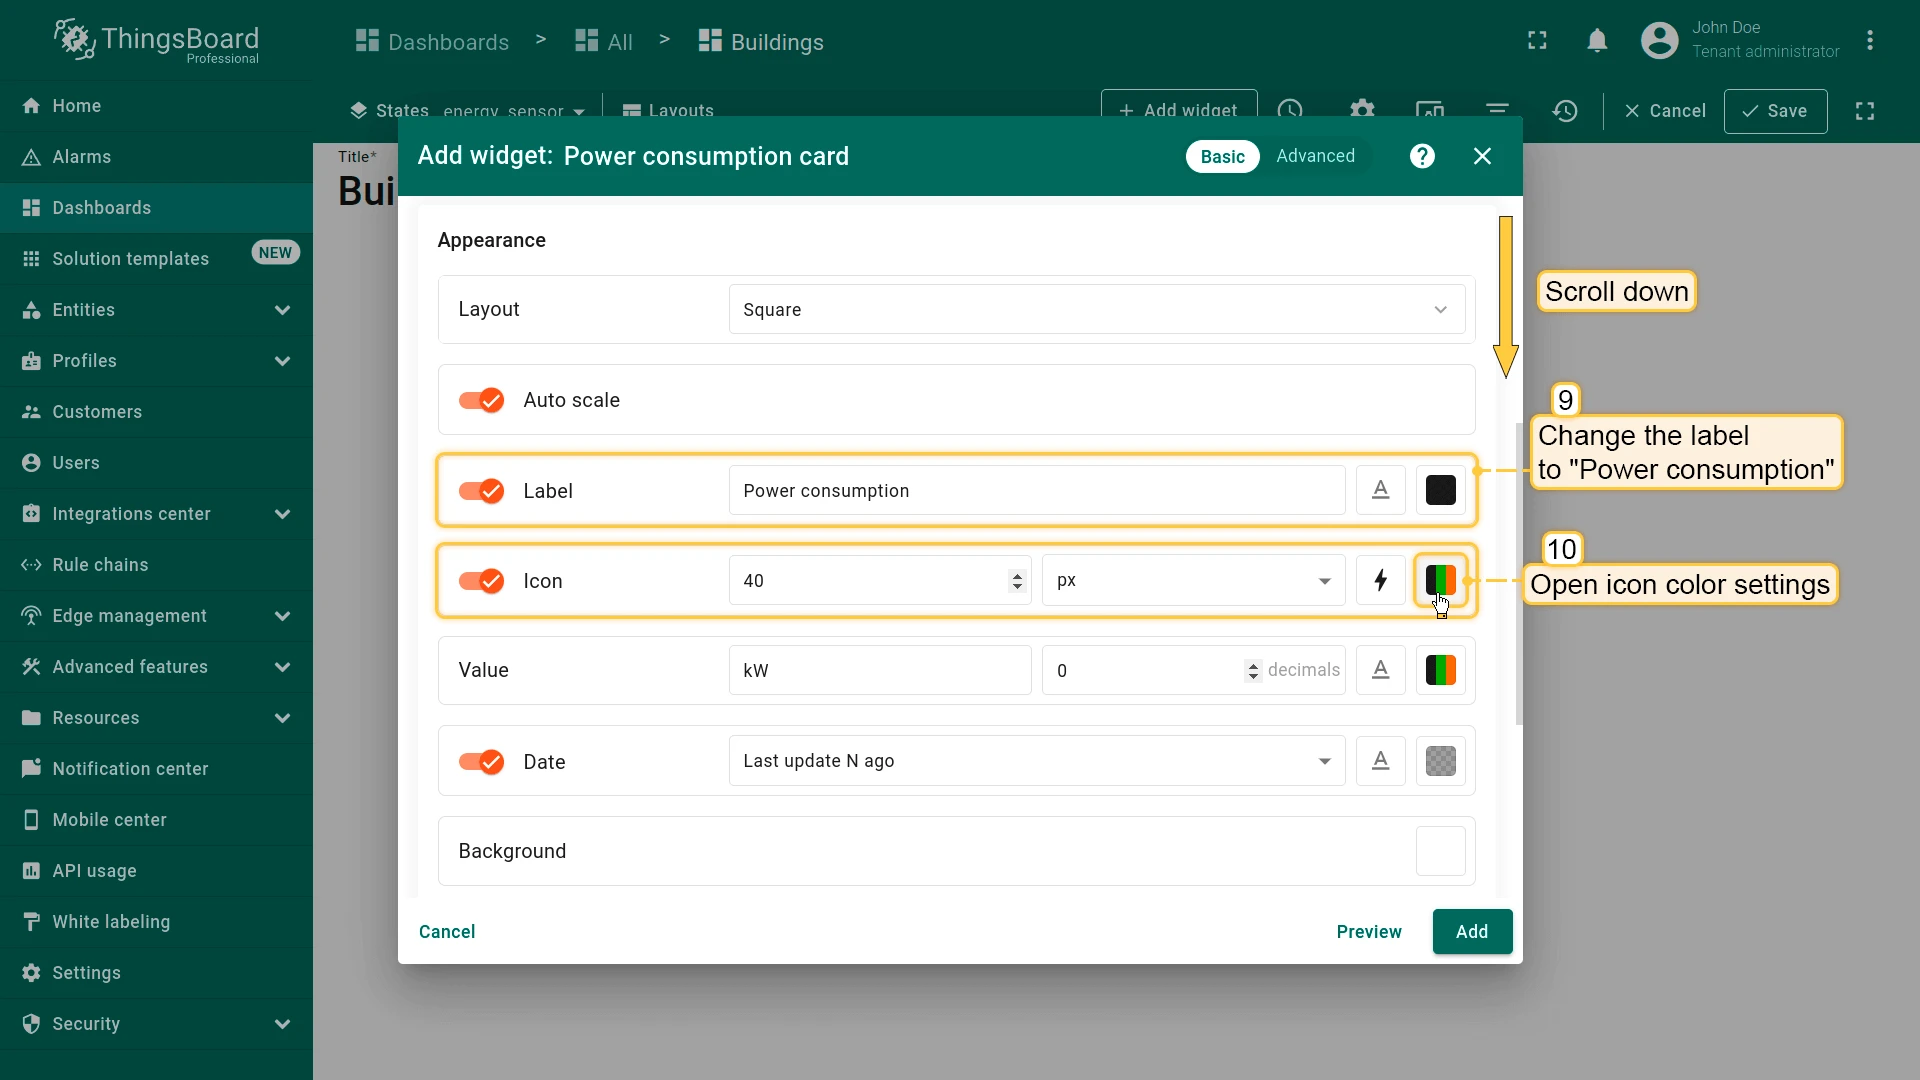
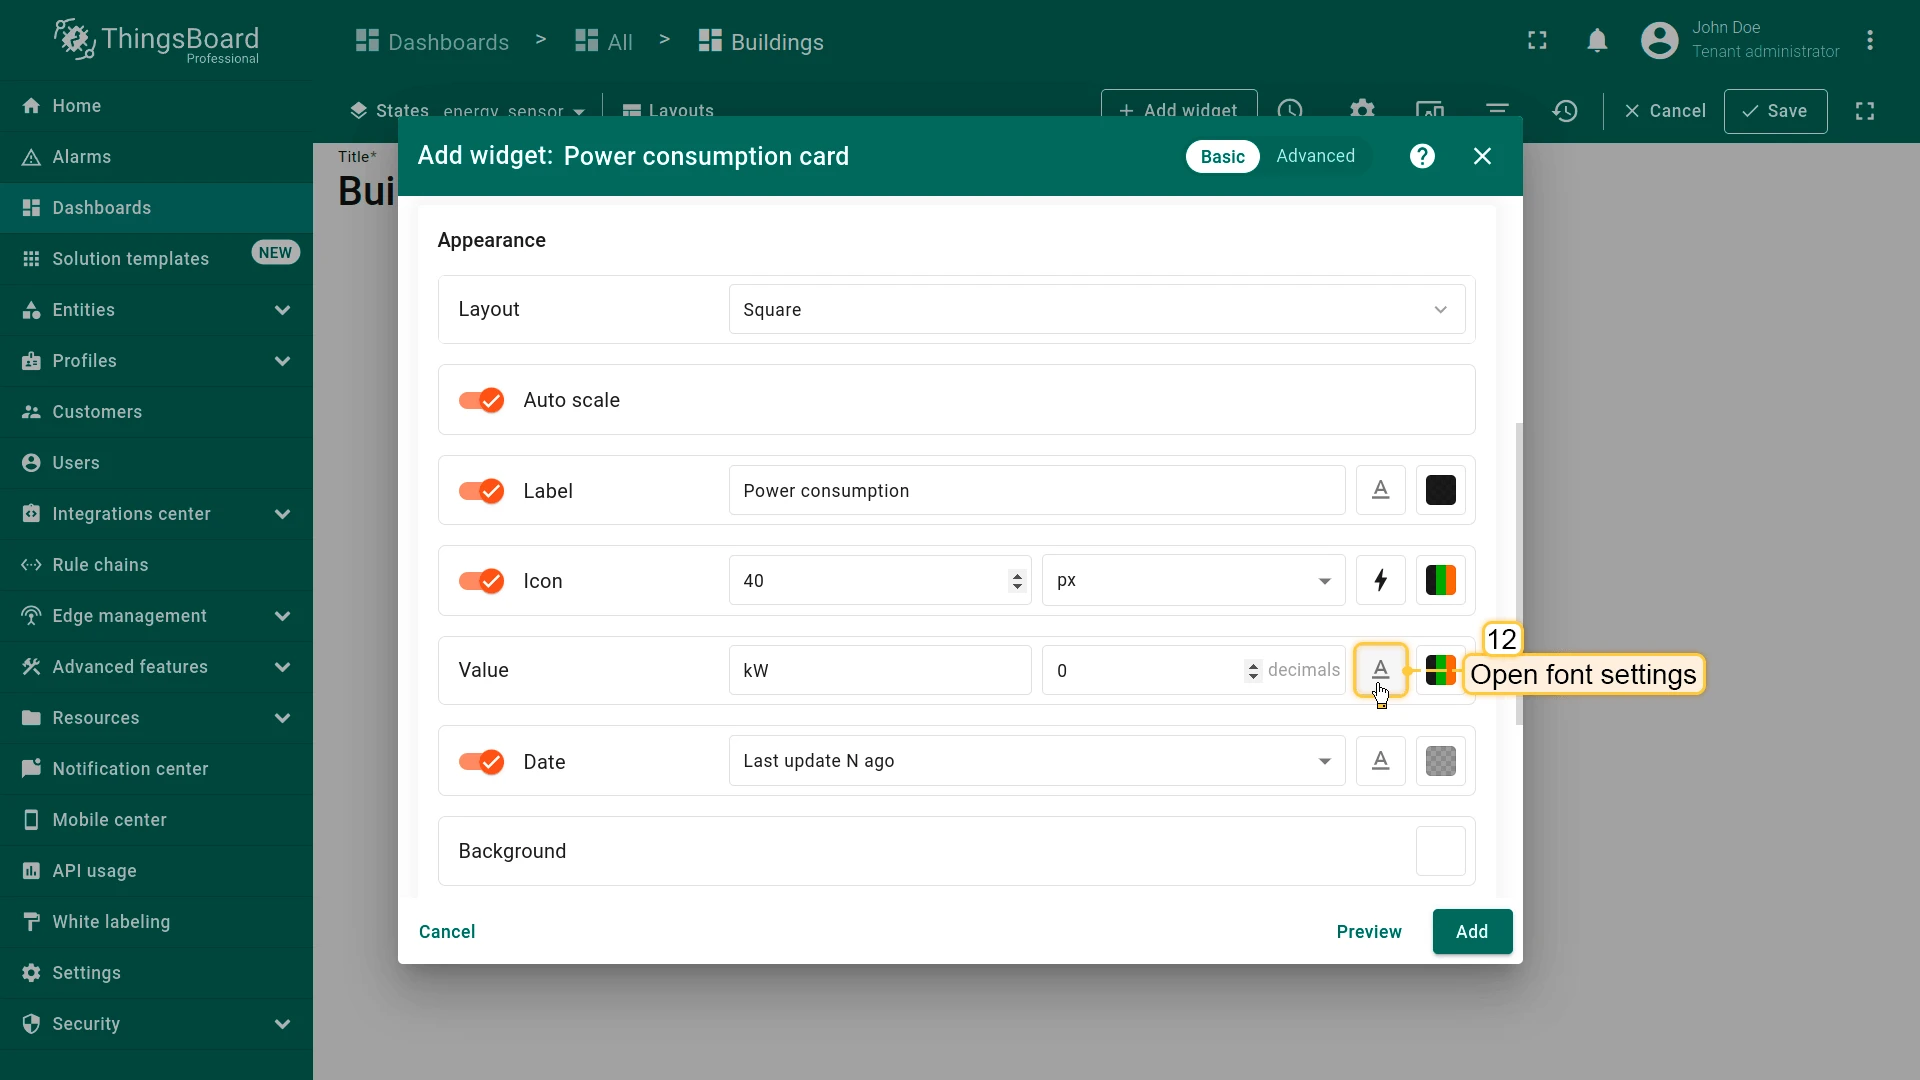
- Label: Power consumption
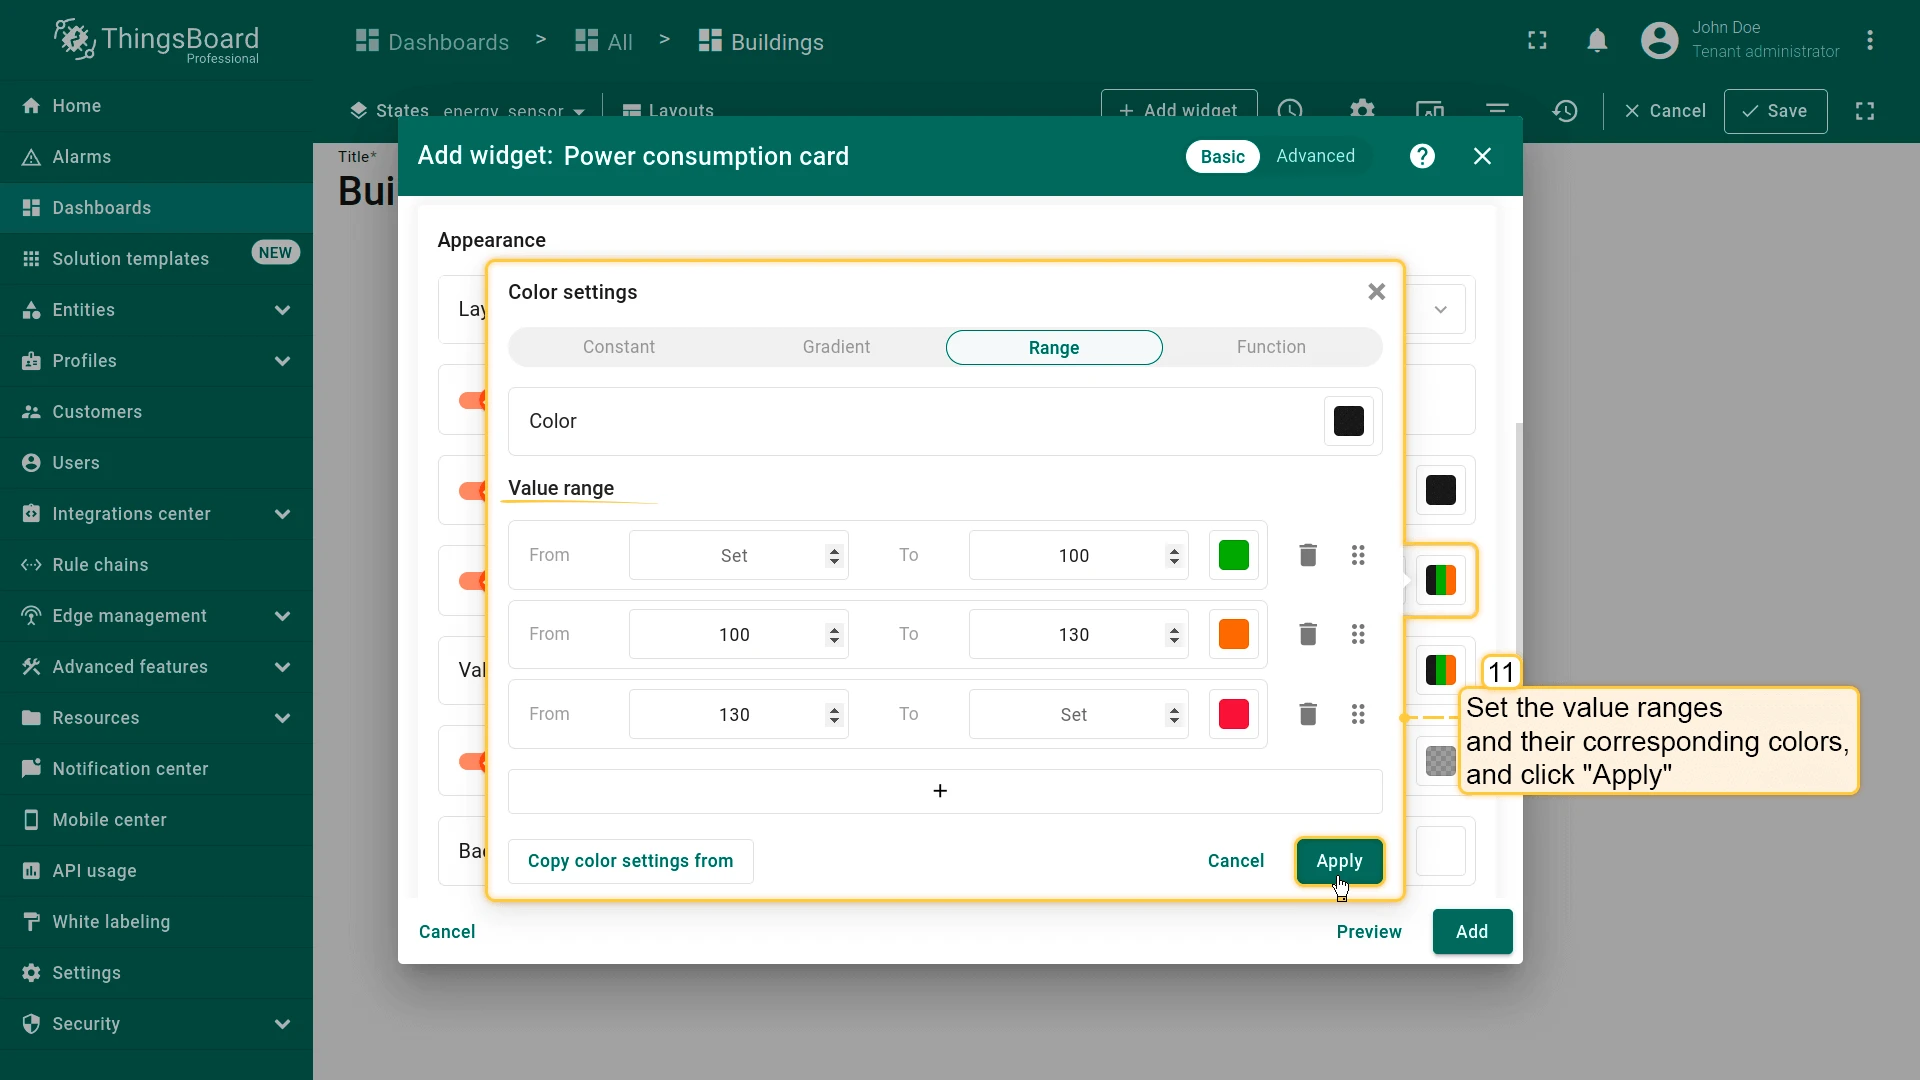
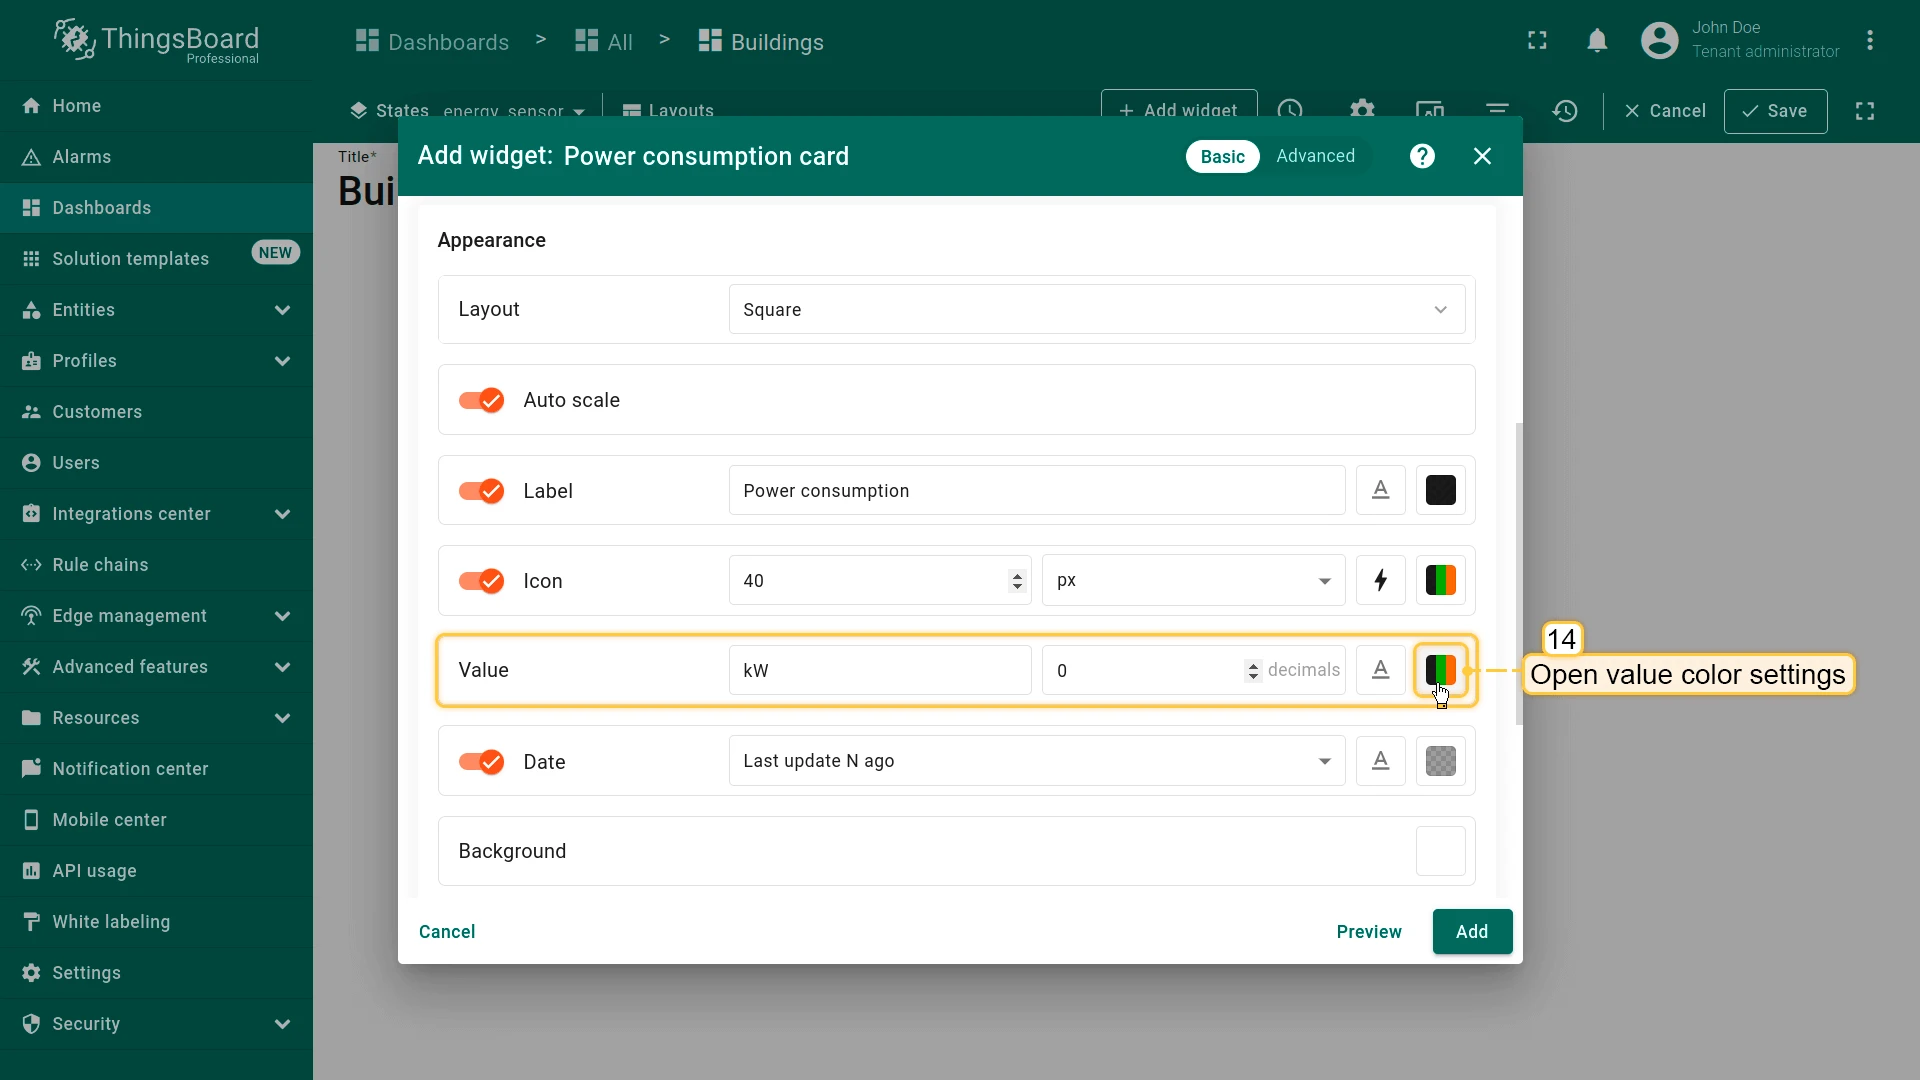
- Set value ranges and colors (Icon and Value)
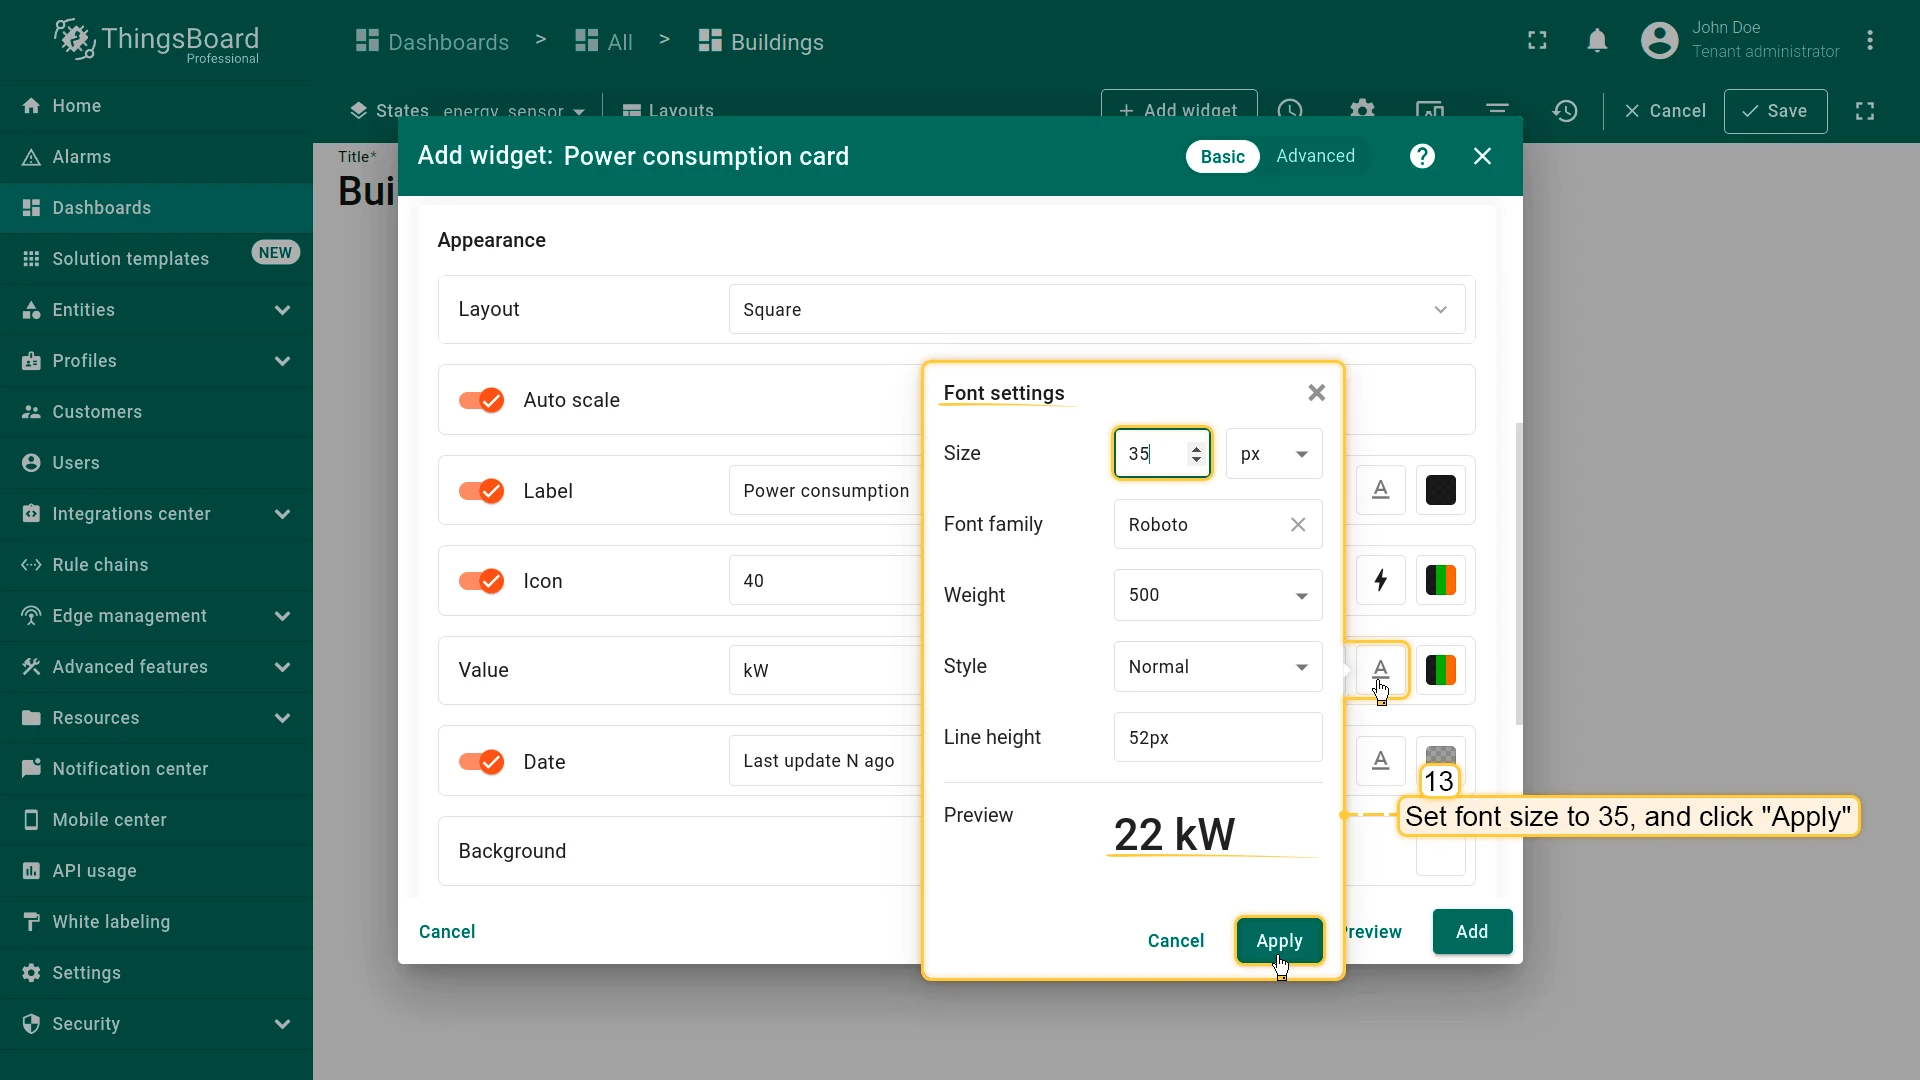
- Set font size to 35 px
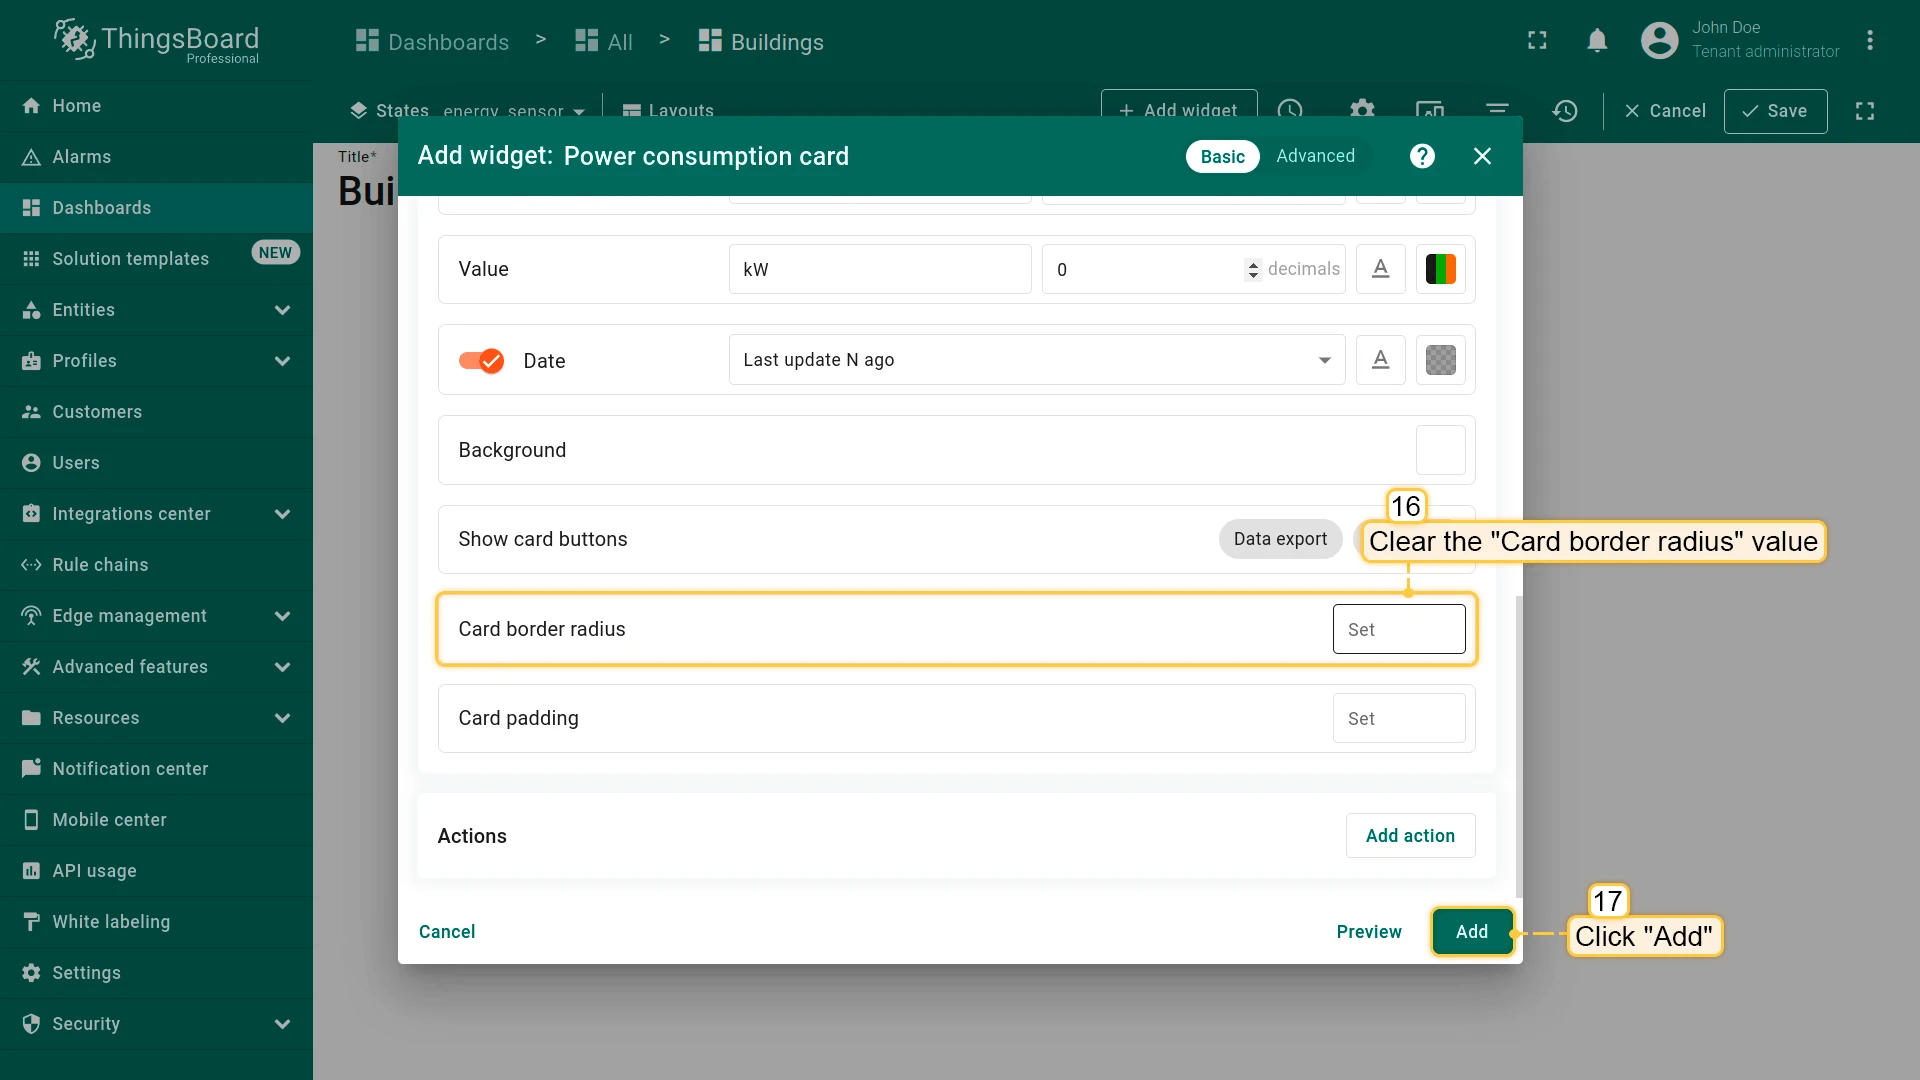
- Set unit label to kW
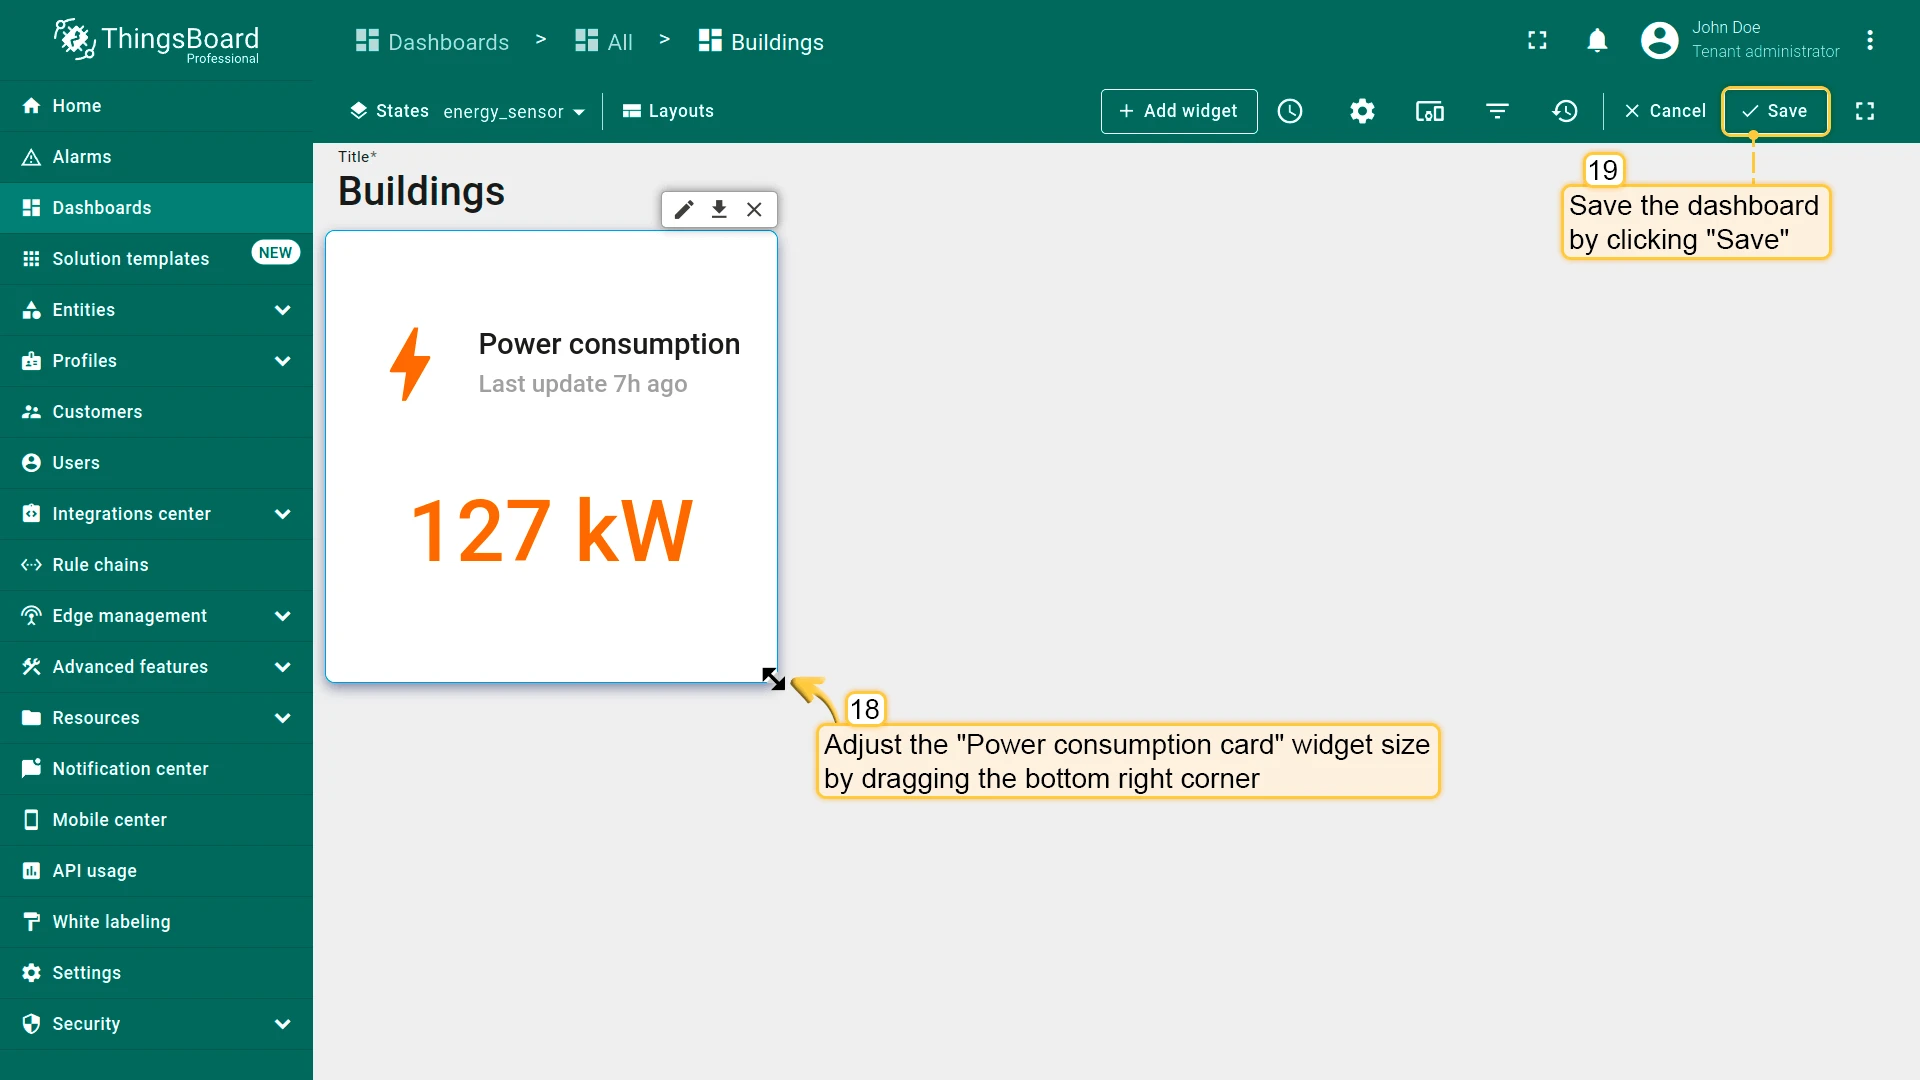
- Clear Card border radius and click Add.
- Resize the widget and save the dashboard.

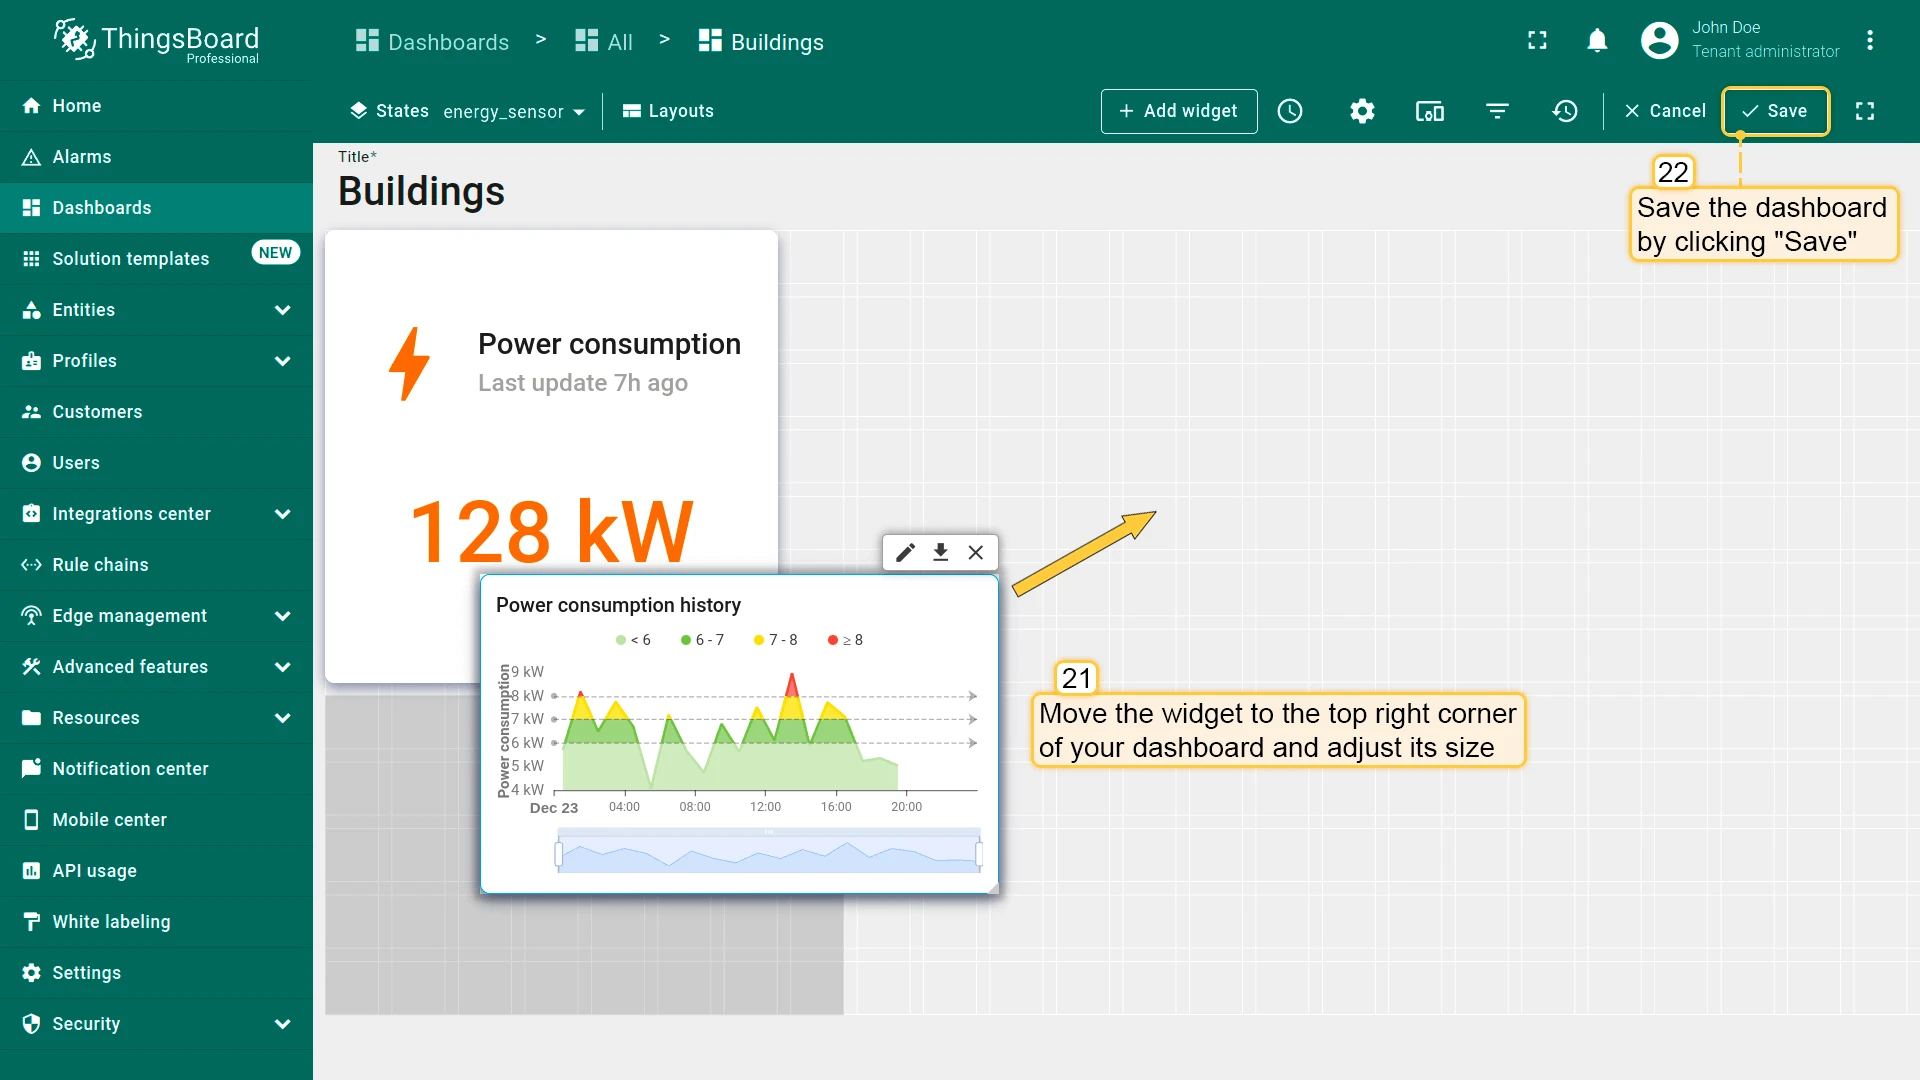
Power Consumption Chart
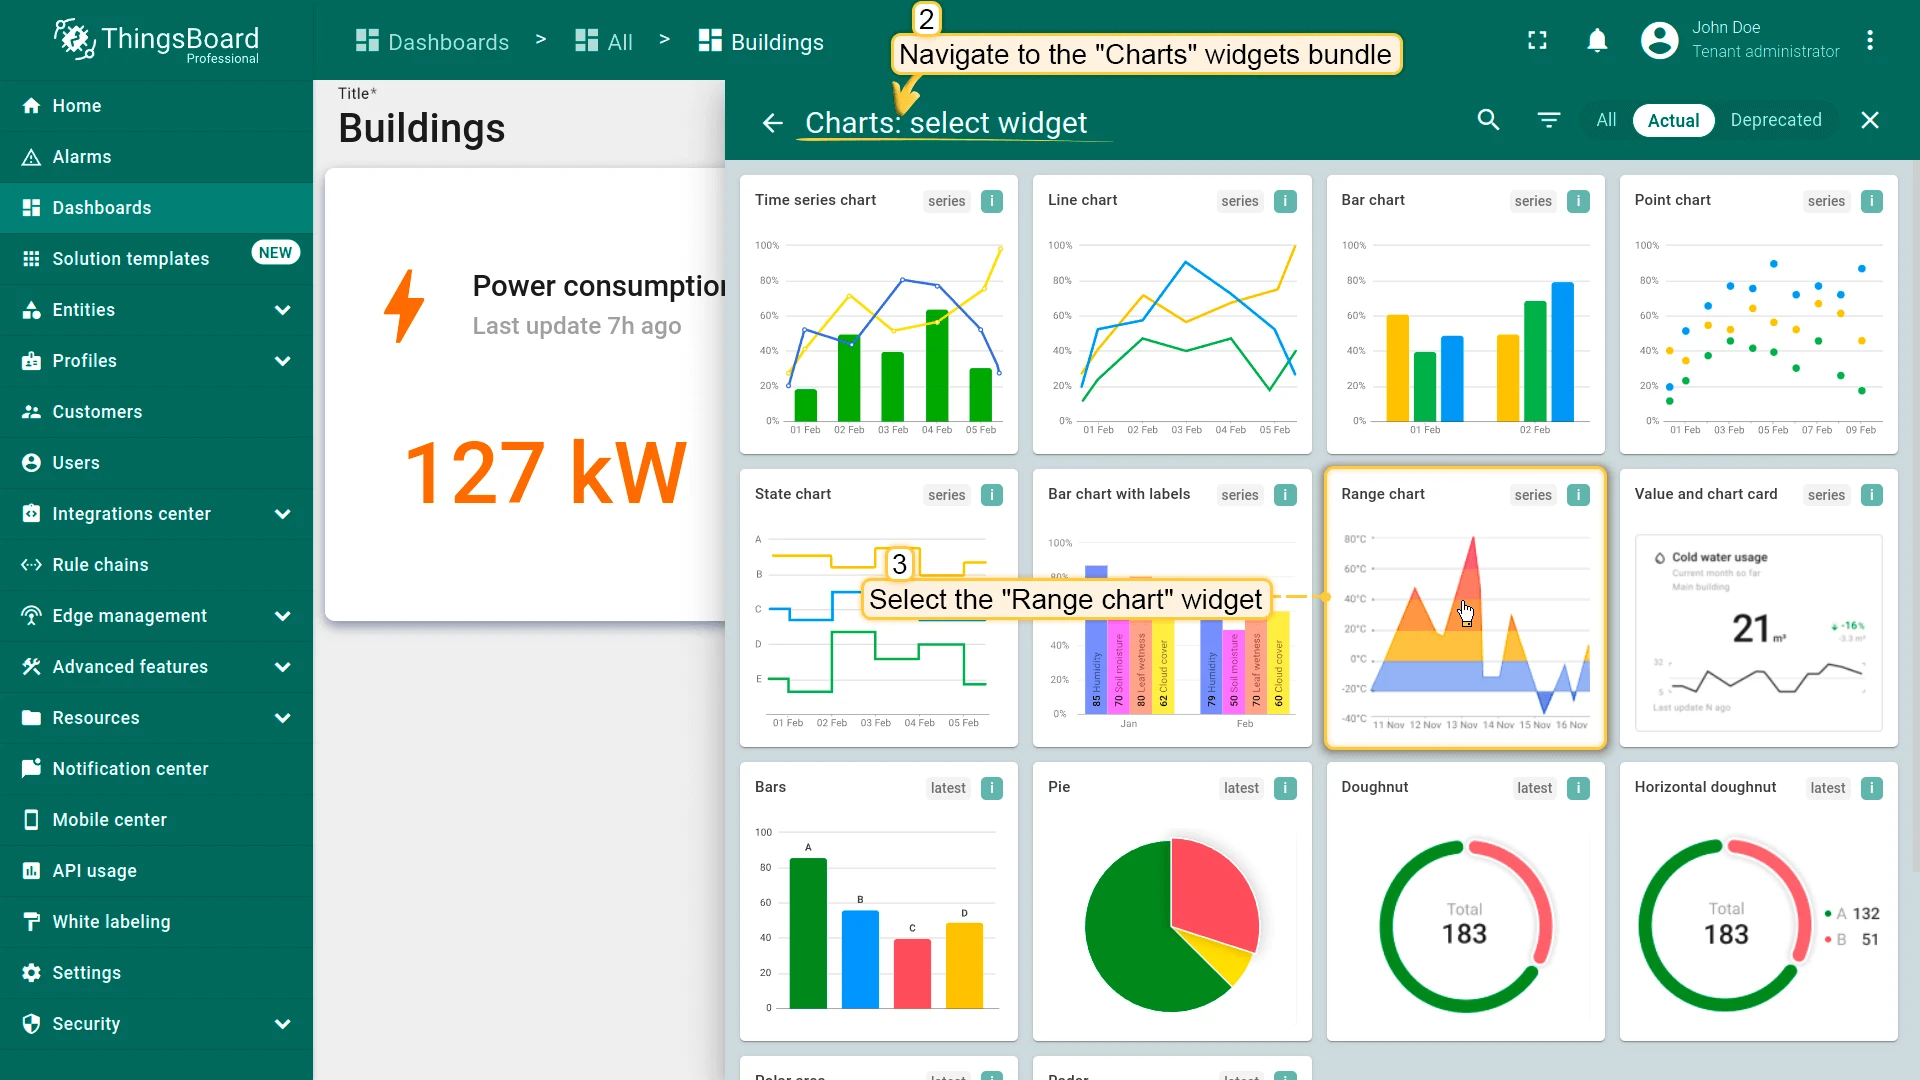
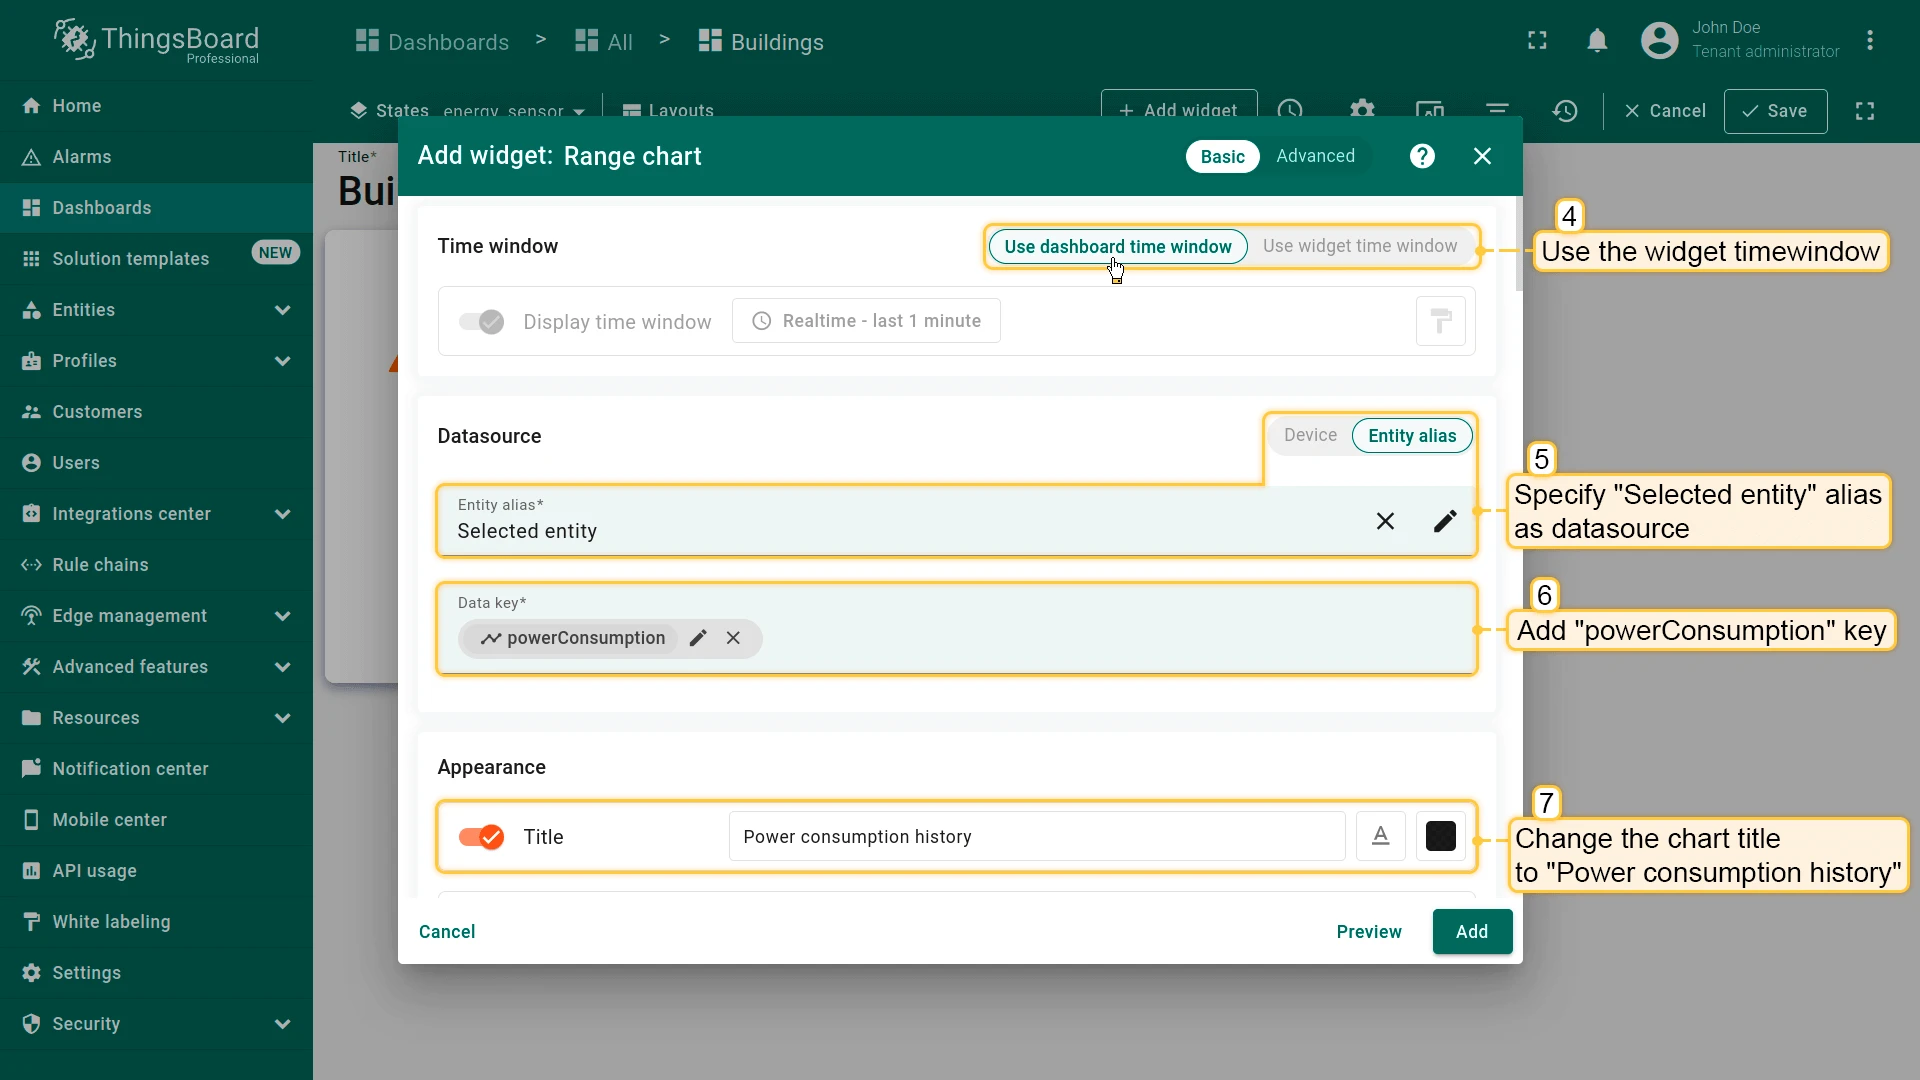
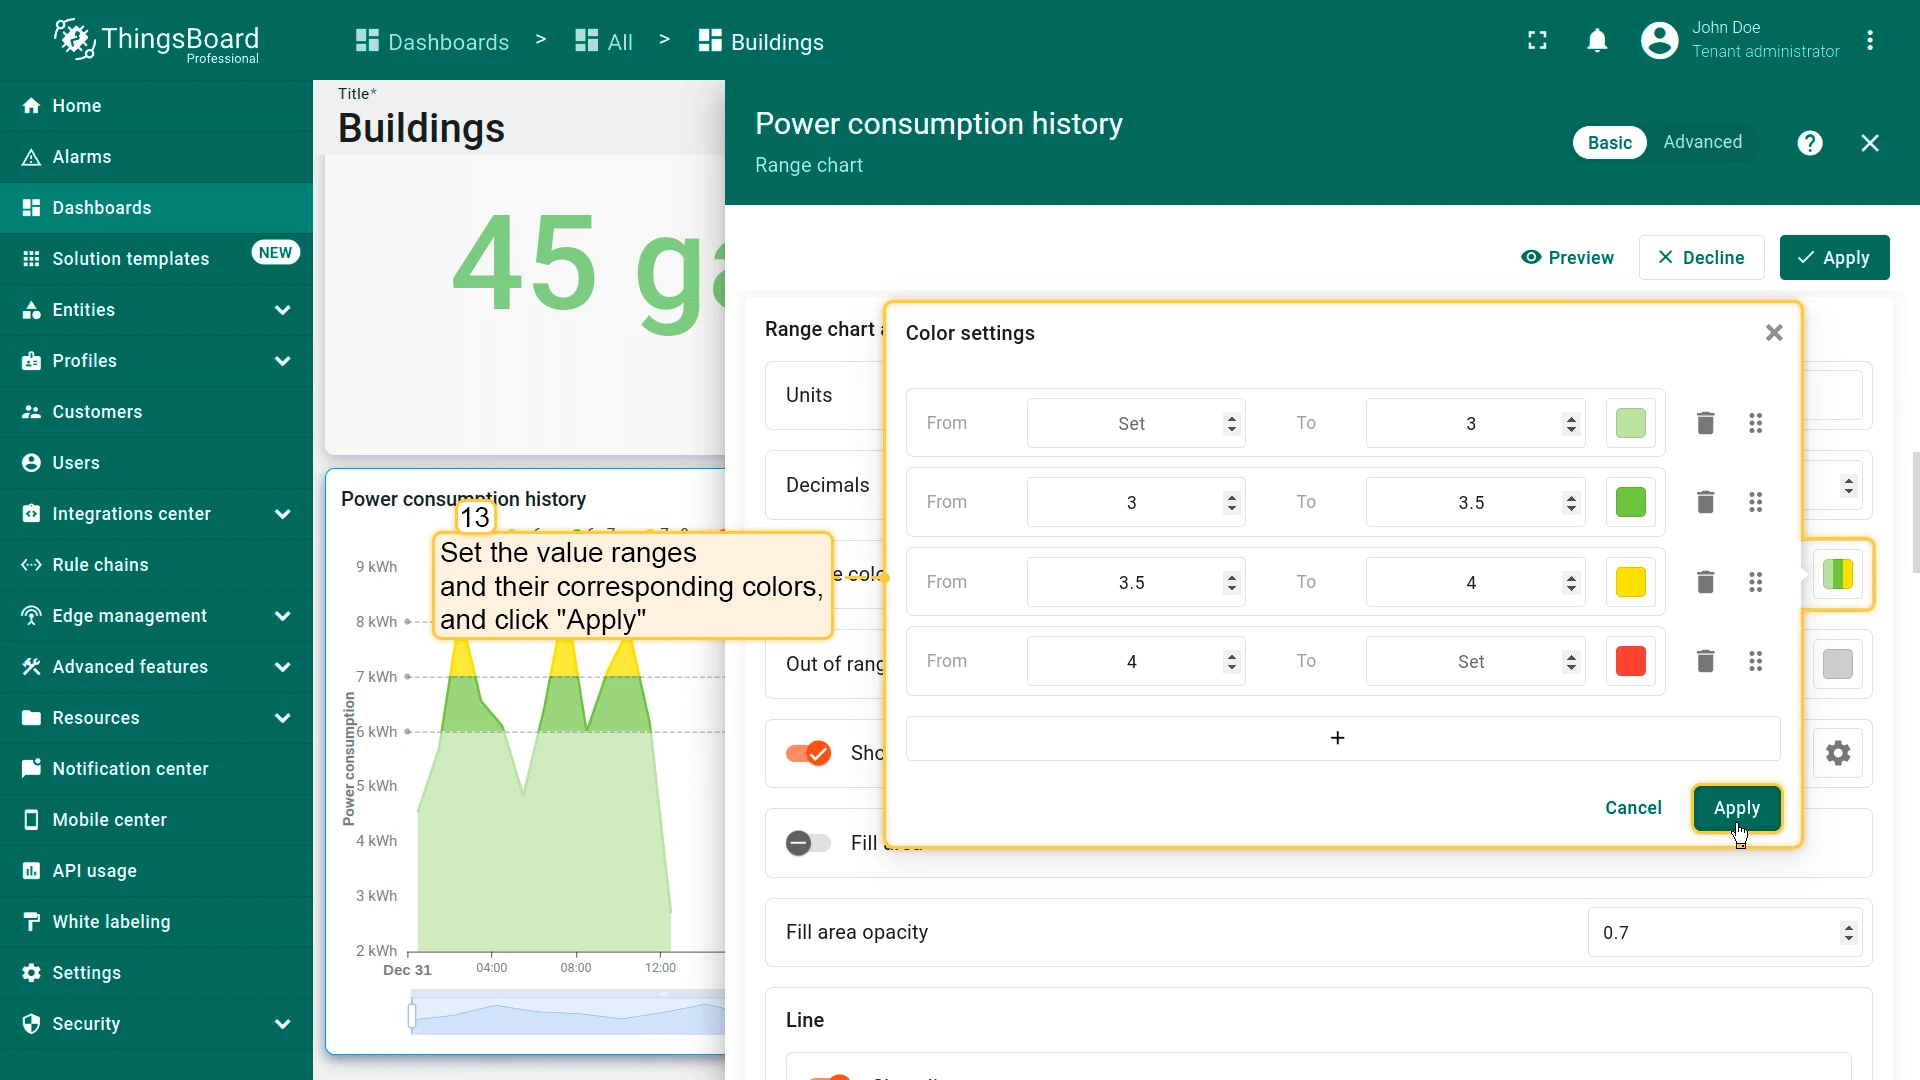
Section titled “Power Consumption Chart”- Click + Add widget in edit mode and select Charts ⇾ Range chart.
- Set datasource to Selected entity and add powerConsumption key.
- Configure chart:
- Title: Power consumption history
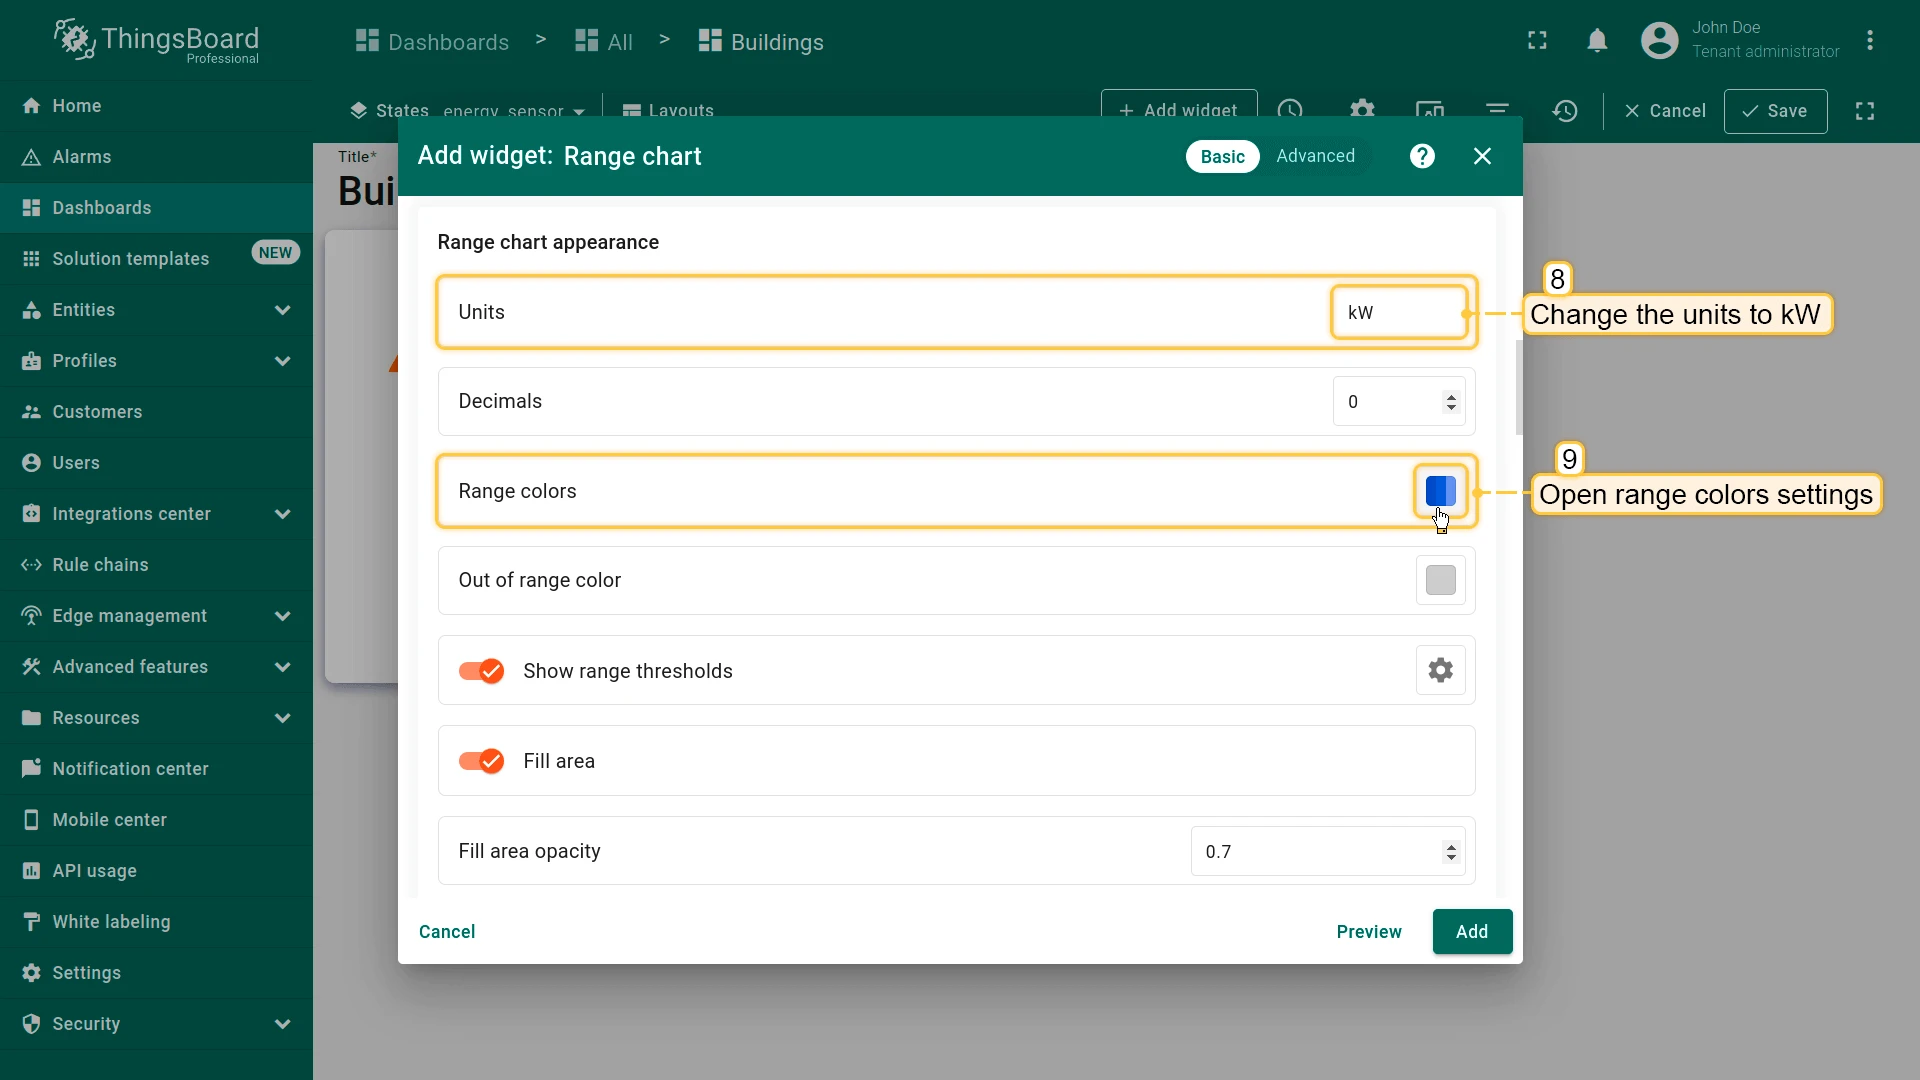
- Units: kW
- Use dashboard time window
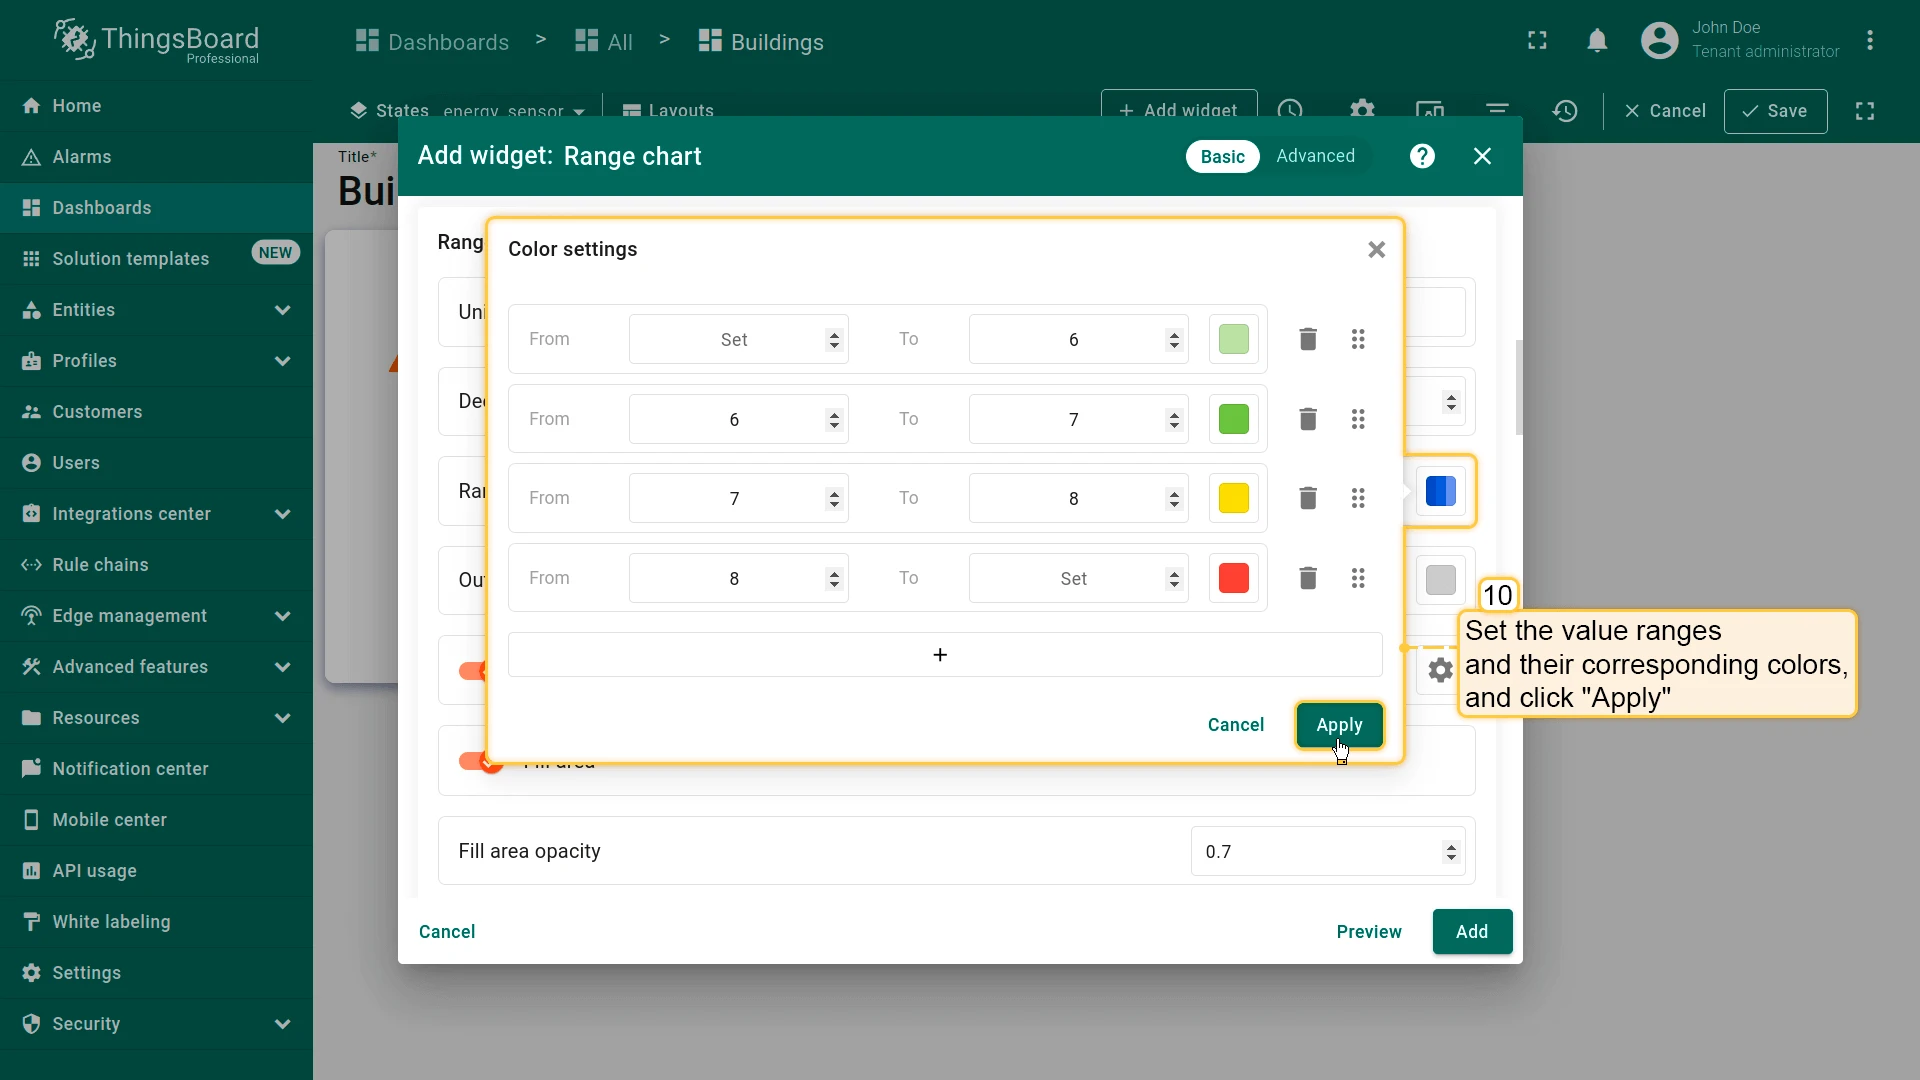
- Set value ranges and colors
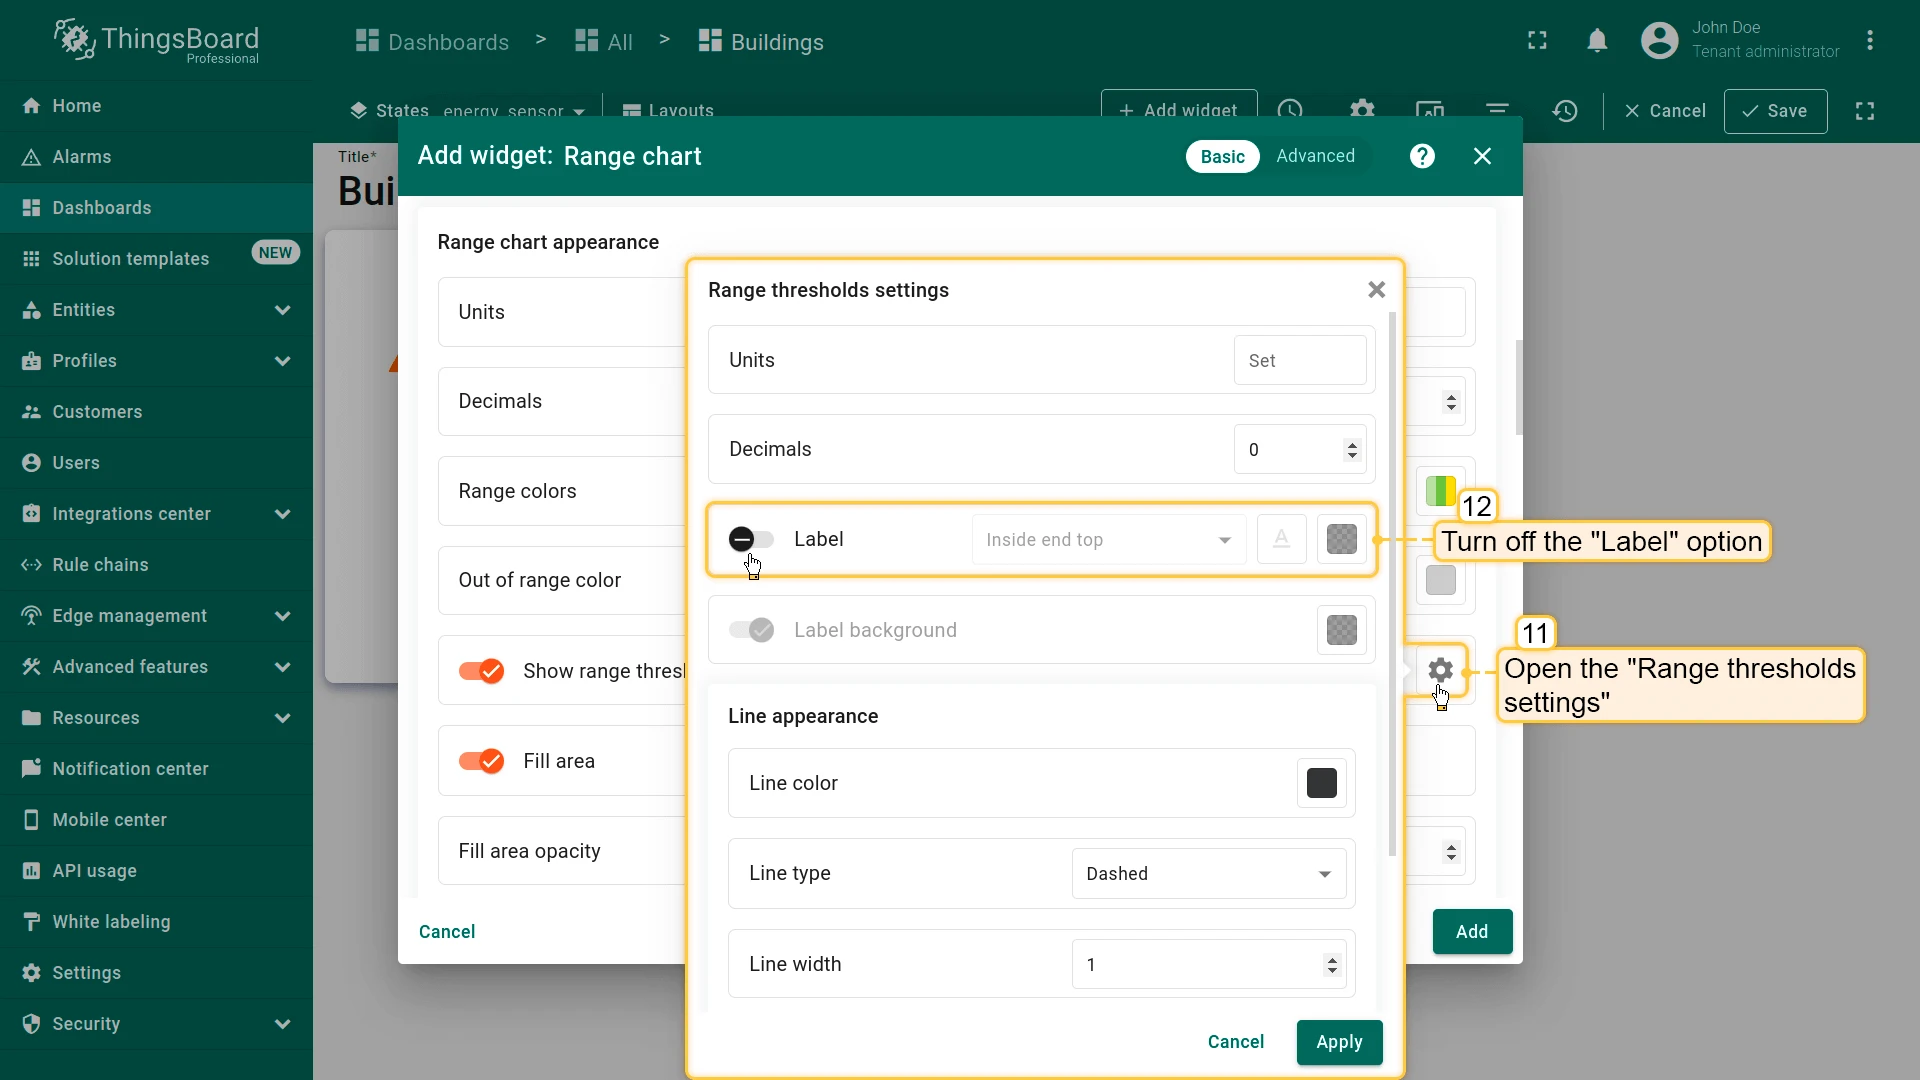
- Configure appearance:
- Disable Label in thresholds
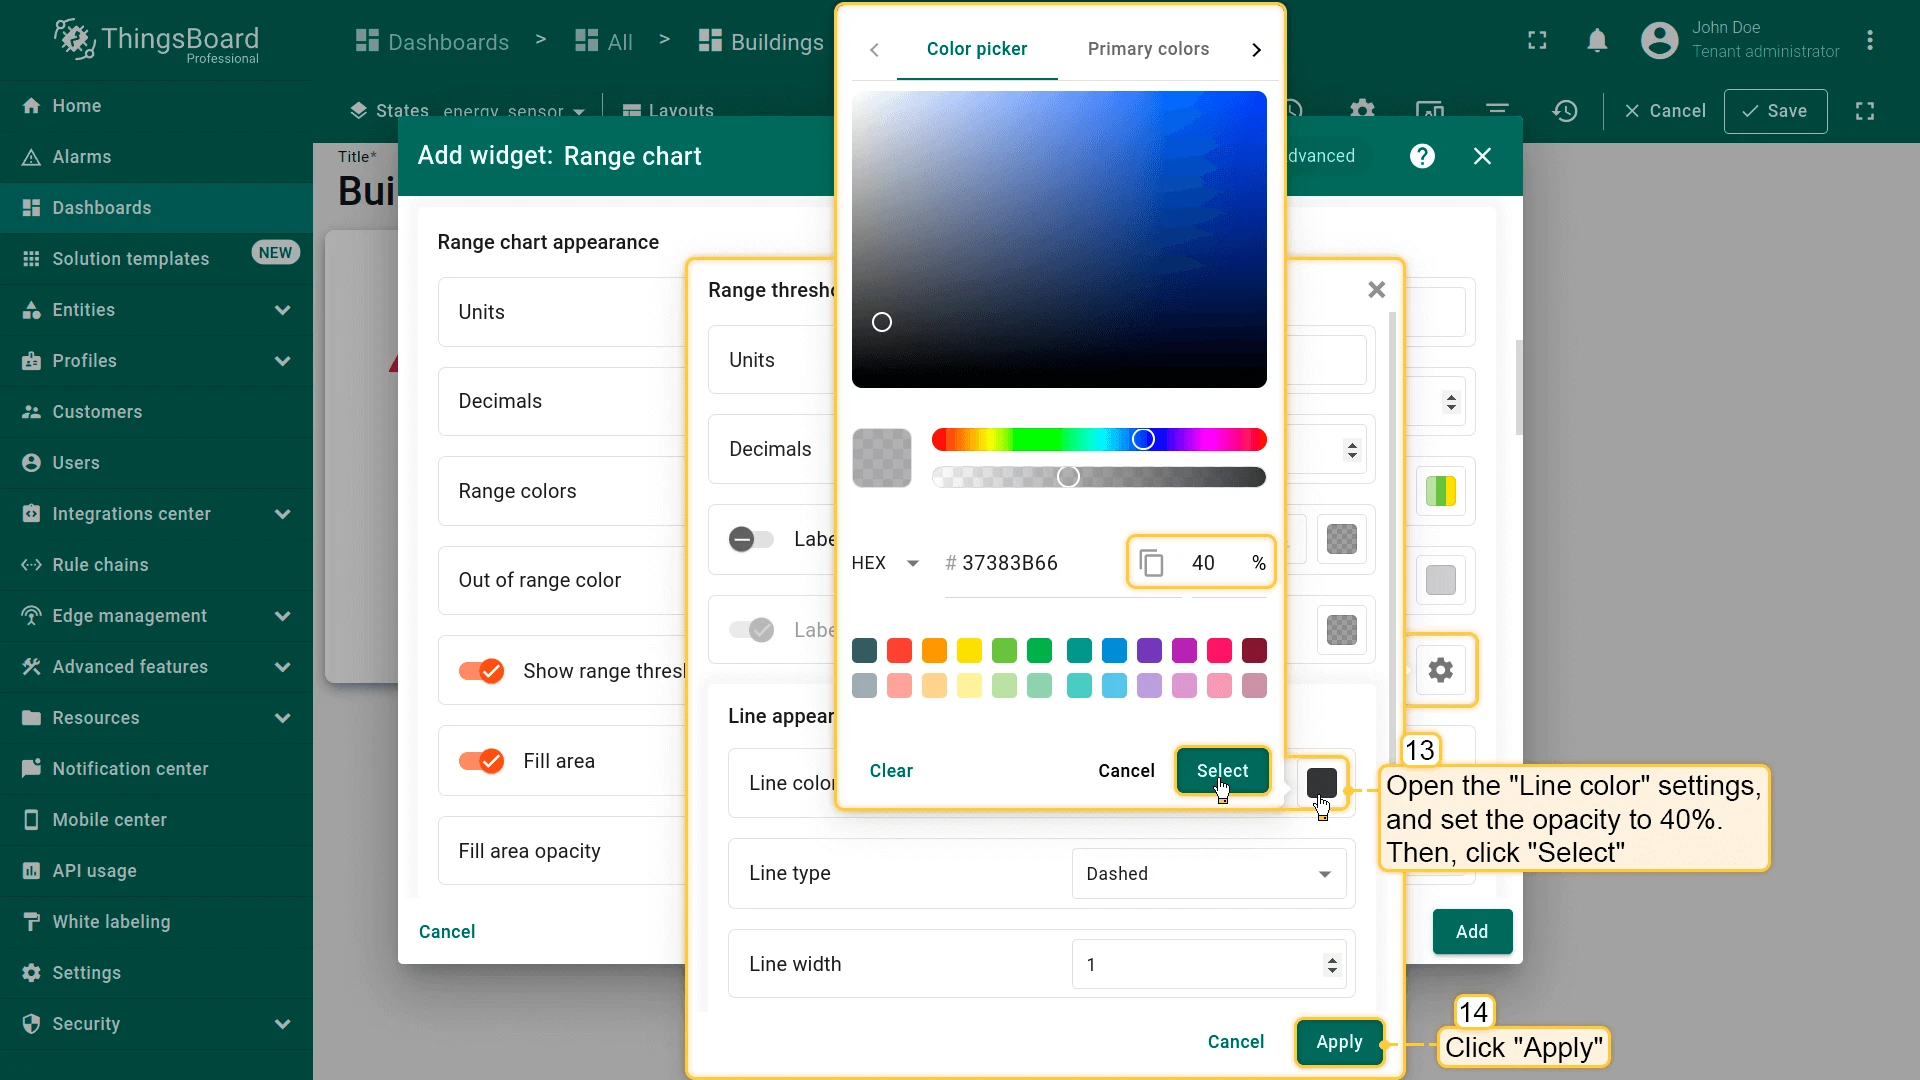
- Set Line color opacity to 40%
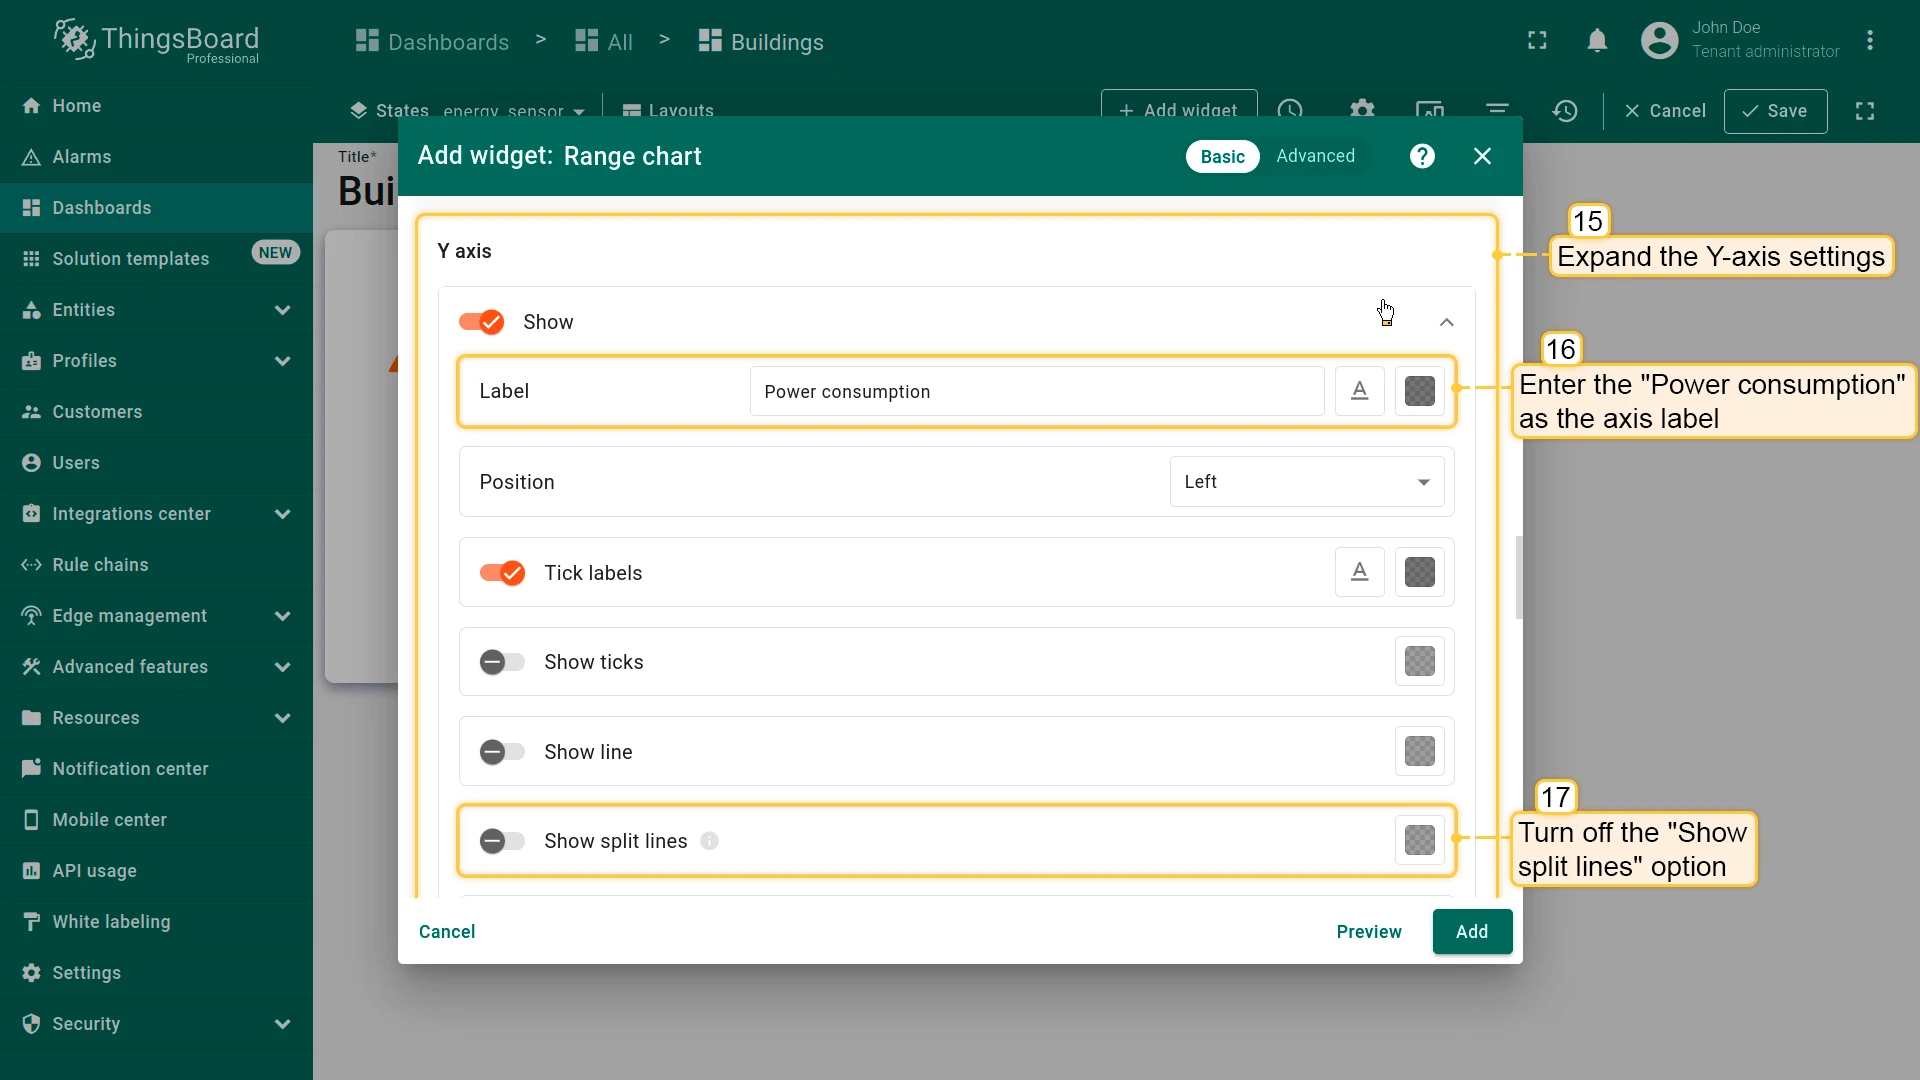
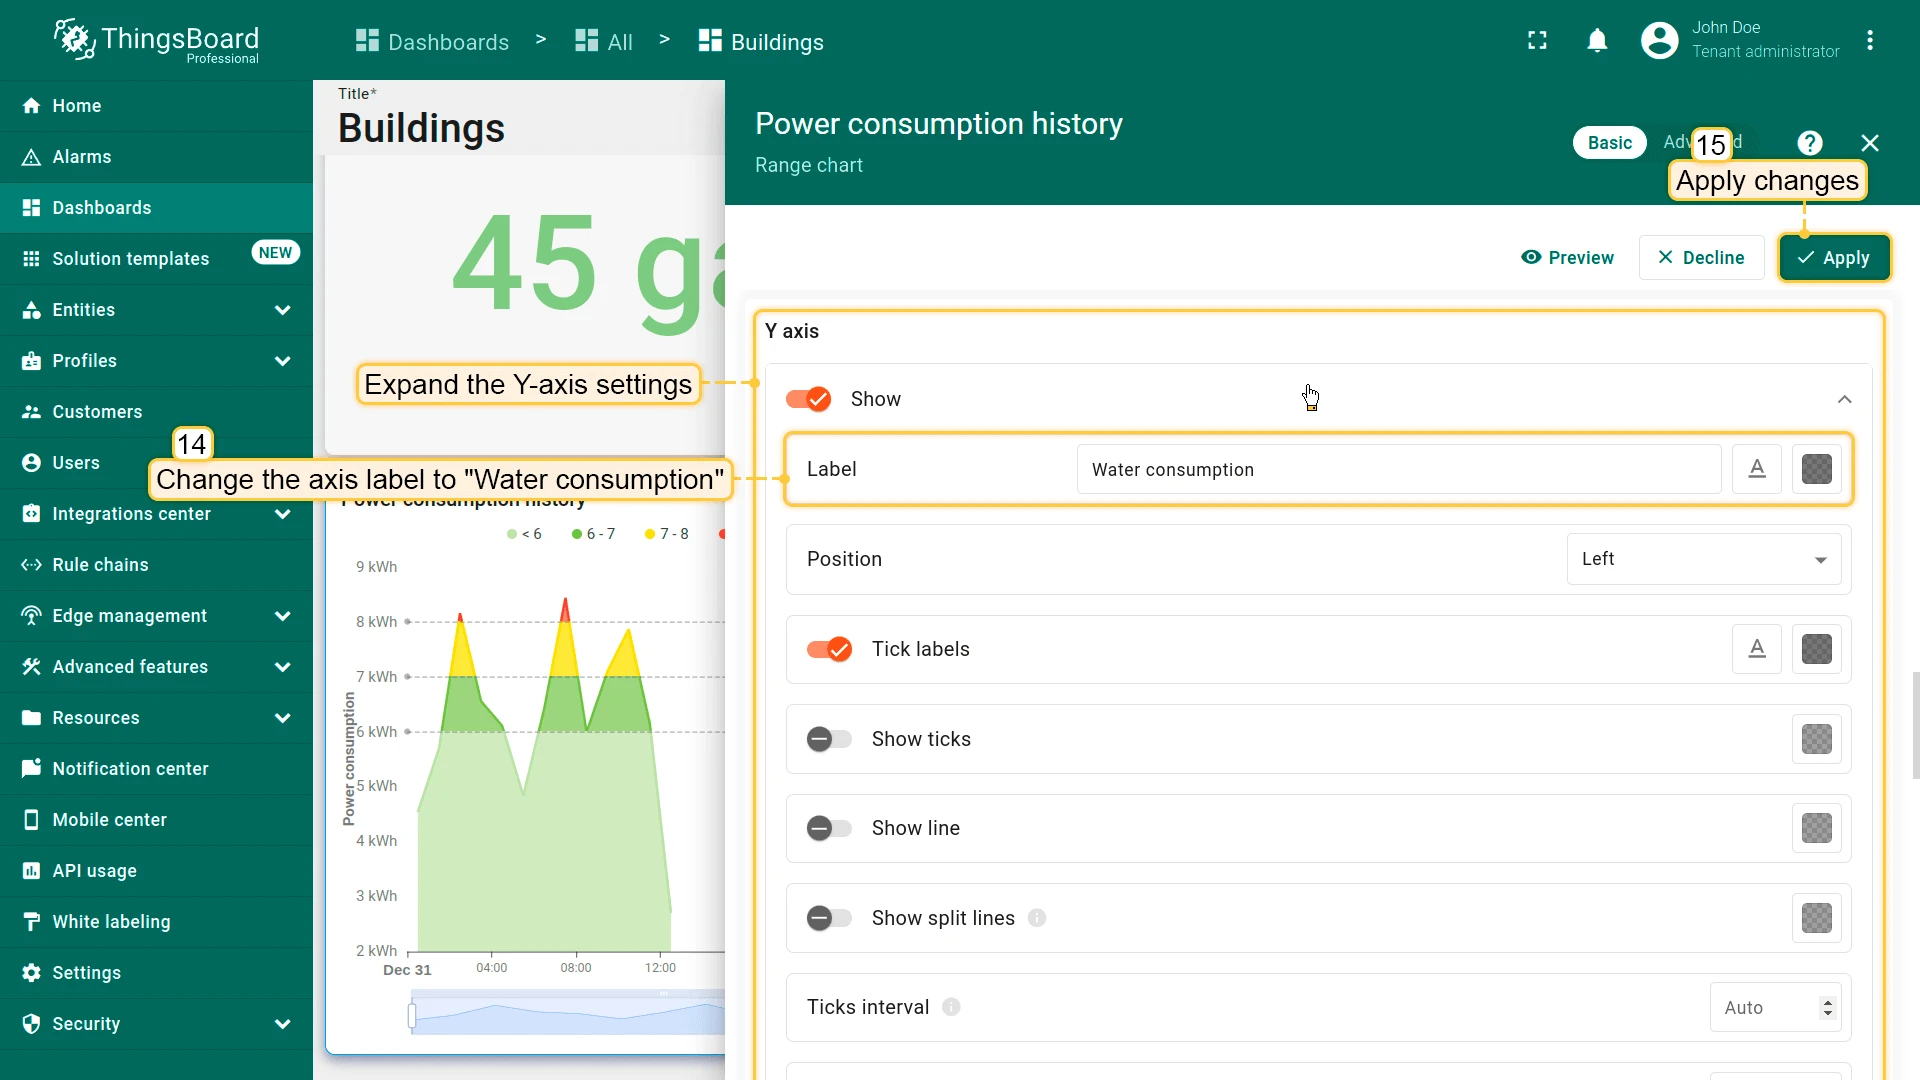
- Configure Y-axis:
- Label: Power consumption
- Disable Show split lines
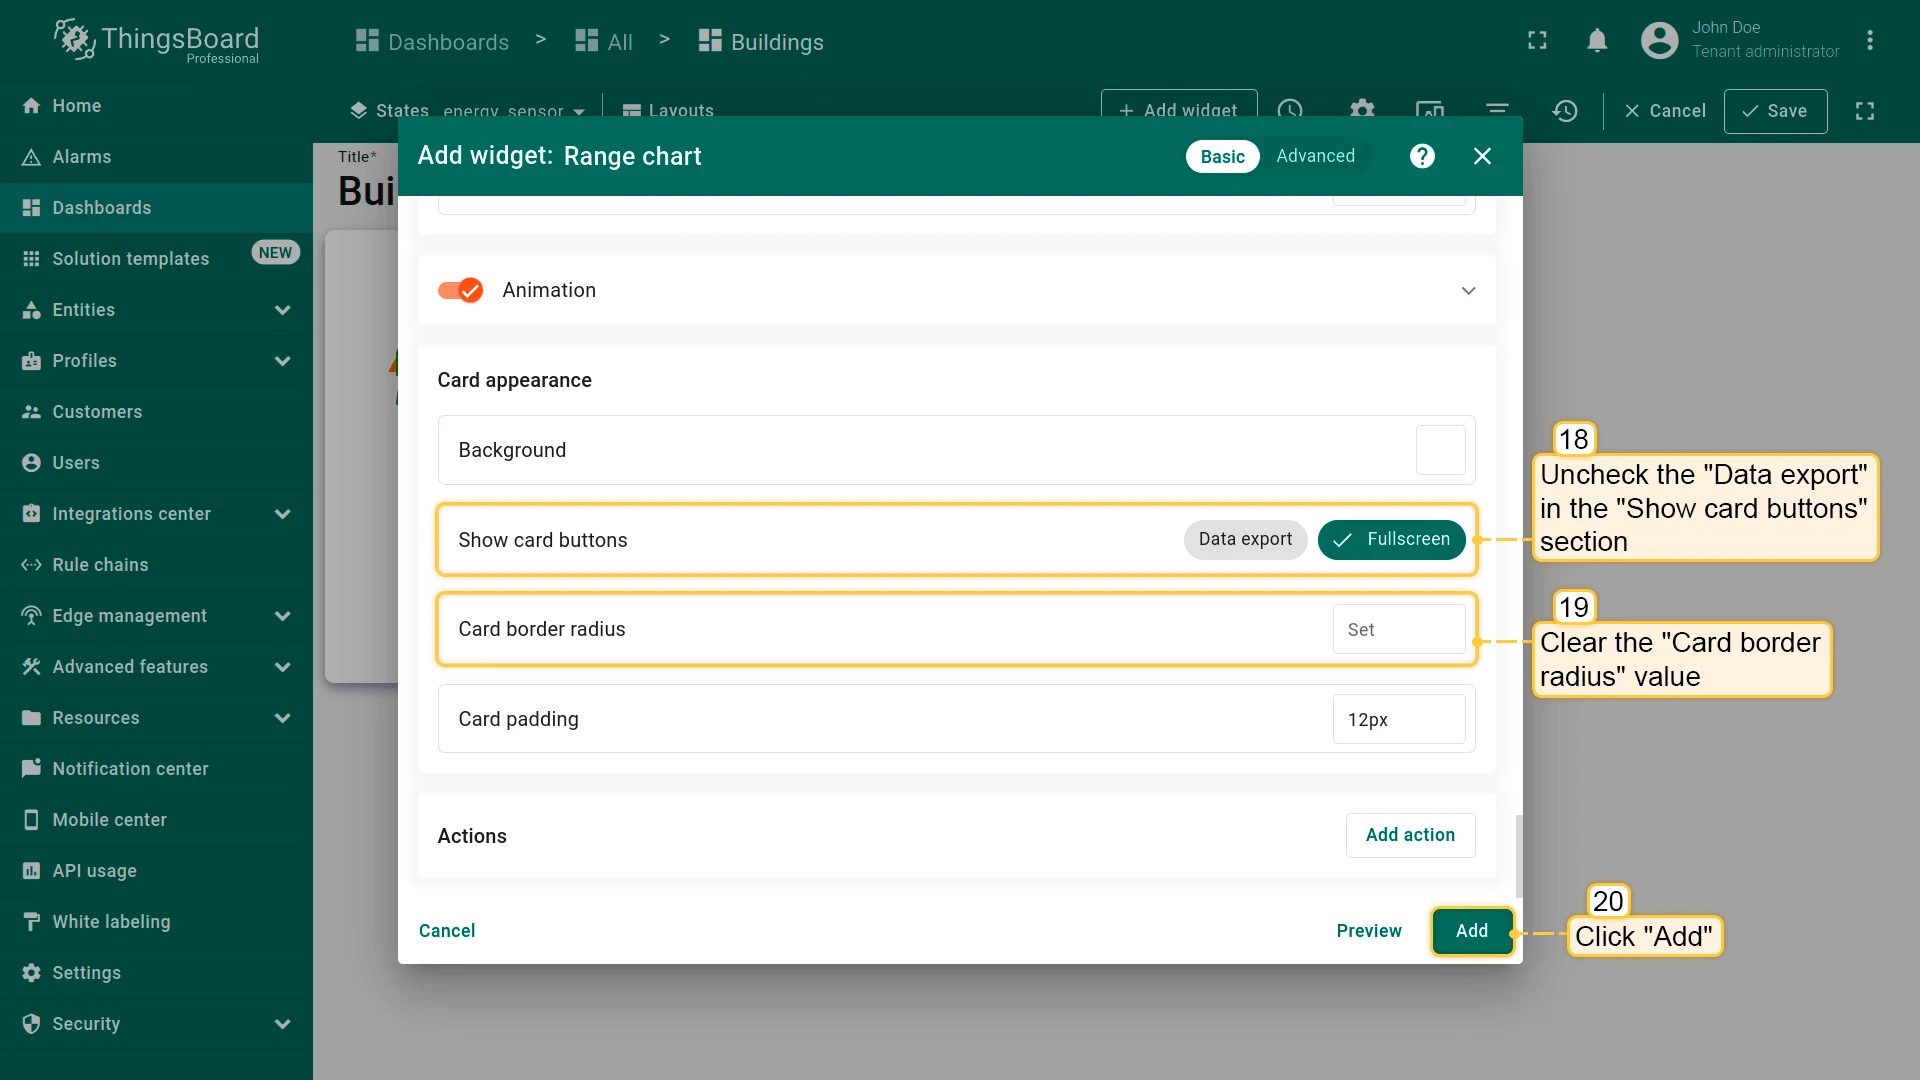
- Configure card:
- Disable Data export
- Clear Card border radius
- Click Add
- Place the widget next to Power consumption, resize, and save the dashboard.
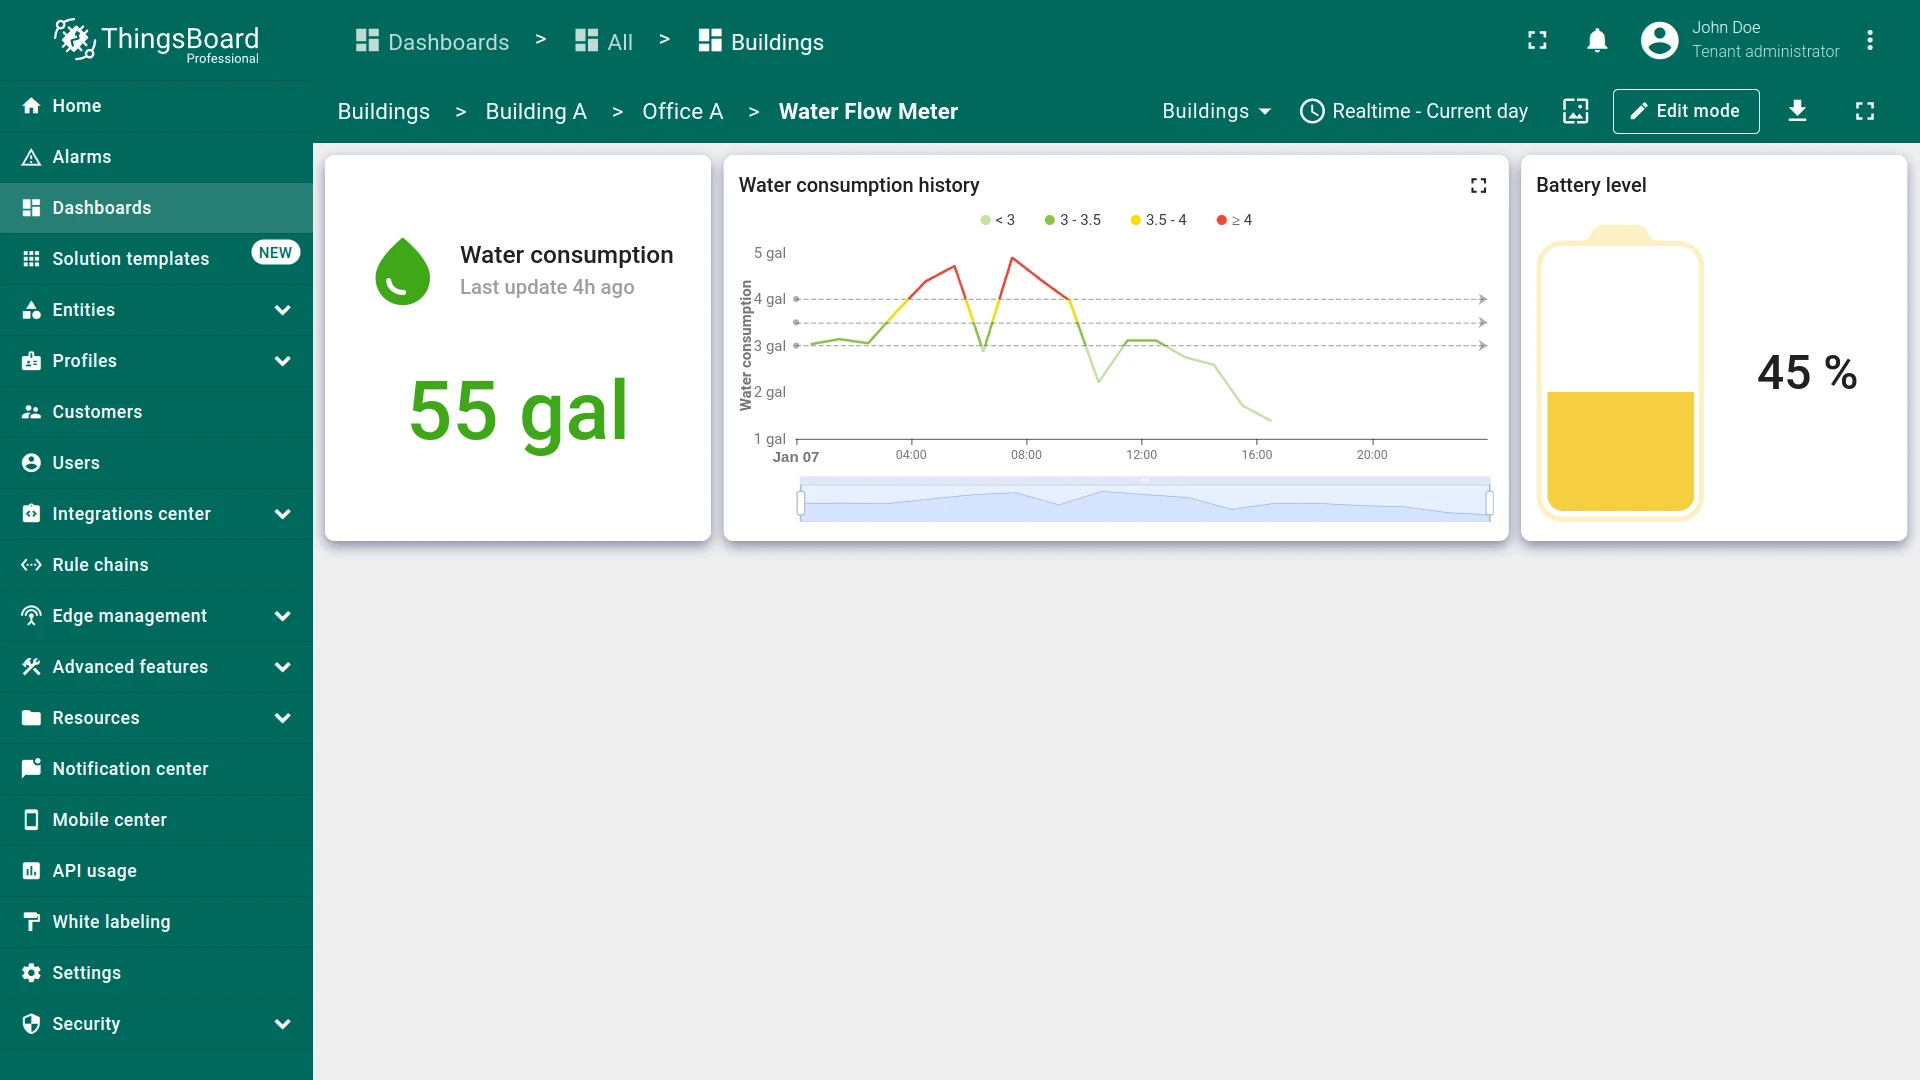
Step 3.9 Water Sensor State
Section titled “Step 3.9 Water Sensor State”Build the water_sensor state with water consumption (card + chart) and a battery level gauge widget.
Current Water Consumption
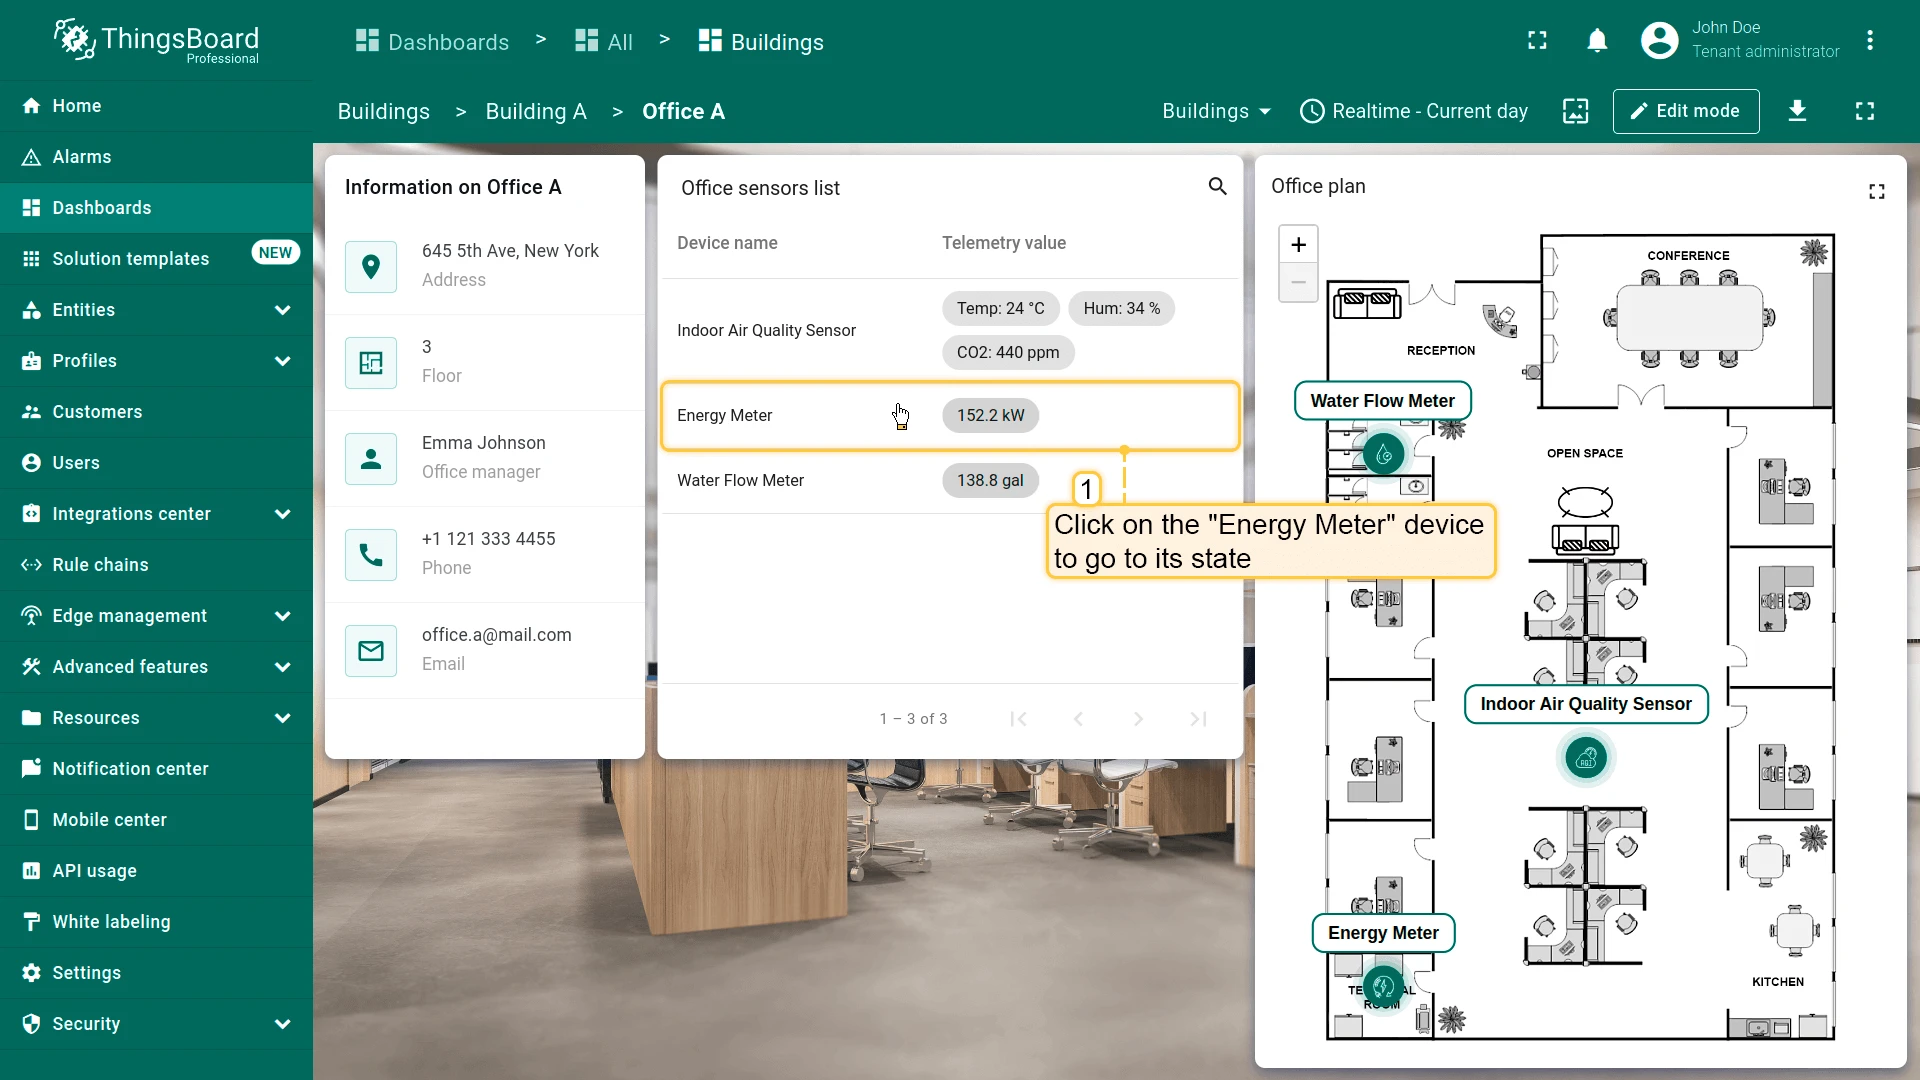
Section titled “Current Water Consumption”- Open Water Flow Meter state from Office sensors list.
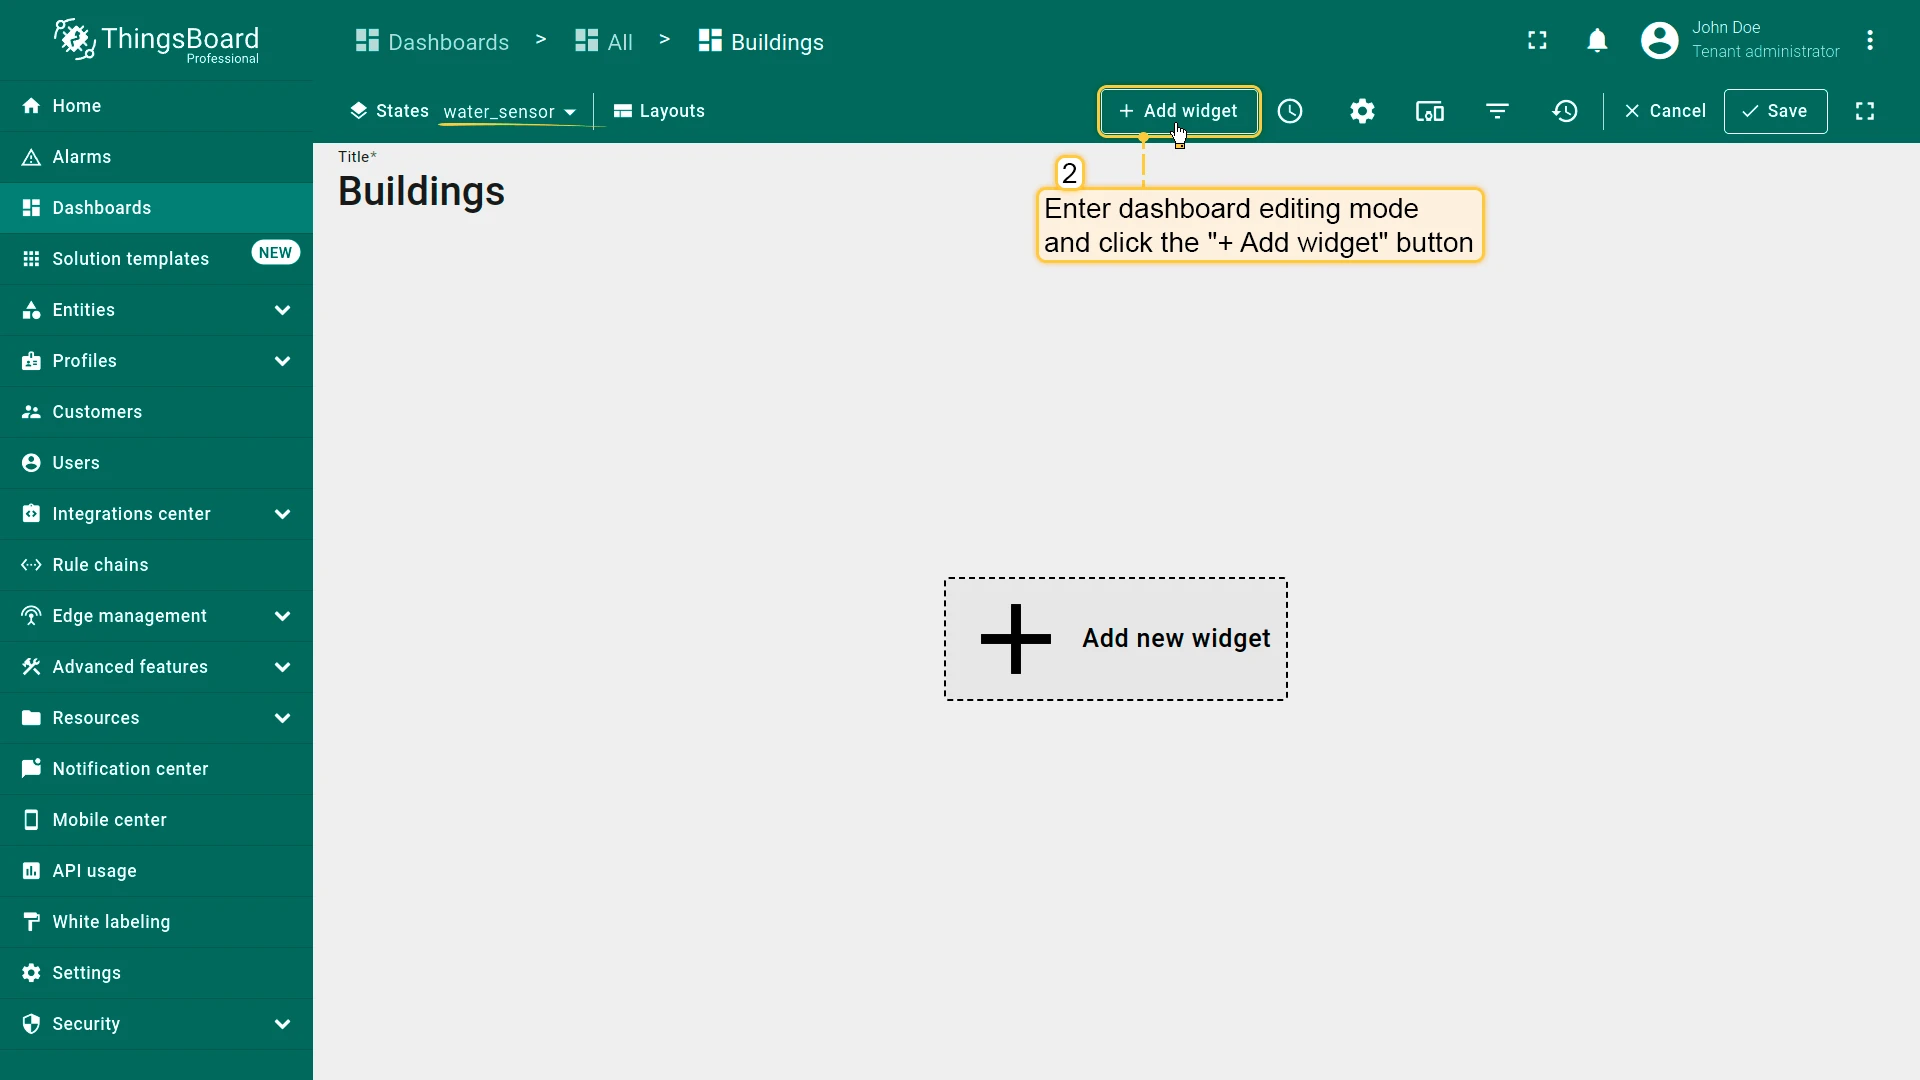
- Click + Add widget in edit mode.
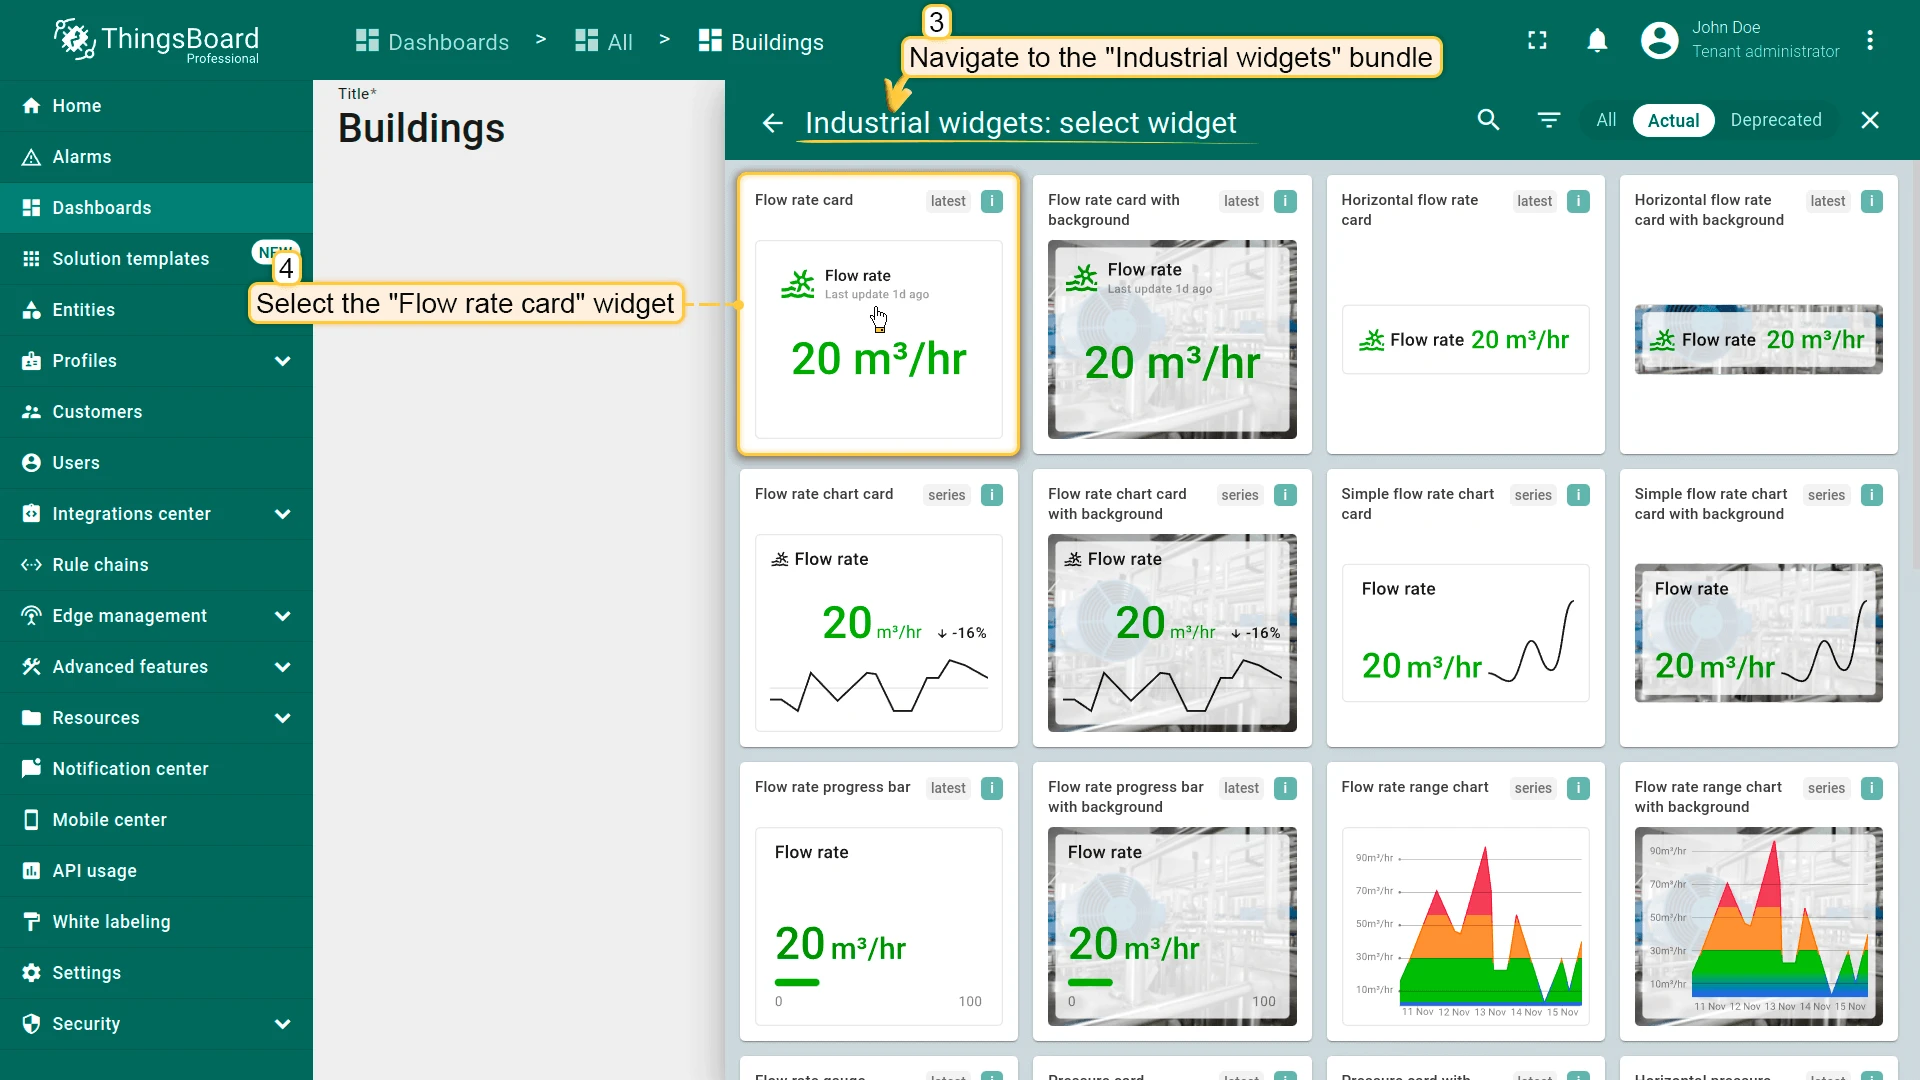
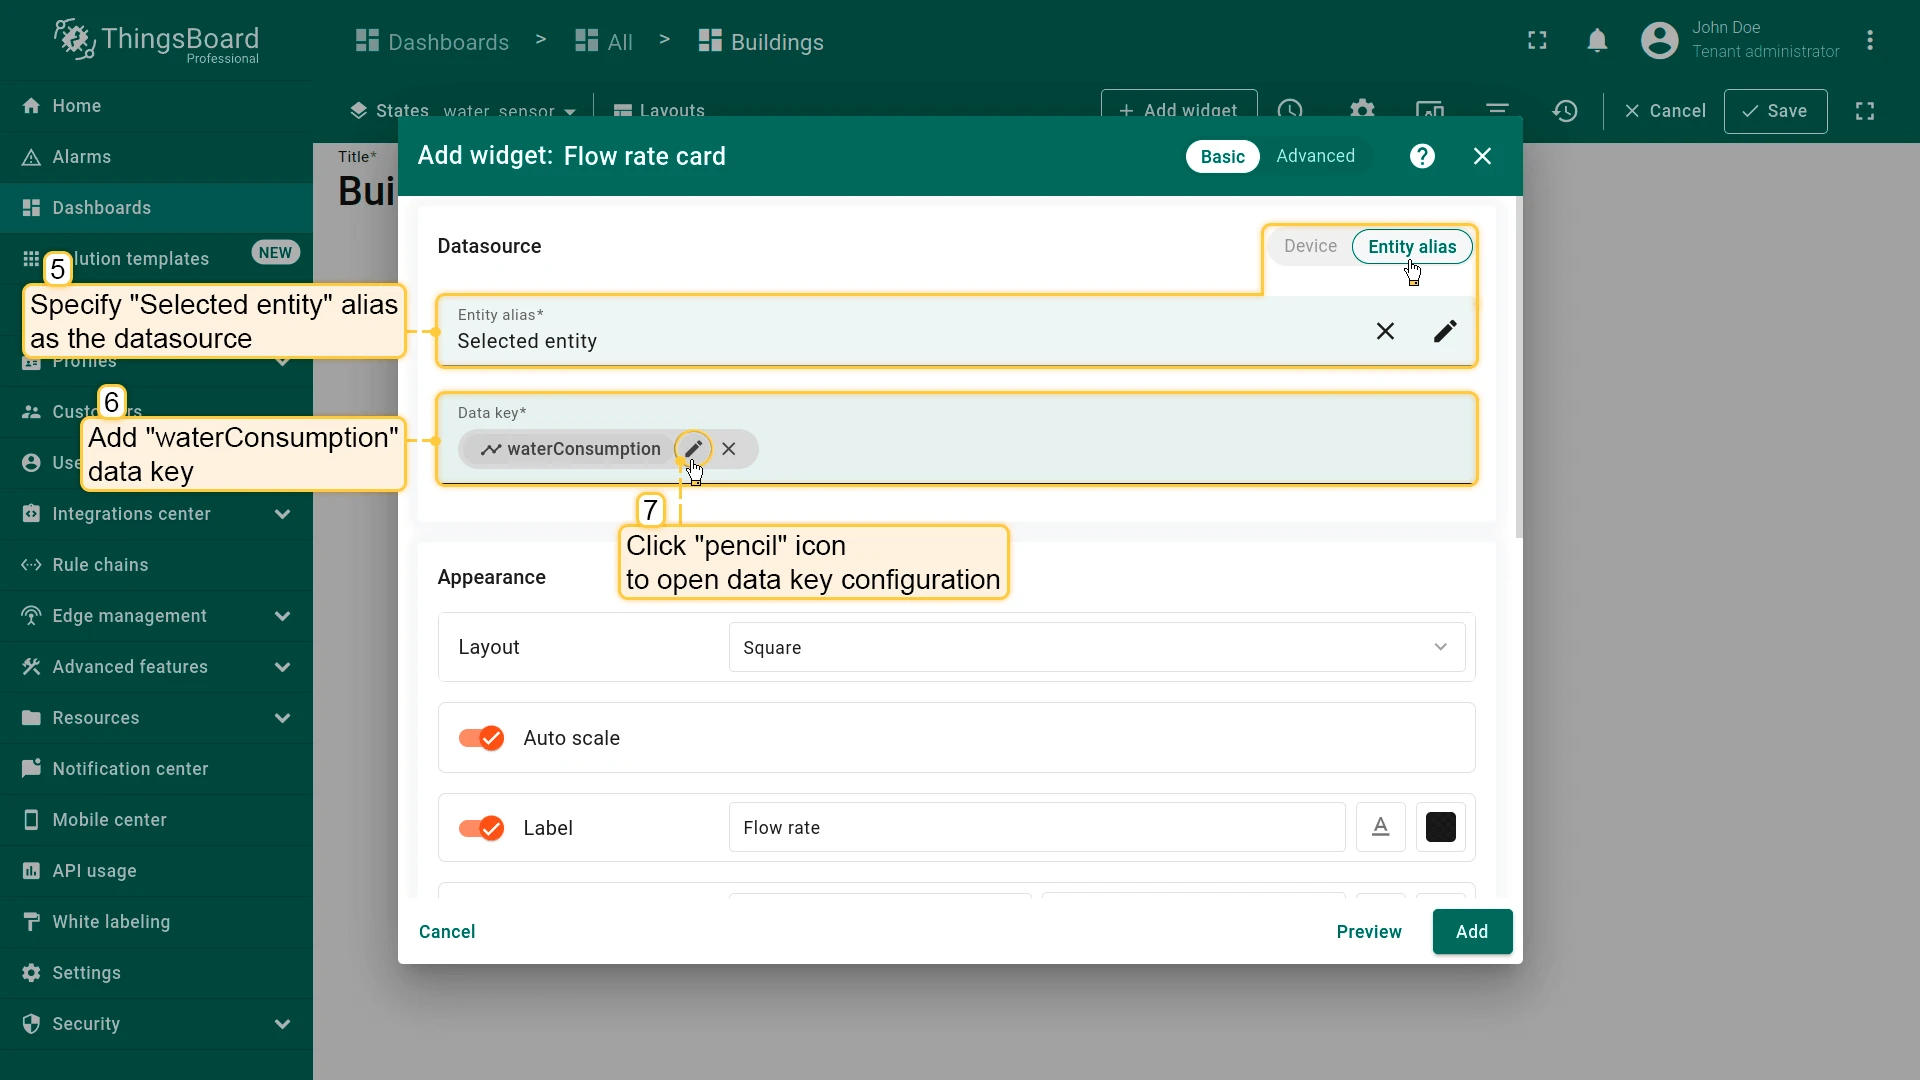
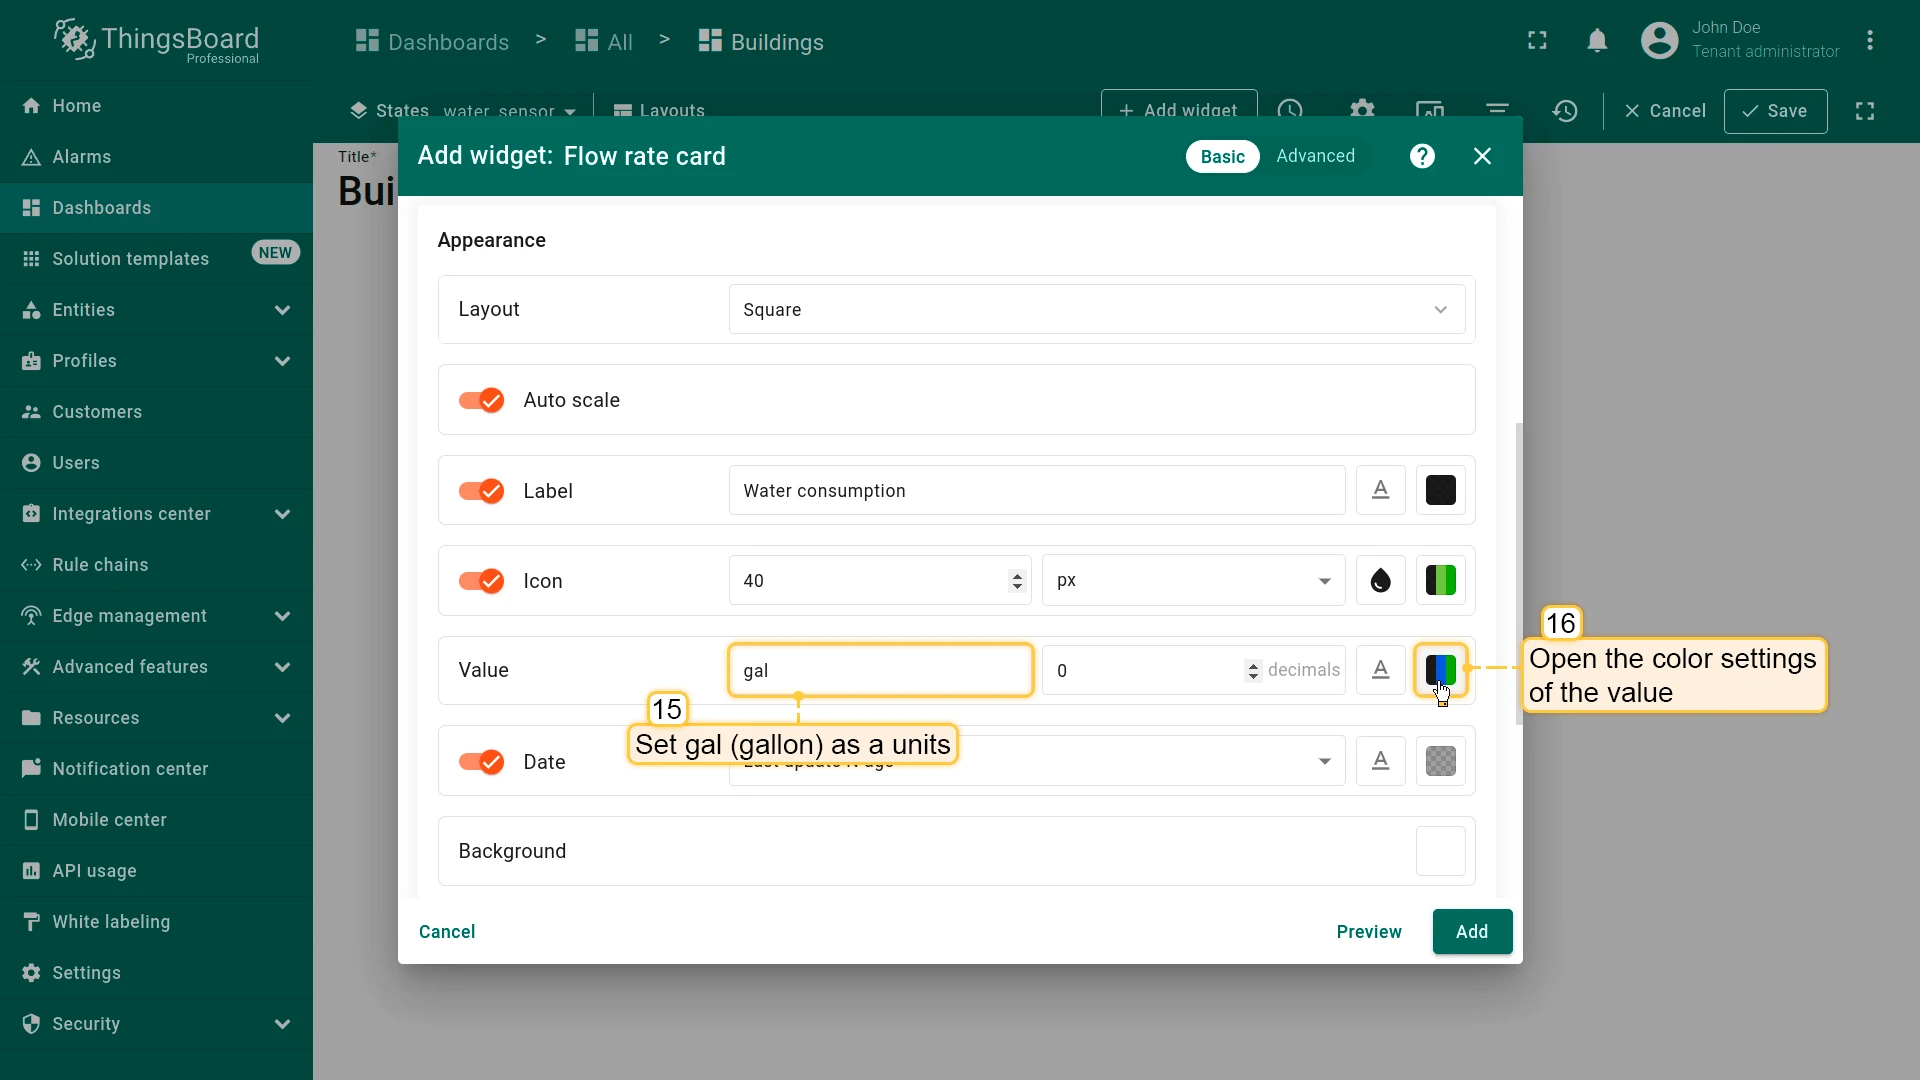
- Select Industrial widgets ⇾ Flow rate card.
- Set datasource to Selected entity and add waterConsumption key.
- Configure data key: Set aggregation to Sum
- Use the dashboard time window.
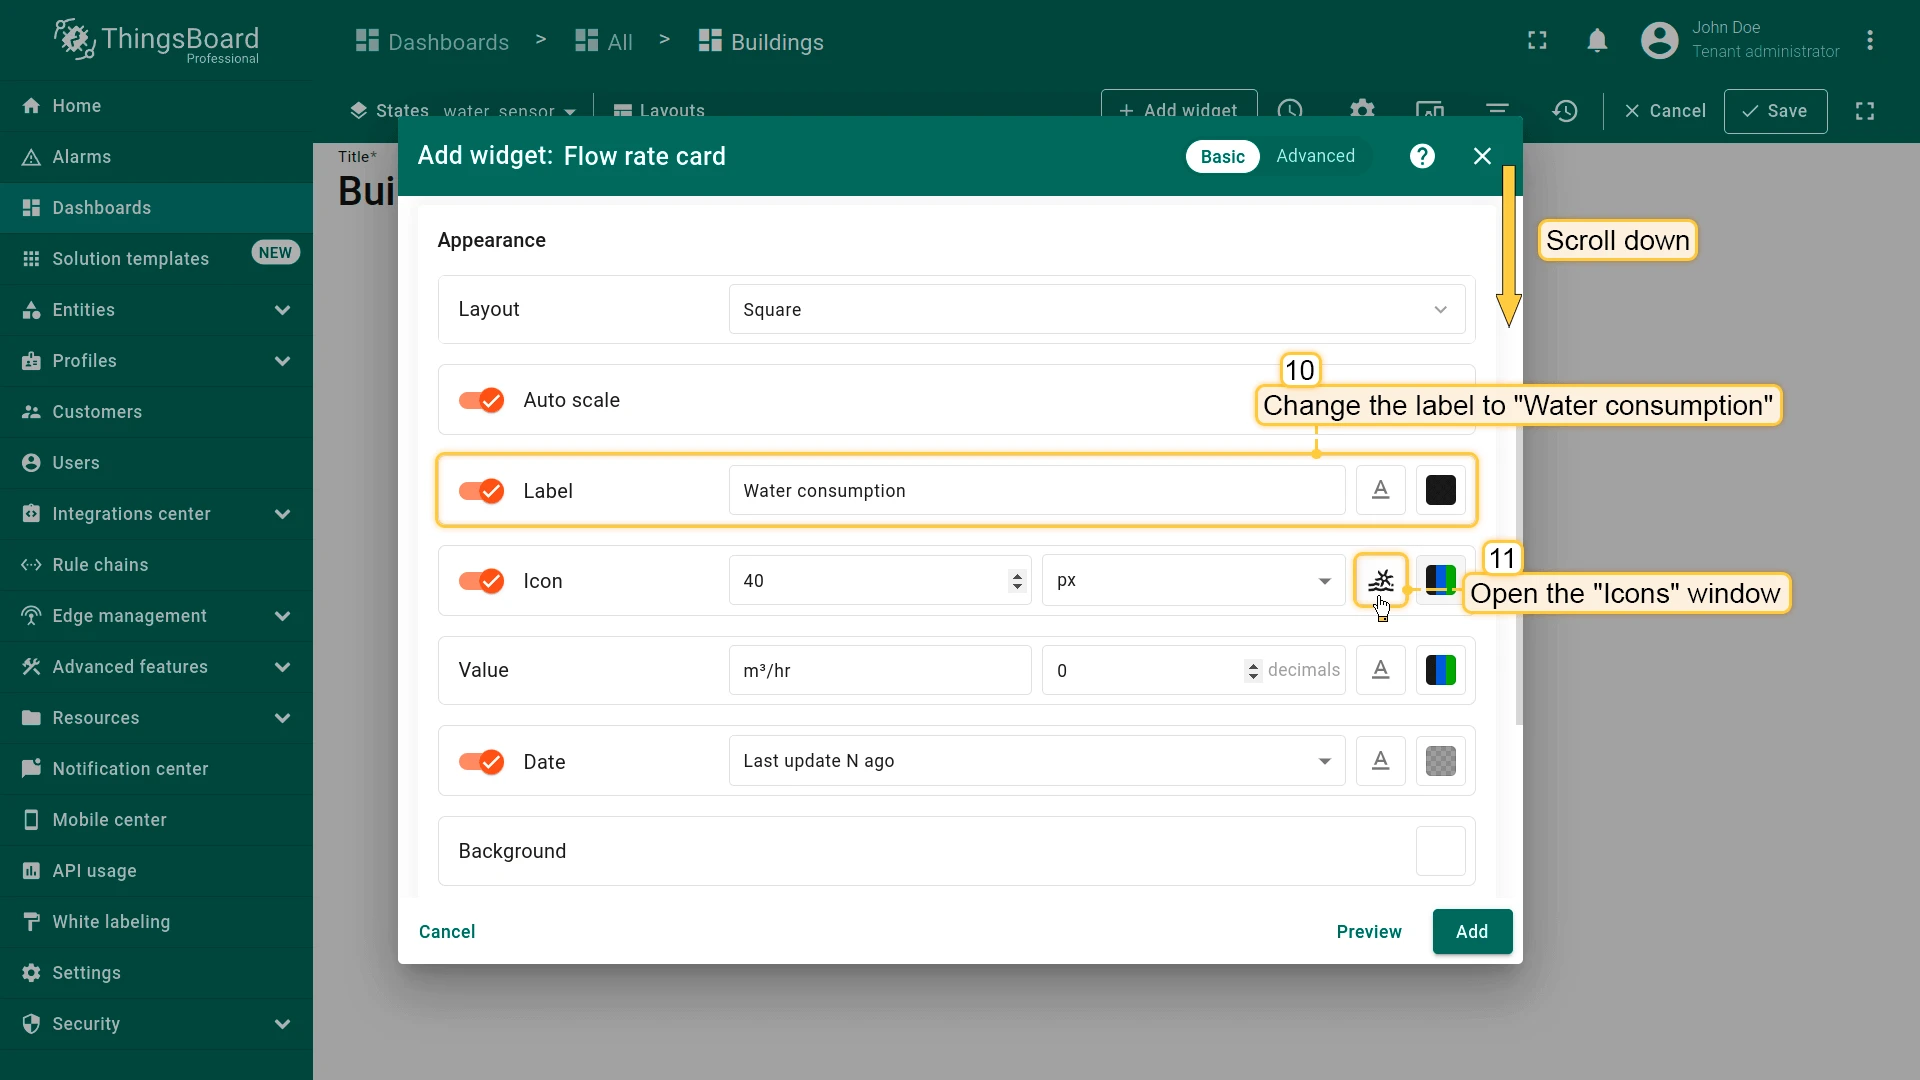
- Configure widget:
- Label: Water consumption
- Set units to gallon
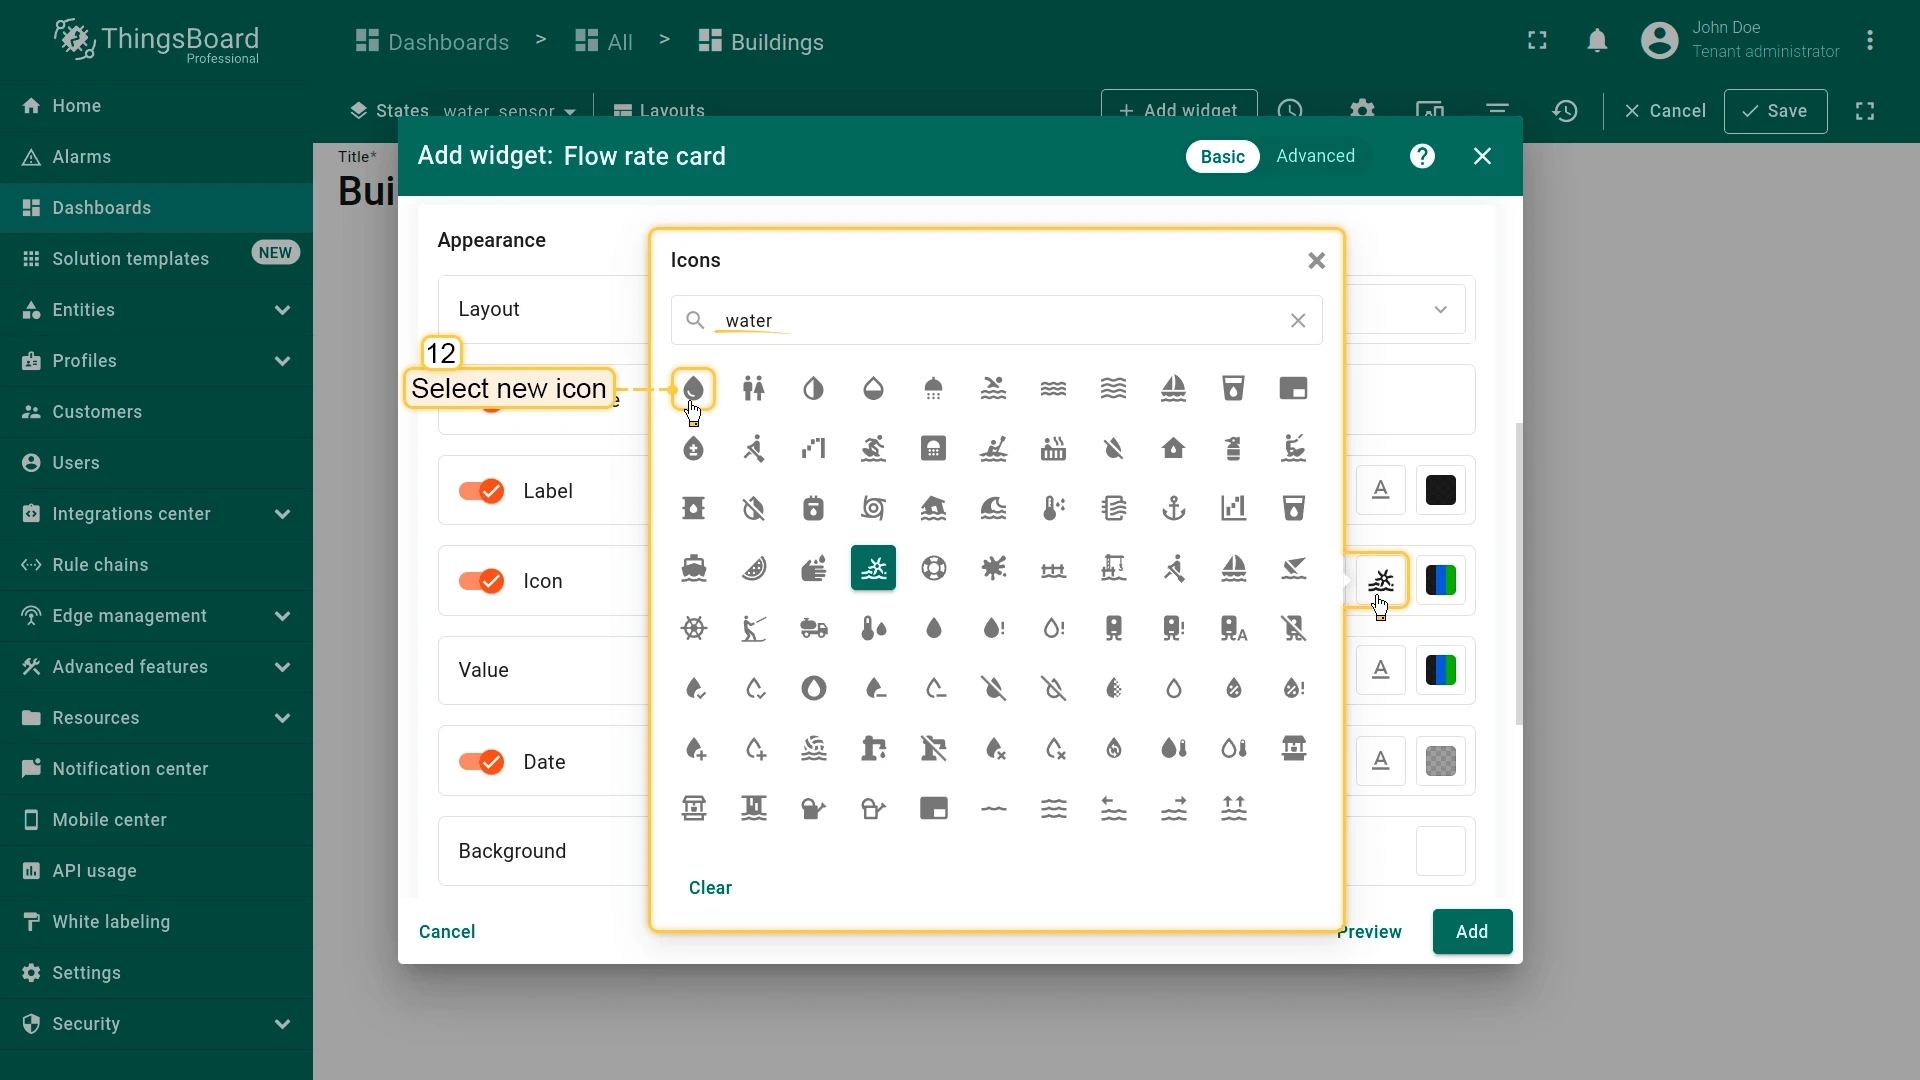
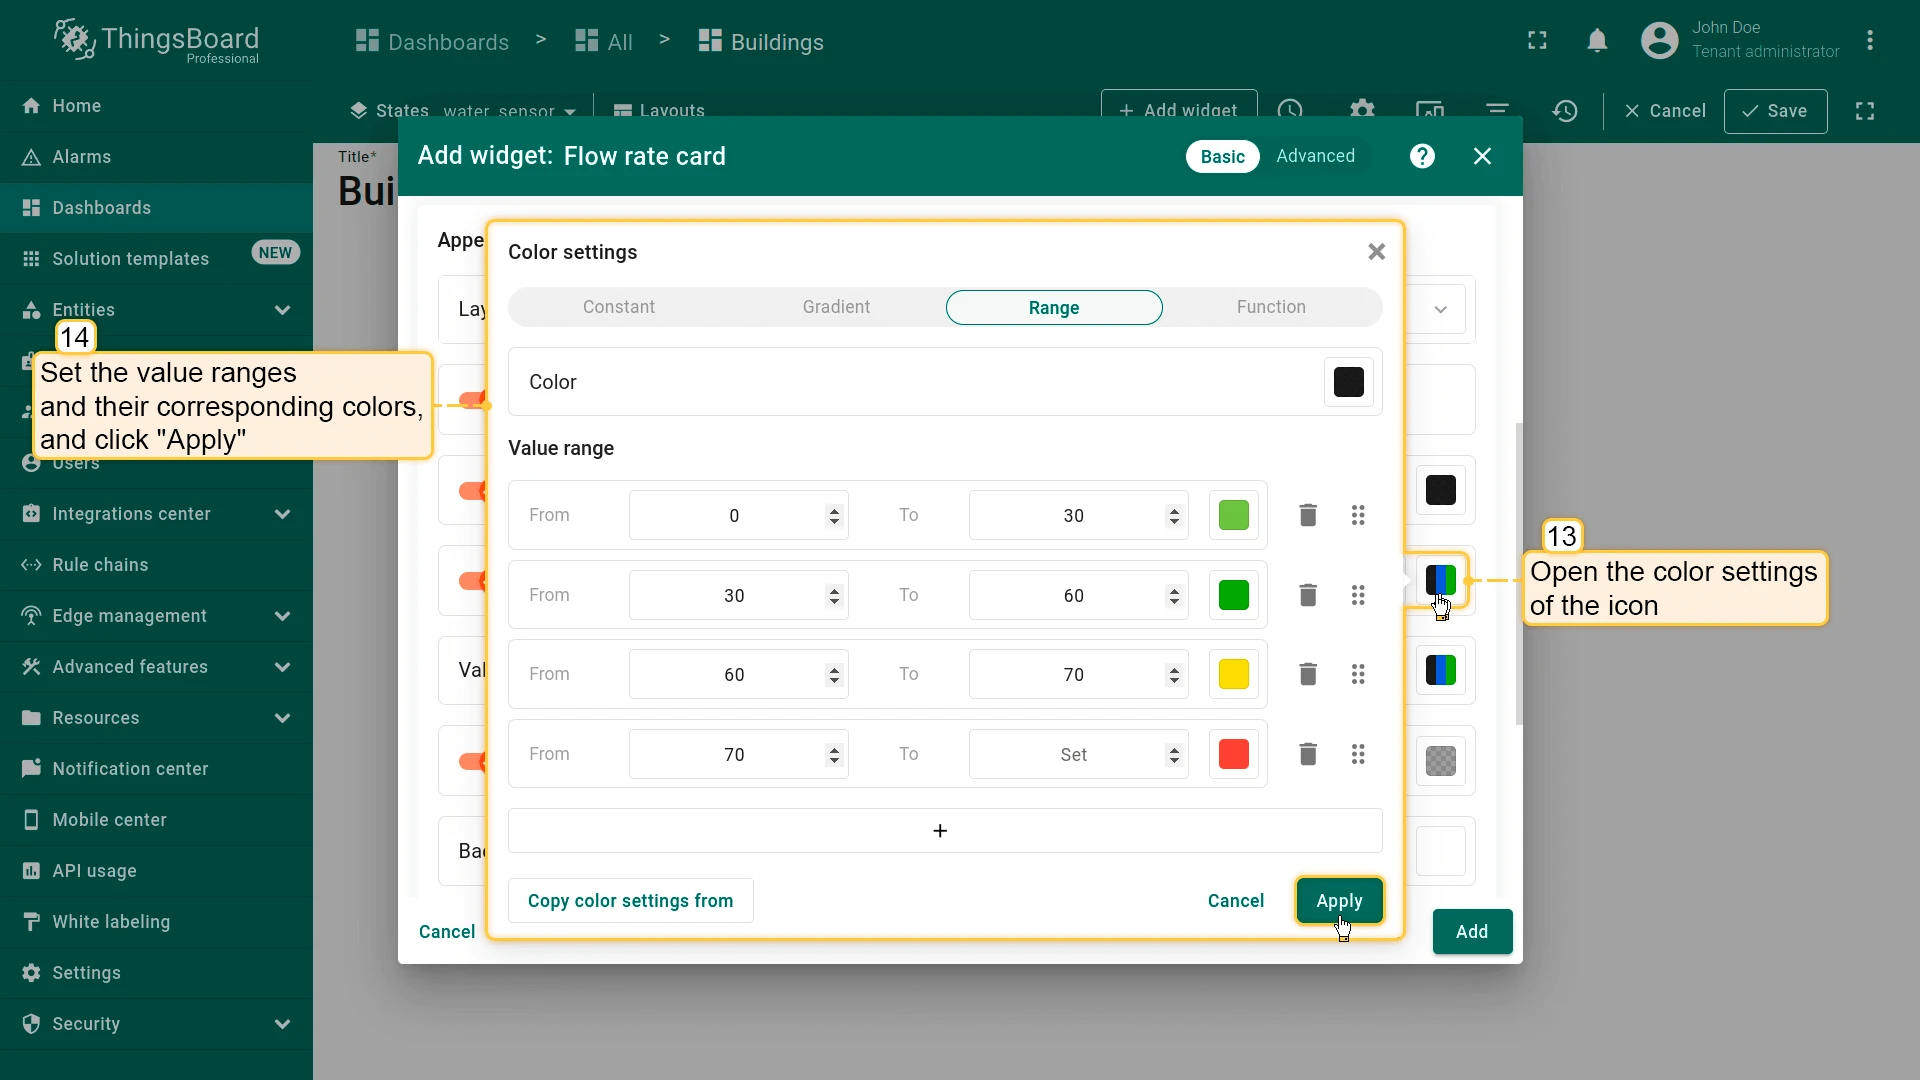
- Change icon and configure icon colors
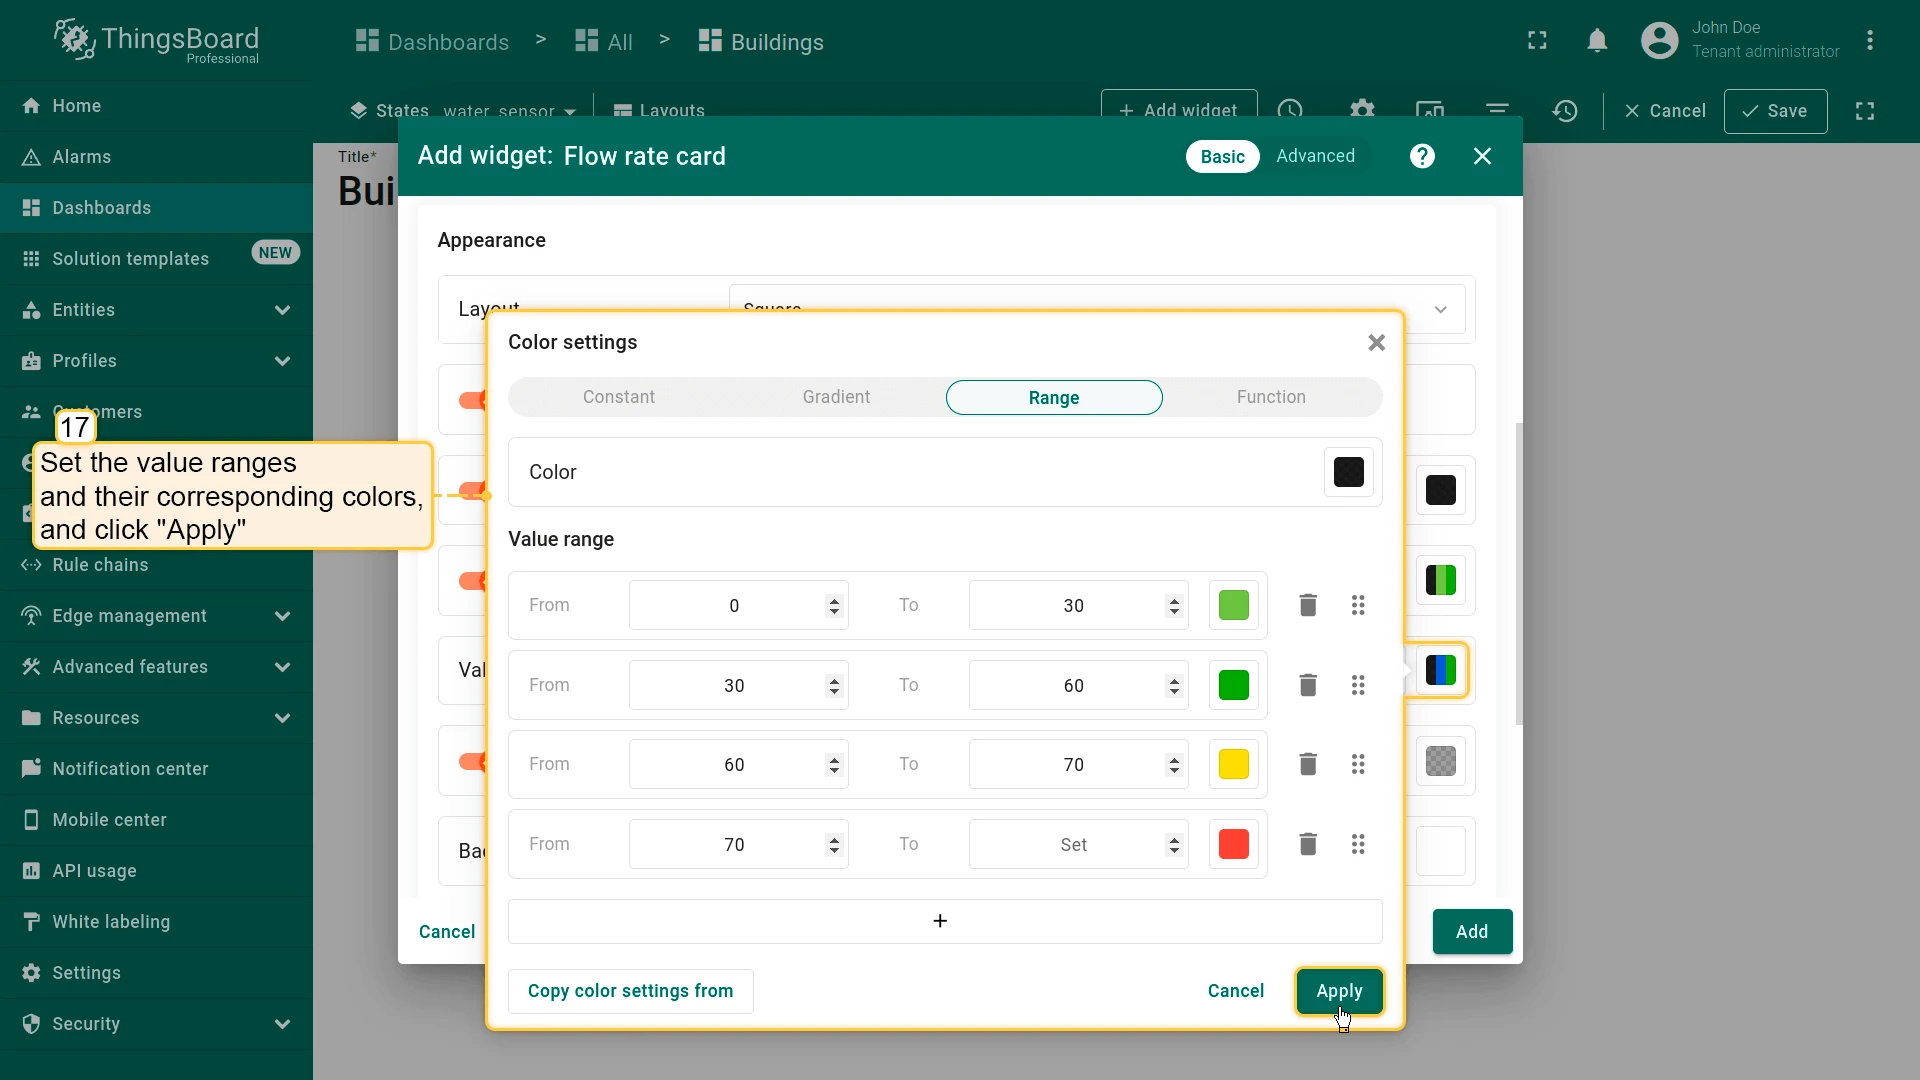
- Configure value ranges and colors
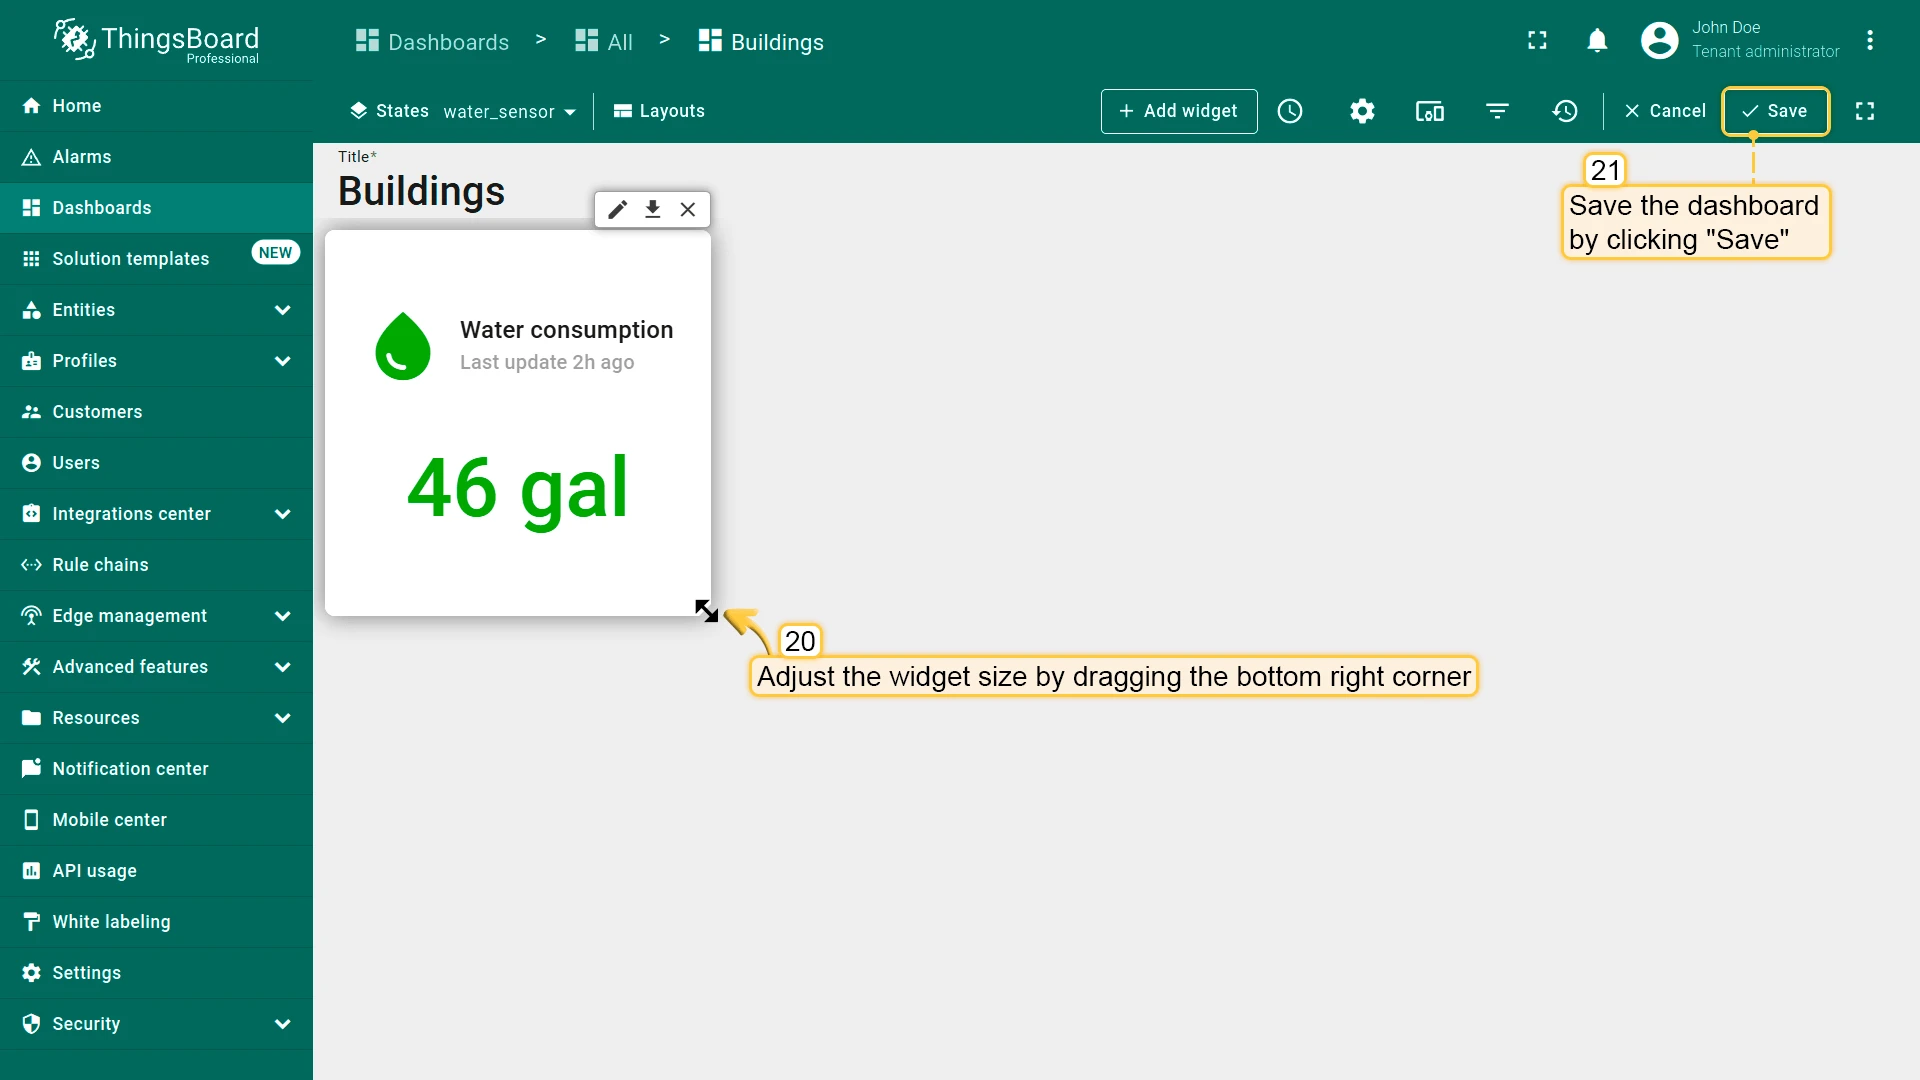
- Clear Card border radius and click Add.
- Resize the widget and save the dashboard.


Water Consumption Chart
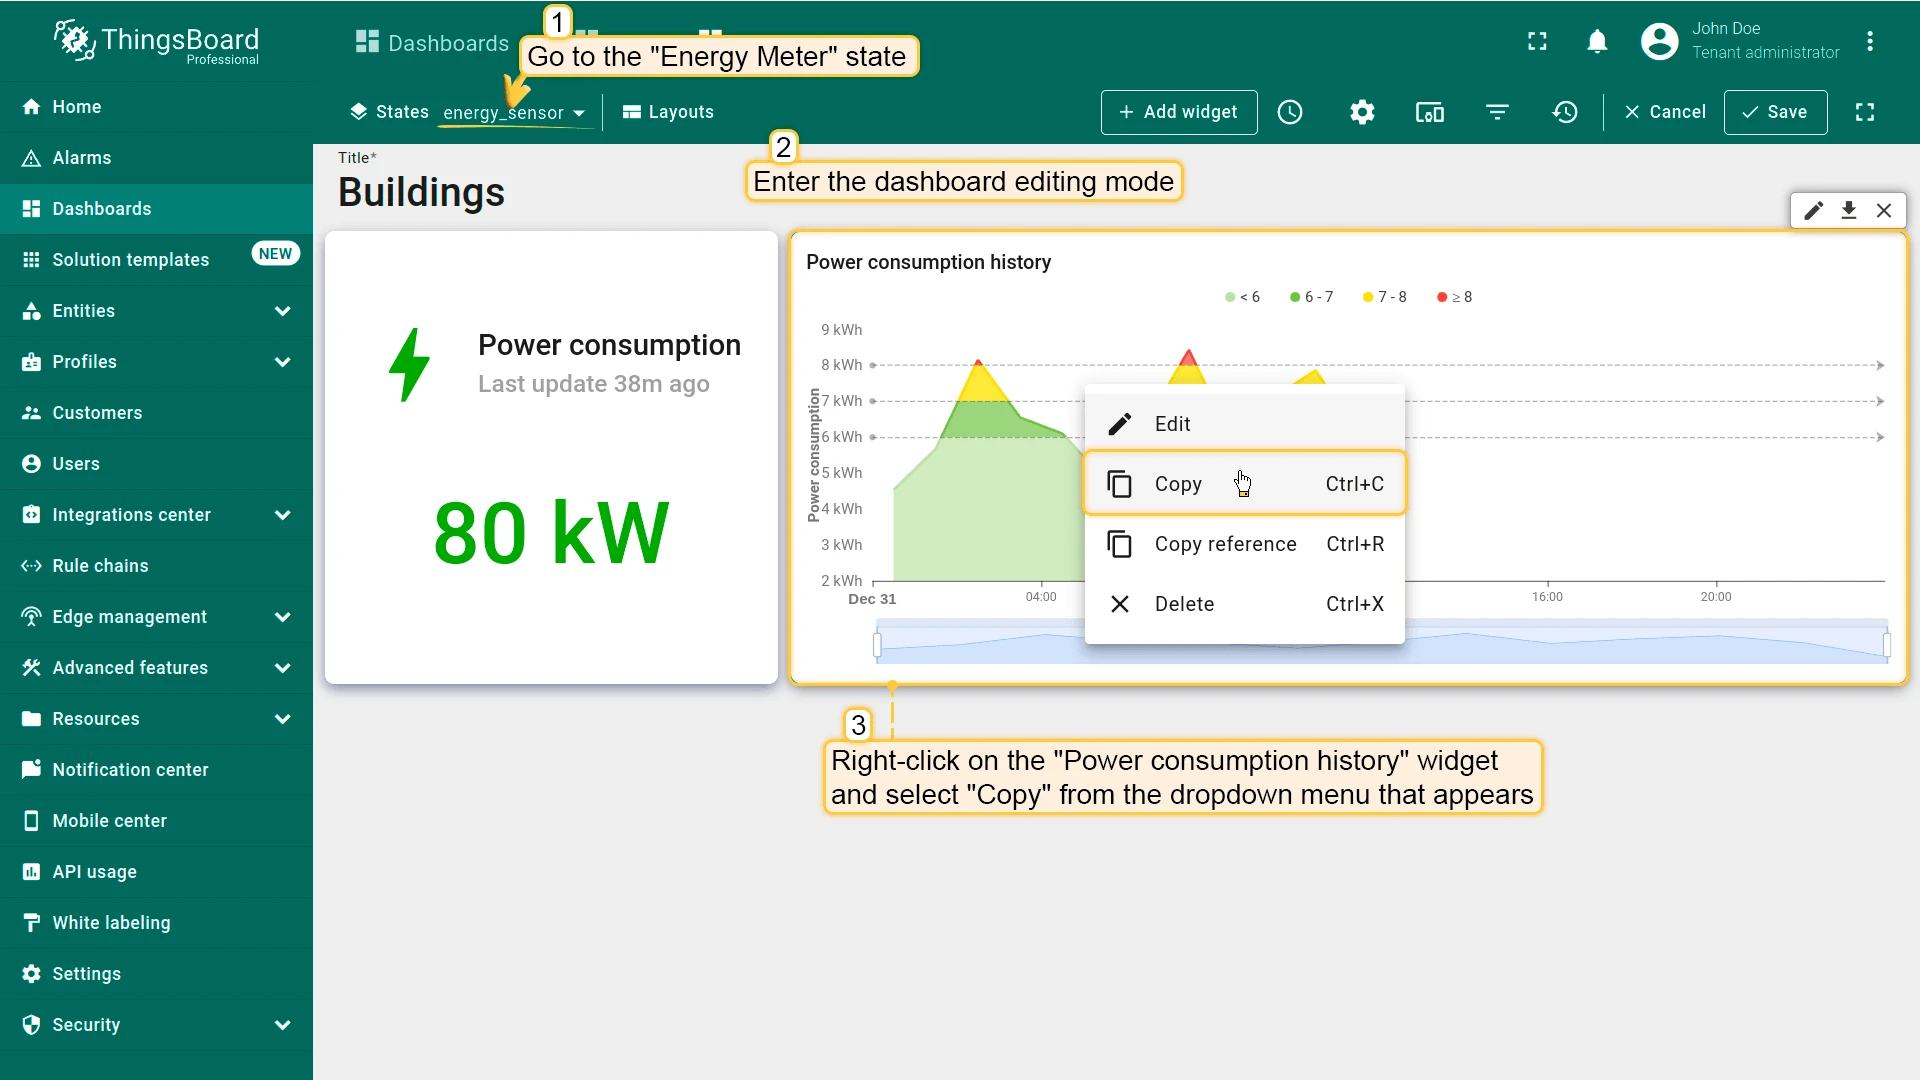
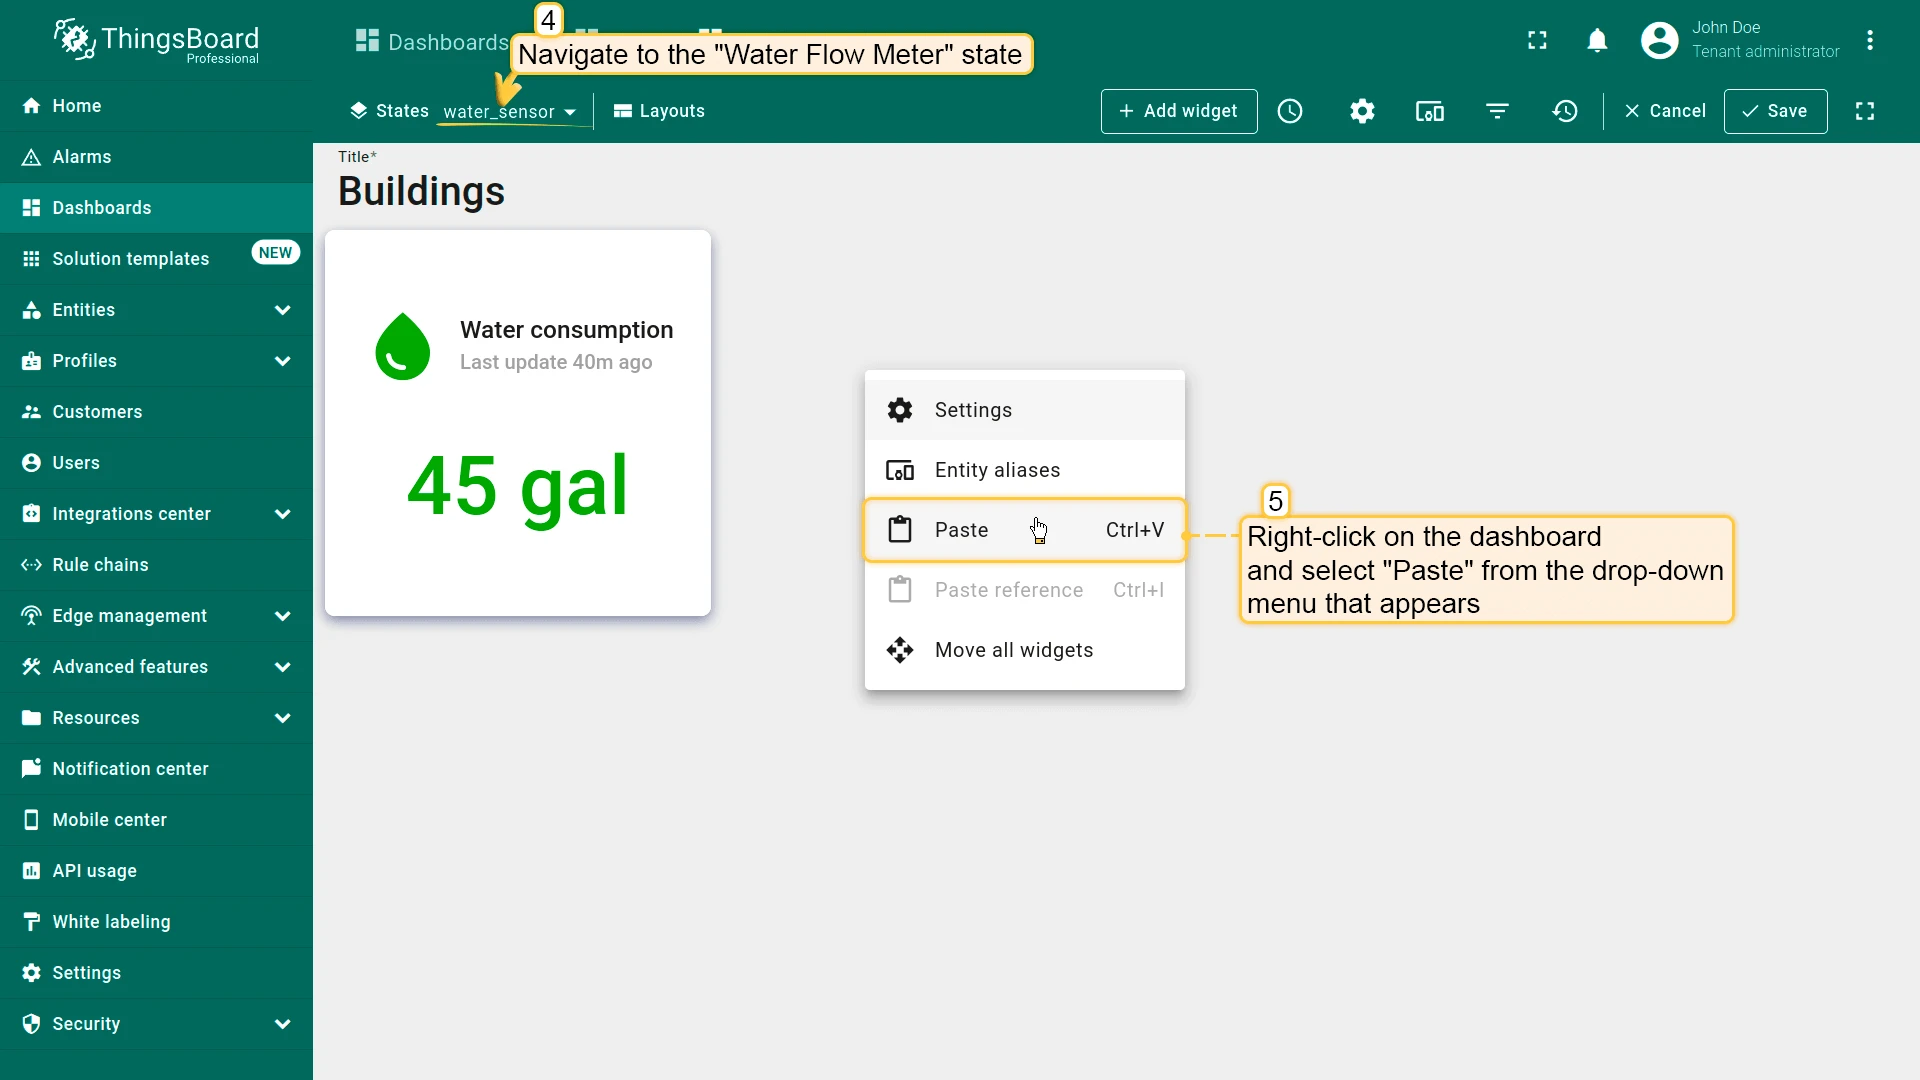
Section titled “Water Consumption Chart”- Open Energy Meter state in edit mode and copy Power consumption history widget.
- Open Water Flow Meter and paste the widget.
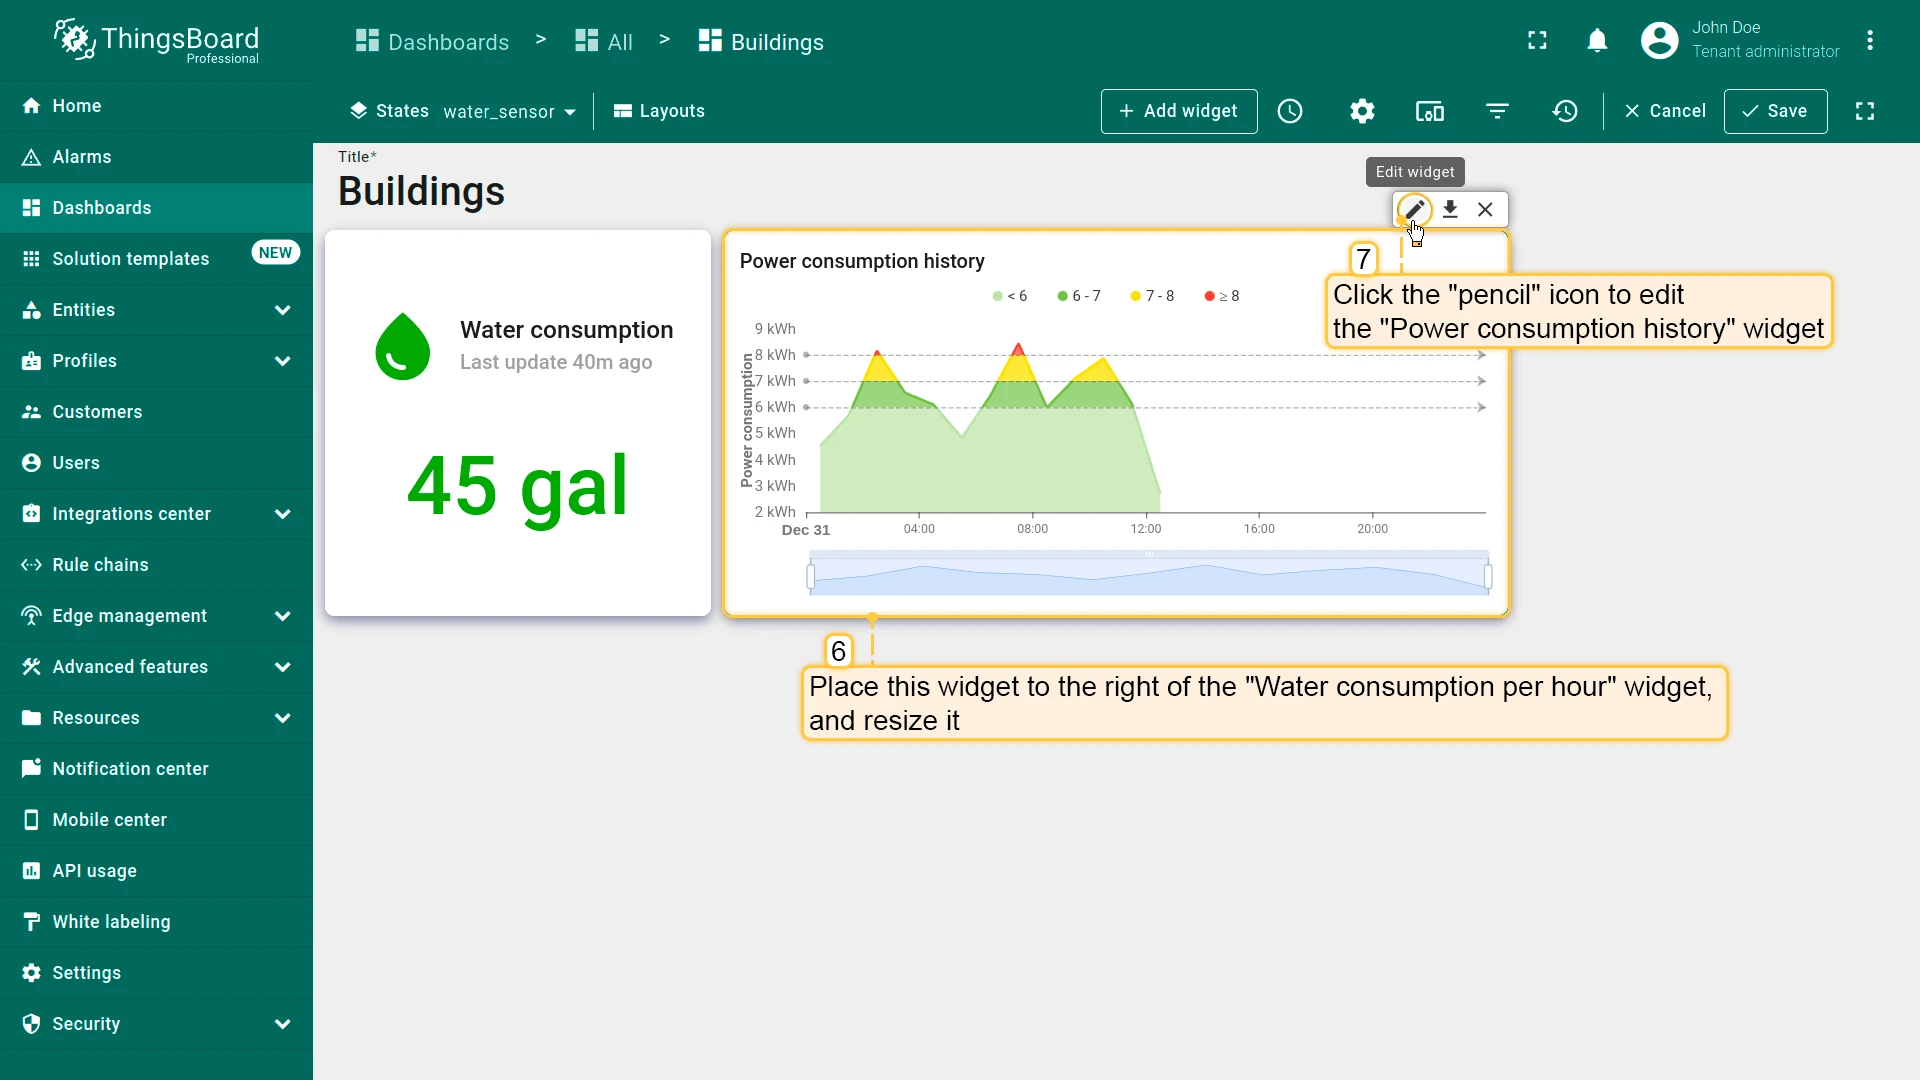
- Place it next to Water consumption and resize.
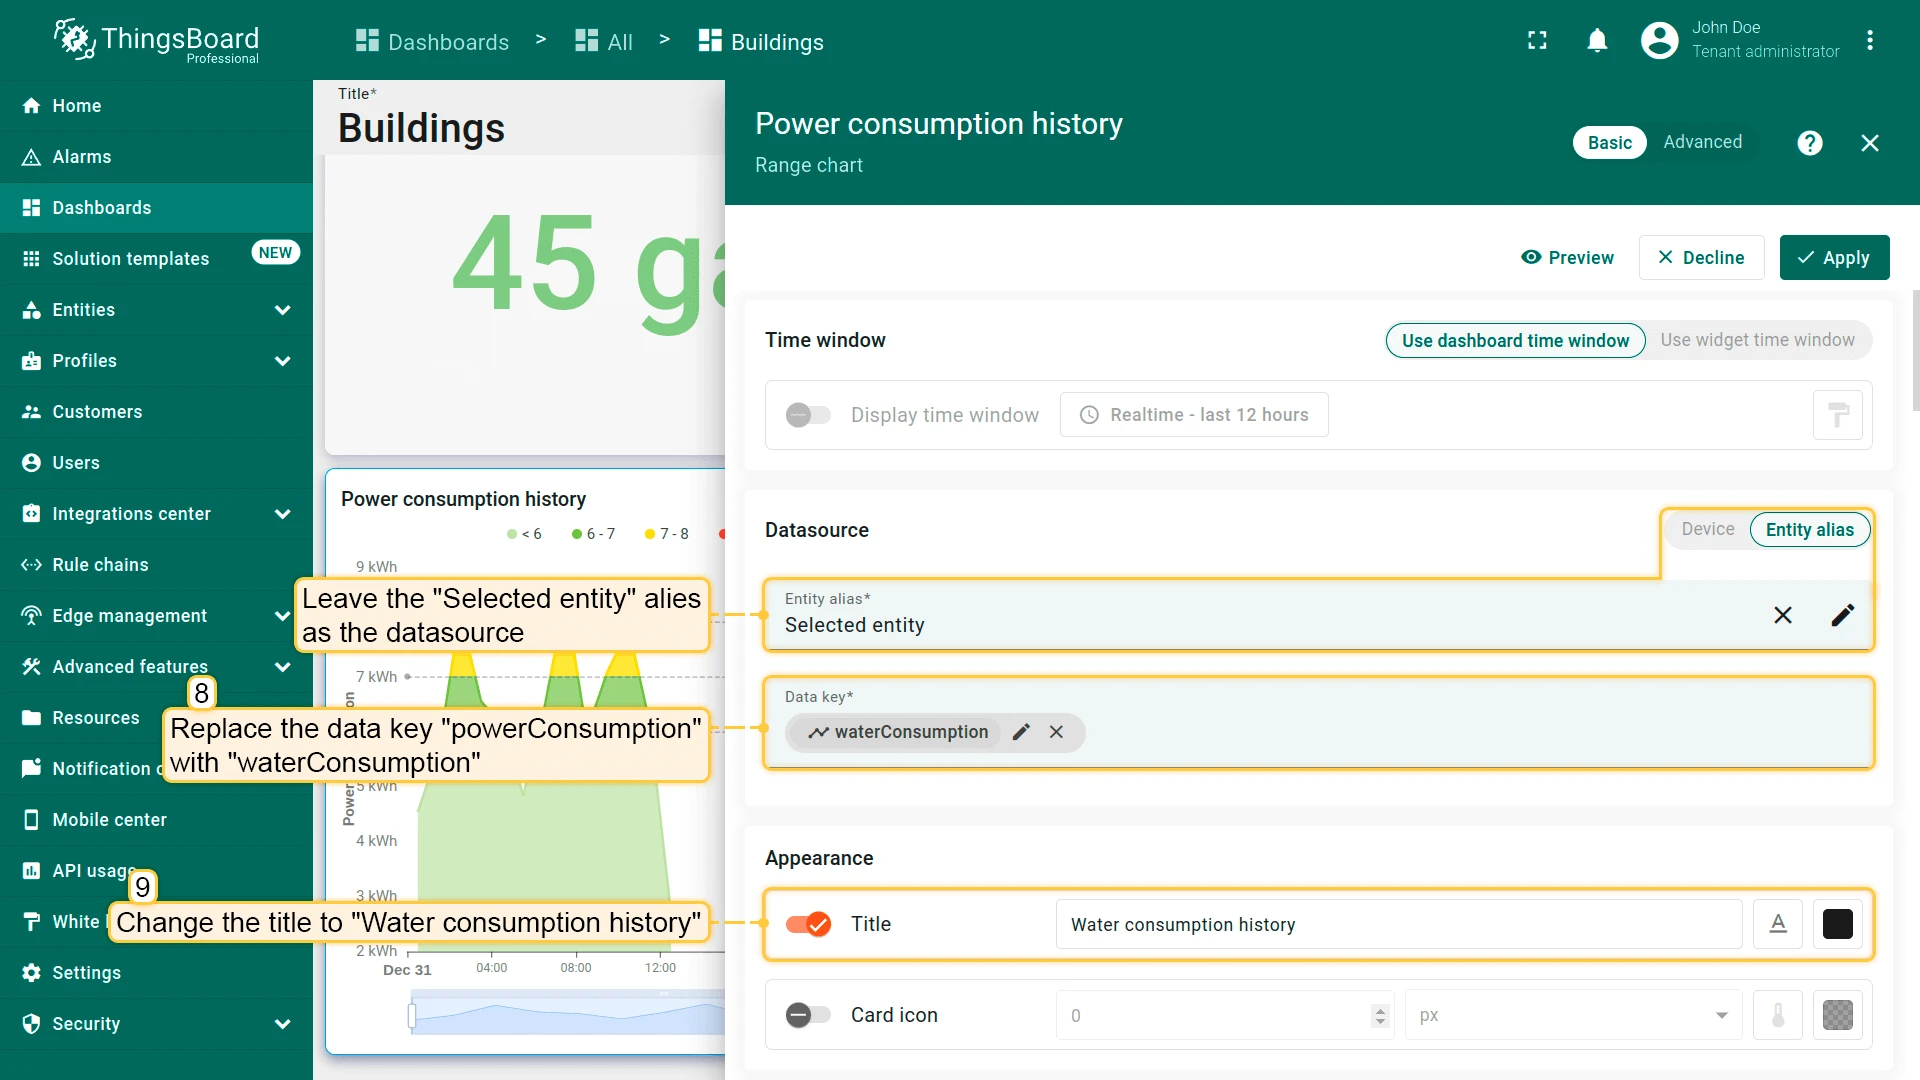
- Open widget settings and update:
- Datasource: Selected entity
- Key: waterConsumption
- Title: Water consumption history
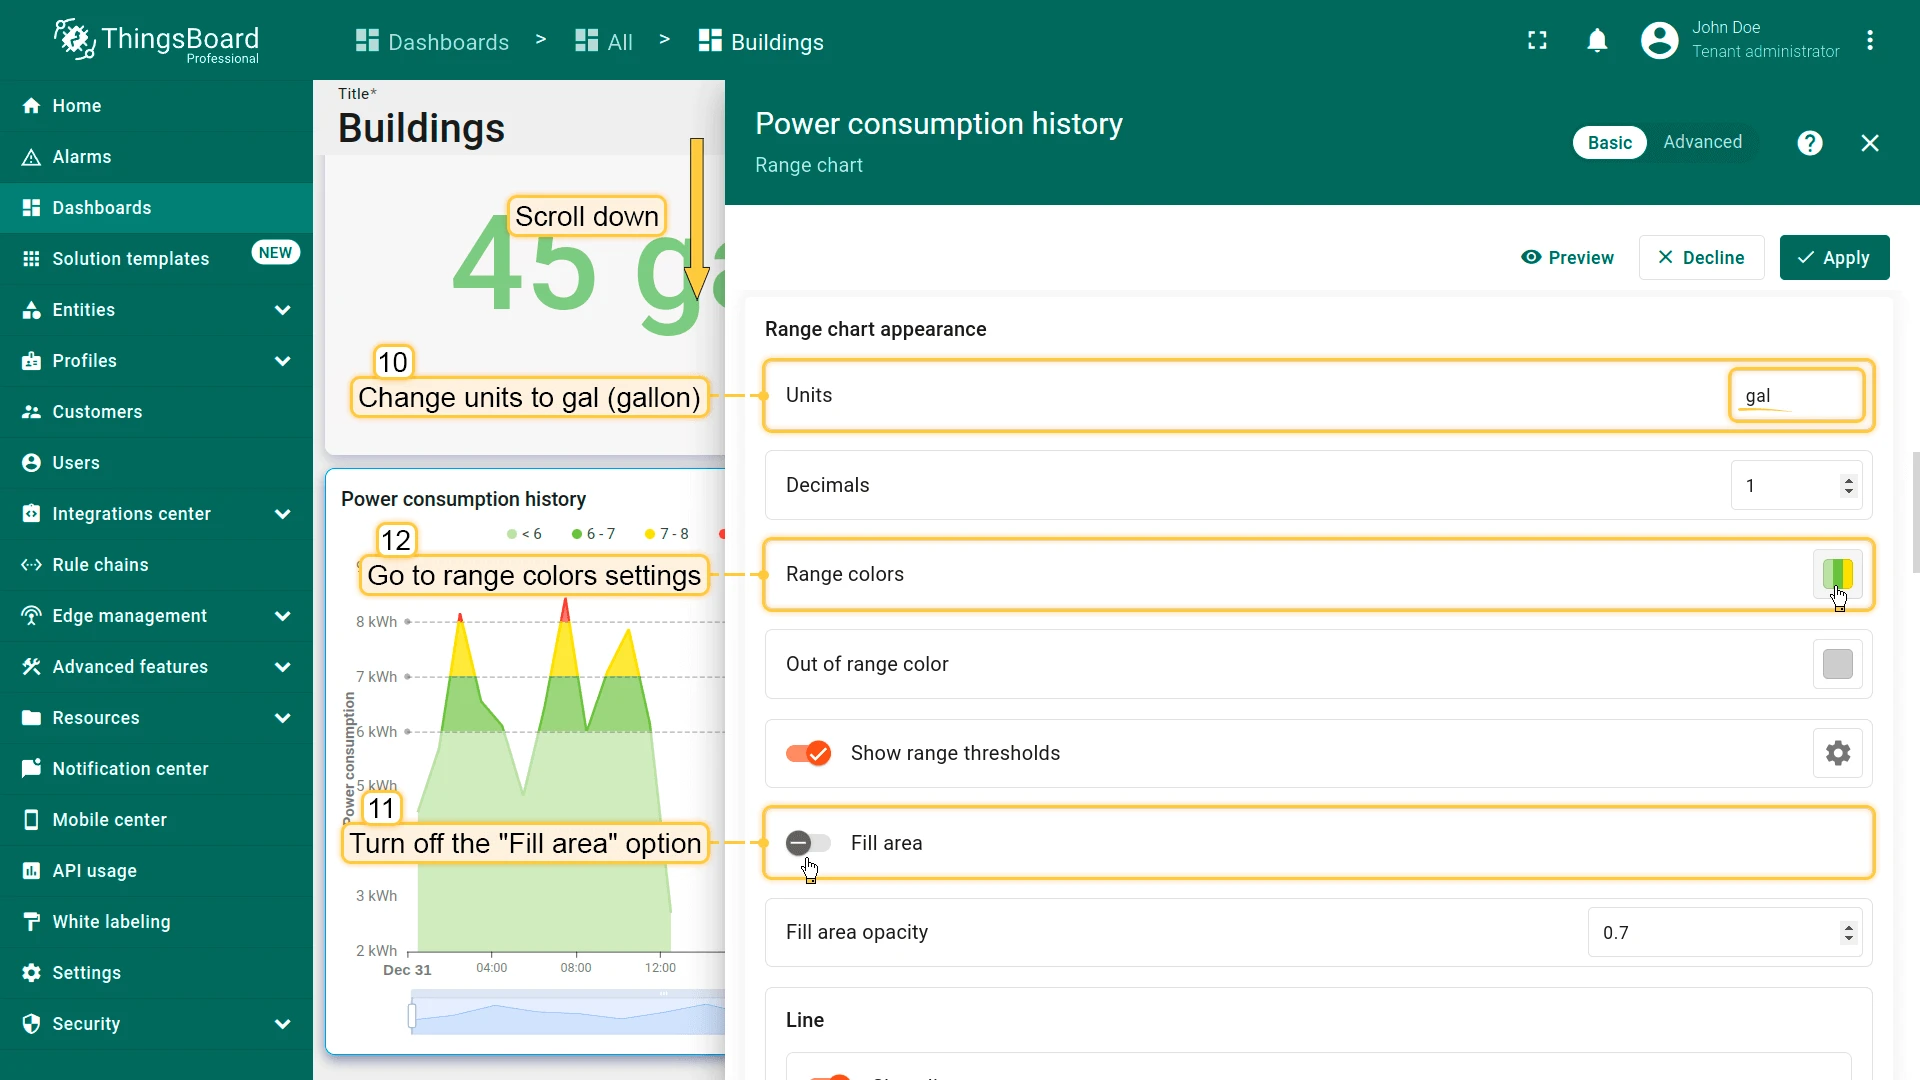
- Units: gal
- Disable Fill area
- Set value ranges and colors
- Y-axis label: Water consumption
- Click Apply
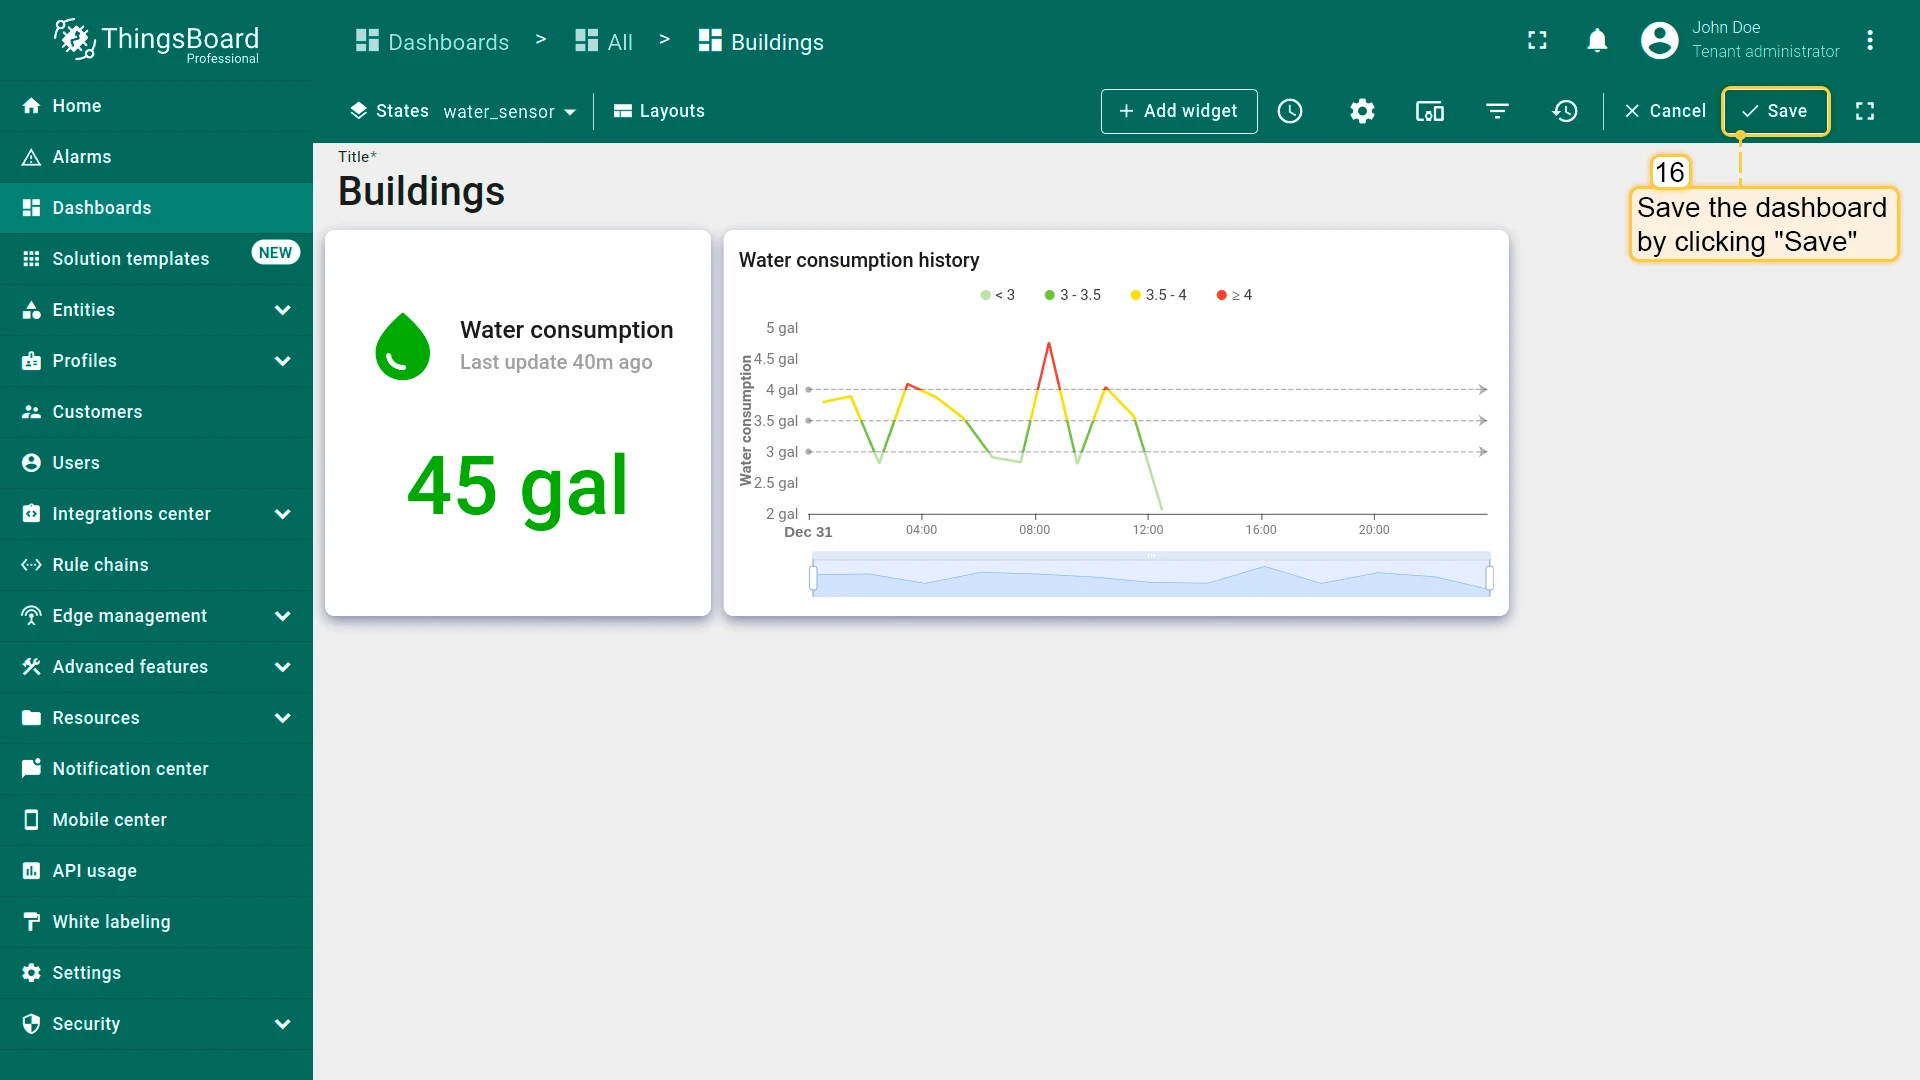
- Save the dashboard.
Battery Level Widget
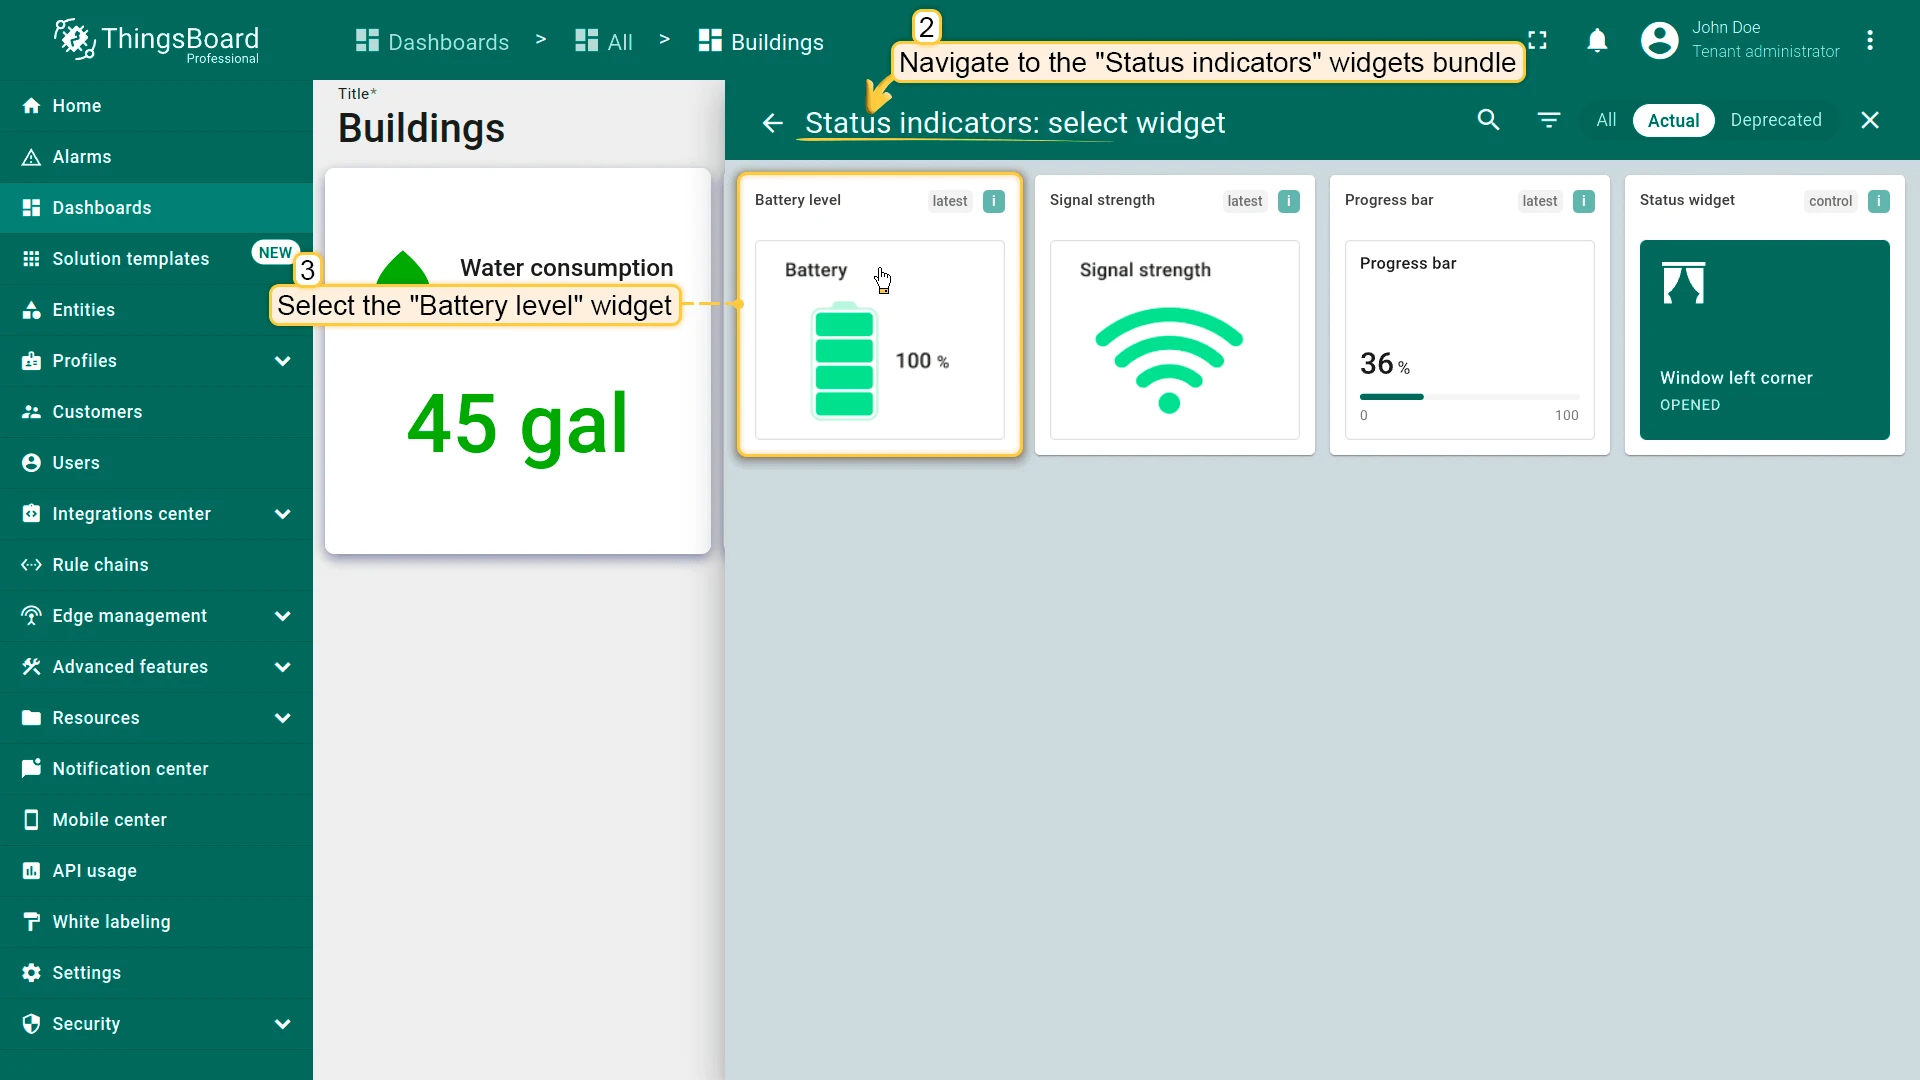
Section titled “Battery Level Widget”- Click + Add widget and select Status indicators ⇾ Battery level.
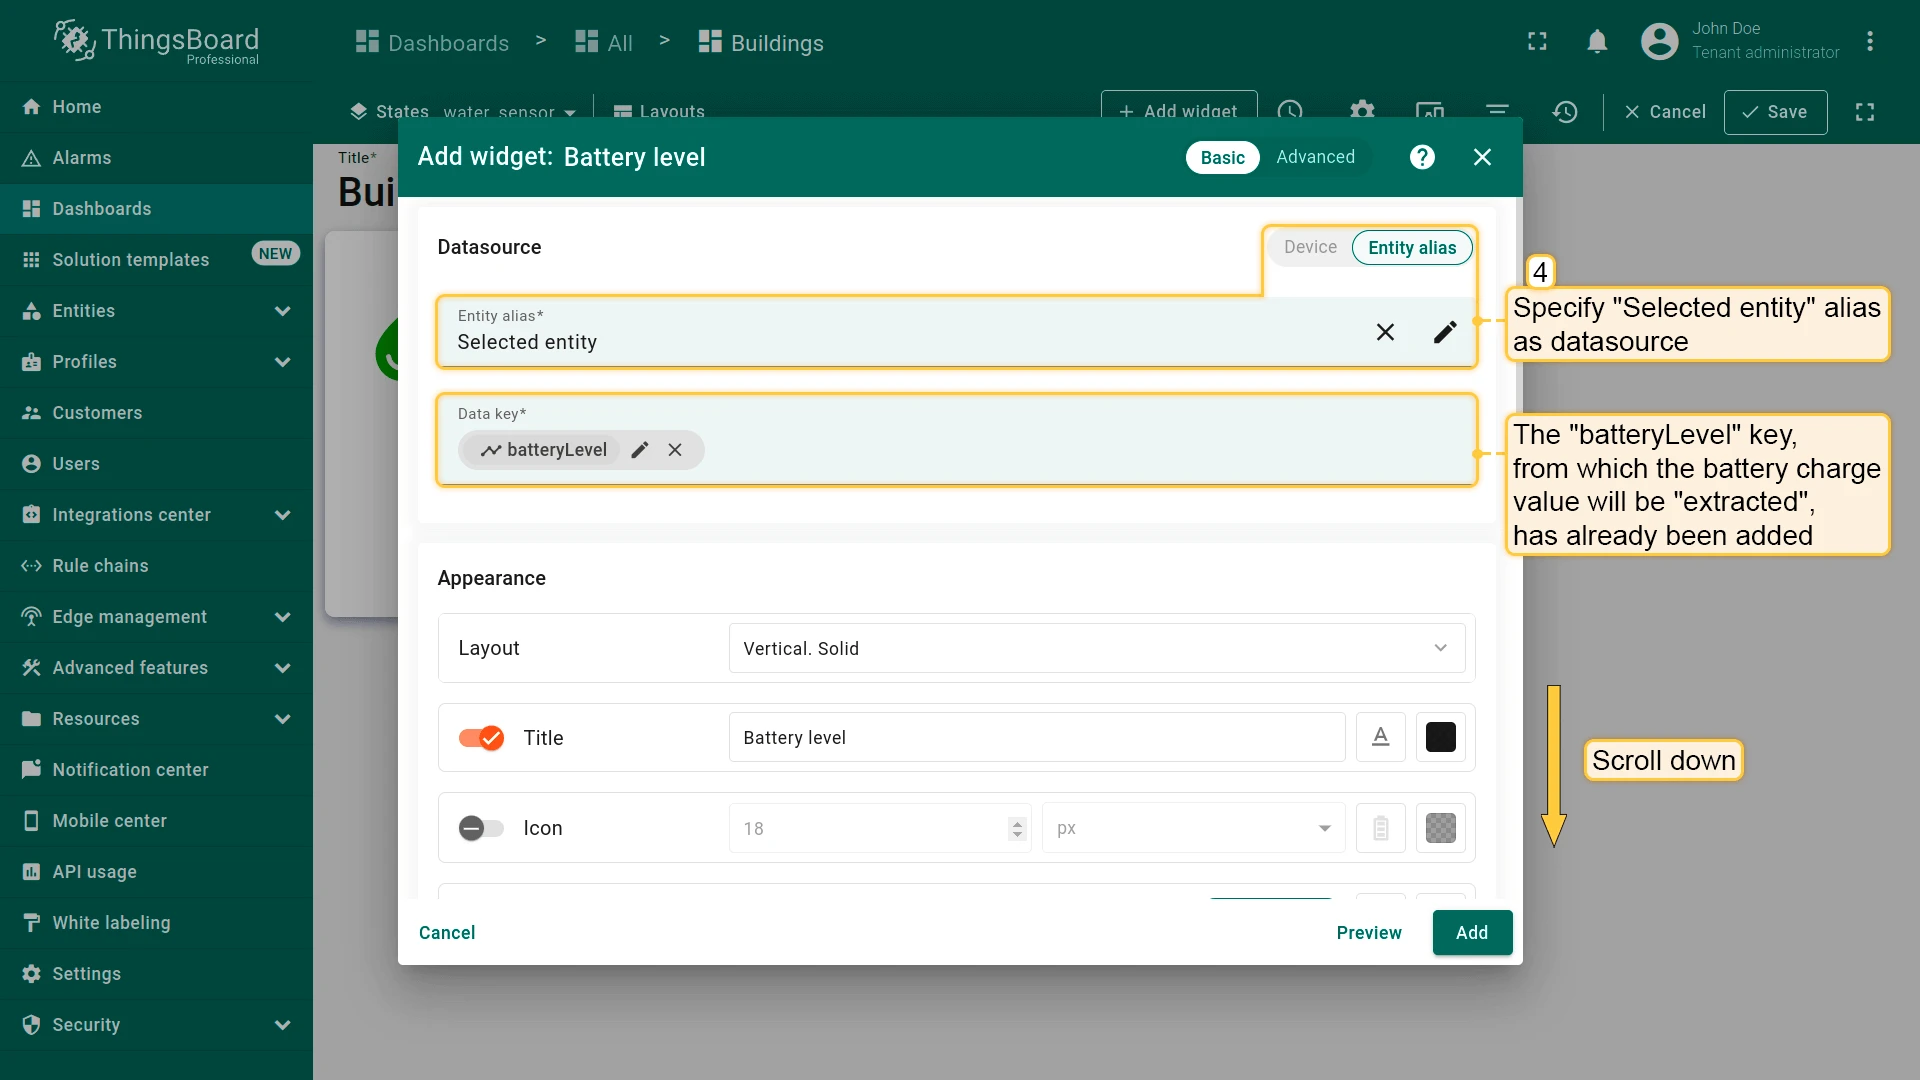
- Set datasource to Selected entity.
- Keep batteryLevel as the data key.
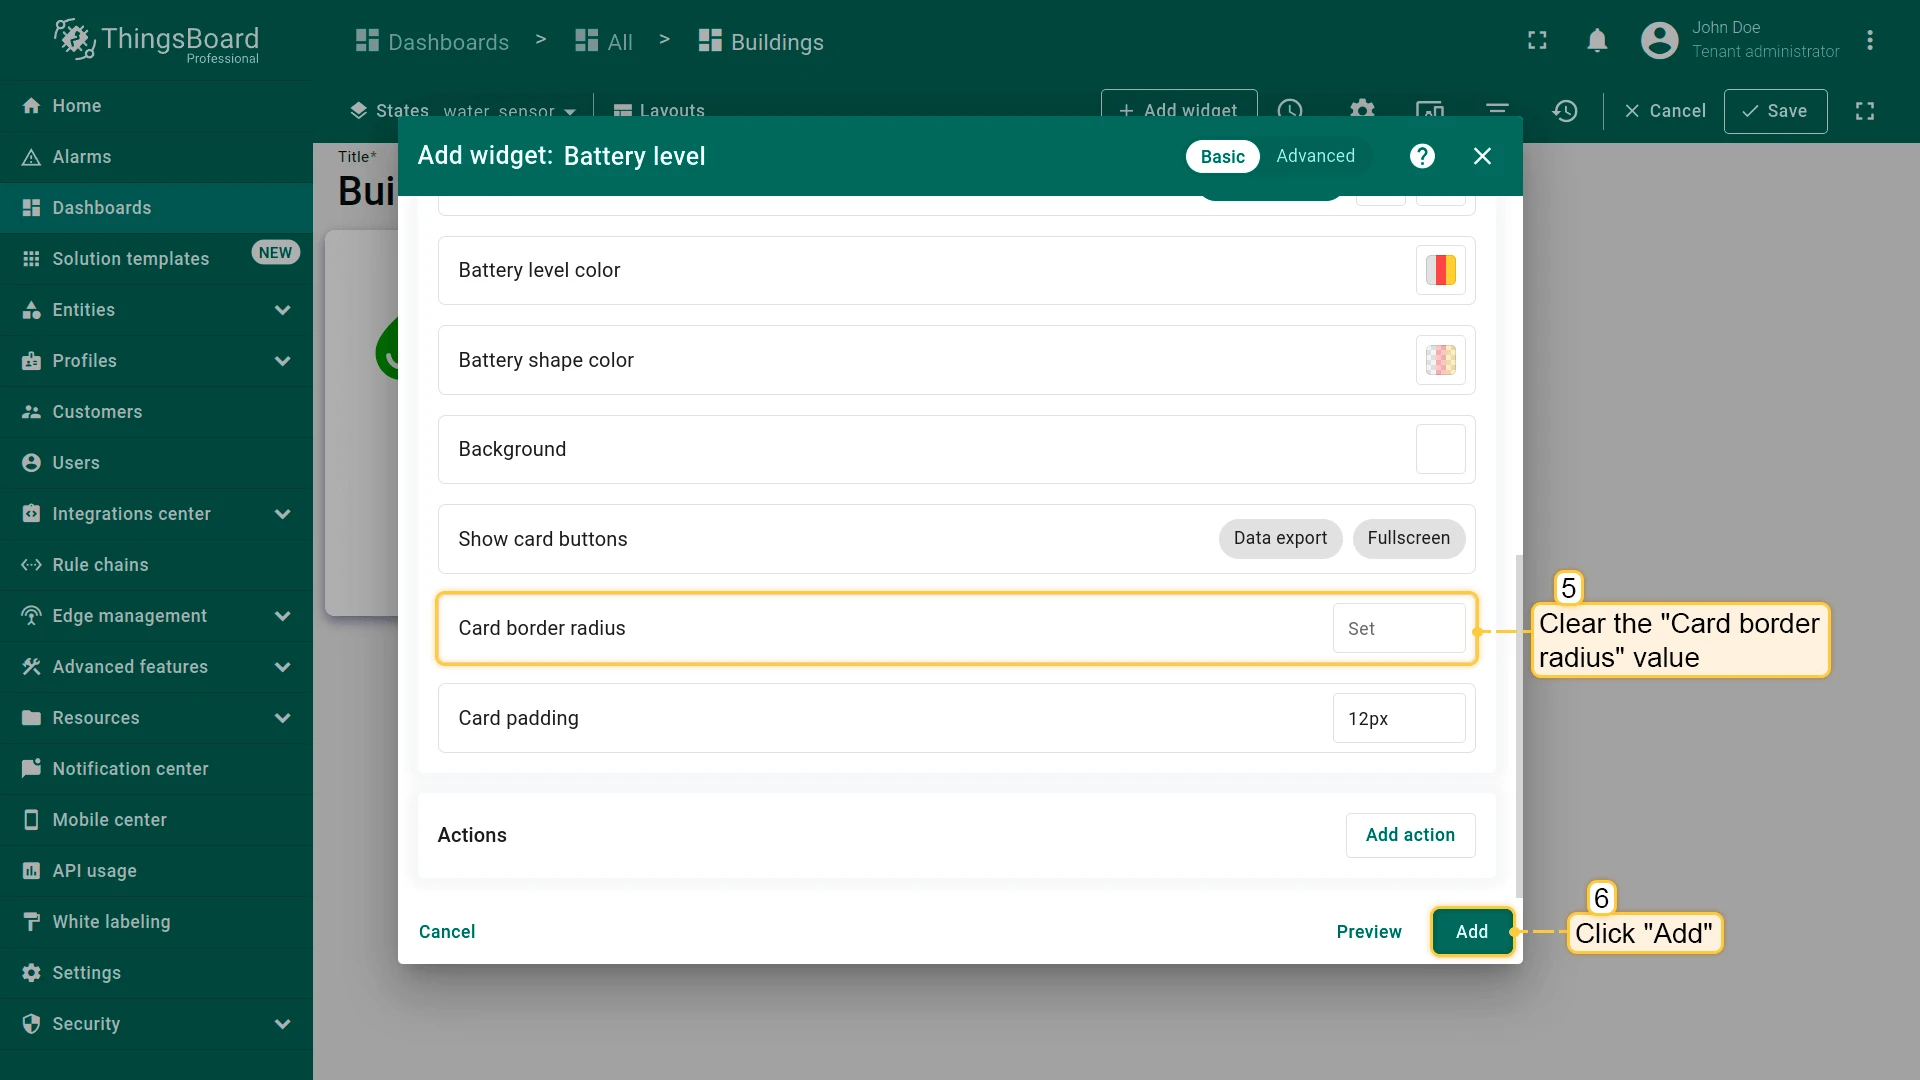
- Clear Card border radius and click Add.
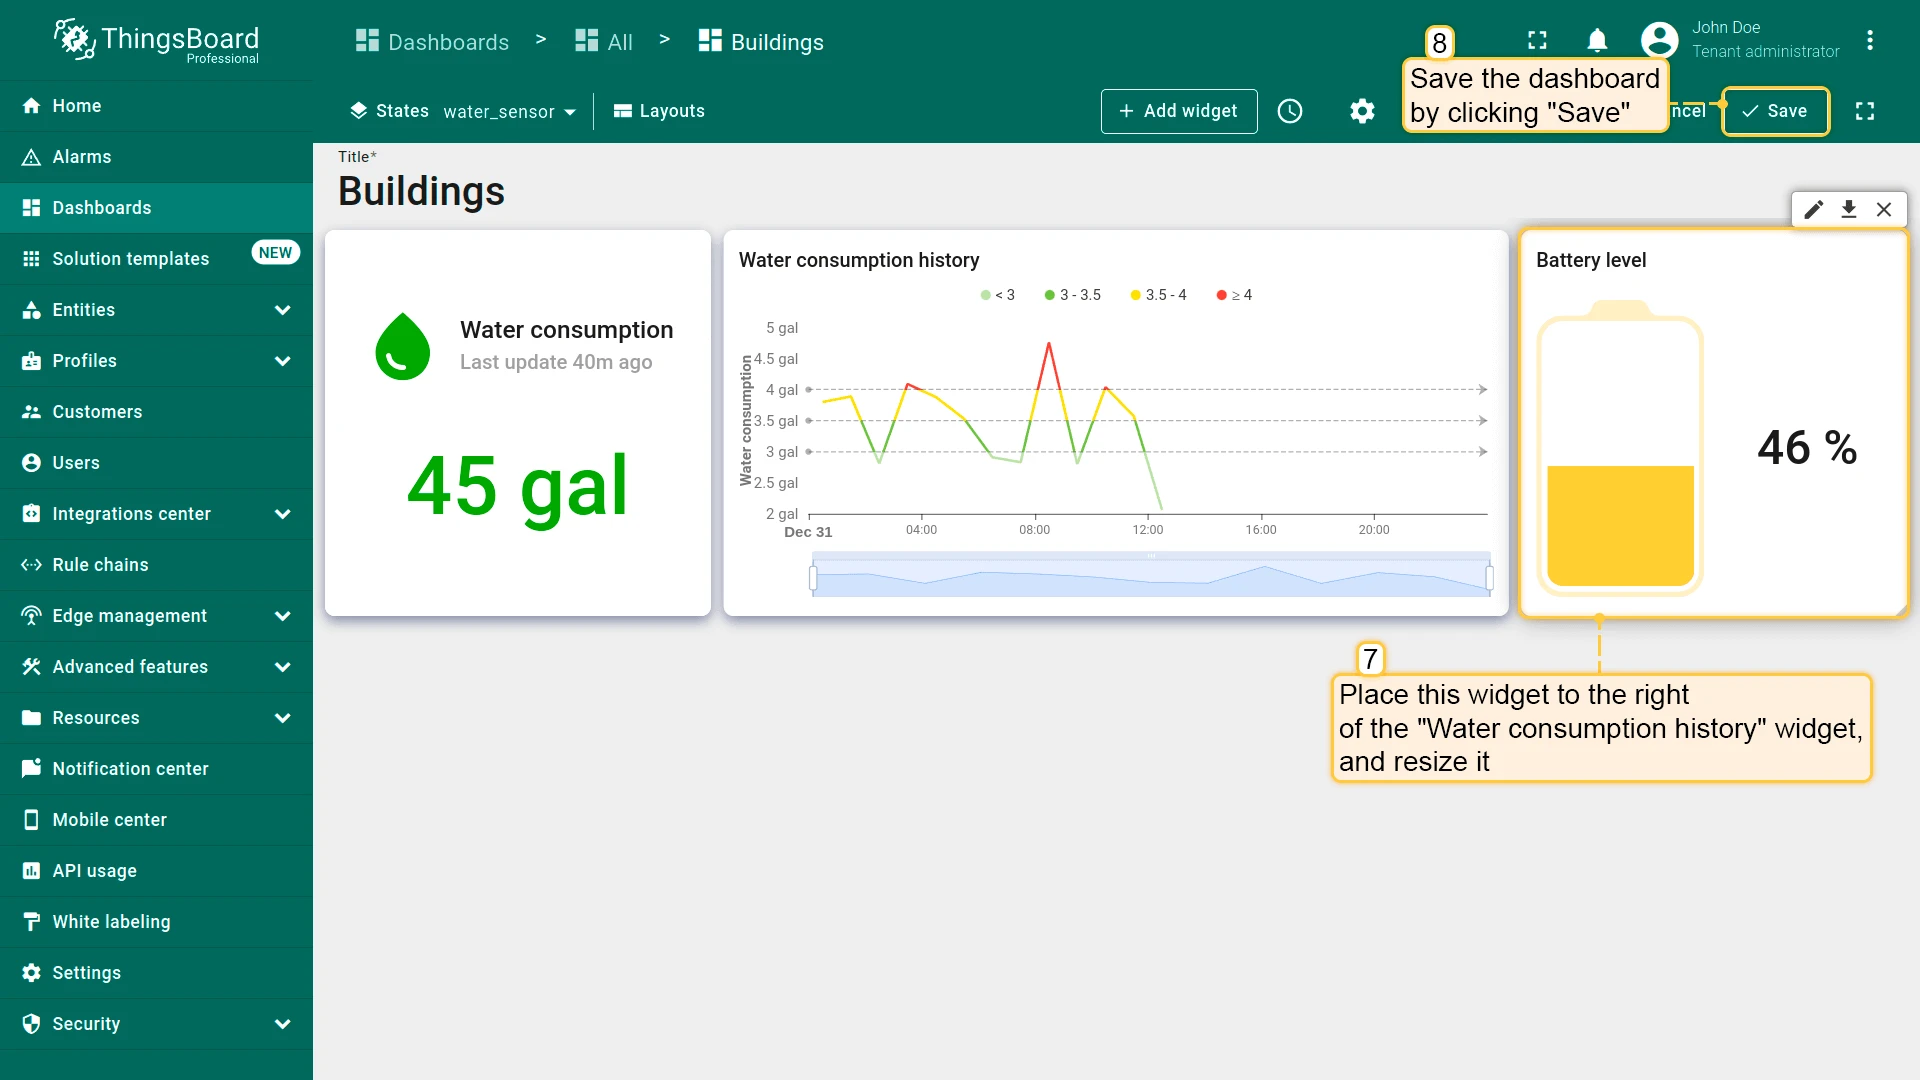
- Place next to Water consumption history.
- Resize, and save.
Final View
Section titled “Final View”
Best Practices: Telemetry, Aggregation, and Multi-Level Widgets
Section titled “Best Practices: Telemetry, Aggregation, and Multi-Level Widgets”Rule Chain Generators — Use generators for demo dashboards and testing. Keep messages counts and periods reasonable (100 messages, 10-min intervals) to simulate realistic data without overwhelming the system.
Cell Content Functions — Use these to combine multiple keys into single formatted columns. Check data type and availability before rendering (avoid null/undefined errors).
Device-Type Routing — When a single action must route to different states based on device type, use Custom actions with getDevice() to read the device’s type field and call openState() accordingly.
Tooltip Functions — Render different telemetry fields per device type. Use template substitution (${powerConsumption:1}, ${temperature:0}) to format values directly in the tooltip HTML.
State Hierarchy & Context — Each state should represent one level of the user’s drill-down journey. Pass context via Entity from dashboard state or Asset search query aliases so widgets adapt to the selected entity automatically.
Checklist for moving on
Section titled “Checklist for moving on”Was this helpful?