Trigger Related Entities via Relation
This tutorial demonstrates how to trigger a related device action based on telemetry received from another device using the Rule Engine.
Use case
Section titled “Use case”A Smoke Detector reports telemetry: smoke = "true"
ThingsBoard:
- creates a Smoke Alarm
- finds a related Fire Alarm System
- sends an RPC command to activate it
When smoke != "true":
- the alarm is cleared
Architecture
Section titled “Architecture”Devices
- Smoke Detector with the type Smoke Sensor
- Fire Alarm System with the type Fire Alarm Device
Relation
- Smoke Detector -- Uses --> Fire Alarm System
Rule chains
- modified Root Rule Chain
- new Related Fire Alarm System rule chain
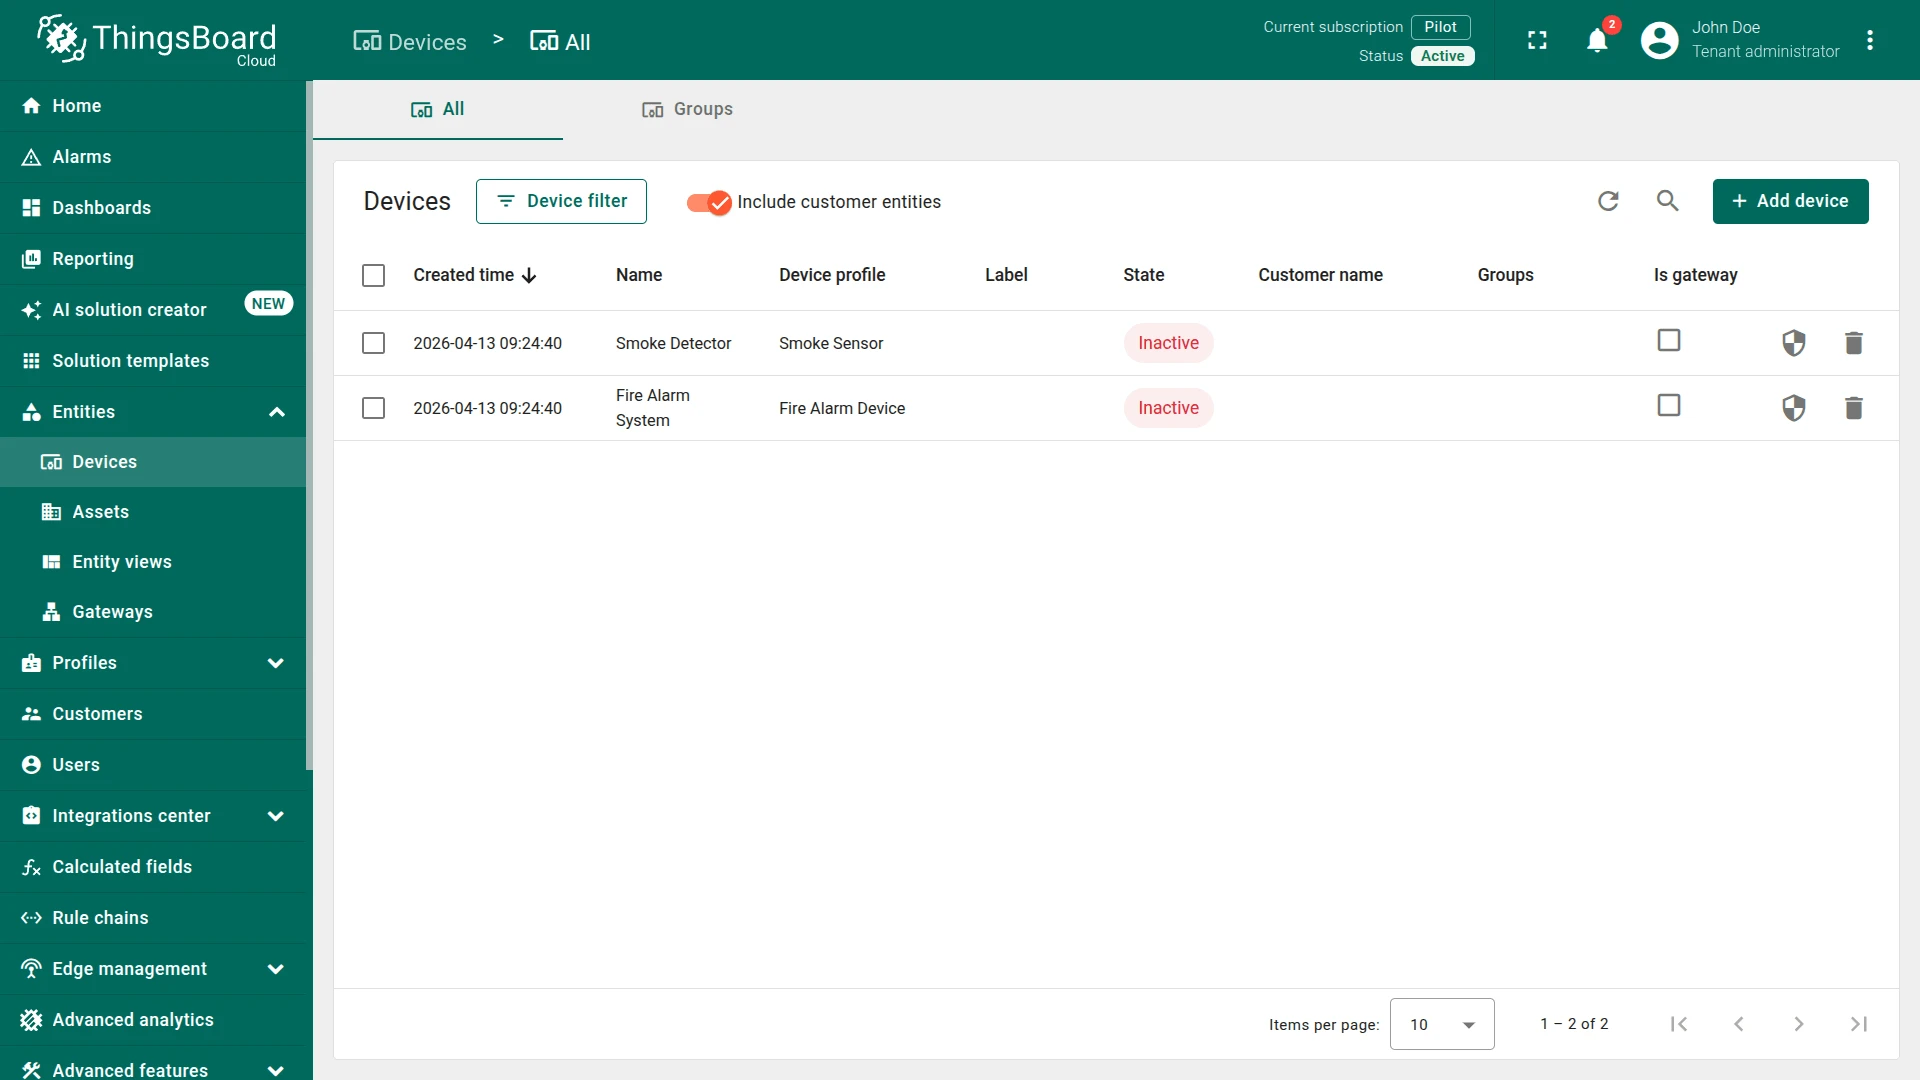
Step 1. Create devices
Section titled “Step 1. Create devices”Create two devices:
Device 1
- Name:
Smoke Detector - Type:
Smoke Sensor
Device 2
- Name:
Fire Alarm System - Type:
Fire Alarm Device
Step 2. Create relation
Section titled “Step 2. Create relation”Create a relation:
- From:
Smoke Detector - To:
Fire Alarm System - Relation type:
Uses

Step 3. Create rule chain
Section titled “Step 3. Create rule chain”You can import a ready-made rule chain or build it manually.
Option 1. Import rule chain
Option 2. Create manually
- Create a new rule chain named
Related Fire Alarm System, open it, and add the following nodes:
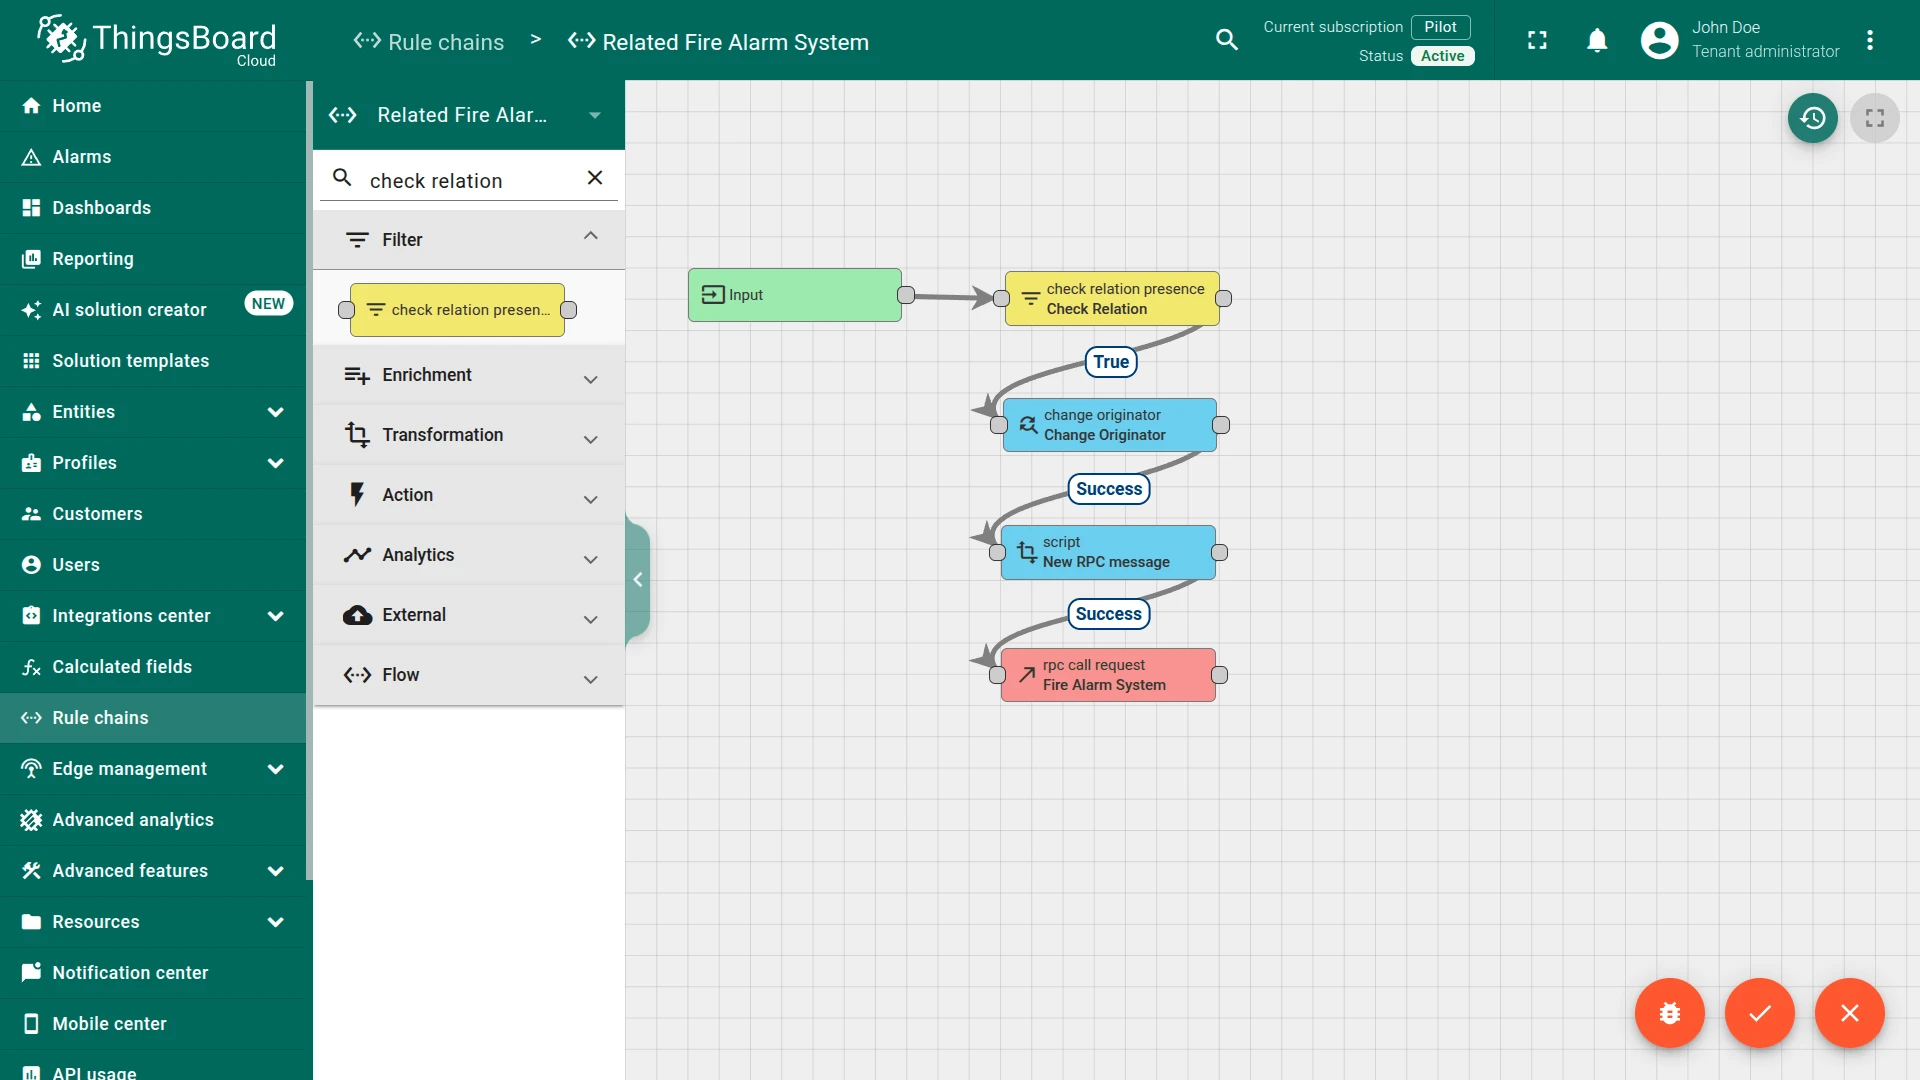
Step 3.1 Check Relation Presence node
Section titled “Step 3.1 Check Relation Presence node”Add the Check Relation Presence node and connect it to the Input node.
This node will check the relation from the Fire Alarm System device to the originator of the message Smoke Detector using the type and direction of relation. If the relation exists, the message will be sent through the True chain.
Fill in the fields:
- Name:
Check Relation - Relation search parameters:
- Direction:
To originator - Relation type:
Uses - Check relation to specific entity:
Fire Alarm Systemdevice
- Direction:

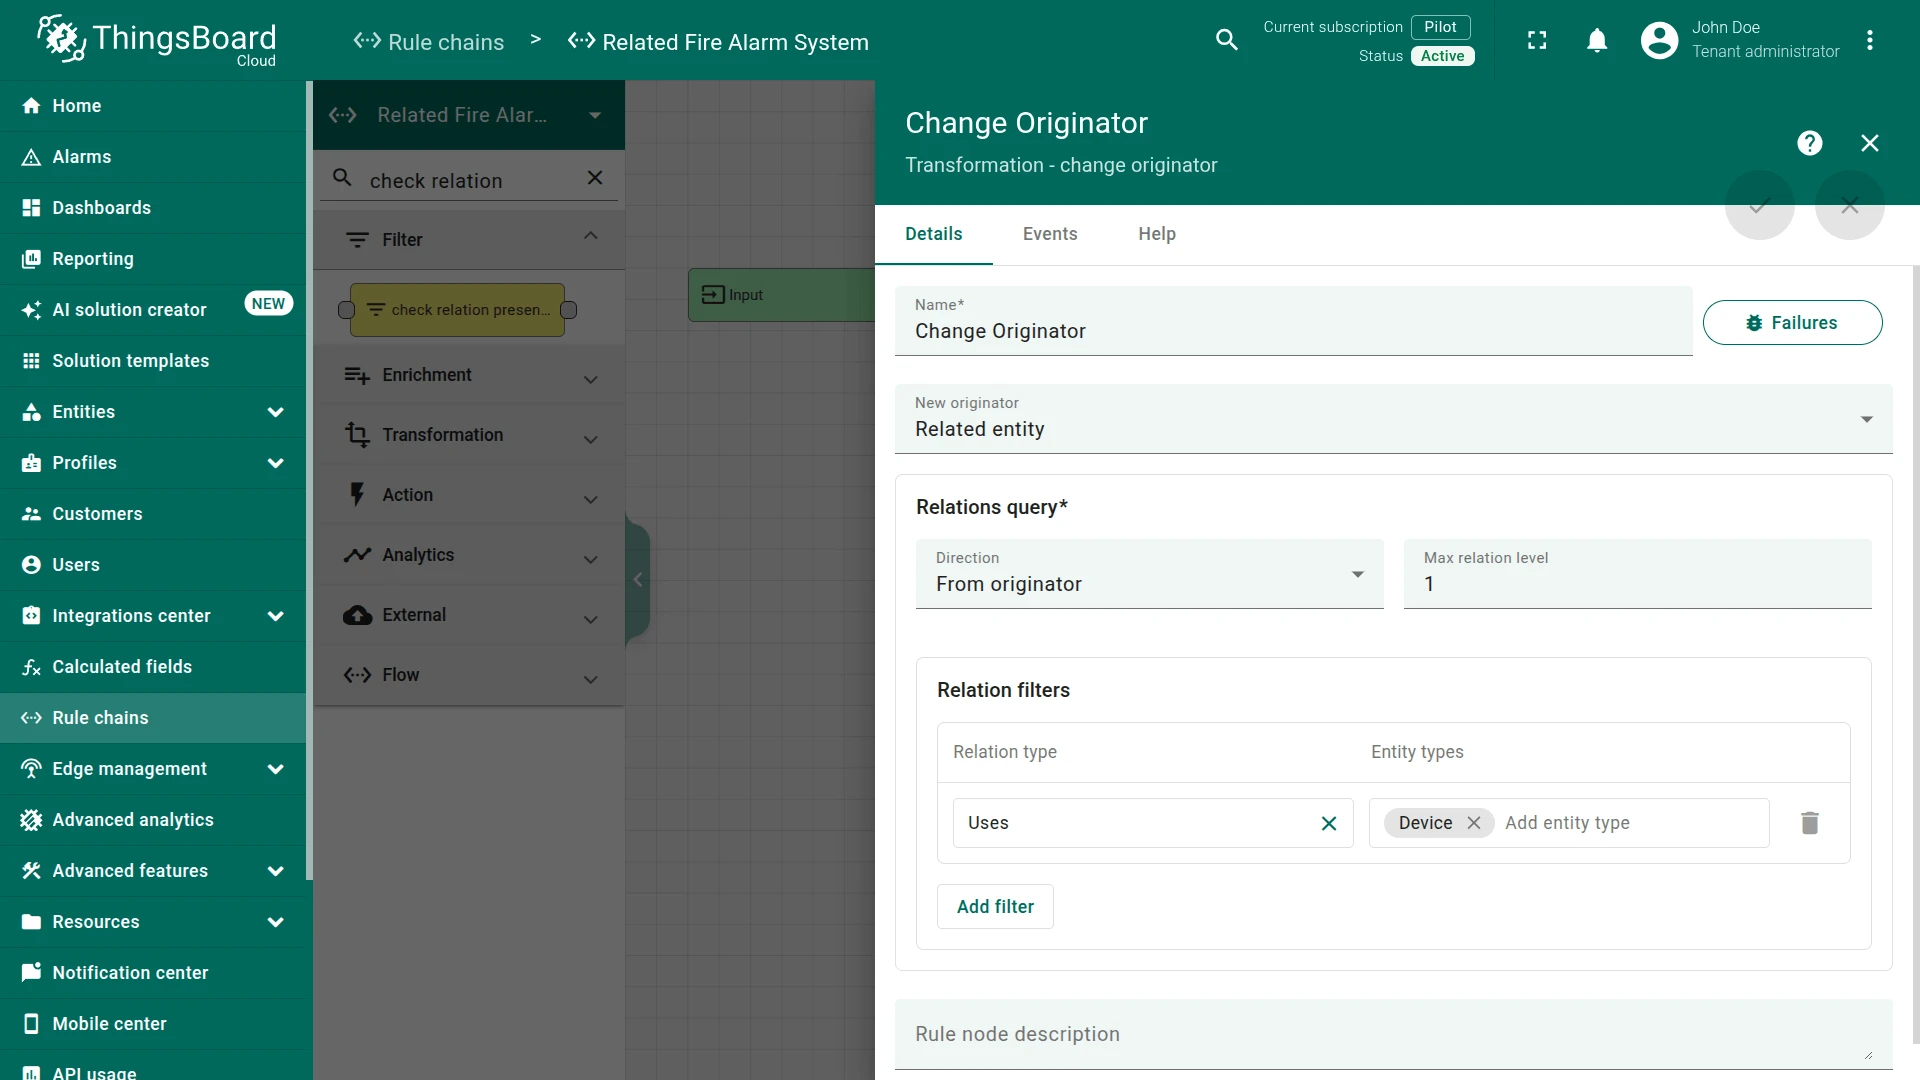
Step 3.2 Change Originator node
Section titled “Step 3.2 Change Originator node”Add the Change Originator node and connect it to the Check Relation Presence node with a relation type True.
This node will change the originator from the Device Smoke Detector to the related Device Fire Alarm System and the submitted message will be processed as a message from another entity, namely Fire Alarm System.
Fill in the fields:
- Name:
Change Originator - New originator:
Related entity - Relations query:
- Direction:
From originator - From originator:
1
- Direction:
- Relation filters:
- Relation type:
Uses - Entity types:
Device
- Relation type:
Step 3.3 Script Transformation node
Section titled “Step 3.3 Script Transformation node”Add the Transformation Script node and connect it to the Change Originator node with a relation type Success. Enter the Name field as New RPC message.
This node will transform an original message into RPC request message.
The RPC call will have 2 properties:
| Property | Value |
| method | ON |
| params | {} |
In order to do this, add the following Script:
newMsg = {};if (msg.smoke == 'true') {newMsg.method = 'ON';}newMsg.params = {};return {msg: newMsg, metadata: metadata, msgType: msgType};var newMsg = {};if (msg.smoke == 'true') {newMsg.method = 'ON';}newMsg.params = {};return {msg: newMsg, metadata: metadata, msgType: msgType};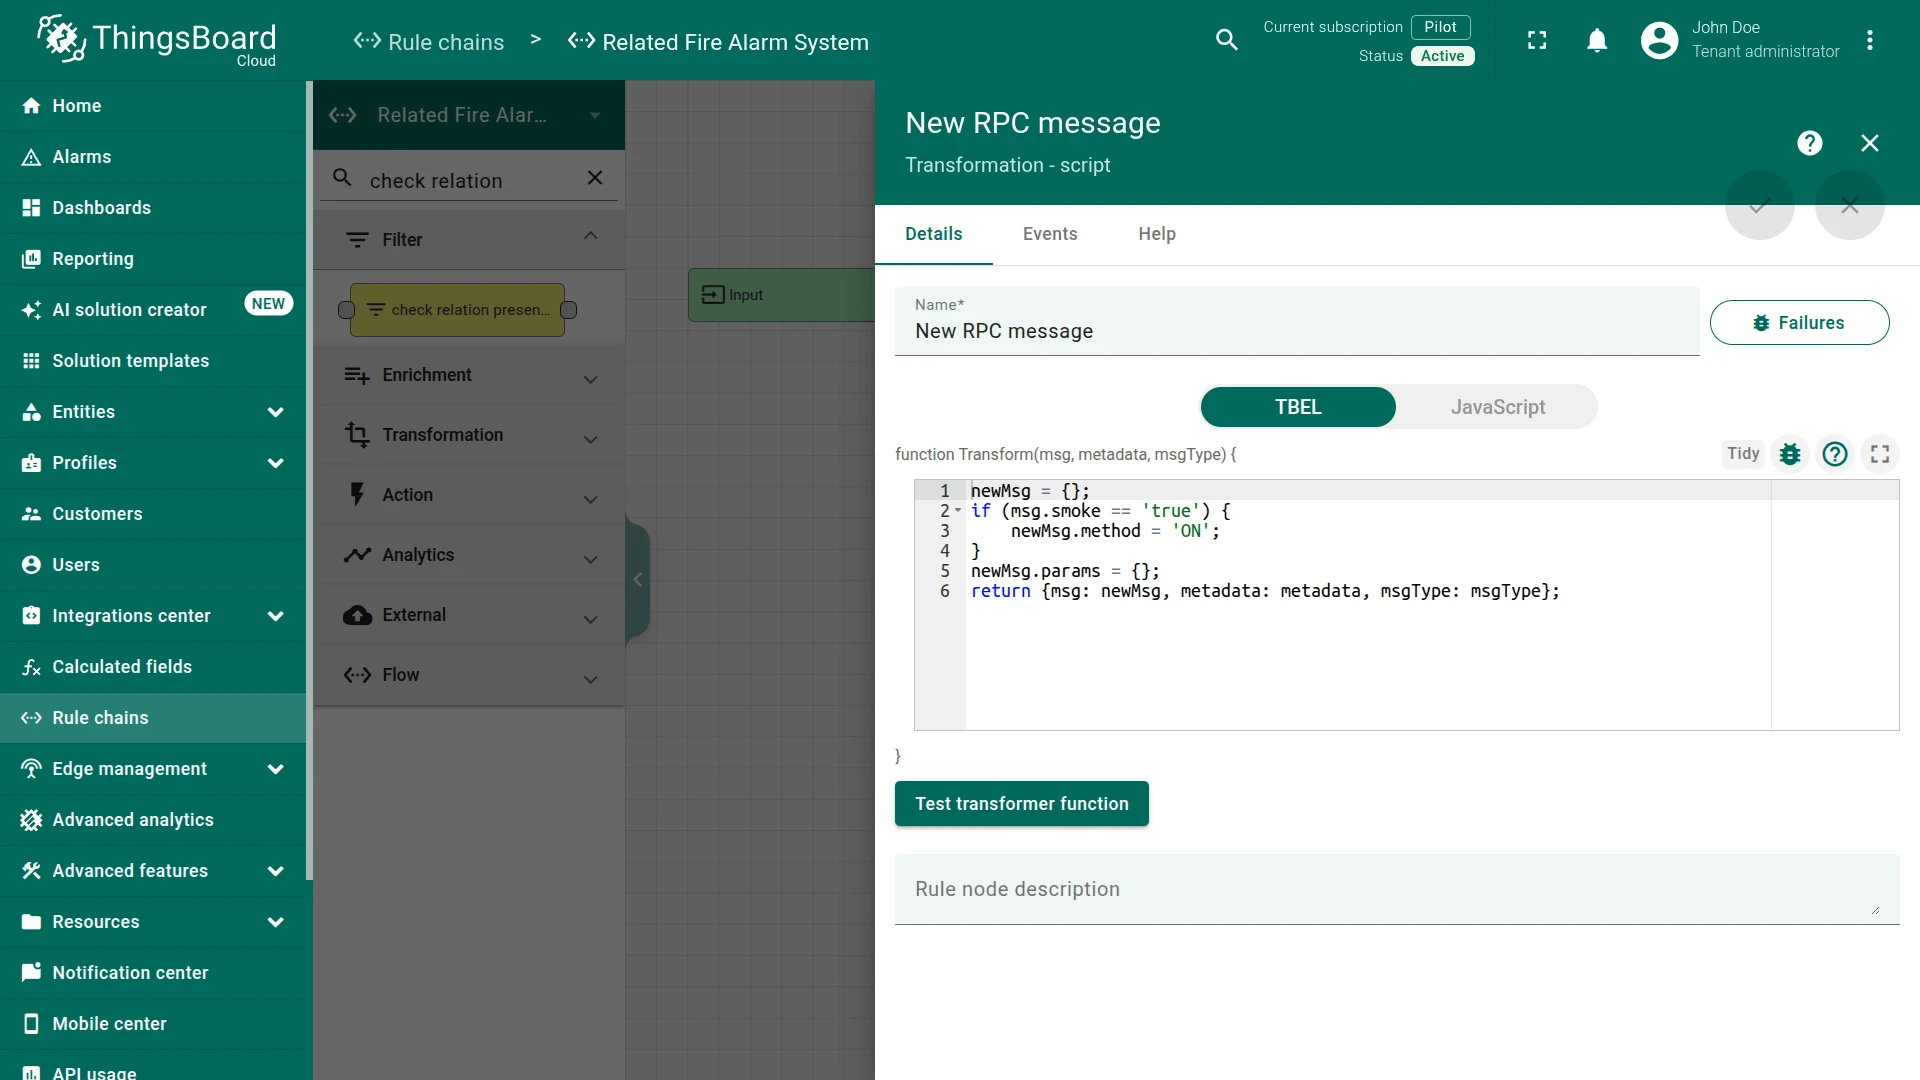
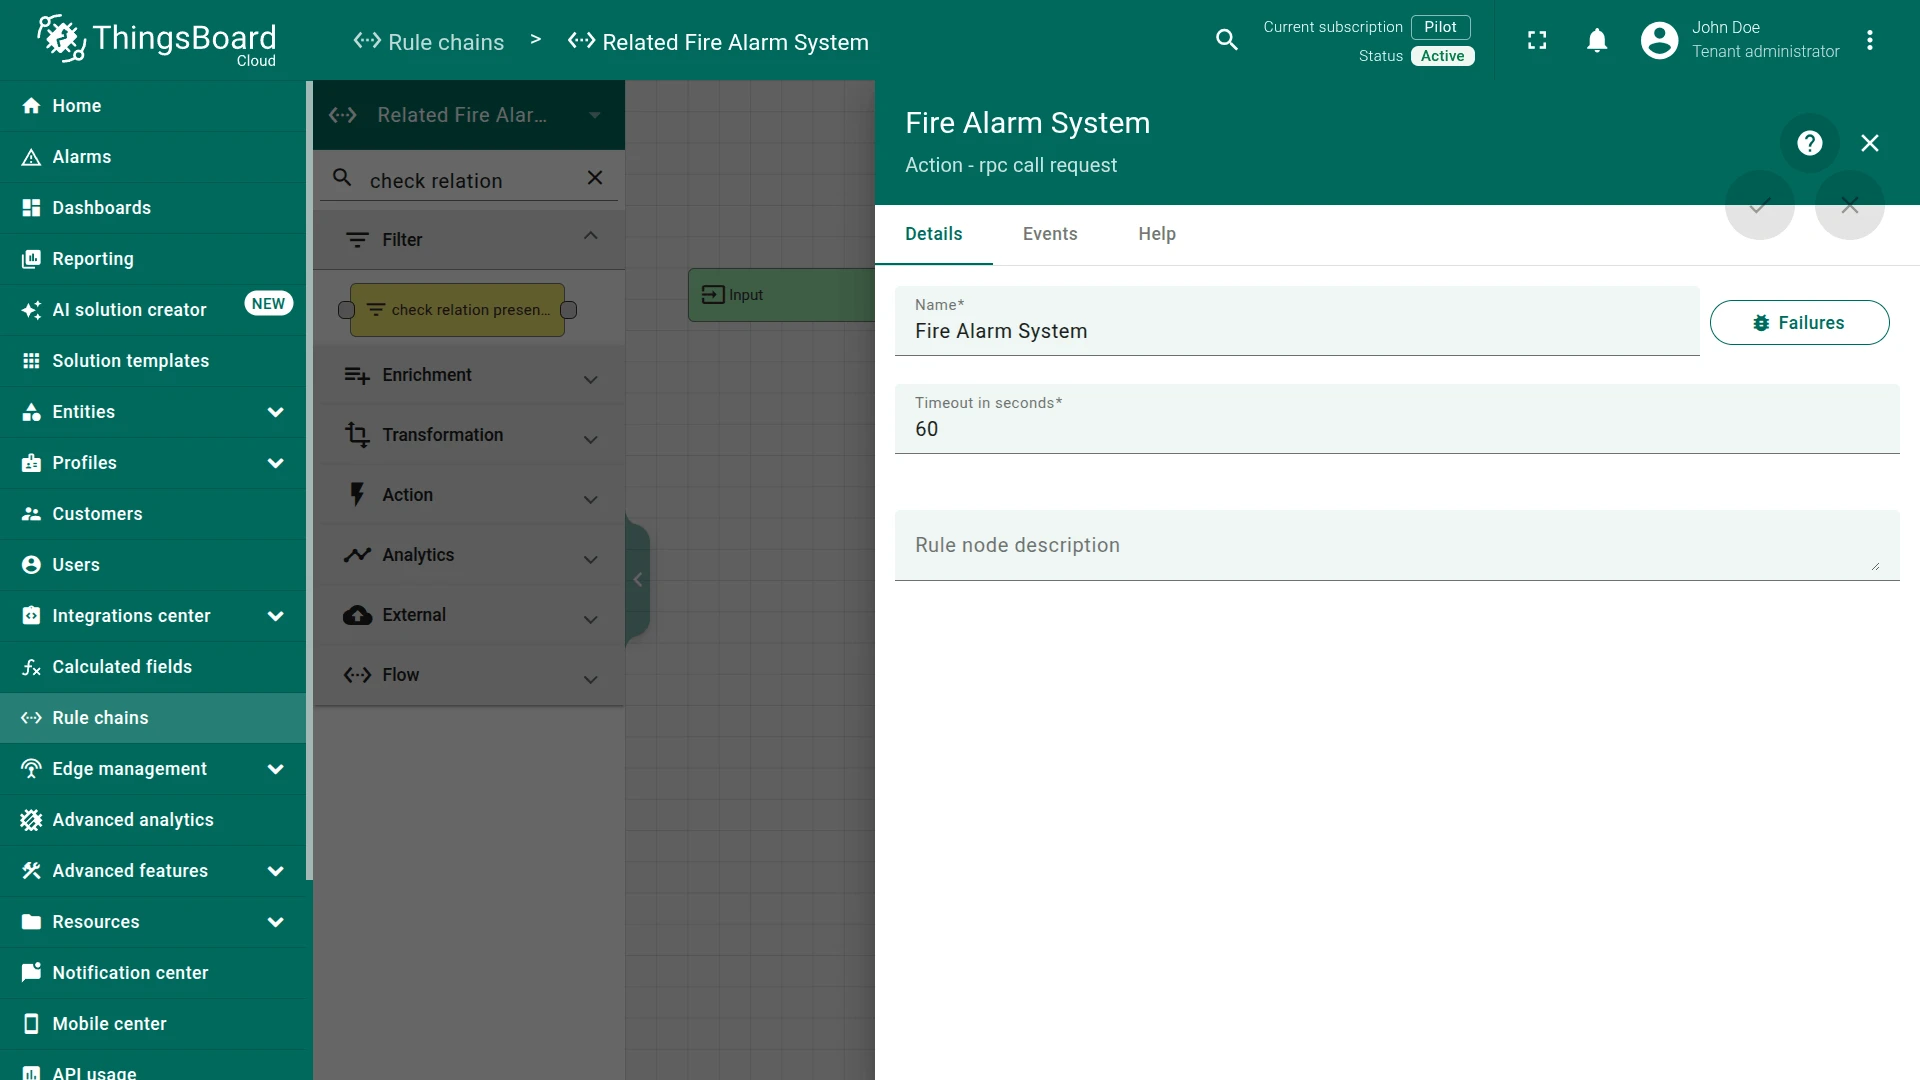
Step 3.4 RPC call request node
Section titled “Step 3.4 RPC call request node”Add the RPC call request node and connect it to the Transformation Script node with a relation type Success.
This node takes the message payload and sends it as a response to the Message Originator Fire Alarm System.
Fill in the fields with the input data shown in the following table:
- Name:
Fire Alarm System - Fire Alarm System:
60
Step 3.5 Check the node connections
Section titled “Step 3.5 Check the node connections”- Input ⇾ Check Relation
-
Check Relation ⇾
True⇾ Change Originator -
Change Originator ⇾
Success⇾ New RPC message -
New RPC message ⇾
Success⇾ Fire Alarm System
This Rule chain is ready. Save it.
Step 4. Modify the Root Rule Chain
Section titled “Step 4. Modify the Root Rule Chain”In the Root Rule Chain, add these nodes after Save Timeseries node:
Step 4.1 Filter Script node
Section titled “Step 4.1 Filter Script node”Add the Filter Script node and connect it to the Save Timeseries node with a relation type Success.
Enter the Name field as Smoke Alarm Filter.
This node will check if data of incoming message is smoke using the following script:
return msg.smoke == 'true';return msg.smoke == 'true';
Step 4.2 Clear Alarm node
Section titled “Step 4.2 Clear Alarm node”Add the Clear Alarm node and connect it to the Filter Script node with a relation type False.
Enter the Name field as Clear Smoke Alarm and the Alarm type as Smoke Alarm.
This node loads the latest Alarm with configured Alarm Type for Message Originator Smoke Detector and Clears the Alarm if it exists.

Step 4.3 Create Alarm node
Section titled “Step 4.3 Create Alarm node”Add the Create Alarm node and connect it to the Filter Script node with a relation type True.
Enter the Name field as Create Smoke Alarm and the Alarm type as Smoke Alarm.
This node tries to load the latest Alarm with configured Alarm Type for Message Originator, namely Smoke Detector.
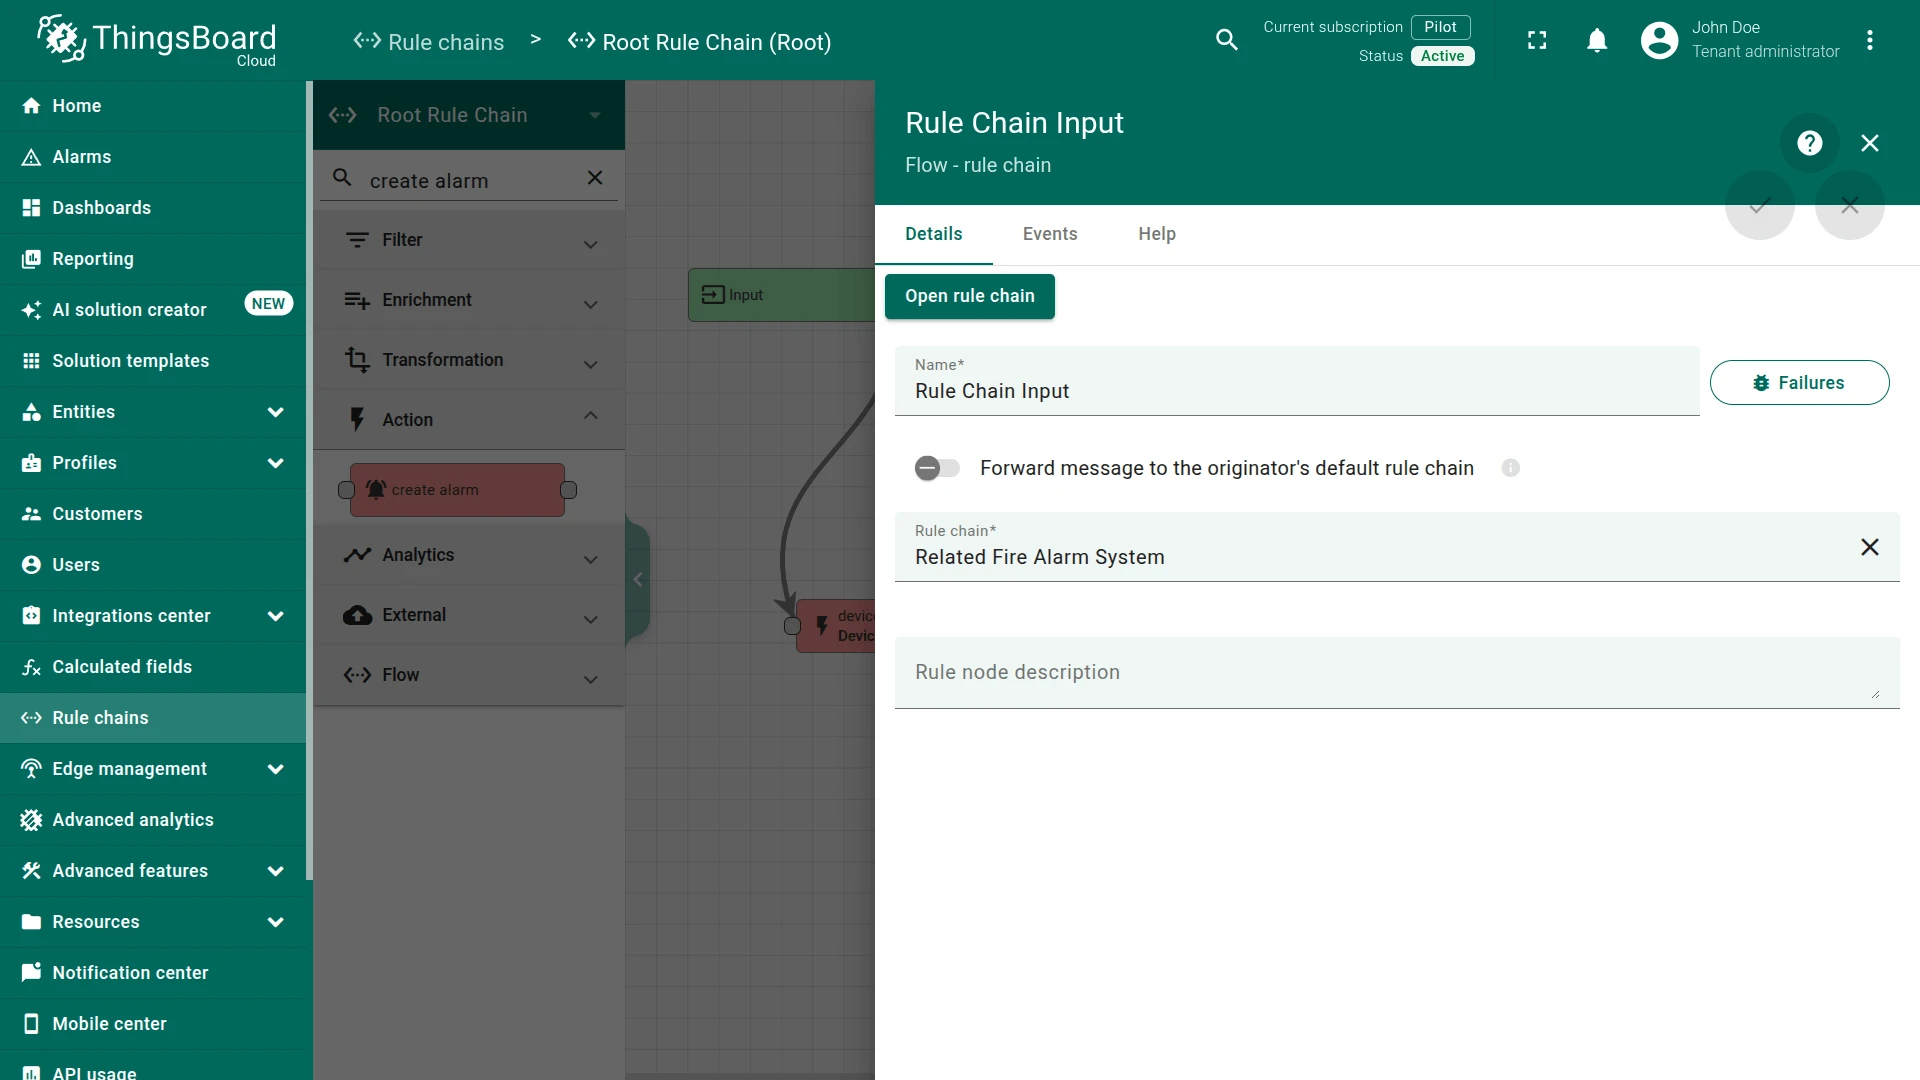
Step 4.4 Rule Chain node
Section titled “Step 4.4 Rule Chain node”Add the Rule Chain node and connect it to the Filter Script node with a relation type True.
Enter the Name field as Related Fire Alarm System.
This node forwards incoming Message to specified Rule Chain Related Fire Alarm System.
Step 4.5 Check the node connections
Section titled “Step 4.5 Check the node connections”-
Save Timeseries ⇾
Success⇾ Smoke Alarm Filter -
Smoke Alarm Filter ⇾
False⇾ Clear Smoke Alarm -
Smoke Alarm Filter ⇾
True⇾ Create Smoke Alarm -
Smoke Alarm Filter ⇾
True⇾ Rule Chain Input
This Rule chain is ready. Save it.

Step 5. Test the setup
Section titled “Step 5. Test the setup”To verify the configuration:
-
Download the following JavaScript emulator to emulate the Fire Alarm System device.
-
Run the script by executing the following command:
Terminal window ACCESS_TOKEN=$ACCESS_TOKEN node FireAlarmEmulator.jsReplace
$ACCESS_TOKENwith the access token of the Fire Alarm System device.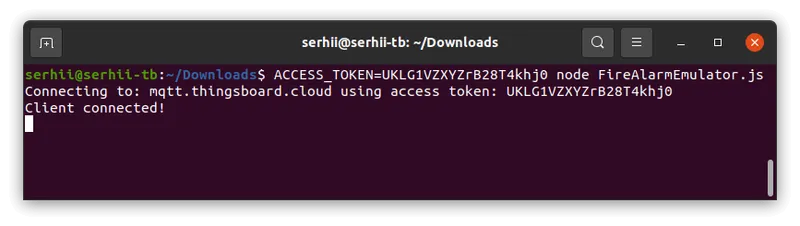
-
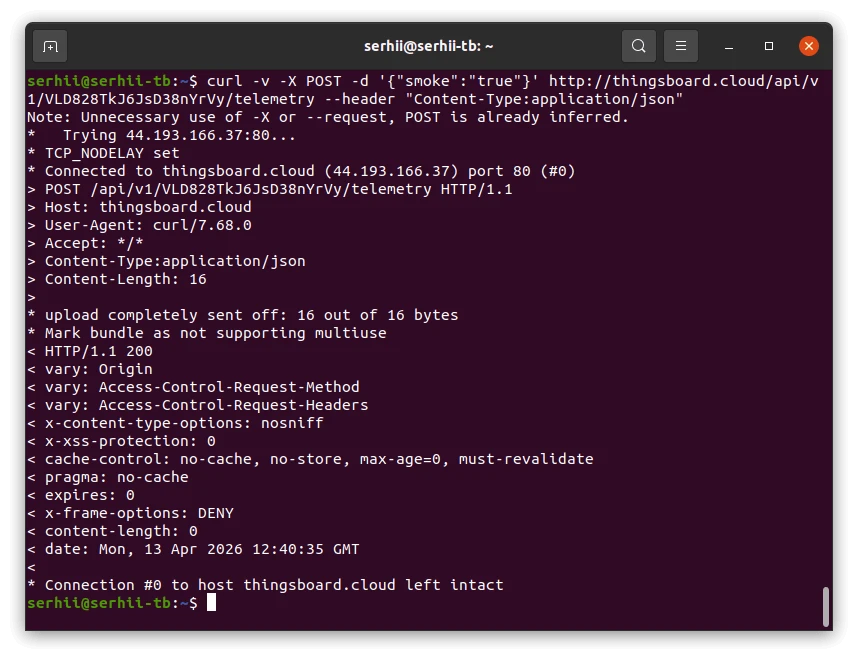
Post telemetry to the
Smoke Detector:Terminal window curl -v -X POST -d '{"smoke":"true"}' https://thingsboard.cloud/api/v1/$ACCESS_TOKEN/telemetry --header "Content-Type:application/json"Replace
$ACCESS_TOKENwith the access token of the Smoke Detector.
Expected result:
- A Smoke Alarm is triggered for the Smoke Detector device and appears in the Alarm list.
- The Smoke Detector reports telemetry
smoke = true, which triggers the alarm logic. - The related Fire Alarm System device receives an RPC command (
Fire alarm: ON) as a result of the relation-based rule chain.


To test alarm clearing, send telemetry where smoke is no longer true, for example a message without active smoke logic. Based on the configured filter, the False branch will clear the alarm. This follows directly from the Root Rule Chain logic in the tutorial.
Also, you can:
- configure the dashboard by adding an alarm widget to visualize the alarms.
- define an additional logic for alarm processing, for example, sending an email when an alarm is generated.
See Also
Section titled “See Also”- Validate incoming telemetry tutorial — for more information about how to validate an incoming telemetry using the Script Filter node.
- Create & Clear Alarms: configure dashboard guide — to learn how to add an Alarm widget to the dashboard.
- RPC capabilities guide — for more information about how RPC works in ThingsBoard.
Was this helpful?