The Things Stack Industries Integration
The Things Stack Industries integration connects ThingsBoard to a private The Things Industries (TTI) LoRaWAN network server over MQTT. ThingsBoard subscribes to the TTI MQTT API, receives uplink messages from your LoRaWAN devices, decodes the payload via the uplink converter, and stores the result as ThingsBoard telemetry and attributes. Downlink is optional: when configured, ThingsBoard encodes Rule Engine messages via the downlink converter and publishes them back to TTI, which delivers them to the device.

Use this integration when your LoRaWAN infrastructure runs on a private The Things Industries tenant rather than the public The Things Network. For public TTN connectivity, see the The Things Stack Community integration.
Prerequisites
Section titled “Prerequisites”Before creating the integration, ensure:
- You have access to ThingsBoard PE or ThingsBoard Cloud with integration functionality enabled for your tenant.
- You have permissions to create integrations and data converters.
- You have a The Things Industries account with at least one registered application and device.
- At least one device is registered in your TTI application and is sending uplinks. If you have not registered a device yet, follow the Register an End Device step below.
The Things Stack Industries Setup
Section titled “The Things Stack Industries Setup”Register an Application
Section titled “Register an Application”- Log in to the The Things Industries console.
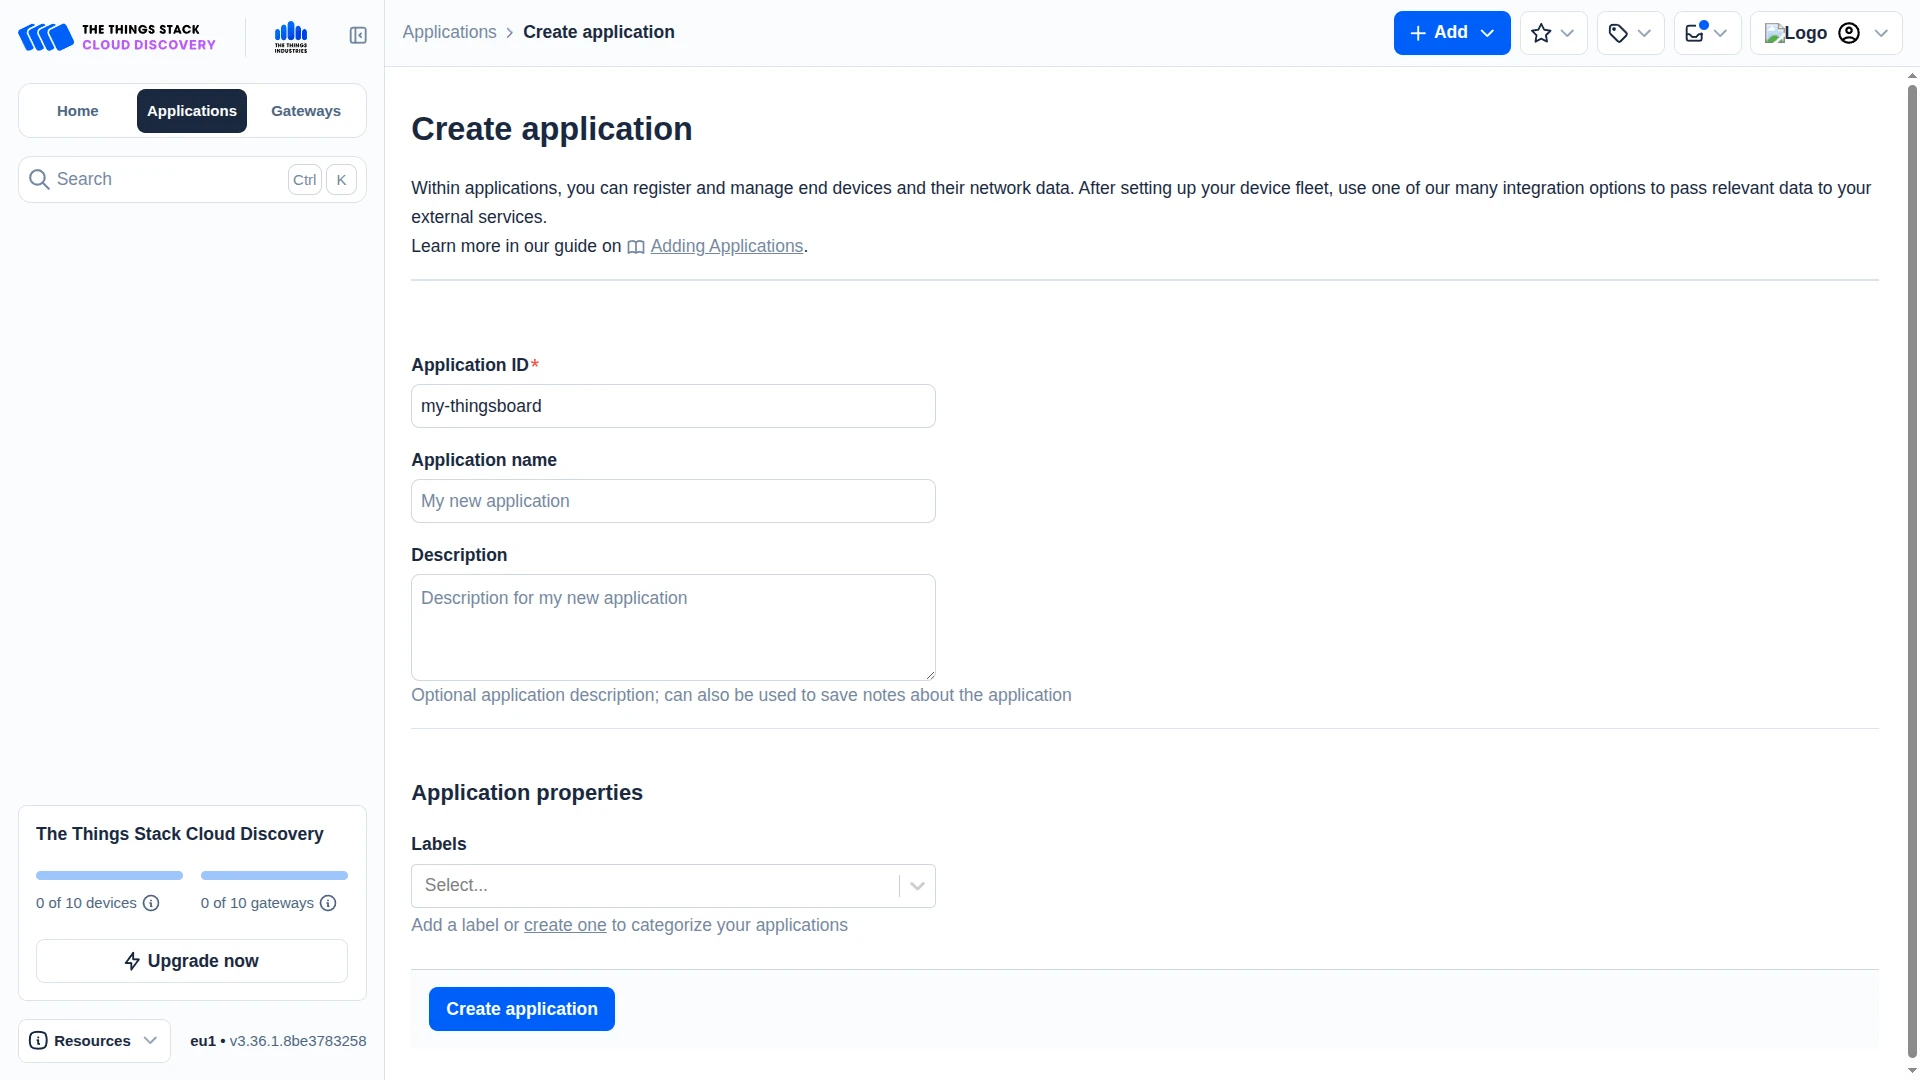
- Go to the Applications section and click Add application.
- Enter an Application ID — e.g.
thingsboard-integration. - Click Create application.
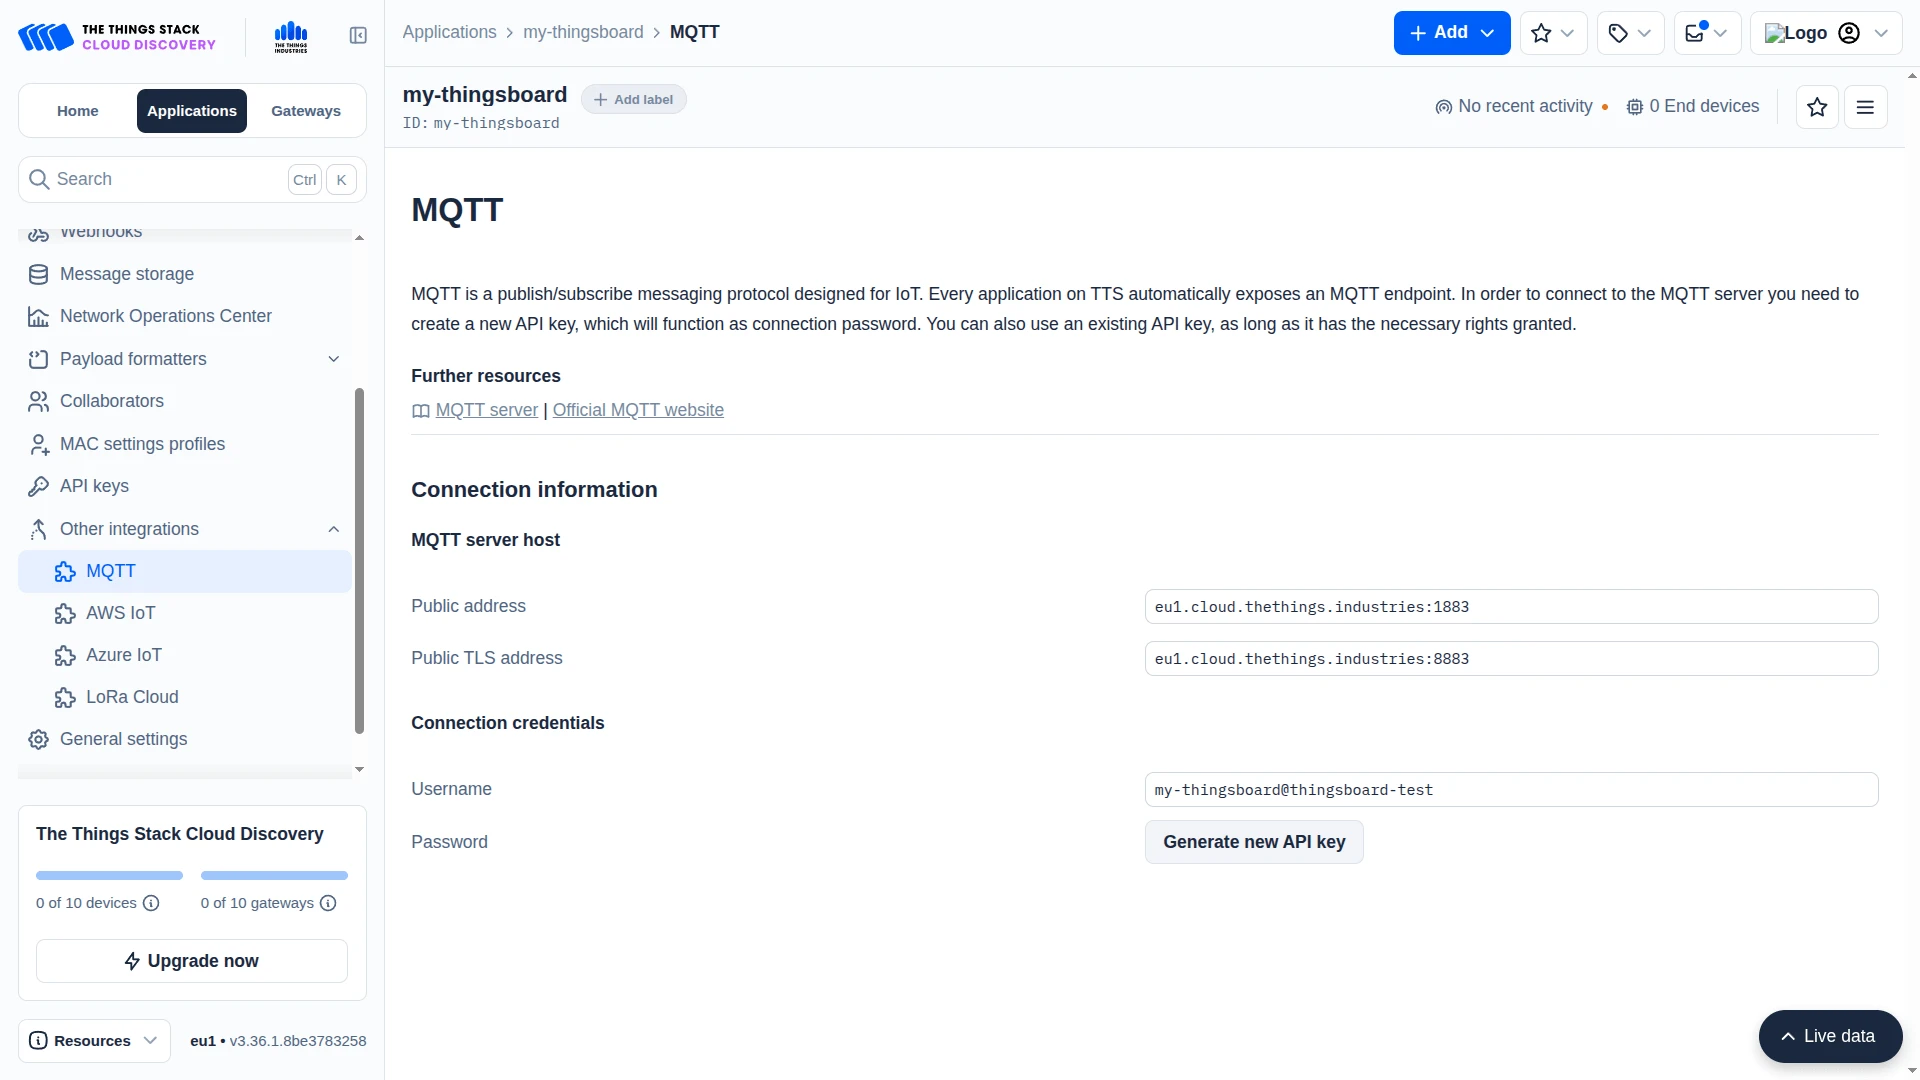
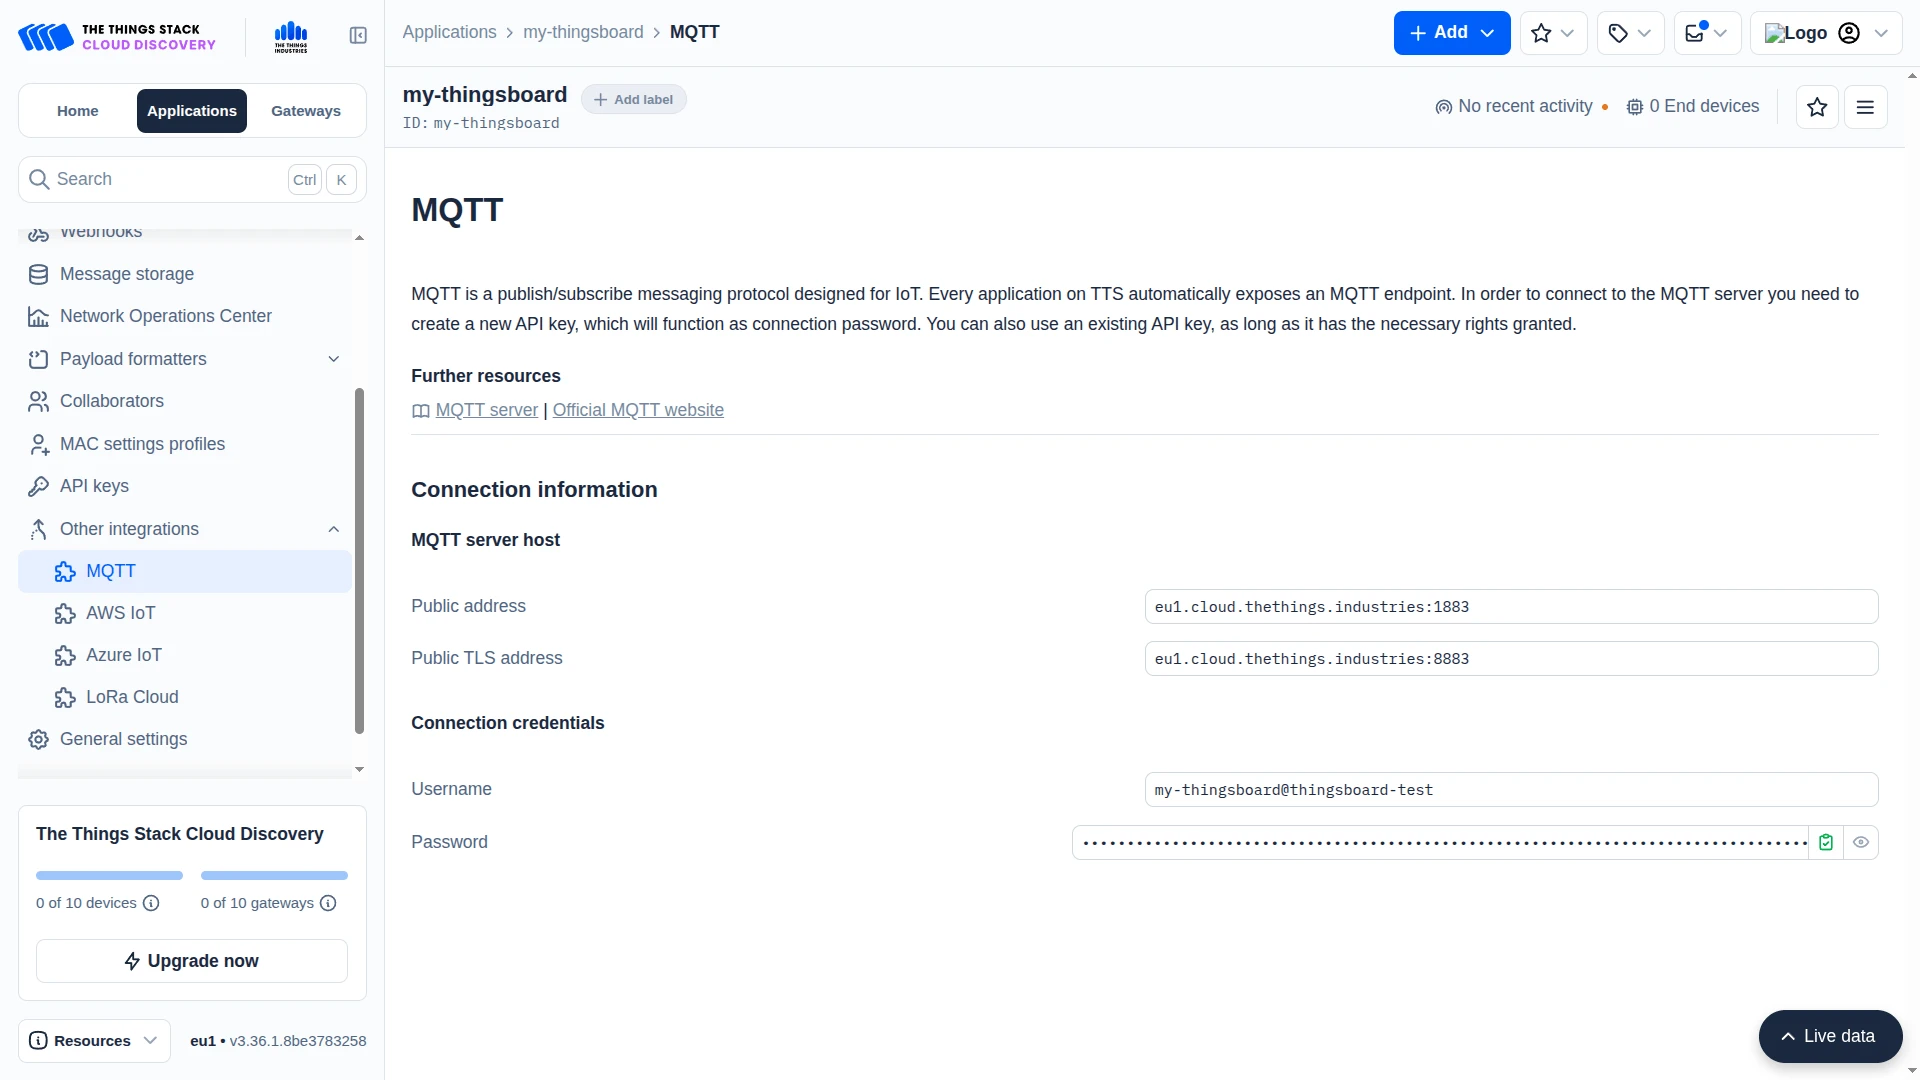
Obtain MQTT Credentials
Section titled “Obtain MQTT Credentials”TTI exposes an MQTT broker for each application. ThingsBoard uses the credentials from this integration to subscribe to device uplinks and publish downlinks.
- In the TTI console, open your application and go to Other integrations → MQTT.
- Copy the Username and click Generate new API key to obtain the Password.
- Save both values — you will need them when configuring the ThingsBoard integration.
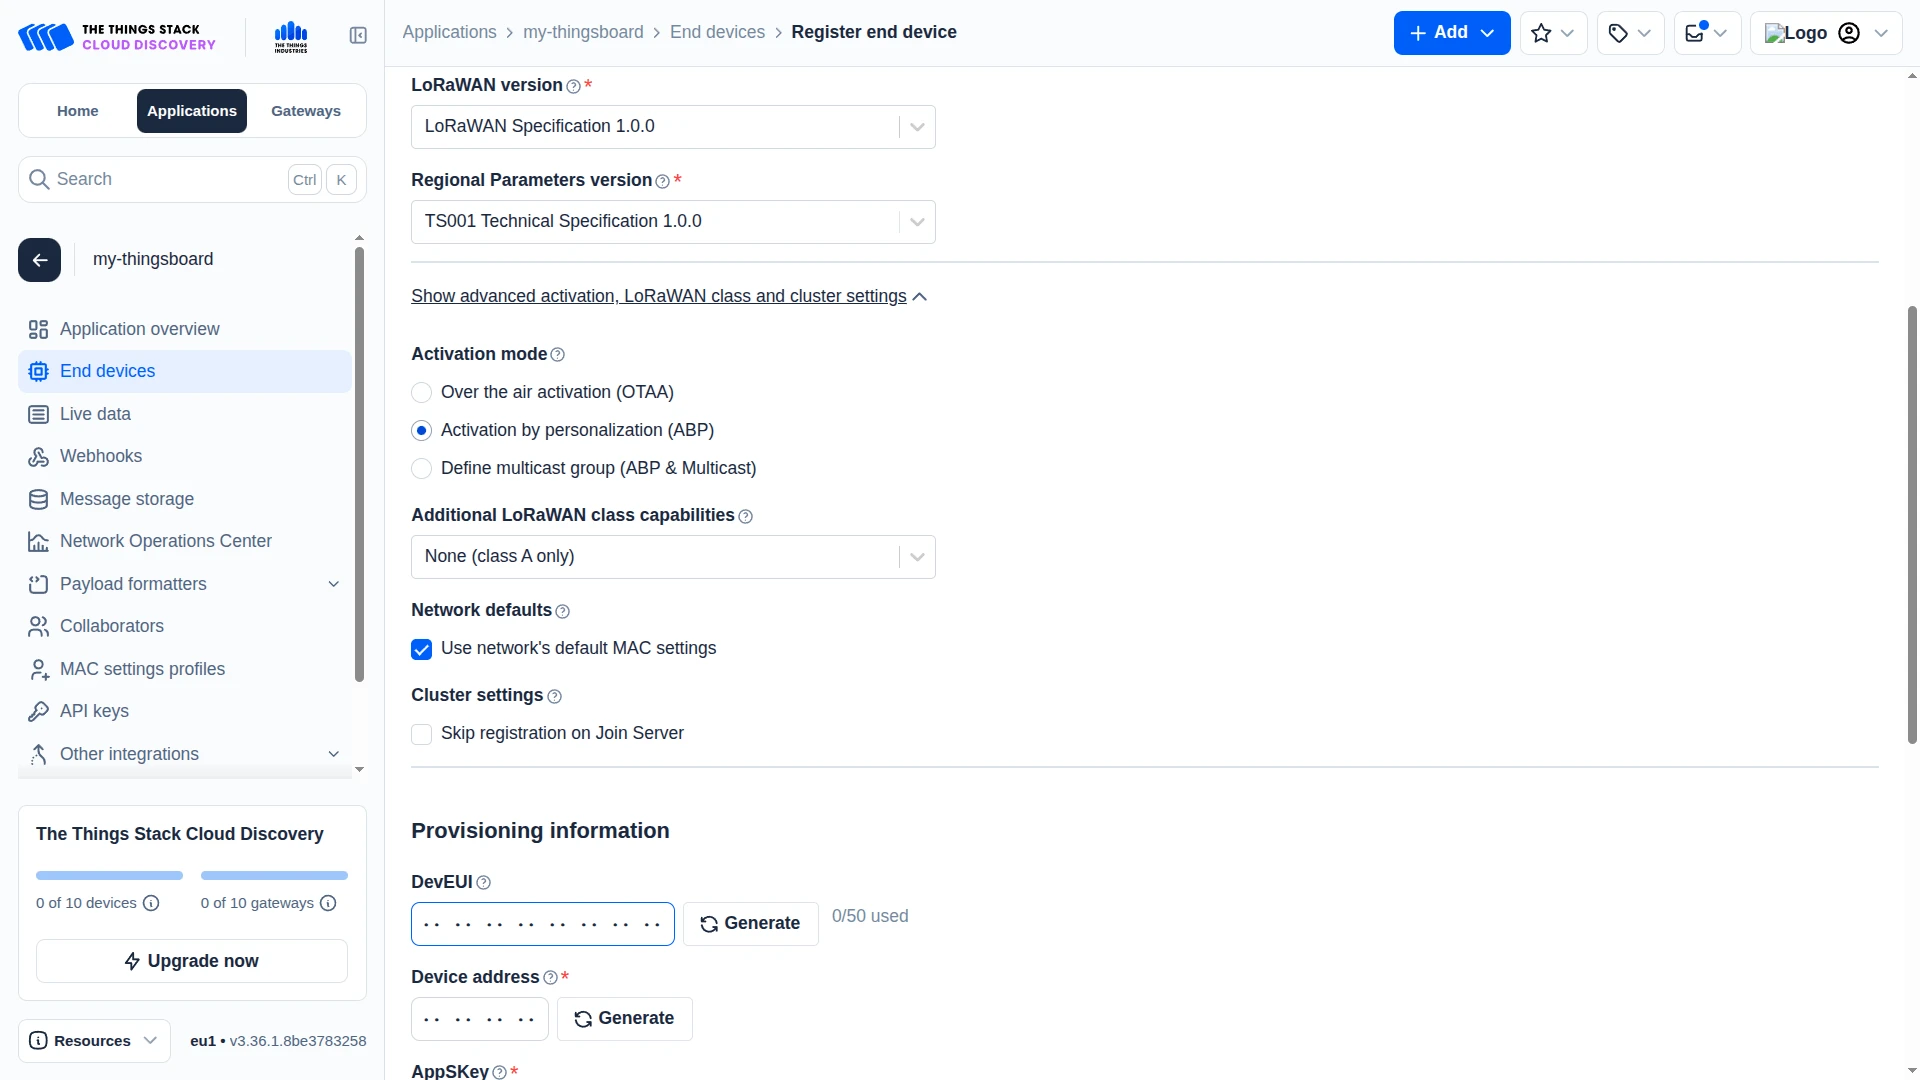
Register an End Device
Section titled “Register an End Device”- In the application, open End devices and click Add end device.
- Configure the End device type:
- Under Input method, select Enter end device specifics manually.
- Frequency plan — e.g.
Europe 863-870 MHz (SF9 for RX2 - recommended). - LoRaWAN version — e.g.
LoRaWAN Specification 1.0.0.
- Click Show advanced activation, LoRaWAN class and cluster settings and set Activation mode to Activation by personalization (ABP).
- Fill in the Provisioning information:
- DevEUI — click Generate. This becomes the device identifier in ThingsBoard.
- Device address — click Generate.
- AppSKey — click Generate.
- NwkSKey — click Generate.
- End device ID — e.g.
thermostat-a. This value is used to route downlink messages.
- Click Add end device.


Create TTI Uplink Data Converter
Section titled “Create TTI Uplink Data Converter”The uplink converter receives each TTI uplink message, decodes the LoRaWAN payload, and returns a structured object that ThingsBoard uses to create or update a device and store its telemetry and attributes.
If your device is in the built-in catalog, use the Library tab instead of writing a decoder — see Converters library for over 100 ready-made decoders.
For the full decoder function reference — all input parameters and output fields — see Uplink data converter.
- Go to Integrations center ⇾ Data converters.
- Click + Add data converter ⇾ Create new converter.
In the Add data converter dialog:
- Converter type — leave Uplink (selected by default).
- Integration type — in the search field, enter
The Things Stackand select The Things Stack Industries from the list. - Name — enter a converter name, for example
TTI Uplink Converter. - Configure main decoding parameters:
- Device name — the default value
Device $euinames each ThingsBoard device using the DevEUI from the uplink message (e.g.Device ABABABABABABABAA). On the first uplink ThingsBoard creates the device; on subsequent uplinks it updates the existing one. - The default decoder is pre-filled. Leave it unchanged for this guide.
By default the editor opens in TBEL; use the TBEL / JS toggle (upper right) to switch languages.
/*** Decodes the incoming payload and returns a structured object containing telemetry data and attributes.** @param {byte[]} input - The raw payload received as an array of bytes.* @returns {Object} output - The structured output with decoded telemetry and attributes.*/function decodePayload(input) {// Initialize the output object with empty attributes and telemetry for clarity.var result = { attributes: {}, telemetry: {}};// Detect input type and normalize to byte arrayvar bytes;if (metadata.payloadFormat == 'JSON') {// payloadFormat is 'JSON' when The Things Industries payload formatters are configured on the application or device level.// In that case, decoded_payload is a JSON object produced by your formatter.// This template assumes the formatter returns { "bytes": [...] } with the raw byte array.// If your formatter returns pre-decoded values in a different structure,// update this section to extract the values directly from 'parsed' instead.var parsed = decodeToJson(input);if (parsed.bytes == null) {throw new Error("Payload formatter output does not contain a 'bytes' field. " +"Update this decoder to match your formatter's output structure.");}bytes = parsed.bytes;} else {// payloadFormat is 'BINARY' when no payload formatter is configured — raw bytes from frm_payload are passed directly.bytes = input;}// Decode serial number (SN) from the first 4 bytes of the payload.// Press '?' icon in the top right corner to learn more about built in helper functions and capabilities.result.attributes.sn = parseBytesToInt(bytes, 0, 4);// Extract the timestamp from metadata (represented in milliseconds).var timestamp = metadata.ts; // ts is the timestamp parsed from the incoming message's time, or returns the current time if it cannot be parsed.// Combine the timestamp with decoded values and add it to the telemetry.result.telemetry = {ts: timestamp,values: {// Decode battery level from the 5th byte of the payload.battery: parseBytesToInt(bytes, 4, 1),// Decode temperature from the 6th and 7th bytes of the payload (divided by 100).temperature: parseBytesToInt(bytes, 5, 2) / 100.0,// Decode saturation from the 8th byte of the payload.saturation: parseBytesToInt(bytes, 7, 1)}};// Return the fully constructed output object.return result;// Same logic, less code:// return {// attributes: {// sn: parseBytesToInt(bytes, 0, 4)// },// telemetry: {// ts: convertDateToTimestamp(extractDateFromMetadata()),// values: {// battery: parseBytesToInt(bytes, 4, 1),// temperature: parseBytesToInt(bytes, 5, 2) / 100.0,// saturation: parseBytesToInt(bytes, 7, 1)// }// }// };}var result = decodePayload(payload);// Uncomment this code block to overwrite values set in the main configuration window. Useful if you extract device/asset/customer/group names from the payload;// result.type = 'DEVICE'; // Entity type allows you to choose type of created entity. Can be 'DEVICE' or 'ASSET'.// result.name = 'Temperature Sensor'; // Device or asset name (the value must be unique)// result.profile = 'IndustrialSensorProfile'; // Device or asset profile name.// result.customer = 'MyCustomer'; // If customer is not null - created entity will be assigned to customer with such name.// result.group = 'SensorsGroup'; // If group is not null - created entity will be added to the entity group with such name.// Return the final result object.return result;/*** Decodes the incoming payload and returns a structured object containing telemetry data and attributes.** @param {number[]} input - The raw payload received as an array of bytes.* @returns {Object} output - The structured output with decoded telemetry and attributes.*/function decodePayload(input) {// Initialize the output object with empty attributes and telemetry for clarity.var result = { attributes: {}, telemetry: {}};// Detect input type and normalize to byte array.var bytes;if (metadata.payloadFormat == 'JSON') {// payloadFormat is 'JSON' when The Things Industries payload formatters are configured on the application or device level.// In that case, decoded_payload is a JSON object produced by your formatter.// This template assumes the formatter returns { "bytes": [...] } with the raw byte array.// If your formatter returns pre-decoded values in a different structure,// update this section to extract the values directly from 'parsed' instead.var parsed = decodeToJson(input);if (parsed.bytes == null) {throw new Error("Payload formatter output does not contain a 'bytes' field. " +"Update this decoder to match your formatter's output structure.");}bytes = parsed.bytes;} else {// payloadFormat is 'BINARY' when no payload formatter is configured — raw bytes from frm_payload are passed directly.bytes = input;}// Decode serial number (SN) from the first 4 bytes of the payload.// Press '?' icon in the top right corner to learn more about built in helper functions and capabilities.result.attributes.sn = parseBytesToInt(bytes, 0, 4);// Extract the timestamp from metadata (represented in milliseconds).var timestamp = metadata.ts; // ts is the timestamp parsed from the incoming message's time, or returns the current time if it cannot be parsed.// Initialize an object to store decoded key/value telemetry data.var values = {};// Decode battery level from the 5th byte of the payload.values.battery = parseBytesToInt(bytes, 4, 1);// Decode temperature from the 6th and 7th bytes of the payload (divided by 100).values.temperature = parseBytesToInt(bytes, 5, 2) / 100.0;// Decode saturation from the 8th byte of the payload.values.saturation = parseBytesToInt(bytes, 7, 1);// Combine the timestamp with values and add it to the telemetry.result.telemetry = {ts: timestamp,values: values};// Return the fully constructed output object.return result;// Same logic, less code:// return {// attributes: {// sn: parseBytesToInt(bytes, 0, 4)// },// telemetry: {// ts: convertDateToTimestamp(extractDateFromMetadata()),// values: {// battery: parseBytesToInt(bytes, 4, 1),// temperature: parseBytesToInt(bytes, 5, 2) / 100.0,// saturation: parseBytesToInt(bytes, 7, 1)// }// }// };}var result = decodePayload(payload);// Uncomment this code block to overwrite values set in the main configuration window. Useful if you extract device/asset/customer/group names from the payload;// result.type = 'DEVICE'; // Entity type allows you to choose type of created entity. Can be 'DEVICE' or 'ASSET'.// result.name = 'Temperature Sensor'; // Device or asset name (the value must be unique)// result.profile = 'IndustrialSensorProfile'; // Device or asset profile name.// result.customer = 'MyCustomer'; // If customer is not null - created entity will be assigned to customer with such name.// result.group = 'SensorsGroup'; // If group is not null - created entity will be added to the entity group with such name.// Return the final result object.return result;/*** Converts a byte array to a string and parses it as JSON.** @param {number[]} payload - The array of bytes.* @returns {Object} - The parsed JSON object.*/function decodeToJson(payload) {return JSON.parse(String.fromCharCode.apply(String, payload));}/*** Parse a slice of bytes from an array into an integer (big-endian).** @param {number[]} input - The array of bytes.* @param {number} offset - The starting index.* @param {number} length - The number of bytes to convert.* @returns {number} - The resulting integer.*/function parseBytesToInt(input, offset, length) {var result = 0;for (var i = offset; i < offset + length; i++) {result = (result << 8) | (input[i] & 0xFF);}return result;} - Device name — the default value
Review advanced decoding parameters — pre-populated for The Things Stack Industries; leave defaults unless your setup differs.
These parameters control TTI network metadata — signal quality, location, and LoRa settings that ThingsBoard extracts automatically from each uplink message. The decoder script controls device sensor data — the fields written to
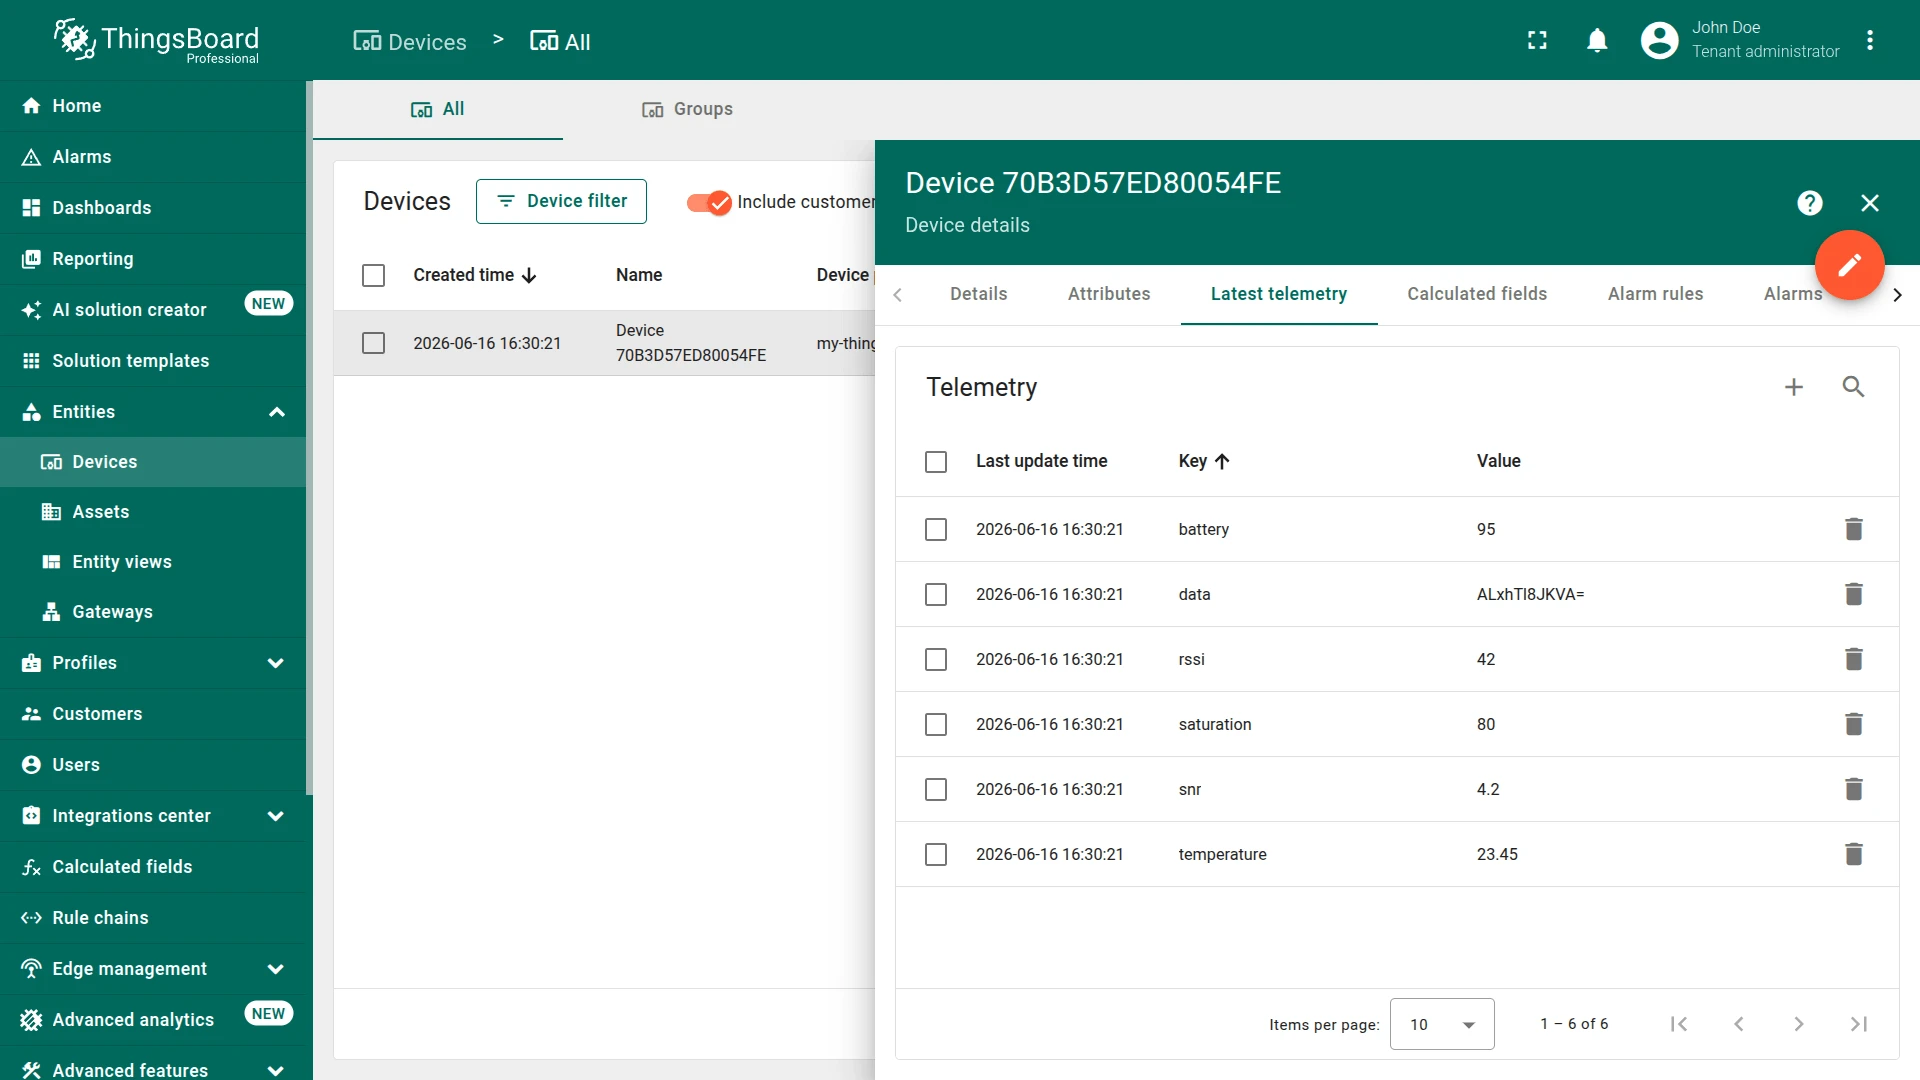
result.attributesandresult.telemetry.values.The default telemetry keys extracted from TTI messages include:
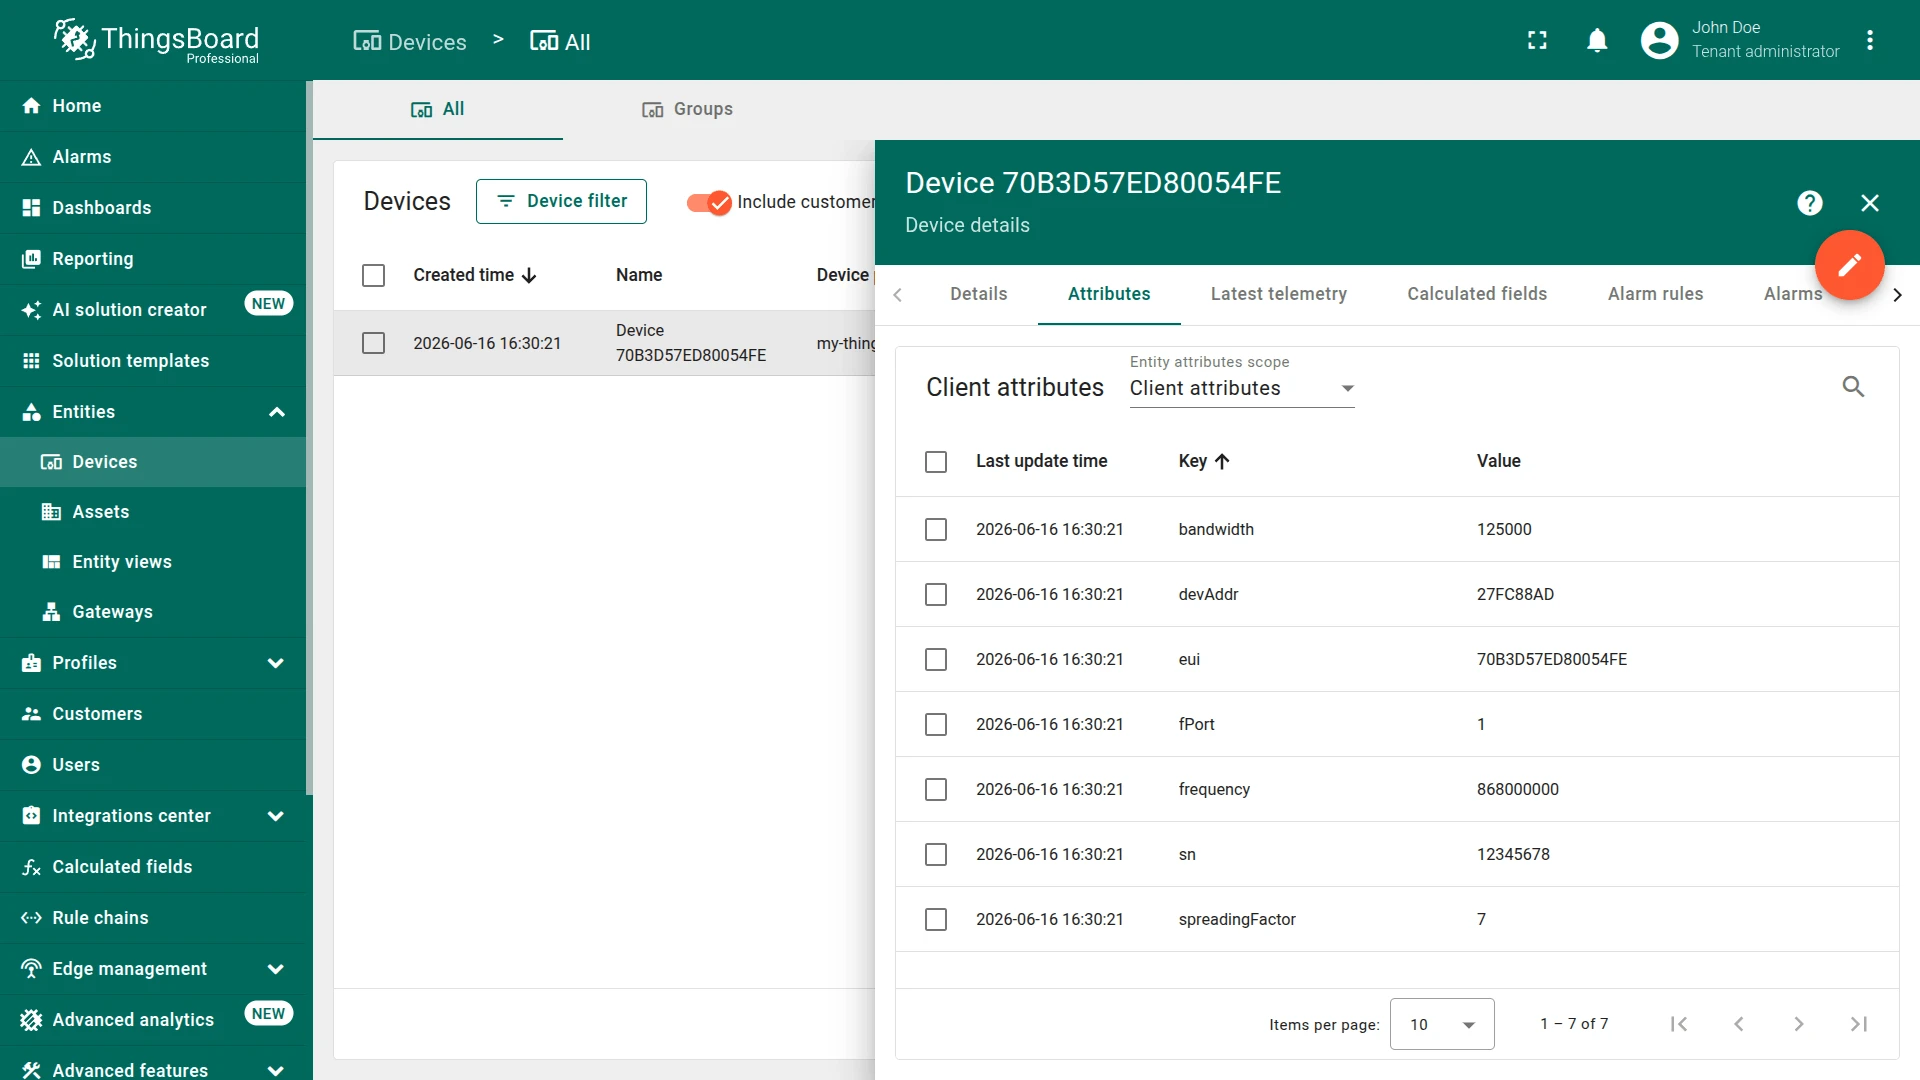
fCnt,data,decoded,latitude,longitude,altitude,rssi,snr,channel.The default attribute keys include:
eui,devAddr,fPort,bandwidth,spreadingFactor,codeRate,frequency,brandId,modelId,hardwareVersion,firmwareVersion,attributes,tenantId.- Click Add.
What the Converter Receives
ThingsBoard passes two variables to the decoder function:
| Variable | Type | Description |
|---|---|---|
payload | byte array | The LoRaWAN payload bytes. For BINARY format — raw bytes from frm_payload. For JSON format — bytes of the serialized decoded_payload object produced by the TTI formatter. |
metadata | object | Key-value map populated from the TTI uplink MQTT message. |
Key metadata fields available in the decoder:
| Field | Description |
|---|---|
metadata.payloadFormat | 'BINARY' or 'JSON' — use this to branch your decoding logic. 'JSON' when a TTI payload formatter is configured. |
metadata.ts | Uplink timestamp in milliseconds, parsed from the TTI received_at field; falls back to server time if absent. |
metadata.eui | DevEUI of the sending device, e.g. ABABABABABABABAA |
metadata.devAddr | Device address assigned by the network |
metadata.fPort | LoRaWAN frame port number |
metadata.spreadingFactor | Spreading factor of the uplink transmission |
metadata.rssi | Received signal strength indicator (dBm) |
metadata.snr | Signal-to-noise ratio (dB) |
Example: BINARY Payload Decoded
The decoder reads byte ranges using parseBytesToInt(input, offset, length) and produces:
| Bytes | Field | Output type | Expression | Notes |
|---|---|---|---|---|
| 0–3 | sn | attribute | parseBytesToInt(bytes, 0, 4) | Device serial number |
| 4 | battery | telemetry | parseBytesToInt(bytes, 4, 1) | Battery level |
| 5–6 | temperature | telemetry | parseBytesToInt(bytes, 5, 2) / 100.0 | Raw value ÷ 100 |
| 7 | saturation | telemetry | parseBytesToInt(bytes, 7, 1) | Saturation level |
Example payload (hex):
00BC614E5F092950Example output:
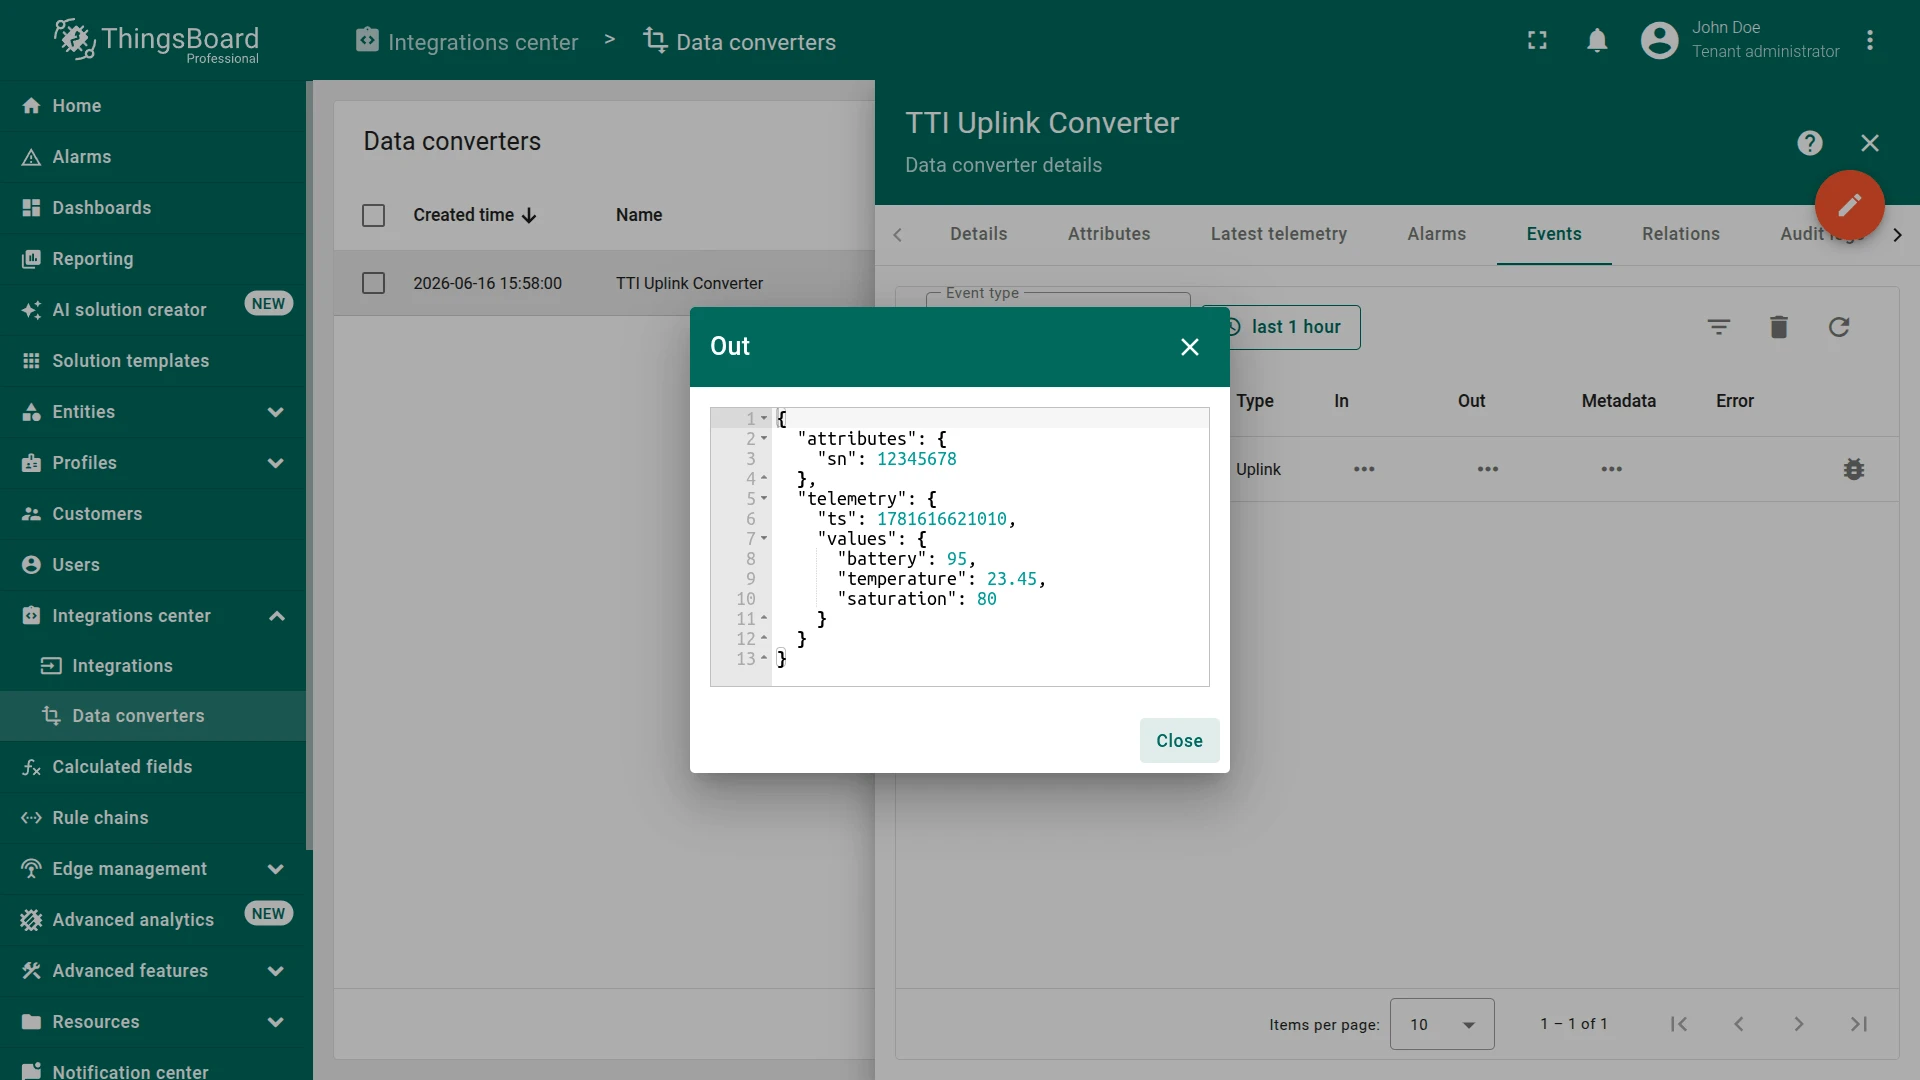
{ "attributes": { "sn": 12345678 }, "telemetry": { "ts": 1684398325906, "values": { "battery": 95, "temperature": 23.45, "saturation": 80 } }}Adapting the Converter
- Different device name — change the Device name pattern in Main decoding configuration (e.g. replace
Device $euiwith$deviceIdor a fixed string). - Different byte layout — adjust the offset and length in each
parseBytesToInt()call to match your payload structure. - TTI payload formatter configured — if your TTI application has a JavaScript formatter, ThingsBoard receives the formatter’s output as a JSON object (
payloadFormat == 'JSON'). Update theparsed.bytesextraction to match your formatter’s output structure, or map decoded fields directly:values: { temperature: parsed.temperature }. - Additional attributes — add more keys to
result.attributes(e.g.result.attributes.firmwareVersion = parsed.fw).
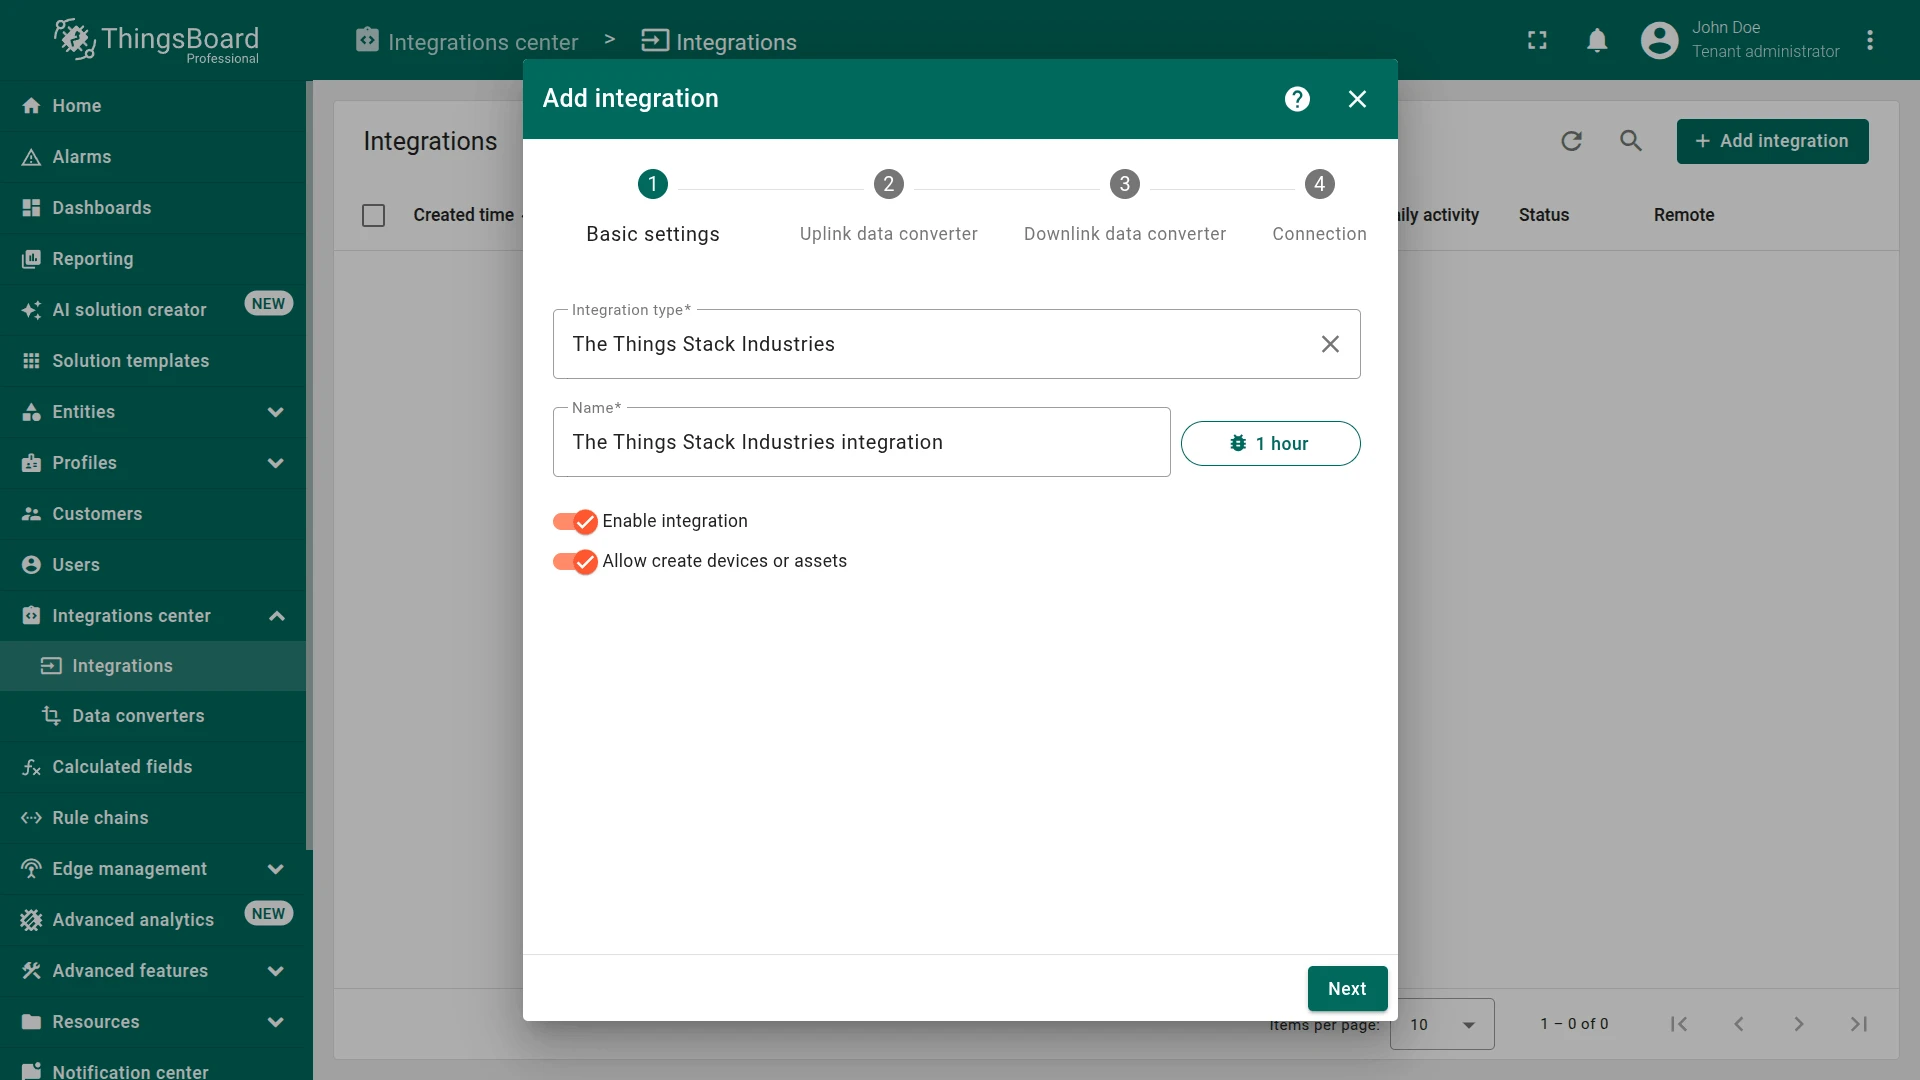
Create TTI Integration
Section titled “Create TTI Integration”- Go to Integrations center ⇾ Integrations and click + Add integration.
- Basic settings:
- Select The Things Stack Industries as the integration type.
- Enter a Name for the integration, or keep the default
The Things Stack Industries integration. - Enable integration and Allow create devices or assets are enabled by default.
- Click Next.
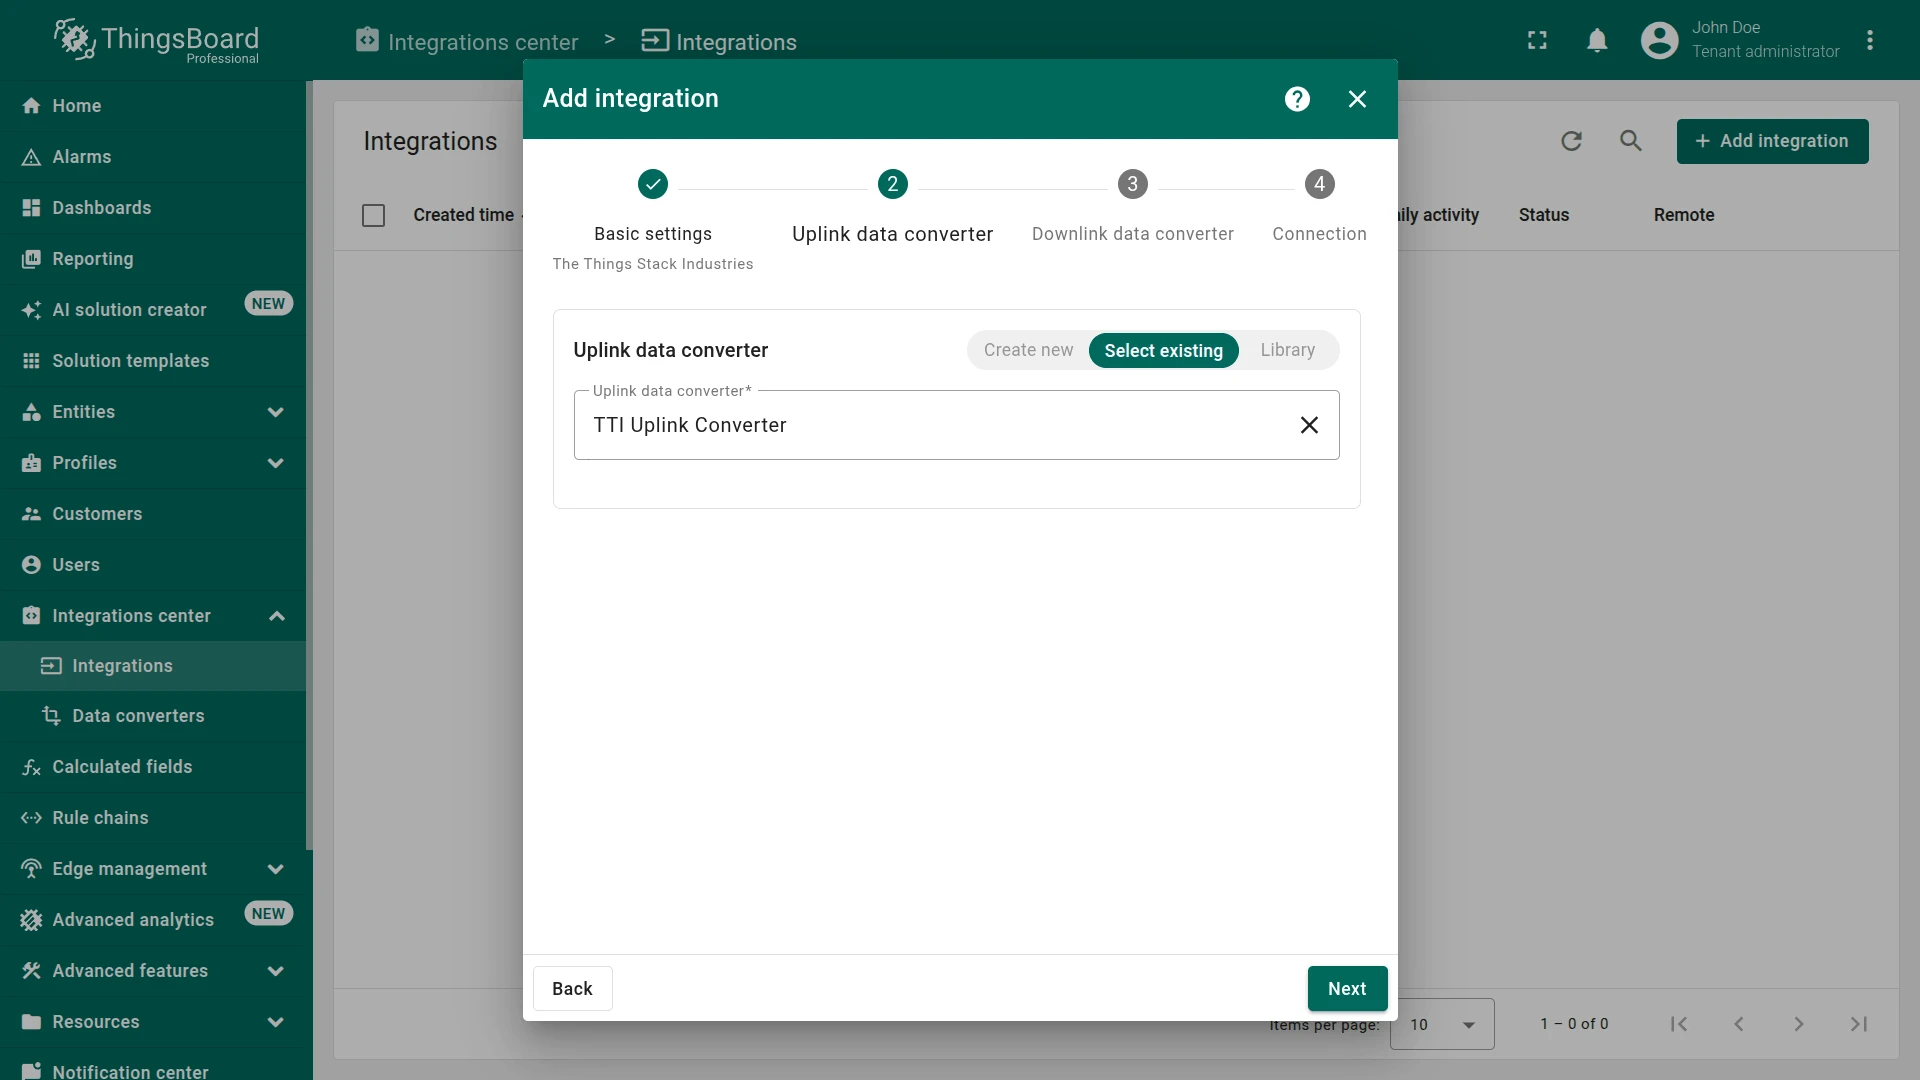
- Uplink data converter:
- Click Select existing and choose the TTI Uplink Converter created in the previous step.
- Alternatively, click Create new to define the decoder inline, or use Library to load a vendor-provided preset.
- Click Next.
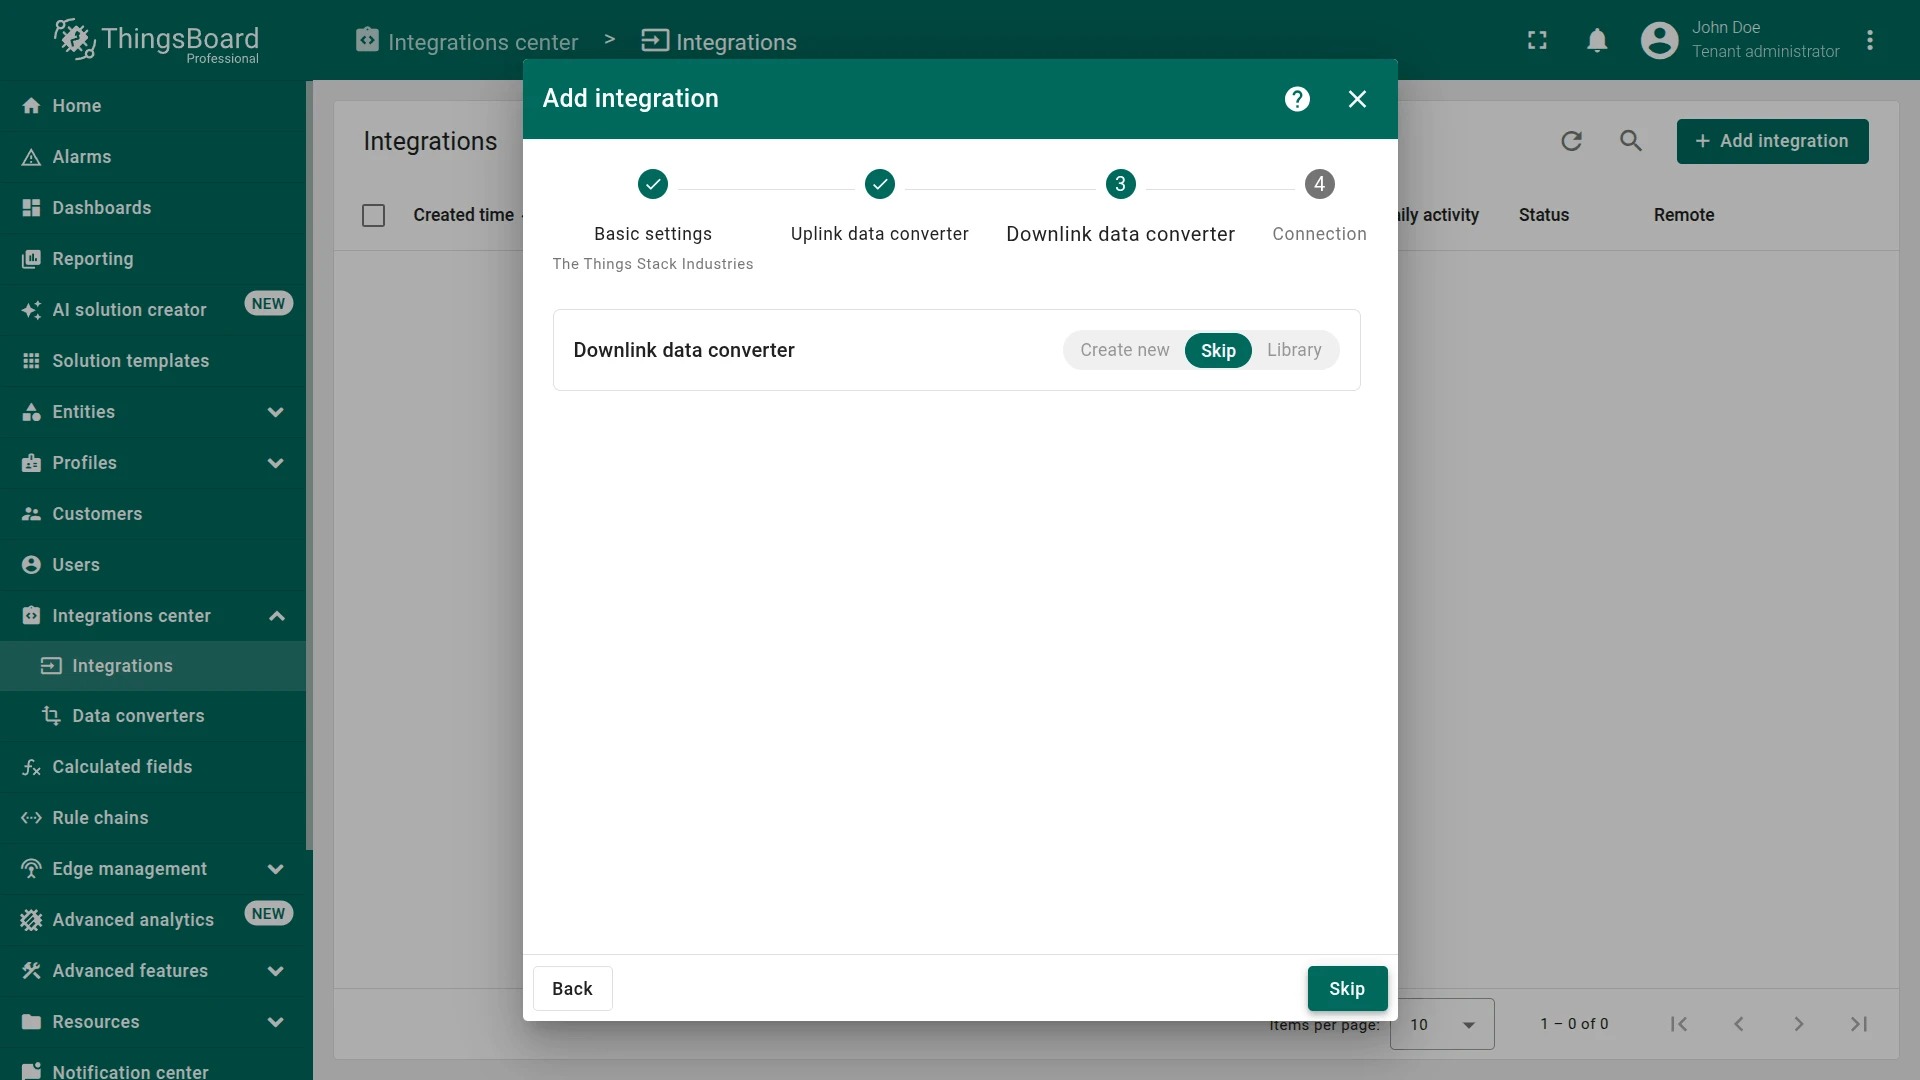
- Downlink data converter:
- Click Skip — the downlink converter is only needed for sending commands to devices and can be added later.
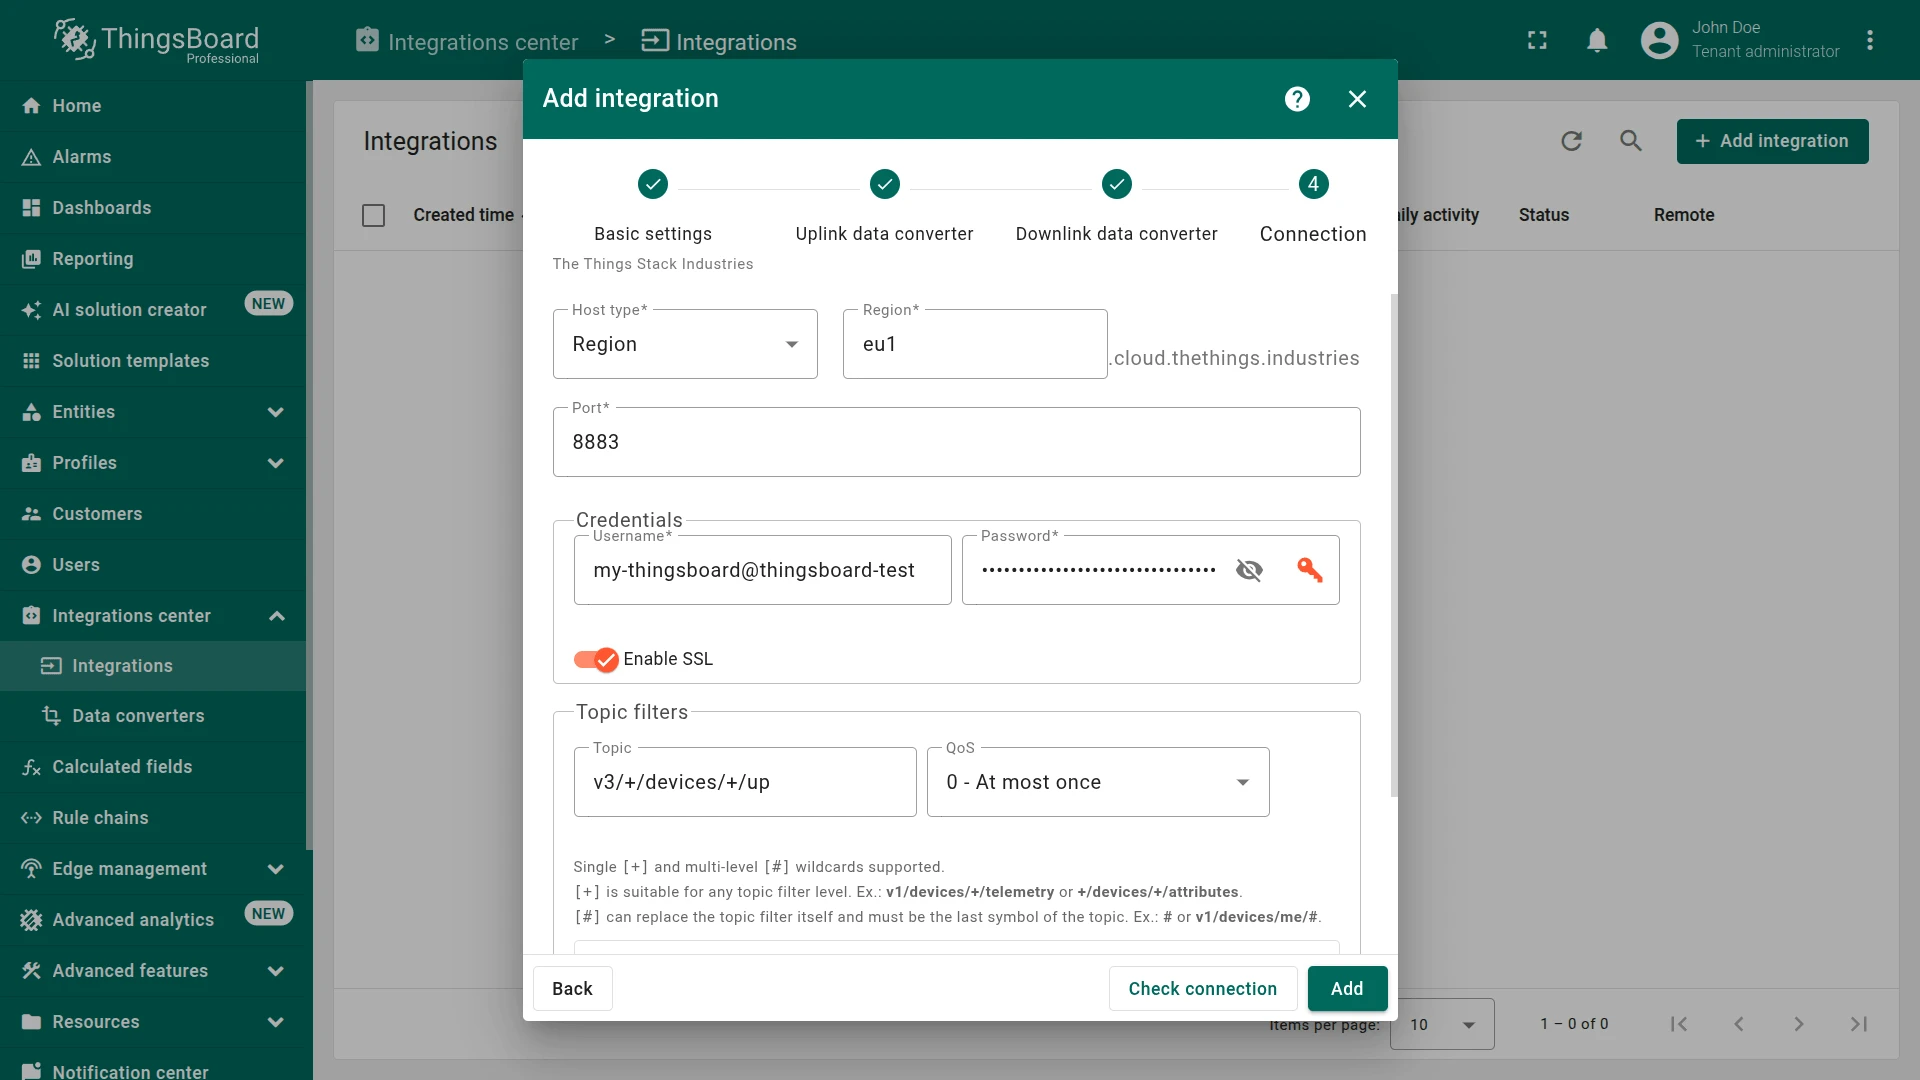
- Connection settings:
- Host type — leave Region selected.
- Region — enter the identifier of the TTI cluster where your application is registered (e.g.
eu1). ThingsBoard constructs the broker hostname as{region}.cloud.thethings.industries. - Port —
8883. - Credentials:
- Username — the username from the TTI MQTT integration (e.g.
my-thingsboard@thingsboard-test). - Password — the API key generated in the Obtain MQTT Credentials step.
- Enable SSL is on by default — leave it enabled.
- Optionally click Check connection — the wizard shows Connected when successful.
- Click Add to complete the integration setup.

Connection Settings
Section titled “Connection Settings”Host Type
| Value | Description |
|---|---|
| Region | Connect to a standard TTI cluster. Enter the Region identifier (e.g. eu1, nam1, au1) — ThingsBoard constructs the broker host as {region}.cloud.thethings.industries. |
| Custom | Specify a fully custom broker hostname — use this for private or self-hosted TTI deployments. |
Port
| Value | Description |
|---|---|
8883 | TLS-encrypted MQTT. Required when Enable SSL is on. Default and recommended for all TTI clusters. |
1883 | Unencrypted MQTT. Only for local or private deployments where TLS is not available. |
Credentials
| Parameter | Value |
|---|---|
| Username | The TTI MQTT integration username — format: {applicationId}@{tenantId} (e.g. thingsboard-integration@thingsboard). |
| Password | The API key generated via Integrations → MQTT → Generate new API key in the TTI console. |
Enable SSL
Encrypts the MQTT connection using TLS. Enabled by default and required for all connections to TTI clusters (port 8883). Disable only when connecting to a local deployment on port 1883.
Topic Filters
Defines which MQTT topics ThingsBoard subscribes to for uplink messages.
| Field | Description |
|---|---|
| Topic | MQTT topic filter. + matches a single topic level. Default: v3/+/devices/+/up (all devices across all applications accessible with the credentials). |
| QoS | Quality of service level: 0 — at most once; 1 — at least once (may deliver duplicates); 2 — exactly once. |
Downlink Topic Pattern
MQTT topic used to publish downlink messages to TTI. Default: v3/{username}/devices/${devId}/down/push, where {username} is the MQTT username (including the @tenantId suffix) and ${devId} is resolved from metadata.devId in the downlink converter output.
Execute Remotely
When enabled, ThingsBoard generates an Integration key and Integration secret that let the integration run as a separate process outside the ThingsBoard cluster — useful when the TTI broker is only reachable from a local network.
Advanced Settings
| Parameter | Default | Description |
|---|---|---|
| Protocol version | MQTT 3.1.1 | MQTT protocol version for the broker connection. |
| Max bytes in message | 32368 | Maximum payload size in bytes. Messages exceeding this limit are silently dropped. |
| Connection timeout (sec) | 10 | Seconds ThingsBoard waits for a broker response before marking the connection as failed. |
Test the Integration
Section titled “Test the Integration”After the integration is created, send a test uplink and confirm that ThingsBoard received the message, decoded it correctly, and provisioned the device.
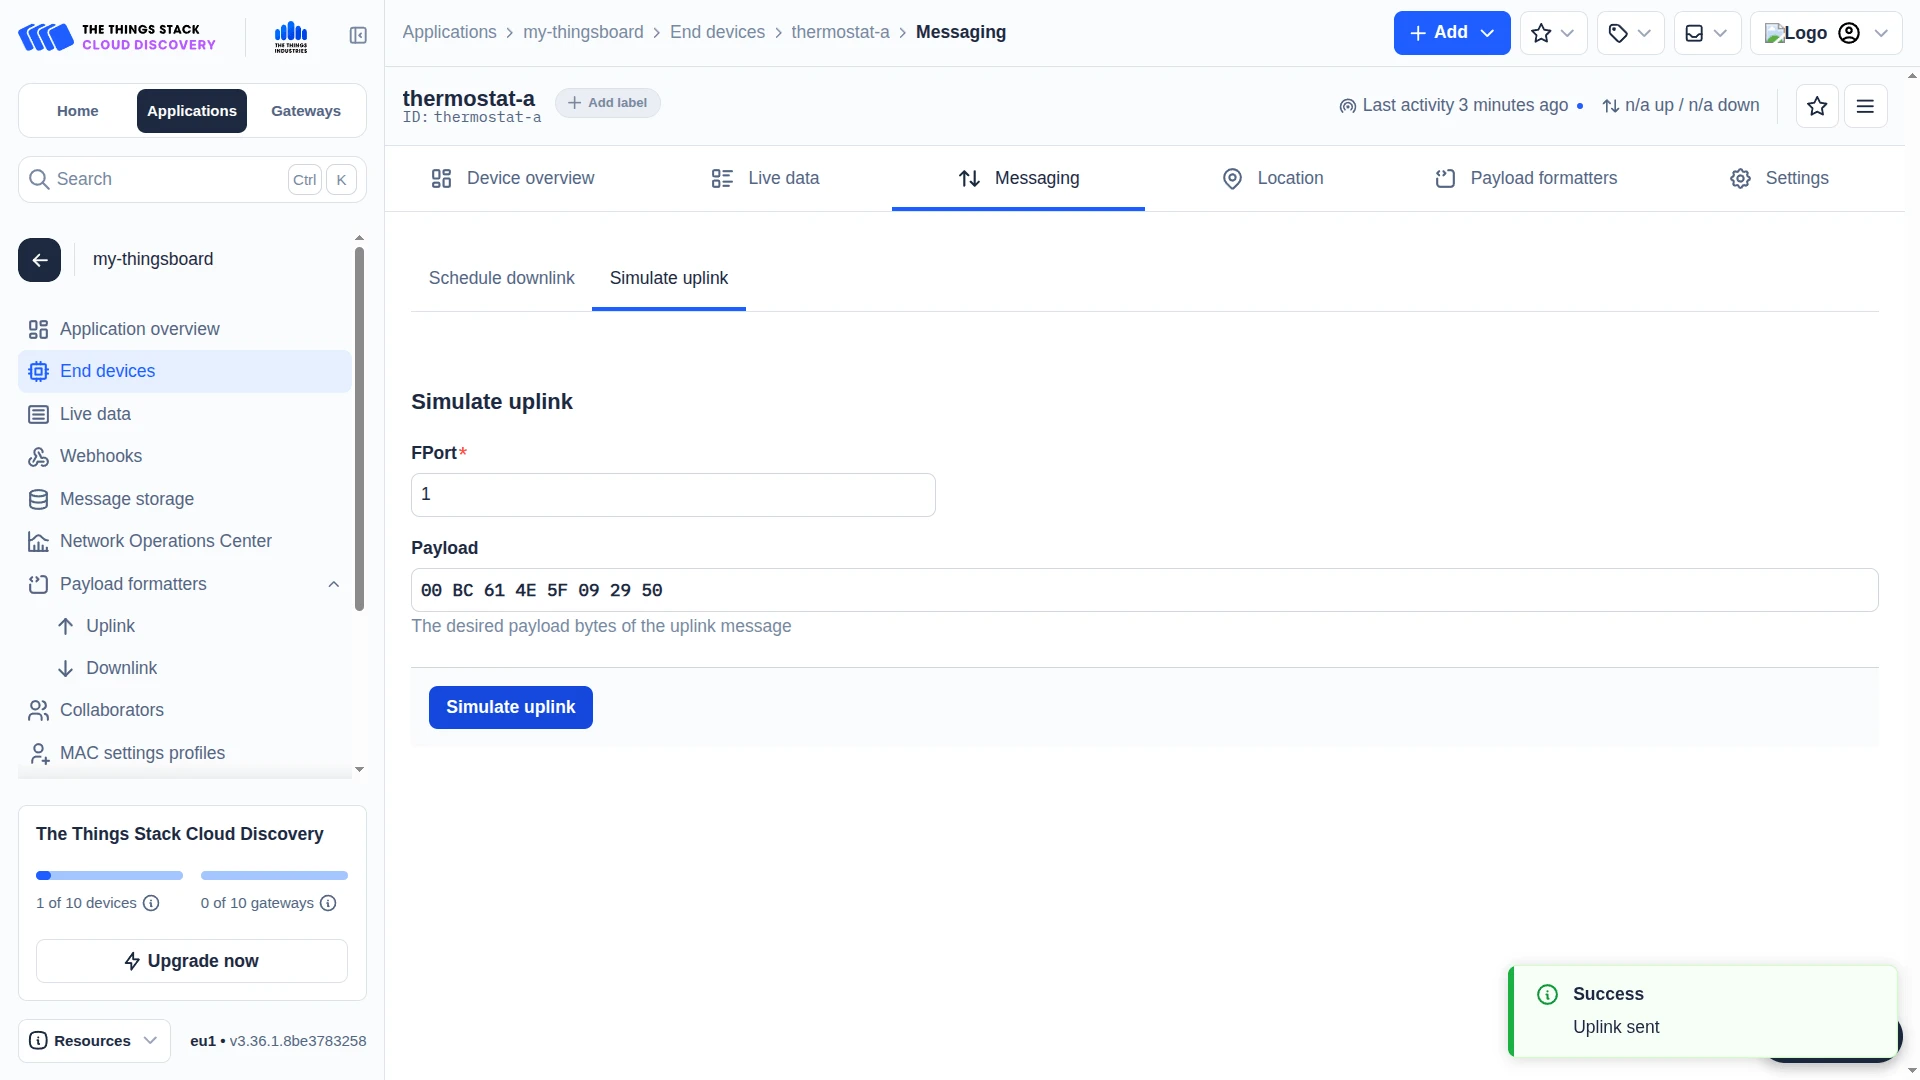
Send Test Uplink
Section titled “Send Test Uplink”Use the TTI console to simulate an uplink from the registered end device.
- In the TTI console, go to End devices and open thermostat-a — or the end device you registered earlier.
- Open the Messaging tab and click Simulate uplink.
- Leave FPort at its default value (
1). - In the Payload field, enter the test payload:
00BC614E5F092950
- Click Simulate uplink. A Success — Uplink sent toast confirms the message was accepted.
This payload matches the byte layout from the uplink converter: sn = 12345678, battery = 95, temperature = 23.45, saturation = 80.

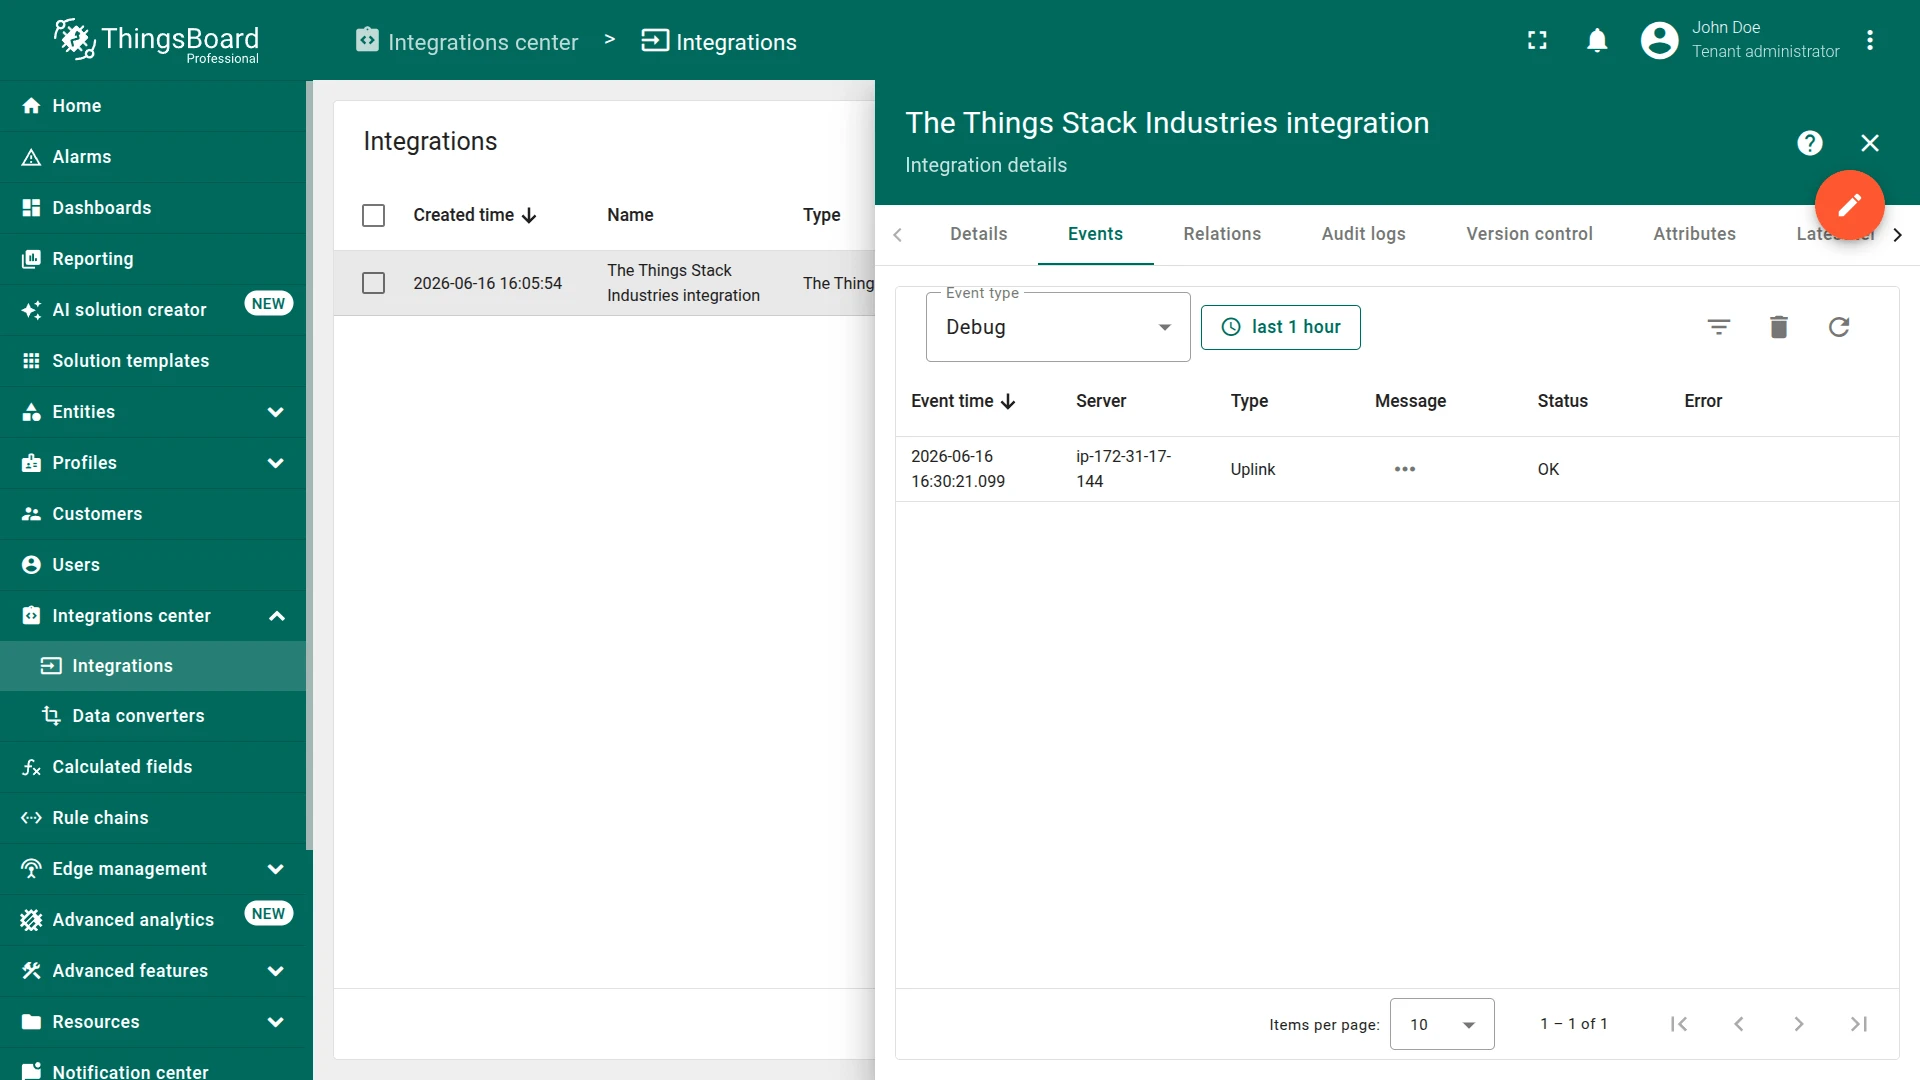
Verify Integration Events
Section titled “Verify Integration Events”Go to Integrations center ⇾ Integrations, open The Things Stack Industries integration, and click the Events tab. Each successfully processed uplink appears as a row with status OK.
Verify Converter Events
Section titled “Verify Converter Events”To inspect converter processing, go to Integrations center ⇾ Data converters, click TTI Uplink Converter, and open its Events tab:
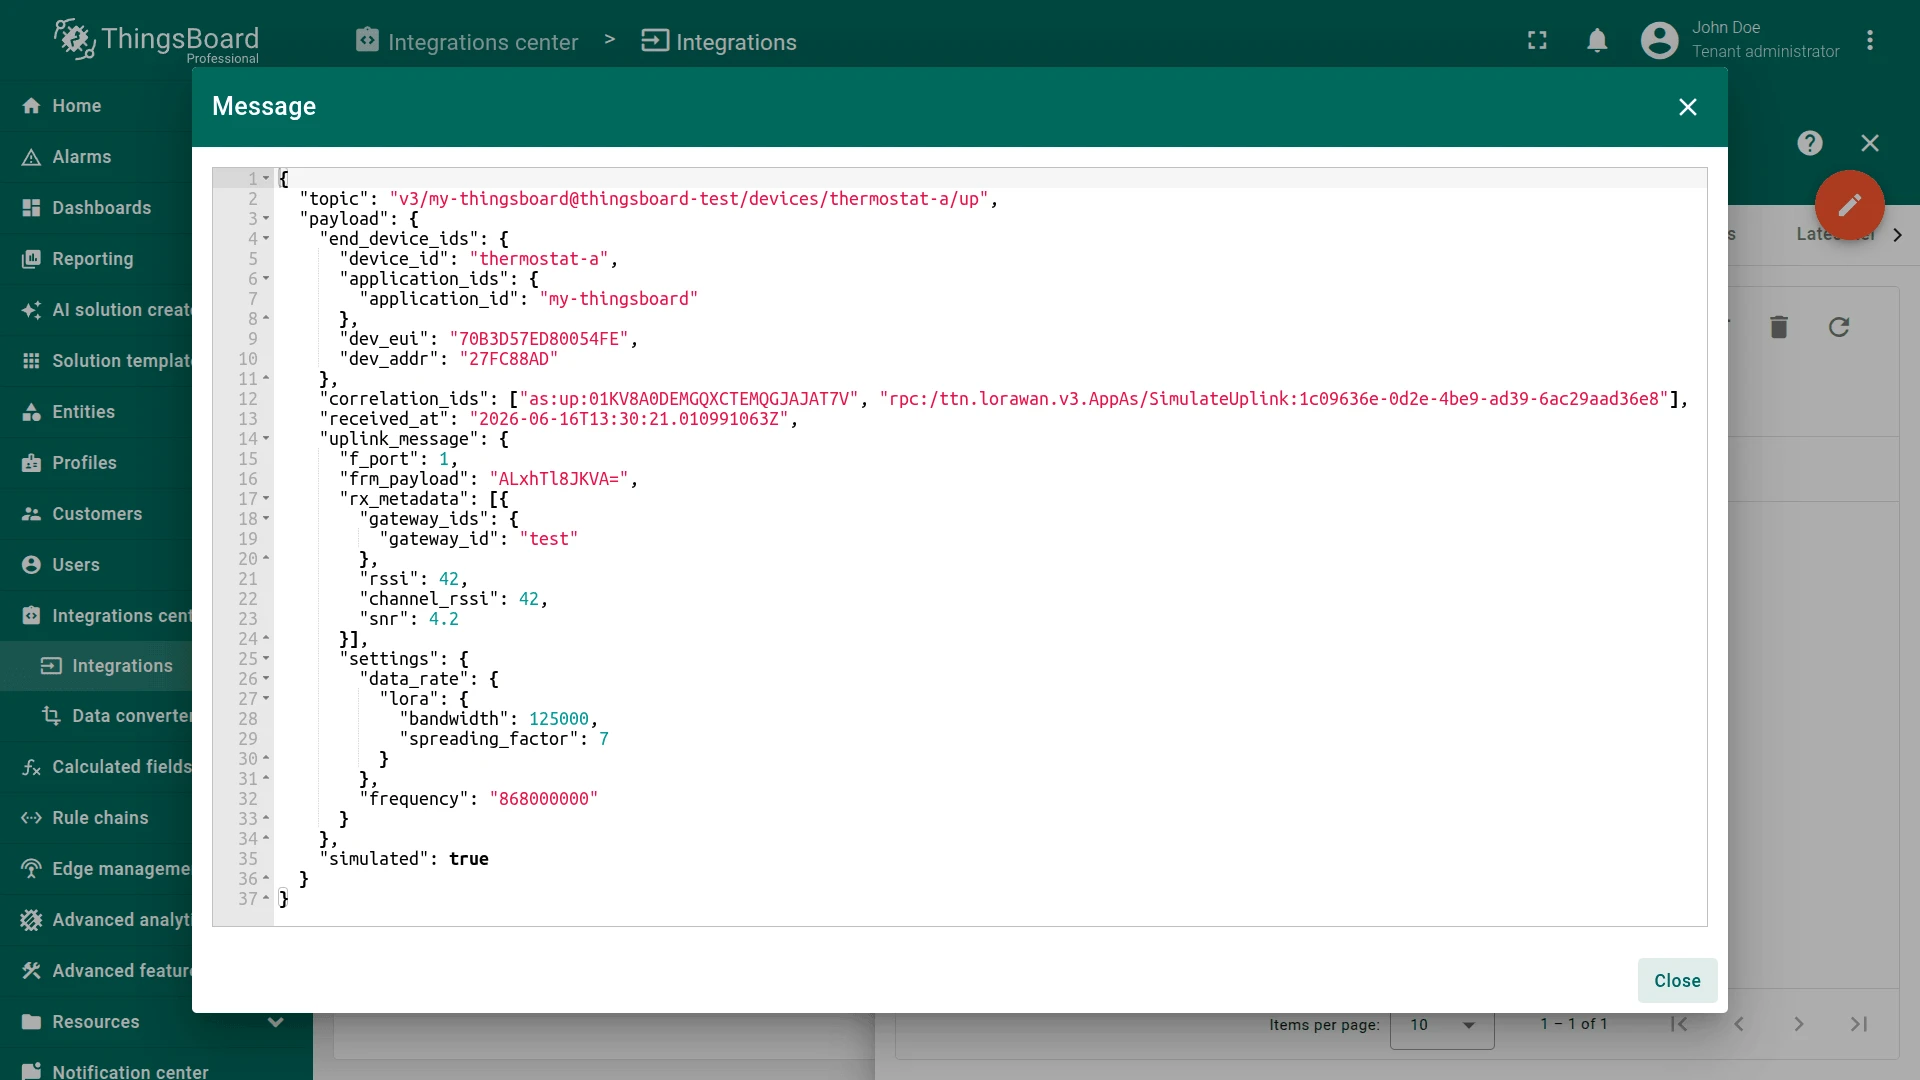
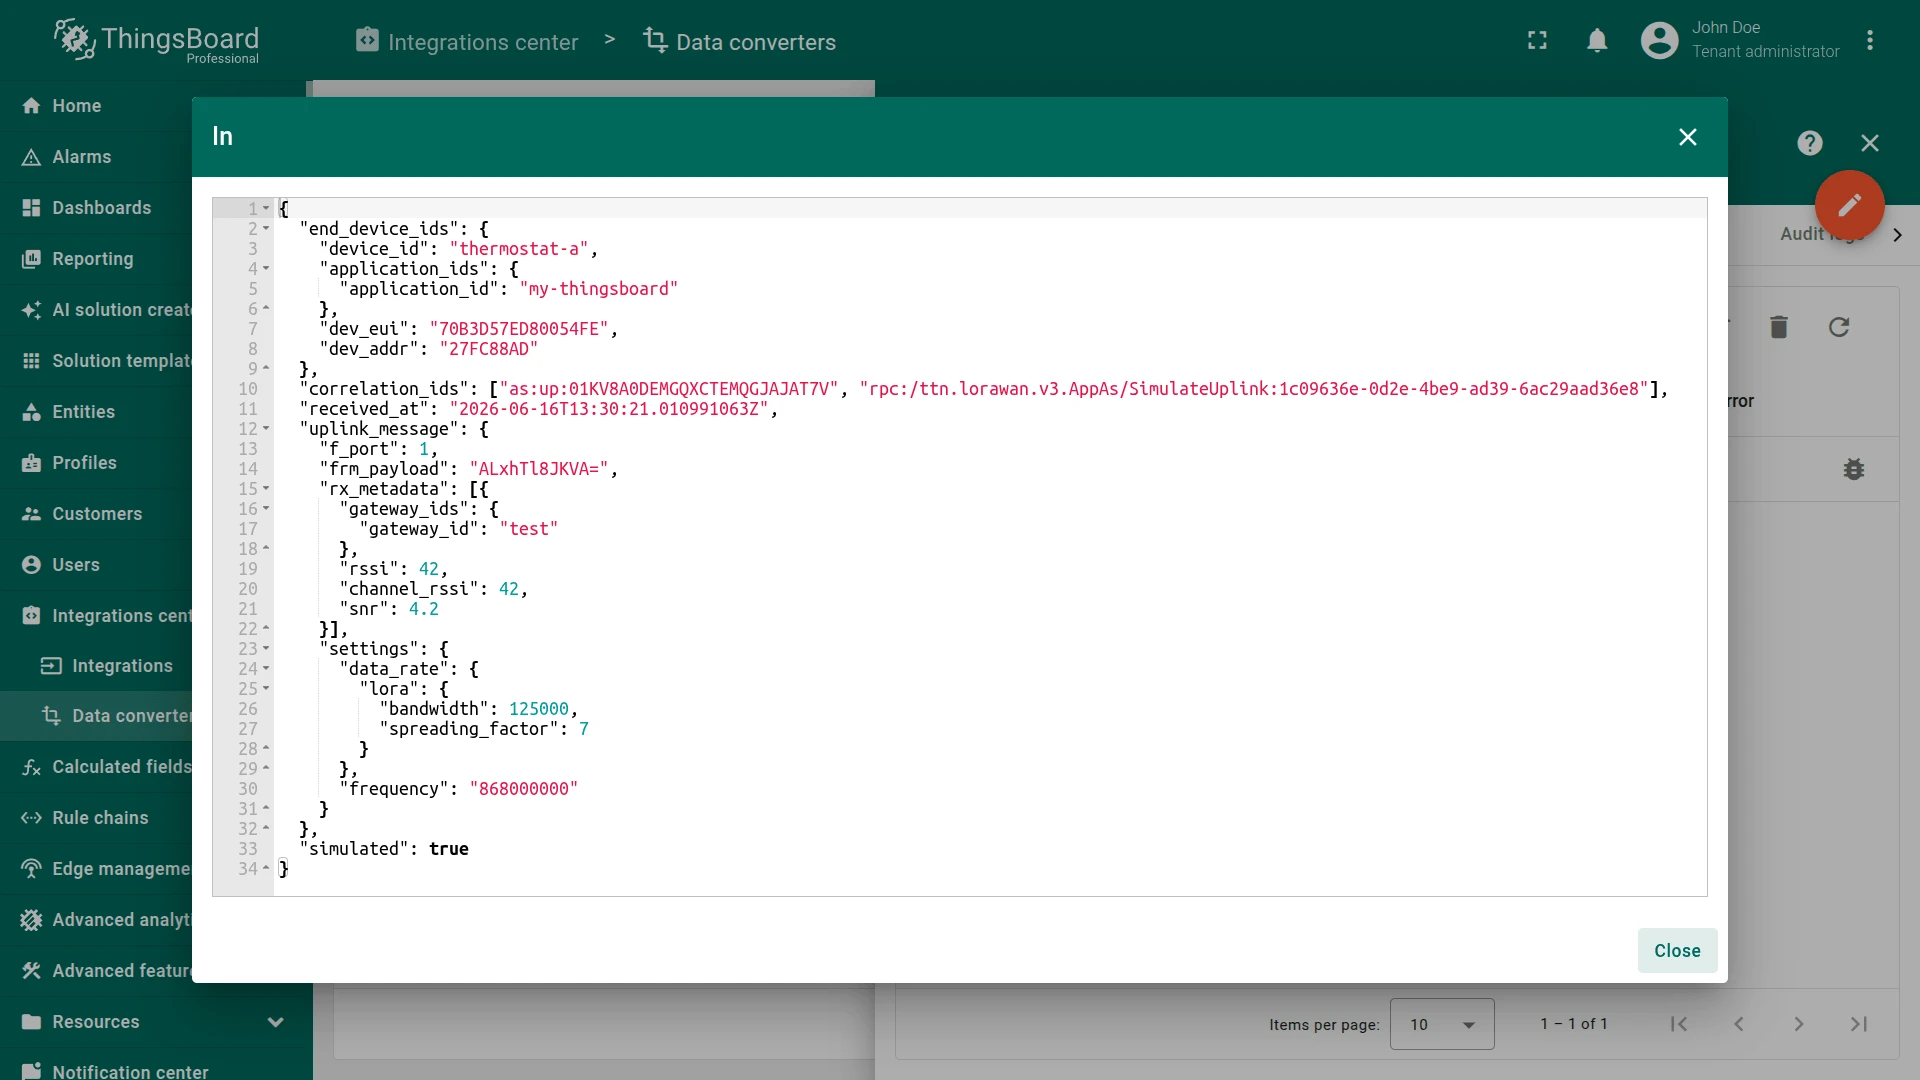
- In — the raw TTI message passed to the decoder.
- Out — the decoded result:
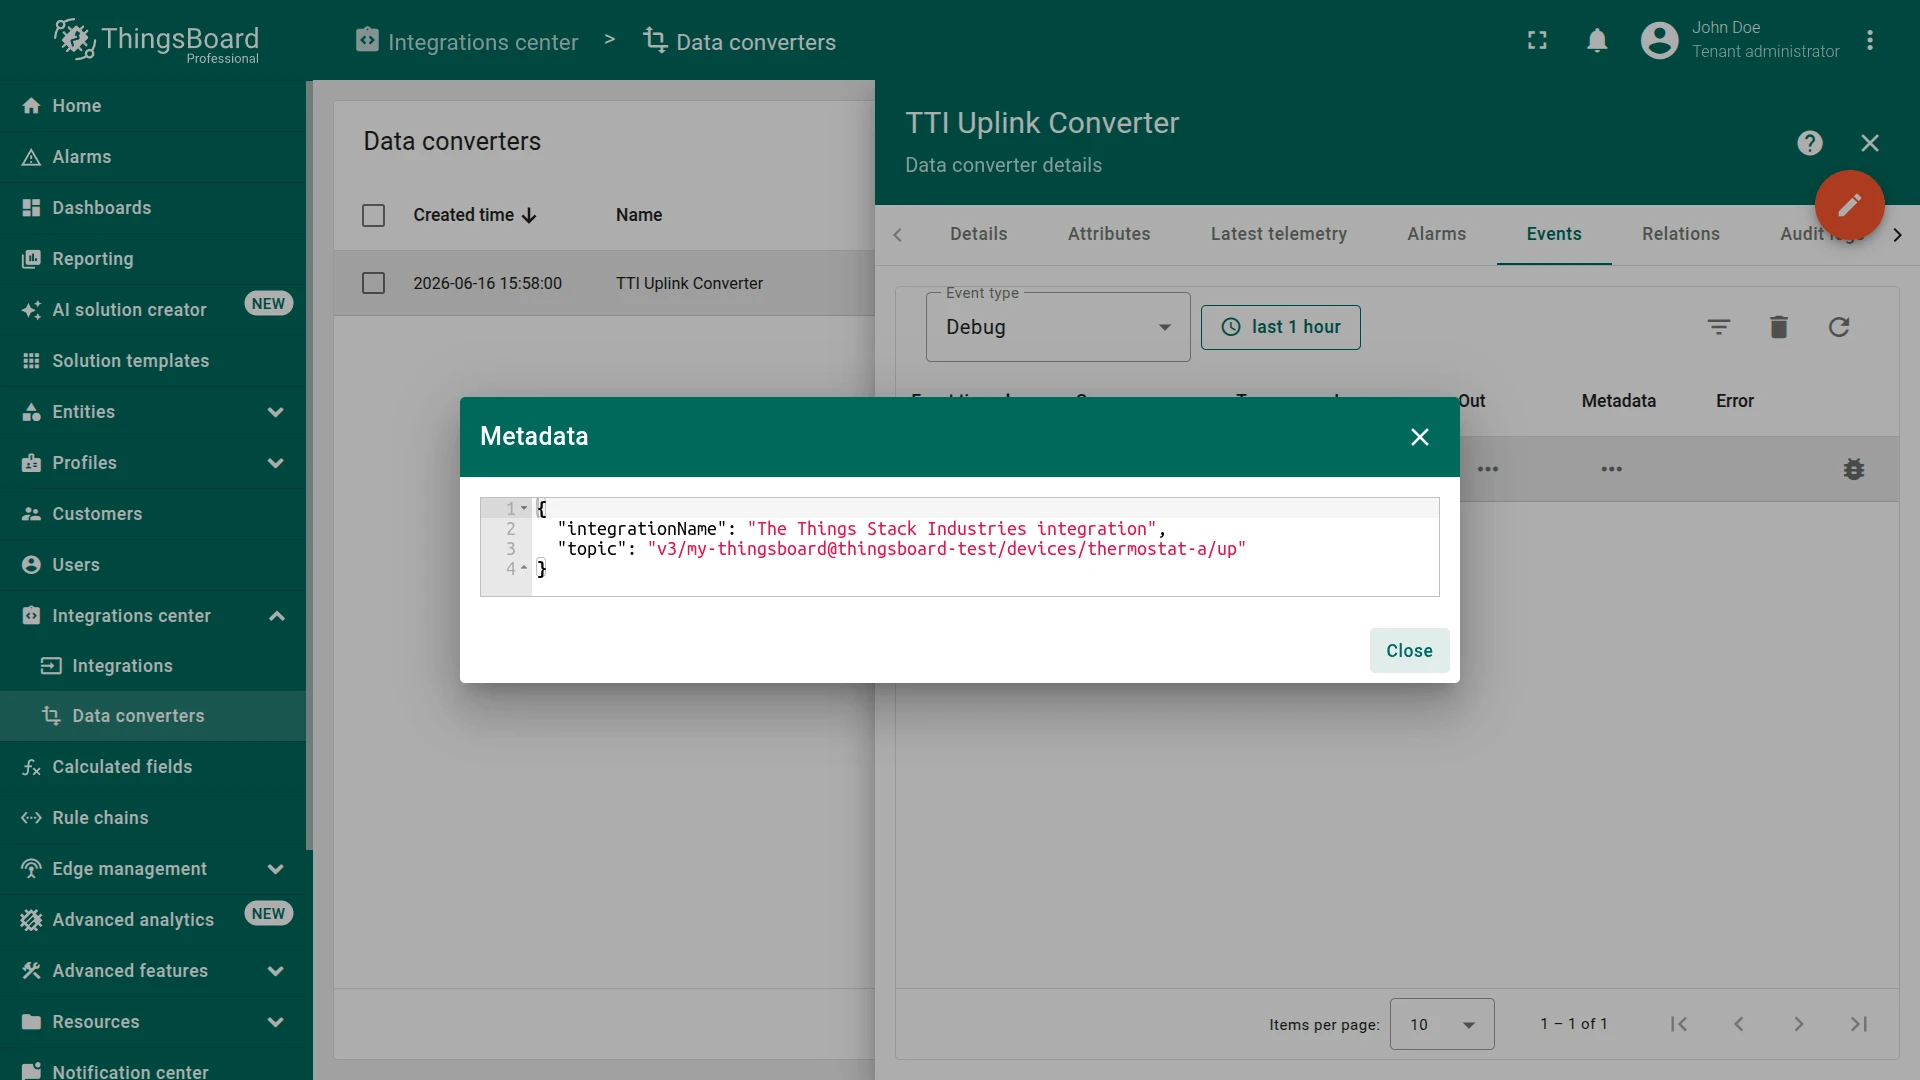
attributesandtelemetryvalues written to ThingsBoard. - Metadata — the integration name and MQTT topic associated with the message.

Verify Device Provisioning
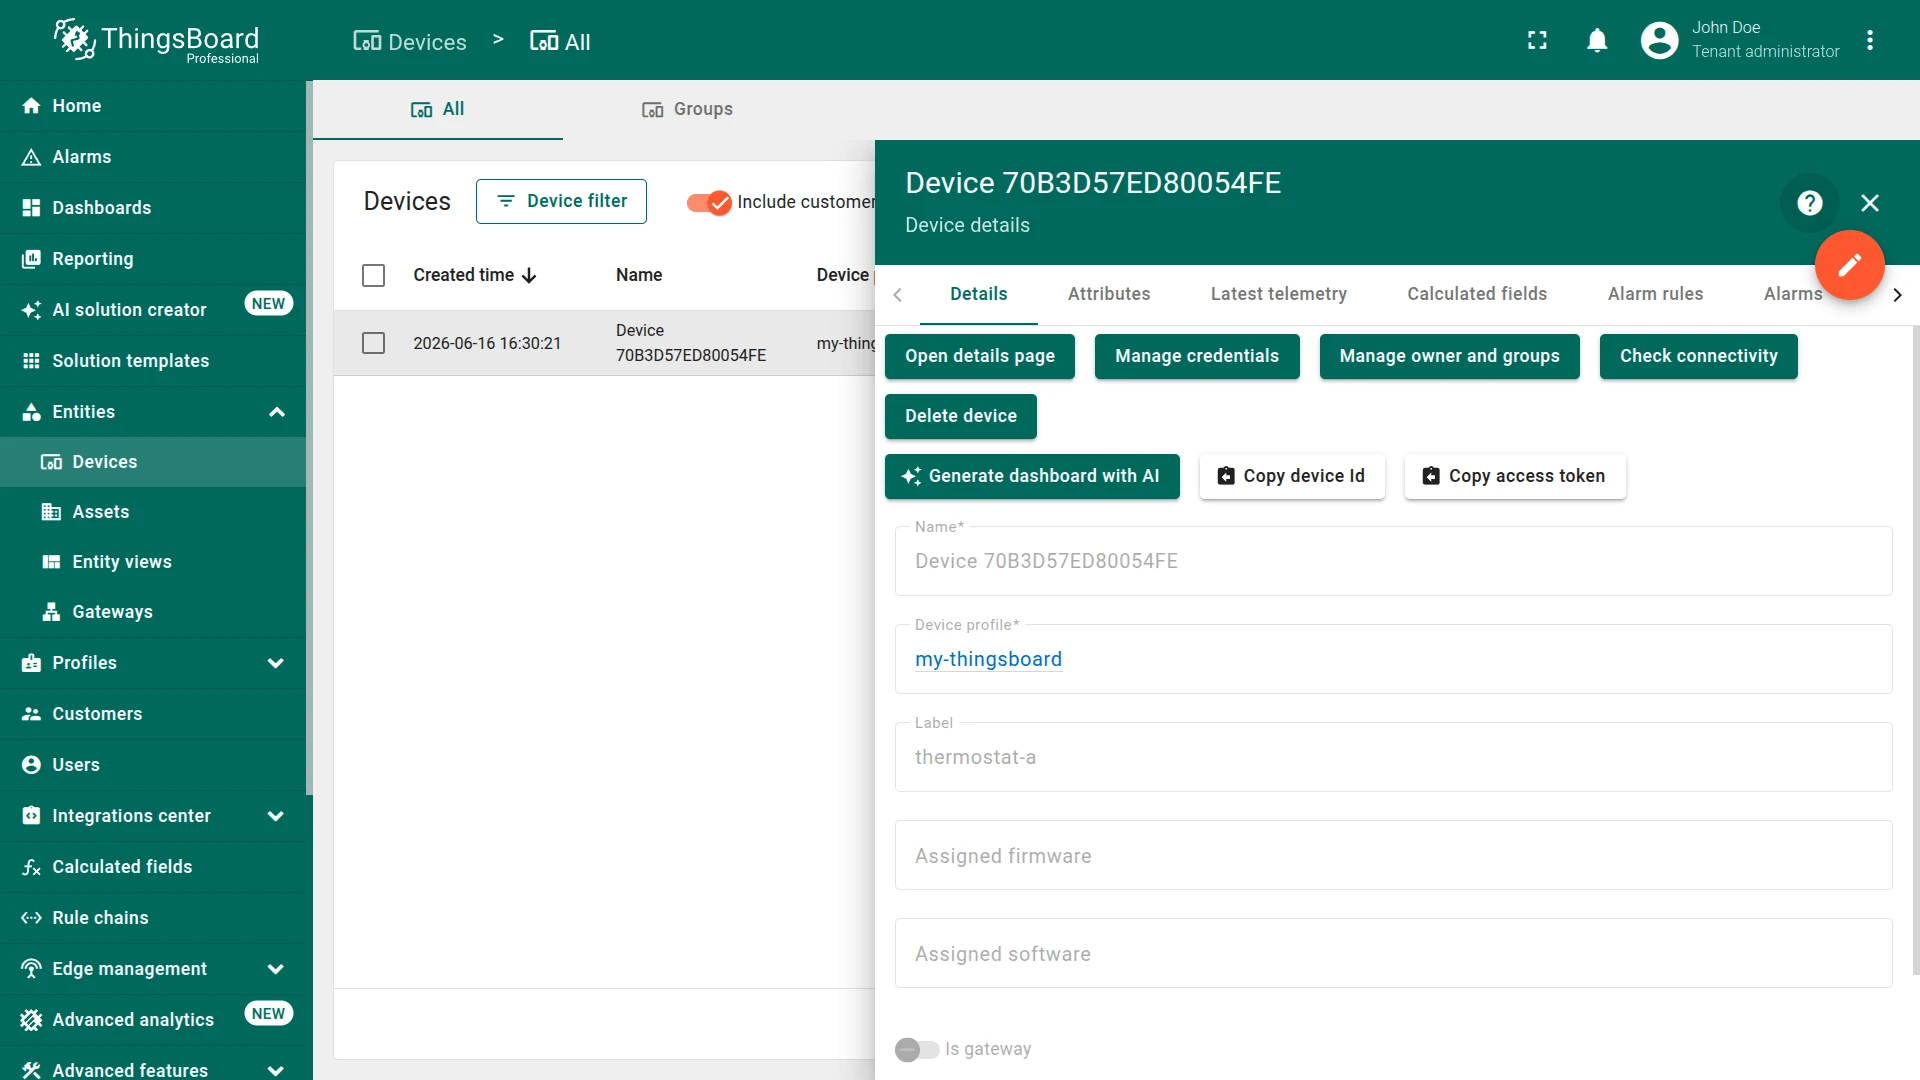
Section titled “Verify Device Provisioning”Go to Entities ⇾ Devices. ThingsBoard automatically provisions a new device named Device <DevEUI> (e.g. Device 70B3D57ED80054FE) on the first uplink from each end device.
Open the device and click the Latest Telemetry tab — you should see temperature, battery, and saturation decoded by the converter, plus network metadata fields such as rssi, snr, and latitude extracted from the TTI message.
Configure Downlink
Section titled “Configure Downlink”To send a command to a TTI device from ThingsBoard, the Root Rule Chain must forward attribute changes to the TTI integration.
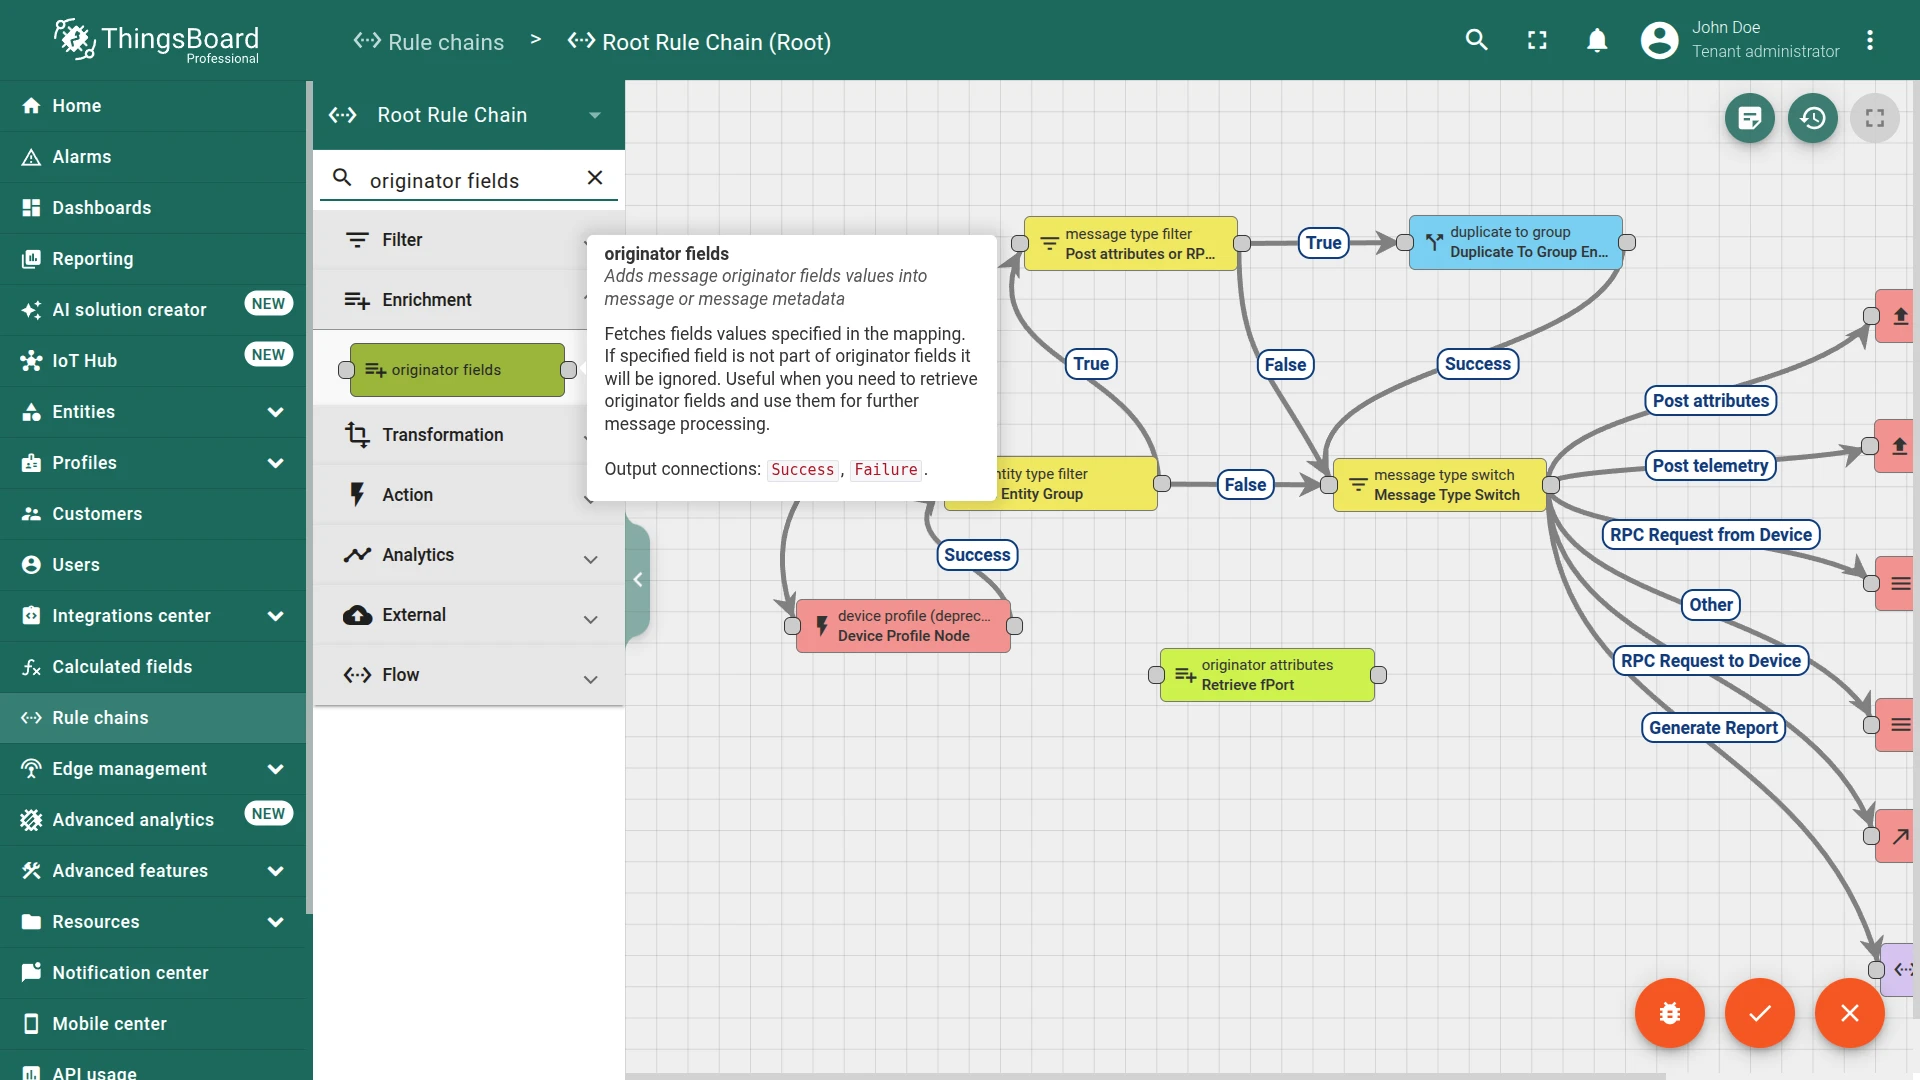
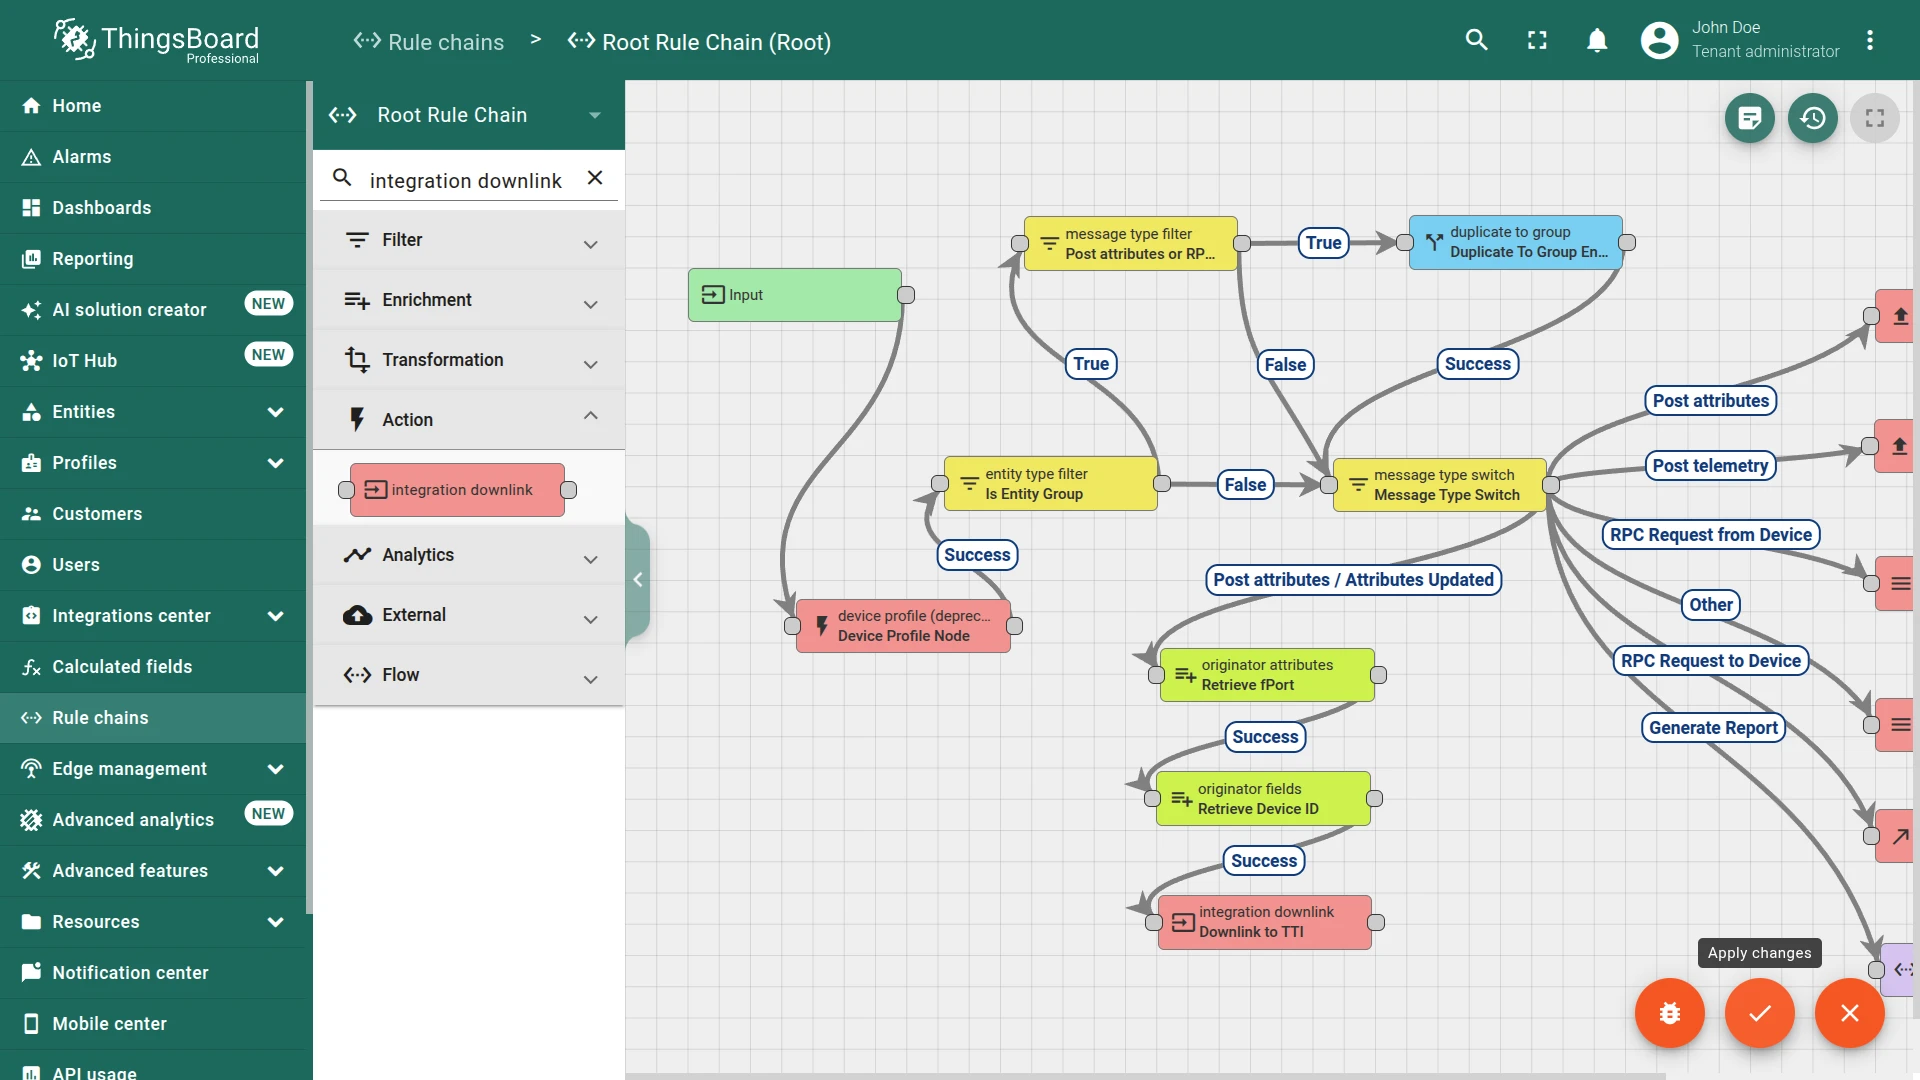
Configure the Root Rule Chain
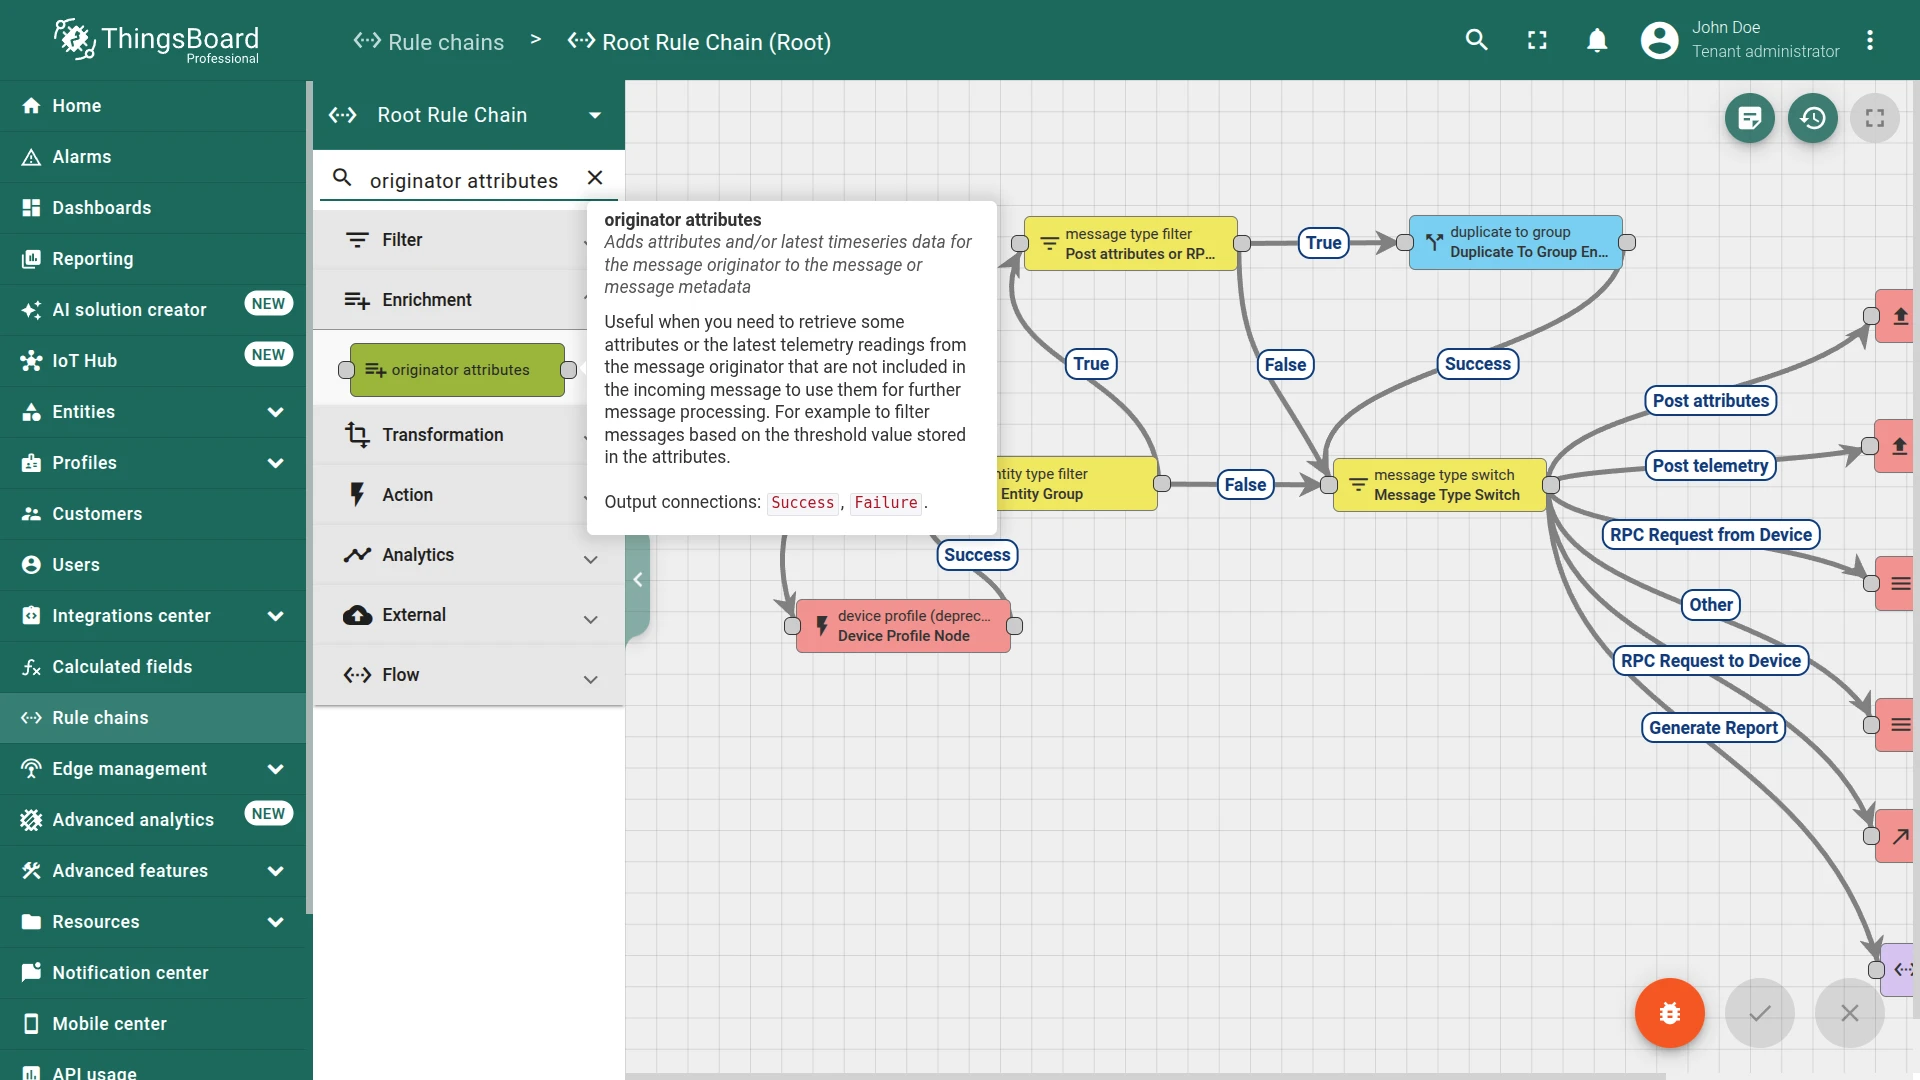
Section titled “Configure the Root Rule Chain”Three rule nodes are needed: an originator attributes node that reads the device’s fPort client attribute and injects it into message metadata, an originator fields node that reads the TTI End device ID from the ThingsBoard device Label and injects it into message metadata, and an integration downlink node that sends the message to the integration.
- Open Rule Chains ⇾ Root Rule Chain and click the edit icon.
- In the node panel, search for originator attributes and drag it onto the canvas.
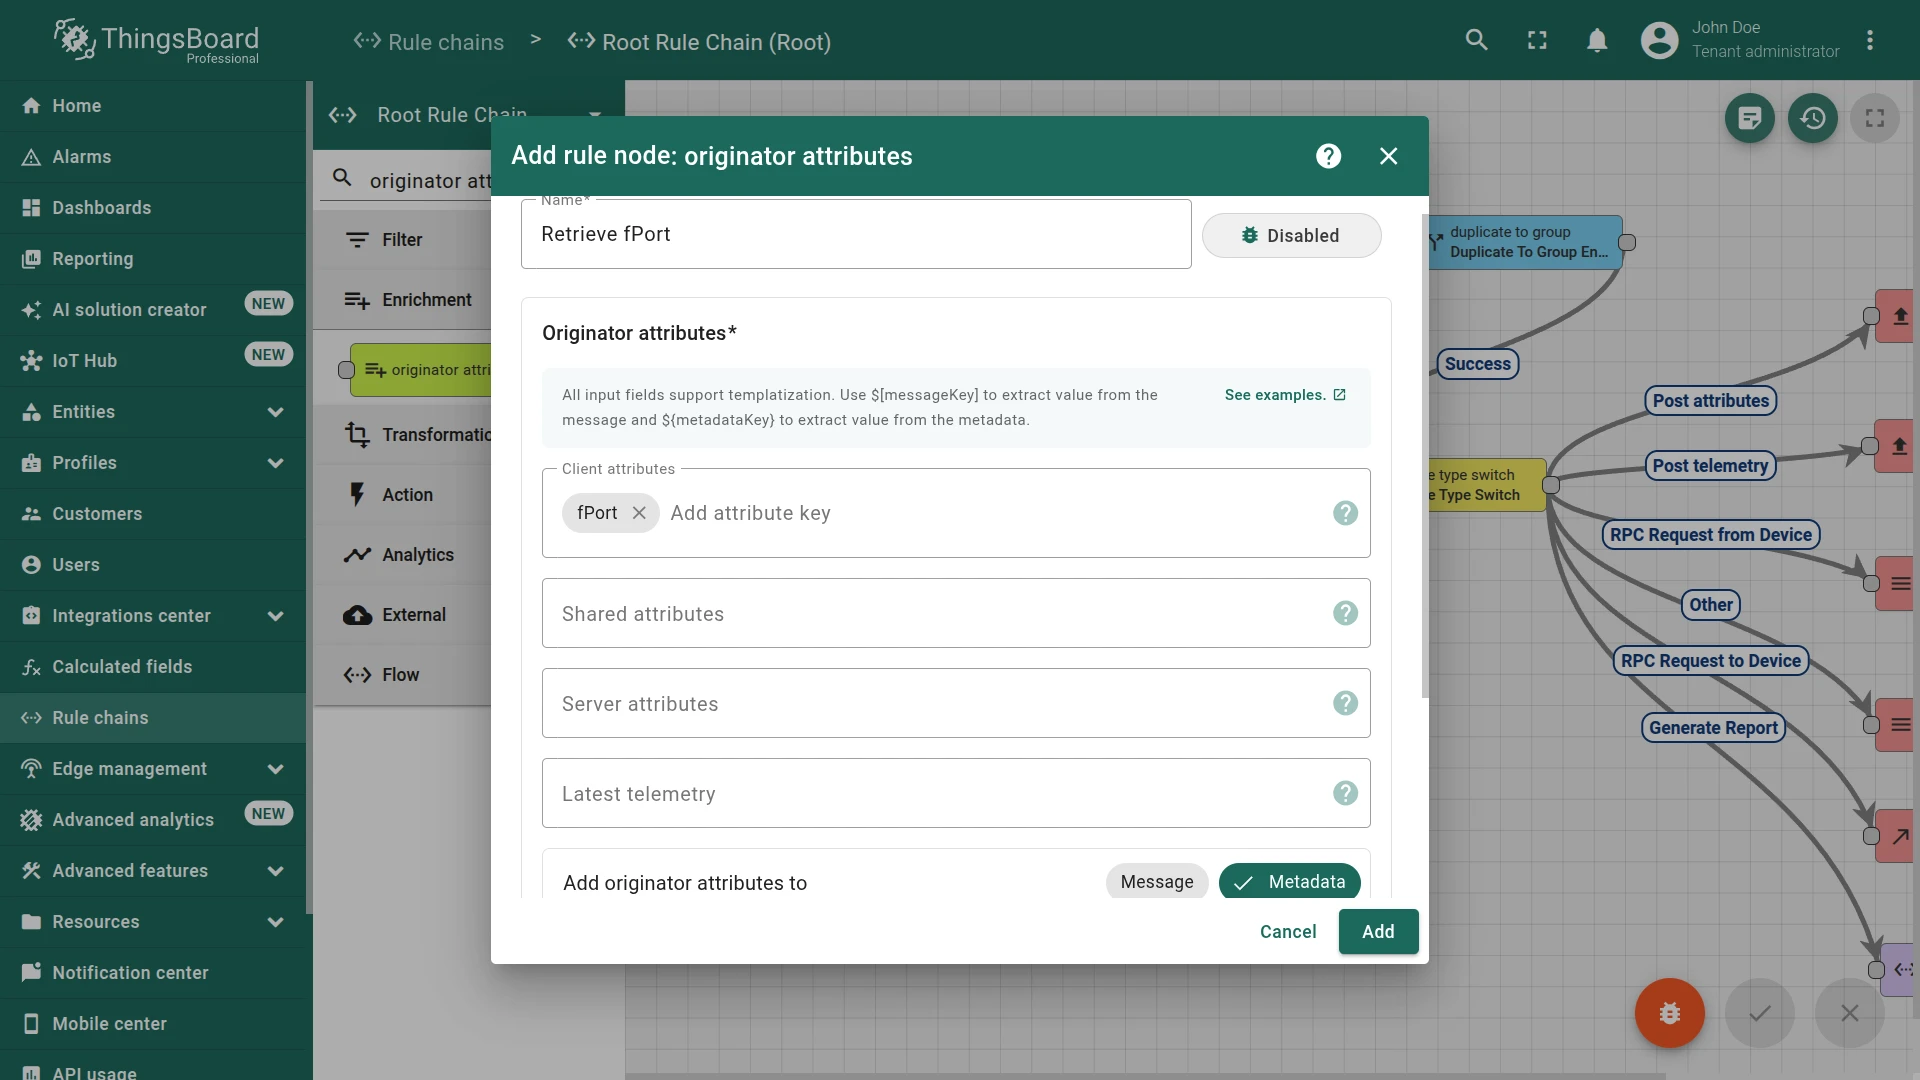
- Configure the node:
- Name — e.g.
Retrieve fPort. - Under Client attributes, add
fPort. - Set Add originator attributes to to Metadata.
- Click Add.
- Name — e.g.
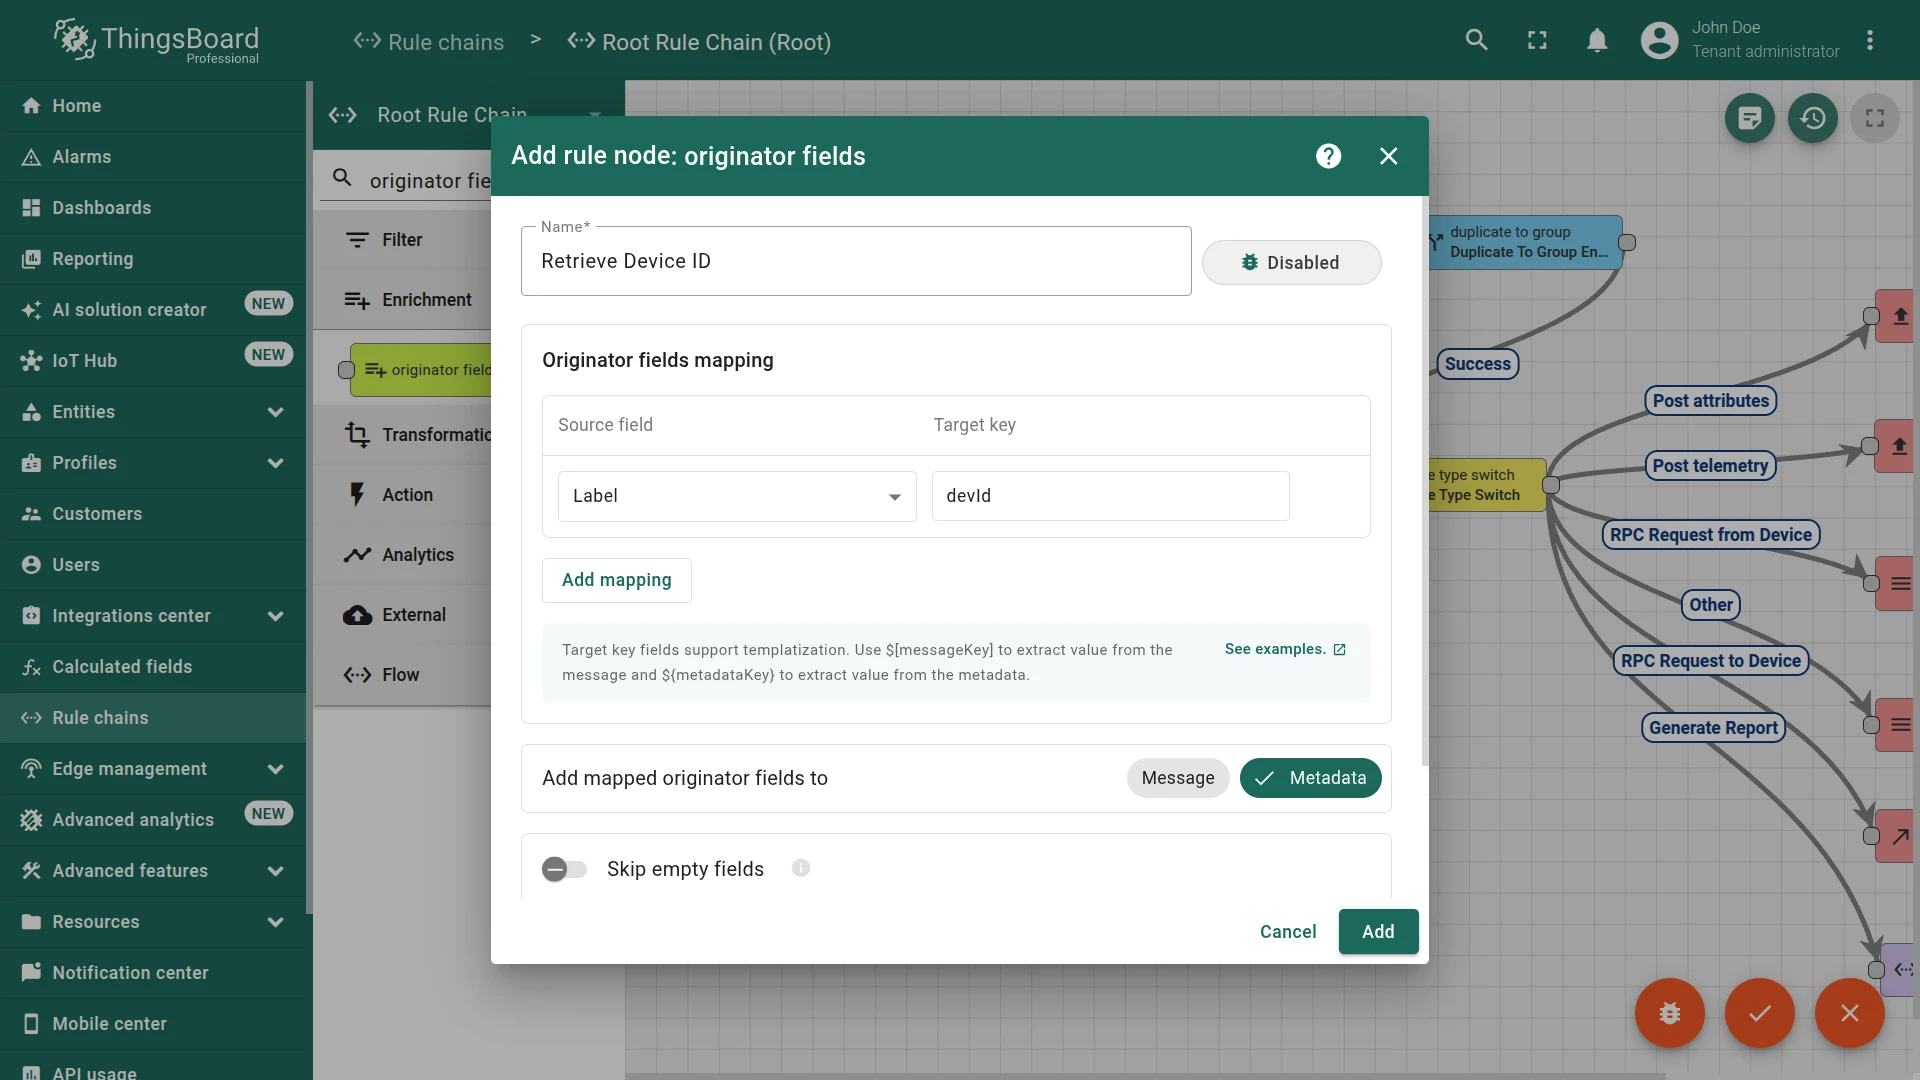
- In the node panel, search for originator fields and drag it onto the canvas.
- Configure the node:
- Name — e.g.
Retrieve Device ID. - Under Originator fields mapping, set Source field to
Labeland Target key todevId. - Set Add mapped originator fields to to Metadata.
- Click Add.
- Name — e.g.
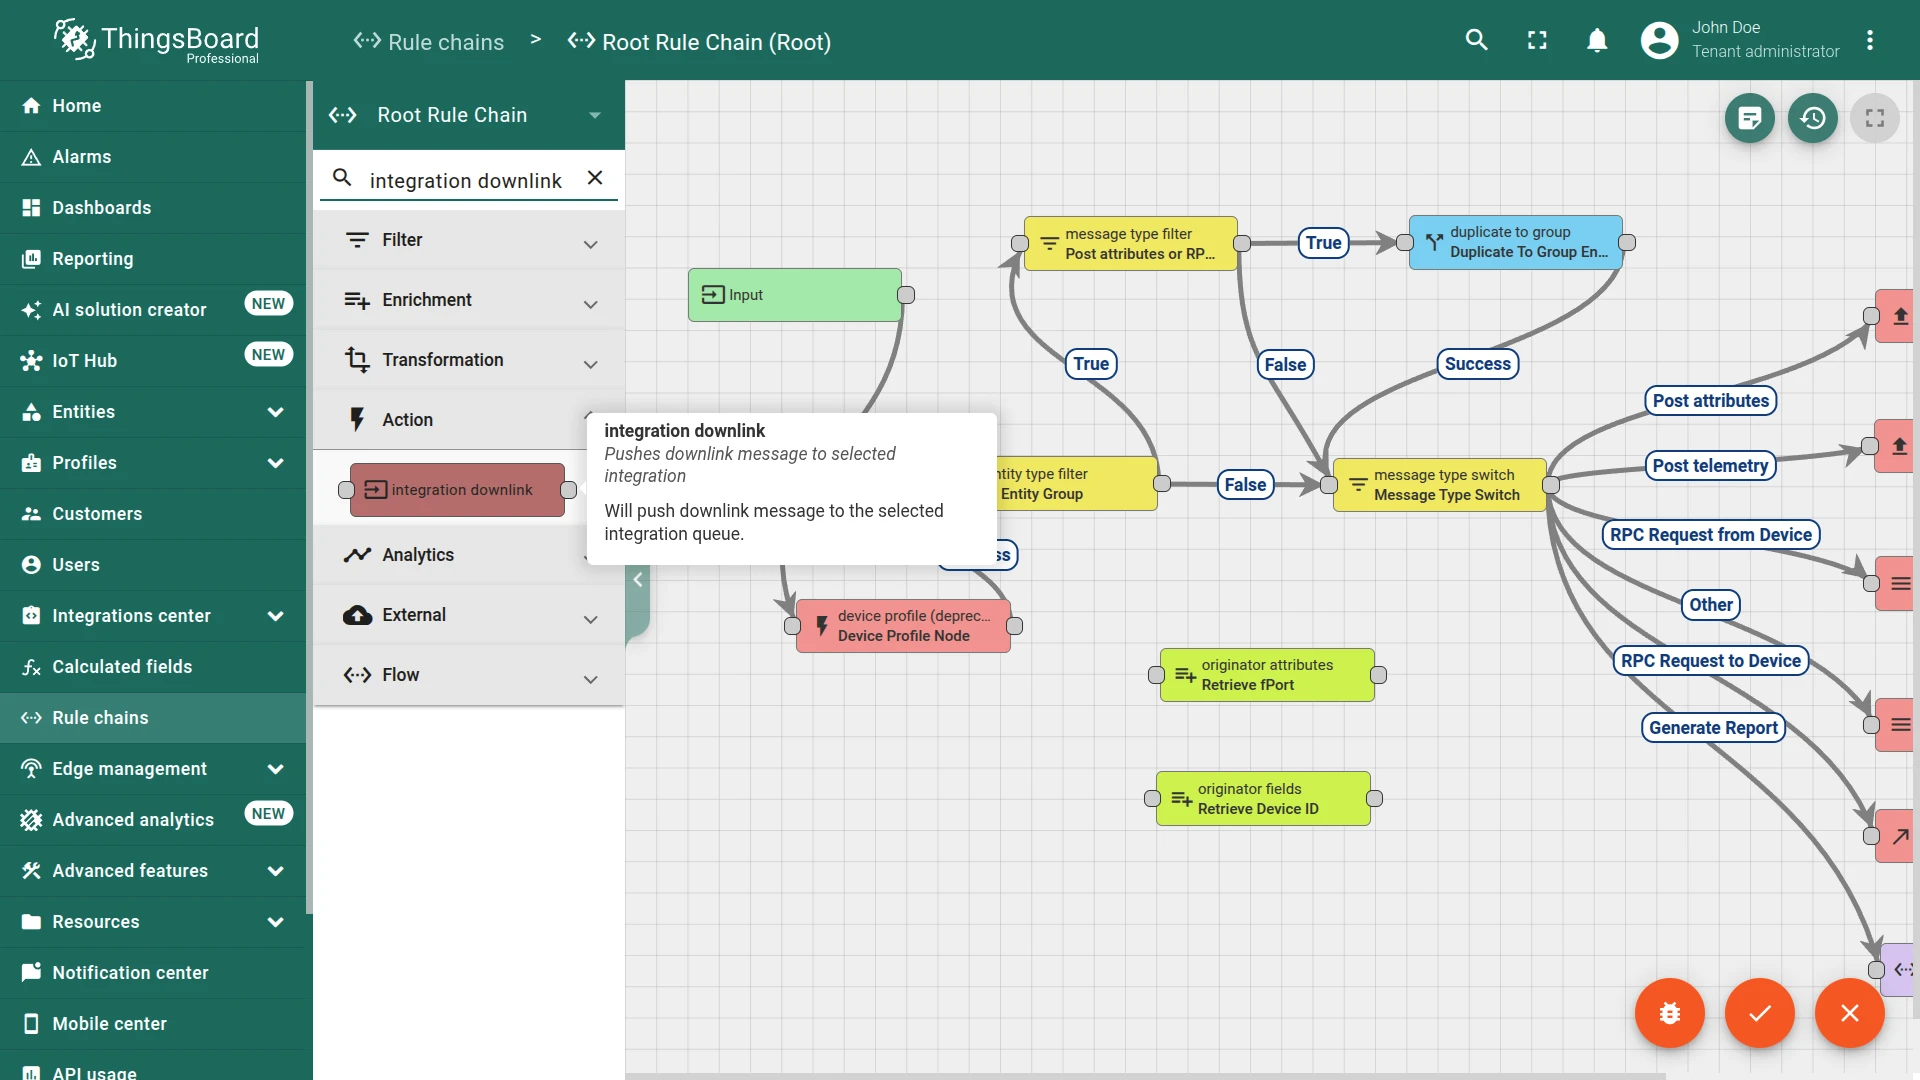
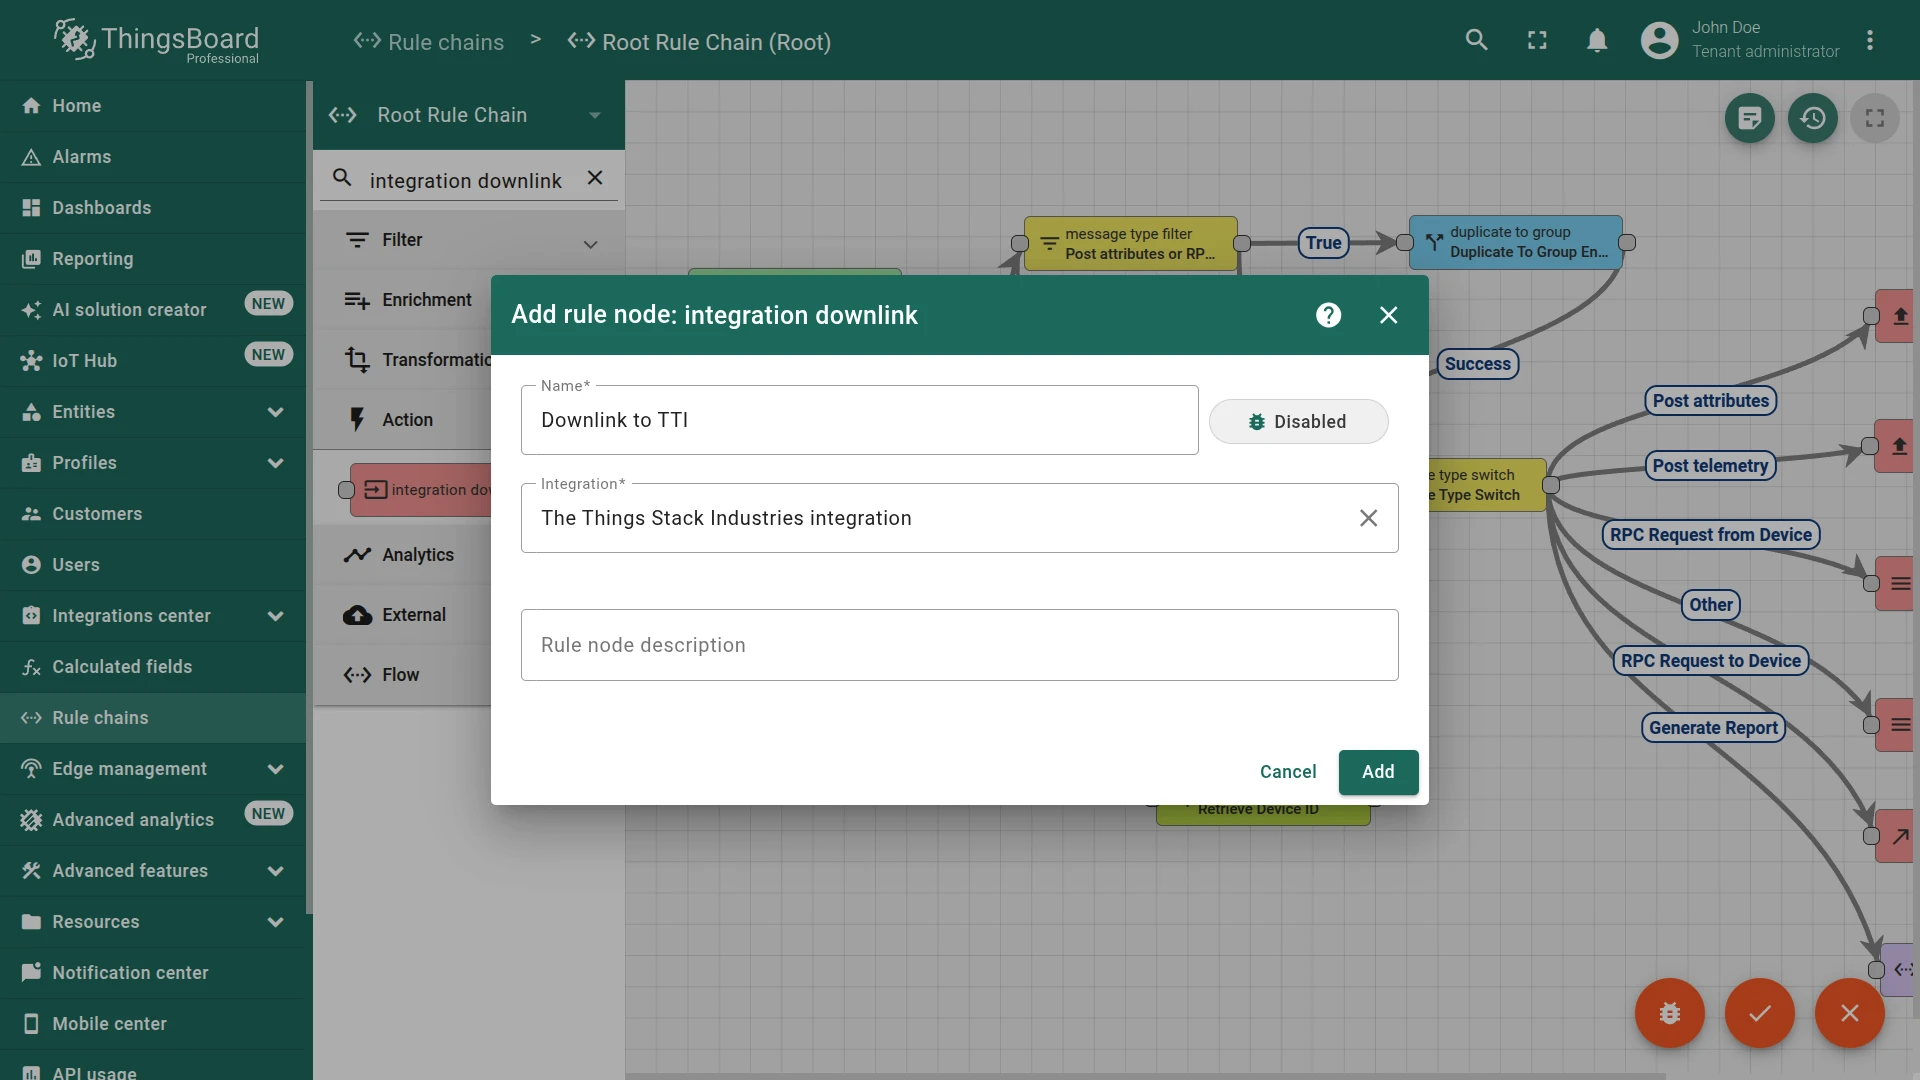
- In the node panel, search for integration downlink and drag it onto the canvas.
- Configure the node:
- Name — e.g.
Downlink to TTI. - Integration — select The Things Stack Industries integration.
- Click Add.
- Name — e.g.
- Connect the message type switch node to the originator attributes node using the Post attributes and Attributes Updated relations.
- Connect the originator attributes node to the originator fields node using the Success relation.
- Connect the originator fields node to the integration downlink node using the Success relation.
- Click Apply changes.
Add Downlink Converter
Section titled “Add Downlink Converter”The downlink converter receives a Rule Engine message and encodes it into a TTI-compatible downlink payload. The converter output must follow this structure:
{ "contentType": "JSON", "data": "{\"downlinks\":[{\"f_port\":2,\"frm_payload\":\"e3Bvd2VyU3RhdGU9b259\",\"priority\":\"NORMAL\"}]}", "metadata": { "devId": "thermostat-a" }}| Field | Description |
|---|---|
contentType | Encoding of the data field: TEXT, JSON, or BINARY. |
data | The TTI downlink payload serialized as a string. Must contain a downlinks array with f_port, frm_payload (base64-encoded bytes), and priority. See the TTI MQTT API documentation for the full field list. |
metadata.devId | TTI End device ID of the target device (e.g. thermostat-a). The Originator fields node injects this value from the ThingsBoard device’s Label. |
For the full encoder function reference, see Downlink data converter.
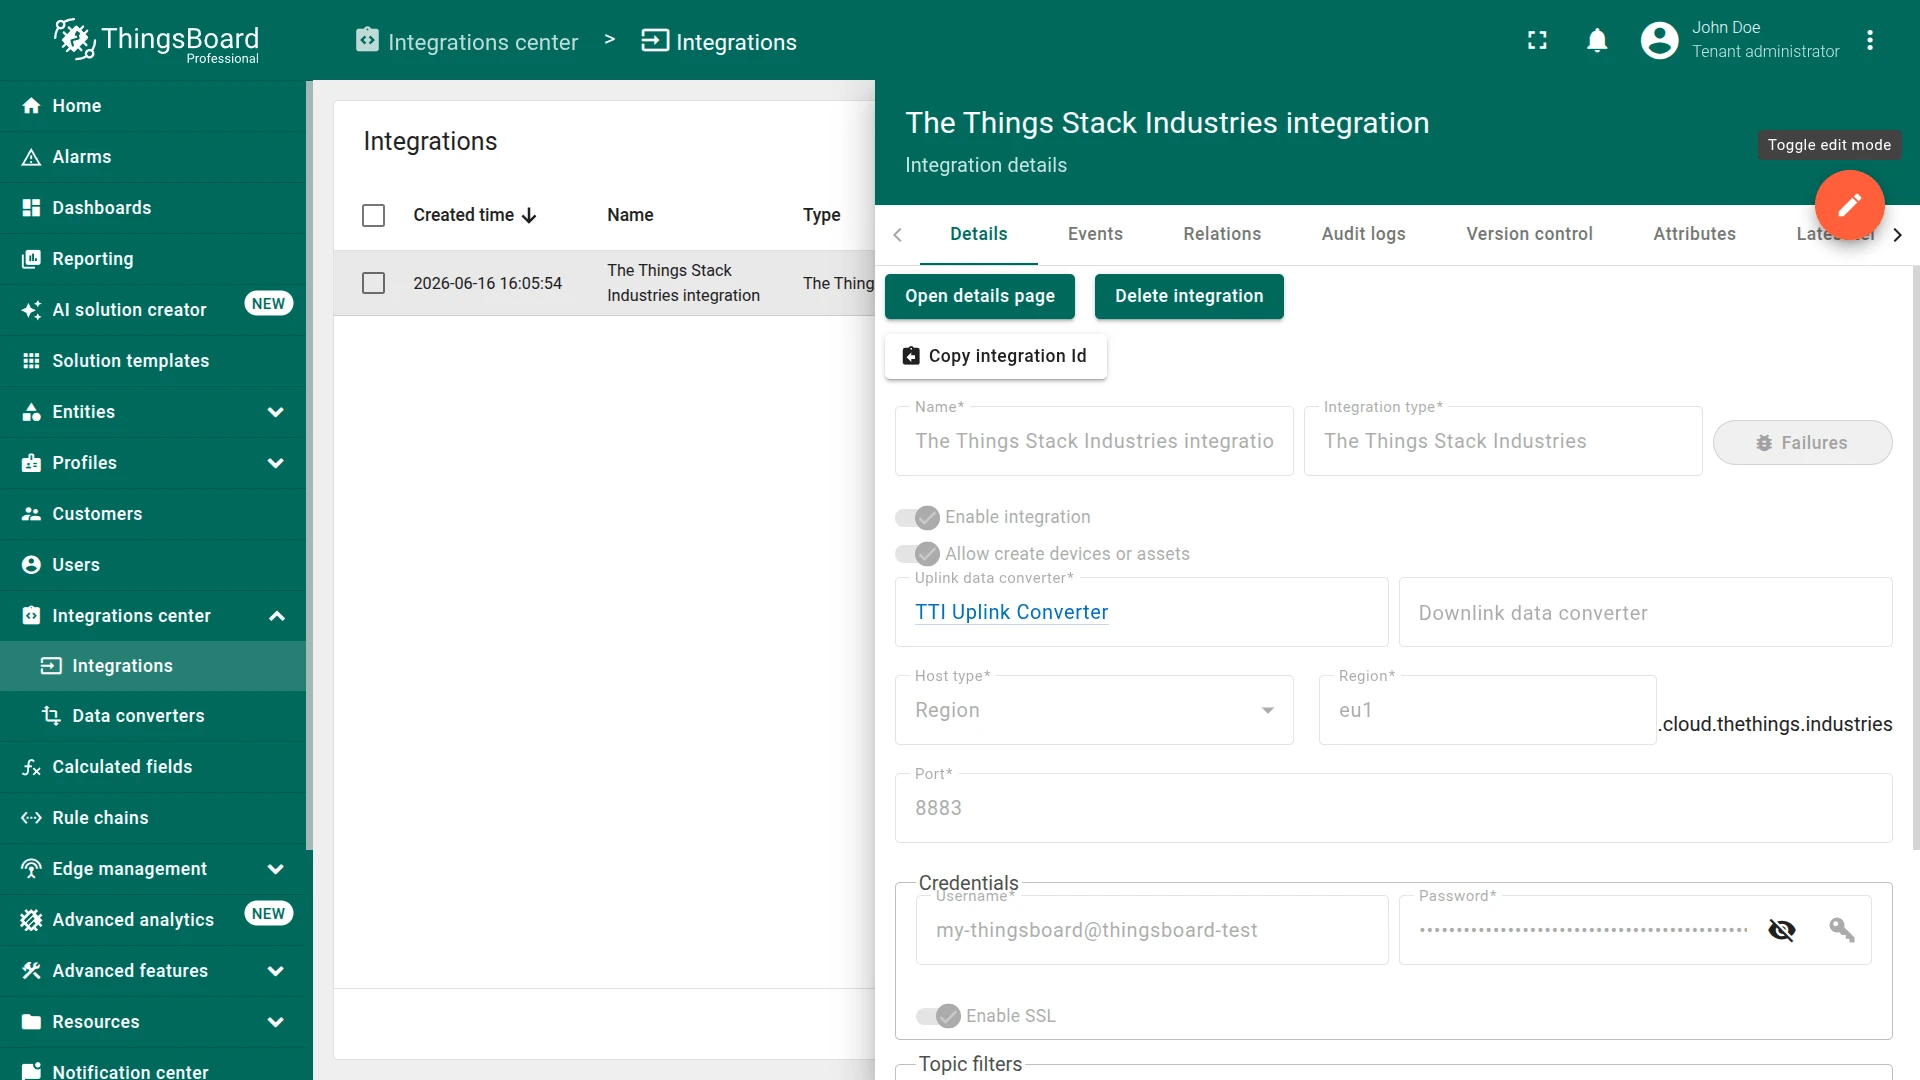
Add the downlink converter to the existing integration:
- Go to Integrations center ⇾ Integrations and open The Things Stack Industries integration.
- Click the pencil icon to enter edit mode.
- In the Downlink data converter field, click Create new.
- Enter a name (e.g.
TTI Downlink Converter), paste the encoder script below, and click Add. - Click Apply changes to save the integration.
// Encode downlink data from incoming Rule Engine message
// msg - JSON message payload downlink message json// msgType - type of message, for ex. 'ATTRIBUTES_UPDATED', 'POST_TELEMETRY_REQUEST', etc.// metadata - list of key-value pairs with additional data about the message// integrationMetadata - list of key-value pairs with additional data defined in Integration executing this converter
/** Encoder **/
// Target device identifier used to build the TTI downlink topic (devId is assumed to be added via Originator fields rule node)var devId = metadata.devId;// LoRaWAN frame port the downlink is scheduled on (cs_fPort is assumed to be added via Originator attributes rule node, prefix 'cs_' (client-side) is added by rule node)var fPort = metadata.cs_fPort;
// The Things Industries expects a 'downlinks' array; each entry is a single scheduled downlink.var data = {  downlinks: [{    // Frame port to deliver the payload on (must match the device's expected port).    f_port: fPort,    // false - best-effort downlink; set to true to request an acknowledgement from the device.    confirmed: false,    // Downlink payload, base64-encoded as required by the TTN API.    frm_payload: btoa(msg),    // Scheduling priority for the network server: LOWEST, LOW, BELOW_NORMAL, NORMAL, ABOVE_NORMAL, HIGH, HIGHEST.    priority: "NORMAL"  }]};
// Result object with encoded downlink payloadvar result = {  contentType: "JSON",  data: JSON.stringify(data),  metadata: {    devId: devId  }};
return result;
// Encode downlink data from incoming Rule Engine message
// msg - JSON message payload downlink message json// msgType - type of message, for ex. 'ATTRIBUTES_UPDATED', 'POST_TELEMETRY_REQUEST', etc.// metadata - list of key-value pairs with additional data about the message// integrationMetadata - list of key-value pairs with additional data defined in Integration executing this converter
/** Encoder **/
// Target device identifier used to build the TTI downlink topic (devId is assumed to be added via Originator fields rule node)var devId = metadata.devId;// LoRaWAN frame port the downlink is scheduled on (cs_fPort is assumed to be added via Originator attributes rule node, prefix 'cs_' (client-side) is added by rule node)var fPort = metadata.cs_fPort;
// The Things Industries expects a 'downlinks' array; each entry is a single scheduled downlink.var data = { downlinks: [{ // Frame port to deliver the payload on (must match the device's expected port). f_port: fPort, // false - best-effort downlink; set to true to request an acknowledgement from the device. confirmed: false, // Downlink payload, base64-encoded as required by the TTN API. frm_payload: btoa(msg), // Scheduling priority for the network server: LOWEST, LOW, BELOW_NORMAL, NORMAL, ABOVE_NORMAL, HIGH, HIGHEST. priority: "NORMAL" }]};
// Result object with encoded downlink payloadvar result = { contentType: "JSON", data: JSON.stringify(data), metadata: { devId: devId }};
return result;The originator fields node injects metadata.devId from the ThingsBoard device’s Label. The full Rule Engine message is serialized to JSON and base64-encoded into frm_payload.
To adapt this converter:
- Different port — update the
fPortclient attribute on the device. The encoder reads it frommetadata.cs_fPort(injected by the Originator attributes node) and uses it as the LoRaWAN frame port. - Confirmed downlink — set
confirmed: trueto request an acknowledgement from the device. Use with caution — unacknowledged confirmed frames consume retries and may delay subsequent messages. - Selective payload — to send only a specific field, replace
btoa(msg)withbtoa(JSON.stringify({ key: msg.key })). - Different device routing —
metadata.devIdis populated from the device Label by the Originator fields node. If your ThingsBoard devices use a different field to store the TTI End device ID, update the Originator fields node mapping accordingly.


Test Downlink
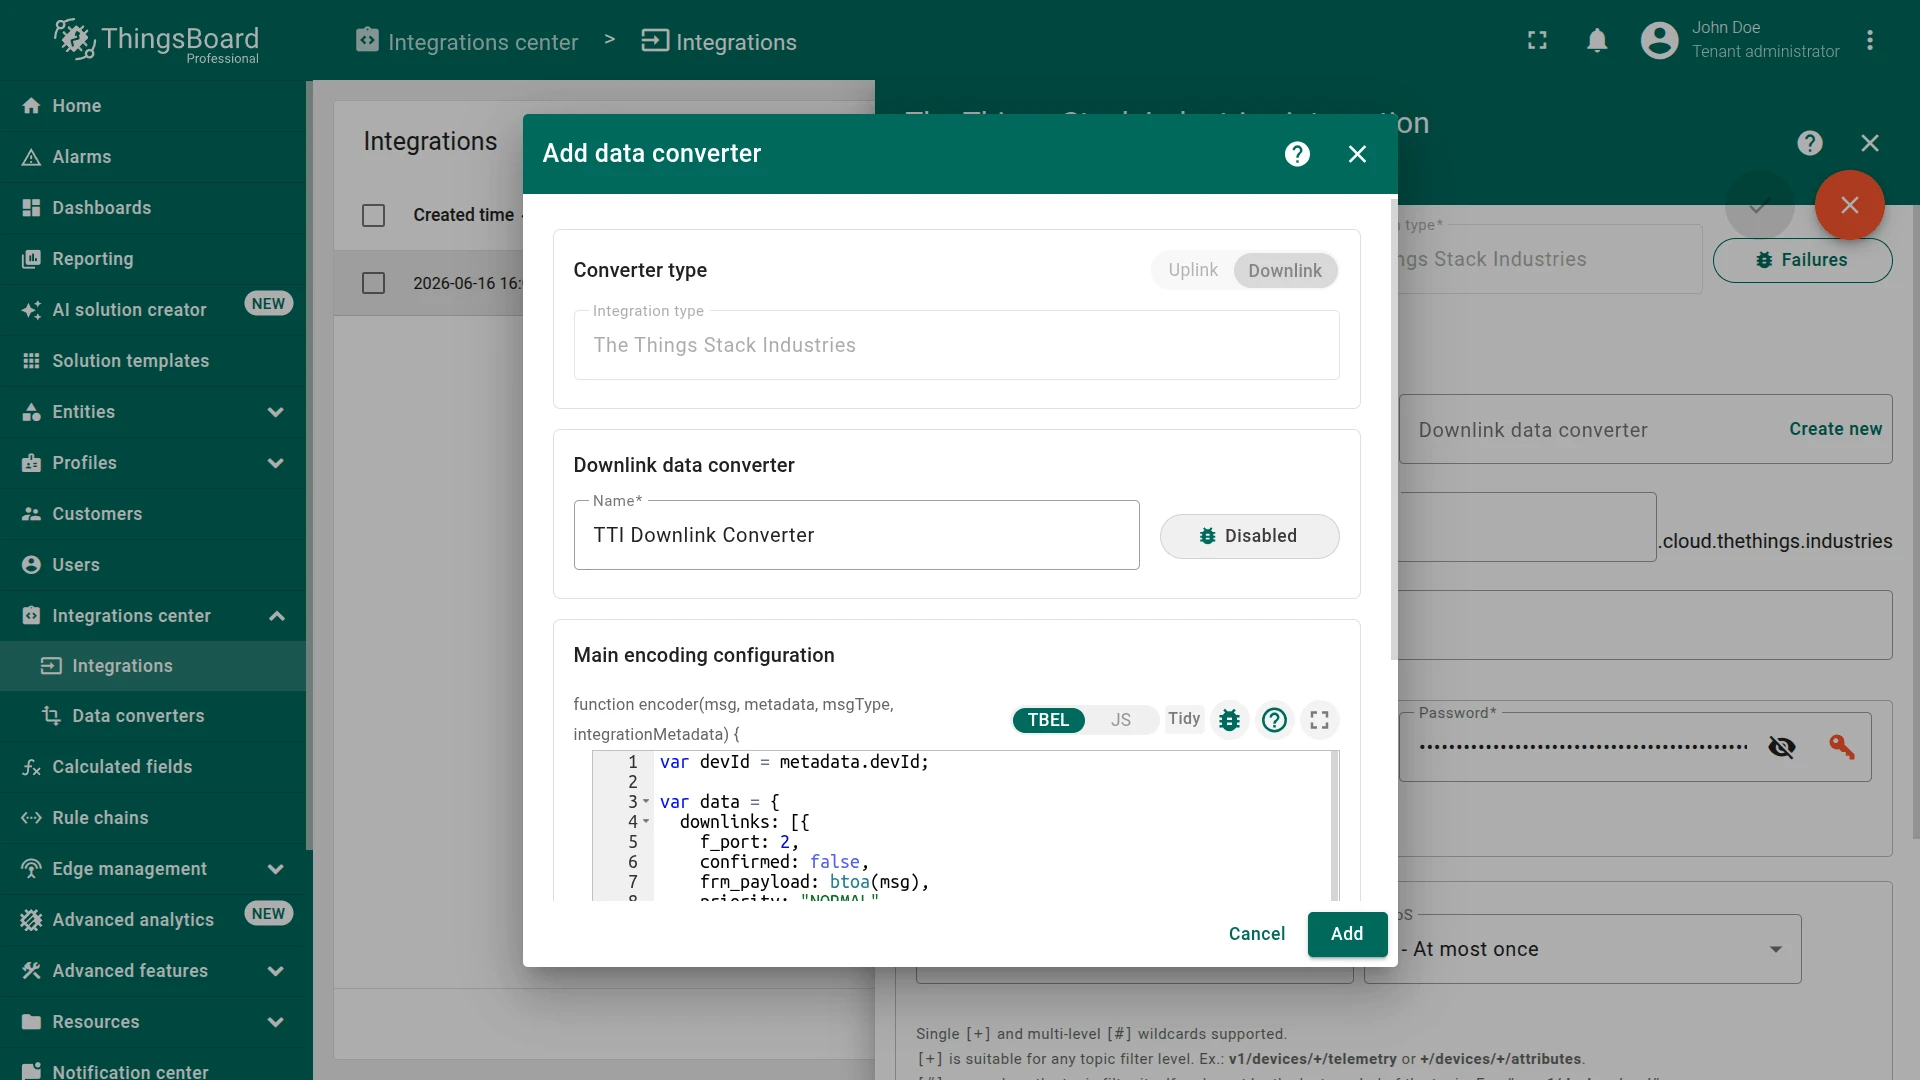
Section titled “Test Downlink”Trigger a downlink by adding a shared attribute to the ThingsBoard device provisioned during the uplink test:
- Go to Entities ⇾ Devices, open the device provisioned by the integration, and open the Attributes tab.
- Switch to Shared attributes and click +.
- Set the key (e.g.
powerState) and a value (e.g.on). - Click Add.
Verify Downlink Converter Events
Section titled “Verify Downlink Converter Events”Go to Integrations center ⇾ Data converters, open TTI Downlink Converter, and click the Events tab. Click an event row to inspect:
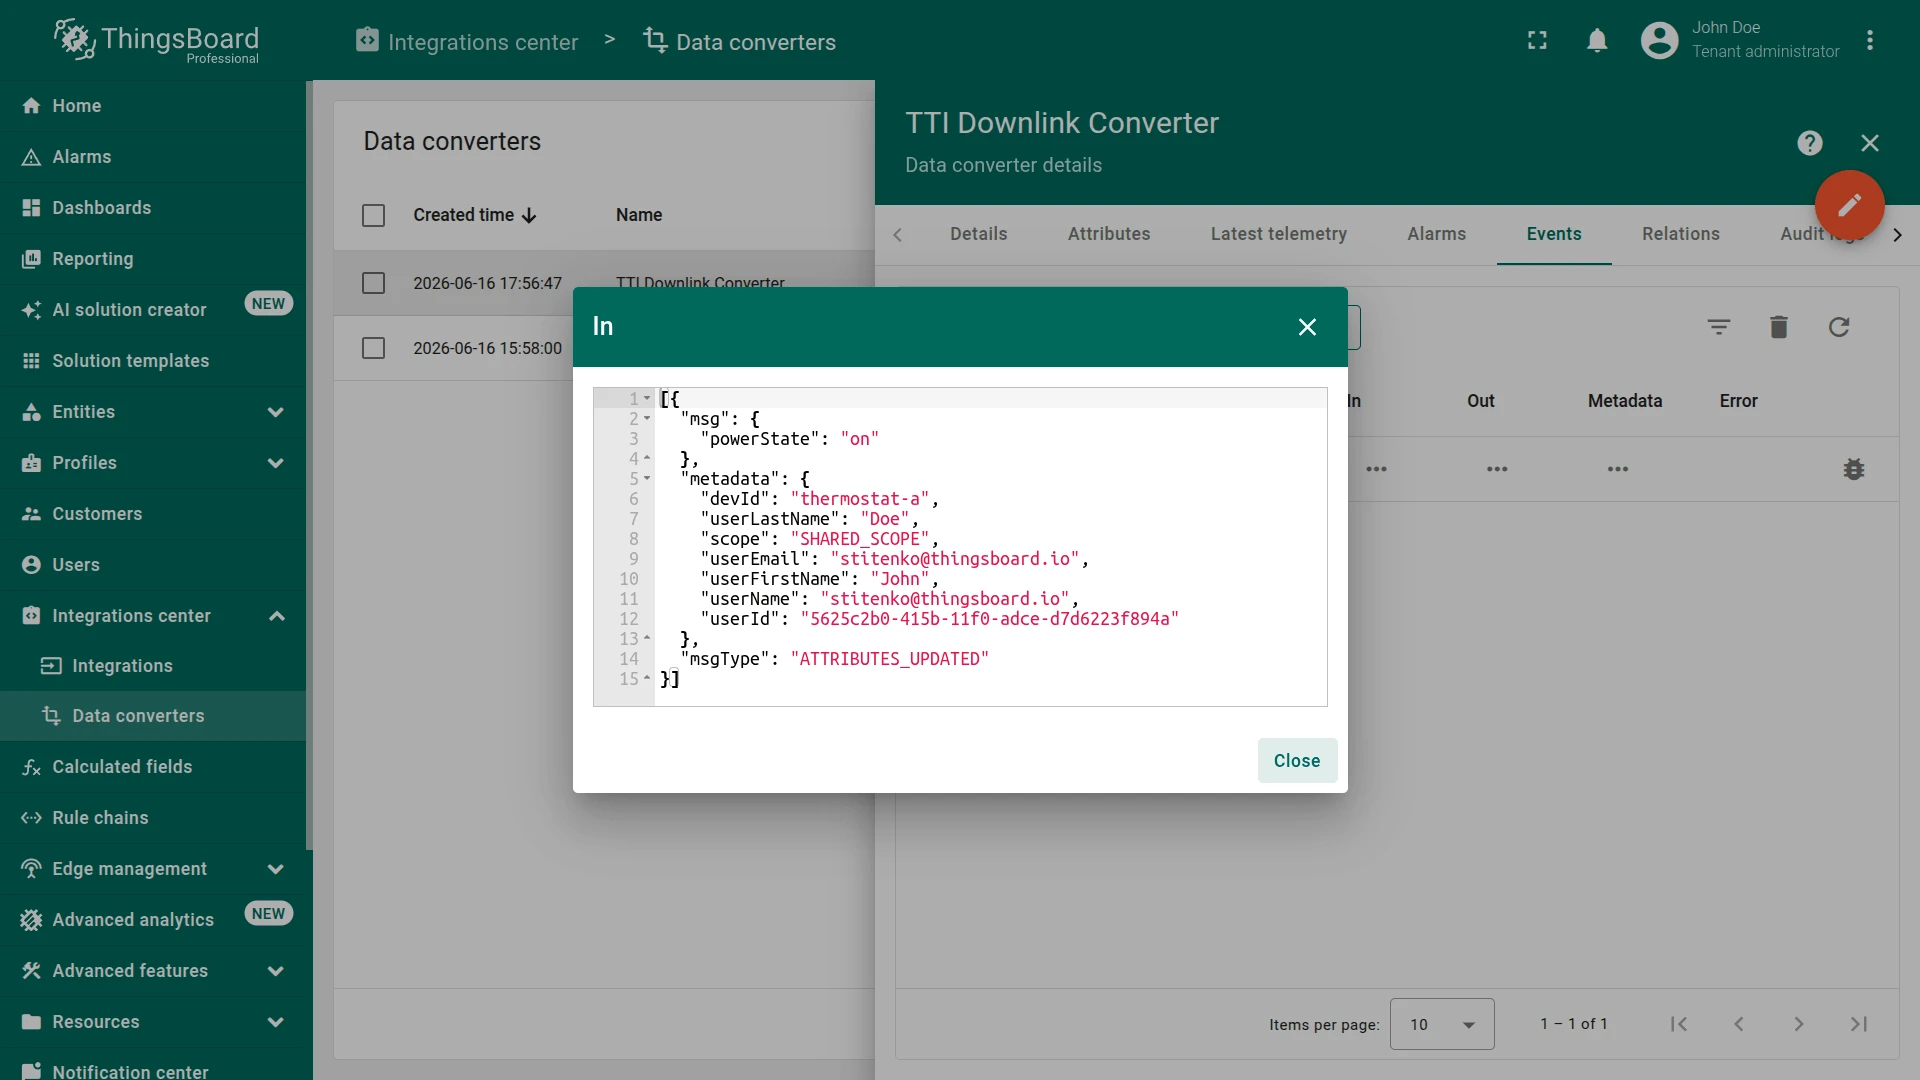
- In — the Rule Engine message received by the converter:
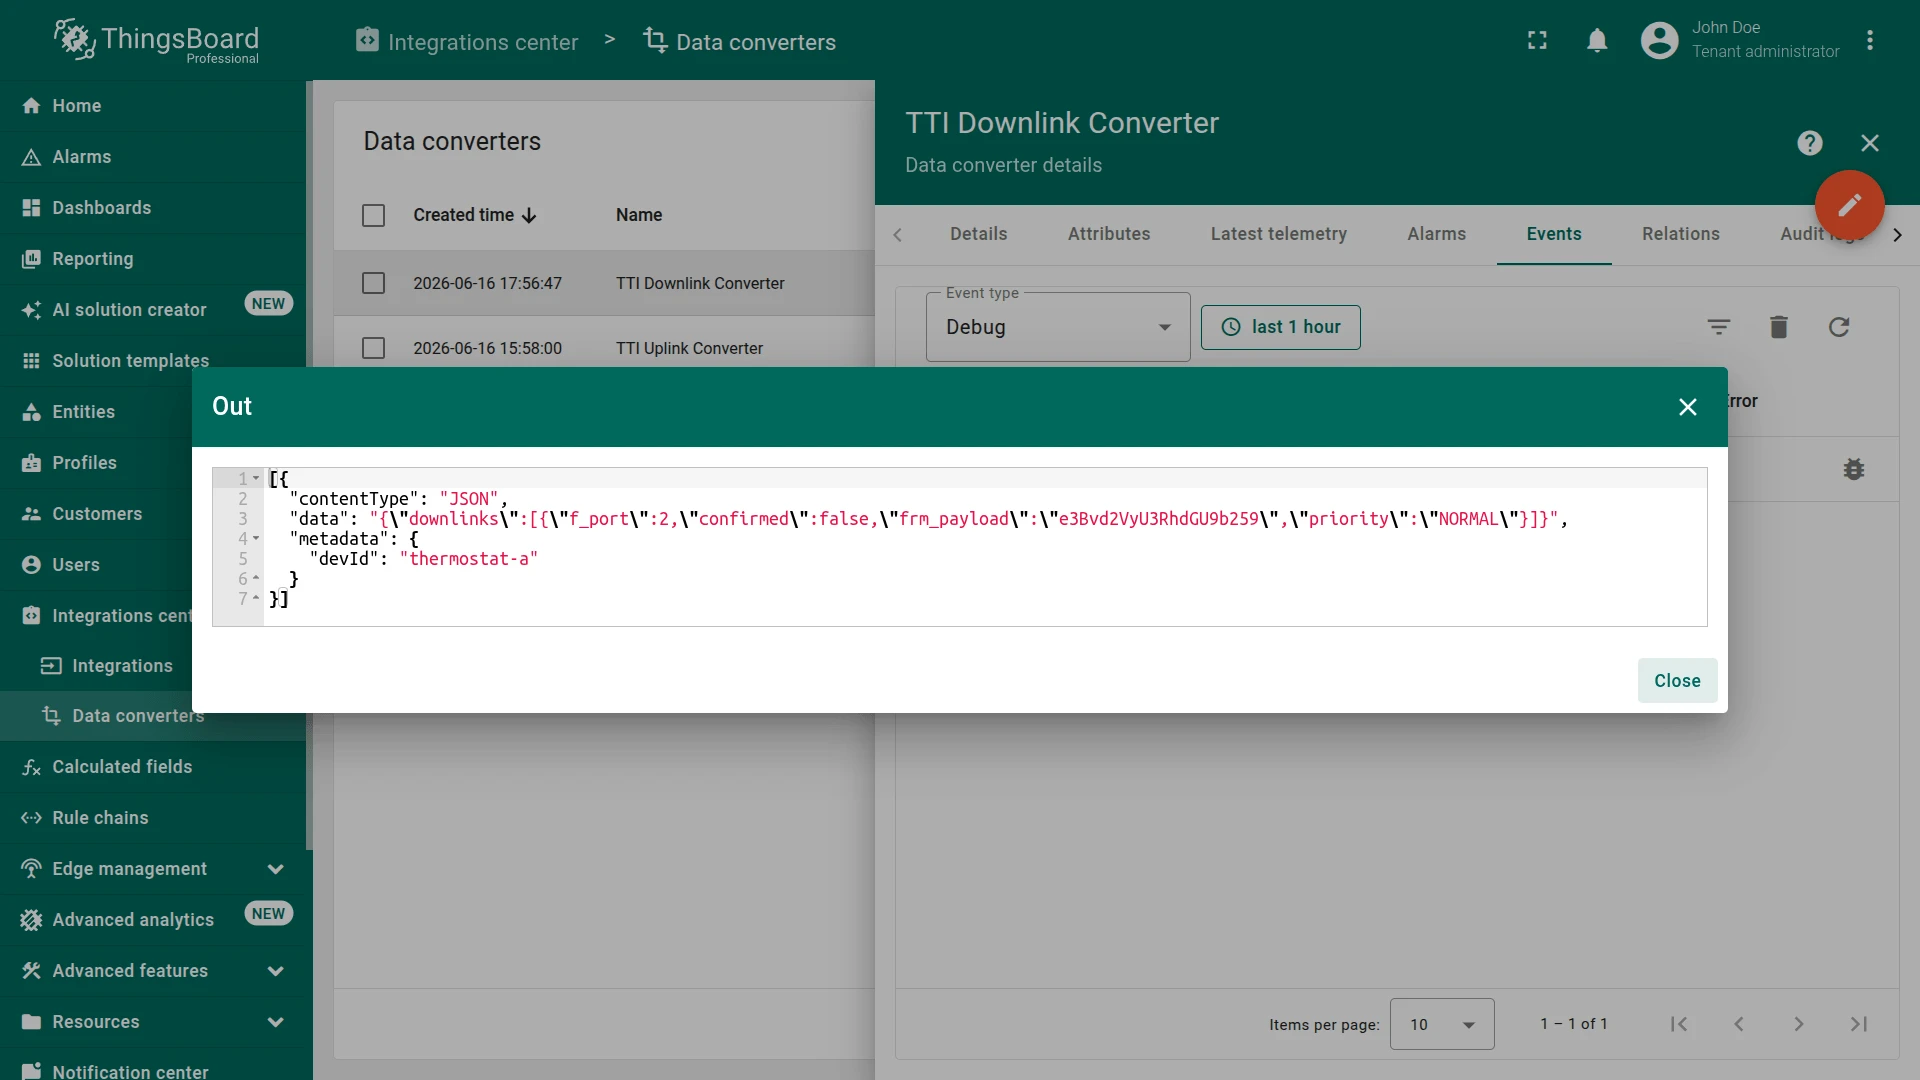
msgcontains the attribute payload;metadata.devIdcontains the TTI End device ID injected by the Originator fields node. - Out — the encoded output sent to TTI: a JSON
downlinksarray withfrm_payloadbase64-encoded from the message body.

Verify TTI Delivery
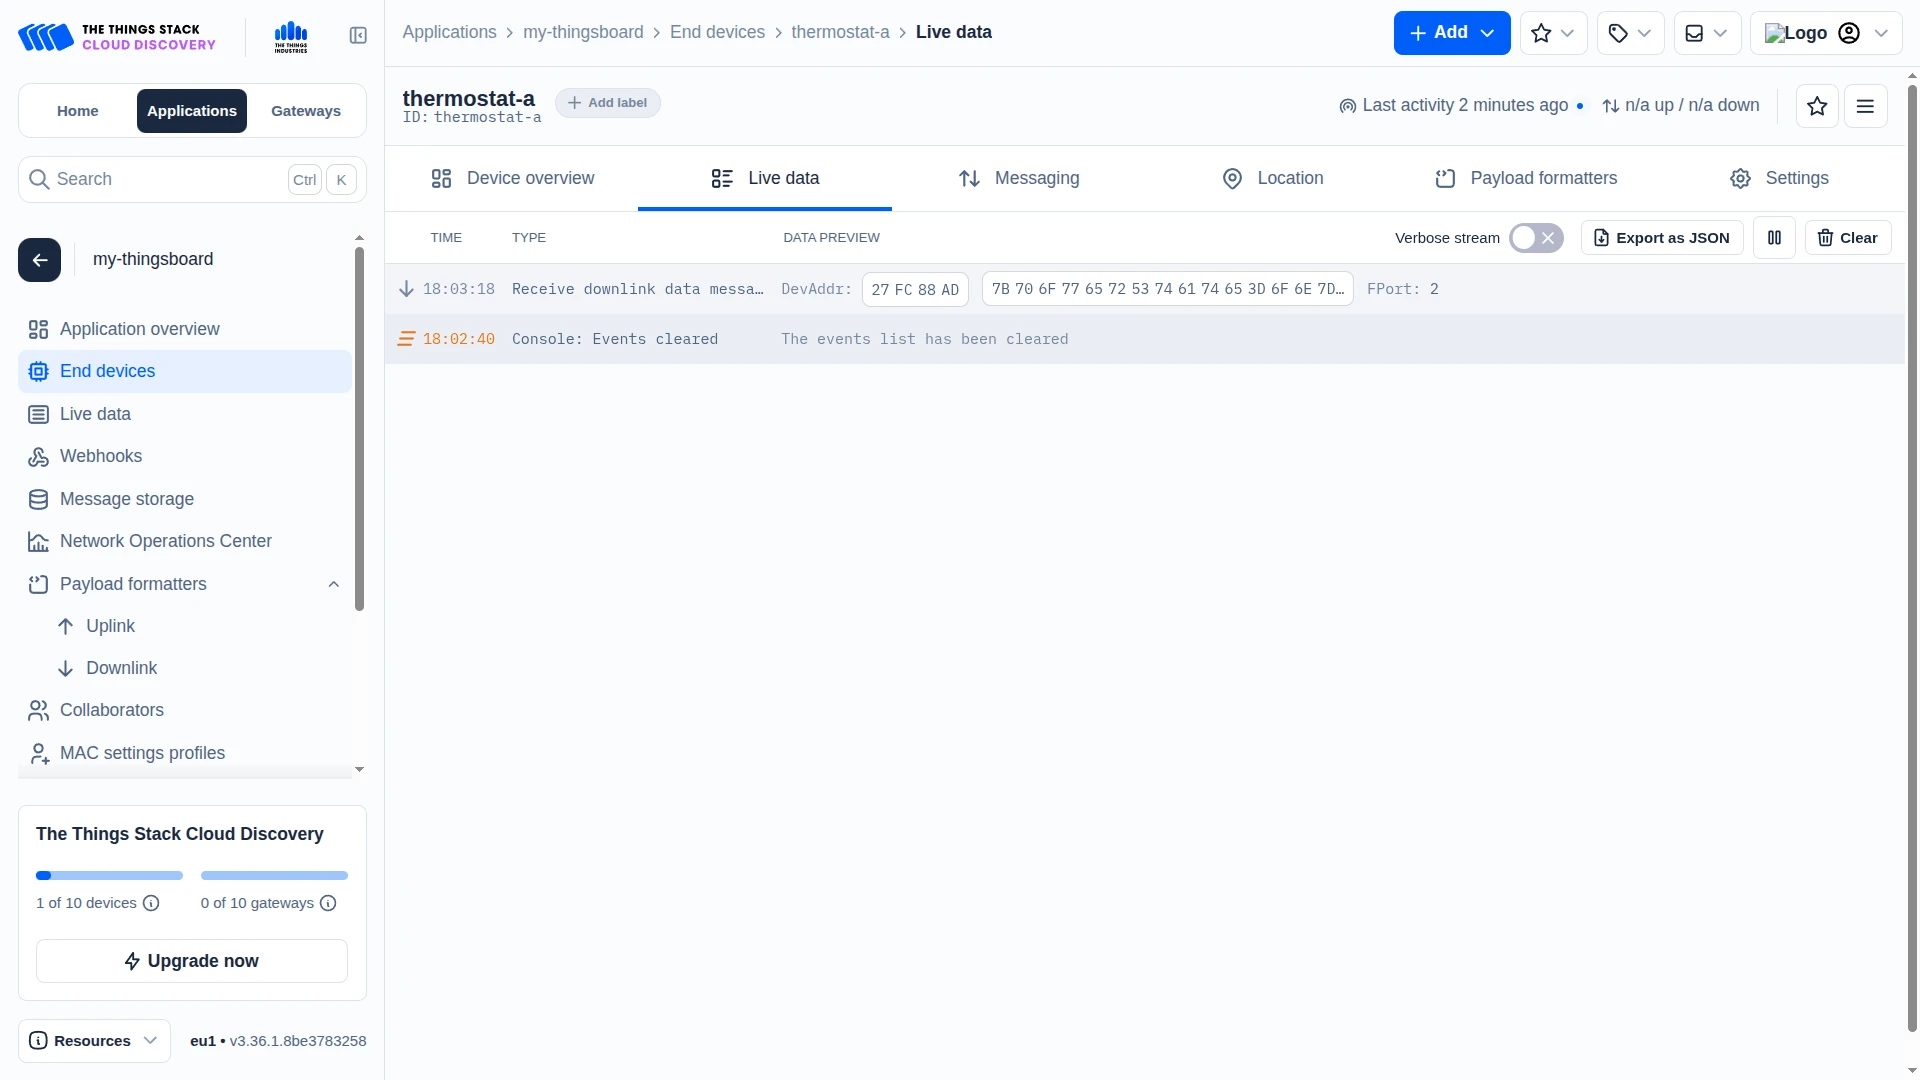
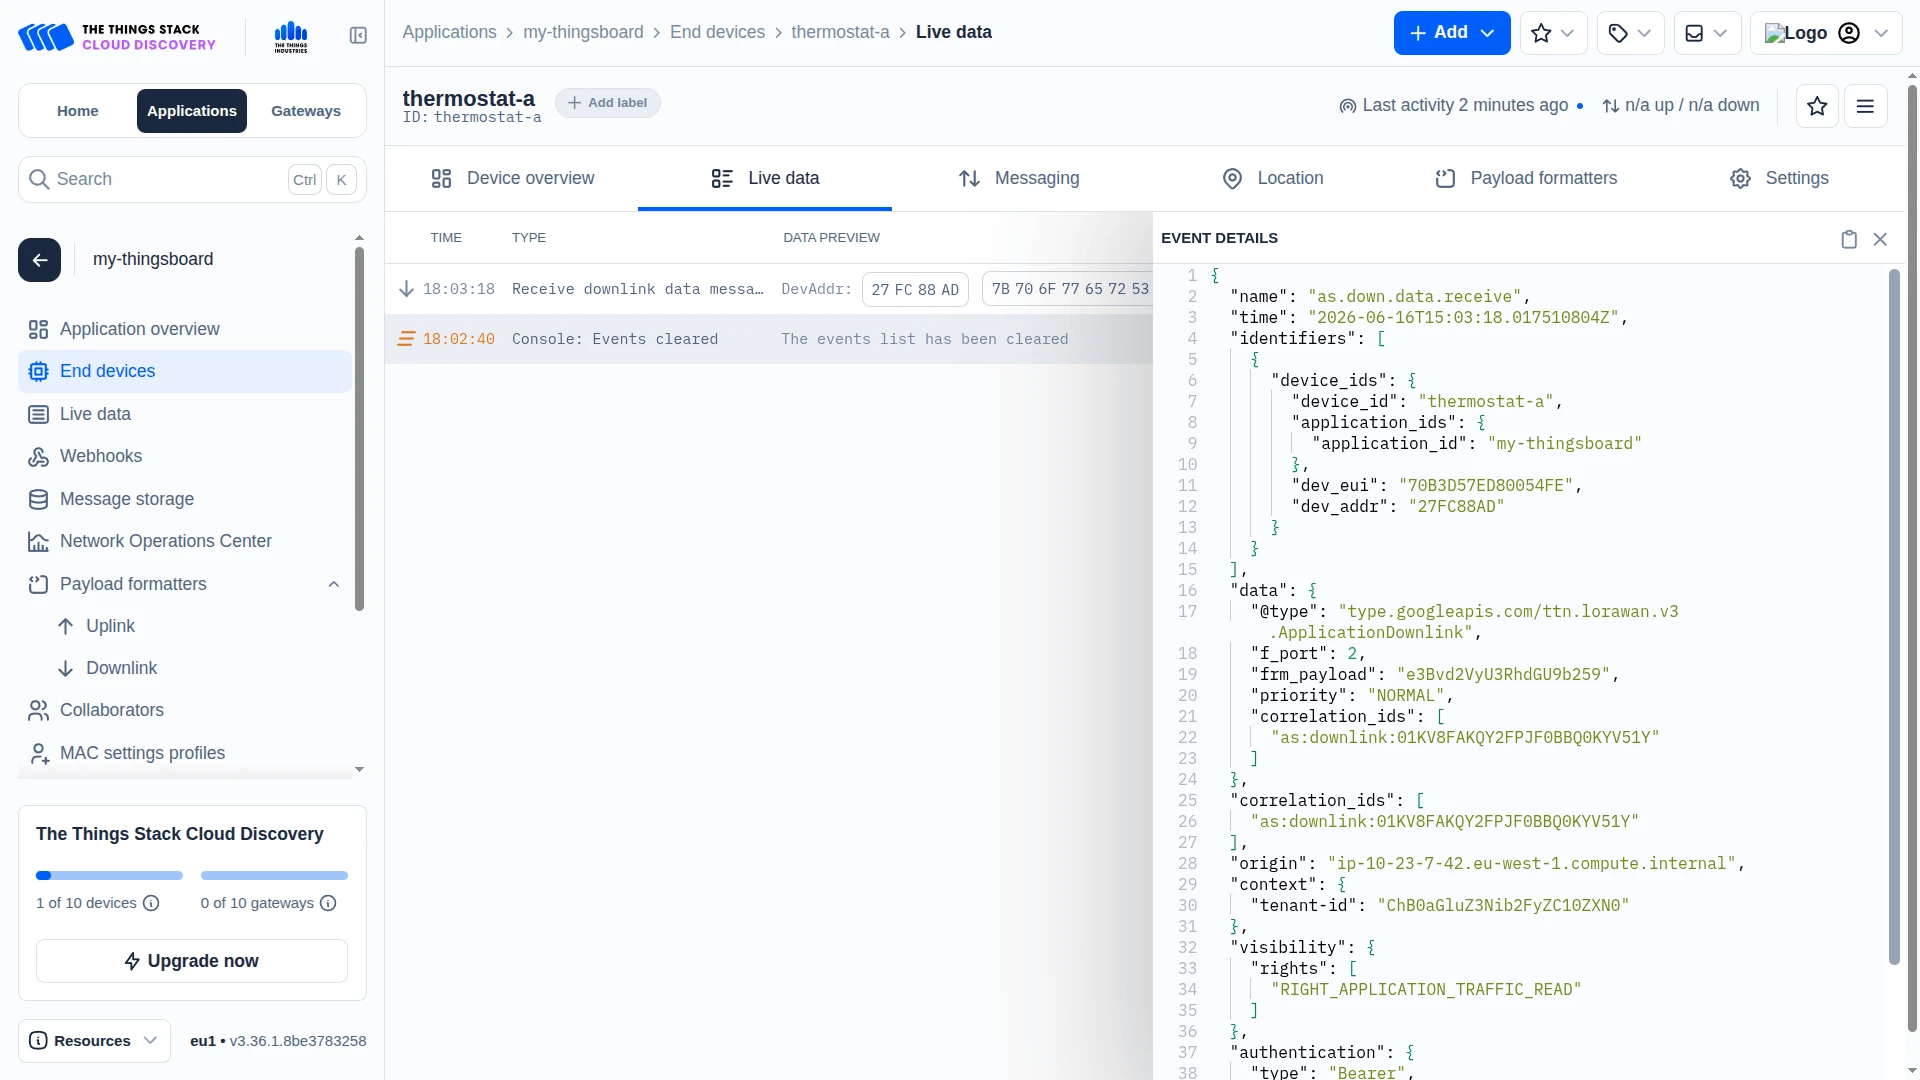
Section titled “Verify TTI Delivery”Go to the TTI console, open End devices ⇾ thermostat-a (or your device), and click the Live data tab — the downlink event appears in the list.
Troubleshooting
Section titled “Troubleshooting”This section covers the most common problems encountered when setting up and running the The Things Stack Industries integration. Each entry describes the symptom, the most likely cause, and the steps to resolve it.
No Uplinks Received
| Symptom | Cause | Fix |
|---|---|---|
| No uplinks received | Wrong MQTT credentials | Open the integration, click the pencil icon, go to the Connection step, and re-enter the credentials. The Username must be in the format {applicationId}@{tenantId} (e.g. my-thingsboard@thingsboard-test) — not your TTI account username. The Password is the TTI API key. |
| No uplinks received | TTI API key expired or revoked | In the TTI console, open your application, go to Other integrations → MQTT, and generate a new API key. Update the integration password with the new key. |
| No uplinks received | Wrong cluster region | The broker host is constructed as {region}.cloud.thethings.industries. Confirm the Region field matches the cluster your TTI application is registered on — e.g. eu1, nam1, or au1. Open your TTI application in the console and check the server address shown on the MQTT integration page. |
| No uplinks received | SSL mismatch | Port 8883 requires Enable SSL to be on. Port 1883 requires it to be off. Using port 8883 without SSL, or 1883 with SSL, causes a connection failure. |
| No uplinks received | Wrong topic filter | The default uplink topic filter is v3/+/devices/+/up. If you changed this value, open the integration in edit mode and verify the Topic field under Connection settings matches the uplink topic your TTI tenant uses. |
| Check connection passes but no uplinks arrive | No devices sending uplinks | Confirm the end device is active and sending messages. In the TTI console, open the device and click Live data — uplinks appear in real time. |
| Check connection passes but no uplinks arrive | Device registered in a different application | The API key is scoped to one TTI application. Confirm the device is registered under the same application the MQTT credentials were generated for. |
Uplink Received but Device Not Created
| Symptom | Cause | Fix |
|---|---|---|
| Uplink received, no device in ThingsBoard | Allow create devices or assets is disabled | Open the integration, click the pencil icon, and enable Allow create devices or assets in the Basic settings step. |
| Uplink received, no device in ThingsBoard | Converter returns empty output or device name is unresolved | Go to Integrations center ⇾ Data converters, open the uplink converter, and click the Events tab. Inspect the Out panel of a recent event — confirm name is present and non-empty. If the Device $eui template is used, confirm metadata.eui is populated in the In panel. |
| Uplink received, converter shows error | parsed.bytes == null | A TTI payload formatter is configured but its output does not include a bytes field. Either update the formatter to return { "bytes": [...] }, or update the decoder to extract values directly from the parsed object — for example, values: { temperature: parsed.temperature }. See Adapting the Converter. |
| Uplink received, converter shows error | Byte offset out of range | The payload is shorter than the decoder expects. Open the converter Events tab, click a failed event, and compare the raw bytes in the In panel against the offsets in the decoder. Adjust the parseBytesToInt(bytes, offset, length) calls to match your device’s actual payload length. |
| Uplink received, converter shows error | TBEL or JavaScript exception | Open the uplink converter Events tab, click a failed event, and read the full stack trace in the Error panel. The trace includes the line number and variable name that caused the failure. |
Telemetry Fields Missing or Have Wrong Values
| Symptom | Cause | Fix |
|---|---|---|
| Fewer fields than expected | Byte offsets do not match the device payload | Open the converter Events tab, click an event, and compare the raw bytes in the In panel against the decoded values in Out. Adjust the offset and length in each parseBytesToInt() call to match your device’s payload structure. |
| Temperature or other field reads as a large integer | Wrong payloadFormat branch active | If a TTI payload formatter is configured, metadata.payloadFormat is 'JSON' and the decoder receives the JSON-serialized formatter output, not raw bytes. Open the In panel of a converter event and check metadata.payloadFormat — if it is 'JSON', confirm the if (metadata.payloadFormat == 'JSON') branch is correctly extracting values from the parsed object. |
| Field appears in Attributes instead of Latest Telemetry | Field assigned to the wrong output object | ThingsBoard stores result.attributes as device attributes and result.telemetry.values as time-series telemetry. Move the field to the correct object in the decoder. |
Downlink Not Delivered
| Symptom | Cause | Fix |
|---|---|---|
| Downlink converter Events tab is empty — no events triggered | Rule Chain misconfigured | In the Root Rule Chain, confirm the message type switch node is connected to the Retrieve fPort (originator attributes) node via the Post attributes and Attributes Updated relations, that Retrieve fPort connects to Retrieve Device ID (originator fields) via Success, and that Retrieve Device ID connects to Downlink to TTI (integration downlink) via Success. |
Downlink converter triggered but metadata.devId is empty | ThingsBoard device Label is not set | Open the device in Entities ⇾ Devices, click the pencil icon, and set the Label field to the TTI End device ID (e.g. thermostat-a). The Originator fields node reads the device Label and injects it into metadata.devId. Without it, the downlink topic cannot be resolved and no message is sent to TTI. |
| Downlink always goes to the same device | devId is hardcoded in the encoder | The encoder must read metadata.devId instead of using a hardcoded string. See Add Downlink Converter for the correct encoder script. |
| Downlink converter triggered, output looks correct, but no downlink in TTI | Downlink topic pattern misconfigured | Open the integration in edit mode, scroll to Advanced settings → Downlink topic pattern, and confirm the pattern is v3/{username}/devices/${devId}/down/push where {username} includes the full @tenantId suffix. |
| Downlink delivered to TTI but device does not respond | confirmed: true with no acknowledgement | If the downlink uses confirmed: true, the device must send an uplink to acknowledge. If the device is out of range or offline, confirmed frames are retried until the retry limit is reached, delaying subsequent messages. Switch to confirmed: false unless ACK tracking is required. |
Connection Check Fails
| Symptom | Cause | Fix |
|---|---|---|
| ”Connection refused” | Wrong port or SSL setting | Confirm port 8883 with Enable SSL on, or port 1883 with Enable SSL off. |
| ”Connection timeout” | Wrong cluster hostname | Confirm the Region is set correctly and the host resolves to {region}.cloud.thethings.industries. Switch Host type to Custom and enter the full hostname directly to rule out a region lookup issue. |
| ”Unauthorized” or “Bad credentials” | Invalid username or password | Re-enter the username in {applicationId}@{tenantId} format and paste a freshly generated API key as the password. |
How to Read Debug Events
- Go to Integrations center ⇾ Integrations, open The Things Stack Industries integration, and click the Events tab.
- Click an event row to inspect:
- In — the raw MQTT message received from TTI before processing.
- Out — what the converter returned: device name, attributes, and telemetry values passed to ThingsBoard.
- Error — error text and stack trace, if processing failed.
- For converter-level details, go to Integrations center ⇾ Data converters, open TTI Uplink Converter, and click the Events tab — the same In / Out / Error panels are available there.
Enable Debug mode on the integration to capture all raw input/output events. Starting from ThingsBoard 3.9, full debug events are stored only during the first hour — afterward, only error events are retained. Disable debug mode once the issue is identified.
See Also
Section titled “See Also”Was this helpful?