ChirpStack Integration
ChirpStack Integration connects ThingsBoard to a ChirpStack open-source LoRaWAN Network Server via HTTP webhook, decodes the LoRaWAN payload and maps it to ThingsBoard telemetry and attributes. In the reverse direction, ThingsBoard encodes Rule Engine messages via a downlink converter and delivers them to devices through the ChirpStack API.

Prerequisites
Section titled “Prerequisites”Before creating the integration, ensure:
- You have access to ThingsBoard Cloud with integration functionality enabled for your tenant.
- You have permissions to create integrations and data converters.
- A running ChirpStack Network Server — see the ChirpStack Docker Compose guide, or see Start ChirpStack Network Server below for a quick Docker Compose setup.
- At least one device registered and connected in ChirpStack — see the ChirpStack device connection guide.
Start ChirpStack Network Server
Section titled “Start ChirpStack Network Server”The quickest way to run ChirpStack locally is with Docker Compose. The official chirpstack-docker repository provides a ready-to-use Compose configuration.
-
Install Docker — make sure Docker and Docker Compose are installed on your host. See the Docker installation guide.
-
Clone the repository:
Terminal window git clone https://github.com/chirpstack/chirpstack-docker.gitcd chirpstack-docker -
Configure the region — EU868 is configured by default. To use a different supported region, follow the instructions in the repository
README.md. -
Start ChirpStack:
Terminal window docker compose upOn the first run, some errors may appear in the logs while the database initializes — this is expected.
-
Connect a gateway — the Compose environment includes a ChirpStack Gateway Bridge instance pre-configured for EU868, accepting UDP packets on port
1700. -
Open the web interface — navigate to
http://localhost:8080and log in with usernameadminand passwordadmin.
If ChirpStack runs on a remote host, replacelocalhostwith its address.
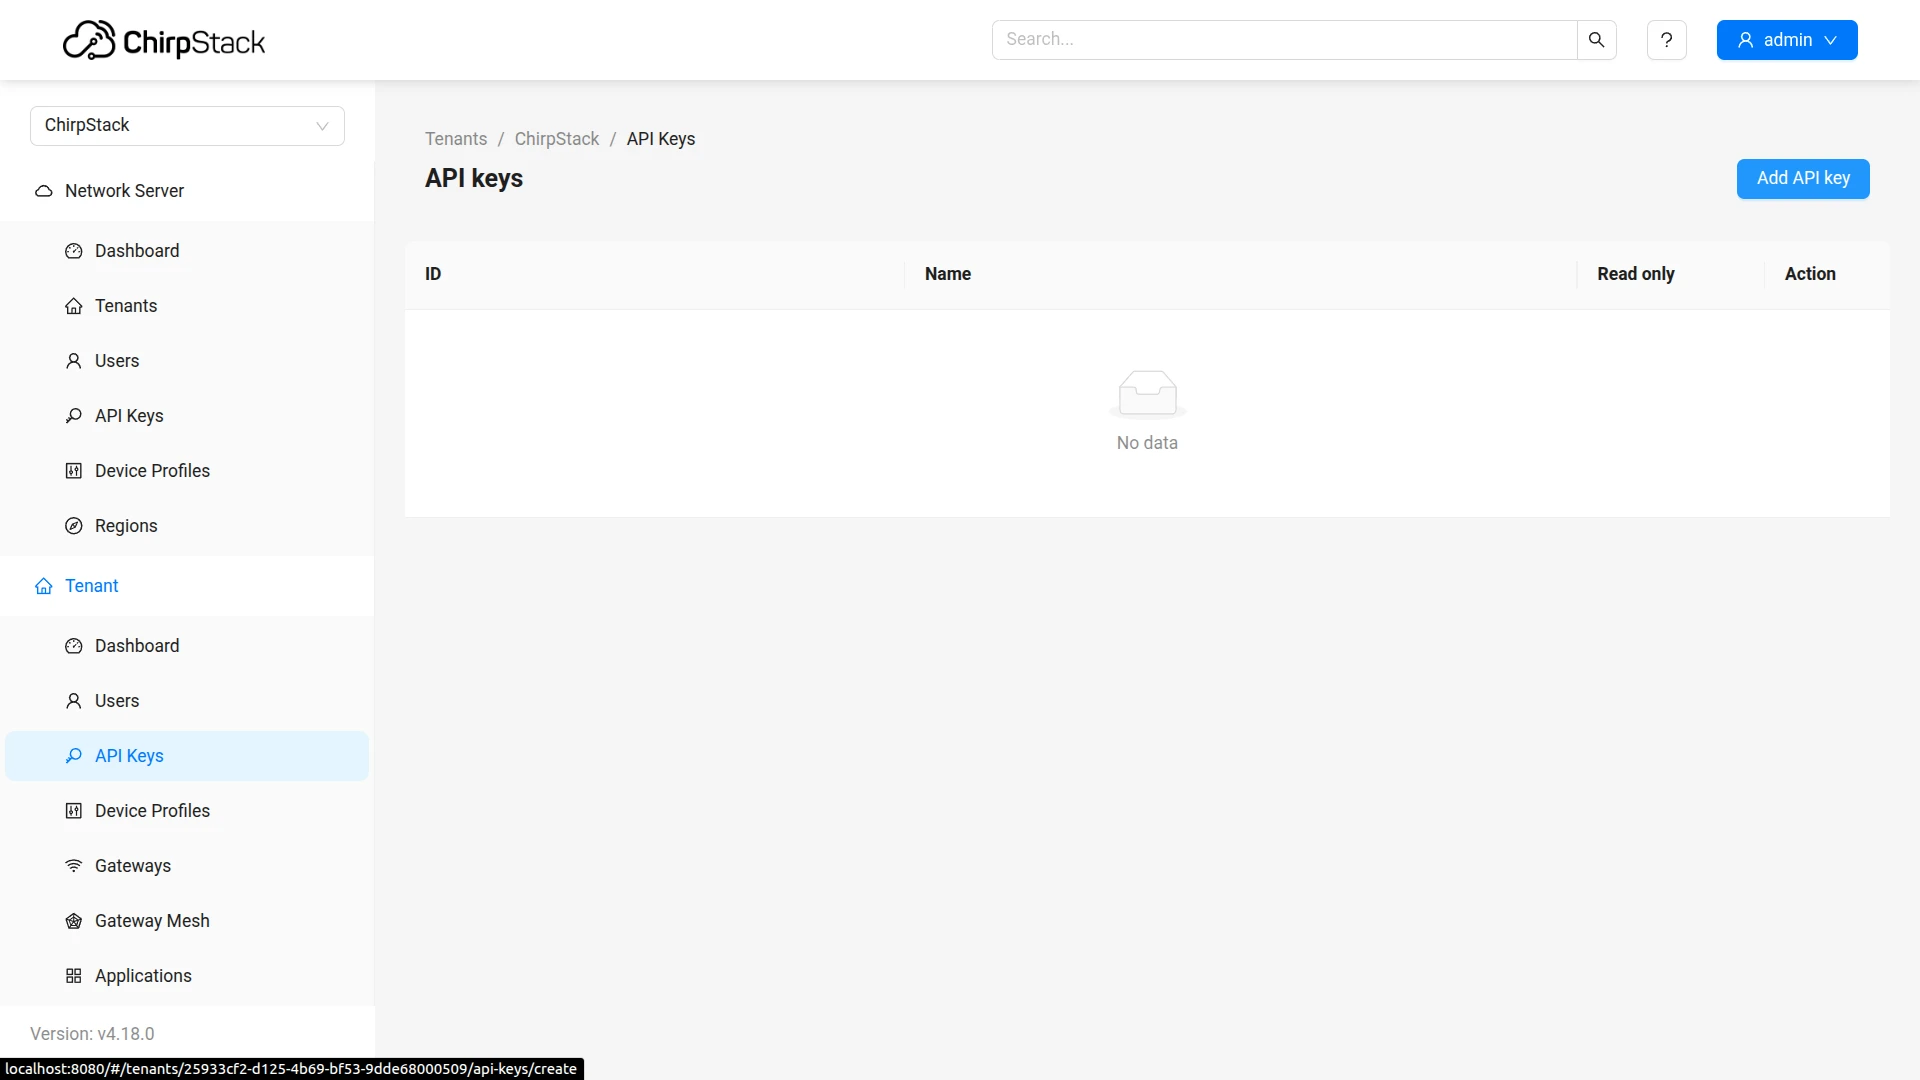
Add ChirpStack API Key
Section titled “Add ChirpStack API Key”The API key is used by ThingsBoard to authenticate requests to the ChirpStack API when sending downlink messages.
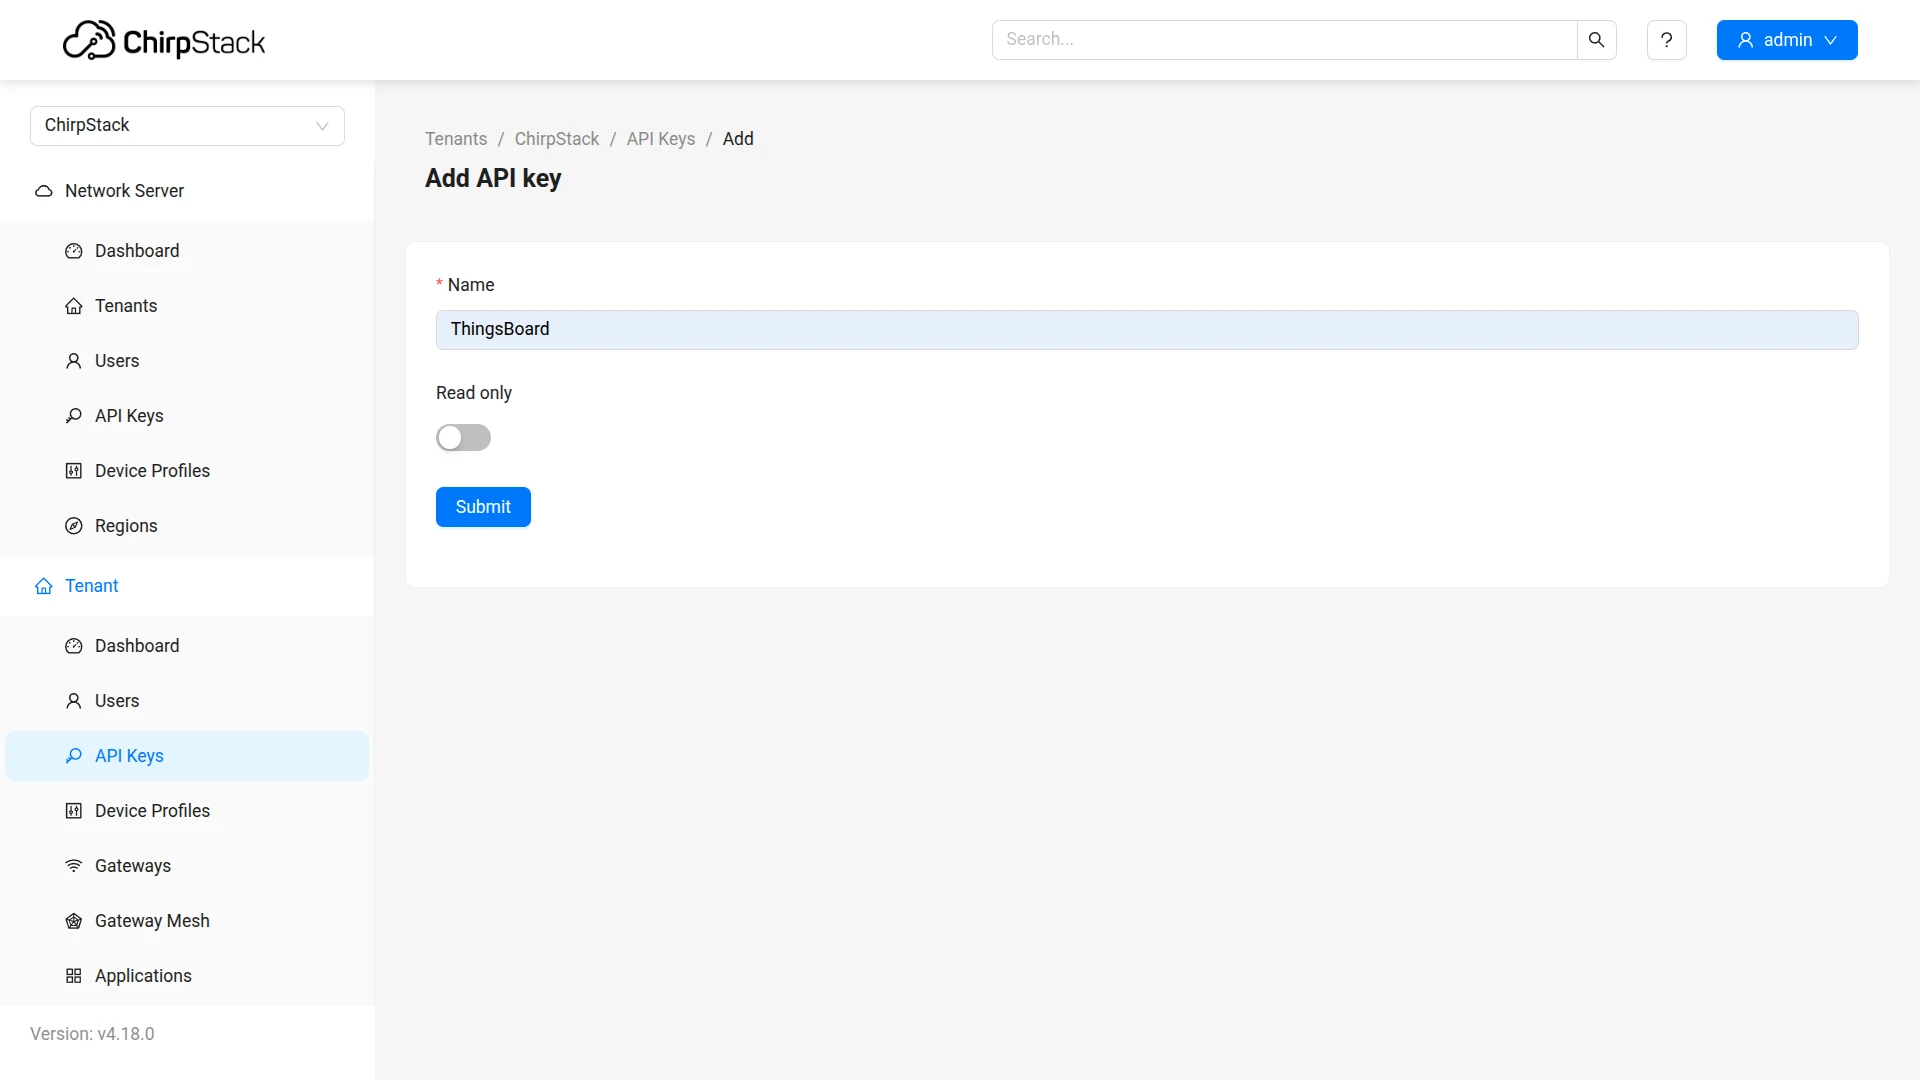
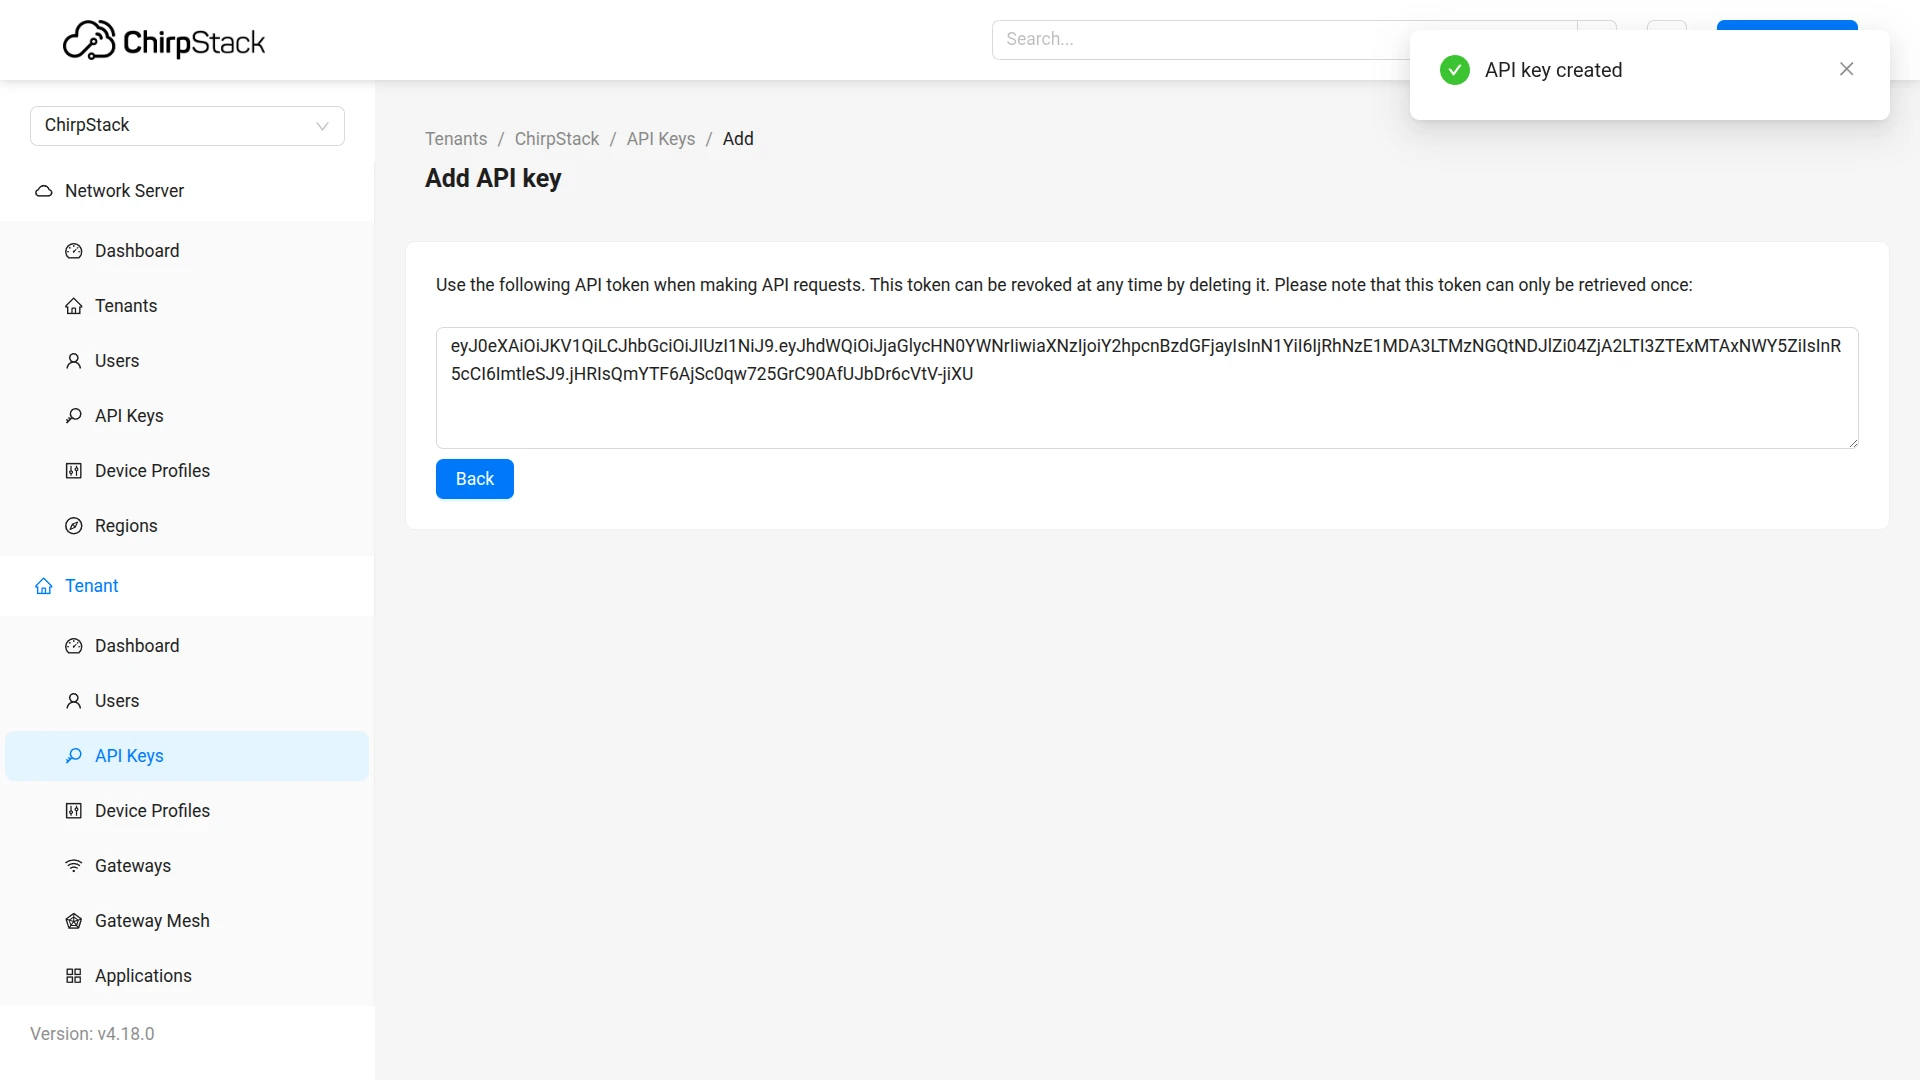
- In the ChirpStack UI, go to Tenant ⇾ API Keys and click Add API key.
- Enter a name for the key (e.g.
ThingsBoard) and click Submit. - Copy and save the token — it is displayed only once.
Create ChirpStack Uplink Data Converter
Section titled “Create ChirpStack Uplink Data Converter”The uplink converter receives each ChirpStack uplink message as raw bytes, decodes the LoRaWAN payload, and returns a structured object that ThingsBoard uses to create or update a device and store its telemetry and attributes.
If your device is in the built-in catalog, use the Library tab instead of writing a decoder — see Converters library for over 100 ready-made decoders.
For the full decoder function reference — all input parameters and output fields — see Uplink data converter.
- Go to Integrations center ⇾ Data converters.
- Click + Add data converter ⇾ Create new converter.
In the Add data converter dialog:
- Converter type — leave Uplink (selected by default).
- Integration type — in the search field, enter
ChirpStackand select ChirpStack from the list. - Name — enter a converter name, for example
ChirpStack Uplink Converter. - Configure main decoding parameters:
- Specifies the device naming template and entity type. The default value
Device $euiuses the device EUI as the unique name in ThingsBoard. - The default decoder is pre-filled. Leave it unchanged for this guide.
By default the editor opens in TBEL; use the TBEL / JS toggle (upper right) to switch languages.
/*** Decodes the incoming payload and returns a structured object containing telemetry data and attributes.** @param {byte[]} input - The raw payload received as an array of bytes.* @returns {Object} output - The structured output with decoded telemetry and attributes.*/function decodePayload(input) {// Initialize the output object with empty attributes and telemetry for clarity.var result = { attributes: {}, telemetry: {}};// Extract the timestamp from metadata (represented in milliseconds).var timestamp = metadata.ts; // ts is the timestamp parsed from the incoming message's time, or returns the current time if it cannot be parsed.if (metadata.payloadFormat == 'JSON') {// payloadFormat is 'JSON' when ChirpStack sends a pre-decoded JSON payload// (the uplink contains an "object" field produced by a codec/payload formatter).// All fields from the decoded object are put directly into telemetry.var decoded = decodeToJson(input);result.telemetry = {ts: timestamp,values: decoded};return result;}// payloadFormat is 'BINARY' when raw base64 payload is received (data field).// Decode serial number (SN) from the first 4 bytes of the payload.// Press '?' icon in the top right corner to learn more about built in helper functions and capabilities.result.attributes.sn = parseBytesToInt(input, 0, 4);// Combine the timestamp with decoded values and add it to the telemetry.result.telemetry = {ts: timestamp,values: {// Decode battery level from the 5th byte of the payload.battery: parseBytesToInt(input, 4, 1),// Decode temperature from the 6th and 7th bytes of the payload (divided by 100).temperature: parseBytesToInt(input, 5, 2) / 100.0,// Decode saturation from the 8th byte of the payload.saturation: parseBytesToInt(input, 7, 1)}};// Return the fully constructed output object.return result;// Same logic, less code:// return {// attributes: {// sn: parseBytesToInt(input, 0, 4)// },// telemetry: {// ts: convertDateToTimestamp(metadata.time),// values: {// battery: parseBytesToInt(input, 4, 1),// temperature: parseBytesToInt(input, 5, 2) / 100.0,// saturation: parseBytesToInt(input, 7, 1)// }// }// };}var result = decodePayload(payload);// Uncomment this code block to overwrite values set in the main configuration window. Useful if you extract device/asset/customer/group names from the payload;// result.type = 'DEVICE'; // Entity type allows you to choose type of created entity. Can be 'DEVICE' or 'ASSET'.// result.name = 'Temperature Sensor'; // Device or asset name (the value must be unique)// result.profile = 'IndustrialSensorProfile'; // Device or asset profile name.// result.customer = 'MyCustomer'; // If customer is not null - created entity will be assigned to customer with such name.// result.group = 'SensorsGroup'; // If group is not null - created entity will be added to the entity group with such name.// Return the final result object.return result;/*** Decodes the incoming payload and returns a structured object containing telemetry data and attributes.** @param {number[]} input - The raw payload received as an array of bytes.* @returns {Object} output - The structured output with decoded telemetry and attributes.*/function decodePayload(input) {// Initialize the output object with empty attributes and telemetry for clarity.var result = { attributes: {}, telemetry: {}};// Extract the timestamp from metadata (represented in milliseconds).var timestamp = metadata.ts; // ts is the timestamp parsed from the incoming message's time, or returns the current time if it cannot be parsed.if (metadata.payloadFormat == 'JSON') {// payloadFormat is 'JSON' when ChirpStack sends a pre-decoded JSON payload// (the uplink contains an "object" field produced by a codec/payload formatter).// All fields from the decoded object are put directly into telemetry.var decoded = decodeToJson(input);result.telemetry = {ts: timestamp,values: decoded};return result;}// payloadFormat is 'BINARY' when raw base64 payload is received (data field).// Decode serial number (SN) from the first 4 bytes of the payload.// Press '?' icon in the top right corner to learn more about built in helper functions and capabilities.result.attributes.sn = parseBytesToInt(input, 0, 4);// Initialize an object to store decoded key/value telemetry data.var values = {};// Decode battery level from the 5th byte of the payload.values.battery = parseBytesToInt(input, 4, 1);// Decode temperature from the 6th and 7th bytes of the payload (divided by 100).values.temperature = parseBytesToInt(input, 5, 2) / 100.0;// Decode saturation from the 8th byte of the payload.values.saturation = parseBytesToInt(input, 7, 1);// Combine the timestamp with values and add it to the telemetry.result.telemetry = {ts: timestamp,values: values};// Return the fully constructed output object.return result;// Same logic, less code:// return {// attributes: {// sn: parseBytesToInt(input, 0, 4)// },// telemetry: {// ts: convertDateToTimestamp(metadata.time),// values: {// battery: parseBytesToInt(input, 4, 1),// temperature: parseBytesToInt(input, 5, 2) / 100.0,// saturation: parseBytesToInt(input, 7, 1)// }// }// };}var result = decodePayload(payload);// Uncomment this code block to overwrite values set in the main configuration window. Useful if you extract device/asset/customer/group names from the payload;// result.type = 'DEVICE'; // Entity type allows you to choose type of created entity. Can be 'DEVICE' or 'ASSET'.// result.name = 'Temperature Sensor'; // Device or asset name (the value must be unique)// result.profile = 'IndustrialSensorProfile'; // Device or asset profile name.// result.customer = 'MyCustomer'; // If customer is not null - created entity will be assigned to customer with such name.// result.group = 'SensorsGroup'; // If group is not null - created entity will be added to the entity group with such name.// Return the final result object.return result;/*** Converts a byte array to a string and parses it as JSON.** @param {number[]} payload - The array of bytes.* @returns {Object} - The parsed JSON object.*/function decodeToJson(payload) {return JSON.parse(String.fromCharCode.apply(String, payload));}/*** Converts a slice of bytes from an array into an integer (big-endian).** @param {number[]} input - The array of bytes.* @param {number} offset - The starting index.* @param {number} length - The number of bytes to convert.* @returns {number} - The resulting integer.*/function parseBytesToInt(input, offset, length) {var result = 0;for (var i = offset; i < offset + length; i++) {result = (result << 8) | (input[i] & 0xFF);}return result;} - Specifies the device naming template and entity type. The default value
Check advanced decoding parameters — pre-populated for ChirpStack; leave defaults unless your setup differs.
- Click Add.
Payload Formats
ChirpStack sends the LoRaWAN payload in one of two formats, indicated by metadata.payloadFormat:
| Format | Source | When it applies | How to decode |
|---|---|---|---|
BINARY | data field — base64, auto-decoded to bytes by ThingsBoard | No payload codec configured in ChirpStack | Use parseBytesToInt, parseBytesToFloat, and similar helpers |
JSON | object field — pre-decoded by a ChirpStack payload codec | A payload codec is active on the device profile | Use decodeToJson(input) — the decoded object is ready to map |
What the Converter Receives
ThingsBoard passes two variables to the decoder:
| Variable | Type | Description |
|---|---|---|
payload | byte array | The LoRaWAN payload bytes. For BINARY format, these are the decoded bytes from the data field. For JSON format, these are the bytes of the serialised object field. |
metadata | object | Key-value map with fields extracted from the ChirpStack webhook. |
Key metadata fields pre-populated for ChirpStack:
| Field | Description |
|---|---|
metadata.payloadFormat | 'BINARY' or 'JSON' — determines how to parse payload |
metadata.ts | Uplink timestamp in milliseconds; falls back to server time if the message time field cannot be parsed |
What the Converter Must Return
The decoder must return a plain object. The device name is resolved from the Main decoding configuration naming template unless overridden in the script:
| Field | Required | Description |
|---|---|---|
name | No* | Overrides the device name from the Main decoding configuration template. Must be unique in ThingsBoard. |
type | No | Entity type: 'DEVICE' (default) or 'ASSET' |
profile | No | Device profile name. Defaults to 'default'. |
customer | No | Assigns the device to the named customer. |
group | No | Adds the device to the named entity group. |
attributes | No | Flat key-value map stored as ThingsBoard device attributes. |
telemetry | No | { ts, values } object, or an array of such objects. ts is in milliseconds; values is a flat key-value map. |
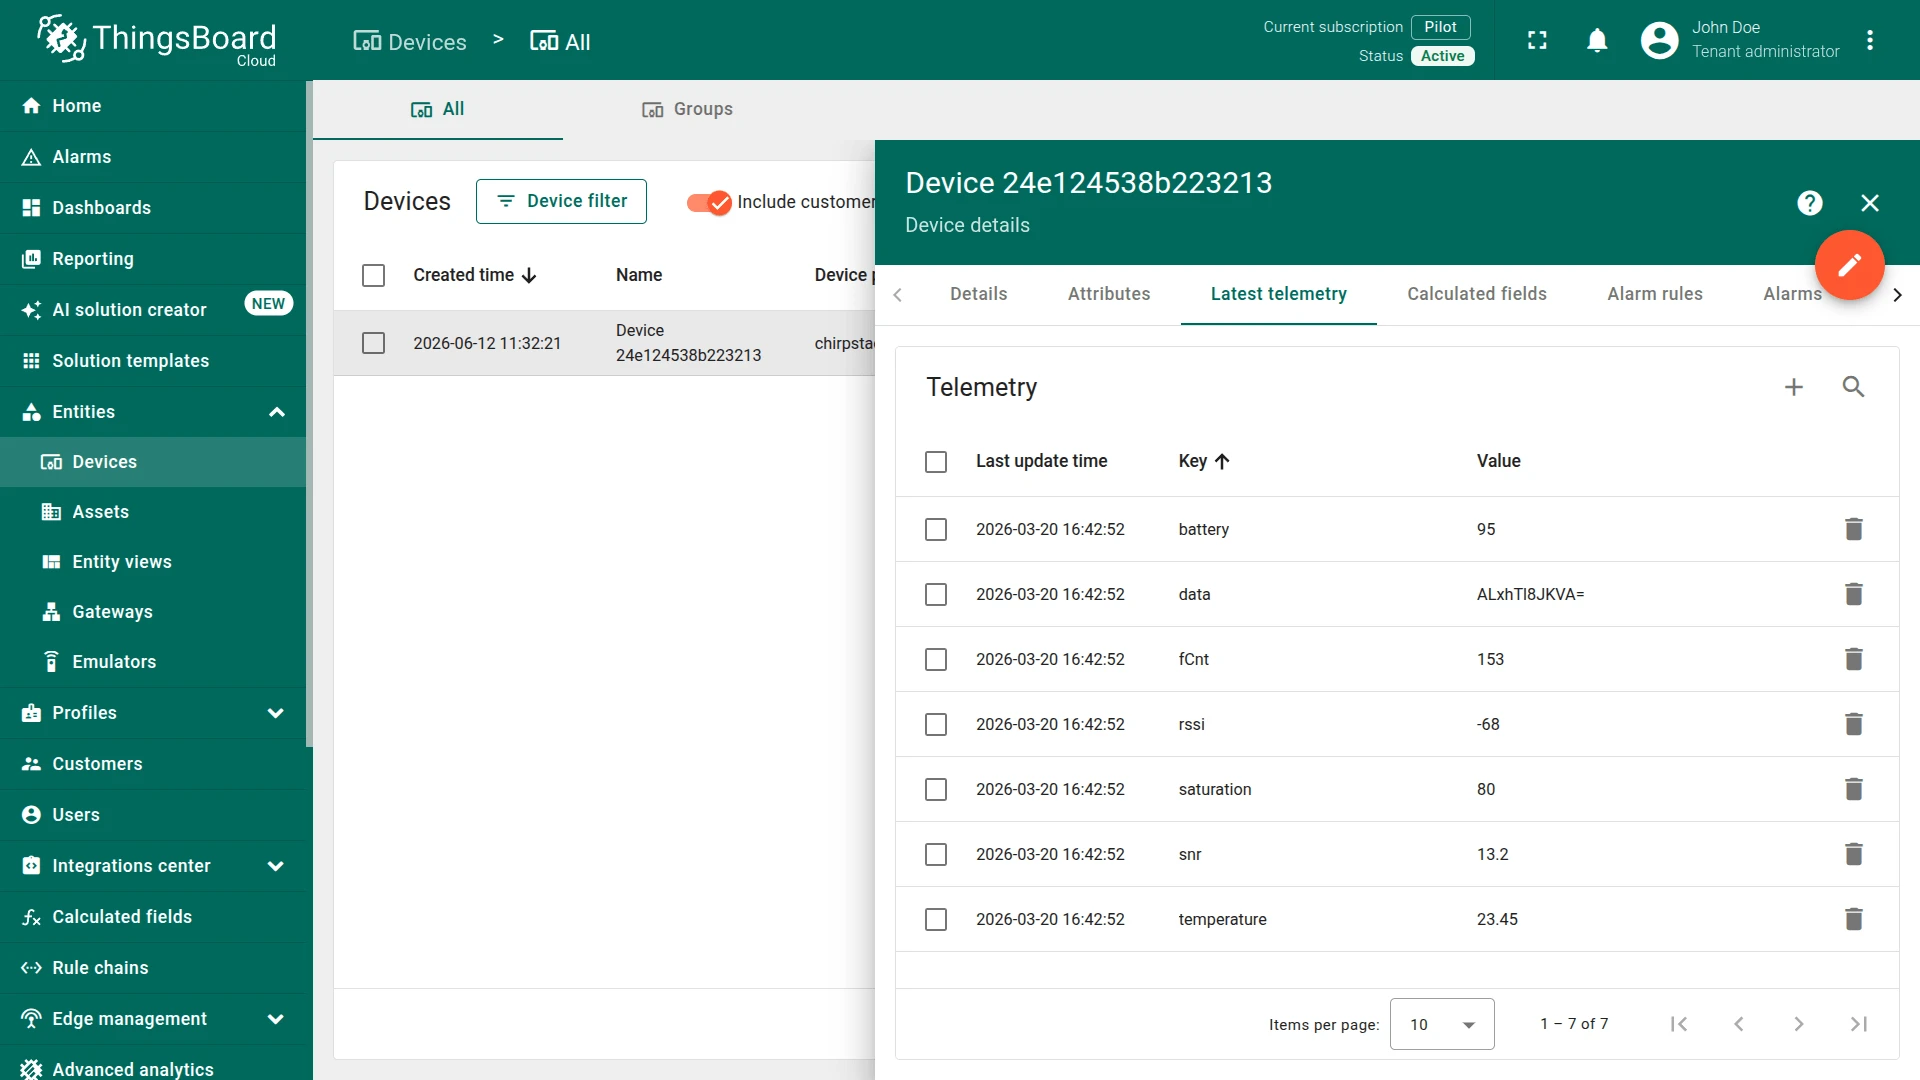
*When name is not set, ThingsBoard applies the Main decoding configuration template. The default template Device $eui substitutes $eui with the device EUI from the ChirpStack message (e.g. Device 24e124538b223213). On the first uplink ThingsBoard creates the device; on subsequent uplinks it updates the existing one.
Understanding the Example Decoder
The example BINARY decoder expects an 8-byte payload with this layout:
| Bytes | Length | Expression | Output field | Example value |
|---|---|---|---|---|
| 0–3 | 4 | parseBytesToInt(input, 0, 4) | attributes.sn | 12345678 |
| 4 | 1 | parseBytesToInt(input, 4, 1) | telemetry.battery | 95 |
| 5–6 | 2 | parseBytesToInt(input, 5, 2) / 100.0 | telemetry.temperature | 23.46 |
| 7 | 1 | parseBytesToInt(input, 7, 1) | telemetry.saturation | 80 |
BINARY — input → output. For the test payload "ALxhTl8JKVA=" used in Send Test Uplink:
{ "attributes": { "sn": 12345678 }, "telemetry": { "ts": 1742480572653, "values": { "battery": 95, "temperature": 23.46, "saturation": 80 } }}JSON — input → output. When a ChirpStack payload codec is active, the object field arrives pre-decoded and the converter writes all its fields directly to telemetry. If ChirpStack decodes the payload to:
{ "temperature": 23.5, "humidity": 60, "battery": 95 }The converter produces:
{ "telemetry": { "ts": 1742480572653, "values": { "temperature": 23.5, "humidity": 60, "battery": 95 } }}Adapting the Decoder to Your Device
- Match your payload structure — update byte offsets, lengths, and field names in
decodePayloadto match your device’s binary specification. Refer to your device’s payload documentation for the byte layout. - Add or remove fields — add more
parseBytesToIntcalls (orparseBytesToFloat, string extraction, etc.) for additional sensors; remove entries your device does not transmit. - Use a ChirpStack payload codec — configure a codec in ChirpStack and
metadata.payloadFormatbecomes'JSON'. The decoder already handles this path — no binary parsing needed. - Override device identity from the payload — set
result.name,result.profile,result.group, orresult.customerto derive device identity from payload content rather than the Main decoding configuration template.
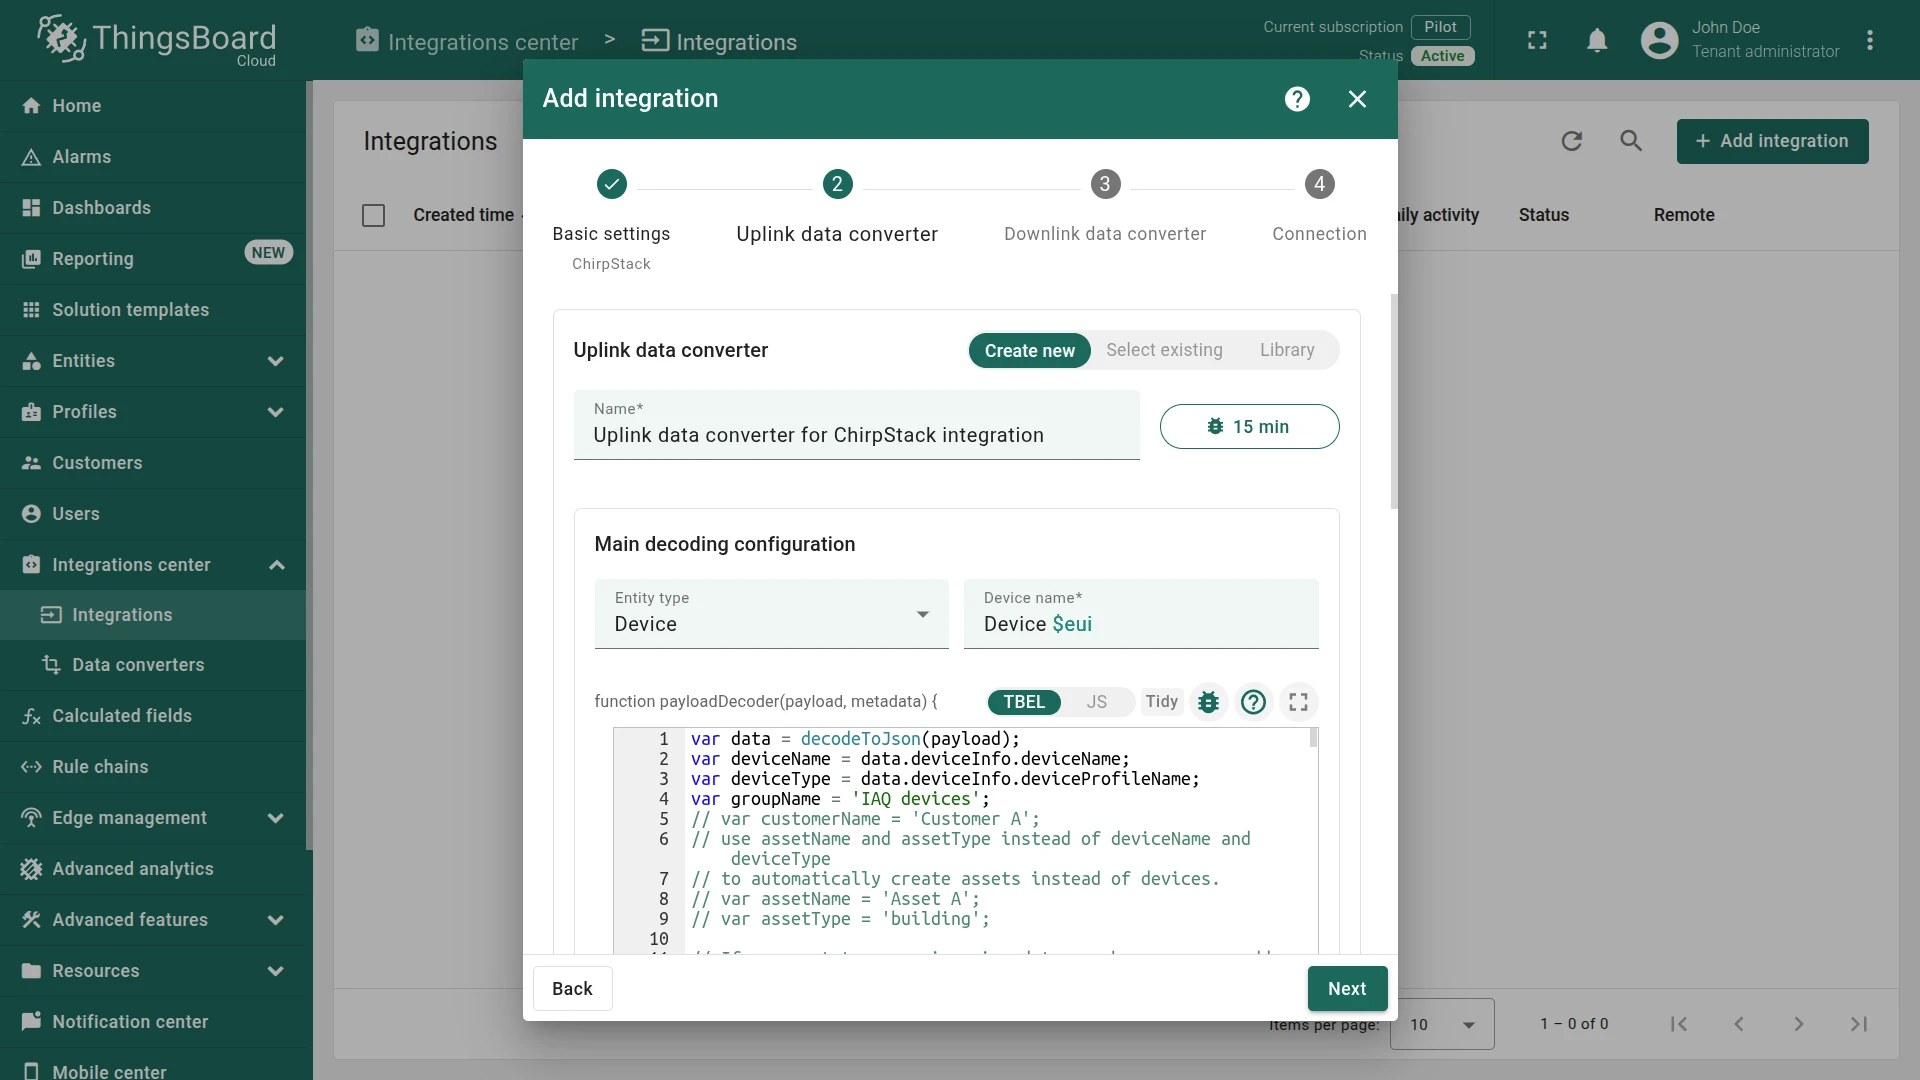
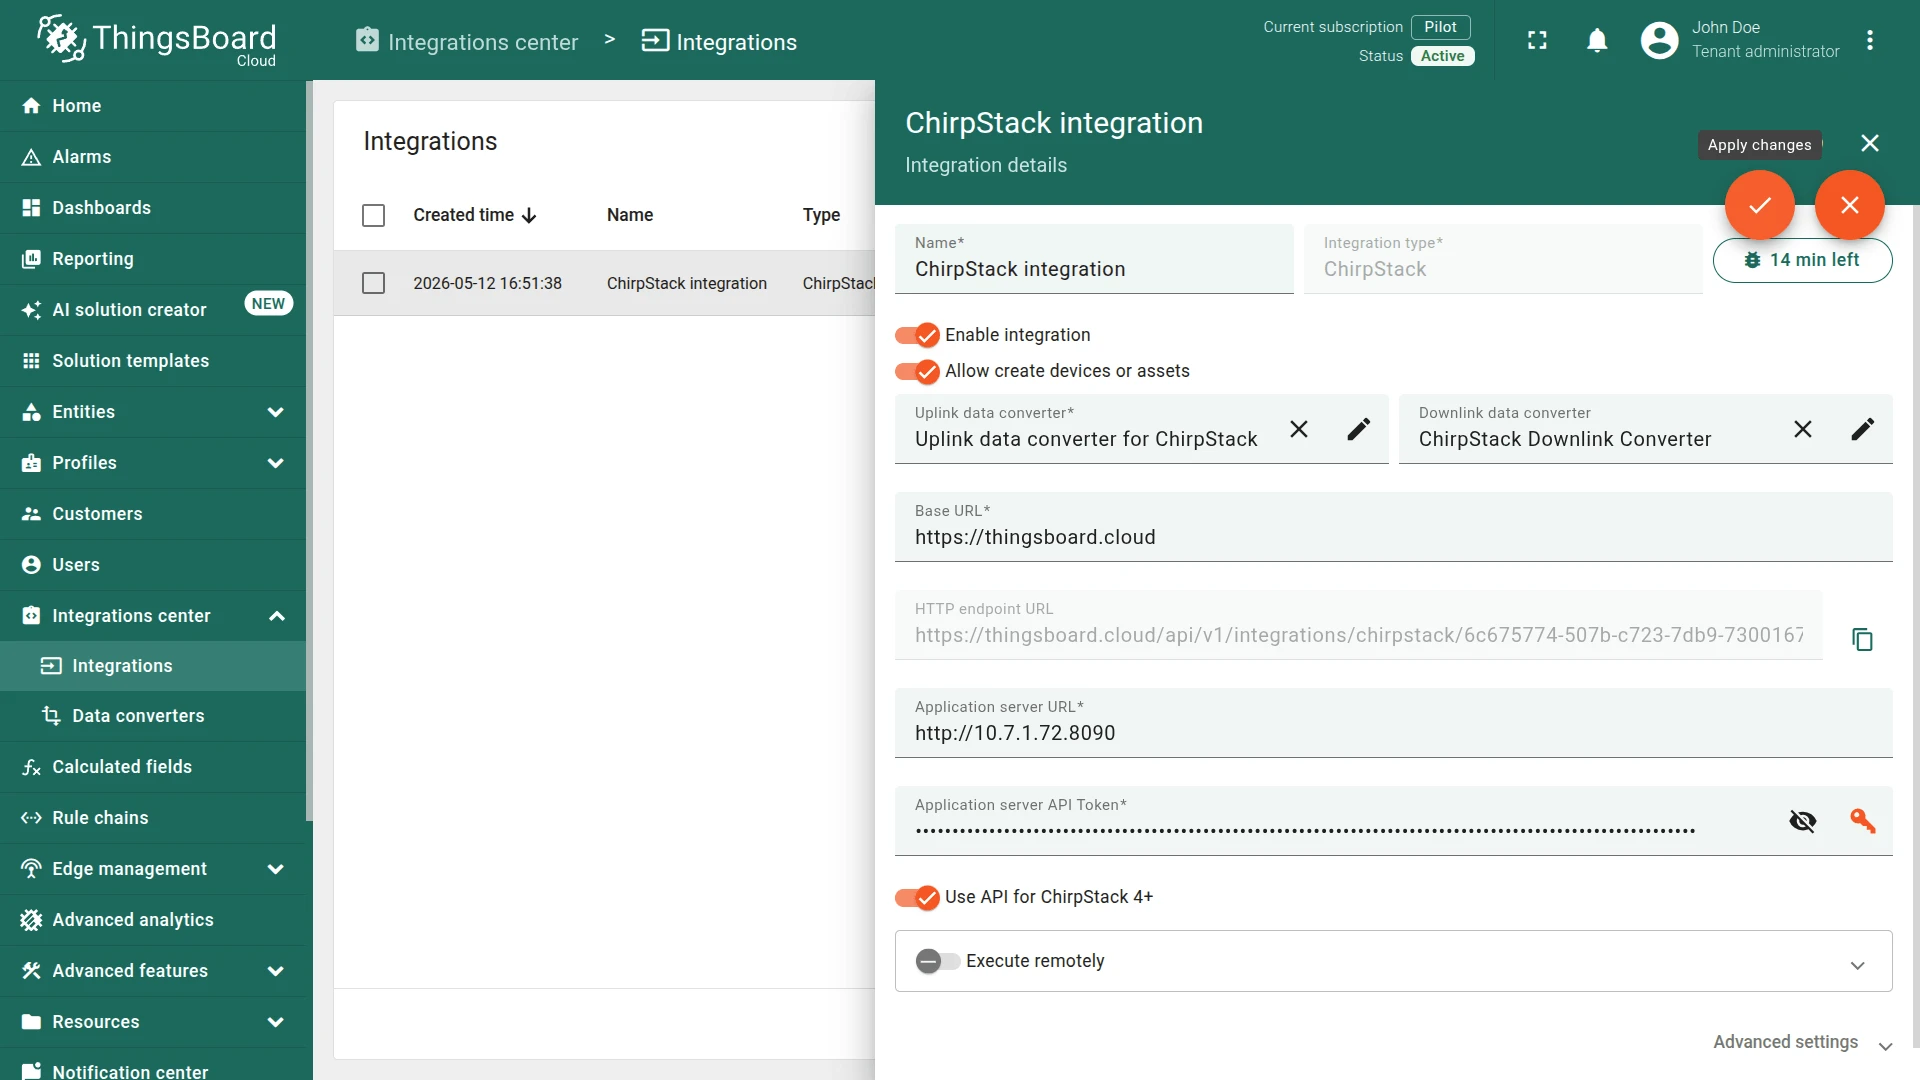
Create ChirpStack Integration
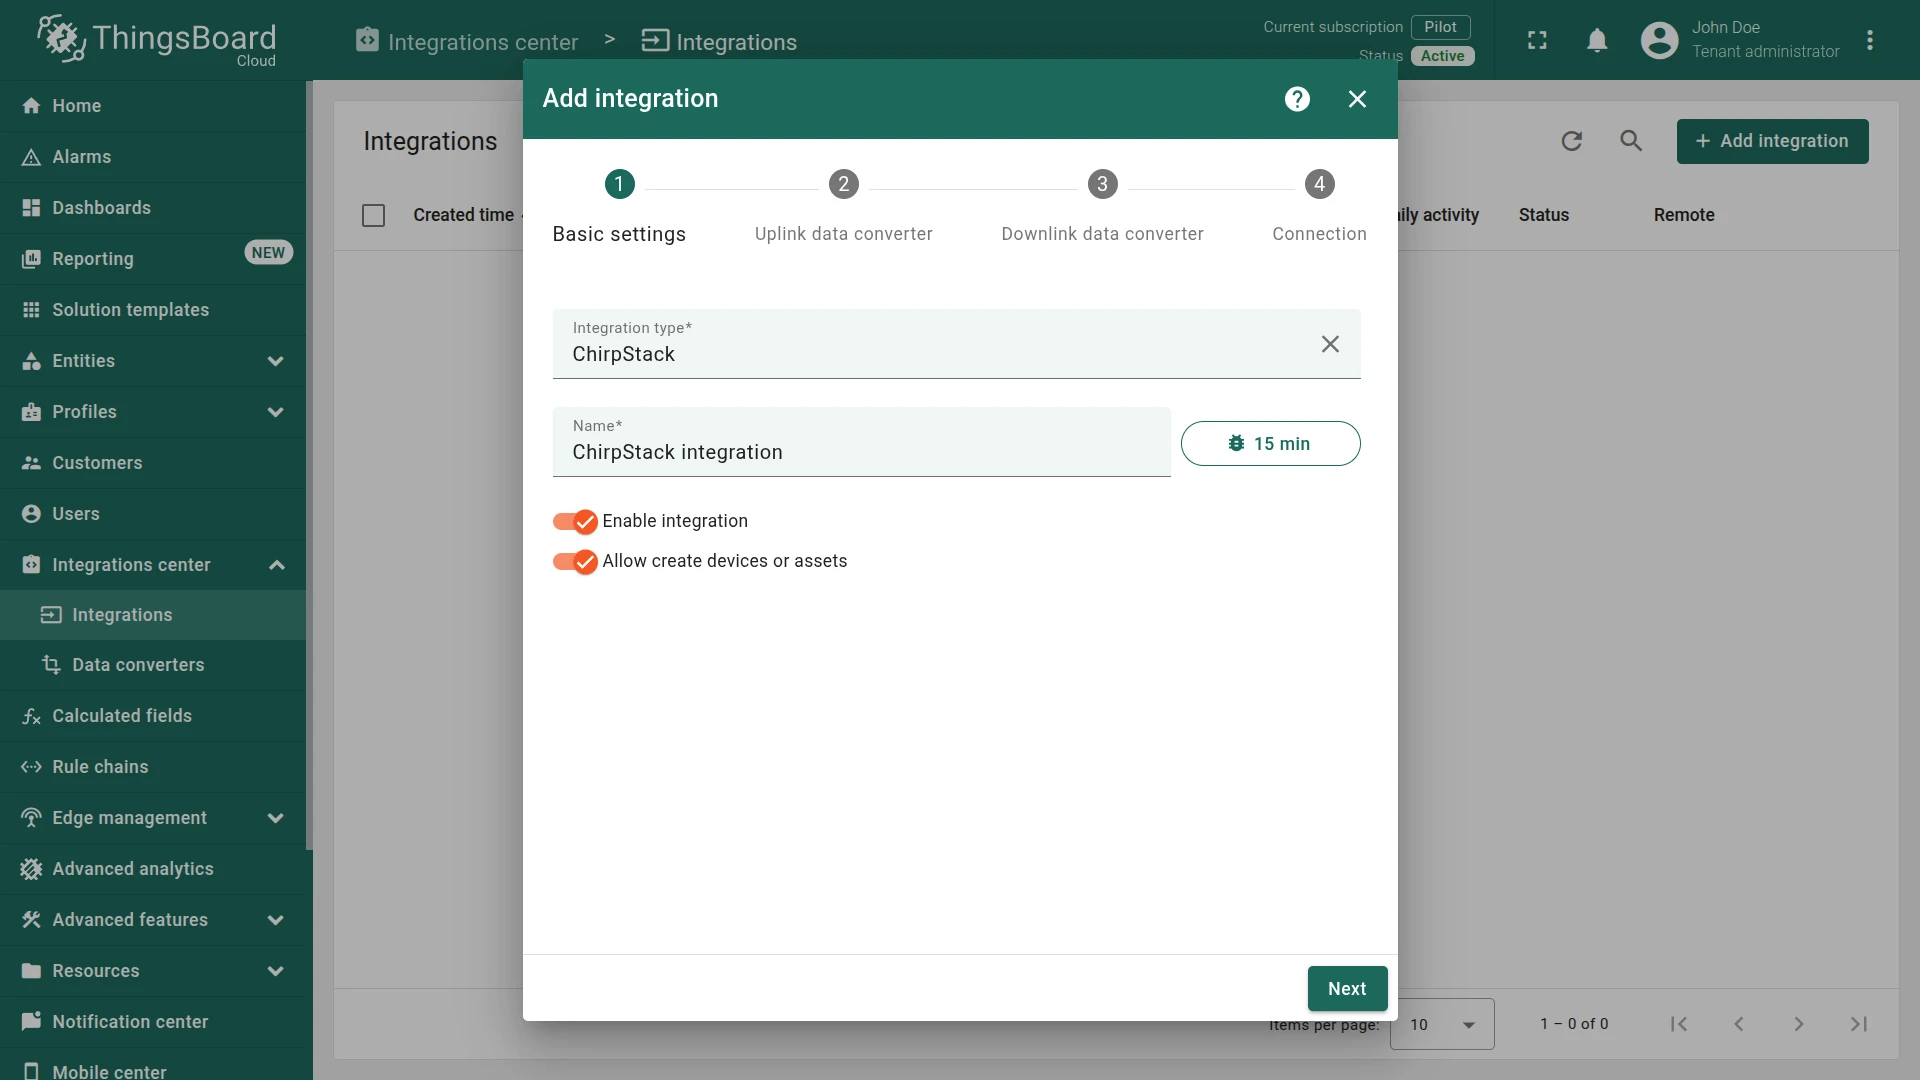
Section titled “Create ChirpStack Integration”- Go to Integrations center ⇾ Integrations and click + Add integration.
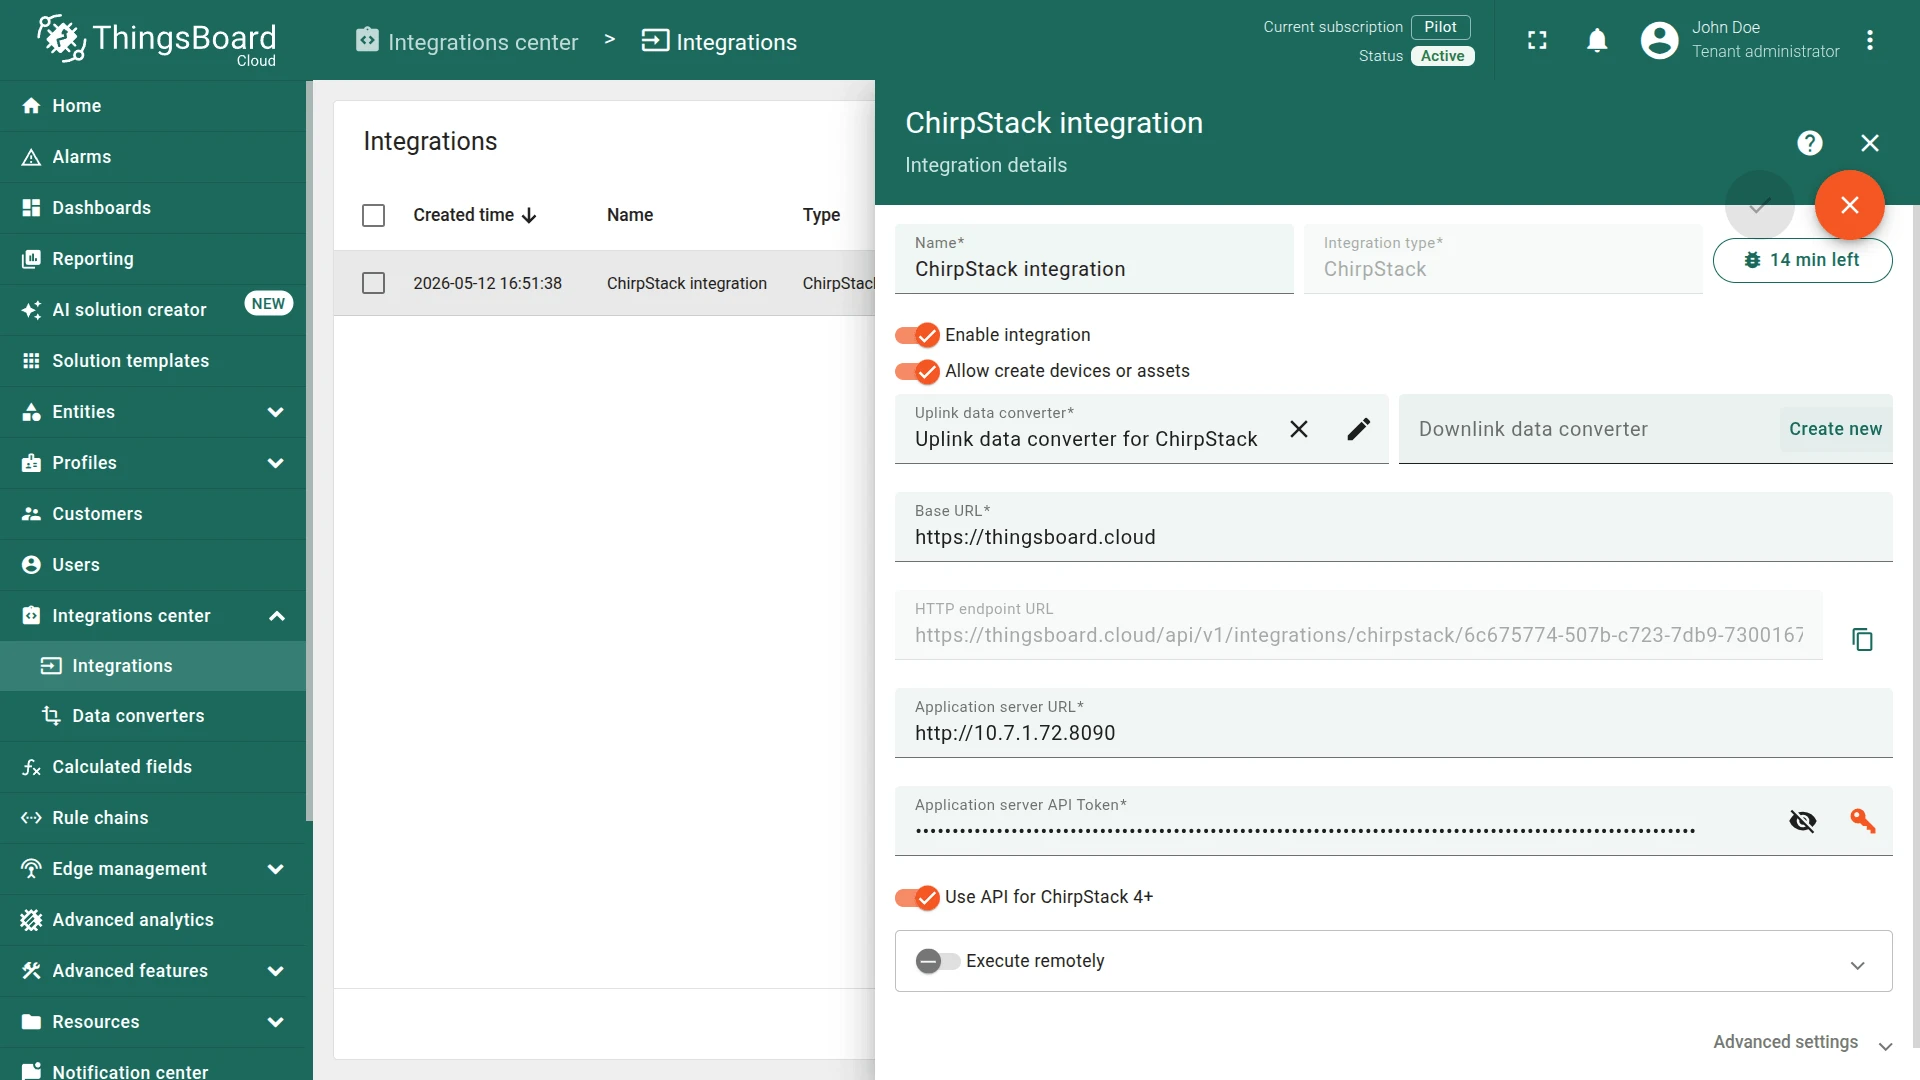
- Basic settings:
- Select ChirpStack as the integration type.
- Enter a Name for the integration, or keep the default
ChirpStack integration. - Enable integration and Allow create devices or assets are enabled by default.
- Click Next.
- Uplink data converter:
- Click Select existing and choose the ChirpStack Uplink Converter created in the previous step.
- Alternatively, click Create new to define the decoder inline, or use Library to load a vendor-provided preset.
- Click Next.
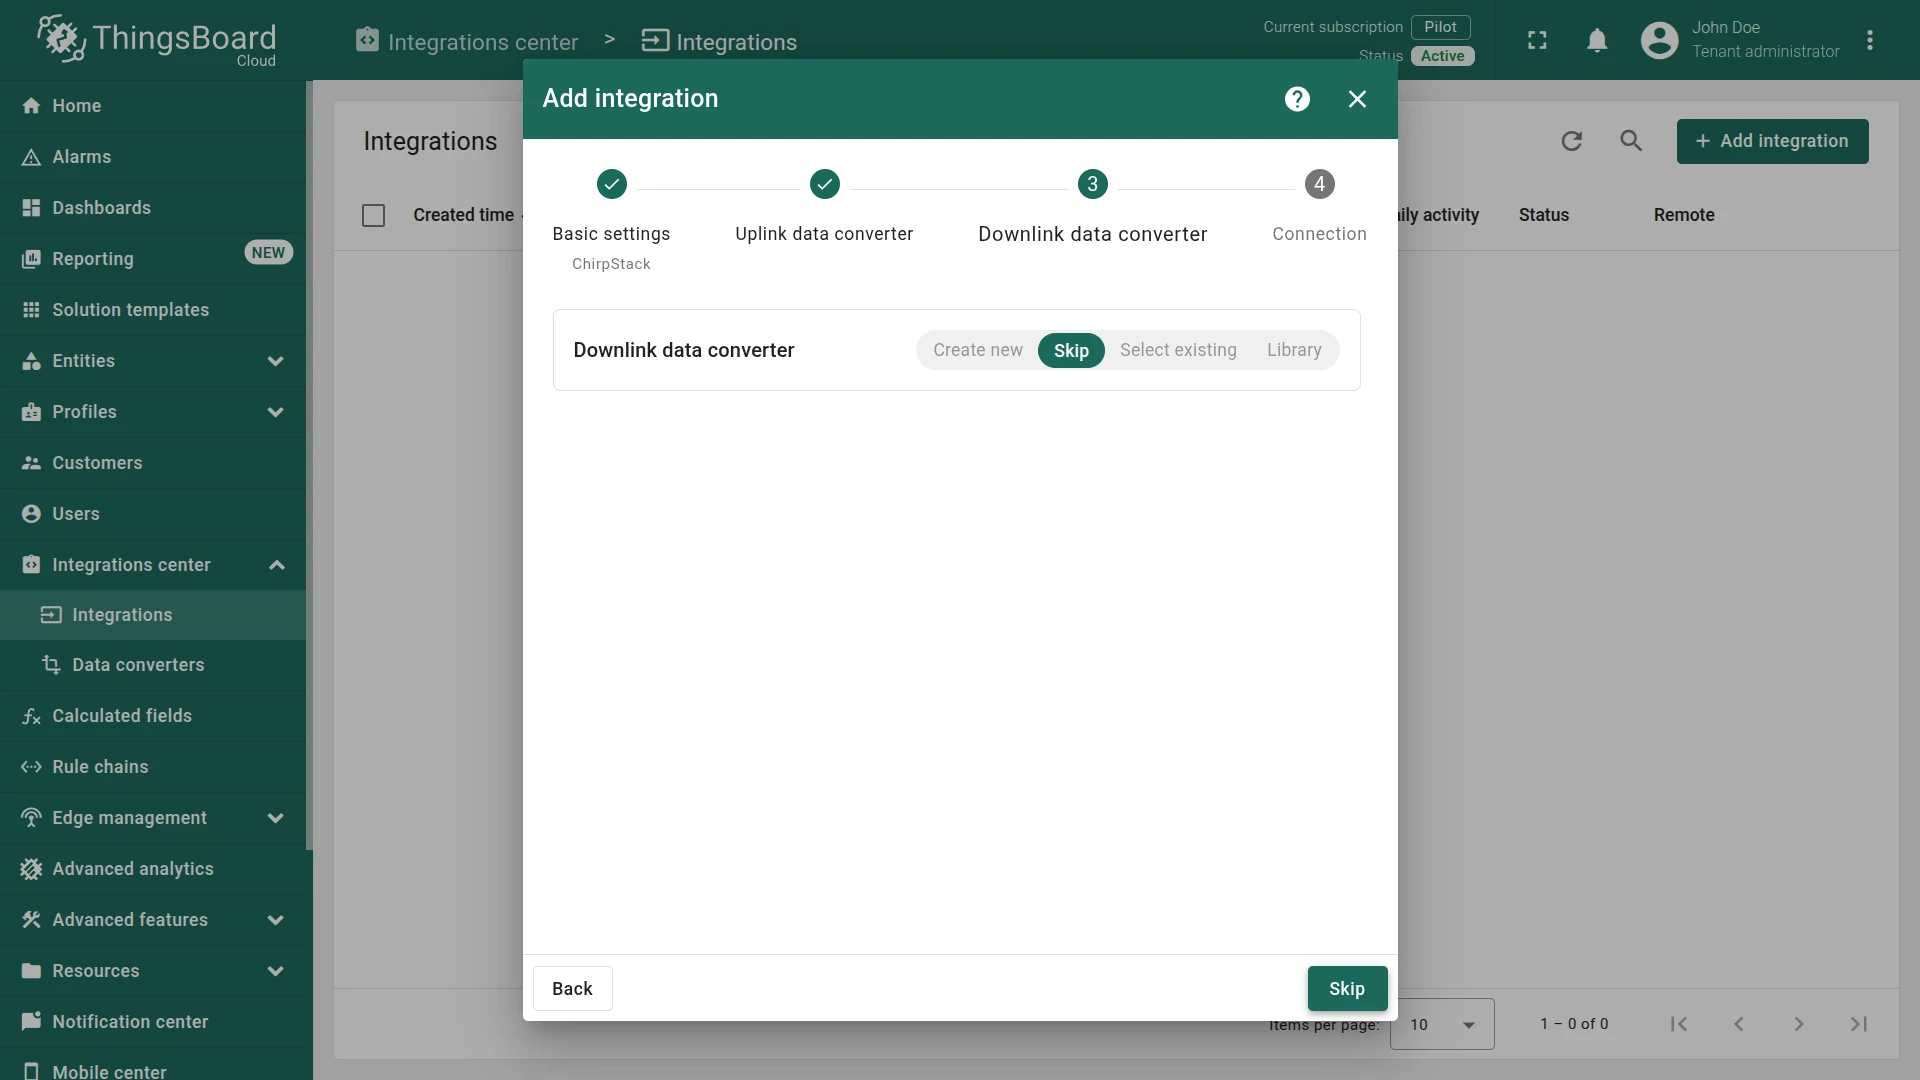
- Downlink data converter:
- Click Create new to add a downlink converter inline, or
- Click Skip — the downlink converter is only needed for sending commands to devices and can be added later.
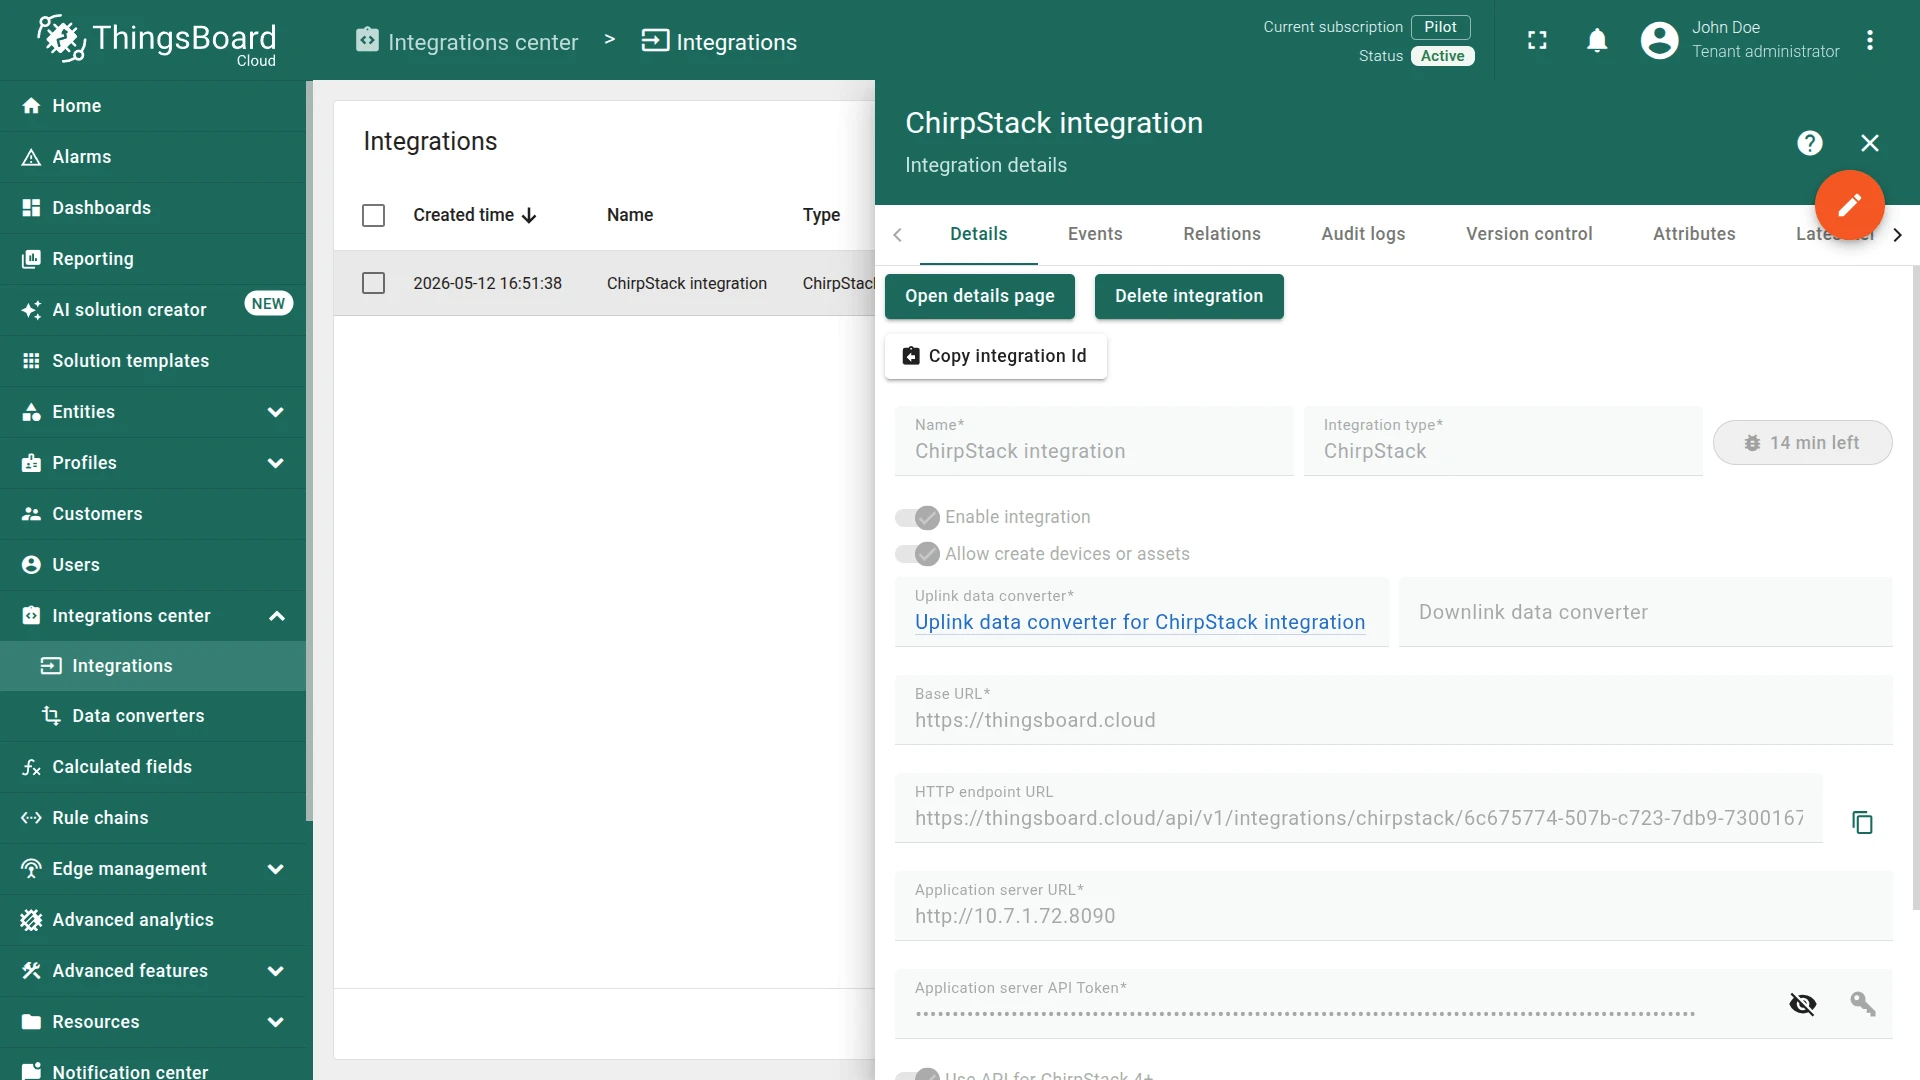
- Connection:
- Enter the ThingsBoard server Base URL.
- Copy the HTTP endpoint URL — you will need it when configuring ChirpStack.
- Enter the Application server URL (the ChirpStack REST API address; with a standard Docker Compose installation, typically port
8090). - Enter the Application server API Token — obtained in Add a ChirpStack API key above.
- Use API for ChirpStack 4+ is enabled by default — disable only when connecting to ChirpStack 3.x.
- Click Add to complete the integration.

Connection Settings
Section titled “Connection Settings”Base URL
The base address of the ThingsBoard server, used to construct the HTTP endpoint URL.
HTTP Endpoint URL
Auto-generated endpoint for this integration. Configure ChirpStack to forward uplink messages to this URL.
Application Server URL
The address of the ChirpStack REST API service. With a standard Docker Compose installation, this is typically port 8090.
Application Server API Token
API token used to authenticate ThingsBoard requests to the ChirpStack API when sending downlink messages. See Add a ChirpStack API key.
Use API for ChirpStack 4+
Enables the ChirpStack v4 API. Enabled by default — disable only when connecting to ChirpStack 3.x.
Execute Remotely
When enabled, ThingsBoard generates an Integration key and Integration secret that allow the integration to run as a separate process outside the ThingsBoard cluster — useful when the integration must reach services not accessible from the ThingsBoard server.
See Remote Integration for setup details.
Configure ChirpStack
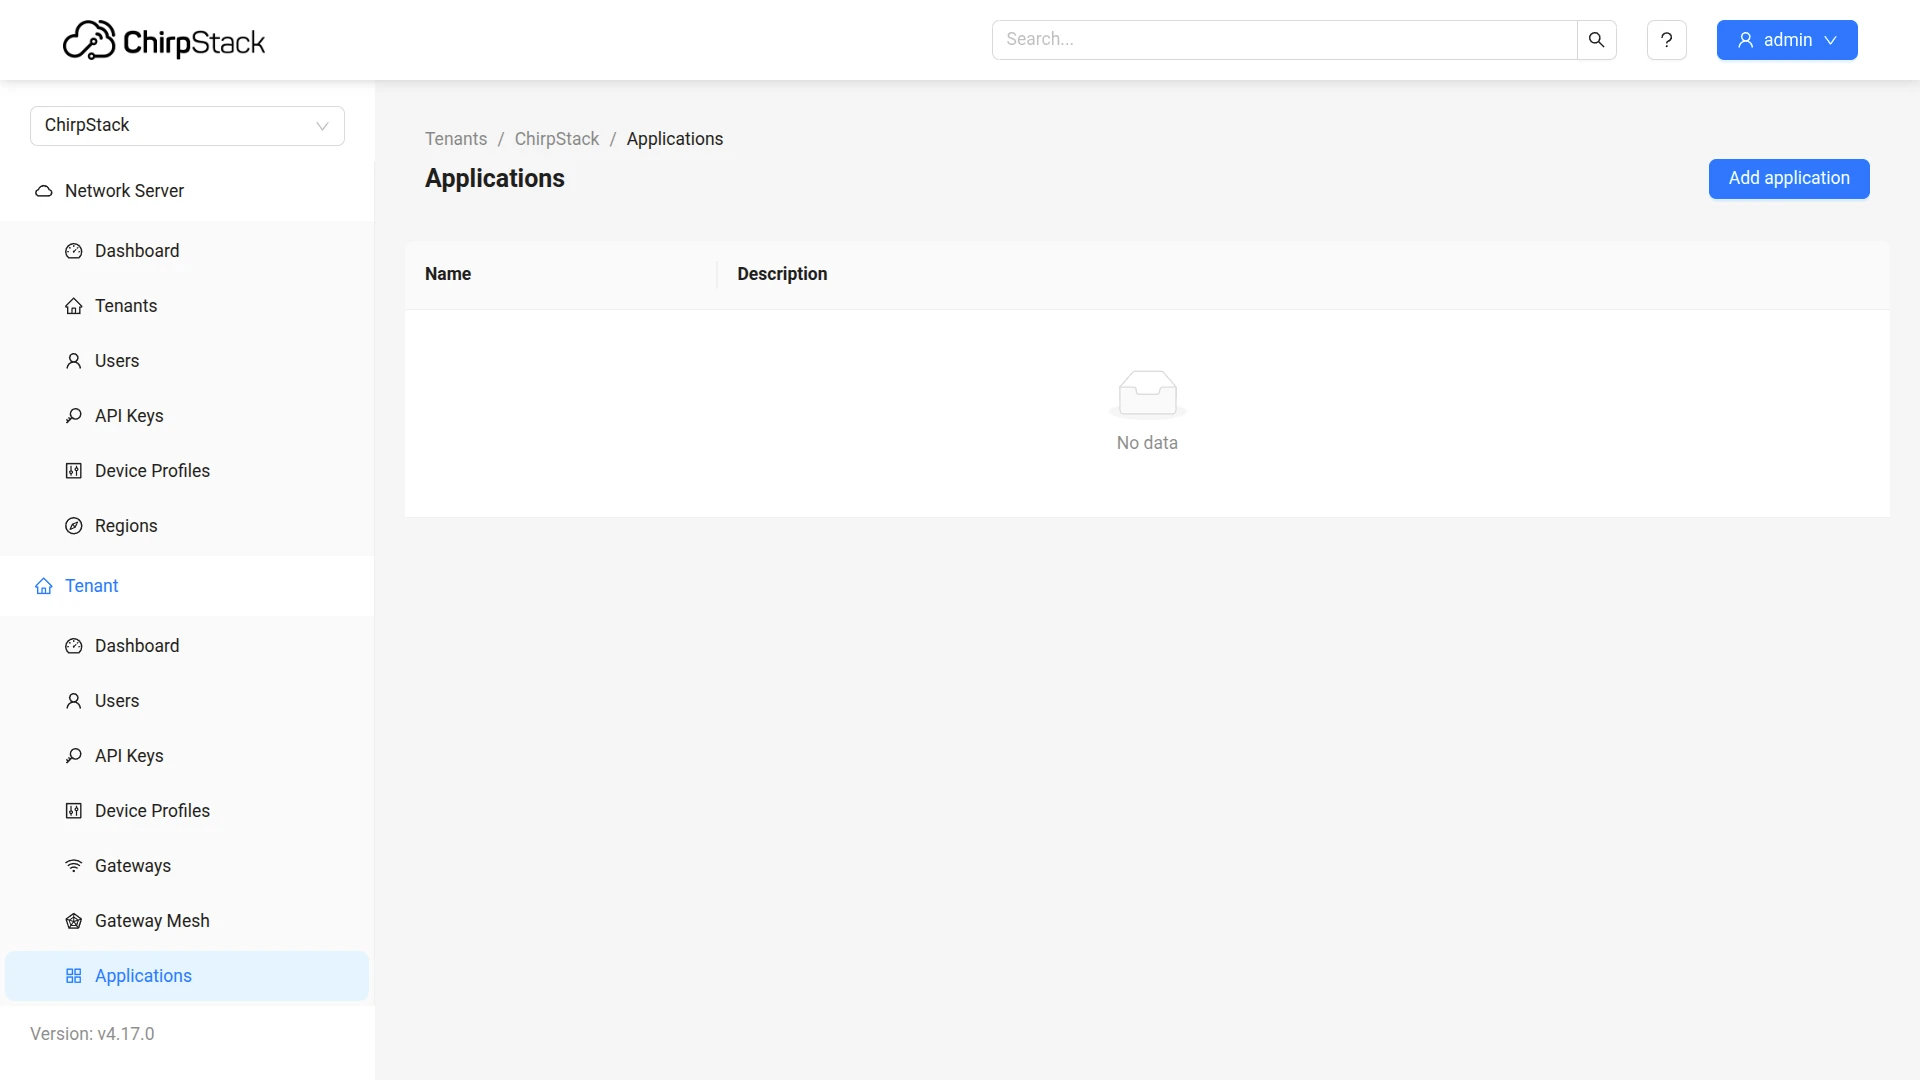
Section titled “Configure ChirpStack”To forward uplink messages from ChirpStack to ThingsBoard, add an HTTP integration to your ChirpStack application. If you already have a ChirpStack application with your devices registered, skip steps 1–2.
- Open ChirpStack UI.
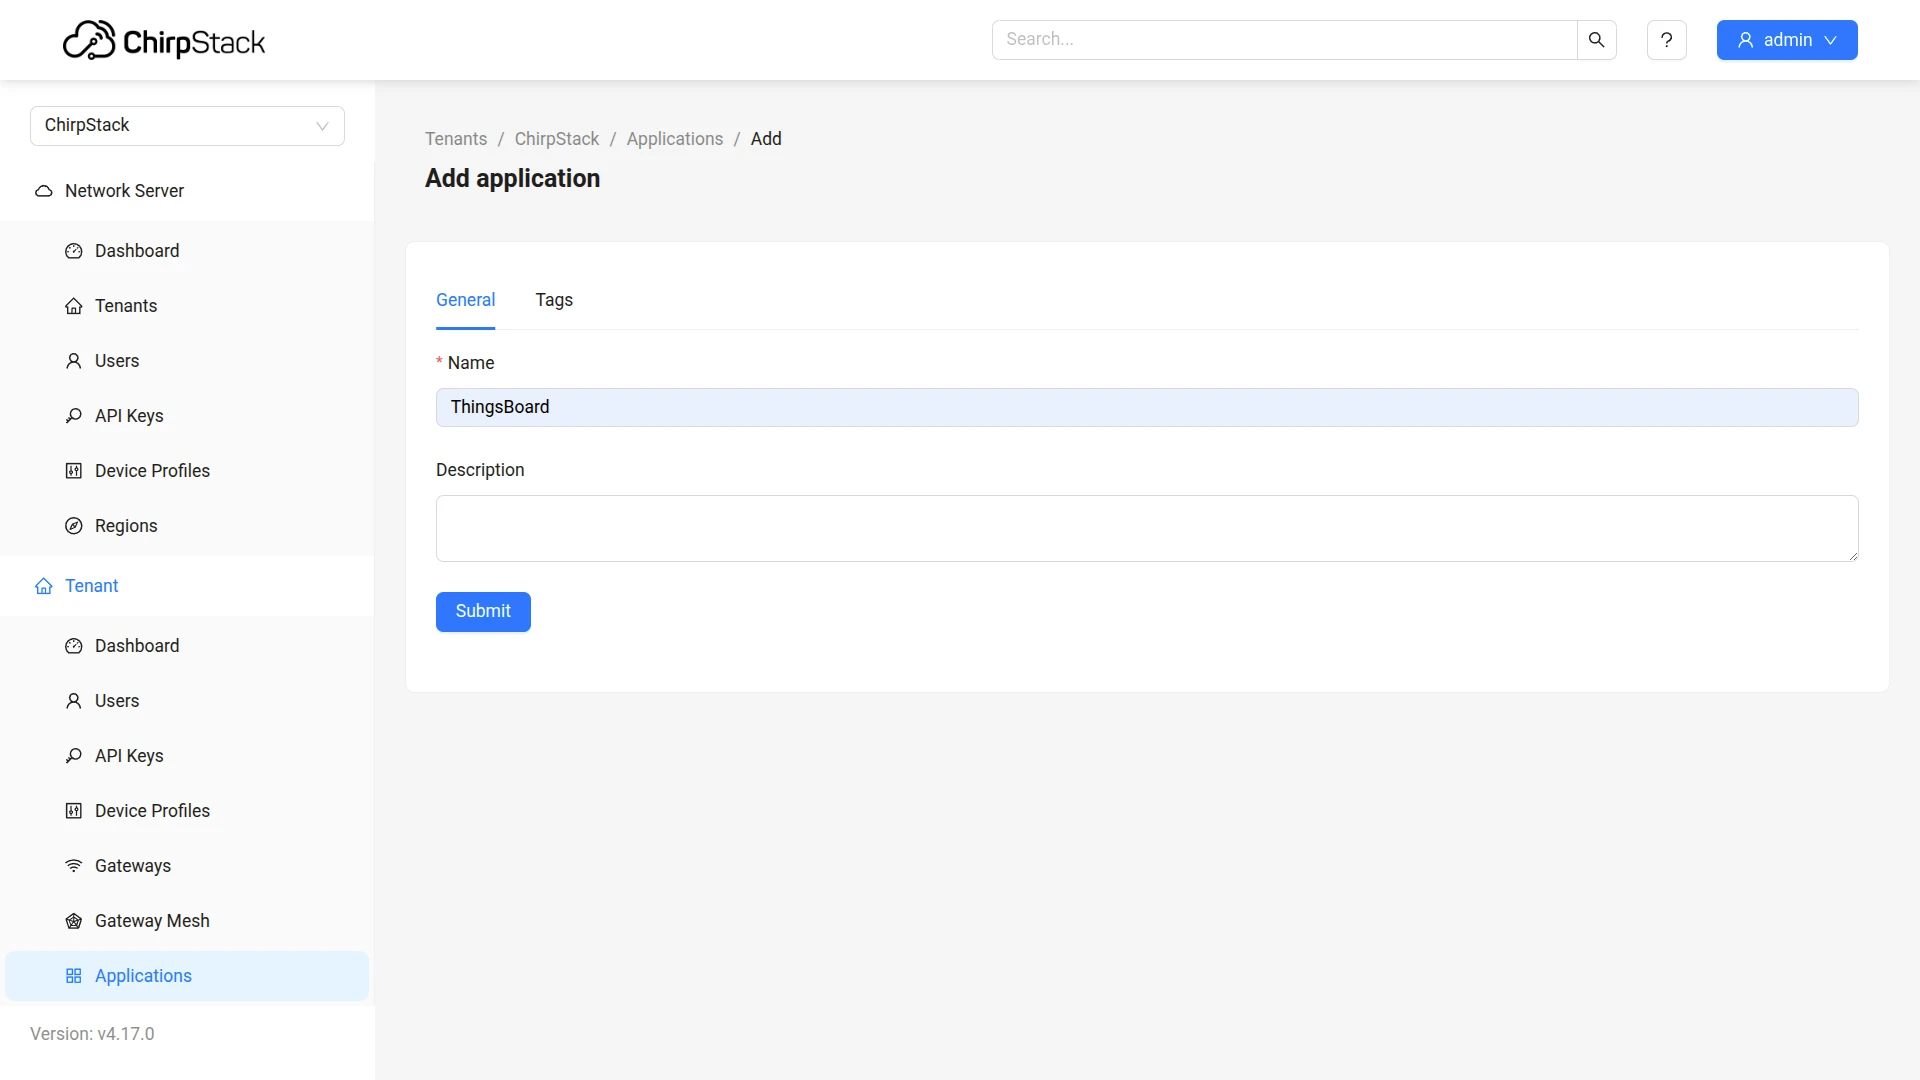
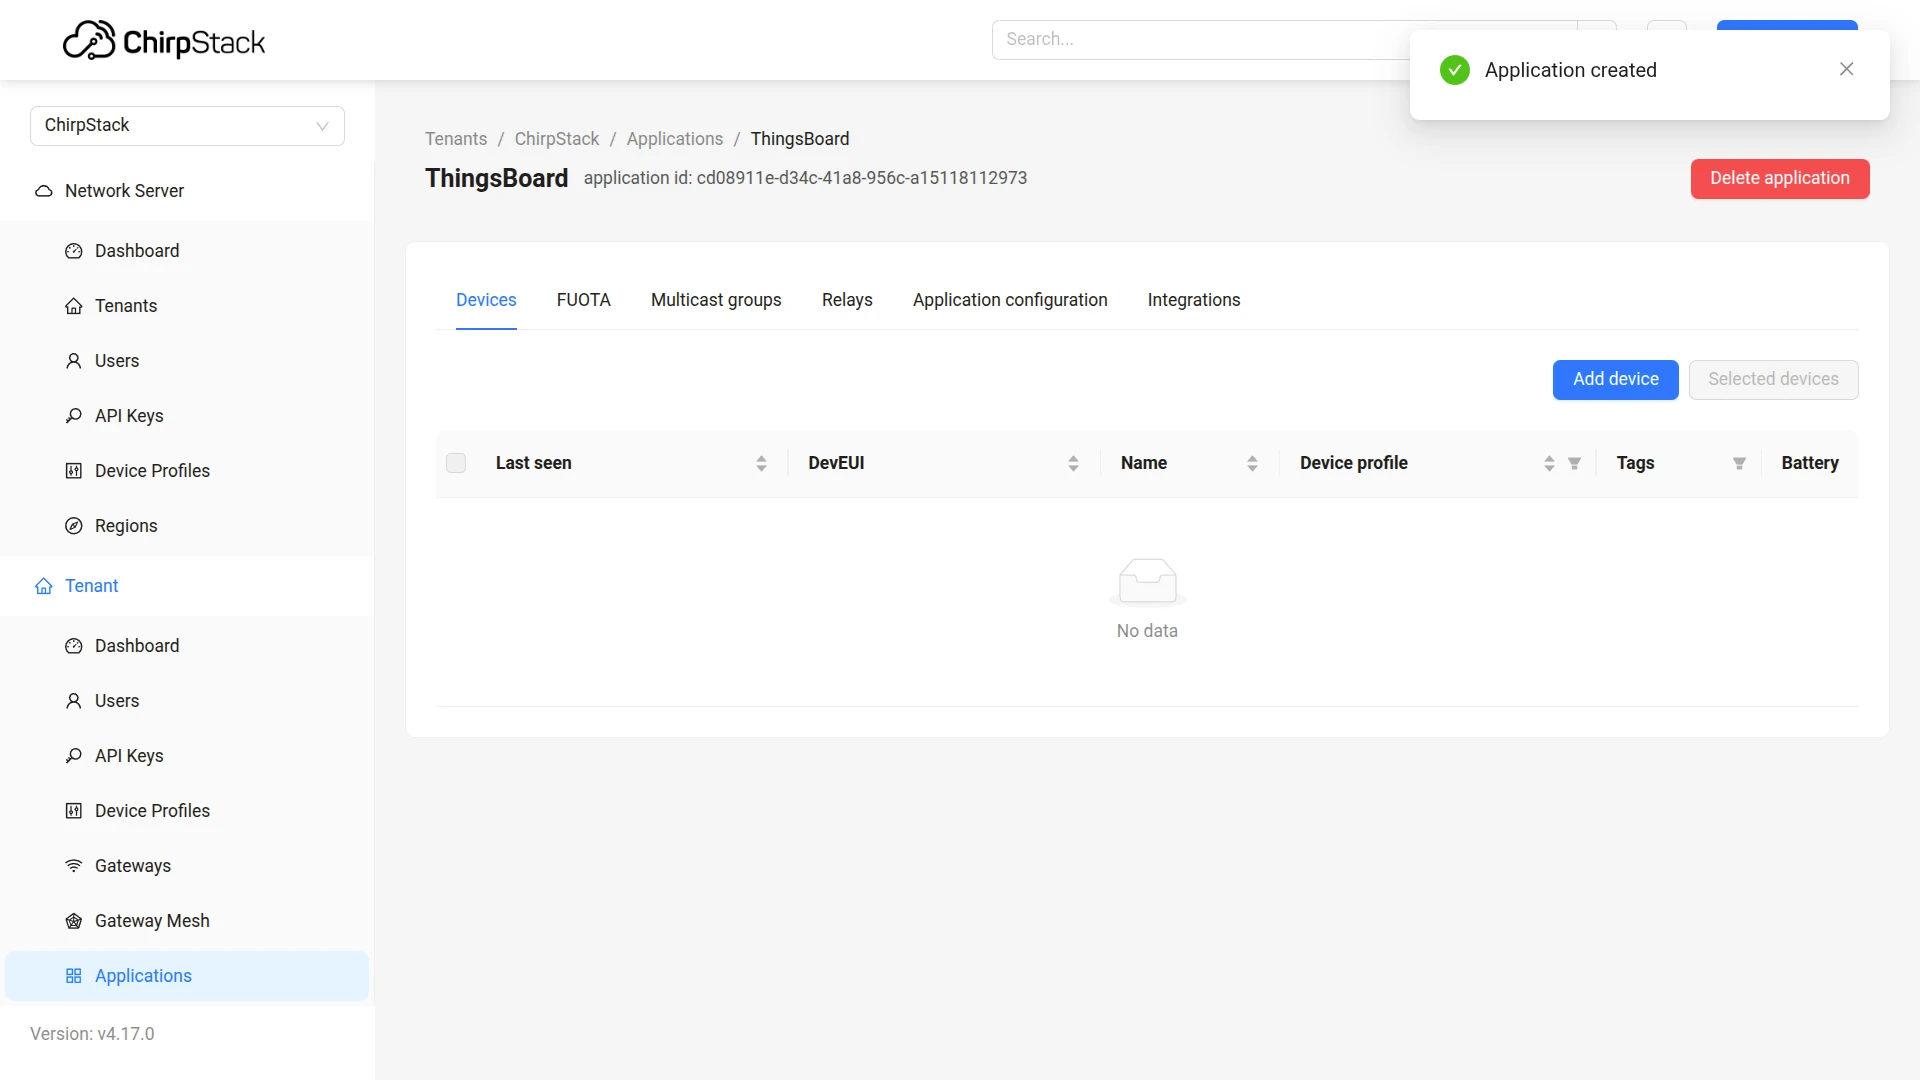
- Go to Tenant ⇾ Applications and click Add application.
- Name the application (e.g.
ThingsBoard) and click Submit. - Open the application and navigate to the Integrations tab.
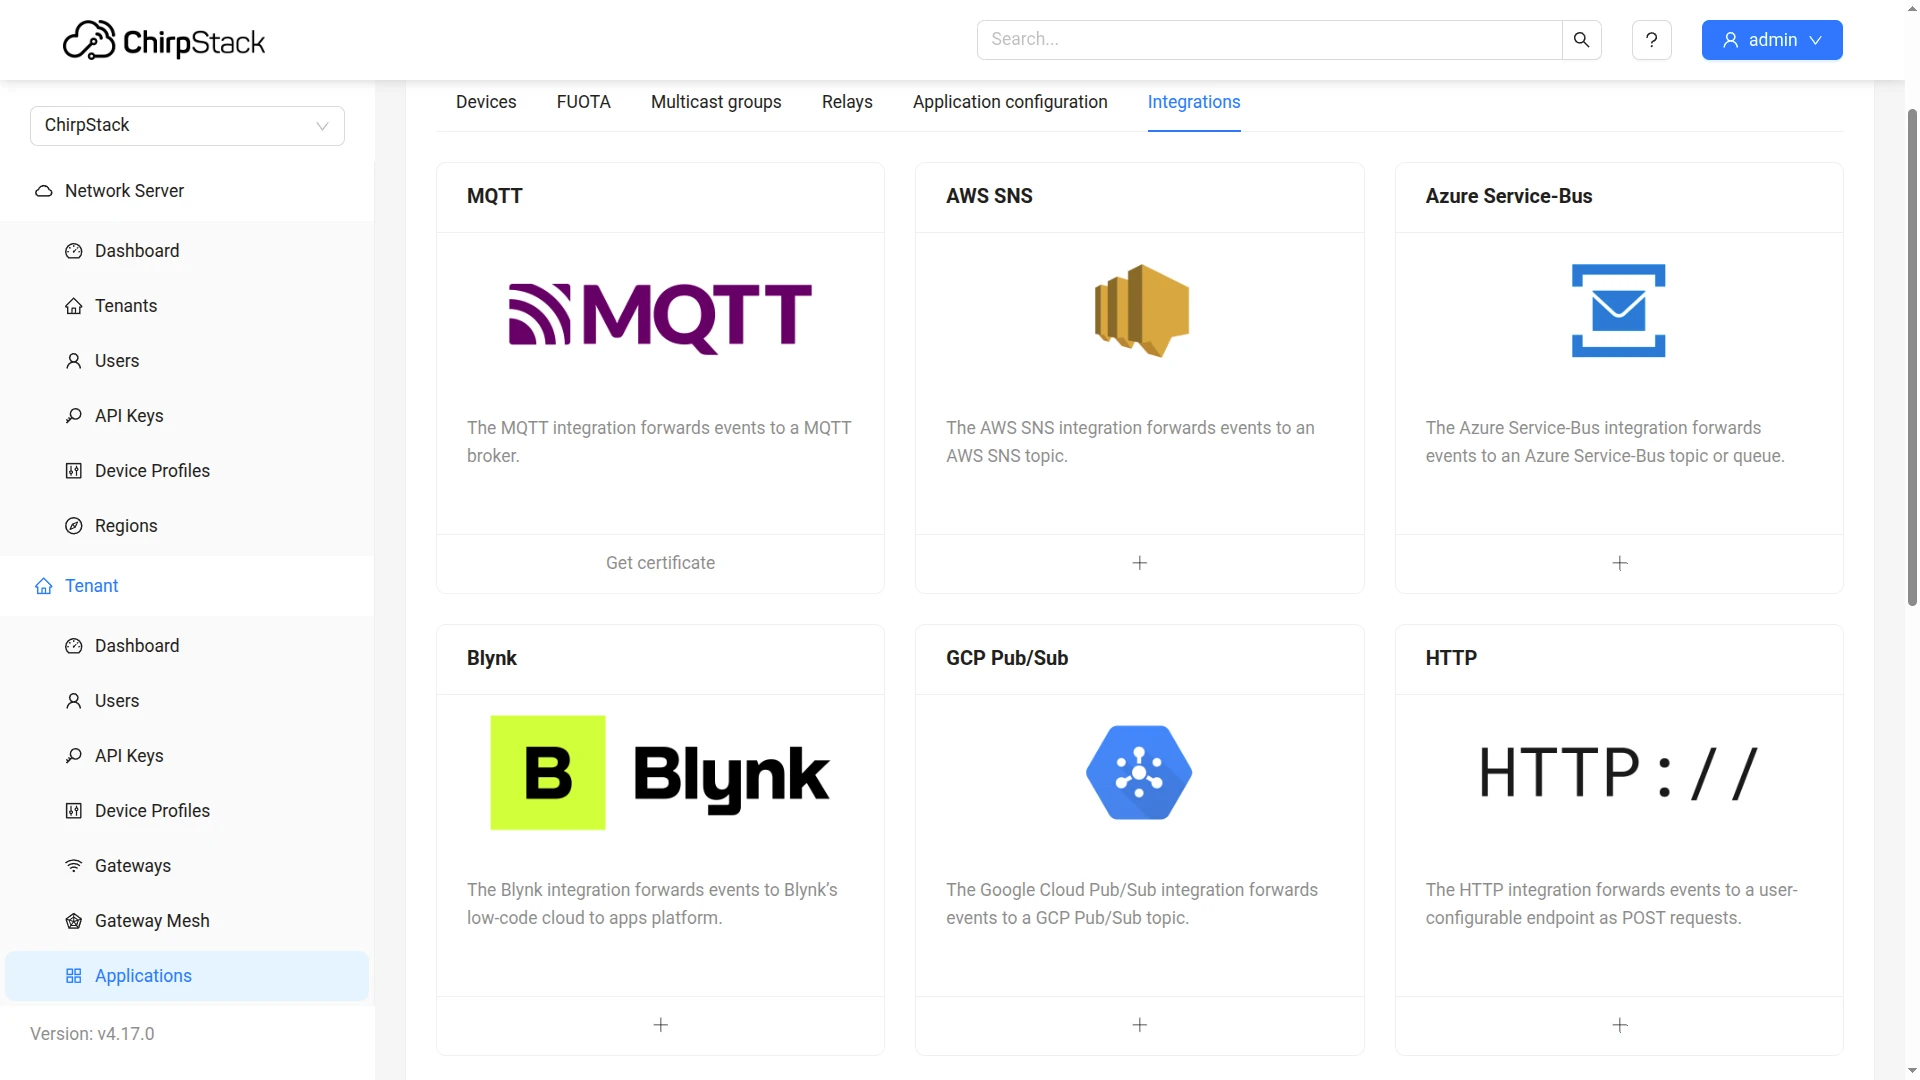
- In the integration catalog, click + on the HTTP card.
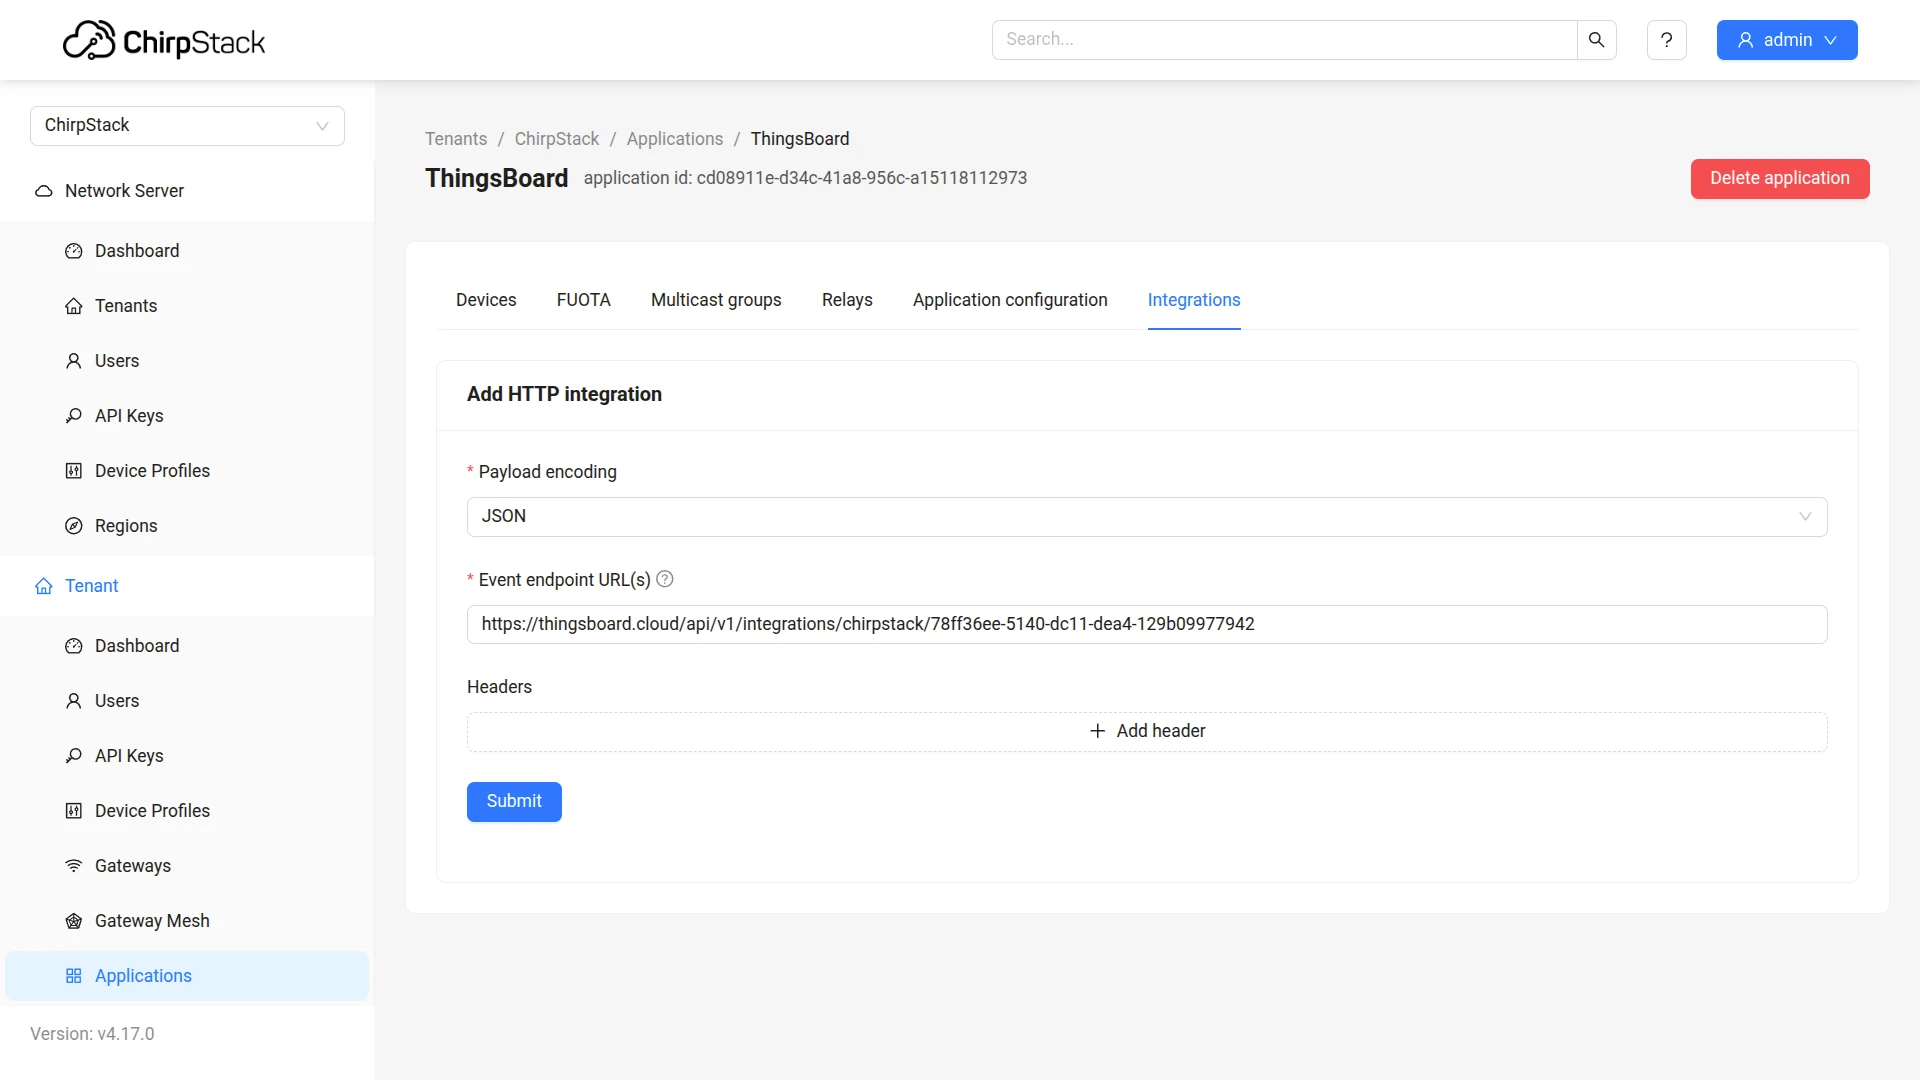
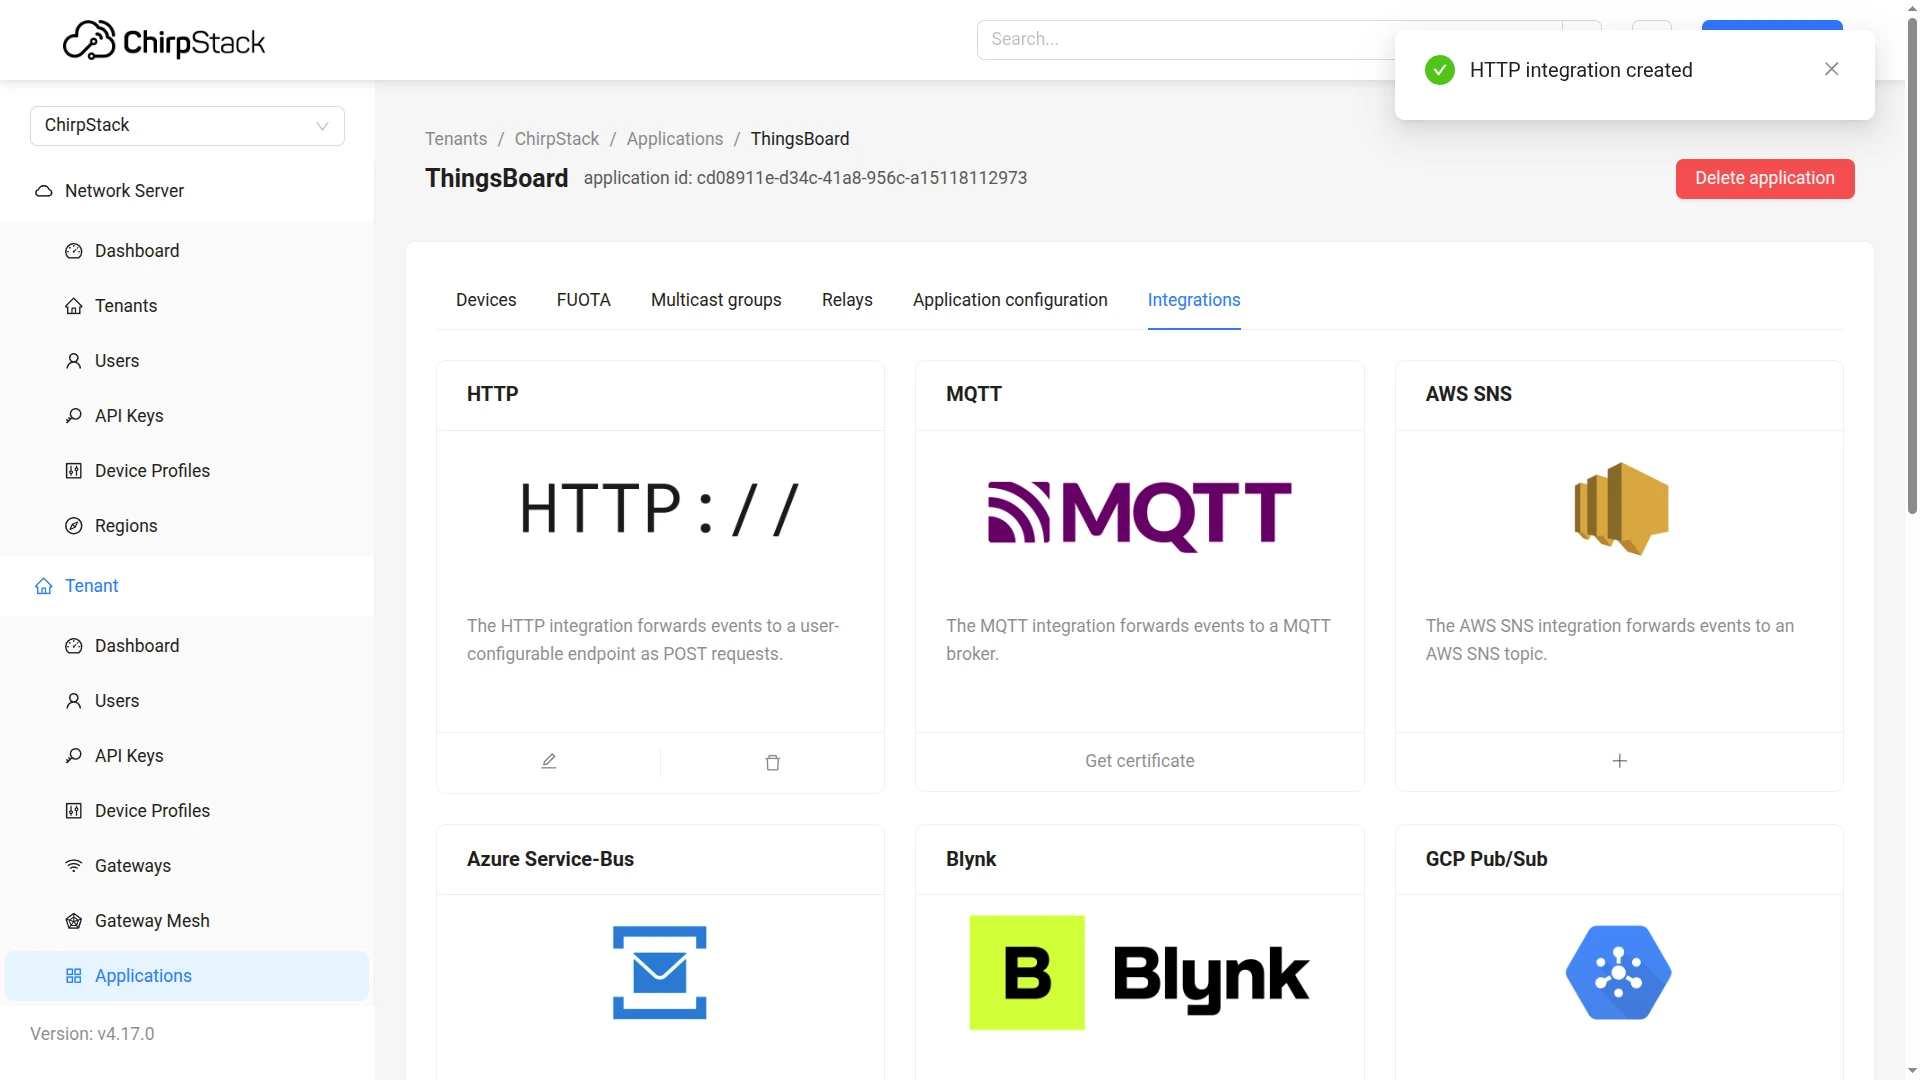
- Paste the copied HTTP endpoint URL field from the ThingsBoard integration. Click Submit.
Now every uplink from the device will be sent to ThingsBoard.
Test the Integration
Section titled “Test the Integration”After the integration is created, send a test uplink and confirm that ThingsBoard received the message, decoded it correctly, and provisioned the device.
Send Test Uplink
Section titled “Send Test Uplink”When a device sends an uplink message via ChirpStack, ThingsBoard automatically creates the device on the first uplink (provided Allow create devices or assets is enabled in the integration settings) and stores its telemetry and attributes.
If you do not have a physical device sending data, you can emulate a device message by sending an HTTP request directly to the ThingsBoard endpoint using curl — bypassing ChirpStack entirely. This is useful to verify that the integration and uplink converter are configured correctly before connecting real hardware.
Use this command to send a test uplink message. Replace $HTTP_ENDPOINT_URL with the HTTP endpoint URL copied from the integration.
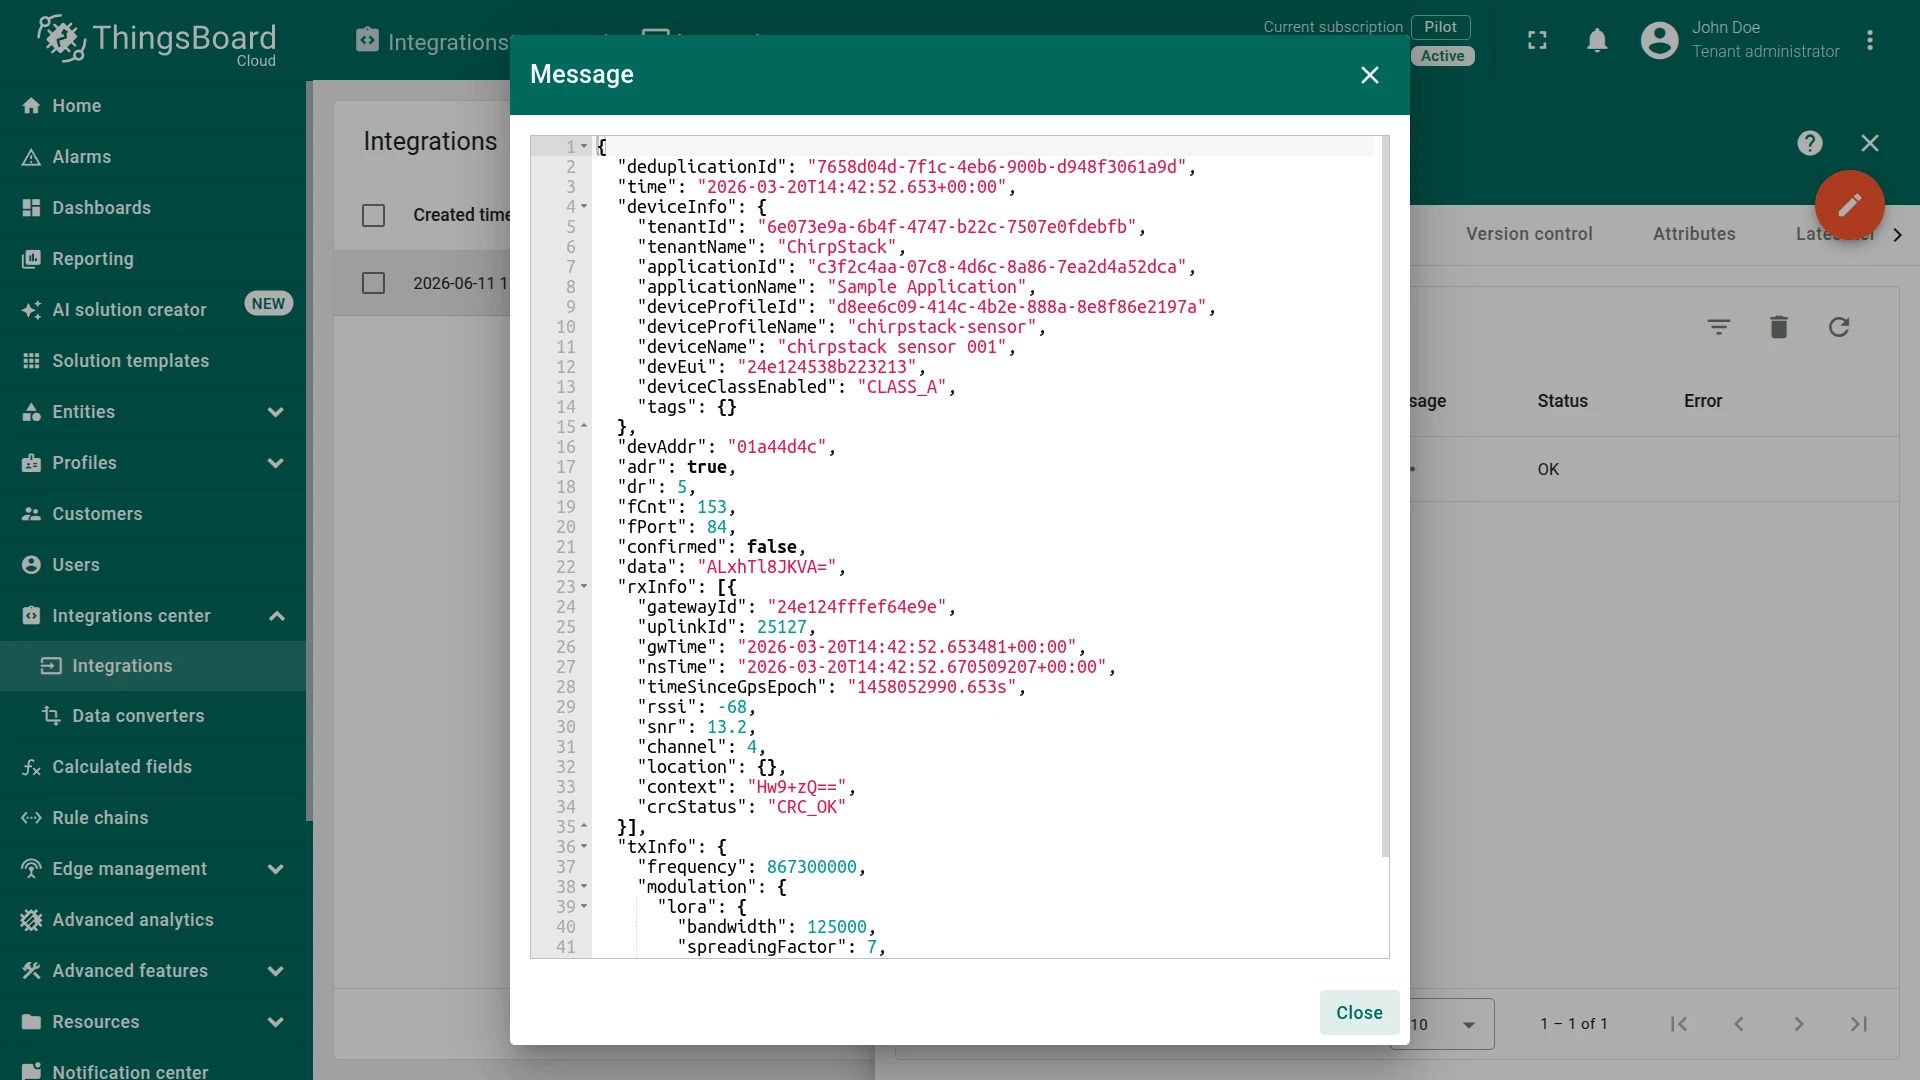
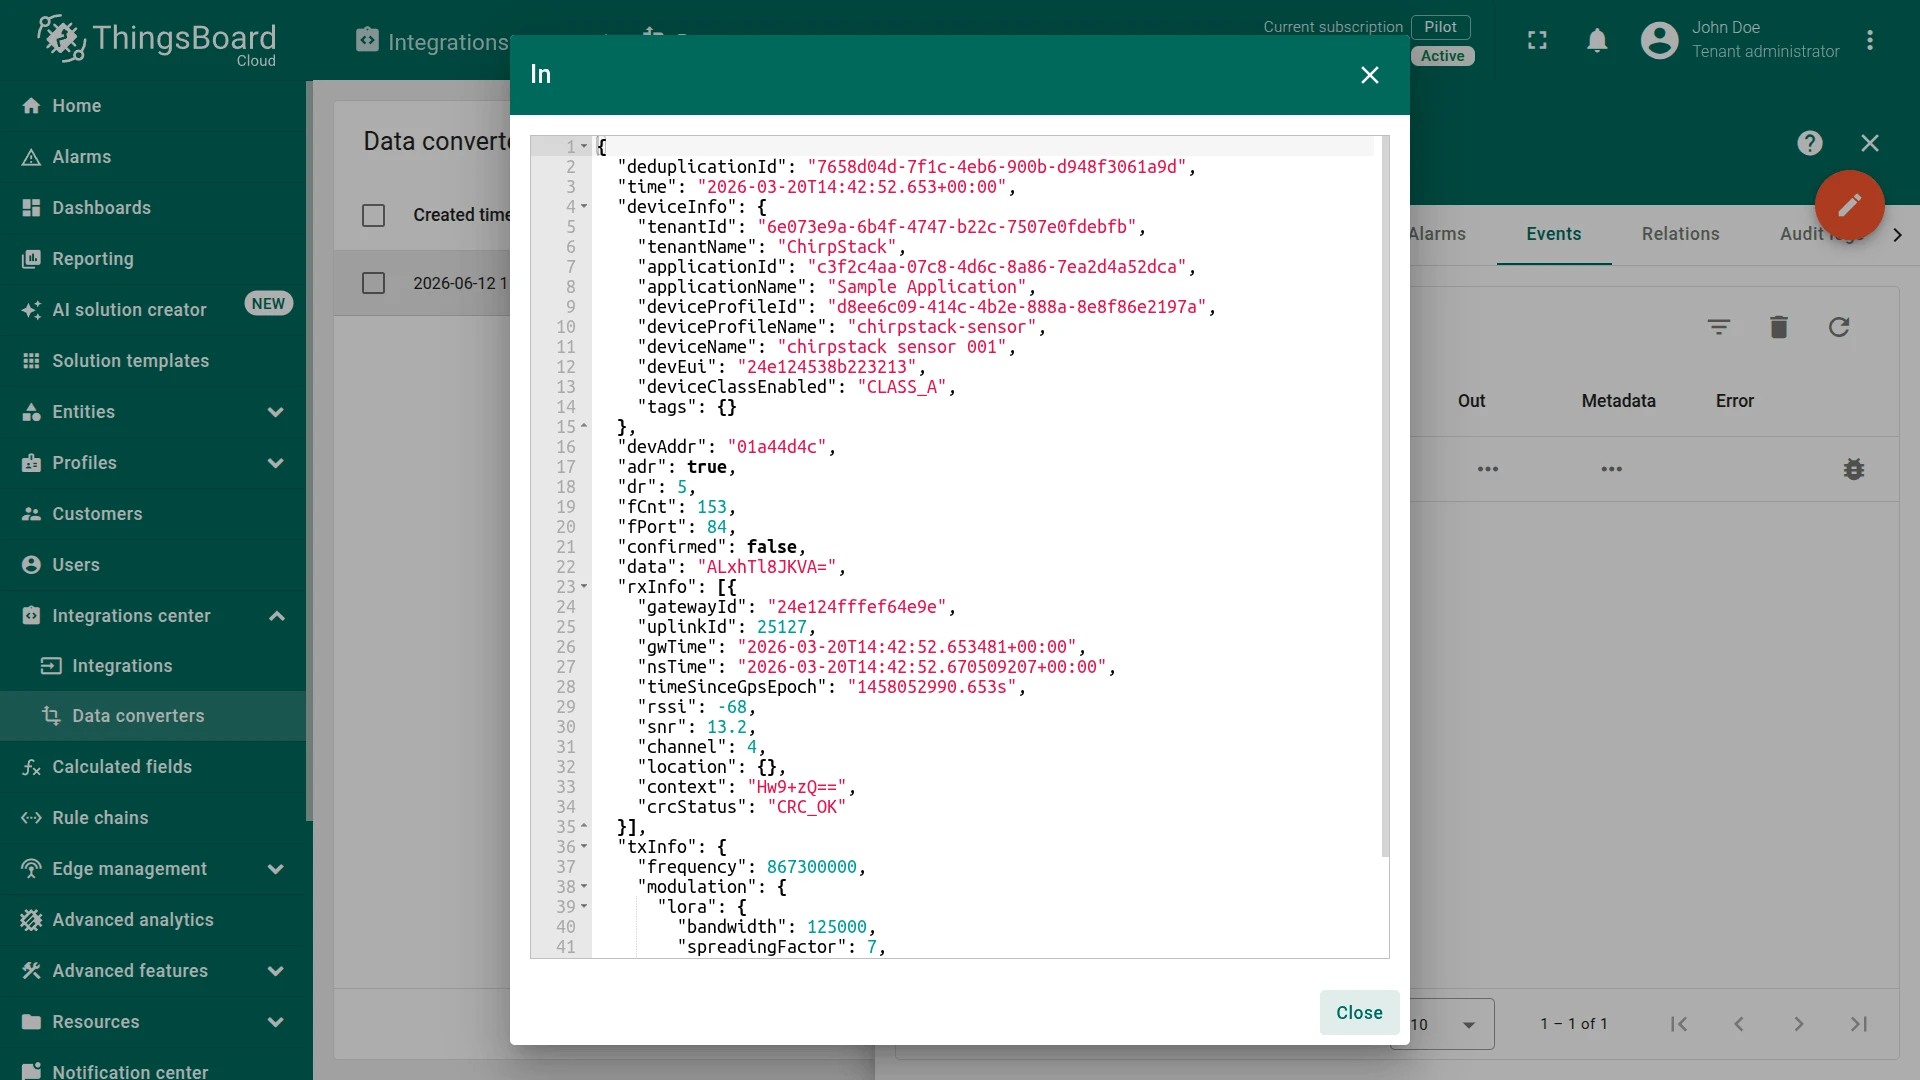
curl -v \ -H "Content-Type: application/json" \ -d '{"deduplicationId":"7658d04d-7f1c-4eb6-900b-d948f3061a9d","time":"2026-03-20T14:42:52.653+00:00","deviceInfo":{"tenantId":"6e073e9a-6b4f-4747-b22c-7507e0fdebfb","tenantName":"ChirpStack","applicationId":"c3f2c4aa-07c8-4d6c-8a86-7ea2d4a52dca","applicationName":"Sample Application","deviceProfileId":"d8ee6c09-414c-4b2e-888a-8e8f86e2197a","deviceProfileName":"chirpstack-sensor","deviceName":"chirpstack sensor 001","devEui":"24e124538b223213","deviceClassEnabled":"CLASS_A","tags":{}},"devAddr":"01a44d4c","adr":true,"dr":5,"fCnt":153,"fPort":84,"confirmed":false,"data":"ALxhTl8JKVA=","rxInfo":[{"gatewayId":"24e124fffef64e9e","uplinkId":25127,"gwTime":"2026-03-20T14:42:52.653481+00:00","nsTime":"2026-03-20T14:42:52.670509207+00:00","timeSinceGpsEpoch":"1458052990.653s","rssi":-68,"snr":13.2,"channel":4,"location":{},"context":"Hw9+zQ==","crcStatus":"CRC_OK"}],"txInfo":{"frequency":867300000,"modulation":{"lora":{"bandwidth":125000,"spreadingFactor":7,"codeRate":"CR_4_5"}}},"regionConfigId":"eu868"}' \ "$HTTP_ENDPOINT_URL"Verify Integration Events
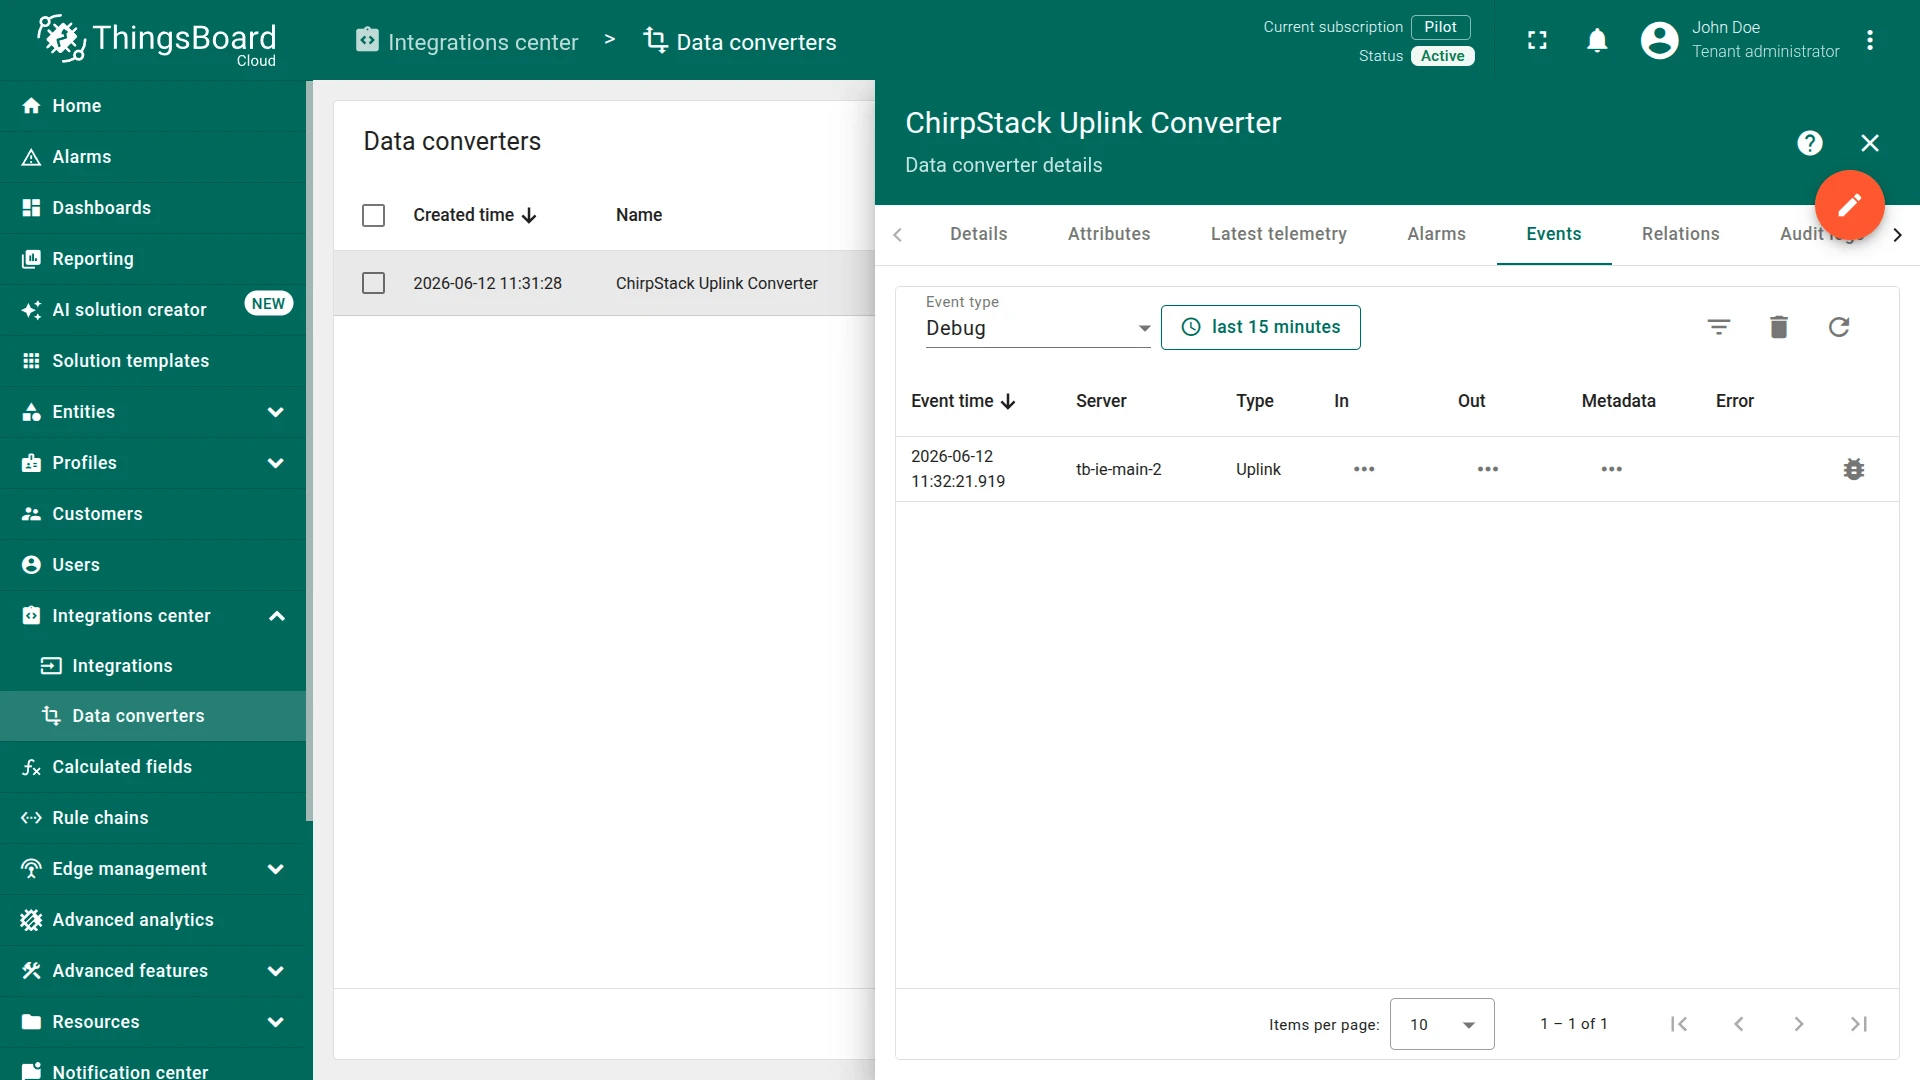
Section titled “Verify Integration Events”Go to Integrations center ⇾ Integrations, open ChirpStack integration, and click the Events tab. Each successfully processed uplink appears as a row with status OK.

Verify Converter Events
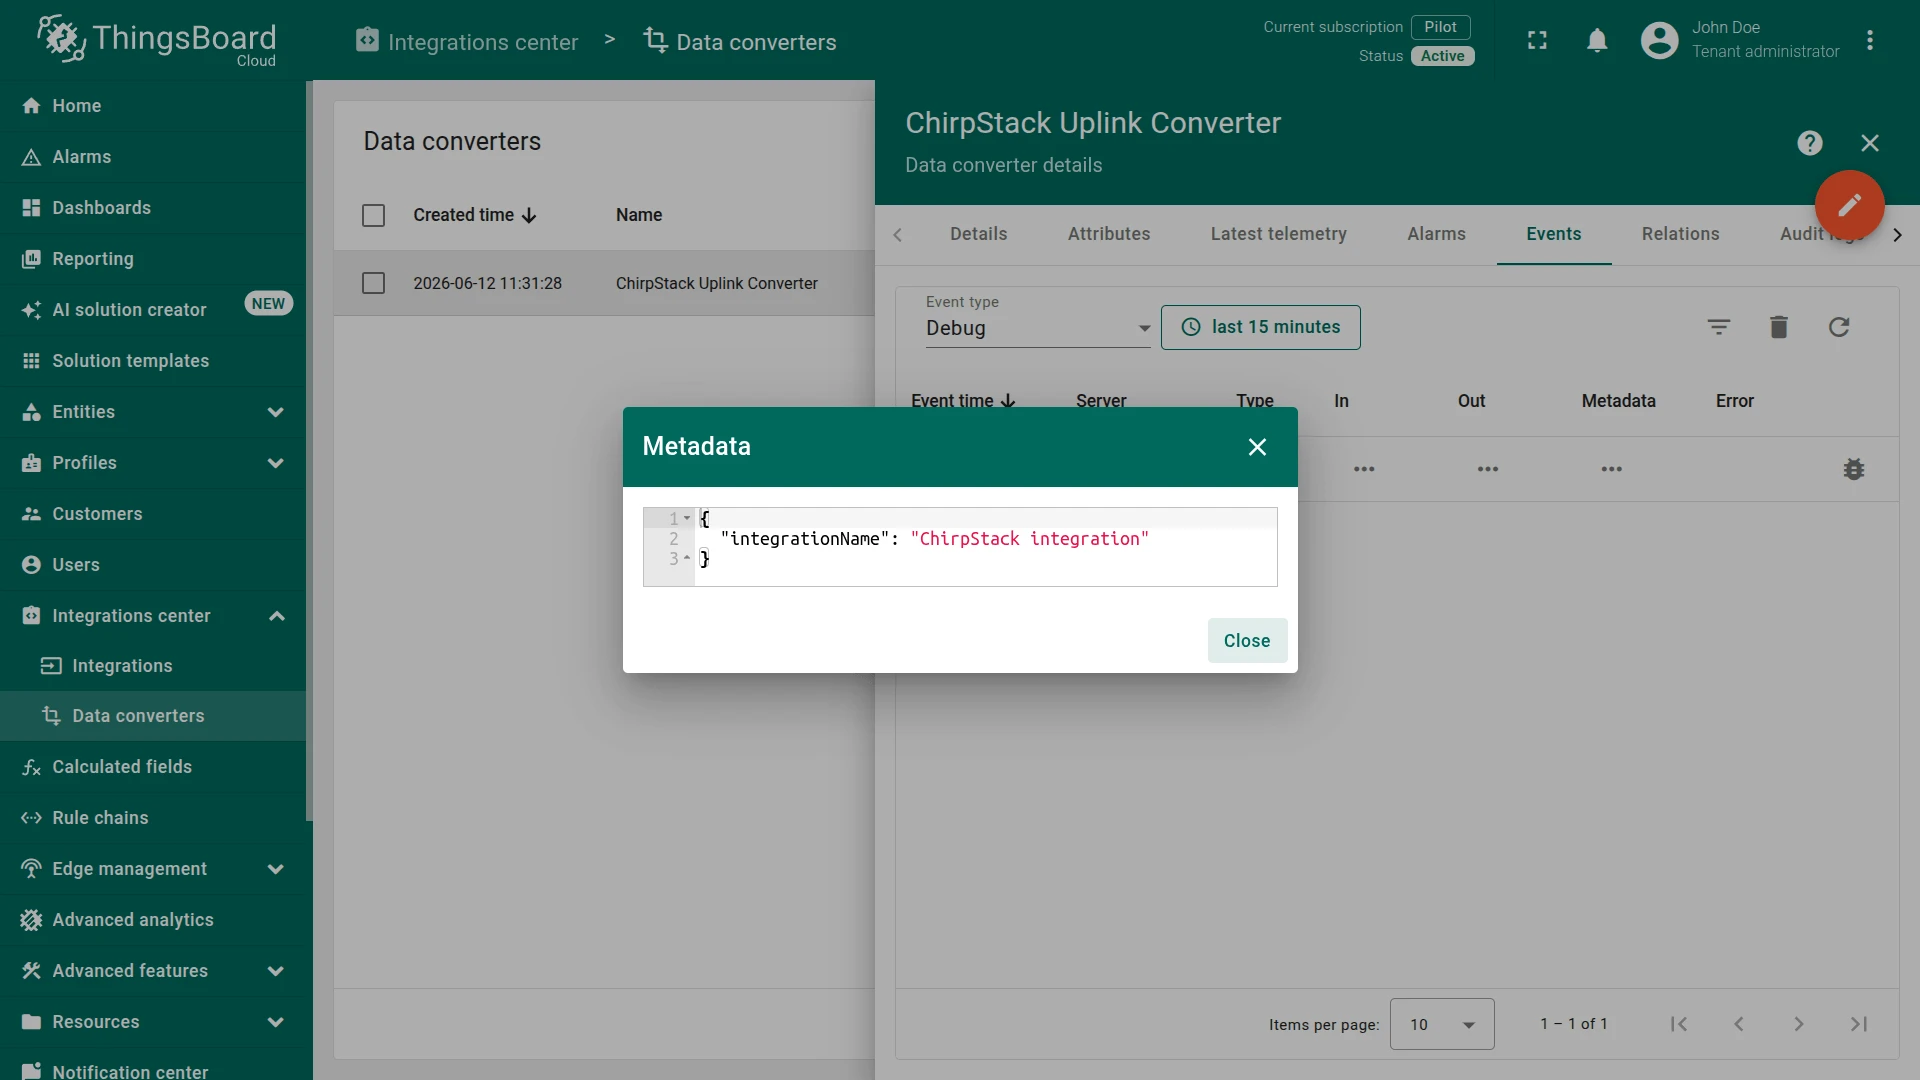
Section titled “Verify Converter Events”To inspect converter processing, go to Integrations center ⇾ Data converters, click ChirpStack Uplink Converter, and open its Events tab:
- In shows the raw ChirpStack message
- Out shows the decoded result (
attributes,telemetry) - Metadata contains the integration name and any key-value pairs configured on the integration

Verify Device Provisioning
Section titled “Verify Device Provisioning”Go to Entities ⇾ Devices. Once an uplink is received, a new device named Device 24e124538b223213 (matching the devEui from the payload) appears.

Configure Downlink
Section titled “Configure Downlink”The downlink converter (encoder) transforms a Rule Engine message into the payload delivered to the device through the ChirpStack API. For the full encoder function reference, see Downlink data converter.
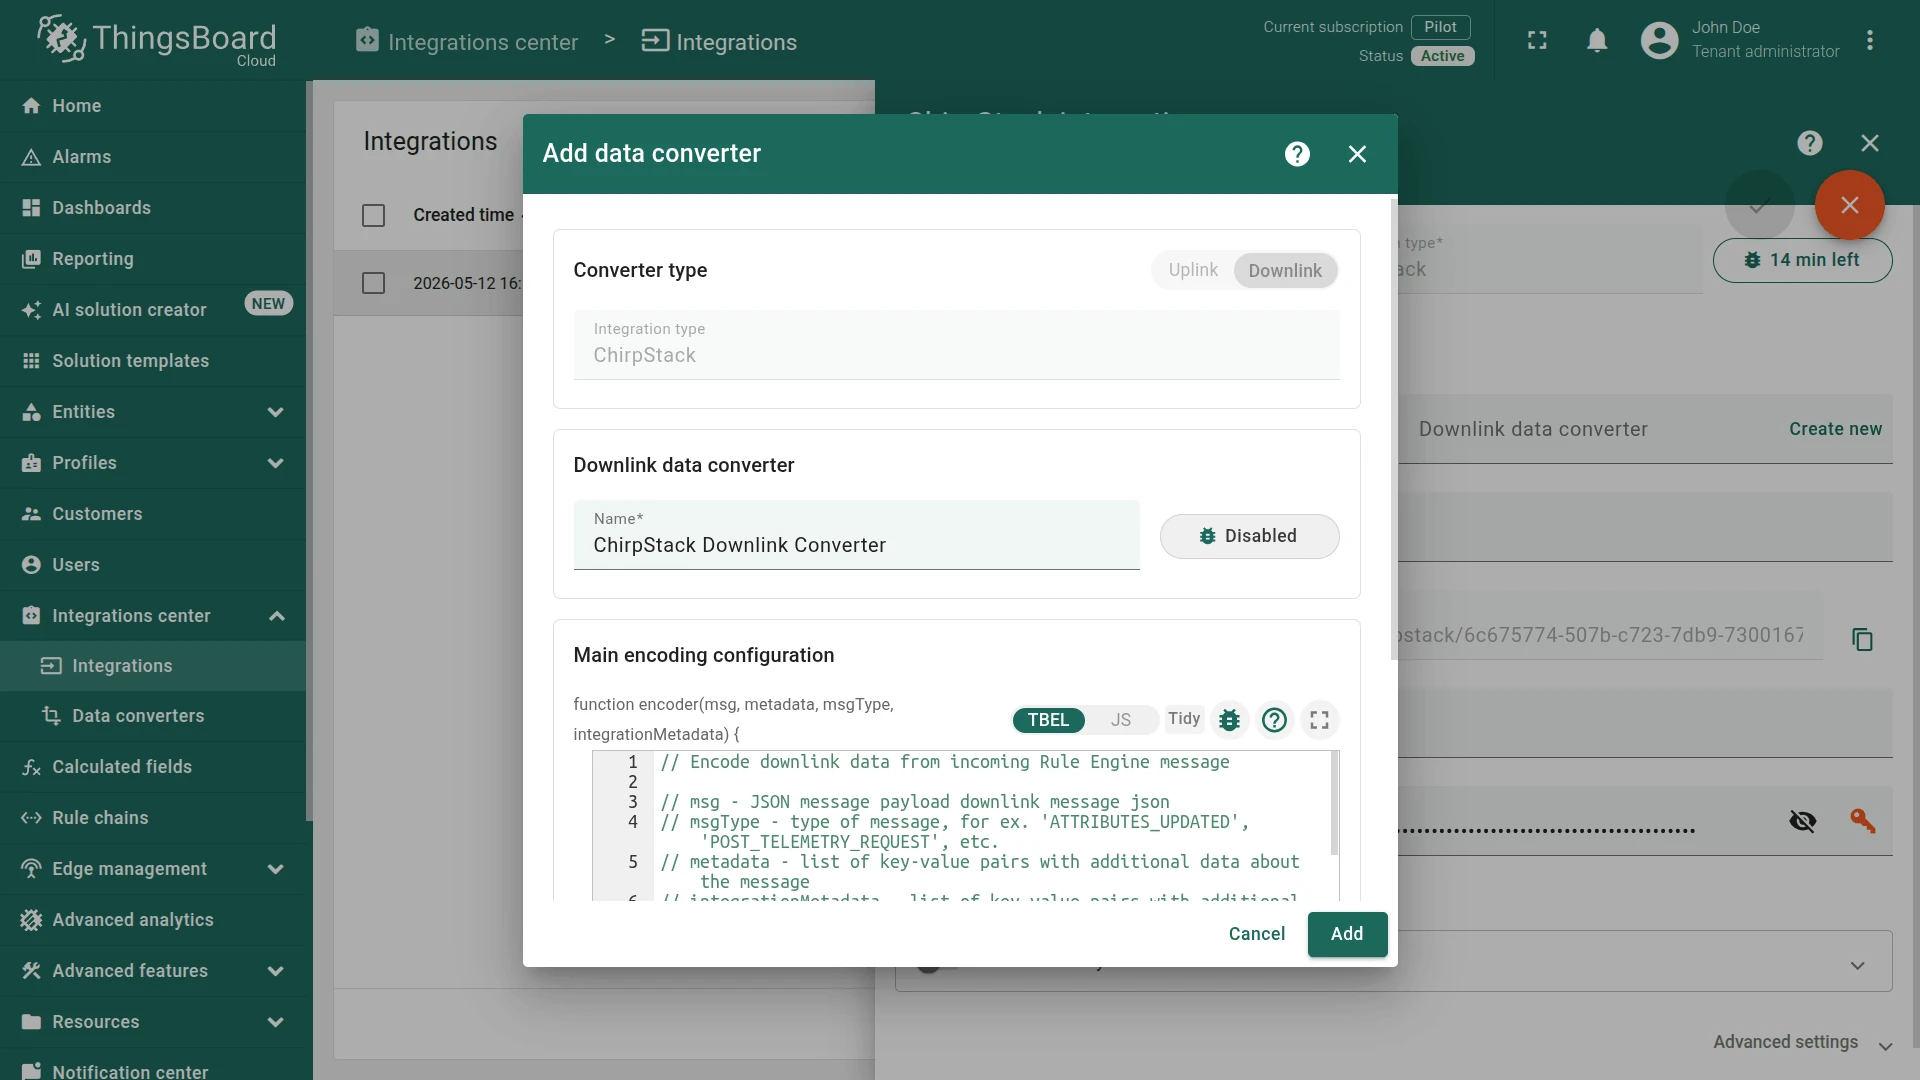
Add Downlink Converter
Section titled “Add Downlink Converter”- Go to Integrations center ⇾ Integrations and open the ChirpStack integration.
- Click the pencil icon to enter edit mode.
- In the Downlink data converter field, click Create new.
- Enter a name, paste the encoder script shown after these steps, then click Add.
// Encode downlink data from incoming Rule Engine message
// msg - JSON message payload downlink message json// msgType - type of message, for ex. 'ATTRIBUTES_UPDATED', 'POST_TELEMETRY_REQUEST', etc.// metadata - list of key-value pairs with additional data about the message// integrationMetadata - list of key-value pairs with additional data defined in Integration executing this converter
/** Encoder **/
// Result object with encoded downlink payloadvar result = {
  // downlink data content type: JSON, TEXT or BINARY (base64 format)  contentType: "TEXT",
  // downlink data  data: btoa(msg),
  // Optional metadata object presented in key/value format  metadata: {    DevEUI: metadata.cs_eui,    fPort: metadata.cs_fPort  }};
return result;
// Encode downlink data from incoming Rule Engine message
// msg - JSON message payload downlink message json// msgType - type of message, for ex. 'ATTRIBUTES_UPDATED', 'POST_TELEMETRY_REQUEST', etc.// metadata - list of key-value pairs with additional data about the message// integrationMetadata - list of key-value pairs with additional data defined in Integration executing this converter
/** Encoder **/
// Result object with encoded downlink payloadvar result = {
// downlink data content type: JSON, TEXT or BINARY (base64 format) contentType: "TEXT",
// downlink data data: btoa(msg),
// Optional metadata object presented in key/value format metadata: { DevEUI: metadata.cs_eui, fPort: metadata.cs_fPort }};
return result;- Click Apply changes.
The encoder base64-encodes the entire Rule Engine message as the LoRaWAN payload. metadata.cs_eui and metadata.cs_fPort are populated by the get required fields node in the downlink rule chain, which reads the eui and fPort client attributes from the device. Both attributes must be set on each device before downlinks can be delivered.
Configure Rule Chain
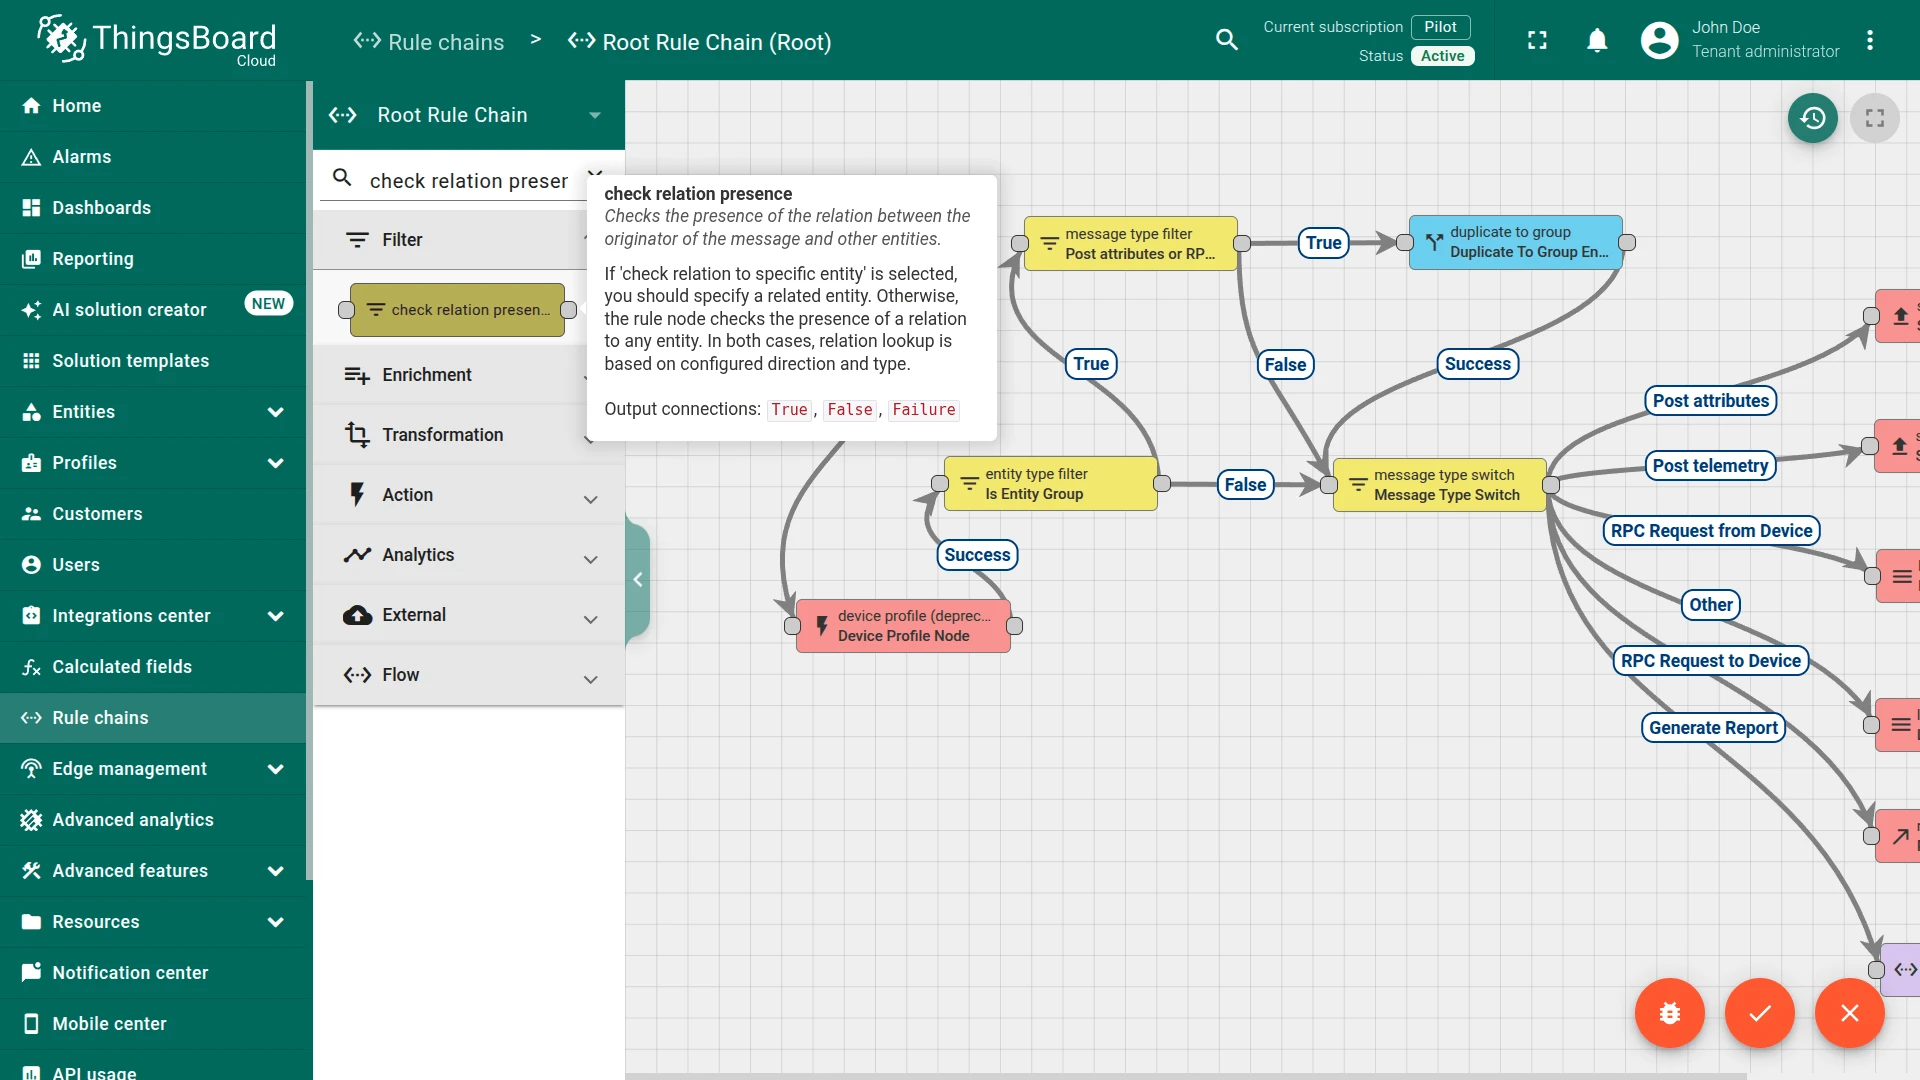
Section titled “Configure Rule Chain”ChirpStack downlinks require two device-specific values — eui and fPort — that must be looked up from the device’s client attributes before calling the ChirpStack API. A dedicated rule chain handles this lookup cleanly. In the Root Rule Chain, a check relation presence node filters messages so that only devices managed by this ChirpStack integration enter the downlink flow, preventing unrelated devices from accidentally triggering it.
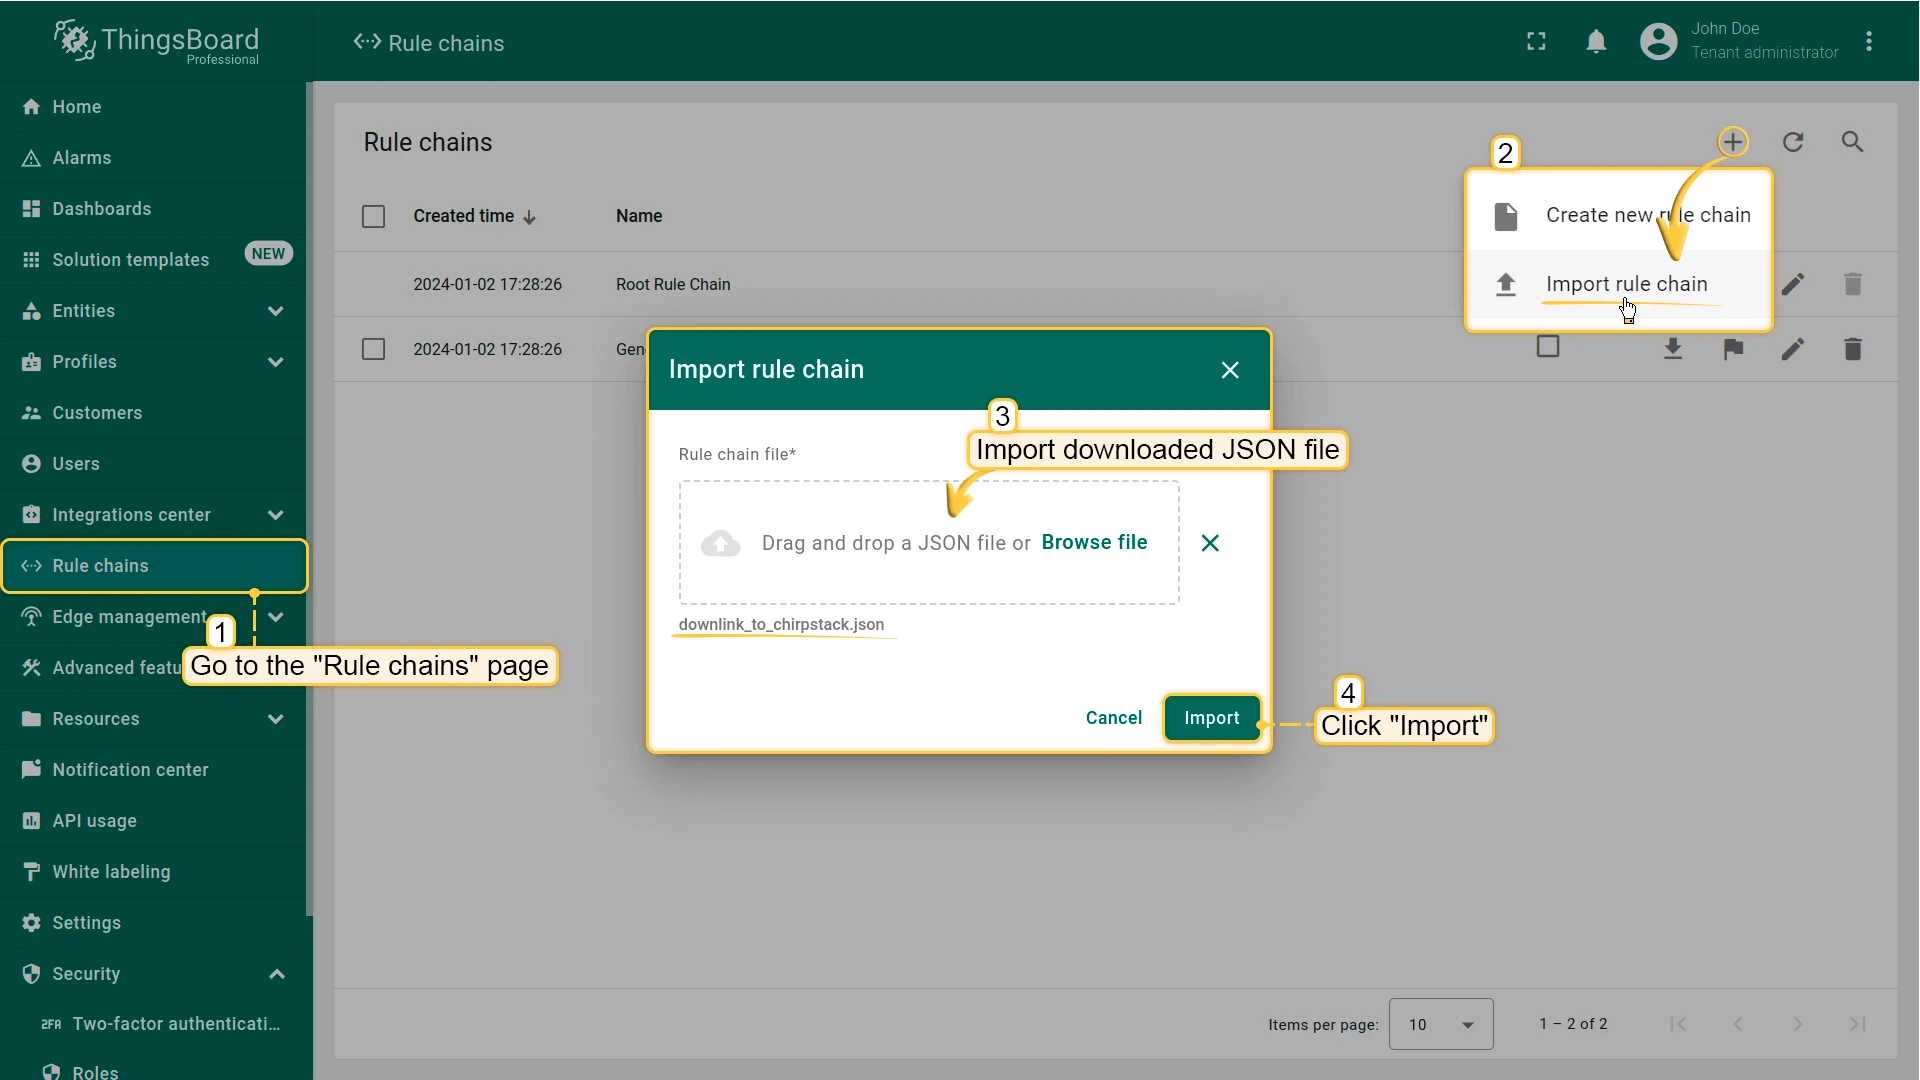
Import the Downlink Rule Chain
Section titled “Import the Downlink Rule Chain”Download the rule chain file: downlink_to_chirpstack.json
- Go to Rule chains and click + Add rule chain ⇾ Import rule chain.
- Drag
downlink_to_chirpstack.jsoninto the import window and click Import. - The Downlink to ChirpStack rule chain opens - double-click the integration downlink node.
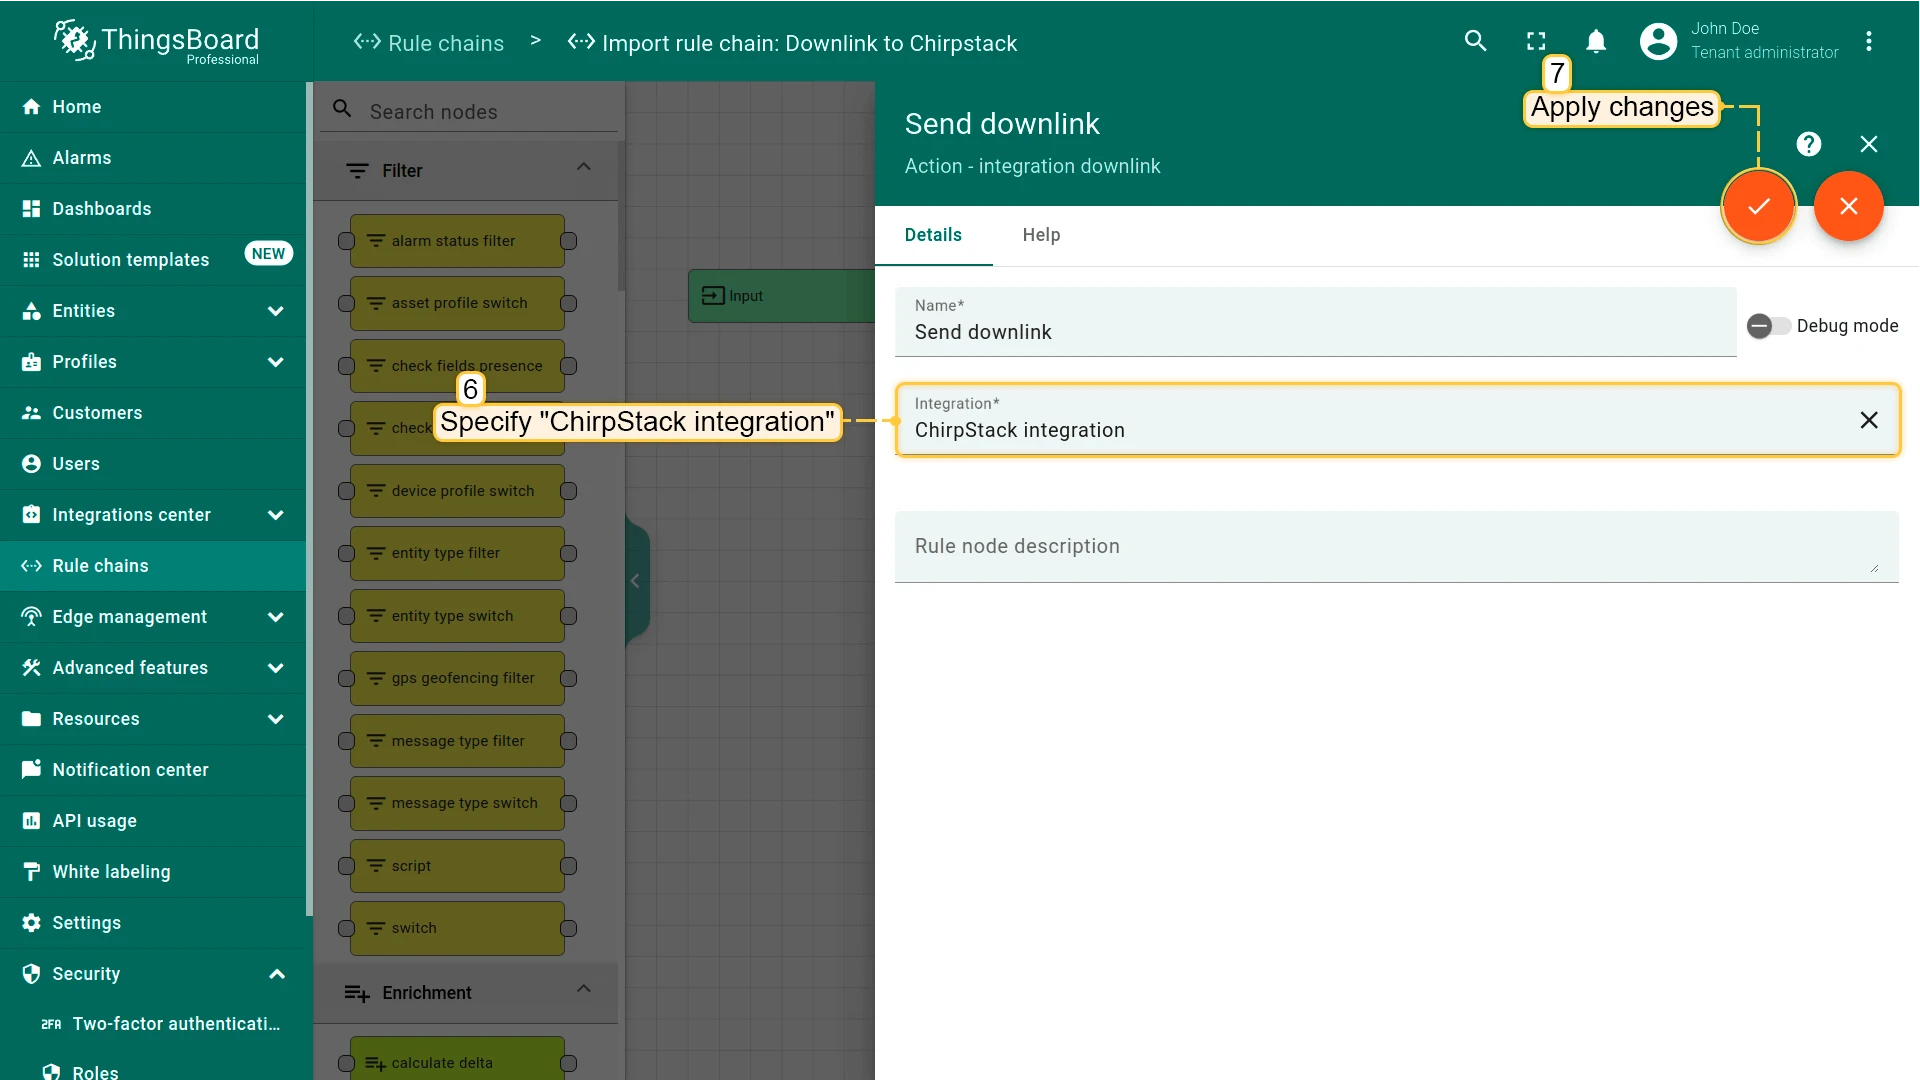
- Set Integration to your ChirpStack integration and click Add.
- Click Apply changes to save the rule chain.
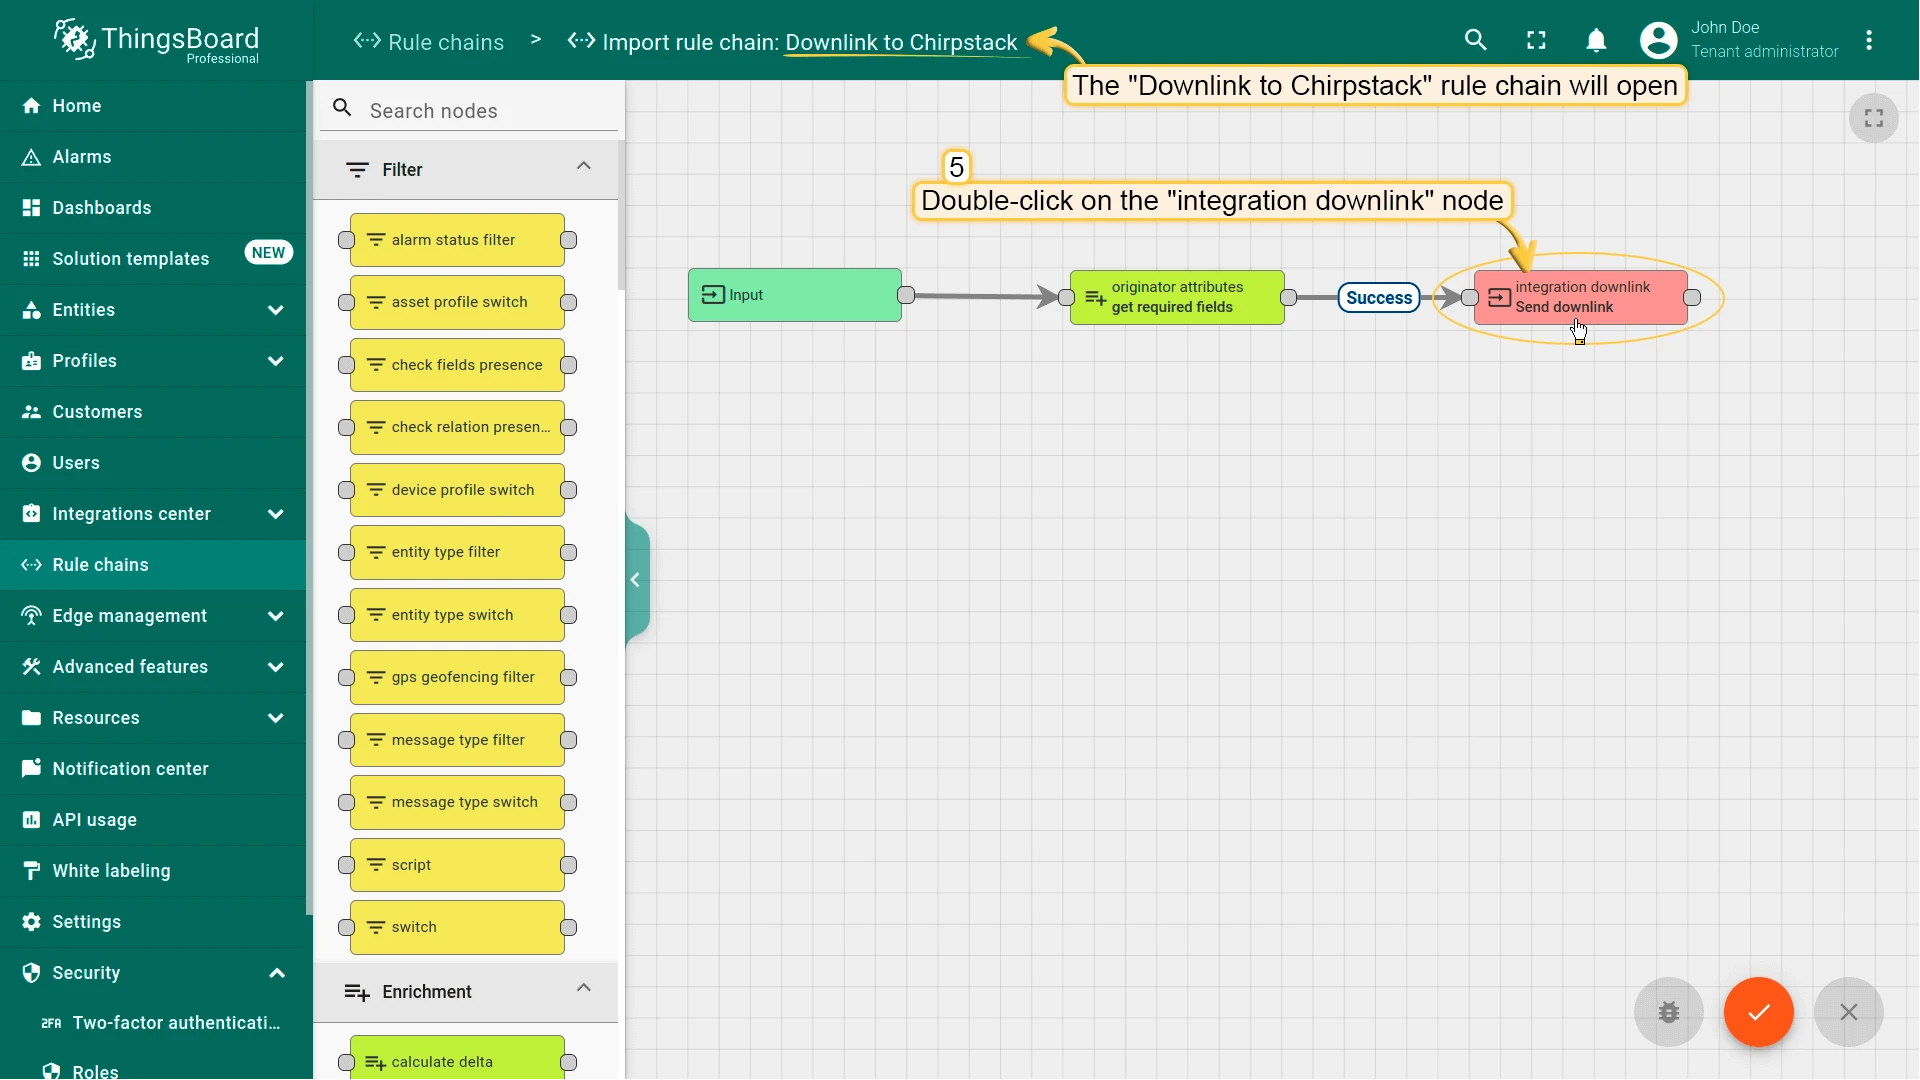
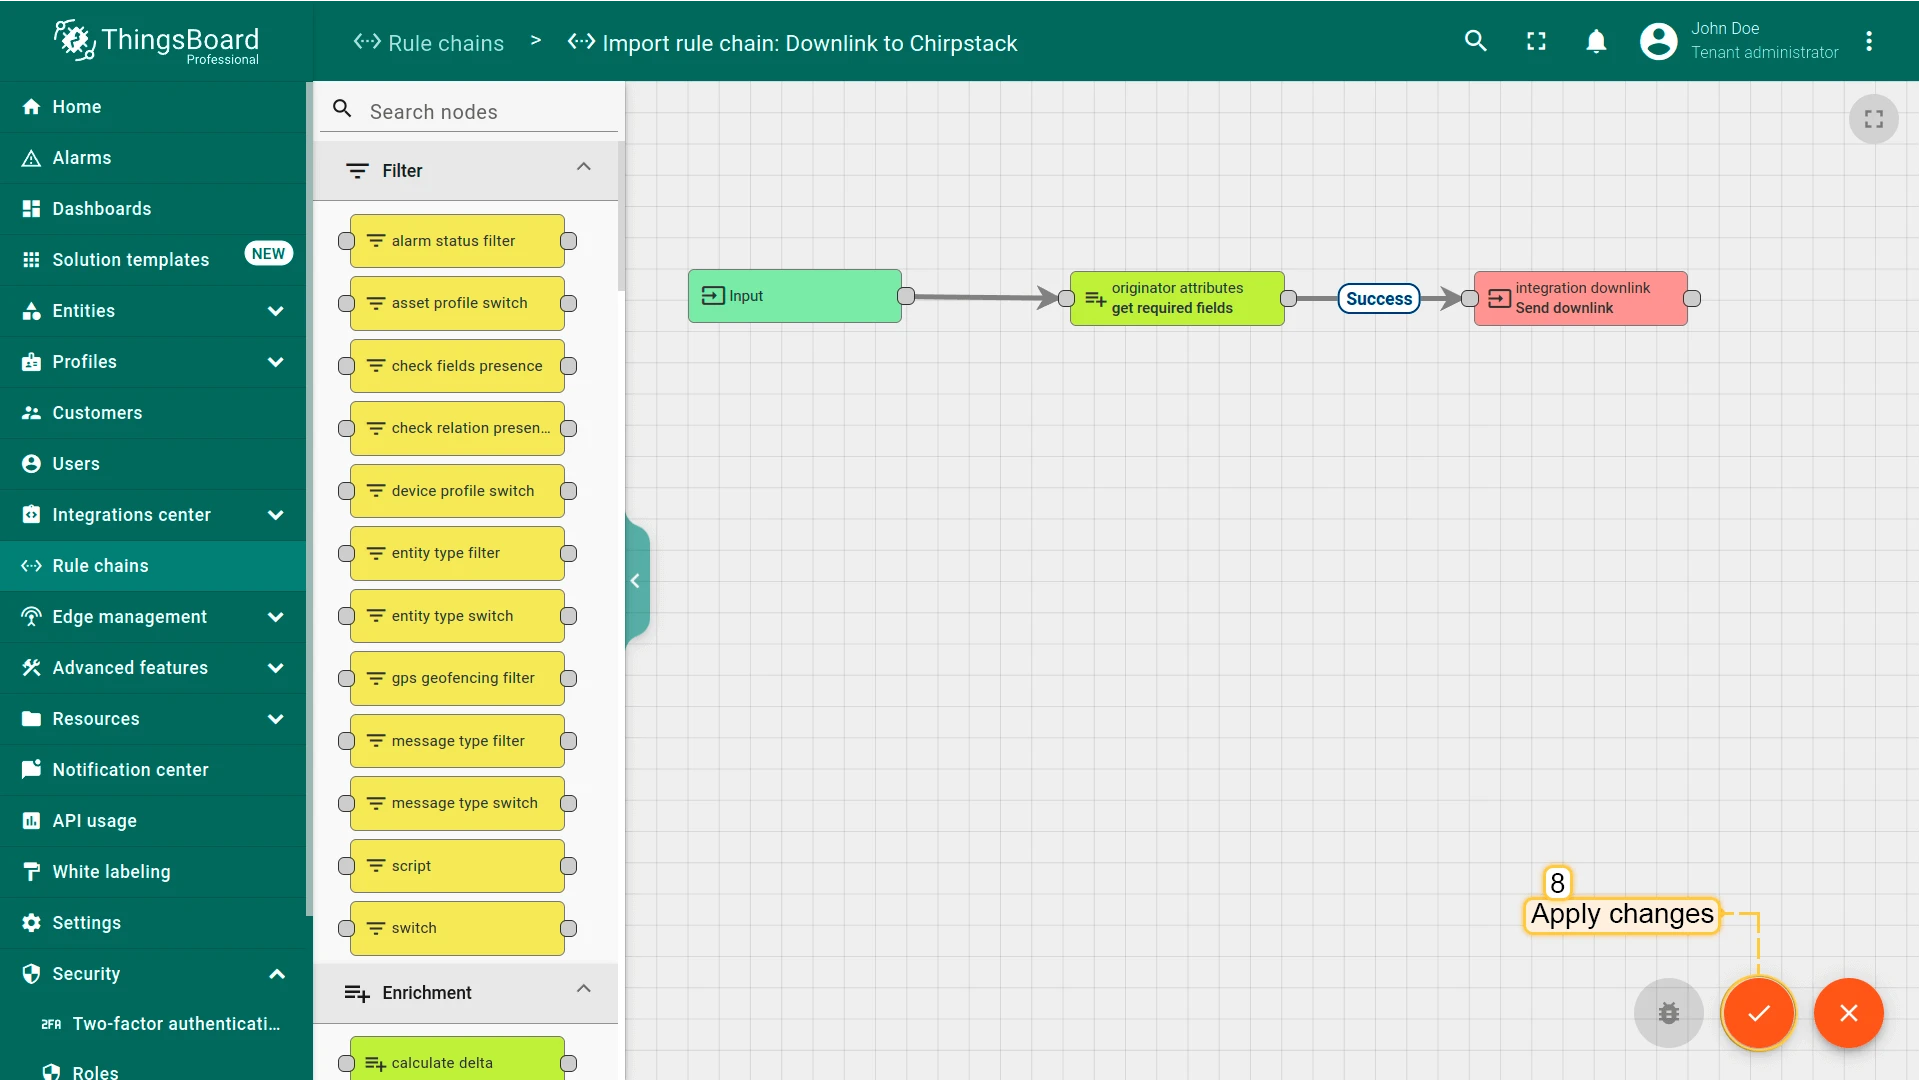
The rule chain contains two nodes connected in sequence:
- get required fields — reads the
fPortandeuiclient attributes from the device and copies them into message metadata ascs_fPortandcs_eui. If either attribute is absent on the device, the message takes the Failure path and no downlink is sent. Make sure both attributes are set on every device before testing. - Send downlink — forwards the message to the ChirpStack integration, which runs the downlink converter and queues the encoded payload through the ChirpStack API.
Modify Root Rule Chain
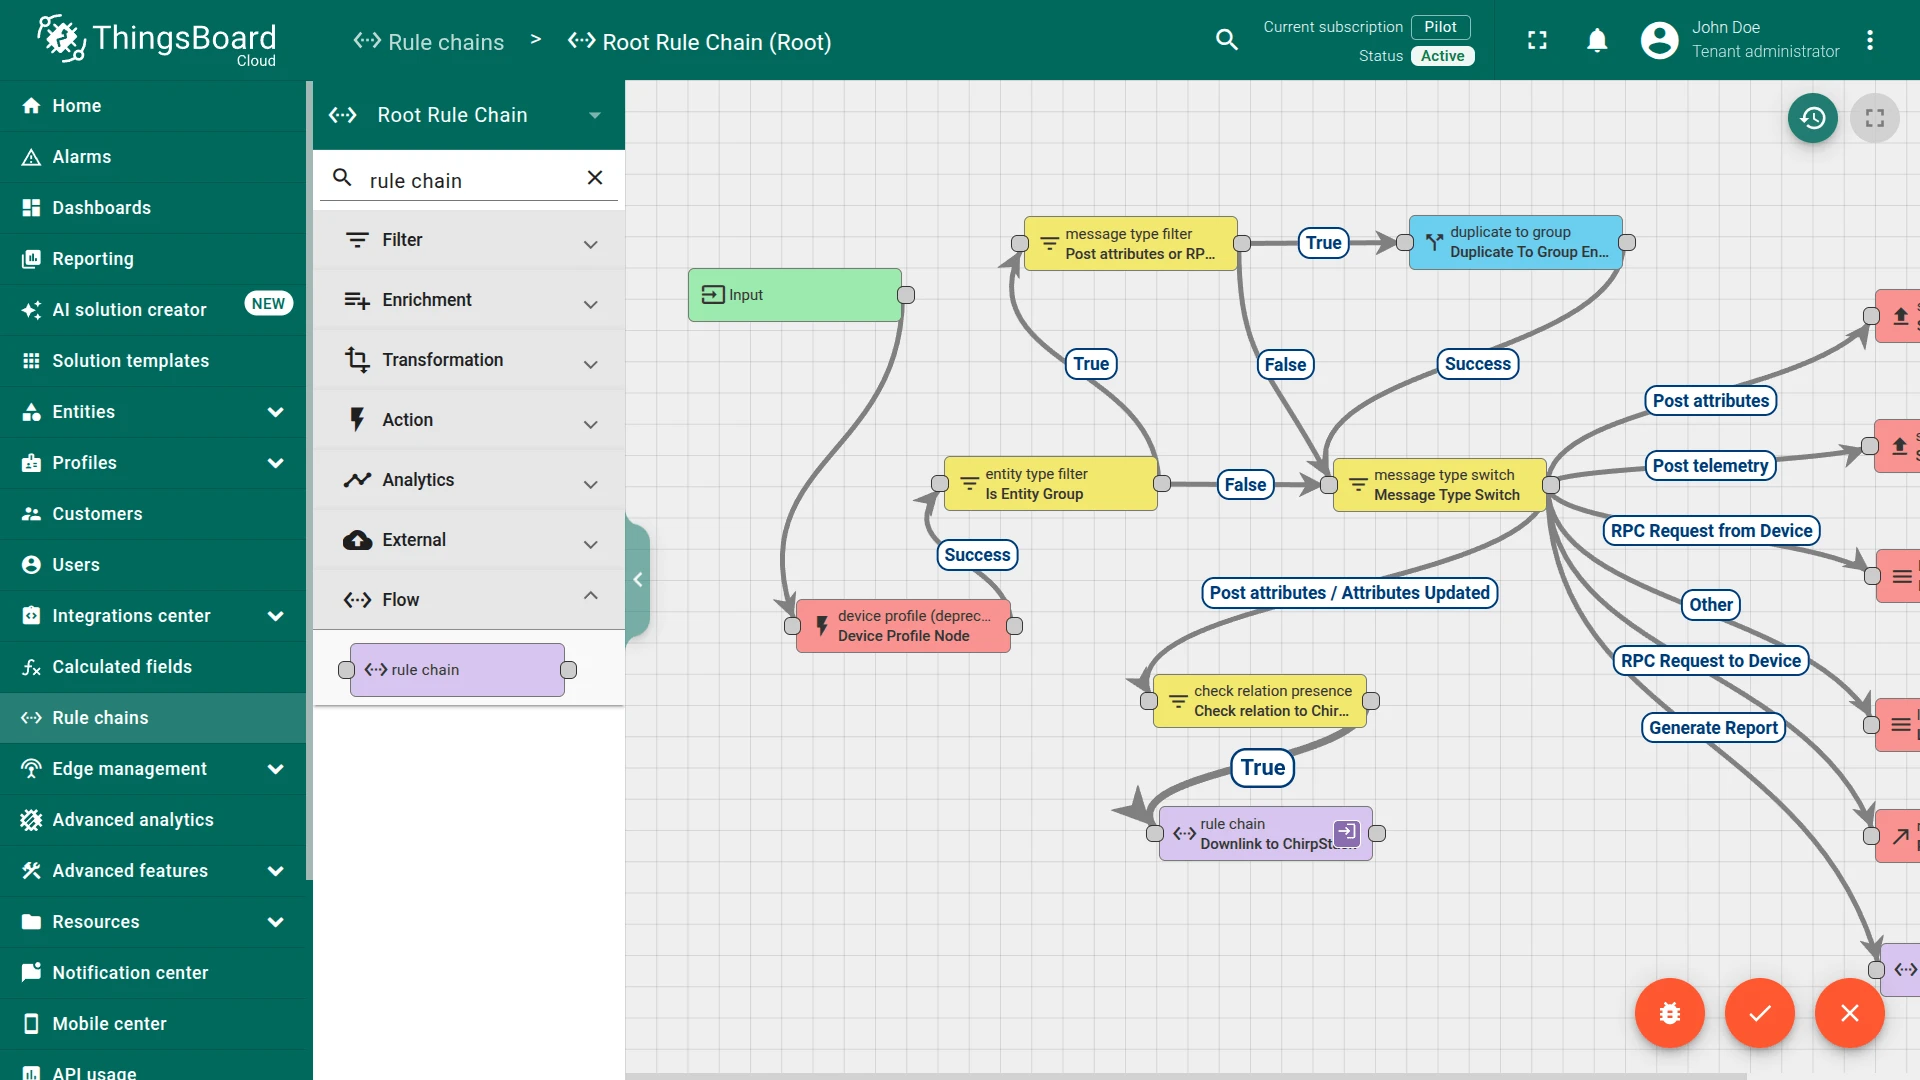
Section titled “Modify Root Rule Chain”- Go to Rule chains and open the Root Rule Chain.
- Search for check relation presence in the node panel and drag it onto the canvas.
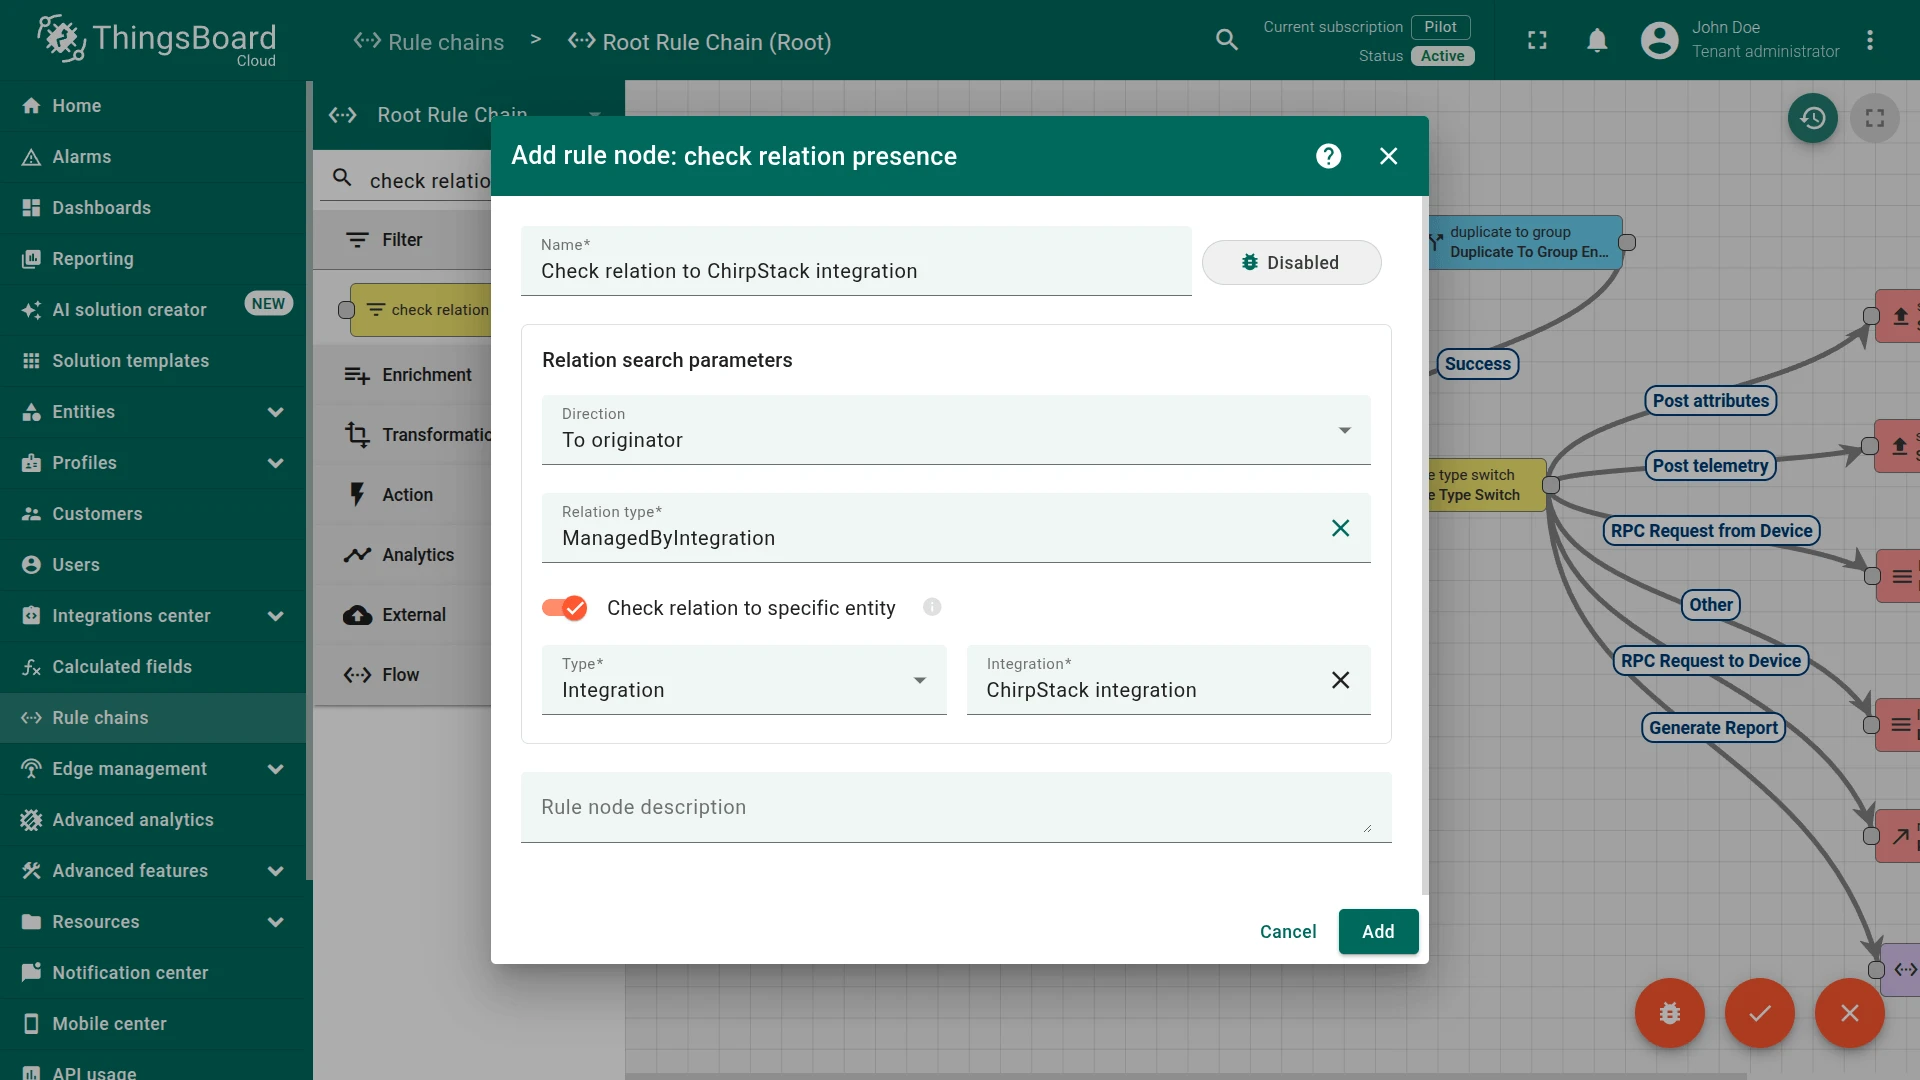
- Configure the check relation presence node:
- Name:
Check relation to ChirpStack integration - Direction: To originator
- Relation type:
ManagedByIntegration - Enable Check relation to specific entity
- Set Type to
Integration, and select your ChirpStack integration - Click Add
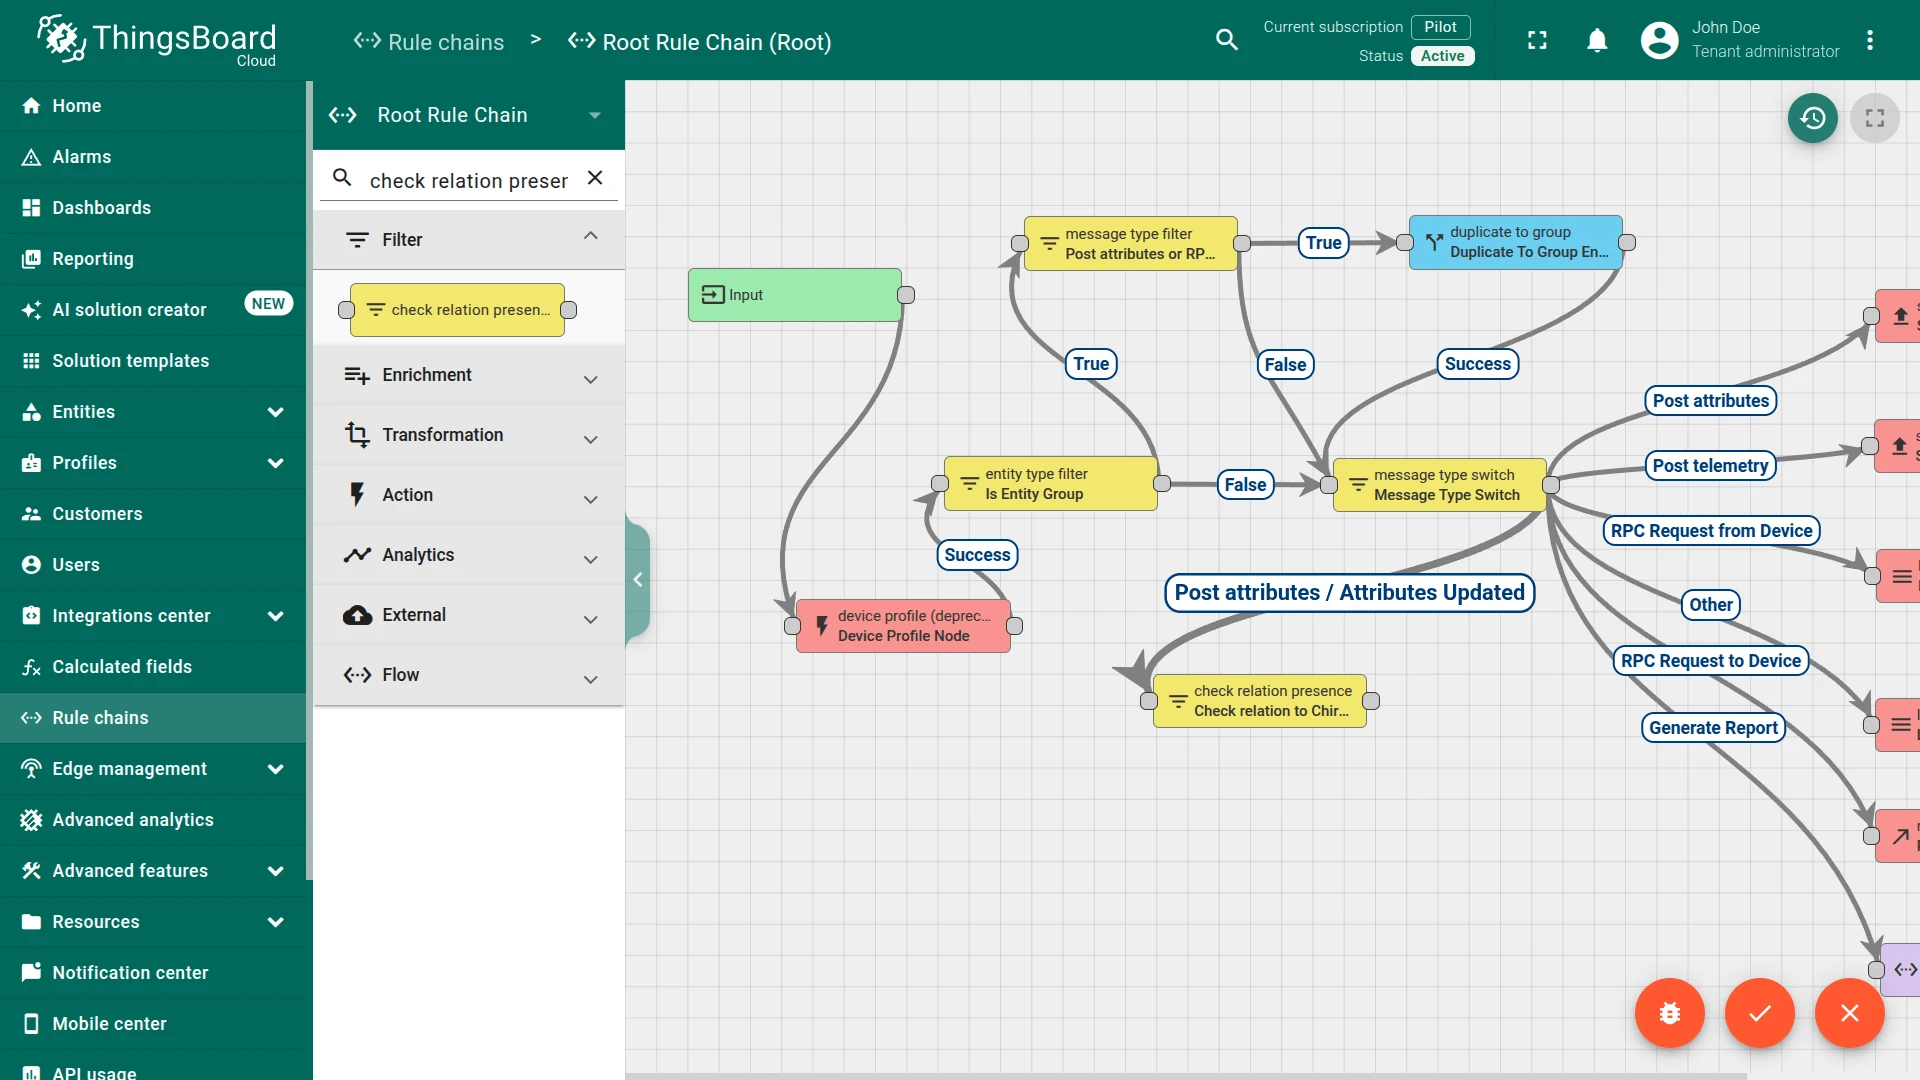
- Name:
- Connect the message type switch node to the check relation presence node using the Attributes Updated link.
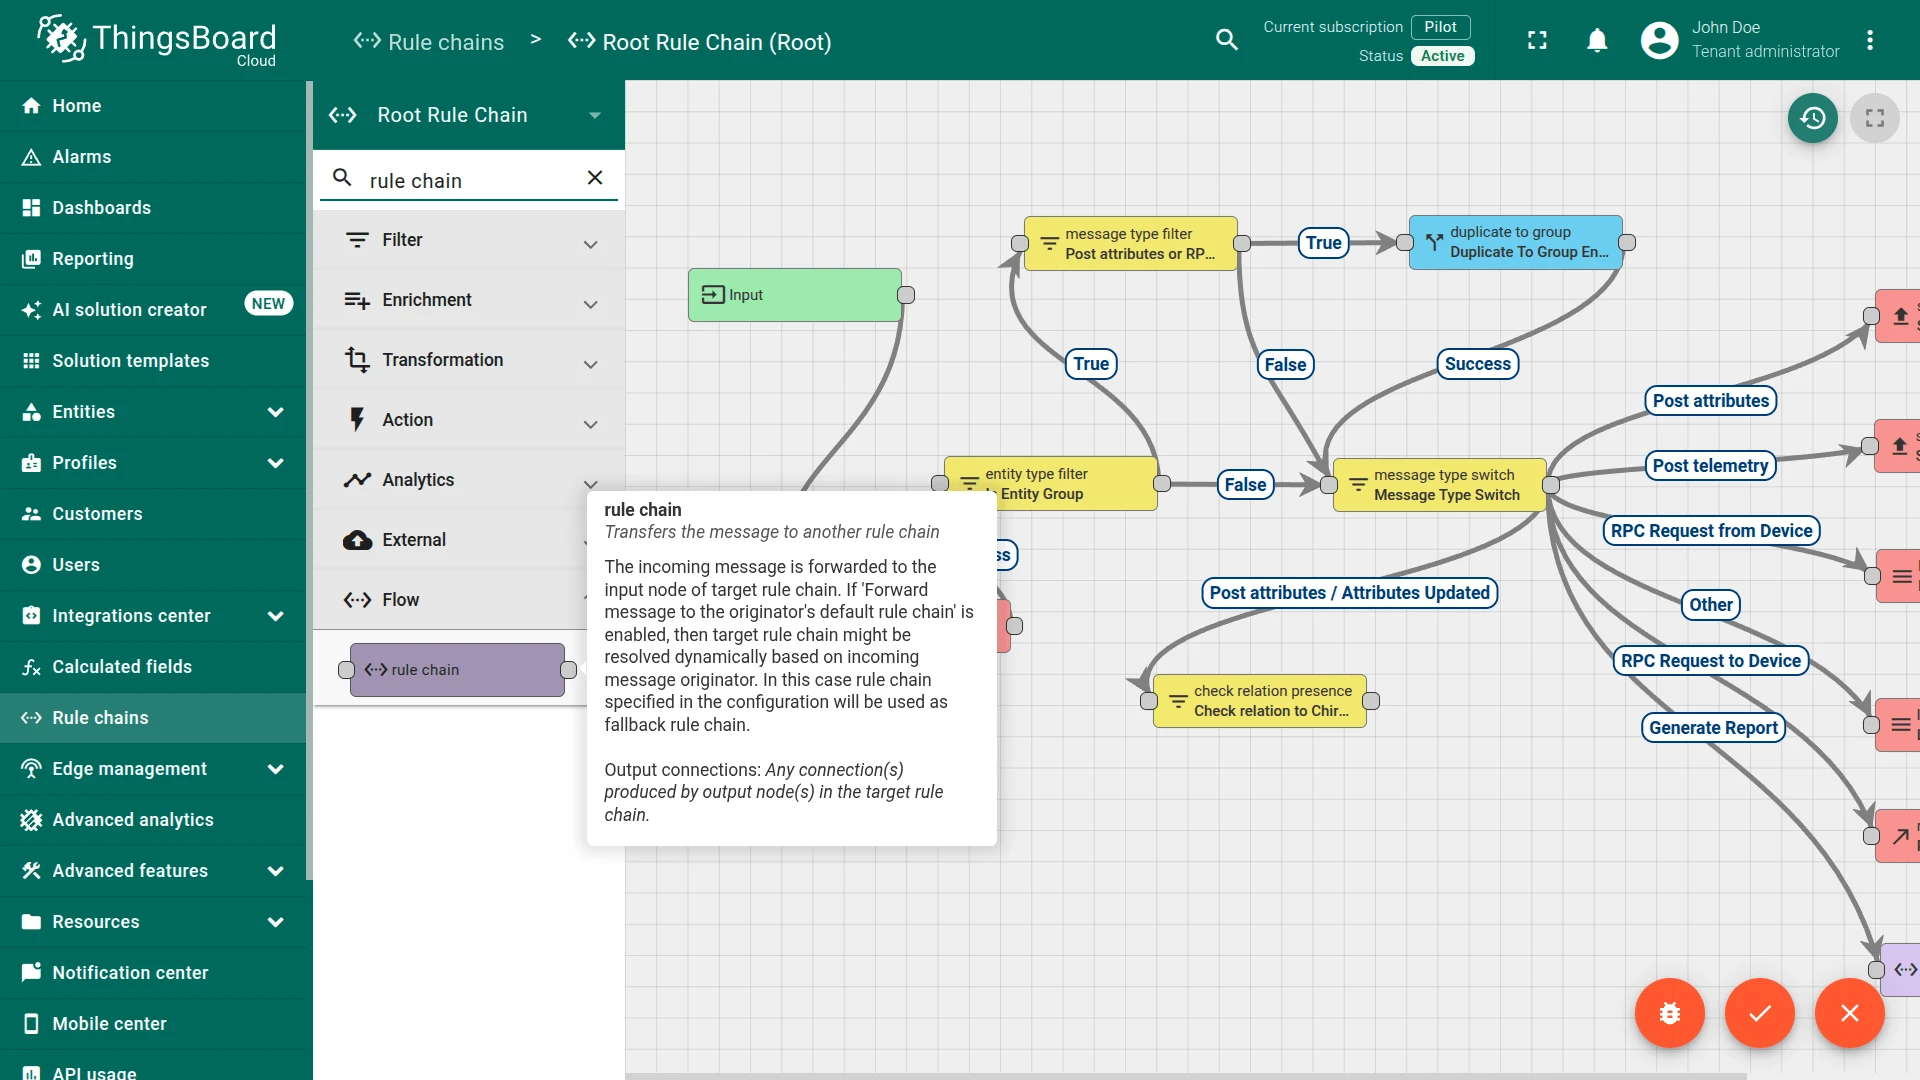
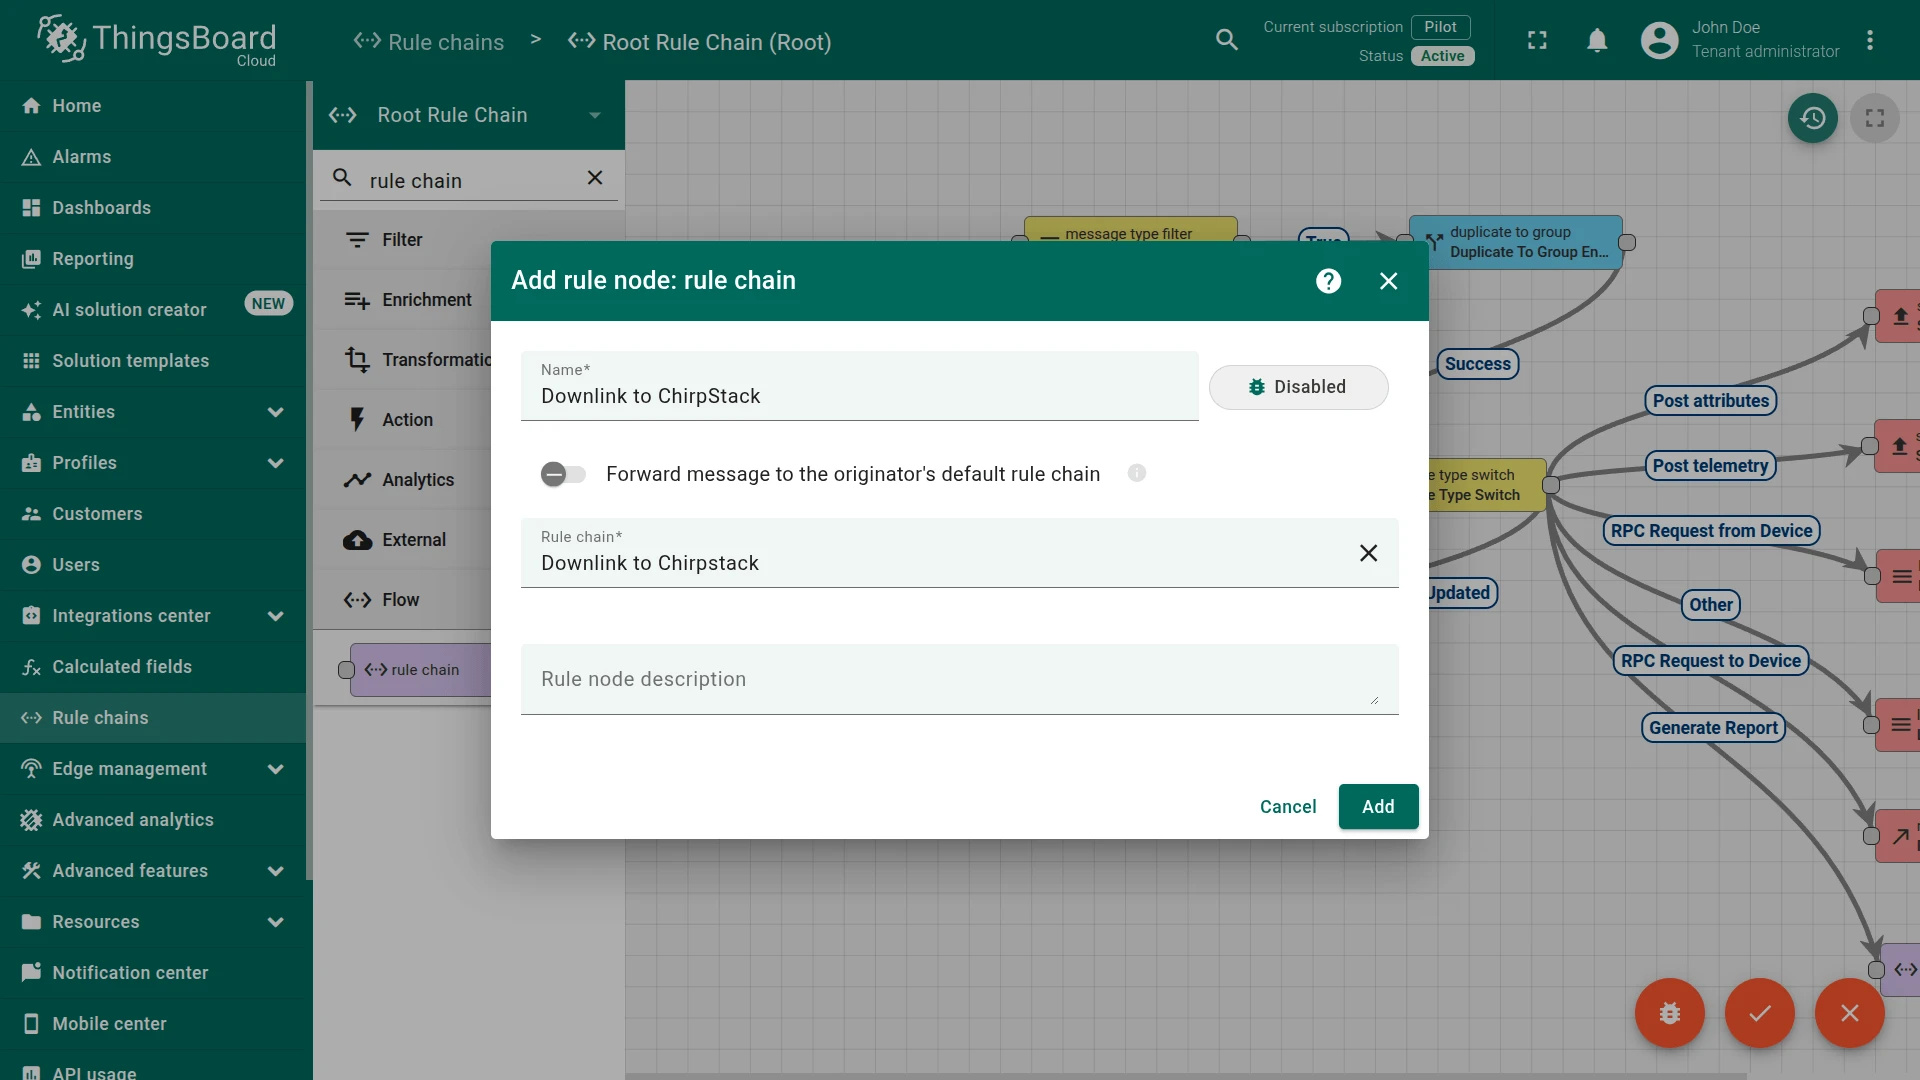
- Search for rule chain in the node panel and drag it onto the canvas.
- Configure the rule chain node:
- Name:
Downlink to ChirpStack - Rule chain: Downlink to ChirpStack.
- Click Add
- Name:
- Connect the check relation presence node’s True output to the rule chain node.
- Click Apply changes to save the Root Rule Chain.
Test Downlink
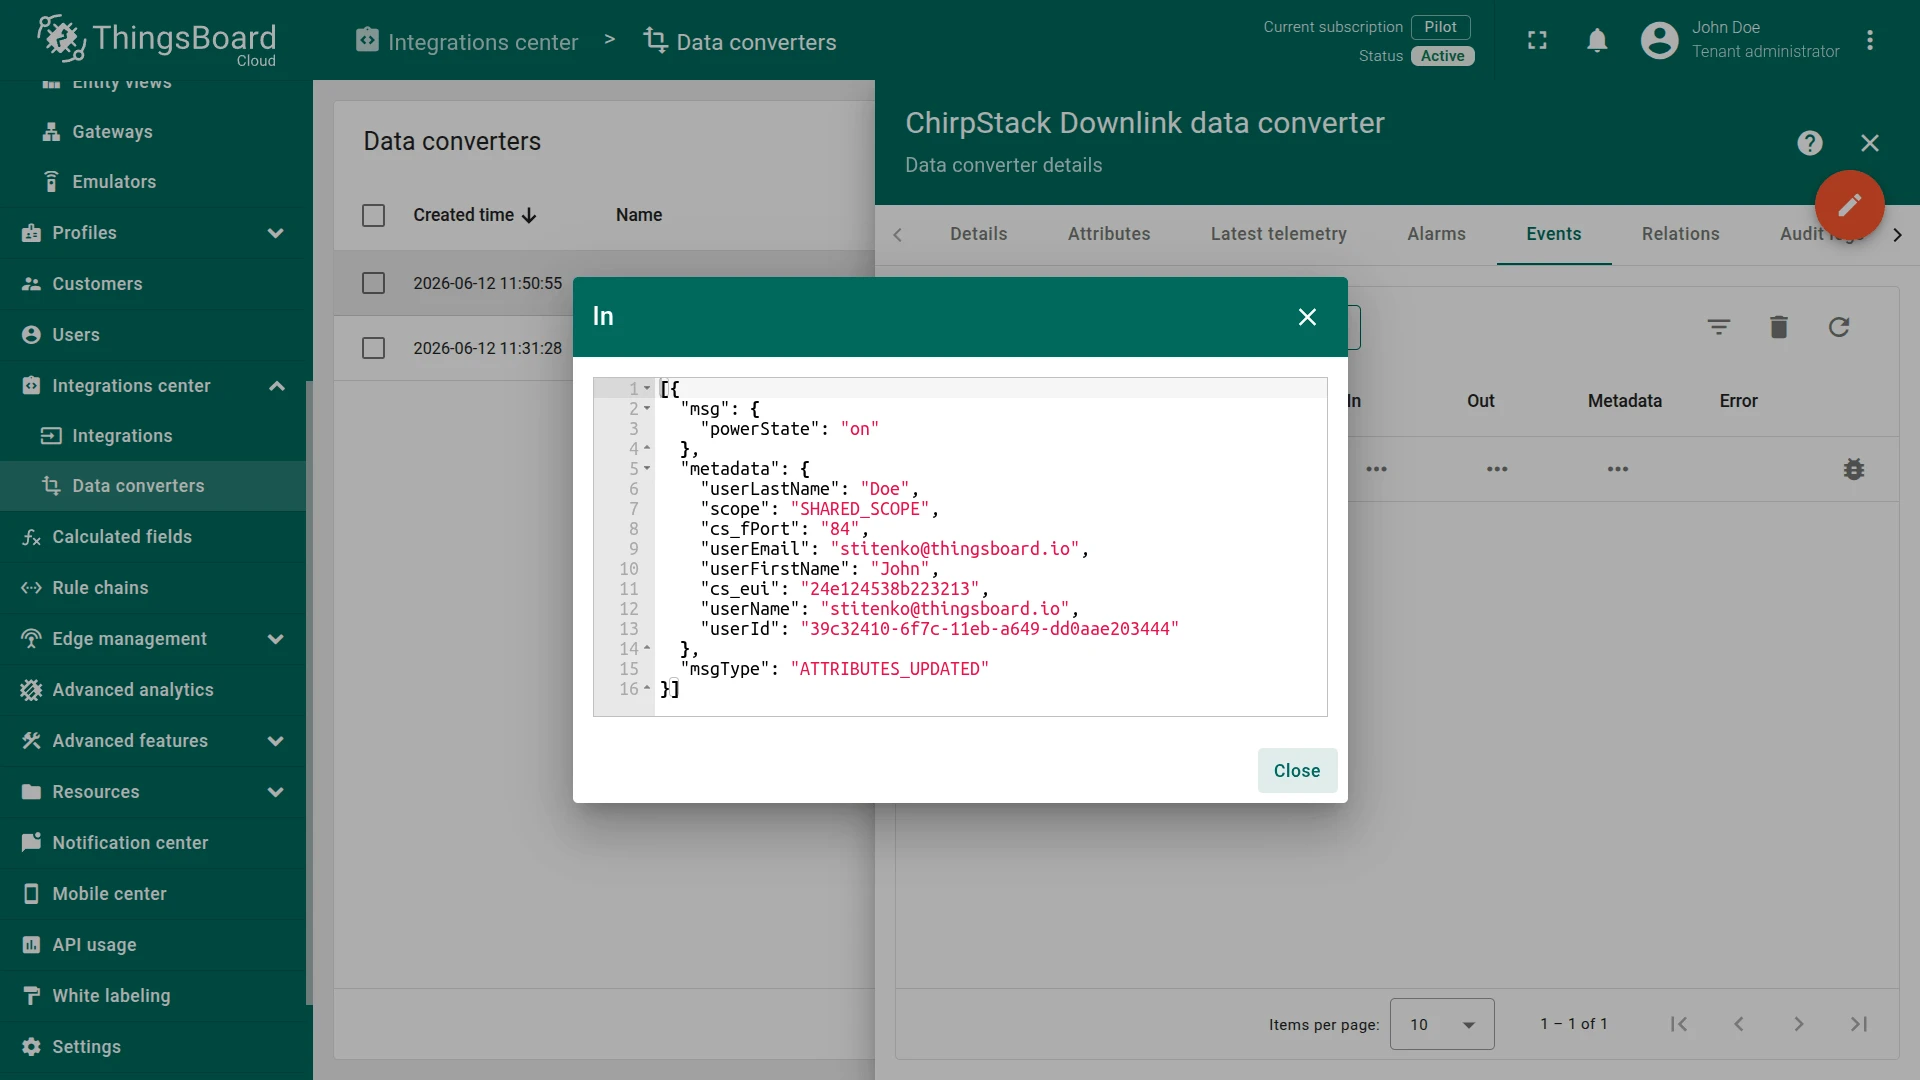
Section titled “Test Downlink”The encoder base64-encodes the entire Rule Engine message — adding or updating any shared attribute on the device triggers a downlink.
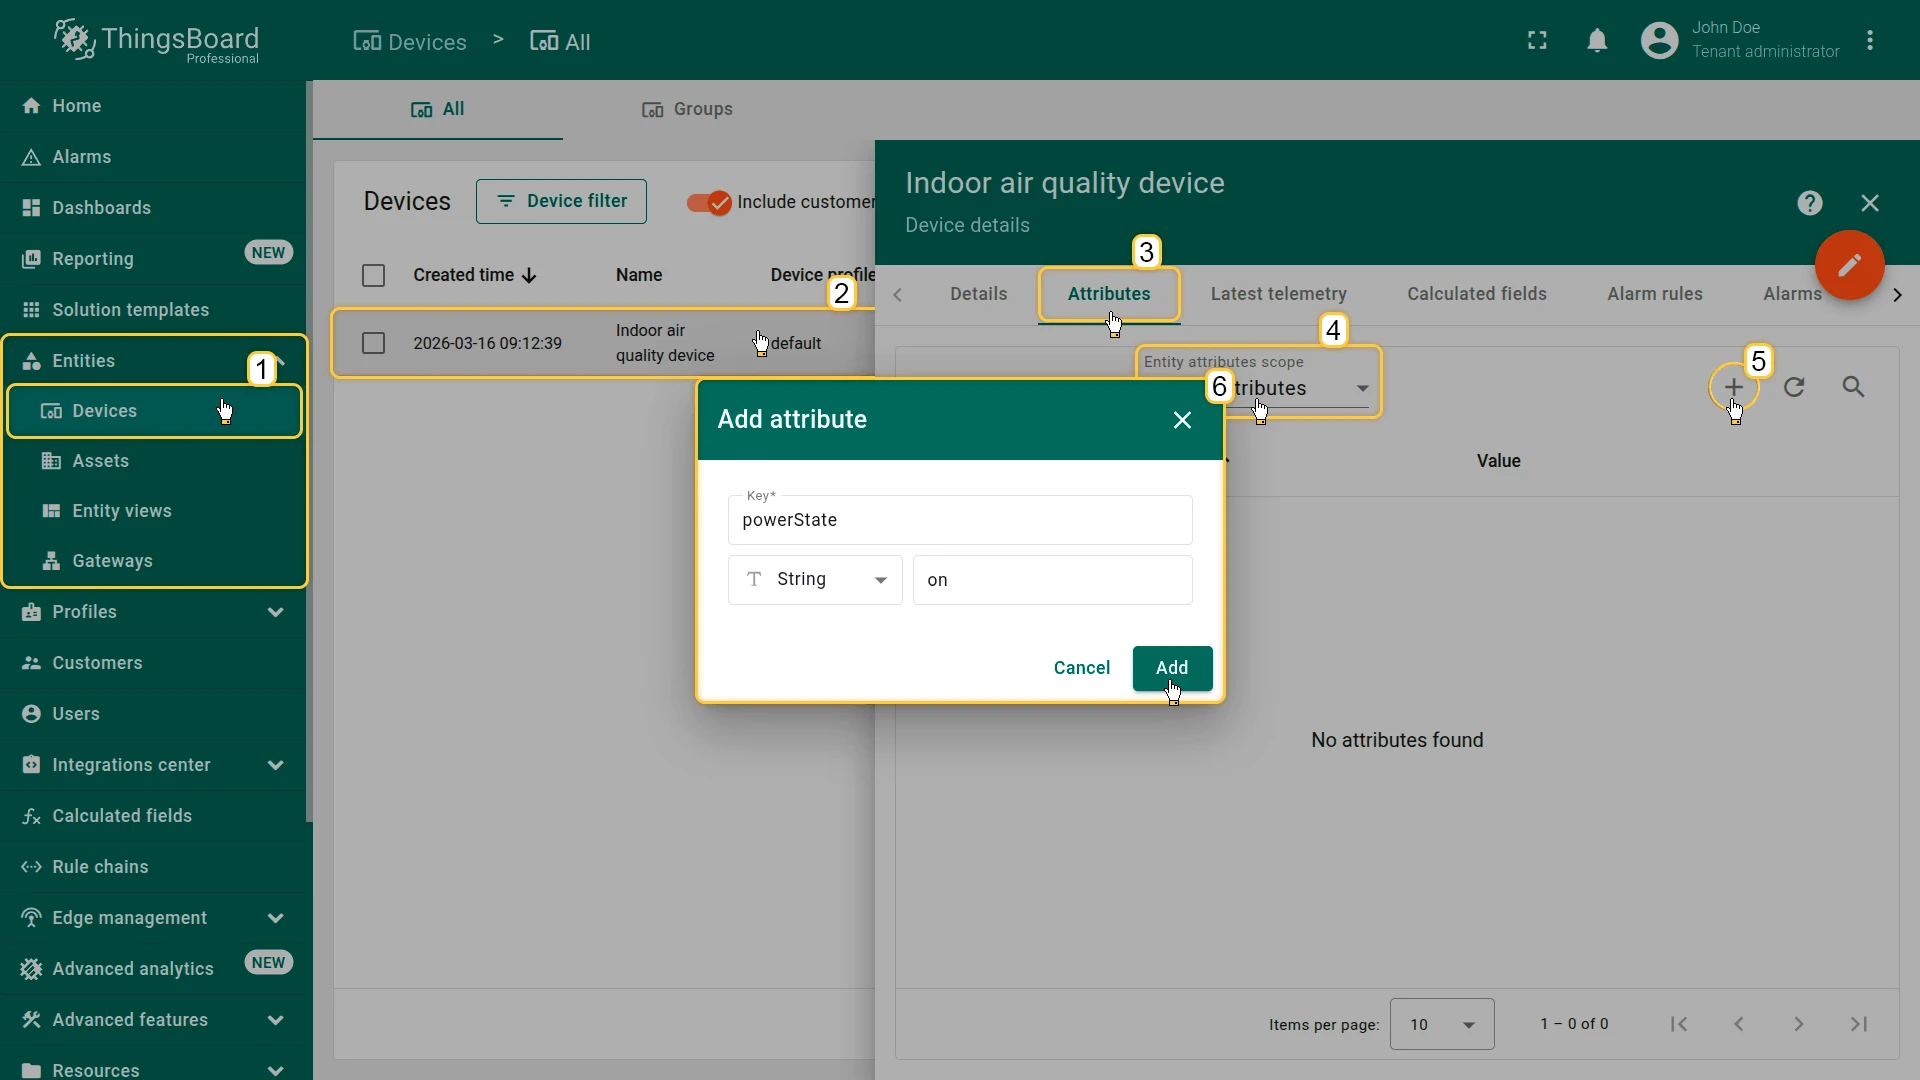
- Go to Entities ⇾ Devices, select your device, open the Attributes tab.
- Switch to Shared attributes, click + to add a new attribute.
- Set the key (e.g.
powerState) and a value (e.g.on). - Click Add.
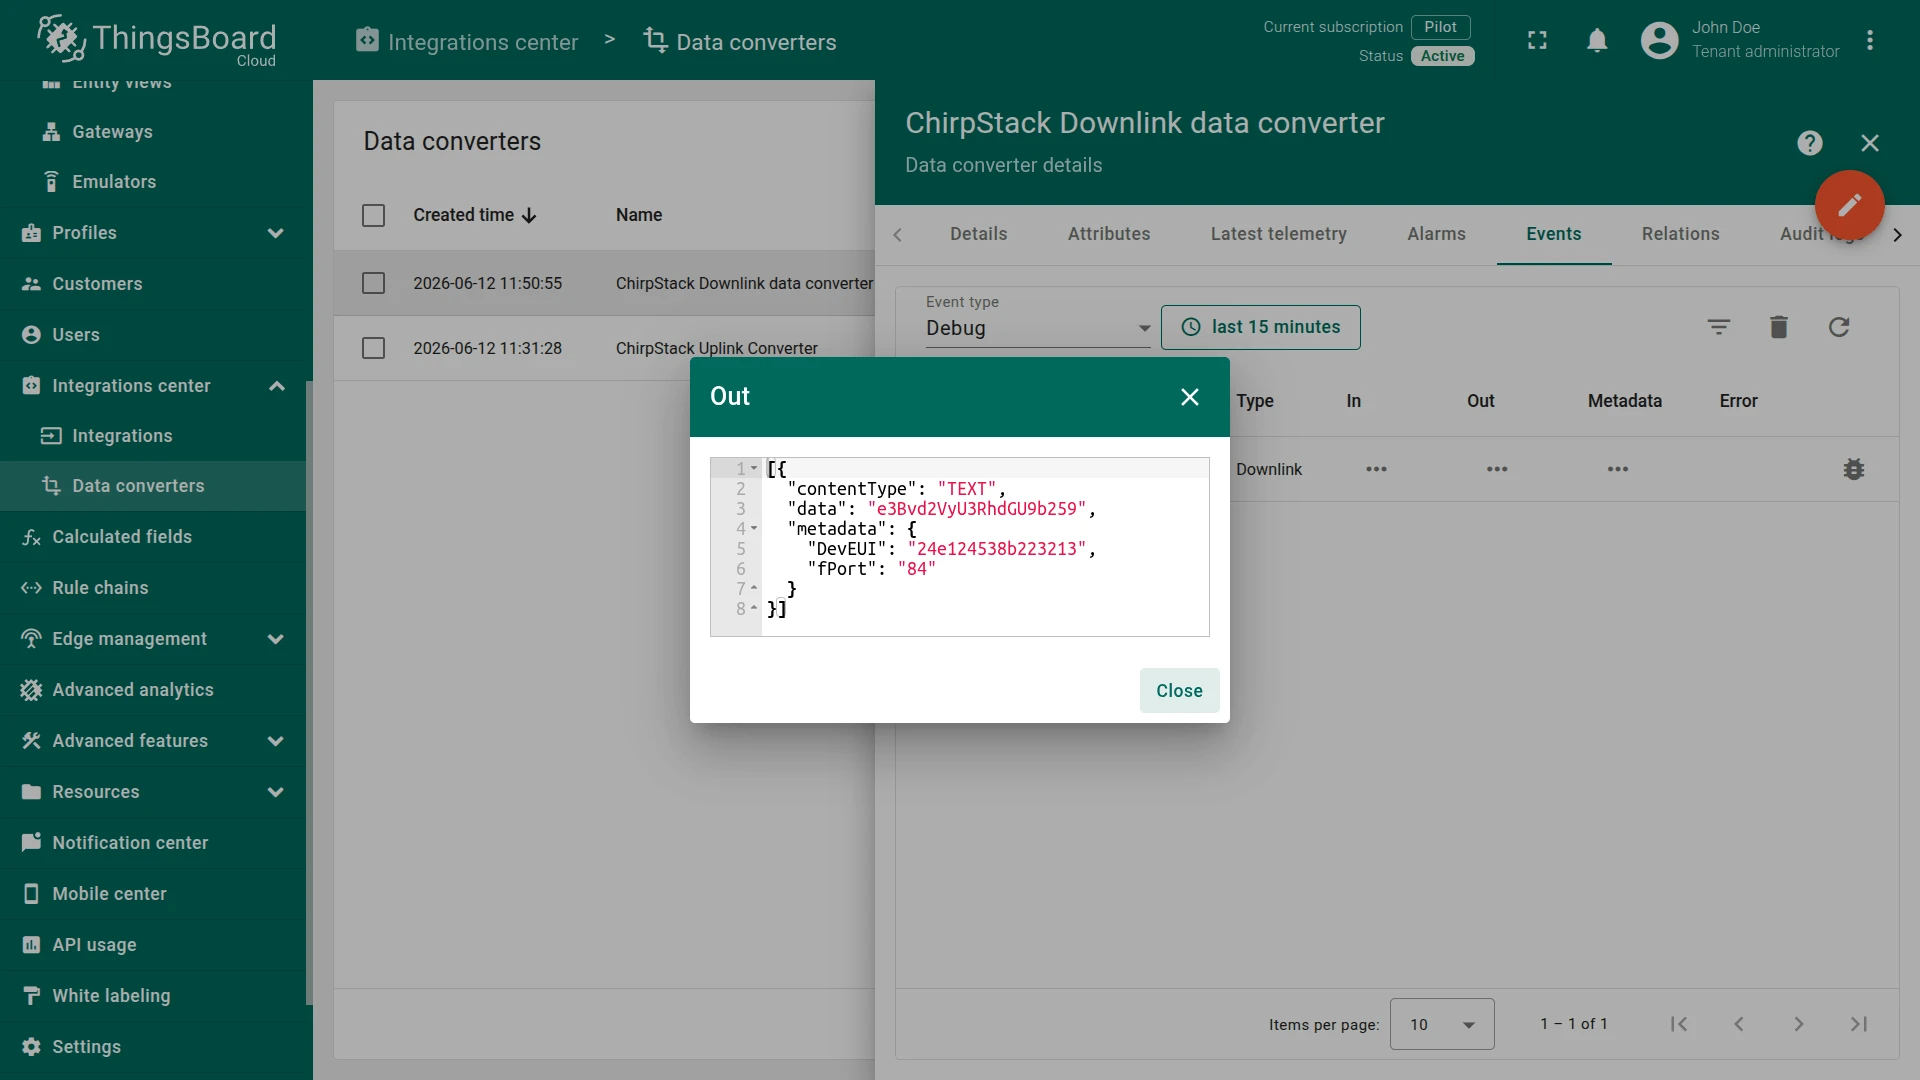
Check the downlink converter Events tab:
- In shows the
ATTRIBUTES_UPDATEDmessage - Out shows the encoded payload with
DevEUIandfPortin metadata

Troubleshooting
Section titled “Troubleshooting”| Symptom | Cause | Fix |
|---|---|---|
| No uplinks received | Wrong HTTP endpoint URL configured in ChirpStack | Re-copy the HTTP endpoint URL from the integration (toggle edit mode → Connection step) and update the ChirpStack application’s HTTP integration |
| No uplinks received | ChirpStack HTTP integration missing or not saved | In the ChirpStack UI, open the application’s Integrations tab and confirm the HTTP integration is listed; add it if missing |
| Uplinks received but device not created | Allow create devices or assets is disabled | Open the integration, click Toggle edit mode, and enable Allow create devices or assets in Basic settings |
| Uplinks received but device not created | Converter returns empty output or deviceName is missing | Go to Data converters, open the uplink converter, and inspect Events → Out; ensure deviceName is resolved from the payload |
Error in converter | TBEL or JavaScript exception | Open Events → Error on the uplink converter and inspect the stack trace |
| Downlink not delivered | Invalid or expired API token | Open the integration, click Toggle edit mode, and re-enter the Application server API Token (see Add ChirpStack API Key) |
| Downlink not delivered | DevEUI or fPort missing from converter output | Open the downlink converter Events → Out; if either key is missing, add the eui and fPort client attributes to the device |
| Downlink not delivered | Rule chain misconfigured | In the Root Rule Chain, confirm the check relation presence node is connected via the Attributes Updated link and its True output connects to the Downlink to ChirpStack rule chain node |
How to read Debug Events
- Go to Integrations center ⇾ Integrations, open the ChirpStack integration, and click the Events tab. Filter by Uplink.
- Click on an event to inspect:
- In — the raw ChirpStack webhook message received by the integration
- Out — what the converter returned: decoded device name, attributes, and telemetry
- Error — error text, if any
Enable Debug mode on the integration to capture all raw input/output events. Starting from ThingsBoard 3.9, the full set of debug events is stored only during the first 1 hour; afterward, only error events are retained. Disable debug mode once the issue is identified.
See Also
Section titled “See Also”Was this helpful?