SigFox Integration
Sigfox Integration connects ThingsBoard to the Sigfox Backend via HTTP callbacks, receiving device payloads and converting them into ThingsBoard telemetry and attributes.

Prerequisites
Section titled “Prerequisites”- A ThingsBoard PE account with permission to create integrations.
- A Sigfox account with a registered device.
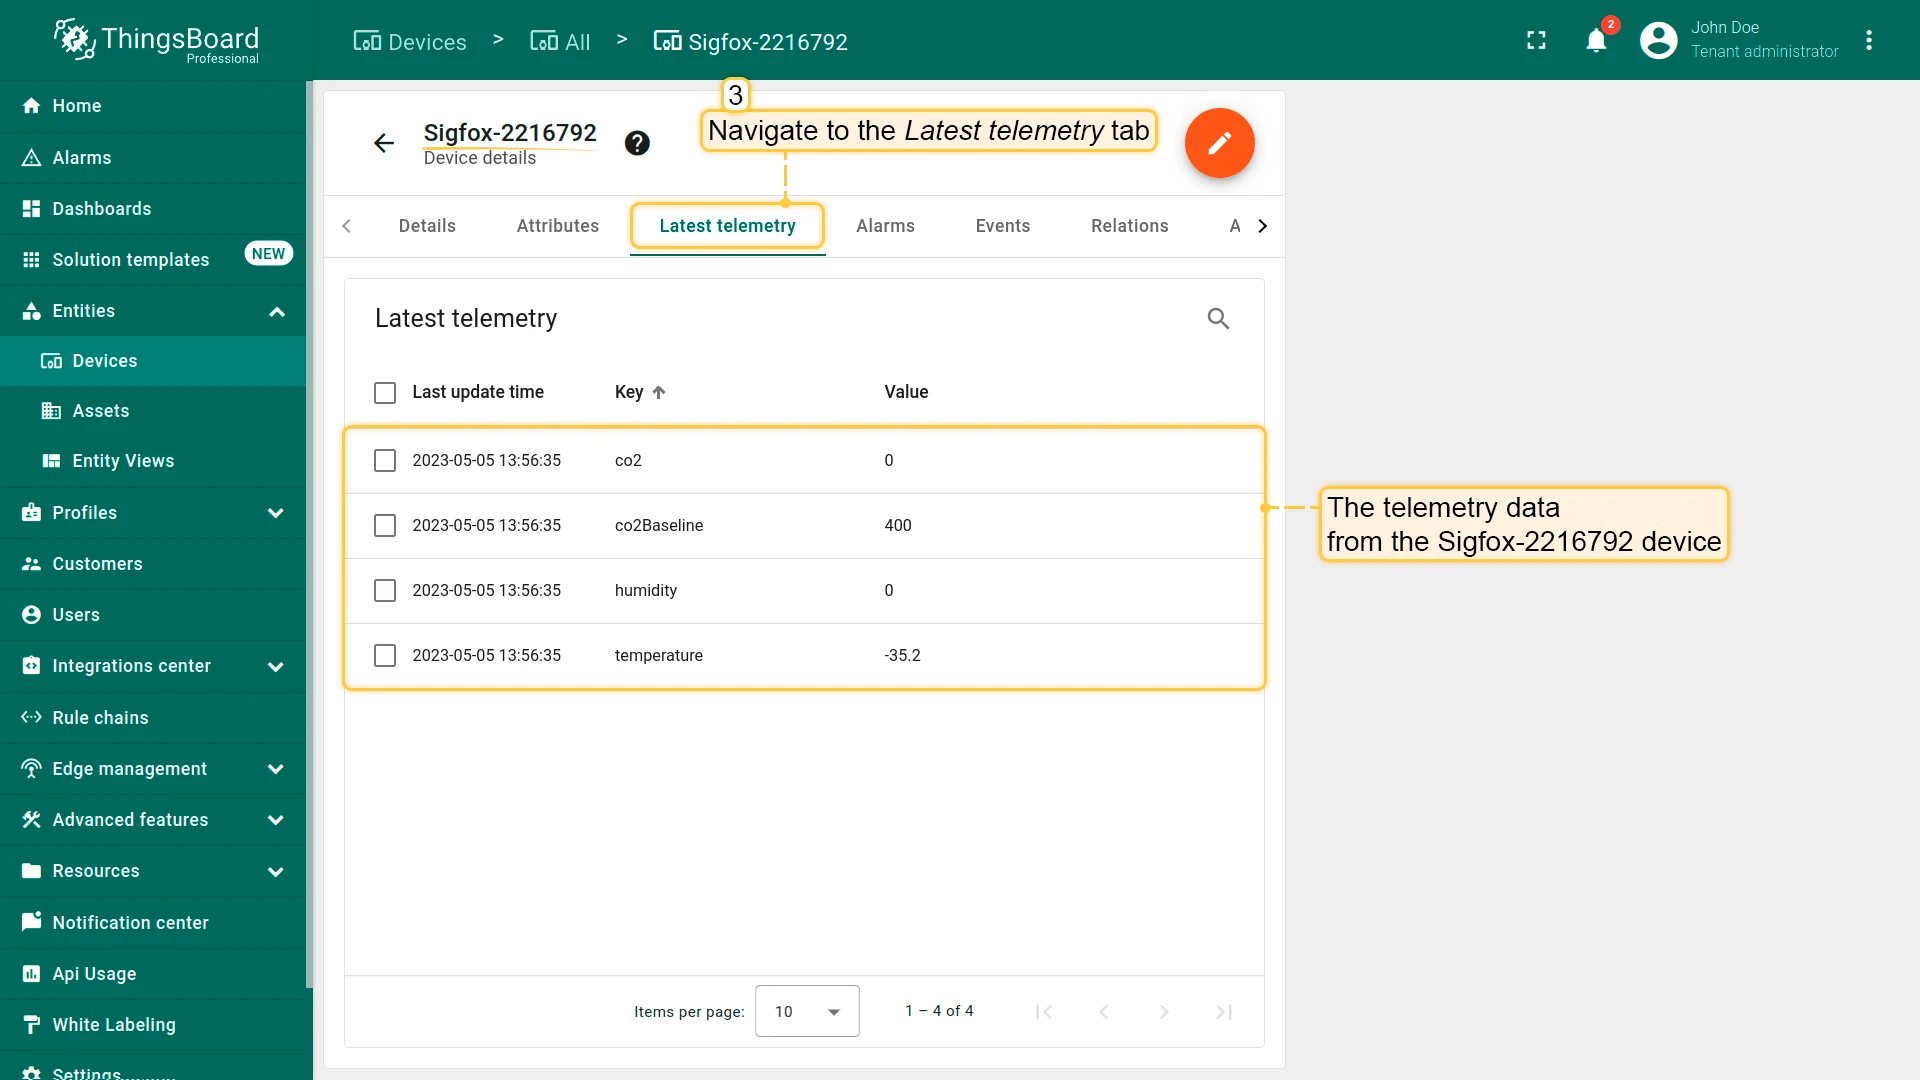
In this tutorial, device Sigfox-2216792 is a Sigfox Airwits CO2 sensor that publishes temperature, humidity, co2, and co2Baseline readings encoded as a binary hex string.
ThingsBoard integration setup
Section titled “ThingsBoard integration setup”Create an uplink converter
Section titled “Create an uplink converter”The uplink converter transforms incoming Sigfox payloads into the ThingsBoard data format. Sigfox uses a generic uplink converter. ThingsBoard provides a pre-built converter for Sigfox — import the JSON file and customize the decoder function to match your device payload structure.
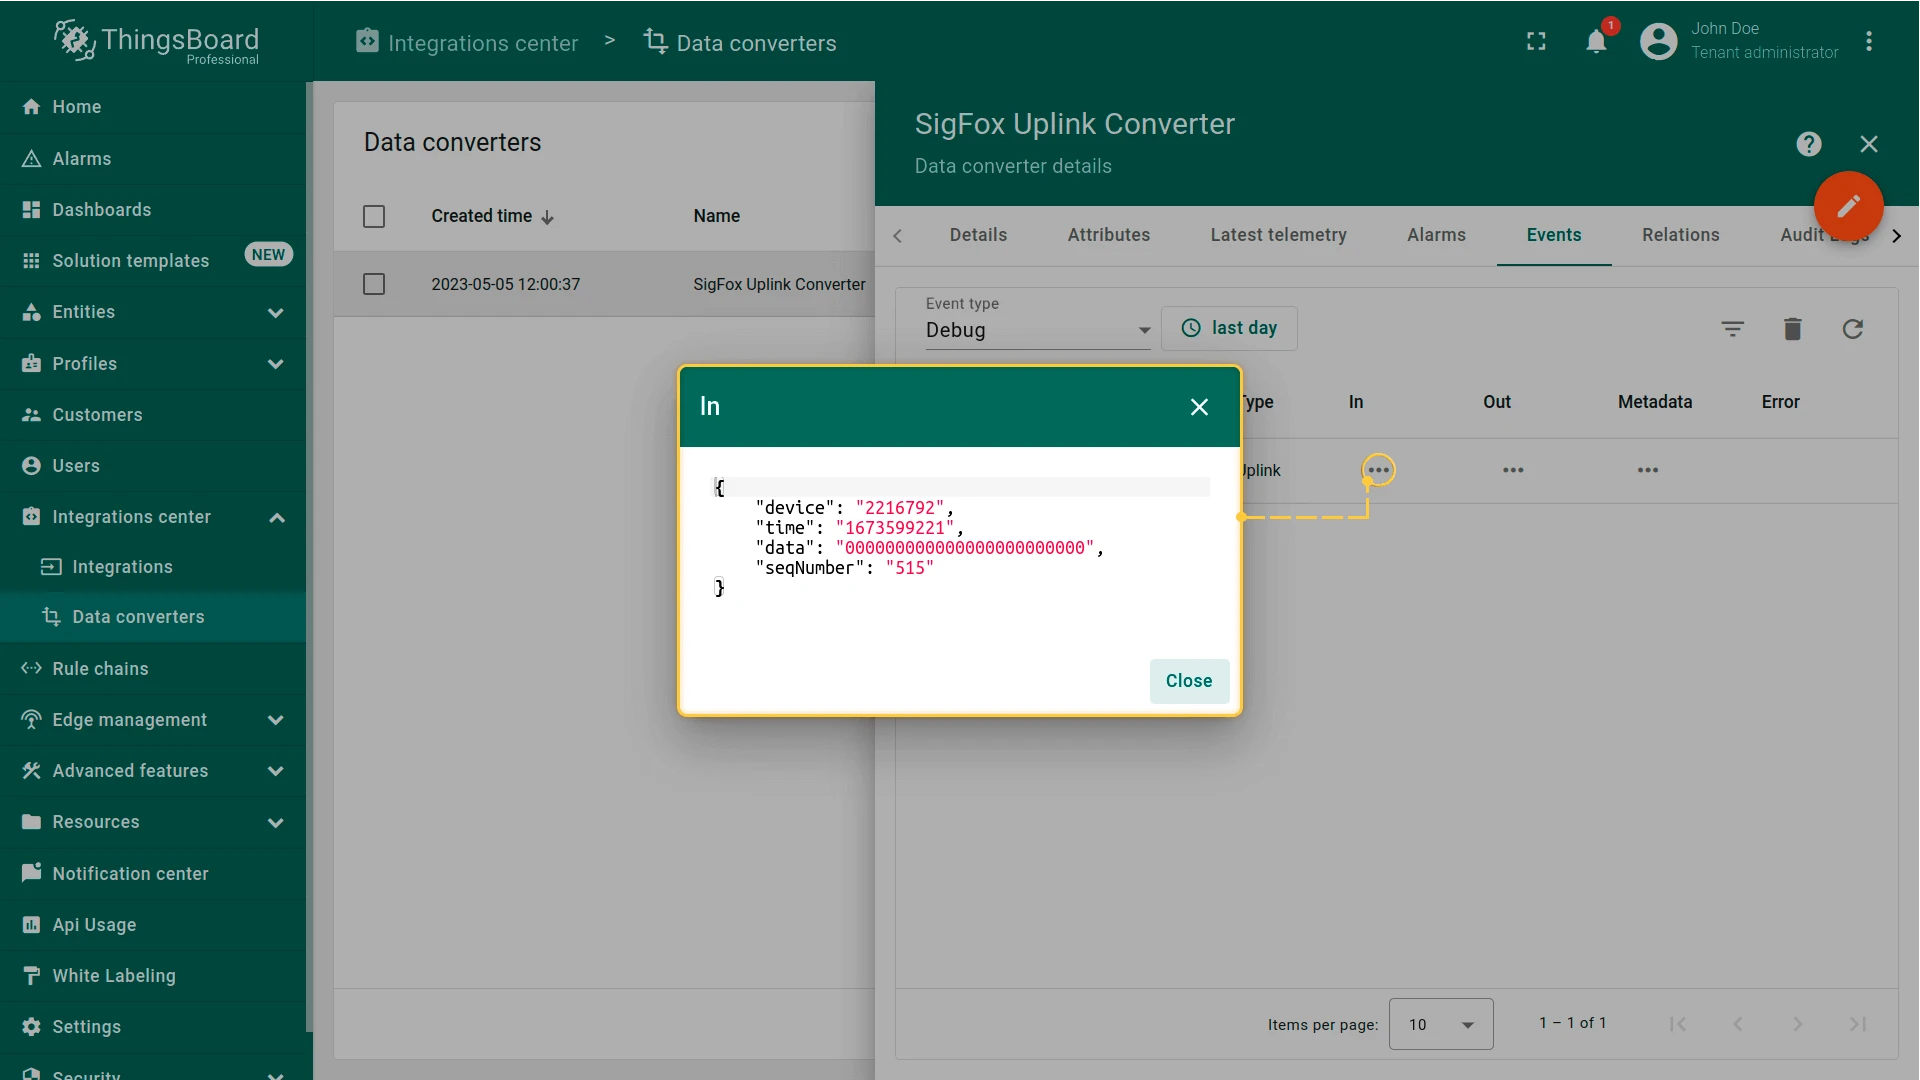
Sample payload from a Sigfox device:
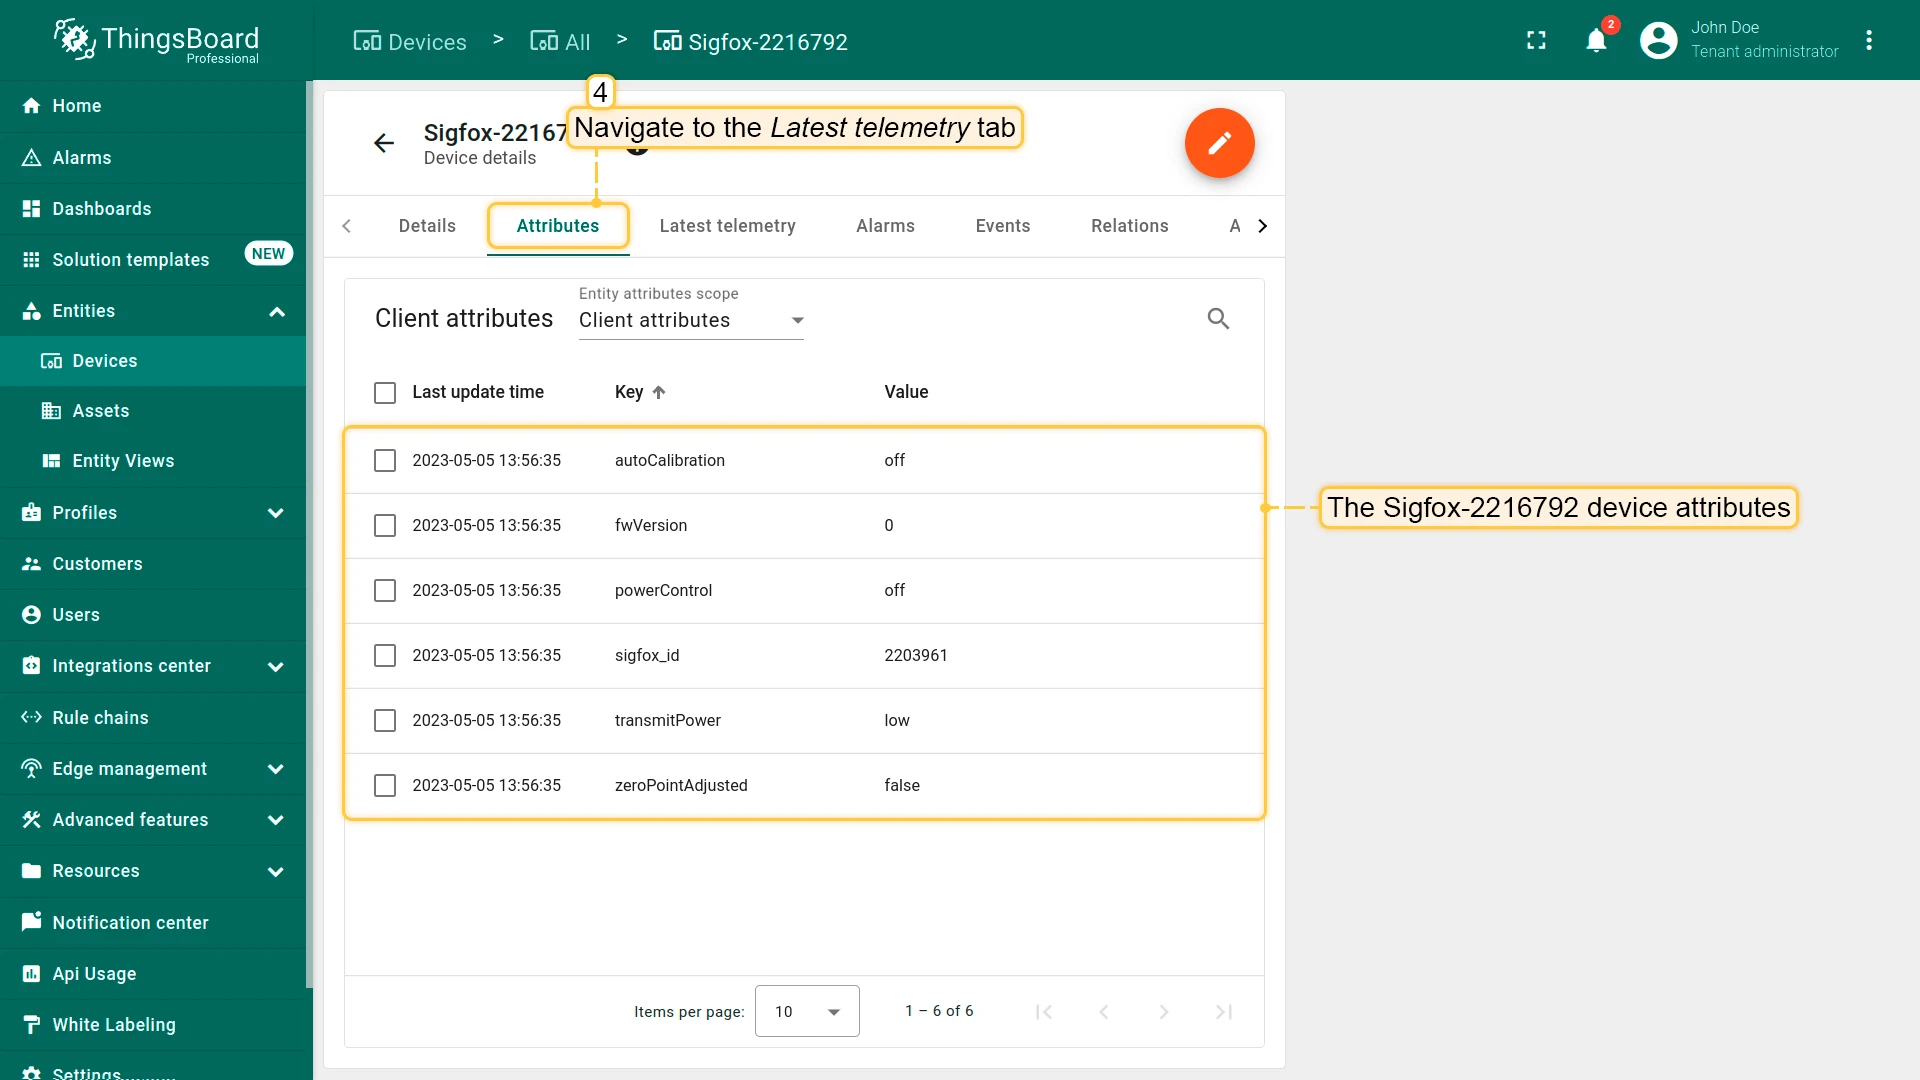
{ "device": "BF1327", "time": "1661868952", "data": "2502af2102462a", "seqNumber": "3737"}The device field maps to the device name. The data field is a hex-encoded sensor reading — each byte pair encodes a measurement: bytes 1–2 = temperature (offset −40, scale ÷10), byte 3 = humidity, bytes 4–5 = CO₂, byte 6 = CO₂ baseline. The first byte encodes device configuration flags (autoCalibration, transmitPower, etc.) stored as attributes.
- Download the uplink converter file:
- Go to Integrations center ⇾ Data converters.
- Click + Add data converter ⇾ Import converter.
- Drag and drop the downloaded JSON file into the Import converter window and click Import.
The decoder function used in this tutorial:
/** Decoder **/
// decode payload to stringvar json = decodeToJson(payload);var deviceName = 'Sigfox-' + json.device;var deviceType = 'Sigfox Airwits CO2';var groupName = 'UC-0023 Sigfox Airwits CO2';
var attrByte = parseInt(json.data.substring(0, 2), 16);var autoCalibration = (attrByte & 0x1) === 1 ? "on" : "off";var zeroPointAdjusted = ((attrByte & 0x2) >> 1) === 1 ? true : false;var transmitPower = ((attrByte & 0x4) >> 2) === 1 ? "full" : "low";var powerControl = ((attrByte & 0x8) >> 3) === 1 ? "on" : "off";var firmwareVersion = attrByte >> 4;
var temperature = parseInt(json.data.substring(2, 6), 16) / 10.0 - 40;var humidity = parseInt(json.data.substring(6, 8), 16);var co2 = parseInt(json.data.substring(8, 12), 16);
var co2Baseline = 0;var co2BaselineN = parseInt(json.data.substring(12, 14), 16);if (co2BaselineN === 0) { co2Baseline = 400;} else { co2Baseline = co2BaselineN * 10;}
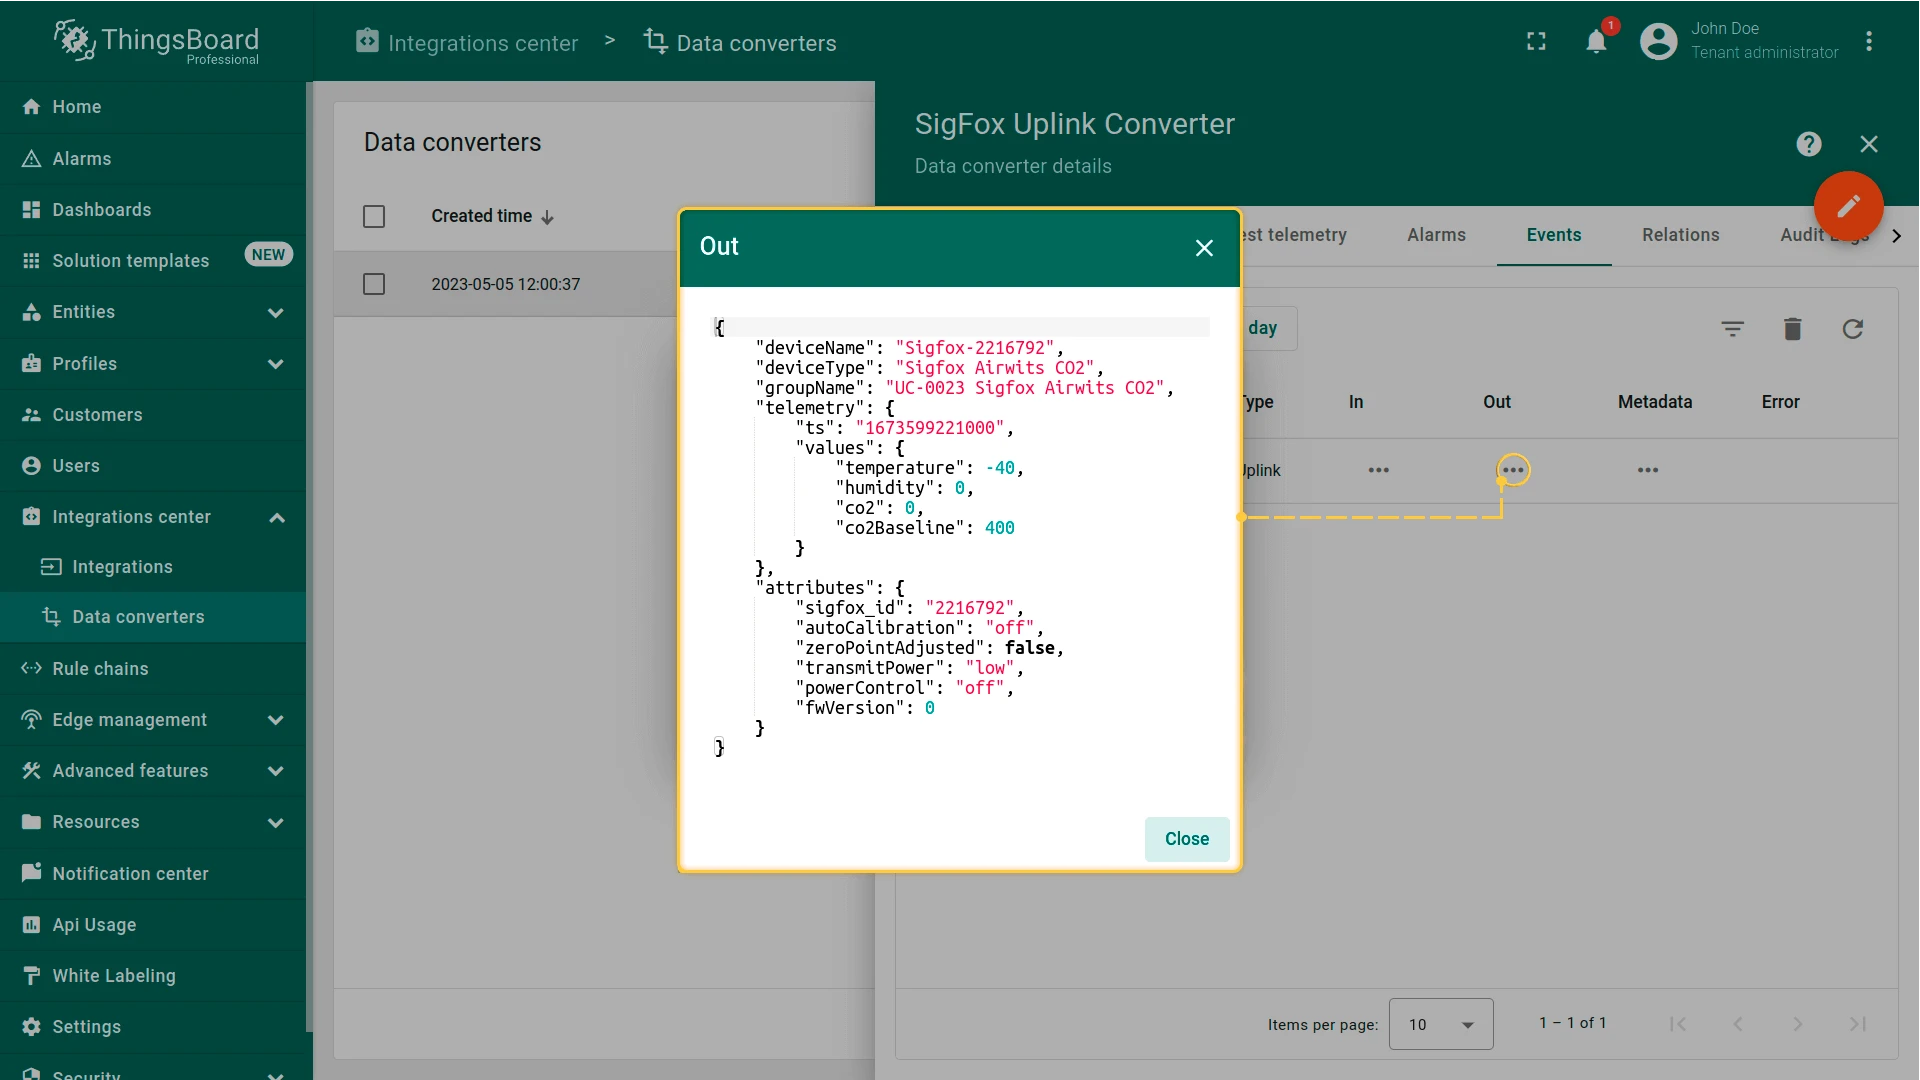
var result = { deviceName: deviceName, deviceType: deviceType, groupName: groupName, telemetry: { ts: json.time + "000", values: { temperature: toFixed(temperature, 1), humidity: humidity, co2: co2, co2Baseline: co2Baseline } }, attributes: { sigfox_id: json.device, autoCalibration: autoCalibration, zeroPointAdjusted: zeroPointAdjusted, transmitPower: transmitPower, powerControl: powerControl, fwVersion: firmwareVersion }};
/** Helper functions 'decodeToString' and 'decodeToJson' are already built-in **/
return result;/** Decoder **/
// decode payload to stringvar json = decodeToJson(payload);var deviceName = 'Sigfox-' + json.device;var deviceType = 'Sigfox Airwits CO2';var groupName = 'UC-0023 Sigfox Airwits CO2';
var attrByte = parseInt(json.data.substring(0, 2), 16);var autoCalibration = (attrByte & 0x1) === 1 ? "on" : "off";var zeroPointAdjusted = ((attrByte & 0x2) >> 1) === 1 ? true : false;var transmitPower = ((attrByte & 0x4) >> 2) === 1 ? "full" : "low";var powerControl = ((attrByte & 0x8) >> 3) === 1 ? "on" : "off";var firmwareVersion = attrByte >> 4;
var temperature = parseInt(json.data.substring(2, 6), 16) / 10 - 40;var humidity = parseInt(json.data.substring(6, 8), 16);var co2 = parseInt(json.data.substring(8, 12), 16);
var co2Baseline = 0;var co2BaselineN = parseInt(json.data.substring(12, 14), 16);if (co2BaselineN === 0) { co2Baseline = 400;} else { co2Baseline = co2BaselineN * 10;}
var result = { deviceName: deviceName, deviceType: deviceType, groupName: groupName, telemetry: { ts: json.time + "000", values: { temperature: parseFloat(temperature.toFixed(1)), humidity: parseFloat(humidity), co2: co2, co2Baseline: co2Baseline } }, attributes: { sigfox_id: json.device, autoCalibration: autoCalibration, zeroPointAdjusted: zeroPointAdjusted, transmitPower: transmitPower, powerControl: powerControl, fwVersion: firmwareVersion }};
/** Helper functions **/
function decodeToString(payload) { return String.fromCharCode.apply(String, payload);}
function decodeToJson(payload) { var str = decodeToString(payload); var data = JSON.parse(str); return data;}
return result;To adapt this converter to your device:
- Different device name — change
'Sigfox-' + json.deviceto any identifier present in your payload. - Different payload encoding — update the
substringranges and arithmetic to match your device’s byte layout. - Additional telemetry — add more keys to
telemetry.values(e.g.pressure: ...). - Attributes — the first byte of
json.datais decoded into device attributes; update the bit-mask logic to match your device’s configuration byte structure.
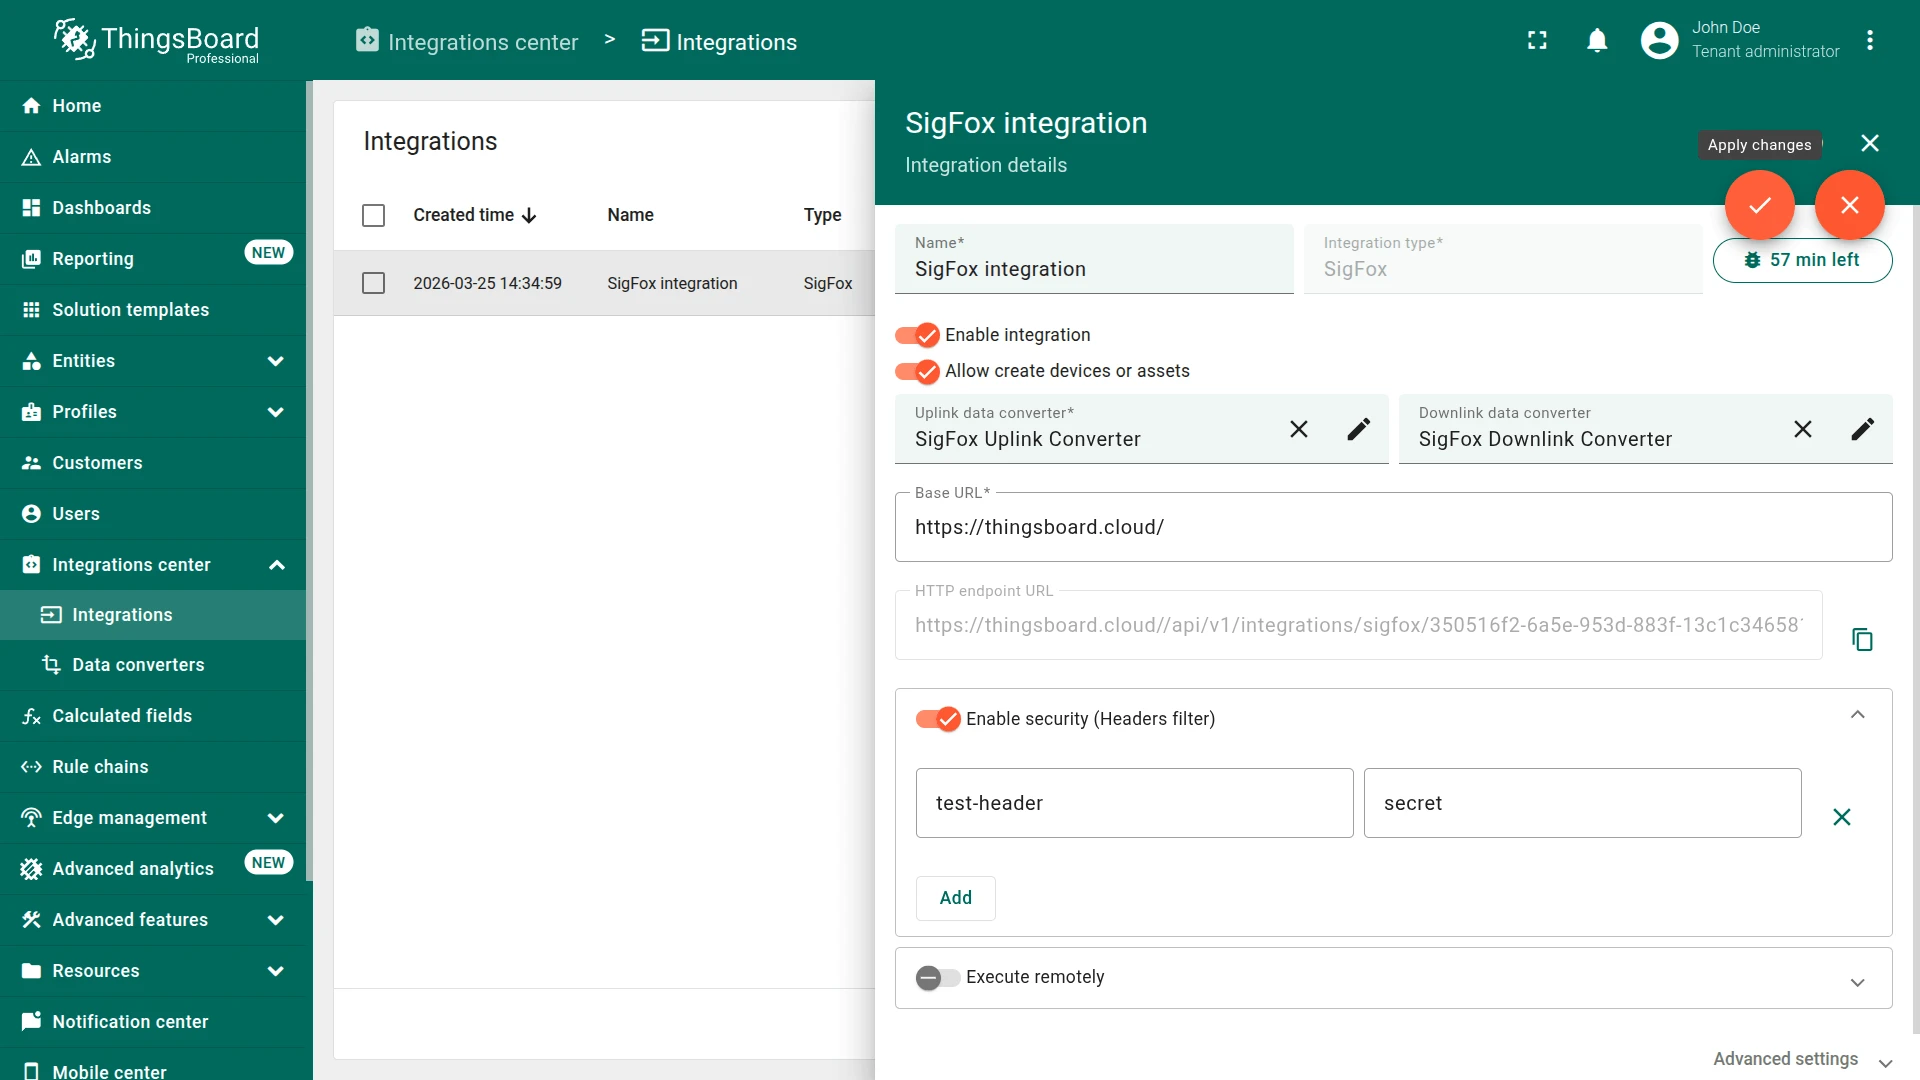
Create the integration
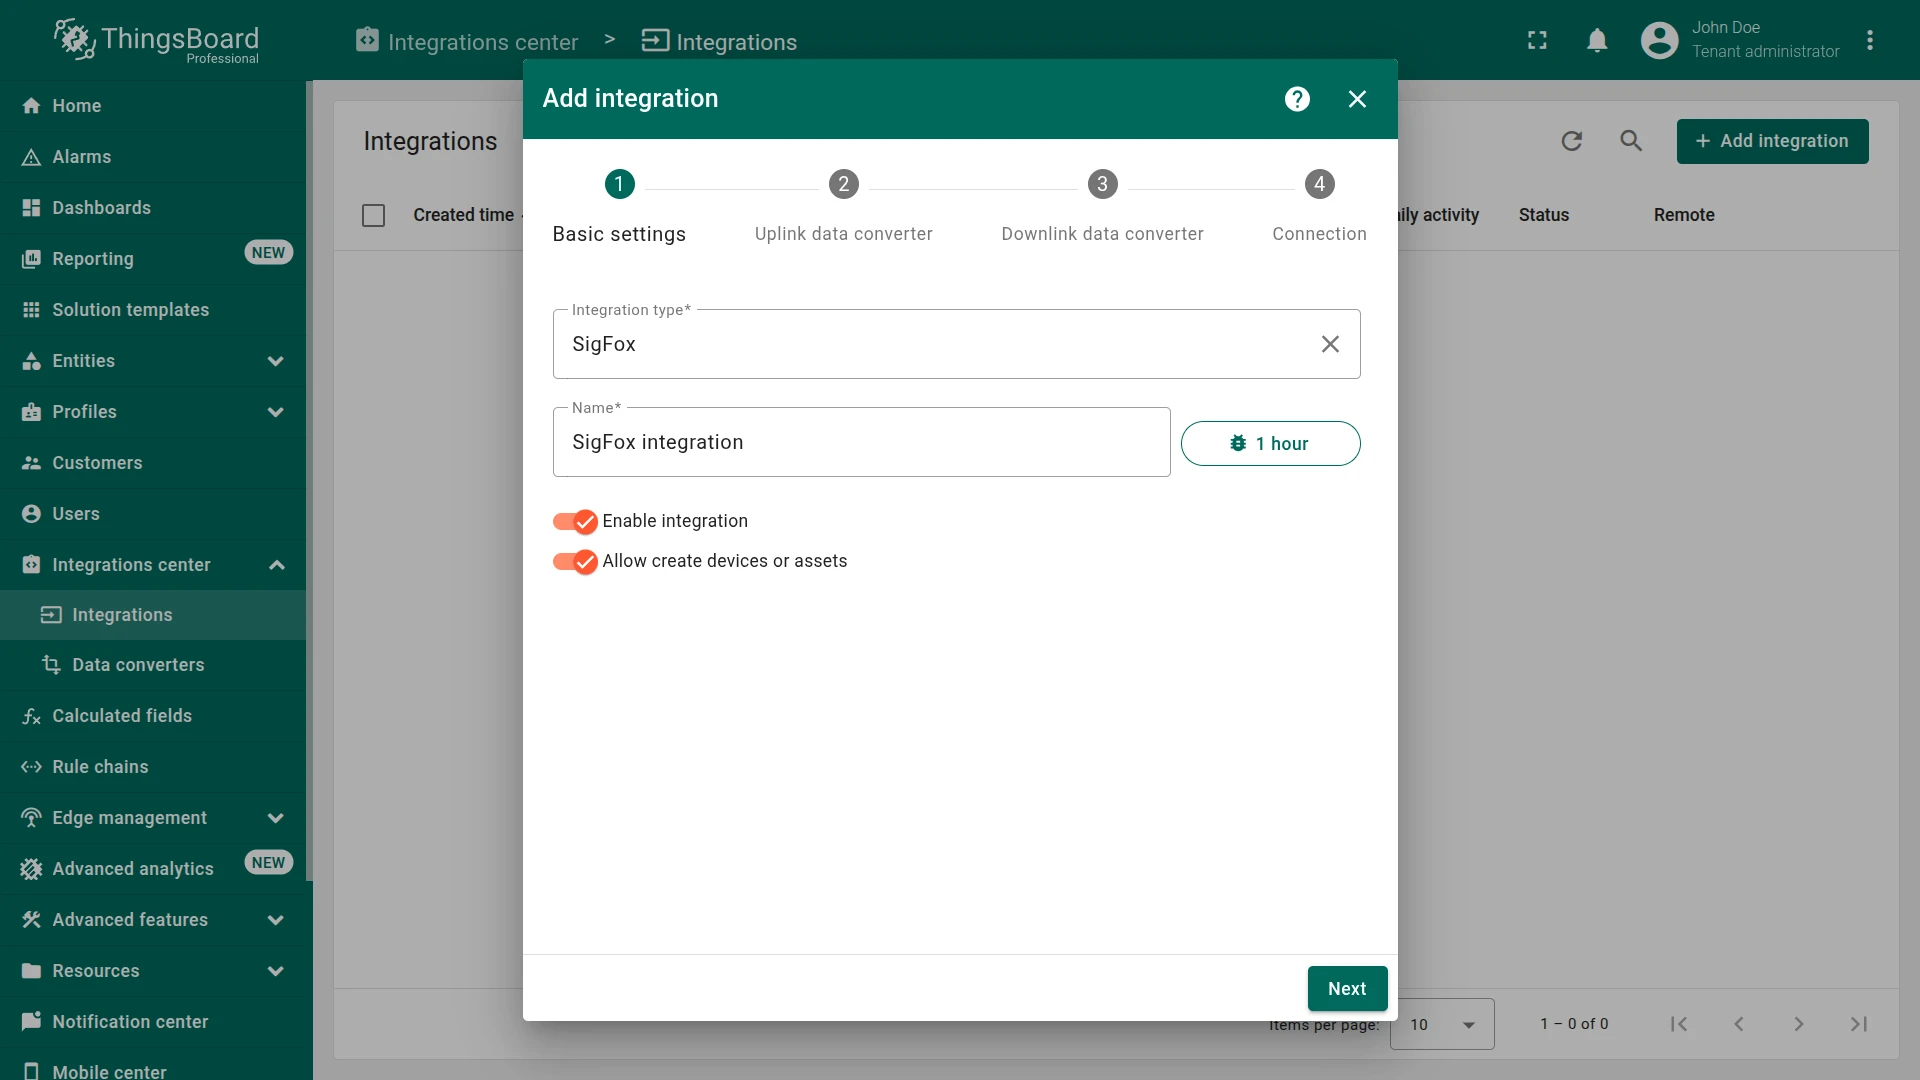
Section titled “Create the integration”- Go to Integrations center ⇾ Integrations and click + Add integration.
- Basic settings:
- Set Integration type to SigFox.
- Enable integration and Allow create devices or assets are on by default.
- Click Next.
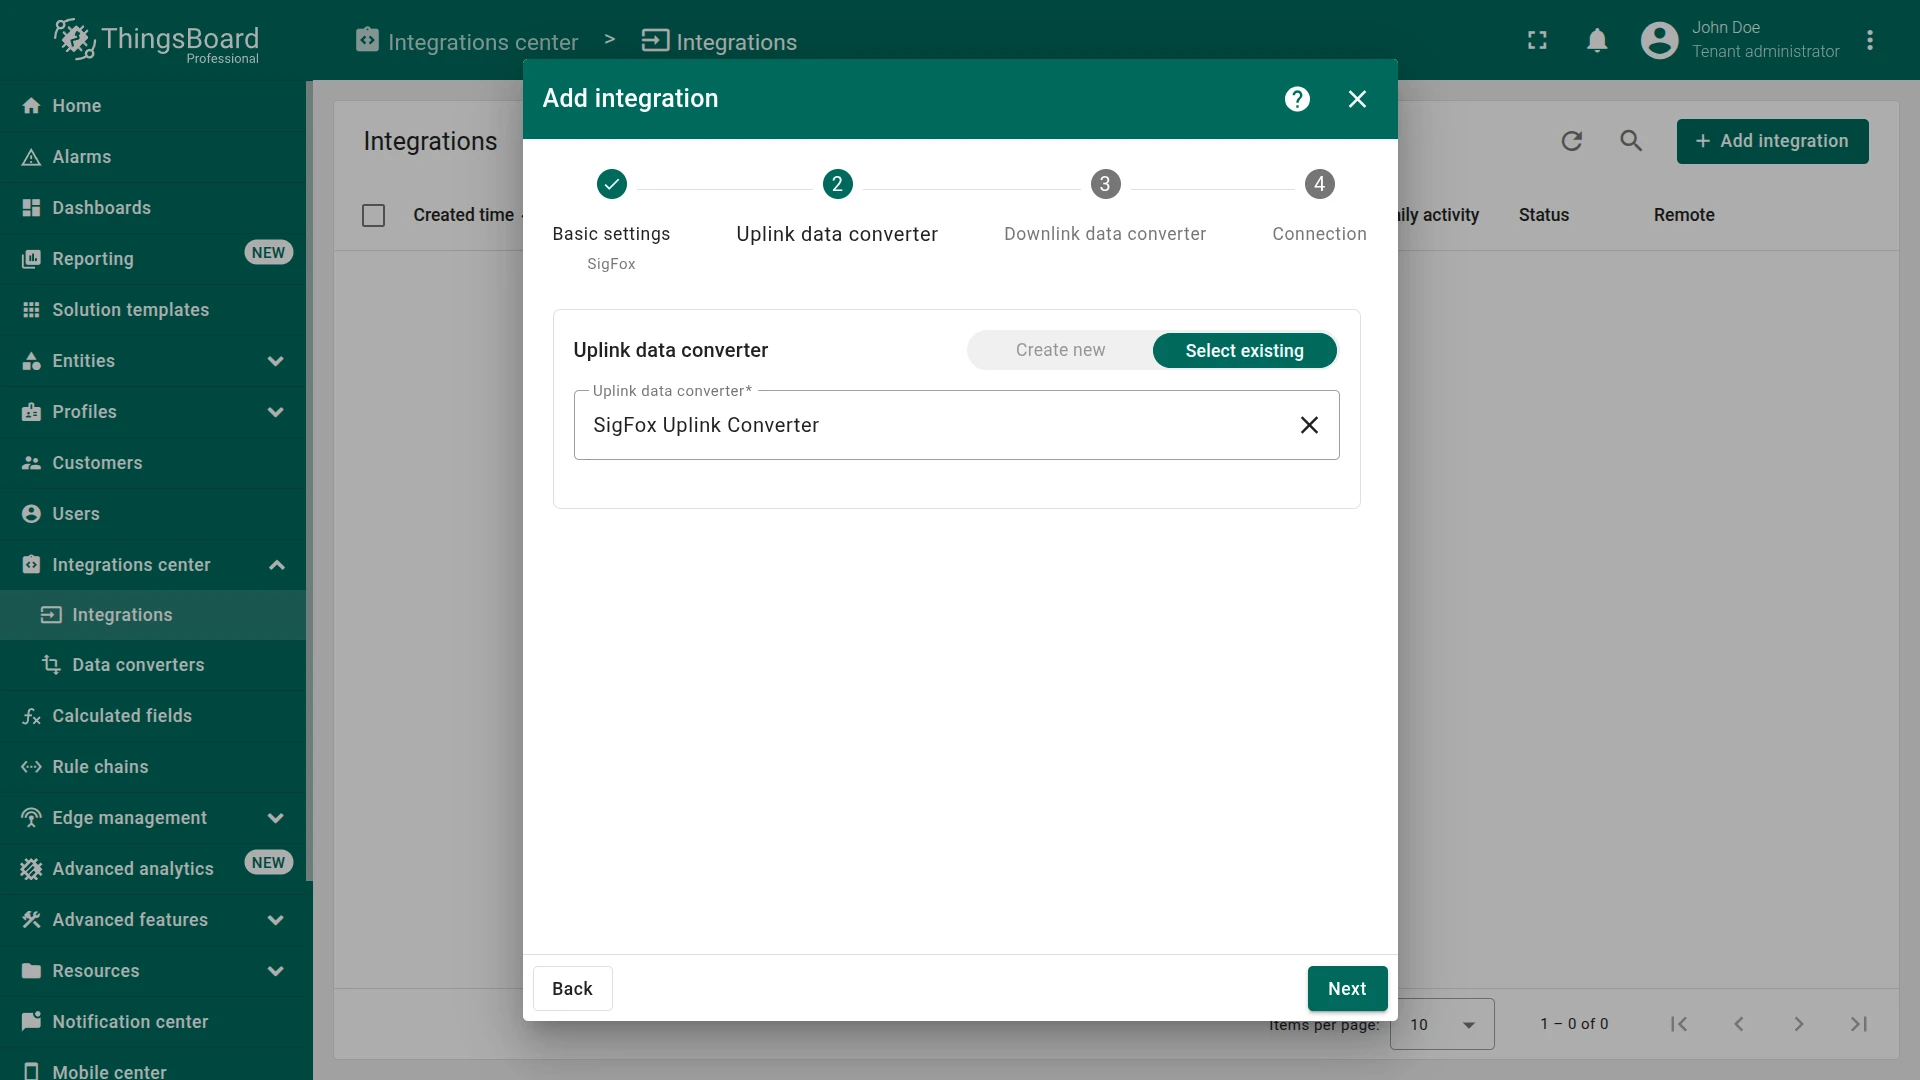
- Uplink data converter:
- Click Select existing and choose the previously created
SigFox Uplink Converter. - Click Next.
- Click Select existing and choose the previously created
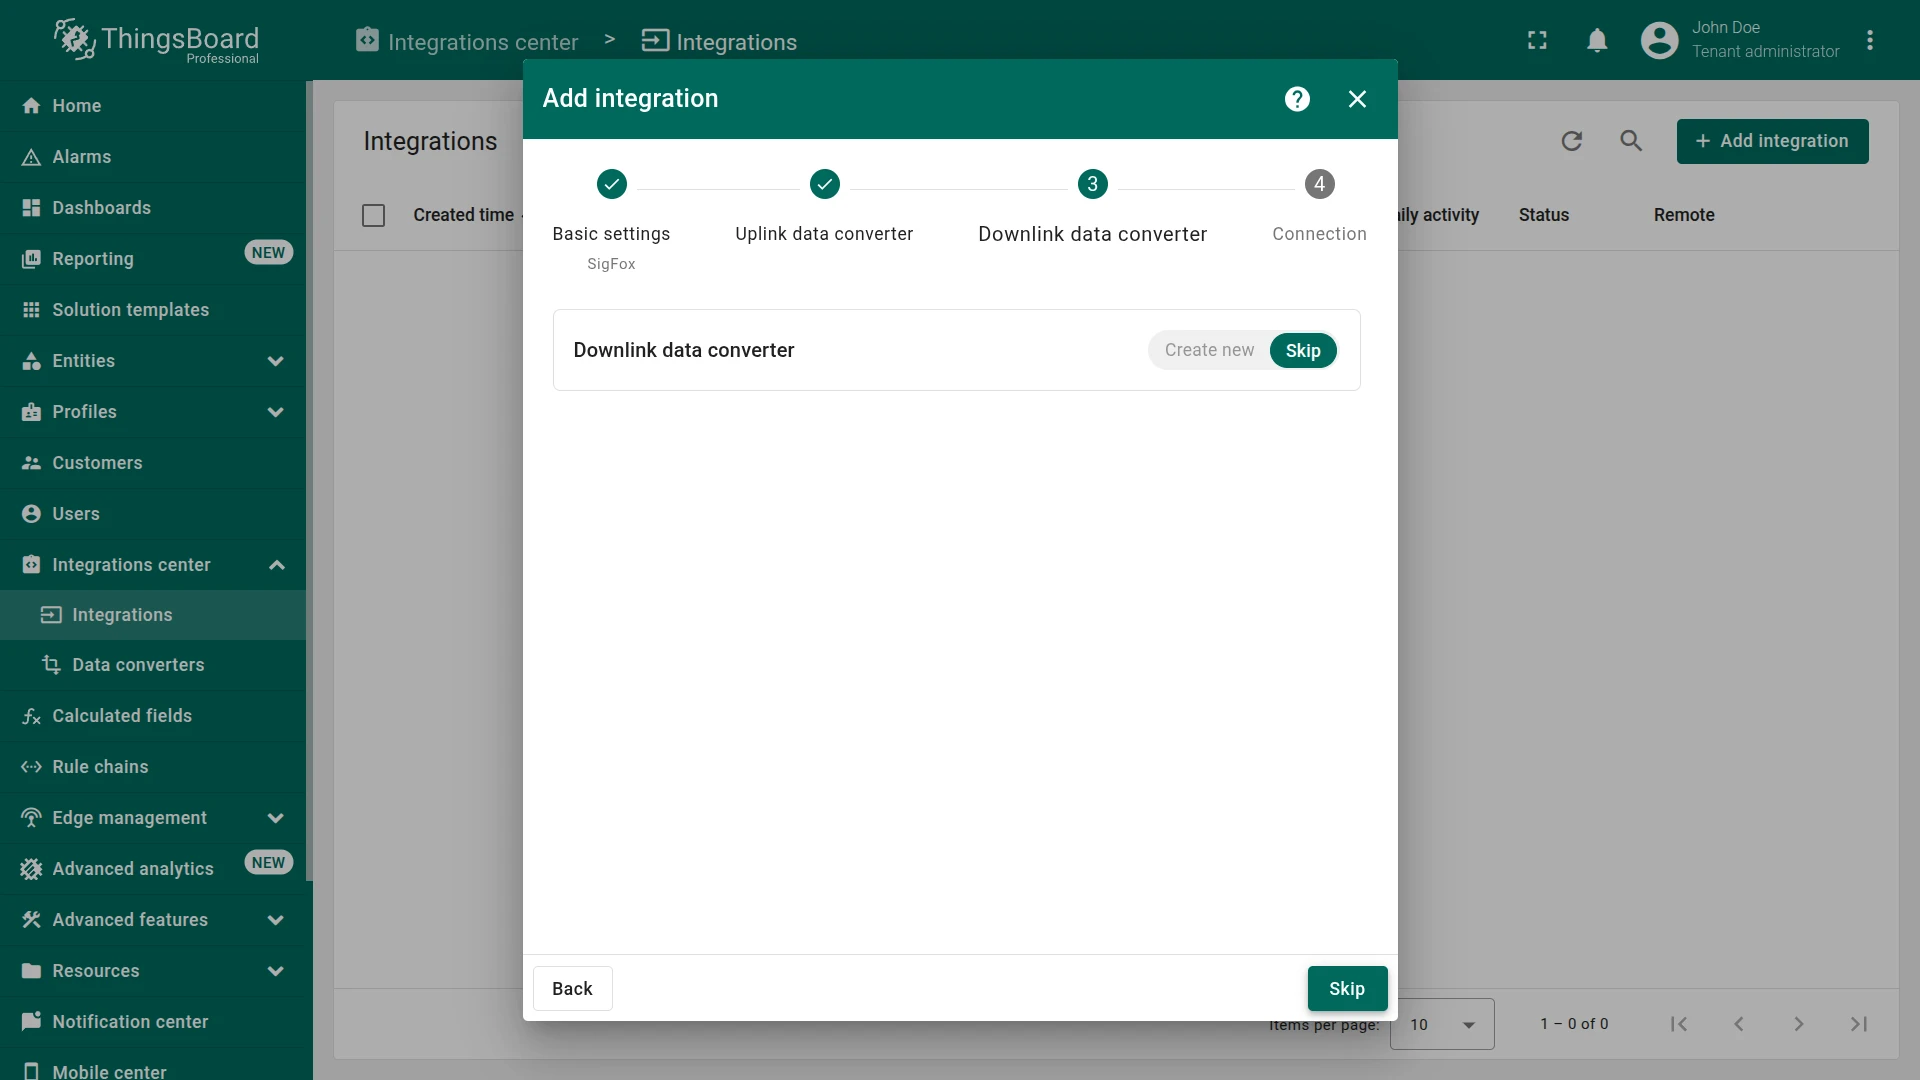
- Downlink data converter:
- Leave empty and click Skip — the downlink converter can be added later.
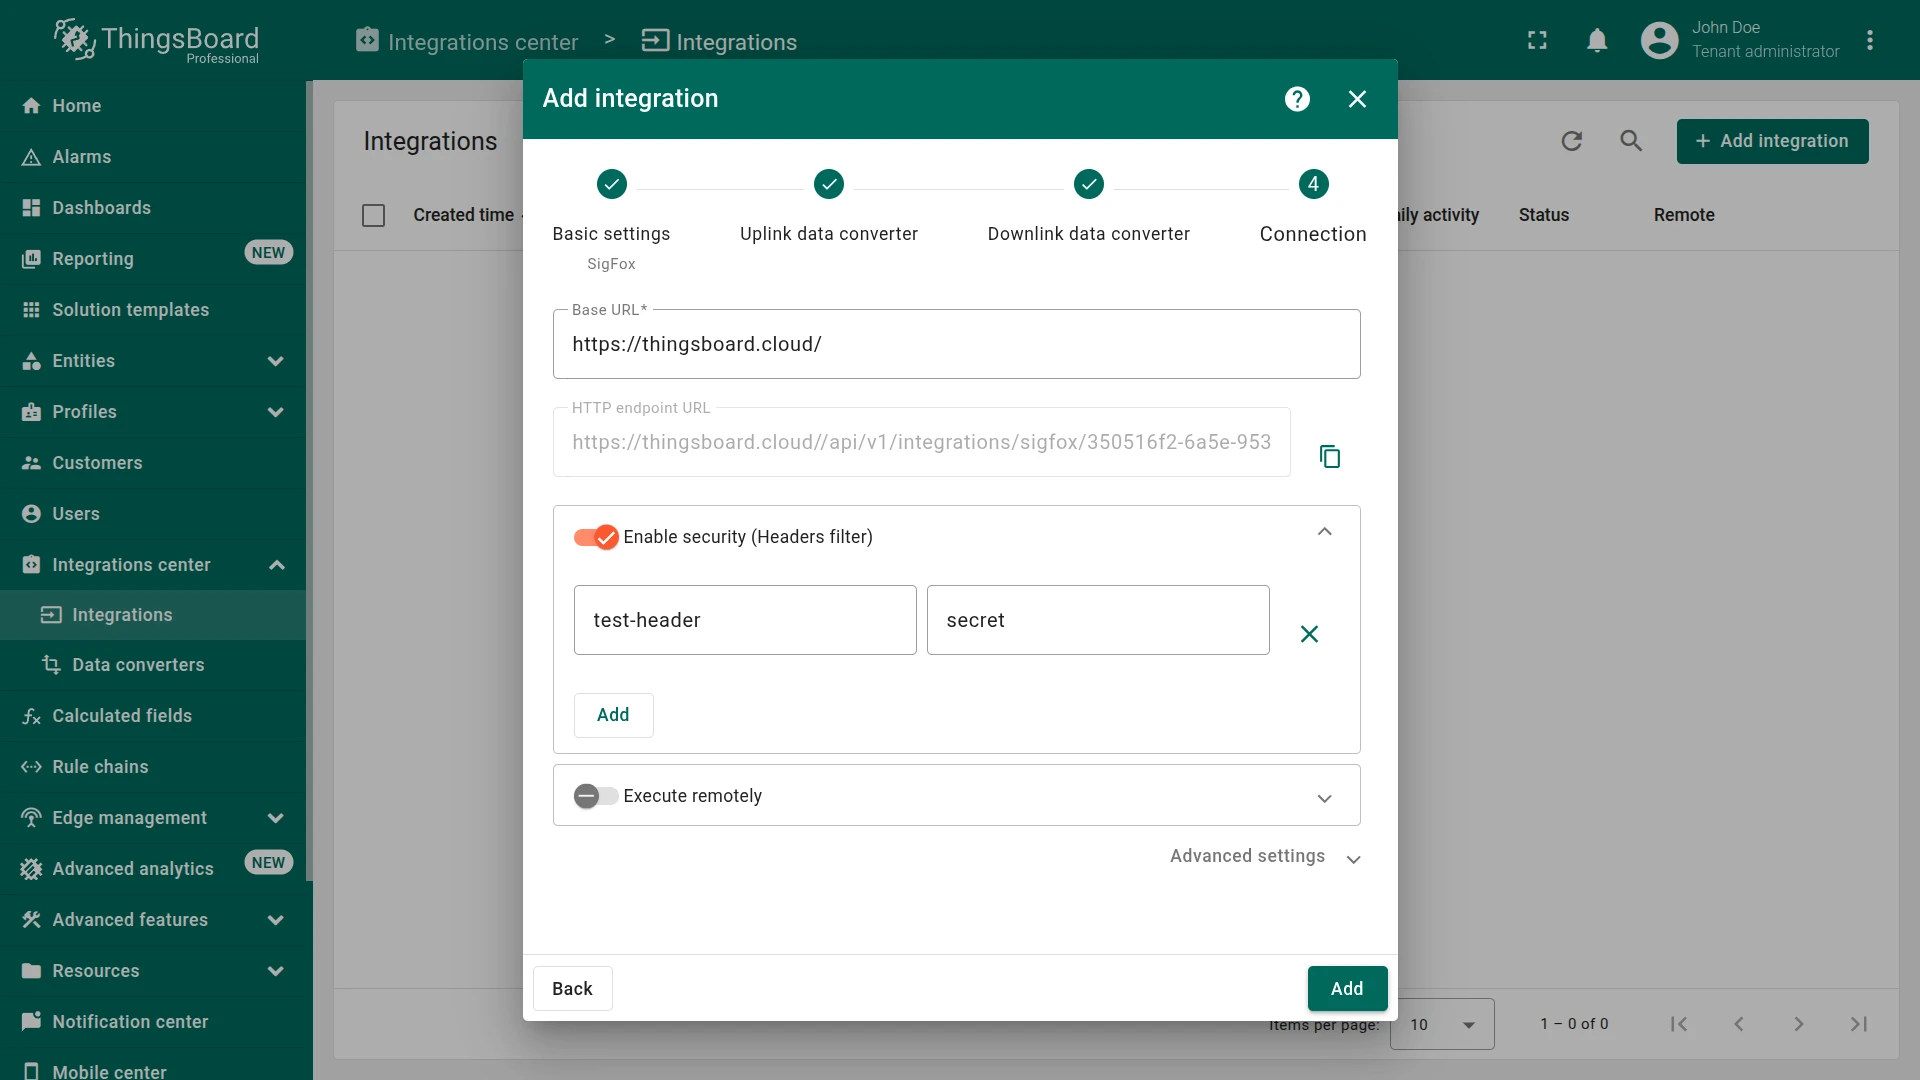
- Connection settings:
- Copy the generated HTTP endpoint URL — you will need it when configuring the Sigfox Backend callback.
- Enable Security (Headers filter) and add a header key-value pair to restrict access to this endpoint.
- Click Add to save the integration.
Connection settings
Section titled “Connection settings”HTTP endpoint URL
ThingsBoard generates a unique HTTP endpoint URL for each integration. Copy this URL and paste it into the URL pattern field in your Sigfox Backend callback. The URL is stable as long as the integration exists.
Security (Headers filter)
When enabled, ThingsBoard validates every incoming request against the configured header name-value pairs — requests missing the expected header are rejected. Add the same header key-value pair to the Sigfox Backend callback Headers field to authenticate requests.
Execute remotely
When enabled, ThingsBoard generates an Integration key and Integration secret that allow the integration to run as a separate process outside the ThingsBoard cluster — useful when your ThingsBoard instance is in a private network not reachable from the Sigfox cloud.
Advanced settings
| Parameter | Default | Description |
|---|---|---|
| Description | — | Optional text description for the integration. |
| Metadata | — | Key-value pairs injected into every message as integrationMetadata in the converter script. |
Configure Sigfox Backend
Section titled “Configure Sigfox Backend”Configure your Sigfox account to forward device messages to ThingsBoard.
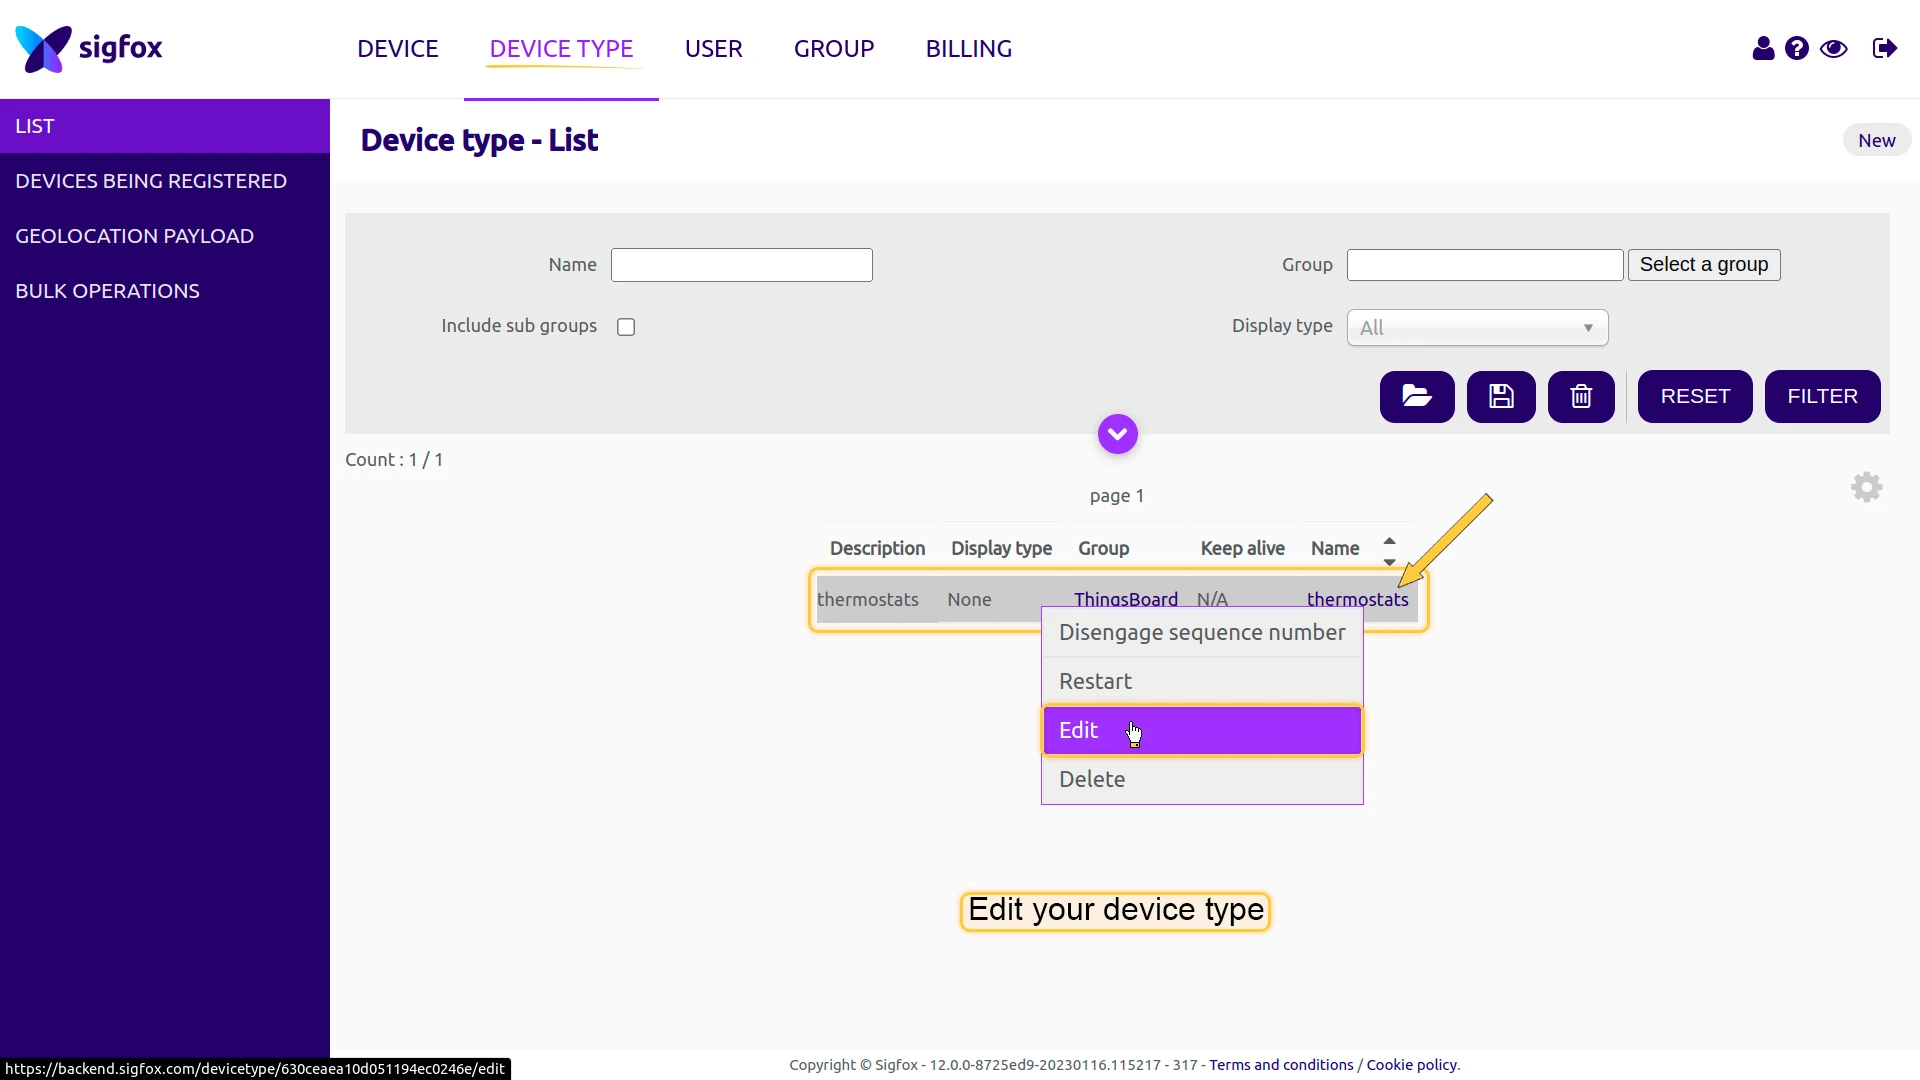
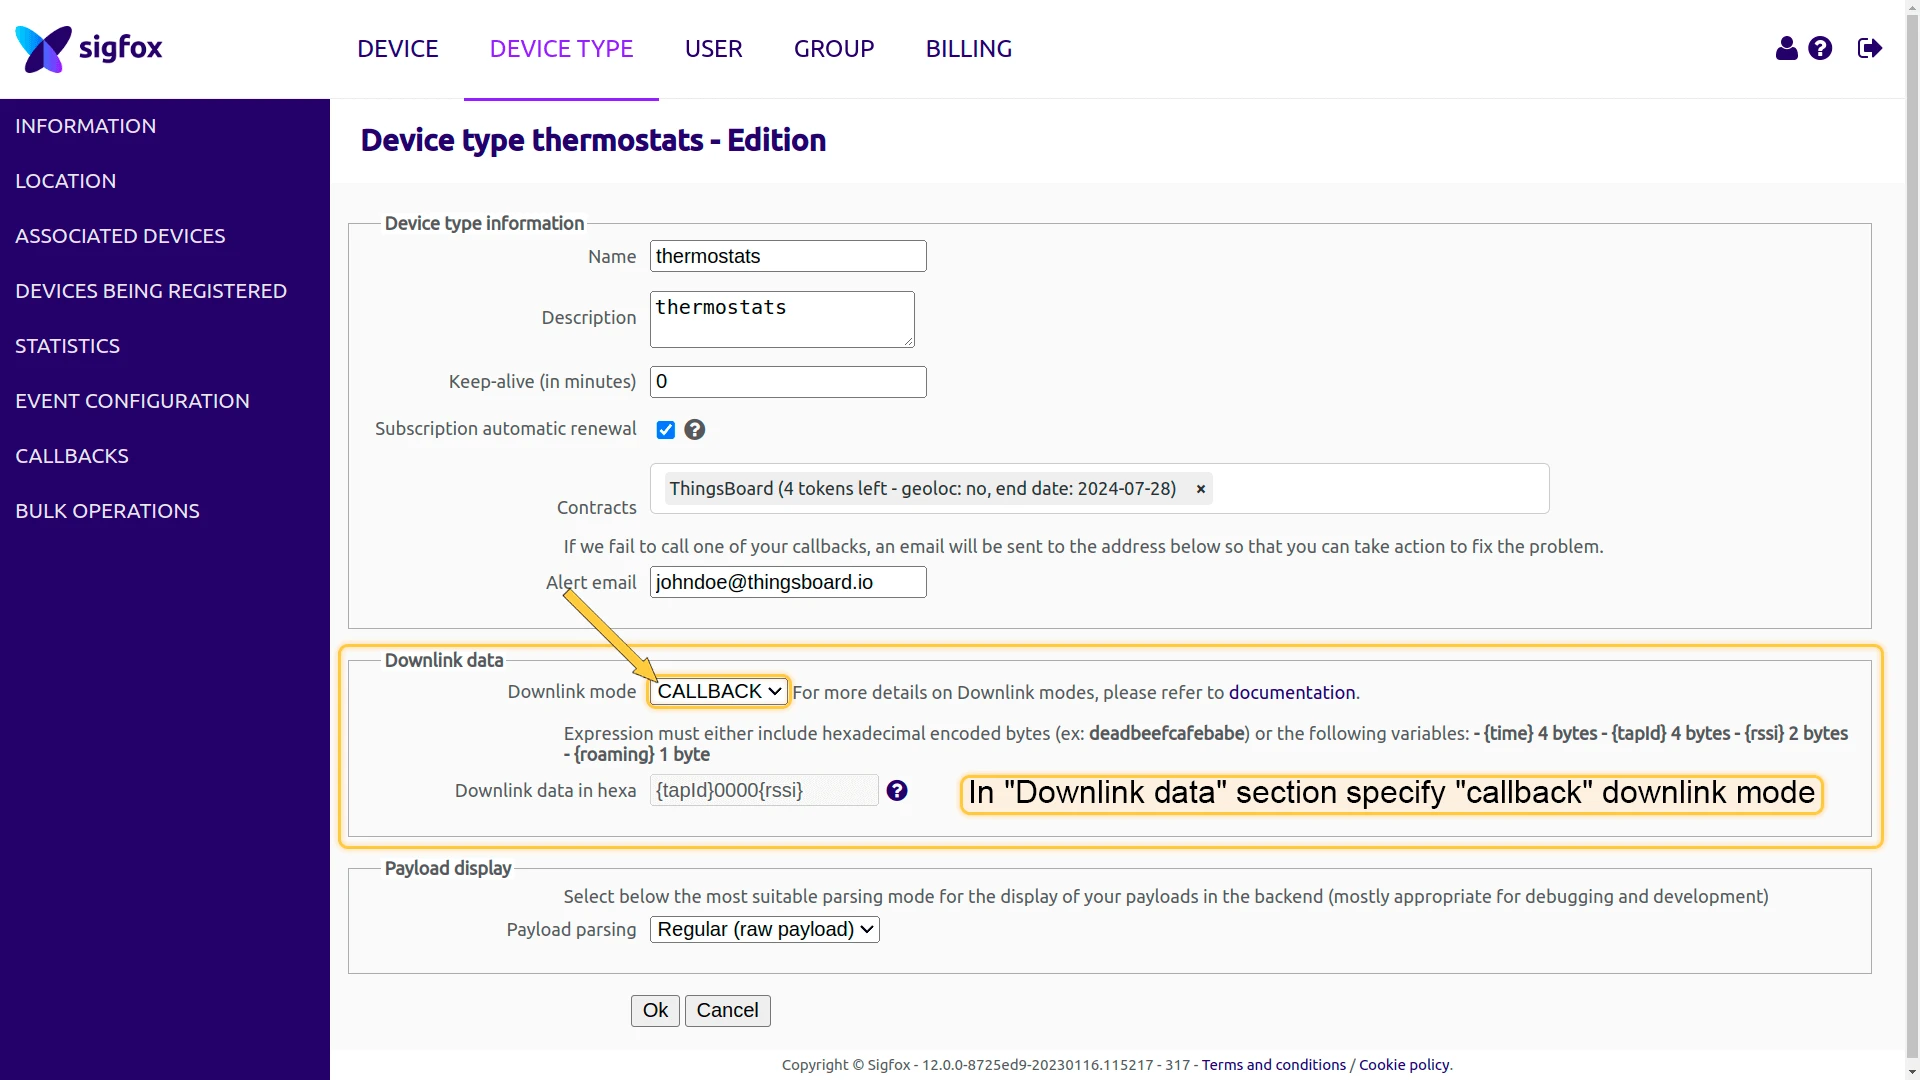
Configure the device type
Section titled “Configure the device type”- In your Sigfox Backend, go to Device type and locate the device type associated with your device (e.g.
thermostats). - Click the row’s context menu and select Edit.
- In the Downlink data section, set Downlink mode to
CALLBACK. - Click Ok to save.
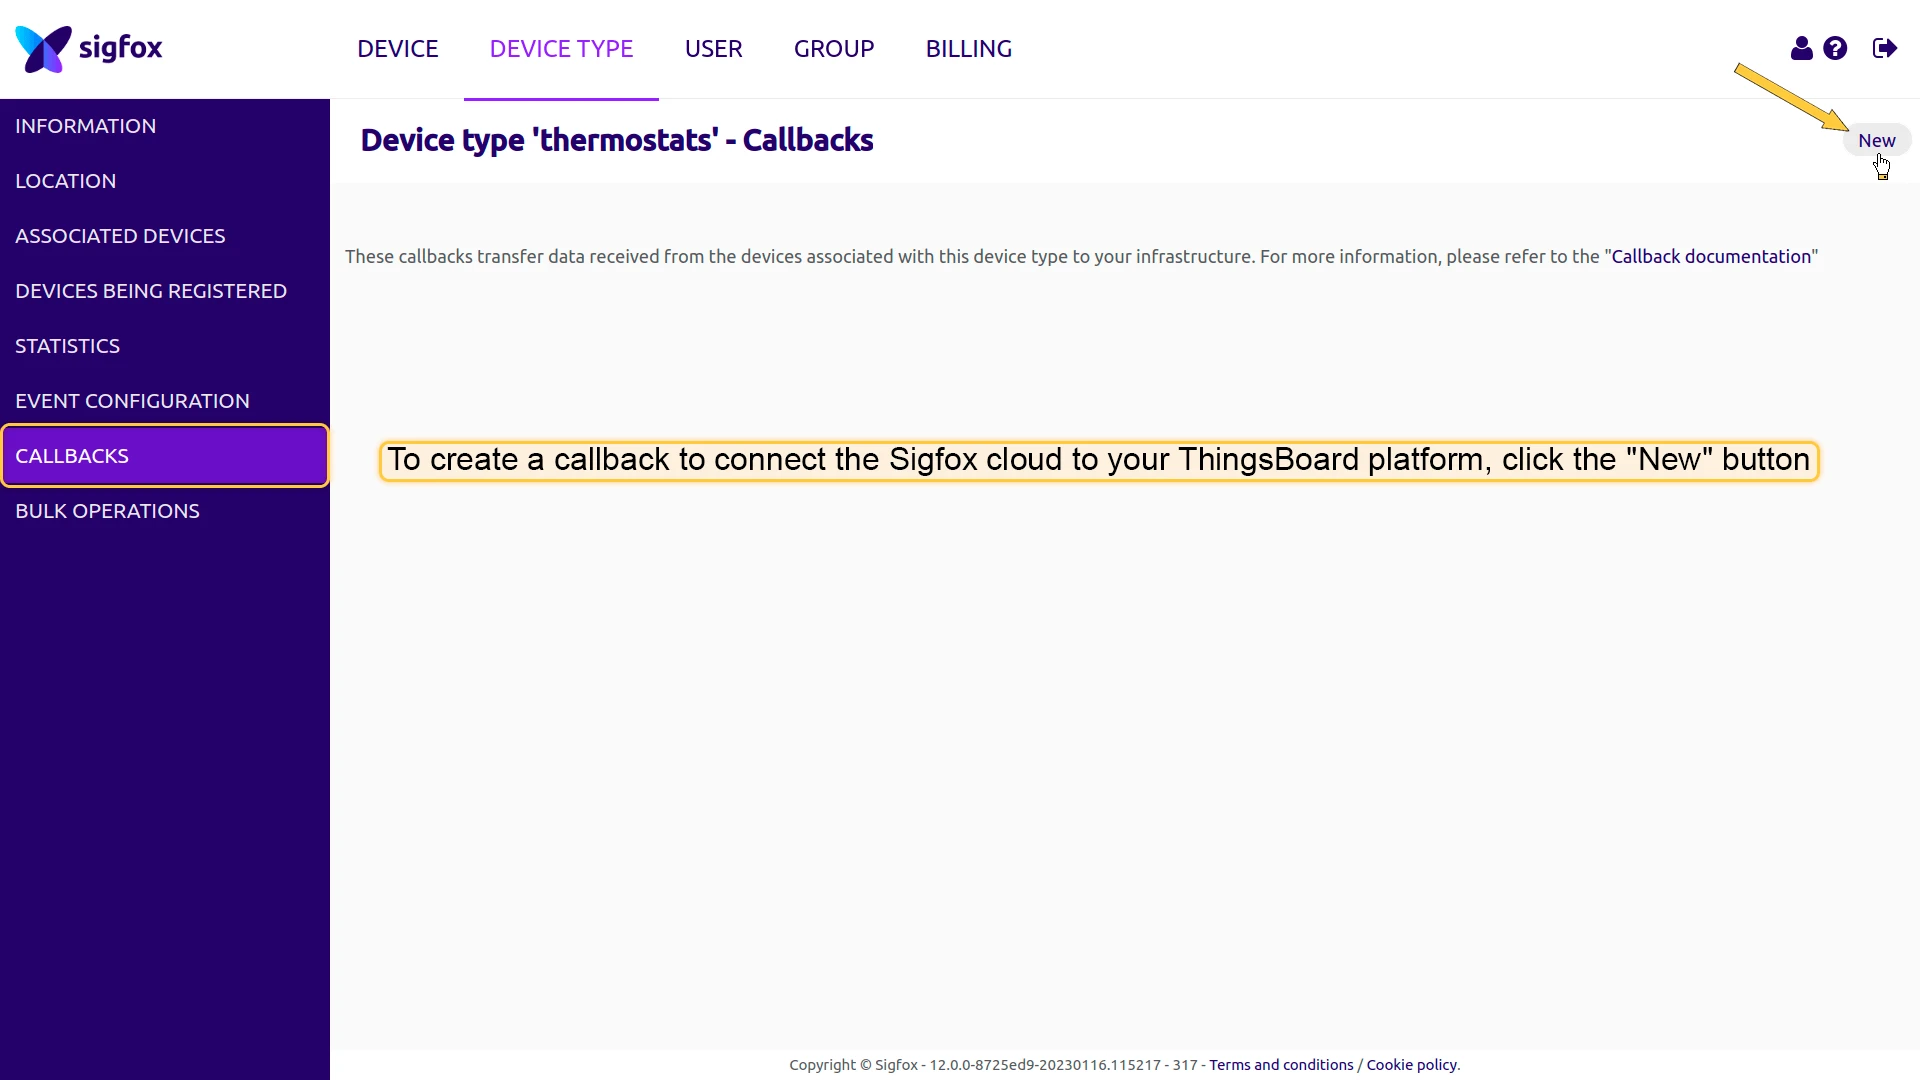
Create a custom callback
Section titled “Create a custom callback”- Go to the Callbacks tab of the device type and click New in the upper right corner.
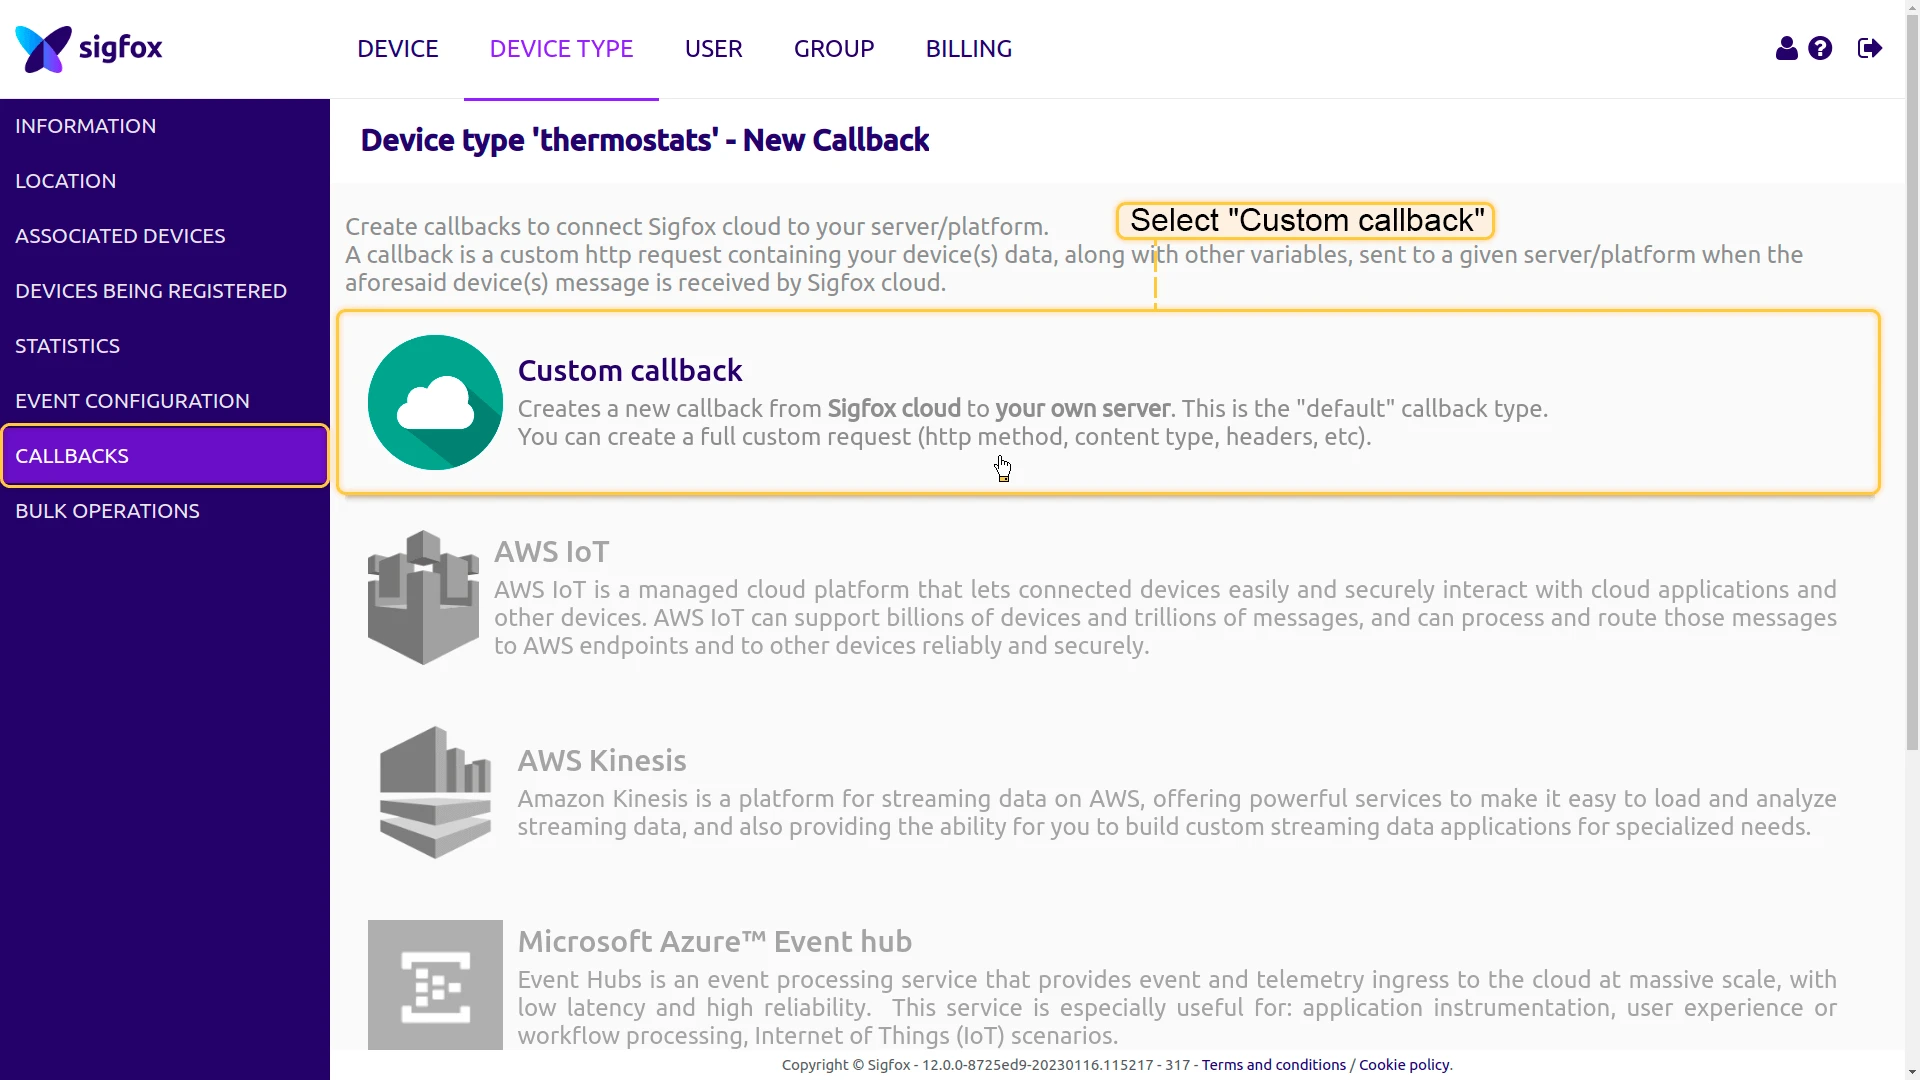
- Select Custom callback.
- Configure the callback:
- Type:
DATA, Channel:URL, Subtype:BIDIR(required for downlink support). - Custom payload config: enter the format string for your device (e.g.
int1: sint.8 #0;). - URL pattern: paste the ThingsBoard HTTP endpoint URL copied from the integration.
- Headers: if Security is enabled on the integration, add the same header key-value pair here.
- Content type:
application/json.
- Type:
- Enter the message body below and click Ok.
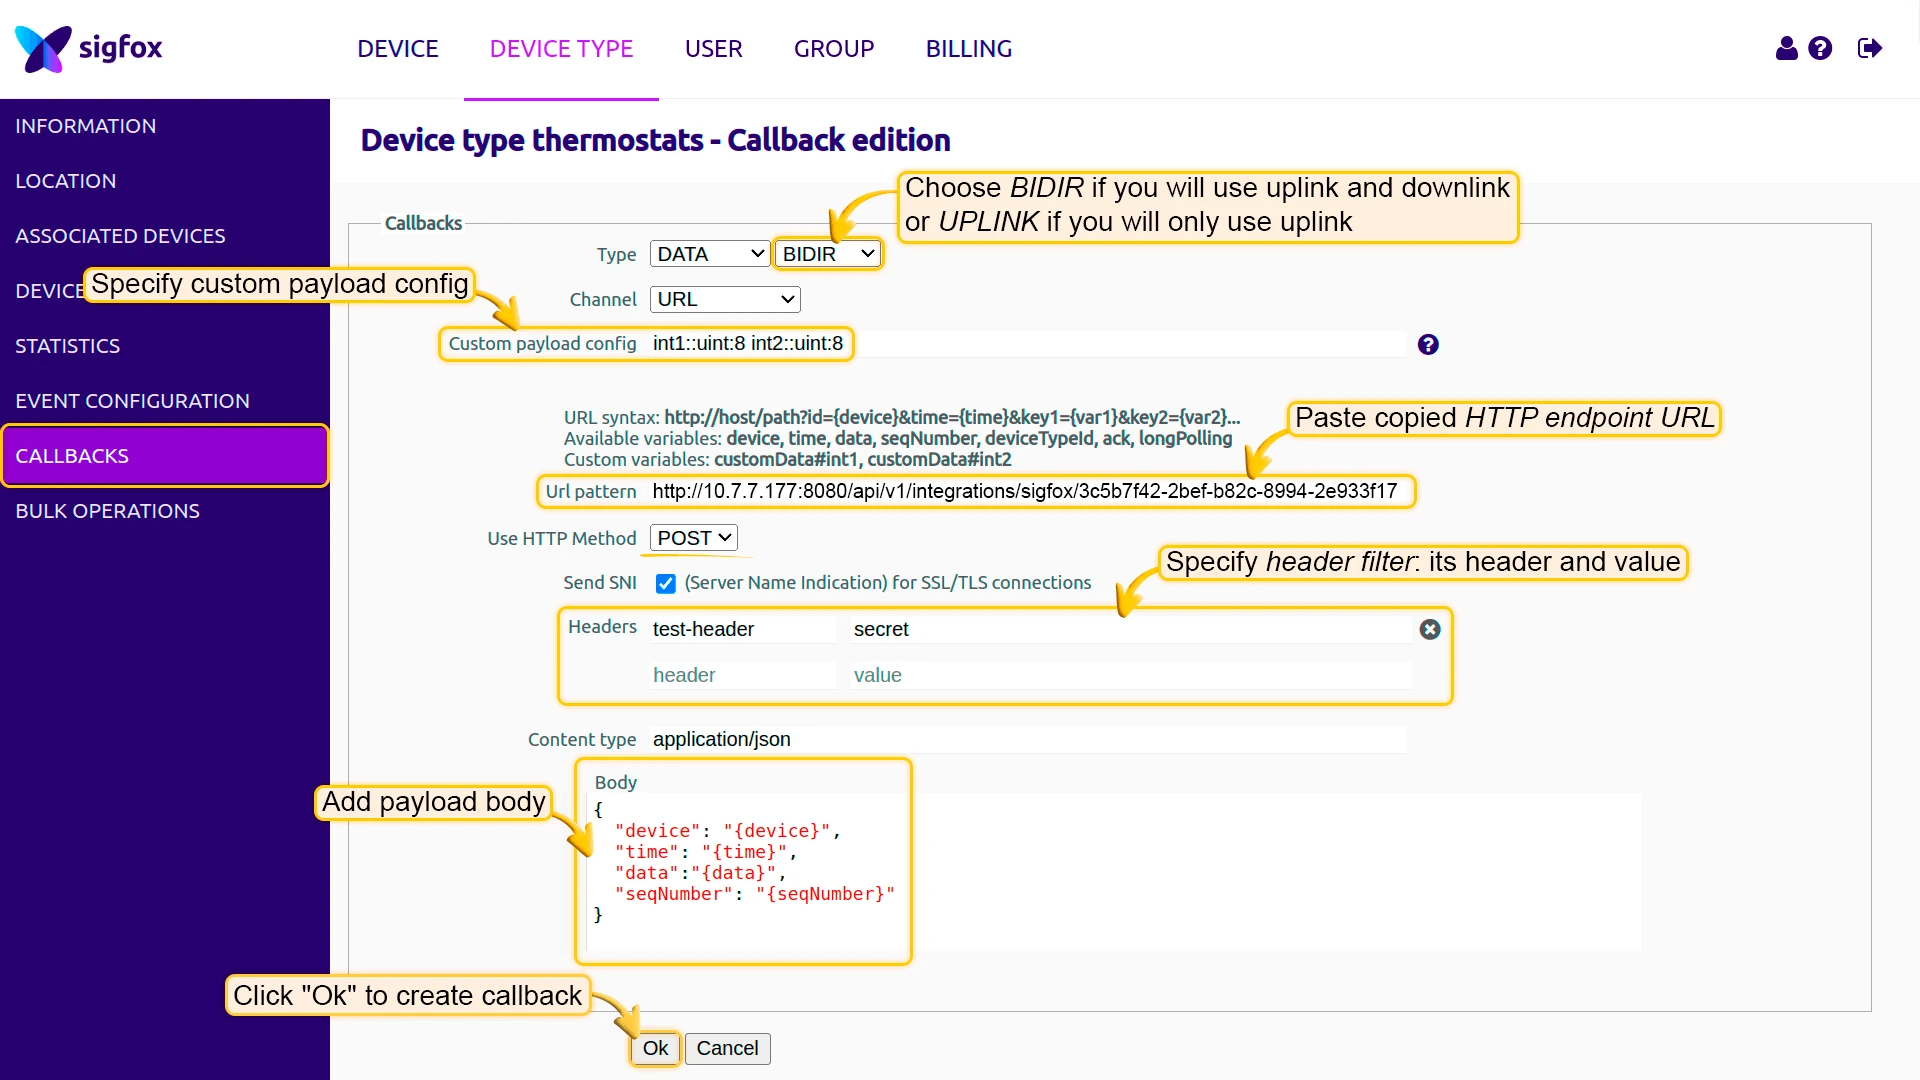
Callback message body:
{ "device": "{device}", "time": "{time}", "data": "{data}", "seqNumber": "{seqNumber}"}Activate the downlink callback
Section titled “Activate the downlink callback”After creating the callback, click the circle in the Downlink column to designate it as the active downlink handler. The circle turns solid (filled) to indicate active status.

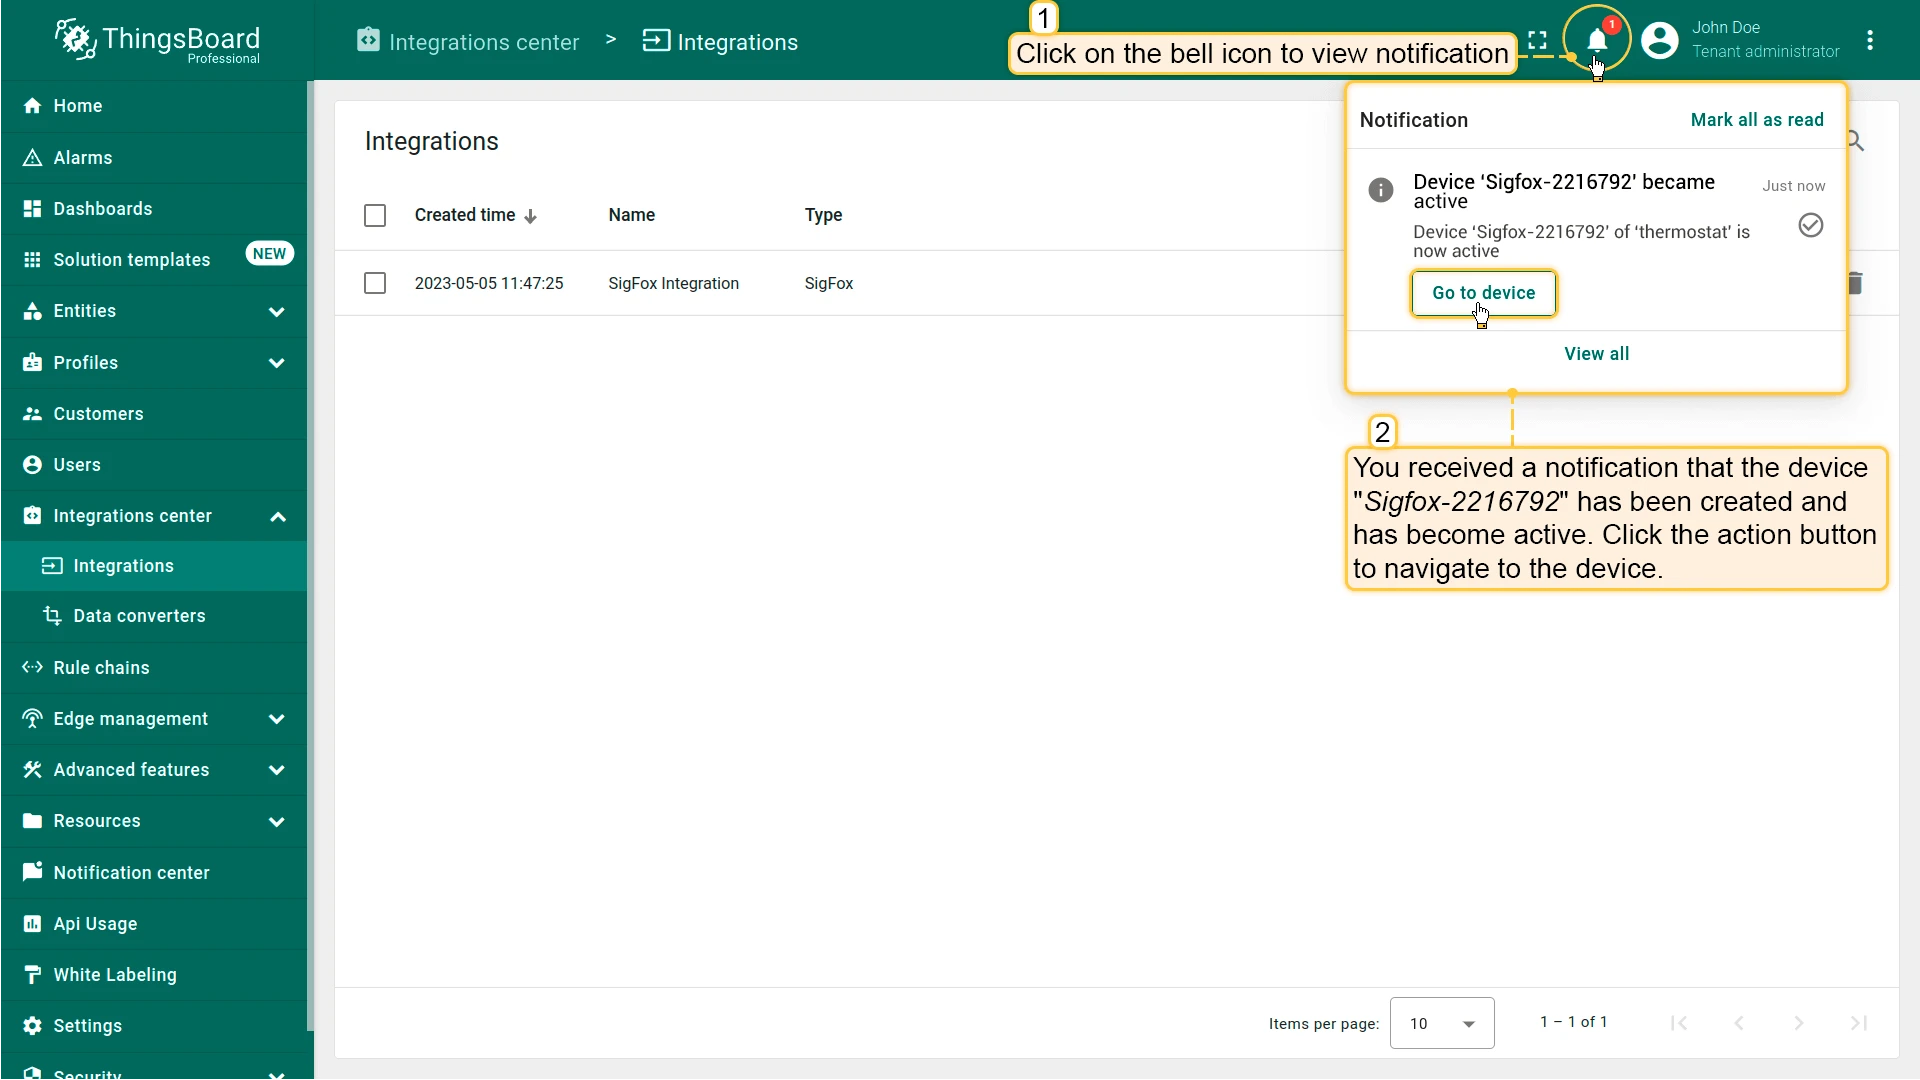
Test uplink
Section titled “Test uplink”Send an uplink message from your Sigfox device. ThingsBoard automatically creates the device and sends a notification. Click the bell icon and then Go to device to open the provisioned device.
Open the device to review its data:
You can also inspect the raw and decoded data in the uplink converter’s Events tab:
Configure and test downlink
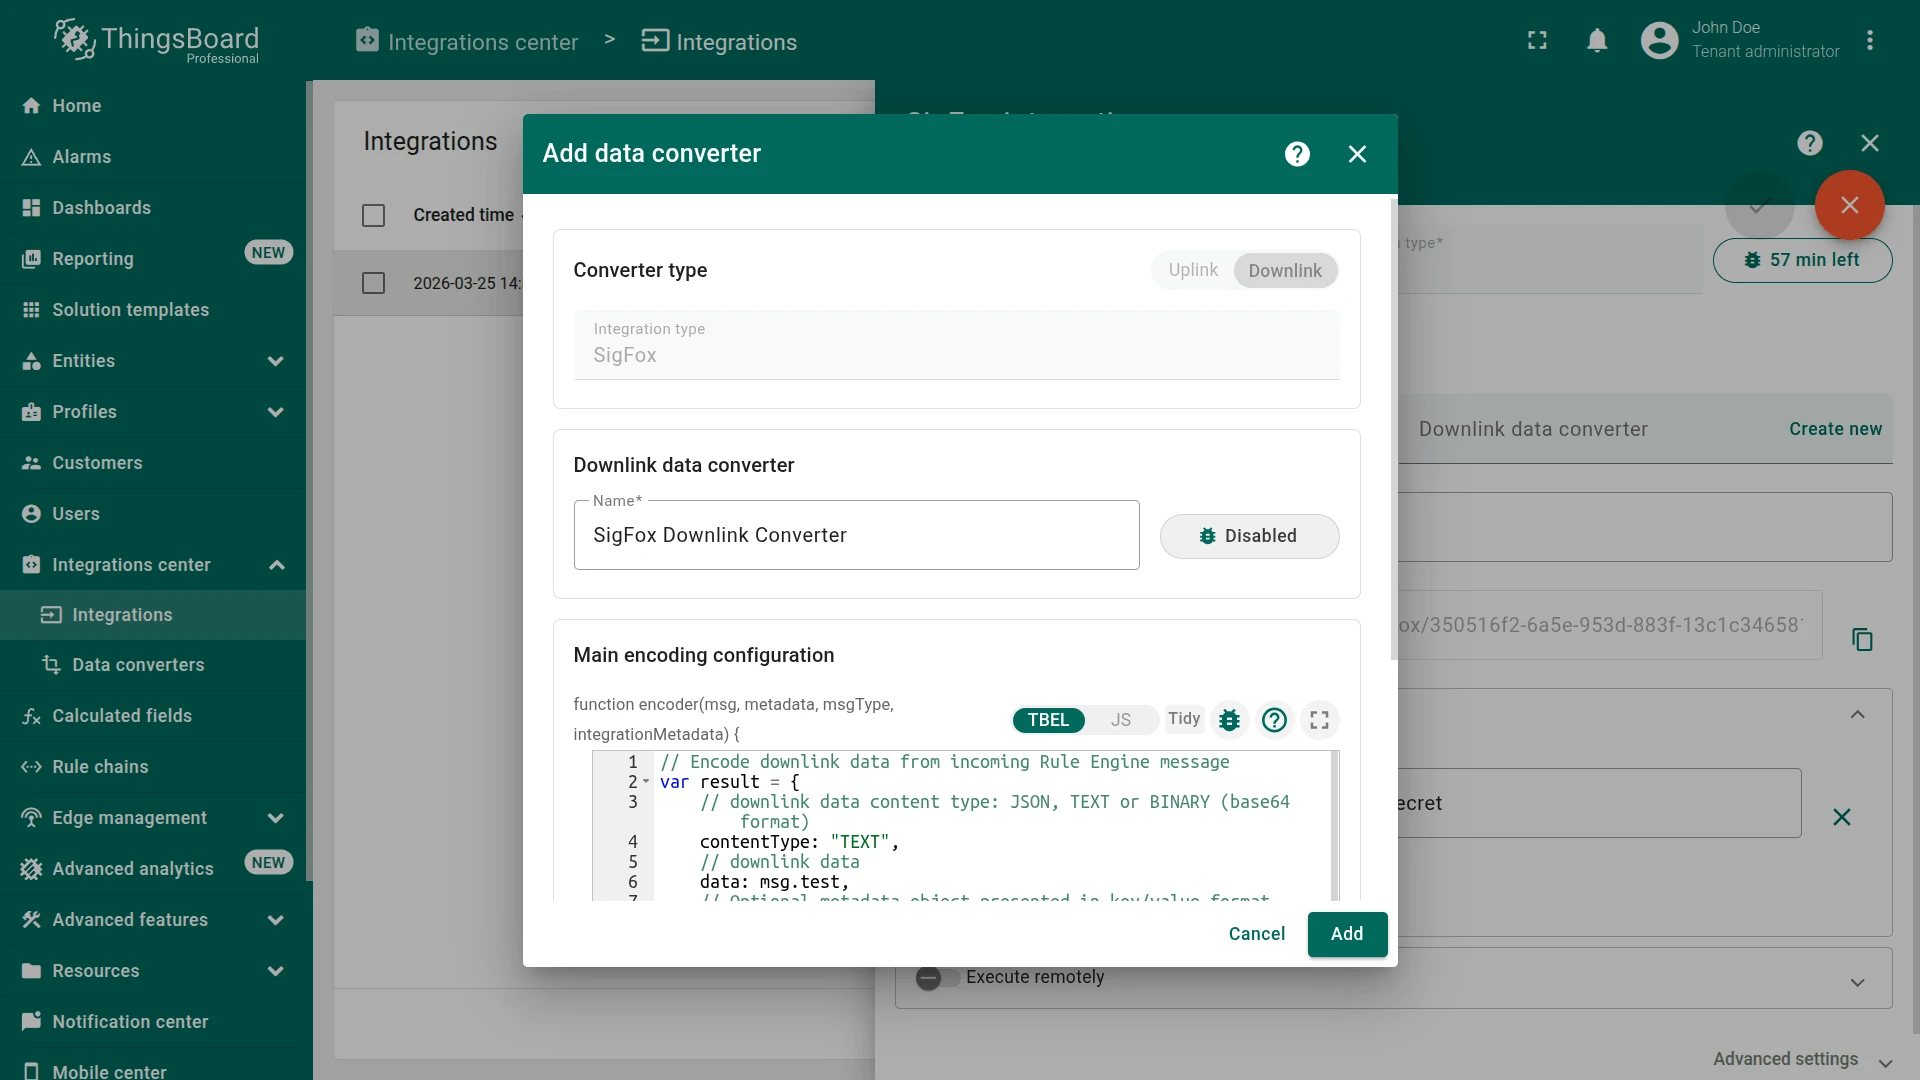
Section titled “Configure and test downlink”To send messages from ThingsBoard back to a Sigfox device, create a downlink converter and configure a rule chain. For the full encoder reference, see Downlink data converter.
The encoder function used in this tutorial:
// Encode downlink data from incoming Rule Engine messagevar result = { // downlink data content type: JSON, TEXT or BINARY (base64 format) contentType: "TEXT", // downlink data data: msg.test, // Optional metadata object presented in key/value format metadata: { "device": "2203961" }};return result;// Encode downlink data from incoming Rule Engine messagevar result = { // downlink data content type: JSON, TEXT or BINARY (base64 format) contentType: "TEXT", // downlink data data: msg.test, // Optional metadata object presented in key/value format metadata: { "device": "2203961" }};return result;To adapt this encoder to your use case:
data— replacemsg.testwith the field from the Rule Engine message that carries the value to send (e.g.msg["base-key"]when the triggering shared attribute is namedbase-key). The Sigfox network supports up to 8 bytes of downlink payload.contentType— useTEXTfor a plain string,JSONfor a JSON object, orBINARYfor a base64-encoded binary payload.metadata.device— replace the hardcoded device ID with the Sigfox device ID (without theSigfox-prefix) that should receive the downlink message.
Assign the downlink converter to the integration
Section titled “Assign the downlink converter to the integration”- Go to Integrations center ⇾ Integrations and open SigFox Integration.
- Click Toggle edit mode.
- In the Downlink data converter field, click Create new.
- In the Add data converter dialog, enter a name, and paste the encoder function from above into the editor and click the Add button.
- Click Apply changes.

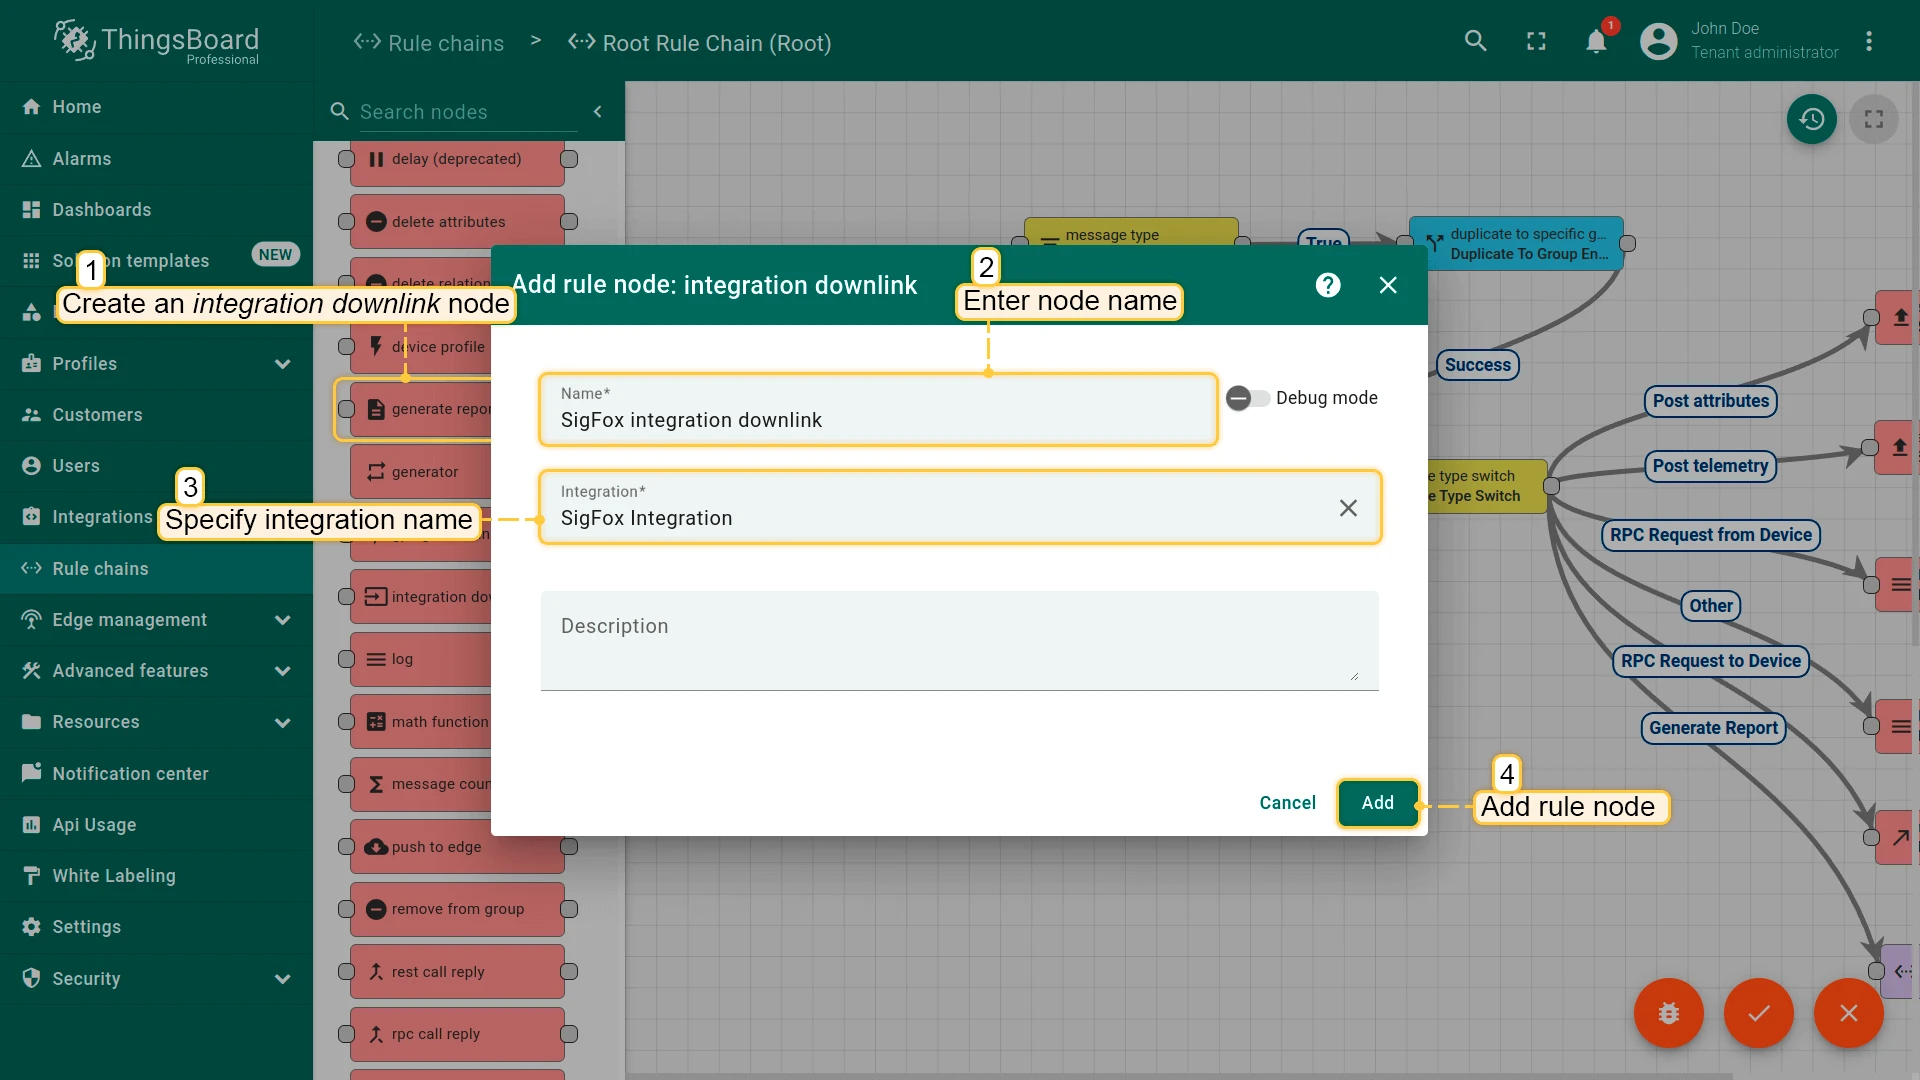
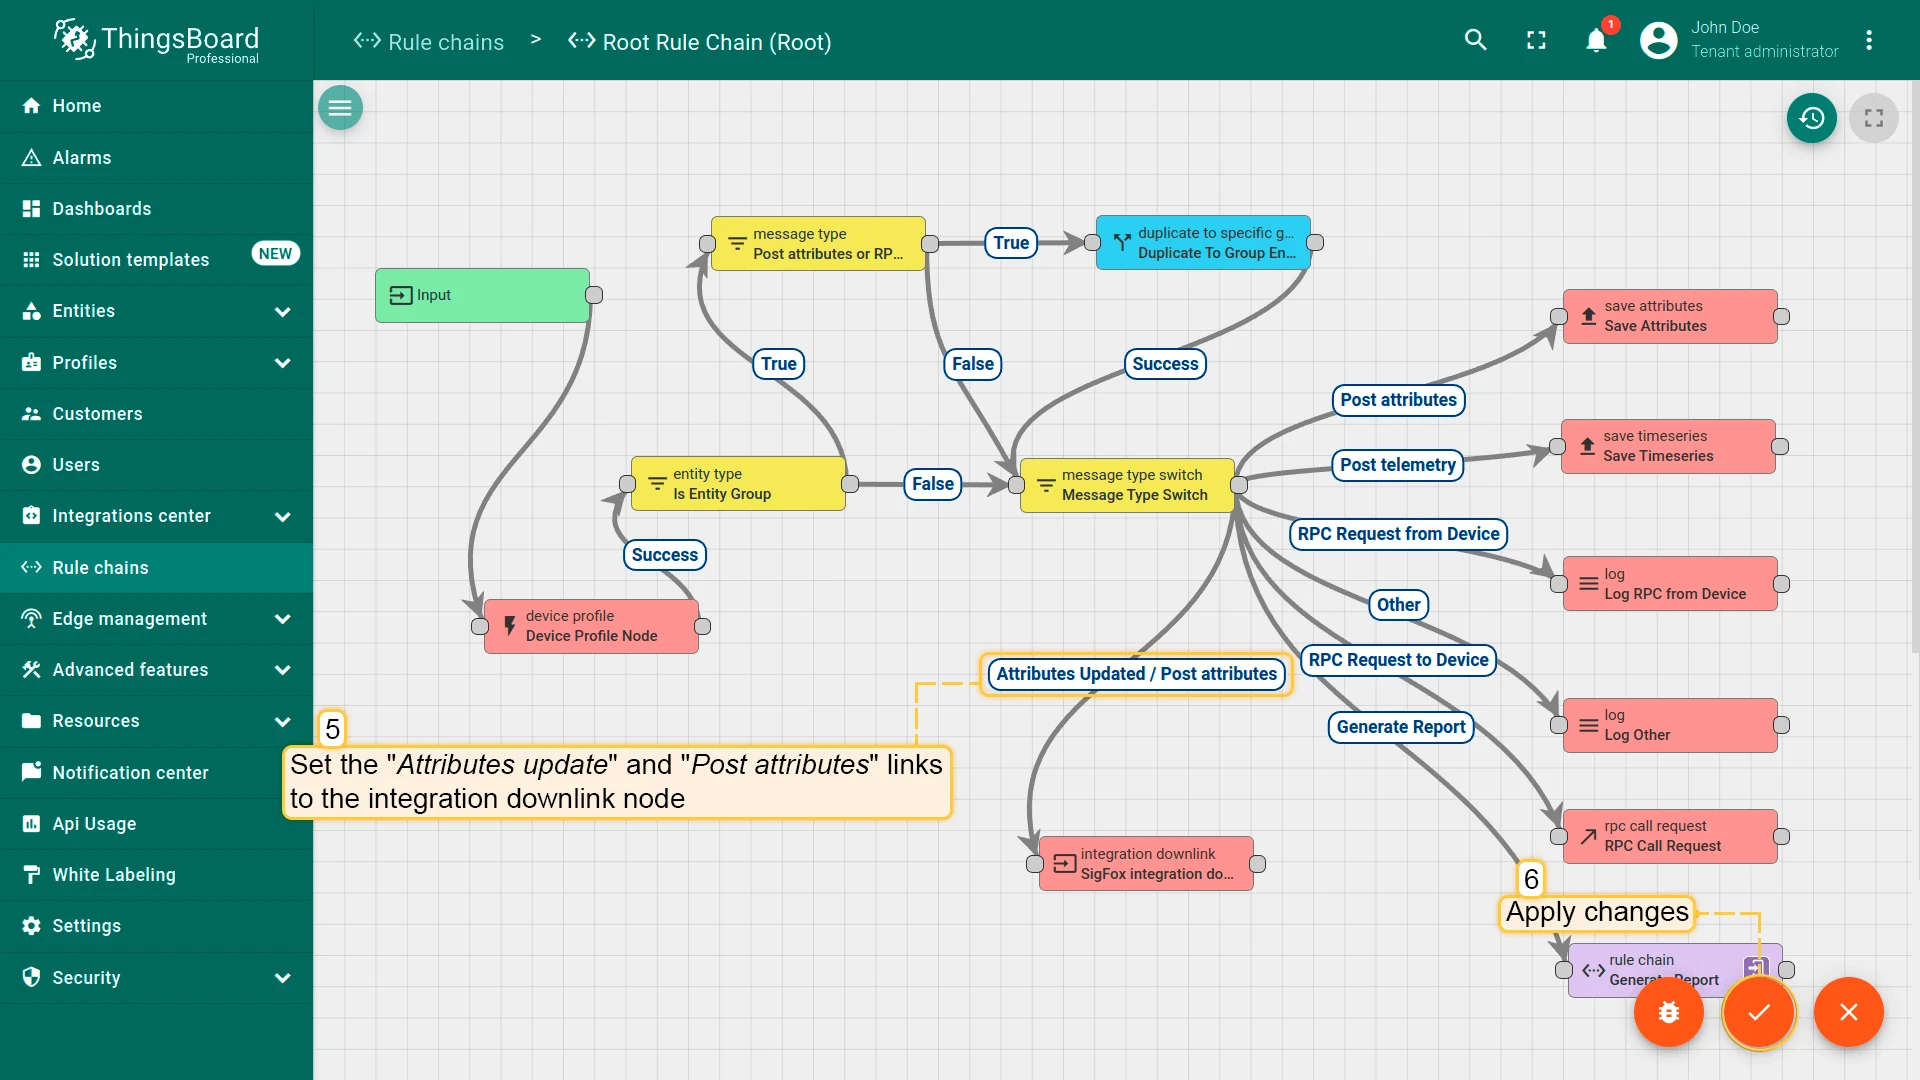
Configure the Root Rule Chain
Section titled “Configure the Root Rule Chain”- Go to Rule chains and open the Root Rule Chain.
- Find the Integration Downlink node, drag it onto the canvas, name it
SigFox integration downlink, select the SigFox integration, and click Add. - Connect the Message Type Switch node to the Integration Downlink node using both Attributes Updated and Post Attributes relation types.
- Save the rule chain.
Test the downlink
Section titled “Test the downlink”Adding or updating a shared attribute triggers the Attributes Updated relation in the rule chain, which forwards the change to the SigFox integration downlink node. ThingsBoard encodes the value using the downlink converter and sends it to Sigfox via the Cloud API. Sigfox queues the message and delivers it on the device’s next uplink transmission.
- Go to Entities ⇾ Devices and open your device.
- Click the Attributes tab and switch to Shared attributes.
- Click +, enter a key (e.g.
base-key) and a string value (e.g.74524517), and click Add.

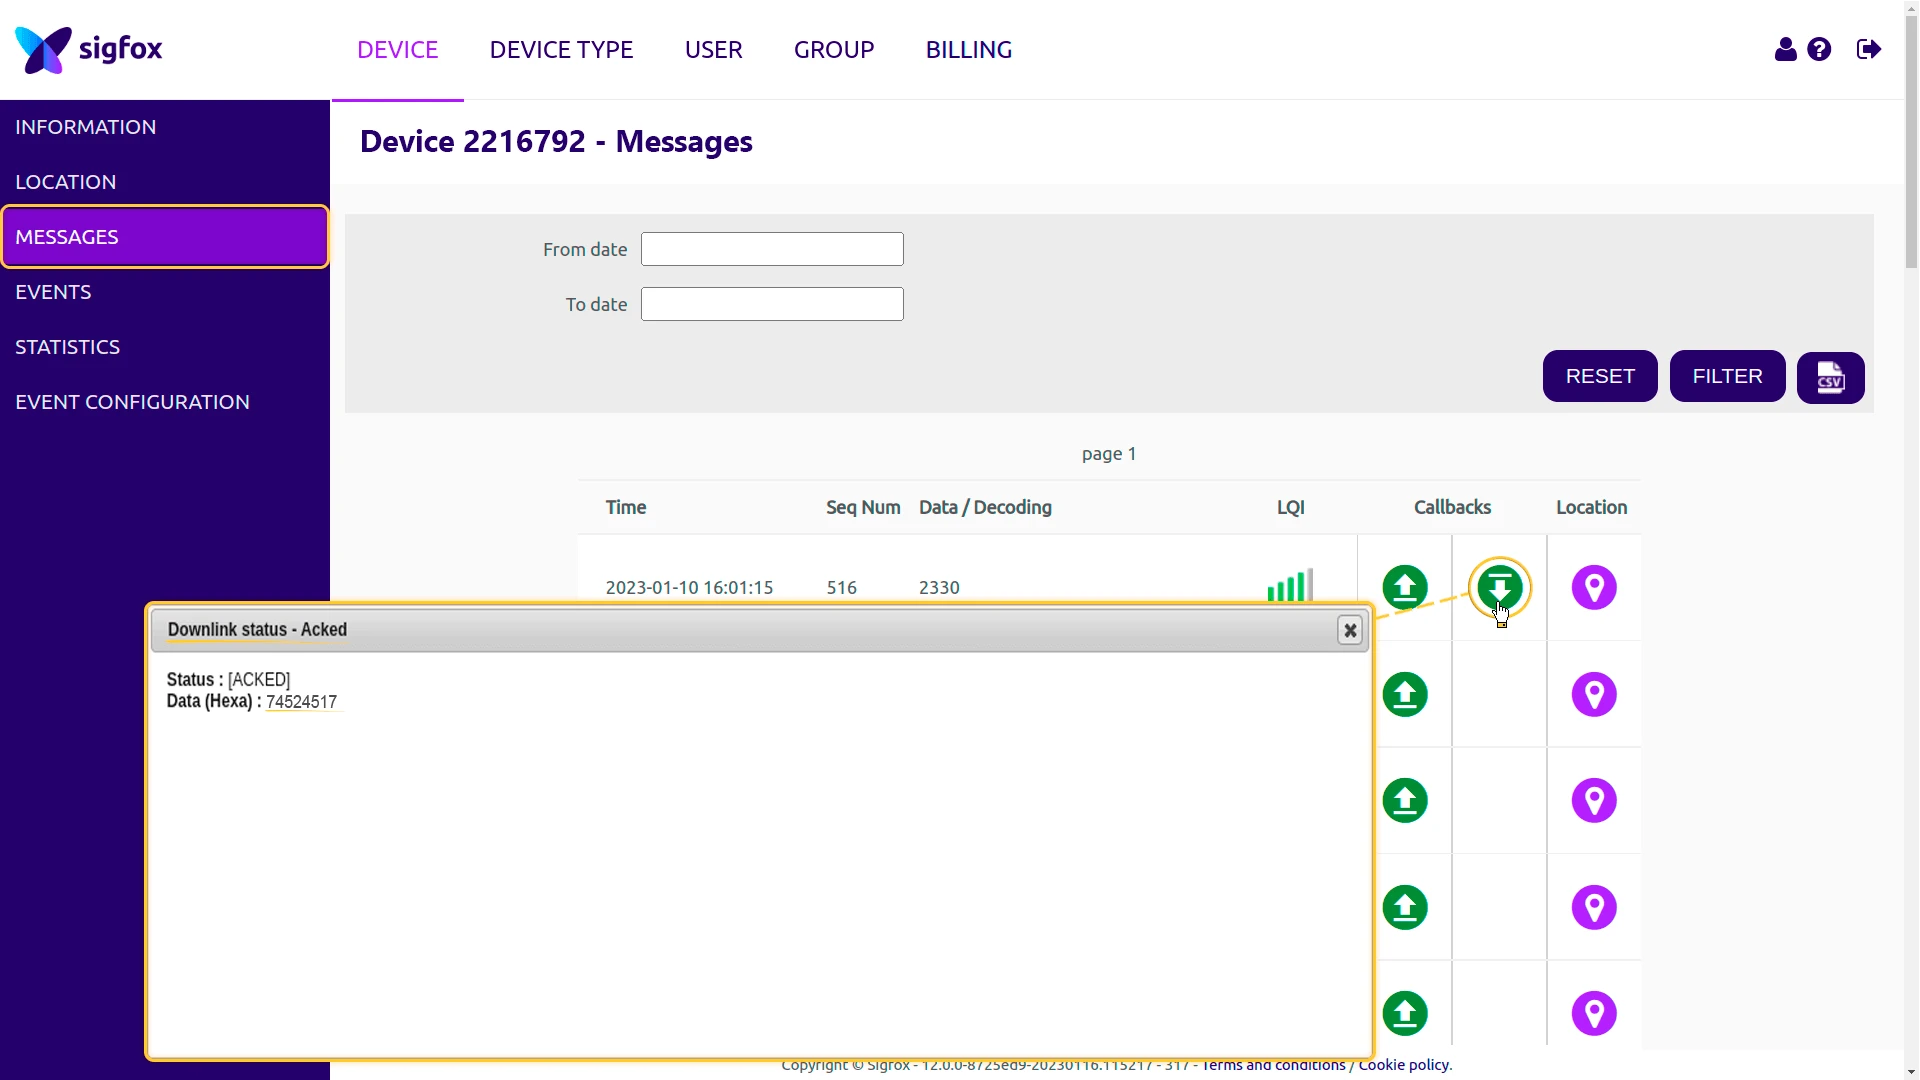
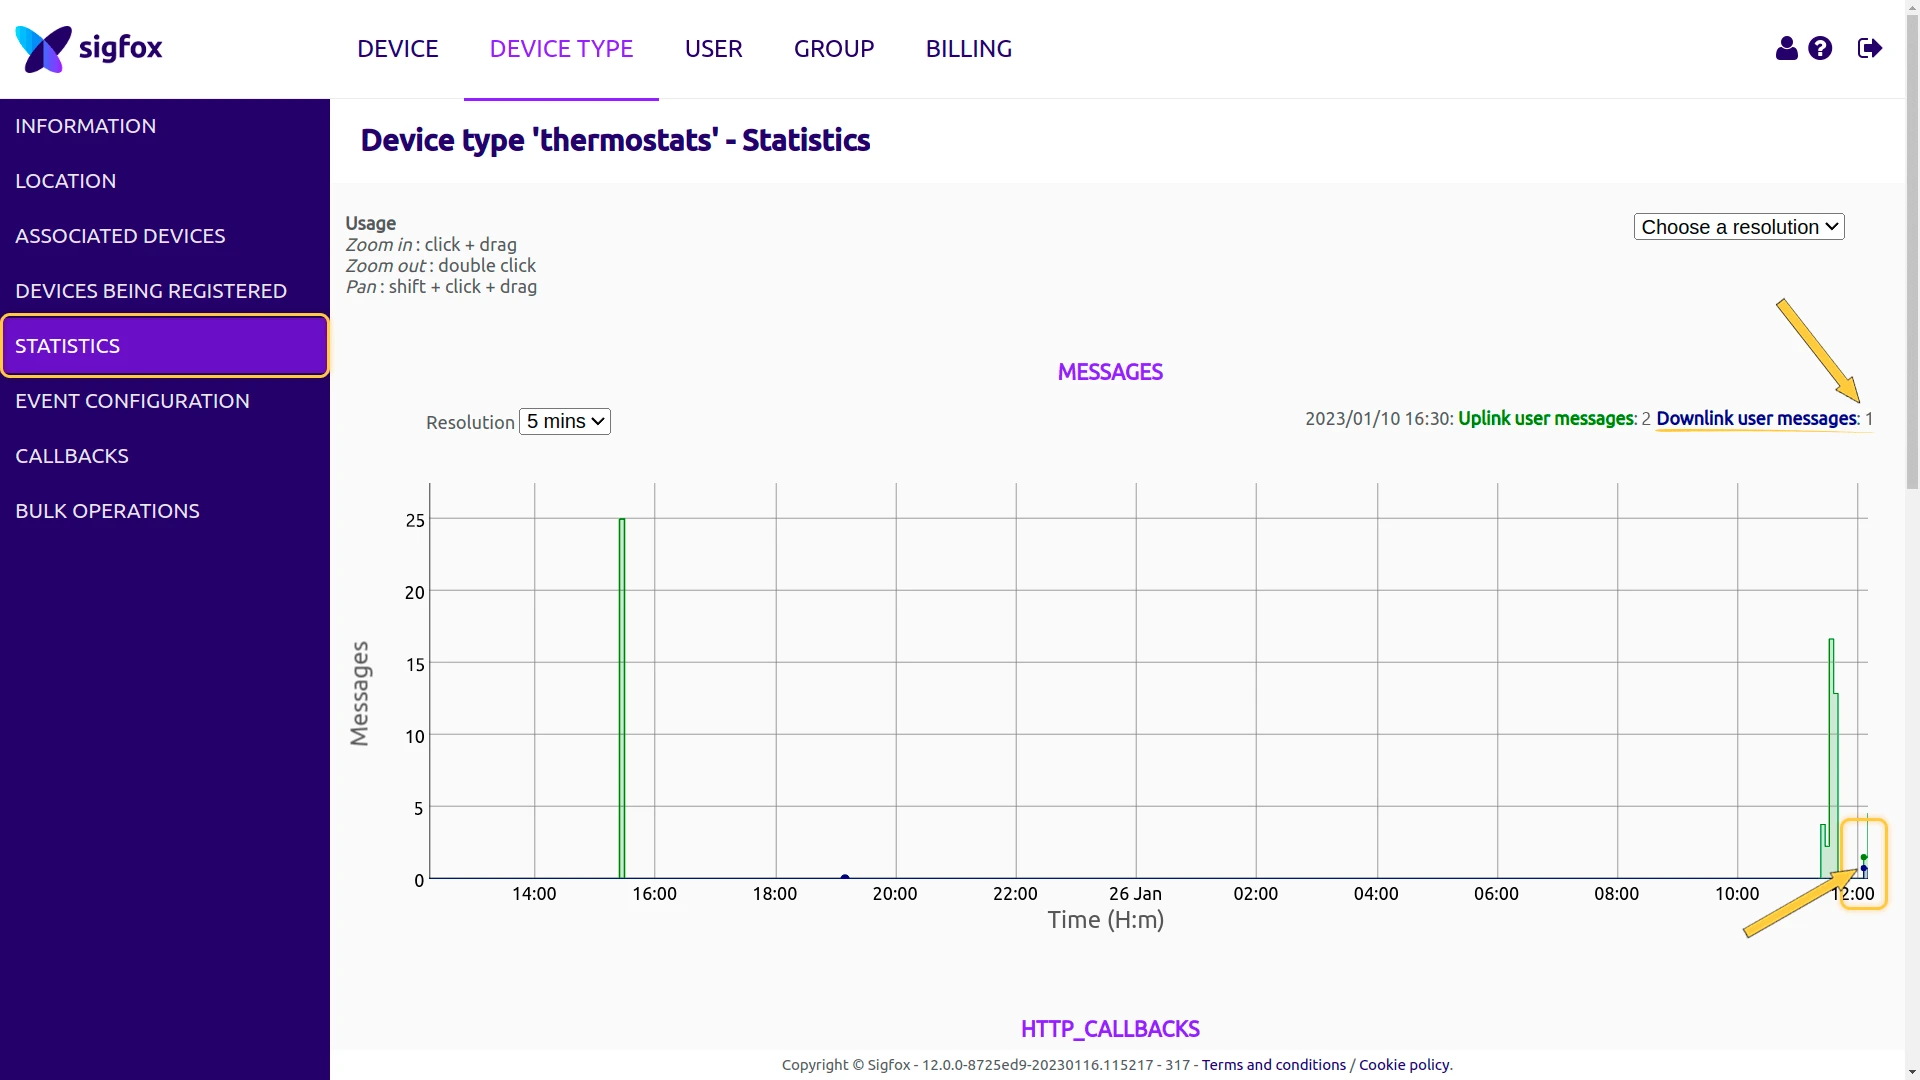
After the device sends its next uplink, the downlink is delivered. In your Sigfox Backend, go to the device Messages tab to confirm the downlink was acknowledged, and check the device type Statistics tab to see it reflected in the message chart.
See also
Section titled “See also”Was this helpful?