Monitor and Control Airconditioners over OPC-UA
The OPC UA C++ Demo Server exposes a BuildingAutomation object with 10 simulated AirConditioner devices, each reporting Temperature, Humidity, State, and PowerConsumption values. The ThingsBoard OPC-UA integration subscribes to these device nodes, decodes their values into telemetry via an uplink converter, and — through a downlink converter and a dedicated rule chain — turns any airconditioner on or off by calling its Start / Stop OPC-UA method, all from a live dashboard.
This recipe walks through one concrete scenario end to end. For a full field-by-field reference of every OPC-UA integration setting, see OPC-UA Integration.
Prerequisites
Section titled “Prerequisites”- A ThingsBoard Professional Edition instance installed locally;
- The OPC UA C++ Demo Server (Windows only).
Step 1. Launch the OPC UA Demo Server
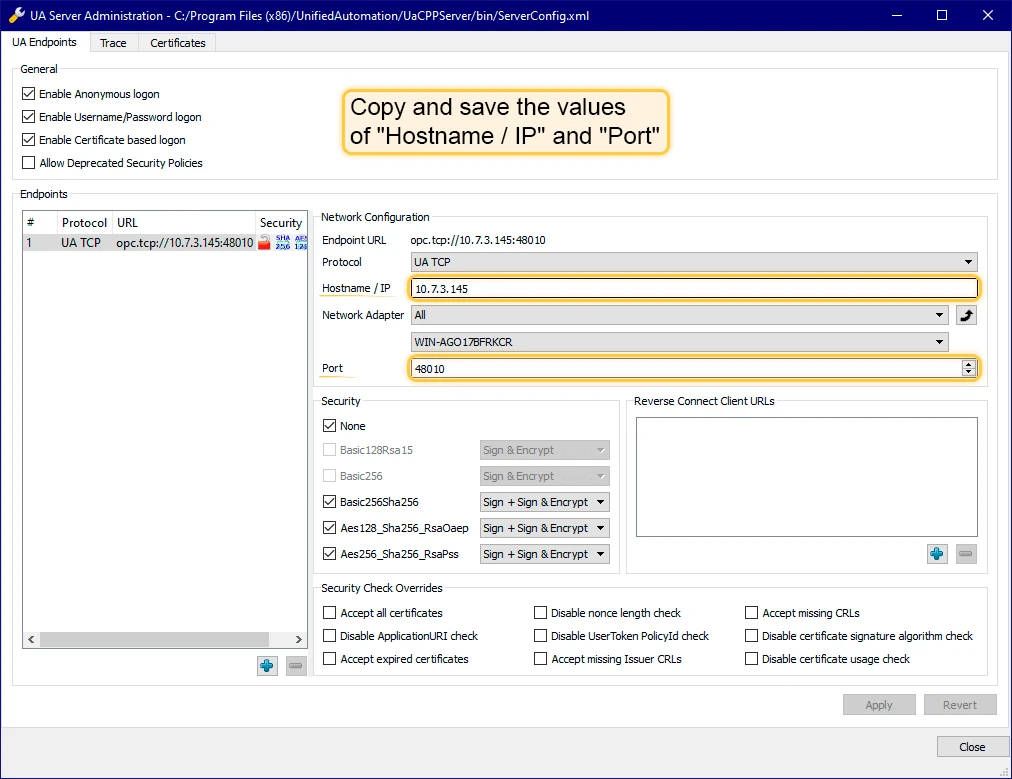
Section titled “Step 1. Launch the OPC UA Demo Server”- Launch UA Admin Dialog and note the Hostname / IP and Port values — you will enter them in the ThingsBoard integration.
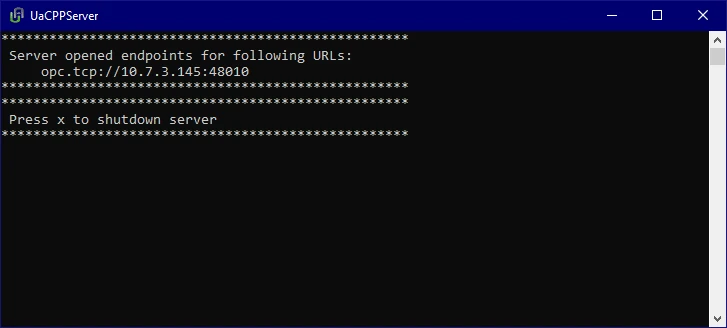
- Launch UaCPPServer — the console window confirms the server is running and displays the endpoint URL in
opc.tcp://host:portformat.
Step 2. Create the Uplink Converter
Section titled “Step 2. Create the Uplink Converter”The integration wizard (Step 4) requires selecting an existing uplink and downlink converter, so both are created first.
The uplink converter decodes incoming OPC-UA node values and maps them to the ThingsBoard data model. The decoder function receives:
payload— JSON object with node values, e.g.{"temperature": "72.15819999999641"}metadata— node metadata:opcUaNode_name,opcUaNode_namespaceIndex,opcUaNode_identifier,opcUaNode_fqn,integrationName
Sample payload:
{ "temperature": "72.15819999999641"}Sample metadata:
{ "opcUaNode_namespaceIndex": "3", "opcUaNode_name": "AirConditioner_1", "integrationName": "OPC-UA Airconditioners", "opcUaNode_identifier": "AirConditioner_1", "opcUaNode_fqn": "Objects.BuildingAutomation.AirConditioner_1"}For the full decoder function reference, see Uplink data converter.
- Download the uplink converter file:
- Go to Integrations center ⇾ Data converters.
- Click + Add data converter ⇾ Import converter.
- Drag and drop the downloaded JSON file into the Import converter window.
- Click Import.
The decoder function used in this recipe:
var data = decodeToJson(payload);var deviceName = metadata['opcUaNode_name'];var namespaceIndex = metadata['opcUaNode_namespaceIndex'];var deviceType = 'airconditioner';
var result = {   deviceName: deviceName,   deviceType: deviceType,   telemetry: {   },   attributes: {       namespaceIndex: namespaceIndex   }};
if (data.temperature != null) {    result.telemetry.temperature = toFixed(data.temperature, 2);}
if (data.humidity != null) {   result.telemetry.humidity = toFixed(data.humidity, 2);}
if (data.powerConsumption != null) {   result.telemetry.powerConsumption = toFixed(data.powerConsumption, 2);}
if (data.state != null) {   result.attributes.state = data.state == '1' ? true : false;}
/** Helper functions 'decodeToString' and 'decodeToJson' are already built-in **/
return result;var data = decodeToJson(payload);var deviceName = metadata['opcUaNode_name'];var deviceType = 'airconditioner';
var result = { deviceName: deviceName, deviceType: deviceType, telemetry: { }, attributes: { }};
if (data.temperature) { result.telemetry.temperature = Number(Number(data.temperature).toFixed(2));}
if (data.humidity) { result.telemetry.humidity = Number(Number(data.humidity).toFixed(2));}
if (data.powerConsumption) { result.telemetry.powerConsumption = Number(Number(data.powerConsumption).toFixed(2));}
if (data.state !== undefined) { result.attributes.state = data.state === '1' ? true : false;}
function decodeToString(payload) { return String.fromCharCode.apply(String, payload);}
function decodeToJson(payload) { var str = decodeToString(payload); var data = JSON.parse(str); return data;}
return result;Step 3. Create the Downlink Converter
Section titled “Step 3. Create the Downlink Converter”The downlink converter encodes RPC commands from ThingsBoard into OPC-UA write operations or method calls. The encoder must return a single object with these fields:
contentType—JSON,TEXT, orBINARYdata— JSON string with two optional arrays:writeValues—{nodeId, value}pairs; NodeId format:ns=<namespaceIndex>;<type>=<identifier>where<type>iss(string),i(numeric),g(GUID), orb(byte string)callMethods—{objectId, methodId, args}objects for calling OPC-UA methods
metadata— must be an empty object ({}) for OPC-UA
The output of the downlink converter must follow this structure:
[{ "contentType": "JSON", "data": "{\"writeValues\":[],\"callMethods\":[{\"objectId\":\"ns=3;s=AirConditioner_1\",\"methodId\":\"ns=3;s=AirConditioner_1.Stop\",\"args\":[]}]}", "metadata": {}}]For the full encoder function reference, see Downlink data converter.
- Go to Integrations center ⇾ Data converters.
- Click + Add data converter ⇾ Create new converter.
- Set Converter type to Downlink.
- Select integration type from the dropdown — OPC-UA.
- Enter a converter name:
OPC-UA Downlink Converter - In the Main encoding configuration, enter an encoder function:
var data = {    writeValues: [],    callMethods: []};
if (msgType === 'RPC_CALL_FROM_SERVER_TO_DEVICE') {    if (msg.method === 'setState') {        var targetMethod = msg.params === 'true' ? 'Start' : 'Stop';        var writeValue = {              nodeId: 'ns=' + metadata['cs_namespaceIndex'] +';s=' + metadata['deviceName'],              value: msg.params        };        data.writeValues.push(writeValue);        var callMethod = {              objectId: 'ns=' + metadata['cs_namespaceIndex'] +';s=' + metadata['deviceName'],              methodId: 'ns=' + metadata['cs_namespaceIndex'] +';s=' + metadata['deviceName']+'.'+targetMethod,              args: []        };        data.callMethods.push(callMethod);    }}
var result = {    contentType: "JSON",    data: JSON.stringify(data),    metadata: {}};
return result;var data = { writeValues: [], callMethods: []};
if (msgType === 'RPC_CALL_FROM_SERVER_TO_DEVICE') { if (msg.method === 'setState') { var targetMethod = msg.params === 'true' ? 'Start' : 'Stop'; var writeValue = { nodeId: 'ns=' + metadata['cs_namespaceIndex'] +';s=' + metadata['deviceName'], value: msg.params }; data.writeValues.push(writeValue); var callMethod = { objectId: 'ns=' + metadata['cs_namespaceIndex'] +';s=' + metadata['deviceName'], methodId: 'ns=' + metadata['cs_namespaceIndex'] +';s=' + metadata['deviceName']+'.'+targetMethod, args: [] }; data.callMethods.push(callMethod); }}
var result = { contentType: "JSON", data: JSON.stringify(data), metadata: {}};
return result;- Optionally, click Test encoder function to validate.
- Click Add.
Step 4. Create the Integration
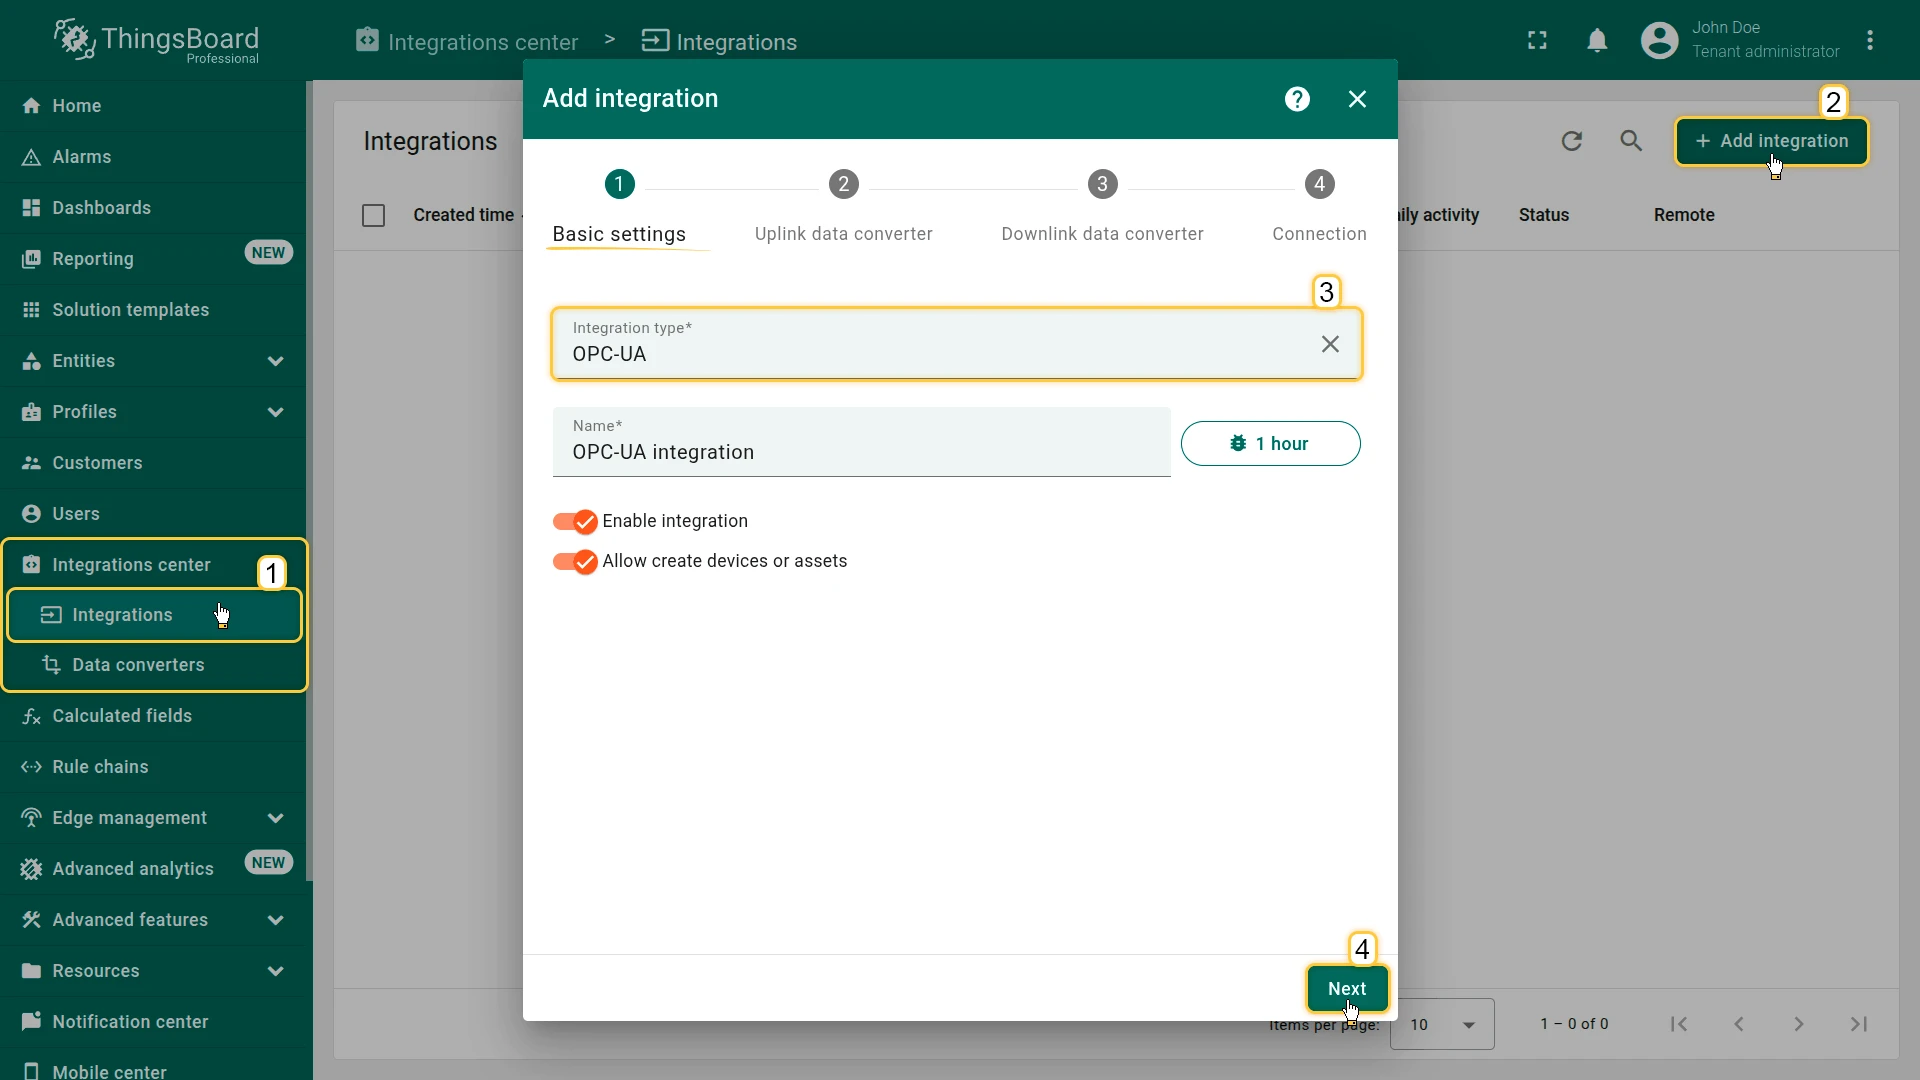
Section titled “Step 4. Create the Integration”- Go to Integrations center ⇾ Integrations and click + Add integration.
- Basic settings:
- Set Integration type to OPC-UA.
- Enable integration and Allow create devices or assets are on by default.
- Click Next.
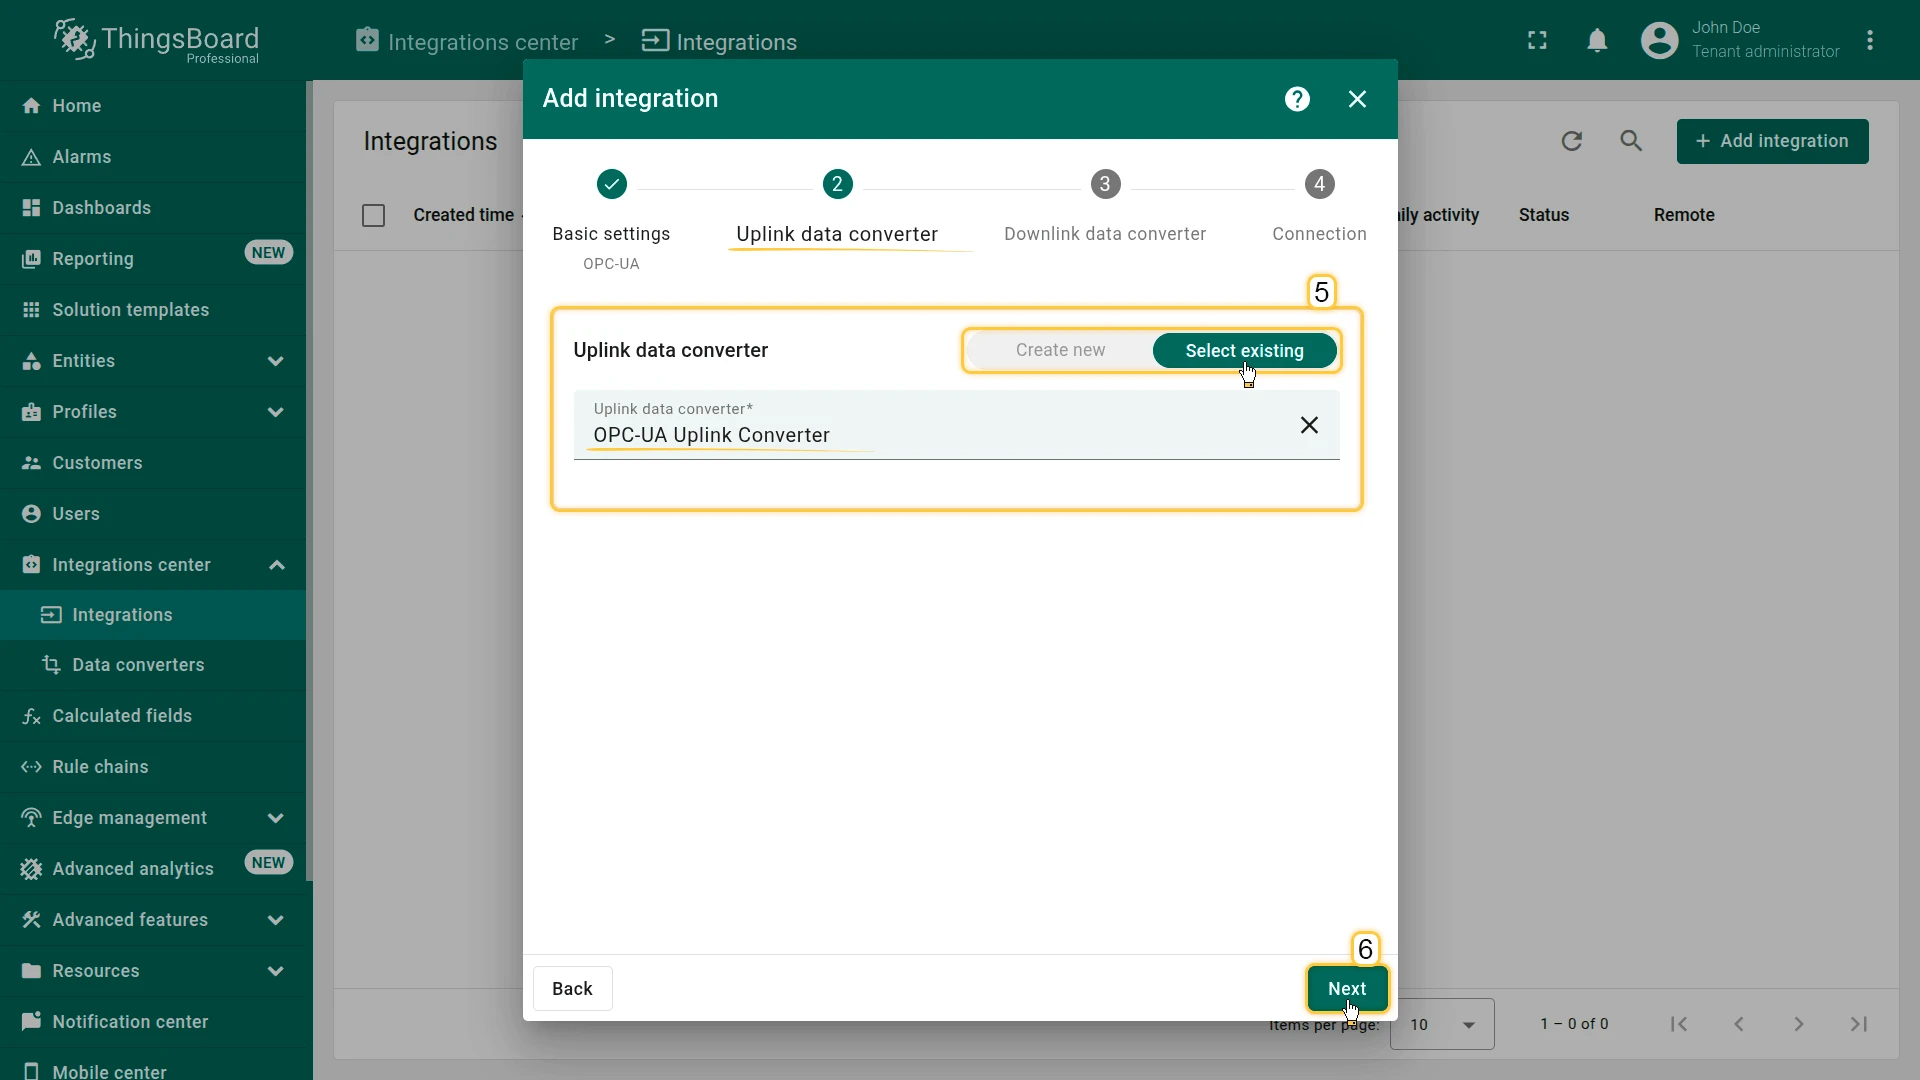
- Uplink data converter:
- Select existing — choose the previously created
OPC-UA Uplink Converterfrom the list. - Click Next.
- Select existing — choose the previously created
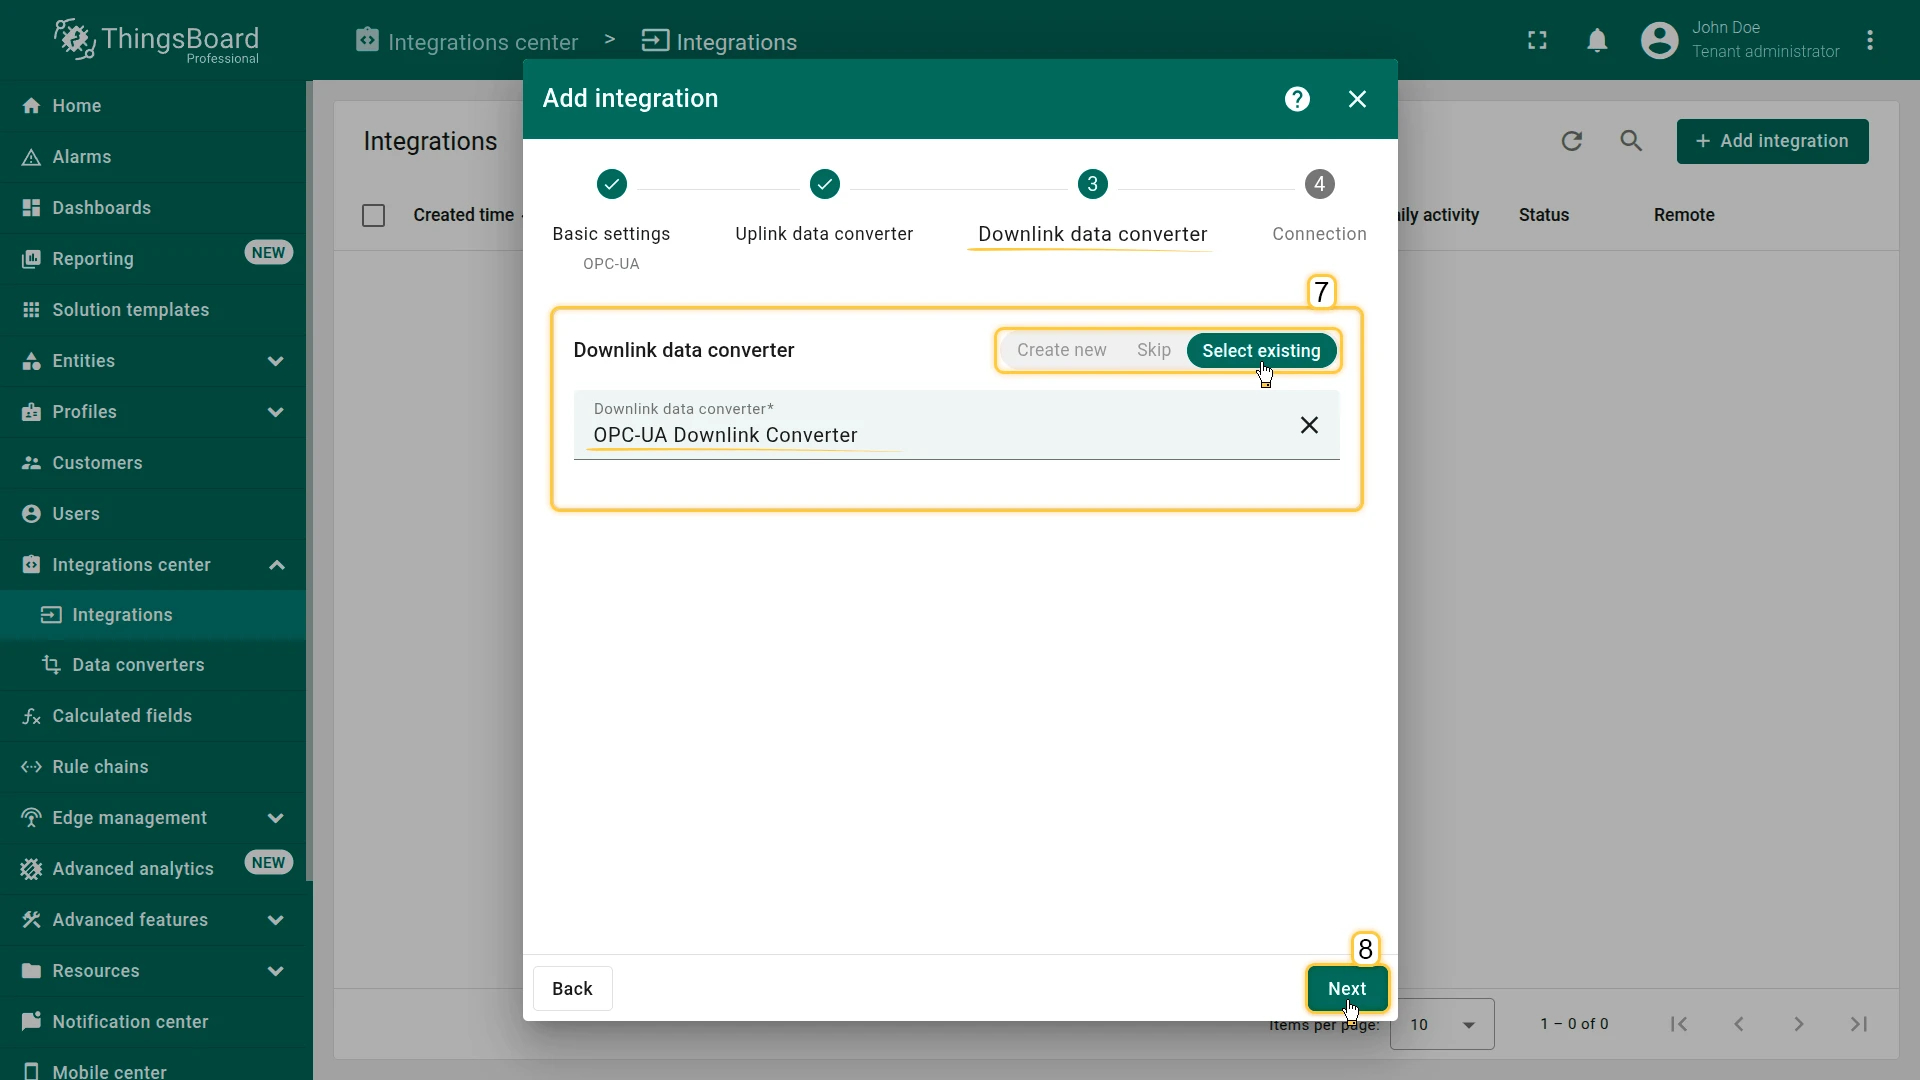
- Downlink data converter:
- Select existing — choose the previously created
OPC-UA Downlink Converterfrom the list. - Click Next.
- Select existing — choose the previously created
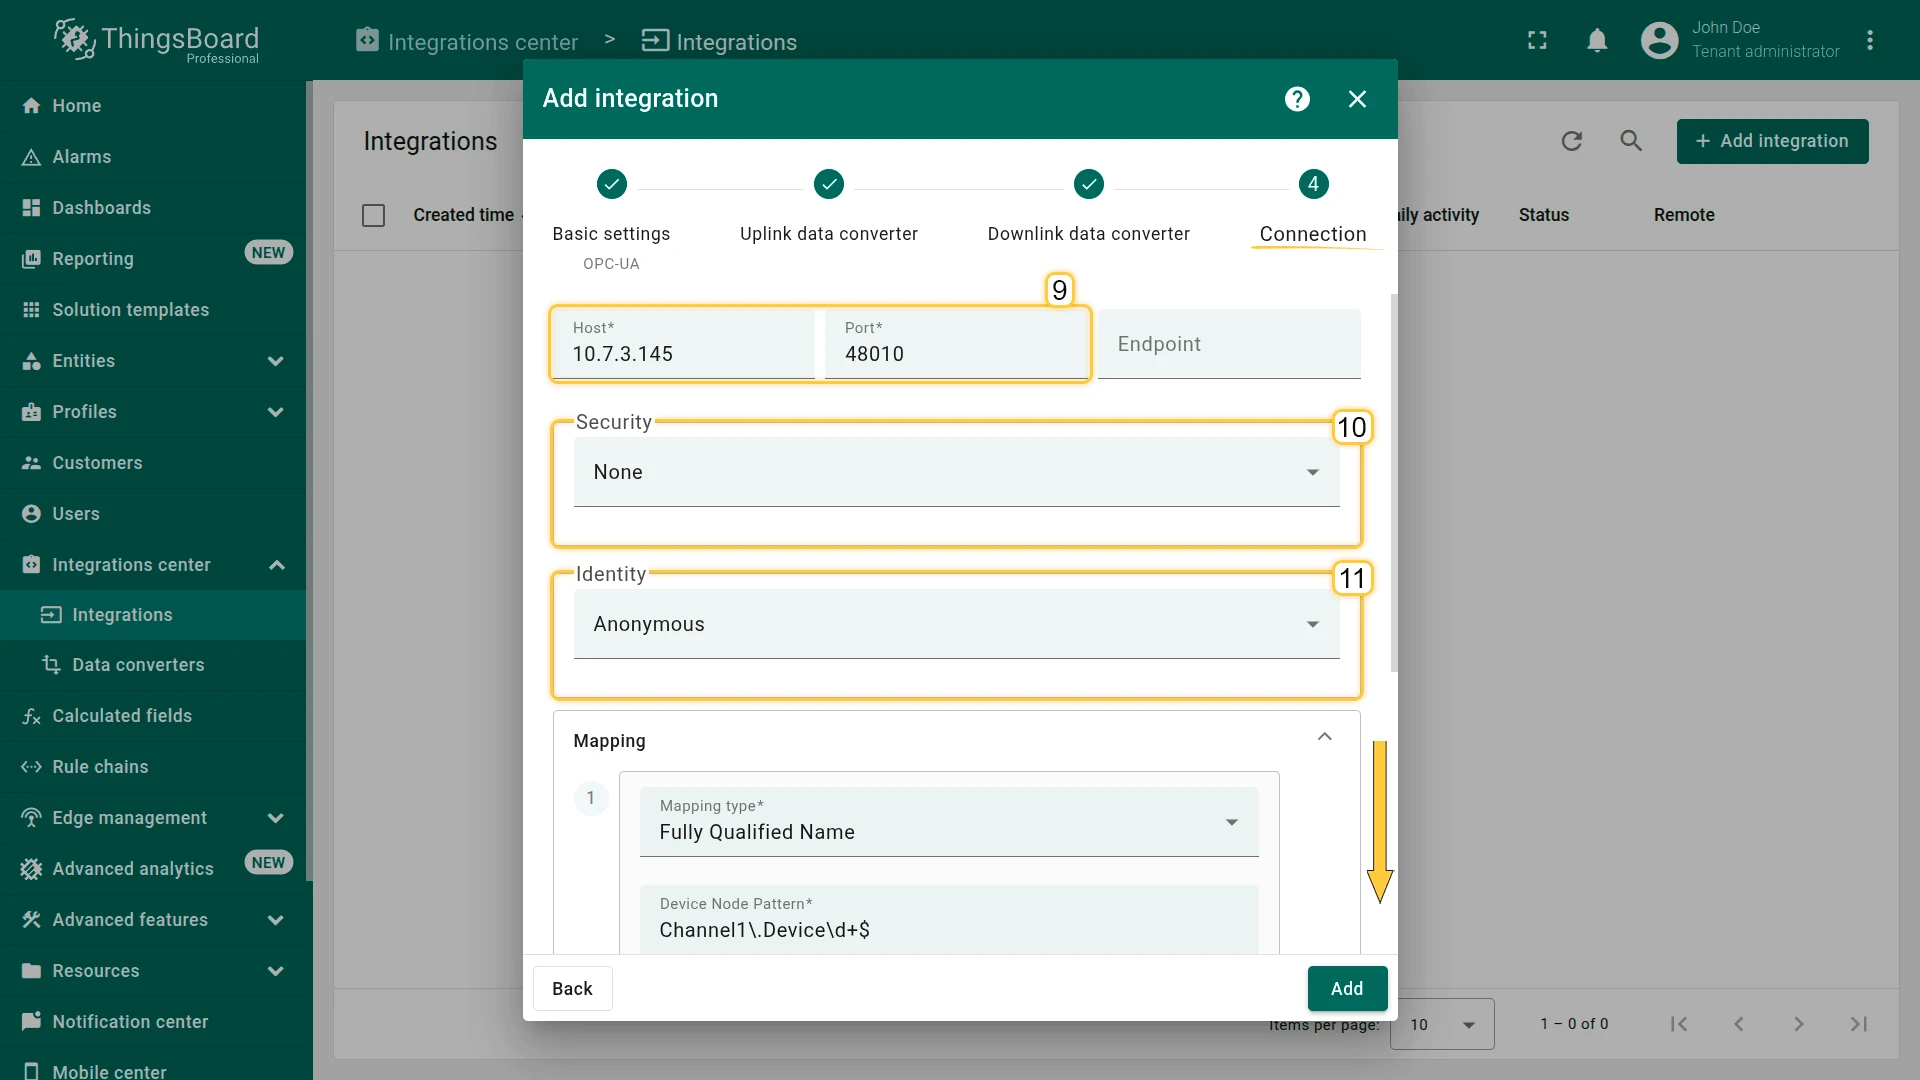
- Configure the connection:
- Host and Port — the values noted from the UA Admin Dialog.
- Security —
None. - Identity —
Anonymous.
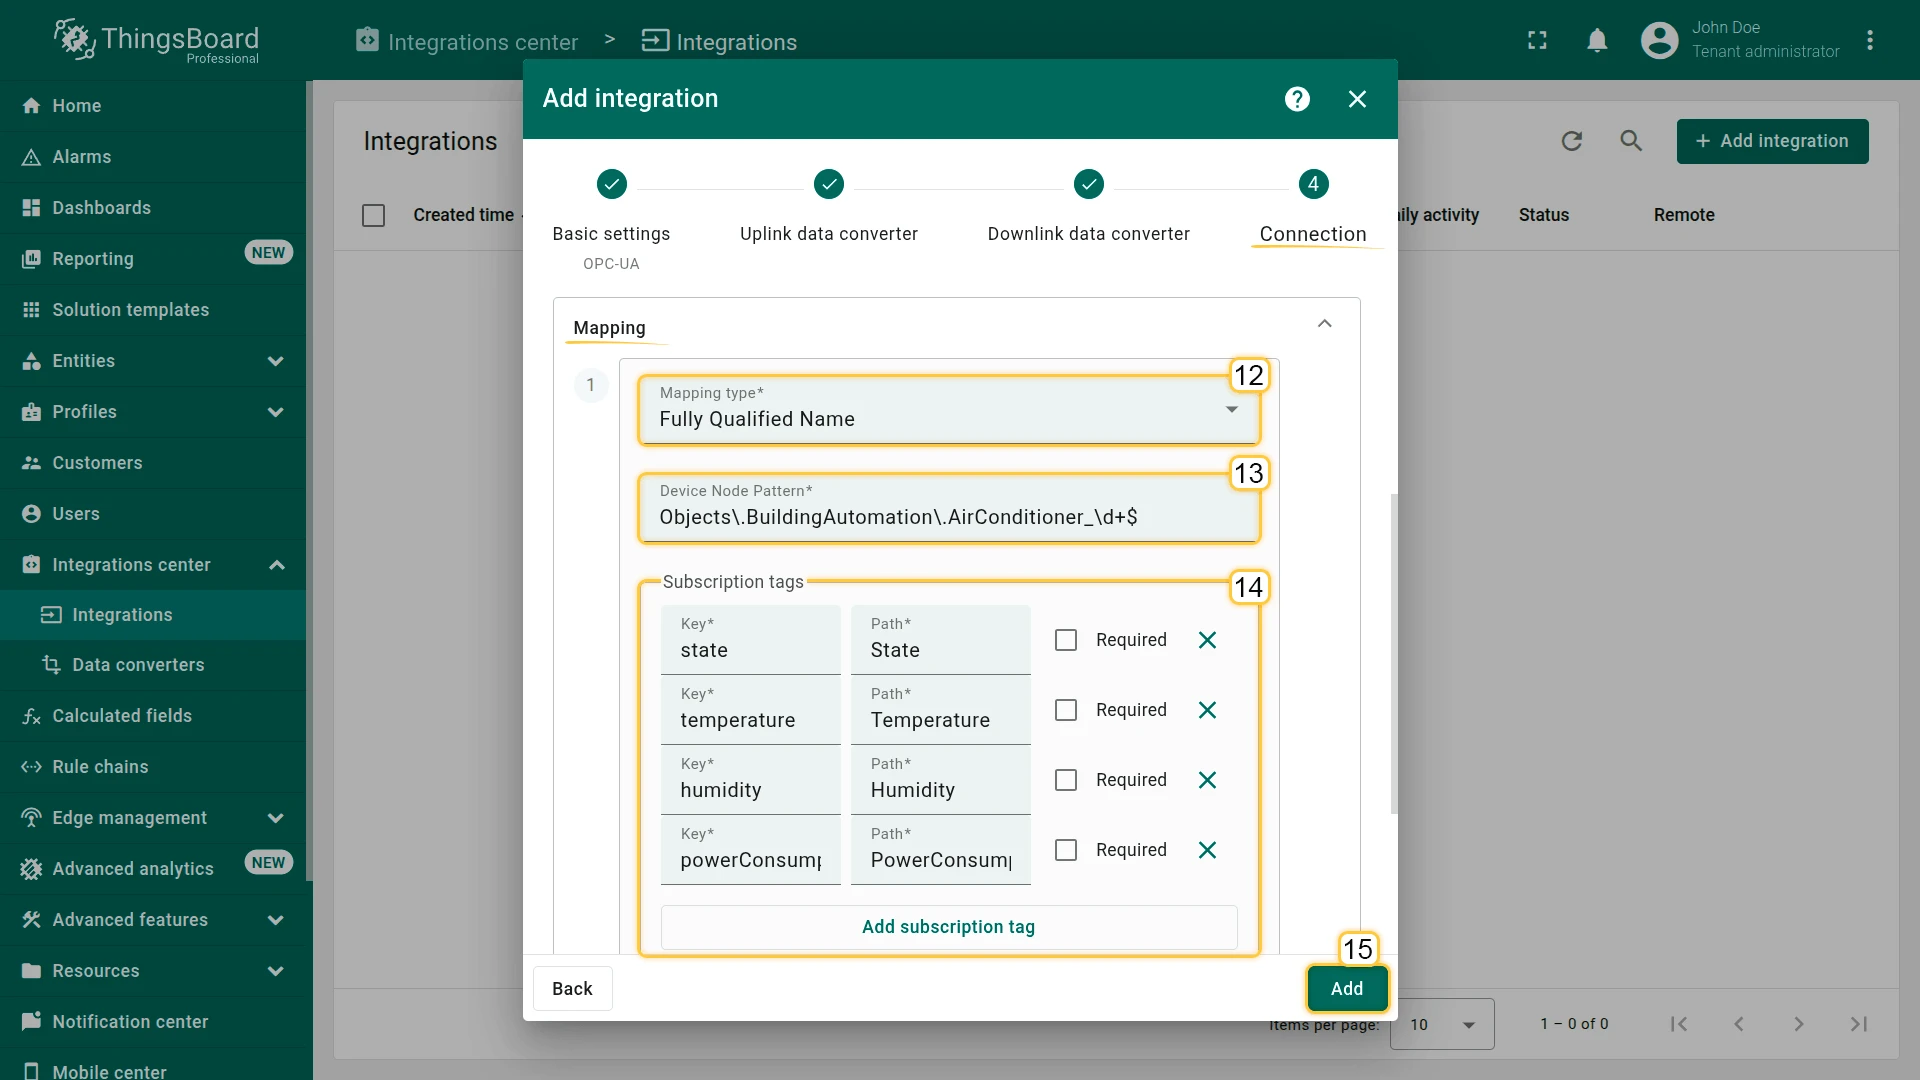
None/Anonymousmatch the demo server’s defaults — no encryption and no login required. A production OPC-UA server will typically enforce a stricter Security policy and require credentials under Identity; see Connection settings for the available options.Configure the mapping:- Mapping type:
Fully Qualified Name. - Device Node Pattern:
Objects\.BuildingAutomation\.AirConditioner_\d+$— regex matched against OPC-UA node FQNs to identify device nodes; matches all ten simulated devices,AirConditioner_1throughAirConditioner_10. - Subscription tags — define the node paths and output message keys:
- state —
State. - temperature —
Temperature - humidity —
Humidity - powerConsumption —
PowerConsumption. - Leave Required unchecked for all four tags — none are mandatory for this demo, so a message still processes even if a particular node value is temporarily unavailable.
- Click Add to complete the integration.
Step 5. Verify Uplink Telemetry
Section titled “Step 5. Verify Uplink Telemetry”After saving, ThingsBoard connects to the OPC-UA server and 10 airconditioner devices appear on the Devices page. If no devices appear within a few seconds, see Troubleshooting.
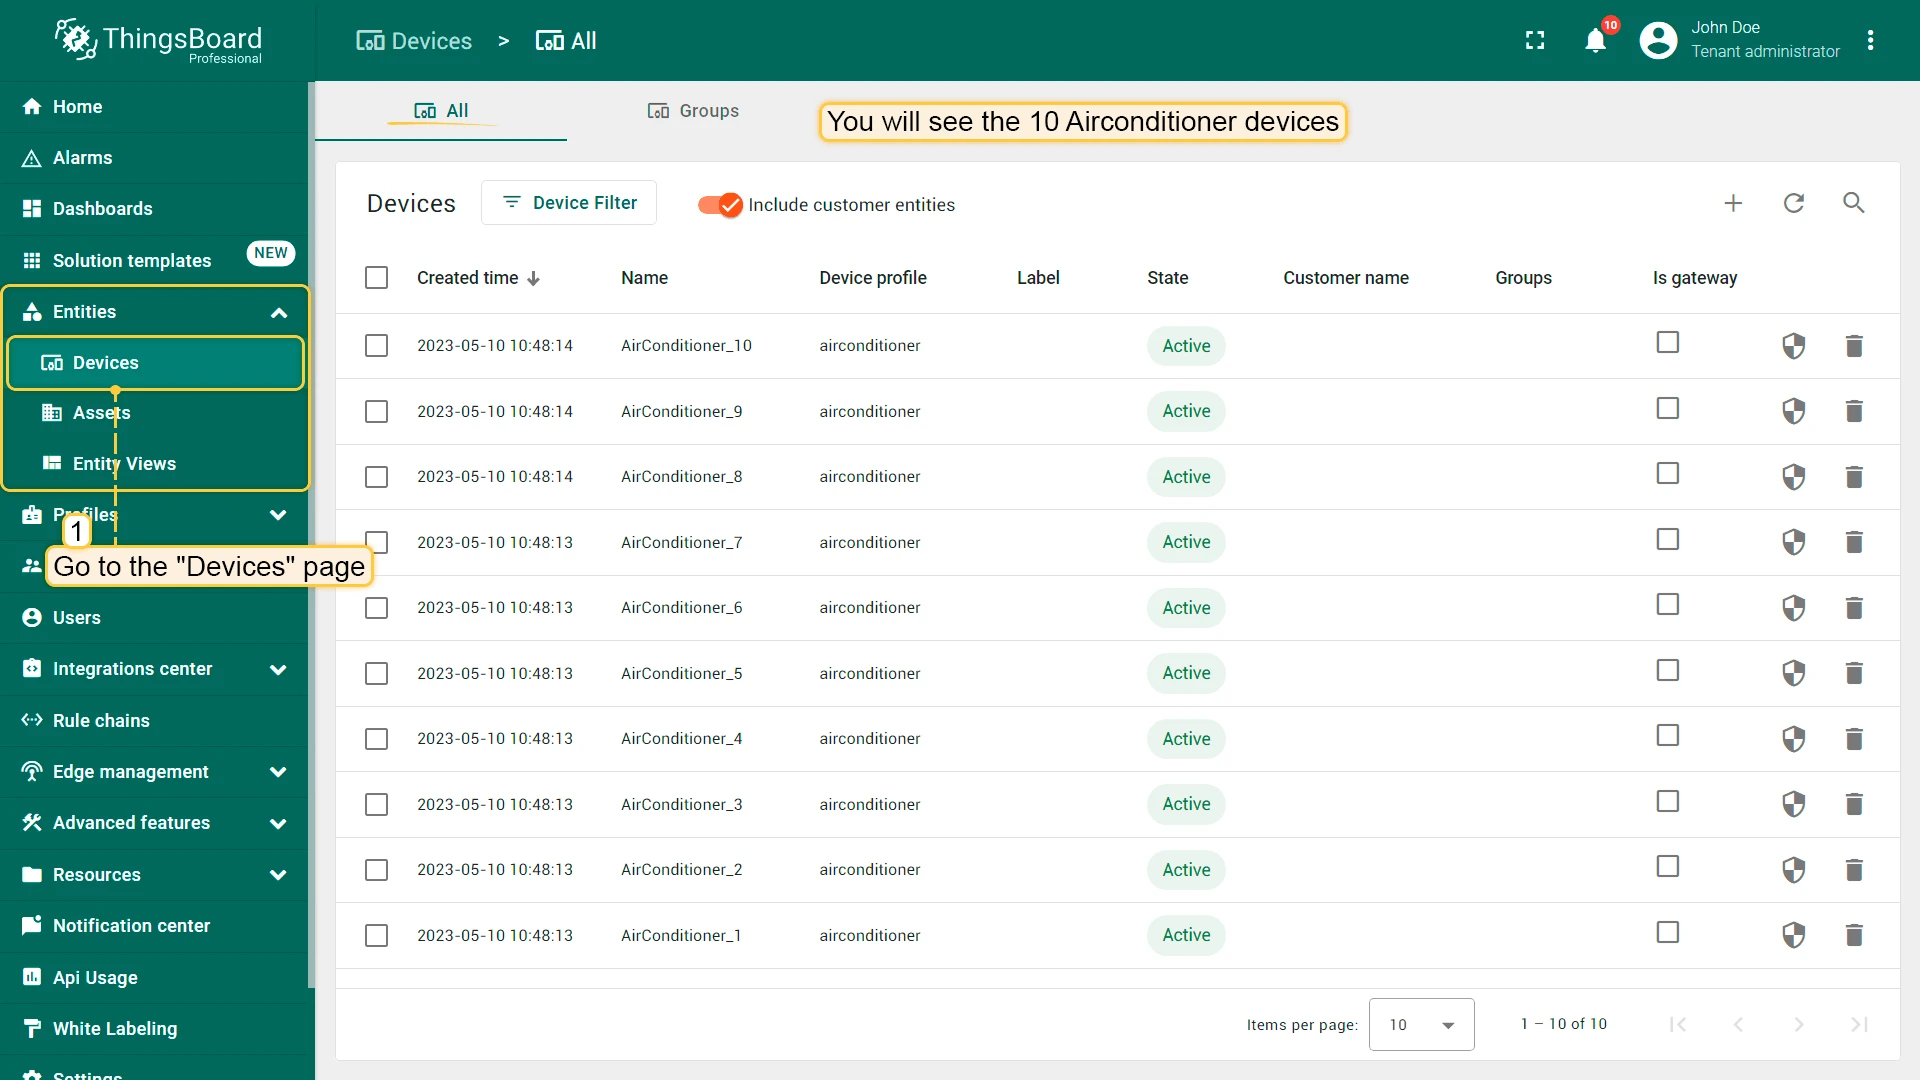
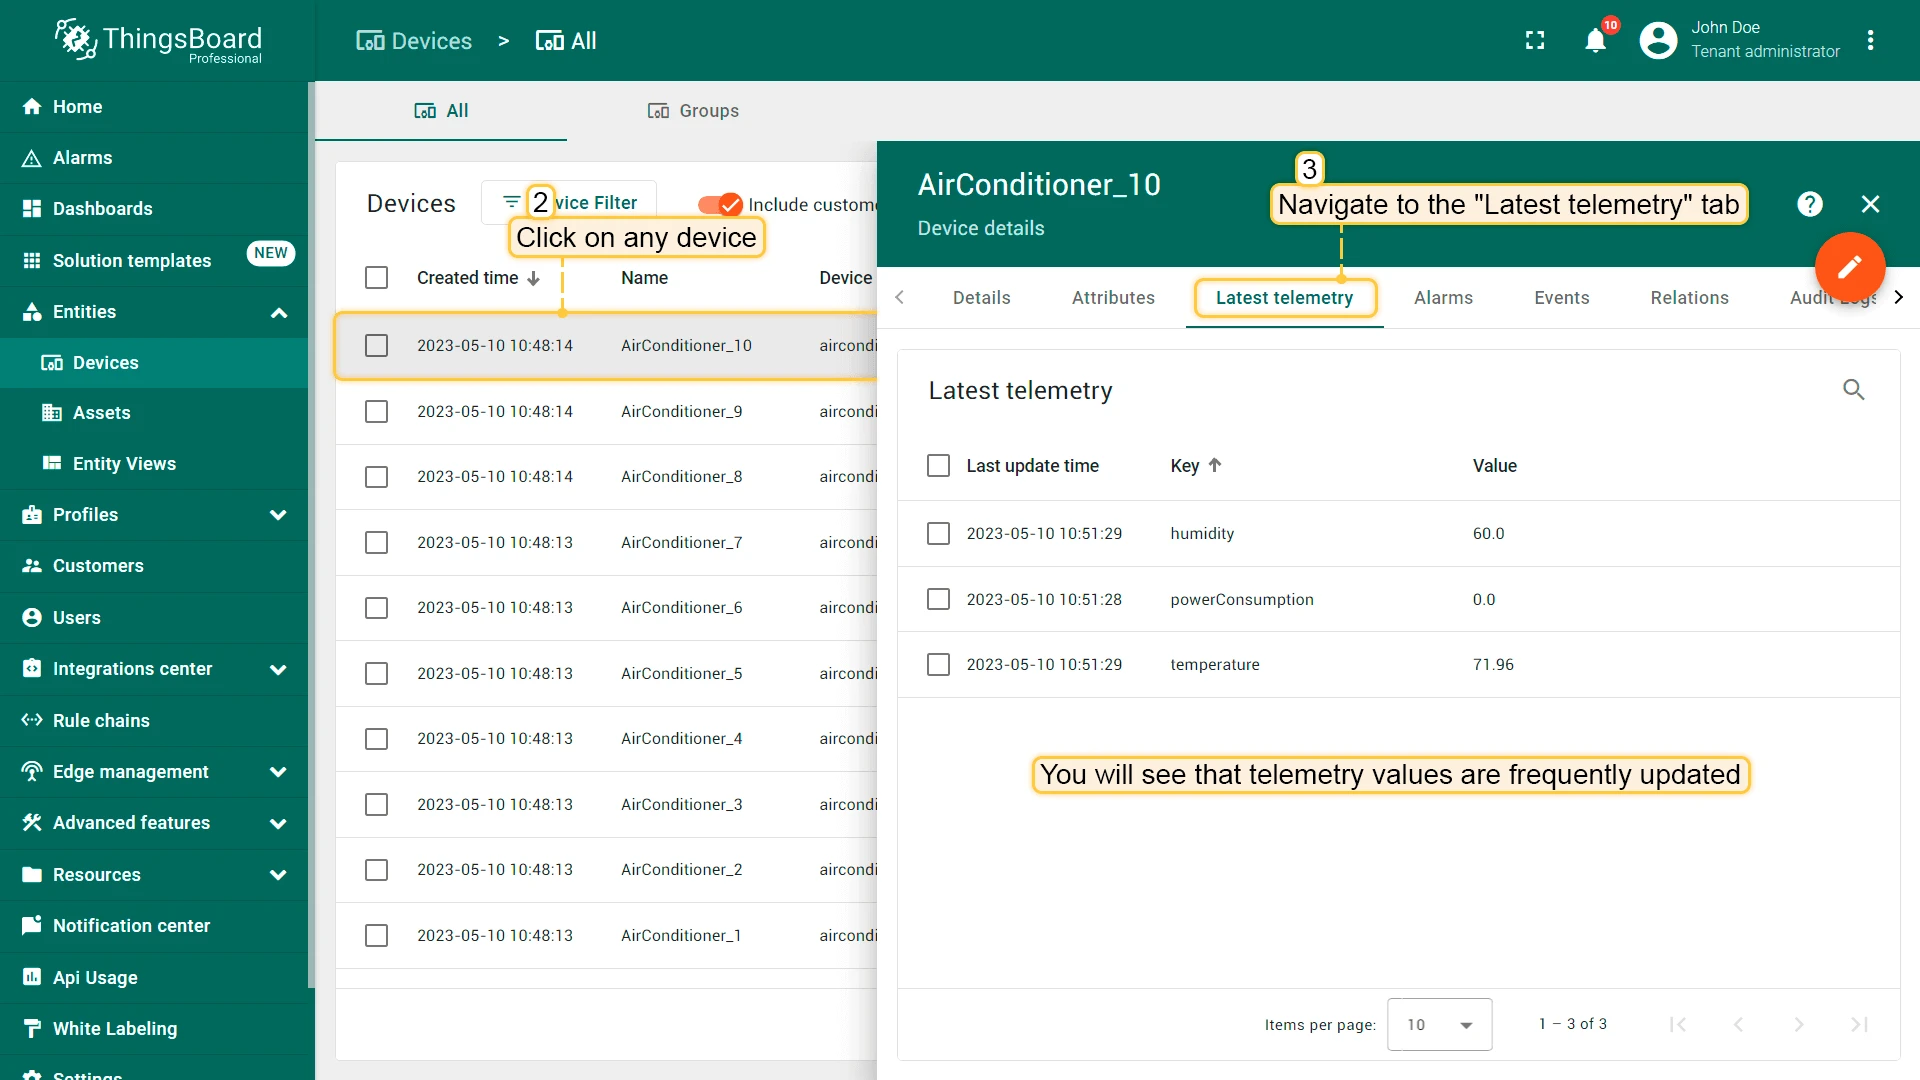
Click a device and open its Latest Telemetry tab to confirm temperature, humidity, and powerConsumption values are updating.
Step 6. Import the Airconditioners Rule Chain
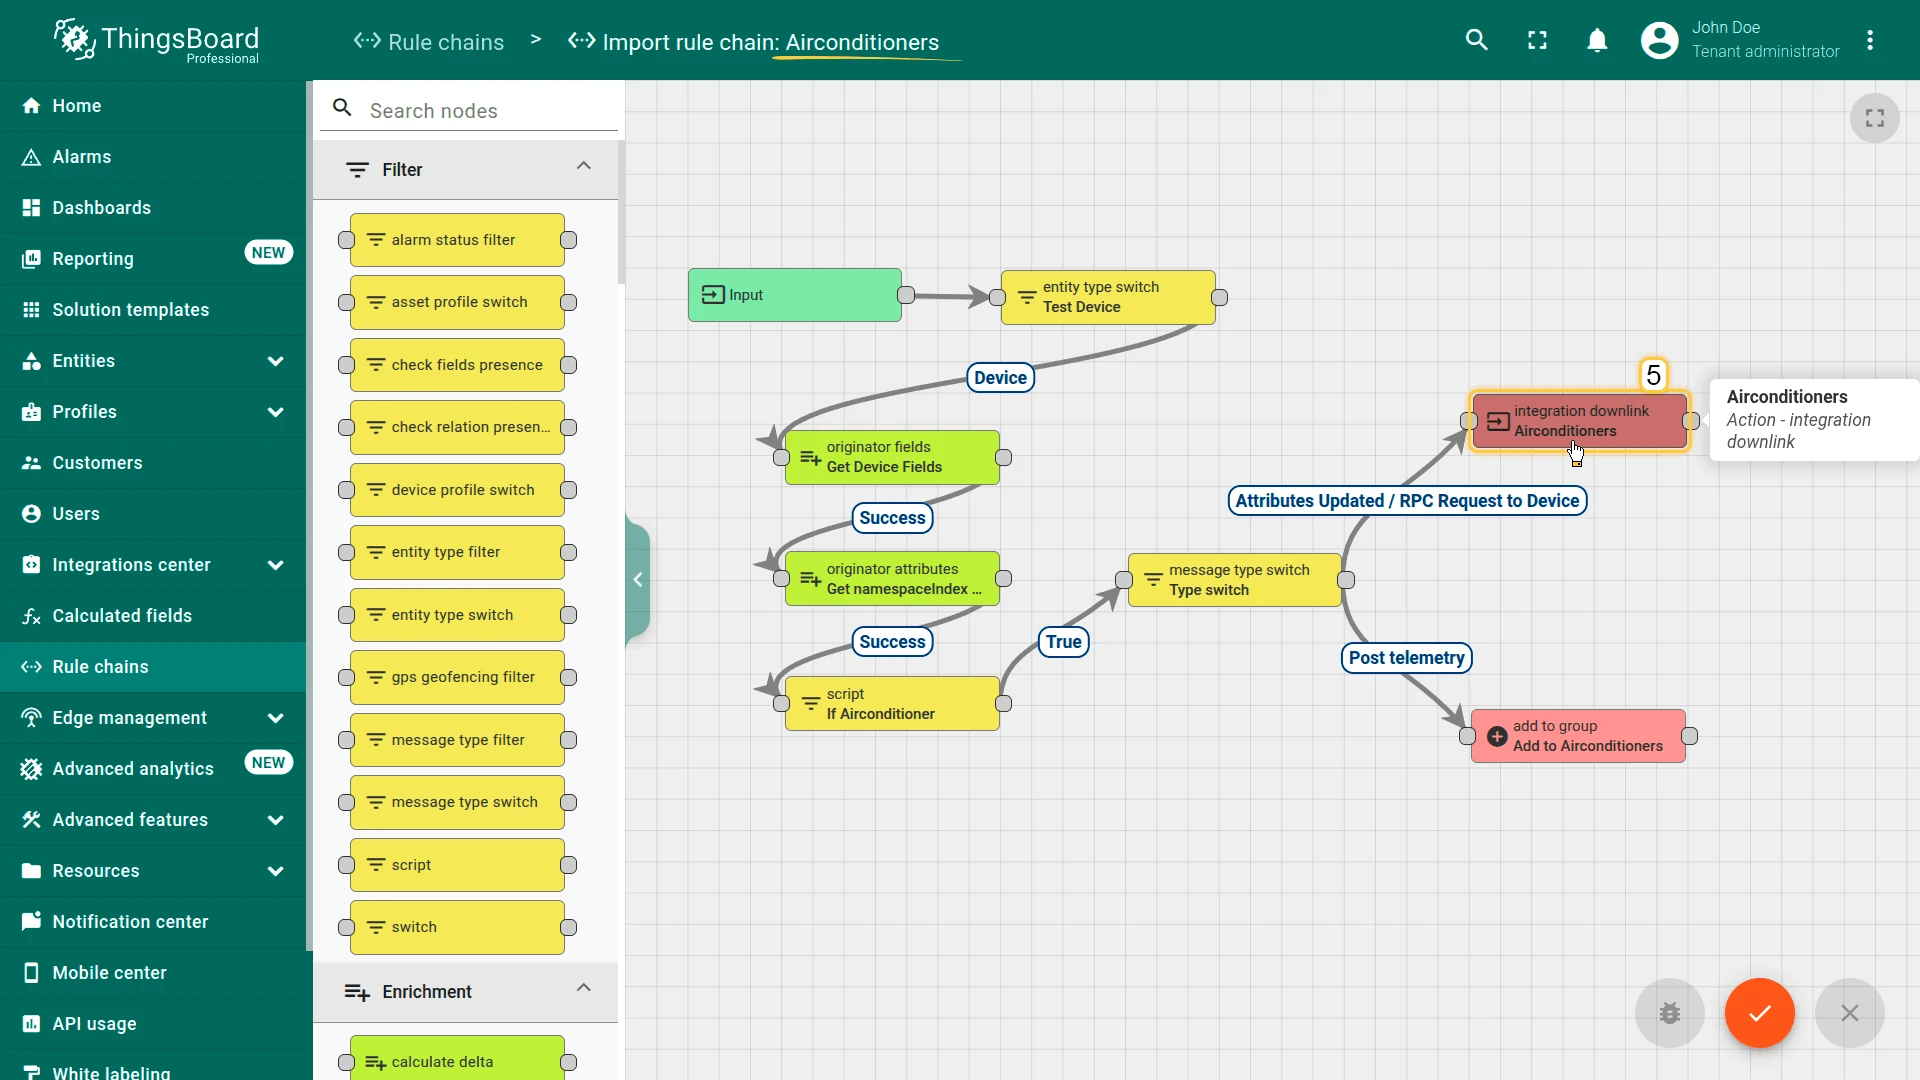
Section titled “Step 6. Import the Airconditioners Rule Chain”To enable downlink (RPC) support, import the pre-built Airconditioners rule chain — it contains the integration downlink node that routes RPC commands to the OPC-UA integration, plus the attribute-enrichment node referenced in Step 3.
Download: airconditioners_rule_chain.json
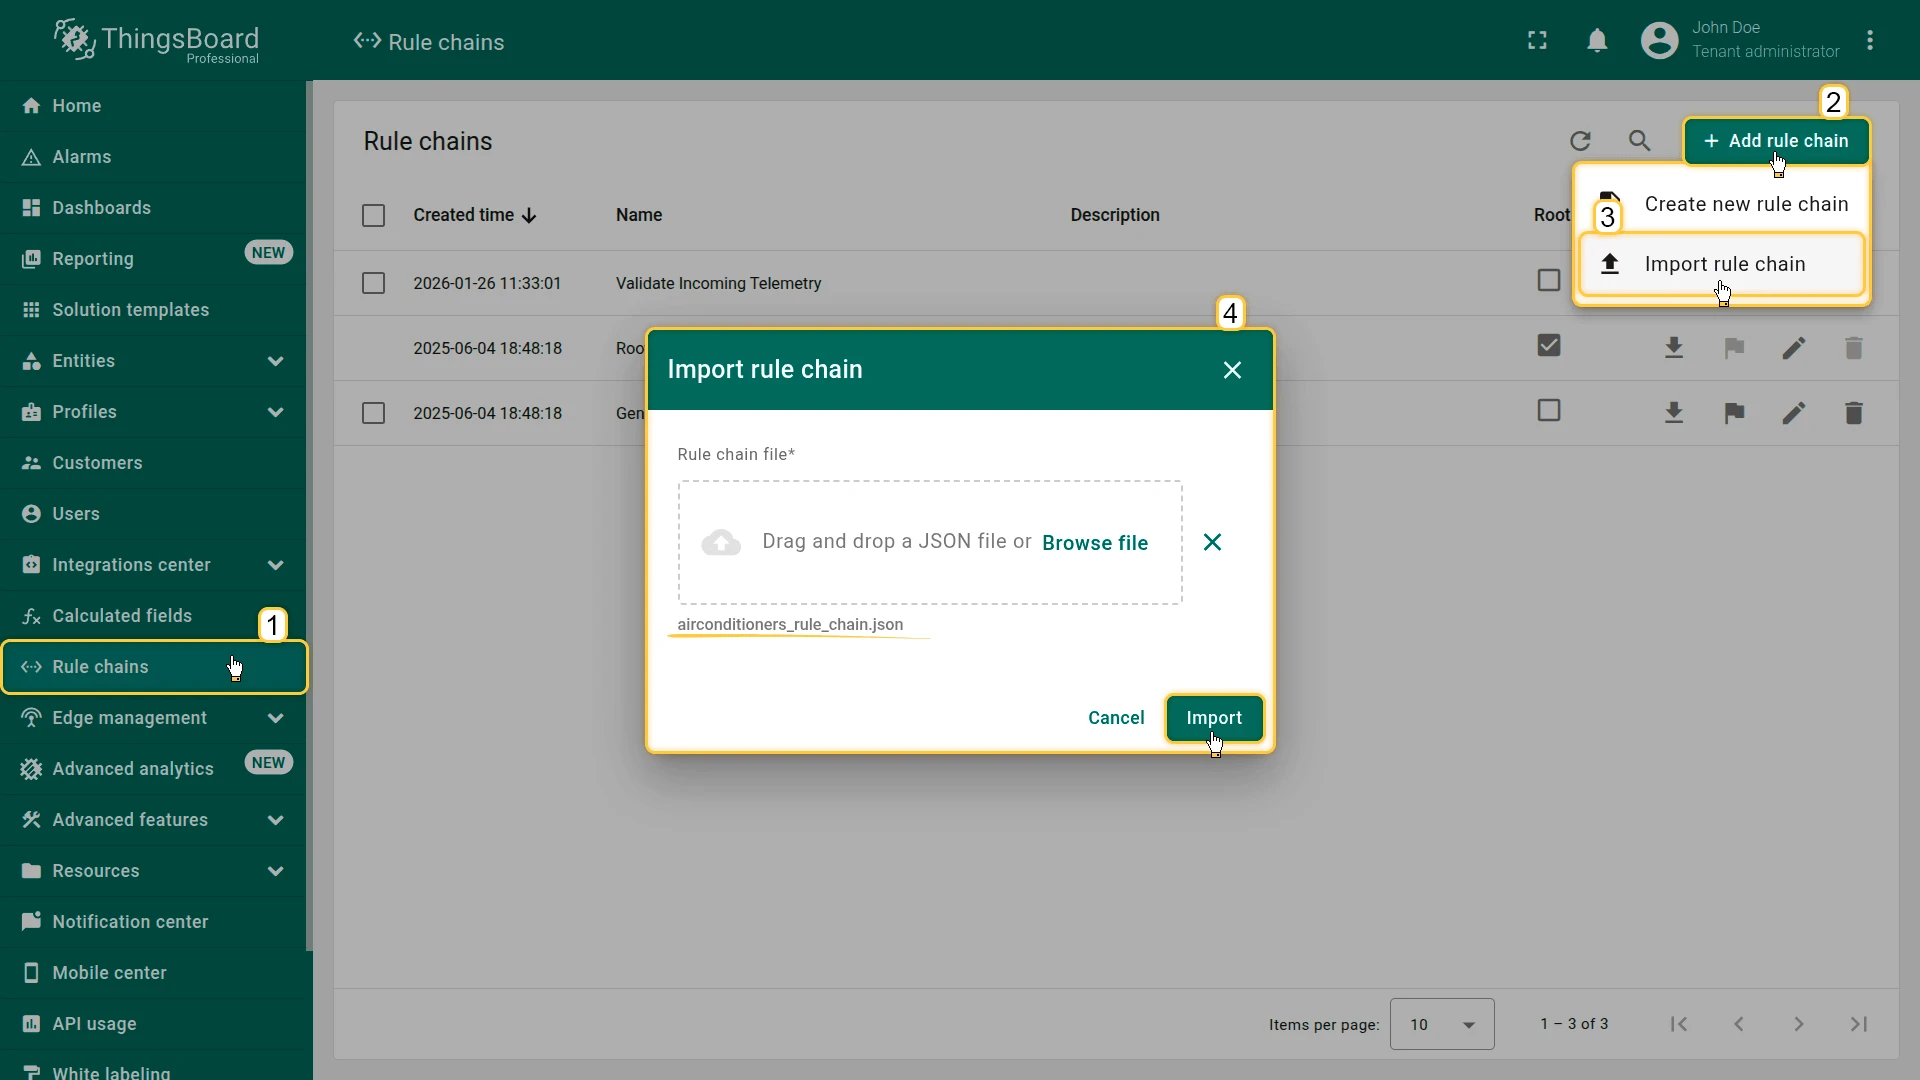
- Go to Rule chains, click + Add rule chain ⇾ Import rule chain, drag
airconditioners_rule_chain.jsoninto the window, and click Import. - The Airconditioners rule chain opens. Double-click the integration downlink node.
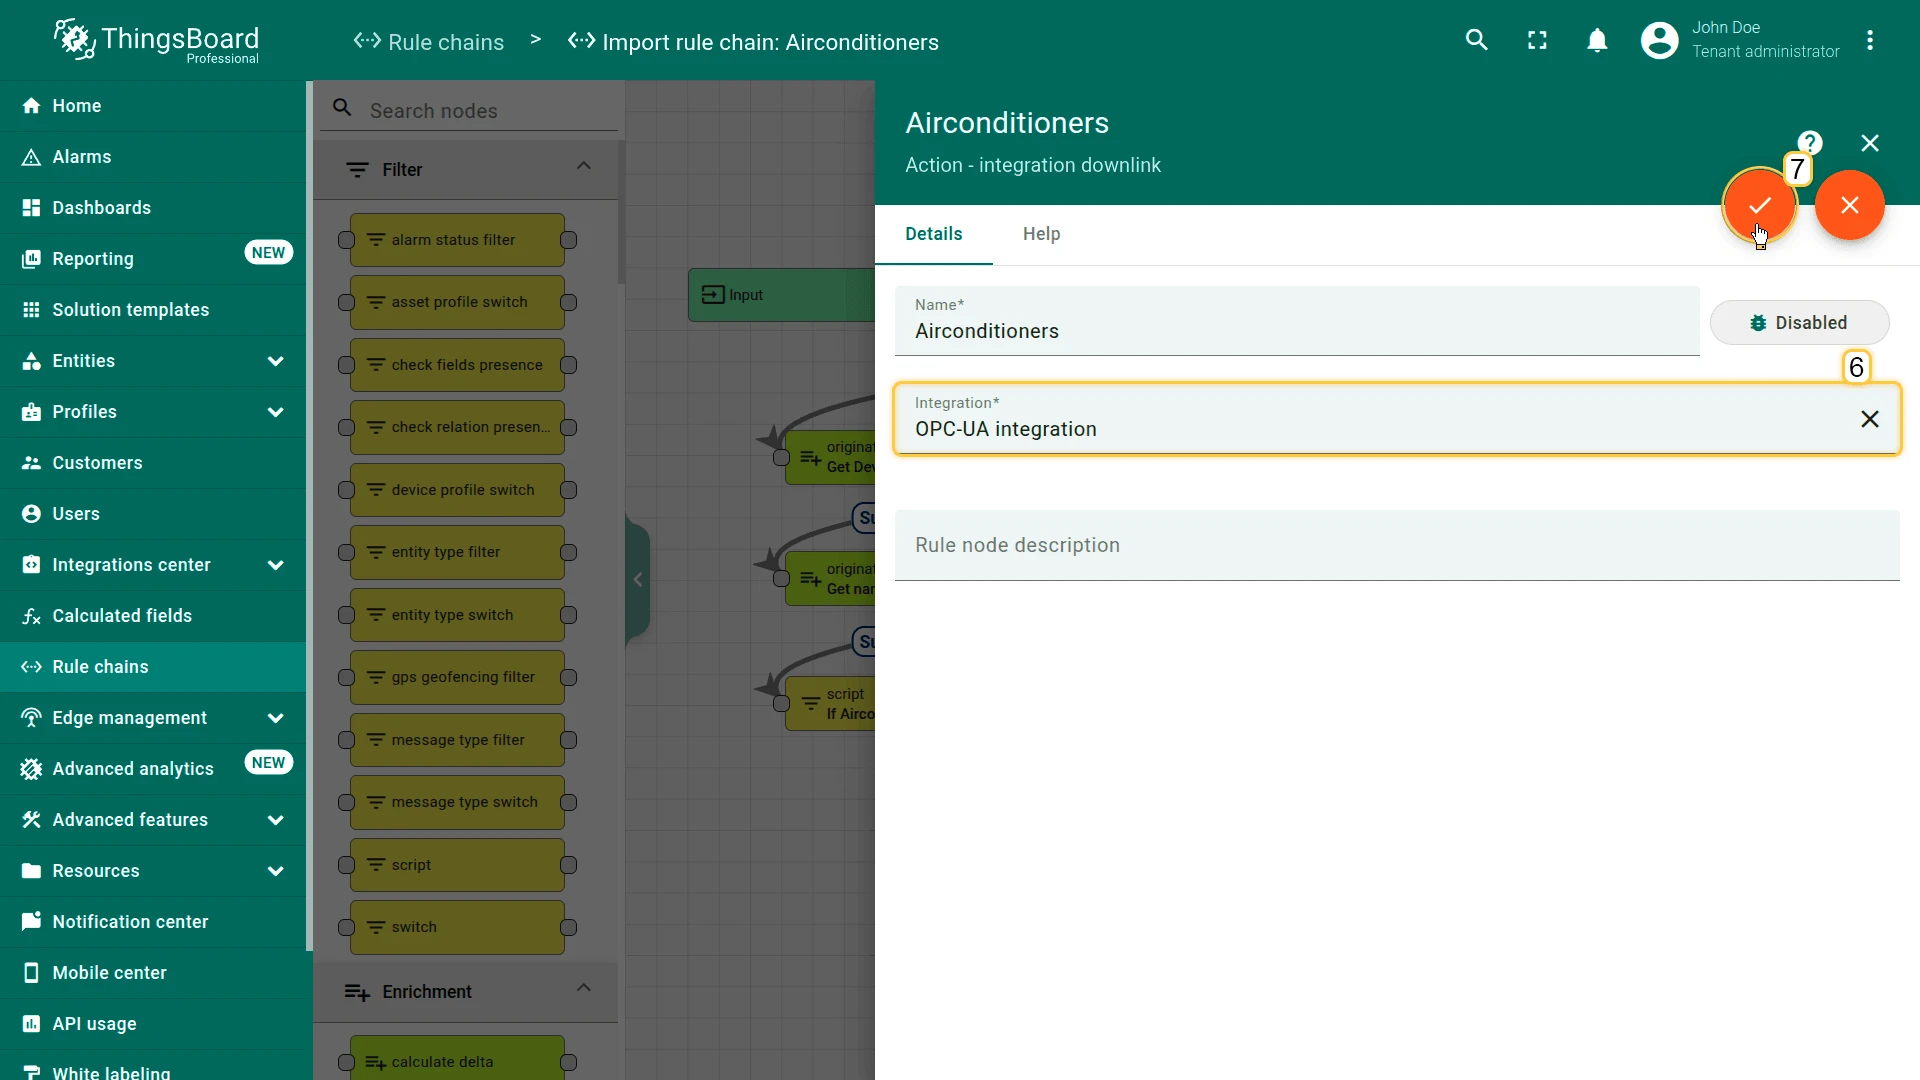
- Set Integration to your OPC-UA integration and click the orange checkmark to confirm.
- Click Apply changes to save the rule chain.
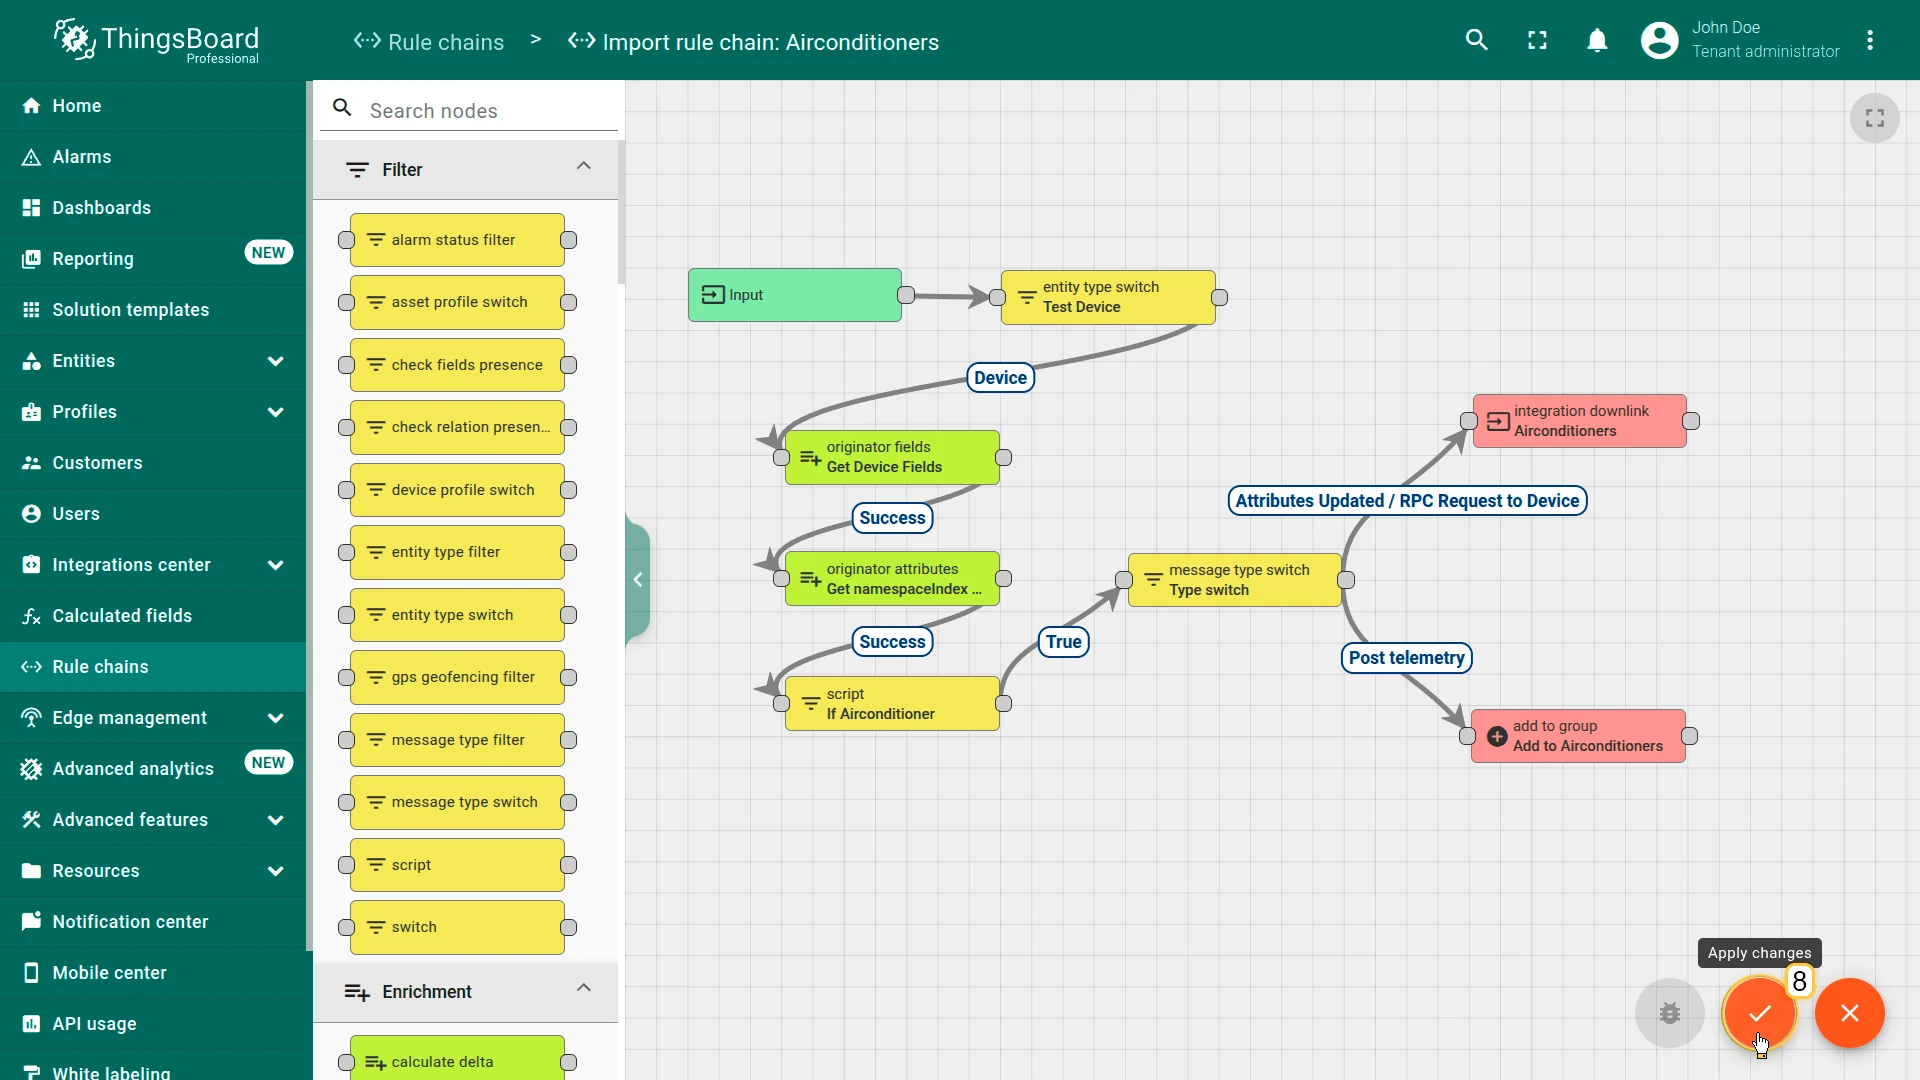
Step 7. Wire It into the Root Rule Chain
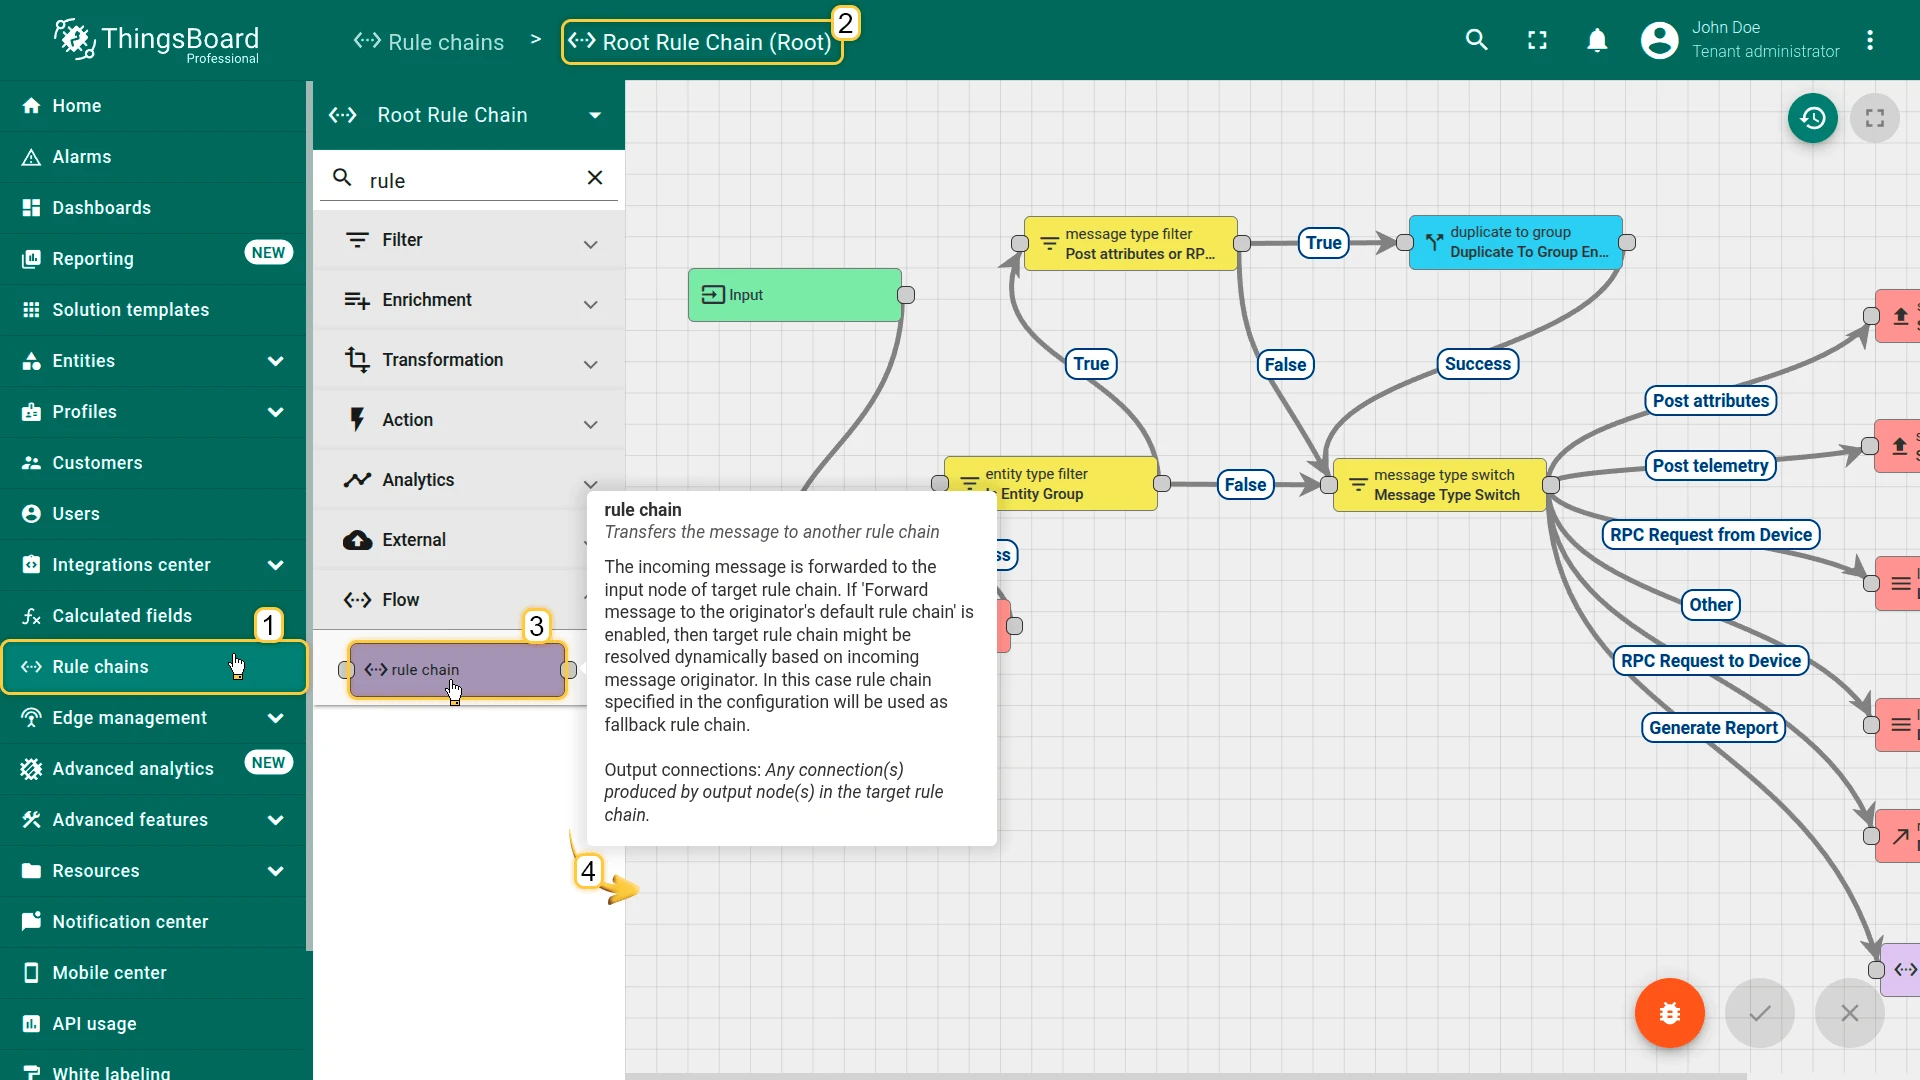
Section titled “Step 7. Wire It into the Root Rule Chain”- Go to Rule chains and open the Root Rule Chain.
- Search for
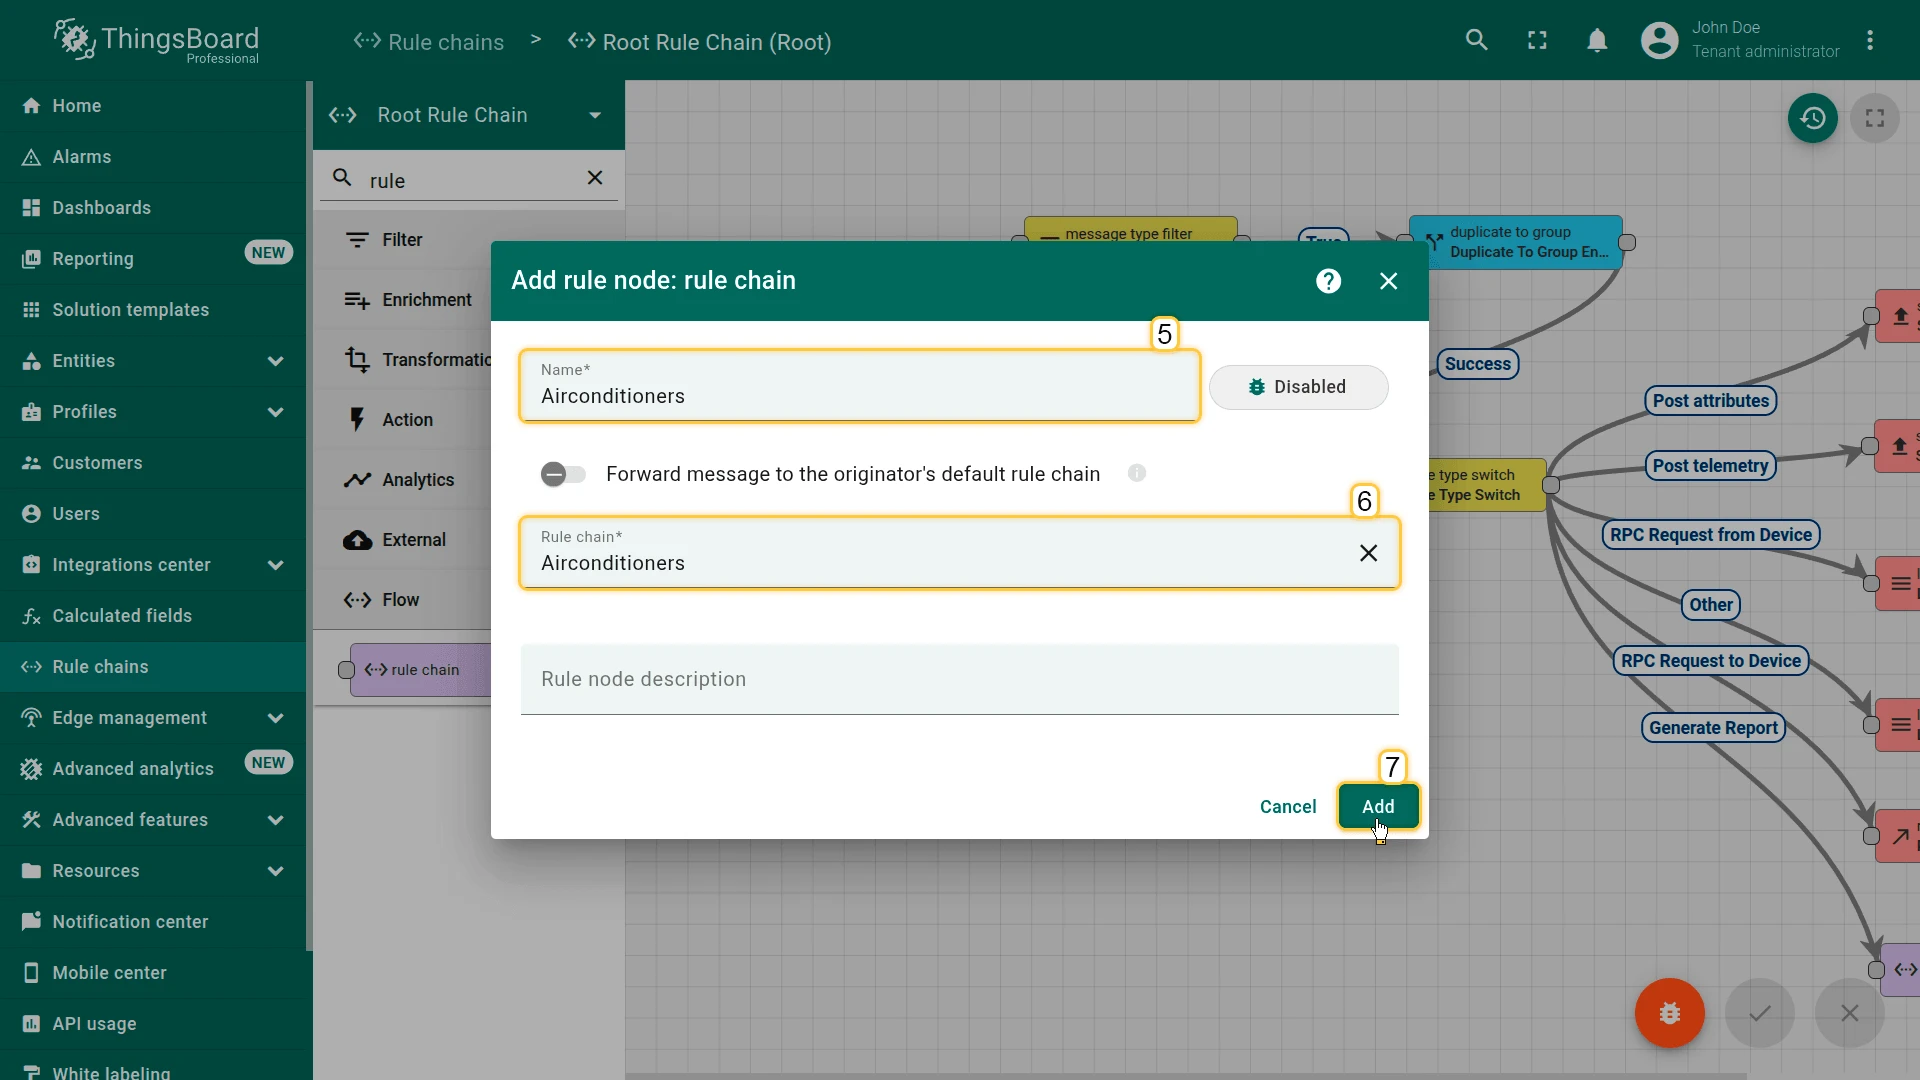
rule chainin the node panel and drag it onto the canvas. - In the Add rule node dialog, set Name =
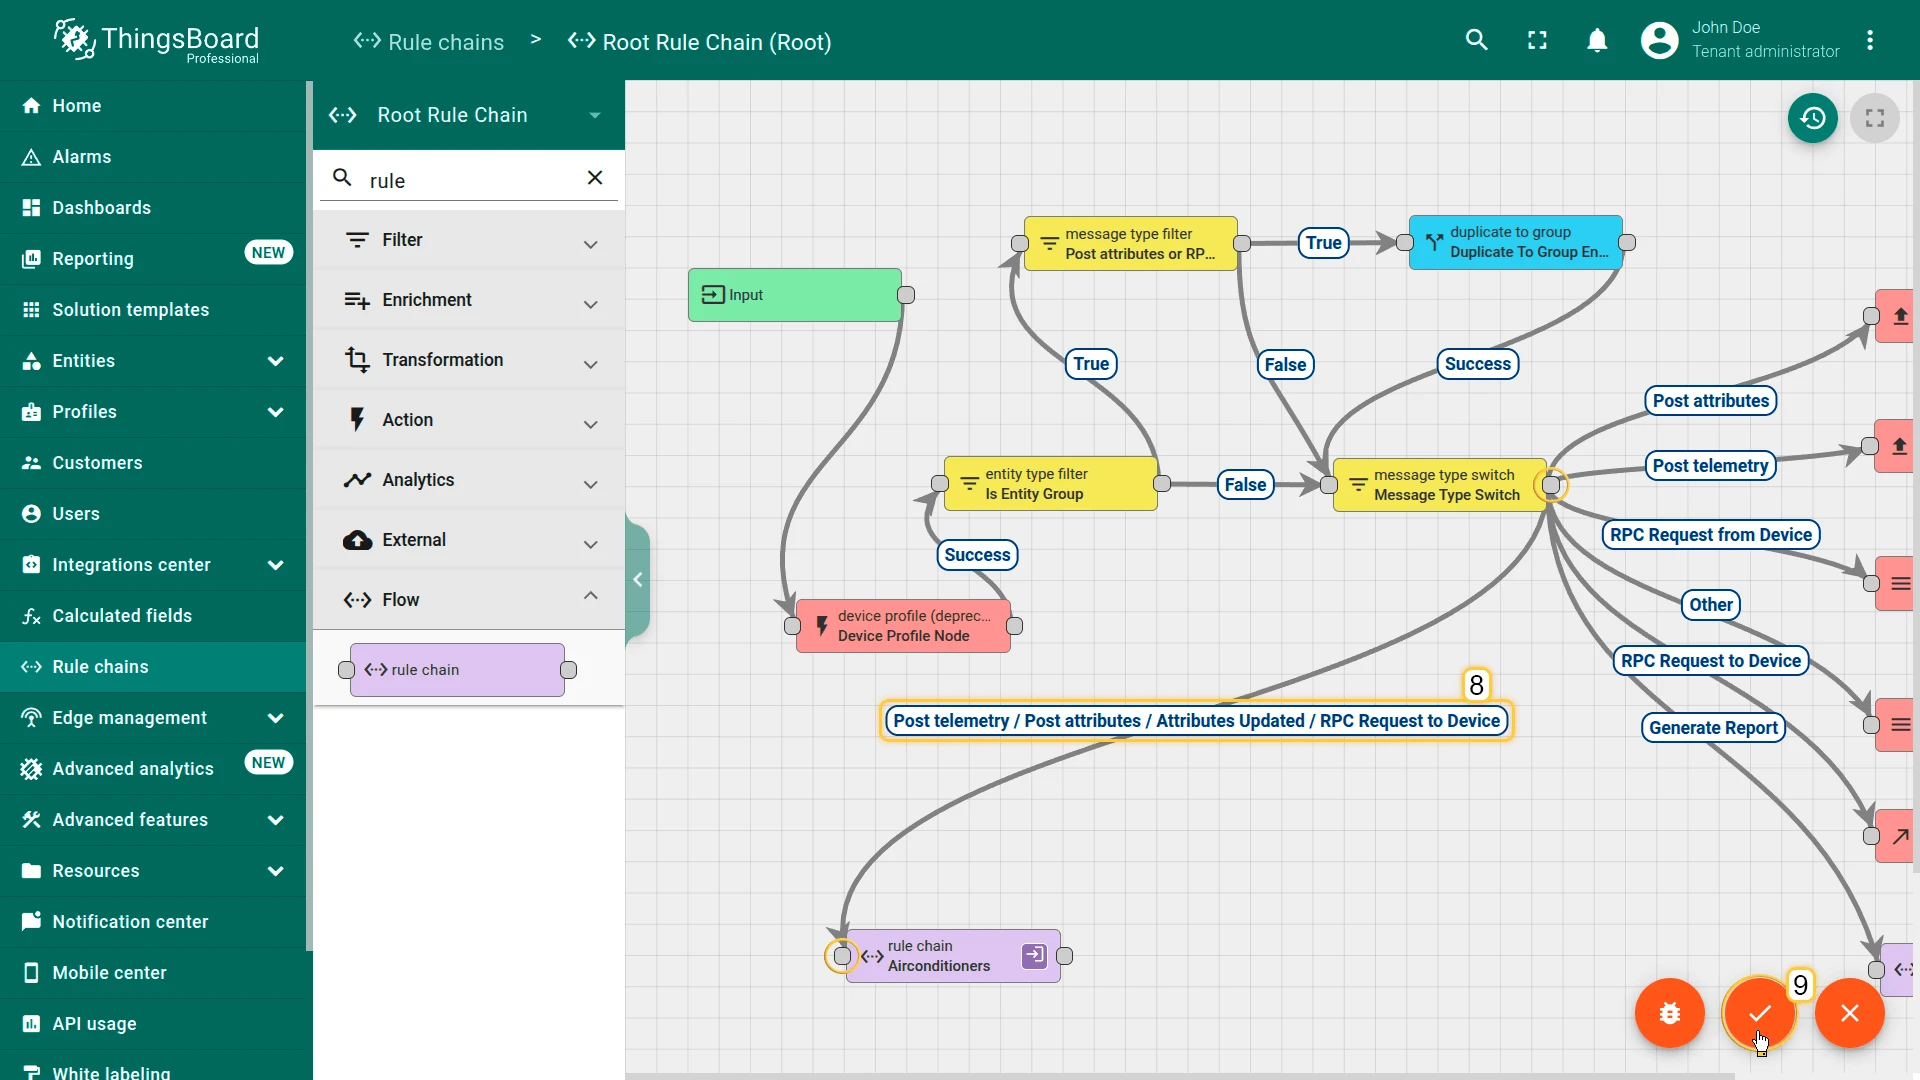
Airconditionersand Rule chain = Airconditioners. Click Add. - Connect the message type switch node to the Airconditioners node using the Post Telemetry, Post attributes, Attributes Updated, and RPC Request to Device relations.
- Click Apply changes.
Step 8. Import the Airconditioners Dashboard
Section titled “Step 8. Import the Airconditioners Dashboard”Download the dashboard file: airconditioners_dashboard.json
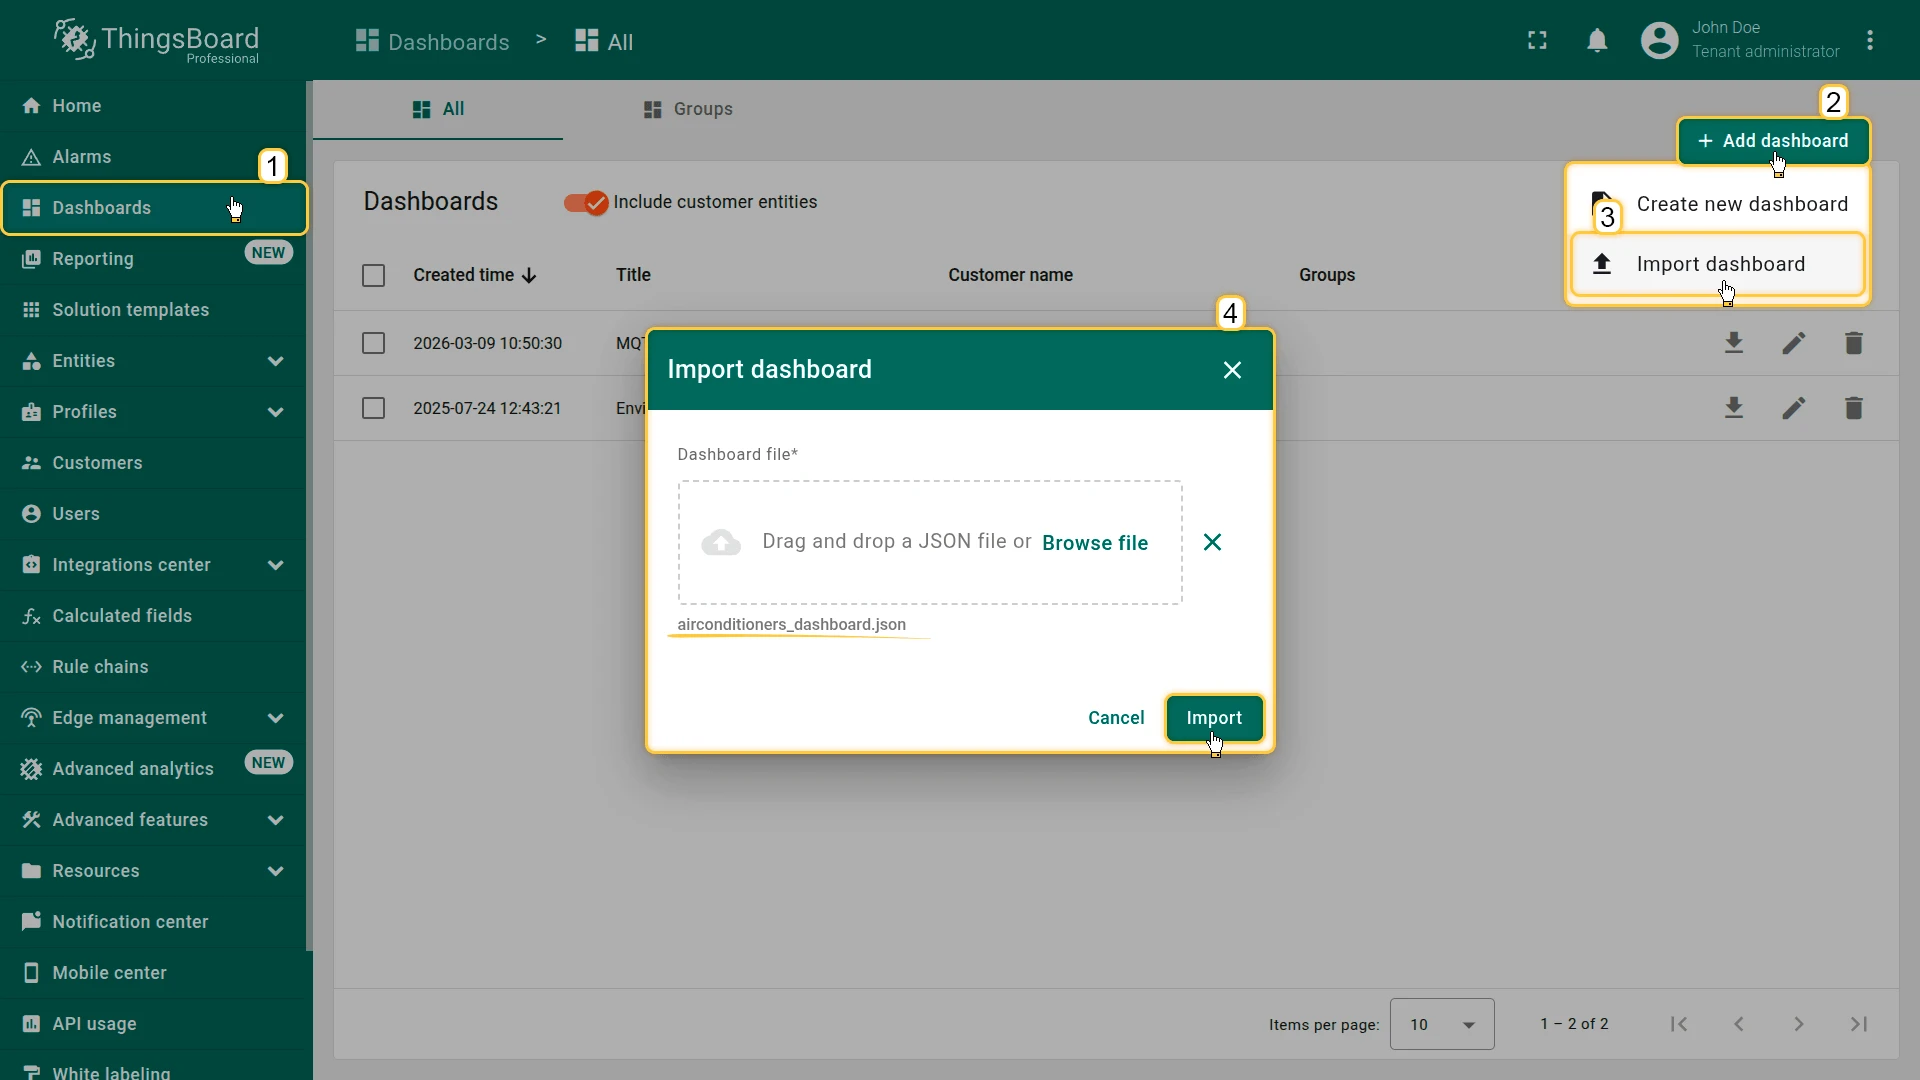
- Go to the Dashboards page.
- Click + Add dashboard ⇾ Import dashboard.
- Drag and drop the downloaded JSON file into the Import dashboard dialog and click Import.
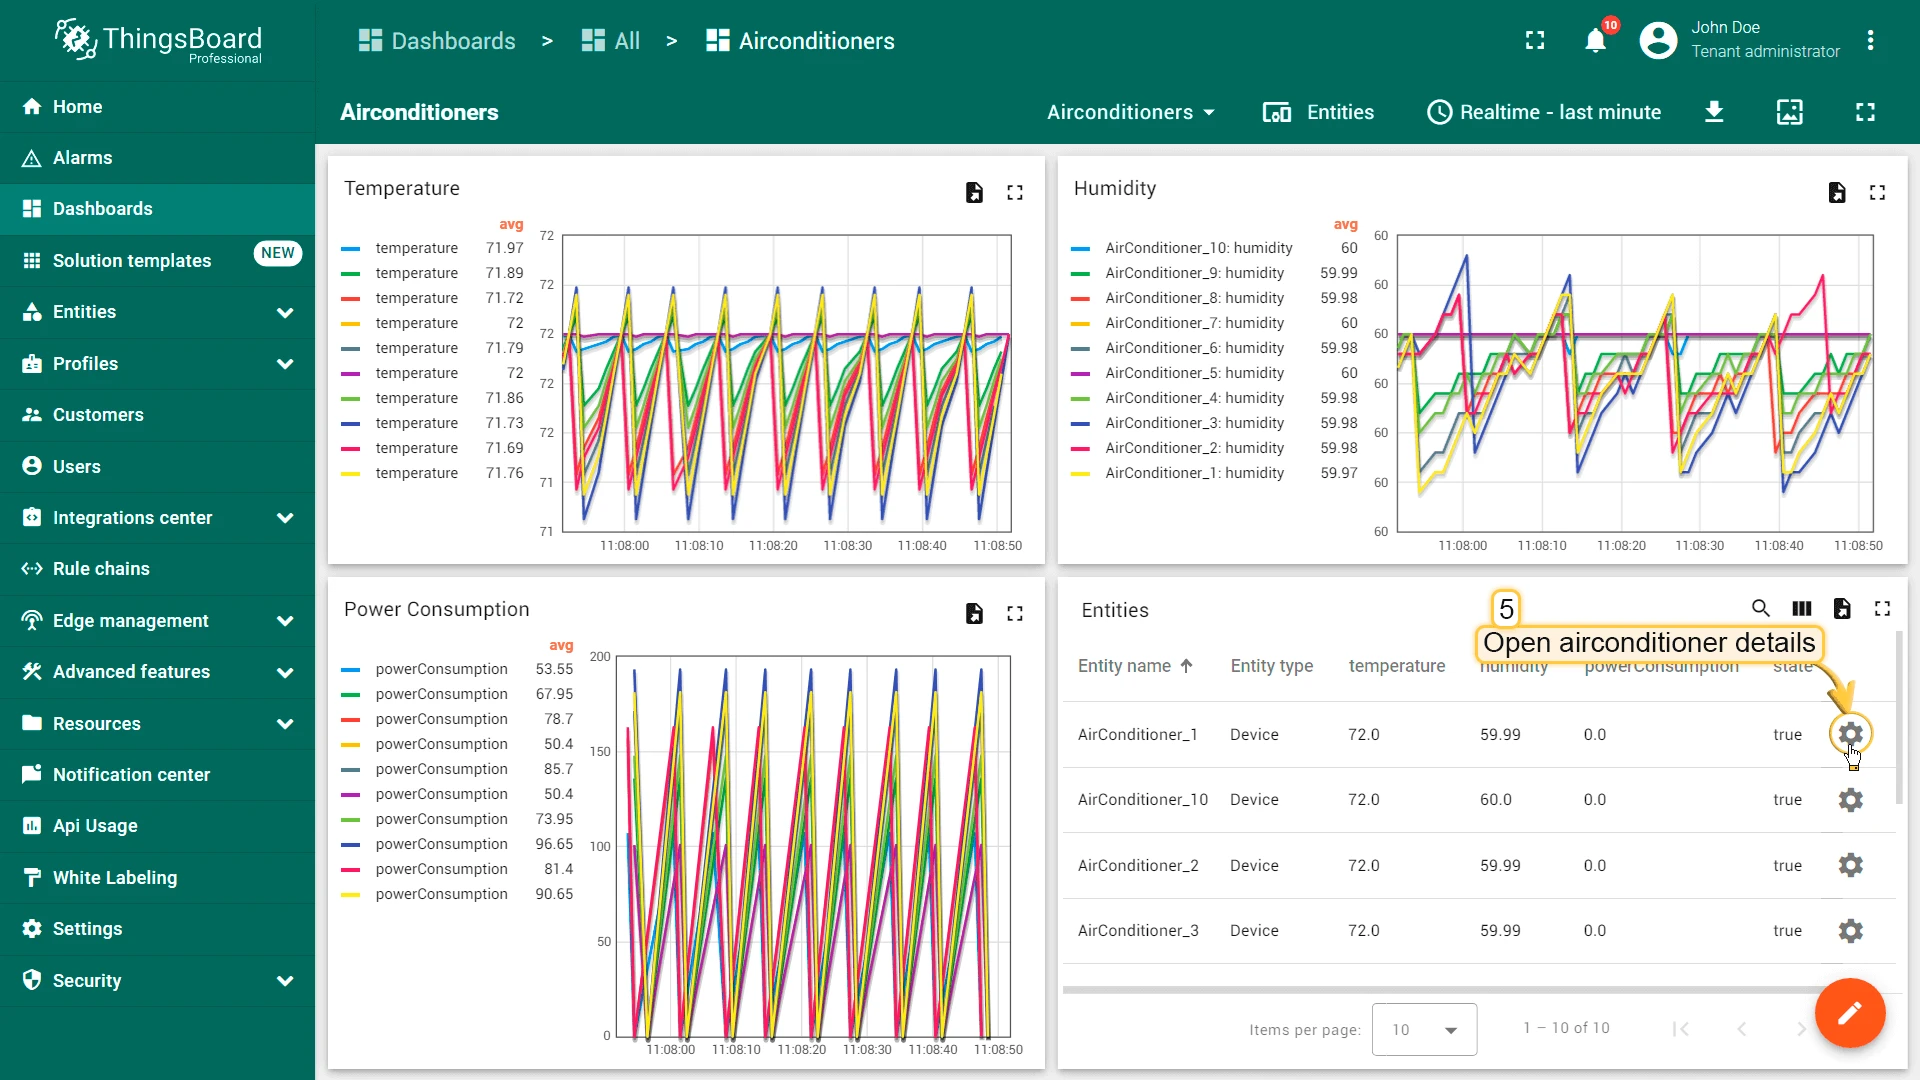
- Open the Airconditioners dashboard.
The dashboard displays real-time Temperature, Humidity, and Power Consumption graphs for all 10 airconditioners, built from standard widgets.
Step 9. Test Downlink Control
Section titled “Step 9. Test Downlink Control”Each airconditioner’s detail view has an Airconditioner status indicator widget and a Round switch control widget — turning the switch sends an RPC command through the pipeline configured in Steps 3, 6, and 7.
- In the Entities widget, click the Open airconditioner details icon next to any device.
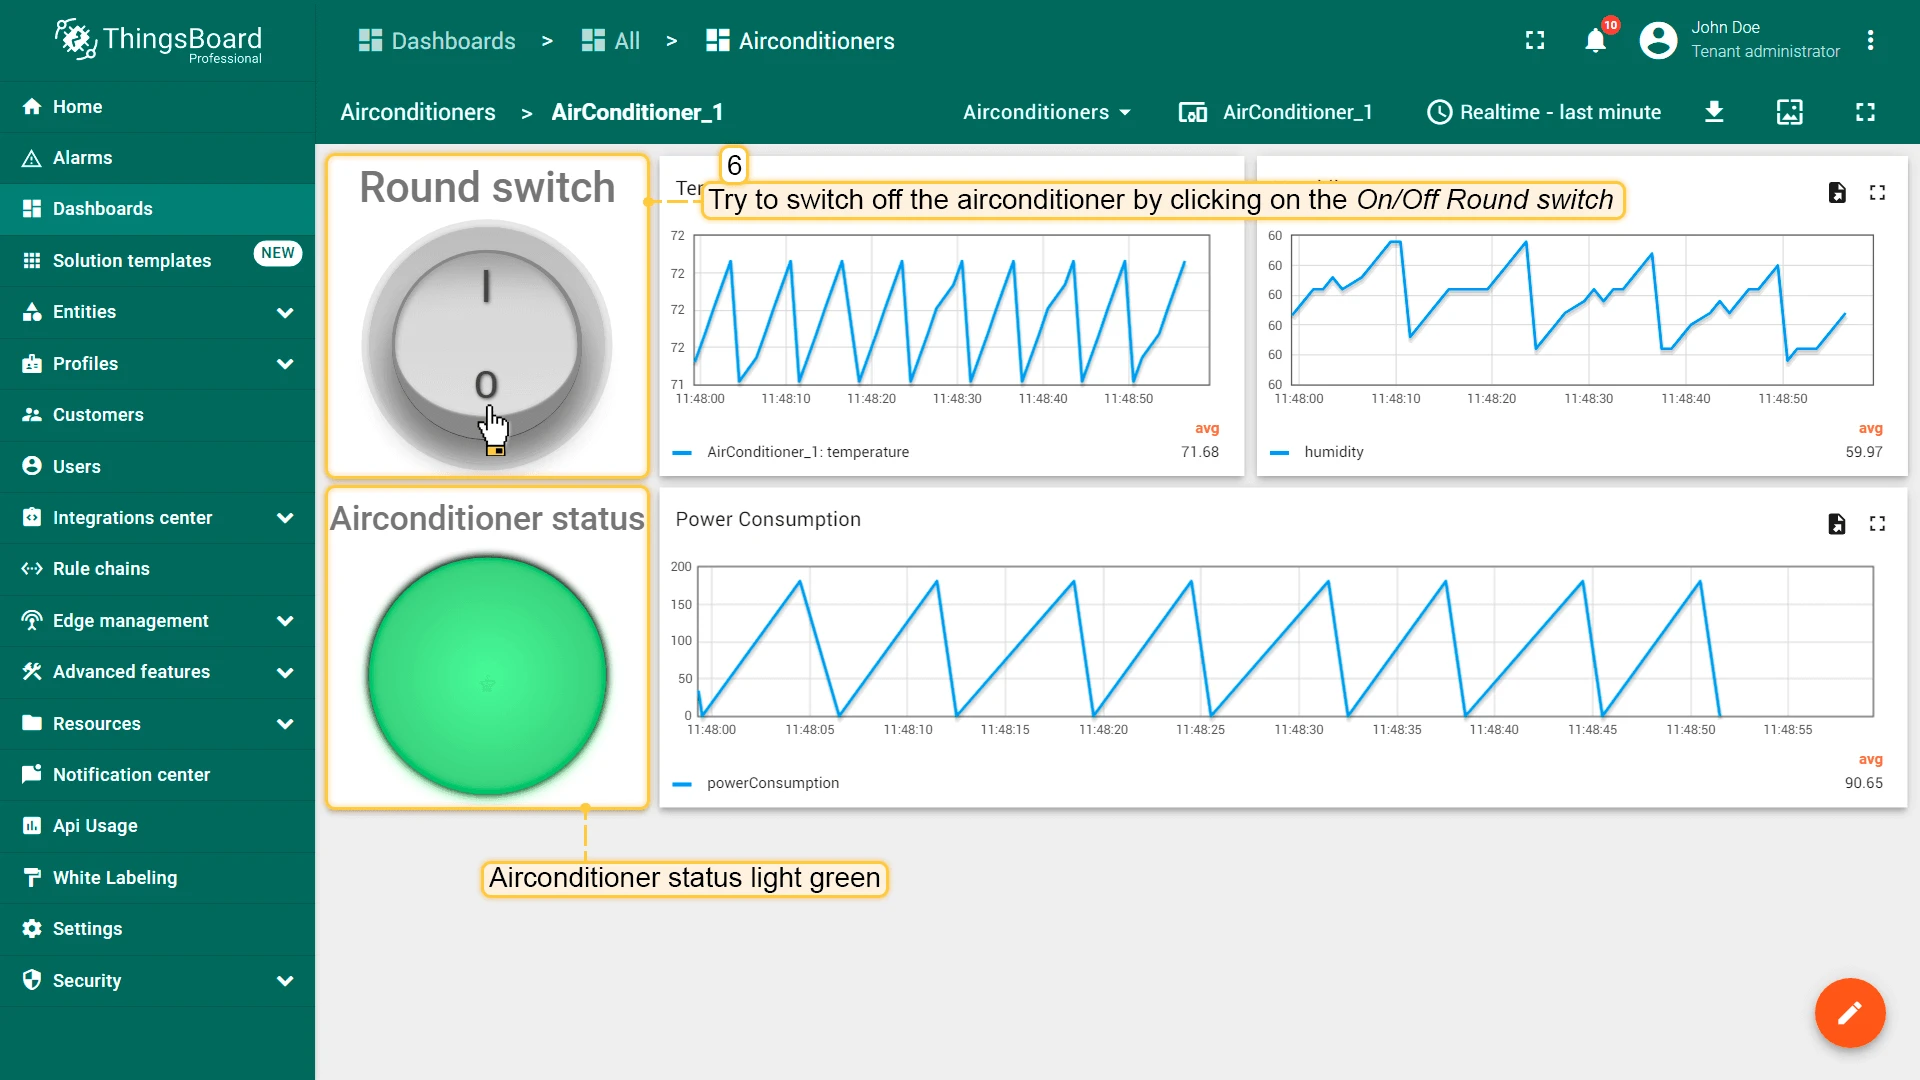
- The Airconditioner status indicator is green. Click the Round switch to turn the airconditioner off.
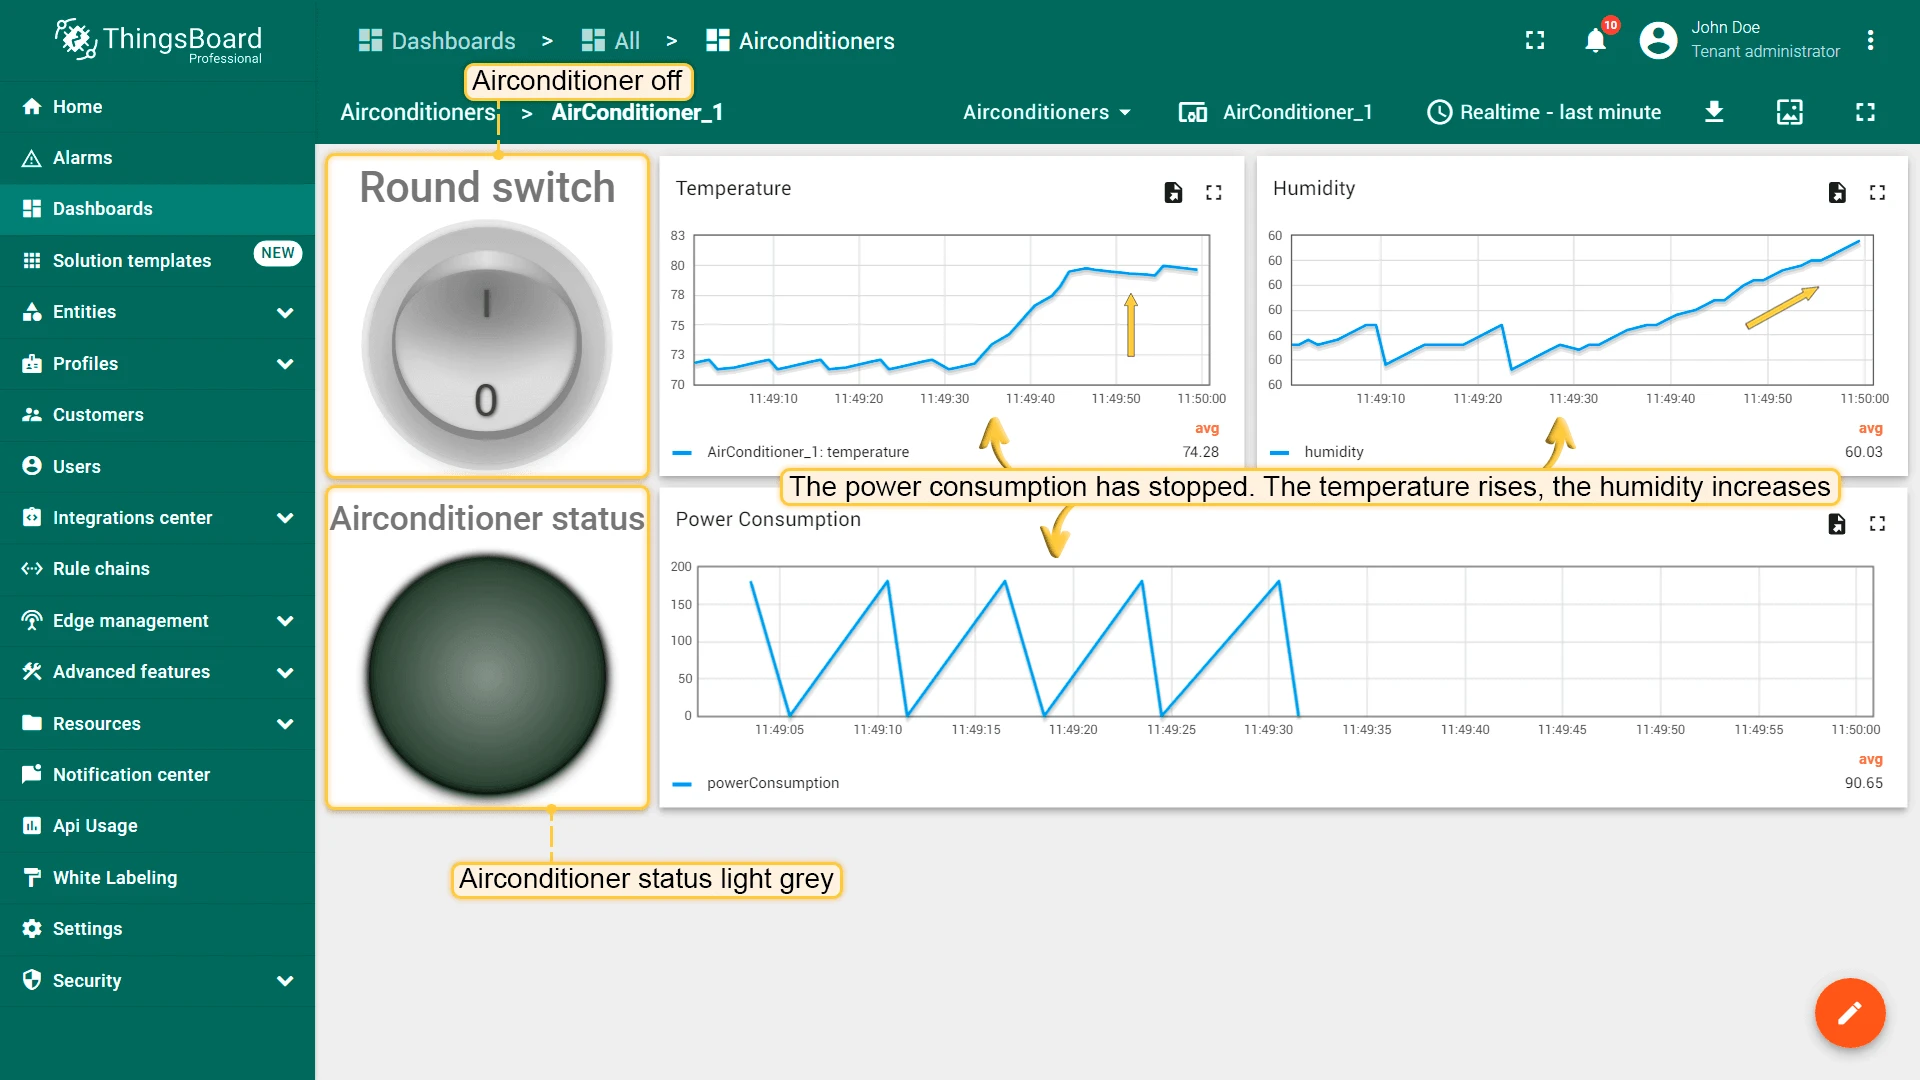
After switching off, the status indicator turns grey, temperature and humidity begin to rise, and power consumption drops to zero.
How It Works
Section titled “How It Works”On the uplink path, the OPC-UA integration polls the subscribed device nodes, matches them against the Device Node Pattern, and passes each tag’s raw value to the uplink converter’s decodeToJson(payload). The decoder maps temperature, humidity, and powerConsumption to telemetry and state to a device attribute.
On the downlink path, toggling the Round switch sends an RPC_CALL_FROM_SERVER_TO_DEVICE message with method: setState and params of "true"/"false". The Airconditioners rule chain, wired to the RPC Request to Device relation on the Root Rule Chain, first runs a Get Attributes node that reads the namespaceIndex client-scope attribute and injects it into the message metadata as cs_namespaceIndex (see Step 3), then routes the message to the integration downlink node. The downlink converter’s encoder builds the OPC-UA nodeId from metadata['cs_namespaceIndex'] and metadata['deviceName'], and calls the Start or Stop method on that node depending on the requested state.
Troubleshooting
Section titled “Troubleshooting”No devices appear after adding the integration — confirm UaCPPServer is still running and that Host/Port match the values shown in the UA Admin Dialog (Step 1). A connection failure otherwise fails silently — no devices will appear on the Devices page.
Devices appear but telemetry never updates — check that the Subscription tags paths (Temperature, Humidity, State, PowerConsumption) exactly match the child node names on the server; these are case-sensitive.
Fewer or no devices are created — the Device Node Pattern regex doesn’t match the server’s actual node FQNs. Browse the server’s node tree to confirm the exact path, then adjust the pattern.
The Round switch has no effect — this is expected for a device that hasn’t sent an uplink message yet: the OPC-UA nodeId used for the Start/Stop call depends on the namespaceIndex client attribute, which is only set once the uplink converter has processed at least one message for that device (see Step 3). Wait for telemetry to appear (Step 5) before testing downlink control.
Connecting to a real (non-demo) server fails — a production OPC-UA server typically enforces a Security policy other than None and requires Identity credentials rather than Anonymous; see Connection settings.
Was this helpful?